Как отправить картинку по смс
Картинки можно отправлять не только в сообщении ММС или электронной почты, но также и посредством обычных текстовых сообщений, они придут даже в том случае, если телефон получателя монохромный.
Вам понадобится
- — доступ к интернету;
- — ваш телефон.
Инструкция
Загрузите изображение из вашего телефона на специальный мобильный файлообменник, ссылки на которые уже зачастую бывают вставлены в меню камеры телефона или его галерею. Также ссылки доступны из меню браузера, либо вы можете выбрать сайт для расположения файла самостоятельно. После загрузки картинки на сервер скопируйте ссылку на него в буфер обмена телефона.
Создайте новое СМС-сообщение. Вставьте в него адрес изображения, которое вы загрузили на файловый обменник. Обратите внимание, что в данном случае у получателя должен быть доступ к мобильному интернету и ссылка в его модели телефона должна подсвечиваться для перехода.
Лучше всего, конечно, в таких случаях пользоваться ММС-сообщениями, но не все они поддерживают загрузку определенного размера файловых изображений, не всегда их профиль настроен в меню телефона и не всегда передача осуществляется быстро. Это основные преимущества такого способа отправки картинок по СМС.
Если у получателя нет доступа к интернету, пришлите ему ссылку в сообщении и укажите, чтобы он открыл ее на домашнем компьютере, переписав текст в адресную строку его веб-браузера. Обратите внимание, что здесь проще всего, конечно же, воспользоваться электронной почтой.
Воспользуйтесь старым способом отправки картинок в СМС-сообщении, которым пользовались еще в конце 90-х начале 20-х годов владельца монохромных телефонов. Нарисуйте картинку при помощи символов, которые доступны для вставки в обычное сообщение. С появлением ММС и интернета в телефонах данный вид отправки картинок морально устарел, однако все же он существует, потому было бы не лишним воспользоваться и им. Обратите внимание, что не все телефоны имеют одинаковое разрешение экрана, учитывайте данный параметр при вводе и по краям пользуйтесь переносом на следующую строку.
Полезный совет
Пользуйтесь переносом строк при вводе символов.
Войти на сайт
или
Забыли пароль?
Еще не зарегистрированы?
This site is protected by reCAPTCHA and the Google Privacy Policy and Terms of Service apply.
Краткая инструкция о том, как отправить картинку или фотографию в смс, на андроиде. Это может пригодится когда нужно что-то сфотографировать и переслать.
В меню выбираем иконку с названием АЛЬБОМ.

В альбоме видим ваши картинки и фотографии.

Указательным пальцем тычем на нужную нам фотографию или картинку и не отпускаем палец до тех пор пока выбранная картинка не отметится (выделится рамкой) как на картинке ниже.

За тем в верхней части экрана вашего телефона появится дополнительное меню, в нем вам нужно нажать на 3 вертикальные точки, чтобы вызвать меню как на рисунке ниже.

В самом начале меню будут способы отправки, которыми вы чаще всего пользуетесь. Или как они настроены системой по умолчанию.
Нажимаем на надпись Посмотреть все

Выбираем пункт Сообщения , вас перекинет в другое окно, в окно сообщений.

Внизу экрана видно, что сообщение мультимедийное, значит фотография или картинка успешно добавлены в сообщение. Теперь нужно ввести номер телефона (в поле КОМУ:) того, кому вы хотели отправить картинку. На этом все.
Содержание
- — Можно ли отправить картинку по смс?
- — Как передать фотографии с телефона на телефон?
- — Как отправить фото с телефона в интернет?
- — Как отправить фото в формате PDF с телефона?
- — Как перекинуть фото и видео с одного телефона на другой?
- — Как отправить фото из галереи в контакт?
- — Как отправить фото другу?
Можно ли отправить картинку по смс?
Картинки можно отправлять не только в сообщении ММС или электронной почты, но также и посредством обычных текстовых сообщений, они придут даже в том случае, если телефон получателя монохромный. Статьи по теме: Как отправить картинку по смс Как отправить картинку по ММС
Как передать фотографии с телефона на телефон?
Откройте изображение, которое вы хотите отправить, в вашем телефоне. Для этого используйте приложение «Photos». Нажмите «Отправить». Выберите способ отправки изображения в зависимости от приложений, которые есть на вашем телефоне.
Как отправить фото с телефона в интернет?
Как отправить ссылку на фотографии или поделиться ими с помощью других приложений
- Откройте приложение «Google Фото» …
- Выберите фотографию, альбом или видео.
- Нажмите на значок «Поделиться» .
- В разделе «Поделиться через приложение» выберите нужное приложение. …
- Чтобы создать ссылку и поделиться ею, нажмите Создать ссылку.
Как отправить фото в формате PDF с телефона?
Сохранение в формате PDF
- Откройте файл, который вы хотите сохранить в формате PDF, а затем нажмите Файл на планшете или коснитесь значка «Файл» …
- В меню Файл коснитесь пункта Печать.
- Если этот пункт еще не выбран, нажмите Печать в PDF (Майкрософт) на планшете или PDF на телефоне.
- Нажмите Печать.
Как перекинуть фото и видео с одного телефона на другой?
Перенос фото с одного Андроида на другой разными способами
- Синхронизация фотографий с помощью Google Photo.
- Перенос фотографий с помощью Bluetooth.
- Перенос фотографий по Wi-Fi.
- Специальный софт для этой задачи PhotoSync — Transfer Photos. Photo Transfer App. Photo Transfer.
Как отправить фото из галереи в контакт?
Нажимаем на плюсик и в меню выбираем Загрузить из галереи если фото уже есть, либо Сделать снимок, если вы только собираетесь что-нибудь запечатлеть.
- Далее переходим к вашей галерее внутри телефона и выбираем нужное изображение, можно несколько. …
- Фотографии успешно загружены в альбом, о чем вы будете оповещены.
Как отправить фото другу?
Как отправлять изображения, видео, GIF и другие файлы
- Откройте приложение «Сообщения» .
- Откройте чат или создайте новый.
- Нажмите на значок «Прикрепить» .
- Выберите, какие файлы хотите отправить: фотографии, видео, стикеры, GIF-изображения или другие файлы. …
- Выберите нужный файл из прокручиваемого списка.
Интересные материалы:
Как можно свернуть окно с помощью клавиатуры?
Как можно уменьшить нагрузку на процессор?
Как можно узнать штрафы гаи?
Как можно вставить рисунок в текстовый документ Microsoft Word?
Как можно выкрутить свечи?
Как можно заблокировать свою страницу в одноклассниках?
Как можно запаять силумин?
Как мыть Кейкапы?
Как на Асус выставить загрузку с флешки?
Как на клавиатуре открыть диспетчер устройств?
Есть много случаев, когда нужно отправить фотографии с одного телефона на другой телефон: может появиться новый, нужно поделиться снимком с друзьями, отправить отчёт на работу начальнику. Приблизительно столько же существует способов сделать это. О каждом из них мы расскажем подробно, выберите сами какой нужен вам.
Способ 1. По блютузу
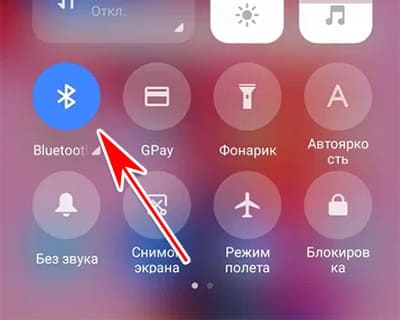
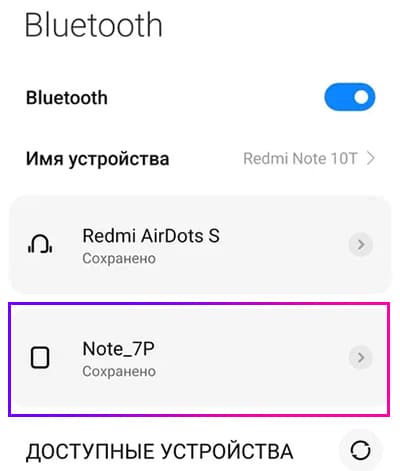
Работает, когда 2 телефона находятся поблизости в радиусе 5-10 метров друг от друга. На всех устройствах должен быть включен Bluetooth.
- Опускаем шторку смартфона, находим кнопку Bluetooth.

- Прикасаемся к ней, не отпускаем.
- Начинаем поиск устройств. Находим в списке название второго телефона и нажимаем на него. Дождитесь статуса: Подключено.

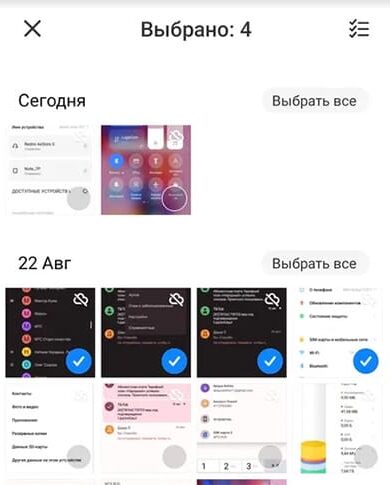
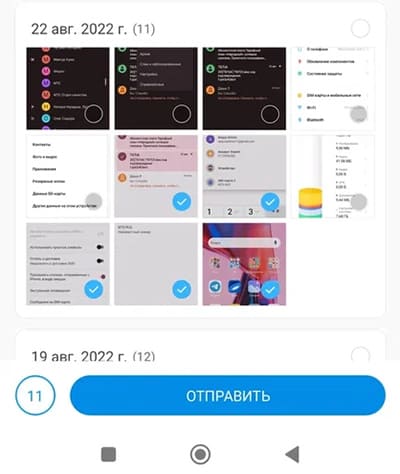
- Открываем галерею телефона и выбираем фотографию. Если нужно отправить много, выберите одну фотку долгим нажатием и отметьте остальные.

- Выбираем кнопку Отправить.
- В вариантах нажимаем По Bluetooth.

Не самый надёжный способ, да и годится лишь когда в ваших руках оба телефона. Не подходит? Переходим к следующему.
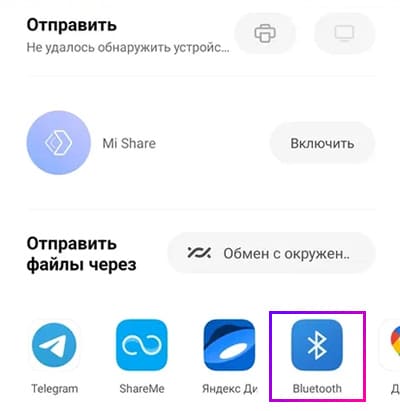
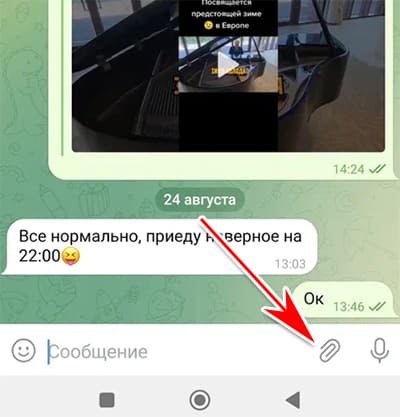
Способ 2. Telegram
В вашем телефоне должны быть мессенджеры, которыми вы пользуетесь: Телеграм, Вотсап, Вайбер; мобильные приложения: ВКонтакте, Одноклассники, Инстаграм. Любое из них является хорошим средством пересылки фото между телефонами.
- Запускаем приложение для общения/социальной сети.
- Открываем чат с перепиской человека, кому нужно отправить на телефон фотографии.

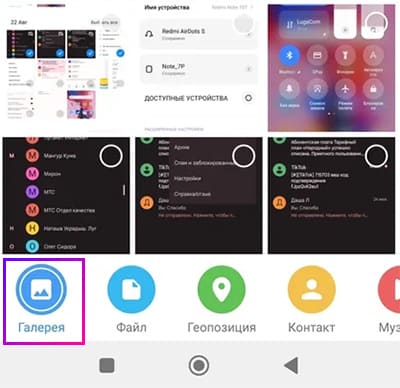
- Нажимаем на кнопку в виде канцелярской скрепки.
- Выбираем – Галерея.

- Помечаем фотографии и отправляем.
Например, вы хотите отправить таким способом файлы самому себе. Тогда на обоих телефонах должно быть установлено это приложение. Откройте переписку и найдите в меню кнопку загрузки фото в память телефона.
Способ 3. Мобильное приложение ShareMe
Небольшая программа под Android и iPhone для обмена файлами между мобильными устройствами – один из лучших вариантов. Давайте научимся ею пользоваться.
- Установите на оба смартфона ShareMe (по ссылкам выше).
- Нажмите на кнопку Отправить.

- На экране необходимо выбрать файлы и нажать ещё раз Отправить.

- На другом телефоне нажмите – Получить.
- Камеру первого смартфона наведите на QR-код второго.

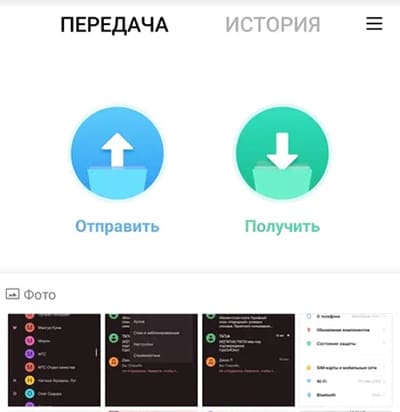
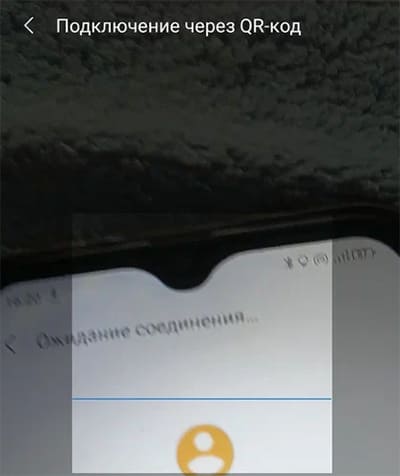
ShareMe умеет передавать между ПК и телефоном любые типы файлов: игры, фильмы, музыку без ограничения и на большой скорости. У нас есть обзорная статья на это приложение, ознакомьтесь.
Способ 4. По E-mail
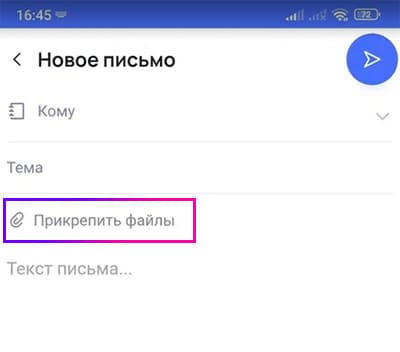
Почта была и остаётся популярным способом обмена информацией. Для отправки изображений из галереи одного телефона на другой нужен обычный мобильный браузер или приложение E-mail. Если вы знаете адрес почты получателя:
- Открываем свой E-mail и создаём новое письмо на имя получателя.
- Нажимаем – Прикрепить файл (скрепка) и выбираем фотографии в галерее.

- Добавляем текст и отправляем письмо.
Используйте «электронку» для пересылки файлов с телефона на ПК и другие устройства. Чтобы отослать фото на свой компьютер, откройте черновик, добавьте файл и сохраните, не отправляя.
Способ 5. Через облако
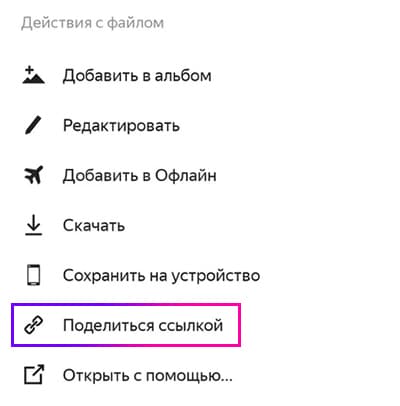
Вы могли и не знать, что обладаете бесплатным пространством для хранения файлов в интернете. Если когда-нибудь регистрировали аккаунт Гугл или Яндекс, то оно точно у вас есть. В сервисе Google Фото можно поделиться фотографией. Чтобы перенести фотографии с телефона на телефон:
- Используйте Яндекс Диск, Google Drive или другое. Их можно скачать бесплатно в маркете для вашего телефона.
- Добавьте в облако изображения.
- Выберите его в приложении облачного хранилища для просмотра.
- Нажмите на кнопку меню в окне просмотра.
- Прикоснитесь к пункту – Поделиться ссылкой.

- Выберите приложение, через которое ссылка будет отправлена в сообщениях.
На устройстве-получателе также должно быть установлено то приложение, с которого была отправлена ссылка на фотографию. Чтобы лучше понять, как работает передача файлов в облаке, ознакомьтесь с инструкцией.
Подведём итог
Появляется вопрос: в каких случаях тот или иной способ будет подходящим для меня?
- Если с вами рядом оба телефона, используйте блютуз в телефоне или приложение ShareMe;
- Для передачи изображений с мобильного телефона на мобильный телефон на большом расстоянии воспользуйтесь облачным сервисом или электронной почтой;
- Чтобы переносить файлы на домашних устройствах: между телефоном и ПК, ноутбуком и телефоном и т.д., подойдут все способы;
- Для отправки альбома с множеством фотографий – социальные сети, мессенджеры и облачные сервисы.
Остались вопросы? Мы готовы на них ответить, задавайте!
![]() Download Article
Download Article
A simple guide to sending photos to a mobile device
![]() Download Article
Download Article
- Using Nearby Share (PC to Android)
- Using AirDrop (Apple Devices)
- Emailing or Texting (Computer to Phone)
- Sharing Between Phones with Apps
- Using a USB Cable (Computer to iPhone)
- Using a USB Cable (Computer to Android)
- Q&A
|
|
|
|
|
|
If you need to transfer some pictures to a cell phone, there are many ways to do so. Sending photos to a mobile phone only takes a few moments, and the process is the same whether you’re sending the pictures to yourself or another person. If the pictures are on your PC or Mac, you have several options, including using AirDrop (to send from Mac to iPhone), Nearby Share (for PC to Android), attaching to messages, or using a USB cable. You can also share pictures from one cell phone to another similarly. This wikiHow article teaches you easy ways to send pictures to an Android or iPhone from a computer, another phone, or a tablet.
Things You Should Know
- The easiest way to share pics to or from a cell phone is using Nearby Share (PC & Android) or AirDrop (Apple devices).
- To send photos from one phone to another, you can share the photos with Messenger, AirDrop, WhatsApp, email, and more.
- You can also transfer photos from a computer to an Android or iPhone using a USB cable or via email.
-

1
-
2
Sign in with your Google Account. By signing in with your Google Account, you can sync your Google Contacts and change discoverability settings to only be visible to your contacts or only to your own devices. You can also opt to not use an account.
- You can also follow these steps to transfer images from one Android smartphone to another nearby Android smartphone!
- If you’re initiating the Nearby Share on your phone, you can simply tap «Nearby Share» on the photo in your phone’s gallery app. If the receiver is an Android smartphone as well, they only need to accept the file when you tap their phone’s name in the «Nearby Share» list.
Advertisement
-
3
Choose a device name. This device name will be used to identify your device and it will be visible to other people.
-
4
Choose device discoverability settings. On the setup page, click on the option inside the «Receiving» box to select who will be capable of discovering your device via nearby share. You can opt to be visible to Everyone, only to your Contacts (contacts from your Google Account), only to your devices (requires a Google Account), or to no one.
-
5
Go back to the setup page and click Done. You can choose to help improve the app by allowing the app to automatically send usage info and crash reports to Google.
-
6
Allow Bluetooth and Wi-Fi access. Nearby Share requires both Bluetooth and Wi-Fi.
-
7
Drag and drop pictures to Nearby Share app on your Windows PC. The Nearby Share app will start looking for nearby devices.
-
8
Wait for the «Device nearby is sharing» notification on your Android. Turning on Wi-Fi and Bluetooth and connecting your Android device to the same Wi-Fi network with your computer can speed up the process.
-
9
Tap the notification or manually change the visibility of your Android Phone. Tapping the notification will launch Nearby Share on your Android and make the phone visible to everyone temporarily. You can also change this on the Nearby Share settings on your Android device and set up visibility to only your contacts or to your own devices.
-
10
On the Nearby Share app on your PC, click your Android cell phone.
-
11
Accept the file on your phone. Once you tap the button, the file will be downloaded onto your phone.


Advertisement
-
1
Make sure the receiving device has AirDrop on. You can use AirDrop to send pictures to an iPhone from any Apple device, including your Mac, iPad, or another iPhone, if both devices are within Bluetooth and Wi-Fi range. On the iPhone that’s receiving the photos:
- Open Settings and tap General.
- Tap AirDrop.
- If the person sending the photos from their Mac, iPhone, or iPad is in your contacts list, you can enable Contacts Only. If not, choose Everyone.[1]
- Also, ensure that Bluetooth and Wi-Fi is enabled on both devices. If either device has a Personal Hotspot turned on, disable it.
-
2
Open the Photos app on the device sending the photos. For example, if you want to send photo from a Mac to an iPhone, open the Photos app on your Mac.
-
3
Click or tap the photo you want to share. This opens a larger version of the photo. Alternatively, you can select multiple photos.
- To select multiple photos on a Mac, hold down the Command key as you click each photo.
- To select multiple photos on an iPhone or iPad, tap Select at the top-right corner of the All Photos tab, then tap each photo you want to send.
-
4
Click or tap the Sharing icon
. This share icon looks like a square with an arrow pointing up. You’ll see it in the lower-left corner of your screen on an iPhone or iPad, and in the top toolbar on a Mac.[2]
-
5
Click or tap AirDrop. A list of nearby devices will appear.
-
6
Click or tap the iPhone to which you want to send the photos. If the other device (Mac, iPhone, or iPad) has Bluetooth and Wi-Fi enabled and is in range, you should see it listed here.
- The receiving device will get a pop-up with that picture that you are sending via AirDrop.


Advertisement
-
1
Open your email program or website on a PC or Mac. You can easily attach photos to an email message to send them to a cell phone. For example, if you have a Gmail address, you can go to https://www.gmail.com on your computer.
- Alternatively, if you have Facebook Messenger on the device you’re sending photos from and the cell phone receiving the photos, you can easily attach photos in Facebook Messenger.
-
2
Compose a new message. On your computer, create the message that you want to send along with the photos.
-
3
Attach the images. Click the «Attachments» button, which often looks like a paperclip, and then browse for the images you want to attach. Most email services support sending up to 20 MB, which is usually about 5 images per message.
-
4
Enter the recipient. If you’re sending the photos to your own cell phone, you can enter your own email address. Alternatively, enter the email address of the person who should receive the photos.
- MMS — If you want the message to be sent as an MMS message to the cell phone, use the recipient’s MMS address.
-
5
Send the message. You may have to wait a few moments for the images to upload to your mail server and another few moments for the message to be delivered.
-
6
Open your email or the MMS message on your cell phone. If you’re sending the images to yourself, the message should arrive in a few moments.
- To receive an MMS message, you will need to have a cellular data connection.
-
7
Save the images. The process varies depending on your phone, but generally, you can press and hold an open image on your screen or tap the Menu button and choose to save it to your phone. Repeat this for each of the images in the message.
- Using text messages or email is a great way to send pictures from an Android to iPhone or from an iPhone to an Android.


Advertisement
-
1
Open the picture that you want to send. If you’re sending photos from an iPhone, open the Photos app and select the photo. On an Android, you can use your phone’s Gallery app or Google Photos.
-
2
Tap the «Share» button.[3]
This looks different depending on the phone and version that you are using. -
3
Select an app to share with. There are several options to choose from, depending on the apps you have installed on your phone:
- You can select your text messaging app to attach the selected photo to an MMS, RCS, or iMessage.
- Choose your email app to attach the photo to an email message.
- Other apps: There will be a variety of other options listed based on what you have installed, including Facebook Messenger, WhatsApp, and more.
-
4
Choose a recipient and send the message. Depending on the method you chose, you’ll need to finalize the message that will go along with the image. The message may take a few moments to send if you’re sending multiple images.


Advertisement
-
1
Move the images you want to transfer into one folder. You can have multiple subfolders in the folder, but having them all in one place will make it much easier to add the images to your iPhone.
-
2
Connect your iPhone to your computer using a USB cable.
-
3
Open iTunes (Windows) or Finder (Mac). You’ll need to use Finder instead of iTunes for macOS Catalina and newer.[4]
-
4
Click the Device button or select your iPhone. If you’re using iTunes, click the picture of an iPhone next to the menu at the top of iTunes. On a Mac, click your iPhone in the left panel.[5]
- You will also be asked to trust the computer on your iPhone’s screen.
-
5
Select the Photos option in the left panel.
-
6
Select «Sync Photos.» You can now choose an album or a folder to sync.
-
7
Select the folder with the pictures you want to transfer. You can select multiple folders if you’d like.
-
8
Click Apply. If syncing doesn’t start right away, click Sync to sync the photos to your phone now.[6]


Advertisement
-
1
Install Android File Transfer if you have a Mac. If you have a Windows PC, you won’t need to install anything special to send photos from your PC to an Android phone.[7]
On a Mac, go to https://www.android.com/filetransfer/ and click Download. Then, follow these instructions to install:- Double-click the file you downloaded.
- Drag Android File Transfer to Applications.
- Once installed, open Android File Transfer. The app will open on its own the next time you connect your Android to your Mac, but you’ll need to launch it manually at first.
-
2
Connect your Android phone to your computer with a USB cable. If you are using Windows, the Autoplay window will usually appear. If you are using a Mac, your should now see your Android in Android File Transfer.
-
3
Tap Charging this device via USB on your Android. A list of options will appear.
-
4
Tap File Transfer under «Use USB for.» This allows you to send photos and other files from your computer to your Android. A file transfer window will expand on your PC or Mac’s screen.[8]
-
5
Drag the photos you want to send to your Android. Navigate to the folder on your computer to which you’ve saved the photos, and drag each photo to your Android. As you drag photos, they’ll be sent to your Android instantly.
-
6
Disconnect your Android when finished. If you’re using Windows, eject your Android before unplugging it from your PC. On a Mac, you can simply unplug it once you’ve transferred the photos.


Advertisement
Add New Question
-
Question
How do I send pictures from phone to phone?

Follow the instructions listed in the article above.
-
Question
I received a picture with a message, but I want to forward the picture only — how can I do that?
You can save the picture to the gallery on your phone, and then send it in a new message.
-
Question
I have a camera and cannot see the pictures in the phone.
Some cameras, such as «Samsung smart camera», give you the option to send the pictures to your phone directly, but most of the cameras don’t have this option. You will have to put the photos on your computer, then plug your phone and put the pictures from the PC to the phone.
See more answers
Ask a Question
200 characters left
Include your email address to get a message when this question is answered.
Submit
Advertisement
Thanks for submitting a tip for review!
About This Article
Thanks to all authors for creating a page that has been read 826,921 times.