Introduction: Lego Computer Case
Peace is a lie, there is only passion.
Through passion, I gain strength.
Through strength, I gain power.
Through power, I gain victory.
Through building a Lego computer, I gain hours and hours of sitting in a basement (lol)
Welcome to the Lego computer build instructable! Through this tutorial I’ll show you the general method for how to build a computer case of any style out of Legos! To help with the instructions I’m going to use a Star Wars Imperial themed case that I put together. The end goal should be to make a case EXACTLY how you want it though (i.e. custom colors, theme, exterior and interior shape, etc.) so you can accommodate whatever computer parts you want to use and whatever style you like.
This is a rather *big* instructable so I’ve broken it up into a few different sections to make it easier to follow. The sections are:
Basics of Lego Structures
Basics of Computer Building
Constructing a Computer Model and Design
How to Order Lego Parts
How to Build the Computer You Designed
Before we begin I’d like to lay out some of the pros and cons of building the case so that you have an idea of what you’ll be getting out of the build.
Cons:
* Price (the case may be a few thousand lego parts and this could cost around $300 dollars, so it’s pretty expensive but this varies depending on your design.)
* Heat (computers get hot inside and the abs plastic of Lego bricks is not good at dissipating heat)
Pros:
* Customizability (this case can be made to do pretty much whatever you want if you’re willing to put in some time engineering it)
* Longevity (the case should last the rest of your life because you can add, subtract, or redesign Lego parts based on your needs)
* Awesomeness (you should be proud of your case and show it off a little because it probably looks cool and took a lot of time to make)
* Knowledge (if you didn’t know much about computers when you started, you’ll learn all kinds of things by the time you finish this project and don’t worry, when I started I didn’t know anything about how to build a computer)
I’m competing in the shopbot challenge so if you like this project don’t forget to give me a vote!
Click this to check out my model designs(search the username «greenyouse» and click on the green arrow instead of hitting return. Note, I’m using an external optical disk drive for my case. You’ll need Lego Digital Designer from step 5 to view them in-depth.)
Step 1: Basics of Lego Structures
Ok, this step should be pretty easy to grok for anyone with experience building with legos but it’s still really important. Here are three basic rules to building lego structures that will direct how you build your computer case.
First: If the wall is only one brick thick, secure gaps between adjacent bricks within rows by placing a brick over or under the gap (pictures 3,5).
Second: If the wall is thicker, make alternating rows perpendicular to one another (pictures 2,4).
Third: Use larger, plate lego pieces for points that will receive the most stress. Larger pieces will be more stable than small ones and three layers of plate pieces interlocked in a structure will be more stable than one brick (pictures 6,7).
(also check out what a brick, plate, and tile look like)
Use this site to understand the dimensions of lego pieces. This is probably the most important thing to remember while building the case so keep referring back to it until you memorize the dimensions!
Step 2: Basics of Lego Structures — Mosaics
Here’s how to make any image (aka Lego mosaic) for your computer case! First find a picture that you’d like to use. Then stare at it for nine or ten hours until you burn the image into your mind and can channel the force and make it on the fly in Lego Designer (jk, that’s what I did)
If you want an easier way to construct the Lego mosaic try this:
1. Measure the number of pegs on your model that you want your image to take up (length x width)
2. Print the picture of the image you want and cut out a piece of tracing paper that have the same scale as the brick picture you measured in step 1
3. Make a grid on the tracing paper using x and y lines that match up with the number of bricks you counted from step 1 (i.e. 23 rows and 46 columns if you had a space of 23 x 46 in step 1)
4. With the image under the tracing paper, use colored pencils to trace an outline of the shape of each of the colors in the original picture
5. Brickify this by making each square on the graph one color to symbolize one lego brick. Try sticking to the color that takes up the majority of the square. For example, if a square was 1/3 red and 2/3 black, it may be better to make the square black. There will be some image distortion but try playing around with it until it comes out alright.
This could also be done with gimp or photoshop by automatically doing a grid overlay on the picture too http://www.wikihow.com/Transfer-Images-Using-a-Grid-and-a-Computer
The biggest rule of thumb for this section is that the larger the lego space, the more image resolution you’ll get. Try thinking of each brick as a pixel in a picture. The more space you have, the more pixels, and the more detailed the image becomes.
Step 3: Basics of Computer Building — Parts?
Now the real work begins! Okay, if you’ve already built a computer before you can pretty much skip this step, however, it may be good to peek at the checklist below. For everyone else, it’s time to learn how to build your own computer (Woohoo)! Since there are already TONS of instructions on different websites for how to do this I’ll leave it to a professional to explain:
Building Your Own PC
More
Even More!
To help with buying the parts, here’s a cheat sheet of basic parts you’ll need for the build:
PSU
GPU
Motherboard
CPU
Fans
RAM
CPU Cooler
Motherboard screws
Thermal gel
HDD/SSD
A Switch to the motherboard for power and reset
Optical disk drive (for CD’s, DVD’s, Blu-ray’s, etc.)
Wireless internet adapter (Optional)
Fan controller (Optional)
Additional cables (Optional)
Additional accessories (Optional)
Remember to make a list of what you want your computer to be able to do (gaming, basic internet browsing, movie editing and animation work, etc.) and buy parts based on that. If you didn’t know already, new computer parts are EXPENSIVE! To help, I’d suggest buying most of the parts during store sales (like black friday or cyber monday, I saved about $300 doing this). Otherwise there’s nothing wrong with older computer parts and you even may be able to buy all the old computer components for less than the case.
Step 4: Basics of Computer Building — Fans?
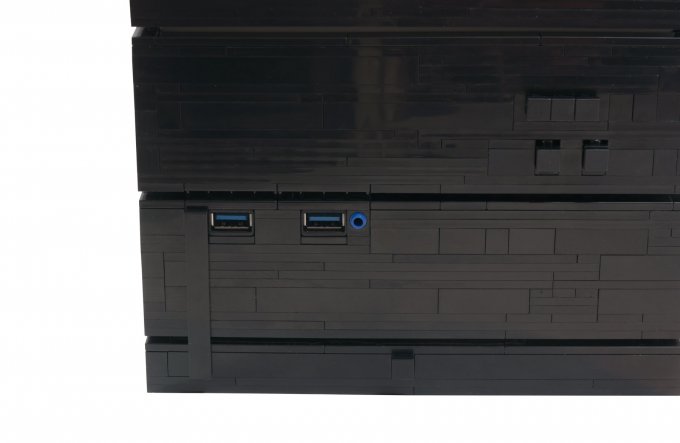
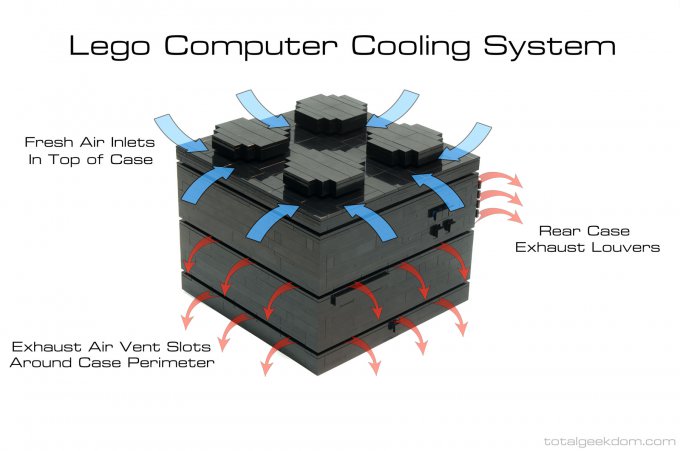
Uff da, that’s a lot of computer research but hopefully you’ve gotten a feel for the basics by now. Now let’s focus on what type of case fans to get. Since the case will need to circulate lots of air, I suggest getting fans that have high cfm (cubic feet per minute of air pushed) ratings. I think it’s probably best to get the same model intake fan as exhaust fan to try to get neutral pressure inside the case (here are couple discussions on case pressure, more pressure stuff, and the king of all fans if you can afford it ze über-fan). Depending on the motherboard you get and the number of fans you want, you might need a fan controller. Make sure to look at the number of fans your motherboard will be able to control to know for sure!
Getting fan filters for the intake fans is probably a good idea too because you won’t want dust to accumulate inside your case.
Step 5: Constructing a Computer Model and Design
Good job making it through the beginning stages. Be warned, next few steps will be much more challenging. Think of the project as jedi training. The lego and computer research you did was like the initial lightsaber training that Luke did onboard the Millenium Falcon. This chapter of the project, however, will be like lifting an entire x-wing out of a swamp using only your mind. Stay with it and don’t give up because it will all be worth it when you finish!
The modeling software that I chose to use for the project is called Lego Digitial Designer. It might be a little clunky when you first use it but read through the manual on how to use it because it will help a TON!
download here
look at the help manual here
I would strongly suggest building each part of the case (such as the left wall, floor, right wall, front wall, etc.) individually so each part has its own workspace (and don’t forget to put each part in a group). When all the parts are finished, create a mega workspace and import all the parts into it. Then get excited as you see all of your pieces locking together to form the case (hopefully everything fits perfectly). By using all the part groups for building the construction process will be tidier, more manageable, and more fun at the end when everything locks together!
Click this to check out my model designs(search the username «greenyouse» and click on the green arrow instead of hitting return. Note, I’m using an external optical disk drive for my case. You’ll need Lego Digital Designer from step 5 to view them in-depth.)
Step 6: Model and Design — Replication
Here’s a little tip for building that I hope is helpful. To make the design process easier try creating a small design of about four or so bricks that can be replicated over and over to form larger structures like a wall or corner column. This will save lots of time and effort. It’s like when the Empire decided to just find one really good soldier and clone a few million copies of him. Why spend time recruiting a bunch of people when you don’t need to? When you have a nice mini-structure, just replicate it until you end up with something much bigger!
Step 7: Model and Design — Dimensions, Dimensions, Dimensions
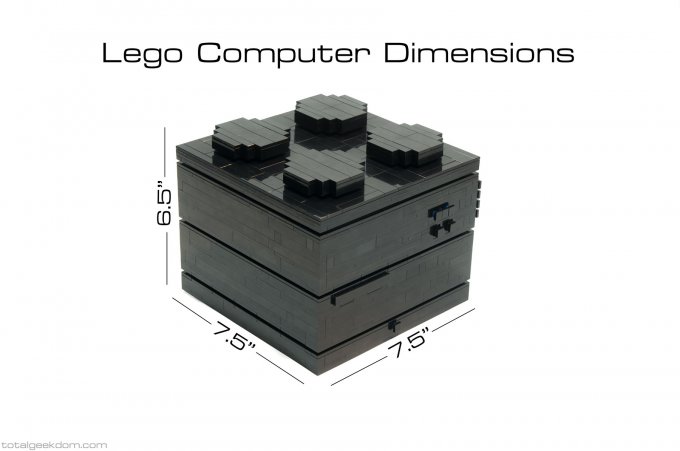
Make sure to ALWAYS note the dimensions of each computer part you’re thinking of purchasing so that you can incorporate the part into your lego case! You must plan EXACTLY how each part will fit into the case. This is a serious pain in the butt and may be the crux of the lego case designing. Try keeping a little list of all the parts and their dimensions, including the case dimensions, (in millimeters or lego pegs) on your computer so you can work with it while designing.
There isn’t too much I can offer to help with this section since the computer parts and the case design are up to you. The motherboard and the PSU should be the biggest parts in your case so if there’s any way you can sit the motherboard or PSU up vertically it will save some space. I got the PSU to sit vertically in my case but the motherboard could be done by building little wells (where the motherboard screws and standoffs go) into one of the walls and smushing a little sugru into well to hold everything together. If you’re going to hang stuff off the wall it will be difficult though because legos can take vertical loads but aren’t very good at lateral stress. This means that a heavy motherboard may need to somehow touch the ground a little to take weight off the wall wells (as you can tell this is risky and complicated but try it if you’re feeling daring). You might want to come back to this page after working on the project a while.
I found it was helpful to doodle a little map of the inside layout of the case to plan where everything is going to go. Each computer part is drawn in as a box and there are dimensions scattered about all over the place. To start the doodle draw the boundaries of the case you’ll be using. Then just fill everything in accordingly. Look at the dimensions of everything and make sure the parts will all fit nicely in the case. (the picture is of the original design I tried)
Stick with it and you’ll get it to work eventually!
Step 8: Model and Design — Mobo Wells
Wells for the motherboard can be built really easily. To secure the motherboard there will probably be seven or so standoffs which connect to screws (wikipedia article). The screws pass through the motherboard and hold it down. Normally the standoffs would screw into the case but since we’re using legos we’ll have to improvise a little. The standoffs are really small and can easily fit into one peg of space. Unfortunately the motherboard screws won’t line up perfectly with the lego pegs underneath so I’d suggest making little wells with an opening the size of about four pegs in a square shape for a bit of wiggle room to put the standoffs in. After this, a little bit of sugru can be molded into the well and hold the standoff securely in place.
Always pass the top screws through the motherboard first. Then tighten the standoffs onto those screws. Add a dab of sugru into each of the wells and then place the screws with standoffs and motherboard attached into the sugru.
Step 9: Model and Design — Accessibility
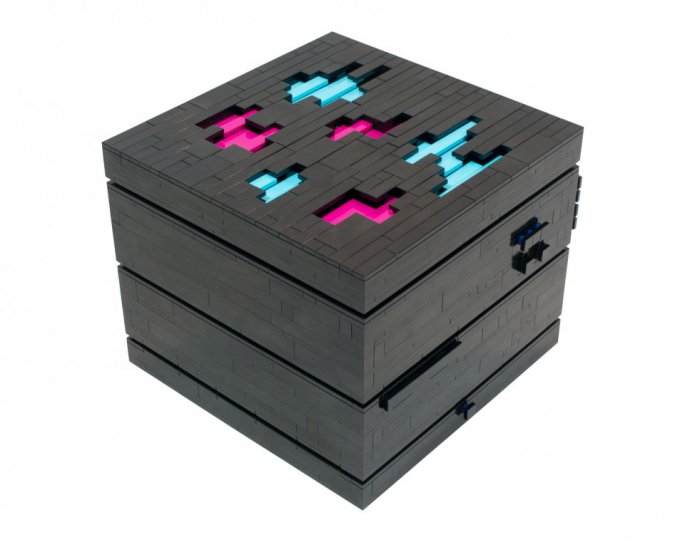
I guess this step is somewhat optional but if you know that you’re going to use your case for a long time (remember it should last the rest of your life) you’ll probably want to make the inside of the case accessible so you can clean and swap parts out. The easiest way that I found for getting this was to make a case top that could easily pop off. For my case all I would need to do to get inside is pop the top off and move the fans and plexiglass, then I could get at anything I wanted inside the case. That takes about one minute and is incredibly easy.
Alternatively you could try making a swivel wall but this is much, much more difficult.
Step 10: Model and Design — Plexiglass Windows
If you want to put plexiglass windows in your case, it’s pretty easy. I put channels in my walls to hold the plexiglass so all I have to do is line up the plexiglass with the slots and drop it in. Using plexiglass for walls will also mean fewer bricks that you’ll need to design and eventually purchase, so it’s cheaper and easier to construct. I would recommend this for the first lego computer build. Later builds could replace the plexiglass wall with a wall full of drive bays or something but it would be good to start with a basic build before tackling harder stuff.
Step 11: Model and Design — Drive Bays?
For housing the HDD/SSD there are a few options. The first and easiest is to put the drive on the floor of the case. There’s not much to that, just make sure it gets some airflow (this is what I did for my case).
Little beds could also be made to house the drives in the corners too. I didn’t quite finish the design for this but it would be good if the bed were resting on something solid (like on top of the PSU). This would only take a handful of extra pieces and may be easy to make quickly. This design also would get great airflow.
The most difficult style was making removable drive trays. I did a little model of this that has locking drive trays and cords that run through the wall to connect to each drive (like the mac pro). You’ll also need the wall on the opposite side of the computer to swing open easily so you can get at your trays. This means doing even more work! In the end it takes tons a extra bricks and is much more difficult to build so I didn’t quite finish all the design and decided not to use this for my first case model (I only needed one drive anyway).
If you really need more than one drive, I’d suggest trying to stack corner drive trays before going to removable trays.
Step 12: Model and Design — Motherboard Faceplate
This step is pretty simple, just make a hole in one of the walls for the motherboard faceplate. Making one or two pegs of lego that stick out to hold the faceplate in place is a good idea for this part. Doing a channel to hold the faceplate is also smart.
Getting the dimensions of the faceplate before ordering the motherboard may be difficult but snoop around a little on the internet for a manual because these generally will have the dimensions. Otherwise don’t sweat it too much because this part shouldn’t be too difficult to put in quickly after your motherboard arrives at your house.
Step 13: Model and Design — Fan Holders
Ok, now we’ll need to cook up a design for the fan holders (this is a long, difficult build but don’t worry you’re almost done with designing, and it’s kind of fun right?). Luckily most fans have two outer walls with a channel that runs in between the walls. What we’ll do is insert some lego bricks into the channels and if we can get a snug fit on all four corners of the fan it should stay in place. I used these fans and tried estimating what the size of the channel was using some basic math (this fan is 140mm across and it’s a circle inside of a square). The estimation works pretty well although I ended up having to tweak the middle holders a little bit when I actually put the case together.
Keep in mind air circulation while your placing the fans. Air should definitely be going to the motherboard and HDD/SDD!
Step 14: How to Order Lego Parts — Counting
Huzzah!! You did it, you designed an entire case out of legos and hypothetically got all of your parts to fit! Well now you’re almost done but you just have a little more to cover. This is the last difficult part of the build. Just imagine that you’re Luke flying through the trenches of the Death Star. All you have left to do now is to line up your shot and fire the proton torpedoes!
Before you order any of the lego parts, you’ll need to take your model apart and count each lego of the pieces that were used and record the part types. The simplest way to do this is to make a spreadsheet with three pages — one for bricks, another for plates, and a last one for tiles. Then, within each of the sheets make separate rows for parts that only have a thickness of one peg and the rest of the parts. Create columns for each of the parts, separated by the dimensions of the parts (like, 1×1, 1×2, 1×3 etc.). Then leave a space in the row under the part type header to list how many of each part type there were in the model.
If this explanation is confusing, check out my spreadsheet example (maybe you should just refer to that anyway).
To take stock of everything just use the building guide mode in LDD (upper right corner button or f7) and record each part (thanks sherrycayheyhey). To quickly switch between applications when entering parts into the spreadsheet use alt + tab (apple + tab) and for windows within an application use alt + ~ (apple + ~).
Turn on some tunes while you work because this could take a while!
Edit: I uploaded the spreadsheet I used for ordering LEGOs. Hope this is useful!
Step 15: How to Order Lego Parts — Ordering
Now that the monotonous counting is done, it’s time to order the parts. As you’ll find out lego parts, unfortunately, are a little more expensive than you might expect. Luckily, lego fanatics have created an online marketplace for legos called BrickLink and the LEGO company has an online store too named Pick A Brick Shop. You’ll need to use these to get the lego parts you need (unless you have an ungodly amount of lego pieces siting around your home).
BrickLink is usually a little cheaper than pick a brick and I would try searching the BrickLink in depth first and using the LEGO site as a fallback. It pays to get anal about comparing stores! On BrickLink I tried to use the 10 largest stores in my state and compared prices for each one (using a store in your state should cut down on shipping). This is necessary because many stores have limited inventories and prices may vary considerably. Unfortunately, some parts may not be available or are ridiculously expensive. If this happens try changing your large or uncommon parts for smaller or more common parts (like a 2×16 to two 2×8). This may require that you alter parts of your design a bit but hopefully your case will work out alright. If there’s no way to do a BrickLink order for a part try Pick A Brick but know that the prices are usually a little bit more expensive (they do have a basically unlimited supply though…).
Try ordering lego brick separator too if you don’t already have one. This is handy for taking bricks apart during the build and saves lots of time. I think I used this at least one hundred times while I was building (that’s not an exaggeration).
Step 16: How to Order Lego Parts — Base Plate
When you attach your computer model to a slab of wood, metal, or plastic in the next step, it will help to have a large base plate or a group of base plates so that you don’t glue down the bottom lego layer of your computer and lose the ability to modify all of those lego parts later! Try ordering an extra large, grey base plate from the Lego store or get a few smaller base plates from somewhere to avoid this problem.
Step 17: How to Build the Computer You Designed — Board
You’re almost done! Now you’ll need to attach your lego baseplate to a board so that you can move the computer around without having it fall apart. I used a piece of wood from Home Depot that was pretty cheap ($10) but feel free to use whatever you want — just don’t use HDPE or LDPE material that you find in cutting boards because it’s made of polyethylene so glue wont work on it at all. For some extra style points you could try this board if you have some money left to spend.
Stick four globs of sugru onto the bottom of your board to act as adhesive feet. Then, whip out some glue that can bond abs plastic to the board you’re using (I used gorilla super glue) and glue your large, lego baseplate to the board.
(sorry I didn’t get any pics of the lego baseplate attached to the wood but it’s under the black and white bottom layer)
Step 18: How to Build the Computer You Designed — Build!
I would suggest building the building the bottom layer of your computer now and attaching it to the lego baseplate when you finish. Getting plexiglass to fit into the case is pretty simple too. Start by measuring the place where you’ll put the plexiglass sheets so you know the dimensions that you’ll need for the sheets. Then use some painter’s tape to outline where you want to make your cut (this will keep you from slipping and making a bad cut). Finally, just score it on both sides with a plastic cutter, snap it apart, and smooth out the edges of the plexiglass where the cut was made with a knife and drop it into the case.
If you’re thinking of doing a plate and tile ceiling like I did you should know that it’s a little unstable. When a lot of lego plates are put in a big sheet they tend to buckle really easily. I tried attaching a big green lego baseplate to the underside to stablize everything but it didn’t totally fix it. You could also try a plexiglass sheet underneath the ceiling to make the ceiling super reinforced (I wish I would’ve done that).
As you go you might run into some snags like a motherboard faceplate might not fit quite right with the motherboard inside (grr). If something like this happens just go slow and be creative and hopefully everything will work out. It definitely helps to have a little stash of extra legos just in case of emergencies.
Use step 8 for how to get the motherboard to fit in the case and start building the rest of your case, installing computer parts as you go (add a little sugru for extra reinforcement if needed)!
Here’s a video of some of the build below (skip ahead for the final product). Sorry I didn’t film the entire build because it took lots of extra time to record.
Step 19: Test It Out
Now, the moment of truth… TURN IT ON! Hopefully everything worked out and after some hard work your imagination finally became a reality. Install the operating systems and enjoy!
Here are some pictures of other peoples’ lego computers:
Lego Folding Farm (props to Mike Schropp! I built my computer using some design concepts from his awesome computer build)
City Computer
Lego Computer + Monitor
Ok, not a computer but cool none the less
Google «lego computer» for tons more examples
I hope you enjoyed the article, post lots of info if you build a lego computer yourself, let me know if you have questions about stuff and I’ll try helping/posting more info, and may the force be with you!
Обновлено: 13.07.2023
Большинство людей старшего поколения уже давно знакомы с конструктором LEGO как через своих детей и внуков, так и через личный опыт. Однако, наверняка найдутся те, кто не смог ощутить всю радость и приятные ощущения от сборки набора во времена своего детства. Но результаты технического прогресса дают возможность без затрат строить самоделки из конструктора на виртуальном «столе» (а с сегодняшними ценами на LEGO это особенно актуально). Для этого достаточно иметь даже не самый мощный или дорогой компьютер.
Итак, компьютер есть, органы управления в виде клавиатуры и мышки есть — осталось установить соответствующую программу. В этой статье мы разберём тот софт, с которого начинал я сам и которым пользуются многие виртуальные (и не только) самодельщики – Lego Digital Designer (он же LDD). Виртуальный редактор существует с 2004 года, а с 2010 года и поныне используется четвёртая генерация. Последняя полноценная программа этой генерации имеет версию 4.3.11. Существующая сейчас на официальном сайте LEGO версия 4.3.12. является очень сырой и неполноценной, поэтому она не будет затронута в статье, и следует скачать 4.3.11. для нормальной работы.
Установка редактора версии 4.3.11. на Windows 10 имеет иной порядок действий, чем на Windows 7 или XP. Это связано Adobe Flash Player и его версии ActiveX, не поддерживающейся в «десятке», но поддерживающейся в «семёрке». Пункты «1» , «2» , и » 6.1 » необходимы только для установки на Windows 10 .
1. Правой кнопкой мыши щёлкаем по установщику «setupldd-pc-4_3_11.exe» и среди перечня действий выбираем пункт «Извлечь в setupldd-pc-4_3_11» (необходим архиватор WinRAR или 7z).
2. Открываем получившуюся папку. В ней 3 файла: «install_flash_player_active_x.exe», «LDDSetup.exe», и «OpenGLChecker.exe». Удаляем в папке «install_flash_player_active_x.exe», а файл «OpenGLChecker.exe» переименовываем в «install_flash_player_active_x».
3. После запуска установщика, мастер установки рекомендует закрыть другие программы для обновления системных файлов без необходимости перезагружать компьютер. Смело нажимаем «Next».
1. Правой кнопкой мыши щёлкаем по установщику «setupldd-pc-4_3_11.exe» и среди перечня действий выбираем пункт «Извлечь в setupldd-pc-4_3_11» (необходим архиватор WinRAR или 7z).
После загрузочного экрана нас встречает главное меню: на переднем плане расположены три раздела, которые отличаются лишь наполнением деталей и выбором палитры. На заднем плане — наш виртуальный рабочий стол (или же «сцена»), на котором и будут собираться самоделки. Кнопка с папкой означает «открыть», то есть выбрать файл из некой директории. Кнопка с файлом открывает сам рабочий стол.
1. Синее окошко — классический раздел. Присутствует ограниченный ассортимент деталей, но каждая деталь дублируется в нескольких цветах и имеют предустановленные декали. Именно его я использовал в начале своего хобби, не зная о существовании раздела «Universe», но об этом чуть ниже. Ныне классическая часть редактора не используется.
2. Белое окошко — проектирование различных роботов и установок на основе системы Mindstorms ( с англ. мозговой штурм). Имеет ещё более ограниченный выбор деталей и ещё более ограниченный выбор цветов в них, с декалями та же история. Ныне имеет ограниченное использование.
3. Чёрное окошко — расширенный раздел (собственно, что «extended» и означает). Сейчас является основным и используется в полной мере ввиду максимального объёма деталей, возможности выбора цвета из доступной палитры, и наличия списка декалей доступных для конкретной детали. Рассматривать интерфейс и основы управления буду именно в Extended.
Нажимаем на кнопку с файлом и попадаем на виртуальный сборочный цех. Начнём с основного — с нашего рабочего стола. Он сделан в виде большой пластины размером 32х32 пина (или студов, или пупырышков — кому как удобнее). По четырём сторонам расположены стрелки для вращения камеры, но их в управлении рекомендую не использовать, т.к. это попросту неудобно. Внимание: вращается не сам стол, а именно камера вокруг стола. В самом низу расположен счётчик деталей . Интересно то, что программа хоть и не кушать много, но больше количество объёмных деталей вкупе с настроенной детализацией (об этом ниже) могут сказаться на работе программы и дальнейшем строительстве. Однако, никто же сначала не строит работы на десять тысяч деталей, правильно?
Слева от рабочего пространства — категории с деталями . Эту колонку можно расширить вширь в правую сторону. Каждая категория отображает конкретный или условный тип деталей: кубики, пластины, скосы, минифигурки, и т.д.
Над категориями — наименование раздела, строка поиска , в которой можно забить либо номер детали, либо её наименование на английском, а также три колонки: «Bricks», «Templates», «Groups». Первая колонка у нас выбрана сейчас, вторая предназначена для сохранения шаблонов, которые могут пригодится при строительстве, а в третьей можно разделить и сохранить получившуюся модель на группы и подгруппы при её цельном виде на рабочем столе.
Под категориями — кнопки » открыть/скрыть все детали » и » фильтр цвета деталей «. В случае с классическим режимом фильтр и правда работает как фильтр, но в расширенном он окрашивает все детали в выбранный пользователем цвет (изначально все детали в extended-разделе покрашены в красный). Ползунок справа от кнопок — масштабирование, то есть чем левее ползунок уходит, тем визуальный масштаб деталей меньше, но их больше помещается в одно поле.
Двойная стрелочка от строки поиска — скрыть сегмент с категориями.
Средняя часть и самая основная по функциям. Несколько кнопок имеют дополнительные назначения, которые и будут указаны в порядке слева направо. Для демонстрации некоторых функций мне поможет небольшая модель машинки.
Первая кнопка — курсор (V). У курсора имеются следующие допназначения:
1.1. Курсор выбора и перемещения одной детали.
1.2. Выбор нескольких деталей.
1.3. Проверка соединения.
1.4. Выделение деталей одного цвета.
1.5. Выделение деталей одного типа.
1.6. Выделение деталей одного цвета и типа.
1.7. Выделить все объекты.
Вторая кнопка — копирование (C). При нажатии на деталь рядом появляется её копия.
Третья кнопка — вращение (H). Позволяет что-то открывать/закрывать/поднимать/опускать при наличии в модели вращательных деталей или конструкций. Имеет три строки измерения по осям XYZ. Угол можно задать как по стрелочкам, как по «циферблату» в левом верхнем углу, так и задать угол вручную.
Четвёртая кнопка — выравнивание осей (Shift+H). Позволяет визуализировать работу простых механических систем (например, работу шестерней) или соединить две отдельные точки.
Пятая кнопка — сгибание (комбинации клавиш нет). Позволяет сгибать шланги и т.н. «флексы» — полые гнущиеся трубочки. Как и выравнивание осей данная функция работает немного нестабильно. Рекомендую её не использовать вовсе, т.к. на ресурсе Mecabricks возможность сгибать резиночки и флексы реализована более удобно.
Шестая кнопка — палитра и декалирование. В ней есть следующие допназначения:
6.1. Выбор и возможность окрашивания (B). Пользователю предоставляется палитра из четырёх категорий цветов: однотонные, прозрачные, металлик, и устаревшие.
6.2. Пипетка. Даёт возможность узнать выбрать необходимый из модели цвет, если он вам неизвестен или его нет в стандартной палитре цветов.
6.3. Декалирование. При нажатии на деталь пользователю становится виден список доступных для неё декалей.
Седьмая кнопка — скрыть деталь (L). Позволяет скрыть деталь не удаляя её и не вынимая из конструкции. Очень помогает в объёмных постройках. Использование данной функции сопровождается небольшой иконкой минифигурки с закрывшимся руками лицом в правом верхнем углу.
Восьмая кнопка — удалить деталь (D).
Теперь перейдём к настройкам. В меню настроек можно перейти либо через «Edit» -> «Preferences», либо через комбинацию клавиш «Ctrl+6».
1. Show information field — добавляет информационное поле в нижнюю часть экрана, содержащее информацию о выбранных вами деталях или количестве деталей на столе.
2. Show tooltips — добавляет метки рядом с курсором мыши, разъясняя, как работают различные кнопки.
3. Enable sound in the application — отключить звуки в программе.
4. “Keys for turning” shown along with cursor — на курсоре отображается значок клавиатуры, указывающий на поворот.
5. Repeat inserting selected bricks — последняя выбранная деталь «приклеивается» к курсору и, щёлкнув левой кнопкой мыши, делает её копию.
6. Brick Count — показывает количество деталей.
7. Invert camera X-axis — инвертировать движение камеры относительно оси X мыши (влево/вправо).
8. Invert camera Y-axis — инвертировать движение камеры относительно оси Y мыши (вверх/вниз).
9. High-quality rendering of bricks placed in scene — высокое качество визуализации деталей на столе.
10. High-quality rendering of bricks in the Brick palette — высокое качество визуализации деталей в палитре.
11. Outlines on bricks — контуры на деталях.
12. Advanced shading — улучшенные тени на деталях.
13. Choose language — выбор языка интерфейса (английский/немецкий).
14. Compatibility mode — безопасный режим. Использовать следует лишь в том случае, если возникли проблемы с запуском LDD.
15. Reset preferences — возврат настроек по умолчанию.
Теперь, когда вы ознакомились с базовым интерфейсом LEGO Digital Designer, перед строительством осталось узнать основные клавиши управления клавиатуры и мыши:
Левая кнопка мыши (ЛКМ):
Нажмите на деталь, чтобы её выбрать.
Нажмите и перетащите, чтобы переместить деталь по столу.
Правая кнопка мыши (ПКМ):
Нажмите и удерживайте, чтобы повернуть вид камеры.
Средняя кнопка мыши (СКМ):
Увеличение/уменьшение масштаба сцены.
Кнопки на дополнительной клавиатуре (Num Lock):
Кнопки «2», «4», «6», «8» — поворот камеры вниз, влево, вправо, вверх.
Кнопка «5» — возвращение камеры в стандарное положение с видом на все детали и модели, расположенные на столе.
Кнопки на клавиатуре:
Кнопки «стрелка вверх», «стрелка вниз», «стрелка вправо», «стрелка влево» — вращение детали.
Ctrl+I — импорт модели в открытый файл.
Ctrl+Shift+S — сохранить как. (выбор формата).
Не рекомендую использовать следующие клавиши или их сочетание: «Ctrl+K» (скриншот), F6 (режим просмотра), F7 (создание инструкции, т.к. порядок действий зачастую бывает нелогичным или неправильным).
Итог: несмотря на всю простоту программы и прекращение поддержки, LEGO Digital Designer всё ещё можно использовать в качестве простого виртуального редактора. Конечно, и по возможностям и по технологичности он уступает тому же Stud.io, но за весь мой 11-летний опыт работы у меня ни разу не было мысли о том, что нужен более усовершенствованный виртуальный редактор. Под свои цели и задачи LDD и сейчас является удобной программой для разработки самоделок.


Схемы и инструкции LEGO запись закреплена
Полицейский пикап по мотивам Volkswagen Amarok.

Изначально автомобиль создавался мной 5 лет назад с целью массового оснащения служебным транспортом различных служб моего Лего города.
Всего успел собрать три таких пикапа: автоомбиль инженерно-сапёрного подразделения ОМОН, автомобиль пиротехнической группы МЧС и автомобиль следственно-оперативной группы, который как раз на фото.
Затем Лего я забросил. А когда вернулся, то эти машины уже не удовлетворяли мои потребности: ни масштабом, ни копийностью.
И вот я начал их разбирать. Как вдруг подумал, что все-таки стоит показать вам. А вдруг кому-то эта очень простая конструкция придется по вкусу

Схемы и инструкции LEGO запись закреплена
Peugeot Boxer группы захвата.
Рылся в архивах и нашёл несколько фото самоделок, которые я не успел опубликовать до ухода из мира Лего) Бусику лет 5 отроду.
Может кому пригодится микроавтобус для города, ведь делается он элементарно.


Виталик Тихий


Схемы и инструкции LEGO запись закреплена
Привет!
Вот уже много лет я не занимаюсь Лего. А 30 апреля, в День пожарной охраны России, решил посмотреть на свои детские пожарные самоделки 5-8 — летней давности и получил дозу приятной ностальгии. Кстати, в лучшие годы число пожарок достигало пятидесяти!
Решил и вам показать эти красные карикатурные машинки)


Андрей Волков

Качественная работа
Схемы и инструкции LEGO запись закреплена


Микаил Абдуразаков
Схемы и инструкции LEGO запись закреплена
Таверна «Фарегил» из The Elder Scrolls IV: Oblvion.
Таверна служит отличным местом отдыха для путников, идущих через глухие леса Западного Вельда по Зеленой дороге. Здесь живет и работает каджитка по имени Абука, всегда готовая обеспечить заблудшего странника едой, выпивкой и ночлегом.

Денис Андрианов

Схемы и инструкции LEGO запись закреплена
Крейсер «Вольфрам», моя выдумка, по сути. Вооружение видно на рендерах: 4 двухпушечные башни главного калибра, 6 башен вспомогательного калибра (по 3 на борт), 4 спаренных торпедных аппарата (по 2 на борт), 6 пусковых мощного зенитно-ракетного комплекса, РЛС дальнего радиуса действия. главный калибр и ЗРК очень дальнобойные (что, правда, в ущерб разрушительности), вкупе с мощной РЛС это позволяет «Вольфраму» поражать цели с большого расстояния, часто — с безопасного расстояния. Торпедные аппараты соединены с бортовым сонаром, и это делает «Вольфрам» не самым безобидным противником для подлодок. А хорошие ходовые качества позволяют ему пакостить и исчезать до того, как появятся более мощные корабли вроде линкоров.
Схемы и инструкции LEGO запись закреплена
Схемы и инструкции LEGO запись закреплена


Андрей Миронов

Схемы и инструкции LEGO запись закреплена


Схемы и инструкции LEGO запись закреплена
LEC | Российское Lego Комьюнити
Надоели розыгрыши за репост без шанса на победу? Специально для самых талантливых LEGO самодельщиков LEC и KonigBricks запускают конкурс
Победители, занявшие 1 и 2 место смогут выбрать один из запечатанных раритетов:
Lego 7423 Mountain Sleigh
Lego 6004 Crossbow Cart
Lego 5619 Crystal Hawk
Если раритеты вам неинтересны, всем 3 победителям предлагается любой приз на выбор из списка ниже (состояние наборов отличное)
1 место:
Lego 70803 Cloud Cuckoo Palace
Lego 75038 Jedi Interceptor
Lego 60086 Lego City Starter Set
2 место:
Lego 76113 Spider-Man Bike Rescue
Lego 44005 Bruizer
Lego 70002 Lennox’ Lion Attack
3 место:
Lego 60032 Arctic Snowmobile
Lego 75075 AT-AT
Lego 9092 Crazy Demon
Сроки проведения — с 05.07.2020 по 05.08.2020. Результаты конкурса опубликуем 6 августа. Лучшие работы будут выбирать админы обеих групп. Призы будут высланы по почте (доставка осуществляется за наш счет).
Компания Лего разработала фантастическую серию конструкторов, которые отражают жизнь современного мегаполиса. Речь идет об одном из самых масштабных проектов компании – Лего Сити. Кипящая и ни на секунду не останавливающаяся жизнь в мегаполисе настолько разнообразная и многогранная, что место есть всему: радостям, веселью, а также различным неприятностям. Пожары, кражи, преследования преступников, как по суше, так и по воде. Большое внимание отведено в серии тематике строительства, поскольку данная сфера помогает городу быть в целости и сохранности, а также расширяет его границы. Не обошли вниманием разработчики и такую актуальную тему, как освоение космического пространства.


Данная серия конструкторов подразделяется на несколько тематических выпусков. Речь идет о «Городской жизни», «Космодроме», «Полиции», «Пожарной службе», «Стройплощадке», «Железной дороге», «Водном транспорте».
Каждый конструктор состоит из определенного количества деталей, часть которых относится к блочным, а также фигурок человечков. Детали максимально безопасны, возрастные ограничения – от 5 лет, литые блочные части позволяют составлять на базе имеющихся моделей новые конструкции. Инструкции по сборке понятны даже самым маленьким инженерам. Главное – это фантазия, которая безгранична.
Данная серия Лего Сити имеет нижнюю возрастную границу, но по большому счету, верхней границы по возрасту нет. Маленьким детям могут помогать собирать старшие братья и сестры, активное участие в разного рода операциях по спасению, преследованию, путешествиям будут принимать участие и взрослые (родители, бабушка и дедушка, тети и дяди). А вот какие мероприятия можно режиссировать из конструкторов Лего Сити, кроме схемы сборки, поможет воображение, логическое мышление, жизненный опыт и безграничная фантазия.
Опасная, но почетная служба пожарников представлена конструкторами тематической серии Лего Сити. Как проводят свободное от укрощения стихии и спасения из огня время пожарники можно обыграть при помощи конструктора «Пожарная часть». В этом здании также размещается «Пожарная команда быстрого реагирования». В гараже припаркован «Пожарный автомобиль с лестницей». А вот по полному бездорожью в сельской местности или на строительных участках на помощь придут спасатели на «Пожарном квадроцикле». Самым маленьким подойдет для ознакомления с нелегкой службой пожарников набор для начинающих.
Наряду с отважными пожарниками Lego City, всегда готова прийти на помощь пострадавшим от рук преступников полицейская служба. Речь идет о таких наборах конструкторов как:
- «Полицейском участке»,
- «Полицейском патрульном катере»,
- «Полицейской погоне»,
- «Участке новой лесной полиции»,
- «Полицейском корабле на воздушной подушке»,
- «Погоне на полицейском вертолете».
Однако и у воришек есть свой арсенал. К примеру, кроме «Секретного убежища», преступники могут пользоваться «Шиной для побега». Однако когда полицейские сделают свою работу, в игру вступит набор «Остров-тюрьма».
Преследование преступника привело к жертвам со стороны городского населения. Но отчаиваться не стоит: скорая помощь не оставит в беде. На «Карете скорой помощи» или на «Самолете скорой помощи» без промедления пострадавшего доставят в больницу.
Мирная жизнь течет своим чередом. Содержать город в порядке помогают разные службы: строительная, эвакуаторы, уборщики. Речь идет о таких наборах как о «Пароме», «Мусоровозе», «Машине техобслуживания», «Эвакуаторе», «Строительной бригаде», «Экскаваторе», «Бульдозере».
Исследовать можно не только жизнь в городе, но и за его пределами. Морские глубины или бескрайние просторы космоса – вот куда можно попасть из Лего Сити. Наборы «Обслуживающий шаттл», «Глубоководная подводная лодка», «Корабль исследователей морских глубин», «Глубоководная исследовательская база», «Глубоководный скутер», «Вертолет исследователей моря» помогут проникнуть в тайны океана или доставят астронавтов на орбиту.
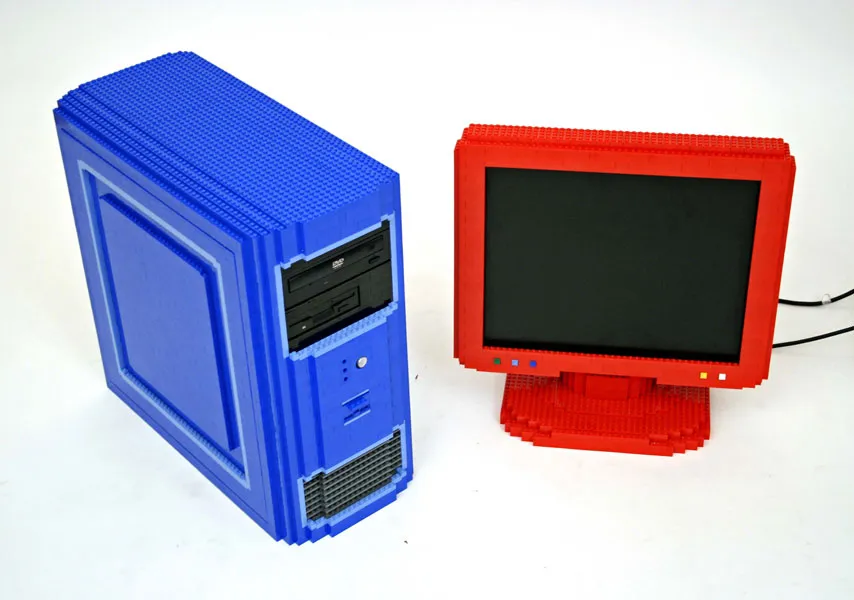
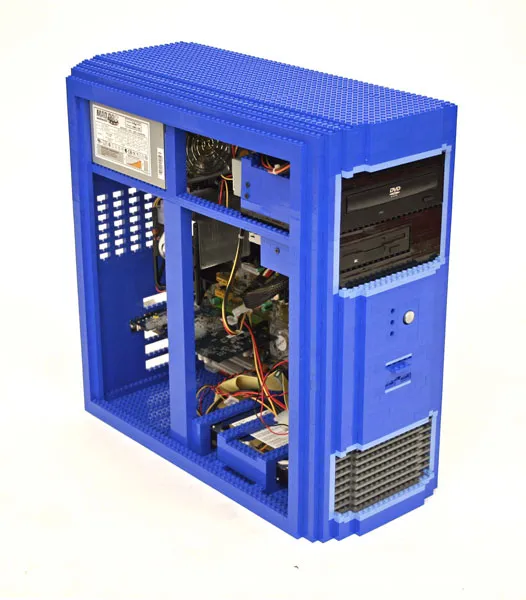
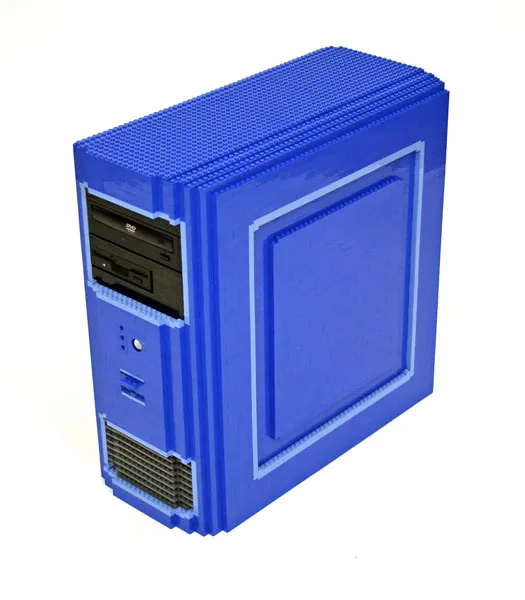
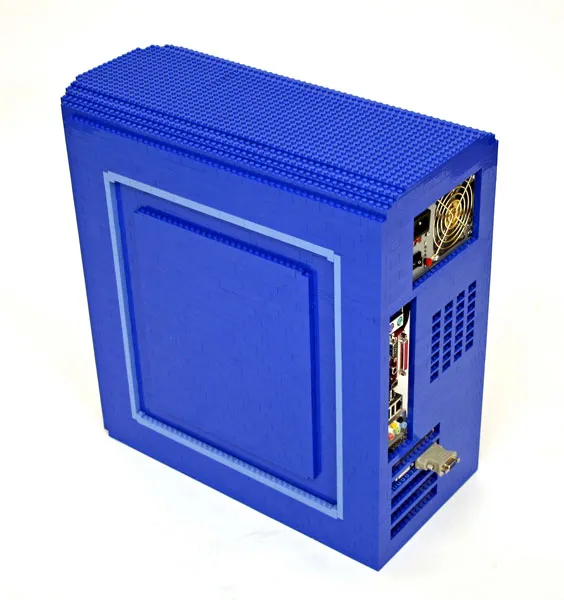
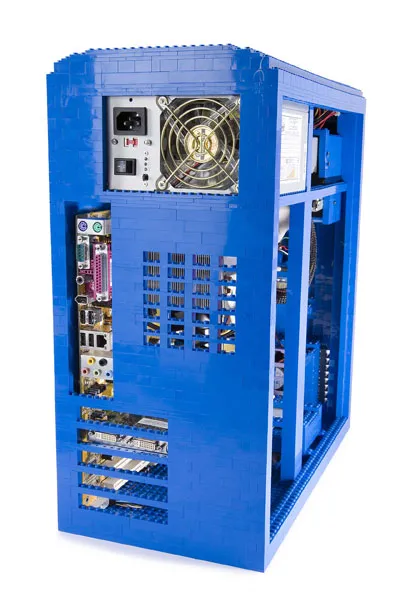
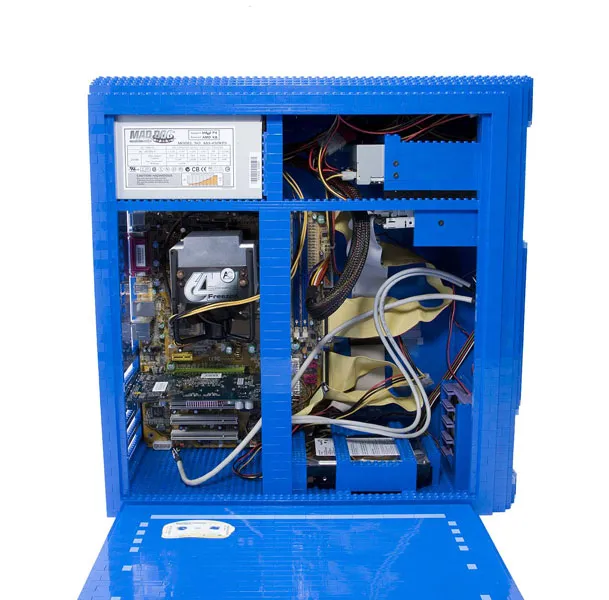
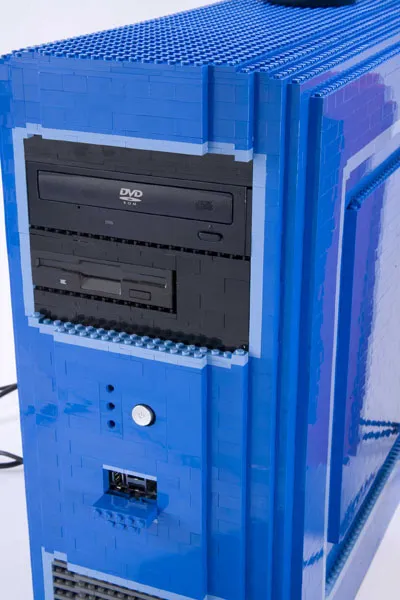
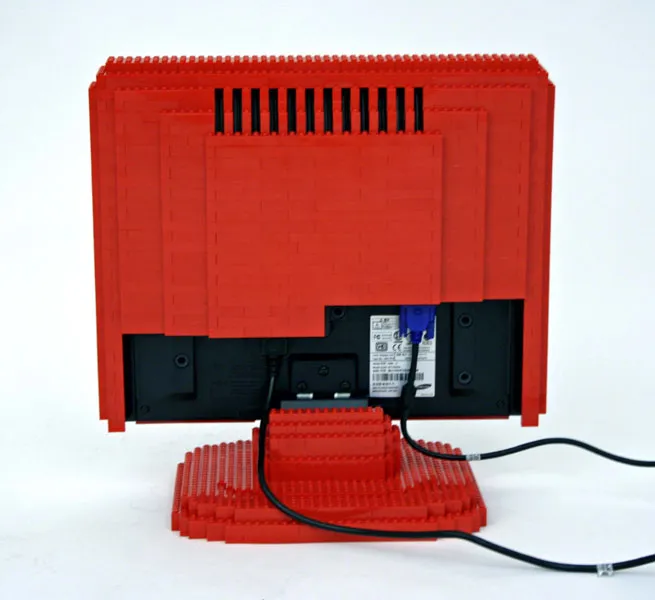
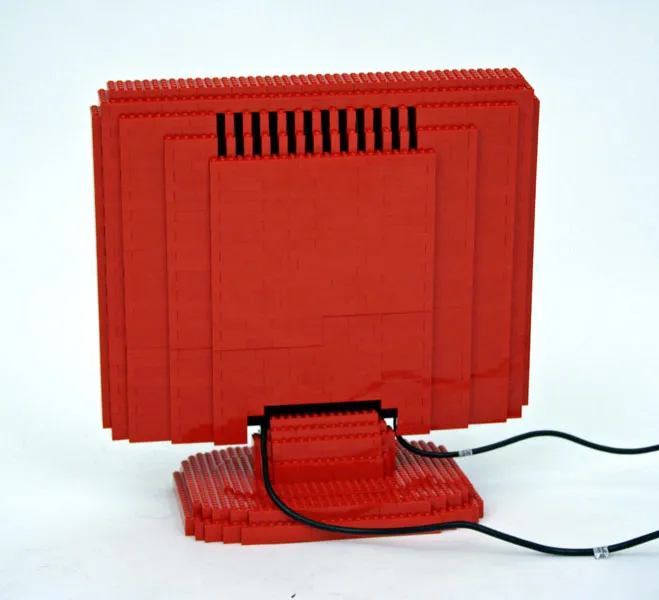
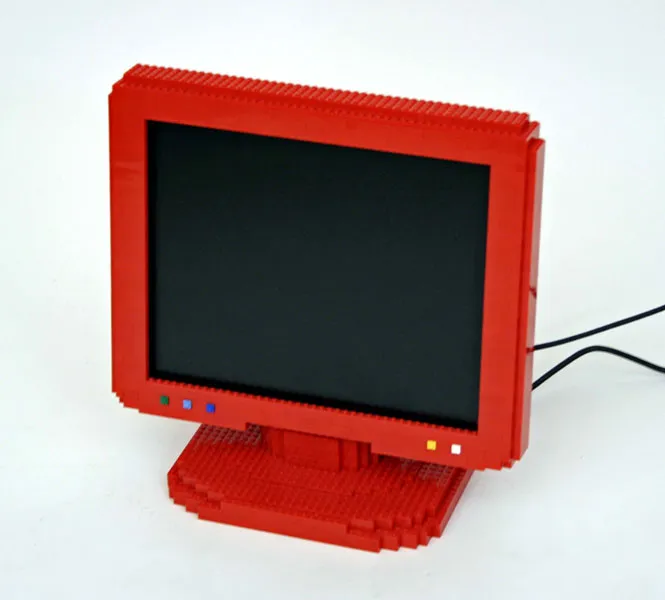
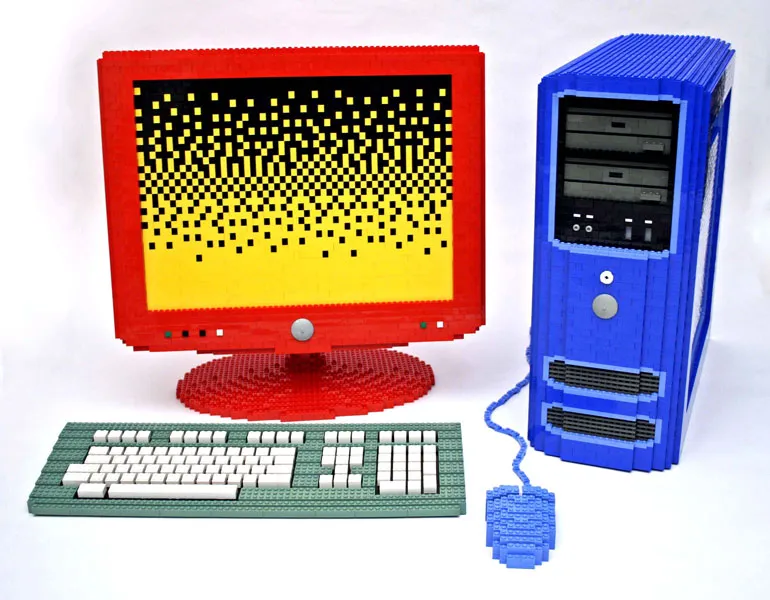
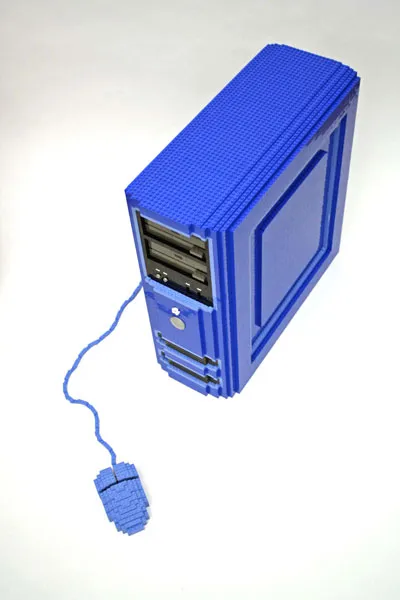
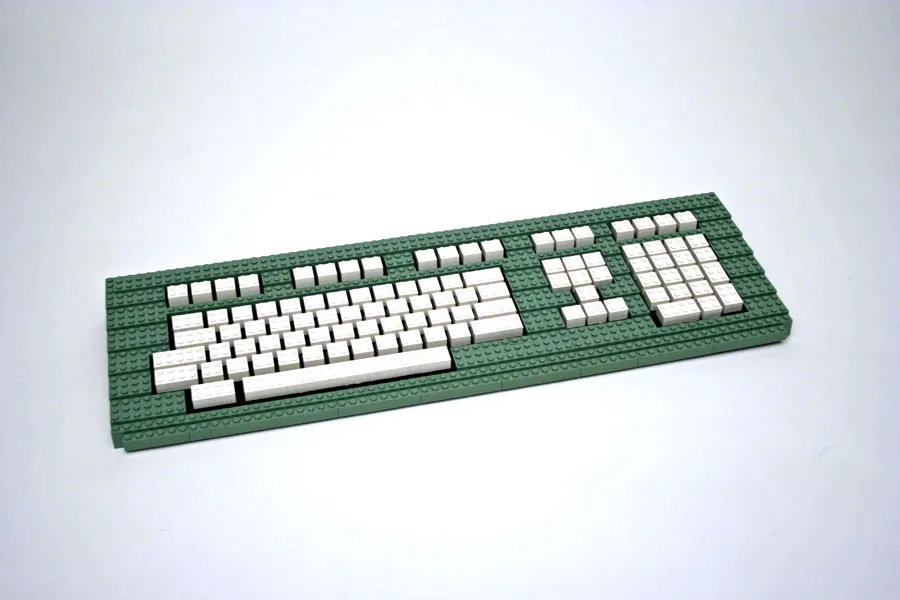
Например Nathan Sawaya собрал себе компьютер. Точнее корпуса для системника и монитора:
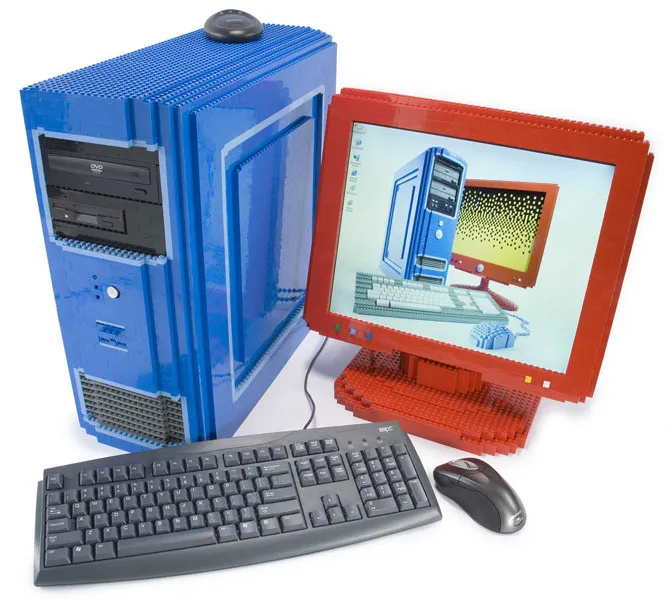
Компьютер из Lego
Компьютер из Lego
Компьютер из Lego
Компьютер из Lego
Компьютер из Lego
Компьютер из Lego
Компьютер из Lego
Компьютер из Lego
Компьютер из Lego
Компьютер из Lego
Компьютер из Lego
Компьютер из Lego
Компьютер из Lego
Компьютер из Lego

Компьютер из Lego

Компьютер из Lego
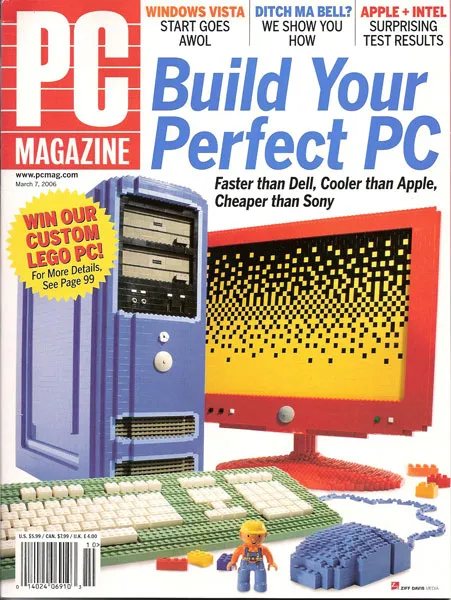
На самом деле это был какой-то конкурс журнала PC Magazine, в результате которого отдавали такой конструктор для сборки 
Компьютер из Lego
13 комментариев к «Компьютер из Lego»
Ведьмак 3: Дикая Охота

Team Fortress 2
World of Warcraft
Князь 2. Продолжени.

Люди, ищущие что-то нетривиальное, наверняка оценят созданный Майком Шроппом компактный и одновременно мощный LEGO-компьютер. Как уже можно догадаться, каркас машины выполнен из деталей конструктора LEGO. Благодаря знаменитым «кирпичикам» получилась уникальная вещь.
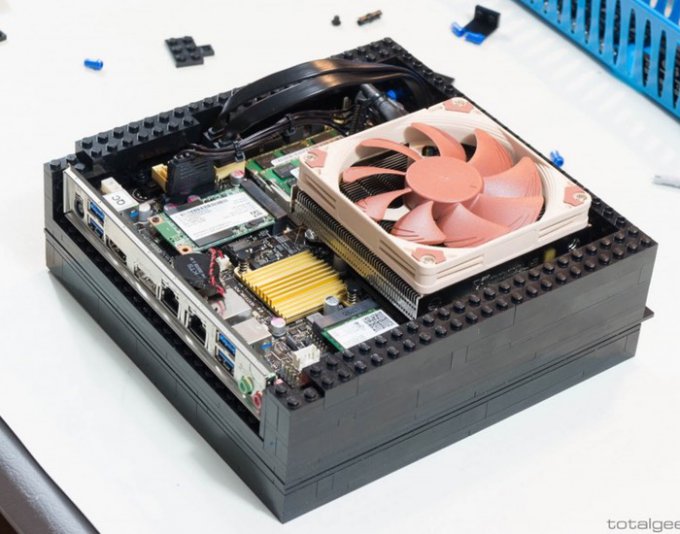
Если говорить о спецификациях, они довольно приличные. Чего Майк сумел добиться от форм-фактора MicroATX? Конструкция позволяет установить любой процессор семейства Intel Core (от i3 до i7). Есть место для 16 ГБ оперативной памяти, нескольких твердотельных накопителей и оптических приводов. Необходимый уровень охлаждения обеспечивает 140-миллиметровый вентилятор. В роли графического ускорителя выступает Intel HD4600. Легко подключить несколько дисплеев (в том числе 4K) благодаря наличию HDMI и Displayport. Указанных компонентов вполне достаточно для серфинга в Интернете, работы с офисными программами, просмотра видео формата 1080р и нетребовательных игр. Поддерживаются операционные системы Windows (с 7 по 10) и Linux.
LEGO PC автор проекта делал для себя, однако не прочь снабдить подобной сборкой всех желающих — за деньги, разумеется. Заявки изобретатель принимает на личном сайте. Цена машины варьируется от комплектации, и представляет собой стоимость от $999 до $1199.
Читайте также:
- Lego technic кран liebherr ltm 11200
- Все дома лего креатор
- Конструктор кроссвордов с вопросами
- Китайское лего техник lepin
- Идеи игр с лего

2 года назад

11 месяцев назад

3 года назад

1 год назад

1 год назад

3 года назад

2 года назад

2 года назад

9 месяцев назад

1 год назад

1 год назад

3 года назад

4 месяца назад

2 года назад

2 года назад

1 год назад

2 года назад

4 месяца назад

6 месяцев назад

2 года назад

2 года назад

5 лет назад

4 года назад

1 год назад

5 лет назад

2 года назад

2 года назад

1 год назад

2 года назад

2 года назад

2 года назад

3 года назад

2 года назад

1 год назад

4 года назад

2 года назад

1 год назад

1 месяц назад

1 год назад

1 месяц назад

9 месяцев назад

5 месяцев назад

1 год назад

4 месяца назад

2 года назад

4 месяца назад

2 года назад

1 месяц назад

4 года назад

1 год назад