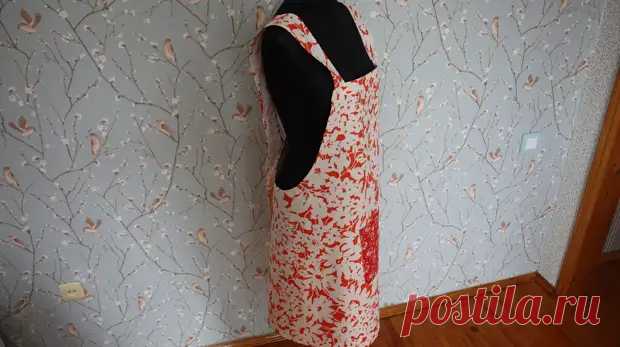
Только представьте, что ваш кухонный фартук с грудкой можно теперь надевать, не завязывая. При всем этом от не станет провисать или перекашиваться, и даже напротив, подчеркнет фигуру. И все это благодаря не совсем обычному, но при этом простому и предельно понятному способу сборки. 
Для пошива проще всего воспользоваться готовой выкройкой в натуральную величину, для этого достаточно скачать шаблон. Для раскроя основной детали складываем ткань вдвое, с таким расчетом, чтобы прямая линия, соответствующая длине изделия проходила вдоль линии сгиба. Для удобства дополнительно скрепляем выкройку с двумя слоями ткани, а затем вырезаем нужную деталь.

Основа фартука готова, дальше работать придется только с развернутой деталью. При этом следует пометить линию сгиба удобным способом, к примеру, проутюжить.

Помимо основной детали выкраиваем 2 бретели, планку для подшивки и карман, а затем переходим непосредственно к пошиву и сборке.

Формируем накладной карман. Положив деталь лицом вниз, заутюживаем вдоль одной из длинных сторон подгиб в 1 см, а затем прокладываем строчку зигзагом по периметру. Затем переворачиваем деталь лицом вверх и по той же стороне делаем еще один подгиб вверх, но теперь на 2,5 см. Края ткани на стыках фиксируем портновскими булавками, выдержав отступ от края в 1 см, а затем прокладываем строчку в местах фиксации.
Выворачиваем деталь кармана и расправляем уголки. Затем с обеих сторон делаем подгибы к центру шириной в 1 см, одновременно заутюживая их. Сверху также делаем подгиб. В результате получаем деталь с обработанными краями, заглаженными наизнанку.
Отложив вдоль линии сгиба основной детали фартука вниз 34 см, крепим к ней карман при помощи портновских булавок широким подгибом вверх. Убедившись в том, что карман расположен четко посередине, пристрачиваем его к фартуку. Вглубь от верхних углов прокладываем по дополнительному шву с отступом в 1 см на величину подгиба.
При желании количество, размер и местонахождение карманов можно изменить. Суть работы при этом останется прежней.

Совмещаем широкие части лямок с фартуком и прикрепляем с каждого боку портновскими булавками по принципу лицом к лицу. Прокладываем строчку с отступом 1,5 см от края, а затем дополнительно обрабатываем край зигзагом.

По всему периметру за исключением верха лямок и верха грудки делаем 2 подгиба в 1 см, заутюживая их по ходу работы. Дополнительно скрепляем портновскими булавками весь подгиб, сделанный по внешней стороне фартука, а также внутреннюю часть подгиба вдоль лямок, а затем прокладываем строчку с отступом в 0,5 см. Временно незастроченным остается подгиб, проложенный вдоль выемок и грудки.

Помечаем линию подгиба в области грудки, а затем укладываем фартук лицом вверх, подводим концы бретелей к грудке крест на крест, стыкуем детали так, чтобы линии подгиба по внешнему краю были совмещены, а необработанные части располагались на одной прямой. Прикрепляем бретели к грудке при помощи портновских булавок.

Деталь планки для подшивки и стабилизации бретелей заглаживаем вдоль по одной стороне на 1 см, а затем прикрепляем поверх пристроченных бретелей и грудки с развернутым подгибом так, чтобы по обе стороны планка равномерно выступала за грудку или находилась вровень с ней. Затем прокладываем строчку.
С обеих сторон на планке делаем отметки вдоль лямок, они будут приходиться на линию сгиба на грудке. Прокладываем швы по отметкам так, чтобы случайно не пристрочить лямки, а затем выворачиваем пристроченную деталь. В результате лямки оказываются сверху.

Перевернув фартук, разравниваем планку, одновременно делаем подгибы с боков по ранее заложенным складам и прячем их внутрь. Дальше остается только проложить строчку по внутренней стороне по тому участку, который ранее остался непростроченным, то есть охватить обе выемки и грудку. Отступ, как и ранее делаем 0,5 см.
Фартук полностью готов, все швы обработаны и заделаны.

Больше подробностей, касающихся пошива японского фартука, в видео:
Главная
/
Рукоделие
-
- Пожаловаться
sam.mirtesen.ru
07.03.2023, 10:49:54
Сохранено в Вещи: выкройки
Рукоделие
кухня
фартук для кухни
фартук
другая кухня
Svetlana Davidova
4764 подписчика
Нет комментариев
Introduction: Make a No Ties X Back Apron From Trousers
I love the variously named Japanese / Cross Back / X Back / Mobius / No Ties or Strings aprons usually made from linen fabric. I had a pair of linen trousers that had worn thin in places, so I couldn’t wear them anymore 
I decided to make one of these aprons from them, trying to get the most apron out of the material available, keeping the waistband and fly intact on the lower edge/hem, to make the apron shorter start the shoulder straps further down the trouser leg.
Here are the basic instructions….with plenty of opportunity to embellish, finesse and personalize as you wish 
Step 1: Materials
Essential
1. Pair of trousers (see Step 2.)
2. Flat area at least 80 x 110 cms (floor/table)
3. 8 x sheets A4 paper and sticky tape
4. Pencil/ marker/ chalk
5. Sharp craft knife or similar
6. Sewing needle
Desirable
7. Pins
8. Sharp scissors
(9. Sewing machine (non electric) and thread with hem foot)
Optional
10. Steam iron
11. Sewing machine (electric) and thread with zigzag stitch
12. Pinking shears
Step 2: Selecting Trousers
For best results, choose trousers
- in a colour and fabric you like
- in a fabric suitable for an apron
- that have a hem ideally 30cms wide (60cms circumference)
- that are straight legged
Step 3: Drawing Up Pattern
- Lines indicate A4 sheets of paper X 8
- Dashed lines indicate folds lines
- You can add or subtract length at edge on the left
METHOD:
4. Fold each A4 sheet carefully into 16
5. Stick sheets together (use flat surface for accuracy)
6. Copy outline of apron (and marks) using fold lines as a guide
7. Cut out shape and along center line = 2 pattern pieces
8. Keep the spare paper in case you need it to help make pockets later
Step 4: Prepare Trousers
1. Turn trousers inside out
2. Locate inside-leg seam
3. Assess the rows of stitching — there are usually 2 rows — 1.Straight chain stitch and 2. Overlocked/Serged edge.
4. Start by finding the beginning of the straight chainstitch which can be undone by pulling the 2 threads apart
5. With the blade, cut through one or two of the threads of the overlocking stitch to leave 1 thread intact
6. Save the thread (it matches the fabric) wind it onto some card to keep it from tangling
7. Undo crotch seam similarly from fly up back to waistband. You may need to cut through the waistband
Optional
8. If you have a steam iron, press undone seams flat
Step 5: Mark Out Apron Shape
1. On flat surface lay out trousers (still inside out)
2. Place 2 sides of trousers on top of each other (try to match well)
3. Line up centre seams from hem to waistband
4. Make sure edges line up
Optional:
If you have pins (or similar) use them to hold pieces in this position
Step 6: Back Pattern Piece
1. Align shoulder to hem corner + 1cm
2. Mark sewing line using pattern + extra 1cm at top (Shown)
(3. if you want to turn an edge hem too, move the pattern in 1cm from outer edge of trousers) (Not shown)
Leave in place
Go to next step
Step 7: Back Pattern Piece 2
4. Pivot at shoulder and align to centre seam
5. Mark arm opening
Leave in place
Go to next step
Step 8: Front Pattern Piece
6. Align front pattern piece at centre seam, using marks
Step 9: Front Pattern Piece — Neckline
7. Slide paper piece straight to outer edge
8. Mark stitching line, leave 1cm seam allowance
9. Mark neck opening and top of shoulder + 1cm (see Step 7)
Step 10: Front Pattern Piece — Front Seam
10. Pivot at shoulder point to create stitching line to end of fly opening
11. This can be a bit fiddly as the fly is well constructed with lots of parts
Step 11: Front Pattern Piece — Arm Opening
12. Return the shoulder to your marks from Step 9
13. Pivot at shoulder towards centre seam
14. Mark arm opening
Step 12: Shaping Arm Opening
15. Remove pattern pieces
16. Mark the arm opening by joining the front and back lines in a smooth curve
17. Mark a smooth line from back shoulder to waistband
Step 13: Before Cutting Apron Out
1 Line
- If you want to leave the edge as it is it will start to fray to a degree dependent on the fabric
you can enclose the edge with a strip of fabric cut for the purpose or use ribbon or bias binding (approx 5m) 2 Lines
- Add an additional mark line approx 1cm beyond the existing line if you wish to
fold over the edge to enclose the cut and stitch this down — known as a hem
this can be done by hand or machine sewing
trim with Pinking shears which can retard fraying
Inner line is stitching line
Outer line is cutting line
Step 14: Cutting Out
If you’re using pins — check none are across the line as this will interfere with cutting
Move the pins to secure the 2 pieces of fabric together
Without pins — use your hand to hold the fabric flat
Cut smoothly along marked line
Step 15: Making Up
Before you disturb the pieces too much
- Secure the centre front seam from the fly to the neck opening with
- Hand stitching following the straight line
- Pin well and sew with sewing machine
- Open apron out and press the centre front seam open
- Check it is smooth and even with no puckering before trimming away excess fabric
Step 16: Making Cross Back
1. Either side of the neck opening are 2 front straps — Left and Right
2. Back straps on the other side of arm opening — Left and Right
TO MAKE CROSS BACK
3. Fold the apron so the Left Back Strap meets Right Front Strap at shoulder
4. Fold the apron so the Right Back Strap meets Left Front Strap at shoulder
Ensure the fabric isn’t twisted
Step 17: Joining the Shoulders
1. Line up the shoulders
2. On pivot points
3. Ensure the stitching is on the inside of the apron as are the other seams
Step 18: Cross Back Magic!
Pick up by the shoulders
Your trousers are now an apron
Work out how to put it on
Step 19: Pockets
Essential
- Sew up pocket openings
Desirable
If the pockets are attached on outside
- Carefully open what was the bottom edge
- Remove pockets and move where you like and reattach
If the pockets are attached on inside
- Cut away excess fabric
- Use this fabric and/or left over trouser fabric to create pockets
Optional
Create new pockets
Step 20: The Edge
Cross back aprons are sometimes called Mobius aprons because they have a continuous edge
Options
1. Leave the edge
2.Fold the edge twice to enclose the cut edge and stitch down using sewing needle and saved thread
3. Trim edge with Pinking shears to retard fraying
4. Hem edge using Hem foot with non-electric sewing machine
5. Zigzag or overlock/serge the edge with electric sewing machine
6. Bind the edge with ribbon / homemade or bought bias binding (approx. 5m)
NOTE: If you cut through the waistband give some extra attention to this area when doing edge