Kerio Control безопасного доступа в Интернет, защиты сетей и контроля трафика.
Межсетевой экран гарантирует защищенный канал.
Программа имеет встроенный прокси-сервер с дополнительный средства антивирусной защиты.
Kerio Control становится одним из лучших вариантов для обеспечения безопасности локальных сетей.
У нас на Kerio Control цена одна из лучших на рынке программного обеспечения в подписке GFI Unlimited.
Kerio Control – настройка раздачи интернета

Для корректной настройки раздачи трафика необходимо выбрать тип подключения к Интернету.
Для каждой локальной сети настраивается наиболее подходящий. Может быть подключен постоянный доступ, при такой функции присутствует постоянной подключение к Интернету.
Вторым вариантом, может быть подключение при необходимости – программа сама установит соединение, когда это нужно.
Есть два подключения, Kerio Control при потере связи с Интернетом будет создавать переподключение на другой канал.
Имея два или несколько каналов Интернета, можно выбрать четвертый тип подключения. Нагрузка будет распределяться на все каналы равномерно.
Kerio Control: настройка пользователей
Надо настраивать параметры доступа пользователей, необходима базовая настройка программы. Вам необходимо указать и добавить сетевые интерфейсы, выбрать сетевые службы, доступные для пользователей. Не забудьте настроить правила для VPN-подключений и правила для служб, работающих в локальной сети. Для внести пользователей в программу, рекомендуем для начала разбить их на группы. Данную функцию можно установить во вкладке «Пользователи и группы».
В группах надо создать права доступа, например, возможность пользоваться VPN, смотреть статистику.
В сети есть домен, внести пользователей очень просто. Нужно включить функцию «Использовать базу данных пользователей домена» в меню «Пользователи». В сети домена нет, пользователей нужно добавлять вручную, задав каждому имя, адрес почты, логин и описание.
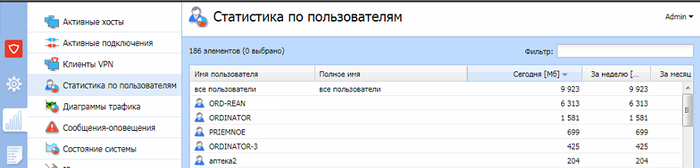
Настройка статистики в Kerio Control
Kerio Control показывала статистику Интернет-трафика, необходимо авторизовать пользователей.
Вам нужно мониторинг статистику пользователей, включите функцию автоматической регистрации браузером каждого пользователя.
Сотрудников в компании небольшое количество, можно для каждого компьютера настроить постоянный IP и каждого пользователя связать с ним.
Не забудьте перед этим авторизовать всех пользователей вручную или через базу данных пользователей домена. Для каждого ПК трафик будет отображать в Kerio Control за каждым пользователем.
Kerio Control: фильтрация содержимого – настройка параметров
Для настройки системы безопасности нужно перейти из вкладки «Конфигурация» в параметры «Фильтрация содержимого». В разделе «Антивирус» вы можете настроить обновление антивирусных баз и отметить с помощью флажков те протоколы, которые будут проверяться.
Для включить проверку HTTP-трафика, перейти вкладку «Политика HTTP». Активируйте «черный список» и внесите в него запрещенные слова. Используя добавленные вами ориентиры, все сайты, на которых будут встречаться данные выражения, система сразу заблокирует. Создать более гибкую систему фильтрации создайте правила с помощью подраздела «Правила URL».
Kerio Control: настройка правил трафика
Настройка правил трафика осуществляется через раздел «Конфигурация». Перейдите во вкладку «Политика трафика» и выберите один из трех параметров, который нужно настроить. В пункте «Правила трафика» вы создаете правила, с помощью которых и будет регулироваться доступ пользователей в Интернет, фильтрация контента и подключение из удаленного офиса.
Задайте имя правила. В графе «Источник» вы можете выбрать «Любой источник», «Доверенный источник» или перечислить конкретные источники. В графе «Назначение» нужно указать, куда будут направляться данные, в локальную сеть, VPN-туннель или Интернет. Пункт «Службы» предназначен для внесения в список всех служб и портов, с помощью которых будет реализовываться конкретное правило.
Настройка балансировки нагрузки Kerio Control
Контролировать сетевой трафик и рационально его распределять между наиболее важными каналами передачи необходимо настроить балансировку нагрузки. Таким образом, оптимизируется доступ в интернет пользователей. Благодаря распределению трафика на наиболее важном канале соединения для передачи важных данных всегда будет непрерывный Интернет.
Для назначения объема сетевого трафика в программе реализована поддержка QoS. Вы можете создать максимальную пропускную способность для приоритетного канала, при этом трафик с низкой степенью важности будет приостановлен. Есть возможность настроить балансировку нагрузки по нескольким соединениям.
Kerio Control NAT: настройка
С помощью фаервола Kerio вы можете обеспечить безопасное соединение ПК локальной сети. Создать доступ к интернету некоторым сотрудникам в удаленном офисе, при этом без каких-либо действий с их стороны. Для этого потребуется создать VPN-подключение в вашей локальной сети из удаленного офиса. Установите и настройте интерфейсы для подключения к интернету. На панели управления во вкладке «Политика трафика» создайте правило, разрешающее локальный трафик.
Не забудьте указать в источнике все нужный объекты. Также потребуется создать правило, которое разрешит локальный пользователям доступ в интернет. Нужно настроить NAT, несмотря на созданные правила доступа в интернет не будет без включения данной функции. Во вкладке «Политика трафика» выберите раздел «Трансляция» и установите флажок «Включить источник NAT». Укажите путь балансировки.
Kerio Control: настройка интерфейсов
Настройка интерфейсов производится непосредственно после установки программы. Уже активировали лицензию Kerio Control который был куплен в подписке GFI Unlimited и выбрали тип подключения к интернету, можно заняться настройкой интерфейсов. Перейдите на консоли управления в раздел «Интерфейсы». Интерфейсы, которые подключены к интернету и доступны, программа сама обнаруживает. Все наименования будут выведены в виде списка.
При распределенной нагрузке на интерфейсы (выбор типа подключения к интернету), можно добавлять сетевые интерфейсы в неограниченном количестве. Устанавливается максимально возможная нагрузка для каждого из них.
Видео
- GFI FaxMaker
- Как сделать пароль надежным и запоминающимся
- GFI MailEssentials
- GFI Unlimited – инструкция
- Специальные предложении
- GFI Unlimited – подписка сразу на все продукты GFI и Kerio
- Как сисадмину не остаться без работы
- GFI Unlimited – инструкция
- Kerio Control лицензия
- Информация о Kerio Control
Эта страница является продолжением повествования о настройках Kerio Control. Про установку и базовые настройки можно прочитать ТУТ .
К нам в организацию наконец-то подвели оптоволоконную линию для передачи данных. По ней теперь идет часть телефонии и интернет. Рассмотрим настройки Kerio при подключении к оптическому конвертеру. Новая схема подключения на рисунке ниже.
Цифровой поток из городской АТС приходит по опто-волоконной линии в распределительный шкаф (РШ). 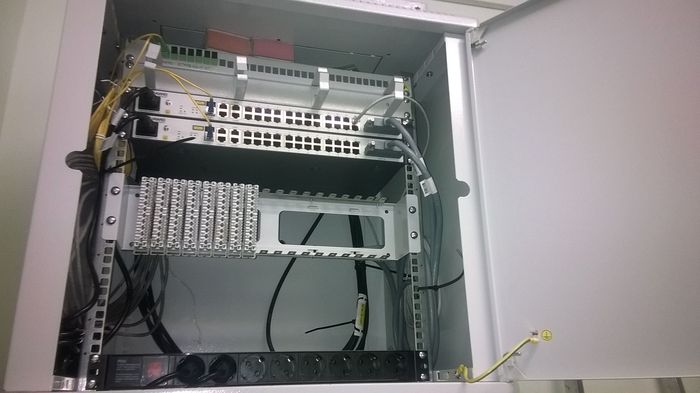
В РШ конвертер преобразует сигнал из светового вида в электрический и разделяет на телефонию и ЛВС. В нашем случае конвертером является сетевой терминал Huawei SmartAX MA5620 2шт. К нему и ко всему остальному оборудованию серверной обязательно нужны ИБП.
Подключаем Ethernet-кабель от сетевого терминала во внешнюю сетевую карту 1 Kerio Control. Какой порт в терминале подключать должен сообщить провайдер.
Подключаем Ethernet-кабель от главного коммутатора (из которого идет вся остальная ЛВС организации) во внутреннюю сетевую карту 2 Kerio Control, см. схему.
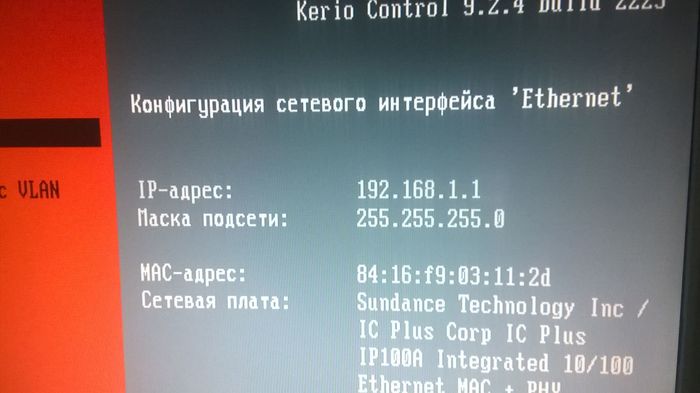
Включаем ПК на котором установлен Kerio Control. В нашем случае настройки уже были выполнены. Если настройки не выполнены, читаем первую часть описания. Если кратко в настройках Kerio нужно указать IP адрес внутренней сетевой карты в пункте «Конфигурация сети». У нас это 192.168.1.1. Маска подсети: 255.255.255.0.
Далее, в любом ПК, который подключен к ЛВС запускаем Internet Explorer и в адресной строке вводим https://192.168.1.1:4081/admin . Браузер сообщит о проблеме с сертификатом безопасности этого сайта. Нажимаем ниже – Продолжить открытие этого веб сайта. Если Kerio не активирован, откроется мастер активации. В нашем случае активация уже выполнена. Авторизируемся и переходим в пункт меню Интерфейсы.
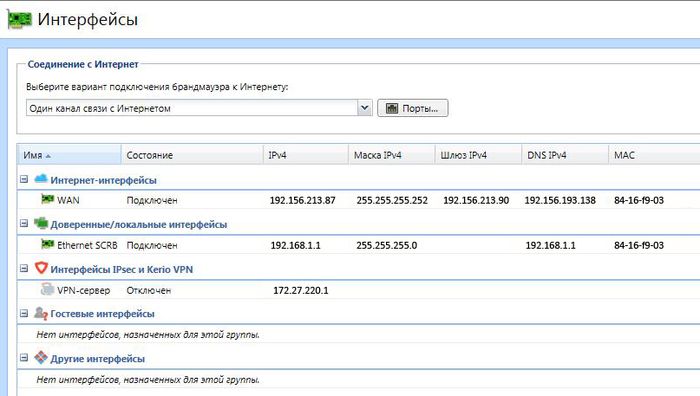
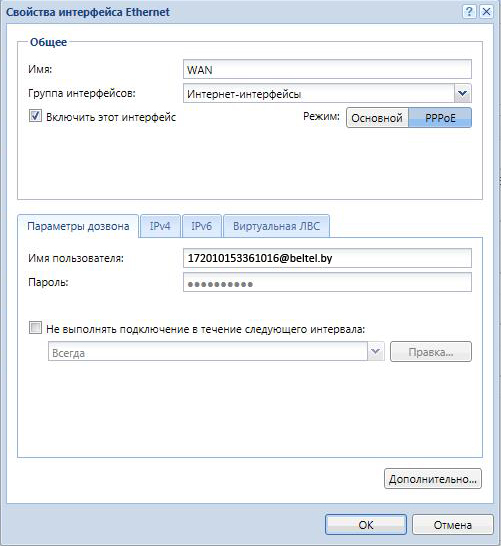
Выбираем вариант подключения брандмауэра к Интернету – Один канал связи с Интернетом.
Изменяем настройки в разделе Интернет-интерфейсы. На вкладке режима «Основной» прописываем настройки IPv4 вручную.
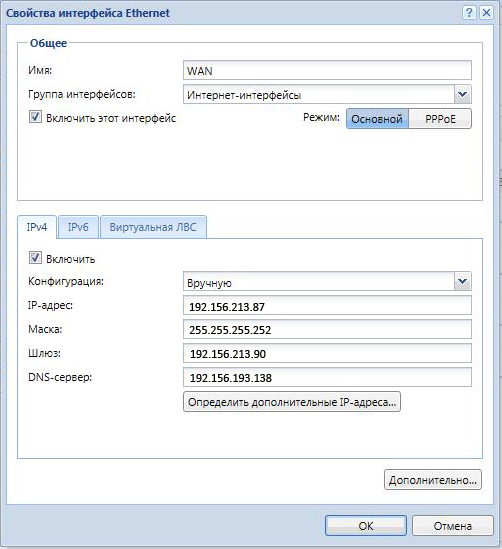
Все данные: внешний IP, маску, шлюз, DNS, должен предоставить провайдер.
На вкладке «PPPoE» в параметрах дозвона вводим имя пользователя и пароль из договора на предоставление услуги. ОК.
Можно запустить мастера настроек и через него сделать всё то же самое.
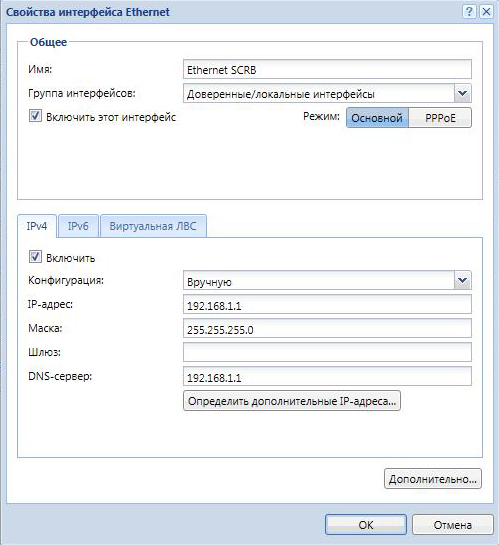
Далее выбираем следующее подключение в пункте «Доверенные/локальные интерфейсы» – наша внутренняя сеть. Эти пункты в зависимости от версии Kerio могут называться по-другому. Придумываем имя и вносим данные как на картинке ниже. DNS от Керио. Шлюз не пишем. ОК.
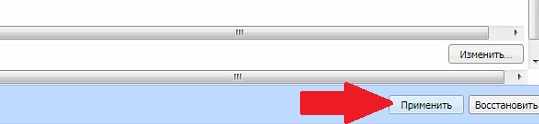
Нажимаем кнопку «Применить» в нижней правой части экрана, настройки активируются.
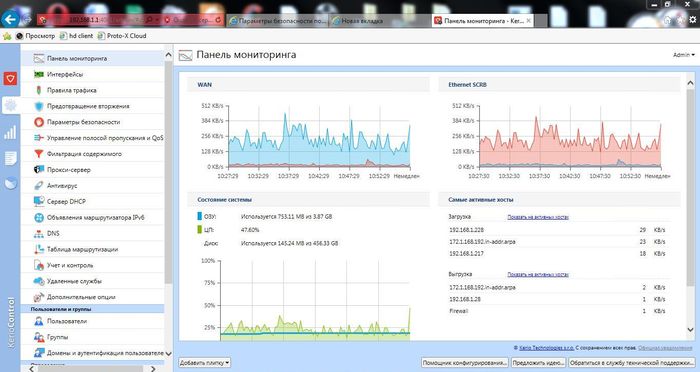
Проверим подключение к Интернету. Интернет работает.
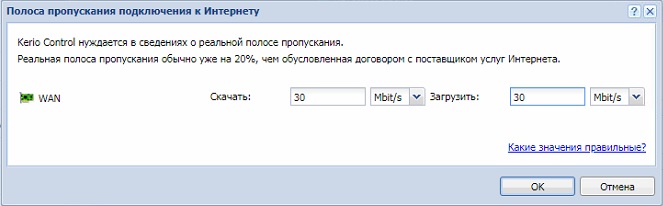
Переходим в пункт «Управление полосой пропускания» и в нижней части выставляем значения скорости.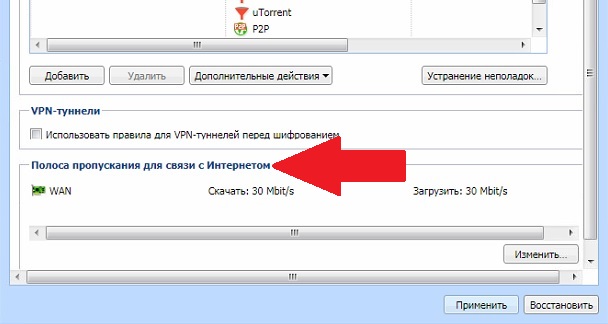
Подсказка Керио нам сообщает, что реальная скорость будет на 20% меньше заявленной в договоре.
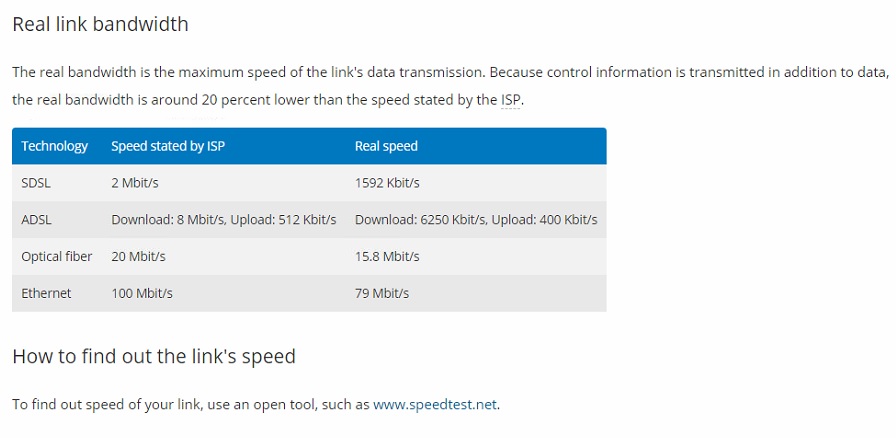
Чтоб не заморачиваться с подсчетами выставляем значение как по тарифному плану, у нас 30Мбит/с.
 Запускаем SpeedTest и смотрим реальную картину.
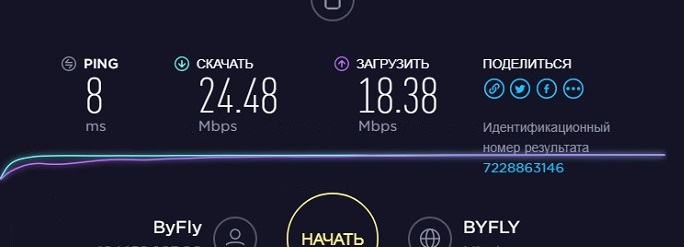
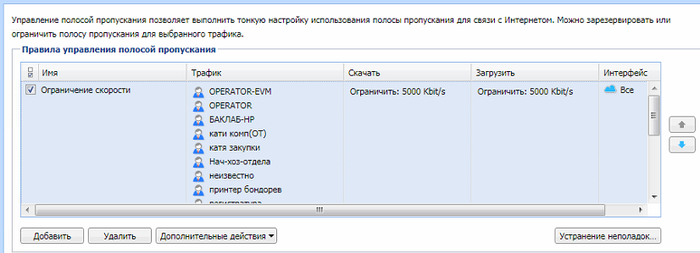
Скорость скачивания близка к истине, а вот загрузка немного просела. Эта полоса пропускания относится ко всем пользователям, подключенным в сеть. Возможно, что кто-то бесконтрольно что-то загружал в интернет в этот момент, или какие-то другие причины. Для ограничения скорости пользователям переходим к правилам полосы пропускания.
Нужно отметить, что после 1 (одного) ADSL модема на 150+ компьютеров оптика для нашей ЛВС оказалась спасительным Мессией и манной небесной одновременно.
Пока не внесены все пользователи, можно ограничить скорость для всех одновременно, но это неудобно. Поэтому нужно добавить пользователей ЛВС в разделе «Пользователи». Так как этого не сделано, ограничим скорость всем без разбора. Создаем новое правило – Ограничение скорости.
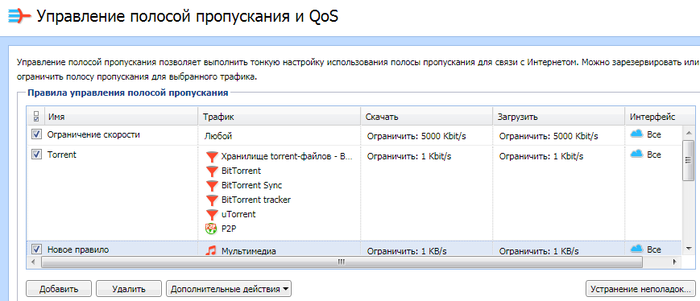
Трафик любой. Скорость ограничиваем по своему усмотрению и обстоятельствам. Максимальное значение устанавливать не рекомендуется. Половина или треть или даже четверть от максимальной скорости вполне подойдет. Если какой-то пользователь займет весь разрешенный канал, то всегда останется резерв для остальных. Для злостных качателей нужно создать отдельное правило и ограничивать им скорость индивидуально или по группам.
Устанавливаем скорость для скачивания и загрузки.

Интерфейсы – Все. Нажимаем применить и правило начнет действовать. Следующее правило – это торренты, которые перегружают сеть. Создаем новое правило. В разделе «Трафик» выбираем «Приложения и веб-категории» и отмечаем всё, что относится к торренту.
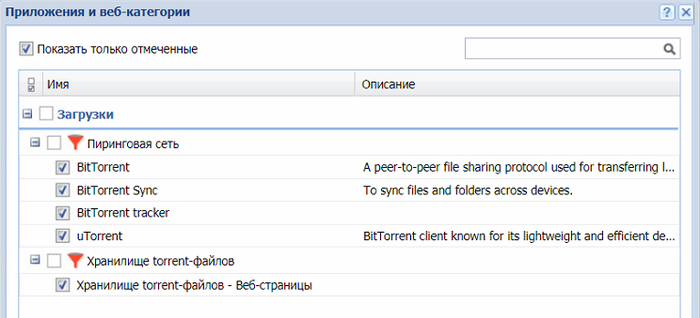
В пункте «Правила трафика» выбираем пиринговую сеть.

Жмем ОК.
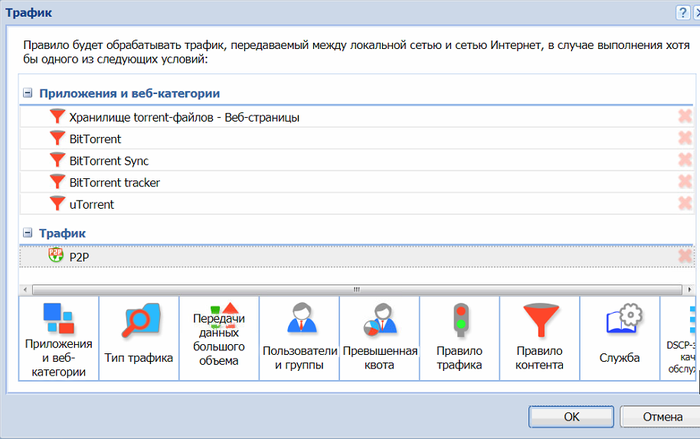
Устанавливаем скорость скачивания и загрузка минимальной, интерфейсы – Все. Нажимаем применить и торренты нашей сети больше не страшны.
Итак, у нас есть правило, ограничивающее скорость доступа в интернет всем пользователям и ограничение скорости торрентов. Остальные ограничения например ютуба или социальных сетей выполним в разделе «Фильтрация содержимого». Однако до этого лучше немного позависать и добавить всех пользователей. Переходим в раздел меню – «Пользователи».

Для добавления пользователя нажимаем кнопку «Добавить».
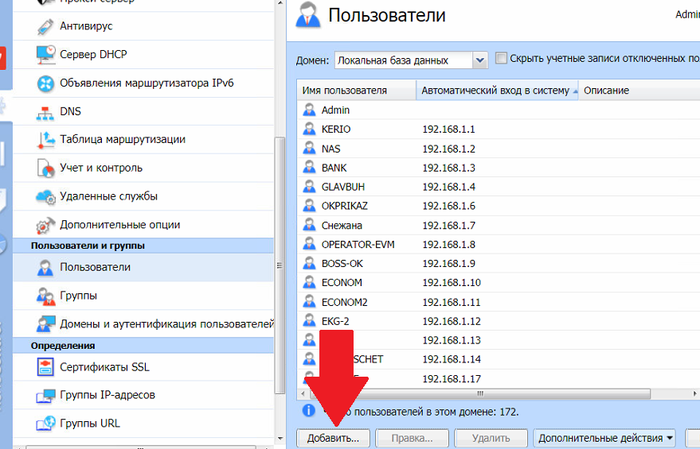
Вносим имя пользователя. У нас имя в большинстве случаев соответствует имени ПК т.к. не привязан домен.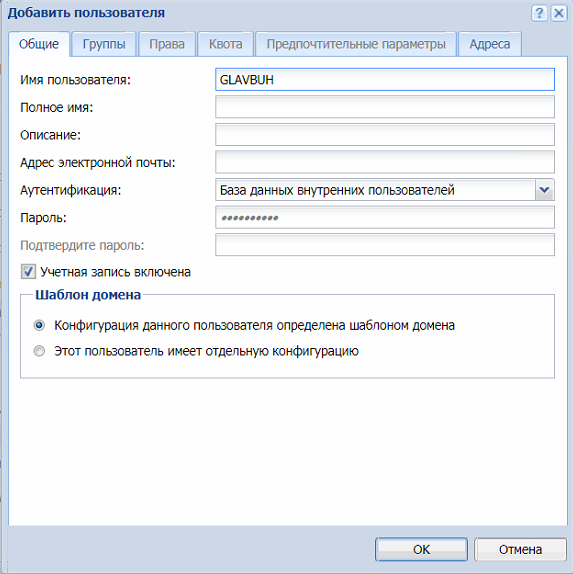
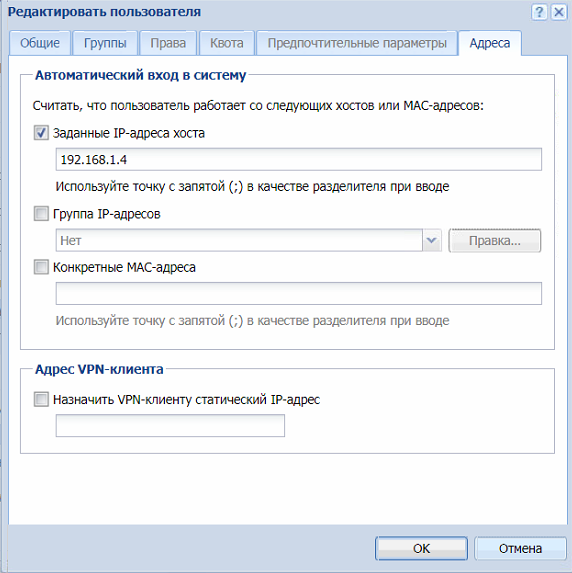
В разделе адреса привязываем IP адрес, потому что у нас в сети статическая IP адресация. Более надежно привязать MAC-адрес. Данные для привязки можно взять из ведомости ПК, которую сис. админы конечно же ведут, или из сканера сети. Нажимаем ОК.
Ну и так далее со всеми пользователями.
После этого, в пункте меню «Управление полосой пропускания» можно выбрать пользователей или группы пользователей и назначить им определенную скорость для скачивания и загрузки в интернете.
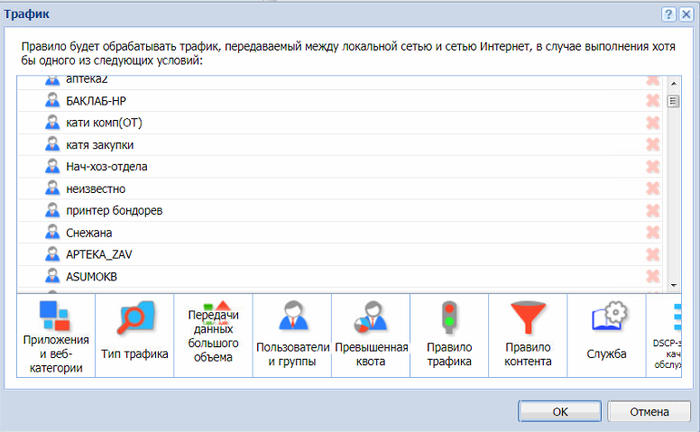
Добавляем сперва всех пользователей в список, нажав на пункт «Пользователи и группы», (отмечаем всех, ОК). Затем, удаляем из списка, нажимая красный крестик, админов, сервера, конференц-зал, руководство и прочие важные места. Устанавливаем скорость. При этом, нужно деактивировать (снять галочку) с самого первого правила, которое ограничивает трафик всем без исключения. Получится новое правило, как на картинке ниже.
Далее можно создавать список пользователе, которые много скачивают или играют в он-лайн игры и занижать им скорость, чтоб другие на жаловались на плохой интернет, как у нас было до установки Kerio очень часто.
Посмотреть кто сколько скачал можно в разделе статистика.
Другие полезные возможности Kerio Control будут рассмотрены в следующий раз.
-
Contents
-
Table of Contents
-
Troubleshooting
-
Bookmarks
Quick Links
Kerio WinRoute Firewall 6
Administrator’s Guide
Kerio Technologies
Related Manuals for Kerio Tech Firewall6
Summary of Contents for Kerio Tech Firewall6
-
Page 1: Kerio Winroute Firewall
Kerio WinRoute Firewall 6 Administrator’s Guide Kerio Technologies…
-
Page 2
Kerio Technologies. All Rights Reserved. This guide provides detailed description on the Kerio WinRoute Firewall, version 6.5.1. Improved version. All additional modifications and updates reserved. For current product version, check http://www.kerio.com/kwfdwn. Information regarding registered trademarks and trademarks are provided in appendix A. -
Page 3: Table Of Contents
Contents Quick Checklist …………..7 Introduction .
-
Page 4
Media hairpinning Configuration of network services DNS Forwarder DHCP server Dynamic DNS for public IP address of the firewall Proxy server HTTP cache …………123 Bandwidth Limiter How the bandwidth limiter works and how to use it Bandwidth Limiter configuration… -
Page 5
User Accounts and Groups 15.1 Viewing and definitions of user accounts 15.2 Local user accounts 15.3 Local user database: external authentication and import of accounts 15.4 Active Directory domains mapping 15.5 User groups Remote Administration and Update Checks 16.1 Setting Remote Administration 16.2 Update Checking Advanced security features… -
Page 6
22.4 Config Log …………. 295 22.5 Connection Log 22.6… -
Page 7: Quick Checklist
Chapter 1 Quick Checklist In this chapter you can find a brief guide for a quick setup of “Kerio WinRoute Firewall” (called briefly “WinRoute” in further text). After this setup the firewall should be immediately available and able to share your Internet connection and protect your local network. For a detailed guide refer to the separate WinRoute —…
-
Page 8
Chapter 1 Quick Checklist Select an antivirus and define types of objects that will be scanned. If you choose the integrated McAfee antivirus application, check automatic update settings and edit them if necessary. Note: External antivirus must be installed before it is set in WinRoute, otherwise it is not available in the combo box. -
Page 9: Introduction
Chapter 2 Introduction 2.1 Kerio WinRoute Firewall Kerio WinRoute Firewall 6.0 is a complex tool for connection of the local network to the Internet and protection of this network from intrusions. It is developed for Windows systems (since version 2000). Basic Features Transparent Internet Access With Network Address Translation (NAT) technology, the local private network can be…
-
Page 10
Chapter 2 Introduction access to a specific port (it can temporarily open the port demanded by the server). FTP in the active mode, Real Audio or PPTP are just a few examples. Network Configuration WinRoute has a built-in DHCP server, which sets TCP/IP parameters for each workstation within your local network. -
Page 11: Conflicting Software
Email alerts WinRoute can send email alerts informing users about various events. This function makes firewall administration easier for the administrators since they need not connect to WinRoute frequently to check it through. All sent alerts are saved in a special log file. User quotas A limit can be set for transmitted data per each user.
-
Page 12
Chapter 2 Introduction The Windows Firewall / Internet Connection Sharing system service. WinRoute can automatically detect and disable this service on its host system. The Routing and Remote Access (RRAS) system service in the Windows Server operating systems. This service also allows Internet connection sharing (NAT). WinRoute can detect if there is NAT enabled in the RRAS service and it displays a warning if it’s the case. -
Page 13: Installation
4090/TCP+UDP — proprietary VPN server (for details refer to chapter 23) Antivirus applications Most of the modern desktop antivirus programs (antivirus applications designed to pro- tect desktop workstations) scans also network traffic — typically HTTP, FTP and email protocols. WinRoute also provides with this feature which may cause collisions. Therefore it is recommended to install a server version of your antivirus program on the WinRoute host.
-
Page 14
Chapter 2 Introduction Installation packages Kerio WinRoute Firewall is distributed in two editions: one is for 32-bit systems and the other for 64-bit systems (see the product’s download page: http://www.kerio.com/kwfdwn). The 32-bit edition (the “win32” installation package) supports the following operating systems: Windows 2000 Windows XP (32 bit) Windows Server 2003 (32 bit) -
Page 15
We recommend you to check through the following items before you run WinRoute installation: Time of the operating system should be set correctly (for timely operating system and antivirus upgrades, etc.) The latest service packs and any Microsoft recommended security updates should be applied. -
Page 16
Chapter 2 Introduction Figure 2.1 Installation — customization by selecting optional components use). This will install the WinRoute low-level driver into the system kernel. WinRoute Engine will be automatically launched when the installation is complete. The engine runs as a service. Note: If you selected the Custom installation mode, the behavior of the installation program will be as follows:… -
Page 17
Warning If the FAT32 file system is used, it is not possible to protect WinRoute in the way suggested above. For this reason, it is recommended to install WinRoute only on computers which use the NTFS file system. Conflicting Applications and System Services The WinRoute installation program detects applications and system services that might con- flict with the WinRoute Firewall Engine. -
Page 18: Winroute Components
Chapter 2 Introduction Figure 2.2 Disabling colliding system services during installation Note: Upon each startup, WinRoute detects automatically whether the Windows Firewall / Inter- net Connection Sharing is running. If it is, WinRoute stops it and makes a record in the warning log.
-
Page 19: Winroute Engine Monitor
system start-up). It also provides easy access to the Administration Console. For details, refer to chapter 2.5. Note: WinRoute Firewall Engine is independent on the WinRoute Engine Monitor. The Engine can be running even if there is no icon in the system tray. Kerio Administration Console It is a versatile console for local or remote administration of Kerio Technologies server products.
-
Page 20: Upgrade And Uninstallation
Chapter 2 Introduction Start-up Preferences With these options WinRoute Engine and/or WinRoute Engine Monitor applications can be set to be launched automatically when the operating system is started. Both options are enabled by default. Administration Runs Kerio Administration Console (equal to double-clicking on the WinRoute Engine Mon- itor icon).
-
Page 21
2.6 Upgrade and Uninstallation Uninstallation To uninstall WinRoute, stop all three WinRoute components. The Add/Remove Programs option in the Control Panel launches the uninstallation process. All files under the WinRoute directory can be optionally deleted. (the typical path is C:Program FilesKerioWinRoute Firewall) —… -
Page 22: Configuration Wizard
Chapter 2 Introduction 2.7 Configuration Wizard Using this Wizard you can define all basic WinRoute parameters. It is started automatically by the installation program. Setting of administration username and password Definition of the administration password is essential for the security of the firewall. Do not use the standard (blank) password, otherwise unauthorized users may be able to access the WinRoute configuration.
-
Page 23
and administration. Thus WinRoute will enable all traffic between the firewall and the remote host. Note: Skip this step if you install WinRoute locally. Allowing full access from a point might endanger security. Figure 2.7 Initial configuration — Allowing remote administration Enable remote access This option enables full access to the WinRoute computer from a selected IP address Remote IP address… -
Page 24: Winroute Administration
Chapter 3 WinRoute Administration All Kerio products including WinRoute are administered through the Kerio Administration Console application(an application used for administration of all Kerio Technologies’ server products; thereinafter Administration Console). Using this program you can access WinRoute Firewall Engine either locally (from the WinRoute host) or remotely (from another host). Traffic between Administration Console and WinRoute Firewall Engine is encrypted.
-
Page 25
Figure 3.1 The main window of Administration Console for WinRoute Administration Window — Main menu The main menu provides the following options: File Reconnect — reconnection to the WinRoute Firewall Engine after a connection drop-out (caused for example by a restart of the Engine or by a network error). New connection —… -
Page 26
Chapter 3 WinRoute Administration Copy license number to clipboard — copies the license number (the ID licence item) to the clipboard. This may be helpful e.g. when ordering an upgrade or subscription, where the number of the base license is required, or when sending an issue to the Kerio Technologies technical support. -
Page 27: View Settings
Detection of WinRoute Firewall Engine connection drop-out Administration Console is able to detect the connection failure automatically. The failure is usually detected upon an attempt to read/write the data from/to the server (i.e. when the Ap- ply button is pressed or when a user switches to a different section of Administration Console). In such case, a connection failure dialog box appears where the connection can be restored.
-
Page 28
Chapter 3 WinRoute Administration Figure 3.4 Column customization in Interfaces This dialog offers a list of all columns available for a corresponding view. Use checking boxes on the left to enable/disable displaying of a corresponding column. You can also click the Show all button to display all columns. -
Page 29: Product Registration And Licensing
Chapter 4 Product Registration and Licensing When purchased, Kerio WinRoute Firewall must be registered, Upon registration of the product, so called license key is generated.(the license.key file — see chapter 25.1). If the key is not imported, WinRoute will behave as a full-featured trial version and its license will be limited by the expiration timeout.
-
Page 30: License Information
Chapter 4 Product Registration and Licensing McAfee license This license is defined by the two following dates: update right expiration date (independent of WinRoute) — when this date expires, the antivirus keeps functioning, however, neither its virus database nor the an- tivirus can be updated yet.
-
Page 31
Figure 4.1 Administration Console welcome page providing license information Copyright Copyright information. Homepage Link to the Kerio WinRoute Firewall homepage (information on pricing, new versions, etc.). Click on the link to open the homepage in your default browser. Operational system Name of the operating system on which the WinRoute Firewall Engine service is running. -
Page 32: Registration Of The Product In The Administration Console
Chapter 4 Product Registration and Licensing Company Name of the company (or a person) to which the product is registered. Depending on the current license, links are displayed at the bottom of the image: For unregistered versions: Become a registered trial user — registration of the trial version. This type of registration is tentative and it is not obligatory.
-
Page 33
Clicking on Become a registered trial user launches the registration wizard. On the first page of the wizard, read the security code displayed in the picture and type it to the text field (this protects the registration server from misuse). The security code is not case-sensitive. -
Page 34
Chapter 4 Product Registration and Licensing Figure 4.3 Trial version registration — user information Figure 4.4 Trial version registration — other information The fourth page provides the information summary. If any information is incorrect, use the Back button to browse to a corresponding page and correct the data. The last page of the wizard provides user’s Trial ID. -
Page 35
4.3 Registration of the product in the Administration Console Figure 4.5 Registration of the trial version — summary Figure 4.6 Trial version registration — Trial ID At this point, an email message (in the language set in the Administration Console) where confirmation of the registration is demanded is sent to the email address specified on the page two of the wizard. -
Page 36
Chapter 4 Product Registration and Licensing Registration of the purchased product Follow the Register product with a purchased license number link to run the registration wiz- ard. On the first page of the wizard, it is necessary to enter the license number of the basic product delivered upon its purchase and retype the security code displayed at the picture in the text field (this protects the server from misuse). -
Page 37
4.3 Registration of the product in the Administration Console Figure 4.8 Product registration — license numbers of additional components, add-ons and subscription… -
Page 38
Chapter 4 Product Registration and Licensing Figure 4.9 Product registration — user information Page four includes optional information. Is is not obligatory to answer these questions, however, the answers help Kerio Technologies accommodate demands of as many cus- tomers as possible. These questions are asked only during the primary (original) registration. -
Page 39
4.3 Registration of the product in the Administration Console Figure 4.10 Product registration — other information Figure 4.11 Product registration — summary… -
Page 40: Product Registration At The Website
Chapter 4 Product Registration and Licensing 4.4 Product registration at the website If, by any reason, registration of WinRoute cannot be performed from the Administration Con- sole, it is still possible to register the product at Kerio Technologies website. The registration form can be found under Purchase the registration process described in chapter 4.3.
-
Page 41
Administrators are informed in two ways: By a pop-up bubble tip (this function is featured by the WinRoute Engine Monitor mod- ule), by an pop-up window upon a login to the Administration Console (only in case of expiration of subscription). Note: WinRoute administrators can also set posting of license or subscription expiration alerts by email or SMS (see chapter 19.3). -
Page 42: User Counter
Chapter 4 Product Registration and Licensing Figure 4.13 The notice that the subscription has already expired 4.6 User counter This chapter provides a detailed description on how WinRoute checks whether number of licensed users has not been exceeded. The WinRoute license does not limit number of user accounts. Number of user accounts does not affect number of licensed users.
-
Page 43
The following items are considered as clients: All hosts from which users are connected to the firewall All clients of the WinRoute’s proxy server (see chapter 8.4) All local hosts communication of which is routed between Internet interfaces and WinRoute’s local interfaces. The following items belong to this group: Each host which is connected to the Internet while no user is authenticated from the host, All local servers mapped from the Internet,… -
Page 44: Network Interfaces
Chapter 5 Network interfaces WinRoute is a network firewall. This implies that it represents a gateway between two or more networks (typically between the local network and the Internet) and controls traffic passing through network adapters (Ethernet, WiFi, dial-ups, etc.) which are connected to these net- works.
-
Page 45
change of a network adapter etc., there is no need to edit traffic rules — simple adding of the new interface in the correct group will do. In WinRoute, the following groups of interfaces are defined: Internet interfaces — interfaces which can be used for Internet connection (network cards, wireless adapters, dial-ups, etc.), Trusted / Local interfaces by the firewall (typically Ethernet or WiFi cards),… -
Page 46
Chapter 5 Network interfaces IP Address and Mask IP address and the mask of this interface’s subnet. If the more IP addresses are set for the interface, the primary IP address will be displayed. On Windows, the address assigned to the interface as first is considered as primary. Status Current status of the interface (up/down). -
Page 47
Remove Removes the selected interface from WinRoute. This can be done under the following conditions: the interface is an inactive (disabled) VPN tunnel, the network adapter is not active or it is not physically present, the interface is a dial-up which no longer exists in the system. Network cards and dial-ups defined in the operating system as well as established VPN tunnels cannot be removed in WinRoute. -
Page 48
Chapter 5 Network interfaces handle the line by hand. Note: You can use WinRoute’s web interface (see chapter 11) to dial or hang up lines. For VPN tunnels, the Enable and Disable buttons are available that can be used to enable /disable the VPN tunnel selected for details, see chapter 23.3). -
Page 49: Internet Connection
Chapter 6 Internet Connection The basic function of WinRoute is connection of the local network to the Internet via one or more Internet connections (Internet links). Depending on number and types of Internet links, WinRoute provides various options of Internet connection: A Single Internet Link —…
-
Page 50: Persistent Connection With A Single Link
Chapter 6 Internet Connection This involves selection of the Internet connection type in the Configuration Interfaces sec- tion of the WinRoute configuration, setting corresponding interfaces for connection to the Internet and definition of corresponding traffic rules (see chapter 7.3). Hint All necessary settings can be done semi-automatically with use of Traffic Policy Wizard —…
-
Page 51
Figure 6.1 Traffic Policy Wizard — persistent connection with a single link Figure 6.2 Network Policy Wizard — selection of an interface for the Internet connection On the top of the list, the Internet interface where the default gateway is set is offered. Therefore, in most cases the appropriate adapter is already set within this step. -
Page 52
Chapter 6 Internet Connection Resulting interface configuration When you finish set-up in Traffic Policy Wizard, the resulting configuration can be viewed under Configuration Interfaces and edited if desirable. Figure 6.3 Configuration of interfaces — connection by a single leased link The Internet Interfaces groups includes only card Internet selected in the third page of the wizard. -
Page 53: Connection With A Single Leased Link — Dial On Demand
6.2 Connection with a single leased link — dial on demand If the WinRoute host is connected to the Internet via dial-up, WinRoute can automatically dial the connection when users attempt to access the Internet. WinRoute provides the following options of dialing/hanging control: Line is dialed when a request from the local network is received.
-
Page 54
Chapter 6 Internet Connection Figure 6.4 Traffic Policy Wizard — dial on demand Figure 6.5 Network Policy Wizard — selection of an interface for the Internet connection Resulting interface configuration When you finish set-up in Traffic Policy Wizard, the resulting configuration can be viewed under Configuration Interfaces and edited if desirable. -
Page 55
Figure 6.6 Configuration of interfaces — an on-demand dial link packets to the corresponding destination network in accordance with the system routing table (see also chapter 18.1) and perform IP address translation (NAT). However, such configuration would be of any use. It is therefore recommended to keep only a single on-demand-dial link in the Internet interfaces group. -
Page 56
Chapter 6 Internet Connection Figure 6.7 Interface properties — dialing settings For these purposes, it is possible to set time intervals for persistent connection and/or hang-up. By clicking on Edit buttons, it is possible to select a time interval for each mode or create a new interval, without jumping to another, completely different section of the administration interface. -
Page 57
connection is recovered automatically. If the connection is set to be hung-up at the moment of the outage, the con- nection will not be recovered. In mode of on-demand dial (i.e. outside the intervals defined), connection will be recovered in response to the first request (i.e. packet sent from the local network to the Internet). -
Page 58: Connection Failover
Chapter 6 Internet Connection Warning WinRoute is running in the operating system as a service. Therefore, external applica- tions and operating system’s commands will run in the background only (in the SYSTEM account). The same rules are applied for all external commands and external programs called by scripts.
-
Page 59
a new default route via this link which allows us to test Internet connection on the secondary link. In case of two leased links, the simplest way is to disable one of the connections int he operating system and test the other (enabled) link. And, as implied, test the other in the same way when the first link is checked. -
Page 60
Chapter 6 Internet Connection Figure 6.10 Traffic Policy Wizard — failover of a leased link by a dial-up Resulting interface configuration When you finish set-up in Traffic Policy Wizard, the resulting configuration can be viewed under Configuration Interfaces and edited if desirable. Figure 6.11 Configuration of interfaces —… -
Page 61
6.3 Connection Failover The Internet interfaces group includes the Internet and the Dial-up link selected as primary and secondary (failover) on the third page of the wizard. The information provided in the Internet column states which link is used for primary and which one for secondary connection. The Status column informs of the link status (up/down) as well as of the fact whether the link is active (just being used as Internet connection at the moment) or not. -
Page 62: Network Load Balancing
Chapter 6 Internet Connection Note: Probe hosts must not block ICMP Echo Requests (PING) since such requests are used to test availability of these hosts — otherwise the hosts will be always considered as unavailable. This is one of the cases where the primary default gateway cannot be used as the testing computer.
-
Page 63
Both the primary and the secondary link may be configured automatically by the DHCP proto- col. In that case, WinRoute looks all required parameters up in the operating system. It is recommended to check functionality of individual Internet links out before installing WinRoute. -
Page 64
Chapter 6 Internet Connection On the third page of the wizard, add all links (one by one) which you intend to use for traffic load balancing. Figure 6.14 Traffic Policy Wizard — failover of a leased link by a dial-up For each link, specification of bandwidth is required (i.e. -
Page 65
6.4 Network Load Balancing Resulting interface configuration When you finish set-up in Traffic Policy Wizard, the resulting configuration can be viewed under Configuration Interfaces and edited if desirable. Figure 6.15 Configuration of interfaces — network traffic load balancing The Internet interfaces group includes the Internet 4Mbit and the Internet 8Mbit link selected as an interface for Internet traffic load balancing on the third page of the wizard. -
Page 66
Chapter 6 Internet Connection Advanced settings (optimization, dedicated links, etc.) In basic configuration, network load balancing is applied automatically with respect to their proposed speeds (see above). It is possible to use traffic rules to modify this algorithm (e.g. by dedicating one link for a particular traffic). -
Page 67: Traffic Policy
Chapter 7 Traffic Policy Traffic Policy belongs to of the basic WinRoute configuration. All the following settings are displayed and can be edited within the table: security (protection of the local network including the WinRoute host from Internet intrusions IP address translation (or NAT, Network Address Translation — technology which en- ables transparent access of the entire local network to the Internet with one public IP address only) access to the servers (services) running within the local network from the Internet…
-
Page 68
Chapter 7 Traffic Policy Step 1 — information To run successfully, the wizard requires the following parameters on the WinRoute host: at least one active adapter connected to the local network at least either one active adapter connected to the Internet or one dial-up defined. This connection is not required to be dialed at the moment of the wizard’s startup. -
Page 69
Step 4 — Internet access limitations Select which Internet services will be available for LAN users: Figure 7.2 Network Policy Wizard — enabling access to Internet services Allow access to all services Internet access from the local network will not be limited. Users can access any Internet service. -
Page 70
Chapter 7 Traffic Policy Kerio VPN and it can be used along with a third-party VPN solution. For detailed information, see chapter 24. Figure 7.3 Network Policy Wizard — Kerio VPN Step 6 — specification of servers that will be available within the local network If any service (e.g. -
Page 71
Figure 7.5 Network Policy Wizard — mapping of the local service Service is running on Select a computer where the corresponding service is running (i.e. the host to which traffic coming in from the Internet will be redirected): Firewall — the host where WinRoute is installed Local host with IP address —… -
Page 72
Chapter 7 Traffic Policy Rules Created by the Wizard The traffic policy is better understood through the traffic rules created by the Wizard in the previous example. These rules are not affected by the selected type of Internet connection (the wizard, pages 2 and 3). -
Page 73
These rules are not created unless the option allowing access to a particular service is enabled in step 5. Note: In these rules, value for Source is also set to Any. The main reason for this is to keep consistent with rules for mapped services (all these rules are defined in page 6 of the wizard). -
Page 74: How Traffic Rules Work
Chapter 7 Traffic Policy Firewall Traffic This rule enables access to certain services from the WinRoute host. It is similar to the NAT rule except from the fact that this rule does not perform IP translation (this host connects to the Internet directly). Default rule This rule drops all communication that is not allowed by other rules.
-
Page 75
7.3 Definition of Custom Traffic Rules Name Name of the rule. It should be brief and unique. More detailed information can be included in the Description entry. Matching fields next to names can be either ticked to activate or unticked to disable. If a par- ticular field is empty, WinRoute will ignore the rule. -
Page 76
Chapter 7 Traffic Policy Figure 7.9 Traffic rule — source address definition Warning If either the source or the destination computer is specified by DNS name, WinRoute tries to identify its IP address while processing a corresponding traffic rule. If no corresponding record is found in the cache, the DNS forwarder forwards the query to the Internet. -
Page 77
Figure 7.10 Traffic rule — selecting an interface of a group of interfaces Note: Only the Internet interfaces and the Trusted / Local interfaces group can be used in traffic rules. Another method is used to add interfaces for Kerio VPN(see below). The Other interfaces group includes interfaces of various types that were not filed in another group. -
Page 78
Chapter 7 Traffic Policy Figure 7.12 Traffic rule — users and groups in the source/destination address definition Hint Users/groups from various domains can be added to a rule at a moment. Select a do- main, add users/groups, choose another domain and repeat this process until all de- manded users/groups are added. -
Page 79
7.3 Definition of Custom Traffic Rules Use the Any button to replace all defined items with the Any item (this item is also used by default for all new rules). This item will be removed automatically when at least one new item is added. -
Page 80
Chapter 7 Traffic Policy Use the Any button to replace all defined items with the Any item (this item is also used by default for all new rules). Whenever at least one new service is added, the Any value removed automatically. -
Page 81
Note: It is recommended to use the Deny option to limit the Internet access for local users and the Drop option to block access from the Internet. Translation Source or/and destination IP address translation. Source IP address translation (NAT — Internet connection sharing) The source IP address translation can be also called IP masquerading or Internet connection sharing. -
Page 82
Chapter 7 Traffic Policy If WinRoute works in the mode of network traffic load balancing (see chapter 6.4), you can select a method which will be used for spreading the traffic between the LAN and the Internet over individual Internet links: Load balancing per host —… -
Page 83
Figure 7.16 Traffic rule — NAT — NAT with specific interface (its IP address) any other address is used (including even local private addresses). NAT will not work correctly and packets sent tto the Internet will be dropped. For obvious reasons, specific IP address cannot be used for NAT in the Internet connection failover and the network traffic load balancing modes. -
Page 84
Chapter 7 Traffic Policy are let in. This translation method guarantees high security — the firewall will not let in any packet which is not a response to the sent request. However, many applications (especially applications working with multimedia, Voice over IP technologies, etc.) use another traffic method where other clients can (with direct connection established) connect to a port “opened”… -
Page 85
Figure 7.18 Traffic rule — destination address translation No Translation — destination address will not be modified. Translate to — IP address that will substitute the packet’s destination address. This address also represents the IP address of the host on which the service is actually running. -
Page 86
Chapter 7 Traffic Policy Log matching packets — all packets matching with rule (permitted, denied or dropped, according to the rule definition) will be logged in the Filter log. Log matching connections — all connections matching this rule will be logged in the Connection log (only for permit rules). -
Page 87: Basic Traffic Rule Types
Default — all necessary protocol inspectors (or inspectors of the services listed in the Service entry) will be applied on traffic meeting this rule. None — no inspector will be applied (regardless of how services used in the Service item are defined). Other —…
-
Page 88
Chapter 7 Traffic Policy Destination The Internet interfaces group. With this group, the rule is usable for any type of Internet connection (see chapter 6) and it is not necessary to modify it even it Internet connection is changed. Service This entry can be used to define global limitations for Internet access. -
Page 89
Figure 7.23 Traffic rule that makes the local web server available from the Internet Source Mapped services can be accessed by clients both from the Internet and from the local network. For this reason, it is possible to keep the Any value in the Source entry (or it is possible to list all relevant interface groups or individual groups —… -
Page 90
Chapter 7 Traffic Policy dropped. Therefore, it is recommended to put all rules for mapped services at the top of the table of traffic rules. Note: If there are separate rules limiting access to mapped services, these rules must precede mapping rules. It is usually possible to combine service mapping and access restriction in a single rule. -
Page 91
Limiting Internet Access Sometimes, it is helpful to limit users access to the Internet services from the local network. Access to Internet services can be limited in several ways. In the following examples, the limitation rules use IP translation. There is no need to define other rules as all traffic that would not meet these requirements will be blocked by the default «catch all»… -
Page 92
Chapter 7 Traffic Policy Alternatively you can define the rule to allow only authenticated users to access specific services. Any user that has a user account in WinRoute will be allowed to access the Internet after authenticating to the firewall. Firewall administrators can easily monitor which services and which pages are opened by each user (it is not possible to connect anonymously). -
Page 93: Policy Routing
7.5 Policy routing If the LAN is connected to the Internet by multiple links with load balancing (see chapter 6.4), it may be needed that one link is reserved for a certain traffic, leaving the rest of the load for the other links.
-
Page 94
Chapter 7 Traffic Policy Setting of NAT in the rule for email services is shown in figure 7.31. It is recommended to allow use of a back-up link for case that the reserved link fails. Otherwise, email services will be unavailable when the connection fails. Figure 7.31 Policy routing —… -
Page 95: User Accounts And Groups In Traffic Rules
7.6 User accounts and groups in traffic rules Example: Optimization of network traffic load balancing WinRoute provides two options of network traffic load balancing: per host (clients) or per con- nection (for details, refer to chapter 7.3). With respect to variability of applications on individ- ual hosts and of user behavior, the best solution (more efficient use of individual links) proves to be the option of load balancing per connection.
-
Page 96
Chapter 7 Traffic Policy Figure 7.34 This traffic rule allows only selected users to connect to the Internet Such a rule enables the specified users to connect to the Internet (if authenticated). However, these users must open the WinRoute interface’s login page manually and authenticate (for details, see chapter 10.1). -
Page 97: Partial Retirement Of Protocol Inspector
User not authenticated yet who attempts to open a Web site will be automatically redirected to the authentication page (or authenticated by NTLM, or logged in from the corresponding host). After a successful authentication, users specified in the NAT rule (see figure 7.35) will be allowed to access also other Internet services.
-
Page 98: Use Of Full Cone Nat
Chapter 7 Traffic Policy Figure 7.37 Service definition without inspector protocol Figure 7.38 This traffic rule allows accessing service without protocol inspection Warning To disable a protocol inspector, it is not sufficient to define a service that would not use the inspector! Protocol inspectors are applied to all traffic performed by corresponding protocols by default.
-
Page 99
Example: SIP telephone in local network In the local network, there is an IP telephone registered to an SIP server in the Internet. The parameters may be as follows: IP address of the phone: 192.168.1.100 Public IP address of the firewall: 195.192.33.1 SIP server: sip.server.com Since the firewall performs IP address translation, the telephone is registered on the SIP server with the firewall’s public address (195.192.33.1). -
Page 100: Media Hairpinning
Chapter 7 Traffic Policy Figure 7.40 Enabling Full cone NAT in the traffic rule 7.9 Media hairpinning WinRoute allows to “arrange” traffic between two clients in the LAN which “know each other” only from behind the firewall’s public IP address. This feature of the firewall is called hairpin- ning (with the hairpin root suggesting the packet’s “U-turn”…
-
Page 101
a packet is addressed to a client in the local network. Then it translates the destination IP address and sends the packet back to the local network (as well as in case of port mapping). This ensures that traffic between the two phones will work correctly. Note: Hairpinning requires traffic between the local network and the Internet being allowed (be- fore processed by the firewall, packets use a local source address and an Internet destina-… -
Page 102: Configuration Of Network Services
Chapter 8 Configuration of network services This chapter provides guidelines for setting of basic services in WinRoute helpful for easy configuration and smooth access to the Internet: DNS forwarder — this service is used as a simple DNS server for the LAN, DHCP server —…
-
Page 103
of the firewall’s network interfaces, see chapter 5, more information on Internet connection options, refer to chapter 6. DNS Forwarder configuration In WinRoute default settings, the DNS Forwarder is enabled and DNS queries are automatically forwarded to one of the DNS servers set for the particular Internet link (usually DNS servers assigned by the ISP). -
Page 104
Chapter 8 Configuration of network services Time period for keeping DNS logs in the cache is specified individually in each log (usually 24 hours). Use of DNS also speeds up activity of the built-in proxy server (see chapter 8.4). Clear cache Click this button to remove all records in the DNS Forwarder’s cache (regardless of their lifetime). -
Page 105
The rule can be defined for: DNS name — queries requiring names of computers will be forwarded to this DNS server (so called A queries) a subnet — queries requiring IP addresses of the particular domain will be forwarded to the DNS server (reverse domain — PTR queries) Rules can be reordered by arrow buttons. -
Page 106
Chapter 8 Configuration of network services The Name DNS query option allows specification of a rule for name queries. Use the If the queried name matches entry to specify a corresponding DNS name (name of a host in the domain). It is usually desirable to forward queries to entire domains rather than to specific names. -
Page 107
names. When any DNS query is received, this file will be checked first to find out whether the desired name or IP address is included. If not, the query is forwarded to a DNS server. If this function is on, DNS Forwarder follows the same rule. Use the Edit button to open a special editor where the hosts file can be edited within the Administration Console even if this console is connected to WinRoute remotely (from another host). -
Page 108: Dhcp Server
Chapter 8 Configuration of network services Example The local domain’s name is company.com. The host called john is configured so as to obtain an IP address from the DHCP server. After the operating system is started the host sends to the DHCP server a query with the information about its name (john). The DHCP server assigns the host IP address 192.168.1.56.
-
Page 109
DHCP Server Configuration To configure the DHCP server in WinRoute go to Configuration define IP scopes, reservations or optional parameters, and view information about occupied IP addresses or statistics of the DHCP server. The DHCP server can be enabled/disabled using the DHCP Server enabled option (at the top). Configuration can be modified even when the DHCP server is disabled. -
Page 110
Chapter 8 Configuration of network services Figure 8.6 DHCP server — default DHCP parameters DNS server Any DNS server (or multiple DNS servers separated by semicolons) can be defined. We recommend you to use DNS Forwarder in WinRoute as the primary server (first in the list) —… -
Page 111
First address, Last address First and last address of the new scope. Note: If possible, we recommend you to define the scope larger than it would be defined for the real number of users within the subnet. Subnet mask Mask of the appropriate subnet. It is assigned to clients together with the IP address. Note: The Administration Console application monitors whether first and last address belong to the subnet defined by the mask. -
Page 112
Chapter 8 Configuration of network services Example In 192.168.1.0 subnet you intend to create two scopes: to 192.168.1.49 and from 192.168.1.61 to 192.168.1.100. 192.168.1.50 to 192.168.1.60 will be left free and can be used for other purposes. Create the scope from 192.168.1.10 to 192.168.1.100 and click on the Exclusions but- ton to define the scope from 192.168.1.50 to 192.168.1.60. -
Page 113
To view configured DHCP parameters and their values within appropriate IP scopes see the right column in the Address Scope tab. Note: Simple DHCP server statistics are displayed at the right top of the Address Scope tab. Each scope is described with the following items: total number of addresses within this scope number and percentage proportion of leases number and percentage proportion of free addresses… -
Page 114
Chapter 8 Configuration of network services Figure 8.11 DHCP server — reserving an IP address Any IP address included in a defined subnet can be reserved. This address can but does not have to belong to the scope of addresses dynamically leased, and it can also belong to any scope used for exceptions. -
Page 115
Leases IP scopes can be viewed in the Leases tab. These scopes are displayed in the form of trees. All current leases within the appropriate subnet are displayed in these trees. Figure 8.12 DHCP server — list of leased and reserved IP addresses Note: Icon color represents address status (see below). -
Page 116
Chapter 8 Configuration of network services Data about expired and released addresses are kept by the DHCP server and can be used later if the same client demands a lease. If free IP addresses are lacked, these addresses can be leased to other clients. Declined addresses are handled according to the settings in the Options tab (see below). -
Page 117
Warning DHCP server cannot assign addresses to RAS clients connecting to the RAS server directly at the WinRoute host (for technical reasons, it is not possible to receive DHCP queries from the local RAS server). For such cases, it is necessary to set assigning of IP addresses in the RAS server configuration. -
Page 118: Dynamic Dns For Public Ip Address Of The Firewall
Chapter 8 Configuration of network services 8.3 Dynamic DNS for public IP address of the firewall Kerio WinRoute Firewall provides (among others) services for remote access from the Internet to the local network (VPN server — see chapter chapter 24). Also other services can be accessible from the Internet — e.g. the WinRoute’s web interface (see chapter 21), remote administration of WinRoute by the Administration Console (see chapter16.1) or any other service (e.g.
-
Page 119
Dynamic DNS records use very short time-to-live (TTL) and, therefore, they are kept in cache of other DNS servers or forwarders for a very short time. Probability that the client receives DNS response with an invalid (old) IP address is, therefore, very low. Some DDNS servers also allow concurrent update of more records. -
Page 120: Proxy Server
Chapter 8 Configuration of network services Once this information is defined, it is recommended to test update of dynamic DNS record by clicking on Update now. This verifies that automatic update works well (the server is available, set data is correct, etc.) and also updates the corresponding DNS record (IP address of the firewall could have changed since the registration or the last manual update).
-
Page 121
Proxy Server Configuration To configure proxy server parameters open the Proxy server tab in Configuration Filtering HTTP Policy. Enable non-transparent proxy server This option enables the HTTP proxy server in WinRoute on the port inserted in the Port entry (3128 port is set by the default). Warning If you use a port number that is already used by another service or application, WinRoute will accept this port, however, the proxy server will not be able to run and the following… -
Page 122
Chapter 8 Configuration of network services Enable connection to any TCP port This security option enables to allow or block so called tunneling of other application protocols (than HTTP, HTTPS and FTP) via the proxy server. If this option is disabled, the proxy server allows to establish connection only to the standard HTTPS port 443) —… -
Page 123: Http Cache
Allow browsers to use configuration script automatically… It is possible to let Internet Explorer be configured automatically by the DHCP server. To set this, enable the Automatically detect settings option. WinRoute’s DHCP server must be running (see chapter 8.2), otherwise the function will not work.
-
Page 124
Chapter 8 Configuration of network services Cache directory Directory that will be used to store downloaded objects. The cache file under the direc- tory where WinRoute is installed is used by default. Warning Changes in this entry will not be accepted unless the WinRoute Firewall Engine is restarted. -
Page 125
startup, the WinRoute Firewall Engine detects that the cache size exceeds 2047 MB, the size is changed to the allowed value automatically. If the maximum cache size set is larger than the free space on the corresponding disk, the cache is not initialized and the following error is recorded in the Error log (see chapter 22.8). -
Page 126
Chapter 8 Configuration of network services Note: Clients can always require a check for updates from the Web server (regardless of the cache settings). Use combination of the Ctrl and the F5 keys to do this using either the Internet Explorer or the Firefox/SeaMonkey browser. -
Page 127
TTL of objects matching with the particular URL. The 0 days, 0 hours option means that objects will not be cached. Cache status and administration WinRoute allows monitoring of the HTTP cache status as well as manipulation with objects in the cache (viewing and removing). -
Page 128
Chapter 8 Configuration of network services Example Search for the * ker?o * string lists all objects with URL matching the specification, such as kerio, kerbo, etc. Each line with an object includes URL of the object, its size in bytes (B) and number of hours representing time left to the expiration. -
Page 129
8.5 HTTP cache… -
Page 130: Bandwidth Limiter
Chapter 9 Bandwidth Limiter The main problem of shared Internet connection is when one or more users download or upload big volume of data and occupy great part of the line connected to the Internet (so called bandwidth). The other users are ten limited by slower Internet connection or also may be affected by failures of certain services (e.g.
-
Page 131
9.2 Bandwidth Limiter configuration Figure 9.1 Bandwidth Limiter configuration The Bandwidth Limiter module enables to define reduction of speed of incoming traffic (i.e. from the Internet to the local network) and of outgoing data (i.e. from the local network to the Internet) for transmissions of big data volumes and for users with their quota exceeded. -
Page 132
Chapter 9 Bandwidth Limiter services if too much big data volumes are transferred). If they are lower, full line capacity is often not employed. Warning For optimal configuration, it is necessary to operate with real capacity of the line. This value may differ from the information provided by ISP. -
Page 133
9.2 Bandwidth Limiter configuration Figure 9.2 Bandwidth Limiter — network services Figure 9.3 Bandwidth Limiter — selection of network services IP Addresses and Time Interval It may be also helpful to apply bandwidth limiter only to certain hosts (for example, it may be undesired to limit a mailserver in the local network or communication with the corporate web server located in the Internet). -
Page 134
Chapter 9 Bandwidth Limiter addresses across the local network and the Internet. Where user workstations use fixed IP addresses, it is also possible to apply this function to individual users. It is also possible to apply bandwidth limiter to a particular time interval (e.g. in work hours). -
Page 135: Detection Of Connections With Large Data Volume Transferred
cally. With exception of special conditions (testing purposes) it is highly recommended not to change the default values! Figure 9.5 Bandwidth Limiter — setting parameters for detection of large data volume transfers For detailed description of the detection of large data volume transmissions, refer to chapter 9.3.
-
Page 136
Chapter 9 Bandwidth Limiter Examples: The detection of connections transferring large data volumes will be better understood through the following examples. The default configuration of the detection is as follows: at least 200 KB of data must be transferred while there is no interruption for 5 sec or more. The connection at figure transfer of the third load of data. -
Page 137: User Authentication
Chapter 10 User Authentication WinRoute allows administrators to monitor connections (packet, connection, Web pages or FTP objects and command filtering) related to each user. The username in each filtering rule represents the IP address of the host(s) from which the user is connected (i.e. all hosts the user is currently connected from).
-
Page 138
Chapter 10 User Authentication from the IP address. However, users may authenticate from other hosts (using the methods described above). IP addresses for automatic authentication can be set during definition of user account (see chapter 15.1). Note: This authentication method is not recommended for cases where hosts are used by multiple users (user’s identity might be misused easily). -
Page 139
Redirection to the authentication page If the Always require users to be authenticated when accessing web pages option is en- abled, user authentication will be required for access to any website (unless the user is already authenticated). The method of the authentication request depends on the method used by the particular browser to connect to the Internet: Direct access —… -
Page 140
Chapter 10 User Authentication available for other operating systems. For details, refer to chapter 25.2. Automatically logout users when they are inactive Timeout is a time interval (in minutes) of allowed user inactivity. When this period ex- pires, the user is automatically logged out from the firewall. The default timeout value is 120 minutes (2 hours). -
Page 141: Web Interface
Chapter 11 Web Interface WinRoute contains a special Web server that can be used for several purposes, such as an interface for viewing of statistics (Kerio StaR) and setting of certain user account parameters. This Web server is available over SSL or using standard HTTP with no encryption (both versions include identical pages).
-
Page 142
Chapter 11 Web Interface Figure 11.1 Configuration of WinRoute’s Web Interface Enable secured Web Interface (HTTPS) Use this option to open the secured version (HTTPS) of the Web interface The default port for this interface is 4081. WinRoute server name Server DNS name that will be used for purposes of the Web interface (e.g. -
Page 143
Advanced parameters for the Web interface can be set upon clicking on the Advanced button. Configuration of ports of the Web Interface Use the TCP ports section to set ports for unencrypted and encrypted versions of the Web interface (default ports are 4080 for the unencrypted and 4081 for the encrypted version of the Web interface). -
Page 144
Chapter 11 Web Interface SSL Certificate for the Web Interface The principle of an encrypted WinRoute Web interface is based on the fact that all communi- cation between the client and server is encrypted to protect it from wiretapping and misuse of the transmitted data. -
Page 145
11.1 Web Interface Parameters Configuration Figure 11.3 SSL certificate of WinRoute’s Web interface Figure 11.4 Creating a new “self-signed” certificate for WinRoute’s Web interface A new (self-signed) certificate is unique. It is created by your company, addressed to your company and based on the name of your server. Unlike the testing version of the certificate, this certificate ensures your clients security, as it is unique and the identity of your server is guaranteed by it. -
Page 146: User Logon And Logout
Chapter 11 Web Interface Verisign, Thawte, SecureSign, SecureNet, Microsoft Authenticode, etc.). To import a certificate, open the certificate file ( * .crt) and the file including the correspond- ing private key ( * .key). These files are stored in sslcert under the WinRoute’s installation directory.
-
Page 147
Primary domain — missing domain is acceptable in the name specification (e.g. jsmith), but it is also possible to include the domain (e.g. jsmith@company.com), Other domains — the name specified must include the domain (e.g. drdolittle@usoffice.company.com). If none or just one Active Directory domain is mapped, all users can authenticate by their usernames without the domain specified. -
Page 148
Chapter 11 Web Interface Hint URL for user logout from the firewall can be added to the web browser’s toolbar as a link. User can use this “button” for quick logout. User password authentication If an access to the web interface is attempted when an authentication from the particular host is still valid (the user has not logged out and the timeout for idleness has not expired —… -
Page 149: Status Information And User Statistics
11.3 Status information and user statistics On the Status tab, the following information is provided: User and firewall information The page header provides user’s name or their username as well as the firewall’s DNS name or IP address. Transfer Quota Statistics The upper section of the Status page provides information on the data volume having been transferred by the moment in both directions (download, upload) for the particular day (today), week and month.
-
Page 150: User Preferences
Chapter 11 Web Interface 11.4 User preferences The Preferences tab allows setting of custom web content filtering and preferred language for the web interface. If user account is created in the WinRoute’s internal database (see chap- ter 15), user can use preferences also to change password. Content filtering options The upper section of the page enables to permit or deny particular items of web pages.
-
Page 151
This option will block the window.open() method in JavaScript. Cross-domain referer — blocking of the Referer items in HTTP headers. This item includes pages that have been viewed prior to the current page. The Cross-domain referer option blocks the Referer item in case this item does not match the required server name. -
Page 152
Chapter 11 Web Interface Figure 11.10 Editing user password Warning Passwords can be changed only if the user is configured in the WinRoute internal database (see chapter 15.1). If another authentication method used, the WinRoute Firewall Engine will not be allowed to change the password. In such a case, the Change password section is not even displayed in the Preferences page. -
Page 153: Dial-Up
Note: Language settings affect also the format of displaying date and numbers in the web interface. 11.5 Dial-up Users allowed to dial RAS connections (see chapter 15.1) can dial and hang up individual RAS links and view their status on the Dial-up lines tab. This tab lists all dial-up lines defined in WinRoute regardless of groups where they belong (for details, see chapter 5).
-
Page 154: Http And Ftp Filtering
Chapter 12 HTTP and FTP filtering WinRoute provides a wide range of features to filter traffic using HTTP and FTP protocols. These protocols are the most spread and the most used in the Internet. Here are the main purposes of HTTP and FTP content filtering: to block access to undesirable Web sites (i.e.
-
Page 155: Conditions For Http And Ftp Filtering
12.1 Conditions for HTTP and FTP filtering For HTTP and FTP content filtering, the following conditions must be met: Traffic must be controlled by an appropriate protocol inspector. An appropriate protocol inspector is activated automatically unless its use is denied by traffic rules.
-
Page 156
Chapter 12 HTTP and FTP filtering Rules in this section are tested from the top of the list downwards (you can order the list entries using the arrow buttons at the right side of the dialog window). If a requested URL passes through all rules without any match, access to the site is allowed. -
Page 157
Open the General tab to set general rules and actions to be taken. Description Description of the rule (information for the administrator). If user accessing the URL is Select which users this rule will be applied on: any user — for all users (no authentication required). selected user(s) —… -
Page 158
Chapter 12 HTTP and FTP filtering for example a rule allowing access to certain pages without authentication can be defined. Unless authentication is required, the do not require authentication option is ineffective. selected user(s) — applied on selected users or/and user groups. Click on the Set button to select users or groups (hold the Ctrl and the Shift keys to select more that one user /group at once). -
Page 159
Go to the Advanced tab to define more conditions for the rule or/and to set options for denied pages. Valid at time interval Selection of the time interval during which the rule will be valid (apart from this inter- val the rule will be ignored). Use the Edit button to edit time intervals (for details see chapter 14.2). -
Page 160
Chapter 12 HTTP and FTP filtering Denial options Advanced options for denied pages. Whenever a user attempts to open a page that is denied by the rule, WinRoute will display: A page informing the user that access to the required page is denied as it is blocked by the firewall. -
Page 161
Figure 12.4 Options for Websites with content meeting a URL rule Deny Web pages containing … Use this option to deny users to access Web pages containing words/strings defined on the Forbidden Words tab in the Configuration/Content Filtering For detailed information on forbidden words, see chapter 12.5. Scan content for viruses according to scanning rules Antivirus check according to settings in the Configuration section will be performed (see chapter 13.3) if this option is enabled. -
Page 162: Global Rules For Web Elements
Chapter 12 HTTP and FTP filtering 12.3 Global rules for Web elements In WinRoute you can also block certain features contained in HTML pages. Typical undesirable items are ActiveX objects (they might enable starting of applications on client hosts) and pop- up windows (automatically opened browser windows, usually used for advert purposes).
-
Page 163: Content Rating System (Iss Orangeweb Filter)
Allow <applet> HTML tags HTML <applet> tags (Java Applet) Allow cross-domain referer This option enables/disables the Referer item included in an HTTP header. The Referer item includes pages that have been viewed prior to the current page. If the Allow inter-domain referer is off, Referer items that include a server name different from the current HTTP request will be blocked.
-
Page 164
Chapter 12 HTTP and FTP filtering in the ISS OrangeWeb Filter tab will not be available). For detailed information about the licensing policy, read chapter 44. The firewall’s traffic rules must not block access to ISS OrangeWeb Filter’s database servers. If, for any reason, access from the firewall to the Internet is restricted, it is necessary to allow access to the COFS service (6000/TCP). -
Page 165
server name (e.g. www.kerio.com). Server name represents any URL at a corre- sponding server. a particular URL (e.g. www.kerio.com/index.html). It is not necessary to in- clude protocol specification (http://) . URL using wildcard matching (e.g. * .ker?o. * ). An asterisk stands for any num- ber of characters (even zero), a * .ker?o. -
Page 166
Chapter 12 HTTP and FTP filtering On the URL Rules tab in Configuration Content Filtering HTTP Rules, define a rule by using image 12.8 as guidance: Figure 12.8 ISS OrangeWeb Filter rule The is rated by ISS OrangeWeb Filter rating system is considered the key parameter. The URL of each opened page will be rated by the ISS OrangeWeb Filter module. -
Page 167: Web Content Filtering By Word Occurrence
Note: You can define multiple URL rules that will use the ISS OrangeWeb Filter rating technology. Multiple categories may be used for each rule. We recommend you to unlock rules that use the ISS OrangeWeb Filter rating system (the Users can Unlock this rule option in the Advanced tab). This option will allow users to unlock pages blocked for incorrect classification.
-
Page 168
Chapter 12 HTTP and FTP filtering Warning Definition of forbidden words and treshold value is ineffective unless corresponding URL rules are set! Definition of rules filtering by word occurrence First, suppose that some forbidden words have been already defined and a treshold value has been set (for details, see below). -
Page 169
On the Content Rules tab, check the Deny Web pages containing… option to enable filtering by word occurrence. Figure 12.11 A rule filtering web pages by word occurrence (word filtering) Word groups To define word groups go to the Word Groups tab in Configuration HTTP Policy, the Forbidden Words tab. -
Page 170
Chapter 12 HTTP and FTP filtering Individual groups and words included in them are displayed in form of trees. To enable filtering of particular words use checkboxes located next to them. Unchecked words will be ignored. Due to this function it is not necessary to remove rules and define them again later. Note: The following word groups are predefined in the default WinRoute installation: Pornography —… -
Page 171: Ftp Policy
Weight Word weight the level of how the word affects possible blocking or allowing of access to websites. The weight should respect frequency of the particular word in the language (the more common word, the lower weight) so that legitimate webpages are not blocked. Description A comment on the word or group.
-
Page 172
Chapter 12 HTTP and FTP filtering FTP Rules Definition To create a new rule, select a rule after which the new rule will be added, and click Add. You can later use the arrow buttons to reorder the rule list. Checking the box next to the rule can be used to disable the rule. -
Page 173
Open the General tab to set general rules and actions to be taken. Description Description of the rule (information for the administrator). If user accessing the FTP server is Select which users this rule will be applied on: any user — the rule will be applied on all users (regardless whether authenticated on the firewall or not). -
Page 174
Chapter 12 HTTP and FTP filtering Go to the Advanced tab to define other conditions that must be met for the rule to be applied and to set advanced options for FTP communication. Valid at time interval Selection of the time interval during which the rule will be valid (apart from this inter- val the rule will be ignored). -
Page 175
12.6 FTP Policy Scan content for viruses according to scanning rules Use this option to enable/disable scanning for viruses for FTP traffic which meet this rule. This option is available only for allowing rules — it is meaningless to apply antivirus check to denied traffic. -
Page 176: Antivirus Control
Chapter 13 Antivirus control WinRoute provides antivirus check of objects (files) transmitted by HTTP, FTP, SMTP and POP3 protocols. In case of HTTP and FTP protocols, the WinRoute administrator can specify which types of objects will be scanned. WinRoute is also distributed in a special version which includes integrated McAfee antivirus. Besides the integrated antivirus, WinRoute supports several antivirus programs developed by various companies, such as Eset Software, Grisoft, F-Secure, etc.).
-
Page 177: How To Choose And Setup Antiviruses
local network — incoming email at the local SMTP server). Check of outgoing traffic causes problems with temporarily undeliverable email. For details, see chapter 13.4. Object transferred by other than HTTP, FTP, SMTP and POP3 protocols cannot be checked by an antivirus. If a substandard port is used for the traffic, corresponding protocol inspector will not be applied automatically.
-
Page 178
Chapter 13 Antivirus control Use the Integrated antivirus engine section in the Antivirus tab to set update parameters for McAfee. Figure 13.2 Antivirus selection (integrated antivirus) Check for update every … hours Time interval of checks for new updates of the virus database and the antivirus engine (in hours). -
Page 179
Last update check performed … ago Time that has passed since the last update check. Virus database version Database version that is currently used. Scanning engine version McAfee scanning engine version used by WinRoute. Update now Use this button for immediate update of the virus database and of the scanning engine. After you run the update check using the Update now… -
Page 180
Chapter 13 Antivirus control Use the Options button to set advanced parameters for the selected antivirus. Dialogs for in- dividual antiviruses differ (some antivirus programs may not require any additional settings). For detailed information about installation and configuration of individual antivirus programs, refer to http://www.kerio.com/kwf. -
Page 181: Http And Ftp Scanning
network send their email via an SMTP server located in the Internet. Checking of outgoing SMTP traffic is not apt for local SMTP servers sending email to the Internet. An example of a traffic rule for checking of outgoing SMTP traffic is shown at figure 13.6. Figure 13.6 An example of a traffic rule for outgoing SMTP traffic check Substandard extensions of the SMTP protocol can be used in case of communication of two Microsoft Exchange mailservers.
-
Page 182
Chapter 13 Antivirus control To set parameters of HTTP and FTP antivirus check, open the HTTP, FTP scanning tab in Configuration Content Filtering Figure 13.7 Settings for HTTP and FTP scanning Use the If a virus is found… entry to specify actions to be taken whenever a virus is detected in a transmitted file: Move the file to quarantine —… -
Page 183
Warning When handling files in the quarantine directory, please consider carefully each action you take, otherwise a virus might be activated and the WinRoute host could be attacked by the virus! Alert the client — WinRoute alerts the user who attempted to download the file by an email message warning that a virus was detected and download was stopped for security reasons. -
Page 184
Chapter 13 Antivirus control Scanning rules are ordered in a list and processed from the top. Arrow buttons on the right can be used to change the order. When a rule which matches the object is found, the appropriate action is taken and rule processing is stopped. New rules can be created in the dialog box which is opened after clicking the Add button. -
Page 185: Email Scanning
Action Settings in this section define whether or not the object will be scanned. If the Do not scan alternative is selected, antivirus control will not apply to transmission of this object. The new rule will be added after the rule which had been selected before Add was clicked. You can use the arrow buttons on the right to move the rule within the list.
-
Page 186
Chapter 13 Antivirus control Advanced parameters and actions that will be taken when a virus is detected can be set in the Email scanning tab. Figure 13.9 Settings for SMTP and POP3 scanning In the Specify an action which will be taken with attachments… section, the following actions can be set for messages considered by the antivirus as infected: Move message to quarantine —… -
Page 187: Scanning Of Files Transferred Via Clientless Ssl-Vpn
Note: Regardless of what action is set to be taken, the attachment is always removed and a warning message is attached instead. Use the TLS connections section to set firewall behavior for cases where both mail client and the server support TLS-secured SMTP or POP3 traffic. In case that TLS protocol is used, unencrypted connection is established first.
-
Page 188
Chapter 13 Antivirus control Figure 13.10 Settings for scanning of files transferred via Clientless SSL-VPN Transfer directions Use the top section of the SSL-VPN Scanning tab to set to which transfer direction the antivirus check will be applied. By default, only files downloaded from a remote client to a local host are scanned to avoid slowdown (local network is treated as trustworthy). -
Page 189: Definitions
Chapter 14 Definitions 14.1 IP Address Groups IP groups are used for simple access to certain services (e.g. WinRoute’s remote administration, Web server located in the local network available from the Internet, etc.). When setting access rights a group name is used. The group itself can contain any combination of computers (IP addresses), IP address ranges, subnets or other groups.
-
Page 190: Time Intervals
Chapter 14 Definitions Type Type of the new item: Host (IP address or DNS name of a particular host), Network / Mask (subnet with a corresponding mask), IP range (an interval of IP addresses defined by starting and end IP address in- cluding the both limit values), Address group (another group of IP addresses —…
-
Page 191
Time range types When defining a time interval three types of time ranges (subintervals) can be used: Absolute The time interval is defined with the initial and expiration date and it is not repeated Weekly This interval is repeated weekly (according to the day schedule) Daily It is repeated daily (according to the hour schedule) Defining Time Intervals… -
Page 192: Services
Chapter 14 Definitions Valid at days Defines days when the interval will be valid. You can either select particular weekdays (Selected days) or use one of the predefined options (All Days, Weekday — from Monday to Friday, Weekend — Saturday and Sunday). Note: Each time range must contain at least one item.
-
Page 193
Clicking on the Add or the Edit button will open a dialog for service definition. Name Service identification within WinRoute. It is strongly recommended to use a concise name to keep the program easy to follow. Figure 14.5 WinRoute’s network services Figure 14.6 Network service definition 14.3 Services… -
Page 194
Chapter 14 Definitions Description Comments for the service defined. It is strongly recommended describing each definition, especially with non-standard services so that there will be minimum confusion when referring to the service at a later time. Protocol The communication protocol used by the service. Most standard services uses the TCP or the UDP protocol, or both when they can be defined as one service with the TCP/UDP option. -
Page 195
Any — all the ports available (1-65535) Equal to —a particular port (e.g.80) Greater than, Less than — all ports with a number that is either greater or less than the number defined Not equal to — all ports that are not equal to the one defined In range —… -
Page 196: Url Groups
Chapter 14 Definitions Note: Generally, protocol inspectors cannot be applied to secured traffic (SSL/TLS). In this case, WinRoute “perceives” the traffic as binary data only. This implies that such traffic cannot be deciphered. Under certain circumstances, appliance of a protocol inspector is not desirable. There- fore, it is possible to disable a corresponding inspector temporarily.
-
Page 197
Search engines — top Internet search engines. Windows Updates — URL of pages requested for automatic updates of Windows. These URL groups are used in predefined URL rules (see chapter 12.2). WinRoute administra- tors can use predefined groups in their custom rules or/and edit them if needed. Click on the Add button to display a dialog where a new group can be created or a new item can be added to existing groups. -
Page 198
Chapter 14 Definitions Examples: www.kerio.com/index.html — a particular page www. * — all URL addresses starting with www. www. * www.kerio.com — all URLs at the www.kerio.com server (this string is equal to the www.kerio.com/ * string) * sex * — all URL addresses containing the sex string * sex??.cz * —… -
Page 199: User Accounts And Groups
Chapter 15 User Accounts and Groups User accounts in WinRoute improve control of user access to the Internet from the local net- work. User accounts can be also used to access the WinRoute administration using the Admin- istration Console. WinRoute supports several methods of user accounts and groups saving, combining them with various types of authentication, as follows: Internal user database User accounts and groups and their passwords are saved in WinRoute.
-
Page 200: Viewing And Definitions Of User Accounts
Chapter 15 User Accounts and Groups Transparent cooperation with Active Directory (Active Directory mapping) WinRoute can use accounts and groups stored in Active Directory directly — no import to the local database is performed. Specific WinRoute parameters are added by the template of the corresponding account.
-
Page 201
The searching is helpful especially when the domain includes too many accounts which might make it difficult to look up particular items. Hiding / showing disabled accounts It is possible to disable accounts in WinRoute. Check the Hide disabled user accounts to show only active (enabled) accounts. -
Page 202: Local User Accounts
Chapter 15 User Accounts and Groups Note: It is also possible to select more than one account by using the Ctrl and Shift keys to perform mass changes of parameters for all selected accounts. In mapped Active Directory domains, it is not allowed to create or/and remove user accounts. These actions must be performed in the Active Directory database on the relevant domain server.
-
Page 203
15.2 Local user accounts Figure 15.2 Local user accounts in WinRoute Step 1 — basic information Figure 15.3 Creating a user account — basic parameters Name Username used for login to the account. -
Page 204
Chapter 15 User Accounts and Groups Warning The user name is not case-sensitive. We recommend not to use special characters (non- English languages) which might cause problems when authenticating at the Web interface or the SSL-VPN interface. Full Name A full name of the user (usually first name and surname). Description User description (e.g. -
Page 205
Warning Passwords may contain printable symbols only (letters, numbers, punctuation marks). Password is case-sensitive. We recommend not to use special characters (non-English languages) which might cause problems when authenticating via the Web interface. NTLM authentication cannot be used for automatic authentication method by NTLM (refer to chapter 25.2).. -
Page 206
Chapter 15 User Accounts and Groups Step 3 — access rights Figure 15.5 Creating a new user account — user rights Each user must be assigned one of the following three levels of access rights. No access to administration The user has no rights to access the WinRoute administration. This setting is commonly used for the majority of users. -
Page 207
is displayed. The unlock feature must also be enabled in the corresponding URL rule (for details, refer to chapter 12.2). User can dial RAS connection If the Internet connection uses dial-up lines, users with this right will be allowed to dial and hang up these lines in the Web interface (see chapter 11). -
Page 208
Chapter 15 User Accounts and Groups Figure 15.6 Creating a new user account — data transmission quota Check the Notify user by email when quota is exceeded option to enable sending of warn- ing messages to the user in case that a quota is exceeded. A valid email address must be specified for the user (see Step 1). -
Page 209
Don’t block further traffic mode resetting of the data volume counter of the user (see chapter 20.1). Actions for quota-exceeding are not applied if the user is authenticated at the firewall. This would block all firewall traffic as well as all local users. However, transferred data is included in the quota! Hint Data transfer quota and actions applied in response can also be set by a user account template. -
Page 210
Chapter 15 User Accounts and Groups set by using user’s web browser preferences, language set as preferred for the previous user’s login to the web interface will be used. If the user has not logged into the web interface before, alerts will be in English. -
Page 211: Local User Database: External Authentication And Import Of Accounts
15.3 Local user database: external authentication and import of accounts Automatic login can be set for the firewall (i.e. for the WinRoute host) or/and for any other host(s) (i.e. when the user connects also from an additional workstation, such as notebooks, etc.).
-
Page 212
Chapter 15 User Accounts and Groups Active Directory Use the Enable Active Directory authentication option to enable/disable user authentication at the local database in the selected Active Directory domain. The following conditions must be met to enable smooth functionality of user authentication through Active Directory: The WinRoute host must be a member of this domain. -
Page 213
15.3 Local user database: external authentication and import of accounts Figure 15.10 Configuration of automatic import of user accounts from Active Directory The other option (specification of a controller) is recommended for domains with one server only (speeds the process up). It is also necessary to enter login data of a user with read rights for the Active Directory database (any user account belonging to the corresponding domain). -
Page 214: Active Directory Domains Mapping
Chapter 15 User Accounts and Groups domain type, specify the following parameters: NT domain — domain name is required for import. The WinRoute host must be a mem- ber of this domain. Figure 15.11 Importing accounts from the Windows NT domain Active Directory —…
-
Page 215
Note: The Windows NT domain cannot be mapped as described. In case of the Windows NT domain, it is recommended to import user accounts to the local user database (refer to 15.3). Domain mapping requirements The following conditions must be met to enable smooth functionality of user authentication through Active Directory domains: For mapping of one domain: The WinRoute host must be a member of the corresponding Active Directory do-… -
Page 216
Chapter 15 User Accounts and Groups Domain Access In the Domain Access section, specify the login user name and password of an account with read rights for the Active Directory database (any user account within the domain can be used, unless blocked). Click Advanced to set parameters for communication with domain servers: It is possible to let WinRoute connect automatically to a specified server or to search for a domain server. -
Page 217
Figure 15.14 Advanced settings for access to the Active Directory NT authentication support For the Active Directory domain, NTLM is also available as an authentication method. This option is required if you intend to use automatic authentication in web browsers (see chapter 25.2). -
Page 218
Chapter 15 User Accounts and Groups One domain is always set as primary. In this domain, all user accounts where the domain is not specified, will be searched (e.g. jsmith). Users of other domains must login by username including the domain (e.g. drdolittle@usoffice.company.com). Use the Add or the Edit button to define a new domain. -
Page 219: User Groups
The following operations will be performed automatically within each conversion: substitution of any appearance of the local account in the WinRoute configuration (in traffic rules, URL rules, FTP rules, etc.) by a corresponding account from the Active Directory domain, removal of the account from the local user database. Accounts not selected for the conversion are kept in the local database (the collision is still reported).
-
Page 220
Chapter 15 User Accounts and Groups Domain Use the Domain option to select a domain for which user accounts or other parameters will be defined. This item provides a list of mapped Active Directory domains (see chap- ter 15.4) and the local user database. In WinRoute, it is possible to create groups only in the local user database. -
Page 221
15.5 User groups Step 2 — group members Figure 15.19 Creating a user group — adding user accounts to the group Using the Add and Remove buttons you can add or remove users to/from the group. If user accounts have not been created yet, the group can be left empty and users can be added during the account definition (see chapter 15.1). -
Page 222
Chapter 15 User Accounts and Groups The group must be assigned one of the following three levels of access rights: No access to administration Users included in this group cannot access the WinRoute administration. Read only access Users included in this group can access the WinRoute administration. However, they can only read the records and settings and they are not allowed to edit them. -
Page 223: Remote Administration And Update Checks
Chapter 16 Remote Administration and Update Checks 16.1 Setting Remote Administration Remote administration can be either permitted or denied by definition of the appropriate traffic rule. Traffic between WinRoute and Administration Console is performed by TCP and UDP protocols over port 44333. The definition can be done with the predefined service KWF Admin.
-
Page 224: Update Checking
Chapter 16 Remote Administration and Update Checks Hint The same method can be used to enable or disable remote administration of Kerio MailServer through WinRoute (the KMS Admin service can be used for this purpose). Note: Be very careful while defining traffic rules, otherwise you could block remote adminis- tration from the host you are currently working on.
-
Page 225
Check for new versions Use this option to enable/disable automatic checks for new versions. Checks are per- formed: 2 minutes after each startup of the WinRoute Firewall Engine, and then every 24 hours. Results of each attempted update check (successful or not) is logged into the Debug log (see chapter 22.6). -
Page 226
Chapter 16 Remote Administration and Update Checks Figure 16.3 Administration Console’s welcome page informing that a new version is available… -
Page 227: Advanced Security Features
Chapter 17 Advanced security features 17.1 P2P Eliminator Peer-to-Peer (P2P) networks are world-wide distributed systems, where each node can repre- sent both a client and a server. These networks are used for sharing of big volumes of data (this sharing is mostly illegal). DirectConnect and Kazaa are the most popular ones. In addition to illegal data distribution, utilization of P2P networks overload lines via which users are connected to the Internet.
-
Page 228
Chapter 17 Advanced security features Figure 17.1 Detection settings and P2P Eliminator Check the Inform user by email option if you wish that users at whose hosts P2P networks are detected will be warned and informed about actions to be taken (blocking of all traffic / allowance of only certain services and length of the period for which restrictions will be ap- plied). -
Page 229
Note: If a user who is allowed to use P2P networks (see chapter 15.1) is connected to the fire- wall from a certain host, no P2P restrictions are applied to this host. Settings in the P2P Eliminator tab are always applied to unauthorized users. Information about P2P detection and blocked traffic can be viewed in the Status users section (for details, refer to chapter 19.1). -
Page 230: Special Security Settings
Chapter 17 Advanced security features Number of suspicious connections Big volume of connections established from the client host is a typical feature of P2P networks (usually one connection for each file). The Number of connections value defines maximal number of client’s network connections that must be reached to consider the traffic as suspicious.
-
Page 231
Figure 17.4 Security options — Anti-Spoofing and cutting down number of connections for one host Anti-Spoofing Anti-Spoofing checks whether only packets with allowed source IP addresses are received at individual interfaces of the WinRoute host. This function protects WinRoute host from attacks from the internal network that use false IP addresses (so called spoofing). -
Page 232
Chapter 17 Advanced security features Connections count limit is useful especially when a local client host is attacked by a worm or Trojan horse which attempts to establish connections to larger number of various servers. Connection count limits protects the firewall (the WinRoute host) from flooding and it can reduce undesirable activities by worms and Trojan horses. -
Page 233: Other Settings
Chapter 18 Other settings 18.1 Routing table Using Administration Console you can view or edit the system routing table of the host where WinRoute is running. This can be useful especially to resolve routing problems remotely (it is not necessary to use applications for terminal access, remote desktop, etc.). To view or modify the routing table go to Configuration up-to-date version of the routing table of the operating system including so called persistent routes (routes added by the route -p command).
-
Page 234
Chapter 18 Other settings Warning Changes in the routing table might interrupt the connection between the WinRoute Firewall Engine and the Administration Console. We recommend to check the routing table thoroughly before clicking the Apply button! Route Types The following route types are used in the WinRoute routing table: System routes —… -
Page 235
Definitions of Dynamic and Static Rules Click on the Add (or Edit when a particular route is selected) button to display a dialog for route definition. Network, Network Mask IP address and mask of the destination network. Interface Selection of an interface through which the specific packet should be forwarded. Gateway IP address of the gateway (router) which can route to the destination network. -
Page 236: Universal Plug-And-Play (Upnp)
Chapter 18 Other settings If this option is not enabled, the route will be valid only until the operating system is restarted or until removed manually in the Administration Console or using the route command. Removing routes from the Routing Table Using the Remove button in the WinRoute admin console, records can be removed from the routing table.
-
Page 237
Enable UPnP This option enables UPnP. Warning If WinRoute is running on Windows XP, Windows Server 2003, Windows Vista or Windows Server 2008, check that the following system services are not running before you start the UPnP function: SSDP Discovery Service Universal Plug and Play Device Host If any of these services is running, close it and deny its automatic startup. -
Page 238: Relay Smtp Server
Chapter 18 Other settings 18.3 Relay SMTP server WinRoute provides a function which enables notification to users or/and administrators by email alerts. These alert messages can be sent upon various events, for example when a virus is detected (see chapter 13.3), when a Peer-to-Peer network is detected (refer to chapter 17.1), when an alert function is set for certain events (details in chapter 15.1) or upon reception of an alert (see chapter 19.3).
-
Page 239
be used for reference in recipient’s mail client or for email classification. This is why it is always recommended to specify sender’s email address in WinRoute. Connection test Click Test to test functionality of sending of email via the specified SMTP server. WinRoute sends a testing email message to the specified email address. -
Page 240: Status Information
Chapter 19 Status Information WinRoute activities can be well monitored by the administrator (or by other users with ap- propriate rights). There are three types of information — status monitoring, statistics and logs. Communication of each computer, users connected or all connections using WinRoute can be monitored.
-
Page 241
Figure 19.1 List of active hosts and users connected to the firewall User Name of the user which is connected from a particular host. If no user is connected, the item is empty. Currently Rx, Currently Tx Monitors current traffic speed (kilobytes per second) in both directions (from and to the host —… -
Page 242
Chapter 19 Status Information Connections Total number of connections to and from the host. Details can be displayed in the context menu (see below) Authentication method Authentication method used for the recent user connection: plaintext — user is connected through an insecure login site plaintext SSL —… -
Page 243
User quota Use this option to show quota of the particular user (Administration Console switches to the User quota tab in Status The User quota option is available in the context menu only for hosts from which a user is connected to the firewall. Refresh This option refreshes information in the Active Hosts window immediately (this function is equal to the Refresh button displayed at the bottom of the window). -
Page 244
Chapter 19 Status Information Login information Information on logged-in users: User — name of a user, DNS name (if available) and IP address of the host from which the user is connected Login time — date and time when a user logged-in, authentication method that was used and inactivity time (idle). -
Page 245
FTP — DNS name or IP address of the server, size of downloaded/saved data, information on currently downloaded/saved file (name of the file including the path, size of data downloaded/uploaded from/to this file). Multimedia (real time transmission of video and audio data) — DNS name or IP address of the server, type of used protocol (MMS, RTSP, RealAudio, etc.) and volume of downloaded data. -
Page 246
Chapter 19 Status Information The following columns are hidden by default. They can be shown through the Modify columns dialog opened from the context menu (for details, see chapter 3.2). Source port, Destination port Source and destination port (only for TCP and UDP protocols). Protocol Protocol used for the transmission (TCP, UDP, etc.). -
Page 247: Network Connections Overview
Figure 19.6 Information on selected host and user — traffic histogram Select an item from the Time interval combo box to specify a time period which the chart will refer to (2 hours or 1 day). The x axis of the chart represents time and the y axis represents traffic speed.
-
Page 248
Chapter 19 Status Information connections from other hosts to services provided by the host with WinRoute connections performed by clients within the Internet that are mapped to services run- ning in LAN WinRoute administrators are allowed to close any of the active connections. Note: Connections among local clients will not be detected nor displayed by WinRoute. -
Page 249
Source, Destination IP address of the source (the connection initiator) and of the destination. If there is an appropriate reverse record in DNS, the IP address will be substituted with the DNS name. The following columns are hidden by default. They can be enabled through the Modify columns dialog opened from the context menu (for details, see chapter 3.2). -
Page 250
Chapter 19 Status Information Refresh This option will refresh the information in the Connections window immediately. This function is equal to the function of the Refresh button at the bottom of the window. Auto refresh Settings for automatic refreshing of the information in the Connections window. Informa- tion can be refreshed in the interval from 5 seconds up to 1 minute or the auto refresh function can be switched off… -
Page 251: Alerts
For each item either a color or the Default option can be chosen. Default colors are set in the operating system (the common setting for default colors is black font and white background). Font Color Active connections — connections with currently active data traffic Inactive connections —…
-
Page 252
Chapter 19 Status Information This tab provides list of “rules” for alert sending. Use checking boxes to enable/disable indi- vidual rules. Use the Add or the Edit button to (re)define an alert rule. alert Type of the event upon which the alert will be sent: Virus detected —… -
Page 253
Connection failover event — the Internet connection has failed and the system was switched to a secondary line, or vice versa (it was switched back to the pri- mary line). For details, refer to chapter 6.3. License expiration — expiration date for the corresponding WinRoute li- cense/subscription (or license of any module integrated in WinRoute, such as ISS OrangeWeb Filter, the McAfee antivirus, etc.) is getting closer. -
Page 254
Chapter 19 Status Information (overview), the consoledetails subdirectory — messages displayed at the bottom section of Status Alerts (details), the email subdirectory — messages sent by email (each template contains a message in the plain text and HTML formats), the sms subdirectory — SMS messages sent to a cell phone. In the Administration Console, alerts are displayed in the language currently set as preferred (see Kerio Administration Console —… -
Page 255
Each line provides information on one alert: Date — date and time of the event, Alert — event type, Details — basic information on events (IP address, username, virus name, etc.). Click an event to view detailed information on the item including a text description (defined by templates under consoledetails —… -
Page 256: Basic Statistics
Chapter 20 Basic statistics Statistical information about users (volume of transmitted data, used services, categorization of web pages) as well as of network interfaces of the WinRoute host (volume of transmitted data, load on individual lines) can be viewed in WinRoute. In the Administration Console, it is possible to view basic quota information for individual users (volume of transferred data and quota usage information) and statistics of network interfaces (transferred data, traffic charts).
-
Page 257
Note: Optionally, other columns providing information on volume of data transmitted in indi- vidual time periods in both directions can be displayed. Direction of data transmission is related to the user (the IN direction stands for data received by the user, while OUT represents data sent by the user). -
Page 258: Interface Statistics
Chapter 20 Basic statistics Warning Be aware that using this option for the all users item resets counters of all users, including unrecognized ones! Note: Values of volumes of transferred data are also used to check user traffic quota (see chapter 15.1).
-
Page 259
Example The WinRoute host connects to the Internet through the Public interface and the local network is connected to the LAN interface. A local user downloads 10 MB of data from the Internet. This data will be counted as follows: IN at the Public interface is counted as an IN item (data from the Internet was received through this interface), at the LAN interface as OUT (data was sent to the local network through this interface). -
Page 260
Chapter 20 Basic statistics Reset interface statistics This option resets statistics of the selected interface. It is available only if the mouse pointer is hovering an interface at the moment when the context menu is opened. Refresh This option will refresh the information on the Interface Statistics tab immediately. This function is equal to the function of the Refresh button at the bottom of the window. -
Page 261
20.2 Interface statistics Figure 20.5 Chart informing about average throughput at the interface Example Suppose the 1 day interval is selected. Then, an impulse unit is represented by 5 minutes. This means that every 5 minutes an average traffic speed for the last 5 minutes is recorded in the chart. -
Page 262: Kerio Star — Statistics And Reporting
Chapter 21 Kerio StaR — statistics and reporting The WinRoute’s web interface provides detailed statistics on users, volume of transferred data, visited websites and web categories. This information may help figure out browsing activities and habits of individual users. The statistics monitor the traffic between the local network and the Internet. Volumes of data transferred between local hosts and visited web pages located on local servers are not included in the statistics (also for technical reasons).
-
Page 263
The statistics use data from the main database. This implies that current traffic of individual users is not included in the statistics immediately but when the started period expires and the data is written in the database. Note: Data in the database used for statistics cannot be removed manually (such action would be meaningless). -
Page 264: Settings For Statistics And Quota
Chapter 21 Kerio StaR — statistics and reporting The following example addresses case of a mapped web server accessible from the Internet. Any (anonymous) user in the Internet can connect to the server. However, web servers are usually located on a special machine which is not used by any user. Therefore, all traffic of this server will be accounted for users who are “not logged in”.
-
Page 265
Enable/disable gathering of statistic data The Gather Internet Usage statistics option enables/disables all statistics (i.e. stops gath- ering of data for statistics). The Gather Users’ Activity records option enables gathering of detailed information about activity of individual users (visited web sites, transferred files, etc. — see chapter 21.7). If is not necessary to gather these statistics, it is recommended to disable this option (this reduces demands to the firewall and avoids creating of needless files on the disk). -
Page 266
Chapter 21 Kerio StaR — statistics and reporting Statistics and quota exceptions On the Exceptions tab, it is possible to define exceptions for statistics and for transferred data quota. This feature helps avoid gathering of irrelevant information. Thus, statistics are kept trans- parent and gathering and storage of needless data is avoided. -
Page 267: Connection To Star And Viewing Statistics
For details on IP groups, see chapter 14.1. Users and groups Select users and/or user groups which will be excluded from the statistics and no quota will be applied to them. This setting has the highest priority and overrules any other quota settings in user or group preferences.
-
Page 268
Chapter 21 Kerio StaR — statistics and reporting Note: Within local systems, secured traffic would be useless and the browser would bother user with needless alerts. Remote access to the statistics It is also possible to access the statistics remotely, i.e. from any host which is allowed to connect to the WinRoute host and the web interface’s ports, by using the following methods: If the host is connected to WinRoute by the Administration Console, the Internet Usage Statistics link available under Status… -
Page 269
Warning In case of access via the Internet (i.e. from a remote host) it is recommended to use only the secured version of the web interface. The other option would be too risky. StaR page in the web interface The page is divided into the following tabs: Overall —… -
Page 270: Accounting Period
Chapter 21 Kerio StaR — statistics and reporting Printable version Any page of the StaR interface can be converted to a printable version. For this purpose, use the Print option in the upper toolbar. Figure 21.5 Kerio StaR — toolbar Clicking on Print displays the current StaR page in a new window (or on a new tab) of the browser in a printable format and the browser’s print dialog is opened.
-
Page 271
21.4 Accounting period Figure 21.7 Selection of accounting period Figure 21.8 Custom accounting period The starting and ending day can be defined manually or selected from the thumbnail calendar available upon clicking on the icon next to the corresponding textfield. Note: Under certain circumstances, an information may be reported that this period will be rounded to whole weeks or months. -
Page 272: Overall View
Chapter 21 Kerio StaR — statistics and reporting 21.5 Overall View The Overall tab provides overall statistics for all users within the local network (including anonymous, i.e. unauthenticated users) for the selected accounting period. Traffic by periods The first chart provides information on the volume of data transferred in individual sub- periods of the selected period.
-
Page 273
Top Requested Web Categories This chart shows top five web categories requested in the selected period sorted by the ISS OrangeWeb Filter module. The number in the chart refers to total number of HTTP requests included in the particular category. For technical reasons, it is not possible to recognize whether the number includes requests to a single page or to multiple pages. -
Page 274
Chapter 21 Kerio StaR — statistics and reporting ter 10.1. Hint The way of users’ names are displayed in the table can be set in the Administration Con- sole, in section Accounting, after clicking on the Advanced button (see chapter 21.2). Only full names are shown in charts (or usernames if the full name is not defined in the account of the particular user). -
Page 275
For better reference, WinRoute sorts protocols to predefined classes: Web — HTTP and HTTPS protocols and any other traffic served by the HTTP protocol inspector (see chapter 7.3), E-mail — SMTP, IMAP, POP3 protocols (and their secured versions), FTP — FTP protocol (including traffic over proxy server), Multimedia —… -
Page 276: User Statistics
Chapter 21 Kerio StaR — statistics and reporting 21.6 User statistics The Individual tab allows showing of statistics for a selected user. First, select a user in the Select User menu. The menu includes all users for which any statistic data is available in the database —…
-
Page 277: Users’ Activity
21.7 Users’ Activity The Users’ Activity tab allows showing of detailed information on “browsing activities” of in- dividual users. This section answers questions like What was this user doing in the Internet in the selected period? How much time did this user spend by browsing through web pages?, etc. In the top right section of the Users’…
-
Page 278
Chapter 21 Kerio StaR — statistics and reporting Updating data in StaR — to WinRoute, gathering and evaluation of information for StaR means processing of large data volumes. To reduce load on the firewall, data for StaR is updated approximately once in an hour (see information about the last data update). -
Page 279
The header informs about the total number of visited web pages in the selected period and the total number of web searches. WinRoute treats a HTTP request as a search if its URL meets certain criteria. Most of top-used search engines is detected correctly. Each record of connection to a web page includes: Start time and duration (see above). -
Page 280
Chapter 21 Kerio StaR — statistics and reporting The header informs about number of detected email messages and total volume of data transferred by email protocols. WinRoute can recognize only email communication by SMTP and POP3. Such traffic must be unencrypted and it must use corresponding pro- tocol inspectors. -
Page 281
The header informs about total number of recognized files, total volume of transferred data (in both directions), data transferred via P2P networks (in both directions) and num- ber of blocked attempts for sharing of files in P2P networks (this information is displayed only if there was such attempt detected and blocked). -
Page 282: Users By Traffic
Chapter 21 Kerio StaR — statistics and reporting rules — e.g. by browsing through banned web pages on a remote host or by transferring forbidden files by VPN. Figure 21.22 User’s Activity — remote and VPN access The Remote Access header informs about: number of VPN connections and total volume of data transferred via VPN, number of remote connections and total volume of transferred data.
-
Page 283: Top Visited Websites
Hint The way of users’ names are displayed in the table can be set in the Administration Console, in section Accounting, after clicking on the Advanced button (see chapter 21.2). 21.9 Top Visited Websites The Visited Sites tab includes statistics for the top ten most frequently visited web domains. These statistics provide for example the following information: which sites (domains) are visited by the users regularly, which users are the most active in web browsing,…
-
Page 284
Chapter 21 Kerio StaR — statistics and reporting the particular domain (the www prefix is attached to the domain name, i.e. for example the www.google.com page is opened for the google.com domain). The chart shows part of the most active users (up to six items) in the total visit rate of the particular domain. -
Page 285: Top Requested Web Categories
21.10 Top Requested Web Categories Figure 21.26 Table of top active users for the particular domain Hint The way of users’ names are displayed in the table can be set in the Administration Console, in section Accounting, after clicking on the Advanced button (see chapter 21.2). Only full names are shown in charts (or usernames if the full name is not defined in the account of the particular user).
-
Page 286
Chapter 21 Kerio StaR — statistics and reporting Below the chart, detailed statistics for each of top ten visited web categories are shown: The header provides name of the category and total number of requests to websites belonging to the category. The chart shows part of the most active users (up to six items) in the total visit rate of the particular category. -
Page 287
21.10 Top Requested Web Categories Hint The way of users’ names are displayed in the table can be set in the Administration Console, in section Accounting, after clicking on the Advanced button (see chapter 21.2). Only full names are shown in charts (or usernames if the full name is not defined in the account of the particular user). -
Page 288: Logs
Chapter 22 Logs Logs are files where history of certain events performed through or detected by WinRoute are recorded and kept. Each log is displayed in a window in the Logs section. Each event is represented by one record line. Each line starts with a time mark in brackets (date and time when the event took place, in seconds).
-
Page 289
File Logging Use the File Loggingtab to define file name and rotation parameters. Enable logging to file Use this option to enable/disable logging to file according to the File name entry (the .log extension will be appended automatically). If this option is disabled, none of the following parameters and settings will be available. Rotate regularly Set intervals in which the log will be rotated regularly. -
Page 290
Chapter 22 Logs Keep at most … log file(s) Maximal count of log files that will be stored. Whenever the threshold is reached, the oldest file will be deleted. Note: If both Rotate regularly and the Rotate when file exceeds size are enabled, the particular file will be rotated whenever one of these conditions is met. -
Page 291: Logs Context Menu
Syslog server DNS name or IP address of the Syslog server. Facility Facility that will be used for the particular WinRoute log (depends on the Syslog server). Severity Severity of logged events (depends on the Syslog server). 22.2 Logs Context Menu When you right-click inside any log window, a context menu will be displayed where you can choose several functions or change the log’s parameters (view, logged information).
-
Page 292
Chapter 22 Logs Copy Copies the selected text onto the clipboard. A key shortcut from the operating system can be used (Ctrl+C or Ctrl+Insert in Windows). Save log This option saves the log or selected text in a file as plaintext or in HTML. Hint This function provides more comfortable operations with log files than a direct access to log files on the disk of the computer where WinRoute is installed. -
Page 293
Highlighting Highlighting may be set for logs meeting certain criteria (for details, see below). Select font Within this dialog you can select a font of the log printout. All fonts installed on the host with the Administration Console are available. Encoding Coding that will be used for the log printout in Administration Console can be selected in this section. -
Page 294
Chapter 22 Logs Figure 22.6 Log highlighting settings Figure 22.7 Highlighting rule definition Each highlighting rule consists of a condition and a color which will be used to highlight lines meeting the condition. Condition can be specified by a substring (all lines containing the string will be highlighted) or by a so called regular expression (all lines containing one or multiple strings matching the regular expression will be highlighted). -
Page 295: Alert Log
The Debug log advanced settings Special options are available in the Debug log context menu. These options are available only to users with full administration rights (see chapter 15.1).. Options of information which can be monitored by the Debug log are addressed in chap- ter 22.6.
-
Page 296
Chapter 22 Logs Configuration database changes Changes performed in the Administration Console. A simplified form of the SQL language is used when communicating with the database. Example [18/Apr/2008 10:27:46] james — insert StaticRoutes set Enabled=’1’, Description=’VPN’, Net=’192.168.76.0’, Mask=’255.255.255.0’, Gateway=’192.168.1.16’, Interface=’LAN’, Metric=’1’ [18/Apr/2008 10:27:46] —… -
Page 297: Connection Log
22.5 Connection Log The Connection log gathers information about traffic matching traffic rules with the Log match- ing connections enabled (see chapter 7) or meeting certain conditions (e.g. log of UPnP traffic — see chapter 18.2). How to read the Connection Log? [18/Apr/2008 10:22:47] [ID] 613181 [Rule] NAT [Service] HTTP [User] james [Connection] TCP 192.168.1.140:1193 ->…
-
Page 298: Debug Log
Chapter 22 Logs 22.6 Debug Log Debug (debug information) is a special log which can be used to monitor certain kinds of information, especially for problem-solving. Too much information could be confusing and impractical if displayed all at the same time. Usually, you only need to display information relating to a particular service or function.
-
Page 299: Dial Log
Figure 22.9 Selection of information monitored by the Debug log WinRoute services — protocols processed by WinRoute services (DHCP server, DNS Forwarder, Web interface, and UPnP support), Decoded protocols — logs of specific protocols (HTTP and DNS), Miscellaneous — other information on miscellaneous topics (e.g. packet process- ing by the Bandwidth Limiter, Internet connection, HTTP cache, used licenses, update check, employment of dynamic DNS, etc.), Protocol inspection —…
-
Page 300
Chapter 22 Logs The first log item is reported upon initialization of dialing. The log always includes WinRoute name of the dialed line (see chapter 5). If the line is dialed from the Admin- istration Console, the log provides this additional information where the line was dialed from (console —… -
Page 301: Error Log
Another event is logged upon a successful connection (i.e. when the line is dialed, upon authentication on a remote server, etc.). On-demand dialing (response to a packet sent from the local network) [15/Mar/2008 15:53:42] Packet TCP 192.168.1.3:8580 -> 212.20.100.40:80 initiated dialing of line «Connection» [15/Mar/2008 15:53:53] Line «Connection»…
-
Page 302
Chapter 22 Logs Each record in the Error log contains error code and sub-code as two numbers in parentheses (x y). The error code (x) may fall into one of the following categories: 1-999 — system resources problem (insufficient memory, memory allocation error, etc.) 1000-1999 —… -
Page 303: Filter Log
22.9 Filter Log This log gathers information on web pages and objects blocked/allowed by the HTTP and FTP filters (see chapters 12.2 and 12.6) and on packets matching traffic rules with the Log matching packets option enabled (see chapter 7) or meeting other conditions (e.g. logging of UPnP traffic —…
-
Page 304: Http Log
Chapter 22 Logs Local traffic — the name of the traffic rule that was matched by the packet packet to — packet direction (either to or from a particular interface) LAN — interface name (see chapter proto: — transport protocol (TCP, UDP, etc.) len: —…
-
Page 305
An example of an HTTP log record in the Apache format 192.168.64.64 — jflyaway [18/Apr/2008:15:07:17 +0200] «GET http://www.kerio.com/ HTTP/1.1» 304 0 +4 192.168.64.64 — IP address of the client host rgabriel — name of the user authenticated through the firewall (a dash is displayed if no user is authenticated through the client) [18/Apr/2008:15:07:17 +0200] —… -
Page 306: Security Log
Chapter 22 Logs DIRECT — the WWW server access method (WinRoute always uses DIRECT access) 206.168.0.9 — IP address of the WWW server 22.11 Security Log A log for security-related messages. Records of the following types may appear in the log: Anti-spoofing log records Messages about packets that where captured by the Anti-spoofing module (packets with invalid source IP address —…
-
Page 307: Sslvpn Log
Example 1 [17/Jul/2008 11:55:14] FTP: Bounce attack attempt: client: 1.2.3.4, server: command: PORT 10,11,12,13,14,15 (attack attempt detected — a foreign IP address in the PORT command) Example 2 [17/Jul/2008 11:56:27] FTP: Malicious server reply: client: 1.2.3.4, server: response: 227 Entering Passive Mode (10,11,12,13,14,15) (suspicious server reply with a foreign IP address) Failed user authentication log records Message format:…
-
Page 308: Warning Log
Chapter 22 Logs Example [17/Mar/2008 08:01:51] Copy File: File: ’\serverdatawwwindex.html’ 22.13 Warning Log The Warning log displays warning messages about errors of little significance. Warnings can display for example reports about invalid user login (invalid username or password), error in communication of the server and Web administration interface, etc.
-
Page 309: Web Log
Note: With the above three examples, the relevant records will also appear in the Security log. 22.14 Web Log This log contains all HTTP requests that were processed by the HTTP inspection module (see section 14.3) or by the built-in proxy server (see section 8.4). Unlike in the HTTP log, the Web log displays only the title of a page and the WinRoute user or the IP host viewing the page.
-
Page 310: Kerio Vpn
Chapter 23 Kerio VPN WinRoute enables secure interconnection of remote private networks using an encrypted tun- nel and it provides clients secure access to their local networks via the Internet. This method of interconnection of networks (and of access of remote clients to local networks) is called virtual private network (VPN).
-
Page 311: Vpn Server Configuration
No special user accounts must be created for VPN clients. User accounts in WinRoute (or domain accounts if the Active Directory is used — see chapter 10.1) are used for authentication. Statistics about VPN tunnels and VPN clients can be viewed in WinRoute (refer to chap- ter 20.2).
-
Page 312
Chapter 23 Kerio VPN Figure 23.2 VPN server settings — basic parameters Enable VPN server Use this option to enable /disable VPN server. VPN server uses TCP and UDP protocols, port 4090 is used as default (the port can be changed in advanced options, however, it is usually not necessary to change it). -
Page 313
It is recommended to check whether IP collision is not reported after each change in configuration of the local network or/and of the VPN! Warning Under certain circumstances, collision with the local network might also arise when a VPN subnet is set automatically (if configuration of the local network is changed later). -
Page 314
Chapter 23 Kerio VPN Figure 23.4 VPN server settings — specification of DNS servers Specify a DNS server which will be used for VPN clients: Use WinRoute as DNS server — IP address of a corresponding interface of WinRoute host will be used as a DNS server for VPN clients (VPN clients will use the DNS for- warder). -
Page 315
Figure 23.5 VPN server settings — server port and routes for VPN clients upon clicking on the Apply button: (4103:10048) Socket error: for service to port 4090. (5002) Failed to start service «VPN» bound to address 192.168.1.1. To make sure that the specified port is really free, view the Error log to see whether an error of this type has not been reported. -
Page 316: Configuration Of Vpn Clients
Chapter 23 Kerio VPN 23.2 Configuration of VPN clients The following conditions must be met to enable connection of remote clients to local networks via encrypted channels: The Kerio VPN Client must be installed at remote clients (for detailed description, refer to a stand-alone document, Kerio VPN Client —…
-
Page 317: Interconnection Of Two Private Networks Via The Internet (Vpn Tunnel)
23.3 Interconnection of two private networks via the Internet (VPN tunnel) items). To generate the rules automatically, select Yes, I want to use Kerio VPN in Step 5. For details, see chapter 7.1. For access to the Internet, VPN clients use their current Internet connections. VPN clients are not allowed to connect to the Internet via WinRoute (configuration of default gateway of clients cannot be defined).
-
Page 318
Chapter 23 Kerio VPN The passive mode is only useful when the local end of the tunnel has a fixed IP address and when it is allowed to accept incoming connections. At least one end of each VPN tunnel must be switched to the active mode (passive servers cannot initialize connection). -
Page 319
23.3 Interconnection of two private networks via the Internet (VPN tunnel) Figure 23.8 VPN tunnel — certificate fingerprints If the local endpoint is set to the active mode, the certificate of the remote endpoint and its fingerprint can be downloaded by clicking Detect remote certificate. Passive endpoint cannot detect remote certificate. -
Page 320
Chapter 23 Kerio VPN Routing settings On the Advanced tab, you can set which method will be used to add routes provided by the remote endpoint of the tunnel to the local routing table as well as define custom routes to remote networks. -
Page 321
23.3 Interconnection of two private networks via the Internet (VPN tunnel) Connection establishment Active endpoints automatically attempt to recover connection whenever they detect that the corresponding tunnel has been disconnected (the first connection establishment is attempted immediately after the tunnel is defined and upon clicking the Apply button in Configuration Interfaces, i.e. -
Page 322: Exchange Of Routing Information
Chapter 23 Kerio VPN Figure 23.11 Common traffic rules for VPN tunnel Traffic rules set by this method allow full IP communication between the local network, remote network and all VPN clients. For access restrictions, define corresponding traffic rules (for local traffic, VPN clients, VPN tunnel, etc.). Examples of traffic rules are provided in chapter 23.5.
-
Page 323: Example Of Kerio Vpn Configuration: Company With A Filial Office
23.5 Example of Kerio VPN configuration: company with a filial office sions, custom routes are used as prior. This option easily solves the problem where a remote endpoint provides one or more invalid route(s). Custom routes only — all routes to remote networks must be set manually at the local endpoint of the tunnel.
-
Page 324
Chapter 23 Kerio VPN networks). Configuration of VPN with redundant routes (typically in case of a company with two or more filials) is described in chapter 23.6. Note: This example describes a more complicated pattern of VPN with access restrictions for individual local networks and VPN clients. -
Page 325
23.5 Example of Kerio VPN configuration: company with a filial office Suppose that both networks are already deployed and set according to the figure and that the Internet connection is available. Traffic between the network of the headquarters, the network of the branch office and VPN clients will be restricted according to the following rules: VPN clients can connect to the LAN 1 and to the network of the branch office. -
Page 326
Chapter 23 Kerio VPN local hosts into the hosts file (if they use IP addresses) or enable cooperation of the DNS Forwarder with the DHCP server (in case that IP addresses are assigned dynamically to these hosts). For details, see chapter 8.1. In the Interfaces section, allow the VPN server and set its SSL certificate if necessary. -
Page 327
23.5 Example of Kerio VPN configuration: company with a filial office Figure 23.13 Headquarters — no restrictions are applied to accessing the Internet from the LAN In step 5, select Create rules for Kerio VPN server. Status of the Create rules for Kerio Clientless SSL-VPN option is irrelevant (this example does not include Clientless SSL-VPN interface’s issues). -
Page 328
Chapter 23 Kerio VPN When the VPN tunnel is created, customize these rules according to the restriction re- quirements (see item 6). Note: To keep the example as simple and transparent as possible, only traffic rules relevant for the Kerio VPN configuration are mentioned. Customize DNS configuration as follows: In configuration of the DNS Forwarder in WinRoute, specify DNS servers to which DNS queries which are not addressed to the company.com domain will be for-… -
Page 329
23.5 Example of Kerio VPN configuration: company with a filial office Set the IP address of this interface (10.1.1.1) as a primary DNS server for the WinRoute host’s interface connected to the LAN 1 local network. It is not necessary to set DNS server at the interface connected to LAN 2 —… -
Page 330
Chapter 23 Kerio VPN Figure 23.19 Headquarters — VPN server configuration For a detailed description on the VPN server configuration, refer to chapter 23.1. -
Page 331
23.5 Example of Kerio VPN configuration: company with a filial office Create a passive end of the VPN tunnel (the server of the branch office uses a dynamic IP address). Specify the remote endpoint’s fingerprint by the fingerprint of the certificate of the branch office VPN server. -
Page 332
Chapter 23 Kerio VPN Add the Company headquarters rule allowing connections from both headquar- ters subnets to the branch office network.. Rules defined this way meet all the restriction requirements. Traffic which will not match any of these rules will be blocked by the default rule (see chapter 7.3). Configuration of a filial office Install WinRoute (version 6.0.0 or later) at the default gateway of the branch office (“server”). -
Page 333
23.5 Example of Kerio VPN configuration: company with a filial office In this case, it would be meaningless to create rules for the Kerio VPN server and/or the Kerio Clientless SSL-VPN, since the server uses a dynamic public IP address). Therefore, leave these options disabled in step 5. -
Page 334
Chapter 23 Kerio VPN Figure 23.25 Filial office — DNS forwarder configuration Figure 23.26 Filial office — DNS forwarding settings Set the IP address of this interface (192.168.1.1) as a primary DNS server for the WinRoute host’s interface connected to the local network. Set the IP address 192.168.1.1 as a primary DNS server also for the other hosts. -
Page 335
23.5 Example of Kerio VPN configuration: company with a filial office Figure 23.27 Filial office — TCP/IP configuration at a firewall’s interface connected to the local network Figure 23.28 Filial office — VPN server configuration Create an active endpoint of the VPN tunnel which will connect to the headquarters server… -
Page 336
Chapter 23 Kerio VPN (newyork.company.com). Use the fingerprint of the VPN server of the headquarters as a specification of the fingerprint of the remote SSL certificate. Figure 23.29 Filial office — definition of VPN tunnel for the headquarters At this point, connection should be established (i.e. the tunnel should be created). If connected successfully, the Connected status will be reported in the Adapter info column for both ends of the tunnel. -
Page 337: Example Of A More Complex Kerio Vpn Configuration
Add the new VPN tunnel into the Local Traffic rule. It is also possible to remove the Dial-In interface and the VPN clients group from this rule (VPN clients are not allowed to connect to the branch office). Note: It is not necessary to perform any other customization of traffic rules. The required restrictions should be already set in the traffic policy at the server of the headquarters.
-
Page 338
Chapter 23 Kerio VPN tunnels (so called triangle pattern). This example can be then adapted and applied to any number of interconnected private networks. The example focuses configuration of VPN tunnels and correct setting of routing between in- dividual private networks (it does not include access restrictions). Access restrictions options within VPN are described by the example in chapter 23.5. -
Page 339
Note: For every installation of WinRoute, a stand-alone license for the corresponding num- ber of users is required! For details see chapter 4. Configure and test connection of the local network to the Internet. Hosts in the local net- work must use the WinRoute host’s IP address as the default gateway and as the primary DNS server. -
Page 340
Chapter 23 Kerio VPN Allow traffic between the local and the remote networks. To allow any traffic, just add the created VPN tunnels to the Source and Destination items in the Local traffic rule. Access restrictions options within VPN are described by the example in chapter 23.5. Test reachability of remote hosts in both remote networks. -
Page 341
In step 5, select Create rules for Kerio VPN server. Status of the Create rules for Kerio Clientless SSL-VPN option is irrelevant (this example does not include Clientless SSL-VPN interface’s issues). Figure 23.33 Headquarter — creating default traffic rules for Kerio VPN This step will create rules for connection of the VPN server as well as for communication of VPN clients with the local network (through the firewall). -
Page 342
Chapter 23 Kerio VPN Enable the Use custom forwarding option and define rules for names in the filial1.company.com and filial2.company.com domains. To specify the for- warding DNS server, always use the IP address of the WinRoute host’s inbound interface connected to the local network at the remote side of the tunnel. Figure 23.36 Headquarter —… -
Page 343
23.6 Example of a more complex Kerio VPN configuration Figure 23.37 Headquarter — TCP/IP configuration at a firewall’s interface connected to the local network… -
Page 344
Chapter 23 Kerio VPN Enable the VPN server and configure its SSL certificate (create a self-signed certificate if no certificate provided by a certification authority is available). Note: The VPN network and Mask entries now include an automatically selected free sub- net. -
Page 345
23.6 Example of a more complex Kerio VPN configuration Create a passive endpoint of the VPN tunnel connected to the London filial. Use the fin- gerprint of the VPN server of the London filial office as a specification of the fingerprint of the remote SSL certificate. -
Page 346
Chapter 23 Kerio VPN Figure 23.40 The headquarters — routing configuration for the tunnel connected to the London filial Warning In case that the VPN configuration described here is applied (see figure 23.31), it is un- recommended to use automatically provided routes! In case of an automatic exchange of routes, the routing within the VPN is not be ideal (for example, any traffic between the headquarters and the Paris filial office is routed via the London filial whereas the tunnel between the headquarters and the Paris office stays waste. -
Page 347
Use the same method to create a passive endpoint for the tunnel connected to the Paris filial. Figure 23.41 The headquarters — definition of VPN tunnel for the Paris filial On the Advanced tab, select the Use custom routes only option and set routes to the sub- nets at the remote endpoint of the tunnel (i.e. -
Page 348
Chapter 23 Kerio VPN Figure 23.42 The headquarters — routing configuration for the tunnel connected to the Paris filial Figure 23.43 Headquarter — final traffic rules… -
Page 349
Configuration of the London filial Install WinRoute (version 6.1.0 or higher) at the default gateway of the filial’s network. Use Network Rules Wizard (see chapter 7.1) to configure the basic traffic policy in WinRoute. To keep the example as simple as possible, it is supposed that the access from the local network to the Internet is not restricted, i.e. -
Page 350
Chapter 23 Kerio VPN warded (primary and secondary DNS server of the Internet connection provider by default). Figure 23.46 The London filial office — default traffic rules for Kerio VPN Figure 23.47 The London filial office — DNS forwarder configuration Enable the Use custom forwarding option and define rules for names in the company.com and filial2.company.com domains. -
Page 351
Set the IP address of this interface (172.16.1.1) as a primary DNS server for the WinRoute host’s interface connected to the LAN 1 local network. It is not necessary to set DNS at the interface connected to LAN 2. Set the IP address 172.16.1.1 as a primary DNS server also for the other hosts. Enable the VPN server and configure its SSL certificate (create a self-signed certificate if no certificate provided by a certification authority is available). -
Page 352
Chapter 23 Kerio VPN our example, the ping gw-newyork.company.com command can be used at the London branch office server. Figure 23.50 The London filial office — definition of VPN tunnel for the headquarters… -
Page 353
23.6 Example of a more complex Kerio VPN configuration Figure 23.51 The London filial — routing configuration for the tunnel connected to the headquarters… -
Page 354
Chapter 23 Kerio VPN Create a passive endpoint of the VPN tunnel connected to the Paris filial. Use the finger- print of the VPN server of the Paris filial office as a specification of the fingerprint of the remote SSL certificate. Figure 23.52 The London filial office —… -
Page 355
23.6 Example of a more complex Kerio VPN configuration Figure 23.53 The London filial — routing configuration for the tunnel connected to the Paris branch office Figure 23.54 The London filial office — final traffic rules… -
Page 356
Chapter 23 Kerio VPN Configuration of the Paris filial Install WinRoute (version 6.1.0 or higher) at the default gateway of the filial’s network. Use Network Rules Wizard (see chapter 7.1) to configure the basic traffic policy in WinRoute. To keep the example as simple as possible, it is supposed that the access from the local network to the Internet is not restricted, i.e. -
Page 357
Customize DNS configuration as follows: In configuration of the DNS Forwarder in WinRoute, specify DNS servers to which DNS queries which are not addressed to the company.com domain will be for- warded (primary and secondary DNS server of the Internet connection provider by default). -
Page 358
Chapter 23 Kerio VPN Note: The VPN network and Mask entries now include an automatically selected free sub- net. Check whether this subnet does not collide with any other subnet in the headquarters or in the filials. If it does, specify a free subnet. Figure 23.59 The Paris filial office —… -
Page 359
23.6 Example of a more complex Kerio VPN configuration Create an active endpoint of the VPN tunnel which will connect to the headquarters server (newyork.company.com). Use the fingerprint of the VPN server of the headquarters as a specification of the fingerprint of the remote SSL certificate. Figure 23.60 The Paris filial office —… -
Page 360
Chapter 23 Kerio VPN Paris branch office server. Figure 23.61 The Paris filial — routing configuration for the tunnel connected to the headquarters… -
Page 361
Create active gw-london.company.com). filial office as a specification of the fingerprint of the remote SSL certificate. Figure 23.62 The Paris filial office — definition of VPN tunnel for the London filial office On the Advanced tab, select the Use custom routes only option and set routes to London’s local networks. -
Page 362
Chapter 23 Kerio VPN Figure 23.63 The Paris filial — routing configuration for the tunnel connected to the London branch office Figure 23.64 The Paris filial office — final traffic rules connect to this branch office). VPN test The VPN configuration has been completed by now. At this point, it is recommended to test reachability of the remote hosts in the other remote networks (at remote endpoints of individ- ual tunnels). -
Page 363: Kerio Clientless Ssl-Vpn
Chapter 24 Kerio Clientless SSL-VPN Kerio Clientless SSL-VPN (thereinafter “SSL-VPN”) is a special interface used for secured remote access to shared items (files and folders) in the network protected by WinRoute via a web browser. To a certain extent, the SSL-VPN interface is an alternative to Kerio VPN Client (see chapter 23). Its main benefit is that it enables an immediate access to a remote network from any location without any special application having been installed and any configuration having been per- formed (that’s the reason for calling it clientless).
-
Page 364
Chapter 24 Kerio Clientless SSL-VPN Click Advanced to open a dialog where port and SSL certificate for SSL-VPN can be set. Figure 24.2 Setting of TCP port and SSL certificate for SSL-VPN SSL-VPN’s default port is port 443 (standard port of the HTTPS service). Click Change SSL Certificate to create a new certificate for the SSL-VPN service or to import a certificate issued by a trustworthy certification authority. -
Page 365: Usage Of The Ssl-Vpn Interface
24.2 Usage of the SSL-VPN interface For access to the interface, most of common graphical web browsers can be used (however, we recommend to use Internet Explorer version 6.0 or Firefox/SeaMonkey with the core version 1.3 and later). Specify URL in the browser in the https://server/ format, where server represents the DNS name or IP address of the WinRoute host.
-
Page 366
Chapter 24 Kerio Clientless SSL-VPN mapped mary, the domain must be included in the username specification (e.g. sidneywashington@usoffice.company.com). Handling files and folders The way the SSL-VPN interface is handled is similar to how the My Network Places system window is used. At the top of the page, an entry is available, where location of the demanded shared item (so called UNC path) can be specified —… -
Page 367
24.2 Usage of the SSL-VPN interface Right under the navigation tree, actions available for the specified location (i.e. for the se- lected item or folder) is provided. The basic functions provided by the SSL-VPN interface are download of a selected file to the local host (the host where the user’s browser is running) and uploading a file from the local host to a selected location in the remote domain (the user must have write rights for the destination). -
Page 368
Chapter 24 Kerio Clientless SSL-VPN Figure 24.6 Clientless SSL-VPN — new bookmark Examples of operations with files and folders In this section, several examples of manipulation with files and folders via the SSL-VPN inter- face. Creating folders The dialog allows creating of a new folder in the specified location. By default, the current path specified in the URL line is indicated. -
Page 369
Figure 24.8 Clientless SSL-VPN — destination path (folder) selection Figure 24.9 Clientless SSL-VPN — copying or moving of files/folders In the copy/move dialog, specify the destination path (folder) or select it in the tree or it is also possible to use a bookmark (see above). Moving of files / folders It is also possible to remove any number of folders or/and files as well as all files and folders in the current path. -
Page 370
Chapter 24 Kerio Clientless SSL-VPN a standard download dialog. It is not possible to download whole folders or multiple files at a time. Uploading files The upload dialog allows selection of a destination folder (by default, the folder which is currently opened in the SSL-VPN interface is set). Destination folder can be specified manually, selected in the folder tree or loaded from a bookmark (see above). -
Page 371: Specific Settings And Troubleshooting
Chapter 25 Specific settings and troubleshooting This chapter provides description of advanced features and specific configurations of the fire- wall. It also includes helpful guidelines for solving of issues which might occur when you use WinRoute in your network. 25.1 Configuration Backup and Transfer For cases when it is necessary to reinstall the firewall’s operating system (e.g.
-
Page 372
Chapter 25 Specific settings and troubleshooting details traffic Administration Console, (http://www.kerio.com/kwf-manual). sslcert SSL certificates for all components using SSL for traffic encryption (i.e. the web interface, VPN server and the Clientless SSL-VPN interface). license If WinRoute has already been registered, the license folder includes a license key file (including registered trial versions). -
Page 373
star The star directory includes a complete database for statistics of the WinRoute web inter- face. Handling configuration files We recommend that WinRoute Firewall Engine be stopped prior to any manipulation with the configuration files (backups, recoveries, etc.)! Information contained within these files is loaded and saved only upon starting or stopping the MailServer. -
Page 374
Chapter 25 Specific settings and troubleshooting Use a plaintext editor (e.g. Notepad) to open the winroute.cfg configuration file. Go to the following section: <list name=»Interfaces»> Scan this section for the original adapter. Find an identifier for a new interface in the new adapter’s log and copy it to the original adapter. -
Page 375: Automatic User Authentication Using Ntlm
Note: The method described above includes a complete “clone” of WinRoute on a new host. Some of the steps are optional — for example, if you do not wish to keep the current statistics, do not copy the star subdirectory. 25.2 Automatic user authentication using NTLM WinRoute supports automatic user authentication by the NTLM method (authentication from Web browsers).
-
Page 376
Chapter 25 Specific settings and troubleshooting Figure 25.1 NTLM — user authentication options Figure 25.2 Setting of NT authentication for local user accounts For mapped Active Directory domain — the corresponding NT domain must be set in the particular domain’s configuration on the Active Directory tab (for details, refer to chapter 15.4). -
Page 377
Figure 25.4 Configuration of WinRoute’s Web Interface Web browsers For proper functioning of NTLM, a browser must be used that supports this method. By now, the following browsers are suitable: Internet Explorer version 5.01 or later Firefox or SeaMonkey with the core version Mozilla 1.3 or later NTLM authentication process NTLM authentication process differs depending on a browser used. -
Page 378: Ftp On Winroute’s Proxy Server
Chapter 25 Specific settings and troubleshooting Firefox/SeaMonkey The browser displays the login dialog. For security reasons, automatic user authentica- tion is not used by default in the browser. This behaviour of the browser can be changed by modification of configuration parameters — see below. If authentication fails and direct connection is applied, the firewall’s login page is opened automatically (refer to chapter 11.2).
-
Page 379
Terminal FTP clients (such as the ftp command in Windows or Linux) do not allow config- uration of the proxy server. For this reason, they cannot be used for our purposes. To connect to FTP servers, the proxy server uses the passive FTP mode. If FTP server is protected by a firewall which does not support FTP (this is not a problem of WinRoute), it is not possible to use proxy to connect to the server. -
Page 380
Chapter 25 Specific settings and troubleshooting Hint To configure web browsers, you can use a configuration script or the automatic detection of configuration. For details, see chapter 8.4. Note: Web browsers used as FTP clients enable only to download files. Uploads to FTP server via web browsers are not supported. -
Page 381: Internet Links Dialed On Demand
Hint The defined proxy server is indexed and saved to the list of proxy servers automatically. Later, whenever you are creating other FTP connections, you can simply select a corresponding proxy server in the list. 25.4 Internet links dialed on demand If an on-demand dial-up link is used (see chapter 6.2), consider specific behavior of this con- nection type.
-
Page 382
Chapter 25 Specific settings and troubleshooting net would be routed via this interface (no matter where it is actually connected to) and WinRoute would not dial the line. Only one link can be set for on-demand dialing in WinRoute. WinRoute does not enable automatic selection of a line to be dialed. -
Page 383
will be dialed upon a client’s DNS query. If a local DNS server is used, the line will be dialed upon a query sent by this server to the Internet (the default gateway of the host where the DNS server is running must be set to the IP address of the WinRoute host). It can be easily understood through the last point that if the DNS server is to be running at the WinRoute host, it must be represented by DNS Forwarder because it can dial the line if necessary. -
Page 384
Chapter 25 Specific settings and troubleshooting To avoid unintentional dialing based on DNS requests, WinRoute allows definition of rules where DNS names are specified for which the line can be dialed or not. To define these rules, click on Advanced in Configuration mand mode). -
Page 385
25.4 Internet links dialed on demand Activate the Enable dialing for local DNS names option in the Other settings tab to enable this (at the top of the Dial On Demand dialog window). In other cases, it is recommended to leave the option disabled (again, the line can be dialed undesirably). -
Page 386: Technical Support
Chapter 26 Technical support Free email and telephone technical support is provided for Kerio WinRoute Firewall. For con- tacts, see the end of this chapter. Our technical support staff is ready to help you with any problem you might have. You can also solve many problems alone (and sometimes even faster).
-
Page 387: Tested In Beta Version
26.2 Tested in Beta version The text file will be stored in the home directory of the logged user. (e.g. C:Documents and SettingsAdministrator) as kerio_support_info.txt. Note: The kerio_support_info.txt file is generated by the Administration Console. This implies that in case you connect to the administration remotely, this file will be stored on the computer from which you connect to the WinRoute administration (not on the com- puter/server where the WinRoute Firewall Engine is running).
-
Page 388
Chapter 26 Technical support Kerio Technologies Inc. 111 W. Saint John Street, Suite 1100 San Jose, CA 95113 Phone: +1 408 496 4500 http://www.kerio.com/ Contact form: http://support.kerio.com/ United Kingdom Kerio Technologies UK Ltd. Enterprise House Vision Park Histon Cambridge, CB24 9ZR Tel.: +44 1223 202 130 http://www.kerio.co.uk/ Contact form:… -
Page 389: Legal Notices
Appendix A Legal Notices Microsoft , Windows , Windows NT , Windows Vista , Internet Explorer , ActiveX , and Active Directory are trademarks or registered trademarks of Microsoft Corporation. Mac OS are Safari are trademarks or registered trademarks of Apple Computer, Inc. Linux is registered trademark of Linus Torvalds.
-
Page 390: Used Open-Source Libraries
Appendix B Used open-source libraries Kerio WinRoute Firewall contains the following open-source libraries: bindlib Copyright 1983, 1993 The Regents of the University of California. All rights reserved. Portions Copyright 1993 by Digital Equipment Corporation. Firebird This software embeds modified version of Firebird database engine distributed under terms of IPL and IDPL licenses.
-
Page 391
Copyright 1999-2006 The PHP Group. All rights reserved. This product from http://www.php.net/software/. php_mbstring Copyright 2001-2004 The PHP Group. Copyright 1998-2002 HappySize, Inc. All rights reserved. Prototype Copyright Sam Stephenson. Homepage: http://prototype.conio.net/ ptlib This product includes unmodified version of the ptlib library distributed under Mozilla Public License (MPL). -
Page 392: Glossary Of Terms
Glossary of terms ActiveX This Microsoft’s proprietary technology is used for creation of dynamic objects for web pages. This technology provides many features, such as writing to disk or execution of commands at the client (i.e. on the host where the Web page is opened). This technology provides a wide range of features, such as saving to disk and running commands at the client (i.e.
-
Page 393
DMZ (demilitarized zone) is a reserved network area where services available both from the Internet and from the LAN are run (e.g. a company’s public web server). DMZ provides an area, where servers accessible for public are be located separately, so they cannot be misused for cracking into the LAN. -
Page 394
Glossary of terms Ident The Ident protocol is used for identification of user who established certain TCP connec- tion from a particular (multi-user) system. TheIdent service is used for example by IRC servers, FTP servers and other services. More information (in English) can be found for example at Wikipedia. IMAP Internet Message Access Protocol (IMAP) enables clients to manage messages stored on a mail server without downloading them to a local computer. -
Page 395
will be redirected to this host. Packets that do not match with any record in the NAT table will be dropped. destination address translation (Destination NAT, DNAT, it is also called port mapping) — is used to enable services in the local network from the Internet. If any packet incoming from the Internet meets certain requirements, its IP address will be substituted by the IP address of the local host where the service is running and the packet is sent to this host. -
Page 396
Glossary of terms Ports 1-1023 are reserved and used by well known services (e.g. 80 = WWW). Ports above 1023 can be freely used by any application. PPTP Microsoft’s proprietary protocol used for design of virtual private networks. See chapters and sections concerning VPN. Private IP addresses Local networks which do not belong to the Internet (private networks) use reserved ranges of IP addresses (private addresses). -
Page 397
Routing table The information used by routers when making packet forwarding decisions (so called routes). Packets are routed according to the packet’s destination IP address. On Windows, routing table can be printed by the route print command, while on Unix systems (Linux, Mac OS X, etc.) by the route command. -
Page 398
Glossary of terms RST (Reset) — request on termination of a current connection and on initiation of a new one URG (Urgent) — urgent packet PSH (Push) — request on immediate transmission of the data to upper TCP/IP layers FIN (Finalize) — connection finalization TCP/IP Name used for all traffic protocols used in the Internet (i.e. -
Page 399: Index
Index Active Directory 205, automatic import of accounts domain mapping import of user accounts multiple domains mapping administration remote 22, Administration Console columns views setup alerts overview settings templates anti-spoofing antivirus check 13, conditions external antivirus file size limits HTTP and FTP McAfee protocols rules for file scanning…
-
Page 400
Index forwarding rules hosts file local domain dynamic DNS FTP 154, 195, filtering rules full cone NAT groups interface throughput charts IP address of forbidden words user groups 199, 205, H.323 hairpinning HTTP cache content filtering content rating filtering by words logging of requests proxy server URL Rules… -
Page 401
media hairpinning multihoming NAT 81, full cone NAT 83, NT domain import of user accounts NTLM 137, 139, configuration of web browsers deployment WinRoute configuration P2P Eliminator Peer-to-Peer (P2P) networks allow 207, deny detection ports speed limit policy routing port SSL-VPN port mapping 70, 84, probe hosts 61,… -
Page 402
Index top visited websites user groups users’ activity volume of transferred data status information active hosts connections subscription expiration Syslog system requirements technical support contacts traffic policy created by wizard default rule definition exceptions Internet access limiting wizard transparent proxy Trial ID TTL 123, uninstallation… -
Page 403
security center Windows Firewall 17, WinRoute Engine Monitor 18, WinRoute Firewall Engine wizard configuration traffic rules…
На чтение 2 мин Просмотров 2.5к. Опубликовано 08.08.2022
Kerio Control — это межсетевой экран с защитой от современных угроз
Firewall, VPN, защита от вторжений, контроль загружаемых файлов и управление трафиком сотрудников
Содержание
- Задание
- Требования
- Установка
- Настройка web панели Kerio Cotrol
- Проброс порта 3389 через Kerio control
Задание
Есть локальная сеть , в ней нужно организовать dhcp сервер, доступ к интернет, опубликовать сервера в интернет. Локальная сеть будет с адресацией 172.16.0.0/24
Требования
Сервер или виртуальная машина, также 2 сетевых карты.
В моем случае это виртуальная машина с 2 сетевыми интерфейсами. Первый сетевой интерфейс , в него напрямую подключен линк от провайдера , вторая сетевая карта это приватная сеть(в вашем случае скорее всего будет External network)


Установка
Скачиваем образ с официаольного сайта либо скачиваем Kerio Control 9.3.4 build 3795 по ссылке.
Я буду производить установку Kerio на виртуальную машину , для начала установки я выберу по одному интерфейсу локальной сеть, с нее и начнем установку , позже я добавлю сетевую карту с интернетом.


Начинаем установку, выбираем язык


Соглашаемся с лицензионными правилами

Защита от дурака , нам говорят что установка полность очистит диск , соглашаемся вводим 135

Установка пошла

Жмем Enter для перезагрузки

Настройка web панели Kerio Cotrol
Дожидаемся включения нашего сервера

Сразу после включения в сети заработает dhcp сервер!!!


Переходим в браузер на локальном компьютере.


После входа в Kerio на виртуальной машине добавляем сетевой интерфейс и назначаем ему внешний ip адрес

Зажимаем и перемещаем интерфейс в Интнертнет — интерфейсы — нажимаем применить

Выключаем прокси сервер, по желанию , если оставите включенным по умолчанию вы себя назначите публичным прокси без авторизации

Включаем или выключаем прокси сервер

также можно проверить через пинг подкление к интернет

на этом базовую настройку можно считать законченной. У нас уже должен работать интернет, и раздаватся dhcp.
Проброс порта 3389 через Kerio control


Немного вступительных слов.
Пятнадцать лет назад компания из четырёх энтузиастов в маленьком Чешском городке разработала и выпустила первую версию революционного решения, которое положило начало компании Kerio Technologies. WinRoute Pro был продвинутым программным маршрутизатором и NAT-файерволом, работающим на операционной системе Windows, используемой на стандартных пользовательских ПК, именно сочетание этих особенностей привело к огромной популярности продукта среди ИТ-специалистов.
Давайте перенесёмся вперёд в 2009 год. Прошедшее десятилетие было ознаменовано повышенным вниманием к безопасности, в связи с этим версия Kerio Winroute Firewall 6.7.1. пользовалась особым успехом. В рамках данной версии была выпущена первая версия программного модуля (Software Appliance). Этот модуль был собран на основе проприетарной Linux-подобной ОС с использованием фирменного веб-интерфейса администрирования для выполнения функций управления системой. Одновременно с программным модулем был подготовлен виртуальный модуль (Virtual Appliance) для среды виртуализации от VMware. Однако оба Appliance-модуля были менее функциональны, чем основная Windows-версия приложения. Спустя год произошло значимое изменение названия продукта, он стал называться Kerio Control. Это стало следствием включения в функционал продукта системы предотвращения вторжений (IPS) и превращения его в полноценное Unified Threat Management (UTM) решение.
С ростом популярности продукта среди пользователей, целью развития Kerio Control стало повышение производительности и расширение возможностей по организации и поддержанию безопасности. В версии Kerio Control 7.4 это отразилось в виде добавления поддержки виртуальных локальных сетей (VLAN). Однако эта функция, как и некоторые другие, добавленные за два последних года, уже были недоступны для Windows-приложения Kerio Control.
Именно факт выхода весомой функции VLAN ознаменовал завершение «эры» Kerio Control для Windows. Версия Kerio Control 7.4 стала последней «Windows-версией» Kerio Control.
Поддержка данной версии (как пользовательская, так и поддержка кода приложения) осуществляется компанией Kerio до конца 2014 года. Мы призываем всех наших пользователей, по возможности, выполнить переход с текущих Windows-версий приложения Kerio Control на программные или виртуальные модули Kerio.
Для упрощения перехода нами была добавлена поддержка системы виртуализации от компании Microsoft – Hyper-V. Аутентификация пользователей через службу каталогов Microsoft Active Directory сохранена в полном и привычном для наших пользователей объёме. Администрирование и доступ к интерфейсу пользовательской статистики всё так же можно осуществлять с использованием стандартных веб-обозревателей, установленных на любой современной ОС. VPN сервер Kerio и IPsec VPN позволяют подключаться как с различных стационарных ОС, в том числе Windows, Linux, MacOS, так и с использованием встроенных VPN-клиентов мобильных устройств Android и Apple.
Да, Windows это отличная платформа, но всё проходит, и на смену приходит Kerio OS — Linux-подобная ОС, которая является универсальной платформой для всех Appliance-сборок приложения Kerio Control. И вот как раз для помощи нашим текущим пользователям выполнить переход с Windows версии нашего приложения KControl/KWF, мы решили опубликовать специальное руководство по переходу с Windows на Appliance платформу, которое также можно скачать со специальной страницы в нашем облаке Samepage.io в виде pdf-файла для ознакомления в «офф-лайн» режиме.
И он сказал, «Поехали!!»
Итак, предлагаю начать по порядку. Для начала хотелось бы рассмотреть несколько наиболее распространённых заблуждений, останавливающих администраторов UTM Kerio Control от подобной миграции:
- Сложность перехода.
- Невозможность сохранить конфигурацию, журналы приложения, данные пользовательской статистики при переходе на Appliance-сборку.
- Обязательное знание Open Source.
- Невозможность выполнения более одной роли на одном физическом сервере.
- Сложность резервирования Linux-решений.
- «Работает — не трогай» («Если есть вероятность того, что какая-нибудь неприятность может случиться, то она обязательно произойдёт» («закон Мерфи»).
В опровержение этих «мифов», предлагаю кратко рассмотреть реальную картину происходящего в процессе миграции с Windows-версии на Appliance-версию Kerio Control:
- Переход с выполнением дополнительных шагов обновления версии в случаях, когда это нужно, занимает не более двух часов «грязного» времени.
- Конфигурация, данные журналов и базы пользовательской статистики переносятся полностью. Это будет рассмотрено отдельно в рамках данного Руководства.
- Знания и опыт работы с OpenSource в целом и с ОС семейства Linux в частности, не нужны. Установка приложения и конфигурация базовых параметров (IP-адреса, время и язык интерфейса системы) происходит через графический пользовательский интерфейс на русском языке. Все остальные действия по администрированию Вашего UTM-шлюза Kerio Control осуществляются через привычный русифицированный веб-интерфейс администрирования. Осуществлять доступ в консоль Linux нет необходимости, хотя это и возможно и чуть позже мы подробно рассмотрим, когда это может потребоваться.
- С использованием «виртуального модуля» Kerio Control вы можете в рамках одного сервера виртуализации исполнять столько ИТ-ролей, сколько Вам потребуется. Виртуализация в целом позволяет лучше использовать ресурсы серверного оборудования и расширить границы в планировании ИТ-инфраструктуры.
- Ещё одно преимущество перехода — это упрощённый метод резервирования конфигурации «программного модуля» Kerio Control с использованием автоматического резервирования конфигурации в облако компании Kerio – Samepage.io, либо на любой удобный для вас FTP-сервер.
- Требование обновления версии может исходить не только от ИТ-отдела, но также являться следствием требований бизнеса по расширению возможностей UTM-решения. Не стоит забывать, что «всё достигнутое по обеспечению безопасности полётов является результатом преодоления «закона Мерфи».
Теперь предлагаю познакомиться с тем, что же собой представляют программный (Software Appliance) и виртуальный (Virtual Appliance) модули Kerio Control.
Kerio Control Software Appliance


Особенности Kerio Control Software Appliance
-
Kerio Control в сочетании с безопасной ОС
-
32-bit ОС Debian на Linux Kernel 3.12 с возможностью использования до 64Гб ОП (поддержка PAE)
-
Доступен в образе (ISO)
-
Прожигается на CD/DVD или USB-Flash для установки на “голое” железо.
Основные преимущества платформы
- Отсутствие программных и аппаратных конфликтов
- Нет вирусных угроз
- Привычно-лёгкий интерфейс администрирования Kerio Control
- Нет необходимости в знании *nix систем.
Kerio Control Virtual Appliance
Kerio Control Гипервизоры от
Software Appliance VMware и Microsoft


Поддерживаемые средства виртуализации:
-
VMware (workstation, player, server, ESX)
-
Hyper-V (2008 r2, 2012, 2012 r2)
Основные преимущества платформы
- Выполнение нескольких изолированных ролей на одном физическом
сервере - Перенос UTM на другой сервер возможен за считанные минуты
- Возможность добавления сетевого адаптера не изменяя аппаратных
средств - Повышенная безопасность сети без необходимости приобретения нового
оборудования
После того, как мы познакомились с возможными вариантами дистрибутивов, самое время обратиться к пользователям «бородатых» версий Kerio Winroute. Ниже приведена информация по обновлению старых Windows версий KWF до версии Kerio Control 7.4 (финальная версия приложения для платформы Windows) а так же несколько нюансов, которые необходимо учитывать при выполнении процедуры обновления версии приложения Kerio Control/KWF в целом.
Обновление с версии ниже 6.X.Xна версию 7.X.Xдолжно осуществляться поэтапно в соответствии со следующей схемой:
- Пошаговый переход с KWF 6.5.x на KControl 7.4.x (Windows)
- 6.5.X > 6.6.0 >> 6.7.1 > 7.0.X > 7.1.X >> 7.4.X
Прямой переход на 7.4.X возможен только с версии 7.1.X и более поздних версий.
- Переход с версии 7.0.X на версию 8.X.X (Appliance)
- 7.0.X > 7.1.X >> 8.0.X (Software Appliance)
При выполнении обновления важно учесть следующие моменты:
- Экспорт конфигурации Windows-версии KControl/KWF можно использовать для применения только на аналогичной версии Applaince-сборки, для гарантированного переноса 100% всех настроек
- Возможен перенос базы данных пользовательской статистики посещения сети Интернет и содержимого журналов приложения Kerio Control.
- Перенос базы данных пользовательской статистики посещения сети Интернет и содержимого журналов приложения Kerio Control необходимо выполнить в рамках версии 7.4.2 (финальная версия приложения Kerio Control для ОС Windows)
Это всё, что касается вводной части.
Теперь же, для ознакомления непосредственно с очерёдностью действия администратора по обновлению используемой версии KControl/KWF.
Ниже перечислим шаги, которые, кому-то все, кому-то лишь часть, предстоит выполнить администраторам,
- Обновление используемой версии
- Переход на Appliance платформу
- Установка Software Appliance
- Установка VMware Virtual Appliance
- Установка Hyper-V Virtual Appliance
- Настройка сетевых интерфейсов
- Сохранение и перенос пользовательской конфигурации и данных
- Перенос базы данных журналов приложения и базы данных пользовательской статистики посещения сети Интернет
- Проверка целостности перенесённых данных
- Обновление на актуальную версию Kerio Control Appliance
Актуализация используемой версии приложения Kerio Control (KWF)
Первое, что нам потребуется, это получить те версии дистрибутивов KControl/KWF которые необходимы Вам для выполнения перехода, согласно порядка перехода, описанного немного выше. Для загрузки необходимых дистрибутивов используйте только официальный источник – сайт компании Керио: www.kerio.ru или непосредственно сайт нашего архива релизов: download.kerio.com/archive
Путь к архиву показан на нижеследующих изображениях:
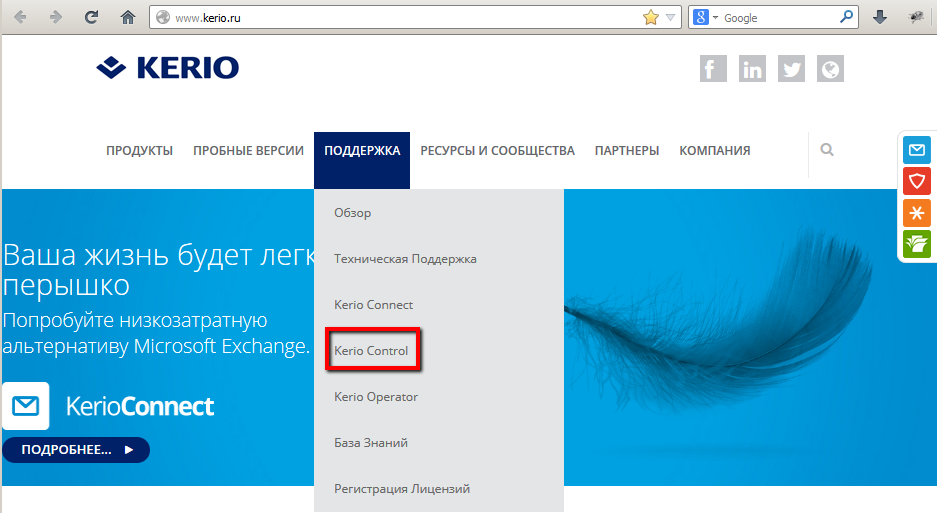

Предположим, что вы осуществляете переход с последней версии KWF 6.7.1, ваша цель — работающая версия Kerio Control Appliance 8.3 (актуальная версия приложения на Апрель 2014 года)
Основной «сложностью» перехода в данном случае является необходимость выполнять не прямое обновление с версии KWF 6.7.1 на Kerio Control 8.3, а последовательный переход на некоторые «мажорные» (major) версии. Данная необходимость обусловлена включением в конфигурационные файлы этих «мажорных» версий некоторых возможностей, которые требуют постобработки после установки приложения.
Для осуществления перехода с версии KWF 6.7.1 на версию Kerio Control 8.3 потребуется выполнить следующие шаги обновления:
1. Обновление до версии Kerio Control 7.0.0
2. Обновление до версии Kerio Control 7.1.0
3. Обновление до версии Kerio Control 7.4.2 (финальная версия для Windows)
Загрузить необходимые дистрибутивы вы сможете из нашего архива релизов.
Сам процесс обновления от версии к версии является обычной установкой новой версии «поверх» старой. Программа установки автоматически завершит работу системной службы Kerio Control (Kerio Winroute Firewall), определит директорию установки текущей версии Kerio Control (Kerio Win-route Firewall) и произведёт замену файлов приложения, требующих обновления; файлы протоколов приложения и пользовательской конфигурации сохраняются без изменений. Файлы конфигурации будут сохранены в специальной директории «UpgradeBackups», расположенной в корне директории %programmfiles%Kerio.
Видео ролик штатного процесса обновления:
Переход на последнюю Windows-версию Kerio Control 7.4.2 будет финальным шагом обновления в рамках данной платформы. Следующими этапами перехода является подготовка Appliance платформы, перенос конфигурации, базы журналов и пользовательской статистики.
Переход на платформу Appliance.
В данном разделе мы рассмотрим варианты разворачивания различных Appliance-дистрибутивов Kerio Control.
Установка Software Appliance
Данный вариант установочного пакета может быть развёрнут следующими способами:
- ISO образ может быть записан на физический CD или DVD носитель, который в дальнейшем необходимо использовать для установки Kerio Control на физический или виртуальный хост.
- В случае использования виртуальных ПК, ISO-образ можно подключить как виртуальный CD/DVD-ROM для совершения установки с него, без необходимости записи на физический носитель.
- ISO образ можно записать на USB-flash накопитель и произвести установку с него. Для уточнения инструкций, обратитесь к соответствующей статье ( kb.kerio.com/928 ) в нашей базе знаний.
Установка VMware Virtual Appliance
Для установки Kerio Control VMware Virtual Appliance на различные средства виртуализации от компании VMware, используйте соответствующий вариант дистрибутива Kerio Control VMware Virtual Appliance:
Для VMware Server, Workstation, Player, Fusion используйте заархивированный(*.zip) VMX файл:
Установка виртуального модуля в VMware player
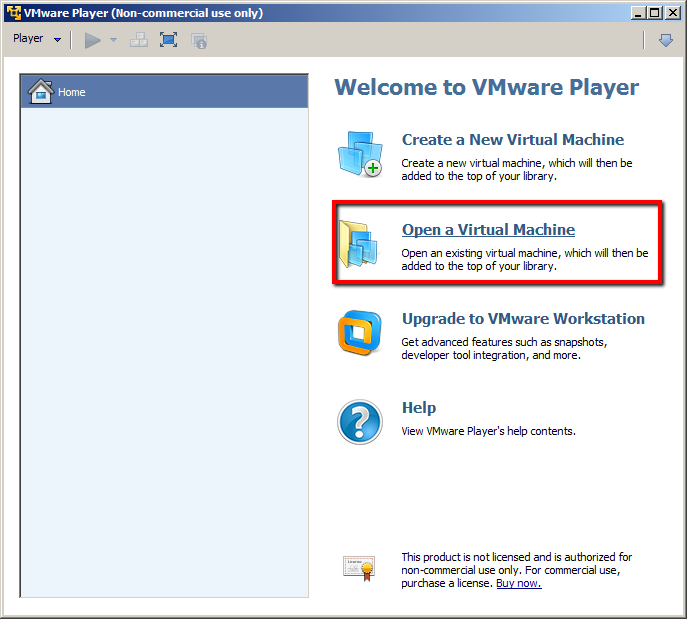
- Для VMware ESX/ESXi/vSphere Hypervisor используйте специальную OVF-ссылку для импорта виртуального модуля, имеющую вид:
http://download.kerio.com/en/dwn/control/kerio-control-appliance-1.2.3-4567-linux.ovf
VMware ESX/ESXi автоматически загрузит OVF-конфигурационный файл и соответствующий ему образ виртуального жёсткого диска (.vmdk)
При использовании OVF формата необходимо учитывать следующие аспекты:
- В виртуальном модуле Kerio Control синхронизация времени с сервером виртуализации отключена. Однако Kerio Control обладает встроенными инструментами синхронизации времени с публичными сетевыми источниками времени Интернета. Таким образом, использование синхронизации между виртуальной машиной и сервером виртуализации необязательно.
- Задачи «отключения» и «перезапуска» виртуальной машины будут выставлены в значения «по умолчанию». Возможность установления этих значений в режим «принудительного» отключения и «принудительного» перезапуска сохранена, однако данные варианты отключения и перезапуска могут стать причинами потери данных в виртуальном модуле Kerio Control. Виртуальный модуль Kerio Control поддерживает т.н. «мягкое» отключение и «мягкую» перезагрузку, позволяющие выключить или перезагрузить гостевую ОС правильным образом, поэтому рекомендуется использовать значения по умолчанию.
Установка виртуального модуля (ovf) в VMware vSphere
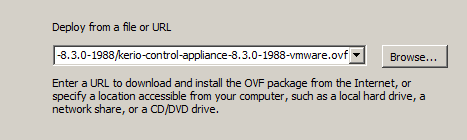
Установка Virtual Appliance для Hyper-V
- Загрузите заархивированный (*.zip) дистрибутив, распакуйте его в нужную папку.
- Создайте новую виртуальную машину, выберите опцию «Использовать имеющийся виртуальный жёсткий диск», указав в качестве образа диска файл, распакованный из загруженного архива
Установка виртуального модуля в MS Hyper-V


Следующим важным моментом подготовки к переходу на Appliance платформу, является корректная настройка сетевых интерфейсов на выбранной Appliance платформе.
Настройка сетевых интерфейсов в Software Appliance
В псевдографическом интерфейсе Kerio Control Software Appliance доступны возможности настройки IP адреса/множества адресов в статическом или динамическом режиме, создание VLAN интерфейсов и возможность настройки интерфейса в режиме PPPoE.
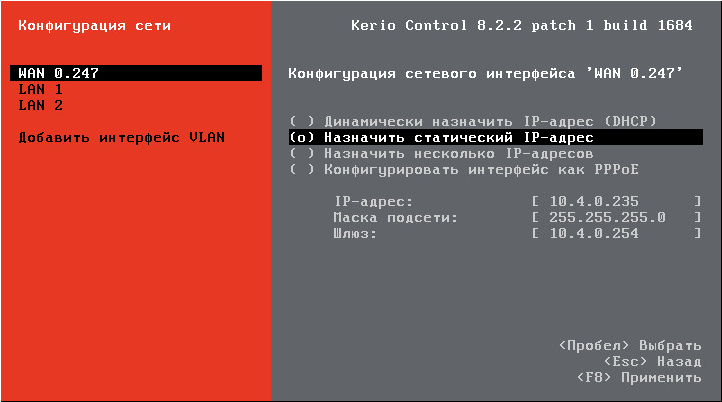
Примечание: Первоначальная настройка сетевых интерфейсов в самом дистрибутиве Kerio Control Software Appliance идентична для всех сборок Kerio Control Appliance, отличия есть только при настройке виртуальных сетевых интерфейсов в различных средах виртуализации, где может применяться Kerio Control.
Подготовка виртуальных сетевых интерфейсов в Hyper-V
Для выполнения корректной и минимально необходимой настройки виртуального коммутатора Hyper-V вам потребуется выполнить следующие шаги:
Сопоставление физических и виртуальных сетевых интерфейсов
Проверка наличия службы виртуального моста на физических сетевых интерфейсах сервера

Для ознакомления с вариантом быстрой настройки сетевых интерфейсов Kerio Control Hyper-V virtual Appliance просмотрите следующий видео ролик:
Примечание: Полные рекомендации по настройке сетевых интерфейсов для среды виртуализации Hyper-V необходимо брать из официального источника компании производителя.
(http://technet.microsoft.com/ru-ru/)
Подготовка виртуальных сетевых интерфейсов в VMware vSphere
Примерно такая же цепочка действий и в случае с подготовкой виртуальных сетевых интерфейсов в vSphere.
Создание нескольких виртуальных коммутаторов, количество зависит от ваших потребностей в виртуальных сетевых коммуникациях.
Создание виртуального коммутатора в VMware vSphere
Создание виртуального коммутатора в VMware vSphere

Создание виртуального коммутатора в VMware vSphere
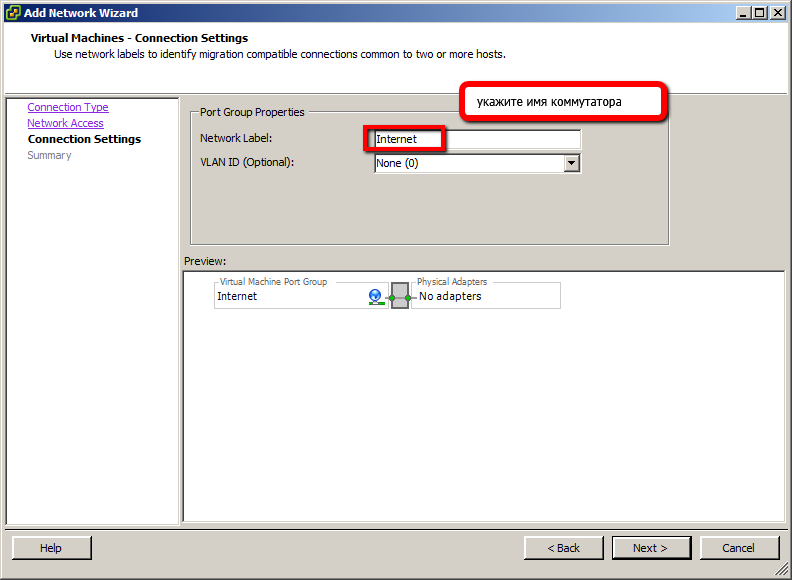
Добавление соответствующих физических сетевых интерфейсов к виртуальным коммутаторам, для возможности взаимодействия с ними физической ЛВС предприятия
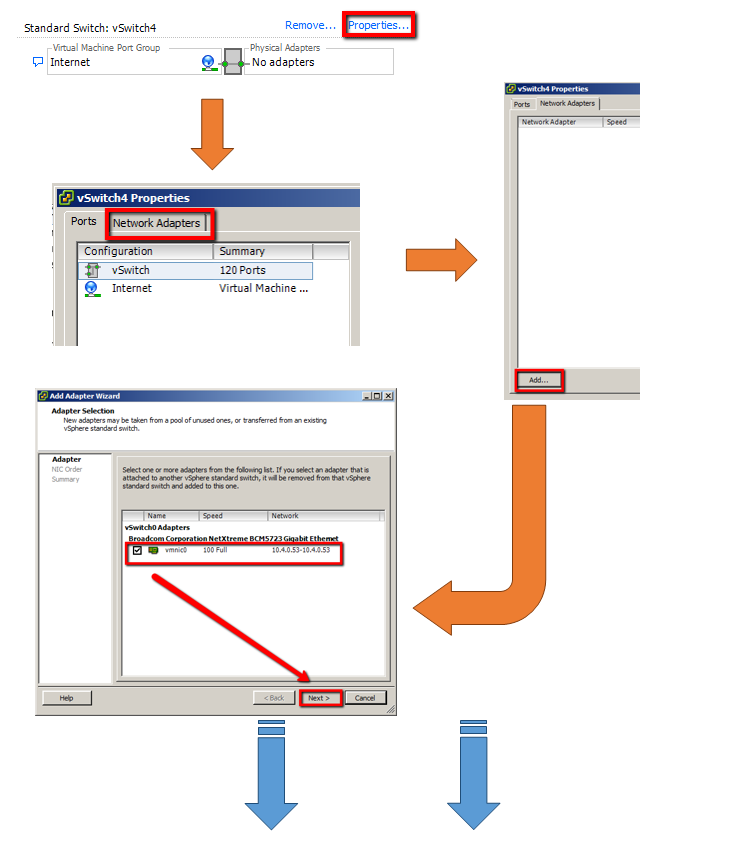

Сопоставление созданных виртуальных коммутаторов с виртуальными сетевыми интерфейсами Kerio Control VMware Virtual Appliance
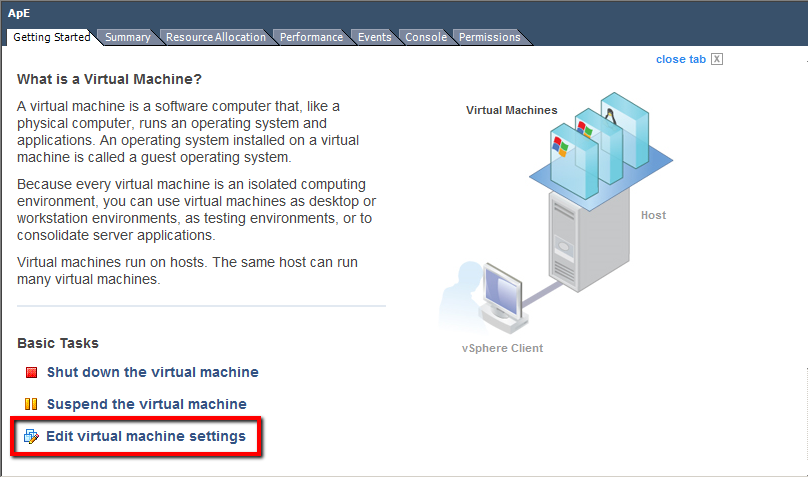
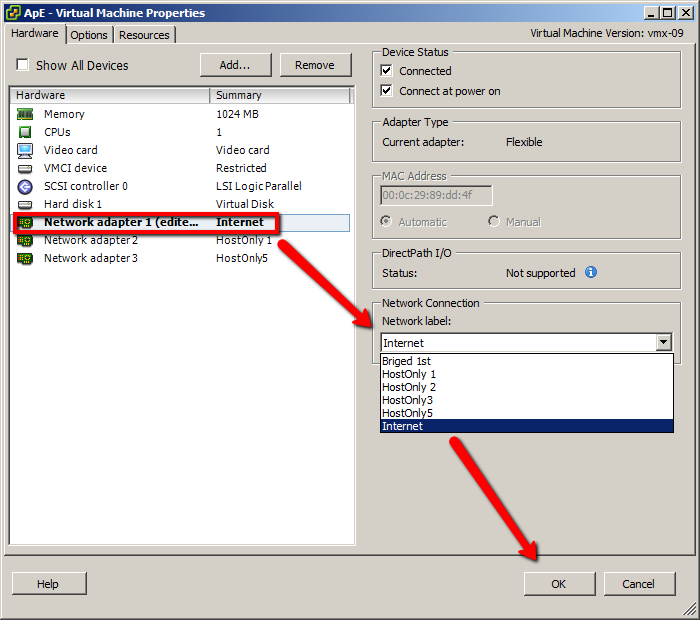
Примечание: Полные рекомендации по настройке сетевых интерфейсов для среды виртуализации VMware необходимо брать из официального источника компании производителя ( www.vmware.com/support/vsphere-hypervisor.html )
После того, как Appliance сборка была развёрнута и была произведена настройка сетевых интерфейсов, вы можете перейти к переносу основной пользовательской конфигурации с вашей Windows версии Kerio Control.
Сам процесс переноса конфигурации состоит из двух шагов:
Сохранение текущей конфигурации с использованием помощника конфигурирования
При выполнении сохранения конфигурации рекомендуется запомнить, а лучше выписать, MAC-адреса Ваших текущих сетевых интерфейсов и их соответствие используемым IP-адресам. Это понадобится при восстановлении конфигурации на новой установке Kerio Control Appliance.
Процесс сохранения конфигурации показан на приведённых ниже изображениях:

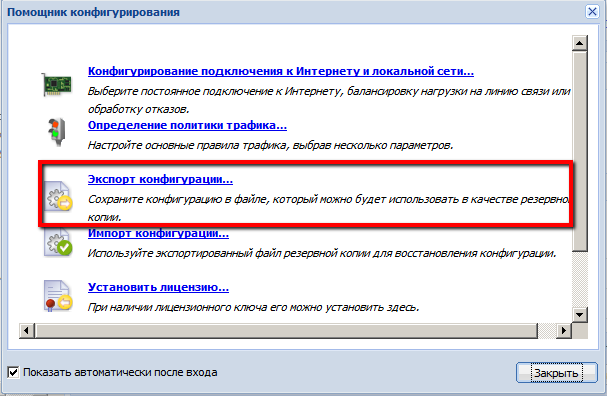
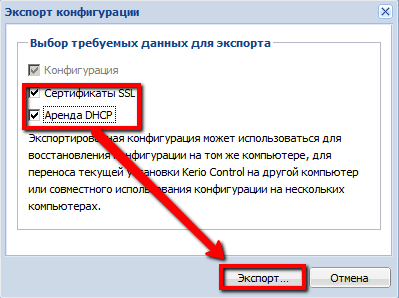
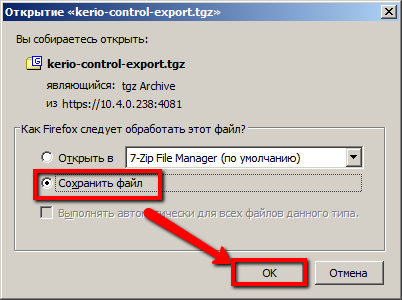
После этого шага вы сохранили архив, включающий в себя все файлы пользовательской конфигурации текущей версии Kerio Control.
Следующим шагом, является восстановление ранее сохранённой конфигурации на Appliance. При восстановлении конфигурации помощник конфигурирования предложит сопоставить конфигурацию старых сетевых интерфейсов с новыми, использующимися на сервере Kerio Control Appliance.
Примечание: Это именно тот момент, когда Вам понадобится информация о MAC и IP-адресах со старого сервера, которую Вы выписали или запомнили при сохранении конфигурации на старом.
Процесс восстановления конфигурации показан на приведённых ниже изображениях:
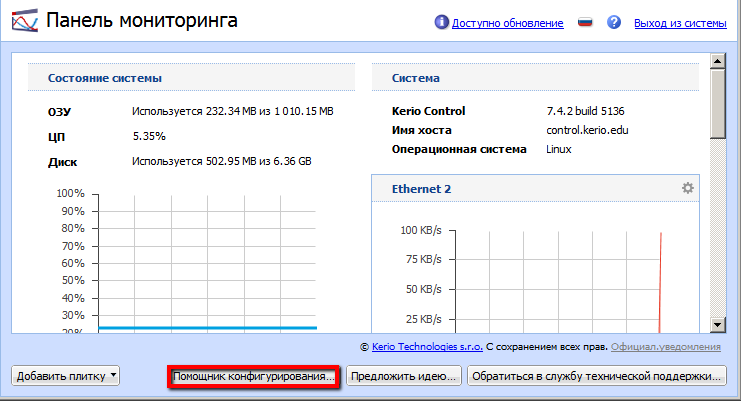

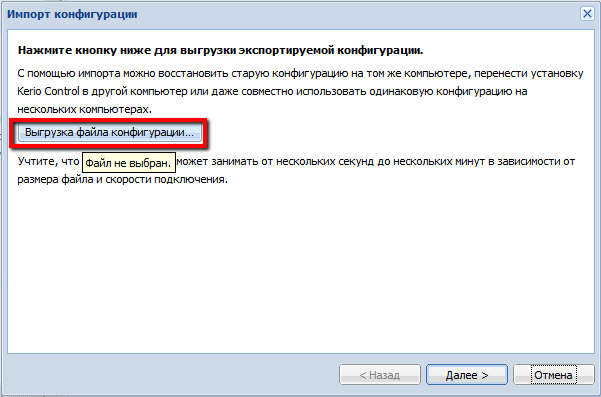
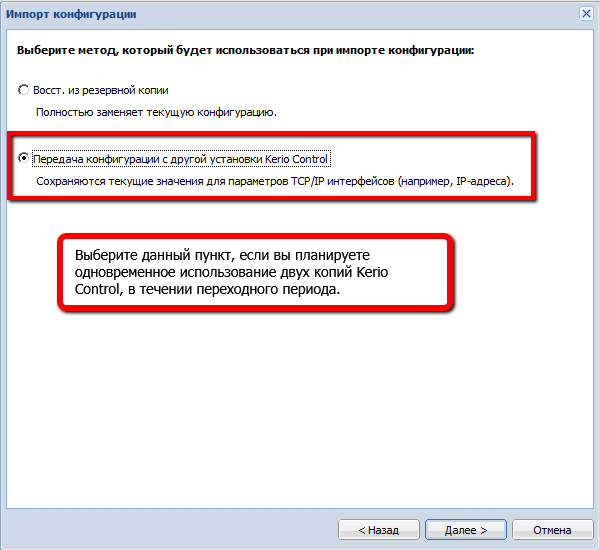
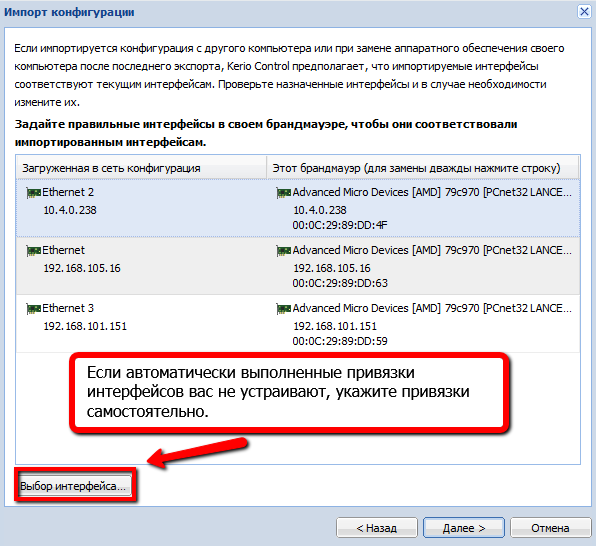
Для сохранения конфигурации сервер Kerio Control Appliance выполнит автоматическую перезагрузку, после чего его можно будет использовать.
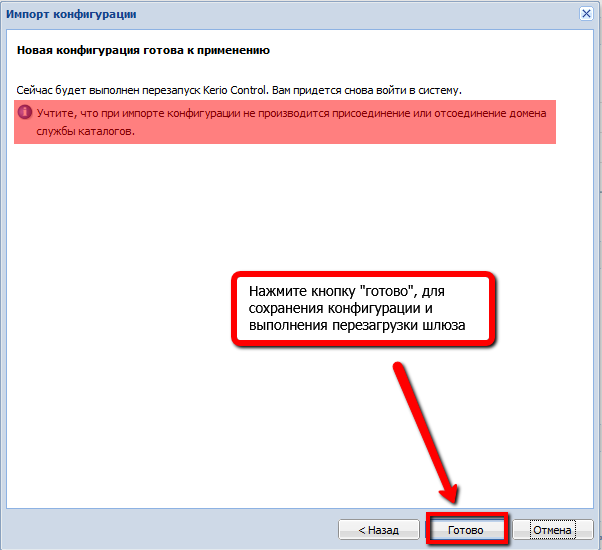
Однако процесс миграции ещё рано считать завершённым, т.к. нам необходимо перенести данные протоколов приложения и базы данных пользовательской статистики с вашего старого сервера.
И вот тут начинается самое интересное! То, что вы будете читать ниже, не описано ни в одной официальной, да и в неофициальной документации, т.е. тут будет помещено несколько приемлемых «лайв хаков», использование которых поможет вам в выполнении столь важного процесса, перехода на Appliance платформу Kerio Control.
И как обычно, прежде, чем мы перейдём с вами к непосредственному описанию, привычный «дисклэймер»:
ВАЖНО: Описанная ниже процедура не является документированной возможностью, поэтому во избежание нежелательных последствий, прежде, чем Вы начнёте выполнять перенос данных, создайте их полную резервную копию путём копирования данных на защищённое хранилище.
И так преступим! Для начала сохраним текущую базу протоколов приложения. Для этого надо сохранить файлы протоколов, которые располагаются по указанному пути
%programfiles%keriowinroute firewalllogs*
Для лучшей сохранности этих данных перед выполнением переноса рекомендуется выполнить их резервную копию на доступное безопасное хранилище.
Затем, сохраняем текущую базу данных пользовательской статистики. Вся эта информация сосредоточена в файле базы данных firebird, располагающегося в папке
%programfiles%keriowinroute firewallstardata
Оттуда нам нужен лишь файл star.fdb. Для лучшей сохранности этих данных перед выполнением переноса рекомендуется выполнить резервную копию на доступное безопасное хранилище.
После того, как мы обнаружили и сохранили всю необходимую информацию, нам необходимо её перенести на новый сервер, работающий под управлением Kerio Control Appliance, для этого первое, что вам потребуется сделать для загрузки сохранённых ранее данных на Kerio Control Appliance, это включить SSH сервер для выполнения SFTP доступа. Для этого в веб-интерфейсе администрирования Kerio Control перейдите в меню Состояние -> Состояние системы, нажмите и держите клавишу “Shift” и щёлкните по кнопке «Действия». В раскрывшемся списке выберите пункт «Включить SSH», подтвердите ваши действия, согласившись с вопросом в появившемся окне.
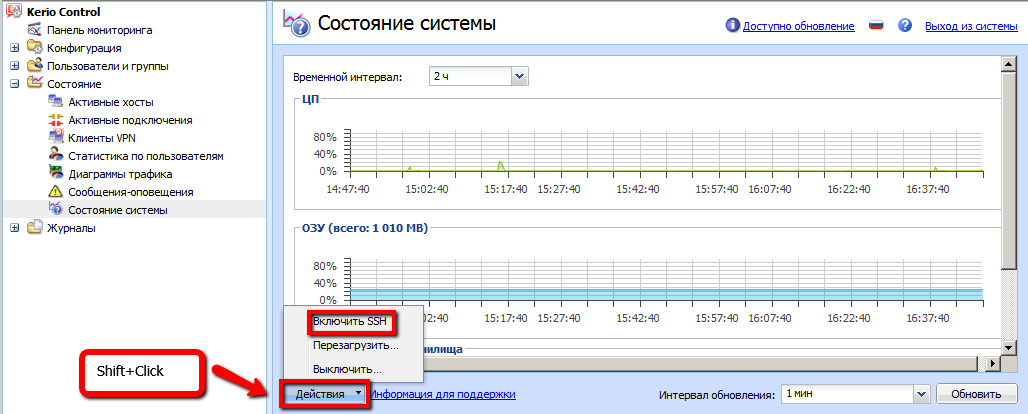
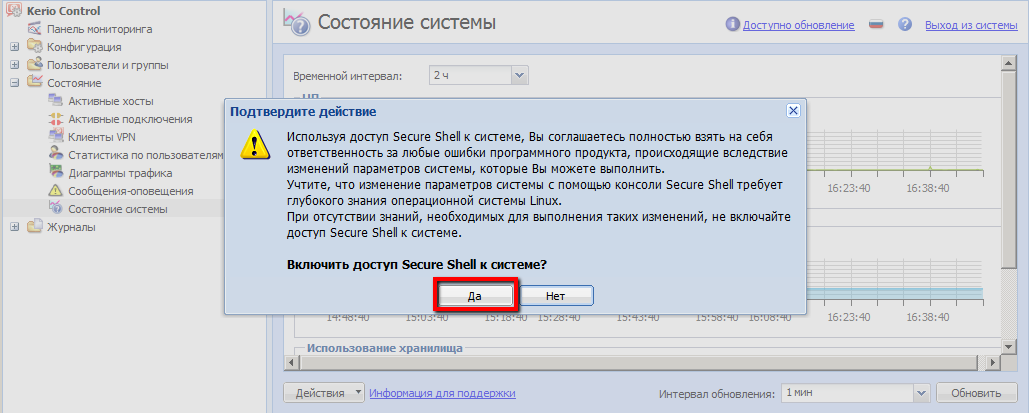

После этого необходимо удостовериться, что в правилах трафика Kerio Control Вы разрешили доступ к хосту Kerio Control Appliance по протоколу SSH из нужного Вам местоположения.
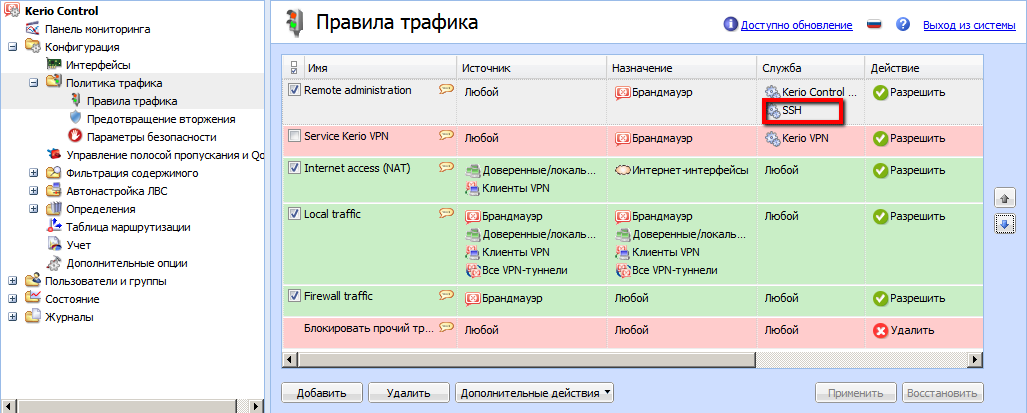
После того, как Вы включили SSH и разрешили соответствующий доступ, Вам необходимо выполнить подключение к серверу Kerio Control Appliance для загрузки на него необходимых данных протоколов и базы данных пользовательской статистики. Для этого мы будем использовать приложение WinSCP, которое позволяет выполнять подключения по протоколу SFTP.
Для подключения к серверу Kerio Control Appliance необходимо указать имя пользователя и пароль доступа, в качестве имени пользователя укажите имя “root” (без кавычек); в качестве пароля укажите пароль встроенной в Kerio Control учётной записи “Admin”.
Параметры sFTP подключения к серверу Kerio Control
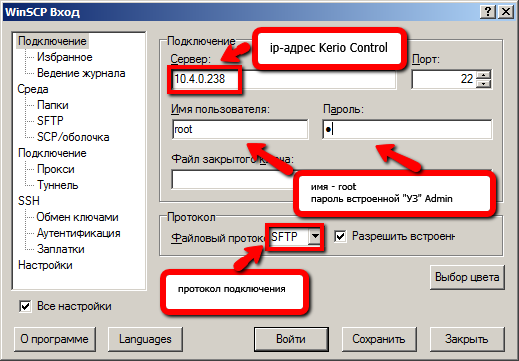
После установления подключения необходимо разместить Ваши данные в определённых папках сервера. Файлы протоколов необходимо скопировать в папку /var/winroute/logs, а файл пользовательской статистики в папку /var/ winroute/star/data, при этом старые файлы необходимо либо удалить, либо переименовать.
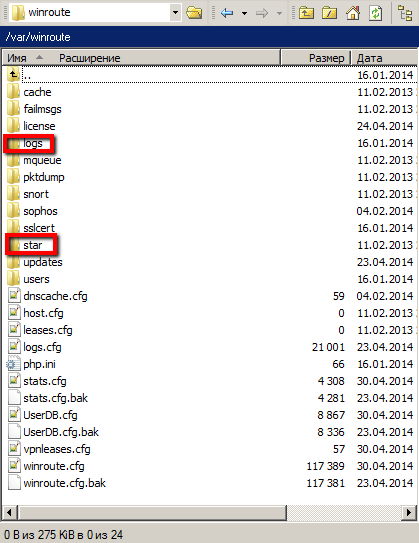
Примечание: Лучше переименовать старые файлы, для сохранения резервной копии текущих данных. В случае файлов протоколов приложения переименовывать надо лишь старые файлы с расширением *.log
После того как копирование завершено, необходимо перезапустить службу Kerio Control. Для этого необходимо получить прямой доступ к серверу Kerio Control Appliance. В случае Software Appliance, доступ осуществляется через монитор и клавиатуру самого сервера, на котором установлен Kerio Control Software Appliance. В случае виртуального модуля Kerio Control, доступ осуществляется через консоль соответствующей среды виртуализации. Во всём остальном действия будут одинаковы.
Для перехода из псевдографической консоли к интерфейсу командной строки, нажмите комбинацию клавиш “Alt-F2”. В приглашении на введение имени пользователя укажите имя “root” (без кавычек), нажмите “enter”, в поле пароль введите пароль встроенной в Kerio Control учётной записи «Admin».
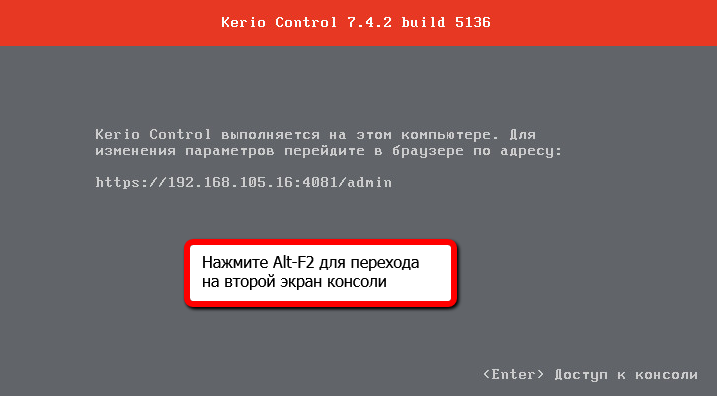
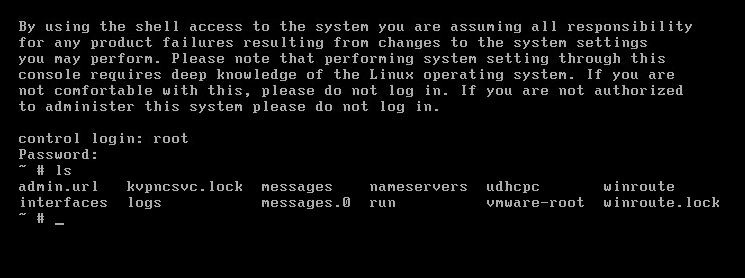
Примечание: необходимо учесть, что в ОС семейства Linux введение пароля не отображается даже значками астериска, и если Вы допустили ошибку, исправить её будет нельзя — придётся вводить пароль заново.
В приглашении на ввод команды введите следующее:
/etc/boxinit.d/60winroute restart
Эта команда выполнит перезапуск демона (службы) Kerio Control, после чего Kerio Control «подцепит» скопированные ранее данные протоколов приложения и пользовательской статистики.

После старта демона Kerio Control, необходимо проверить целостность перенесённых данных, для этого можно воспользоваться веб-интерфейсом пользовательской статистики и/или веб-интерфейсом администрирования приложения Kerio Control.
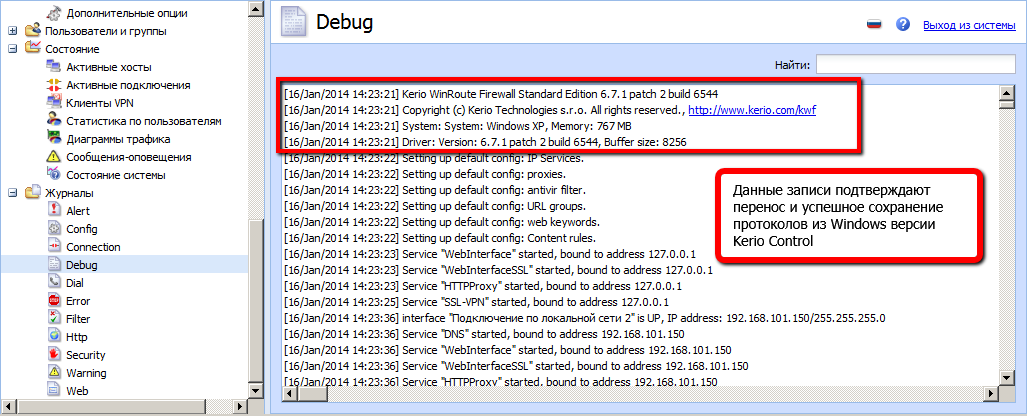
Если со всеми данными всё в порядке, то можно считать переход на новую платформу Kerio Control Appliance завершённым и осталось лишь выполнить штатную процедуру обновления Kerio Control до актуальной на текущий момент версии. Если же с какой-то частью данных «не всё в порядке», то есть два варианта:
1) удостовериться, что данные взятые с исходного сервера Kerio Control (KWF) были изначально в порядке 
2) если с исходными данными всё ок, то необходимо повторить процедуру переноса той части данных с которыми были проблемы.
3) если решения из пп. 1 и 2 не помогли, то оставьте тут комментарий, попробуем разобраться вместе 
Теперь, когда все важные данные на своих местах, можно «подтянуть» версию Kerio Control Appliance до актуальной. Штатный процесс обновления может проходить двумя способами, в автоматическом и ручном режимах.
Автоматический режим обновления версии.
Kerio Control может выполнять автоматическую проверку наличия новых версий на сайте обновления компании Kerio.
- В веб-интерфейсе администрирования перейдите в пункт меню «Дополнительные опции», во вкладку «Проверка обновлений»
- Включите опцию «Периодически проверять наличие новых версий». Kerio Control будет проверять наличие новых версий каждые 24 часа. Как только будет установлено наличие новой версии, на вкладке «Проверка обновлений» будет отображена ссылка для загрузки обновления. Для того чтобы проверить наличие обновления незамедлительно, щёлкните по кнопке «Проверить сейчас»
- Если Вы хотите загружать обновлённые версии сразу же после их обнаружения, включите опцию «Загружать новые версии автоматически». Как только новая версия будет загружена, Вы получите соответствующее уведомление в веб-интерфейсе администрирования.
- После загрузки обновления нажмите кнопку «Обновить сейчас»
- Подтвердите Ваше намерение произвести обновление и выполнить последующую автоматическую перезагрузку Kerio Control
- Дождитесь завершения установки новой версии и перезагрузки Kerio Control.
- Обновление завершено.
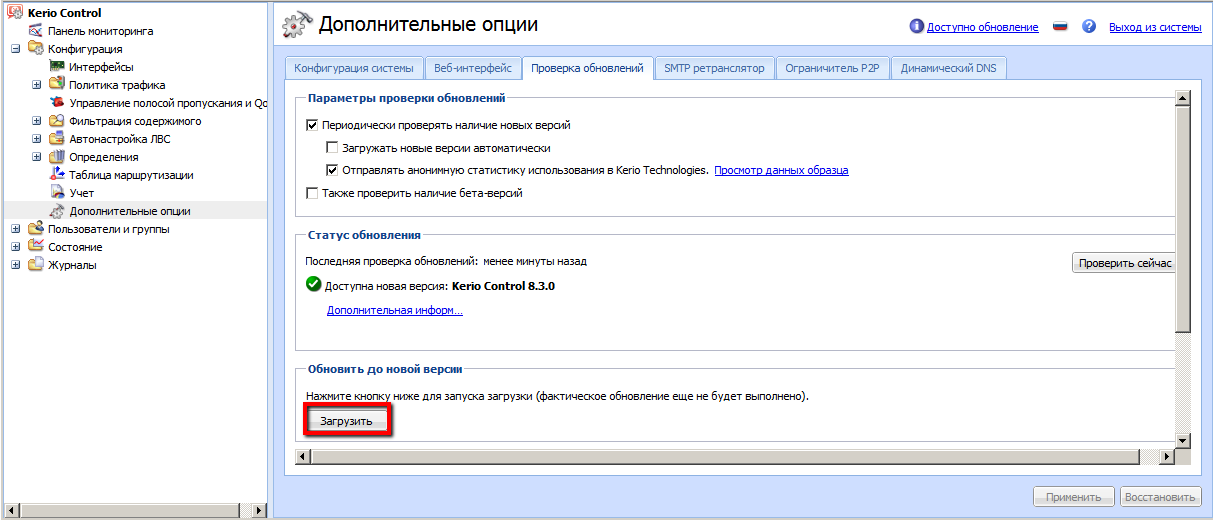
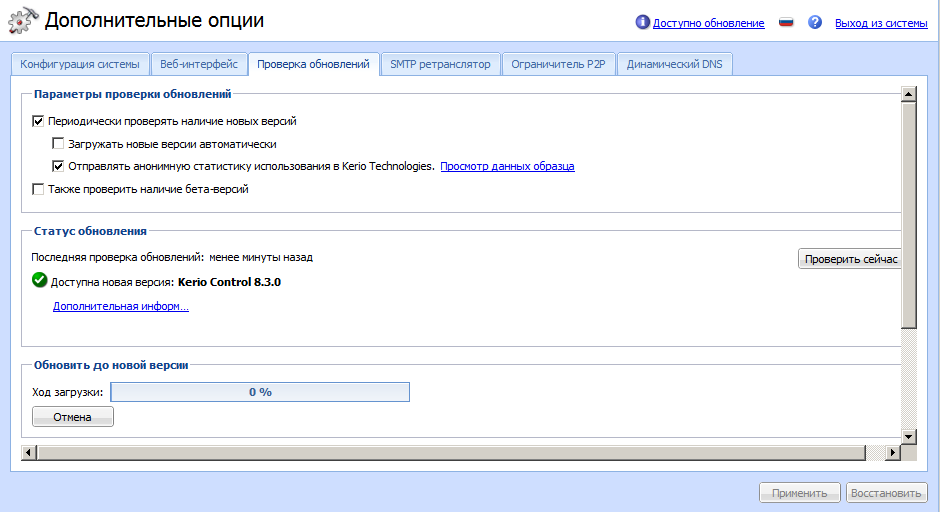

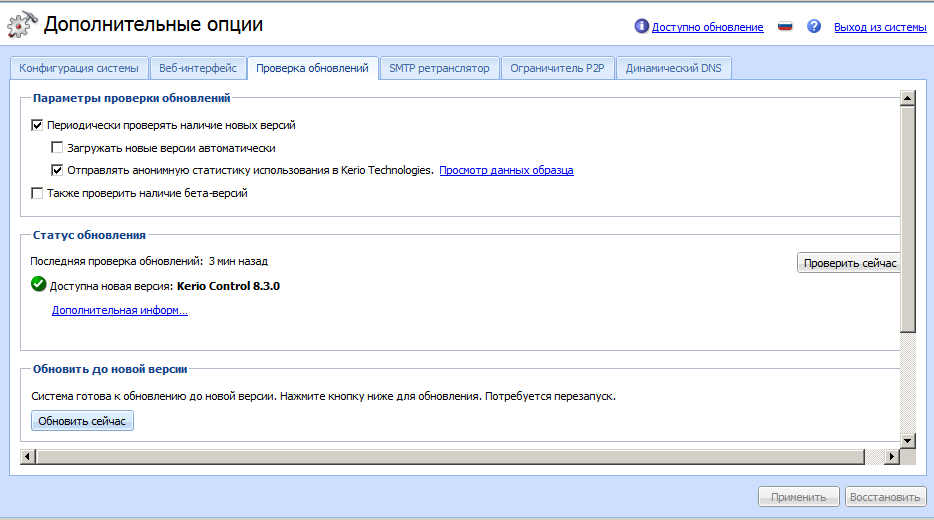
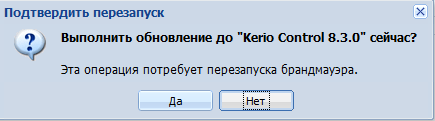

Ручной режим обновления версии.
Данный режим обновления может быть полезен при следующих обстоятельствах:
- Откат на предыдущую версию Kerio Control
- Обновление на промежуточную или не очередную версию (например, закрытый Beta релиз).
- Обновление шлюза при наличии максимальных ограничений для МСЭ на доступ к ресурсам сети Интернет.
Для выполнения обновления в ручном режиме Вам необходимо загрузить специальный образ (Upgrade Image) со страницы загрузки Kerio Control (http://www.kerio.ru/support/kerio-control ).
После загрузки выполните следующие шаги:
- В веб-интерфейсе администрирования перейдите в пункт меню «Дополнительные опции», во вкладку «Проверка обновлений»
- Щёлкните по кнопку «Выбор»
- Укажите местоположение файла образа обновления (kerio-control-upgrade.img)
- Щёлкните по кнопке «Загрузить файл обновления версии»
- После загрузки щёлкните по кнопке «Начать обновление версии»
- Дождитесь обновления версии и перезагрузки Kerio Control
- Обновление завершено.


Вуаля, у вас полноценный интернет шлюз на базе Kerio Control Appliance! Поздравляем вас с завершением процесса перехода на UTM Kerio Control!
Только зарегистрированные пользователи могут участвовать в опросе. Войдите, пожалуйста.
Какая платформа, по вашему мнению, лучше подходит для корпоративного UTM шлюза?
10.1%
Software Appliance
10
26.26%
Virtual Appliance
26
25.25%
Hardware Appliance
25
Проголосовали 99 пользователей.
Воздержались 26 пользователей.