-
Руководства по ремонту
2
-
Инструкции по эксплуатации
1

DeLonghi BAR40 инструкция по эксплуатации
(12 страниц)
- Языки:Русский
-
Тип:
PDF -
Размер:
409.31 KB
Просмотр
На NoDevice можно скачать инструкцию по эксплуатации для DeLonghi BAR40. Руководство пользователя необходимо для ознакомления с правилами установки и эксплуатации DeLonghi BAR40. Инструкции по использованию помогут правильно настроить DeLonghi BAR40, исправить ошибки и выявить неполадки.
инструкцияDeLonghi Bar 40 Caffé Tosca

MACCHINA DA CAFFÉ
COFFEE MAKER
CAFETERIE
KAFFEEAUTOMATEN
KOFFIEZETTER
CAFETERA
CAFETEIRA
MHXANH KAºE
KAHVINKEITIN
ESPRESSOMASKIN
KAFFEMASKINE
ESPRESSOMASKIN
EKSPRES DO KAWY
KÁVÉFŐZŐGÉP
ääééîîÖÖÇÇÄÄêêääÄÄ
KKÁÁVVOOVVAARR
Istruzioni per l’uso
Owner’s instructions
Mode d’emploi
Bedienungsanleitung
Gebruiksaanwijzingen
Instrucciones para el uso
Manual de instruções
O‰Ëy˜ xÚËÛ˘
Käyttöohjeet
Bruksanvisning
Brugervejledning
Bruksanvisning
NNáávvoodd kk ppoouuÏÏiittíí
Kezelési utasítás
ààÌÌÒÒÚÚÛÛÍ͈ˆËËflfl ÔÔÓÓ ˝˝ÍÍÒÒÔÔÎÎÛÛ‡‡ÚÚ‡‡ˆˆËËËË
Instrukcja użytkowanie
Посмотреть инструкция для DeLonghi Bar 40 Caffé Tosca бесплатно. Руководство относится к категории кофеварки, 1 человек(а) дали ему среднюю оценку 6.1. Руководство доступно на следующих языках: английский. У вас есть вопрос о DeLonghi Bar 40 Caffé Tosca или вам нужна помощь? Задайте свой вопрос здесь
Главная
Не можете найти ответ на свой вопрос в руководстве? Вы можете найти ответ на свой вопрос ниже, в разделе часто задаваемых вопросов о DeLonghi Bar 40 Caffé Tosca.
Как часто следует очищать кофеварку от накипи?
Какой лучший способ очистки кофеварки от накипи?
Как долго можно хранить кофе в зернах?
Как лучше всего хранить кофе?
Как помол сказывается на вкусе кофе?
Инструкция DeLonghi Bar 40 Caffé Tosca доступно в русский?
Не нашли свой вопрос? Задайте свой вопрос здесь
View a manual of the DeLonghi Bar 40 Caffé Tosca below. All manuals on ManualsCat.com can be viewed completely free of charge. By using the ‘Select a language’ button, you can choose the language of the manual you want to view.

MANUALSCAT | EN
Question & answers
Have a question about the DeLonghi Bar 40 Caffé Tosca but cannot find the answer in the user manual? Perhaps the users of ManualsCat.com can help you answer your question. By filling in the form below, your question will appear below the manual of the DeLonghi Bar 40 Caffé Tosca. Please make sure that you describe your difficulty with the DeLonghi Bar 40 Caffé Tosca as precisely as you can. The more precies your question is, the higher the chances of quickly receiving an answer from another user. You will automatically be sent an e-mail to inform you when someone has reacted to your question.
Ask a question about the DeLonghi Bar 40 Caffé Tosca
Page: 1
WARNING — THIS APPLIANCE MUST BE EARTHED
IMPORTANT
The wires in the mains lead are coloured in accordance with the
following code:
Green and yellow: Earth
Blue: Neutral
Brown: Live
As the colours of the wires in the mains lead may not correspond with
the coloured markings identifying the terminals in your plug, proceed as
follows:
The green and yellow wire must be connected to the terminal in the plug
marked with the letter E or the earth symbol or coloured green or
green and yellow.
The blue wire must be connected to the terminal marked with the letter N
or coloured black.
The brown wire must be connected to the terminal marked with the letter
L or coloured red.
N
E
L
ELECTRICAL CONNECTION (UK ONLY)
A) If your appliance comes fitted with a plug, it will incorporate a 13
Amp fuse. If it does not fit your socket, the plug should be cut off
from the mains lead, and an appropriate plug fitted, as below.
WARNING: Very carefully dispose of the cut off plug after
removing the fuse: do not insert in a 13 Amp socket elsewhere in
the house as this could cause a shock hazard.
With alternative plugs not incorporating a fuse, the circuit must be
protected by a 15 Amp fuse.
If the plug is a moulded-on type, the fuse cover must be re-fitted when
changing the fuse using a 13 Amp Asta approved fuse to BS 1362.
In the event of losing the fuse cover, the plug must NOT be used
until a replacement fuse cover can be obtained from your nearest
electrical dealer. The colour of the correct replacement fuse cover is
that as marked on the base of the plug.
B) If your appliance is not fitted with a plug, please follow the
instructions provided below:
Page: 2
Thank you for choosing this Delonghi coffee machine.
To get the very best out of your new coffee machine
it is advisable to read these instructions before using
the appliance. This is the only way to ensure
optimum results and maximum safety.
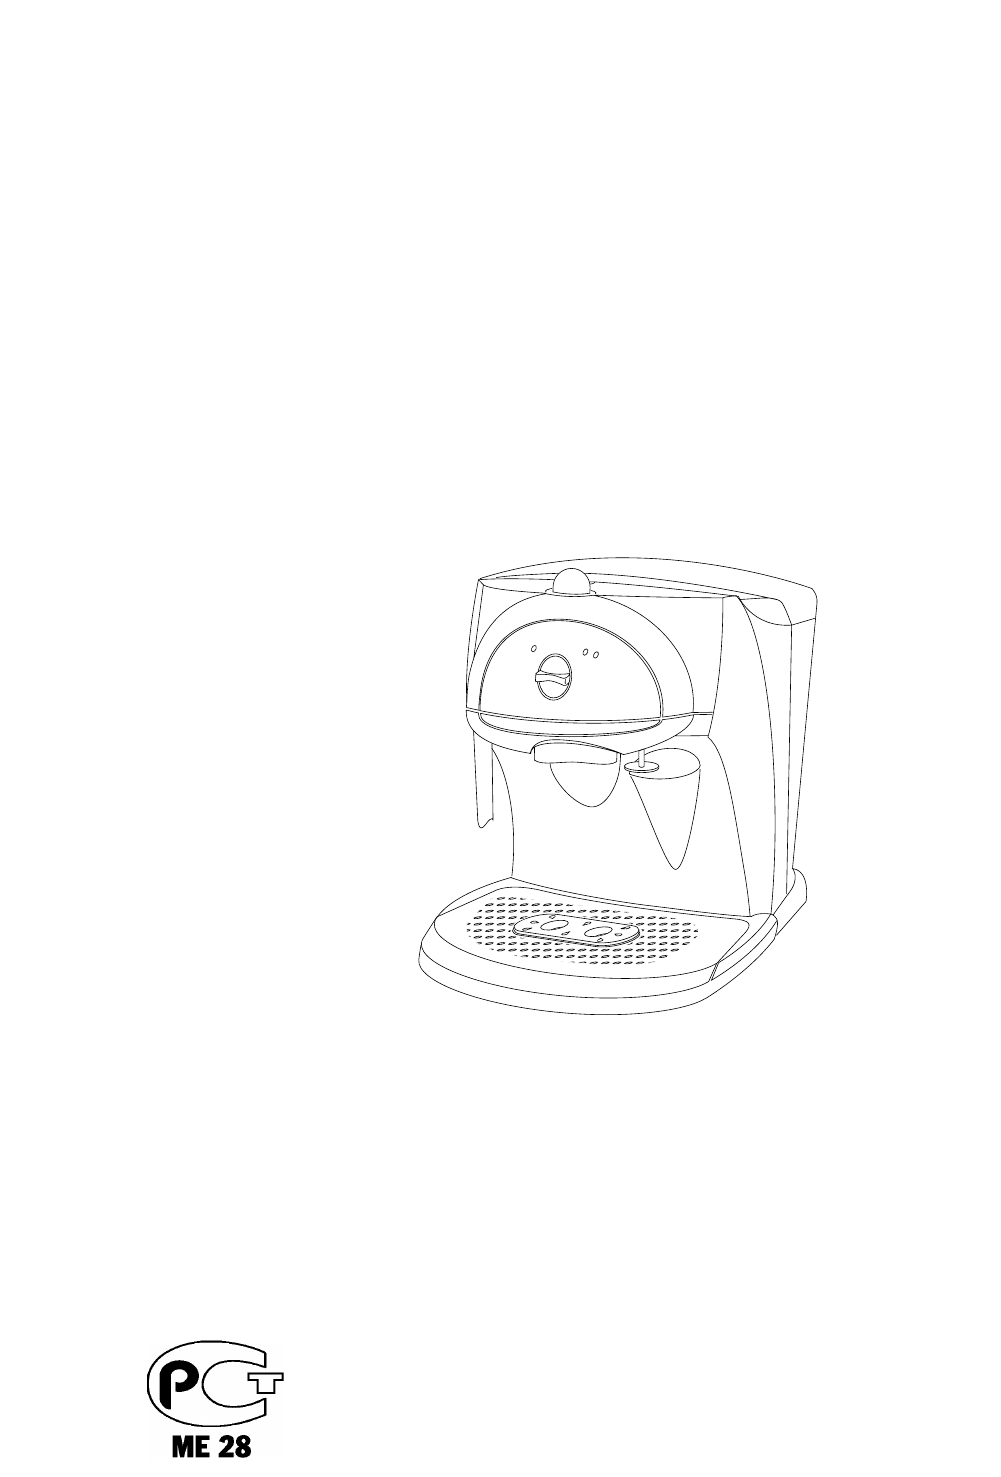
DESCRIPTION OF THE APPLIANCE
The following terms are used throughout the instruction
manual
1 Filter holder for ground coffee
2 1-cup filter
3 2-cup filter
4 Filter holder for pods (if fitted)
5 Steam release knob
6 Coffee tamper
7 Removable drip tray — black area inside for
positioning cups
8 Power supply cable
9 ‘OK’ light
10 Boiler on function
11 Selector knob
12 Espresso function
13 “O” OFF position
14 Cappuccino function (for milk frothing)
15 Coffee measuring spoon
16 Boiler outlet
17 Milk frother
18 Steam nozzle
19 Delivery tube
20 Water tank
21 Lid for water tank
SAFETY WARNINGS
• This machine has been built to “make coffee” and to
“reheat beverages”; please be careful to avoid burns
from the sprays of hot water or steam and avoid any
improper use.
• When the appliance is in use, do not touch any of the
machine’s hot surfaces.
• After unpacking, make sure that the machine is
complete and undamaged. In case of doubt, do not
use the appliance and seek the advice of a qualified
service professional.
• Packaging materials (plastic bags, foam polystyrene,
etc.) should not be left within the reach of children as
this could be a potential source of danger.
• This appliance is to be utilised for domestic use only.
Any other use is to be considered improper and
therefore, dangerous.
• The manufacturer takes no responsibility for damage
derived from improper use.
• Never touch the appliance with wet or damp hands.
• The appliance is not intended for use by young
children or infirm persons without supervision.
• Young children should be supervised to ensure that
they do not play with the appliance.
• In case of breakdown or malfunctioning, turn off the
appliance immediately and do not touch it. For
repairs, please contact a Service Centre authorized
by the manufacturer and request the use of original
replacement parts only. The lack of respect for this
point may compromise the safe use of the appliance.
• The power supply cable of this appliance must never be
replaced by the user, because its replacement requires
the use of special tools. If the cable should become
damaged, or in case it needs to be replaced, please go
to a Service Centre authorized by the manufacturer.
• When the appliance is not in use, turn off and
disconnect the plug from the socket.
• As with any electrical appliance, whilst the
instructions aim to cover as many eventualities as
possible, caution and common sense should be
applied when operating your appliance, particularly
in the vicinity of young children.
INSTALLATION
• Place the coffee maker on flat work surface at a safe
distance from taps and sinks.
• Check that the voltage corresponds to that indicated on
the appliance rating plate. The appliance must always
be connected to a well-earthed socket rated at 10 A
minimum. The manufacturer is not liable for damage
caused by inadeguate earthing of the appliance.
• In the event of incompatibility between the plug on
the appliance and the socket, have the plug replaced
with another of the right type by a qualified
professional.
If the cable is damaged or requires replacing,
contact a service centre authorised by the
manufacturer only.
• Never install the machine in an environment that can
reach a temperature less than or equal to 0°C (if the
water in it freezes, the coffee maker may be damaged).
• When the machine is in operation, any additional
cable can be stored in the machine by inserting it
back into the cable supply outlet.
11
GB
Page: 3
12
USING YOUR MACHINE FOR THE FIRST
TIME
When you are using the machine for the first time, you
should wash all the accessories i.e. filter holder, steam
nozzle etc in warm soapy water and rinse. To ensure
best tasting coffee the internal circuits must also be
flushed through at least five times. To do this follow the
directions below in “How to prepare espresso coffee”
but use only water and not coffee.
HOW TO PREPARE ESPRESSO COFFEE
FILLING THE WATER TANK:
To remove the water tank simply pull upwards (fig 2)
and fill the tank at the sink (fig 3). Do not exceed the
MAX level on the water tank. The tank may also be
filled without removing it, simply by pouring water into
it directly from a jug.
Replace the tank by connecting the valve at the bottom
of the tank with the hole in the base on the machine.
Note: Do not operate the appliance without water in
the tank and always remember to fill the tank when the
water level goes below the MIN level.
PREHEATING THE COFFEE MACHINE
To ensure your espresso coffee is dispensed at the right
temperature it is essential that the coffee unit is
preheated.
• Turn the selector knob so that the indented line on
the selector knob points to the boiler on function
. Red light next to will come on (fig 4).
• Attach the empty filter holder (without coffee) to the
machine by positioning it under the boiler outlet
with the handle towards the left (fig 5). Push
upwards and at the same time turn the handle as
far right as possible. It does not matter if the
handle is not centrally aligned with the machine, as
long as the filter holder is firmly attached to the
appliance.
• Position a cup under the filter holder. Use the same
cup that the coffee will be served in, so that it may
be preheated.
• Wait until the orange “OK” light comes on (fig 6)
and turn the selector knob to the espresso function
position (fig 7). Allow water to flow until the
orange “OK” light goes out, then stop the flow of
water by turning the selector knob to the boiler on
function (fig 4)
• Empty the cup, wait until the “OK” pilot light comes
on again and repeat the whole operation one more
time.
• For optimum preheating, the selector knob can be left
in the “boiler on” position for approximately
half an hour before making any coffee.
HOW TO PREPARE ESPRESSO COFFEE:
Hints and Tips:
• It is important to use a high quality ground coffee
with a fine grind in order to avoid the obstruction
of the filter during the brewing.
• It is important to ensure that the filter is clean before
filling with coffee.
• Tamping the coffee gives a better quality espresso.
If you press too hard, the coffee comes out slowly
and the cream is dark in colour. If on the other
hand, the coffee is not pressed enough, it will come
out too quickly and the cream will be light in colour.
• Preheating the machine will ensure your coffee is
dispensed at the correct temperature
• Espresso is a strong dark coffee with a distinctive
caramel coloured froth, known as the “crema”.
Espresso coffee is best served in small “demi-tasse”
cups, with a half cup being the ideal serving
(approx 11
/2 — 2 fl oz).
1. After carrying out the preheating of the machine as
described in the preceding section, in order to
make just one cup of espresso coffee, insert the 1-
cup filter (the smaller of the two provided) into the
filter holder (Fig.  and fill it with one level
measuring spoon of ground coffee – about 7
grams. If you wish to prepare two cups of espresso
coffee, use the 2-cup filter (the larger of the two
provided) and fill it with two less-than-level
measuring spoons of ground coffee (about 6+6
grams).
2. Distribute the ground coffee uniformly and press it
lightly with the pressing pad (Fig. 10).
3 Remove any excess coffee from the filter holder rim
and attach the filter holder to the machine. To do
this push the filter holder upwards and at the same
time turn the handle as far right as possible. It does
not matter if the handle is not centrally aligned with
the machine, as long as the filter holder is firmly
attached to the appliance (fig 5).
4 Place the cup or cups (cups can be preheated by rinsing
under hot water) on the black part of the removable drip
tray (fig 11). Ensure that the cup or cups line up with
the dispensing holes on the filter holder.
5 Wait until the “OK” light comes on (fig 6) then turn
the selector knob to the espresso function (fig
7) until the desired quantity of coffee is obtained
(approx 11
/2 — 2 fl oz or 1
/2 “demi-tasse” cup.
6 To detach the filter holder, turn the handle from
right to left. To avoid any splashing, do not detach
Page: 4
the filter holder while the machine is dispensing
coffee.
7. To remove the used coffee, hold the filter locked
with the special lever that is built into the handle
and let the coffee fall out by knocking the
overturned filter holder (Fig. 12).
8 To switch off the coffee machine, turn the selector knob
on the appliance to the OFF position “O” (fig 13)
HOW TO PREPARE COFFEE USING THE FILTER
HOLDER FOR PODS (if fitted):
• Preheat the machine as described in the
‘Preheating the Coffee Machine’ section, making
sure to leave the filter holder attached to the unit.
Following this procedure ensures that the coffee is
delivered at a hotter temperature, as well as
guaranteeing that the seal of the filter holder
gaskets is more effective.
• Press the filter holder button and insert the pod into
the filter (fig 14). Follow the instructions on the
pod’s box to pur correctly the pod oon the filter.
Note: Use pods which conform to the ESE
standard: this will be indicated on the packaging
by the following symbol:
The ESE standard is a system accepted by the leading
coffee pod manufacturers, and allows espresso coffee
to be prepared simply and without any mess.
• Attach the filter holder onto the machine, moving
from left to right (fig 5).
If the waffle filter holder is used, after using the filter
holder for ground coffee, it is essential to first
remove any coffee grains (fig.24) that may have
stuck to the hot water drip spout. If this cleaning is
not done, water may exit from the sides of the
waffle filter holder while the coffee is being made.
• Proceed as in points 4, 5 and 6 in the previous
section on how to prepare espresso.
• To remove the pod, press the button on the filter
holder and simply lift the pod out
• To turn the coffee machine off, turn the selector knob
on the appliance to the Off position “O” (fig 13).
If you use the “iIIycaffe” coffee pods, use the special
filter holder. Insert the coffee pod ensuring the
name “iIIy” is facing down and the long side of the
pod is positioned as showned in figure.
HOW TO MAKE CAPPUCCINO
1.Prepare espresso coffee, using cups that are large
enough for cappuccinos (see “How to prepare
espresso coffee).
2.Turn the selector knob to the position (fig. 15)
The “cappuccino function” and “boiler on” red lights
will come on. Wait until the orange “OK” light comes
on, to indicate that the boiler has reached the ideal
temperature for producing steam.
3.In the meantime, fill a container with approximately
3 fl. oz of milk for each cappuccino to be prepared.
The milk must be cold from the refrigerator (not
warm!). In choosing the container, bear in mind that
the volume of the milk will increase by 2 or 3 times.
Semi skimmed milk gives best results.
NOTE: We suggest you used semi-skimed milk at
refrigerator temperature.
4.Position the container with the milk in it under the
milk frother (fig. 16).
5.Immerse the cappuccino maker nozzle about 2 cm
deep into the milk and turn the steam knob in an
anti-clockwise direction (fig. 17) (by turning the knob
to a greater or lesser extent, it is possible to vary the
quantity of steam that comes out from the cappuccino
maker). At this point, the milk will begin to increase
in volume and to appear frothy.
6.Once the desired temperature has been reached (the
ideal temperature is 60°C), stop the delivery of steam
by turning the steam knob in a clockwise direction
and at the same time positioning the selector knob at
“O” (fig. 13).
7.Pour the frothed milk into the cups containing the
espresso coffee. Your cappuccino is now ready. Add
sugar to taste and, if desired, sprinkle a little
powdered chocolate on top of the froth.
IMPORTANT: always clean the milk frother and steam
nozzle immediately after use. Proceed as follows:
1.By turning the steam knob (fig. 17), allow a little
steam to come out for a few seconds. Then close
firmly by turning clockwise.
2.Hold the upper part tight with one hand and use your
other hand to unscrew the cappuccino maker,
rotating it in a clockwise direction, and remove it
from the nozzle (fig. 18).
3.Remove the steam nozzle by sliding it off the delivery
tube (fig. 19).
4.Wash the cappuccino maker and steam nozzle
thoroughly with tepid water.
5.Check that the two holes (indicated by an arrow)
shown in fig. 19 are not blocked. If necessary, clean
them with the help of a pin.
13
Page: 5
14
6.Re-attach the steam nozzle by inserting it firmly into
the steam tube (fig. 20).
7.Re-attach the cappuccino maker by sliding it all the
way into the steam nozzle and then turning it in an
anti-clockwise direction (fig. 21).
PRODUCING HOT WATER
1. Turn on the coffee unit by turning the selector knob
to the position (fig. 4).
2. Position a container under the cappuccino maker.
3. When the ‘OK’ pilot light comes on, position the
selector knob at (fig. 7) and at the same time
turn the steam knob in an anti-clockwise direction
(fig. 17); hot water will come out from the
cappuccino maker.
4. To stop the flow of hot water, turn the steam knob in a
clockwise direction and position the selector knob at “O”.
CLEANING AND MAINTENANCE
CLEANING THE FILTER HOLDER FOR GROUND COFFEE
After use, it is necessary to clean the filter holder in the
following manner:
• Turn the bottom of the filter holder in an anti-
clockwise direction and take it off (fig. 22).
• Rinse with hot water.
• Replace the bottom.
Every so often it is necessary to eliminate the build up
that forms on the metal crown of the filter holder,
immersing it in hot water for about ten minutes and
then activating the cursor several times.
Never wash the filter holder in the dishwasher.
In the event of the coffee maker remaining unused for
a long period, it is not recommended that the filter
holder be left attached, because the gasket of the boiler
could lose its elasticity.
CLEANING THE FILTER HOLDER FOR PODS (IF
SUPPLIED)
Every so often, the filter holder for pods should be
cleaned, as follows:
• press the filter holder button and remove the filter, as
indicated in fig. 23
• check that the pinholes of the filter are not blocked. If
necessary, clean it carefully with hot water, scrubbing
it with an abrasive pad.
• clean the inside of the filter holder and the rubber
gasket;
• replace the filter.
Never wash the filter holder in the dishwasher.
CLEANING THE ESPRESSO BOILER OUTLET
At least once a year, it is necessary to clean the outlet
of the espresso boiler in the following manner:
• check that the coffee machine is not warm and the
plug is detached from the mains;
• using a screwdriver, unscrew the screw that holds the
outlet of the espresso boiler (fig. 23);
• using a moist cloth, clean the area of the boiler
where the outlet was positioned;
• brush the outlet with a little dish-washing liquid until
all the pinholes are clean;
• rinse the outlet under the tap, still scrubbing it;
• replace the outlet of the espresso boiler.
OTHER CLEANING OPERATIONS
1.Do not use solvents or detergents in cleaning the
coffee maker. Use a soft, damp cloth.
2.Remove the drip-trays, empty them and wash them
periodically.
3.Clean the water tank.
ATTENTION: during cleaning, never immerse the unit
in water – it is an electrical appliance.
DESCALING
It is advisable to clean the calcium from the machine
every 200 cups of coffee. It is recommended that
specific (store-bought) products for descaling of
espresso coffee machines be used. If such products are
not available, it is possible to proceed as follows:
1.Fill the tank with water using 1 liter of water;
2.Dissolve 2 spoonfuls (about 30 grams) of citric acid
in the water (available from chemists);
3.Turn the selector knob to the position and wait
until the ‘OK’ light comes on.
4.Check that the filter holder is not attached and place
a container under the outlet of the machine;
5.Turn the selector knob to the position and allow
half of the solution in the tank to flow out. Then stop
the flow by turning the selector to the “O” position.
6.Allow the solution to act for about 15 minutes, then
start up the flow again until the tank is completely
empty;
7.To eliminate the remains of the solution and the
calcium, rinse the tank well, fill it with clean water
and replace.
8.Turn the selector knob to the position and allow
all of the remaining solution in the tank to flow out.
9.Turn the selector knob to the position and repeat
operations 7 and 8 one more time.
Repairs for malfunctioning caused by problems of
calcium build-up are not covered by the guarantee if
the descaling process described above is not carried
out regularly.
Page: 6
PROBLEM POSSIBLE CAUSES SOLUTION
Espresso coffee drips from the
edges of the filter holder,
instead of from its holes.
The coffee has an acidic taste.
• Lack of water in the tank.
• The holes in the filter holder spouts
are blocked.
• The outlet of the espresso boiler is
blocked.
• The tank is badly inserted and the
valve at the bottom is not open.
• Fill the water tank.
• Clean the holes in the spouts.
• Clean as indicated in the “Cleaning
the espresso boiler outlet” section.
• Press the tank lightly so as to open
the valve at the bottom.
• The filter holder is badly inserted.
• The gasket of the espresso boiler has
lost elasticity.
• The holes in the filter holder spouts
are blocked.
• Attach the filter holder on correctly
and turn it all the way.
• Have the espresso boiler gasket
replaced at an Service Centre
• Clean the holes in the spouts.
The espresso coffee is cold. • The ‘OK’ pilot light was not on when
the coffee delivery switch was pres
sed.
• The preheating was not carried out.
• The cups were not preheated.
• Wait until the OK pilot light comes
on.
• Carry out the preheating as indica
ted in the “Preheating the coffee
unit” section.
• Preheat the cups by rinsing them in
hot water.
The pump is too noisy. • The water tank is empty.
• The tank is inserted wrongly and the
valve at the bottom is not open.
• Fill the tank.
• Press the tank lightly so as to open
the valve at the bottom.
The milk does not frothwhen
making a cappuccino.
• The milk is not cold enough.
• The cappuccino maker is dirty.
• Always use milk at refrigerator tem
perature.
• Carefully clean the pinholes in the
milk frother
The coffee cream is light-
coloured (the coffee comes out
quickly from the spout).
• The ground coffee has not been
pressed enough.
• The quantity of ground coffee is
scarce.
• The coffee is not ground finely
enough.
• Tamper the ground coffee down
more.
• Increase the quantity of coffee.
• Only use coffee specifically ground
The coffee cream is dark (the
coffee comes out slowly from
the spout).
• The ground coffee is too tightly pres
sed.
• The quantity of ground coffee is too
much.
• The espresso boiler outlet is blocked.
• The coffee is too finely ground.
• Press the coffee less.
• Decrease the quantity of ground cof
fee.
• Clean the outlet as described in
“Cleaning the espresso boiler outlet”
section.
• Only use coffee specifically ground for
espresso coffee machines.
• The unit was not sufficiently rinsed
after the descaling process
procedure.
• Rinse the unit as described in the
“descaling” section.
15
Espresso coffee no longer
comes out.
- Brand:
- DeLonghi
- Product:
- coffee makers
- Model/name:
- Bar 40 Caffé Tosca
- Filetype:
- Available languages:
- Dutch, English, German, French, Spanish, Italian, Portuguese
Related products DeLonghi Bar 40 Caffé Tosca
MACCHINA DA CAFFÉ
COFFEE MAKER
CAFETERIE
KAFFEEAUTOMATEN
KOFFIEZETTER
CAFETERA
CAFETEIRA
MHXANH KAºE
KAHVINKEITIN
ESPRESSOMASKIN
KAFFEMASKINE
ESPRESSOMASKIN
EKSPRES DO KAWY
KÁVÉFŐZŐGÉP
ääééîîÖÖÇÇÄÄêêääÄÄ
KKÁÁVVOOVVAARR
Istruzioni per l’uso
Owner’s instructions
Mode d’emploi
Bedienungsanleitung
Gebruiksaanwijzingen
Instrucciones para el uso
Manual de instruções
O‰Ëy˜ xÚËÛ˘
Käyttöohjeet
Bruksanvisning
Brugervejledning
Bruksanvisning
NNáávvoodd kk ppoouuÏÏiittíí
Kezelési utasítás
ààÌÌÒÒÚÚÛÛÍ͈ˆËËflfl ÔÔÓÓ ˝˝ÍÍÒÒÔÔÎÎÛÛ‡‡ÚÚ‡‡ˆˆËËËË
Instrukcja użytkowanie