![]()
A d va r s l e r
•Dette apparatet er fremstilt for å kjøle ned rom private hjel og må ikke brukes til andre formål.
•Det er farlig å gjøre inngrep på eller forandre apparatets egenskaper på noen som helst måte.
•Apparatet må installeres i henhold til nasjonale installeringsforskrifter.
•For eventuelle reparasjoner må man alltid ta kontakt med tekniske servicesentre som er godkjent av produsenten. Reparasjoner utført av ukyndig personell kan medføre fare.
•Hvis strømledningen blir ødelagt, skal den bare byttes ut av spesialisert personale godkjent av produsenten, eller av en fagperson med liknende kvalifikasjoner, slik at man forbygger enhver risiko.
•Dette apparatet må kun benyttes av voksne.
•Unngå å la barn eller uegnede personer bruke apparatet uten tilstrekkelig tilsyn.
•Unngå at barn leker med apparatet.
•Dette apparatet må koples til en forsvarlig jordet kontakt.
•La en kyndig elektriker sjekke det elektriske anlegget.
•Unngå bruk av skjøteledninger til el-kabelen
•Før rengjøring eller vedlikehold må støpselet alltid trekkes ut av kontakten.
•Unngå å dra i ledningen når du skal flytte på apparatet.
•Unngå å installere apparatet i rom der luften kan inneholde gass, olje, eller svovel, eller i nærheten av varmekilder.
•Unngå å sette varme eller tunge ting oppe på apparatet.
•Gjør rent antibakteriefilteret minst en gang per uke.
•Unngå å bruke varmeapparater i nærheten av klimaanlegget.
•Hvis apparatet skal transporteres, må det stå vertikalt eller legges på siden.
•Bruk luftkjøleren kun slik som anvist i denne bruksanvisningen. Bruksanvisningen omfatter ikke alle mulige forhold og situasjoner som kan oppstå. Bruk derfor alltid sunn fornuft og vær forsiktig når du installerer, bruker, og oppbevarer elektriske apparater til hjemmebruk.
•Når apparatets levetid er over skal klimaanlegget leveres til egnet innsamlingssted.
•Materialene som er brukt til emballasjen kan gjenvinnes. Det anbefales derfor at du kaster dem i egne containere for gjenvinnbart materiale.
•R407 er en nedkjølingsgass i overensstemmelse med EU-reglene med hensyn til mil. Vi anbefaler at man ikke stikker hull på apparatets kjølekrets.
•Hold apparatet på minst 50 cm avstand fra brennbare materialer (alkohol osv.), og fra trykkbeholdere (sprayflasker f.eks).
BESKRIVELSE
|
1 |
Rist for luftutslipp |
9 |
El-ledning |
|
2 |
Betjeningspanel |
10 |
Propp til dreneringsutløpet |
|
3 |
Hjul |
11 |
Flens med propp |
|
4 |
Håndtak |
12 |
Slange til luftutførsel |
|
5 |
Filter |
13 |
Munnstykke til vindu |
|
6 |
Rist for luft-/dampinntak |
14 |
Fjernkontroll (plassering mot apparatet) |
7Rom for luftutførselsslange
8Rist for luftinntak for kondensator
92
Fo r b e re d e l s e r f ø r b r u k
TILKOPLING TIL STRØMNETTET
Før man setter støpslet i stikkontakten, må man kontrollere følgende:
•nettspenningen samsvarer med den verdien som er angitt på merkeskiltet på baksiden av apparatet
•at stikkontakten og den elektriske tilførselslinjen er dimensjonert for å tåle forutsatt belastning
•at kontakten og støpslet passer sammen. Hvis ikke må selve støpslet byttes ut
•at støpslet er koplet til et jordet anlegg. Produsenten fraskriver seg ethvert ansvar dersom denne verneforskriften ikke overholdes.
Strømledningen må kun byttes ut av teknisk fagpersonell.
Nedenfor finner man alle nødvendige opplysninger for å oppnå best mulig ytelser fra klimaanleggets funksjoner.
Når du bruker apparatet må du alltid passe på at det ikke finnes noe som hindrer inntaket og utslippet av luften.
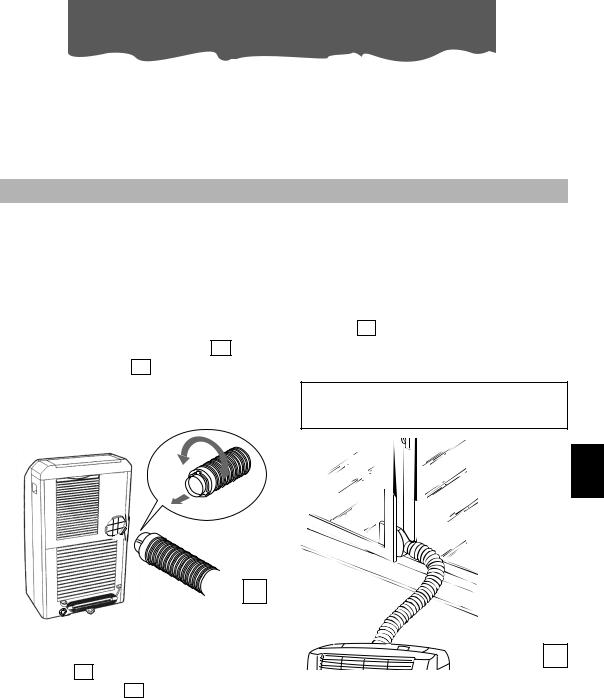
LUFTAVKJØLING UTEN INSTALLASJON
Det er kun noen få, enkle operasjoner som skal til før klimaanlegget gir deg velbehag.
•Sett fast slangen for luftutførsel 12 i det tilhørende rommet 7 på bakre
del av apparatet.
Sett den inn som angitt på figur A.
•Åpne vinduet eller døren på klem, og sett tuten 13 i riktig posisjon, som vist på figuren B.
Begrens lengde og svinger på luftslangene, og unngå at de kommer i klem.
2
NO
1
A
|
• |
Skru av plastenden som finnes på luftutfør- |
B |
|
selsrøret 12 og skru deretter fast munn- |
||
|
stykket til vinduet 13 . |
||
|
• Sett klimaanlegget nær et vindu eller en dør. |
||
|
• |
Sørg for at utførselsslangen for luft ikke |
|
|
kommer i klem. |
93

Fo r b e re d e l s e r f ø r b r u k
LUFTAVKJØLING MED INSTALLASJON
Dersom man skulle ønske det kan apparatet også installeres på en delvis permanent måte (Fig.C).
30 cm 
30 cm
C
I dette tilfellet er det nødvendig å:
•Lage et hull (ø 134 mm.) i en yttervegg eller gjennom et vindu.
Sørge for at høydeforskjellen og dimensjonen på hullet blir er i samsvar med det vi se i figur D.
|
i vindusruten |
i dørrammen |
i veggen: |
Det |
||
|
til |
veran- |
anbefales å isole- |
|||
|
dadør |
re denne delen av |
||||
|
veggen med |
et |
||||
|
passende isole- |
|||||
|
D |
|||||
|
ringsmateriale |
|||||
• Plasser den medfølgende flensen for veg-
|
gen |
11 |
i hullet. |
|||||||
|
• |
Fest slangen |
12 |
inn i rommet på baksi- |
||||||
|
den av apparatet som er beregnet til |
|||||||||
|
dette formål . (fig. A side 93). |
|||||||||
|
• |
Før inn den andre enden på slangen |
12 |
|||||||
|
fast på flensen |
11 |
som angitt i figur E. |
E
MAX100 cm
MIN 35
Hver gang slangen 12 ikke er tilkoblet, kan hul-
let lukkes med proppen på flensen 11 .
MERKNAD.
Når du foretar en halvpermanent installering, anbefaler vi at du lar en dør stå på gløtt (1 cm er nok) for at det skal bli tilstrekkelig utskifting av luft.
Begrens lengde og svinger på luftslangene, og unngå at de kommer i klem.
94

Betjeningspanelet
BETJENINGSPANELET
|
O |
H |
||||
|
Q |
P |
I L |
G |
||
|
N |
M |
|
D |
|||||||||||||
|
C |
|||||||||||||
|
E |
|||||||||||||
|
B |
F |
||||||||||||
|
A |
|||||||||||||
BESKRIVELSE AV BETJENINGSPANELET
ATasten ON/OFF (på/ av)
BTast for funksjonavalg MODE
Luftkjøling, avfukting, ventilasjon
CSeleksjonstast for ventilasjonshastighet (MAX/ MED/ MIN)
ETast for økning av temperaturen/ funksjonstiden/ programmert funksjonstid
FTast for senking av temperaturen/ funksjonstiden/ programmert funksjonstid
GVisningsskjerm Viser hvilke temperturverdier som er blitt stilt inn, og den programmerte funksjonstiden.
HVarsellampe tidsinnstiller i funksjon
I/L/M Varsellaper for ventilasjonshastighet
NVarsellampe ventilasjonsfunksjon
OVarsellampe luftavkjøingsfunksjon
PVarsellampe avfuktingsfunksjon
QVarsellampe alarm
95
 Loading…
На этой странице представлен список инструкций, включающий в себя руководство пользователя, сервисную инструкцию, инструкцию по установке, а также по эксплуатации и ремонту для De Longhi NF190 на различных языках. Выберите нужный тип инструкции и язык, на котором Вам удобнее будет ее читать и нажимайте кнопку «Скачать инструкцию».
Руководство пользователя De Longhi NF190
 |
Руководство пользователя De Longhi NF190
Языки: Шведский
|
|
|
Руководство пользователя De Longhi NF190
Языки: Португальский
|
|
|
Руководство пользователя De Longhi NF190
Языки: Норвежский
|
|
|
Руководство пользователя De Longhi NF190
Языки: Итальянский
|
|
|
Руководство пользователя De Longhi NF190
Языки: Греческий
|
|
|
Руководство пользователя De Longhi NF190
Языки: Французский
|
|
|
Руководство пользователя De Longhi NF190
Языки: Испанский
|
|
|
Руководство пользователя De Longhi NF190
Языки: Немецкий
|
|
|
Руководство пользователя De Longhi NF190
Языки: Русский
|
|
|
Руководство пользователя De Longhi NF190
Языки: Польский
|
|
|
Руководство пользователя De Longhi NF190
Языки: Голландский
|
|
|
Руководство пользователя De Longhi NF190
Языки: Венгерский
|
|
|
Руководство пользователя De Longhi NF190
Языки: Английский
|
|
|
Руководство пользователя De Longhi NF190
Языки: Финский
|
|
|
Руководство пользователя De Longhi NF190
Языки: Датский
|
|
|
Руководство пользователя De Longhi NF190
Языки: Чешский
|


48
Waarschuwingen
•Dit apparaat is bestemd voor de klimaatregeling van huiselijke ruimten en dient niet voor andere doe-
leinden gebruikt te worden.
• Het is gevaarlijk om op welke wijze dan ook de kenmerken van het apparaat te wijzigen.
• Het apparaat moet volgens de nationale installatievoorschriften geïnstalleerd worden.
•Wendt u zich voor eventuele reparaties uitsluitend tot een technisch servicecentrum dat door de
fabrikant erkend is.
• Reparaties uitgevoerd door ondeskundig personeel kunnen gevaarlijk zijn.
•Als het netsnoer beschadigd is, mag dit uitsluitend vervangen worden door de fabrikant of door zijn
technische servicedienst of in elk geval door iemand met soortgelijke vakkennis, om elk risico te
voorkomen.
• Dit apparaat mag uitsluitend door volwassenen gebruikt worden.
• Zonder passend toezicht mag het gebruik van dit apparaat niet aan kinderen of onbekwame per-
sonen worden toegestaan.
• Laat niet toe dat kinderen met het apparaat spelen.
• Dit apparaat moet op een doeltreffende aardleiding aangesloten worden.
•Laat de elektrische installatie door een gekwalificeerd elektricien controleren.
•Vermijd het gebruik van verlengsnoeren voor het netsnoer.
•Trek altijd de stekker uit het stopcontact voordat u reinigings- of onderhoudswerkzaamheden gaat
uitvoeren.
•Trek niet aan het netsnoer om het apparaat te verplaatsen.
•Installeer het apparaat niet in ruimten waar de lucht gas, olie, zwavel kan bevatten, of in de buurt
van warmtebronnen.
• Plaats geen zware of warme voorwerpen op het apparaat.
• Maak de bacteriewerende filters minstens eens per week schoon.
• Gebruik geen verwarmingstoestellen in de nabijheid van dit apparaat.
• Indien het apparaat vervoerd moet worden, moet het verticaal gezet of op een zijde gelegd wor-
den.
• Gebruik de airconditioner alleen op de manier die in deze gebruiksaanwijzingen beschreven wordt.
• Deze gebruiksaanwijzingen dekken niet alle omstandigheden en situaties die zich kunnen voordoen.
• Men moet altijd het gezond verstand gebruiken en voorzichtig zijn bij de installatie, de werking en de
bewaring van huishoudelijke apparatuur.
• Lever het apparaat aan het einde van zijn levensduur bij een speciaal hiervoor bestemd inzamel-
centrum in.
• Het verpakkingsmateriaal is recyclebaar.
• Men adviseert dus dit materiaal in de speciale bakken voor gescheiden afvalverzameling te doen.
• R407c is een koelmiddel dat aan de EG-regelingen inzake milieubescherming voldoet.
• Het is verboden het koelcircuit van het apparaat te doorboren.
•Plaats het apparaat op een afstand van minstens 50 cm van brandbare stoffen (alcohol, enz.) of reci-
piënten onder druk (spuitbussen, enz.).
BESCHRIJVING
1 luchttoevoerrooster
2 bedieningspaneel
3 wieltjes
4 handvaten
5 filter
6 luchtafzuigrooster ontvochtiger
7 zitting luchtafvoerslang
8 luchtafzuigrooster condensor
9 netsnoer
10 dop van de afvoer
11 flens met dop
12 luchtafvoerslang
13 uitblaasmond voor venster
14 afstandsbediening (alleen bij sommige
modellen)
View a manual of the DeLonghi NF 190 below. All manuals on ManualsCat.com can be viewed completely free of charge. By using the ‘Select a language’ button, you can choose the language of the manual you want to view.

MANUALSCAT | EN
Question & answers
Have a question about the DeLonghi NF 190 but cannot find the answer in the user manual? Perhaps the users of ManualsCat.com can help you answer your question. By filling in the form below, your question will appear below the manual of the DeLonghi NF 190. Please make sure that you describe your difficulty with the DeLonghi NF 190 as precisely as you can. The more precies your question is, the higher the chances of quickly receiving an answer from another user. You will automatically be sent an e-mail to inform you when someone has reacted to your question.
Ask a question about the DeLonghi NF 190
- Brand:
- DeLonghi
- Product:
- air-conditioning
- Model/name:
- NF 190
- Filetype:
- Available languages:
- Dutch
Related products DeLonghi NF 190
Lastmanuals offers a socially driven service of sharing, storing and searching manuals related to use of hardware and software : user guide, owner’s manual, quick start guide, technical datasheets… DON’T FORGET : ALWAYS READ THE USER GUIDE BEFORE BUYING !!!
If this document matches the user guide, instructions manual or user manual, feature sets, schematics you are looking for, download it now. Lastmanuals provides you a fast and easy access to the user manual DELONGHI NF 190. We hope that this DELONGHI NF 190 user guide will be useful to you.
Lastmanuals help download the user guide DELONGHI NF 190.
Manual abstract: user guide DELONGHI NF 190
Detailed instructions for use are in the User’s Guide.
[. . . ] If the appliance requires repair, contact a Service Centre authorised by the manufacturer only. If the power cable is damaged, it must be replaced by the manufacturer, an authorised service centre or a qualified electrician in order to eliminate all risk. Do not allow children or unfit persons to use the appliance without adequate supervision. Before cleaning or maintenance operations, always unplug the appliance from the mains socket. [. . . ] · Insert the other end of the hose 12 on the flange 11 as shown in fig. E.
30 cm
MAX100 cm
E
30 cm
C
Proceed as follows: · Drill a hole in an outside wall or through a window pane. Respect the height and dimensions of the hole given in figure D.
MIN 35 cm
When the hose 12 is not fitted, the hole can be closed with the flange cap 11 . When installing the air conditioner semi-permanently, you should leave a door slightly open (as little as 1 cm) to guarantee correct ventilation.
in the window pane
D
in the wooden kickboard of a French window
in the wall: you are recommended to insulate the section of wall using suitable insulation.
Keep the air hoses as short and free of curves as possible to avoid constrictions.
134
17
Control panel
THE CONTROL PANEL O Q N P H L M
I
G
A
B
C
D
E
F
DESCRIPTION OF THE CONTROL PANEL
A ON/OFF button B MODE selection button Air conditioning, dehumidifying, fan. C Fan speed selection button (MAX/MED/MIN) D Timer button E Programmed operation increase temperature/time button F Programmed operation decrease temperature/time button G Display Displays the temperature values set and the programmed operating time H Timer in operation indicator light I/L/M Fan speed lights N Fan mode light O Air-conditioning mode light P Dehumidifying mode light Q Alarm light
18
Operation
TURNING THE APPLIANCE ON
Plug the appliance into the mains. Press the ON/OFF button (A) (when turned on, the air conditioner starts operating in the same mode as when it was turned off). Press the MODE button (B) until the indicator light corresponding to the required mode lights up: Light (O): air-conditioning mode Light (N): fan mode Light (P): dehumidifying mode
GB
AIR-CONDITIONING MODE
Ideal for hot humid weather when you need to cool and dehumidify the room. To set operation of the appliance correctly, press the + (E) or — (F) buttons until the desired temperature is displayed. Then select the fan speed by pressing the FAN button (C) until the indicator light corresponding to the required fan speed lights up: MAX: the air conditioner operates at maximum to reach the required temperature as rapidly as possible MED: reduces noise levels but still maintains a good level of comfort MIN: for silent operation The most suitable temperature for the room during the summer varies from 24 to 27°C. You are recommended, however, not to set a temperature much below the outdoor temperature.
19
Operation
FAN MODE
Adjust fan speed by pressing the FAN button (C) as described for the air-conditioning mode. If you select «MIN» speed, less air is filtered but the appliance is also less noisy.
DEHUMIDIFYING MODE
Ideal for reducing the humidity in a room without lowering or raising the temperature (spring or autumn, damp rooms, rainy spells, etc). In this mode, other speeds cannot be selected.
PROGRAMMING THE TIMER
The timer can be used to delay appliance start up or shut down. How to programme delayed start up · Plug the appliance into a mains socket and press the ON/OFF button (A), then select the required operating mode and other settings (temperature, fan speed, etc). · Press the ON/OFF button (A) again to place the appliance in standby mode. · Use the + (E) or — (F) buttons to set the number of hours delay before the appliance comes on. How to programme delayed shut down · Delayed shut down can be programmed in any operating mode (air conditioning / fan/ dehumidifying). · Use the + (E) or — (F) buttons to set the number of hours delay before the appliance goes off. At the set time, the air conditioner shuts down and remains in standby. Light (H) stops flashing.
20
Using the remote control unit (some models only)
MODELS WITH REMOTE CONTROL
· Point the remote control at the receiver on the air-conditioner. · The remote control should be handled with extreme care and respect. [. . . ] To clean the filters, remove the filter as shown in figure F Use a vacuum cleaner to remove the dust collected on the filter. If it is very dirty, immerse in warm water and rinse a number of times. START OF SEASON CHECKS Make sure the power cable and plug are undamaged and the earth system is efficient. END OF SEASON OPERATIONS To drain all water from the circuit, remove the cap 10 from the drain hose on the back of the appliance and allow the water to drain out into a basin (figure G). [. . . ]
DISCLAIMER TO DOWNLOAD THE USER GUIDE DELONGHI NF 190
Lastmanuals offers a socially driven service of sharing, storing and searching manuals related to use of hardware and software : user guide, owner’s manual, quick start guide, technical datasheets…
In any way can’t Lastmanuals be held responsible if the document you are looking for is not available, incomplete, in a different language than yours, or if the model or language do not match the description. Lastmanuals, for instance, does not offer a translation service.
Click on «Download the user manual» at the end of this Contract if you accept its terms, the downloading of the manual DELONGHI NF 190 will begin.
Copyright © 2015 — LastManuals —
All Rights Reserved.
Designated trademarks and brands are the property of their respective owners.
![]() Loading…
Loading…
На этой странице представлен список инструкций, включающий в себя руководство пользователя, сервисную инструкцию, инструкцию по установке, а также по эксплуатации и ремонту для De Longhi NF190 на различных языках. Выберите нужный тип инструкции и язык, на котором Вам удобнее будет ее читать и нажимайте кнопку «Скачать инструкцию».
Руководство пользователя De Longhi NF190
|
Руководство пользователя De Longhi NF190
Языки: Шведский
|
|
|
Руководство пользователя De Longhi NF190
Языки: Португальский
|
|
|
Руководство пользователя De Longhi NF190
Языки: Норвежский
|
|
|
Руководство пользователя De Longhi NF190
Языки: Итальянский
|
|
|
Руководство пользователя De Longhi NF190
Языки: Греческий
|
|
|
Руководство пользователя De Longhi NF190
Языки: Французский
|
|
|
Руководство пользователя De Longhi NF190
Языки: Испанский
|
|
|
Руководство пользователя De Longhi NF190
Языки: Немецкий
|
|
|
Руководство пользователя De Longhi NF190
Языки: Русский
|
|
|
Руководство пользователя De Longhi NF190
Языки: Польский
|
|
|
Руководство пользователя De Longhi NF190
Языки: Голландский
|
|
|
Руководство пользователя De Longhi NF190
Языки: Венгерский
|
|
|
Руководство пользователя De Longhi NF190
Языки: Английский
|
|
|
Руководство пользователя De Longhi NF190
Языки: Финский
|
|
|
Руководство пользователя De Longhi NF190
Языки: Датский
|
|
|
Руководство пользователя De Longhi NF190
Языки: Чешский
|
48
Waarschuwingen
•Dit apparaat is bestemd voor de klimaatregeling van huiselijke ruimten en dient niet voor andere doe-
leinden gebruikt te worden.
• Het is gevaarlijk om op welke wijze dan ook de kenmerken van het apparaat te wijzigen.
• Het apparaat moet volgens de nationale installatievoorschriften geïnstalleerd worden.
•Wendt u zich voor eventuele reparaties uitsluitend tot een technisch servicecentrum dat door de
fabrikant erkend is.
• Reparaties uitgevoerd door ondeskundig personeel kunnen gevaarlijk zijn.
•Als het netsnoer beschadigd is, mag dit uitsluitend vervangen worden door de fabrikant of door zijn
technische servicedienst of in elk geval door iemand met soortgelijke vakkennis, om elk risico te
voorkomen.
• Dit apparaat mag uitsluitend door volwassenen gebruikt worden.
• Zonder passend toezicht mag het gebruik van dit apparaat niet aan kinderen of onbekwame per-
sonen worden toegestaan.
• Laat niet toe dat kinderen met het apparaat spelen.
• Dit apparaat moet op een doeltreffende aardleiding aangesloten worden.
•Laat de elektrische installatie door een gekwalificeerd elektricien controleren.
•Vermijd het gebruik van verlengsnoeren voor het netsnoer.
•Trek altijd de stekker uit het stopcontact voordat u reinigings- of onderhoudswerkzaamheden gaat
uitvoeren.
•Trek niet aan het netsnoer om het apparaat te verplaatsen.
•Installeer het apparaat niet in ruimten waar de lucht gas, olie, zwavel kan bevatten, of in de buurt
van warmtebronnen.
• Plaats geen zware of warme voorwerpen op het apparaat.
• Maak de bacteriewerende filters minstens eens per week schoon.
• Gebruik geen verwarmingstoestellen in de nabijheid van dit apparaat.
• Indien het apparaat vervoerd moet worden, moet het verticaal gezet of op een zijde gelegd wor-
den.
• Gebruik de airconditioner alleen op de manier die in deze gebruiksaanwijzingen beschreven wordt.
• Deze gebruiksaanwijzingen dekken niet alle omstandigheden en situaties die zich kunnen voordoen.
• Men moet altijd het gezond verstand gebruiken en voorzichtig zijn bij de installatie, de werking en de
bewaring van huishoudelijke apparatuur.
• Lever het apparaat aan het einde van zijn levensduur bij een speciaal hiervoor bestemd inzamel-
centrum in.
• Het verpakkingsmateriaal is recyclebaar.
• Men adviseert dus dit materiaal in de speciale bakken voor gescheiden afvalverzameling te doen.
• R407c is een koelmiddel dat aan de EG-regelingen inzake milieubescherming voldoet.
• Het is verboden het koelcircuit van het apparaat te doorboren.
•Plaats het apparaat op een afstand van minstens 50 cm van brandbare stoffen (alcohol, enz.) of reci-
piënten onder druk (spuitbussen, enz.).
BESCHRIJVING
1 luchttoevoerrooster
2 bedieningspaneel
3 wieltjes
4 handvaten
5 filter
6 luchtafzuigrooster ontvochtiger
7 zitting luchtafvoerslang
8 luchtafzuigrooster condensor
9 netsnoer
10 dop van de afvoer
11 flens met dop
12 luchtafvoerslang
13 uitblaasmond voor venster
14 afstandsbediening (alleen bij sommige
modellen)
View a manual of the DeLonghi NF 190 below. All manuals on ManualsCat.com can be viewed completely free of charge. By using the ‘Select a language’ button, you can choose the language of the manual you want to view.
MANUALSCAT | EN
Question & answers
Have a question about the DeLonghi NF 190 but cannot find the answer in the user manual? Perhaps the users of ManualsCat.com can help you answer your question. By filling in the form below, your question will appear below the manual of the DeLonghi NF 190. Please make sure that you describe your difficulty with the DeLonghi NF 190 as precisely as you can. The more precies your question is, the higher the chances of quickly receiving an answer from another user. You will automatically be sent an e-mail to inform you when someone has reacted to your question.
Ask a question about the DeLonghi NF 190
- Brand:
- DeLonghi
- Product:
- air-conditioning
- Model/name:
- NF 190
- Filetype:
- Available languages:
- Dutch
Related products DeLonghi NF 190
Lastmanuals offers a socially driven service of sharing, storing and searching manuals related to use of hardware and software : user guide, owner’s manual, quick start guide, technical datasheets… DON’T FORGET : ALWAYS READ THE USER GUIDE BEFORE BUYING !!!
If this document matches the user guide, instructions manual or user manual, feature sets, schematics you are looking for, download it now. Lastmanuals provides you a fast and easy access to the user manual DELONGHI NF 190. We hope that this DELONGHI NF 190 user guide will be useful to you.
Lastmanuals help download the user guide DELONGHI NF 190.
Manual abstract: user guide DELONGHI NF 190
Detailed instructions for use are in the User’s Guide.
[. . . ] If the appliance requires repair, contact a Service Centre authorised by the manufacturer only. If the power cable is damaged, it must be replaced by the manufacturer, an authorised service centre or a qualified electrician in order to eliminate all risk. Do not allow children or unfit persons to use the appliance without adequate supervision. Before cleaning or maintenance operations, always unplug the appliance from the mains socket. [. . . ] · Insert the other end of the hose 12 on the flange 11 as shown in fig. E.
30 cm
MAX100 cm
E
30 cm
C
Proceed as follows: · Drill a hole in an outside wall or through a window pane. Respect the height and dimensions of the hole given in figure D.
MIN 35 cm
When the hose 12 is not fitted, the hole can be closed with the flange cap 11 . When installing the air conditioner semi-permanently, you should leave a door slightly open (as little as 1 cm) to guarantee correct ventilation.
in the window pane
D
in the wooden kickboard of a French window
in the wall: you are recommended to insulate the section of wall using suitable insulation.
Keep the air hoses as short and free of curves as possible to avoid constrictions.
134
17
Control panel
THE CONTROL PANEL O Q N P H L M
I
G
A
B
C
D
E
F
DESCRIPTION OF THE CONTROL PANEL
A ON/OFF button B MODE selection button Air conditioning, dehumidifying, fan. C Fan speed selection button (MAX/MED/MIN) D Timer button E Programmed operation increase temperature/time button F Programmed operation decrease temperature/time button G Display Displays the temperature values set and the programmed operating time H Timer in operation indicator light I/L/M Fan speed lights N Fan mode light O Air-conditioning mode light P Dehumidifying mode light Q Alarm light
18
Operation
TURNING THE APPLIANCE ON
Plug the appliance into the mains. Press the ON/OFF button (A) (when turned on, the air conditioner starts operating in the same mode as when it was turned off). Press the MODE button (B) until the indicator light corresponding to the required mode lights up: Light (O): air-conditioning mode Light (N): fan mode Light (P): dehumidifying mode
GB
AIR-CONDITIONING MODE
Ideal for hot humid weather when you need to cool and dehumidify the room. To set operation of the appliance correctly, press the + (E) or — (F) buttons until the desired temperature is displayed. Then select the fan speed by pressing the FAN button (C) until the indicator light corresponding to the required fan speed lights up: MAX: the air conditioner operates at maximum to reach the required temperature as rapidly as possible MED: reduces noise levels but still maintains a good level of comfort MIN: for silent operation The most suitable temperature for the room during the summer varies from 24 to 27°C. You are recommended, however, not to set a temperature much below the outdoor temperature.
19
Operation
FAN MODE
Adjust fan speed by pressing the FAN button (C) as described for the air-conditioning mode. If you select «MIN» speed, less air is filtered but the appliance is also less noisy.
DEHUMIDIFYING MODE
Ideal for reducing the humidity in a room without lowering or raising the temperature (spring or autumn, damp rooms, rainy spells, etc). In this mode, other speeds cannot be selected.
PROGRAMMING THE TIMER
The timer can be used to delay appliance start up or shut down. How to programme delayed start up · Plug the appliance into a mains socket and press the ON/OFF button (A), then select the required operating mode and other settings (temperature, fan speed, etc). · Press the ON/OFF button (A) again to place the appliance in standby mode. · Use the + (E) or — (F) buttons to set the number of hours delay before the appliance comes on. How to programme delayed shut down · Delayed shut down can be programmed in any operating mode (air conditioning / fan/ dehumidifying). · Use the + (E) or — (F) buttons to set the number of hours delay before the appliance goes off. At the set time, the air conditioner shuts down and remains in standby. Light (H) stops flashing.
20
Using the remote control unit (some models only)
MODELS WITH REMOTE CONTROL
· Point the remote control at the receiver on the air-conditioner. · The remote control should be handled with extreme care and respect. [. . . ] To clean the filters, remove the filter as shown in figure F Use a vacuum cleaner to remove the dust collected on the filter. If it is very dirty, immerse in warm water and rinse a number of times. START OF SEASON CHECKS Make sure the power cable and plug are undamaged and the earth system is efficient. END OF SEASON OPERATIONS To drain all water from the circuit, remove the cap 10 from the drain hose on the back of the appliance and allow the water to drain out into a basin (figure G). [. . . ]
DISCLAIMER TO DOWNLOAD THE USER GUIDE DELONGHI NF 190
Lastmanuals offers a socially driven service of sharing, storing and searching manuals related to use of hardware and software : user guide, owner’s manual, quick start guide, technical datasheets…
In any way can’t Lastmanuals be held responsible if the document you are looking for is not available, incomplete, in a different language than yours, or if the model or language do not match the description. Lastmanuals, for instance, does not offer a translation service.
Click on «Download the user manual» at the end of this Contract if you accept its terms, the downloading of the manual DELONGHI NF 190 will begin.
Copyright © 2015 — LastManuals —
All Rights Reserved.
Designated trademarks and brands are the property of their respective owners.
![]()