Инструкции
АНДРОИД ПРИСТАВКИ
КАМЕРЫ ВИДЕОНАБЛЮДЕНИЯ
РАЦИИ
РОУТЕРЫ И МОДЕМЫ
ТЕРМОМЕТРЫ
УСИЛЕНИЕ СИГНАЛА
ФОТОЛОВУШКИ
-
Bookmarks
Quick Links
Related Manuals for Leixen UV-25HX
Summary of Contents for Leixen UV-25HX
-
Page 2
Indice… -
Page 4: Installation
Installation Instalación Connect Power Conexión de la alimentación This transceiver should be connected to a Este equipo debe conectarse a un 13.8V DC 13.8V DC power supply. It can not be fuente de alimentación. No se puede conectar connected directly to an AC outlet. Connect directamente a una toma de CA.
-
Page 5
Remove mounting screws from dos tornillos de los lados del equipo y vuelva a the sides of the transceiver and reinstall instalarlos a través de los orificios en el them through the holes in the bracket. soporte. Note: Do not install the transceiver where it Nota: No instale el transceptor donde pudiera might interfere with the deployment of airbags. -
Page 7
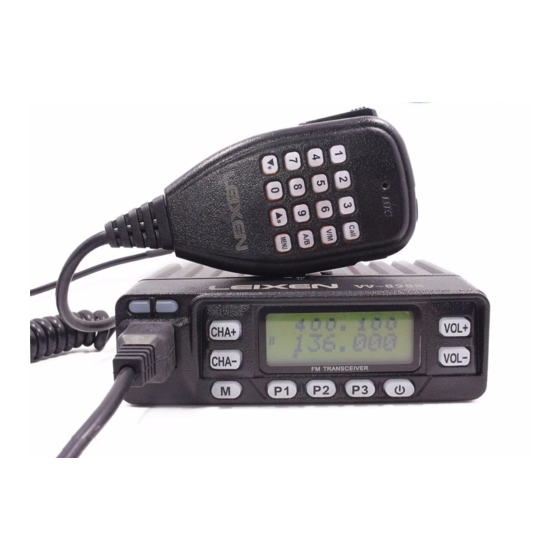
1, Loudspeaker 1, altavoz 2, Indicator Light (Red, green light) 2, indicador de luz (rojo, verde) 3, MIC Connector (RJ45) 3, conector de micrófono (RJ45) 4, CHA+(Channel Up) 4, CHA + (canal arriba) 5, CHA-(Channel Down) 5, CHA-(canal abajo) 6, LCD display screen 6, pantalla LCD 7, VOL+(Volume Up) 7, VOL + (subir volumen) -
Page 8
1, PTT Push to Talk 1, PTT Push to Talk 2, MIC Microphone 2, micrófono MIC 3, UP Up, VOL+ 3, hasta arriba, VOL + 4, DN Down, VOL- 4, abajo de la DN, VOL- 5, A Call 5, una llamada 6, B VFO/MR Switch 6, B interruptor de VFO/MR 7, C A/B mode Switch… -
Page 9
icon Feature Description Operation Method Memory Channel No. Nº de canal de memoria Being A Channel Switch A/B Key Volver a canal A Being B Channel Switch A/B Key Volver a canal A Keyboard Lockout Press M Key for 2 Seconds Bloquo de teclado Pulsar tecla M durante 2 segundos VOX Open… -
Page 10
strength when receiving. Indicador de potencia, 10 casillas para alta potencia, 5 casillas baja potencia. En RX indica intensidad de la señal. Auto Power off Refer to Menu 01 Autoapagado Reverse Frequency Refer to Menu 33 Frecuencia inversa Narrowband Refer to Menu 50 Banda estrecha Dual Reception Refer to Menu 07… -
Page 11: Basic Operation
Front Panel Description Descripción del Panel frontal Orient the transceiver with the front panel facing Oriente el transceptor con la parte frontal hacia you. usted. Find the RJ-45 microphone jack on the left side Encontrará al enchufe de micrófono de RJ-45 of the front panel.
-
Page 12
keypad to select memory channel in MR mode. 4) entrada de número de canal usando el teclado numérico para seleccionar el canal de Note: This transceiver dual-watch memoria en el modo de MR. function, you can switch between A and B channels using the “C”… -
Page 13
4) Use the “CHA+” and “CHA-‘ keys, or the menú de modificación. “VOL+” and “VOL-“ keys to select the desired 4) Use «CHA +» y «CHA-‘ o las teclas»VOL +» y value. «VOL-» para seleccionar el valor deseado. 5) Press the “M” key to confirm your changes, 5) Presione la tecla «M»… -
Page 14
sound an audible confirmation beep when audible de confirmación cuando se presionan. they are pressed. It can be set to “ON” or Puede ser fijado en «ON» u «OFF». Esta función “OFF”. This feature is turned on by default. está activada por defecto. Channel Save (CHASave): Menu 05 Canal Salvar (CHASave): Menú… -
Page 15
These codes represent digits 0-9, plus *, #, A, combinan para crear uno de los 16 códigos B, C, and D. TheVV-898 can generate and separados. Estos códigos representan dígitos decode DTMF sequences in order to control 0-9, además de *, #, A, B, C y D. El VV-898 other equipment, remotely control or inhibit puede generar y descifrar secuencias DTMF other… -
Page 16
call all radios in a specific calling group. radio llamada secuencia llamará a todas las The only radios in the group that will not radios en un grupo específico de llamadas. Las automatically respond to a group call are radios sólo en el grupo que no responde transceivers which are either set to selective automáticamente a una llamada de grupo son call… -
Page 17
buttons on the microphone or “CHA+/CHA-“ or CHA-» o «VOL+/VOL-» las teclas del panel “VOL+/VOL-“ keys on the transceiver front frontal del receptor. panel. 2, transmisión manual: Si está vacía la lista Manual transmission: DTMF DTMF de marcado automático, transmisión autodial list is empty, automatic DTMF… -
Page 18
squelch. IDCS: Only signal channel IDCS: Sólo una señal en el canal con un containing a matching inverted DCS code correspondiente código DCS invertido (uno de (one of 107 codes) will open the receiver’s los 107 códigos) abrirá el squelch del receptor. squelch. -
Page 19
Encode Type and Encode Code (Menus Tipo de codificar y codificar código 10 and 11) (menús 10 y 11) Similar to the settings for “Decode Type” Similar a la configuración de “Decode Type” and “Decode Code” above, using Menu y “Decode Code” anteriormente, utilizando 10, “EncType”… -
Page 20
OFF: Disable. transmitted signal OFF: desactivar. La señal transmitida no does not send any CTCSS or DCS codes. envía los códigos de CTCSS o DCS. CTCSS: Transmit a specified CTCSS tone CTCSS: Transmitir tono CTCSS (one of 56 tones) especificado (uno de 56 tonos) NDCS: Transmit a specified normal DCS NDCS: Transmitir un código DCS normal code (one of 107 codes). -
Page 21
station at the same time as another mismo tiempo, como otra señal de la signal from the transceiver is present. If emisora está presente. Si esta función está this feature disabled, signal desactivada, una señal de la emisora from main transceiver will principal interrumpe recepción de emisoras… -
Page 22
Key Lock Function (Keylock): Menu 17 Bloqueo de teclas (Keylock): Menú 17 You may lock the transceiver controls Puede bloquear controles by holding the “M” key for one second. transceptor manteniendo pulsada la tecla When the lock is enabled, the symbol «M»… -
Page 23
Setting Channel Names: (Name): Menus Configuración nombres 20 /21/22 canales: (Nombre): Menús 20/21/22 Menu determines whether Menú 20 determina si el transceptor transceiver allowed user-defined permitió que el nombre del canal definido channel name displayed or not. If it is por el usuario visualiza o no. -
Page 24
Set Opening Display (OpenDIS): Menu 23 Conjunto de apertura de visualización (OpenDIS): Menú 23 You can select what displays when the Se puede seleccionar lo que se muestra transceiver first powers on by using Menu cuando las primeras potencias transceptor 23. -
Page 25
P1 Short Press: Time (Time display on P1 Presión corta: Tiempo (Indicación de screen) tiempo en pantalla) P2 Long Press: MOLO (Monitor Lock) P2 Presión larga: Molo (Monitor Lock) Short Press: Bandchange(Change P2 Presión corta: Bandchange (Cambiar band) banda) P3 Long Press: SCAN (scan) P3 Presión larga: SCAN (exploración) P3 short Press: MUTE (mute) P3 Presión corta : MUTE (silencio) -
Page 26
High/Low Power Set (Power): Menu 30 Alta / Baja potencia (Power): Menú 30 You may select your desired transmit power Es posible seleccionar el nivel de potencia level from Menu 30. For communication de transmisión deseada desde el menú 30. with nearby stations, we recommend that Para la comunicación con las estaciones you use low power. -
Page 27
pressed. tecla PTT. 2. At the end of the transmission: the PTT 2. Al final de la transmisión: el ID de PTT se ID is sent when the PTT key is released. envía cuando se suelta la tecla PTT. 3. Both: the PTT ID is sent both when the 3. -
Page 28
accomplished by setting Menus 34 and 35. se logra mediante el establecimiento de los First, you will need to set the offset amount, menús 34 y 35. En primer lugar, tendrá que which is the difference between the receive ajustar la cantidad de desplazamiento, que and transmit frequencies. -
Page 29
power “sleep” mode periodically during un modo de bajo consumo de ‘reposo’ quiet periods with no received signals. Set periódicamente durante horas Menu 36 ON to enable this function, or OFF descanso sin señales recibidas. Ajustar el to disable it. The default setting is ON. Menú… -
Page 30
“CHA+” key. Press any other key to stop pulse la tecla ‘V’, la tecla ‘Chagas’, o scanning. la tecla ‘VOL’. escanear hasta la banda de nuevo utilizando la tecla ‘UP’, la ‘VOL +’ tecla o la tecla ‘+ MR/CH CHA’. -
Page 31
weaker signal, while too low a setting may cantidad de ruido de RF en su entorno. Un cause you to hear more noise than you nivel de silenciamiento que es demasiado might want. alta puede causar que pierda la recepción de una señal más débil, mientras que Set the Squelch Level using Menu 40. -
Page 32
timer would prevent accidental, lengthy espera para el transmisor. Definición de un transmissions where the transmitter does temporizador tales evitaría largas not properly unkey(a stuck PTT key, for transmisiones accidentales, en el que el instance). transmisor no hace correctamente (una tecla PTT pegado, por ejemplo) unkey. -
Page 33
VOX D(Delay): VOX D (Delay): VOX Delay determines the delay to stop Retardo VOX determina el retardo para transmitting after you finish speaking. Set detener la transmisión después de que the VOX Delay in Menu 48. Too short a termine de hablar. Ajuste el retardo de VOX delay will cause the transmitter to unkey too en el Menú… -
Page 34
funciones: APAGADO If a shortcut key is disabled, it is not usable Si una tecla de acceso directo está unless Wireless Change Frequency is desactivado, no se puede utilizar a menos enabled. Please refer to Page 44 for details. que el cambio de frecuencia inalámbrica está… -
Page 35
squelch, while pressing it again will close directo MOLO se abrirá el silenciador, the squelch again. If MOLO stays active for mientras se presiona de nuevo se cerrará el more than seconds, squelch will silenciador de nuevo. Si MOLO permanece automatically close. -
Page 36
Función DTMF (DTMF) DTMF Function ( DTMF ) El acceso directo DTMF a su vez, el modo The DTMF shortcut will turn DTMF Mode on DTMF encendido o apagado. or off. Call (Llamada) Call ( Call ) El acceso directo LLAMADA cambiará la The CALL shortcut will toggle the CALL función de llamada y se apaga. -
Page 37
any key other than the “M” key when the restablecimiento pulsando cualquier tecla “Reset?” prompt appears. que no sea la tecla ‘M’ aparece cuando el mensaje ‘Reset?’. Function Reset función de reset Function Reset will reset the transceiver to Función de reset restablecerá el transceptor factory default settings, leaving memory configuración predeterminada… -
Page 38
Lease Time through the programming Tiempo de concesión: Puede configurar el software. The valid Lease Time range is transceptor tiempo de concesión a través from 1 minute to 255 days 24 hours, and 59 del software de programación. El rango de minutes. -
Page 39
3) The transceiver at the home office should be programmed as the “master” transceiver. 3) El transceptor en la oficina en casa debe It should also have a DTMF microphone. programado como transceptor ‘maestro’. También debe tener un micrófono DTMF. 4) The new channel should be programmed into one of the master transceiver’s 199 4) El nuevo canal debe ser programado en… -
Page 40
recién programada. 6) Changing operation: On the master transceiver, press the Call key (“A” on the 6) Cambio de operación: En el transceptor DTMF microphone). principal, pulse la tecla de llamada ( ‘A’ en “Send 01” appears on the screen. Use the el micrófono DTMF). -
Page 41
Please manipulación, realizado usuario refer any service or maintenance concerns mantenimiento y ajuste del transceptor to LEIXEN or a LEIXEN authorized dealer. anulará la garantía. Por favor, consulte cualquier inquietud servicio mantenimiento a LEIXEN o un distribuidor autorizado LEIXEN. -
Page 42
Leixen or a Leixen authorized service sólo a Leixen o una Leixen centro de center. Please contact your local dealer for servicio autorizado. Por favor, póngase en assistance.
- Page 2
Notice Please use the transceiver in compliance with local regulations. A Note To Users Thank you for purchasing the portable transceiver. We trust this transceiver will give you convenient and reliable communication for many years. For the best experience, we advise that you read this manual completely before using your new transceiver. -
Page 3: Table Of Contents
Content Security Information ……….1 Accessories & Options ……….2 Supplied Accessories …………. 2 Optional Accessories …………. 2 Battery Information and Charge ……… 3 Getting Acquainted …………. 5 Keypad Operation …………7 LCD Display …………11 Basic Operation …………13 Power on/off …………….
- Page 4
Ty/Dec Co …………… 25 ) 10/11 [ MENU+1+0/1] Encode Type and Encode Code E nc . ( Ty/Enc Co ……………. 27 ) [ MENU+1+2] FM SCAN F M SCAN ….28 . ( ) [ MENU+1+3]FM SQL F M SQL …… - Page 5
[ MENU+3+6]Save level S avlev ……35 . ( ) [ MENU+3+7] Scan Mode S CNMod ….35 . ( ) [ MENU+3+8] Scan add S CNADD …… 37 . ( ) [ MENU+3+9] Squelch Level A S QL A …. - Page 6
DTMF Function D TMF ……….43 ( ) Call C ALL …………..43 ( ) Transmit 1750Hz 1 750 ……….43 ( ) Scrambler S CRA …………43 ( ) Talk Around T alk …………43 ( ) Reverse Frequency R everse ………. -
Page 7: Security Information
Security Information To use this transceiver safely and efficiently, please read the following safety information. Refer service to qualified technicians only. Turn off the transceiver while refueling or while parked in a gasoline service station. Please turn off the transceiver where flammable gases or fumes may be present.
-
Page 8: Accessories & Options
Accessories & Options Welcome to your new transceiver. Please unpack it carefully and ensure that the below accessories are included. If you find any missing or damaged components, please contact your dealer immediately. Supplied Accessories Item Portable transceiver Antenna Li-ion Battery Pack Battery Charger 9V Adapter Belt Clip…
-
Page 9: Battery Information And Charge
Battery Information and Charge . C harging the battery pack The battery pack is not charged at the factory; Charge it before use. Initially charging the battery pack after purchase or extended storage will not bring the battery pack to its normal operating capacity. After repeating the charge/discharge cycle two or three times, the capacity will increase to normal.
- Page 10
The battery pack life is over when its operating time decreases even though it is fully and correctly charged. Replace the battery pack. Don’t charge the battery pack if it is already fully charged or it will short the life of the battery. Don’t charge the battery pack or radio while it is wet. -
Page 11: Getting Acquainted
Getting Acquainted…
- Page 12
Antenna: A part which to transmit and receive ① signal. Power/Volume Switch ② Speaker: For voice output ③ Microphone: For voice input ④ LCD display: Displays current frequency/channel ⑤ and operations. Keypad: Enters desired frequency/channel or ⑥ operations by keypad TX/RX indicate LED: Left one is for channel A, ⑦… -
Page 13: Keypad Operation
Keypad Operation PTTA EXIT MENU ▲ PTTB ▼ *Band 1 SQL 2 L/H 3 SAVE Call 0ADD 5 REV 4 STEP 6 SQT #V/M 7 VOX 8 FM 9RPT SCAN Keypad operation: Keys Function 1.Function Keys PTTA Push to talk channel A PTTB Push to talk channel B Programmable key: PC…
- Page 14
Press to down, hold to go fast. When ▼ transmitting a DTMF Code, press this key to input C. Press to Exit or switch A/B; hold is a EXIT programmable key. When transmitting a DTMF Code, press this key to input D. *band/Call Press to switch band, hold to start a call. - Page 15
Press and hold to set squelch mode , Numeral OFF/CTC/NDCS/IDCS optional. Can 6:SQT input any CTCSS/DCS directly. Refer to attached Table CTCSS/DCS code. Numeral Press and hold to enable/disable Voice 7:VOX Operated Transmission Press and hold to enable/disable FM Numeral 8:FM Radio, Range 6 5-108MHz. - Page 16
item number can input the two digits in rapid succession. For example, press the [MENU] key+ [5]key to fast reach menu 5; press the [MENU] key, and then press [2]key+[3]key in rapid succession to fast reach menu 23. 2. Call Operation: Push PTTA to transmit a channel A code, Push PTTB to transmit a channel B code. -
Page 17: Lcd Display
LCD Display Icon Feature Description Operation Method Memory Channel A:001-199 B:001-199 Being A Channel Switch A/B Key Menu08-09 Decode Type and code, Menu10-11Encode CT enable Type and code ; VFO/MR mode: Press and hold key 6 Scrambler enable Menu 02 DCS enable The same as CT In VFO/MR mode,…
- Page 18
Being B Channel Switch A/B Key Press and hold M Key Keyboard Lockout for 2 Seconds DW OFF Menu 07 Channel A and B signal strength. Indicate Power Push PTT A to transmit strength when transmitting, 9 grids for high power, 5 grids for small power. -
Page 19: Basic Operation
FM enable Press and hold key 8 Narrowband Menu50 enabled In VFO/MR mode, Low power press and hold key 2 to switch Low/High power Offset enabled: In VFO/MR mode, RPT- press and hold key 9 and select via ▲ or Offset enabled: ▼key.
-
Page 20: Transmitting And Receiving
press ▼ key to reduce volume. Or enter frequency direct by keypad. (Note: If you can’t select your desired frequency, please press and hold key 4 to modify step.) 2, In MR/CH mode, press ▲ key to increase channel, press ▼ key to reduce channel. Or enter channel number directly by keypad.
-
Page 21: Function Menu Operation
and hold for 1.5 seconds). PE key has one programmable function, accessed by a long press. Each of these functions is set in one of the programmable key menus. Note: If you would like to change the hold time for Long Press, you may do so using the programming software.
- Page 22
APRO OFF/COMP/Scra/TXSc/RXSc A udio ( (In A channel only: OFF/TXSc) Processing ) BC LO ON/OFF Busy Lock BEEP ON/OFF Key Beep Chsave A:001-199 B:001-199 (Save to MR) DTMF ON/OFF ON/OFF D ual Reception ( ) Dec Ty OFF/CTCSS/NDCS/IDCS D ecode type (… - Page 23
87-108 MHz (US/Europe) 76-91 MHz (Japan) FM BAND 76-108 MHz (world wide) 65-76 MHz E ast Europe ( ) Font BIG/SMAL Half T he voice of ( Sub-channel is ON/OFF half of main-channel ) Keylck K+S/PTT/KEY/ ALL K eylock ( )… - Page 24
PC L P C long OFF/FM/BAND/MOLO/SQM/ ( ) PC S HALF/SCAN/LOW/EMG/ Scra/DTMF/CALL/1750/ P C short ( ) PTTID/TALK/REV PE L P E Long ( ) Power High/Low PTT ID ON/OFF ON/OFF R everse ( ) Roger ON/OFF OFF/+RPT/-RPT (Offset) RPT SET 0.000-399.995 (Offset value) A=B/… -
Page 25: Menu+1] Auto Power Off (Apo)
STEP 2.5K/5K/6K25/10K/12K5/25K Tail ON/OFF Talk ON/OFF T alk around ( ) 10S-120S/OFF (Time out Timer) TxStop ON/OFF (Transmit Stop) ON /OFF Vox D 1S/2S/3S/4S (Vox Delay) Vox S (Vox Sensitivity) (Vox Stop when ON/OFF radio receiving) WIDNAR WID/NAR (Width/Narrow) Auto Power Off .…
-
Page 26: Menu+2]Apro(Apro)
. [ MENU+2]APRO(APRO) The audio processing menu allows you to set up the compander and voice scrambler. You can set this menu as :OFF, Compander(Comp), Scrambler (Scra) , TX Scrambler(TXSc), RX Scrambler(RX). In A channel, you can only set this menu as: OFF or TX Scrambler(TXSc) .…
-
Page 27: Menu+6] Dtmf Function
. [ MENU+6] DTMF Function DTMF (Dual Tone Multi Frequency), dual tone multi-frequency, consists of high-frequency group and low frequency group, each group contains four frequencies. A high frequency signal and a low frequency signal superimposed to form a combined signal which representing a number.
- Page 28
software. Note: a), If the transceiver is in CH mode, you can not enable or disable DTMF signaling from the transceiver’s front panel. In CH mode, this setting can only be modified from the programming software. b), In MR mode, each memory channel can be independently set to have DTMF signaling enabled or disabled. - Page 29
Consider the following example. Set 10 transceivers as follows: Item Individual ID Unite ID Group ID. Transceiver 1 80811 Group 1 Transceiver 2 80812 Group 1 Transceiver 3 80813 Group 1 Transceiver 4 80814 Group 1 Transceiver 5 80815 Group 1 Transceiver 6 80831 Group 3… - Page 30
Subgroup 3. Send the ID code: 808CC to call all transceivers in Group 1 and Subgroup 3 which are both in Group C. DTMF code transmission mode: Fill in the DTMF call list in the programming software. In VFO / MR / CH mode, be sure that DTMF Mode is enabled. -
Page 31: Menu+7]Dual Reception D W
Remote RX Inhibition and RXTX Inhibition RX Inhibition: If RX Inhibit is enabled, the receiver will remain inactive until it receives the correct RX Enable code. RXTX Inhibition: With RX/TX Inhibit enabled, the transceiver will be unable to receive or transmit until it receives the correct RX/TX Enable code.
- Page 32
squelch. IDCS: Only a signal on the channel containing a matching inverted DCS code will open the receiver’s squelch. After you have selected the decode type in Menu 08, enter any CTCSS or DCS code you desired directly in Menu 09. That means you can enter a standard CTCSS/DCS(Refer to the following tables) or a non-standard CTCSS/DCS code in the range of: CTC: 55.0-255.0… -
Page 33: Menu+1+0/1] Encode Type And Encode Code
Encode Type and Encode Code 10/11 . [ MENU+1+0/1] ( ) E nc Ty/Enc Co Similar to the settings for “Decode Type” and “Decode Code” above, using Menu 10, “Enc Ty” and Menu 11”Enc co”, you may determine the CTCSS or DCS code that is used on a particular channel.
-
Page 34: Menu+1+2] Fm Scanf M Scan
NDCS: Transmit a specified normal DCS code. IDCS: Transmit a specified inverted DCS code. Use Menu 11 to set the desired CTCSS or DCS tone, using the same range as for Menu 09. . [ MENU+1+2] FM SCAN ( F M SCAN )…
-
Page 35: Menu+1+5]Fm Bandf M Band
. [ MENU+1+5]FM BAND ( F M BAND ) Base on the different FM frequency among countries, you can choose different FM frequency from the following FM band: 87-108 MHz (US/Europe) 76-91 MHz (Japan) 76-108 MHz (world wide) 65-76 MHz ( E ast Europe ) .…
-
Page 36: Menu+1+9]Lamp Color L Amp C
second. You can choose what controls are locked as follows: KEY: Numeric and function keys, excluding the “Menu” key. K + S: KEY +▲▼. Numeric +function keys + “▲▼” excluding the “Menu”. PTT: PTT Key. ALL: KEY + ▲▼ + PTT excluding “Menu” key. Default is K + S.
- Page 37
channel numbers. The default is OFF. It may be helpful for you to name particular channels with meaningful labels, such as callsigns, cities, or channel use. Your channel names can be up to six characters long. You can edit channel names using Menu 23. Access Menu 23, press key 2 to edit the first digit, press “▲▼”… -
Page 38: Menu+2+4]Open Beep O Penbe
. [ MENU+2+4]Open Beep ( O penBe ) You can set whether the radio beep or not when it turned on. On: The radio has a beep tone when it turned on. OFF: No beep tone when turned on. . [ MENU+2+5]Open Display (…
-
Page 39: Menu+3+0]Ptt Idp Tt Id
. [ MENU+3+0]PTT ID ( P TT ID ) PTT ID allows you to send a code that identifies your specific transceiver. The PTT ID code is defined in the programming software; the default ID is “123”. You can also set whether PTT ID’s are spoken or displayed.
-
Page 40: Menu+3+2]Roger(Roger)
. [ MENU+3+2]Roger(Roger) The transceiver can send a “Roger beep” to mark the end of a transmission. Select “ON” to enable this feature, or “OFF” to disable it. The default setting is OFF. 33/34 . [MENU+3+3/4]Offset Frequency (RPT SET/RPT TYPE) You can set a channel to use different receive and transmit frequencies.
-
Page 41: Menu+3+5]Ptt Set
Note: Offset frequency setting is only available in VFO mode. It cannot be set in already programmed memory channels. When using the programming software, you must specify both receive and transmit frequencies directly. A new offset value only can effect after the offset direction be chosen again.
- Page 42
for five seconds, then scanning will continue, even if the channel is still active. Carrier operated (CO): Scanning stops when an active channel is encountered. Scanning resumes after two seconds of channel inactivity. The default setting is “TO”. Note: Press any key except ▲ or ▼ to stop scanning. Scan range: You may select two different scanning ranges: VFO frequency scan: All frequencies on the band… -
Page 43: Menu+3+8] Scan Add
keys to enable or disable Scan Add. If Scan Add is disabled on a channel, that channel will be skipped during MR/CH scans. If a channel’s Scan Add is disabled, ▲will be indicated on the transceiver’s display. b) MR/CH Scan is only available if two or more channels are programmed with Scan Add enabled.
-
Page 44: Menu+4+0] Squelch Level B S Ql B
. [ MENU+4+0] Squelch Level B ( S QL B ) Set the Squelch Level of channel B using Menu 40. There are nine levels of squelch setting; the default level is 2. . [ MENU+4+1]Step ( S TEP ) Step is the value in which the operating frequency increases or decreases with presses of the “▲▼”…
-
Page 45: Menu+4+5] Tx Stop T Xstop
accidental, lengthy transmissions where transmitter does not properly unkey(a stuck PTT key, for instance). Not only could such transmissions be disruptive to other communications, they could damage the transmitter. Select Menu 44, and set the Time-Out Timer to OFF, or in 10-second intervals of up to 120 seconds.
-
Page 46: Menu+5+0] Wide And Narrow Bandwidth W Idnar
VOX Sensitivity determines the level of sound that is needed for the VOX to key the transmitter. You should experiment with VOX Sensitivity to find a level that is appropriate to your voice but does not trigger on the presence of too much other background noise. Set Vox S using Menu 48.
-
Page 47: User-Defined Keys Menu
User-defined Keys Menu As previously mentioned the PC long, PC Short, PE long are user programmable. The three keys can be programmed using Menus 26-28. Each of these keys has two programmable functions, accessed by a short press (press and release) or a long press (Press and hold for 1.5 seconds).
-
Page 48: Sq Off Momentary S Qm
will open the squelch, while pressing it again will close the squelch again. If MOLO stays active for more than 10 seconds, squelch will automatically close. ( ) SQ OFF Momentary S QM If the SQM shortcut is enabled, pressing it will disable any CTCSS or DCS squelch, allowing any signal to activate the receiver.
-
Page 49: Emergency E Mg
Emergency ( E MG ) The EMG key will sound an emergency alarm. When this alarm sounds, the indicator LED’s will alternate between flashing red and green and “TXSTOP” will display on the screen. This mode will remain in force until the PTT is pressed or the transceiver is powered down.
-
Page 50: Reverse Frequency R Everse
Reverse Frequency ( R everse ) The Reverse shortcut enables or disables Reverse frequency mode. Reset Menu All Reset(ALLRST) All Reset resets the transceiver to all factory settings, leaving only the DTMF dial list untouched. ) To perform an All Reset, press and holding the Menu Key, rotate the Power Switch to power on the transceiver, the screen will display “ALL RST «.
-
Page 51: Current Channel Delete (Chadel)
Press the Menu key a third time, and the screen will display “Wait”. When the transceiver restarts, the reset is complete. Note: You may cancel the reset by pressing any key other than the “Menu” key when the “Reset?” prompt appears. Current Channel Delete (ChaDel) Current Channel Delete will delete the current channel of the transceiver.
-
Page 52: Special Function
Special Function Programming Password A programming password can be pre-set to the transceiver through the software. When a password pre-set to a transceiver, the password should be input in the software, or the communication between the computer and the transceiver would be failed. Lease Function The Lease function can be set to limit how long a transceiver can be used.
-
Page 53: Maintenance
Any tampering, user performed maintenance or adjustment of the transceiver will void your warranty. Please refer any service or maintenance concerns to LEIXEN or a LEIXEN authorized dealer. Cleaning and Maintenance 1) Handle this equipment with care. Do not carry the transceiver by its antenna or external microphone.
- Page 54
7) If your transceiver is defective or develops a problem, please send it only to an authorized service center. Please contact your local dealer for assistance. -
Page 55: Specification
Specification Band VHF/UHF Dual Band TX Frequency 400~480MHz /136~174MHz 400~520MHz/136~174MHz/ RX Frequency 200-260MHz/65-108MHz Channel Capacity 199*2 Output Power 2W/6W Operation Mode Simplex Dimension 130×60×38mm (L*W*H) Weight 255g Modulation ≤±5KHz Limitation Spurious 60dB Radiation TX Current 1A/1.6A Frequency ±2.5PPM Stability Rx Sensitivity <0.18µV Modulation Type Audio Power…
- Page 56
and completely, but errors and omissions may still exist. We do not assume any responsibility. We keep right to change product design and specifications at any time. As technology develops, design and product specifications are subject to change without notice.
- Home
- Brands
- Leixen Manuals
- Transceiver
- UV-25HX
|
Related Devices:
|
Types of Manuals:
The main types of Leixen UV-25HX instructions:
- User guide — rules of useing and characteristics
- Service manual — repair, diagnostics, maintenance
- Operation manual — description of the main functions of equipment
Transceiver User Guides by Leixen:
Similar to Leixen UV-25HX Manuals, User Guides and Instructions:
-
Intek MT-174W10
INSTRUCTION MANUALMANUALE DI ISTRUZIONIPMR 446 VERSION16CH / 0.5W E.R.P.MT-446W10VHF FM VERSION 136-174 MHz16CH / 1-5-10W MT-174W10UHF FM VERSION 400-470 MHz 16CH / 1-5-10WMT-460W10PROFESSIONALHANDHELD TRANSCEIVERPC PROGRAMMABLEW10SERIES …
MT-174W10 Transceiver, 36
-
HP P2000
HP StorageWorksP2000 G3 Modular Smart ArrayController Module ReplacementInstructionsThis document details procedures for replacing a failedcontroller module in an HP StorageWorks P2000 G3MSA system.© Copyright 2009, 2010 Hewlett-Packard Development Company,L.P.Second edition: March 2010The information in this document …
P2000 Storage, 4
-
Oki ML320
1OkiLAN 6120i Installation The OkiLAN 6120i Print Server enables Ethernet network users to connect to a network-congured printer. It supports 10/100-megabit networks, TCP/IP Direct Printing and Server-Based Printing.Note: Before using the parallel port, you must remove the OkiLAN 6120i from the printer —see your o …
ML320 Print Server, 8
-
Dittel FSG 2T PS
FSG 2T: FCC ID: BVYFSG2T LBA.O.10.911/103 JTSOreplaced by: ESTO: EASA.21O.1304 FAA: TSO C37d TSO C38d DFS-Nr.: D — 0002/2002 FSG 2T PS Fixed / Portable / Mobile VHF/AM Airband Transceiver 5 Watt 118.000 136.975 MHz Operators Manual Before operating the Transceiver, please read this manual thoroughly! P …
FSG 2T PS Transceiver, 57