
New World. New Thinking.
TM
www.lenovo.com
©Lenovo China 2010
P/N: 147003379
Напечатано в Китае
S10-3c UserGuide V1.0 cover_1-4
Lenovo
IdeaPad
S10-
3C
Руководство
пользователя
V1.0
О LENOVO
+
О LENOVO
-
Наша компания
-
Новости
-
Контакт
-
Соответствие продукта
-
Работа в Lenovo
-
Общедоступное программное обеспечение Lenovo
КУПИТЬ
+
КУПИТЬ
-
Где купить
-
Рекомендованные магазины
-
Стать партнером
Поддержка
+
Поддержка
-
Драйверы и Программное обеспечение
-
Инструкция
-
Инструкция
-
Поиск гарантии
-
Свяжитесь с нами
-
Поддержка хранилища
РЕСУРСЫ
+
РЕСУРСЫ
-
Тренинги
-
Спецификации продуктов ((PSREF)
-
Доступность продукта
-
Информация об окружающей среде
©
Lenovo.
|
|
|
|
- Manuals
- Brands
- Lenovo Manuals
- Laptop
- IdeaPad S10-3c
- User manual
-
Contents
-
Table of Contents
-
Troubleshooting
-
Bookmarks
Quick Links
Lenovo
IdeaPad
S10
— 3C
User Guide
V1.0
Related Manuals for Lenovo IdeaPad S10-3c
Summary of Contents for Lenovo IdeaPad S10-3c
-
Page 1
Lenovo IdeaPad — 3C User Guide V1.0… -
Page 2
First Edition (May 2010) © Copyright Lenovo 2010. LENOVO products, data, computer software, and services have been developed exclusively at private expense and are sold to governmental entities as commercial items as defined by 48 C.F.R. 2.101 with limited and restricted rights to use, reproduction and disclosure. -
Page 3
Thank you for purchasing your new Lenovo notebook computer! Before using this product, make sure to read this user guide carefully. We are pleased that you have chosen Lenovo for your mobile computing needs. To help you master the usage of your new computer quickly, we have prepared this user guide. -
Page 4: Explanation Of Hard Disk Capacity
Explanation of hard disk capacity Dear user, While using your computer, you may find that the nominal hard disk capacity indicated is somewhat different from the disk capacity displayed by the operating system. For example, a nominal 40GB hard disk will appear as less than 40GB in the operating system. This discrepancy is not an error in hard disk installation nor any other problem, but a normal phenomenon of computers.
-
Page 5
X × 0.931 G. II. A portion of the hard disk space is used for specific purposes Lenovo computers may come with preinstalled OneKey Rescue system, so the hard disk has a special portion partitioned before delivery, which is used to store hard disk mirror and OneKey Rescue system program files. -
Page 7: Table Of Contents
Getting help on the Web …49 Calling the customer support center …49 Getting help around the world …52 Lenovo warranty service telephone numbers…52 Appendix B. Use, and care Information …53 Caring for your computer …53 Accessibility and comfort…59 Maintenance…61…
-
Page 8
Contents Appendix C. Lenovo limited warranty … 66 Warranty information … 75 Appendix D. Customer replaceable units (CRUs)… 79 Appendix E. Notices… 81 Notices … 81 ENERGY STAR model information … 84 Wireless related information… 86 TV tuner information … 90 Electronic emissions notices… -
Page 9: Important Safety Information
Follow and retain all information included with your computer. The information in this document does not alter the terms of your purchase agreement or the Lenovo Limited Warranty. For more information, see “Appendix C. Lenovo limited warranty” on page 66.
-
Page 10
Important safety information Unpack Inspect the covers of the computer and the AC adapter, especially parts with the following labels attached for any crack or damage. Danger: • Hazardous voltage, current, and energy levels are present inside any component that has this label attached. -
Page 11
Working place Do NOT use the computer in humid places such as a bathroom. Keep the computer and other parts away from liquids. Danger: • An electric shock may be caused by spilled liquid. Do NOT use the computer during a lightning storm. Attention: •… -
Page 12
Important safety information Correct usage procedures Use ONLY the power cord, power adapter and battery pack shipped with the computer. Never use these devices with another product. Be sure the power outlet is suitable for the plug and provides the correct voltage and current for the product you are using. -
Page 13
Do NOT wrap the power cord around the power adapter or other objects. Do NOT squeeze or pinch the cord, or place heavy objects on it. Attention: • Stressing the cord may cause the cord to fray, crack or crimp which may present a safety hazard. -
Page 14
For a list of service and support phone numbers, go to http://consumersupport.lenovo.com. Lenovo provides documentation with instructions when it is appropriate for customers to install options or replace units (CRUs). Closely follow all instructions when installing or replacing parts. -
Page 15: Chapter 1. Getting To Know Your Computer
Chapter 1. Getting to know your computer Top view — — — — — — — — — — — — — — — — — — — — — — — — — — — — — — — — — — — — — — — — — — — — — — — — — — — — — — — — — — — — — — — — — — — — — — — — — — — — — — — — — — — — — — — — — — — Note: The illustrations in this manual may differ from the actual product.
-
Page 16
Chapter 1. Getting to know your computer Attention: • Do NOT open the display panel beyond 130 degrees. When closing the display panel, be careful NOT to leave pens or any other objects in between the display panel and the keyboard. Otherwise, the display panel may be damaged. Integrated camera Wireless module… -
Page 17: Left-Side View
Left-side view RJ-45 port The port connects the computer to an Ethernet network. Note: For details, see “Wired connection” on page 26. Fan louvers Dissipate internal heat. Note: Make sure that none of the fan louvers are blocked or else overheating of the computer may occur.
-
Page 18: Right-Side View
Chapter 1. Getting to know your computer Right-side view Integrated wireless device switch USB port Note: For details, see “Connecting a universal serial bus (USB) device” on page 25. Kensington slot Note: For details, see “Attaching a security lock (not supplied)” on page 21 AC power adapter jack Note: For details, see “Using AC adapter and battery”…
-
Page 19: Front View
Chapter 1. Getting to know your computer Front view — — — — — — — — — — — — — — — — — — — — — — — — — — — — — — — — — — — — — — — — — — — — — — — — — — — — — — — — — — — — — — — — — — — — — — — — — — — — — — — — — — — — — — — Memory card slot Insert memory cards (not supplied) here.
-
Page 20: Bottom View
Chapter 1. Getting to know your computer Bottom view — — — — — — — — — — — — — — — — — — — — — — — — — — — — — — — — — — — — — — — — — — — — — — — — — — — — — — — — — — — — — — — — — — — — — — — — — — — — — — — — — -…
-
Page 21
Battery latch — The manual battery latch is used to keep the battery pack secured in place. manual Speakers The stereo speakers provide rich and powerful sound. Mini PCI Express Card slot/hard disk drive (HDD) compartment For details, see “Using AC adapter and battery” on page 11. Battery pack Memory compartment… -
Page 22: Chapter 2. Learning The Basics
Chapter 2. Learning the basics First use — — — — — — — — — — — — — — — — — — — — — — — — — — — — — — — — — — — — — — — — — — — — — — — — — — — — — — — — — — — — — — — — — — — — — — — — — — — — — — — — — — — — — — — — — — — — — — — Reading the manuals Read the supplied manuals before using your computer.
-
Page 23
Chapter 2. Learning the basics Turning on the computer Press the power button to turn on the computer. Configuring the operating system You may need to configure the operation system when it is first used. The configuration process may include the procedures below. •… -
Page 24: Shutting Down Your Computer
Chapter 2. Learning the basics To put the computer into sleep state, do one of the following. • Click and select Sleep from the Start menu. • Press Fn + F1. Note: Wait until the power indicator light starts blinking (indicating that the computer is in sleep state) before you move your computer.
-
Page 25: Using Ac Adapter And Battery
Using AC adapter and battery Checking battery status You can determine the percentage of battery power remaining by checking the battery icon in the notification area. Note: As each computer user has different habits and needs, it is difficult to predict how long a battery charge will last.
-
Page 26: Removing The Battery Pack
If you are not going to use the computer for an extended period of time, or if you need to send your computer to Lenovo for service etc., remove the battery pack from the computer. Before removing the battery pack, make…
-
Page 27
To avoid possible injury and detriment to the environment, pay attention to the following points: • Replace only with a battery of the type recommended by Lenovo. • Keep the battery pack away from fire. • Do not expose the battery pack to water or rain. -
Page 28: Using The Touchpad
Chapter 2. Learning the basics Using the touchpad Touchpad Touchpad button Note: You can enable/disable the touchpad using Fn+F8. — — — — — — — — — — — — — — — — — — — — — — — — — — — — — — — — — — — — — — — — — — — — — — — — — — — — — — — — — — — — — — — — — — — — — To move the cursor on the screen, slide your fingertip over the pad in the direction in which you want the cursor to move.
-
Page 29: Using The Keyboard
Chapter 2. Learning the basics Using the keyboard — — — — — — — — — — — — — — — — — — — — — — — — — — — — — — — — — — — — — — — — — — — — — — — — — — — — — — — — — — — — — — — — — — — — — — Your computer has a numeric keypad and function keys incorporated in its standard keyboard.
-
Page 30
Chapter 2. Learning the basics Function key combinations Through the use of the function keys, you can change operational features instantly. To use this function, press and hold Fn function keys ; then press one of the… -
Page 31
The following describes the features of each function key. Turn on/off the integrated camera. Fn + Esc: Fn + F1: Enter sleep mode. Turn on/off the backlight of the LCD screen. Fn + F2: Open the interface for the display device switch Fn + F3: to select this notebook or an external display. -
Page 32: Special Buttons
Chapter 2. Learning the basics Special buttons — — — — — — — — — — — — — — — — — — — — — — — — — — — — — — — — — — — — — — — — — — — — — — — — — — — — — — — — — — — — — — — — — — — — — — — — — — — — — -…
-
Page 33
• When the computer is powered off, press this button to enter the OneKey Rescue system if Lenovo OneKey Rescue system has been preinstalled. • Under Windows operating system, press this button to start Lenovo OneKey Recovery. Note: For details, see “OneKey Rescue system” on page 34. -
Page 34: System Status Indicators
Chapter 2. Learning the basics System status indicators These indicators inform you of the computer status. — — — — — — — — — — — — — — — — — — — — — — — — — — — — — — — — — — — — — — — — — — — — — — — — — — Hard disk drive indicator Caps lock indicator Num lock indicator…
-
Page 35: Securing Your Computer
• You are responsible for evaluating, selecting, and implementing the locking devices and security features. Lenovo offers no comment, judgement, or warranty regarding the function, quality or performance of locking devices and security features. Chapter 2. Learning the basics…
-
Page 36: Using Passwords
For details about how to set the password, see the help to the right of the screen in BIOS setup utility. Note: To enter BIOS setup utility, press F2 when the Lenovo logo appears on the screen while the computer is starting up.
-
Page 37: Connecting External Devices
Connecting external devices Your computer has a wide range of built-in features and connection capabilities. Using memory cards (not supplied) Your computer supports the following types of memory cards: • Secure Digital (SD) card • MultiMediaCard (MMC) • Memory Stick (MS) •…
-
Page 38: Inserting A Memory Card
Chapter 2. Learning the basics Inserting a memory card Gently pull the dummy card out of the memory card slot. Note: The dummy card is used for preventing dust and small particles from entering the inside of your computer when the memory card slot is not in use. Retain the dummy card for future use.
-
Page 39
Connecting a universal serial bus (USB) device Your computer comes with three USB ports compatible with USB devices. Note: When using a high power consumption USB device such as USB ODD, use the external device’s power adapter. Otherwise, the device may not be recognized, and system shut down may result. -
Page 40: Chapter 3. Using The Internet
Chapter 3. Using the Internet As a global network, the Internet connects computers worldwide, providing services such as e-mailing, information searching, electronic commerce, Web browsing and entertainment. You can connect the computer to the Internet in the following ways: Wired connection: use physical wiring to connect. Wireless network technology: connect without wiring.
-
Page 41: Hardware Connection
Hardware connection: Cable TV cable Splitter * Cable modem * * Not supplied. Note: The above diagrams are for reference only. Actual connection method may vary. Software configuration Consult your Internet Service Provider (ISP) for details on how to configure your computer.
-
Page 42: Wireless Connection
Chapter 3. Using the Internet Wireless connection Wireless connections provide mobile access to the Internet, allowing you to stay online anywhere the wireless signal covers. Divided by the signal scales, wireless connection to the Internet can be built based on the following standards. Wi-Fi WiMAX Mobile Broadband…
-
Page 43
Using Wi-Fi/WiMax (Select models only) Enabling wireless connection To enable wireless communications, do the following: Slide the integrated wireless device switch to Press Fn + F5 to make configuration. Hardware connection Access point * Wi-Fi/WiMax network * Not supplied Software configuration Consult your Internet Service Provider (ISP) and search Windows Help and Support Center for details on how to configure your computer. -
Page 44
Notes: Various standards are in use by mobile operators to provide Mobile Broadband • services. The Lenovo Mobile Broadband module may support one or more of the following standards: GSM (Global System for Mobile Communications) TD-SCDMA (Time Division-Synchronous Code Division Multiple Access) -
Page 45
• A connection management utility to connect/disconnect to your Mobile Broadband network. Note: In general, your mobile service provider provides this utility. Inserting the SIM card To insert the SIM card: Turn off the computer; then disconnect the AC adapter and all cables from the computer. -
Page 46
Chapter 3. Using the Internet Insert the SIM card to the card slot until it clicks into place as shown in the illustration. Note: Inserting the SIM card in the wrong direction may damage the SIM card slot. Put the battery back in place. Turn the computer over and reconnect the cables. -
Page 47
Push the SIM card in until you hear a click, and then pull the SIM card out. Put the battery back in place. Turn the computer over and reconnect the cables. Note: Never insert or remove the SIM card while the computer is on. Doing so may cause permanent damage to the SIM card as well as the SIM card reader. -
Page 48: Chapter 4. Onekey Rescue System
OneKey Rescue system Introduction The Lenovo OneKey Rescue system is an easy-to-use application that can be used to back up the data on your system partition (C drive) for easy restore when required. You can run Lenovo OneKey Recovery under the Windows operating system, and the OneKey Rescue system without starting the Windows operating system.
-
Page 49
Computers without an integrated optical drive support the creation of recovery • discs; however an appropriate external optical drive is needed to physically create the recovery discs. For more instructions, see the help file of Lenovo OneKey Recovery. Chapter 4. OneKey Rescue system… -
Page 50
Chapter 4. OneKey Rescue system Using Lenovo OneKey Rescue system (Without Windows operating system) In the event that the operating system cannot be loaded, follow the steps below to access OneKey Rescue system. • Shut down your computer. • Press the key to launch OneKey Rescue system. -
Page 51: Chapter 5. Troubleshooting
This section lists frequently asked questions and tell where you can find detailed answers. For details about each publication included in the package with your computer, see Lenovo IdeaPad S10- What safety precautions should I follow when using my computer? See “Important safety information”…
-
Page 52
See “Appendix A. Getting help and service” on page 48 of this guide. Where can I find warranty information? For the warranty applicable to your computer, including the warranty period and type of warranty service, see “Appendix C. Lenovo limited warranty” on page 66. How can I install the device drivers? A compatible device driver is a requirement to ensure correct operation and performance of each component in your computer. -
Page 53
Chapter 5. Troubleshooting When do I need to restore the system to the factory status? You can use this feature when your system fails or you need to re-install your operating system. This will restore your computer back to the initial status when you first booted up your computer after receiving it from the store. -
Page 54: Troubleshooting
Chapter 5. Troubleshooting Troubleshooting If you do not find your problem here, see Chapter 2. The following section only describes problems that might negate the need to refer to the more comprehensive information in Chapter 2. Display problems When I turn on the compu- ter, nothing appears on the screen.
-
Page 55
— Press Fn+F2 to confirm whether the LCD screen has been turned off. If you forget your user password, you must take • your computer to a Lenovo authorized servicer or a marketing representative to have the password changed. •… -
Page 56
Chapter 5. Troubleshooting Keyboard problems A number appears when you enter a letter. Sleep or hibernation problems The computer enters sleep mode unexpectedly. The computer enters sleep mode immediately after Power-on self-test (POST). Note: If the battery is charged and the temperature is within range, have the computer serviced. -
Page 57
The critical low-battery error message appears, and the computer immediately turns off. The computer does not return from sleep mode and does not work. Note: If the system still does not return from sleep mode, your system has stopped responding, and you cannot turn off the computer, reset the computer. However, unsaved data may be lost. -
Page 58
Chapter 5. Troubleshooting Computer screen problems The screen is blank. The screen is unreadable or distorted. Incorrect characters appear on the screen. • Do the following: — If you are using the AC adapter, or using the battery, and the battery status indicator is on, press Fn + ↑… -
Page 59
Sound problems No sound can be heard from the speaker even when the volume is turned Battery problems Your computer shuts down before the battery status indicator shows empty. -or- Your computer operates after the battery status indicator shows empty. The operating time for a fully charged battery is short. -
Page 60
Chapter 5. Troubleshooting A startup problem ® The Microsoft Windows operating system does not start. OneKey Rescue system problems Backup cannot be made. Fail to restore system partition to factory default. Other problems The computer does not respond. • Use the OneKey Rescue system to help solve or identify your problem. -
Page 61
Boot priority order list. • Press F12 when the Lenovo logo appears on the screen while the computer is starting up to select the device you want the computer starts from. -
Page 62: Appendix A. Getting Help And Service
Appendix A. Getting help and service If you need help, service, technical assistance, or just want more information about Lenovo computers, you will find a wide variety of sources available from Lenovo to assist you. This section contains information about where to go for additional information about Lenovo computers, what to do if you experience a problem with your computer, and whom to call for service should it be necessary.
-
Page 63: Getting Help On The Web
• Lenovo hardware repair — If the problem is determined to be caused by Lenovo hardware under warranty, trained service personnel are available to provide the applicable level of service.
-
Page 64
Appendix A. Getting help and service • Engineering change management — Occasionally, there might be changes that are required after a product has been sold. Lenovo or your reseller, if authorized by Lenovo, will make selected Engineering Changes (ECs) available that apply to your hardware. -
Page 65
Note: For the latest list of customer support center telephone numbers and hours of operation, visit the Support Web site at http://consumersupport.lenovo.com. If the number for your country or region is not listed, contact your Lenovo reseller or Lenovo marketing representative. -
Page 66: Getting Help Around The World
A list of warranty service telephone numbers is available at www.lenovo.com/support/phone. For the latest warranty service number in a country or region, please contact Lenovo, or your reseller in your country or region. — — — — — — — — — — — — — — — — — — — — — — — — — — — — — — — — — — — — — — — — — — — — — -…
-
Page 67: Appendix B. Use, And Care Information
Appendix B. Use, and care Information Caring for your computer Though your computer is designed to function reliably in normal work environments, you need to use common sense in handling it. By following these important tips, you will get the most use and enjoyment out of your computer.
-
Page 68
Appendix B. Use, and care Information discharge from your body or clothing to the computer, it poses the same risk of a computer malfunction. Your computer is designed and manufactured to minimize any effects of electrostatic charge. An electrostatic charge above a certain limit, however, can increase the risk of ESD. -
Page 69
— When you install a static-sensitive option or CRU, touch the static- protective package containing the part to a metal expansion-slot cover or other unpainted metal surface on the computer for at least two seconds. This reduces static electricity in the package and your body. — Whenever possible, remove the static-sensitive part from the static- protective packaging and install the part without setting it down. -
Page 70
Appendix B. Use, and care Information • When picking up your open computer, hold it by the bottom. Do not pick up or hold your computer by the display. • Use a quality carrying case that provides adequate cushion and protection. -
Page 71
Take care in setting passwords • Remember your passwords. If you forget a administrator or hard disk password, Lenovo authorized service providers will not reset it, and you might have to replace your system board or hard disk drive. Other important tips •… -
Page 72
Appendix B. Use, and care Information • Register your Lenovo products with Lenovo (refer to the Web page: http://consumersupport.lenovo.com). This can help authorities return your computer to you if it is lost or stolen. Registering your computer also enables Lenovo to notify you about possible technical information and upgrades. -
Page 73: Accessibility And Comfort
Accessibility and comfort Ergonomic information Working in the virtual office may mean adapting to frequent changes in your environment. Following some simple rules will make things easier and bring you the maximum benefits of your computer. Keeping in mind such basics as good lighting and proper seating, for example, can help you improve your performance and achieve greater comfort.
-
Page 74
Appendix B. Use, and care Information What if you are traveling? It may not be possible to observe the best ergonomic practices when you are using your computer while on the move or in a casual setting. Regardless of the setting, try to observe as many of the tips as possible. Sitting properly and using adequate lighting, for example, will help you maintain desirable levels of comfort and performance. -
Page 75: Maintenance
• At least once a week, make a point to back up your data. If critical data is present, it is a good idea to perform a daily backup. Lenovo has many backup options available for your computer. CD-RW drives and CD-RW/DVD drives are available for most computers and are easily installed.
-
Page 76
• Profile your machine at http://consumersupport.lenovo.com to keep up to date with current drivers and revisions. • Keep up to date on device drivers on other non-Lenovo hardware. You might want to read the device driver information release notes prior to updating for compatibility or known issues. -
Page 77
Cleaning the cover of your computer Occasionally clean your computer as follows: Prepare a mixture of a gentle kitchen-use detergent (one that does not contain abrasive powder or strong chemicals such as acid or alkaline). Use 5 parts water to 1 part detergent. Absorb the diluted detergent into a sponge. -
Page 78: Cleaning Your Computer Keyboard
Appendix B. Use, and care Information Cleaning your computer keyboard Absorb some isopropyl rubbing alcohol on a soft, dust-free cloth. Wipe each keytop surface with the cloth. Wipe the keys one by one; if you wipe several keys at a time, the cloth may hook onto an adjacent key and possibly damage it.
-
Page 79
Cleaning your computer display Gently wipe the display with a dry, soft lint-free cloth. If you see a scratchlike mark on your display, it might be a stain transferred from the keyboard when the cover was pressed from the outside. Wipe or dust the stain gently with a soft, dry cloth. -
Page 80: Appendix C. Lenovo Limited Warranty
What this warranty covers Lenovo warrants that each hardware product that you purchase is free from defects in materials and workmanship under normal use during the warranty period. The warranty period for the product starts on the original date of purchase specified on your sales receipt or invoice unless Lenovo informs you otherwise in writing.
-
Page 81
How to obtain warranty service If the product does not function as warranted during the warranty period, you may obtain warranty service by contacting Lenovo or an approved service provider. Each of them is referred to as a “Service Provider.” A list of Service Providers and their telephone numbers is available at www.lenovo.com/support/phone. -
Page 82
If your Service Provider determines that it is unable to either repair or replace your product, your sole remedy is to return the product to your place of purchase or to Lenovo for a refund of your purchase price. -
Page 83
Only unaltered Lenovo products and parts are eligible for replacement. The replacement product or part provided by Lenovo may not be new, but it will be in good working order and at least functionally equivalent to the original product or part. The replacement product or part shall be warranted for the balance of the period remaining on the original product. -
Page 84
Personal Data that you did not delete, you are in compliance with all applicable laws. Use of personal information If you obtain service under this warranty, Lenovo will store, use and process information about your warranty service and your contact information, including name, phone numbers, address, and e-mail address. Lenovo will use this information to perform service under this warranty and to improve our business relationship with you. -
Page 85
• damage caused by a non-authorized service provider; • failure of, or damage caused by, any third party products, including those that Lenovo may provide or integrate into the Lenovo product at your request; and • any technical or other support, such as assistance with “how-to”… -
Page 86
Appendix C. Lenovo limited warranty Limitation of liability Lenovo is responsible for loss or damage to your product only while it is: 1) in your Service Provider’s possession; or 2) in transit in those cases where the Service Provider is responsible for the transportation. -
Page 87
Appendix C. Lenovo limited warranty UNDER NO CIRCUMSTANCES SHALL LENOVO, ITS SUPPLIERS, RESELLERS, OR SERVICE PROVIDERS BE LIABLE FOR ANY OF THE FOLLOWING EVEN IF INFORMED OF THEIR POSSIBILITY: 1) THIRD PARTY CLAIMS AGAINST YOU FOR DAMAGES; 2) LOSS OR DAMAGE TO YOUR DATA;… -
Page 88
CANNOT BE WAIVED OR LIMITED BY CONTRACT. European Economic Area (EEA) Customers in the EEA may contact Lenovo at the following address: EMEA Service Organisation, Lenovo (International) B.V., Floor 2, Einsteinova 21, 851 01, Bratislava, Slovakia. Service under this warranty for Lenovo hardware products purchased in EEA countries may be obtained in any EEA country in which the product has been announced and made available by Lenovo. -
Page 89: Warranty Information
Appendix C. Lenovo limited warranty — — — — — — — — — — — — — — — — — — — — — — — — — — — — — — — — — — — — — — — — — — — — — — — — — — — — — — — — — — — -…
-
Page 90
An optional service offering may be available for purchase from Lenovo to have Lenovo install Self-service CRUs for you. You may find a list of CRUs and their designation in the publication that ships with your product or at www.lenovo.com/CRUs. -
Page 91
Under On-Site Service, your Service Provider will either repair or exchange the product at your location. You must provide a suitable working area to allow disassembly and reassembly of the Lenovo product. For some products, certain repairs may require your Service Provider to send the product to a designated service center. -
Page 92
You may be charged for the replacement product if Lenovo does not receive the failed product within thirty (30) days of your receipt of the replacement product. -
Page 93: Appendix D. Customer Replaceable Units (Crus)
Customers are responsible for replacing all external CRUs. Internal CRUs can be removed and installed by customers or by a Lenovo service technician during the warranty period. Your computer contains the following types of external CRUs: •…
-
Page 94
Appendix D. Customer replaceable units (CRUs) Your computer contains the following types of internal CRUs: • Internal CRUs (located behind an access panel): These CRUs are isolated parts within the computer that are concealed by an access panel that is typically secured by either one or two screws. Once the access panel is removed, only the specific CRU is visible. -
Page 95: Appendix E. Notices
Consult your local Lenovo representative for information on the products and services currently available in your area. Any reference to a Lenovo product, program, or service is not intended to state or imply that only that Lenovo product, program, or service may be used.
-
Page 96
Web sites. The materials at those Web sites are not part of the materials for this Lenovo product, and use of those Web sites is at your own risk. Any performance data contained herein was determined in a controlled environment. -
Page 97
Appendix E. Notices made on development-level systems and there is no guarantee that these measurements will be the same on generally available systems. Furthermore, some measurements may have been estimated through extrapolation. Actual results may vary. Users of this document should verify the applicable data for their specific environment. -
Page 98: Energy Star Model Information
Lenovo is proud to offer our customers products with an ENERGY STAR compliant designation. Lenovo computers of the following machine types, if the ENERGY STAR mark is affixed, have been designed and tested to conform to the ENERGY STAR 5.0 program requirements for computers.
-
Page 99
Lenovo encourages you to make efficient use of energy an integral part of your day-to-day operations. To help in this endeavor, Lenovo has preset the following power-management features to take effect when your computer has been inactive for a specified duration: Table 1. -
Page 100: Wireless Related Information
Appendix E. Notices Wireless related information Wireless interoperability Wireless LAN PCI Express Mini Card is designed to be interoperable with any wireless LAN product that is based on Direct Sequence Spread Spectrum (DSSS), Complementary Code Keying (CCK), and/or Orthogonal Frequency Division Multiplexing (OFDM) radio technology, and is compliant to: •…
-
Page 101
Due to the fact that wireless LAN PCI Express Mini Card and Bluetooth Daughter Card operate within the guidelines found in radio frequency safety standards and recommendations, Lenovo believes the integrated wireless cards are safe for use by consumers. These standards and… -
Page 102
Appendix E. Notices result from deliberations of panels and committees of scientists who continually review and interpret the extensive research literature. In some situation or environment, the use of wireless LAN PCI Express Mini Card or Bluetooth Daughter Card may be restricted by the proprietor of the building or responsible representatives of the organization. -
Page 103
Use of mobile devices on board aircraft is explicitly prohibited by many airlines companies, especially during take-off and landing. The built-in Mobile Broadband module on your computer is a low-power radio transceiver. When it is turned on, it intermittently receives and transmits radio frequency (RF) energy which could cause interference with the operation of the airplane communication or navigation system. -
Page 104: Tv Tuner Information
Appendix E. Notices TV tuner information Products with television tuner options installed The notice below applies to products containing television (TV) tuner devices that connect to external antennas or to cable/CATV systems, or both, and that are intended to be installed in North America. Users and installers in other countries should follow local codes and ordinances when installing appliances that connect to external antennas and cable/ CATV systems.
-
Page 105
Example of antenna grounding Ground clamp Antenna lead-in wire Antenna discharge unit (NEC Section 810-20) Grounding conductors (NEC Section 810-21) Power service grounding electrode system (NEC Article 250, Part H) Ground clamps Electronic service equipment Appendix E. Notices… -
Page 106
Appendix E. Notices The following notice applies to all countries and regions: Danger: • Outdoor antenna grounding If an outside antenna or cable system is connected to the equipment, be sure the antenna or cable system is grounded as to provide some protection against voltage surges and built-up static charges. -
Page 107: Electronic Emissions Notices
— — — — — — — — — — — — — — — — — — — — — — — — — — — — — — — — — — — — — — — — — — — — — — — — The following information refers to Lenovo IdeaPad S10- , machine type 20074 4392.
-
Page 108
Appendix E. Notices available from Lenovo authorized dealers. Lenovo is not responsible for any radio or television interference caused by using other than recommended cables or connectors or by unauthorized changes or modifications to this equipment. Unauthorized changes or modifications could void the user’s authority to operate the equipment. -
Page 109
Um dieses sicherzustellen, sind die Geräte wie in den Handbüchern beschrieben zu installieren und zu betreiben. Des Weiteren dürfen auch nur von der Lenovo empfohlene Kabel angeschlossen werden. Lenovo übernimmt keine Verantwortung für die Einhaltung der Schutzanforderungen, wenn das Produkt ohne Zustimmung der Lenovo verändert bzw. -
Page 110
Dieses Gerät ist berechtigt, in Übereinstimmung mit dem Deutschen EMVG das EG-Konformitätszeichen — CE — zu führen. Verantwortlich für die Konformitätserklärung nach Paragraf 5 des EMVG ist die Lenovo (Deutschland) GmbH, Gropiusplatz 10, D-70563 Stuttgart. Informationen in Hinsicht EMVG Paragraf 4 Abs. (1) 4: Das Gerät erfüllt die Schutzanforderungen nach EN 55024 und EN 55022… -
Page 111
TV communications and to other electrical or electronic equipment. Such cables and connectors are available from Lenovo authorized dealers. Lenovo cannot accept responsibility for any interference caused by using other than recommended cables and connectors. -
Page 112
Appendix E. Notices Lenovo Product Service Information Japanese VCCI Class B Statement… -
Page 113
Appendix E. Notices Japan Compliance Statement for Power line Harmonics A statement of compliance to the IEC 61000-3-2 harmonics standard is required for all products connecting to the power mains and rated less than 20A per phase. Korea Class B… -
Page 114: Weee And Recycling Statements
General recycling statement Lenovo encourages owners of information technology (IT) equipment to responsibly recycle their equipment when it is no longer needed. Lenovo offers a variety of programs and services to assist equipment owners in recycling their IT products. Information on product recycling offerings can be found on Lenovo’s Internet site at…
-
Page 115: Eu Weee Statements
EEE as unsorted municipal waste, but use the collection framework available to them for the return, recycle, recovery of WEEE and minimize any potential effects of EEE on the environment and human health due to the presence of hazardous substances. For additional WEEE information go to: http://www.lenovo.com/lenovo/environment/recycling/.
-
Page 116: Japan Recycling Statements
Collecting and Recycling a Disused Lenovo Computer or Monitor If you are a company employee and need to dispose of a Lenovo computer or monitor that is the property of the company, you must do so in accordance with the Law for Promotion of Effective Utilization of Resources.
-
Page 117
You also can refer to the instructions at www.ibm.com/jp/pc/environment/recycle/battery http://www.ibm.com/jp/pc/environment/recycle/battery If you use a Lenovo notebook computer at home and need to dispose of a battery pack, you must comply with local ordinances and regulations. You also can refer to the instructions at www.ibm.com/jp/pc/environment/recycle/battery… -
Page 118: Notice For Users In The U.s.a
Appendix E. Notices Notice for users in the U.S.A. California Perchlorate Information: Products containing CR (manganese dioxide) lithium coin cell batteries may contain perchlorate. Perchlorate Material — special handling may apply. See http://www.dtsc.ca.gov/hazardouswaste/perchlorate. Notice on deleting data from your hard disk As computers spread into every corner of life, they process more and more information.
-
Page 119
Appendix E. Notices • Format your hard disk, using the software for initializing it. • Using the preinstalled recovery program, bring the hard disk back to factory-ship state. These operations, however, only change the file allocation of the data; they do not delete the data itself. -
Page 120: Appendix F. Features And Specifications
Appendix F. Features and specifications Model Name: IdeaPad S10- Note: The following specifications may contain technical inaccuracies or typographical errors. Lenovo reserves the right to improve and/or change specifications at any time without notice. Form Factor Size Weight System Memory…
-
Page 121
I/O Ports Communication Audio Video Memory card slot Others Kensington slot Appendix F. Features and specifications USB 2.0 port x 3 RJ-45 port Headphone/Mic-in Jack D-sub port 4 in 1 slot x 1 (MMC/SD/MS/MS PRO) -
Page 122: Trademarks
— — — — — — — — — — — — — — — — — — — — — — — — — — — — — — — — — — — — — — — — — — — — — — — — — — — — — — — — — — — — — — — — — — — — — — — — — — — — — — — — — — — — The following terms are trademarks or registered trademarks of Lenovo in the United States, other countries, or both.
-
Page 123: Index
Index AC adapter … 11 Using Battery … 11 Charging Bluetooth … 25 Connecting … 86 Interoperability … 87 Usage environment … 2, 17 Camera … 23 Card reader … 53 Caring your computer Cleaning … 63 Computer cover … 65 Computer display Computer keyboard …
-
Page 124
Index Keyboard … 63 Cleaning … 15 Using … 66 Lenovo Limited Warranty … 61 Maintenance Microphone … 2 Built-in Notice … 93 Electronic emissions … 104 for US users OneKey Rescue system button Password … 41 Problems … 22 Using … -
Page 125
… 21 Security Storage media … 56 Handling … 14 Touch pad … 108 Trademarks … 40 Troubleshooting … 3 USB port …75 Warranty information …49 Help Wireless LAN …2 Antennas …86 Interoperability …87 Usage environment Index… -
Page 127
If your product is not working correctly, DO NOT RETURN IT TO THE STORE. For technical assistance, contact a Lenovo support specialist 24 hours a day by calling toll free 1-877-4 LENOVO (1-877-453-6686). Additionally, you can find support information and updates on the Lenovo Web site located at http://consumersupport.lenovo.com. -
Page 128
New World. New Thinking. www.lenovo.com P/N: 147003378 Printed in China…
Раздел: Компьютерная техника, комплектующие, аксессуары
Тип: Ноутбук
Характеристики, спецификации
Процессор:
Atom N455 1.66 GHz
Жесткий диск:
160 ГБ Serial ATA
Дисплей:
10.1″ 1024 x 600 (WSVGA)
Встроенные устройства:
Web-камера, Wi-Fi антенна, микрофон, стереоколонки
Размеры (ШxТxГ):
270x29x168 мм
Чипсет:
Intel NM10 Express
Безопасность:
пароль жесткого диска, пароль на включение, слот для замка
Тип:
10.1″ TFT широкоэкранный
Частота процессора:
1.66 GHz
Частота системной шины:
667 MHz
Объем жесткого диска:
160 ГБ
Скорость вращения:
5400 об/мин
Максимальное разрешение дисплея:
1024 x 600 (WSVGA)
Графический процессор:
Intel HD Graphics
Аудиокодек:
Realtek ALC272
Стандарты совместимости:
High Definition Audio
Протоколы:
Ethernet, Fast Ethernet
Беспроводные протоколы:
802.11b, 802.11g
Разъем для карты памяти:
Memory Stick, Memory Stick PRO, MultiMediaCard, SD, xD-Picture Card
Партномер:
S10-3C 59056706
Слоты расширения:
1 (0) память — SO DIMM 200-pin
Интерфейсы:
1 x микрофон — линейный вход/микрофон — mini-phone 3.5 mm
Технология батареи:
Li-Ion
Время работы от батареи:
7 ч
Инструкция к Ноутбуку Lenovo IDEAPAD S10-3C
S10-3c UserGuide V1.0 cover_1-4
Lenovo
IdeaPad
S10-3C
©Lenovo China 2010
TM
New World. New Thinking.
Руководство
www.lenovo.com
пользователя V1.0
P/N: 147003379
Напечатано в Китае

S10-3c UserGuide V1.0 cover_2-3
Примечания
•
Перед применением данной информации и продукта, к которому она относится, обязательно прочтите
важную информацию по технике безопасности на стр. iii и заявления в приложении E.
•
Некоторые инструкции в настоящем руководстве подразумевают, что используется система
®
Windows
7. При использовании другой операционной системы Windows некоторые операции могут
немного отличаться. При использовании других операционных систем некоторые операции, возможно,
к вам не относятся и поэтому не должны оказать влияния на использование этого компьютера.
•
Функции, описанные в настоящем руководстве пользователя, одинаковы для большинства моделей.
Некоторые функции могут быть недоступны на данном компьютере и (или) данный компьютер
может обладать функциями, не описанными в настоящем руководстве пользователя.
Первое издание (Май 2010)
© Lenovo, 2010.

Уважаемый пользователь!
Благодарим за приобретение нового ноутбука Lenovo.
Перед началом использования этого изделия внимательно прочитайте
настоящее руководство пользователя.
Мы рады, что Вы выбрали решение Lenovo для обеспечения своих
мобильных компьютерных потребностей. Чтобы помочь Вам быстрее
освоить свой новый компьютер, мы составили настоящее руководство
пользователя. В этом руководстве содержится информация о конфигурации
системы, основные
инструкции по эксплуатации и важные замечания. Нами
приложены все возможные усилия, чтобы избежать любых ошибок и
обеспечить точность и надежность информации, изложенной в настоящем
руководстве. Однако из—за небольшого размера этого руководства
пользователя невозможно полностью охватить все темы. По этой причине мы
приносим своим извинения за любые возможные пропуски.
Компания Lenovo
всегда стремится повысить эффективность и надежность
своей продукции. По этой причине аппаратные и программные компоненты,
указанные в руководстве пользователя, могут не соответствовать Вашей
системе. Однако любые несоответствия между описанием в руководстве
пользователя и фактической работой компьютера не могут оказать
существенное влияние на его использование.
Благодарим Вас за сотрудничество.

Пояснение относительно емкости жесткого диска
Уважаемый пользователь!
При работе с компьютером можно обнаружить, что указанная
номинальная емкость жесткого диска несколько отличается от емкости
диска, указываемой в операционной системе. Например, для жесткого
диска номинальной емкостью 40 ГБ в операционной системе может
отображаться несколько меньшая емкость. Такое расхождение является
нормальным явлением и не связано с какой—либо ошибкой установки
жесткого диска или другой проблемой. Это явление имеет следующие
причины.
I. У производителя и в операционной системе используются
различные стандарты определения емкости жесткого диска
Производитель жесткого диска использует десятичную систему
исчисления (1000), где 1 ГБ = 1000 МБ, 1 МБ = 1000 КБ, 1 КБ = 1000 байт.
Однако при определении емкости жесткого диска операционная система
использует двоичную систему исчисления (1024), где 1 ГБ = 1024 МБ,
1 МБ = 1024 КБ, 1 КБ = 1024 байт. В данном компьютере принят стандарт
производителей жестких дисков. Поскольку стандарты, используемые
производителями жестких дисков и в операционной
системе, различаются,
отображаемая в операционной системе емкость жесткого диска будет
несколько отличаться от номинальной.

Например, если номинальная емкость жесткого диска составляет X ГБ, даже
если он полностью пуст, то емкость, отображаемая операционной системой,
будет следующей:
X × 1000 × 1000 × 1000/ (1024 × 1024 × 1024) ≈ X × 0,931 ГБ
Если часть жесткого диска была использована для каких—либо целей, то
емкость, указанная операционной системой, будет даже ниже, чем
X × 0,931 ГБ.
II. Часть места на жестком диске занята для каких—либо целей
Компьютеры Lenovo могут поставляться с предустановленной системой
OneKey Rescue, поэтому на заводе—производителе на жестком диске выделен
раздел, используемый для хранения зеркального образа диска и файлов
системы OneKey Rescue. Размер, зарезервированный для этого раздела,
различается в зависимости от модели компьютера, операционной системы и
программного обеспечения, поставляемого с компьютером. Для обеспечения
безопасности этот раздел скрыт и
обычно называется “скрытым разделом”.
Кроме того, после форматирования диска или его деления на разделы система
будет использовать определенное место на диске для системных файлов.
По этим причинам доступное пространство жестко диска, отображаемое
операционной системой, всегда ниже, чем номинальная емкость
жесткого диска компьютера.


Содержание
Важная информация по технике
Глава 3. Использование
безопасности…..………….………… iii
Интернета …….……………………….30
Важная информация по технике
Проводное подключение ………...30
безопасности…….………………..……iii
Беспроводное соединение ……....32
Глава 1. Общий обзор
Глава 4. Система OneKey
компьютера …..……………….……… 1
Rescue ………..……………….………..38
Вид сверху …….……………………..…. 1
Система OneKey Rescue ………….38
Вид слева….…………………………..….4
Глава 5. Устранение
Вид справа ……….……………..………. 6
неполадок …….…….……..………....41
Вид спереди…..………………..……….8
Часто задаваемые вопросы……... 41
Вид снизу…………………………..…….9
Устранение неполадок……..……..44
Глава 2. Изучение основ ….….. 11
Приложение A. Получение
Первое использование …..………..11
консультаций и услуг …………...53
Использование адаптера питания и
Получение консультаций через
батареи ……….………………..………..14
Интернет ……….………………..……..54
Использование
Обращение в Центр поддержки
сенсорной панели………….………..17
клиентов…..………………………..…..54
Использование клавиатуры…….. 18
Получение консультаций в других
Специальные кнопки …..………….21
странах …….………………………….... 57
Индикаторы состояния
Телефоны службы гарантийного
компьютера……………………..……..23
обслуживания Lenovo ….………....58
Защита компьютера ………………..24
Использование внешних
устройств ………………………..…….. 26
i

Содержание
Приложение B. Инструкции по
Заявление для пользователей в
эксплуатации и уходу ………….. 59
США………..………………………….. 115
Уход за компьютером…….………. 59
Замечание по удалению данных с
Специальные возможности и
жесткого диска…………………….. 115
удобство работы ………………..….. 66
Приложение F. Компоненты и
Обслуживание…….……………….... 68
технические
Приложение С. Ограниченная
характеристики …………..……… 117
гарантия Lenovo…….………….…. 73
Товарные знаки ………..……..… 119
Информация о гарантии…………. 84
Алфавитный указатель……... 120
Приложение D. Компоненты,
заменяемые пользователем
(CRU) ……..……..……………..…….... 88
Приложение E. Заявления …… 90
Заявления…………………………..….. 90
Информация о моделях с
маркировкой ENERGY STAR … 93
Информация о беспроводной
связи………..………………………..….. 96
Информация о ТВ—тюнере ……. 101
Заявления об электромагнитном
излучении ………..………………….. 104
Заявления о WEEE и
утилизации
………………………….. 111
Заявления о EU WEEE ……….… 112
Заявления по утилизации для
Японии ……….……………………..… 113
ii

Важная информация по технике безопасности
Важная информация по технике
безопасности — — — — — — — — — — — — — — — — — — — — — — — — — — — — — — — — — — — — — — — — — — — — — — — — — — — — — — — — — — — — — — — — — — — — — — — — — — — — — — — — —
Эта информация поможет вам безопасно пользоваться ноутбуком.
Внимательно изучите и сохраните всю документацию, прилагаемую к
компьютеру. Содержащаяся в данном документе информация не меняет
условий вашего договора о приобретении компьютера или ограниченной
гарантии Lenovo. Дополнительную информацию см. раздел “Приложение С.
Ограниченная гарантия Lenovo” на стр.73.
Прочтите в первую очередь
Персональные компьютеры представляют собой электронные устройства.
Это значит, что кабели питания, адаптеры питания и другие детали несут
потенциальную угрозу безопасности и могут стать причиной травм или
материального ущерба, особенно в случае неправильного обращения.
Существуют следующие категории угроз безопасности.
Опасно!
Возможные последствия: физическая травма или смерть.
Внимание!
Последствия: материальный ущерб или небольшая
травма.
Для защиты от возможных рисков и создания безопасной рабочей среды
соблюдайте следующие инструкции.
iii

Важная информация по технике безопасности
Извлечение
Осмотрите на наличие трещин или повреждений крышек компьютера и
адаптер питания, обратив особое внимание на части, на которых есть
следующие наклейки.
Опасно!
• Внутри данного устройства присутствует опасное напряжение,
течет сильный ток и выделяется значительная энергия.
iv
Важная информация по технике безопасности
Рабочее место
НЕ используйте компьютер в местах с повышенной влажностью,
например в ванной комнате.
Не размещайте компьютер и другие компоненты в непосредственной
близости от жидкостей.
Опасно!
• При попадании жидкости на компьютер существует опасность
поражения электрическим током.
НЕ работайте на компьютере во время грозы.
Внимание!
• В противном случае это может стать
причиной повреждения
компьютера и поражения электрическим током.
Следует обеспечить хорошую вентиляцию компьютера и других
компонентов.
Опасно!
•
При размещении включенного компьютера или других компонентов
на кровати, диване или другой мягкой поверхности могут
блокироваться вентиляционные отверстия, что может стать причиной
перегрева компьютера или других компонентов или возгорания.
Отключайте беспроводные устройства в местах, где они могут создавать
помехи, например в больнице или в аэропорту.
v

Важная информация по технике безопасности
Процедуры по правильному использованию
Используйте ТОЛЬКО шнур питания, адаптер питания и батарейный
блок, прилагаемые к компьютеру, никогда не используйте их с другими
устройствами.
Убедитесь, что розетка подходит для подключения компьютера и к ней
подведено надлежащее напряжение, а также она может обеспечить ток,
потребляемый подключаемым устройством.
Опасно!
• Использование ненадлежащего источника питания может
стать
причиной повреждения компьютера, поражения электрическим
током или возгорания.
НЕ используйте розетку, шнур питания, адаптер питания или
батарейный блок, если они повреждены или имеют следы коррозии.
НЕ подключайте к розеткам, к которым подключен компьютер, мощные
бытовые или промышленные приборы.
В случае использования сетевого фильтра подключенная к нему
суммарная нагрузка НЕ ДОЛЖНА превышать его номинальной
мощности. Отсоедините шнур питания, если заметили щелчки,
потрескивание или шипение внутри компьютера или исходящий из него
резкий запах.
vi

Важная информация по технике безопасности
Опасно!
• Перенапряжение может стать причиной неустойчивого
напряжения, что может стать причиной повреждения
компьютера, данных или внешних устройств или возгорания.
НЕ оборачивайте шнур питания вокруг адаптера питания и других
предметов.
НЕ сжимайте и не защемляйте шнур и не ставьте на него тяжелые
предметы.
Внимание!
• При натяжении шнура он может износиться, расслоиться
или
лопнуть, что представляет угрозу безопасности.
Не допускайте, чтобы части компьютера, которые нагреваются во время
работы, длительное время соприкасались с руками, коленями или
другими частями тела.
Внимание!
• При длительном контакте компьютера с телом, даже через
одежду, у вас могут возникнуть неприятные ощущения, и даже
может появиться ожог.
Не роняйте, не
ударяйте, не царапайте, не ставьте тяжелые предметы на
ЖК—дисплей компьютера.
vii

Важная информация по технике безопасности
Внимание!
• Прямой контакт с жидкокристаллическим материалом разбитого
ЖК—дисплея представляет опасность; в этом случае обильно
промойте место контакта проточной водой в течение не менее
15 минут.
Обслуживание и модернизация
НЕ пытайтесь самостоятельно выполнять обслуживание изделия кроме
случаев, когда это рекомендовано Центром поддержки заказчиков или
документацией к изделию.
Внимание!
• НЕ рискуйте и не пытайтесь самостоятельно определить причину
этих явлений. Обратитесь в Центр поддержки заказчиков за
дополнительными указаниями. Список телефонов отделов
обслуживания и поддержки приведен на веб—сайте
http://consumersupport.lenovo.com
.
Если пользователи могут сами установить или заменить CRU, то Lenovo
предоставляет соответствующие инструкции по замене этих
компонентов. Строго следуйте этим инструкциям при установке или
замене подобных компонентов.
Перед тем как открывать крышки устройства, отсоединяйте кабели
питания, батарею и все провода, если только в инструкциях по установке
и настройке не указано иное.
Корпус
включенного компьютера должен быть закрыт.
viii
Глава 1. Общий обзор компьютера
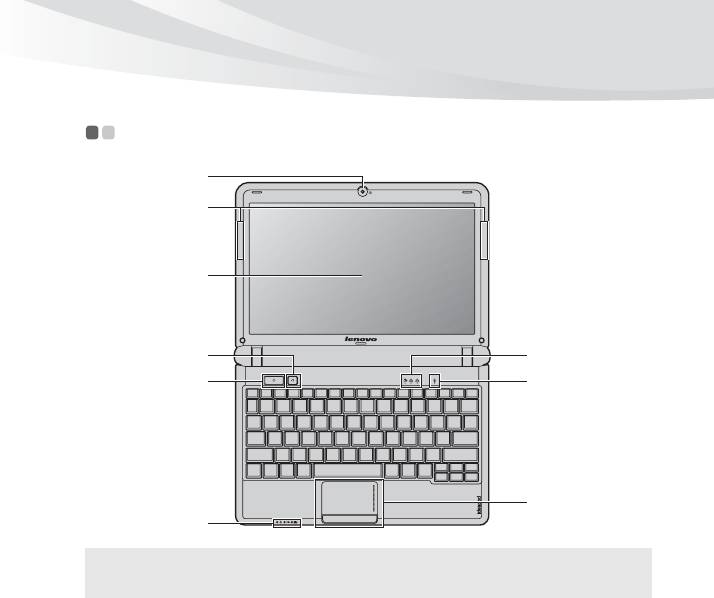
Вид сверху — — — — — — — — — — — — — — — — — — — — — — — — — — — — — — — — — — — — — — — — — — — — — — — — — — — — — — — — — — — — — — — — — — — — — — — — — — — — — — — — — — — — — — —
a
b
c
S10—3C
e
f
d
g
h
f
Примечание. Вид изделия может отличаться от иллюстраций, приведенных в данном
документе. См. описание для определенного продукта.
1

Глава 1. Общий обзор компьютера
Внимание!
• НЕ раскрывайте панель дисплея больше чем на 130 градусов. При
закрытии панели дисплея будьте внимательны, чтобы НЕ оставить ручки
или другие предметы между панелью дисплея и клавиатурой. В
противном случае это может привести к повреждению панели дисплея.
Встроенная
Используйте камеру для видеосвязи.
камера
Антенны
Встроенные антенны обеспечивают оптимальный прием
радиосигнала беспроводной связи.
модуля
беспроводной
связи (Только в
определенных
моделях)
Дисплей
ЖК—дисплей с подсветкой LED обеспечивает яркое
изображение.
компьютера
Кнопка питания
Нажмите эту кнопку, чтобы включить компьютер.
Кнопка система
Нажмите эту кнопку, чтобы открыть систему Система
OneKey Rescue (если система OneKey Rescue установлена),
OneKey Rescue
когда питание компьютера отключено.
Примечание. Для получения дополнительной информации см. раздел “Глава 4.
Система OneKey Rescue” на стр. 38.
Индикаторы
Для получения дополнительной информации см. раздел
“Индикаторы состояния компьютера” на стр. 23.
состояния
компьютера
2
a
b
c
d
e
f

Глава 1. Общий обзор компьютера
Встроенный
Встроенный микрофон с функцией шумоподавления можно
использовать для проведения видеоконференций, записи
микрофон
голосовых сообщений или выполнения несложных
аудиозаписей.
Сенсорная
Сенсорная панель выполняет функции обычной мыши.
панель
Примечание. Для получения дополнительной информации см. раздел
“Использование сенсорной панели” на стр. 17.
3
g
h
Глава 1. Общий обзор компьютера
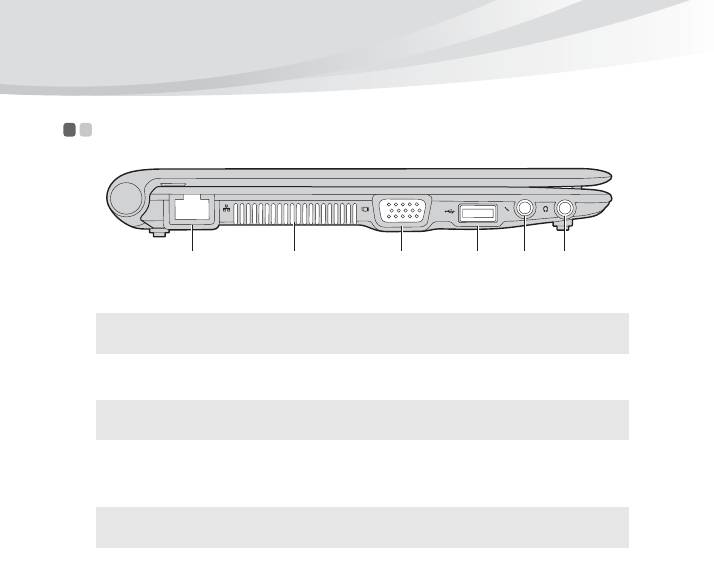
Вид слева — — — — — — — — — — — — — — — — — — — — — — — — — — — — — — — — — — — — — — — — — — — — — — — — — — — — — — — — — — — — — — — — — — — — — — — — — — — — — — — — — — — — — — — — —
a
b c d e f
Порт RJ-45
Используется для подключения к сети Ethernet.
Примечание. Для получения дополнительной информации см. раздел “Проводное
подключение” на стр. 30.
Вентиляционные
Используются для вывода тепла, образующегося внутри
компьютера.
отверстия
Примечание. Убедитесь, что вентиляционные отверстия компьютера не
заблокированы, в противном случае может произойти перегрев.
Порт VGA
Используется для подключения внешних устройств
отображения.
Порт USB
Это гнездо используется для подключения устройств USB.
Примечание. Для получения дополнительной информации см. раздел
“Подключение устройства USB (Universal Serial Bus)” на стр. 28.
Гнездо для
Используется для подключения внешнего микрофона.
микрофона
4
a
b
c
d
e

Глава 1. Общий обзор компьютера
Гнездо для
Используется для подключения внешних наушников.
наушников
Внимание!
• Прослушивание музыки на высокой громкости в течение
длительного периода может привести к нарушению слуха.
5
f
Глава 1. Общий обзор компьютера
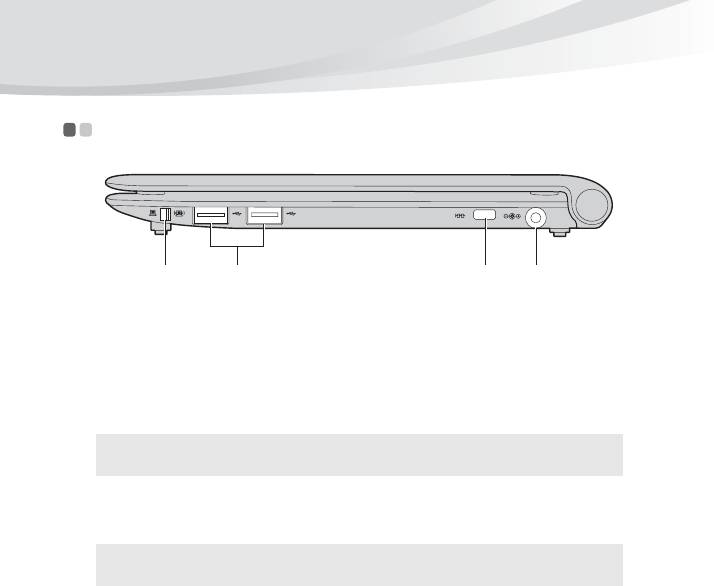
Вид справа — — — — — — — — — — — — — — — — — — — — — — — — — — — — — — — — — — — — — — — — — — — — — — — — — — — — — — — — — — — — — — — — — — — — — — — — — — — — — — — — — — — — — —
a b c d
Встроенный
Используйте этот выключатель для включения/выключения
функции беспроводного соединения всех беспроводных
переключатель
устройств на Вашем компьютере.
беспроводного
соединения
устройства
Порт USB
Это гнездо используется для подключения устройств USB.
Примечание. Для получения дополнительной информации см. раздел
“Подключение устройства USB (Universal Serial Bus)” на стр. 28.
Гнездо для
Используется для подсоединения защитного замка (не
прилагается).
замка
Kensington
Примечание. Для получения дополнительной информации см. раздел “Ус тан о вка
защитного замка (не прилагается)” на стр. 24
6
a
b
c
Аннотации для Ноутбука Lenovo IDEAPAD S10-3C в формате PDF
Топ 10 инструкций
Другие инструкции
- Manuals
- Brands
- Lenovo Manuals
- Laptop
- IdeaPad S10-3
- User manual
-
Contents
-
Table of Contents
-
Troubleshooting
-
Bookmarks
Quick Links
Lenovo
IdeaPad S10
3
—
User Guide
V1.0
Related Manuals for Lenovo IdeaPad S10-3
Summary of Contents for Lenovo IdeaPad S10-3
-
Page 1
Lenovo IdeaPad S10 User Guide V1.0… -
Page 2
First Edition (November 2009) © Copyright Lenovo 2009. LENOVO products, data, computer software, and services have been developed exclusively at private expense and are sold to governmental entities as commercial items as defined by 48 C.F.R. 2.101 with limited and restricted rights to use, reproduction and disclosure. -
Page 3
Thank you for purchasing your new Lenovo notebook computer! Before using this product, make sure to read this user guide carefully. We are pleased that you have chosen Lenovo for your mobile computing needs. To help you master the usage of your new computer quickly, we have prepared this user guide. -
Page 4: Explanation Of Hard Disk Capacity
Explanation of hard disk capacity Dear user, While using your computer, you may find that the nominal hard disk capacity indicated is somewhat different from the disk capacity displayed by the operating system. For example, a nominal 40GB hard disk will appear as less than 40GB in the operating system. This discrepancy is not an error in hard disk installation nor any other problem, but a normal phenomenon of computers.
-
Page 5
X × 0.931 G. II. A portion of the hard disk space is used for specific purposes Lenovo computers may come with preinstalled OneKey Rescue system, so the hard disk has a special portion partitioned before delivery, which is used to store hard disk mirror and OneKey Rescue system program files. -
Page 7: Table Of Contents
Using the keyboard… 14 Special buttons… 16 System status indicators… 18 Securing your computer… 19 Connecting external devices… 21 Using Lenovo Quick Start (select models only) … 24 Chapter 3. Using the Internet … 26 Wired connection … 26 Wireless connection … 28 Chapter 4.
-
Page 8
Contents Appendix C. Lenovo limited warranty … 71 Warranty information … 81 Appendix D. Customer replaceable units (CRUs)… 85 Appendix E. Notices… 87 Notices … 87 ENERGY STAR model information … 90 Wireless related information… 92 TV tuner information … 96 Electronic emissions notices… -
Page 9: Important Safety Information
Follow and retain all information included with your computer. The information in this document does not alter the terms of your purchase agreement or the Lenovo Limited Warranty. For more information, see “Appendix C. Lenovo limited warranty” on page 71.
-
Page 10
Important safety information Unpack Inspect the covers of the computer and the AC adapter, especially parts with the following labels attached for any crack or damage. Danger: • Hazardous voltage, current, and energy levels are present inside any component that has this label attached. -
Page 11
Working place Do NOT use the computer in humid places such as a bathroom. Keep the computer and other parts away from liquids. Danger: • An electric shock may be caused by spilled liquid. Do NOT use the computer during a lightning storm. Attention: •… -
Page 12
Important safety information Correct usage procedures Use ONLY the power cord, power adapter and battery pack shipped with the computer. Never use these devices with another product. Be sure the power outlet is suitable for the plug and provides the correct voltage and current for the product you are using. -
Page 13
Do NOT wrap the power cord around the power adapter or other objects. Do NOT squeeze or pinch the cord, or place heavy objects on it. Attention: • Stressing the cord may cause the cord to fray, crack or crimp which may present a safety hazard. -
Page 14
For a list of service and support phone numbers, go to http://consumersupport.lenovo.com. Lenovo provides documentation with instructions when it is appropriate for customers to install options or replace units (CRUs). Closely follow all instructions when installing or replacing parts. -
Page 15: Chapter 1. Getting To Know Your Computer
Chapter 1. Getting to know your computer Top view — — — — — — — — — — — — — — — — — — — — — — — — — — — — — — — — — — — — — — — — — — — — — — — — — — — — — — — — — — — — — — — — — — — — — — — — — — — — — — — — — — — — — — — — — — — Note: The illustrations in this manual may differ from the actual product.
-
Page 16
OneKey Rescue system has been preinstalled) when the computer is powered off. When the computer is powered-off, press this button to enter Lenovo Quick Start if it has been installed. The touchpad functions as a conventional mouse with built-in left-click and right-click buttons. -
Page 17: Left-Side View
Left-side view — — — — — — — — — — — — — — — — — — — — — — — — — — — — — — — — — — — — — — — — — — — — — — — — — — — — — — — — — — — — — — — — — — — — — — — — — — — — — — VGA port Connects to external display devices.
-
Page 18: Right-Side View
Chapter 1. Getting to know your computer Right-side view Headphone jack Attention: • Listening to music at high volume over extended periods of time may damage your hearing. Microphone jack USB port Note: For details, see “Connecting a universal serial bus (USB) device” on page 23. RJ-45 port Note: For details, see “Wired connection”…
-
Page 19: Bottom View
Chapter 1. Getting to know your computer Bottom view — — — — — — — — — — — — — — — — — — — — — — — — — — — — — — — — — — — — — — — — — — — — — — — — — — — — — — — — — — — — — — — — — — — — — — — — — — — — — — — — — -…
-
Page 20
Chapter 1. Getting to know your computer Battery latch — manual Speakers Hard disk/ Memory/Mini PCI Express Card slot compartment Battery pack SIM card slot (select models only) Notes: After removing the battery pack, you can insert a SIM card into this slot. •… -
Page 21: Chapter 2. Learning The Basics
Chapter 2. Learning the basics First use — — — — — — — — — — — — — — — — — — — — — — — — — — — — — — — — — — — — — — — — — — — — — — — — — — — — — — — — — — — — — — — — — — — — — — — — — — — — — — — — — — — — — — — — — — — — — — — Read the manuals Read the supplied manuals before using your computer.
-
Page 22
Chapter 2. Learning the basics Turn on the computer Press the power button to turn on the computer. Configure the operating system You may need to configure the operation system when it is first used. The configuration process may include the procedures below. •… -
Page 23: Shutting Down Your Computer
To put the computer into sleep state, do one of the following. • Click and select Sleep from the Start menu. • Press Fn + F1. Note: Wait until the power indicator light starts blinking (indicating that the computer is in sleep state) before you move your computer. Moving your computer while the hard disk is spinning can damage the hard disk, causing loss of data.
-
Page 24: Using Ac Adapter And Battery
Chapter 2. Learning the basics Using AC adapter and battery Checking battery status You can determine the percentage of battery power remaining by checking the battery icon in the notification area. Note: As each computer user has different habits and needs, it is difficult to predict how long a battery charge will last.
-
Page 25: Removing The Battery Pack
If you are not going to use the computer for an extended period of time, or if you need to send your computer to Lenovo for service, etc., remove the battery pack from the computer. Before removing the battery pack, make sure the computer has been shut down.
-
Page 26
To avoid possible injury and detriment to the environment, pay attention to the following points: • Replace only with a battery of the type recommended by Lenovo. • Keep the battery pack away from fire. • Do not expose the battery pack to water or rain. -
Page 27: Using The Touchpad
Using the touchpad One-piece touchpad Bottom left area Bottom right area Note: You can enable/disable the touchpad using Fn+F6. Chapter 2. Learning the basics — — — — — — — — — — — — — — — — — — — — — — — — — — — — — — — — — — — — — — — — — — — — — — — — — — — — — — — — — — — — — — — — — — — — — To move the cursor on the screen, slide your fingertip over the pad in the direction in which you want the cursor to move.
-
Page 28: Using The Keyboard
Chapter 2. Learning the basics Using the keyboard Your computer has function keys incorporated in its standard keyboard. Function key combinations Through the use of the function keys, you can change operational features instantly. To use this function, press and hold Fn function keys — — — — — — — — — — — — — — — — — — — — — — — — — — — — — — — — — — — — — — — — — — — — — — — — — — — — — — — — — — — — — — — — — — — — — ;…
-
Page 29
The following describes the features of each function key. Turn on/off the integrated camera. Fn + Esc: Fn + F1: Enter sleep mode. Turn on/off the LCD screen. Fn + F2: Open the interface for the display device switch Fn + F3: to select notebook or external display. -
Page 30: Special Buttons
Chapter 2. Learning the basics Special buttons — — — — — — — — — — — — — — — — — — — — — — — — — — — — — — — — — — — — — — — — — — — — — — — — — — — — — — — — — — — — — — — — — — — — — — — — — — — — — -…
-
Page 31
• When the computer is powered-off, press this button to enter Lenovo Quick Start if it has been installed. Note: For details, see “Using Lenovo Quick Start (select models only)” on page 24. • Under Windows operating systems, press this button to launch a self- defined program, file or a Website. -
Page 32: System Status Indicators
Chapter 2. Learning the basics System status indicators These indicators inform you of the computer status. — — — — — — — — — — — — — — — — — — — — — — — — — — — — — — — — — — — — — — — — — — — — — — — — — — Caps lock indicator Power status indicator Battery status indicator…
-
Page 33: Securing Your Computer
Chapter 2. Learning the basics Securing your computer — — — — — — — — — — — — — — — — — — — — — — — — — — — — — — — — — — — — — — — — — — — — — — — — — — — — — — — — — — — This section provides information about how to help protect your computer from theft and unauthorized use.
-
Page 34: Using Passwords
For details about how to set the password, see the help to the right of the screen in BIOS Setup Utility. Note: To enter BIOS Setup Utility, press F2 when the Lenovo logo appears on the screen while the computer is starting up.
-
Page 35: Connecting External Devices
Connecting external devices Your computer has a wide range of built-in features and connection capabilities. Using memory cards (not supplied) Your computer supports the following types of memory cards: • Secure Digital (SD) card • High Capacity Secure Digital (SDHC) card •…
-
Page 36: Inserting A Memory Card
Chapter 2. Learning the basics Inserting a memory card Push the dummy card until you hear a click. Gently pull the dummy card out of the memory card slot. Note: The dummy card is used for preventing dust and small particles from entering the inside of your computer when the memory card slot is not in use.
-
Page 37
Connecting a universal serial bus (USB) device Your computer comes with three USB ports compatible with USB devices. Note: When using a high power consumption USB device such as USB ODD, use the external device’s power adapter. Otherwise, the device may not be recognized, and system shut down may result. -
Page 38: Using Lenovo Quick Start (Select Models Only)
Using Lenovo Quick Start (select models only) With a boot time of just a few seconds, Lenovo Quick Start offers a handy environment that allows you to enjoy an instant access to functions such as Web browsing, instant messaging and other entertainment functions without entering the traditional operating system.
-
Page 39
Chapter 2. Learning the basics Starting Lenovo Quick Start To launch Lenovo Quick Start, do the following: • Turn off the computer. • Press the QS button. Lenovo Quick Start screen will appear within a few seconds. Exiting Lenovo Quick Start • Click to restart the computer to the main operating system. -
Page 40: Chapter 3. Using The Internet
Chapter 3. Using the Internet As a global network, the Internet connects computers worldwide, providing services such as e-mailing, information searching, electronic commerce, Web browsing and entertainment. You can connect the computer to the Internet in the following ways: Wired connection: use physical wiring to connect. Wireless network technology: connect without wiring.
-
Page 41: Hardware Connection
Chapter 3. Using the Internet Hardware connection: Cable Telephone line TV cable Splitter * Splitter * Cable modem * DSL modem * * Not supplied. Note: The above diagrams are for reference only. Actual connection method may vary. Software configuration Consult your Internet Service Provider (ISP) for details on how to configure your computer.
-
Page 42: Wireless Connection
Chapter 3. Using the Internet Wireless connection Wireless connections provide mobile access to the Internet, allowing you to stay online anywhere the wireless signal covers. Divided by the signal scales, wireless connection to the Internet can be built based on the following standards. Wi-Fi WiMAX Mobile Broadband…
-
Page 43
Using Wi-Fi/WiMax (select models only) Enabling wireless connection To enable wireless communications, do the following: Slide the integrated wireless device switch to Press Fn + F5 to make configuration. Hardware connection Access point * Wi-Fi/WiMax network * Not supplied Software configuration Consult your Internet Service Provider (ISP) and search Windows Help and Support Center for details on how to configure your computer. -
Page 44
Notes: Various standards are in use by mobile operators to provide Mobile Broadband • services. The Lenovo Mobile Broadband module may support one or more of the following standards: GSM (Global System for Mobile Communications) TD-SCDMA (Time Division-Synchronous Code Division Multiple Access) -
Page 45
• A connection management utility to connect/disconnect to your Mobile Broadband network. Note: In general, your mobile service provider provides this utility. Inserting the SIM card To insert the SIM card: Turn off the computer; then disconnect the AC adapter and all cables from the computer. -
Page 46
Chapter 3. Using the Internet Put the battery back in place. Turn the computer over and reconnect the cables. Removing the SIM card To remove the SIM card: Turn off the computer, then disconnect the AC adapter and all cables from the computer. -
Page 47: Chapter 4. Onekey Rescue System
— — — — — — — — — — — — — — — — — — — — — — — — — — — — — — — — — — — — — — — — — — — — — — — — — — — — — — — — — — — — Introduction The Lenovo OneKey Rescue system is an easy-to-use application that can be used to back up the data on your system partition (C drive) for easy restore when required.
-
Page 48
Computers without an integrated optical drive support the creation of recovery • discs; however an appropriate external optical drive is needed to physically create the recovery discs. For more instructions, see the help file of Lenovo OneKey Recovery. -
Page 49
Chapter 4. OneKey Rescue system Using Lenovo OneKey Rescue system (Without Windows operating system) In the event that the operating system cannot be loaded, follow the steps below to access OneKey Rescue system. • Shut down your computer. • Press the key to launch OneKey Rescue system. -
Page 50: Chapter 5. Troubleshooting
This section lists frequently asked questions and tell where you can find detailed answers. For details about each publication included in the package with your computer, see Lenovo IdeaPad S10-3 Setup Poster. What safety precautions should I follow when using my computer? See “Important safety information”…
-
Page 51
See “Appendix A. Getting help and service” on page 53 of this guide. Where can I find warranty information? For the warranty applicable to your computer, including the warranty period and type of warranty service, see “Appendix C. Lenovo limited warranty” on page 71. How can I install the device drivers? A compatible device driver is a requirement to ensure correct operation and performance of each component in your computer. -
Page 52
Chapter 5. Troubleshooting When do I need to restore the system to the factory status? You can use this feature when your system fails or you need to re-install your operating system. This will restore your computer back to the initial status when you first booted up your computer after receiving it from the store. -
Page 53: Troubleshooting
Troubleshooting If you do not find your problem here, see Chapter 2. The following section only describes problems that might negate the need to refer to the more comprehensive information in Chapter 2. Display problems When I turn on the compu- ter, nothing appears on the screen.
-
Page 54
— Press Fn+F2 to confirm whether the LCD screen has been turned off. If you forget your user password, you must take • your computer to a Lenovo authorized servicer or a marketing representative to have the password changed. •… -
Page 55
Sleep or hibernation problems The computer enters sleep mode unexpectedly. The computer enters sleep mode immediately after Power-on self-test (POST). Note: If the battery is charged and the temperature is within range, have the computer serviced. Chapter 5. Troubleshooting • If the processor overheats, the computer automatically enters sleep mode to allow the computer to cool and to protect the processor and other internal components. -
Page 56
Chapter 5. Troubleshooting The critical low-battery error message appears, and the computer immediately turns off. The computer does not return from sleep mode and does not work. Note: If the system still does not return from sleep mode, your system has stopped responding, and you cannot turn off the computer, reset the computer. -
Page 57
Computer screen problems The screen is blank. The screen is unreadable or distorted. Incorrect characters appear on the screen. Chapter 5. Troubleshooting • Do the following: — If you are using the AC adapter, or using the battery, and the battery status indicator is on, press Fn + ↑… -
Page 58
Chapter 5. Troubleshooting Sound problems No sound can be heard from the speaker even when the volume is turned Battery problems Your computer shuts down before the battery status indicator shows empty. -or- Your computer operates after the battery status indicator shows empty. -
Page 59
A startup problem ® The Microsoft Windows operating system does not start. OneKey Rescue system problems Backup cannot be made. Fail to restore system partition to factory default. Other problems The computer does not respond. The computer does not start from the desired device. -
Page 60
Chapter 5. Troubleshooting The connected external device does not work. • Do not connect or disconnect any external device cables other than USB while the computer power is on; otherwise, you might damage your computer. • When using a high power consumption external devices such as an external USB optical disk drive, use external device power adapter. -
Page 61: Chapter 6. Upgrading And Replacing Devices
Chapter 6. Upgrading and replacing devices Replacing the battery Note: Use only the battery provided by Lenovo. Any other battery could ignite or explode. To replace the battery Turn off the computer, or enter hibernation mode. Disconnect the AC adapter and all cables from the computer.
-
Page 62
Chapter 6. Upgrading and replacing devices Install a fully charged battery. Slide the manual battery latch to the locked position. Turn the computer over again. Connect the AC adapter and the cables to the computer again. -
Page 63: Replacing Memory
Replacing memory You can increase the amount of memory in your computer by replacing a double data rate (DDR2) small outline dual inline memory module (SO- DIMM)-available as an option-in the memory slot of your computer. SO- DIMMs are available in various capacities. Note: Use only the memory types supported by your computer.
-
Page 64
Chapter 6. Upgrading and replacing devices Remove the Hard disk/Memory/Mini PCI Express Card slot compartment cover. a. Loosen the screws that secure the compartment cover b. Remove the compartment cover… -
Page 65
Press outwards on the latches on both edges of the socket at the same time, remove the SO-DIMM. Be sure to save the old SO-DIMM for future use. Insert the notched end of the DIMM into the socket. Press the DIMM firmly, and pivot it until it snaps into place. Make sure that it is firmly fixed in the slot and does not move easily. -
Page 66
Chapter 6. Upgrading and replacing devices To make sure that the SO-DIMM is installed correctly, do as follows: Turn the computer on. Hold F2 during startup. The BIOS Setup Utility screen opens. The Installed memory item shows the total amount of memory installed in your computer. -
Page 67: Appendix A. Getting Help And Service
Appendix A. Getting help and service If you need help, service, technical assistance, or just want more information about Lenovo computers, you will find a wide variety of sources available from Lenovo to assist you. This section contains information about where to go for additional information about Lenovo computers, what to do if you experience a problem with your computer, and whom to call for service should it be necessary.
-
Page 68: Getting Help On The Web
• Lenovo hardware repair — If the problem is determined to be caused by Lenovo hardware under warranty, trained service personnel are available to provide the applicable level of service.
-
Page 69
• Engineering change management — Occasionally, there might be changes that are required after a product has been sold. Lenovo or your reseller, if authorized by Lenovo, will make selected Engineering Changes (ECs) available that apply to your hardware. The following items are not covered: •… -
Page 70
Note: For the latest list of customer support center telephone numbers and hours of operation, visit the Support Web site at http://consumersupport.lenovo.com. If the number for your country or region is not listed, contact your Lenovo reseller or Lenovo marketing representative. -
Page 71: Getting Help Around The World
— — — — — — — — — — — — — Warranty Service Telephone Numbers A list of warranty service telephone numbers is available at www.lenovo.com/support/phone. For the latest warranty service number in a country or region, please contact Lenovo, or your reseller in your country or region.
-
Page 72: Appendix B. Use, And Care Information
Appendix B. Use, and care Information Caring your computer Though your computer is designed to function reliably in normal work environments, you need to use common sense in handling it. By following these important tips, you will get the most use and enjoyment out of your computer.
-
Page 73
discharge from your body or clothing to the computer, it poses the same risk of a computer malfunction. Your computer is designed and manufactured to minimize any effects of electrostatic charge. An electrostatic charge above a certain limit, however, can increase the risk of ESD. Therefore, when using the computer close to an appliance that can produce negative ions, give special attention to the following: — Avoid directly exposing your computer to the air from an appliance… -
Page 74
Appendix B. Use, and care Information — When you install a static-sensitive option or CRU, touch the static- protective package containing the part to a metal expansion-slot cover or other unpainted metal surface on the computer for at least two seconds. -
Page 75
• When picking up your open computer, hold it by the bottom. Do not pick up or hold your computer by the display. • Use a quality carrying case that provides adequate cushion and protection. Do not pack your computer in a tightly packed suitcase or bag. -
Page 76
Take care in setting passwords • Remember your passwords. If you forget a supervisor or hard disk password, Lenovo authorized service providers will not reset it, and you might have to replace your system board or hard disk drive. Other important tips •… -
Page 77
• Register your Lenovo products with Lenovo (refer to the Web page: http://consumersupport.lenovo.com). This can help authorities return your computer to you if it is lost or stolen. Registering your computer also enables Lenovo to notify you about possible technical information and upgrades. -
Page 78: Accessibility And Comfort
Appendix B. Use, and care Information Accessibility and comfort Ergonomic information Working in the virtual office may mean adapting to frequent changes in your environment. Following some simple rules will make things easier and bring you the maximum benefits of your computer. Keeping in mind such basics as good lighting and proper seating, for example, can help you improve your performance and achieve greater comfort.
-
Page 79
Appendix B. Use, and care Information What if you are traveling? It may not be possible to observe the best ergonomic practices when you are using your computer while on the move or in a casual setting. Regardless of the setting, try to observe as many of the tips as possible. Sitting properly and using adequate lighting, for example, will help you maintain desirable levels of comfort and performance. -
Page 80: Maintenance
• At least once a week, make a point to back up your data. If critical data is present, it is a good idea to perform a daily backup. Lenovo has many backup options available for your computer. CD-RW drives and CD-RW/DVD drives are available for most computers and are easily installed.
-
Page 81
• Profile your machine at http://consumersupport.lenovo.com to keep up to date with current drivers and revisions. • Keep up to date on device drivers on other non-Lenovo hardware. You might want to read the device driver information release notes prior to updating for compatibility or known issues. -
Page 82
Appendix B. Use, and care Information Cleaning the cover of your computer Occasionally clean your computer as follows: Prepare a mixture of a gentle kitchen-use detergent (one that does not contain abrasive powder or strong chemicals such as acid or alkaline). Use 5 parts water to 1 part detergent. -
Page 83: Cleaning Your Computer Keyboard
Cleaning your computer keyboard Absorb some isopropyl rubbing alcohol on a soft, dust-free cloth. Wipe each keytop surface with the cloth. Wipe the keys one by one; if you wipe several keys at a time, the cloth may hook onto an adjacent key and possibly damage it.
-
Page 84
Appendix B. Use, and care Information Cleaning your computer display Gently wipe the display with a dry, soft lint-free cloth. If you see a scratchlike mark on your display, it might be a stain transferred from the keyboard when the cover was pressed from the outside. Wipe or dust the stain gently with a soft, dry cloth. -
Page 85: Appendix C. Lenovo Limited Warranty
What this warranty covers Lenovo warrants that each hardware product that you purchase is free from defects in materials and workmanship under normal use during the warranty period. The warranty period for the product starts on the original date of purchase specified on your sales receipt or invoice unless Lenovo informs you otherwise in writing.
-
Page 86
How to obtain warranty service If the product does not function as warranted during the warranty period, you may obtain warranty service by contacting Lenovo or an approved service provider. Each of them is referred to as a “Service Provider.” A list of Service Providers and their telephone numbers is available at www.lenovo.com/support/phone. -
Page 87
If your Service Provider determines that it is unable to either repair or replace your product, your sole remedy is to return the product to your place of purchase or to Lenovo for a refund of your purchase price. -
Page 88
Only unaltered Lenovo products and parts are eligible for replacement. The replacement product or part provided by Lenovo may not be new, but it will be in good working order and at least functionally equivalent to the original product or part. The replacement product or part shall be warranted for the balance of the period remaining on the original product. -
Page 89
Personal Data that you did not delete, you are in compliance with all applicable laws. Use of personal information If you obtain service under this warranty, Lenovo will store, use and process information about your warranty service and your contact information, including name, phone numbers, address, and e-mail address. Lenovo will use this information to perform service under this warranty and to improve our business relationship with you. -
Page 90
• damage caused by a non-authorized service provider; • failure of, or damage caused by, any third party products, including those that Lenovo may provide or integrate into the Lenovo product at your request; and • any technical or other support, such as assistance with “how-to”… -
Page 91
Appendix C. Lenovo limited warranty Limitation of liability Lenovo is responsible for loss or damage to your product only while it is: 1) in your Service Provider’s possession; or 2) in transit in those cases where the Service Provider is responsible for the transportation. -
Page 92
Appendix C. Lenovo limited warranty UNDER NO CIRCUMSTANCES SHALL LENOVO, ITS SUPPLIERS, RESELLERS, OR SERVICE PROVIDERS BE LIABLE FOR ANY OF THE FOLLOWING EVEN IF INFORMED OF THEIR POSSIBILITY: 1) THIRD PARTY CLAIMS AGAINST YOU FOR DAMAGES; 2) LOSS OR DAMAGE TO YOUR DATA;… -
Page 93
CANNOT BE WAIVED OR LIMITED BY CONTRACT. European Economic Area (EEA) Customers in the EEA may contact Lenovo at the following address: EMEA Service Organisation, Lenovo (International) B.V., Floor 2, Einsteinova 21, 851 01, Bratislava, Slovakia. Service under this warranty for Lenovo hardware products purchased in EEA countries may be obtained in any EEA country in which the product has been announced and made available by Lenovo. -
Page 94
Appendix C. Lenovo limited warranty Lenovo Turkey address LENOVO TECHNOLOGY B.V. TURKIYE ISTANBUL SUBESI Beybi Giz Plaza, Dereboyu cad., Meydan Sok., No:28, Kat:10, Daire 35 Maslak Posta Kodu: 34398 Tel : 3658900-99 Fax: 2902750… -
Page 95: Warranty Information
Appendix C. Lenovo limited warranty — — — — — — — — — — — — — — — — — — — — — — — — — — — — — — — — — — — — — — — — — — — — — — — — — — — — — — — — — — — -…
-
Page 96
An optional service offering may be available for purchase from Lenovo to have Lenovo install Self-service CRUs for you. You may find a list of CRUs and their designation in the publication that ships with your product or at www.lenovo.com/CRUs. -
Page 97
Under On-Site Service, your Service Provider will either repair or exchange the product at your location. You must provide a suitable working area to allow disassembly and reassembly of the Lenovo product. For some products, certain repairs may require your Service Provider to send the product to a designated service center. -
Page 98
You may be charged for the replacement product if Lenovo does not receive the failed product within thirty (30) days of your receipt of the replacement product. -
Page 99: Appendix D. Customer Replaceable Units (Crus)
Customers are responsible for replacing all external CRUs. Internal CRUs can be removed and installed by customers or by a Lenovo service technician during the warranty period. Your computer contains the following types of external CRUs: •…
-
Page 100
Appendix D. Customer replaceable units (CRUs) Your computer contains the following types of internal CRUs: • Internal CRUs (located behind an access panel): These CRUs are isolated parts within the computer that are concealed by an access panel that is typically secured by either one or two screws. Once the access panel is removed, only the specific CRU is visible. -
Page 101: Appendix E. Notices
Consult your local Lenovo representative for information on the products and services currently available in your area. Any reference to a Lenovo product, program, or service is not intended to state or imply that only that Lenovo product, program, or service may be used.
-
Page 102
Web sites. The materials at those Web sites are not part of the materials for this Lenovo product, and use of those Web sites is at your own risk. Any performance data contained herein was determined in a controlled environment. -
Page 103
Appendix E. Notices made on development-level systems and there is no guarantee that these measurements will be the same on generally available systems. Furthermore, some measurements may have been estimated through extrapolation. Actual results may vary. Users of this document should verify the applicable data for their specific environment. -
Page 104: Energy Star Model Information
Lenovo is proud to offer our customers products with an ENERGY STAR compliant designation. Lenovo computers of the following machine types, if the ENERGY STAR mark is affixed, have been designed and tested to conform to the ENERGY STAR 5.0 program requirements for computers.
-
Page 105
Lenovo encourages you to make efficient use of energy an integral part of your day-to-day operations. To help in this endeavor, Lenovo has preset the following power-management features to take effect when your computer has been inactive for a specified duration: Table 1. -
Page 106: Wireless Related Information
Appendix E. Notices Wireless related information Wireless interoperability Wireless LAN PCI Express Mini Card is designed to be interoperable with any wireless LAN product that is based on Direct Sequence Spread Spectrum (DSSS), Complementary Code Keying (CCK), and/or Orthogonal Frequency Division Multiplexing (OFDM) radio technology, and is compliant to: •…
-
Page 107
Due to the fact that wireless LAN PCI Express Mini Card and Bluetooth Daughter Card operate within the guidelines found in radio frequency safety standards and recommendations, Lenovo believes the integrated wireless cards are safe for use by consumers. These standards and… -
Page 108
Appendix E. Notices result from deliberations of panels and committees of scientists who continually review and interpret the extensive research literature. In some situation or environment, the use of wireless LAN PCI Express Mini Card or Bluetooth Daughter Card may be restricted by the proprietor of the building or responsible representatives of the organization. -
Page 109
Use of mobile devices on board aircraft is explicitly prohibited by many airlines companies, especially during take-off and landing. The built-in Mobile Broadband module on your computer is a low-power radio transceiver. When it is turned on, it intermittently receives and transmits radio frequency (RF) energy which could cause interference with the operation of the airplane communication or navigation system. -
Page 110: Tv Tuner Information
Appendix E. Notices TV tuner information Products with television tuner options installed The notice below applies to products containing television (TV) tuner devices that connect to external antennas or to cable/CATV systems, or both, and that are intended to be installed in North America. Users and installers in other countries should follow local codes and ordinances when installing appliances that connect to external antennas and cable/ CATV systems.
-
Page 111
Appendix E. Notices Example of antenna grounding Ground clamp Antenna lead-in wire Antenna discharge unit (NEC Section 810-20) Grounding conductors (NEC Section 810-21) Power service grounding electrode system (NEC Article 250, Part H) Ground clamps Electronic service equipment… -
Page 112
Appendix E. Notices The following notice applies to all countries and regions: Danger: • Outdoor antenna grounding If an outside antenna or cable system is connected to the equipment, be sure the antenna or cable system is grounded as to provide some protection against voltage surges and built-up static charges. -
Page 113: Electronic Emissions Notices
— — — — — — — — — — — — — — — — — — — — — — — — — — — — — — — — — — — — — — — — — — — — — — — — The following information refers to Lenovo IdeaPad S10-3, machine type 20039 647.
-
Page 114
Appendix E. Notices available from Lenovo authorized dealers. Lenovo is not responsible for any radio or television interference caused by using other than recommended cables or connectors or by unauthorized changes or modifications to this equipment. Unauthorized changes or modifications could void the user’s authority to operate the equipment. -
Page 115
Um dieses sicherzustellen, sind die Geräte wie in den Handbüchern beschrieben zu installieren und zu betreiben. Des Weiteren dürfen auch nur von der Lenovo empfohlene Kabel angeschlossen werden. Lenovo übernimmt keine Verantwortung für die Einhaltung der Schutzanforderungen, wenn das Produkt ohne Zustimmung der Lenovo verändert bzw. -
Page 116
Dieses Gerät ist berechtigt, in Übereinstimmung mit dem Deutschen EMVG das EG-Konformitätszeichen — CE — zu führen. Verantwortlich für die Konformitätserklärung nach Paragraf 5 des EMVG ist die Lenovo (Deutschland) GmbH, Gropiusplatz 10, D-70563 Stuttgart. Informationen in Hinsicht EMVG Paragraf 4 Abs. (1) 4: Das Gerät erfüllt die Schutzanforderungen nach EN 55024 und EN 55022… -
Page 117
TV communications and to other electrical or electronic equipment. Such cables and connectors are available from Lenovo authorized dealers. Lenovo cannot accept responsibility for any interference caused by using other than recommended cables and connectors. -
Page 118
Appendix E. Notices Lenovo Product Service Information Japanese VCCI Class B Statement… -
Page 119
Appendix E. Notices Japan Compliance Statement for Power line Harmonics A statement of compliance to the IEC 61000-3-2 harmonics standard is required for all products connecting to the power mains and rated less than 20A per phase. Korea Class B… -
Page 120: Weee And Recycling Statements
General recycling statement Lenovo encourages owners of information technology (IT) equipment to responsibly recycle their equipment when it is no longer needed. Lenovo offers a variety of programs and services to assist equipment owners in recycling their IT products. Information on product recycling offerings can be found on Lenovo’s Internet site at…
-
Page 121: Eu Weee Statements
EEE as unsorted municipal waste, but use the collection framework available to them for the return, recycle, recovery of WEEE and minimize any potential effects of EEE on the environment and human health due to the presence of hazardous substances. For additional WEEE information go to: http://www.lenovo.com/lenovo/environment/recycling/.
-
Page 122: Japan Recycling Statements
Collecting and Recycling a Disused Lenovo Computer or Monitor If you are a company employee and need to dispose of a Lenovo computer or monitor that is the property of the company, you must do so in accordance with the Law for Promotion of Effective Utilization of Resources.
-
Page 123
You also can refer to the instructions at www.ibm.com/jp/pc/environment/recycle/battery http://www.ibm.com/jp/pc/environment/recycle/battery If you use a Lenovo notebook computer at home and need to dispose of a battery pack, you must comply with local ordinances and regulations. You also can refer to the instructions at www.ibm.com/jp/pc/environment/recycle/battery… -
Page 124: Notice For Users In The U.s.a
Appendix E. Notices Notice for users in the U.S.A. California Perchlorate Information: Products containing CR (manganese dioxide) lithium coin cell batteries may contain perchlorate. Perchlorate Material — special handling may apply. See http://www.dtsc.ca.gov/hazardouswaste/perchlorate. Notice on deleting data from your hard disk As computers spread into every corner of life, they process more and more information.
-
Page 125
Appendix E. Notices • Format your hard disk, using the software for initializing it. • Using the preinstalled recovery program, bring the hard disk back to factory-ship state. These operations, however, only change the file allocation of the data; they do not delete the data itself. -
Page 126: Appendix F. Features And Specifications
Appendix F. Features and specifications Model Name: IdeaPad S10-3 Note: The following specifications may contain technical inaccuracies or typographical errors. Lenovo reserves the right to improve and/or change specifications at any time without notice. Form Factor Size Weight System Memory…
-
Page 127
Appendix F. Features and specifications I/O Ports USB 2.0 port x 3 RJ-45 port Communication Audio Headphone/Mic-in Jack Video D-sub port Memory card slot 5 in 1 slot x 1 (MMC/SD/MS/MS PRO/SDHC) -
Page 128: Trademarks
— — — — — — — — — — — — — — — — — — — — — — — — — — — — — — — — — — — — — — — — — — — — — — — — — — — — — — — — — — — — — — — — — — — — — — — — — — — — — — — — — — — — The following terms are trademarks or registered trademarks of Lenovo in the United States, other countries, or both.
-
Page 129: Index
Index AC adapter … 10 Using Battery … 10 Charging Bluetooth … 23 Connecting … 92 Interoperability … 93 Usage environment … 2, 15 Camera … 21 Card reader … 58 Caring your computer Cleaning … 68 Computer cover … 70 Computer display Computer keyboard …
-
Page 130
Index … 4 Kensington slot Keyboard … 68 Cleaning … 14 Using … 71 Lenovo Limited Warranty … 66 Maintenance Microphone … 2 Built-in Notice … 99 Electronic emissions … 110 for US users OneKey Rescue system button Password … 40 Problems … -
Page 131
… 19 Security Storage media … 61 Handling … 13 Touch pad … 114 Trademarks … 39 Troubleshooting … 3 USB port … 19 VeriFace …81 Warranty information …54 Help Wireless LAN …2 Antennas …92 Interoperability …93 Usage environment Index… -
Page 133
If your product is not working correctly, DO NOT RETURN IT TO THE STORE. For technical assistance, contact a Lenovo support specialist 24 hours a day by calling toll free 1-877-4 LENOVO (1-877-453-6686). Additionally, you can find support information and updates on the Lenovo Web site located at http://consumersupport.lenovo.com. -
Page 134
New World. New Thinking. www.lenovo.com P/N: 147003021 Printed in China…