® POD X3 Family Pilot’s Handbook Manuel de pilotage Pilotenhandbuch Pilotenhandboek Manual del Piloto An in-depth exploration of the advanced technologies and pulsing tonal pleasures of POD X3, POD X3 Live & POD X3 Pro. 40-00-0120 Electrophonic Limited Edition available @ www.line6.com/manuals Rev
Important Safety Instructions C A UT I O N RISK OF ELECTRIC SHOCK DO NOT OPEN WARNING : TO REDUCE THE RISK OF ELECTRIC SHOCK, DO NOT REMOVE COVER (OR BACK). NO USER-SERVICEABLE PARTS INSIDE. REFER SERVICING TO QUALIFIED SERVICE PERSONNEL. WARNING : TO REDUCE THE RISK OF FIRE OR ELECTRIC SHOCK, DO
You should read these Important Safety Instructions Keep these instructions in a safe place • • • • • • • • Read these instructions. Keep these instructions. Heed all warnings. Follow all instructions. Do not use this apparatus near water. Clean only with dry cloth. Do not block any ventilation
Please Note: Line 6, POD, POD X3, POD X3 Live, POD X3 Pro. PODxt, Vetta, FBV, FBV Shortboard, FBV Express, and FBV4 are trademarks of Line 6, Inc. All other product names, trademarks, and artists’ names are the property of their respective owners, which are in no way associated or affiliated with
Table of Contents Tutorial: POD X3 Live for Guitar…………………………………… 1•1 Tutorial: POD X3 & POD X3 Pro for Guitar………………….. 2•1 Controls & Connections………………………………………………… 3•1 POD
EQ………………………………………………………………………………………………….. 5•14 Wah………………………………………………………………………………………………… 5•15 Volume
Tutorials Tutorial: POD X3 Live for 1•1 1. Plug your guitar into Guitar In. 2. Turn on POD X3 Live. 3. Recall User Preset “32D: Tutorial1”. Press to get to User Bank 32 Guitar Press to load preset D.
Tutorials 4. The Home Page shows with the Amp+Cab block selected. 1•2 5. Pick an Amp Model. Double-press to show AMP+CAB settings. Turn to pick an Amp Model. 6. Tweak the Amp Tone Controls. TYPE selects from Guitar, Bass and Pre-Amp Models.
Tutorials 7. Pick a Stomp Model and tweak it. 1•3 Double Press Turn to select DISTORTION: KILLER Z Press down to select lower row. Turn to tweak upper row settings. Turn to tweak lower row settings.
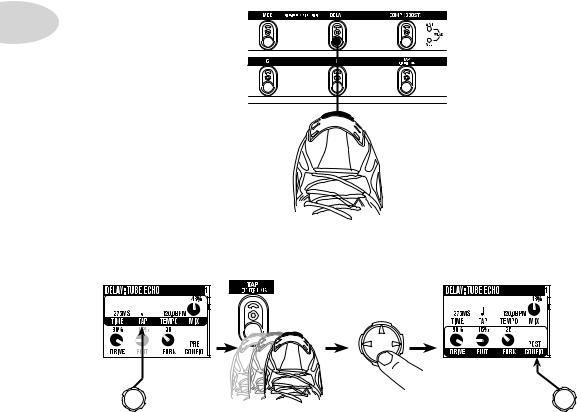
Tutorials 8. Show the Delay settings. 1•4 Double Press 9. Set the Delay tempo, and set it to run post (after the Amp Model). Press down to select lower row. Tap is set to quarter note. Tap delay temo. Set CONFIG to POST.
Tutorials 10. Select the EQ. 1•5 Press to show the Home Page. Press up/down/left/ right to select EQ. Press to turn EQ on/off. 11. Tweak the EQ. Press up/down to select upper/lower row. There is no model select for EQ. Double-press to show EQ settings.
Tutorials 12. Turn both Tones on at once. 1•6 HOLD FOR 2 SECONDS 13. Load preset to Tone 2 Only.
Tutorials 14. Select and Tweak Tone 1/Tone 2. 1•7 Tone 1 is selected above. Tone 2 is selected above. PRESS BRIEFLY 15. These knobs and footswitches control only one Tone at a time:
Tutorials 16. Tweak combined volume of Tone 1 + Tone 2. 1•8 17. Save. PRESS Press to finish save. Choose a User location to save to. Choose to edit name for Tone 1 or Tone 2. Move cursor. Change character.
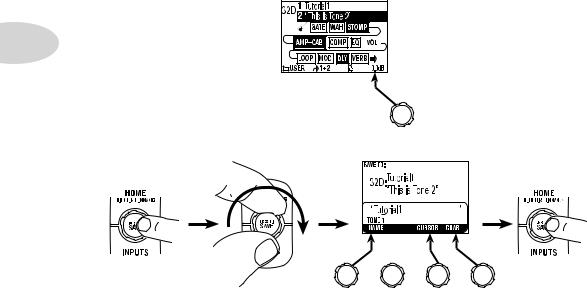
Tutorials Tutorial: POD X3 & POD X3 Pro for Guitar 1. Plug your guitar into Input 1. 2•1 PAD 1 2. Turn on POD X3 or POD X3 Pro. 3. Recall User Preset “32D:Tutorial1”. Press to show the Home Page. Turn to select . Turn to choose preset 32D Tutorial 1 . Turn to choose folder User . Press to return to
Tutorials 4. Turn on the Amp Model. PRESS 2•2 AMP+CAB is off (outlined). AMP+CAB is on (black). 5. Pick an Amp Model. PRESS Double-press Turn to pick an Amp Model. TYPE selects from Guitar, Bass and Pre-Amp Models. 6. Tweak the Amp Tone Controls.
Tutorials 7. Pick a Stomp Model and tweak it. 2•3 Double-press Turn to select DISTORTION: KILLER Z Press down to select lower row. Turn to tweak upper row settings. Turn to tweak lower row settings. 8. Show the Delay settings. DOUBLE-PRESS TO ADJUST Double-press
Tutorials 9. Set the Delay tempo, and set it to run post (after the Amp Model). 2•4 Tap delay tempo Press down to select lower row. Tap is set to quarter note. Set CONFIG to post. 10. Select the EQ. Press to show the Home Page. Press up/down/left/ right to select EQ. Press to turn EQ on/off. 11.
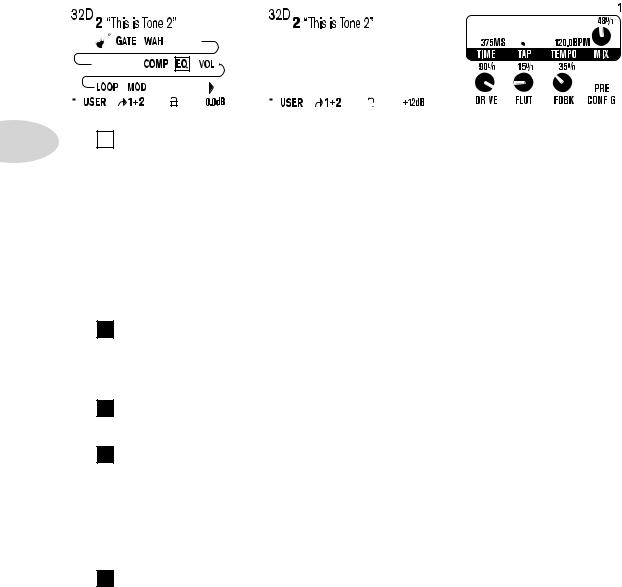
Tutorials 12. Turn both Tones on at once. HOLD FOR DUAL PRESS TO SAVE PRESS Press to show the Home Page. 2•5 HOLD FOR 2 SECONDS 13. Load preset to Tone 2 only. Preset loads into Tone 2. Turn to select . Turn to select folder FX HVY . Turn to choose preset Bubble Echo . 14. Select and tweak Tone
Tutorials 15. These knobs and buttons control only one Tone at a time: DRIVE BASS MIDDLE TREBLE PRESENCE REVERB 2•6 TONE VOLUME PRESS ON/OFF • DOUBLE-PRESS TO ADJUST 16. Tweak the combined volume of Tone 1 + Tone 2. 17. Save. PRESS Press to finish save. Choose a User location to save to. Choose to
Controls & Connections Controls & Connections POD X3 3•1 1 Display – the LCD (liquid crystal display) is your window into the power of POD X3. You’ll see (2) types of “pages” in the display: Home Page – the “Tone Path” Home Page shows you all the digital processing “blocks” that are working to
Controls & Connections Tone Path Home Page 3•2 2 Select Knob page you’re on. – Big User Home Page (available for User Presets only) Edit Page turning this knob will do different things depending on what Home Page – turn to select presets. See Chapter 4 for all the details. Edit Page – turn to pick
Controls & Connections Press the Home button to leave the Edit page and return to the Home Page. Chapter 5 gives you details on all the Edit pages available. 7 Outputs / Hold for System – press to enter the Outputs setup page, where you can set up POD X3 for whatever you’re connecting it to. This
Controls & Connections setting to just the right value. See Chapter 5 to learn how to set up effects to follow the tempo that you’ve tapped. Press and hold the Tap button for 2 seconds to activate the tuner. You can also add footswitch tuner activation with an optional FBV foot controller. 10 Drive
Controls & Connections Volume to maximum, when setting levels. 15 Clip Light – this lights when clipping is detected, which generally means unpleasantly distorted, bad sound. Try reducing the output level of the device that’s feeding your POD X3, or reducing the Tone Volume for Tone 1 or Tone 2, or
Controls & Connections 20 S/PDIF Out – this jack sends out 24-bit digital versions of the Left & Right Outputs. The System setup page lets you choose the sample rate and adjust the level. See Chapter 6 for the scoop. 21 USB 2.0 – POD X3’s USB 2.0 jack lets you connect directly to a USB 2.0-equipped
Controls & Connections Join the Club! Visit www.line6.com/club to register online and join the All Access club, the place to get: • Free iTunes and MP3 Jam Tracks. • Free loops for GarageBand, Acid, Reason and more. • Free guitar lessons from LA session pros. • Free chord and scale practice tools.
Controls & Connections POD X3 Live HOME HOLD FOR COMMANDS ON/OFF DOUBLE-CLICK TO EDIT PRESS TO SAVE INPUTS OUTPUTS HOLD FOR SYSTEM 3•8 1 Display – the LCD (liquid crystal display) is your window into the power of POD X3 Live. You’ll see (2) types of “pages” in the display: Home Page – the “Tone
Controls & Connections 2 Select Knob page you’re on. – turning this knob will do different things depending on what Home Page – turn to select presets. See Chapter 4 for all the detail. Edit Page – turn to pick a different Model. This works for the Amp, Stomp, Mod, Delay, Reverb, and Wah edit
Controls & Connections 8 Multi-function Knobs – turn any one of these knobs to adjust the corresponding parameter in the display. 3•10 See Chapter 4 to learn about Home Page functions for these knobs. 9 Footswitches – these allow you to do the following: Tone 2 / Hold for Dual – press to toggle
Controls & Connections Tap / Hold for Tuner – POD X3 Live allows you to control the time and speed of your Delay and/or Mod effects by simply tapping on this footswitch. Tap a few times here, and the effects that are set to “lock” to that tempo will change to match what you tapped. There’s also a
Controls & Connections or guitar level inputs. Line level inputs should allow you to turn POD X3 Live’s Master Volume up all the way (or close to it) and thereby get the best sound possible. If your gear has inputs that function as mic/line level inputs, try to set the trim for those inputs to the
Controls & Connections 21 Guitar In – plug your guitar or bass in here. You techies will want to know this is a mono, unbalanced connection. The Guitar In Pad switch sets the sensitivity of this jack. The Inputs page is where you assign whether this input feeds Tone 1, Tone 2 or both. See Chapter 6
Controls & Connections 28 Effects Loop – the Effects Loop provides a mono FX Send and a stereo FX Return, operating at approximately 19.5 Volts peak-to-peak, making it optimal for line level devices. The loop can also be used with most stomp boxes by adjusting the send and return levels. Use the
Controls & Connections • 7 is the sum of the inputs you’ve chosen for Tone 1. • 8 is the sum of the inputs you’ve chosen for Tone 2. You can also connect your headphones or powered speakers directly to POD X3 to hear your computer-generated audio, along with POD X3’s real-time processing. See
Controls & Connections POD X3 Pro ® 3•16 1 Display – the LCD (liquid crystal display) is your window into the power of POD X3 Pro. You’ll see (2) types of “pages” in the display: Home Page – the “Tone Path” Home Page shows you all the digital processing “blocks” that are working to deliver your
Controls & Connections 2 Select Knob page you’re on. – turning this knob will do different things depending on what Select Knob Home Page – turn to select presets. See Chapter 4 for all the details. Edit Page – turn to pick a different Model. This works for the Amp, Stomp, Mod, Delay, Reverb, and
Controls & Connections 8 Multi-function Knobs – turn any one of these knobs to adjust the corresponding parameter in the display. 3•18 See Chapter 4 to learn about Home Page functions for these knobs. 9 Keypad – these buttons allow you to do the following: Tone 2 / Hold for Dual – press to toggle
Controls & Connections This knob, along with the Tone Controls, Reverb, and Tone Volume knobs, adjusts the Tone that is currently selected – Tone 1 or Tone 2. See Chapter 4 for more info on Dual Tone and how this all works. 11 Tone Controls – Bass, Middle, Treble, Presence. Just like any guitar
Controls & Connections 17a Guitar In Pad – engage this Pad to tame hotter signals at the Guitar In jack when you use guitars with active pickups or other high output sources. 18 Low Cut Filter – push this button in to engage the Low Cut Filter for the Mic Input. It cuts 75Hz and below, which is
Controls & Connections 25 S/PDIF I/O – the S/PDIF Out jack sends out 24-bit digital versions of the Direct Out signals. The System setup screen lets you choose the sample rate and adjust the level. See Chapter 6 for details. The S/PDIF In jack receives 24-bit digital audio. 26 Studio/Direct Out –
Controls & Connections 33 USB 2.0 – POD X3 Pro’s USB 2.0 jack lets you connect directly to a USB 2.0-equipped computer, and take advantage of many computer-powered features: • Line 6 Monkey software makes it easy to install software and get updates. Install driver software with Line 6 Monkey, and
Controls & Connections 36 Line Inputs – these two unbalanced 1/4-inch inputs can be used for a second guitar or just about any other instrument or line inputs. The Inputs page is where you assign whether these inputs feed Tone 1, Tone 2 or both. See Chapter 6 for more info. Join the Club! Visit
Getting Around,Tones & Tuner Getting Around, Tones & Tuner POD X3, POD X3 Live and POD X3 Pro allow you to completely tweak your tone, giving you the ability to dial-in just about any sound you can imagine. More importantly, we’ve come up with an amazingly straight-forward way for you to take total
Getting Around,Tones & Tuner • Amp+Cab • Loop (POD X3 Live & Pro) • Gate • Mod • Wah • Dly • Stomp • Rev • EQ • Vol (always on) • Comp 4•2 Each block in the path can be selected, turned on or off (except Volume), and tweaked to your liking. To select a block from the Home Page, use the 4-way Nav
Getting Around,Tones & Tuner If there are multiple rows or multiple pages of parameters in an Edit Page, you can use the Up and Down buttons to get to them all. Press up/down to select upper/lower row for tweaking. Turn to tweak upper row settings. Turn to tweak lower row settings. 4•3 From any
Getting Around,Tones & Tuner The Dual Tone Concept One of the most powerful features of POD X3, POD X3 Live and POD X3 Pro is Dual Tone capability. What is Dual Tone, you ask? There are actually two (2) completely independent Tone paths available in POD X3, POD X3 Live and POD X3 Pro! This allows
Getting Around,Tones & Tuner Dual tone on HOLD Dual tone off 3. Tweak your Tones. From the Home Page, briefly pressing the Tone 2 button (POD X3 & POD X3 Pro) or stepping on the Tone 2 footswitch (POD X3 Live) will toggle between controlling Tone 1 and Tone 2. When you’re on the one you want, you
Getting Around,Tones & Tuner Tone Volume Controls • The Tone Volume knob adjusts the volume of the Tone that is currently selected. Use this control to set the correct balance between Tone 1 and Tone 2. • From the Home Page, the rightmost Multi-function knob lets you adjust the volume of Tone 1 +
Getting Around,Tones & Tuner Preset Folders POD X3, POD X3 Live and POD X3 Pro include over 350 presets to cover a wide range of styles. These presets store complete amp-and-effect selections and settings that you can call up at the touch of a button. Of these presets, there are 128 User locations
Getting Around,Tones & Tuner Recalling Presets There are a couple of ways to recall presets from the Preset Library. To recall a “complete” preset (both Tone 1 and Tone 2) at once, do the following: 4•8 Press to show the Home Page. Turn to select . Turn to choose a folder. Turn the Select knob to
Getting Around,Tones & Tuner Or only Tone 2: Press to show the Home Page. Turn to select . Turn to choose a folder. Turn the Select Knob to choose a preset from that folder. Note: You can also recall User Presets on POD X3 and POD X3 Pro using an optional Line 6 FBV, FBV Shortboard or FBV Express.
Getting Around,Tones & Tuner Locking Tone 2 From the Home Page, you can lock Tone 2 to prevent it from getting overwritten when loading new presets. This is handy when you’re using Tone 2 for vocals and you want to make sure it doesn’t change when you recall guitar presets on Tone 1. Tone 2
Getting Around,Tones & Tuner Tuner Press and hold the Tap button or footswitch for 2 seconds to enter tuner mode — shazam! Instant digital chromatic tuner for Tone 1. The display will change to the following: TUNER 50 440HZ REF 50 E BYPASS AUDIO All Amp Model and effects processing are bypassed so
Reference:Tweaking Tones Reference: Tweaking Tones Amp + Cab Type – turn this knob to select Guitar Amp Models, Bass Amp Models or Pre-Amp type Models. Select Knob – once the Type has been selected, turn the Select Knob to pick an Amp Model. The Model names will appear at the top of the display.
Reference:Tweaking Tones Tone Controls 5•2 Tone Controls adjust the overall tone of the currently-loaded Amp Model. You should know that these controls are individually crafted for each Amp Model, so their response and interactivity will change depending on the Amp Model that is selected. For
Reference:Tweaking Tones Bass Amp Model Tone Controls: Bass – bass tone control. Lo Mid – low-mid tone control. Hi Mid – high-mid tone control. Treble – treble tone control. Drive – controls how hard you’re driving the input of the chosen Amp Model, and just like the input volume control on a
Reference:Tweaking Tones Stomp Boxes 5•4 What guitarist doesn’t like Stompboxes? POD X3, POD X3 Live and POD X3 Pro include an arsenal of amazing-sounding Distortion, Dynamics, and Filter Stomp Box Models, lovingly crafted after a whole carpet-full of the greatest effects of guitar history. Quick
Reference:Tweaking Tones Dynamics Stomp Boxes Sust – varies the compression threshold. Level – adjusts the overall level. Sens – varies the effect’s response to your playing. Amount – on Vetta Juice, varies the ratio of compression. Ramp – for Swell effects, sets the time it takes for your sound to
Reference:Tweaking Tones Attack – controls how long it takes for the effect to happen. Pos – represents the current angle of that pedal, with 0% meaning the pedal is fully heel down, and 100% meaning it’s fully toe down. If you don’t have a pedal connected, you can still adjust Pos to get a “parked
Reference:Tweaking Tones Modulation Effects Modulation effects are things that swoosh, pulse and warble—from phase shifters to flangers to choruses. Why are they called modulation effects? Well, if we consult a dictionary, we discover that ‘modulate’ in the electronic world means to “alter the
Reference:Tweaking Tones (before the amp model), or Post (after the amp model). Fdbk – adjusts how much of the effected signal is fed back to the input of the effect. Manual – on Jet Flanger, controls the length of the very short delay that’s applied to the sweep to make the flanging effect happen.
Reference:Tweaking Tones Delay Select Knob – turn to pick a Delay model. Time – for mono delays, sets the time for the delay line; for stereo delays, sets the time for the left side delay line. Tap – set this to OFF to have this effect ignore tempo, or pick a note value that you’d like your speed
Reference:Tweaking Tones Drive – for Tape Delay models, adds some tube warmth. Flut – for Tape Delay models, adjusts wow-and-flutter, that unique sound of a slipping, dirty capstan. Heads – for some Tape Delays, enables you to choose from the available combinations of the model’s virtual tape
Reference:Tweaking Tones Reverb When we set out to create POD X3, POD X3 Live and POD X3 Pro, we devoted our fanatical modeling technology and energy for innovation to developing no-compromise reverb effects. The collection of reverb models emulate physical environments (rooms and halls), plate
Reference:Tweaking Tones Gate 5•12 The Gate effect helps eliminate unwanted noise when you’re not playing, and can be especially valuable when using high gain sounds. Like a security gate, it’s supposed to quickly open to pass the things that you want, and then swing closed to keep out the things
Reference:Tweaking Tones Compressor -20dB COMPRESSOR 3dB THRESH 75% GAIN 75% 75% TYPE TYPE BYP VOL 1 The Compressor effect is just the thing when you want to smooth out your levels the way that you would typically do in a recording studio. Thresh – determines how aggressive you want the Compressor
Reference:Tweaking Tones EQ 5•14 Here’s some good, old-fashioned EQ to make your tone sparkle, rattle the neighbor’s windows, and everything in-between. You’ve got (2) bands of shelving EQ and (2) bands of semi-parametric “peaking” EQ to choose from. Lo Fq – sets the corner frequency of the
Reference:Tweaking Tones Wah The Wah effect is generally expected to be controlled by the pedal built into POD X3 Live or an optional Line 6 FBV foot controller or third-party MIDI controller. Select Knob – turn to pick a Wah pedal. Your choices are Vetta Wah, Fassel, Weeper, Chrome, Chrome Custom,
Reference:Tweaking Tones Volume Pedal 5•16 The Volume effect is generally expected to be controlled by the pedal built into POD X3 Live or an optional Line 6 FBV foot controller or third-party MIDI controller. Min – determines how much volume you’ll hear when the volume pedal is at its minimum
Reference:Tweaking Tones Effects Loop (POD X3 Live & POD X3 Pro only) -58dB EFFECT LOOP +24dB 100% SEND 75% RETURN 75% MIX 75% TYPE TYPE BYP VOL 1 POST CONFIG This lets you tweak the settings related to the Effects Loop. Note that the Loop can only be on for one Tone at a time, and turning the Loop
Reference: Configuration & Setup Reference: Configuration & Setup Inputs Press the Inputs button to get to the Inputs page: INPUTS GUITAR TONE 1 SAME TONE 2 DISABLE GLOBAL S/PDIF CONTROL DIGITAL VARIAX Here, you can route your hardware inputs to Tone 1 and Tone 2. Tone1 – pick an input to get
Reference: Configuration & Setup • Analog Input Restriction: POD X3 Pro does not allow simultaneous input from more than one analog input per Channel Strip. For example, if Gtr 1 is selected as input for Tone 1, no combination of a Tone 1 analog input such as Gtr 1, Mic 1, Line 1, Gtr 1+Gtr 2, Gtr
Reference: Configuration & Setup the second Outputs page. • Studio/Direct Tone 1 – the 1/4-inch jacks output Tone 1 only, panned center, with Studio Mode processing. • Studio/Direct Tone 2 – the 1/4-inch jacks output Tone 2 only, panned center, with Studio Mode processing. “Live” Modes (for feeding
Reference: Configuration & Setup Outputs Page 2: Studio/Direct Mix STUDIO/DIRECT MIX ON TONE 1 MATCH STUDIO/ DIRECT DIGITAL PAN 48kHz RATE ON TONE 2 PAN +12dB S/PDIF LE VEL FORMAT • This mix provides POD’s legendary direct recording sound, ideal for connecting direct to a mixer, recorder, PA, or
Reference: Configuration & Setup to increase the digital output level of sounds that don’t have a lot of Amp Model or stompbox distortion or other settings that are driving their levels up. Format – selects the digital output’s format, either S/PDIF or AES/EBU for POD X3 Pro, S/PDIF for POD X3 and
Reference: Configuration & Setup • 1-Wah/Vol 2-Tweak – Pedal 1 controls Wah and Volume with the toe switch toggling between the two. Pedal 2, if present, controls whatever is assigned to Tweak. Mstvol (POD X3 Live & POD X3 Pro only) – choose whether the Master Volume knob will control 1/4-Live
Reference: Configuration & Setup Commands Press and hold the Home / Hold for Commands button for 2 seconds to get to the Commands page: Turn the Select knob to choose a Command, then press the Save button to execute the Command. Press the Home button to exit without executing a command. Swap Tone 1
Example Setups Example Setups Need quick instructions for a particular setup? Just follow these easy steps. And like any good recipe, once you’ve got the hang of things, feel free to add your own tweaks on these recommended settings to spice it up… Mono or Stereo Recording or Direct to Mixer/PA
Example Setups Recording Tone 1 & 2 to Separate Mono Tracks 1. Connect outputs to your recorder: • POD X3: connect the 1/4-inch outs. • POD X3 Live & POD X3 Pro: the XLR outputs are recommended for live sound systems, to provide a level that approximately matches a mic’ed up amp. You can also use
Example Setups 3. Set the first OUTPUTS page (1/4-inch jacks Outputs): • Mode: Studio/Direct Tone 1 Feed One Guitar Amp 1. Connect 1/4-inch output(s) to your amp or speaker system. 2. Set the first OUTPUTS page (1/4-inch Outputs): • Mode: Combo Front, Combo Pwramp, Stack Front, or Stack PwrAmp. •
Example Setups • Tone 1 Pan: Full Left • Tone 2: On • Tone 2 Pan: Full Right 3. Check your Master Volume. • Select the loudest preset/settings you intend to use. • Play your instrument and turn Master Volume as high as you can without clipping the amp/speakers you’re feeding. Feed Two Guitar Amps,
Example Setups • From the Home Page, turn the second knob below the display, and begin loading Tone 2 settings. • Selecting Tone 1 from the preset you just saved (you’ve copied Tone 1 to Tone 2). • Set Tone 2’s Tone Volume low. • Add more effects to Tone 2, cranking up the effect mixes, so you hear
Example Setups • Select the loudest preset/settings you intend to use. • Play your instrument and turn Master Volume as high as you can without clipping the amp/speakers you’re feeding. Electric Guitar to On-Stage Amp and Direct Out + Vocals/ Acoustic/etc. to Direct Out Only 1. Connect your
Example Setups 8. Check your Master Volume. • Select the loudest preset/settings you intend to use. • Play your instrument and turn Master Volume as high as you can without clipping the amp/speakers you’re feeding. 7•7
USB & Computer Software USB & Computer Software Updating POD X3, POD X3 Live or POD X3 Pro’s Firmware Here are step-by-step instructions for making sure your POD X3, POD X3 Live or POD X3 Pro has the latest firmware installed. 1. From www.line6.com/monkey, download and install the latest version of
USB & Computer Software POD X3 Live or POD X3 Pro and complete its startup. 6. On the Updates tab, look to see if your USB Firmware and Flash Memory are up to date. • If either one doesn’t show a green circle with a checkmark, highlight Device Firmware and click the Update button to the right.
USB & Computer Software 5. The 7 and 8 inputs are perfect as raw sources for plug-in processing. • See www.line6.com/gearbox_plugin for info on our POD X3-equivalent plugin. 6. Connect your headphones or powered speakers directly to your POD X3, POD X3 Live or POD X3 Pro to hear your
PRESS TO HOLD FOR SYSTEM OUTPUTS DOUBLE-CLICK TO EDIT ON/OFF TONE 2 ON TONE 1 MODE WAH STOMP WAH STOMP PAN ON TONE 2 1/4-INCH OUTPUTS PAN STUDIO/DIRECT MIC/ROOM/SPEAKER SIMULATION COMBO OR STACK FRONT OR PWRAMP VOL (PRE) GATE VOL (PRE) GATE TONE 1 TONE 2 SAVE TONE 1 OR STUDIO/ DIRECT TONE 1 MODE
PRESS TO LOOP: TONE 1 OR TONE 2 (NOT BOTH) HOLD FOR SYSTEM OUTPUTS DOUBLE-CLICK TO EDIT ON/OFF TONE 2 TONE 1 WAH STOMP ON TONE 1 MODE PAN ON TONE 2 1/4-INCH OUTPUTS COMBO OR STACK FRONT OR PWRAMP PAN STUDIO/DIRECT MIC/ROOM/SPEAKER SIMULATION LOOP (PRE) VOL (PRE) GATE WAH STOMP LOOP (PRE) VOL (PRE)
PRESS TO GATE LOOP: TONE 1 OR TONE 2 (NOT BOTH) TAPPED FROM CHANNEL STRIP INPUTS HOLD FOR SYSTEM OUTPUTS DOUBLE-CLICK TO EDIT ON/OFF TONE 2 TONE 1 WAH STOMP TONE 1 MODE PAN TONE 2 1/4-INCH OUTPUTS COMBO OR STACK FRONT OR PWRAMP PAN STUDIO/DIRECT MIC/ROOM/SPEAKER SIMULATION LOOP (PRE) VOL (PRE) GATE
Перед вами файл pdf, где представлена инструкция (руководство) на русском для LINE 6 POD X3 Live. Вы можете скачать ее либо изучить в онлайн режиме.
Подробные сведения об инструкции:
Устройство из раздела: процессор
Бренд-производитель: LINE 6
Наименование модели: LINE 6 POD X3 Live
Инструкция на английском языке
Файл: pdf
Размер файла: 2,29 MB

Скачать инструкцию к HARPER HDT2-1110
ЗАГРУЗИТЬ
Просмотр инструкции онлайн
|
10 898 торговых марок |
Скачайте инструкцию БЕСПЛАТНО! Diplodocs позволяет скачать несколько типов инструкций для наилучшего использования LINE 6 POD X3 LIVE |

|
Вам требуется помощь по использованию изделия? Все инструкции по категориям |
инструкция по эксплуатации LINE 6 POD X3 LIVEDiplodocs поможет скачать инструкцию LINE 6 POD X3 LIVE .
Введите модель изделия LINE 6…
Фрагмент инструкции: руководство пользователя LINE 6 POD X3 LIVE
|

Copyright © 2005 — 2012 — Diplodocs —
Все права защищены.
Торговые марки принадлежат их соответствующим владельцам.
![]()
®
POD X3 Family
Pilot’s Handbook
Manuel de pilotage
Pilotenhandbuch
Pilotenhandboek
Manual del Piloto
An in-depth exploration of the advanced technologies and pulsing tonal pleasures of POD X3, POD X3 Live & POD X3 Pro.
|
40-00-0120 |
Electrophonic Limited Edition available @ www.line6.com/manuals |
Rev E |

Important Safety Instructions
CAUTION
RISK OF ELECTRIC
SHOCK DO NOT OPEN
WARNING : TO REDUCE THE RISK OF ELECTRIC SHOCK, DO NOT REMOVE COVER (OR BACK). NO USER-SERVICEABLE PARTS INSIDE. REFER SERVICING TO QUALIFIED SERVICE PERSONNEL.
WARNING : TO REDUCE THE RISK OF FIRE OR ELECTRIC SHOCK,
DO NOT EXPOSE THE APPLIANCE TO RAIN OR MOISTURE.
NOTICE: This equipment has been tested and found to comply with the limits for a Class B digital device pursuant to Part 15 of FCC Rules. Operation is subject to the following two conditions: (1) This device may not cause harmful interference, and (2) this device must accept any interference received, including interference that may cause undesired operation.
The lightning flash with arrowhead symbol, within an equilateral triangle, is intended to alert the user to presence of uninsulated “dangerous voltage” within the product’s enclosure that may be of sufficient magnitude to constitute a risk of electric to persons.
The exclamation point, within an equilateral triangle, is intended to alert the user to the presence of important operation maintenance (servicing) instruction in literature accompanying the appliance.
The serial number can be found on the bottom or back of your POD X3, POD X3 Live or POD X3 Pro. It’s the number that begins with “(21)”. Please note it here for future reference:
SERIAL NO:

You should read these Important Safety Instructions
Keep these instructions in a safe place
•Read these instructions.
•Keep these instructions.
•Heed all warnings.
•Follow all instructions.
•Do not use this apparatus near water.
•Clean only with dry cloth.
•Do not block any ventilation openings. Install in accordance with the manufacturer’s instructions.
•Do not install near any heat sources such as radiators, heat registers, stoves, or other apparatus (including amplifiers that produce heat.
•Connect only to AC power outlets rated 100-120V or 230V 47-63Hz (depending on the voltage range of the included power supply).
•Do not defeat the safety purpose of the polarized or grounding-type plug. A polarized plug has two blades with one and the other. A grounding type plug has two blades and a third grounding prong. The wide blade or the third prong are provided for your safety. If the provided plug does not fit into your outlet, consult an electrician for replacement of the obsolete outlet.
•Protect the power cord from being walked on or pinched particularly at plugs, convenience receptacles, and the point where they exit from the apparatus.
•Only use attachments/accessories specified by the manufacturer.
•Use only with the cart, stand, tripod, bracket, or table specified by the manufacturer, or sold with the apparatus. When a cart is used, use caution when moving the cart/apparatus combination to avoid injury from tip-over.
•Unplug this apparatus during lightning storms or when unused for long periods of time.
•Refer all servicing to qualified service personnel. Servicing is required when the apparatus has been damaged in any way, such as power-supply cord or plug is damaged, liquid has been spilled or objects have fallen into the apparatus, the apparatus has been exposed to rain or moisture, does not operate normally, or has been dropped.
•The apparatus shall not be exposed to dripping or splashing and that no objects filled with liquids, such as vases, shall be placed on the apparatus.
•WARNING: To reduce the risk of fire or electric shock do not expose this apparatus to rain or moisture.
•The appliance coupler is used as the disconnect device, the disconnect device shall remain readily operable.
•Prolonged listening at high volume levels may cause irreparable hearing loss and/or damage. Always be sure to practice “safe listening.”
•Service is required when the apparatus has been damaged in any way, such as:
•power-supply cord or plug is damaged.
•liquid has been spilled or objects have fallen into the apparatus.
•the unit has been exposed to rain or moisture.
•the unit is dropped or the enclosure is damaged.
•the unit does not operate normally or changes in performance in a significant way.
Please Note:
Line 6, POD, POD X3, POD X3 Live, POD X3 Pro. PODxt, Vetta, FBV, FBV Shortboard, FBV Express, and FBV4 are trademarks of Line 6, Inc. All other product names, trademarks, and artists’ names are the property of their respective owners, which are in no way associated or affiliated with Line 6. Product names, images, and artists’ names are used solely to identify the products whose tones and sounds were studied during Line 6’s sound model development for this product. The use of these products, trademarks, images, and artists’ names does not imply any cooperation or endorsement.
POD X3, POD X3 Live and POD X3 Pro Pilot’s Handbook © 2008 Line 6, Inc.
Table of Contents
|
Tutorial: POD X3 Live for Guitar………………………………….. |
1•1 |
|
Tutorial: POD X3 & POD X3 Pro for Guitar………………….. |
2•1 |
|
Controls & Connections……………………………………………….. |
3•1 |
|
POD X3…………………………………………………………………………………………….. |
3•1 |
|
POD X3 Live…………………………………………………………………………………….. |
3•8 |
|
POD X3 Pro…………………………………………………………………………………….. |
3•16 |
|
Getting Around,Tones &Tuner……………………………………… |
4•1 |
|
Home Page………………………………………………………………………………………… |
4•1 |
|
The Dual Tone Concept……………………………………………………………………… |
4•3 |
|
Tone Volume Controls……………………………………………………………………….. |
4•5 |
|
Preset Folders…………………………………………………………………………………….. |
4•7 |
|
Recalling Presets………………………………………………………………………………… |
4•8 |
|
Recalling User Presets on POD X3 Live.………………………………………………. |
4•9 |
|
Locking Tone 2………………………………………………………………………………… |
4•10 |
|
Saving Tones……………………………………………………………………………………. |
4•11 |
|
Tuner………………………………………………………………………………………………. |
4•12 |
|
Reference:TweakingTones…………………………………………….. |
5•1 |
|
Amp + Cab……………………………………………………………………………………….. |
5•1 |
|
Tone Controls……………………………………………………………………………………. |
5•2 |
|
Stomp Boxes.…………………………………………………………………………………….. |
5•4 |
|
Modulation Effects……………………………………………………………………………… |
5•7 |
|
Delay………………………………………………………………………………………………… |
5•9 |
|
Reverb…………………………………………………………………………………………….. |
5•11 |
|
Gate……………………………………………………………………………………………….. |
5•12 |
|
Compressor.…………………………………………………………………………………….. |
5•13 |
|
EQ………………………………………………………………………………………………….. |
5•14 |
|
Wah………………………………………………………………………………………………… |
5•15 |
|
Volume Pedal…………………………………………………………………………………… |
5•16 |
|
Effects Loop (X3 Live & Pro)…………………………………………………………….. |
5•17 |
|
Reference: Configuration & Setup…………………………………. |
6•1 |
|
Inputs.………………………………………………………………………………………………. |
6•1 |
|
Outputs.……………………………………………………………………………………………. |
6•2 |
|
System………………………………………………………………………………………………. |
6•5 |
|
Commands………………………………………………………………………………………… |
6•7 |
|
Example Setups……………………………………………………………. |
7•1 |
|
Mono or Stereo Recording or Direct to Mixer/PA.………………………………… |
7•1 |
|
Recording Tone 1 & 2 to Separate Mono Tracks……………………………………. |
7•2 |
|
Recording Tone 1 & 2 to Separate Stereo Tracks (X3 Live & Pro).…………. |
7•2 |
|
Feed One Guitar Amp………………………………………………………………………… |
7•3 |
|
Feed Two Guitar Amps, One for Tone 1 and One for Tone 2.…………………. |
7•3 |
|
Feed Two Guitar Amps, One “Wet” and One “Dry”……………………………….. |
7•4 |
|
Feed a Guitar Amp & Send Separate XLR Direct Outs (X3 Live & Pro).… |
7•5 |
|
Electric Guitar to On-Stage Amp and Direct Out + |
|
|
Vocals/Acoustic/etc. to Direct Out Only………………………………………………. |
7•6 |
|
USB & Computer Software…………………………………………… |
8•1 |
|
Updating POD X3, POD X3 Live or POD X3 Pro’s Firmware.………………… |
8•1 |
|
Setting Up for USB Recording…………………………………………………………….. |
8•2 |
|
Appendix A: Signal Flow………………………………………………. |
A•1 |
|
POD X3……………………………………………………………………………………………. |
A•1 |
|
POD X3 Live……………………………………………………………………………………. |
A•2 |
|
POD X3 Pro……………………………………………………………………………………… |
A•3 |

Tutorials
Tutorial: POD X3 Live for Guitar
|
1. Plug your guitar into Guitar In. |
1•1 |
2.Turn on POD X3 Live.
3.Recall User Preset “32D: Tutorial1”.
|
Press to get to User Bank 32 |
Press to load preset D. |

Tutorials
4. The Home Page shows with the Amp+Cab block selected.
1•2
5. Pick an Amp Model.
Double-press t o s h o w AMP+C AB settings.
Turn to pick an
Amp Model. TYPE selects from Guitar, Bass and Pre-Amp Models.
6. Tweak the Amp Tone Controls.
![]()
Tutorials
7. Pick a Stomp Model and tweak it.
1•3
|
Double Press |
Turn to select DISTORTION: KILLER Z |
Press down to select lower row.
|
Turn to tweak upper row settings. |
Turn to tweak lower row settings. |
Tutorials
8. Show the Delay settings.
1•4
Double Press
9. Set the Delay tempo, and set it to run post (after the Amp Model).
Press to
lower row.
|
Tap is set to |
Tap delay temo. |
|
Set CONFIG |
|
|
quarter note. |
to POST. |

Tutorials
10. Select the EQ.
1•5
|
Press to show |
||||||||||||||||||||||||||
|
Press up/down/left/ |
Press to turn |
Double-press |
||||||||||||||||||||||||
|
the Home Page. |
right to select EQ. |
EQ on/off. |
to show EQ |
|||||||||||||||||||||||
|
settings. |
||||||||||||||||||||||||||
11. Tweak the EQ.
Press up/down to select upper/lower row.
There is no model select for EQ.

Tutorials
12. Turn both Tones on at once.
1•6
HOLD FOR 2 SECONDS
13. Load preset to Tone 2 Only.

14. Select and Tweak Tone 1/Tone 2.
Tone 1 is selected above.
PRESS BRIEFLY
Tutorials
1•7
Tone 2 is selected above.
15. These knobs and footswitches control only one Tone at a time:
Tutorials
16. Tweak combined volume of Tone 1 + Tone 2.
1•8
17. Save.
PRESS
Press to finish save.
|
Choose a User |
Choose to |
Move |
Change |
|
location to save to. |
edit name for |
cursor. |
character. |
|
Tone 1 orTone 2. |

Tutorials
Tutorial: POD X3 & POD X3 Pro
for Guitar
|
1. Plug your guitar into Input 1. |
2•1 |
PAD
2.Turn on POD X3 or POD X3 Pro.
3.Recall User Preset “32D:Tutorial1”.
Press to show the Home Page.
|
Turn to select |
Turn to choose |
|
. |
folder User . |
|
Turn to choose preset |
Press to return to the |
|
32D Tutorial 1 . |
Home Page. |

Tutorials
4. Turn on the Amp Model.
|
2•2 |
AMP+CAB is off (outlined). |
AMP+CAB is on (black).
5. Pick an Amp Model.
|
Double-press |
Turn to pick an |
|
Amp Model. |
TYPE selects from
Guitar, Bass and
Pre-Amp Models.
6. Tweak the Amp Tone Controls.

Tutorials
7. Pick a Stomp Model and tweak it.
2•3
Double-press
to select DISTORTION: KILLER Z
Press down to select lower row.
|
Turn to tweak upper row settings. |
Turn to tweak lower row settings. |
8. Show the Delay settings.
DOUBLE-PRESS TO ADJUST
Double-press

Tutorials
9. Set the Delay tempo, and set it to run post (after the Amp Model).
|
2•4 |
Tap delay tempo |
Press down |
|
to select |
||
|
lower row. |
||
|
Tap is set to |
Set CONFIG |
|
|
quarter note. |
to post. |
10. Select the EQ.
|
Press to show |
Press up/down/left/ |
Press to turn |
Double-press |
|
|
the Home Page. |
||||
|
right to select EQ. |
EQ on/off. |
to show EQ |
||
|
settings. |
11. Tweak the EQ.
Press up/down to select upper/lower row.
There is no model select for EQ.
![]()
Tutorials
12. Turn both Tones on at once.
HOLD FOR DUAL
PRESS TO
SAVE
 PRESS
PRESS
2•5
|
Press to show |
HOLD FOR 2 SECONDS |
|
the Home Page. |
13. Load preset to Tone 2 only.
Preset loads into Tone 2.
|
Turn to choose preset |
||
|
Turn to |
Turn |
Bubble Echo . |
|
to select |
||
|
select . |
folder |
FX HVY . |
14. Select and tweak Tone 1/Tone 2.
|
Tone 1 is selected above. |
Tone 2 is selected above. |
||||||||||||||||||||||||||||||||||||||||||||
|
PRESS BRIEFLY |
|||||||||||||||||||||||||||||||||||||||||||||

Tutorials
15. These knobs and buttons control only one Tone at a time:
|
DRIVE |
BASS |
MIDDLE |
TREBLE |
PRESENCE |
REVERB |
TONE |
|
2•6 |
VOLUME |
|||||
PRESS ON/OFF • DOUBLE-PRESS TO ADJUST
16. Tweak the combined volume of Tone 1 + Tone 2.
17. Save.
PRESS
Press to finish save.
|
Choose a User |
Choose to |
Move |
Change |
|
location to save to. |
edit name for |
cursor. |
character. |
|
Tone 1 orTone 2. |

Controls & Connections
Controls & Connections
POD X3
3•1
1 Display – the LCD (liquid crystal display) is your window into the power of POD X3. You’ll see (2) types of “pages” in the display:
Home Page – the “Tone Path” Home Page shows you all the digital processing “blocks” that are working to deliver your great tone. For User Presets, you can also switch to a “Big User” Home Page, which shows you the bank and channel number where the preset is stored. The tone names that are loaded in the current preset, and the bank and channel number where the preset is stored are also displayed. You can get to the Home Page at any time by pressing the Home button. You can toggle between the two Home Pages by repeatedly pressing the Home button.
Edit Page – shows you all parameters available to tweak for a processing block or setup page.
Controls & Connections
|
Tone Path Home Page |
Big User Home Page |
Edit Page |
||||||||||||||||||||||||||||||||||
|
(available for User Presets only) |
||||||||||||||||||||||||||||||||||||
|
3•2 |
Select Knob – turning this knob will do different things depending on what |
|||||||||||||||||||||||||||||||||||
|
2 |
||||||||||||||||||||||||||||||||||||
|
page you’re on. |
Home Page – turn to select presets. See Chapter 4 for all the details.
Edit Page – turn to pick a different Model. This works for the Amp, Stomp, Mod,
Delay, Reverb, and Wah edit pages. Full details are in Chapter 5.
You can also press this knob to store your own tweaked-up sounds in POD X3. Just press, choose what to store and where to store it, and press the button again to complete the
Save. Chapter 4 will fill you in.
3 Home / Hold for Commands – press to return to the Home Page. For User Presets, press repeatedly to toggle between the Tone Path Home Page and the Big User Home Page. Press and hold for 2 seconds to enter the Commands page. Full details are in Chapter 6.
4 Inputs – press to enter the Inputs setup page to configure which inputs you’re using.
Full details are in Chapter 6.
5 4-way Nav – pressing this will do different things depending on what page you’re on.
Home Page – press Up, Down, Left, and Right to navigate to a processing block.
Edit Page – press Up and Down to move through each row of parameters available. You can also press Left and Right to move to the previous or next edit page.
6 On/Off – press to turn the selected processing block on or off (the blocks are on when the buttons are lit and the block on the Home Page is solid). Double-press to enter the processing block’s Edit page, where you can fine-tune the parameters for that block.

Controls & Connections
Press the Home button to leave the Edit page and return to the Home Page. Chapter 5 gives you details on all the Edit pages available.
7 Outputs / Hold for System – press to enter the Outputs setup page, where you can set up POD X3 for whatever you’re connecting it to. This is a very important step for getting the best sound out of your POD X3. Press and hold for 2 seconds to enter the
|
System setup page. Full details are in Chapter 6. |
|
|
8 Multi-function Knobs – turn any one of these knobs to adjust the |
|
|
corresponding parameter in the display. |
3•3 |
See Chapter 4 to learn about Home Page functions for these knobs.
9 Keypad – these buttons allow you to do the following:
Tone 2 / Hold for Dual – press to toggle between Tone 1 and Tone 2 (you’re editing
Tone 2 when the button is lit). Press and hold to turn Dual Tone on or off. See Chapter 4 for more details, including info on using an FBV to control Dual Tone functions.
Amp, Stomp, Mod, Delay, Verb – press to turn the Amp, Stomp, Mod, Delay, and Reverb processing blocks on or off (the blocks are on when the buttons are lit). Double-press one of these buttons to tweak the block. For example, just press the
Stomp button two times quickly and you’re instantly taken to the Stomp Box Edit Page. Press the Home button to leave the Edit Page and return to the Home Page.
Chapter 5 gives you details on all the Edit Pages available.
Tap / Hold for Tuner – POD X3 allows you to control the time and speed of your
Delay and/or Mod effects by simply tapping on this button. Just tap a few times here and the effects that are set to “lock” to that tempo will change to match what you tapped. There’s also a Tempo parameter in the effects’ Edit Pages, so you’ll see exactly what Tempo you’ve tapped. This is especially useful if you are trying to nudge your Tap

Controls & Connections
|
setting to just the right value. See Chapter 5 to learn how to set up effects to follow |
|||
|
the tempo that you’ve tapped. |
|||
|
Press and hold the Tap button for 2 seconds to activate the tuner. You can also add |
|||
|
footswitch tuner activation with an optional FBV foot controller. |
|||
|
Drive – controls how hard you’re driving the input of the chosen Amp Model. |
|||
|
10 |
|||
|
Like |
the input volume control on a non-master volume guitar amp, higher settings give |
||
|
you more “dirt.” |
|||
|
3•4 |
This knob, along with the Tone Controls, Reverb, and Tone Volume knobs, adjusts |
||
|
the Tone that is currently selected – Tone 1 or Tone 2. See Chapter 4 for more info on |
|||
|
Dual Tone and how this all works. |
|||
|
Tone Controls – Bass, Middle, Treble, Presence. Just like any guitar |
|||
|
11 |
|||
|
amp. |
And when you change Amp Models, the response and interactivity of these controls |
||
|
change, too – so they act like the tone controls of the original amp that inspired the Amp |
|||
|
Model you’ve selected. |
|||
|
Reverb – spin this knob to set the Reverb level of the Tone that is currently |
|||
|
12 |
|||
|
selected. |
|||
|
Tone Volume – this knob controls the relative volume level of the current |
|||
|
13 |
|||
|
Tone. |
14 Master Volume – this controls the overall output level of POD X3 and also sets the headphone level. Changing the MasterVolume level does not change your tone, so you can get the tone you want at any volume level. This setting is not saved when you store settings into one of the POD X3’s memory locations.
When running into line level gear (like recorders, mixers and PA’s), POD X3 will generally give the best signal-to-noise performance when you have the Master Volume control at max. With the Master Volume control turned down low, you may get extra hiss – which obviously isn’t what you want – if you turn up your mixer or recorder’s output to compensate. In order to allow you to set the Master Volume as high as possible when connecting to recording, mixing, and other studio gear, be sure you are plugging POD X3’s outputs into line level, not microphone or guitar level inputs. Line level inputs should allow you to turn POD X3’s Master Volume up all the way (or close to it) and thereby get the best sound possible. If your gear has inputs that function as mic/line level inputs, try to set the trim for those inputs to the minimum level, and POD X3’s Master

Controls & Connections
Volume to maximum, when setting levels.
15 Clip Light – this lights when clipping is detected, which generally means unpleasantly distorted, bad sound. Try reducing the output level of the device that’s feeding your POD X3, or reducing the Tone Volume for Tone 1 or Tone 2, or the volume of Tone 1 + Tone 2 that can be adjusted from the right knob below the Home Page.
16 Input 1/Guitar In – plug your guitar or bass in here. You techies will want to know this is a mono, unbalanced connection. The Inputs page is where you assign
|
whether this input feeds Tone 1, Tone 2 or both. See Chapter 6 for more info. |
3•5 |
|||||||||||||||||||||||||||||
|
Phones – plug your headphones in here to avoid noise complaints from the |
||||||||||||||||||||||||||||||
|
17 |
||||||||||||||||||||||||||||||
|
neighbors (or the rest of your family). The volume is set by the Master Volume knob. |
||||||||||||||||||||||||||||||
|
Any time you use headphones, it important to be sure they’re not set for ridiculous volume |
||||||||||||||||||||||||||||||
|
before your slap them on your ears. Try a MasterVolume knob setting of about 10 o’clock |
||||||||||||||||||||||||||||||
|
to start, then turn up from there if you need more volume. |
||||||||||||||||||||||||||||||
|
To give you great sound through the headphones, your POD X3 automatically switches |
||||||||||||||||||||||||||||||
|
to Studio Mode whenever headphones are connected (for more on Studio Mode, see |
||||||||||||||||||||||||||||||
|
Outputs in Chapter 6.). |
||||||||||||||||||||||||||||||
18 Power – connect the included PX-2 power pack and flip the switch here to bring your POD X3 to life.
19 Input 2/Microphone In andTrim – plug in your microphone here and
use the Trim control to get a nice, healthy level. The Inputs page is where you assign whether this input feeds Tone 1, Tone 2 or both. See Chapter 6 for more info.

Controls & Connections
20 S/PDIF Out – this jack sends out 24-bit digital versions of the Left & Right Outputs. The System setup page lets you choose the sample rate and adjust the level.
See Chapter 6 for the scoop.
21 USB 2.0 – PODX3’sUSB2.0jackletsyouconnectdirectlytoaUSB2.0-equipped computer, and take advantage of many computer-powered features:
•Line 6 Monkey software makes it easy to install software and get updates. Install driver software with Line 6 Monkey, and POD X3 provides 8 audio inputs to your
•1-2 is the main signal, configured on POD X3’s Outputs page for Digital Outs.
•3-4 is Tone 1 separately in stereo.
•5-6 is Tone 2 separately in stereo.
•7 is the sum of the inputs you’ve chosen for Tone 1.
•8 is the sum of the inputs you’ve chosen for Tone 2.
You can also connect your headphones or powered speakers directly to POD X3 to hear your computer-generated audio, along with POD X3’s real-time processing. See Chapter 8 for more info on USB 2.0 recording.
22 FBV Pedal – connect an optional foot controller here, including the FBV, FBV Shortboard, and FBV Express. The System page lets you set it all up. See Chapter 6 for details. Note that POD X3 does not work with the older Line 6 Floor Board or FBV2.
23 Left & Right Outputs – these balanced, 1/4-inch TRS (tip/ring/sleeve) connectors are ready to rock with pro +4 dBu balanced equipment. They will also work happily with unbalanced –10 dBV equipment and standard guitar cables. If you need mono output, you can use either one.

Controls & Connections
Join the Club!
Visit www.line6.com/club to register online and join the All Access club, the place to get:
•Free iTunes and MP3 Jam Tracks.
•Free loops for GarageBand, Acid, Reason and more.
•Free guitar lessons from LA session pros.
|
• Free chord and scale practice tools. |
3•7 |
•Stay informed of contest and special offers.
•Access to discussion forums, software updates and more.

Controls & Connections
POD X3 Live
|
HOME |
ON/OFF |
|
HOLD FOR COMMANDS |
DOUBLE-CLICK TO EDIT |
|
PRESS TO |
|
|
SAVE |
|
|
INPUTS |
OUTPUTS |
|
HOLD FOR SYSTEM |
3•8
1 Display – the LCD (liquid crystal display) is your window into the power of POD X3 Live. You’ll see (2) types of “pages” in the display:
Home Page – the “Tone Path” Home Page shows you all the digital processing “blocks” that are working to deliver your great tone. For User Presets, you can also switch to a “Big User” Home Page, which shows you the bank and channel number where the preset is stored. The tone names that are loaded in the current preset, and the bank and channel number where the preset is stored are also displayed. You can get to the Home Page at any time by pressing the Home button. You can toggle between the two Home Pages by repeatedly pressing the Home button.
Edit Page – shows you all parameters available to tweak for a processing block or setup page.
|
Tone Path Home Page |
Big User Home Page |
Edit Page |
||||||||||||||||||||||||||||||||
|
(available for User Presets only) |
 Loading…

Тихо, мирно, без лишнего шума и пыли произошла революция. В один миг оказались разрушенными только что сформировавшиеся «устои» цифрового мира обработки гитарного, басгитарного звука и вокала.
Новые процессоры серии POD X3 уже нельзя назвать просто «гитарными». «Х3» означает POD умноженный трехкратно, а именно «три в одном» — гитарный, басгитарный и вокальный процессор в одном корпусе. Соответственно в процессоре, помимо инструментального входа, появился XLR вход для микрофона.
POD X3 LIVE по сути состоит из двух процессоров Line 6 Pod X3 Live, соответственно теперь стало возможным подключать одновременно и независимо обрабатывать два канала (например: гитара и вокал, басгитара и гитара …). Так же можно искать свой оригинальный звук, смешивая звуки двух встроенных процессоров в нужной Вам пропорции, например: смешивать звук ’90 Marshall JCM-800 со звуком ’53 Fender Deluxe.
Line 6 Pod X3 Live имеет USB порт и может выступать в роли внешней звуковой карты профессионального уровня – идеальное решение для прямой записи в компьютер.
Так же изюминкой нового Line 6 Pod X3 Live является огромный жидкокристаллический дисплей, сделавший более удобной навигацию и редактирование.
Уже не надо докупать дополнительные MODEL PACK или плагины – абсолютно все усилители, кабинеты, педали, обработки, имеющиеся в арсенале разработчиков Line 6 Pod X3 Live, уже встроены и готовы к работе.
Есть цифровой разъем для подключения гитар VARIAX, полная поддержка MIDI, возможность подключения дополнительной педали экспрессии, разрыв для подключения внешних эффектов в петлю – все это делает Line 6 Pod X3 Live универсальным инструментом для воплощения самых изощренных идей.
Входы и выходы
•инструментальный вход ? `
•микрофонный вход XLR (c регулировкой уровня)
•USB 2.0 порт для записи/редактирования на ПК
•S/PDIF стерео цифровой выход
•балансный линейный стерео выход ? TRS
•балансные линейные выходы XLR
•посыл/возврат для подключения в разрыв внешних эффектов ? `
•цифровой разъем для гитар VARIAX
•разъем для дополнительной педали экспрессии ? `
•MIDI: IN/OUT/THRU
•стерео выход для наушников ? `
•FBV разъем для подключения внешнего контроллера
•стерео линейный вход 1/8 ` для подключения CD/MP3
Характеристики Line 6 Pod X3 Live
•78 моделей гитарных усилителей
•24 моделей гитарных кабинетов
•98 моделей студийных обработок и педалей
•28 моделей басгитарных усилителей
•22 моделей басгитарных кабинетов
•6 моделей вокальных предусилителей
•до 9 эффектов одновременно
•хроматический тюнер с bypass
•USB кабель и блок питания в комплекте
Обзор №1
Название инструмента / устройства: Line6 POD X3 Live
Средняя цена: 800 $
Звук: 8-10 (зависит от условий использования, об этом ниже)
Качество сборки / изготовления: 10 (производит впечатление дорогой вещи)
Внешний вид / дизайн: 10 (педаль отличная, кнопки отличные, и вы не поверите, корпус наполовину деревянный)
Особенности и функциональность: 10 (все есть, вплоть до функционала а-ля дигитек вамми, и даже больше!)
Соотношение цена/качество (суммарный рейтинг): 9 (ультимативным решением для студии и живых выступлений этот аппарат не является, хотя и может ооочень много, окончательно вытеснить лампу он пока не в состоянии)
Мнение пользователя:
Итак, это процессор.
Почему в названии девайса фигурирует цифирь 3? А потому что это не просто гитарный процессор, это гитаро-вокально-басовый процессор эффектов, то бишь как говорит реклама — 3 в 1.
У Х3 3 раздельных входа — Input, Aux и Mic (XLR), из них можно одновременно использовать 2, например вокал+гитара или гитара+бас (ага, если вашему басисту не во что играть, скидывайтесь с ним напополам на сий девайс) или даже 2 гитары (я еще пока не пробовал).
Хитрый производитель делает еще точно такой же POD с индексом XT, он стоит столько же, умеет то же самое, но только для гитары. Умельцы каким-то образом заливают в ХТ прошивку от Х3 дабы расширить его функционал до басового.
Для тех же, кому ненужны напольные кнопки, Line6 выпускает POD X3 — относительно небольшой девайс, обладающий всем функционалом Line 6 Pod X3 Live, но без педалек и дешевле.
Ну да вернемся к Line 6 Pod X3 Live.
Вот вы достаете его из коробки, что делать?
Я сразу же отправился на сайт line6, зарегестрировался там (стандартная процедура, резус-фактор и гражданство не спрашивают), скачал свежие драйвера и программку-менеджер monkey (абизъян). Сначала ставим дровишки, когда просят подрубаем включенный POD по USB, Виста радостно находит новую звуковую карту с ASIO, готово. Уже можно начинать писать напрямую в аудиоредактор.
Однако я прочитал на сайте что вышла свежая прошивка с переработанными старыми и добавленными новыми модельками, надо брать. Для этого и понадобится абизъян (monkey).
Ставим абизъяна, он находит Х3, определяет прошивку, находит обновление, но не дает их поставить, пока вы не зарегистрируете свой POD на сайте. Это делается в пару кликов в личном кабинете, после чего нужно перезапустить monkey, и все готово для обновления. Кстати девайс можно отрегистрировать назад от аккаунта, это может понадобится например при продаже.
Заливка прошивки происходит автоматически, лишь понадобится перезагрузить Line 6 Pod X3 Live вручную, когда это попросит абизъян.
Что дальше?
Врубаемся в линию! Тут я очень рекомендую незнакомым с девайсом пробежаться по комикс-туториалу в начале инструкции. Х3 кстати вовсе не такой гиперсложный, как кажется внешне.
Я заюзал недорогие компьютерные активные колонки Sven 2.1 (маленькие сателиты и маленький сабвуфер), подключил их в выход на наушники (он стерео, и как то больше мне в сочетании с колонками понравился) и был приятно удивлен первым же заводским пресетом Plexi. Звук практически такой, как на записи любимых исполнителей.
Попробовал через наушники мониторного вида AKG — тоже все прекрасно. Причем радуют не только винтажные Фендера-Маршаллы, но и модерновые Дизаля, Богнеры, и особенно я проникся как звучит в линию пресет «Blossom» — Soldano SLO-100, именно его, ничего не изменяя, я и использовал на демозаписи выше.
Но это конечно же еще не все. Идем дальше.
У меня дома есть новомодный ламповый Kustom The Defender 5H + кабинет Randall R112CB, а в Х3 Live имеется специальный режим «Во вход комбика/стека». Смысл режима в том, что бы не только изобразить из пода педалборд (фузы/скримеры наличествуют) в дополнение к сырому звучанию стека, но и модифицировать родной тон применив некий интересный виртуальный преамп.
И вот тут и начинается самое интересное, я выбрал модель 5150, отключил эмуляцию каба/мика (очевидно что она при таком раскладе только мешает) и поразился во второй раз. К сожалению в живой Пиви мне пока играть не доводилось, но темки Ван Халена через pod зазвучали прекрасно.
Хочется чего потяжелее? Легким поворотом крутилки достаем вожделенный Меса Ректифаер и, о чудо! Из кабинета начинают литься чарующие звуки медвежьего рыка Месы-Буги. Я разок играл в настоящий Дуал Ректифаер, POD X3 действительно похож.
Бас
Скажу сразу — я не басист, и бас у меня — самая дешевая Ямаха. Но тем не менее это не помешало мне проникнутся той кипой моделек и пресетов что имеется в Line 6 Pod X3 Live для баса.
На записи выше использован без изменений заводской пресет «Modern Rock» модель Mesa/Boogie Bass-400. Бас рычит (свеновский сабвуфер тут оказался очень кстати) и вообще всячески показывает эдакий калифорнийский характер.
Если ваша душа больше лежит к стандартам лохматых 70х, вы так же не останетесь неудовлетворенными, просто загляните в галерею моделей на официальном сайте.
Кроме моделек ампов наличествуют и эффекты/фильтры и прочие басовые вкусняшки.
Вокал
Микрофон у меня Шурик 57 (вероятно китай), типа универсальный. Внутри пода уже имеется для него преамп, с отдельной регулировкой чувствительности.
Есть и пресеты, чего они эмулируют я даже не знаю, но парочка мне пришлась очень по душе. На моей демке опять же не модифицированный пресет «Нешвил», компрессия, звонкий верх и эхо. Как на студии. Думаю с хорошим микрофоном можно достигнуть очень приличного результата, есть даже фирменная технология подавления свистящих звуков в голосе для мальчиков и девочек.
Ах да, еще петь надо уметь. Но меня этот маленький недостаток никогда не останавливал 
Ложечка дегтя
Не все так славно в цифровом королевстве.
Конечно же есть известные минусы, а именно — звук пожат. Этого никак похоже не избежать, ибо даже пропущенный как бы «байпасом» звук гитары не звучит так же динамично как воткнутый прямиком в ламповую голову.
Другое дело, что когда вам нужен вожделенный «плотняк по низам с четкой серединой и открытым звенящим верхом» компрессия будет весьма и весьма кстати.
Еще странность — в дешевые колонки Свен POD Х3 звучит более естественно и без почти что без той присущей цифре щепотки «пластика», чем будучи воткнут в мой ресивер Yamaha с напольными стерео колонками Tannoy Mercury. Похоже Таннои более разборчивы и чувствительны к тонким нюансам, и эти нюансы подмачивают впечатление.
Если кто пробовал поды в хорошие студийные мониторы, расскажите, как оно?
Запись
Тут все потрясающе просто. Соединяемся по USB, достаем Кубейс/Нуенду/Лоджик, выбираем в качестве девайса записи/воспроизведения POD, вставляем стерео трек и пишем.
Благодаря тому, что звук из Х3 идет уже готовый (делей, эхо, компрессия наложены) нам остается записанные треки лишь раскидать по панораме и подогнать по громкости. То есть получить качественную демку теперь можно практически в любом, даже самом простом редакторе. Причем уже во время записи вы из колонок, подключенных к поду, сразу же слышите то, что ложится на трек.
Все хитроумные вычисления переложены с процессора вашего компа на процессор Х3, что немаловажно для владельцев ноутбуков (те кто пытался сотворить 5 треков с 4-м гитарригом не дадут соврать).
Еще одна приятная особенность — возможность реампинга. Это когда в редактор пишется сразу 2 дорожки — обработанный и сухой сигнал с гитары. Если что-то на этапе сведения не устроит в обработанном звуке, можно достать сухой сигнал и применить к нему все тот же Гитарриг/Амплитюб.
А где тут у вас удобства?
Окромя традиционных отдельных кнопочек на педалборде для компрессора/дилея/модуляции есть еще АБ-свичер. Как и с реальным оборудованием, этой спец кнопочкой можно выбирать либо виртуальный канал А, канал Б либо оба А+Б.
Классический вариант применения — Smells like teen spirit. Вешаем на канал А — Фендер Делюкс реверб, на канал Б — прокаченный Плекси, и вперед, вступление играется на канале А, после чего легким нажатием всего лишь на 1 кнопку мы уже высекаем драйвовый рифф. Каналы 100% независимы, могут содержать любые доступные модели в любой доступной последовательности (да, можно менять например положение дилея до/после ампа). Фактически каждый пресет представляет из себя 2 пресета, при нажатии «save» сохраняется состояния обоих каналов в пресете.
Еще интересный момент — возможность гибкого назначения кнопки «comp». Например вместо компрессора она может управлять внешней петлей эффектов (тот самый «разрыв», куда втыкаются любимые аналоговые фузы/дисторшены, если они у вас есть).
Коробка передач
Для управления подом с компа с сайта Line6 можно скачать чудо-программку GearBox, что весьма удобно, когда вы желаете для своего выступления подготовить n-ое количество пресетов заранее.
Всего имеется 32 банка по 4 пресета.
Однако пресеты хранятся не только в банках, но и во внутренних папках, вроде как непривязанно к какой-либо кнопочке.
Кроме удобства редактирования любому владельцу пода доступен он-лайн сервис обмена пользовательскими пресетами (на 1м скриншоте внизу), где все отсортировано по названию песни/исполнителю.
Хотите звучать как Nevermore или Cream на Crossroads? Пара кликов мышой и счастье в ваших руках
Еще есть продвинутый метроном (звучать будет из того, что подключено к POD Х3)
И плеер
Который удобен для воспроизведения бакингтреков. И у метронома и у плеера есть отдельный регулятор громкости.
Цена
Что надо, что бы записать демку?
Нужен комбик, с 12″ динамиком (мы же играем тяжеляк, не так ли?), а это около 12 — 18 000р в магазине. Нужны педальки, хотя бы скример — 5000р. Нужен мик, самый простой Shure PG58 — 2500p. Нужна звуковая карта — M-Audio Audiophile 2496 — 3500p. Нужен микрофонный преамп — еще порядка 3000р. Нужно куда-то это все писать (DAW), нужны горы плагинов для вашей DAW что бы обработать тот сырец, что вы получите. И кстати даже и не надейтесь сразу же получить сколько-нибудь нормальный звук с мика, это довольно занудный и долгий процесс поиска оптимальных параметров и положения в пространстве.
Потратив порядка 32 000р вы еще и рискуете промучатся и не достигнуть приемлемого результата. А даже если и получится, это будет означать что у вас есть лишь одно нужное звучание, и когда речь зайдет о чем-то еще снова начнутся поиски.
Допустим вас не интересует запись вообще, а лишь живые выступления. Что ж, вам всеравно придется собрать как минимум педелборд с ламповым преампом, а это может стоить еще дороже (цена в 200$ за 1 бутиковую аналоговую педальку сейчас норма, не говоря уж о преампах).
А что с Line 6 Pod X3 Live? 25 000р в магазинах, да еще и на барахолках этот товар вовсе не редкий.
Кроме того, как я уже сказал, есть возможность поделить цену девайся пополам, если вашему басисту или второму гитаристу тоже не во что играть.
Variax
Буквально пара технических моментов.
Для подключения Вариакса к Поду нужен только лишь компьютерный сетевой кабель CAT5 с Rj45 с обоих сторон, блок питания Вариакса так же как и батарейки не нужны.
POD Х3 с каждым пресетом сохранят состояние Вариакса, то есть при следующем вызове сохраненного пресета Вариакс будет звучать как на момент сохранения, в независимости от текущего положения свичей на Вариаксе.
Итого впечатления о Line 6 Pod X3 Live
POD X3 Live отличнейший выбор для записи демок (в том числе и дома в наушниках), для непритязательных живых выступлений (особенно для кавер-бендов, где нужно разнообразие характерных звучаний разных эпох) и для репетиций.
Впрочем, если у вас имеется хороший ламповый мощник с кабинетом, то полученный звук может оказаться достоин нечто большего.
В целом аппарат явно рассчитан на подготовленных про/полупро музыкантов, то есть не для пионеров, ибо нет например драм машины, а интерфейс подразумевает что вы ведаете, что творите.
Обзор №2
Line 6 Pod X3 Live юзает огромная куча фирмачей на концертах и звук у них отличный, некоторые даже альбомы целиком пишут. Демки писать — удобно. Есть разрыв, куча входов-выходов, у Х3 Лив функционал еще выше
из минусов — если очень хороший аппарат звучит сразу, ПОД придется настраивать и ковыряться в настройках, а т.к. там этих настроек много — ковыряться можно очень долго.
Из процессоров Х3 можно считать одним из самых продвинутых в области эмуляции усилителей и кабинетов (не будем тут приводить примеры процов за 2000-3000$ — POD X3 стоит 400$, Лив 500$).
Он лучше ХТ аппаратно, возможность обрабатывать и микшировать два канала одновременно дает почти безграничные возможности в рулёжке звука). Далее у Line6 очень серьезная инет-поддержка (на сайте куча полезных вещей — типа стотыщмиллионов пресетов и свежих прошивок).
Короче я 2 руками ЗА! При этом обязательно учитываем цену покупки — 25 тыщ за него это перебор (это как 5000 рублей за мексиканские джинсы ЛЕВИС, которым цена 37$ + 22 доставка). И не стоит забывать что хороший ламповый комб (тыщ от 20-25 уже есть варианты) звучит приятнее.
Обзор №3
Достоинства:
Большие возможности, качество эффектов.
Недостатки:
Со временем ломаются кнопки переключения эффектов.
Данный гитарный процессор полностью стоит своих денег. Считаю его лучшим в своей ценовой категории. Тем более если учитывать те факты, что этот процессор можно использовать для обработки бас-гитары и вокала, а при грамотном подходе вполне можно обрабатывать и другие инструменты. Еще большим плюсом можно отметить то, что этот процессор можно использовать и в качестве звуковой карты. Это очень удобно, если есть желание и возможность записывать инструменты при этом экономя деньги на оборудовании. Так как сей девайс использовался исключительно для гитары, то хочу отметить что эффекты для чистого звука великолепны и разнообразны, за это смело ставим 5.
А вот для перегруза конечно возможности похуже, но всё же при должном подходе, тоже можно выкрутить весьма добротный звук, так что здесь ставим 4.
К сожалению при всем его великолепии, в процессе длительного использования вскрылись и небольшие минусы. У данных процессоров есть больное место, это кнопки ножного переключения эффектов, со временем они в произвольном порядке начинают ломаться. Так же периодически были проблемы с тем что процессор самопроизвольно может перезагрузиться, с чем это связано, с блоком питания или с программным обеспечением выяснить так и не удалось. Но это уже мелочи.
Стоимость: 23600 руб.
Общее впечатление: Отличный процессор.
Обзор №4
Достоинства:
Качественное звучание и разнообразие звуков , эргономичность
Недостатки:
Вес и размер
На мой взгляд гитарные процессоры line 6 такие как POD Live xt, HD500 ну и собственно самый серьёзный из всех подов X3 Live это единственные процессоры обладающие действительно качественными цифровыми перегрузами, которые могут составить конкуренцию ламповым.
Давно хотел сменить свой VOX tonelab и засматривался на POD x3 чтобы купить для записи гитары дома и когда увидел что появился Line 6 Pod X3 Live почти сразу купил его. И вот он радует меня своим звучанием и многообразием эффектов уже пол года .
Немного о характеристиках данного девайса.
На данном процессоре присутствуют аж 78 гитарных перегрузов и 28 басовых, что очень порадует любителей всевозможных жужжалок, также не меньшее количество прочих эффектов (их около 100), которые также не разочаруют любителей всевозможных экспериментов с различными эффектами. Количество ячеек для запоминания созданных вами эффектов целых 250 что должно вполне удовлетворить даже самого требовательного музыканта. При наличии такого количества эффектов процессор достаточно прост и разобраться в нем благодаря интуитивному интерфейсу и отличной эргономике можно даже без инструкции. Присутствует также USB2.0 выход, который наверняка пригодиться тем кто любит записывать дома и не только. Единственный существенный недостаток это вес и размер, чем и приходиться платить за такое огромное количество качественных звуков.
В общем мое впечатление о данном девайсе остаётся достаточно позитивным уже пол года и могу смело рекомендовать его как начинающим так и опытным музыкантам.
Время использования: 6 мес
Стоимость: 22000 руб.
Год выпуска/покупки: 2013
Общее впечатление: Рекомендую как начинающим так и профессионалам
Обзор №5
Достоинства:
X3 — значит Гитара, Бас гитара, Микрофон. Простота и удобство записи. Отличный звук.
Недостатки:
В первых партиях имеются проблемы с кнопками и резисторами. При покупке проверять.
Очень порадовал сей аппарат. Отличный звук, удобство настройки. При регистрации на сайте производителе, при помощи програмки скачиваются драйвера и автоматически перепрошиваеться. Скачиваеться дополнительное ПО. Эмуляция множества усилителей известных мировых брэндов. При подключению к ПК может являться внешней звуковой картой. Запись как сигнала с эфектом так и чистого сигнала. Отдельный XLR вход для динамического микрофона. Независимая работа 2 каналов. Так как у меня проблемы со спиной то вес его порадовал после Pod XT. У последнего вес был значительно больше.
Время использования: 2 года
Стоимость: 23000 руб.
Год выпуска/покупки: 2008
Обзор №6
Качество звука: 10
Звук, просто мега крутой… Это обновленная версия знаменитого POD XT (Live).. В нем заложено 78 гитарных кабинетов, комбиков и усилителе… Куча эффектов.. Процессор готов работать как с кабинетом или комбиком, так и напрямую в линию (переключаем тумблер и вперед).. Причем звук в линию действительно офигенный, как быдто вы втыкаетесь в дорогой Marshall JCM 2000, хотя можно выбрать любой кабинет или комбик… Сравнивал звучание с настоящим MESA BOOGIE Mark2, и оно на 90% схоже с настоящим… есть конечно небольшая разница в динамике звука, но тут все еще зависит от того какие колонки и усилок юзать… Эффектов куча ровно как и преапмов и дистов.. Еще офигенно убила педаль эспрессии с вау эффектом… Вот тут квакушка крутая… и на перегрузе действительно адский звук » УУУУАААААУУУ» Рычащий..
Надежность/качество: 8
Процессор внешне внушает доверие на прочность.. И кнопки переключения эффектов и пресетов отгороженны от крутилок и дисплея двумя металлическими бардюрами-перилами…Но один фиг, как то страшновато, а вдруг в раше случайно ткнешь ногой не по кнопке а по дисплею или ручке какой нибудь (бред конечно, но все равно
Удобство эксплуатации: 9
Банки накручивать надо привыкать.. плюс этого проца в том, что не надо много листать, выбираем двойстиком параемтр редактирования будь-то модели кабинетов или какой нибудь эффект, нажимаем редактировать и работаем конкретно с этим параметром, причем налету… Задержек при редактировании или переключении банков и пресетов нет вообще..
Ваш гитарный уровень: 8
Играю давненько… От блюза до индастриала и спид метала.. В общем мне ничего не чуждо.. И в любом стиле меня выручает и радует мой процессор.. Ибо он очень гибок по параметрам…
В завершение к вышесказанному…: 10
В общем процессор уникален, три в одном- вокальный процессор, басовый и гитарный.. Причем 2 из них могут работать одновременно только по разным каналам выхода… Куча возможностей подключения.. стерео канал посылавозврата, подключение к компу через USB кабель (в комплекте), причем через этот кабель можно либо прошивать, заливать новые модель паки или с компа редактировать уже существующие (если вам лень крутить на проце ручки), так и записываться напрямую без звуковой карты… Помоему это супер решение, потому как не у всех есть профессиональные звуковые карты, а тут все пишеться без проблем.. Правда немного затрудняеться прослушевание звука налету, и поэтому вам необходимо будет слушать звук либо через наушники или комбик или колонки подключенные опять же к процу…
Рекомендую покупать сей аппарат, поверьте он стоит своих денег с лихвой.. Не разочаруетесь..
Обзор №7
Line 6 X3 live — отличный процессор. Насчет рук «не из того места» согласен. Если Вы точно знаете, чего хотите добиться от этого процессора, то обязательно добьетесь. Главное, знать, что должно присутствовать в цепочке и какие усилители использовать.
Итак, сначала поговорим о плюсах. Хочу заметить, что мнение субъективное, и кто-то может не согласиться. Во-первых, это универсальность — Pod подходит как для вокала, так и для баса, не говоря уже о гитаре, благодаря двойному сигнальному тракту можно полдключать как два, так и один инструмент с более насыщенной обработкой. Например при использовании на сцене можно создавать стереоэффект, выводя сигнал на разные усилители(Может не каждому это нужно, но кто пробовал , тот меня поймет). Про настройки рассказывать не стану — их действительно много, поэтому нужно, как я уже сказал, знать, какие параметры нужны именно Вам.
Во-вторых, уже много всего написано про эмуляторы кабинетов, отличный «вау», возможность редактирования в gearBox, использование пода, как внешней звуковой карты и прочее…. Считаю лучше сказать о том, что еще не поднимали на обсуждение.
Я никогда не был любителем процессоров, хотя было у меня их довольно много, и в конце-концов перешел на педали, выстраивал цепи, и был доволен. Потом наш второй гитарист купил себе pod x3 live — и я скажу вам, что мое мнение изменилось. Впервые мне удалось столкнуться с таким огромным набором параметров и возможностей в одном процессоре. Этот инструмент может помочь вам найти свой звук. Если вы не знаете, как это сделать, то лучше, конечно первоначально обратиться к специалисту(что я сначала и сделал ).
Если вас интересует определенный звук(например, вы хотите сделать гитару, как у вашей любимой группы), то стоит просто посмотреть, что использует эта команда(благо, в интернете такой информации много), а потом, настроив нужный кабинет и прочее просто посидеть с ручками в хороших мониторах и поискать необходимые параметры. Это возможно, главное — не лениться. Я не скажу, что звук стопроцентно неотличим, но кабинеты звучат очень приближенно, а при использовании двух каналов на один инструмент — практически неотличимо. Да, и не забудьте обратить внимание на гитару, с которой снимается звук. Ведь нельзя получить красоту звука, например с гитары «Музима»=)
Сейчас у нас в группе два X3 — при игре в студии можно стопроцентно играть в линию. На одном процессоре настроены бас и ритм-гитара, на втором — соло(для лидер-гитары хочется звук пожирнее, с использованием обоих tone одновременно) Т.е. ВАШ ЗВУК У ВАС УЖЕ ВСЕГДА С СОБОЙ, несмотря на то, что будет на сцене. В кабинеты можно вывести с линейного входа, и настроить благоприятнывй для ушей сигнал, который будете слышать только вы (при использовании на сцене.) А в студии особого значения не имеет, поэтому для любителей кабинетного перегруза можно играть в те , которые есть в студии.
Из недостатков назову следующее :
1. Во-первых, не каждый согласится, что процессор может заменить аналоговый звук. Поэтому рассматривая интересы разных личностей не будем — вкус и предпочтения у всех свои.
2 . во-вторых — это громоздкость, весит процессор почти 6 кг и таскать его на репетиции- нелегкая задача. Можно заказать сумку — очень удобно, но всеравно тяжело.
3 В- третьих — использование данного процессора необходимо не всем, это скорее, профессиональный инструмент, не расчитанный на простого обывателя и связываться с ним, ради того, чтобы, как кто-то сказал «щелкать на две кнопочки» не имеет смысла, хотя для выступлений он незаменим. единственное. что смущает, не всегда ваш звук будет звучать так, как вам хотелось, но это уже недостаткеи аппарата организаторов. Перед каждым выступление приходиться все же подкручивать что-то, чтобы добиться нужного результата, но это «что-то» незначительно.
Спасибо за внимание.
Обзор №8
Ну основные претензии к продукции Line6 давно известны:
— легкий одинаковый призвук компрессии абсолютно на всех пресетах;
— если не вслушиваться, пресеты звучат как разные эквалайзеры одной и той же модели дисторшна (если вслушиваться, то вариантов «зерна» всего четыре или пять, а к нему уже прикручиваются различные украшательства);
— все обещанное многообразие поддержки продуктов на официальном сайте — увы — не бесплатно.
От себя добавлю, что за последние 5 лет качество сборки и используемых компонентов сильно снизилось. Нет, приборы, конечно, не разваливаются через месяц пользования. Однако если раньше абсолютно вся продукция позиционировалась как «да, подороже, но только посмотрите и пощупайте — оно того стоит», то сейчас скрипящие клавиши на KB37 и болтающиеся ручки громкости — обычное дело. Говорю это как обладатель POD XT одной из первых в Москве партий.
По поводу POD 2.0 — многие считают, что он звучит православнее XT и X3. Еще многие считают, что ранние прошивки лучше последних.
В остальном повторяться не буду — тут уже многое было сказано. Рекомендую почитать Harmony Central — особенно отрицательные отзывы, которые обычно самые правдивые.