ЖурналTag Программное обеспечение анализатора 3

В этом кратком руководстве рассказывается об установке, настройке и использовании Log.Tag® Анализатор 3.
ЖурналTag® Analyzer — это бесплатное программное обеспечение дляTag® регистраторы, используемые для настройки, загрузки и анализа данных. Для запуска программного обеспечения вам потребуется ПК с ОС Windows 7 или более поздней версии и свободный порт. Он предлагает широкий спектр вариантов построения диаграмм и отчетов, а также задачи автоматизации для настройки, загрузки и обмена данными. Это руководство дает краткий обзорview его функциональности; подробные инструкции по всем функциям см. в подробном журналеTag® Руководство пользователя Analyzer, установленное вместе с программным обеспечением, или вызовите встроенную функцию справки, нажав клавишу F1.
ЗАГРУЗКА ПРОГРАММНОГО ОБЕСПЕЧЕНИЯ
Вы можете получить бесплатную копию журналаTag® Программное обеспечение Analyzer от LogTagАвтора webсайт. С помощью браузера перейдите к https://logtagrecorders.com/software/lta3/download/ и нажмите «Загрузить сейчас», чтобы загрузить программу установки. file. Обратите внимание, что вам потребуются учетные данные администратора для ПК, на котором вы устанавливаете программное обеспечение.
УСТАНОВКА И НАСТРОЙКА
Дважды щелкните программу установки file вы загрузили — он будет сохранен в папке «Загрузки» и будет называться ltanalyzer_32r12.exe или аналогичный. Если вы получили компакт-диск или флэш-накопитель USB с программным обеспечением, запустите его оттуда. Выберите язык, примите условия лицензии и следуйте инструкциям на экране. По завершении на рабочем столе и в списке приложений появится новый значок, который вы используете для запуска журнала.Tag® Анализатор. Если вы используете регистраторы без USB (у них есть 3 серебряных контакта на задней панели), вам потребуется интерфейс LTI-HID. Подключите его к USB-порту на вашем ПК. Его можно оставить постоянно подключенным, чтобы можно было вставлять логгеры из конфигурации или скачивать. Если вы используете USB-логгер со встроенным USB-разъемом, при необходимости подключайте его к свободному USB-порту.
ПОЛЬЗОВАТЕЛЬСКИЙ ИНТЕРФЕЙС
После того, как вы запустили журналTag® Анализатор, откроется главное окно. Отсюда у вас есть доступ к командам меню и панели инструментов. Дополнительные элементы станут видны, как только вы откроете file или скачать регистратор.
БАЗОВАЯ КОНФИГУРАЦИЯ РЕГИСТРАТОРА
Перед использованием регистратора его необходимо настроить с параметрами, необходимыми для запуска и записи значений температуры. Также желательно установить аварийные условия, чтобы вы могли быть проинформированы, когда были зафиксированы температуры, не соответствующие спецификации. Чтобы настроить USB-логгер, сначала подключите его к USB-порту вашего ПК. Если вы используете подставку для интерфейса, поместите регистратор в интерфейс вертикально, серебряными контактами назад. Нажмите «Настроить из журнала».Tag меню или нажмите F3. Появится диалоговое окно конфигурации:
Вверху находятся общие параметры, а внизу несколько вкладок с дополнительными настройками.
- Добавьте описание регистратора или сопутствующих товаров
- При желании укажите пароль для следующей настройки или загрузки.
- Выберите «Дата/время запуска» или «Пуск нажатием кнопки» (с дополнительным предварительным ведением журнала).
- Укажите, как долго вы хотите записывать (с дополнительной задержкой начала).
- Выберите продолжительность времени между каждым чтением.
- Укажите условия срабатывания аварийного сигнала верхней и нижней температуры.
Добавьте сигналы тревоги по мере необходимости или измените любые уже предложенные сигналы тревоги. В зависимости от модели логгера могут присутствовать и другие вкладки, которые позволяют войти в настройки беспроводной сети, тревоги по влажности, тревоги для второго канала записи и другие. Некоторые модели не позволяют изменять определенные параметры (например,tag®), поскольку они предписаны органом по сертификации.
ДОПОЛНИТЕЛЬНЫЕ ПАРАМЕТРЫ КОНФИГУРАЦИИ
В то время как базовой конфигурации достаточно для подготовки регистратора к регистрации, вы можете расширить информацию, которую вы получаете в конце поездки, задав некоторые дополнительные параметры. Доступ к ним осуществляется нажатием соответствующей вкладки.
File Вкладка «Параметры
Эта вкладка доступна только для USB-логгеров и определяет состав PDF-файла. file.
Выберите каждый элемент, который вы хотите отобразить в PDF:
- Включить или отключить список данных, сигнал тревоги и линии сетки
- Определение форматов даты и времени
- Выберите, какой на борту files должен быть сгенерирован
- Выберите единицы измерения температуры PDF, язык и часовой пояс
- Выберите масштаб диаграммы.
Вкладка дополнительных настроек
Эта вкладка доступна для регистраторов с дисплеем и управляет тем, как кнопки регистратора используются для управления сигналами тревоги и другими расширенными параметрами.

Выполните любые дополнительные настройки, связанные с будильником.
- Определите, будет ли аварийный сигнал отображаться на дисплее, даже если температура вернется к норме, и можно ли сбросить аварийный сигнал.
- Установите количество приостановленных показаний при нажатии кнопки
Управление расширенными настройками регистратора
- Разрешить остановку и сброс регистратора
- Включите опцию энергосбережения


Когда вы введете все параметры, нажмите «Настроить». Регистратор теперь будет настроен с параметрами, которые вы ввели. Индикатор выполнения сообщит вам, когда настройка будет завершена. Удалите регистратор из интерфейса или, если это регистратор USB, отключите его и установите на место колпачок. Теперь регистратор готов к запуску и развертыванию.
ЗАГРУЗКА РЕЗУЛЬТАТОВ
В конце поездки вы можете загрузить данные, чтобы их можно было viewредактировать, анализировать и делиться с другими. С журналомTag Анализатор работает, просто подключите регистратор к USB-порту или вставьте его в интерфейсную подставку. Теперь данные автоматически загружаются и сохраняются на вашем ПК в папке «Документы — Мой журнал».Tag Папка данных. Если функция автоматической загрузки отключена, вы также можете нажать «Загрузить из журнала».Tag меню или нажмите F4.
АНАЛИЗ ДАННЫХ
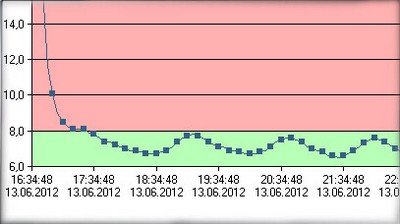
Сразу после загрузки данных вам будет представлена диаграмма, показывающая всю поездку, включая:
- Значения температуры (и, где применимо, влажности)
- Полосы сигналов тревоги с цветовой кодировкой, чтобы вы могли видеть, вышли ли показания за пределы спецификаций
- Оси времени и температуры
- Панель управления графиком
Вы можете использовать мышь для более детального увеличения любой области, перетаскивая курсор мыши по полотну диаграммы (удерживая нажатой левую кнопку мыши). Используйте значки на панели инструментов или колесико мыши для уменьшения масштаба. Диапазон показаний позволяет выбрать, хотите ли вы видеть все показания, только начатые показания или только показания перед запуском. Панель управления диаграммой позволяет включать и выключать определенные элементы диаграммы.] Помимо начальной вкладки «Диаграмма», вы также можете увидеть другие вкладки в нижней части file окно. Эти вкладки представляют данные регистраторов по-разному. Щелкните одну из вкладок, чтобы отобразить следующую информацию:
Вкладка «Отчет»: На этой вкладке отображается сводный отчет о поездке, объединяющий наиболее важные статистические данные о поездке с небольшой диаграммой.
Вкладка «Данные»: На этой вкладке вы найдете список всех показаний температуры, видимых в настоящее время на диаграмме, которые могут быть всеми показаниями или только увеличенными.
Вкладка «Сводка»: На этой вкладке данные представлены в сводной форме, сгруппированные по событиям, таким как контрольные метки. Вы также можете увидеть раздел только для увеличенных показаний. Статистика включает расчетные значения, такие как минимальное, максимальное и среднее значение, стандартное отклонение, среднюю кинетическую температуру и градусо-минуты.
Вкладка «Сводка дня»: Эта вкладка содержит сводку за день от логгеров с памятью статистики, например, vaxtag® или регистраторы TRED30-16R, где каждый из последних 30 дней указан с минимальными и максимальными значениями. Также возможно объединение данных из нескольких логгеров в один мультиграфик. file для сравнения. Вы можете использовать это для картографических исследований или для сравнения данных повторяющихся поездок. ЖурналTag Анализатор позволяет аннотировать графики. Включите эту функцию с помощью кнопки на панели управления диаграммой, затем добавьте текст, выноски и другие данные на холст диаграммы, например статистические данные.
ЭКСПОРТ И ОБМЕН ДАННЫМИ
Данные можно сохранять в разных форматах и делиться ими с другими пользователями. Вы можете экспортировать данные в CSV files (который можно открыть в Excel), текст fileс, HTML fileс и PDF fileс. Это можно сделать автоматически при загрузке логгера или с помощью команды Сохранить как из File меню. Каждый из них file типы могут быть настроены. Ты можешь отправить fileвручную по электронной почте в список получателей или загрузить их на FTP-сервер для загрузки другими пользователями. Используйте значки панели инструментов (Отправить почту и Загрузить) или соответствующие команды из File меню. Это также может быть сделано автоматически каждый раз, когда загружается регистратор. ЖурналTag Анализатор также позволяет files для загрузки непосредственно в ваш журналTag Онлайн аккаунт. ЖурналTag Онлайн журналTagоблачное хранилище и платформа отчетности, которая обеспечивает доступ к данным из любого места, где доступен браузер и подключение к Интернету. Вам нужно будет указать данные своей учетной записи и включить эту функцию в настройках. Если включено, вы можете дополнительно открыть files непосредственно из журналаTag Онлайн с помощью команды «Открыть» из File меню.
НАСТРОЙКА ПРОГРАММНОГО ОБЕСПЕЧЕНИЯ
Большое количество параметров, определяющих внешний вид и поведение программного обеспечения, можно настроить в соответствии с вашими личными предпочтениями. Доступ к ним можно получить, щелкнув значок панели инструментов «Параметры» или щелкнув «Параметры» в меню «Правка», а затем выбрав одну из вкладок. Эти настройки хранятся отдельно для каждого пользователя и могут быть экспортированы и импортированы на другие ПК. Ниже приводится краткое описание этих опций.
- Общие настройки: Выберите язык и единицы измерения температуры, которые использует программное обеспечение, как часто программное обеспечение будет проверять наличие доступных обновлений и какой временной интервал по умолчанию будет отображаться на диаграмме.
- Сводные статистические данные: Выберите, какие значения статистики должны отображаться на вкладке статистики.
- Статистика диаграммы: Выберите, какие значения статистики должны отображаться в окне аннотаций диаграммы.
- Графики: Влияйте на то, как отображается диаграмма, какие маркеры отображать, какие цвета отображать, как работает мышь и как будет называться диаграмма.
- Автоматизация: Здесь вы определяете, какая часть вашего процесса загрузки, реконфигурации и обмена будет автоматизирована. В этом разделе вы также вводите данные для вашего FTP- и SMTP-сервера, чтобы данные вашего регистратора можно было отправлять и загружать.
- File и папка: Этот раздел определяет, где хранятся данные, загруженные из ваших регистраторов, и что fileс будет называться.
- Экспорт и отчеты: Здесь вы определяете, какой экспорт files автоматически генерируются при загрузке регистратора, и как настраивается каждый формат.
- Дата и время: Здесь вы можете настроить отображение даты и времени на всех вкладках, в отчетах и при экспорте. Здесь же вы определяете, какой часовой пояс используется по умолчанию для отображения данных.
- ЖурналTag В сети: Это позволяет вам контролировать некоторые аспекты автоматизации, связанные с журналом.Tag Online.
ПОЛУЧЕНИЕ ПОМОЩИ
Если в любой stagЕсли вы чувствуете, что руководство пользователя и помощь не отвечают на ваши вопросы, и вам нужна дополнительная помощь, обратитесь к своему торговому партнеру или посетите журналTag поддержка webсайт
- https://logtagrecorders.zendesk.com/hc/en-us для получения помощи.
Документы / Ресурсы
Рекомендации

ЖурналTag | Скачать
-
Contents
-
Table of Contents
-
Troubleshooting
-
Bookmarks
Quick Links
Summary of Contents for LogTag LogTag Analyzer Temperature Recorder
-
Page 2
Complying with all applicable copyright laws is the responsibility of the user. No representation or warranty is given and no liability is assumed by LogTag Recorders with respect to the accuracy or use of such information or infringement of patents or other intellectual property rights arising from such use or otherwise. -
Page 3: Table Of Contents
Contents Copyright Introduction Installing the software System requirements … 8 Getting a copy of the software … 8 The installation process … 9 Upgrading from earlier versions … 10 Starting the software … 11 Quick Start Guide Connecting the Interface … 14 Using the LogTag with the Interface …
-
Page 4
Contents Selected LogTag Data files (*.sltd) … 50 PDF files … 52 Understanding the results … 53 Inspecting the information at close range … 55 Manual scaling of the chart … 58 Chart annotations … 60 Chart subtitle … 62 Combining charts onto a single chart … -
Page 5
Working with Networks Distributing software to workstations … 132 Simple Distribution of FTP/SMTP settings … 133 Restricting what users can do … 134 How users log on … 135 How users change their password … 136 Getting more information Getting updated software … 138 Finding your software version … -
Page 6: Introduction
Although this guide includes all the relevant information to install and use the product range supplied by LogTag Recorders, there are at times an expectation that the reader is familiar with using their computer and the Windows® operating system. If a feature of the software is specific to a version of the Windows®…
-
Page 7: Installing The Software
H A P T E R Installing the software To make use of your LogTag you will need to first install the software on your computer. This will allow you to prepare your LogTag(s) for use, retrieve the readings the LogTag(s) have recorded, and analyze the data.
-
Page 8: System Requirements
Getting a copy of the software The software is available for download from the LogTag Recorders Internet site, www.logtagrecorders.com. LogTag Recorders does not charge for the download of the LogTag Analyzer software or for the updates to the LogTag Analyzer software. You are welcome to distribute copies of the LogTag Analyzer software provided it is distributed in the packaged format as originally downloaded from the LogTag Recorders Internet site.
-
Page 9: The Installation Process
Chapter 2 Installing the software When you visit the LogTag Recorders Internet site, follow the software navigation links to obtain a download link for the latest version of the LogTag Analyzer software. The request to download LogTag Analyzer software from the LogTag Recorders Internet site will result in an e-mail automatically being sent to you with the download link for the latest version.
-
Page 10: Upgrading From Earlier Versions
LogTag Analyzer User Guide (2.0) button. When the process is ready to be completed, clicking the «Finish» button, when it appears, will finish the installation process. If you want to stop installing the software, click the «Cancel» button. We recommend you leave all options to their default setting, especially if you are unsure of what option to select or what the actual implications are if the option was to be changed.
-
Page 11: Starting The Software
Chapter 2 Installing the software Note: LogTag Recorders do not recommend updating your LogTag Analyzer software manually. Instead, you should be using the automated update function, which ensures you only use the version with the same character set as the one already installed.
-
Page 12
LogTag Analyzer User Guide (2.0) A «Shortcut» on the desktop, which you can double click to start the software. A «Shortcut» in the «Start» menu system. If you are using Windows XP, you may need to click on the «All Programs» item to locate the «LogTag Analyzer»… -
Page 13: Quick Start Guide
H A P T E R Quick Start Guide You’ve got the software installed on your computer and now you want to use the LogTag, see how it goes and what it can do. This chapter will briefly cover the steps involved to get your LogTag ready to use, how to get it started and then retrieve the recorded information out of the LogTag.
-
Page 14: Connecting The Interface
LogTag Analyzer User Guide (2.0) Connecting the Interface There are two types of the Interface Cradle available. The first connects to the computers serial (RS232) communications port and the other connects to the computers USB (Universal Serial Bus) communications port. Although there may be multiple connectors on the computer for each of these types of communications ports, the shape of each is unique and therefore it is not possible to connect the Interface Cradle to the wrong type of communications port.
-
Page 15: Using The Logtag With The Interface
The sockets for the USB communication ports are typically located at the rear of the computer. In some computers there may also be two or more USB communication ports located on a front panel of the computer and/or on the top of the computer case. Please ensure that the software has been installed prior to connecting the USB Interface Cradle to the computer as the software installation also installs the drivers required to successfully connect and use the USB Interface Cradle.
-
Page 16: Get A Logtag Ready For Use
LogTag Analyzer User Guide (2.0) If the LogTag has readings stored within its memory, the software will automatically start to download the data and will also display an animated picture during the download process, similar to the following picture. The download process can be stopped by clicking on the «Cancel»…
-
Page 17: Welcome
Chapter 3 Quick Start Guide Welcome First the Wizard has a welcome screen (this is «1» on the Action List). This asks you to make sure you have not neglected to place the LogTag firmly in the Interface Cradle. The Wizard is responsible for certain «Action Steps» and these are clearly listed at the left in the wizard window.
-
Page 18: Locate Logtag(S) Download And Save Relevant Data
LogTag Analyzer User Guide (2.0) Locate LogTag(s) download and save relevant data In this screen you will see one of the following pictures next to each of the items in the list: (no picture) indicates the software is still using this communications port. …
-
Page 19: Configure Logtag(S) For Next Use
Chapter 3 Quick Start Guide The communication ports that are not in use (the ones that initially are reported with the mark) can be removed from view by selecting an option (see «Communication Ports» on page 113). You don’t have to do that now, but you can do it later to clean up the «wizard window»…
-
Page 20: Prepare Logtag(S) For Next Use
LogTag Analyzer User Guide (2.0) in more detail in the chapter «Preparing LogTag for use on page 26». Click record the configuration data and you will see the final confirmation screen. Prepare LogTag(s) for next use The last Wizard screen involves sending the new configuration data to each LogTag to prepare them for their next use.
-
Page 21
Once the software has finished uploading the updated configuration information into each LogTag, the window displaying the progress will look similar to the following picture. In this screen you will see one of the following pictures next to each of the items in the list: (no picture) indicates the LogTag is still in the process of being prepared for its next … -
Page 22: Starting And Using The Logtag
LogTag Analyzer User Guide (2.0) Starting and using the LogTag Once a LogTag has been successfully configured for use it is ready to be started. There are two discrete methods available to start a LogTag recording, which are selected during configuration.
-
Page 23
Chapter 3 Quick Start Guide Only flashes if no alert condition is present. -
Page 24: Logtag Light Patterns
LogTag Analyzer User Guide (2.0) LogTag light patterns The LogTag’s LED’s signal a number of different events or status information. The table below contains a summary of the light patterns you may come across during use. Signal Sequence LogTag Sequence of four wake-up signal alternate flashes of green-red LED’s…
-
Page 25: Retrieve Information From Logtag
Alert condition Single flash of red LED present every 4 seconds Communication The green LED will flash occasionally Start button red LED glows faintly press Retrieve information from LogTag When you are ready to view the recordings that are stored within the LogTag, just place the LogTag into the Interface Cradle as before.
-
Page 26: Preparing Logtag(S) For Use
H A P T E R Preparing LogTag(s) for use Before you can use a LogTag to monitor and record environmental conditions you must first prepare it for use. The process of preparing a LogTag for use allows you to define a number of parameters, including: How long it should record the environmental condition for, so that you can be assured …
-
Page 27: Getting A Logtag Ready For Use
Getting a LogTag ready for There are two ways to prepare a LogTag for use, both of which will achieve the same result. Once a LogTag has been through the configuration process to get it ready for next use, any readings previously recorded will no longer be available for retrieval. Click the LogTag icon ( ) on the toolbar or the «Wizard…»…
-
Page 28: Restricted Access Requirements
LogTag Analyzer User Guide (2.0) Restricted Access Requirements Every LogTag supports an option that, when enabled, results in users being required to provide the correct password to gain further access to the LogTag. When the restricted access option is enabled, a window similar to the following picture will be displayed allowing the user to enter the correct password.
-
Page 29
download. The logger will be permanently upgraded as soon as the configuration is downloaded. Following should be noted: The update cannot be reversed. If the «Update logger to enable this feature» is ticked, the upgrade will perform, regardless whether any of the «…requires a password» tick boxes are enabled or not. If multiple units are configured at the same time using more than one interface, all … -
Page 30: Preparing Logtag For Next Use
LogTag Analyzer User Guide (2.0) Preparing LogTag for next use The «Configure LogTag(s) for next use» step provides you with all the options that can be configured to effect how a LogTag records data during its next use. Once the changes within this screen have been made, if any, click information to the LogTag(s).
-
Page 31
Start method This is used to determine how/when the LogTag will start recording its next set of readings. Not every LogTag model can support every start mechanism. As a result, specific options may not be be listed when configuring a LogTag. -
Page 32
LogTag Analyzer User Guide (2.0) Record readings so that: Readings recorded will span at least X days Number of readings to record X maximum is Y Record a reading every Begin recording after a delay of X Enable the OK (Green) indicator Humidity / Temperature Configure requires a… -
Page 33
Upgrade logger to TRIX-8 and TREX-8 loggers which do not yet have the «Download enable this feature requires a password» feature can be upgraded. These units will then require LogTag Analyzer revision 1.8r9 or later to be configured or downloaded, and an error message will be displayed in older versions. -
Page 34: Alert Processing
LogTag Analyzer User Guide (2.0) Alert Processing The LogTag can display a visual alert if one or more of the configured alert conditions have been met. An alert condition can be a single alert reading (a reading outside of or including the upper and lower threshold values), a combination of consecutive alert readings or a total of alert readings encountered during the trip.
-
Page 35
Readings below X or You can set the upper threshold limit and lower threshold limit by above Y (inclusive) entering the appropriate information in the boxes. If readings stay inside the range specified by X and Y the alert indicator will not activate. -
Page 36
LogTag Analyzer User Guide (2.0) Example: You wish to configured a LogTag so alert conditions are indicated if 5 continuous readings are out-of-range or 7 total readings are out-of-range. Alert parameters should be set as follows: This table shows how different conditions would result in the Alert Indicator flashing or not: What the LogTag recorded 2 readings out-of-range, return to normal,… -
Page 37: Advanced Alert Settings
6 readings out-of-range, return to normal Please note following special conditions: 1. If you wish an alert to be indicated on the first reading that is recorded out-of-spec, place a tick in the box next to «Enable the Alert (Red) indicator when» and remove the ticks in both boxes next to the «After X consecutive alert readings»…
-
Page 38
LogTag Analyzer User Guide (2.0) Function Readings above X Readings below Y (inclusive) After X consecutive alert readings (W minutes) Readings above Readings below After X alert readings have occurred (W minutes) Readings above Readings below The advanced settings are displayed automatically without the need to press if an advanced configuration is already found in the logger to be configured. -
Page 39
This table shows how different conditions would result in the Alert Indicator flashing or not: What the LogTag recorded 2 readings of 20ºC or above, return to normal, 8 readings at 0ºC or below, return to normal, 4 readings of 20ºC or above, return to normal 4 readings of 20ºC or above, return to normal, 4 readings of 20ºC or above… -
Page 40: Display Logger Alarms
LogTag Analyzer User Guide (2.0) Display Logger Alarms TRID30-7F and TRID30-7R loggers have a different settings screen. The settings are similar to the Advanced Alert Settings on page 37, hence they are not explained again here. There is however one notable exception; for each range (above or below) you can only select either accumulative or consecutive readings, but not a combination of both.
-
Page 41
Function Purpose Clear and reset alarm If this option is enabled, any user can turn off an active alarm by when STOP/CLEAR pressing the LogTag’s STOP/CLEAR button. It will also reset the button pressed internal counters such that it would be as if no alarm had occurred while the LogTag was recording. -
Page 42: Verify Access Password
LogTag Analyzer User Guide (2.0) Verify Access Password When configuring a LogTag for its next use, if the user enables the «Configure requires a password on page 26» option and/or changes the password to restrict access to the LogTag, then the user is required to verify the password to be defined before it will be stored in the LogTag.
-
Page 43: Continuous Operation
Chapter 4 Preparing LogTag(s) for use operation’ mode, which is explained further in the section «Continuous operation (on page 43)». Once the memory within the LogTag is full the oldest pre-start reading will be overwritten with the latest reading recorded, regardless of whether the reading recorded is a pre-start reading or a reading to be recorded after the LogTag has been started.
-
Page 44: Getting The Best From Your Logtag
LogTag Analyzer User Guide (2.0) Getting the best from your LogTag Many users of humidity and/or temperature loggers are used to attaching the logger to a hook or tie-wrapping them to a monitored object. A wide variety of attachment methods can be used with the hole on upper right hand corner of the LogTag, such as bolting the LogTag in position, attaching it to a packaging strap, using a car-seal for security or other means.
-
Page 45: Prolonging Battery Life
Prolonging battery life If your LogTag is not going to be used for extended periods of time, it may be worthwhile to set the LogTag into «Hibernation» mode. In «Hibernation» mode the LogTag will consume minimal power, which will extend the battery life when compared with leaving an idle LogTag in operating mode.
-
Page 46
LogTag Analyzer User Guide (2.0) The following example illustrates using the «Hibernation» feature. In this screen you will see one of the following pictures next to each of the items in the list: (no picture) indicates the LogTag is still in the process of being set to «Hibernation» … -
Page 47: Results From Logtag
H A P T E R Results from LogTag The LogTag stores the recorded readings in its internal memory. Since the LogTag contains the recorded readings in its internal memory, you must use the LogTag Analyzer software to extract the information from the LogTag through the Interface Cradle and into a format that can be displayed to you in a meaningful way.
-
Page 48: Getting Results From Logtag
LogTag Analyzer User Guide (2.0) Getting results from LogTag You can retrieve the recordings from LogTag(s) as many times as you require. The process of retrieving data stored within a LogTag does not erase it from the LogTag’s memory. If the LogTag is currently recording while you retrieve the information, it will continue to record without interruption.
-
Page 49: Saving Logtag Data
Saving LogTag Data Saving LogTag Data files Every time you download a LogTag Recorder to your computer the data are automatically saved into a file with a *.ltd file extension (LogTag Data). This type of file is unique to LogTag data loggers and can only be read by LogTag Analyzer software. You can: generate a name for this file, which contains certain key details about the unit …
-
Page 50: Selected Logtag Data Files (*.Sltd)
LogTag Analyzer User Guide (2.0) To save a Multi Chart file under a different name, select the Save As… command from the File menu (on page 119) and enter a new file name. Selected LogTag Data files (*.sltd) Users can save a file, which when opened again, will only display a selected time window of the recorded data.
-
Page 51
Chapter 5 Results from LogTag The chart of this file, which contains pre-start readings, has been zoomed to show only a small proportion of the readings: The window slider shows there are still readings earlier and later than the displayed data. When saved as a *.sltd file, it will be automatically re-opened and now only displays the previously zoomed readings: Note: Those readings which are no longer displayed are still present in the file. -
Page 52: Pdf Files
LogTag Analyzer User Guide (2.0) PDF files LogTag Analyzer can save the currently active LogTag data window to a PDF file. One single file will be generated with chart images, a data listing and summary included for each tab. PDF files can be generated automatically, or by selecting «Save as» from the File menu (on page 119).
-
Page 53: Understanding The Results
Chapter 5 Results from LogTag Each section can be identified by its heading. If a chart is zoomed, the PDF file will also contain a zoomed setting. Understanding the results The Data Screen is an all purpose data display. The window appears inside the main LogTag Analyzer window, and has a series of tabs along the bottom.
-
Page 54
LogTag Analyzer User Guide (2.0) Data A listing (spreadsheet style) of the time versus humidity and/or temperature data. Summary A summary of the data, including averages, ranges, alert results, LogTag identification data, and other information. Pre-Start Chart A chart of data stored by the LogTag prior to it being started. Pre-Start Data A listing of the data stored by the LogTag prior it being started. -
Page 55: Inspecting The Information At Close Range
Chapter 5 Results from LogTag Inspecting the information at close range When a file is displayed either from downloading or from calling up a stored data file, the file typically appears as a chart. It might look something like this: The display does not show all of the available data points.
-
Page 56
LogTag Analyzer User Guide (2.0) The highlighted zone is immediately displayed after the left mouse button is released on the maximum displayable resolution: This display now shows the maximum detail from the highlighted area. When this mouse operation has been completed, for example, a picture of the highlighted area can be placed on the clipboard. -
Page 57
Chapter 5 Results from LogTag Whenever the data displayed on the chart has been zoomed in to show more detail and is showing only a portion of the charted data, if you click on the corresponding Data tab you will see that only the readings shown on the chart are currently displayed. If you also click on the corresponding Summary tab you will see an additional section of statistics that have been calculated based on only the portion of readings currently being shown on the Chart screen. -
Page 58: Manual Scaling Of The Chart
LogTag Analyzer User Guide (2.0) Inspection marks are recorded each time the START MARK button is pressed on the LogTag. Each inspection mark is numbered and can be identified by counting the number of marks on the Chart display. If you click on the corresponding Summary tab and scroll down in the data record you will see a summary of all the points that were recorded between each subsequent inspection mark.
-
Page 59
Range of sensor The chart is zoomed to the minimum and maximum values for each sensor. Range of readings The chart is zoomed to the minimum and maximum reading values. Manual Scaling This option lets you specify the date/time range, temperature and humidity ranges (if applicable) for the chart display. -
Page 60: Chart Annotations
LogTag Analyzer User Guide (2.0) Chart annotations To include more information in your chart you can add chart annotations. These will be displayed and printed with your chart. Click the right mouse button at the location where you want to add the annotation. Select «Add»…
-
Page 61
Chapter 5 Results from LogTag To delete all annotations, select «Delete All» from the Annotations popup context menu. Selecting the «Show» command from the Annotations popup context menu will show or hide all of the annotations on the chart. To save the annotations, click the toolbar button or select the «Save»… -
Page 62: Chart Subtitle
LogTag Analyzer User Guide (2.0) Chart subtitle The chart subtitle is displayed and printed underneath the chart title. To edit the subtitle, right-click on the area above the chart and select «Edit Chart Subtitle» from the popup context menu.
-
Page 63
Chapter 5 Results from LogTag Enter or modify the text, then click to display the edited subtitle. To remove the subtitle, delete the text in the Edit Chart Subtitle dialog and click To save the chart subtitle click on the toolbar icon or select the Save (see «File Menu»… -
Page 64: Combining Charts Onto A Single Chart
LogTag Analyzer User Guide (2.0) Combining charts onto a single chart To overlay multiple charts in one view, select the Multi Chart ( ) command. All charts that are currently open will be displayed together. Additional files opened while in Multi Chart mode (including data downloaded from LogTags) will be added to the display.
-
Page 65: Changing Chart Colours
the desired statistics on in the «Customizing the software» on page 86) Window. The chosen values will be displayed separately for each chart. You can also view Min, Max and Average Charts and select other options. Changing Chart Colours By default, all charts in the Multi Chart display are displayed in the colors specified in Charts (on page 90) section within the 86) Window.
-
Page 66
LogTag Analyzer User Guide (2.0) 1. Move the mouse pointer over the chart until the appropriate tooltip is displayed. Right-click, then select the «Shift Chart» command from the popup context menu. This will cause the following dialog to be displayed, where the new start time and date can be entered, or the chart can be revert to its original date/time by selecting the «Original start time»… -
Page 67: Aligning Charts
Chapter 5 Results from LogTag Aligning Charts Select «Align Charts» from the popup context menu to automatically align all charts in the current Multi Chart window. The charts are aligned to the earliest start time: — «Chart» tab: All start times are aligned. — «Pre-start Chart»…
-
Page 68: Special Chart Tabs
LogTag Analyzer User Guide (2.0) Special Chart Tabs When you select the average tab chart tabs will be shown, with the Chart Average tab highlighted: These chart tabs display graphs calculated from the «Chart», «Pre-Start Chart», and «All chart» tabs and show minimum, maximum and average value graphs. Changes in either of the three original data displays, such as adding a new file and aligning or shifting charts, result in a re-display of the corresponding «Min/Max/Average»…
-
Page 69
If one or more of the charts have sections with readings outside the LogTag’s sensor range, LogTag Analyzer is unable to calculate the minimum, maximum and average values, and those sections of the graph will not be displayed. This will likely result in a «broken»… -
Page 70
LogTag Analyzer User Guide (2.0) Before the data are displayed in an average tab, LogTag Analyzer normalizes every chart’s readings so they fall in line with the logging interval of the LogTag with the shortest log interval, in this case unit (B). It does not shift any charts, but rather calculates a theoretical value for those reading times by linear interpolation. -
Page 71: Automatically Calculated Statistics
Automatically calculated statistics When a file is displayed either from downloading or from calling up a stored data file, the software will automatically calculate and display some statistics of the recorded data. These statistics are shown on the corresponding Summary tab and are also calculated for each sequence of data points between the inspection marks.
-
Page 72: Standard Deviation
LogTag Analyzer User Guide (2.0) Standard Deviation The standard deviation is a useful for determining how spread out the readings are from the arithmetic mean (Average Reading). Most controlled environments typically try to keep the environmental conditions at a stable and consistent humidity and/or temperature.
-
Page 73: Mean Kinetic Temperature
Mean Kinetic Temperature Some products and materials have accelerated rates of degradation at higher temperatures. For example, perishable food items, pharmaceutical products and many forms of bacteria can grow/degrade exponentially as the environmental temperature increases. Mean kinetic temperature is a calculation that accommodates the non-linear thermal effect temperature can have on products.
-
Page 74
LogTag Analyzer User Guide (2.0) the number of data points to include in the calculation a data point to include in the calculation, in degrees Celsius For example, if there were 5 data points to calculate the mean kinetic temperature of and they were, 12.3, 15.9, 16.2, 14.7 and 14.9 degrees Celsius, then the mean kinetic temperature would be 14.9 degrees Celsius using the default ΔH. -
Page 75: Degree Minutes
Degree Minutes There are some products and materials that exist which can change their characteristics and/or degrade if they experience temperatures which are not within ideal conditions for long enough. For example, some products may experience freezer burn if they experience an extremely cold condition or experience a colder than ideal temperature for long enough period of time.
-
Page 76: Displaying Statistics
LogTag Analyzer User Guide (2.0) Displaying statistics The statistics displayed on the Summary tab can be configured in the Options dialog. Refer to the (see chapter «Summary Statistics (on page 88)»). By default, all statistics are displayed on the Summary tab. Statistics can also be displayed on the chart, underneath the legend.
-
Page 77: Sending A File By E-Mail Direct From Analyzer
Chapter 5 Results from LogTag You can choose to print all of the information, select a range of dates and times to print from or select a range of «inspection» marks. This could be a very important for transit monitoring since post trip and pre-event data are not significant to a discussion or dispute centering on a humidity and/or temperature maintenance issue.
-
Page 78
LogTag Analyzer software is free and can be downloaded from the LogTag Recorders Internet site, www.logtagrecorders.com. If you want to attach your data files in file formats other than the LogTag Analyzer… -
Page 79: Calling Up Previous Results
Chapter 5 Results from LogTag Calling up previous results The files that have most recently opened and displayed are listed towards the bottom of «File (see «File Menu» on page 119)» menu. To open other files, click the «Open» icon ) located on the toolbar (see «Menus and Toolbars»…
-
Page 80: Digital Signatures
LogTag Analyzer User Guide (2.0) You can also open files directly from within Windows™ Explorer or from within your e-mail software by double clicking on the file or right clicking and selecting «open» from the context menu. When opening files from e-mail programs that store attachments in temporary folders such as MS Outlook, you may be asked to store the file in a new location when performing further actions such as selecting multi-charts or uploading to FTP sites.
-
Page 81
While the file that the digital signature is to be added to is open and currently selected, add a digital signature by clicking on the «Digital Signatures» icon ( toolbar (see «Menus and Toolbars» on page 117), which will display the «File Properties» dialog with the «Digital Signatures»… -
Page 82: How Secure Is My Data
LogTag Analyzer User Guide (2.0) Once the «Add Digital Signature» dialog is visible, enter your LogTag Analyzer user password and the select the meaning for the digital signature that is being added. Click to permanently add the digital signature to the file or not add the digital signature.
-
Page 83
LogTag Recorders know of. A communications or hardware failure has occurred during the transfer of the data from the LogTag to the computer. -
Page 84: Viewing File Properties
LogTag Analyzer User Guide (2.0) Viewing file properties The file properties, which is accessed through the File Menu (on page 119) and/or through the toolbar command, provides users with a brief summary about the data included within the file, as indicated in the following picture.
-
Page 85
Chapter 5 Results from LogTag This file properties information is also available for viewing directly through the Windows Explorer software that was included with the Windows operating system, without the need to have the LogTag Analyzer software open. To view the information, simply locate the file of interest with Windows Explorer and, using the mouse, click the right button over the file and select the «Properties»… -
Page 86: Customizing The Software
H A P T E R Customizing the software In the «Edit» menu is a command called «Options…». This menu command opens a Window, which will allow the many of the features that the software offers to be customized. The following sections will provide an explanation of each of these options so that users will be able to make the best use of the software.
-
Page 87: General Settings
General Settings The General Settings options allow you to change various preferences that will effect the overall appearance of the information shown by the software. Show temperatures in This will determine what units of measurement temperatures will be displayed in. The options include: Fahrenheit (°F) …
-
Page 88: Summary Statistics
LogTag Analyzer User Guide (2.0) Summary Statistics This option allows you to specify which statistics are displayed in the Summary tab. The statistics can be enabled or disabled by clicking the tick box for the relevant item in the list.
-
Page 89: Chart Statistics
Chapter 6 Customizing the software Chart Statistics This option allows you to specify which statistics are displayed on the charts. The statistics can be enabled or disabled by clicking the tick box for the relevant item in the list.
-
Page 90: Charts
LogTag Analyzer User Guide (2.0) Charts The Charts options allow the various aspects of the charts that display the readings recorded by LogTags to be customized. At the base of the Window is a color selector and other relevant controls, which apply to the highlighted item on the list in the window. Some experimentation with these settings will show very quickly how they work.
-
Page 91
-40 and -41.5 will be displayed even if the temperature falls to a much lower actual value. LogTag Recorders provides no guarantee of temperature reading reliability or accuracy beyond the published range for a given product and the «Show readings beyond specification»… -
Page 92: Automation
LogTag Analyzer User Guide (2.0) Automation The Automation options determine what the software does automatically when it detects a LogTag in the Interface Cradle. Enable automatic download of readings from LogTags Instructs the software to automatically retrieve recordings from a LogTag when it is placed in an Interface Cradle that is connected to the computer.
-
Page 93
Only show the latest set of readings after download Instructs the software to only display the most recently retrieved set of readings on the screen. If there are multiple windows of readings open and being displayed, all of these windows will therefore be automatically closed and only the most recently retrieved set of readings will be displayed. -
Page 94
LogTag Analyzer User Guide (2.0) If the globe is active, but no letter is displayed, neither automatic FTP uploading nor automatic e-mailing are activated. Manual FTP or e-mail functions may still both be active. If the globe is grayed out, neither automatic nor manual FTP or e-mail functions are available. -
Page 95: Basic Smtp And E-Mail Settings
It is therefore of the utmost importance that you as the sender obtain permission from the recipients to send these files. LogTag Recorders provides this functionality as a feature assisting in the distribution of information between various users within an organization and will not assume responsibility for any misuse of its software.
-
Page 96
LogTag Analyzer User Guide (2.0) Once you click on the «SMTP Settings» button a dialogue window will appear, allowing you to enter the configuration data for the SMTP e-mail function. A lot of these settings will be familiar to you from your standard e-mail program. If you have been supplied with access data by your network administrator we suggest you print the following table, enter the data into the fields provided and keep it in a safe place. -
Page 97
Use name and Some SMTP servers require an password authentication method, especially if the SMTP server you are using is not provided by your ISP, e.g. if you are using e-mail accounts from a hosted site. In this case you need to tick this box and provide login data for this SMTP server. -
Page 98
LogTag Analyzer User Guide (2.0) Advanced settings Press this button to display a new dialogue window where you can enter advanced SMTP settings like port numbers, retries and log files. Refer to the section about Advanced SMTP settings Attach file in the Select all files that you wish to attach when following formats the e-mail is sent. -
Page 99: Advanced Smtp Settings
Chapter 6 Customizing the software This error message is displayed if LogTag Analyzer could not connect to the specified SMTP site because it could not find it. This could be due to internet connectivity issues, due to an incorrect port name or due to a mis-spelt server name. This error message is displayed if one or more of the addresses in the recipient list have an incorrect mail format (i.e.
-
Page 100: Basic Ftp Settings
LogTag Analyzer User Guide (2.0) This will allow experienced users to change additional settings normally associated with FTP transfers. Field Port Number Retry Maximum Retries Automatic Disconnect if idle Log uploads Log Connection errors Click OK to store the settings or cancel to abort. Basic FTP settings You will require two main pieces of information to upload data to an FTP site: The name of the FTP site and a directory on the site in which the files will be stored…
-
Page 101
Once you have clicked the «FTP Settings» button a dialogue window will appear, allowing you to enter the configuration data for the FTP site access. If you have been supplied with access data by your network administrator we suggest you print this page, enter the data into the fields provided and keep it in a safe place. -
Page 102
LogTag Analyzer User Guide (2.0) Advanced settings Press this button to display a new dialogue window where you can enter advanced FTP settings like port numbers, retries and log files. Refer to the section about Advanced FTP settings All of the above settings are required to make a successful connection to an FTP server. Every time you make changes to these settings you should perform a test by pressing the «Test connection»… -
Page 103: Advanced Ftp Settings
Chapter 6 Customizing the software This error message is displayed if LogTag Analyzer could not connect to the specified FTP site because it could not find it. This could be due to internet connectivity issues, due to an incorrect port number or due to a mis-spelt name. This message appears when either user name or password are incorrect.
-
Page 104
LogTag Analyzer User Guide (2.0) Field Port Number Security Protocol Firewall/Proxy Settings Retry Maximum Retries Automatic Disconnect if idle Log uploads Log Connection errors Click OK to store the settings or cancel to abort. You can restore default settings by clicking on «Restore defaults». -
Page 105: File And Folder Settings
File and Folder Settings The File and Folder Settings options help you manage the LogTag data files. Display X items in my most recently used list This determines how many of the most recently accessed files are listed in the «File Menu»…
-
Page 106: File Name
LogTag Analyzer User Guide (2.0) File Name Whenever information is retrieved from a LogTag it is always automatically saved to disk. This entry determines the method to be used to create a meaningful name of the file that will contain the data downloaded from the LogTag. The button at the end of the edit control ( how file names are to be created by inserting the appropriate predefined element that matches the information you want to use.
-
Page 107
%DATE-TIME The date and time when the LogTag information was originally retrieved. %FINISH The date and time of the last reading recorded after being started. If the LogTag was not started then this information will be blank. %FINISH-DATE The date of the last reading recorded after being started. If the LogTag was not started then this information will be blank. -
Page 108
LogTag Analyzer User Guide (2.0) the definition of how the file names are to be created they will be replaced with the character. If you use a date and/or a time element, the format of that element will be determined by the settings defined in the options. -
Page 109: Exports And Reports
If you answer «No» then the action described in the option «Always create a unique copy of files (recommended)», previously explained, will be performed. Exports and Reports Every time recorded data is retrieved from a LogTag it is automatically saved to disk in the software’s native format so that it can be opened and viewed at a later date.
-
Page 110
LogTag Analyzer User Guide (2.0) To override and customize the contents of the particular file format, simply ensure the file format is highlighted and click . Once has been clicked, a window will be displayed that will show the available options that can be overridden. The options for the PDF files are more extensive than for other files, please see PDF files on page 52. -
Page 111: Dates And Times
Dates and Times The Date and Time options allow how the date and time information is displayed by the software to be overridden. It does not affect how the date and time information is stored and therefore, how the date and/or time information is shown can be changed at any time.
-
Page 112: Time Zones
LogTag Analyzer User Guide (2.0) Year as last two digits, but with no leading zero for years less than 10. Year as last two digits, but with leading zero for years less than 10. yyyy Year represented by full four digits. To customize how the time information is displayed, the following elements may be used.
-
Page 113: Communication Ports
Configuration Time All reading times are displayed in the time zone of the computer Zone used for configuring the LogTag. UTC/GMT Time Zone All times are displayed in Universal Time Coordinates, or Greenwich Mean Time representation. Display Clock / All times are displayed relative to the clock that is showing on Configuration Time the display.
-
Page 114: User Server
LogTag Analyzer User Guide (2.0) Note: USB ports cannot be disabled; if you do not wish the software to communicate with USB ports you must unplug any interface currently connected. User Server The User Server options define if and where the software should connect to the LogTag User Server software.
-
Page 115: Software Updates
The LogTag Analyzer software can periodically check to determine if a newer version of the program is available for download from the LogTag Recorders website. This section allows the time interval, if enabled, between each check for a newer version to be defined.
-
Page 116: Configuration Reports
LogTag Analyzer User Guide (2.0) Configuration Reports It can sometimes be useful to keep a record of the configuration data of a LogTag Recorder. LogTag Analyzer allows a number of selected configuration data to be stored in a text file. These settings are made in the Configuration Reports window. When the «Log configuration data»…
-
Page 117: Menus And Toolbars
H A P T E R Menus and Toolbars At the top of the screen for the LogTag Analyzer, just below the title bar, which contains the name of the software, is the menu system and toolbar for the software. The toolbar provides quick access to some of the more commonly used functions within the menu system.
-
Page 118: Menu Commands
LogTag Analyzer User Guide (2.0) Menu commands The menu system has been separated into groups of related commands. Each of these menu groups is explained in more depth in the subsequent sections. The software will only display the menu groups and commands within each menu group that are appropriate depending on what you are currently doing with the software.
-
Page 119: File Menu
Chapter 7 Menus and Toolbars File Menu The «File» menu contains commands that generally relate to a LogTag file as a whole. A LogTag file contains a variety of information that relates to a data set representing readings that were recorded over a discrete period of time by a single LogTag. The File menu will appear similar to the following picture.
-
Page 120
LogTag Analyzer User Guide (2.0) Command Open (see «Calling up previous results» on page 79)… ( Close Multi Chart ( Single Chart ( Save ( Save As… Upload ( Print (see «Printing the results» on page 76)… ( Print Preview (see «Print preview toolbar»… -
Page 121
Send on page 77… ( Properties (see «Viewing file properties» on page 84)… Digital Signature (see «Digital signatures» on page 80)… User logon (see «How users log on» on page 135)… ( ) username Logoff user ( (see «How users log on» on page 135) ( ) Change Password (see «How… -
Page 122: Edit Menu
LogTag Analyzer User Guide (2.0) Edit Menu The «Edit» menu contains commands that generally relate to the contents of a LogTag file and will appear similar to the following picture. The following table outlines the commands and the explanation of each command that may appear in the «Edit»…
-
Page 123: Logtag Menu
Next group of Marks ( Options (see «Customizing the software» on page 86)… ( LogTag Menu The «LogTag» menu contains commands that generally relate to the usage and interaction with LogTags. The following table outlines the commands and the explanation of each command that may appear in the «LogTag»…
-
Page 124: Window Menu
LogTag Analyzer User Guide (2.0) Window Menu The «Window» menu contains commands that relate to the management of each Window open within the LogTag Analyzer software that displays the contents of a LogTag file. The following table outlines the commands and the explanation of each command that may appear in the «Window»…
-
Page 125: Help Menu
This will gather non personal information from your system to include in the e-mail to be sent to software support at LogTag Recorders, so that the support team will be informed of the relevant information about your system in order to provide you with quality and useful assistance.
-
Page 126: Toolbar Commands
LogTag Analyzer User Guide (2.0) Check Internet for update «Getting updated software» on page 138)… About LogTag Analyzer (see «Finding your software version» on page 140)… ( Toolbar commands Each picture on the toolbar represents a unique command. The pictures that are included on the toolbar represent the following commands: This will bring up the LogTag Wizard, which will take you through the steps to retrieve readings from connected LogTag(s) and prepare them for their next use.
-
Page 127: Print Preview Toolbar
Zooms out one level of the actively displayed chart. If you are displaying a chart and this function is not available, then all data that is available to be displayed is currently been displayed and therefore there is no more additional information that can be displayed by zooming out.
-
Page 128
LogTag Analyzer User Guide (2.0) following picture. Command Print (see «Printing the results» on page 76)… Next Page Prev Page One Page Two Page Zoom In Zoom Out Close Explanation This will open a window allowing you to print a copy of the LogTag file to an output device, which will typically be a printer. -
Page 129: Standard Window Commands
Chapter 7 Menus and Toolbars Standard Window commands In the top right corner of each window, one or all of the buttons in the following image will be displayed and will (from left to right) minimize the window, maximize the window or close the window.
-
Page 130
LogTag Analyzer User Guide (2.0) The following picture illustrates an example of the menu that will appear if a user selects the icon in the top left corner of a data file window, usually by clicking the left mouse button on it, or by clicking the right mouse button on the title bar (see «Menus and Toolbars»… -
Page 131: Working With Networks
H A P T E R Working with Networks When using and deploying software in a network environment, network administrators often require additional technical information about the software so they can integrate support for it correctly and seamlessly. This chapter briefly covers some points of interest for computer network administrators.
-
Page 132: Distributing Software To Workstations
«setup.exe» is the installation software. As many different installation scripts as are suitable for your situation may be defined and used. LogTag Analyzer software is released on the LogTag Recorders Internet site using a standard filename syntax, which is [software_name][major_version][minor_version]r[release_version].exe. For example, if the file name of the installation package was «logtag_analyzer10r24.exe»…
-
Page 133: Simple Distribution Of Ftp/Smtp Settings
Chapter 8 Working with Networks When installing the software on to a Windows NT operating system, the plug and play ® drivers for the USB Interface Cradle will not be installed as Windows NT does not support ® USB devices. Simple Distribution of FTP/SMTP settings Some users may experience difficulties entering the correct parameters for automated…
-
Page 134: Restricting What Users Can Do
LogTag Analyzer User Guide (2.0) At any stage the settings entered can be saved into a file, and previously created files can be loaded again and changed or saved with a different file name. The file name for this file can be selected freely by the Network Administrator. To make use of the automated transfer settings, however, the file must be named «UploadSettings.dat».
-
Page 135: How Users Log On
To provide administrators of systems with a central point of control, LogTag Recorders has developed a software package called «LogTag User Server», which when used in conjunction with this software, it will provide an administrator with the ability to choose whether or not to restrict what users can and cannot do with this software.
-
Page 136: How Users Change Their Password
LogTag Analyzer User Guide (2.0) How users change their password When the software has been be connected to the LogTag User Server network administrator may require and/or permit users to change the password used to logon to the software. Users are only permitted to change the password for the user account that is currently logged on, which is typically their own, and as a security precaution, users will always need to supply their current logon password before being permitted to change it.
-
Page 137: Getting More Information
H A P T E R Getting more information In This Chapter Getting updated software … 138 Finding your software version … 140 Getting more help … 141…
-
Page 138: Getting Updated Software
Visit the LogTag Recorders Internet Site, www.logtagrecorders.com, and follow the relevant instructions to obtain a copy of the software. The first option will download from the LogTag Recorders Internet site the relevant information about the latest version of the software available and compare this information with the software that has already been installed.
-
Page 139
Chapter 9 Getting more information While the software is retrieving the information from the Internet about the latest available version, the software will display its progress in a window similar to the following picture. If a newer version of LogTag Analyzer is available a «Download» button will appear. Clicking «Download»… -
Page 140: Finding Your Software Version
LogTag Analyzer User Guide (2.0) Finding your software version Within the «Help (see «Help Menu» on page 125)» menu, is the «About LogTag Analyzer…» command, which will display a Window similar to the following picture. Within this window, amongst other information, the full version number of the software being used is displayed.
-
Page 141: Getting More Help
This command will gather non personal information from your system to include in the e-mail, which you can review if you want to, so that LogTag Recorders will be informed of the relevant information about your system in order to provide you with quality and useful assistance.
-
Page 142: Appendix
H A P T E R Appendix In This Chapter Troubleshooting … 143 Finding your computer specifications … 144 Resolving USB Driver Problems … 151 Sensor Responsiveness … 169…
-
Page 143: Troubleshooting
Troubleshooting Problem My LogTag appears to be “dead”. No lights are flashing. I am unable to get a serial port “free”. Every time I run the software, every port shows that is already in use What happens if there is an electrical current between the contacts…will that damage the LogTag? Chapter 10…
-
Page 144: Finding Your Computer Specifications
LogTag Analyzer User Guide (2.0) I cannot view the user guide that came with the software. I cannot see all the readings in the «data» screen, some appear to be missing. Why are some of the readings shown «non validated». If above suggestions are insufficient, please check the website at www.logtagrecorders.com for more information, specifically the FAQ section.
-
Page 145
Chapter 10 Appendix b) Once the «Start» button has been clicked, you will see a menu appear. c) If your menu looks similar to the following picture, click on the visible «Control Panel» item. -
Page 146
LogTag Analyzer User Guide (2.0) d) If your menu looks similar to the following picture, the «Control Panel» item is located within the «Settings» menu item. e) Within the «Control Panel» window there is a «System» icon. For Windows XP users, you may need to «Switch to Classic View»… -
Page 147
f) Clicking on the «General» tab at the top of the «System Properties» window, which is usually the default, will display the relevant information for you about your system. To determine your screen resolution and colors: a) Open the «Control Panel» as explained in step 1. b) Open the «Display»… -
Page 148
LogTag Analyzer User Guide (2.0) d) From the «Settings» portion of the «Display Properties» window you will see your current screen settings and you may also be able to change some of your display settings if you want. To determine your spare hard disk drive space: Open «My Computer»… -
Page 149
Chapter 10 Appendix b) Using your mouse, click the button on the right over the drive that includes «(C:)» in its description. c) Select «Properties» (left mouse click) from the popup menu that will appear. -
Page 150
LogTag Analyzer User Guide (2.0) d) Clicking on the «General» tab at the top of the drive properties window will display the relevant information for you about your hard drive. e) If you have multiple (hard disk) drives installed on your computer you can repeat steps (b) through to (d) for each drive to get the same type of information. -
Page 151: Resolving Usb Driver Problems
Chapter 10 Appendix Resolving USB Driver Problems Every USB device requires the appropriate driver files to be installed prior to them being successfully used on a computer. The installation process of the LogTag Analyzer software will attempt to ensure the appropriate driver files are installed on the computer. The USB drivers included in the LogTag Analyzer installation program are Microsoft WHQL certified.
-
Page 152
LogTag Analyzer User Guide (2.0) Providing the LogTag Analyzer software has been already installed, connect the USB Interface Cradle to the computer by plugging the Interface into an available USB socket. USB sockets are typically located at the rear of the computer. Open the «Control Panel». -
Page 153
If your menu looks similar to the following picture, the «Control Panel» item is located within the «Settings» menu item. Within the «Control Panel» window there is a «System» icon. For Windows XP users, you may need to «Switch to Classic View» to locate the «System» icon quickly. Start (open) the «System»… -
Page 154
LogTag Analyzer User Guide (2.0) If your system properties looks similar to the following picture, click the «Hardware» tab followed by the «Device Manager» button to open a view of the devices that have and have not been successfully installed on the computer. -
Page 155
Chapter 10 Appendix If you system properties looks similar to the following picture, click the «Device Manager» tab to view the devices that have and have not been successfully installed on the computer. -
Page 156
LogTag Analyzer User Guide (2.0) Once the device manager is open you should see one of the three following images in the list, as indicated in the following picture. You may need to click on the «+» beside the «Universal Serial Bus controllers» entry to view all the USB devices that have been installed on the computer. -
Page 157: Usb Driver Installation Through Software Installation
For each «USB Interface» entry displayed, using the mouse (pointing device), click the right button on the text of the «USB Interface» entry to display the popup context menu, which will be similar to the following picture. Once this pop context menu is visible, select the «Uninstall»…
-
Page 158
LogTag Analyzer User Guide (2.0) Within the «Control Panel» window there is an icon which allows you to un-install or change already installed programs: — In Windows 2000 this is called «Add/Remove Programs» and looks like this: — In Windows XP it is called «Add or Remove Programs» and looks like this: — In Windows VISTA it is called «Programs and Features»… -
Page 159: Manual Usb Driver Installation On Windows Xp
Chapter 10 Appendix Manual USB driver installation on Windows XP To manually update the USB driver files, for Windows XP computers, open the «Device Manager». The «Device Manager» can be started by opening the «System» icon, located in the Windows «Control Panel», selecting the «Hardware» tab in the «System Properties» window and then click the «Device Manager»…
-
Page 160
«Next >» button to continue. When prompted for the location of the driver files, enter the location of the installation of the software followed by the path to the USB driver files. The default location for these driver files is «C:Program FilesLogTag RecordersLogTag… -
Page 161
Chapter 10 Appendix AnalyzerDriversi386″ («C:Program FilesLogTag RecordersLogTag AnalyzerDriversamd64» for 64-bit Windows systems). You may use the «Browse…» button in the window that appears, similar to the following picture to help you locate the appropriate folder. -
Page 162
LogTag Analyzer User Guide (2.0) Once the driver files have been installed successfully you will see a window similar to the following picture. You may now connect and start using your USB Interface Cradle(s). -
Page 163: Manual Usb Driver Installation On Windows 2000
Chapter 10 Appendix Manual USB driver installation on Windows 2000 To manually reinstall the USB driver files, for Windows 2000 computers, open the «Device Manager». The «Device Manager» can be started by opening the «System» icon, located in the Windows «Control Panel», selecting the «Hardware» tab in the «System Properties» window and then click the «Device Manager»…
-
Page 164
LogTag Analyzer User Guide (2.0) Using the mouse (pointing device), click the right button to display the popup context menu, which will be similar to the following picture. Select the «Properties…» option, using the left button on the mouse. From the «USB Interface Properties» window that will appear, similar to the following picture, click the «Reinstall Driver…»… -
Page 165
The will device driver wizard will appear similar to the following picture, click the «Next >» button to continue. Ensure the «Search for a suitable driver for my device (recommended)» option is selected and click the «Next >» button to continue. Chapter 10 Appendix… -
Page 166
When prompted for the location of the driver files, enter the location of the installation of the software followed by the path to the USB driver files. The default location for these driver files is «C:Program FilesLogTag RecordersLogTag AnalyzerDriversi386». You may use the «Browse…» button in the window that… -
Page 167
Chapter 10 Appendix If you have chosen the correct folder that contains the driver files for the USB Interface Cradle, you will see a window similar to the following picture. Click the «Next >» button to install the driver files. -
Page 168
LogTag Analyzer User Guide (2.0) Once the driver files have been installed successfully you will see a window similar to the following picture. You may now connect and start using your USB Interface Cradle(s). -
Page 169: Sensor Responsiveness
Chapter 10 Appendix Sensor Responsiveness Temperature sensors typically respond to changes in the environment temperature in a logarithmic way and as such you will find that the responsiveness of temperature sensors (how quickly a sensor responds to an environmental temperature change) is expressed in terms of T90.
-
Page 171: Index
Index Advanced Alert Settings • 37, 40 Advanced FTP settings • 102, 103 Advanced SMTP settings • 98, 99 Alert Processing • 25, 34, 38 Aligning Charts • 67, 70 Appendix • 142 Automatic e-mailing and uploading to FTP sites • 78, 93, 120, 126, 133 Automatically calculated statistics •…
-
Page 172
Index Inspecting the information at close range • Installing the software • 7 Introduction • 6 Language • 87 Locate LogTag(s) download and save relevant data • 18 LogTag light patterns • 24 LogTag Menu • 123 Manual scaling of the chart • 58 Manual USB driver installation on Windows 2000 •…
This manual is also suitable for:
Analyzer
Установите прилагаемое программное обеспечение LogTag Analyzer
Подключите электронный термоиндикатор LogTag через USB-интерфейс к компьютеру.
После подключения термоиндикатора появится окно программирования,где вы можете задать параметры:
— границы температурного режима
— частоту измерения
— количество измерений
— другие параметры
После окончания мониторинга термоиндикатор вновь подключается к программе LogTag Analyzer для получения временного графика, файла отчета, сводной таблицы
Подробная инструкция по работе с программой LogTag Analyzer прилагается вместе с термоиндикаторами Logtag.
Программа LogTag Analyzer
LogTag® Analyzer 3 Download Page
Скачать программу LogTag Analyzer на русском языке

Назначение:
Электронный регистрирующий термоиндикатор «ТИКТ» однократного применения предназначен для визуального контроля соблюдения температурного режима при транспортировке и хранении термолабильной продукции.
Использование специального интерфейса «ЛТИ/USB» для ТИКТ позволяет выгружать результаты мониторинга температуры в компьютер, представлять полученные данные в виде гистограмм и обобщеных таблиц за каждые сутки мониторинга, экспортировать их в другие приложения, например, PDF и Excel.
Соответствует требованиям санитарно-эпидемиологических правил СП 3.3686-21 «САНИТАРНО-ЭПИДЕМИОЛОГИЧЕСКИЕ ТРЕБОВАНИЯ ПО ПРОФИЛАКТИКЕ ИНФЕКЦИОННЫХ БОЛЕЗНЕЙ».
Термоиндикаторы зарегистрированы в Росздравнадзоре РФ в качестве медицинских изделий, сертифицированы по системе ГОСТ-Р, поставляются с сертификатом точности от производителя (по международной системе NIST/ILAC).
Свидетельство об утверждении типа средств измерений NZ.C.32.004.A № 67 989, регистрационный номер 69350-17.
Применение
Электронный термоиндикатор «ТИКТ» применяется на всех уровнях «холодовой цепи» при транспортировке и краткосрочном хранении:
- термолабильных лекарственных средств (вакцин, МИБП, иммуноглобулинов, гормональных препаратов и т.п.);
- медицинских диагностических наборов;
- растворов для офтальмологии;
- донорской крови и ее компонентов;
- органов и тканей для трансплантации;
- скоропортящихся продуктов питания;
- электроники и ее компонентов;
- продуктов химической промышленности.
Принцип действия:
Электронный термоиндикатор «ТИКТ» содержит внутренний датчик измерения температуры, вмонтированный в корпус и защищенный от физического воздействия, который позволяет быстро реагировать на изменения температуры окружающей среды.
«ТИКТ» осуществляет мониторинг по 4-м пороговым значениям температуры, установленным на заводе-изготовителе. Символ «OK» (Норма) показывает, что контролируемые условия находились в допустимых пределах. Если в период хранения или транспортировки температура поднималась выше двух верхних порогов или опускалась ниже двух нижних пределов, на ЖК-дисплее появится символ «X» (Тревога), предупреждающий о необходимости проверки годности сопровождаемой продукции.
Основные особенности:
- Индикатор «Х»/ТРЕВОГА – отображается на ЖК-дисплее, если температура вышла за пределы любого из 4-х установленных пороговых значений (2-х верхних порогов — НТ1, НТ2 и 2-х нижних порогов — LТ1, LТ2).
- Индикатор «OK»/НОРМА – отображается на ЖК-дисплее, если температура не выходила за пределы установленных пороговых значений.
- Кнопка START/СТАРТ – запускает и останавливает мониторинг температурного режима.
- Быстрая выгрузка результатов мониторинга на ПК – занимает всего несколько секунд.
- Предварительное программирование на заводе-изготовителе по требованию заказчика – возможна гибкая настройка параметров работы термоиндикатора, таких как: 4 порога температурного режима (2 верхних и 2 нижних), время начала старта (отложенный старт), интервал считывания данных (частота измерений от 1 минуты до нескольких часов), настройка условий активации индикатора «Х» /ТРЕВОГА по однократному, непрерывному или суммарному воздействию температур, выходящих за установленные пределы отдельно для каждого порога, других параметров.
- Корпус размером с ½ кредитной карты – толщина корпуса позволяет отправлять термоиндикатор заказным письмом.
- Часы реального времени – позволяют вести запись температуры и времени синхронно.
- Удобное использование – бесплатное программное обеспечение «ЛогТэг Анализатор» совместимо с любым персональным компьютером и позволяет обрабатывать данные термоиндикатора для вывода гистограмм и обобщеных таблиц за каждые сутки мониторинга, а также экспортировать данные в другие приложения, например, PDF и Excel.
- Высокая надежность и точность.
- Индивидуальный неповторяющийся номер – нанесен на корпус устройства и прошит в памяти микросхемы, что исклюет возможность подмены; номер продублирован штрих-кодом.
- Высокая эффективность и экономичность – прекрасная альтернатива термохимических индикаторов!
Модификация:
Профили настройки создаются по требованию Заказчика.
Профиль стандартный, МИБП:
- температурные пороги и условия срабатывания сигнала «ТРЕВОГА»:
Тревога № 1 — НТ1 >+20°C — суммарно, нарушение длительностью 20 часов;
Тревога № 2 — НТ2 >+8°C — суммарно, нарушение длительностью 48 часов;
Тревога № 3 — LТ1 < +2°C — суммарно, нарушение длительностью 12 часов;
Тревога № 4 — LТ2 < -0,5°C — непрерывно, нарушение длительностью 60 минут. - отложенный старт – 60 минут;
- частота считываний – 1 минута;
- срок мониторинга – до 45 суток;
Технические характеристики:
|
Срок мониторинга после «запуска» |
до 45 суток (4 порога), до 3-х лет (2 порога) |
| Срок хранения информации и возможность считывания после остановки | не менее 6 месяцев |
| Срок хранения термоиндикатора до «запуска» | не более 18 месяцев |
| Диапазон измеряемых температур, °C | от -25°C до +60°C |
| Точность измерений, °C | ≤ ±0,5 |
| Частота (интервал) измерений | от 1 до 15 минут, стандартный профиль — 1 минута |
| Отложенный старт | есть, программируется на заводе-изготовителе, стандартный профиль — 60 минут |
| Пороговые значения |
Стандартный профиль МИБП: |
| Отображение на дисплее | факт нарушения любого из 4-х установленных пороговых значений: 2-х верхних порогов — НТ1, НТ2 и 2-х нижних порогов — LТ1, LТ2 |
| Возможность перезапуска | нет |
| Батарея | 3V литиево-марганцевая |
| Размер дисплея (ДхШ), мм | 14х10 |
| Размер габаритный (ДхШхТ), мм | 71,5×33,0×8,6 |
| Материал | поликарбонат |
| Масса, гр. | 19 |
Расчет количества:
Для контроля соблюдения температурного режима в термоконтейнере или в камере бытового холодильника, как правило, достаточно одного термоиндикатора.
Для контроля крупной холодильной комнаты или рефрижератора целесообразна установка нескольких индикаторов в местах, с которыми связаны риски локального повышения температуры, например, у входных дверей и внешних стен.
Документация
Для просмотра PDF файлов необходима программа Adobe Reader
Другие электронные термоидикаторы / регистраторы:
")
LogTag® TIC20 (ЛогТэг ТИК20)
Разработка: Новая Зеландия
Однократно используемый электронный регистрирующий термоиндикатор со встроенным ЖК-дисплеем, регистрирует изменение температуры по 4-м пороговым значениям в диапазоне от -30°C до +60°C, за период времени до 20 суток с момента активации. Электронный журнал. Индикация сводного отчета на дисплее за последние 20 суток. Применяется для мониторинга температурного режима при транспортировке и кратковременном хранении термолабильной продукции.
")
LogTag® TRID30-7F (ЛогТэг ТРИД30-7Ф)
Разработка: Новая Зеландия
Электронный термоиндикатор регистрирующий со встроенным ЖК-дисплеем для многократного мониторинга температурного режима. Позволяет сохранять в памяти до 7770 значений температуры в диапазоне от -30°C до +60°C. Электронный журнал. Индикация сводного отчета на дисплее за последние 30 суток. Срок службы – не менее 2 лет. Применяется для контроля температурного режима в холодильниках и специально оборудованных холодильных комнатах.
")
LogTag® TRIХ-8 (ЛогТэг ТРИКС-8)
Разработка: Новая Зеландия
Электронный термоиндикатор регистрирующий для многократного мониторинга температурного режима. Позволяет сохранять в памяти до 8000 значений температуры в диапазоне от -40°C до +85°C. Срок службы – не менее 2 лет. Применяется для контроля температурного режима при хранении и транспортировке термолабильной продукции на всех уровнях «холодовой цепи».
")
LogTag® TRIL-8 (ЛогТэг ТРИЛ-8)
Разработка: Новая Зеландия
Низкотемпературный электронный термоиндикатор регистрирующий для мониторинга температурного режима до -80°С. Позволяет сохранять в памяти до 8000 значений температуры в диапазоне от -80°C до +40°C. Продолжительность работы при температуре -80°С до 1000 часов. Применяется для контроля температурного режима при хранении и транспортировке продуктов «глубокой заморозки» с использованием «сухого льда».
")
LogTag® HAXO-8 (ЛогТэг ХАКСО-8)
Разработка: Новая Зеландия
Электронный регистрирующий индикатор с функцией гигрометра (термогигрометр) для многократного мониторинга температуры и влажности. Позволяет сохранять в памяти до 8000 пар значений, синхронизированных по времени и выполненных с высоким разрешением в диапазонах от 0 до 100% RH и от -40°C до +85°C. Срок службы – не менее 2 лет. Применяется для контроля при хранении и транспортировке термолабильной продукции, чувствительной к влажности.
")
LogTag® INTERFACE LTI/USB (ЛогТэг интерфейс ЛТИ/USB)
Разработка: Новая Зеландия
Уникальный интерфейс для обмена данными между термоиндикаторами «ЛогТэг» и программным обеспечением «ЛогТэг Анализатор» на ПК. Позволяет программировать режим работы термоиндикаторов, обрабатывать и представлять полученные данные в виде графиков и таблиц, экспортировать их в другие приложения, например, PDF и Excel.
")
LogTag Analyzer (ЛогТэг Анализатор)
Разработка: Новая Зеландия
Уникальное программное обеспечение на русском языке для программирования термоиндикаторов «ЛогТэг», анализа статистики мониторинга температурного режима, экспорта полученных данных на персональный компьютер. Используется с интерфейсом «ЛТИ/USB».
Возможно, вас заинтересует:

КТМ-4-1
Разработка: Россия
Многоразовый термоконтейнер-сумка медицинского назначения с охлаждающими элементами, 410х290х260 мм. Предназначен для временного хранения и транспортирования медицинских иммунобиологических препаратов и других биологических материалов с температурным диапазоном хранения +2°С +8°С.

КТМ-5-1 ![]()
Разработка: Россия
Термоконтейнер многоразовый медицинского назначения с охлаждающими элементами МХ-0.35. Габаритные размеры термоконтейнера 430х375х340 мм. Контейнер предназначен для временного хранения и транспортирования медицинских иммунобиологических препаратов и других биологических материалов в требуемом диапазоне температур +2°С +8°С.

КТМ-30-1
Разработка: Россия
Многоразовый термоконтейнер медицинского назначения с охлаждающими элементами, 600х500х500 мм. Предназначен для временного хранения и транспортирования медицинских иммунобиологических препаратов и других биологических материалов, а также продуктов питания, имеющих собственную индивидуальную или групповую упаковку с температурным диапазоном хранения +2°С +8°С.

КТМ-60-2
Разработка: Россия
Многоразовый термоконтейнер медицинского назначения с охлаждающими элементами, 775х635х505 мм. Предназначен для временного хранения и транспортирования медицинских иммунобиологических препаратов и других биологических материалов, а также продуктов питания, имеющих собственную индивидуальную или групповую упаковку с температурным диапазоном хранения +2°С +8°С.

КТМ-300-П
Разработка: Россия
Одноразовый палетный термоконтейнер медицинского назначения с охлаждающими элементами, 1200х800х950 мм. Предназначен для временного хранения и транспортирования медицинских иммунобиологических препаратов и других биологических материалов, а также продуктов питания, имеющих собственную индивидуальную илигрупповую упаковку с температурным диапазоном хранения +2°С +8°С.

Хладоэлемент МХ-0,35
Разработка: Россия
Служат для поддержания заданного температурного режима внутри термоконтейнеров КТМ-4-1, КТМ-30-1, КТМ-60-2, КТМ-300-П, КТМ-300-Склад.
")
WarmMark™ Duo (ВомМарк Дуо)
Разработка: США
Одноразовый индикатор, регистрирует общее время воздействия температуры превышающей норму до 336 часов, температура срабатывания +10 / +34°С. Применяется в холодильниках и холодильных камерах, при транспортировке и хранении термолабильной продукции в термоконтейнерах.
")
ColdMark® (КолдМарк)
Разработка: США
Одноразовый индикатор понижения температуры ниже
-3, 0, +2, +5°С. Применяется в холодильниках и холодильных камерах, при транспортировке и хранении термолабильной продукции в термоконтейнерах.
| Тип | термоиндикатор регистрирующий с ЖК-дисплеем, однократного запуска |
| Ресурс работы термоиндикатора, обусловленный ресурсом батареи, не менее | до 45 суток — режим мониторинга, 6 месяцев — режим сохранения в памяти результатов мониторинга |
| Объем памяти | статистика за 45 суток, мин/макс значения температуры / номер суток и продолжительность воздействия запредельных температур за сутки. |
| Диапазон измеряемых температур, °C | от -25°C до +60°C |
| Погрешность измерений, °C | ˂ ±0.5 от -20°C до +25°C, ˂ ±0.7 от -25°C до -20°C ˂ ±1.0 от +25°C до +60°C |
| Число пороговых значений | 4 (2-х верхних порога — НТ1, НТ2 и 2-х нижних порога — LТ1, LТ2), возможна настройка с использованием не всех порогов |
| Пороговые значения, °C | программируются на заводе изготовителе, либо дистрибьютором от -25 до +60, стандарт: +20, +8, +2, -0,5 |
| Частота (интервал) измерений | от 1 до 15 минут, стандарт 1 минута |
| Рабочий цикл при частоте (интервале) измерений | 45 суток |
| Функция отложенного старта | от 0 до 99 минут, стандарт 30 минут |
| Батарея | 3V литиевая |
| Климатическое исполнение | IP64 |
| Материал корпуса | поликарбонат |
| Размер габаритный (ВхШхТ), мм | 71,5×33,0×8,6 |
| Размер дисплея (ВхШхТ), мм | 14х10 |
| Масса, не более, гр. | 19 |
Показать все параметры »
Купить «Термоиндикатор регистрирующий ЛогТэг ТИКТ (LogTag TICT), с поверкой»
Заказ
от 1 шт. — 1012 руб.; от 100 шт. — 989 руб.; от 500 шт. — 940 руб.; от 1000 шт. — специальная цена;
__________________________________
Цены указаны без учета НДС 20% для стандартного профиля настройки.
Минимальная сумма заказа по всему ассортименту — 3000 руб.
![]() Регистрационное удостоверение_ЖК.pdf
Регистрационное удостоверение_ЖК.pdf
![]() ТИКТ_инструкция по запуску.pdf
ТИКТ_инструкция по запуску.pdf
![]() Декларация ЕАЭС.pdf
Декларация ЕАЭС.pdf
![]() Сертификат УТСИ.pdf
Сертификат УТСИ.pdf
Назначение:
Термоиндикатор регистрирующий «ТИКТ» (измеритель-регистратор температуры) предназначен для визуального контроля температурного режима при хранении и транспортировке термолабильной продукции.
Использование специального интерфейса «ЛТИ/USB 2» позволяет получать данные в виде графических гистограмм и суммарных таблиц, экспортировать их в другие приложения, например, PDF и Excel.
Соответствует требованиям санитарно-эпидемиологических правил СП 3.3686-21 «САНИТАРНО-ЭПИДЕМИОЛОГИЧЕСКИЕ ТРЕБОВАНИЯ ПО ПРОФИЛАКТИКЕ ИНФЕКЦИОННЫХ БОЛЕЗНЕЙ».
Соответствует требованиям санитарно-эпидемиологических правил СП 3.1.3271-21 «УСЛОВИЯ ТРАНСПОРТИРОВАНИЯ И ХРАНЕНИЯ ЗАМОРОЖЕННЫХ ИММУНОБИОЛОГИЧЕСКИХ ЛЕКАРСТВЕННЫХ ПРЕПАРАТОВ ДЛЯ ПРОФИЛАКТИКИ НОВОЙ КОРОНАВИРУСНОЙ ИНФЕКЦИИ (COVID-19)»
Термоиндикаторы «ЛогТэг ТИКТ» сертифицированы по системе ГОСТ-Р, поставляются с сертификатом точности от производителя (по международной системе NIST/ILAC) и с первичной поверкой.
Применение:
Рекомендуется к применению на всех уровнях «холодовой цепи» при транспортировке и хранении:
— термолабильных лекарственных средств (вакцин, МИБП, иммуноглобулинов, гормональных препаратов и т.п.);
— медицинских диагностических наборов;
— растворов для офтальмологии;
— донорской крови и ее компонентов;
— органов и тканей для трансплантации;
— скоропортящихся продуктов питания;
— электроники и ее компонентов;
— продуктов химической промышленности.
Принцип действия:
Электронный термоиндикатор «ТИКТ» со встроенным ЖК-дисплеем содержит внутренний датчик измерения температуры, вмонтированный в корпус и защищенный от физического воздействия, который позволяет быстро реагировать на изменения температуры окружающей среды, что присуще выносным (внешним) датчикам.
«ТИКТ» осуществляет мониторинг температуры по 4-м пороговым значениям температуры, установленным на заводе-изготовителе. Символ «V» (Норма) показывает, что контролируемые условия находились в допустимых пределах. Если в период хранения или транспортировки был нарушен хотя бы один из установленных порогов температуры на ЖК-дисплее появится символ «X» (Тревога) и номер нарушенного порога.
Особенности:
— Символ «X» (Тревога) отображается на ЖК-дисплее, если температура вышла за пределы любого из 4-х установленных пороговых значений.
— Символ «V» (Норма) отображается на ЖК-дисплее, если температура не выходила за пределы установленных пороговых значений.
— Кнопка СТАРТ/СТОП запускает и останавливает мониторинг температурного режима.
— Корпус размером с 1/2 кредитной карты.
— Удобное программное обеспечение «ЛогТэг Анализатор» на русском языке для загрузки и анализа результатов мониторинга на ПК.
— Специальная сопроводительная контрольная карточка индикатора (ККИ).
Преимущества:
— Контроль температуры по 4-ем установленным пороговым значениям (2 порога на повышение и 2 порога на понижение).
— Экономичность и эффективность решения.
— Возможность гибкой настройки параметров работы термоиндикатора на заводе изготовителе, либо у дистрибьютора.
— Индивидуальный неповторяющийся номер на корпусе устройства прошит в памяти микросхемы.
— Высокая надежность и точность.
Модификации:
Профили настройки создаются по требованию Заказчика.
Профиль стандартный, ИЛП (МИБП):
температурные пороги и условия срабатывания сигнала «ТРЕВОГА»:
— Тревога № 1 — НТ1 >+20°C — суммарно, нарушение длительностью 20 часов;
— Тревога № 2 — НТ2 >+8°C — суммарно, нарушение длительностью 48 часов;
— Тревога № 3 — LТ1 < +2°C — суммарно, нарушение длительностью 12 часов;
— Тревога № 4 — LТ2 < -0,5°C — непрерывно, нарушение длительностью 60 минут.
— отложенный старт – 60 минут;
— частота считываний – 1 минута;
— срок мониторинга – до 45 суток;
ВОЗМОЖНА ИНДИВИДУАЛЬНАЯ НАСТРОЙКА ПО ТРЕБОВАНИЮ ЗАКАЗЧИКА!
|
|||||||||||||||||||||||||||||||||||

|

|
||||||||||||||||||||||||||||||||||
|
|||||||||||||||||||||||||||||||||||
Видеоинструкция «Как программировать термоиндикаторы LogTag»
|
|||||||||||||||||||||||||||||||||||
|

Описание
Описание термоиндикатора ЛогТэг ЮТРИД-16:
Термоиндикатор регистрирующий «ТРИД30-7Р» предназначен для визуального контроля температурного режима при хранении и транспортировке термолабильной продукции.
Использование специального интерфейса USB позволяет программировать режим работы термоиндикатора, обрабатывать и представлять полученные данные в виде графиков и таблиц, экспортировать их в другие приложения, например, PDF и Excel.
Рекомендуется к применению для контроля температуры при хранении вакцин и иммуноглобулинов, термолабильных лекарственных средств и препаратов крови в медицинских холодильниках, холодильных камерах, переносных термоконтейнерах в лечебно-профилактических учреждениях и аптечных сетях на IV уровне «холодовой цепи».
Отличительные особенности :
- Заменяемая батарея.
- Ежедневная индикация на дисплее сигнала тревоги за последние 30 суток.
- Возможность запуска термоиндикатора по кнопке СТАРТ или по дате/времени.
- Возможность просмотра статистики мониторинга на дисплее за последние 30 суток.
- Корпус размером с кредитную карту.
- Часы реального времени.
- Удобное программное обеспечение «ЛогТэг Анализатор» на русском языке для загрузки и анализа результатов мониторинга на ПК.
- Удобная индивидуальная упаковка с инструкцией на русском языке.
Принцип действия:
Электронный термоиндикатор «ТРИД30-7Р» со встроенным ЖК-дисплеем содержит внутренний датчик измерения температуры, вмонтированный в корпус и защищенный от физического воздействия, который позволяет быстро реагировать на изменения температуры окружающей среды, что присуще выносным (внешним) датчикам. Термоиндикатор позволяет считывать результаты мониторинга температуры непосредственно с дисплея, не прибегая к помощи ПК и интерфейса «ЛТИ/USB».
Преимущества:
- Многократное использование.
- Гибкая пользовательская настройка параметров работы термоиндикатора.
- Возможность установки инспекционной метки для контроля работы персонала.
- Индивидуальный неповторяющийся номер на корпусе устройства прошит в памяти микросхемы.
- Высокая надежность и точность.
- Высокая эффективность и экономичность.
Технические характеристики термоиндикатора:
| Параметр | Значения |
|---|---|
| Тип | термоиндикатор регистрирующий с ЖК-дисплеем («электронный журнал») и заменяемой батареей, многократного использования |
| Ресурс работы термоиндикатора, обусловленный ресурсом батареи, не менее | не менее 12 месяцев |
| Объем памяти | 7770 записей |
| Диапазон измеряемых температур, °C | от -30 до +60 |
| Погрешность измерений, °C | ˂ ±0.5 от -20 до +40 (типично ˂ ±0.3), ˂ ±0.8 при другой температуре (типично ˂ ±0.5) |
| Число пороговых значений | 2 |
| Пороговые значения, °C | программируются пользователем в диапазоне от -30 до +60, стандарт +2 … +8 |
| Частота (интервал) измерений | от 30 сек. до 18 часов, программируются пользователем, стандарт 1 минута |
| Рабочий цикл при частоте (интервале) измерений | сводный отчет всегда за 30 суток. Графики и таблицы — 5 суток / с интервалом измерений 1 мин. (стандарт), 10 суток / 2 мин., 30 суток / 6 мин., 53 суток / 10 мин., 80 суток / 15 мин. |
| Функция отложенного старта | от 0 до 255 минут, стандарт 20 минут |
| Батарея | 3V литиево-марганцевая |
| Климатическое исполнение | IP65 |
| Материал корпуса | поликарбонат |
| Размер габаритный (ВхШхТ), мм | 93×54,5×8,6 |
| Размер дисплея (ВхШхТ), мм | 36х24 |
| Масса, не более, гр. | 41 |
Программное обеспечение для термоиндикатов «ЛогТэг» и интерфейса «ЛТИ/USB». Версия 2.9r9
Регистрационное удостоверение ФCЗ 2012/11810 / ФCЗ 2012/11812
Разработка: Новая Зеландия
ЛогТэг Analyzer 2LTA 2 был заменен недавно выпущенным LTA 3, но пока будет сохранен для существующих пользователей во время перехода, до конца 2020 года
Релиз 2.9.10 от 20.05.2020 |
ЛогТэг Analyzer 2 для Windows XP SP3LTA 2 релиз 2.8.6 был добавлен на сайт в связи с обращениями клиентов для установки на компьютеры с операционной системой Windows XP SP3
Релиз 2.8.6 для Windows XP SP3 |
ЛогТэг Analyzer 3Это новое и улучшенное сопутствующее программное обеспечение, рекомендованное всем владельцам устройств ЛогТэг.
Релиз 3.2.2 от 21.12.2022 |
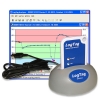
Программное обеспечение «ЛогТэг Анализатор» (LogTag Analyzer) на русском языке.
ПО предназначено для программирования режимов работы термоиндикаторв «ЛогТэг», просмотра, анализа и экспорта полученных данных на персональный компьютер через специальный интерфейс «ЛТИ/USB».
Скачать программоное обеспечение «ЛогТэг Анализатор» (LogTag Analyzer 2.9r9) можно здесь…
Документация
Для просмотра PDF файлов необходима программа Adobe Reader
Другие электронные термоидикаторы / регистраторы:
LogTag® TRID30-7F (ЛогТэг ТРИД30-7Ф)
Разработка: Новая Зеландия
Электронный термоиндикатор регистрирующий со встроенным ЖК-дисплеем для многократного мониторинга температурного режима. Позволяет сохранять в памяти до 7770 значений температуры в диапазоне от -30°C до +60°C. Электронный журнал. Индикация сводного отчета на дисплее за последние 30 суток. Срок службы – не менее 2 лет. Применяется для контроля температурного режима в холодильниках и специально оборудованных холодильных комнатах.
LogTag® TRIХ-8 (ЛогТэг ТРИКС-8)
Разработка: Новая Зеландия
Электронный термоиндикатор регистрирующий для многократного мониторинга температурного режима. Позволяет сохранять в памяти до 8000 значений температуры в диапазоне от -40°C до +85°C. Срок службы – не менее 2 лет. Применяется для контроля температурного режима при хранении и транспортировке термолабильной продукции на всех уровнях «холодовой цепи».
")
LogTag® TRIХ-16 (ЛогТэг ТРИКС-16)
Разработка: Новая Зеландия
Электронный термоиндикатор регистрирующий для многократного мониторинга температурного режима. Позволяет сохранять в памяти до 16000 значений температуры в диапазоне от -40°C до +85°C. Срок службы – не менее 2 лет. Применяется для контроля температурного режима при хранении и транспортировке термолабильной продукции на всех уровнях «холодовой цепи».
LogTag® TRIL-8 (ЛогТэг ТРИЛ-8)
Разработка: Новая Зеландия
Низкотемпературный электронный термоиндикатор регистрирующий для мониторинга температурного режима до -80°С. Позволяет сохранять в памяти до 8000 значений температуры в диапазоне от -80°C до +40°C. Продолжительность работы при температуре -80°С до 1000 часов. Применяется для контроля температурного режима при хранении и транспортировке продуктов «глубокой заморозки» с использованием «сухого льда».
LogTag® HAXO-8 (ЛогТэг ХАКСО-8)
Разработка: Новая Зеландия
Электронный регистрирующий индикатор с функцией гигрометра (термогигрометр) для многократного мониторинга температуры и влажности. Позволяет сохранять в памяти до 8000 пар значений, синхронизированных по времени и выполненных с высоким разрешением в диапазонах от 0 до 100% RH и от -40°C до +85°C. Срок службы – не менее 2 лет. Применяется для контроля при хранении и транспортировке термолабильной продукции, чувствительной к влажности.
LogTag® INTERFACE LTI/USB (ЛогТэг интерфейс ЛТИ/USB)
Разработка: Новая Зеландия
Уникальный интерфейс для обмена данными между термоиндикаторами «ЛогТэг» и программным обеспечением «ЛогТэг Анализатор» на ПК. Позволяет программировать режим работы термоиндикаторов, обрабатывать и представлять полученные данные в виде графиков и таблиц, экспортировать их в другие приложения, например, PDF и Excel.
Возможно, вас заинтересует:
КТМ-4-1
Разработка: Россия
Многоразовый термоконтейнер-сумка медицинского назначения с охлаждающими элементами, 410х290х260 мм. Предназначен для временного хранения и транспортирования медицинских иммунобиологических препаратов и других биологических материалов с температурным диапазоном хранения +2°С +8°С.
КТМ-30-1
Разработка: Россия
Многоразовый термоконтейнер медицинского назначения с охлаждающими элементами, 600х500х500 мм. Предназначен для временного хранения и транспортирования медицинских иммунобиологических препаратов и других биологических материалов, а также продуктов питания, имеющих собственную индивидуальную или групповую упаковку с температурным диапазоном хранения +2°С +8°С.
КТМ-60-2
Разработка: Россия
Многоразовый термоконтейнер медицинского назначения с охлаждающими элементами, 775х635х505 мм. Предназначен для временного хранения и транспортирования медицинских иммунобиологических препаратов и других биологических материалов, а также продуктов питания, имеющих собственную индивидуальную или групповую упаковку с температурным диапазоном хранения +2°С +8°С.
КТМ-300-П
Разработка: Россия
Одноразовый палетный термоконтейнер медицинского назначения с охлаждающими элементами, 1200х800х950 мм. Предназначен для временного хранения и транспортирования медицинских иммунобиологических препаратов и других биологических материалов, а также продуктов питания, имеющих собственную индивидуальную илигрупповую упаковку с температурным диапазоном хранения +2°С +8°С.