1.Welcome to Loopy Pro #
Welcome to Loopy Pro!
Note: This manual is still being written, but is steadily growing. Be sure to go through the in-app tour (in the Help menu, top right button), and check out some of the fantastic tutorials already being released.
At its heart, Loopy Pro is a live-looper – it lets you record and layer pieces of sound which play in loops, to perform and construct musical arrangements on the fly. But it goes a lot further, and includes a variety of tools to customise your workflow so you can use Loopy Pro for a lot more than just live-looping.
Loopy Pro is:
- A live looper
- A sampler
- A clip launcher
- A musical scratchpad
- A sequencer and arranger
- A mixer
- An Audio Unit host, supporting effects, synths, and MIDI sequencers
- An infinitely customisable control surface
And there’s a lot more still to come.
This guide will take you through the fundamental concepts behind Loopy Pro, starting with clips and the colour system, then effects and audio inputs, the actions system, widgets and the clock.
You’ll be introduced to the basics of live looping and the variety of ways it works in Loopy Pro, with concepts like pre-set vs free looping, Retrospective Record, Intro and Tail recording, and Overdubbing, and you’ll be introduced to the gestures system for on-screen interaction. For those who work with pre-made audio, rather than recording it live – or those who want to work with a combination of pre-recorded and live-recorded samples, this guide will also describe the many ways to bring audio into Loopy Pro.
Loopy Pro’s powerful mixer – where much of the project setup takes place – will be examined in detail, and each section and function described: colours, effects, audio inputs, MIDI and buses/sends. Then we will explore the Canvas, and how to set up almost any on-screen layout and control scheme you can imagine.
Song structure and sectioning, and the various ways this can be realised in Loopy Pro will be described, with Play Groups and the various configurations that can be applied. We will also explore the various Play actions that can be setup, for an additional level of customisation and flexibility.
We’ll go through Loopy Pro’s Actions system, and examine how it allows you to control every aspect of your project – with on-screen controls, or via a MIDI controller, or through Follow Actions. And we’ll follow with an examination of the MIDI Learn and MIDI Control system, and how to setup external MIDI controllers to control your Loopy Pro projects.
We’ll take a look at the sequencer, which has a DAW-like timeline for sequencing clip playback as well as driving a fully-automated live-looping session.
Finally, after a quick discussion of running Loopy Pro as an AUv3, hosted within another app, we’ll finish by taking a look at each settings screen.
But first, some Loopy Pro fundamentals:
1.1.Clips #
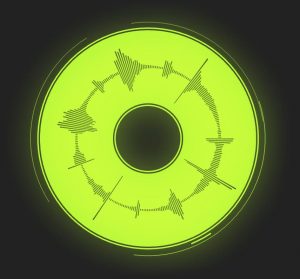
Loops usually appear as circles in Loopy Pro, and play their audio in a seamless loop. They are usually multiples of a bar in length. This is the building block of live-looping.
One shots, represented as squares or rectangles, play once and are usually shorter pieces of audio, like a drum hit, a vocal line, or a sound effect.
Clips of both kinds can be recorded live within Loopy Pro, from the microphone, or any audio hardware plugged into the device, or from an AUv3 Audio Unit, like a synthesiser. You can even resample clips, which means recording some of Loopy Pro’s output back into a clip.
Clips can also be imported into Loopy Pro from outside: you can drag and drop from another app, like the Files app, straight onto a clip. You can import a clip from Files right from within Loopy Pro, or from Loopy Pro’s own Media manager. You can copy and paste audio from another app, or another device, or you can AirDrop from another device into Loopy Pro. You can also copy audio files over USB into Loopy Pro’s Documents folder, and open them from Loopy Pro’s Media manager.
Both imported clips and recorded ones can be time-scaled; when importing a clip, Loopy Pro will attempt to automatically identify the source audio’s tempo, and can optionally adjust the audio to match your current project.
Loops can be grouped together into sections, which can start and stop together, or play one at a time. Loops can be configured to play and stop with a count-in/count-out, which will wait until a given point in the timeline before starting or stopping, or they can play and stop immediately. Both loops and one shots can be configured to play only while holding, or to toggle with each tap – one shots will retrigger from the start, in this mode.
1.2.Colours #
In Loopy Pro, clips – both loops and one shots – are organised into colours. Colours provide a visual distinction between different kinds of clips in your project, but they also perform a larger role.
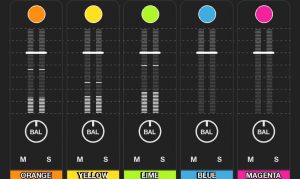
Colours aggregate the output of clips, and provide effects and audio routing. They’re like tracks in a traditional DAW.
Colours can also perform an additional role: customisation of behaviour. Clip Settings, which define how a clip plays and records, can be defined at three levels: Globally, at the colour level, and at the individual clip level. You can override the global clip settings by changing some settings at the colour level – and then all clips of that colour will take on those settings.
With Loopy Pro’s flexible and powerful actions system, colours can do even more, and play a role in sectioning.
You can add as many colours as you like, either in the mixer or in the colours editor.
1.3.Configuration #
Most configuration in Loopy Pro can be defined at three levels:
- Globally
- At the Colour level
- At the Clip Level
This follows a hierarchy: all clips will use the global configuration, unless this configuration has been overridden for the clip’s colour. In turn, that colour configuration may be overridden at the level of the clips themselves.
You can also define settings for playback and recording at the level of individual actions, so you can nominate a particular on-screen control or a MIDI controller button to, for example, trigger a retrospective record, or start a loop recording which will automatically begin overdubbing or mute afterwards.
This allows for a very flexible configuration scheme, where you can, for example:
- Designate a particular colour for Retrospective Recording,
- Nominate a single clip to be un-quantised and un-phase-locked,
- Use a particular button on a MIDI controller to perform a pre-set loop recording, while using free recording as default, or
- Configure an on-screen button to play a loop once and then stop.
1.4.Effects #
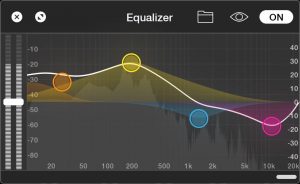
Effects can be applied in a range of places. They can be applied as insert effects to colours, to audio inputs, and to the master output. They can be applied either pre- or post-fader, so that volume changes occur before or after an effect is applied.
Effects can be chained together, and the same effect can be applied to multiple tracks simultaneously, using Loopy Pro’s sophisticated automatic grouping and instancing features.
Loopy Pro also supports buses and sends: you can create a bus channel, which acts as an aggregator of multiple audio tracks, then apply effects to this bus. Then you can create sends from other channels, which allow you to determine how much of each channel is sent to that bus. This allows you to create sophisticated and expressive effects which are applied on top of each channel.
Once you have added effects using the mixer, effects will appear on the main screen of Loopy Pro in the bottom bar.
1.5.Audio Inputs #
Loopy Pro allows you to record live audio from a range of sources. You can record from your iPad or iPhone’s built-in microphone, with an echo cancellation system to reduce echo and feedback from your speakers. If you have a USB audio interface, you can record audio from any number of its channels, including directing different channels to different colours.
You can also use AUv3 Audio Unit synthesisers and other generators within Loopy Pro, with sophisticated support for MIDI controllers and AUv3 Audio Unit MIDI sequencers.
All audio inputs appear within Loopy Pro’s mixer as a channel strip. You can apply insert and send effects to any audio input, and configure each audio input to monitor through specified output channels, or even monitor through the target colour groups and associated effects, so that you can record the dry, un-effected signal while hearing the wet signal with effects applied.
Once you have added Audio Unit audio inputs using the mixer, they will appear on the main screen of Loopy Pro in the bottom bar.
1.6.MIDI Sources #
Loopy Pro supports receiving MIDI from MIDI controller hardware, network and Bluetooth MIDI sources, and AUv3 Audio Unit MIDI generators, such as sequencers.
You can use MIDI to drive AUv3 Audio Unit synthesisers, and to control Loopy Pro’s own actions via MIDI.
Like audio inputs, MIDI sources appear and can be configured in Loopy Pro’s mixer. You can also chain MIDI sources together, to apply MIDI filters such as arpeggiators or chord generators.
In the future, as described on the Loopy Pro roadmap, you’ll also be able to record MIDI loops right within Loopy Pro, and use them to control AUv3 Audio Unit and external synths.
1.7.Actions #
Loopy Pro provides a powerful actions system for controlling every aspect of your project. Actions include controls for clip playback and recording, and audio parameters like volume, balance, pitch and speed. There are actions to adjust effect parameters and sends, play and stop the master clock, adjust input gain and enable/disable inputs, change tempo, and much more.
Loopy Pro’s actions can be controlled in a range of ways.
You can use MIDI Learn to easily make bindings between a MIDI controller and an action that corresponds to an on-screen object, such as a clip or a fader. You can make more sophisticated bindings to MIDI controllers manually using the MIDI Control screen.
You can attach actions to on-screen gestures, and to Follow Actions which occur in response to certain events, like clip playback or recording.
And you can control actions from on-screen controls that you can create called widgets.
1.9.Echo Cancellation #
When you’re using Loopy Pro with no attached audio interface or headphones, Loopy Pro will by default enable its echo cancellation system. This is designed to reduce the amount of sound coming from your speakers that gets recorded. Without this, due to the proximity of the speaker and the microphone, it is very difficult to record loops without capturing all the audio currently being played.
Loopy Pro’s echo cancellation system requires a brief calibration, which involves emitting a series of chirps, and then performing some processing in order to determine the properties of your device’s acoustic feedback path. When you move your device around substantially – such as placing it down on a table – it’s recommended that you recalibrate the echo cancellation system to take into account the changed acoustic environment.
You can perform calibration at any time by opening the mixer and tapping the microphone icon at the top of the hardware input channel strip, then tapping “Calibrate”.
You can also disable echo cancellation in the same place.
Echo Cancellation Caveats
Disabling echo cancellation may be necessary if you wish to use a Bluetooth headset such as the AirPods, or if you are experiencing difficulties with audio level drops using screen recording.
Echo cancellation requires a built-in feature of iOS called “Measurement Mode”, which has a number of unfortunate quirks, including preventing the use of Bluetooth audio devices and dropping the device output audio level.
By disabling echo cancellation, you will also disable Measurement Mode, which will resolve these issues, at the cost of losing the echo cancellation functionality. I have been in discussions with the team at Apple and hope that these shortcomings will be resolved in time.
2.The Clock #
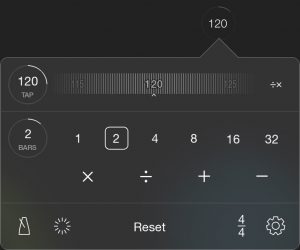
Tempo
You can adjust the tempo of your session by dragging the tempo jog wheel right or left, or tapping in the middle to enter a tempo using the keyboard. Your project’s audio will be time-scaled dynamically to fit the new tempo.
You can also tap out a tempo by tapping on the “Tap” button at the top left of the clock controls.
You can also synchronise the clock with other hardware and apps, using either MIDI Clock Sync or Ableton Link, and you can modify any clock parameters using actions and MIDI control.
Once you have audio content loaded within a project, you will see white bars on the tempo jog wheel which correspond to the native tempos for the loaded audio. The jog wheel will snap to these points, making it easy to return to the original, un-time-scaled audio at any point.
Tempo Correction
If your tempo has been set by the first recorded loop, sometimes it may be incorrectly guessed as double or half the actual tempo. You can use the ÷⨉ tempo correction control to the right of the tempo jog wheel to halve or multiply the tempo without time-scaling the loops.
Reset Tempo
You can reset the tempo to an “unset” state at any point. This will put Loopy Pro into a state ready to assign the tempo from the next loop which is recorded.
Detection Range
When the tempo is currently unset, you can provide minimum and maximum bounds for detection of tempo, when tempo is set by recording the first loop. This can help if a loop is detected at double or half the desired tempo.
Round to Closest BPM
When the tempo is currently unset, turn this setting on to round the tempo set by recording the first loop to the nearest whole number BPM. This can be useful when planning to export the recorded clips for further use within a DAW environment that may require whole-number tempo values.
Master Cycle Length
In many traditional live-loopers, the first loop sets the length of subsequent loops. Loopy Pro provides additional flexibility, and allows you to dynamically set this “Master” length. If you are using Count In and Count Out for your record configuration – Loopy Pro’s default setup – it’s this which determines the length of your loops.
You can change this length via the clock controls by tapping the buttons beside the “Bars” indicator. Jump straight to a length by tapping the numbers, or vary the current length using the mathematical operators: Double, Halve, Add 1, Subtract 1.
You can also modify this length using actions and MIDI control.
Time Signature
You can set a wide range of time signatures in Loopy Pro by tapping the time signature button at the bottom right of the clock controls – by default, this will read “4/4”, indicating four quarter notes per bar.
If you enable the “Update Tempo” switch on this screen, Loopy Pro will keep the duration of each bar constant, while updating the tempo to fit the number of beats you have selected into that duration.
Metronome
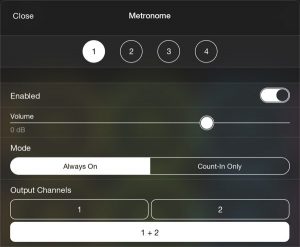
The metronome has four different sounds: A woodblock, high-hat, beeps, and clicks. You can adjust its volume, and if you have an audio interface, you can assign the output channels it is sent to, so that you can separate the metronome from other outputs.
You can also configure when the metronome is enabled: always, or only when a loop is counting-in to begin recording.
3.Getting Started with Live Looping #
Loopy Pro is many things, but at its core it’s a live looper. Live looping is a form of live music production where a track is built up in layers, in real time. In a performance, it allows the audience to witness a song being built from scratch, often from nothing more than the performer’s voice, augmented by effects.
In the studio, looping provides a fun and creative way to experiment with musical ideas and can be an invaluable songwriting aid.
3.1.The First Loop #
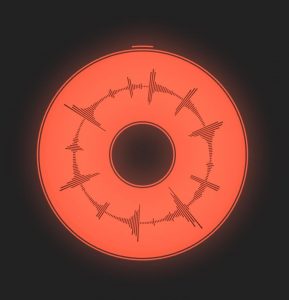
Start and Stop Record
To record your first loop, you tap on one of the empty loops. Loopy Pro begins recording as soon as you release your finger, and will continue recording until you tap again – recording will finish when you release your finger.
Note that recording triggers upon release, rather than press, in order to achieve better touch and timing accuracy: touches on a touchscreen can often be missed if one’s fingertips are too damp or too dry. So: when you’re ready to begin recording, place a finger on the screen. Then release to begin. Ditto when finishing: place your finger on the screen head of time, then release to finish.
You can change this setting to on press, if you choose, by opening Clip Settings, then Gestures at the bottom, and turning on the switch beside “Record On Press”.
Automatic Loop Detection
By default, Loopy Pro’s automatic loop detection will be enabled. This can discover loops in the recorded audio and tighten the first loop for you automatically, without needing to worry about starting or ending record on the beat.
If you find that the detected loops are not the correct tempo, you can revise the detection range from the clock controls.
If you set an approximate tempo and loop length before recording, and enable the “Auto-End Detected Loop” setting in Clip Settings, Loopy will automatically stop recording when it detects a loop and begin playing, for a seamless automated start.
But as you gain experience with looping, you may choose to disable automatic loop detection and coordinate the record start and stop timing yourself. You can turn off automatic loop detection in Clip Settings, by turning off the switch beside “Auto Loop Detection”.
Timing
Without automatic loop detection on, the time that you start and stop recording the first loop is very important. You begin recording on the first beat – the “1” – and then finish recording at the end of the last beat; the final “1”. For example, if you have a one-bar loop as your first loop – “1, 2, 3, 4” – you’d trigger record start on the first “1”, and end on the “1” after the end: “1, 2, 3, 4, 1“. Loopy Pro will then begin playing back your loop immediately.
Starting with a Pre-Set Tempo
You can also set the tempo and loop length prior to recording your first loop, and optionally use a metronome to keep you in time.
3.2.Pre-set or Free Loops #
Loopy Pro provides a variety of ways to record loops.
Pre-Set
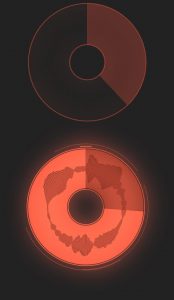
This is the default configuration in Loopy Pro, and mimics the behaviour of many hardware loopers.
There are a number of ways to configure loops to use a pre-set length. From Clip Settings, turn on “Auto Count Out”, and set “Count In Quantization” and “Count Out Quantization”:
- Select Master use the clock’s master cycle length, which can be adjusted dynamically and is initially set by the first recorded loop.
- Select Custom to define a custom quantisation interval.
You can use a combination of Count In and Count Out settings, to change Loopy Pro’s behaviour. For example:
- Set “Count In Quantization” to Custom and 1 Bar to perform a 1 bar count-in, regardless of the master length, and then set “Count Out Quantization” to Master, to record for the master cycle length.
- Set “Count In Quantization” to Master and “Count Out Quantization” to 2 Bars to sync the beginning of a loop with the master cycle length, and record for 2 bars.
You can also define these settings at the Colour and at the Clip level, as well as for individual actions for triggering via a widget or a MIDI controller.
Finally, you can also pre-set the length of an individual clip in that clip’s detail screen, which will automatically stop recording after the given length.
Free
Loopy Pro also supports free looping. Upon starting a recording, Loopy Pro will continue recording indefinitely, until you trigger record end. The length of the loop will be – by default – quantised to the closest number of bars.
This allows you ignore any length restrictions, and determine the duration of each loop as you go.
To enable free looping, turn off the “Auto Count Out” setting from Clip Settings. You can also define this setting at the Colour and at the Clip level, as well as for individual actions for triggering via a widget or a MIDI controller.
You can optionally quantise the beginning and end of recording by setting the “Count In Quantization” and “Count Out Quantization” settings. This will cause Loopy Pro to count-in or count-out to sync with the given interval:
- None: Start/Stop recording immediately, regardless of position in the cycle
- Master: Start/Stop recording in sync with the master cycle length, which can be adjusted dynamically and is initially set by the first recorded loop.
- Custom: Define a custom quantisation interval
3.3.Retrospective Recording #
Retrospective Recording allows you to simply play, and then trigger a recording afterwards, when you have something you’d like to capture. This allows for a wonderfully free and creative workflow.
To enable Retrospective Record, open Clip Settings and turn on the switch beside “Retrospective Recording”. You can also define this setting at the Colour and at the Clip level, as well as for individual actions for triggering via a widget or a MIDI controller.
The duration of loops recorded via Retrospective Record is set by the master clock cycle, which can be changed on-screen or via an action, either from a button on-screen, or a MIDI controller.
Set “Retrospective Quantization” to determine how recording behaves:
- Immediate: Recording will capture the immediately-preceding audio, irrespective of the current position in the current clock cycle.
- Quantized: Recording will capture the whole preceding clock cycle, in sync with the cycle. If, for example, the current cycle is 2 bars and you trigger Retrospective Record at bar 1, beat 3 – i.e. shortly after the beginning of the cycle – Loopy Pro will record up to the end of the preceding bar; it will not capture the audio from the end of the last bar to the current position.
With Loopy Pro’s very customisable configuration system, you can designate individual colours or even individual loops to use Retrospective Record, while keeping the other loops in normal record mode. Or, you can nominate a particular on-screen button or MIDI controller button to initiate Retrospective Record.
3.4.Intro and Tail #
Loops in Loopy Pro can have attached intro and tail/outro sections, which play before the loop begins, and after it ends, respectively. Tail sections can also be mixed into the loop, after the first cycle has been played.
You can enable “Record Intro” and “Record Tail” in Clip Settings, and these additional layers will be automatically recorded.
Intro recording: When beginning a recording count-in – a value for “Count In Quantization” is required for tail recording – Loopy Pro will begin listening, and will start recording the intro section when the audio level crosses a threshold, up to the end of the count-in duration.
Intro sections are particularly useful for representing anacruses/up-beats: part of a musical phrase that precedes the first beat.
Tail recording: After ending a loop recording, Loopy Pro will continue to record for a little while. Recording will stop when Loopy Pro detects the end of a decay, when the audio level is no longer decreasing. You can also tap to end tail recording immediately.
Tail sections allow you to capture the end of a reverb, or a natural acoustic decay, without it being cut-off at the end of the loop, for much more natural-sounding loops.
You can also designate regions of imported audio to be an intro or outro, in the import screen, or after import on the clip detail screen.
3.5.Overdubbing #
After a loop has been recorded, you can record additional layers on top of the same loop. This is overdubbing and you can use it to, for example, add harmony lines to a melody, or augment a beatbox loop with additional sounds.
While a loop is overdubbing, it will continue to add new layers for as long as recording continues.
There are a number of ways to trigger overdubbing. By default, you can 2-finger-tap a loop to immediately begin overdubbing, and tap again to end (you can change this gesture, if you like, in Clip Settings, to something like a swipe or tap). You can also trigger overdubbing via a “Record” action, from a button on-screen or a MIDI controller.
To automatically begin overdubbing after the first loop has been recorded, you can also set the “After Recording” setting in Clip Settings to “Overdub”. This setting can be assigned at the global level, for individual colours, or individual clips.
3.6.Gestures #
Loopy Pro has a number of built-in gestures which you can perform on-screen. You can configure these however you like, either at the global level, per-colour, or per-clip.
Here are the default gestures:
- Tap: Toggle a loop playing, or begin playing a one-shot. If the clip is empty, toggle record. Record will trigger upon release by default, in order to achieve better touch and timing accuracy, but this can be changed to on press if required from Clip Settings.
- Two-Finger Tap: Toggle overdub on a clip
- Swipe down/left/right: Clear a clip’s contents. Perform a long swipe to clear immediately, bypassing the confirmation popover.
- Swipe up: Show the clip detail screen.
- Two-finger rotation/twist: Offset a loop
- One-finger circle around loop perimeter: Instant volume adjust
- Hold-and-drag to another clip: Merge
You can bind any actions to gestures, to create very custom interfaces. Available actions for binding are: tap, two-finger-tap, swipe (any direction), swipe up, swipe down, swipe left, swipe right, long swipe (any direction), long swipe up, long swipe down, long swipe left, long swipe right, long press.
3.7.Mixing Live and Pre-Recorded Loops #
Loopy Pro can be used as a live-looper, a clip-launcher, or a combination of the two. You can import pre-recorded audio to clips, and then play them alongside live-looped content.
With Loopy Pro’s high-quality live time-stretching, you can import pre-recorded loops, then reset the clock tempo, putting Loopy Pro in a state ready to take the tempo from the next recorded loop.
The next loop that you record will behave like the first loop of the session. The tempo and master cycle length will be derived from that loop, and all other audio content in the project will be instantly and automatically time-scaled to fit that new tempo.
This is an incredibly powerful way to run a traditional live-looping performance while also augmenting it with pre-recorded content – all without requiring a pre-set tempo.
4.Importing Audio #
Loopy Pro can load content into projects in almost any audio format, with time and pitch adjustments to fit. There are a wide range of ways you can load content into Loopy Pro:
Drag and Drop
You can drag-and-drop one or more files from any compatible app, such as Files, with its built-in support for services like Dropbox and Google Drive, and USB hard drive and network file server support.
By opening up Loopy and Files side-by-side using the iOS multitasking controls, you can simply drag audio files onto each loop, one at a time, or in a batch.
“Open In”
From any app that supports sharing, you can select Loopy Pro as the sharing target, and the audio will be loaded into Loopy Pro’s Media manager, ready for importing.
AirDrop
From a Mac or anther iOS device, you can AirDrop one or more audio files to your device running Loopy Pro, and then select Loopy Pro as the target. The audio will be loaded into Loopy Pro’s Media manager, ready for importing.
Files
Loopy Pro’s Documents folder is visible within the iOS Files app. You can copy and move audio files into this folder, and the audio will appear within Loopy Pro’s Media manager.
USB Transfer
Loopy Pro’s Documents folder is also available as a destination for copying files via a USB cable, using the macOS Finder, or a third-party app like iExplorer or iFunbox.
Clipboard
Loopy Pro can load audio files from the clipboard, copied either as files or using Audio Copy. You can find copied audio within Loopy’s Media manager.
5.The Mixer: Routing Central #
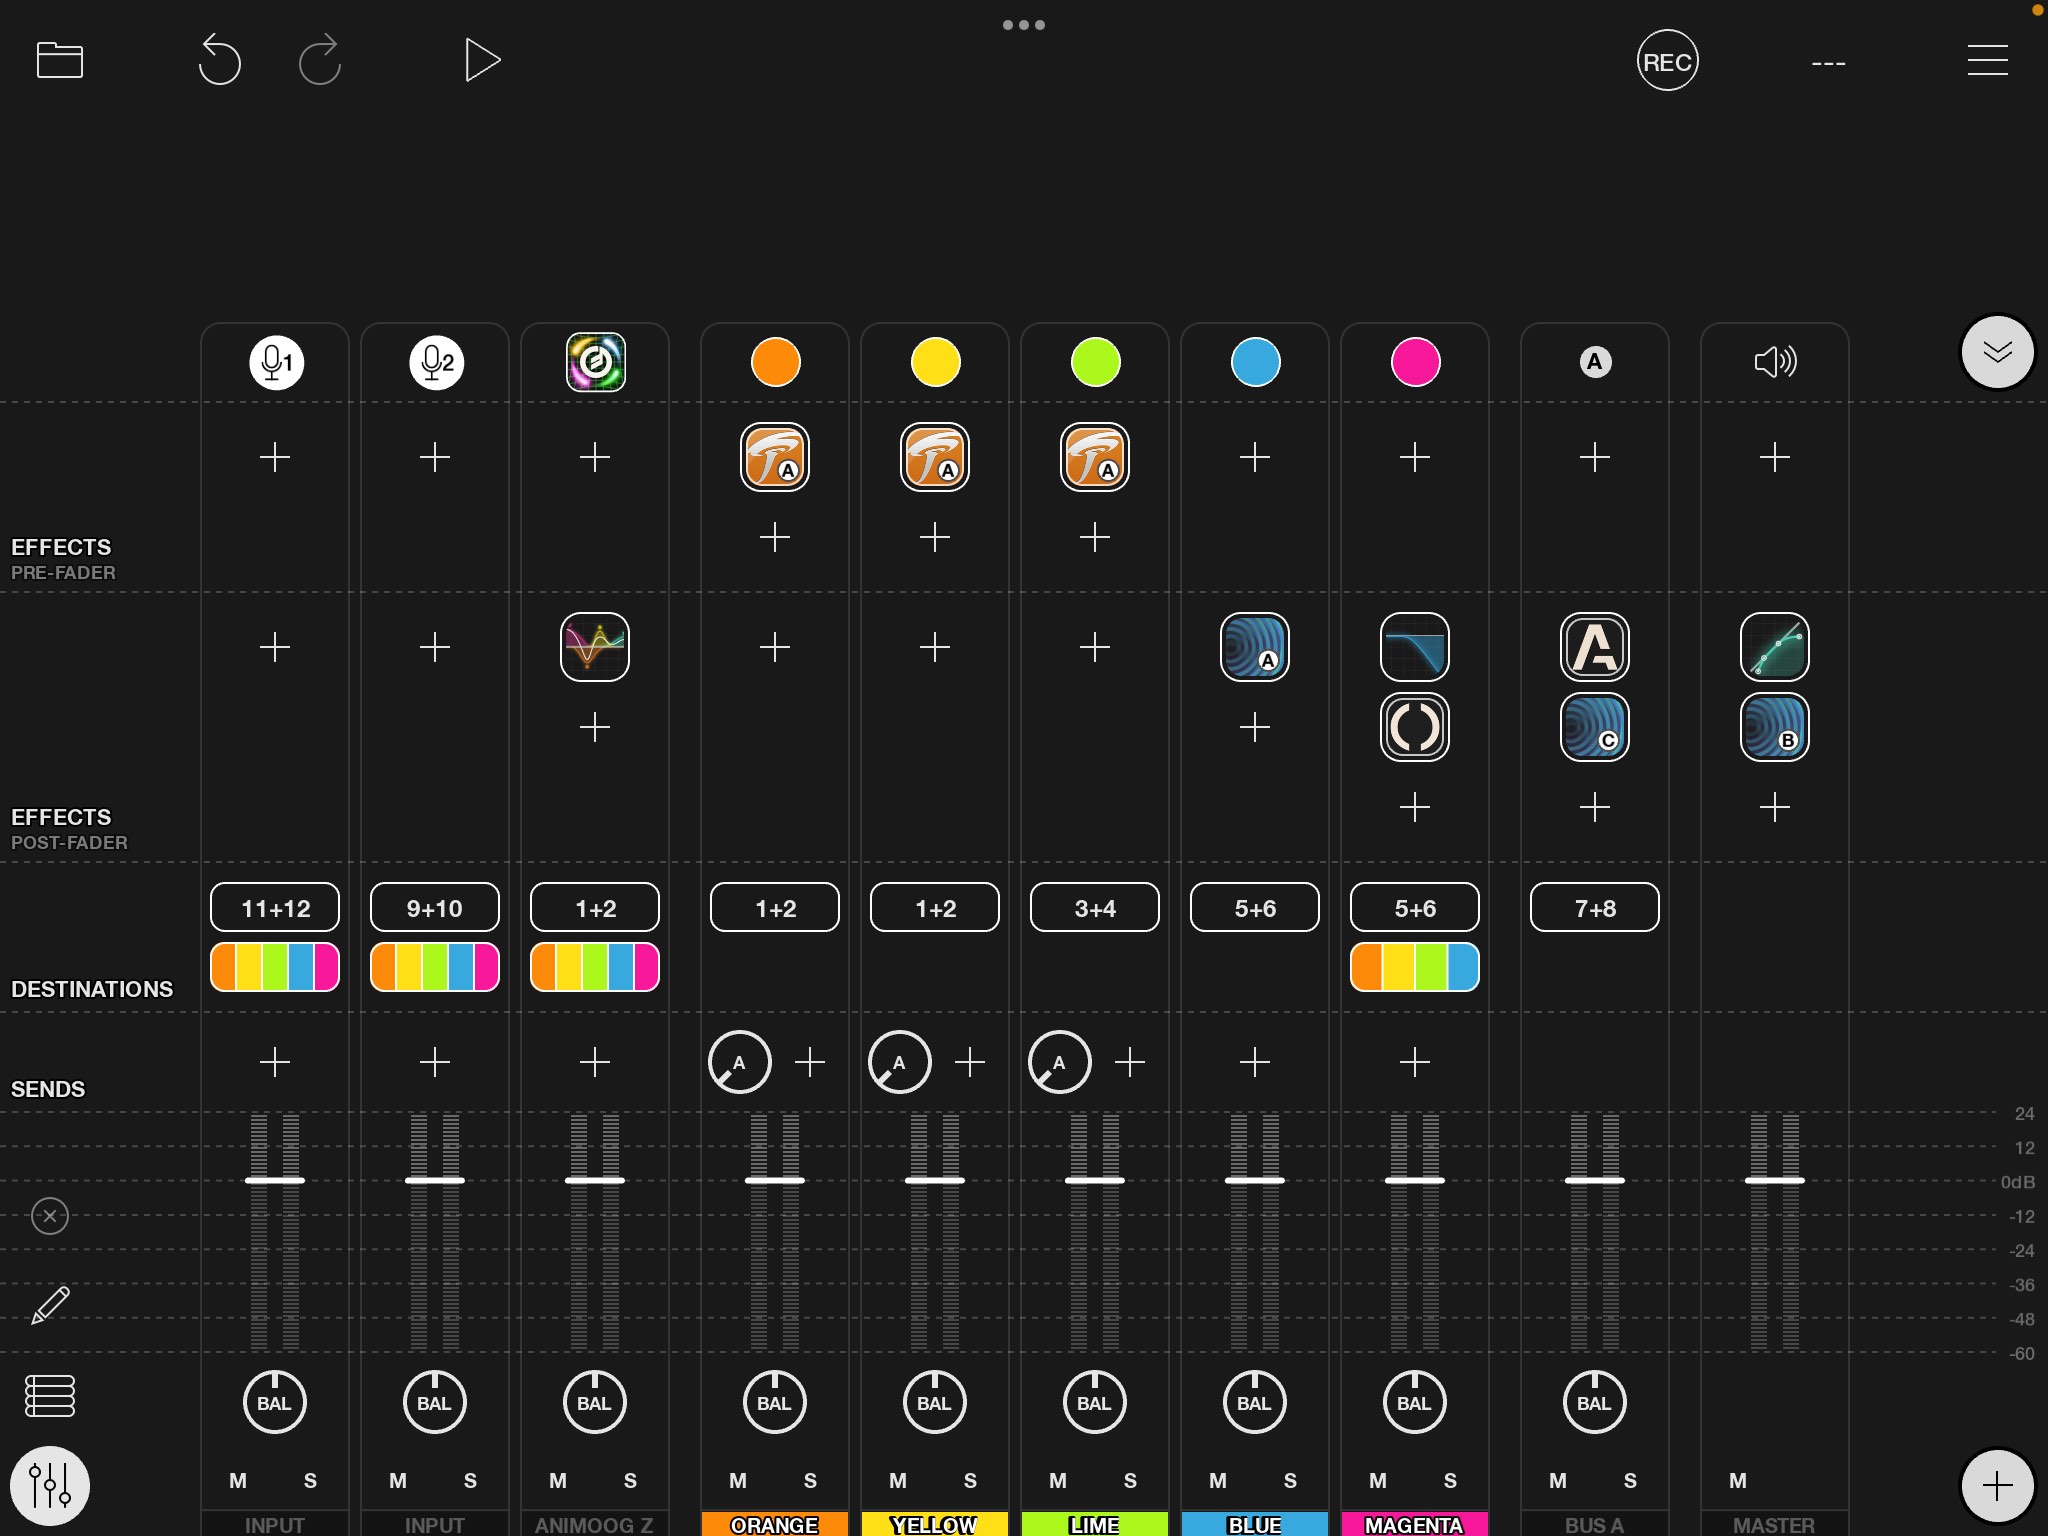
Loopy Pro’s powerful mixer gives you control over your project’s audio inputs, effects and outputs. In its simple form, you can adjust levels and balance, mute and solo for each colour in your project. In its extended form, you can add hardware and AUv3 Audio Unit audio inputs, specify output channels for each colour and each audio input, configure audio input monitoring, and add built-in and AUv3 Audio Unit effects, buses and sends, and MIDI inputs.
Open the mixer by tapping the button from the main screen.
Loopy Pro’s mixer in extended mode
Simple vs Extended Mode
When you first open the mixer, it will be displayed in its simple form, with just the faders and lower controls visible. You will see your canvas above, with your loops and one-shots visible.
Tap the button to put the mixer into extended mode. The mixer will grow, and the extended controls will become visible. Tap
to retract the mixer again into simple mode.
5.1.Channel Strips #
The basic building-block in the mixer is the channel strip, a column in the mixer representing a single channel:
- An audio input, such as a hardware input, or an AUv3 Audio Unit
- A MIDI source, such as a MIDI keyboard an AUv3 Audio Unit MIDI sequencer
- A colour, aggregating one or more clips
- A bus
- The master output
Each channel strip has a fader and level meter, and may have balance and mute/solo controls. Audio inputs and colour channels have controls for sends, destinations, and pre- and post-fader effects.
To adjust levels, balance or send amount, tap and swipe on that control. For finer control, tap and then move your finger away from the control: the control area will expand the further away you move from the original control location, giving you more control over fine adjustment.
Tap the icon at the top of each channel strip to access settings and controls for that channel, and long press to replace or delete.
You can also reorder channel strips as you choose, by pressing on the icon at the top, then dragging left or right (or swiping up to remove that channel strip).
5.2.Colours #
In Loopy Pro, colours aggregate the output from clips, and behave like tracks in a traditional DAW. Each colour appears as a channel strip in the mixer, and has its own fader, balance, mute and solo, as well as sends, destinations, and effects.
If you have an audio interface, colours can be rounded to any output channel.
Colours also act as audio destinations in their own right: by specifying a colour in the “destinations” section for any channel strip, clips of that colour will be able to record audio from that source. This includes both hardware and AUv3 Audio Unit audio inputs, but may also include colours themselves, allowing you to resample the output from one or more colours back into a new clip.
Add new colours by tapping the button, then selecting “Add Color”. You can also add new colours in the colours editor, then easily assign the new colour to clips.
5.3.Audio Inputs #
Loopy Pro can receive audio from the built-in microphone, an attached audio interface (with support for multi-channel input), or an AUv3 Audio Unit.
Each audio input appears as a channel strip in the mixer, and has its own fader, balance, mute and solo, as well as sends, destinations, and effects.
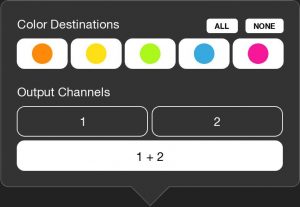
Audio inputs can also be monitored through their destination colours’ signal paths. When enabled, this allows the audio input to be heard through the colours’ effect chain, but recorded without any of those effects applied – “monitor wet, record dry“. This can be setup with the “Monitor Through” setting for that particular audio input, accessed by tapping the icon at the top of the mixer channel strip.
Add new audio inputs by tapping the button, then selecting “Add Hardware Input” or “Add Audio Unit Input”.
5.3.1.Hardware Inputs #
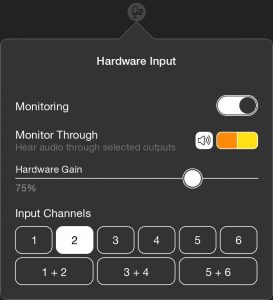
Tap the mic icon at the top of the channel strip to configure the hardware input: you can select the input channel to use for this input, set the hardware gain (if made available by the system; not all devices support hardware gain), configure the channels through which to monitor the audio source, and enable or disable monitoring.
You can have as many hardware audio sources as you like, including multiple instances of the same channel, so you can configure different effect chains on each one.
5.3.2.Audio Unit Inputs #
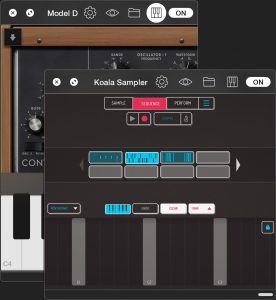
Model D and Koala Sampler AUv3 Audio Units
Loopy Pro supports hosting AUv3 Audio Unit instruments and generators, like synthesisers and other virtual instruments, which can be downloaded and installed from the App Store.
Audio Unit User Interface
Tap the icon at the top of an Audio Unit’s channel strip or on the bottom bar to display its user interface: This is displayed in a moveable and resizable window. Tap or double-tap the titlebar to toggle fullscreen, and
to close the window. Drag the bottom right handle to change the size of the window.
On-Screen Keyboard
In the Audio Unit’s window, tap the button to show Loopy Pro’s onscreen keyboard.
Keys tapped towards the upper side play at a lower velocity than when tapped towards the lower side. Tap to toggle hold of the current notes. Tap
to toggle position lock – when unlocked, you can pinch and zoom to navigate around the keyboard. Tap
to expand the keyboard to fill the window, and tap
to hide the keyboard.
MIDI
Loopy Pro can drive MIDI-capable Audio Units from a variety of MIDI sources: Connected MIDI hardware, such as a USB or Bluetooth MIDI keyboard or sequencer, or a loaded AUv3 Audio Unit MIDI sequencer. You can add MIDI sources either though the mixer, or though the Audio Unit’s settings: Tap to open the settings for the Audio Unit from the toolbar of its window. Tap “MIDI Sources” to access the list of sources for that Audio Unit, then tap “Add MIDI Source” to select a MIDI source. You can also tap
to connect to Bluetooth MIDI devices here.
Presets
Loopy Pro supports both factory and user presets for Audio Units. Tap to open the presets screen, where you can select from the provided factory presets, if available, and create new user presets. Long-press a user preset to rename it, and swipe left to delete.
Bottom Bar Visibility
Audio Units will appear on the bottom bar on Loopy Pro’s main screen by default, for easy access. If you wish to hide an Audio Unit from this bar, tap to toggle visibility.
Idle Mode
By default, Audio Units which are muted will enter “Idle” mode, where they consume little processing resources. With Idle mode, you can have many different Audio Units loaded, without over-taxing your device’s processor. Tap the ON button, or mute it from the mixer or an action to put the Audio Unit into Idle mode. Tap IDLE or unmute the Audio Unit from the mixer or an action to re-activate it.
If you wish the Audio Unit to remain active when muted, you can disable Idle mode by long-pressing on the IDLE button, then turning off the switch beside “Enable Idle Mode” on the popover that appears.
5.4.Effects #
Loopy Pro has a growing collection of built-in effects, and also supports AUv3 Audio Unit effects which can be downloaded and installed from the App Store.
Tap the + button in the Effects section of a channel strip to choose and add an effect. The effect’s icon will appear on the channel strip. Tap to open the effect’s configuration, or double-tap to toggle the effect.
You can also move effects around by holding and dragging between sections on the same channel strip, or to different channel strips entirely.
To remove an effect, hold and drag it out of the Effects section, or long-press and tap “Delete”.
Sends vs Inserts
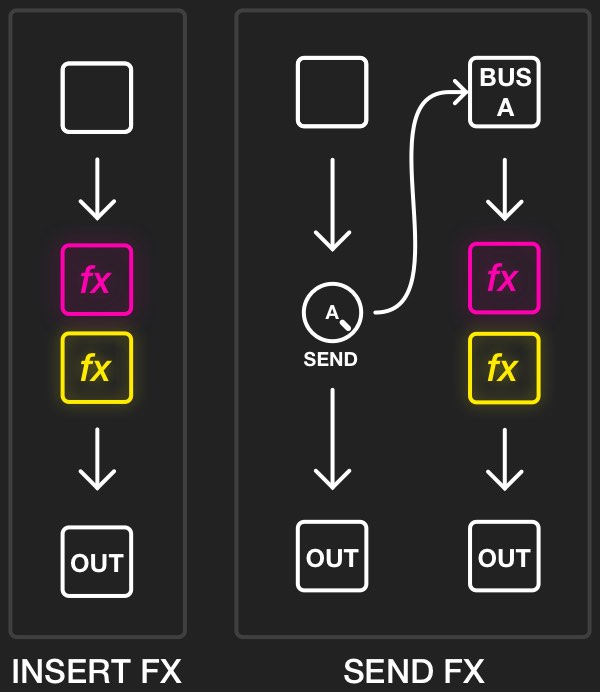
Insert effects can be applied to an audio source, and the affected audio will be recorded into clips. They can also be applied to colours, and will affect all output audio of the colour. Typical effects frequently used as inserts include filters and equalisers, distortion, chorus, limiters and compressors.
Send effects are applied on the output of a bus, to which channels (both audio sources and colours) may send a certain amount of their audio, set by a dial. The affected audio is heard on top of the original audio stream coming from the original channels. Often reverbs and delays are used as sends.
Pre vs Post Fader
Effects can be placed in pre– and post-fader positions. This describes the effect’s position in the signal flow, relative to the volume fader.
Pre-fader effects are applied before the volume fader is applied to the channel: they process the full-volume audio, and then that affected audio is passed into the volume fader.
Post-fader effects are applied after the volume fader: they act on the audio after the volume has been applied, and that affected audio is sent to the output as-is.
Whether you place an effect in the pre- or post-fader position depends on the effect in question. Distortion effects, for example, can behave quite differently with quiet audio versus full-volume audio, and you may want to place these in a pre-fader position to maintain tone at various volume levels. With reverb and delay effects, on the other hand, you may want these to ring out when adjusting the volume, rather than having their output reduced by the fader along with the rest of the channel’s audio, so these may be best placed in a post-fader position.
A performance consideration with pre- and post-fader positions: When you are using the same effect on more than one channel, it’s more efficient to place this effect in the post-fader position for all of the channels. This gives Loopy Pro the opportunity to internally group the channels together and use a single internal instance for the effect. In the pre-fader position, Loopy Pro must use separate internal instances for each channel.
Effect Instances
You can use multiple instances of any effect, and each instance will be treated entirely separately, with its own configuration and interface.
You can also use the same instance of an effect on multiple channels simultaneously, and the effect, with a single configuration and single interface, will be applied to each channel. This is achieved within Loopy Pro by a combination of intelligent internal routing – where channels are grouped together and a single effect instance applied to the group – and internal handling of multiple hidden instances.
Where Loopy Pro is unable to group channels together into a single signal path, it will create multiple, hidden instances of an effect, and automatically synchronise the state across all hidden instances, so that the effect appears as a single instance.
See also the performance consideration note above, concerning pre– and post-fader positions.
Idle Effects
By default, effects which are disabled will enter “Idle” mode, where they consume little processing resources. With Idle mode, you can have many different Audio Units loaded, without over-taxing your device’s processor. Tap the ON button, or disable the effect on the bottom bar of the main screen or with an action to put the Audio Unit into Idle mode. Tap IDLE or enable the effect from the bottom bar or an action to re-activate it.
If you wish the Audio Unit to remain active when disabled, you can disable Idle mode by long-pressing on the IDLE button, then turning off the switch beside “Enable Idle Mode” on the popover that appears.
Effect Tails
When you turn an effect off, Loopy Pro will detect if there is a tail/decay – as with a reverb or a delay, for instance.
When a tail is present, Loopy Pro will perform a smooth transition to avoid cutting off the tail: When you disable the effect, Loopy Pro will mute the effect’s input, then overlay the remaining tail on top of the dry, un-affected audio until the effect output becomes silent.
When this transition is happening, you will see the effect bar button/action flashing. Tap again to cancel this transition and immediately silence the tail.
Bottom Bar Visibility
Effects will appear on the bottom bar on Loopy Pro’s main screen by default, for easy access. If you wish to hide an effect from this bar, tap from the effect’s configuration screen to toggle visibility.
5.4.1.Built-In Effects #
Loopy Pro has a growing number of built-in effects. Here’s a list of the currently-provided effects, and some corresponding notes – see the roadmap for a list of other effects which will be coming soon.
- Reverb – A simple reverb plugin (Apple’s own AUReverb2), with a number of presets provided: Small Room, Medium Room, Large Room, Medium Hall, Large Hall, Plate, Medium Chamber, Large Chamber, Cathedral, Large Room 2, Medium Hall 2, Medium Hall 3, and Large Hall 2.
- Equalizer – A sophisticated parametric stereo EQ, with support for eight filter types: Peak, Band Shelf, Low-Pass, High-Pass, Band-Pass, Low Shelf, High Shelf and Notch. You can combine any number of these, and apply them to both audio channels, or just the left or right. To add a filter, begin dragging on the frequency response line; a peak filter will be created by default, and will follow your finger to allow you to shape the frequency response. Tap the circular handles for each filter to change the type, channel and parameters. All parameters can be controlled via actions; you can specify which parameters are available for control by tapping the “Parameters” item in the popover for each handle.
- Filters: Low-Pass, High-Pass, Band-Pass, Low Shelf, High Shelf – Single filters, based on the Equaliser.
- Dynamics – A combined compressor/limiter module (Apple’s AUDynamicsProcessor).
5.4.2.Audio Unit Effects #
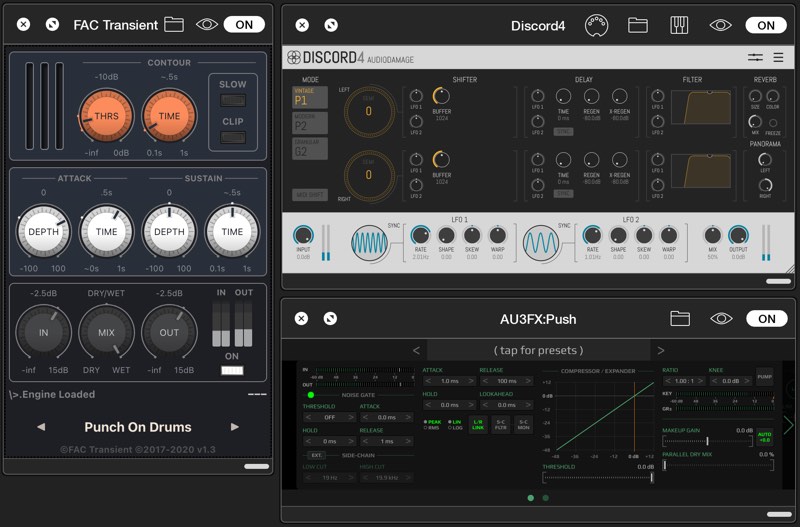
FAC Transient, Discord4 and AU3FX:Push Audio Units
Loopy Pro supports hosting AUv3 Audio Unit effects, which can be downloaded and installed from the App Store.
Audio Unit User Interface
Tap the icon of an effect, or tap the corresponding button on the bottom bar to display its user interface: This is displayed in a moveable and resizable window. Tap or double-tap the titlebar to toggle fullscreen, and
to close the window. Drag the bottom right handle to change the size of the window.
Presets
Loopy Pro supports both factory and user presets for Audio Units. Tap to open the presets screen, where you can select from the provided factory presets, if available, and create new user presets. Long-press a user preset to rename it, and swipe left to delete.
On-Screen Keyboard
Some Audio Unit effects may support MIDI input. Where MIDI is supported, a button is shown in the toolbar of the Audio Unit window. Tap to show Loopy Pro’s onscreen keyboard.
Keys tapped towards the upper side play at a lower velocity than when tapped towards the lower side. Tap to toggle hold of the current notes. Tap
to toggle position lock – when unlocked, you can pinch and zoom to navigate around the keyboard. Tap
to expand the keyboard to fill the window, and tap
to hide the keyboard.
MIDI
Loopy Pro can drive MIDI-capable Audio Units from a variety of MIDI sources: Connected MIDI hardware, such as a USB or Bluetooth MIDI keyboard or sequencer, or a loaded AUv3 Audio Unit MIDI sequencer. You can add MIDI sources either though the mixer, or though the Audio Unit’s settings: Tap to open the settings for the Audio Unit from the toolbar of its window. Tap “MIDI Sources” to access the list of sources for that Audio Unit, then tap “Add MIDI Source” to select a MIDI source. You can also tap
to connect to Bluetooth MIDI devices here.
5.5.MIDI #
Loopy Pro supports full MIDI routing: you can send MIDI from a connected MIDI controller to one or more AUv3 Audio Unit synthesisers/virtual instruments, or drive an Audio Unit synthesiser from an Audio Unit MIDI sequencer. You can also send MIDI out to connected MIDI devices.
Add new MIDI sources by tapping the button, then selecting “Add MIDI”.
In the Destinations section on a MIDI channel strip, tap the + button to add a new destination – this will display a list of the loaded AUv3 Audio Units that can accept MIDI, as well as a list of the MIDI destinations available to the system.
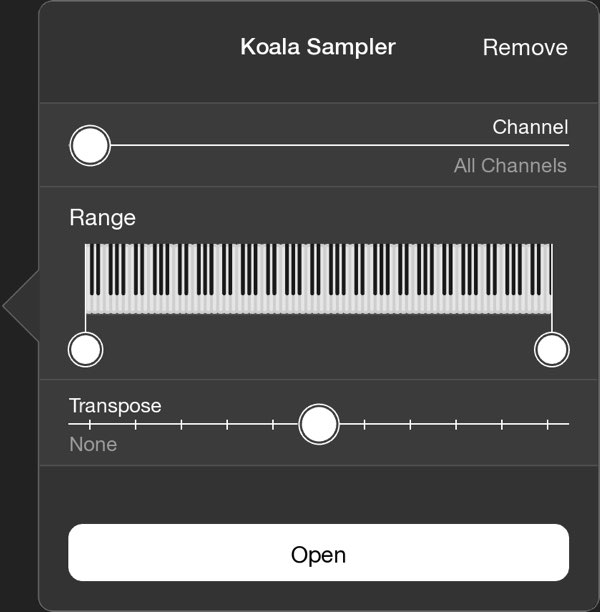
Here, you can specify a particular MIDI channel or Audio Unit cable that the destination should receive. You can also restrict the range of MIDI notes which will be received; currently-playing notes will be visible on the on-screen keyboard.
You can also specify a transposition which be applied to MIDI sent to this destination.
Different destinations of the same MIDI source can have different settings here, allowing you to split a MIDI keyboard out to different Audio Units, for instance.
5.6.Buses and Sends #
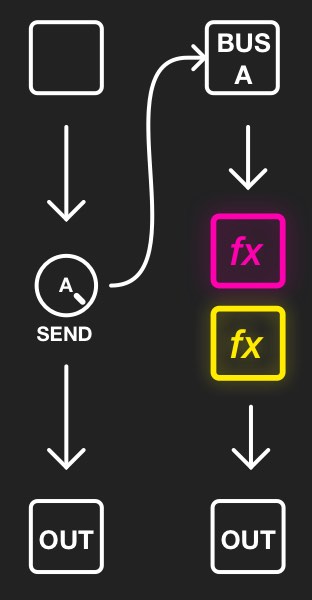
You can add a new bus by either tapping the button, then selecting “Add Bus”, or by adding a new send by tapping the + button within the Sends area of a channel strip, and tapping “New Bus”.
Once a bus has been created, you can create any number of sends from channel strips to this bus, by tapping the + button within the Sends area of a channel strip.
Sends appear as dials which you can adjust by swiping horizontally – make finer controls by moving your finger vertically away from the dial. You can also use actions to adjust sends from widgets or a MIDI controller.
Long press on a send dial to configure its position:
- Before All Effects – the audio from a channel strip will be sent to the bus before any effects or faders are applied.
- Before Fader – audio will be sent at full-volume, before the fader is applied, and after any pre-fader effects. This is the default.
- After Fader – audio will be sent immediately after the fader, and before any post-fader effects.
- After All Effects – audio will be sent at the end of the channel strip’s signal processing chain, after fader and all effects are applied.
Remove a send by long pressing and then tapping “Delete”.
5.7.The Clip Mixer #
With the mixer in its simple mode, tap the button to toggle the Clip Mixer.
You can also enter the Clip Mixer while the main mixer is hidden by long-pressing on the button on the main screen. Tap it again to hide the Clip Mixer, or keep holding the button to switch to momentary mode, and the Clip Mixer will hide when you release the button, for quick changes.
With the Clip Mixer visible, swipe up or down on any clip to adjust the volume. While sliding, move your finger away horizontally to make finer changes. Swipe left or right to adjust the balance. Double-tap on a clip to set the volume back to 0 dB.
You can adjust multiple clips simultaneously by dragging a rectangle from any empty space over the clips you would like to adjust. Then swipe on any clip to adjust the group.
With the Clip Mixer hidden, you can also quickly adjust the gain of a single loop by dragging your finger in a circle around the perimeter of a loop; a momentary radial fader will appear. Move your finger around clockwise to increase the volume, and anti-clockwise to decrease. Let go to hide the fader.
6.The Bottom Bar #
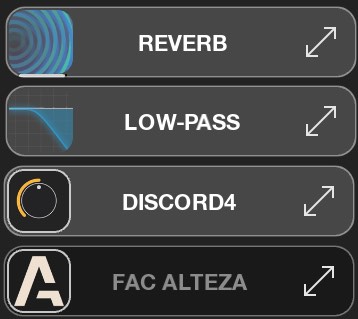
You can enable and disable modules by tapping in the main area of each button, and you can expand the module’s interface by tapping the icon – or double-tapping anywhere on the button.
You can also long press on these buttons to switch this behaviour around, so that a tap in the main area opens the module’s interface, and a tap on the ON/OFF button or double-tap will toggle the module.
Condensed Mode
As you add more effects and inputs, the bottom bar will expand upwards to fit the new items. You can switch the bar to condensed mode by swiping down on any of the buttons – each button will collapse down to a smaller form factor. Swipe up again to switch back to normal mode.
Hiding Effects and Inputs
You can also reduce the number of items that appear in the bottom bar by hiding items. Open an effect or source’s interface by tapping the icon, then tap the
icon to toggle hide.
Making More Room
The buttons at the far left and right of the bottom bar can also be hidden by swiping them off the edge of the screen. Bring them back in by tapping the bar handle, or swiping them back in.
7.Clip Detail #
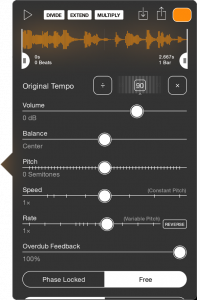
Here you can halve the length of the clip by tapping DIVIDE, and double it using EXTEND or MULTIPLY; Extend will pad with silence, and Multiply will repeat the clip’s contents.
You can import audio to the clip by tapping , and export the clip’s audio by tapping
, and you can change the colour of the clip with the top right colour selector.
You can also rename the clip, by scrolling up to the edit field. The clip name will appear on the clip in the main screen.
If the clip is empty, you can define a pre-set length here, and the clip will automatically record for the set length.
Trimming, Original Tempo and Intro/Outro
Adjust the start and end points of a clip using the start and end handles on the clip’s waveform, and pinch to zoom in and out. The handles will initially snap to beat boundaries; hover for a moment to disable snapping. If your clip is not Phase Locked (see below), then you can tap and drag the playhead around to change the playback position.
If the audio has been imported, you can set the original tempo by either dragging the jog wheel, tapping the ÷ or ⨉ buttons, or tapping in the middle of the jog wheel and typing in the tempo. The clip will be time-stretched to fit your project’s tempo. If this is the first clip of your project, then your project’s tempo will be adjusted instead.
As you move the start and end points using the waveform handles, Loopy Pro will suggest a tempo that corresponds to a whole number of bars. Tap the suggestion to apply that as the clip’s original tempo.
If you inset the start or end point inwards, you can assign the preceding or following audio to be an intro or outro, respectively. These sections will play before or after the loop is started/stopped.
Parameters
You can also adjust the clip’s parameters: volume, balance, pitch, playback speed and rate, and overdub feedback.
Each of these parameters can also be defined at the colour level, and the parameters combine between levels. You can – for example – gain-stage each clip, but still modify the overall level and balance of all clips of the same colour (remember: colours are like tracks in a traditional DAW).
You can adjust any of these parameters via the Adjust Parameter action, for control with a MIDI controller, an on-screen widget or a Follow Action.
Speed and Rate
The “Speed” parameter determines how fast the track plays back, while keeping the pitch constant. When you adjust the speed, Loopy Pro will perform a high-quality time-stretch operation in the background, while playing the clip using a live time-stretch operation. When the time-stretch processing is complete, Loopy Pro will switch the new audio over.
The “Rate” parameter also determines how fast the clip plays, but the pitch of the clip will vary as you change the rate, just like tape or vinyl. You can use the rate parameter to reverse the track, by setting a negative rate, or tapping “Reverse”.
Like the other parameters, speed and rate are applied in addition to the settings at the colour-level – for example, if you specify a playback rate of 2.0x at the colour level, and 0.5x at the level of a particular clip, the clip will be played at 2.0 times 0.5: 1.0x.
When you adjust the playback speed or rate of a clip, Phase Lock (see below) will automatically be disabled, and the clip may go out of time with the rest of the project, as it’s playing at a different speed. You can turn on Phase Lock again and the clip will jump back to a synchronised position. You can also use the Phase Align action to perform this change, controlled by a MIDI controller, on-screen widget or Follow Action.
Overdub Feedback
Also known as “Decay”, this parameter defines how much of the current audio of a clip is carried over into the next overdub layer, while overdubbing.
Set to 0% to enter “replace” mode, where all existing loop audio is replaced by new audio. Set to 100%, the default, to mix all existing layers with new layers.
Phase Lock
Here, you can set a loop to be either phase locked or free. A phase locked loop will lock its playback position to the main timeline, even when it is not playing. When you start a phase locked loop playing, it will begin playing at a position determined by the overall timeline. A free loop, on the other hand, will always play from the start, regardless of the current timeline position.
Loop/Play Once
You can define whether a loop will play continuously (Loop), or play once and stop (Play Once). This setting can also be defined for an individual action, for triggering by an on-screen button or a MIDI controller.
Playback and Recording Settings
You can override the clip settings, by turning on the switch beside “Playback Settings” or “Recording Settings” override. You can also open either the global- or colour-level clip settings from here, for convenience.
Follow Actions and Gestures
Set up clip Follow Actions in conjunction with Loopy Pro’s powerful actions system to perform actions when certain clip events occur, and to implement sidechaining with the Amplitude Envelope follow action.
You can also configure clip gestures here, which will override the global- and colour-level settings. You can configure the actions which are performed when you tap, two-finger tap, long press, or swipe or long swipe in any direction.
8.The Canvas #
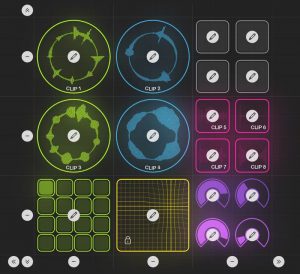
To access Loopy Pro’s canvas editor, tap the button from the main screen. The grid will appear by default, accessed by the
button on the bottom toolbar.
On the grid, you can move and scale elements; select multiple elements at a time by dragging a rectangle from any blank space, and then move them as a group.
Copy elements by selecting them, then tapping “Copy”; paste them by tapping in a blank space, and then tapping “Paste”. You can copy and paste between projects, and even between different devices using iOS’s Universal Clipboard feature.
You can add rows or columns to the canvas by tapping the ,
etc. buttons, and remove them and their contents by tapping the
buttons.
Along the bottom of the canvas are the elements which can be added. Tap an element to add it to the canvas. The following sections describe the elements that can be added to the canvas, and their configuration.
8.1.Clips: Loops and One Shots #
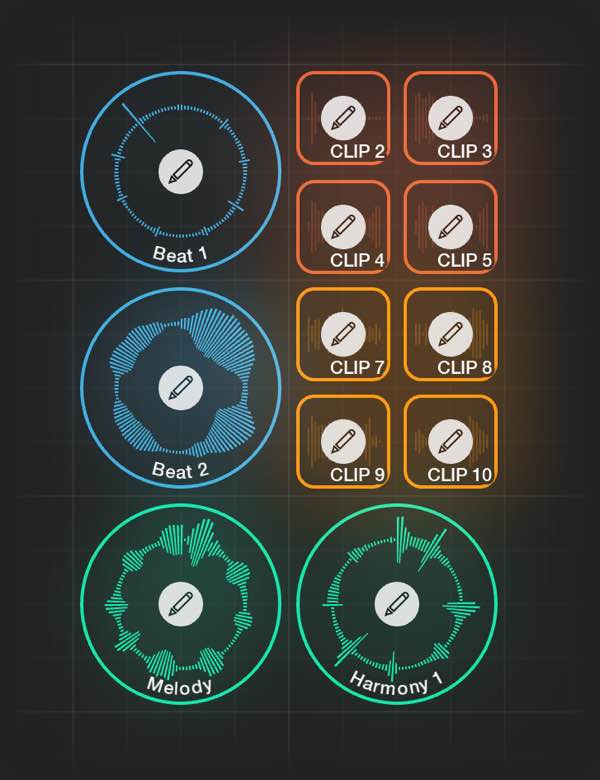
or
.
Clips can be any size; loops will appear as rectangles if they are a non-square aspect.
Once a clip has been added, tap it to open the clip’s detail screen.
You can also assign colours and group clips.
8.2.1.Buttons #
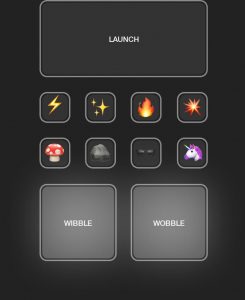
Create a button on the canvas with the toolbar button in the canvas editor.
You can configure a button to, for example, enable an effect on press, and disable it on release, or set a send to 100% on press, and gradually ramp it back to 0% on release. Or you could set up a number of buttons to act as scene launchers, each set to trigger a particular set of clips. A button could perform a cross-fade between one set of clips and another, with a configured interval. Or you could set a button to load the next project in a set.
Buttons provide the following triggers:
- Press
- Release
- Hold/Release – for boolean actions
- Toggle – for boolean actions
- Double-Tap – note that double-tap actions will delay other taps, as the widget waits to see if any tap is a double-tap.
- Long Press
- Two-Finger Tap
- Swipe (any direction)
- Swipe Up
- Swipe Down
- Swipe Left
- Swipe Right
- Long Swipe (any direction)
- Long Swipe (Up)
- Long Swipe (Down)
- Long Swipe (Left)
- Long Swipe (Right)
8.2.2.Sliders and Dials #
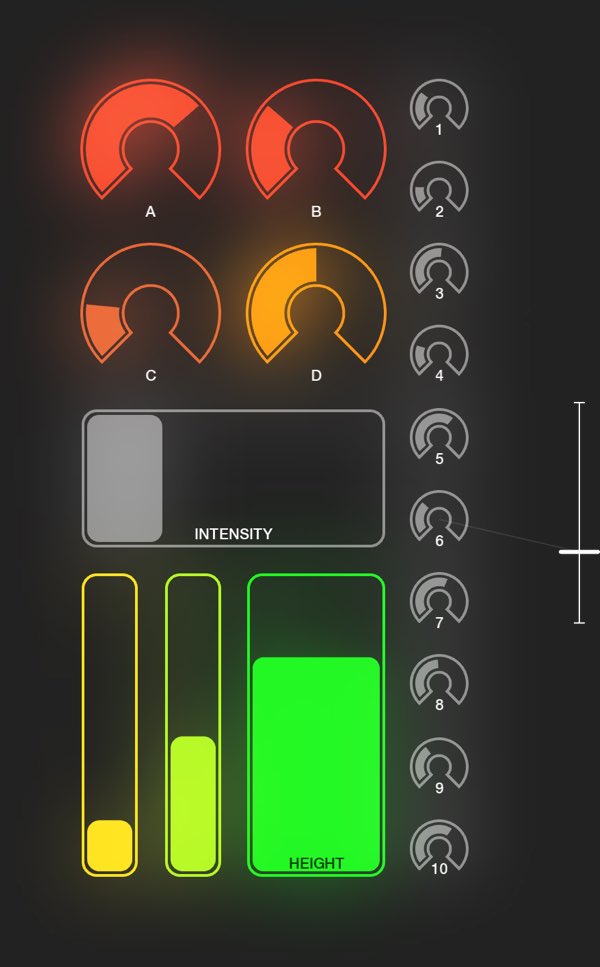
Adjust a slider or dial’s value by dragging up and down, or left and right for horizontal sliders. For finer control, move your finger away from the dial.
Create dials on the canvas with the toolbar button, and sliders with the
and
buttons.
Dials provide the following triggers:
- Value Change
- Press
- Release
- Double-Tap – note that double-tap actions will delay other taps, as the widget waits to see if any tap is a double-tap.
- Two-Finger Tap
8.2.3.X-Y Pads #
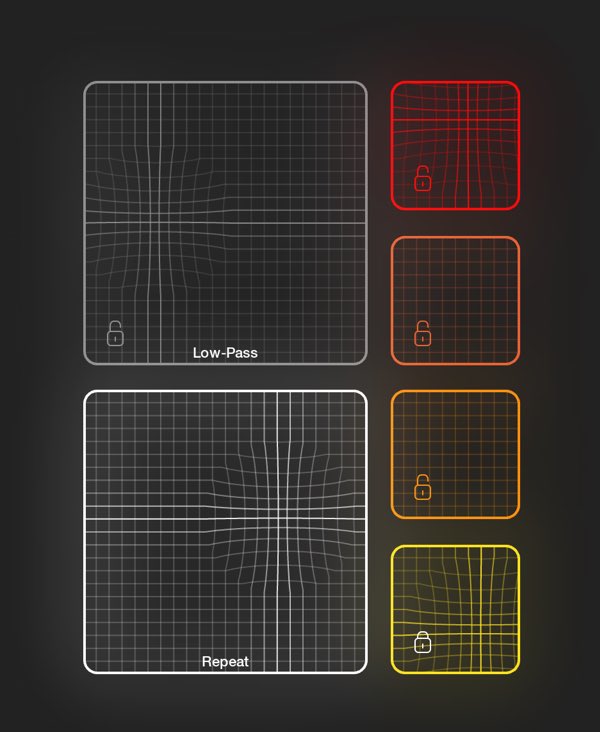
Create an X-Y pad by tapping the button on the canvas editor toolbar.
Loopy Pro provides a configuration screen to map an X-Y pad to a loaded effect. Once you add an X-Y pad, its configuration allows you to choose an effect, and then select which parameters of the effect are controlled by each axis.
You can configure an X-Y pad to operate in two modes: Always On, or Hold. In Hold mode, the effect will be enabled on touch, and disabled upon release. You can tap the button on the pad to lock or unlock the pad temporarily.
You can also customise an X-Y pad’s actions to perform any continuous action you like. You could, for example, use an X-Y pad to send a pair of MIDI CC messages to some external MIDI gear, or an AUv3 Audio Unit.
In custom mode, X-Y pads provide the following triggers:
- X-Value Change
- Y-Value Change
- Press
- Release
- Hold/Release – for boolean actions
8.2.4.The Clip Slicer #
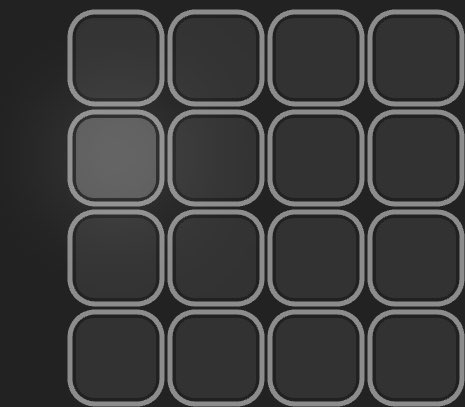
Create a Clip Slicer/Button Grid by tapping the button on the canvas editor toolbar.
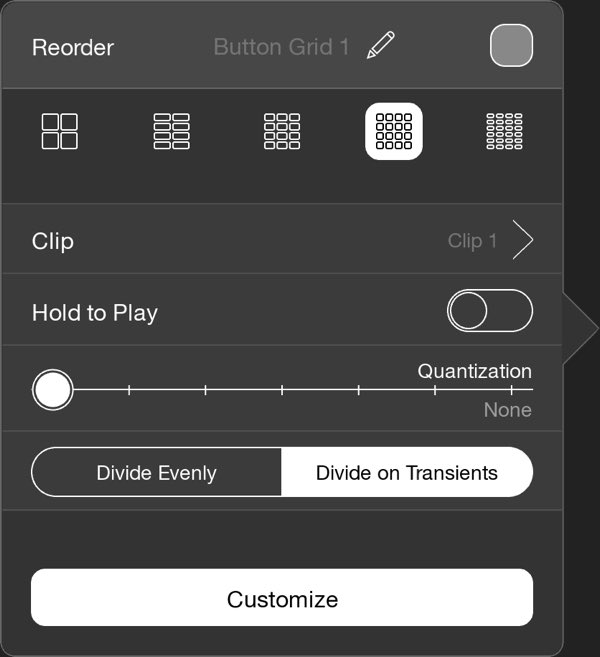
Configure the Clip Slicer with an individual clip, and it will allow you to play individual slices of the clip using the pads, either divided by transients in the clip, or divided evenly across the clip.
You can configure the Clip Slicer for various sizes, from 4 pads up to 24; turn on or off Hold to Play, and customise the quantisation, so that segment playback is synchronised with the timeline.
You can also put the button grid into custom mode, and completely customise the behaviour of each pad. Each pad offers Press, Release, and Hold/Release triggers.
8.2.5.Radio Buttons and Stepped Dials #
Radio Buttons and Stepped Dials are both versions of “List” widgets, which allow you to specify a number of different elements, each with associated actions, and switch between them.
8.2.6.Labels #
Labels allow you to add text to your project’s canvas. You can change the font size, weight and colour, and longer content will word-wrap, and scroll if the label widget is smaller than the text, which means you can also use labels for longer passages, such as lyrics or set lists.
Add a label to the canvas by tapping the button on the canvas editor toolbar.
By default, labels are non-interactive and can be overlapped on top of other canvas elements without interfering with their function. But you can also add actions to label widgets, just like buttons.
Label widgets provide the same set of triggers as button widgets:
- Press
- Release
- Hold/Release – for boolean actions
- Toggle – for boolean actions
- Double-Tap – note that double-tap actions will delay other taps, as the widget waits to see if any tap is a double-tap.
- Long Press
- Two-Finger Tap
- Swipe (any direction)
- Swipe Up
- Swipe Down
- Swipe Left
- Swipe Right
- Long Swipe (any direction)
- Long Swipe (Up)
- Long Swipe (Down)
- Long Swipe (Left)
- Long Swipe (Right)
8.2.7.Tutorial #
8.3.Pages #

Create a new page by tapping the on the page selector, or long press to determine how the new page should be created:
- Copy, to copy the current page elements to the new page.
- Copy With Content, to copy the current page elements, including clip content, to the new page.
- Blank Page to create a blank page.
After you make a selection, new pages will be created the same way until you make a different selection.
Long press on a page label in the selector to delete the page, or to rename it – you can use a single letter or number, or an emoji, to represent the page.
Reorder pages by pressing then dragging.
Pages can behave purely as an extension of the canvas, or as actual content containers. With page actions, you can switch all loops on a page on or off, or solo an individual page, to behave like scenes of clips.
8.4.Assigning Colours #
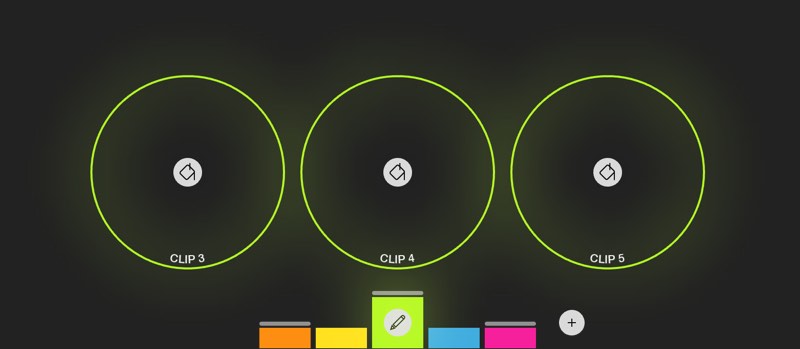
button on the editor toolbar.
Select a colour from the colour swatch at the bottom, and then tap or drag your finger over tracks to assign that colour.
You can add new colours by tapping the button to the right – these will automatically appear in the mixer. Loopy Pro will add new colours in an order that attempts to maintain the maximum visual distinction between colours, and will keep them ordered by hue.
Colours which have been assigned to clips will be displayed with a grey bar above the colour swatch; empty colours have no grey bar.
Long press on a colour swatch to delete that colour.
Colour Settings
Tap on the selected colour swatch to edit the settings for that colour – you can access the same screen by opening the menu at the top right of the screen and tapping “Color Groups”.
Here, you can rename the colour and, just like the clip detail screen, edit the colour’s parameters: volume, balance, pitch and speed. You can override the global clip settings, by turning on the switch beside “Playback Settings” or “Recording Settings” override.
You can also set up clip Follow Actions in conjunction with Loopy Pro’s powerful actions system to perform actions when certain clip events occur, and to implement sidechaining with the Amplitude Envelope follow action.
And you can configure clip gestures here, which will override the global settings. You can configure the actions which are performed when you tap, two-finger tap, long press, or swipe or long swipe in any direction.
9.Creating Song Sections #
Loopy Pro provides a number of different ways to define groups of clips, for near limitless customisability in defining song structure.
Play Groups
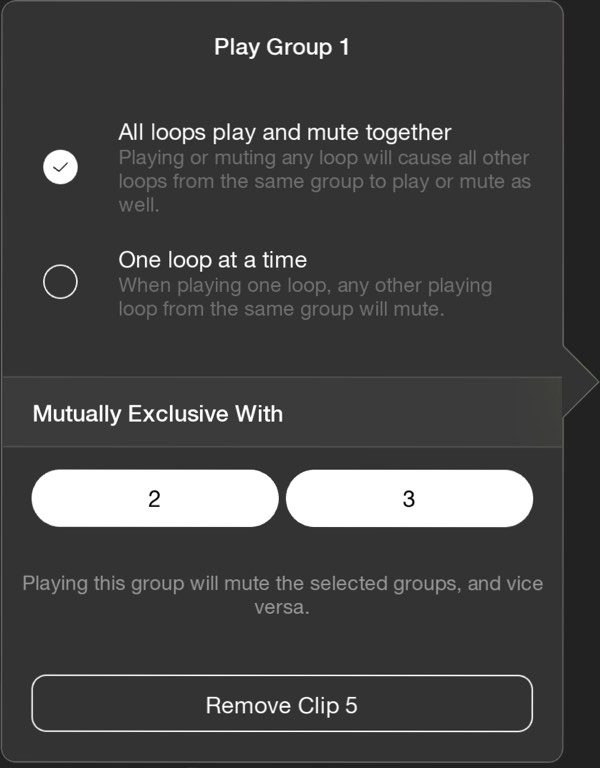
Create and configure Play Groups by opening the canvas editor by tapping the from the main screen, then tapping the
button to open the Play Groups editor. Here, you can drag loops together, or drag a rectangle around a set of loops, in order to create groups.
Tap a loop that’s in a Play Group to open the settings for that group. You can configure a group so that starting or stopping any loop in the group will start or stop all the other loops, or so that only one loop in the group will play at a time.
You can make groups mutually exclusive with each other, so that starting one group will stop the others.
Actions
You can also create your own completely custom groupings by using actions.
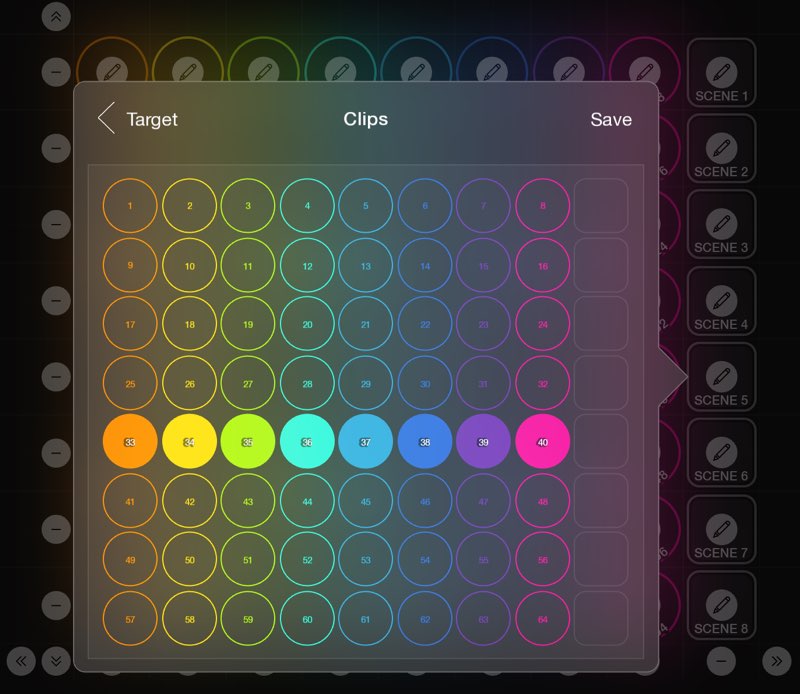
For example, to create a clip/scene launcher layout where loops in rows play together, you could create a column of button widgets, each bound to a solo action, with the clips in each row targeted, and “All Loops” set as the Solo Context. You can see this configuration in the “8×8 Scenes” sample project provided with Loopy Pro.
Scene launcher action configuration
You can also create button widgets bound to the play action, with an arbitrary selection of clips, to create any kind of sectioning you wish.
Follow Actions
You can also use clip play/stop Follow Actions to trigger play/stop actions on other clips whenever a clip is started or stopped.
10.Actions #
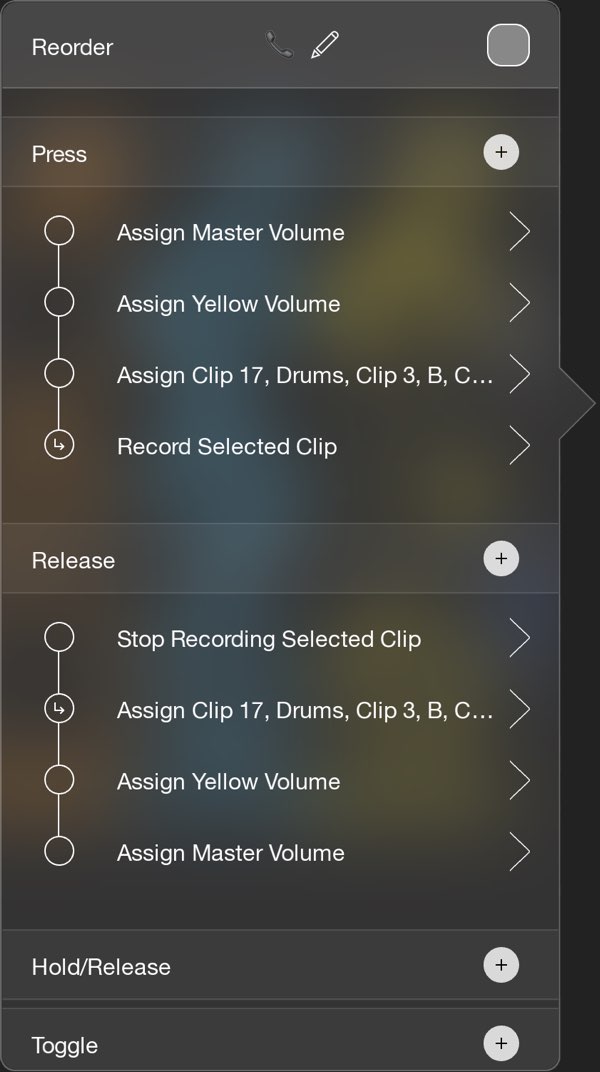
Everything in Loopy Pro can be accessed via actions, which you can attach to on-screen widgets, like buttons and dials, or bind to triggers on a MIDI controller. You can assign actions to gestures, or to Follow Actions.
Actions include controls for clip playback and recording, and audio parameters like volume, balance, pitch and speed. There are actions to adjust effect parameters and sends, play and stop the master clock, adjust input gain and enable/disable inputs, change tempo, and much more.
With actions and widgets, you can essentially make your own audio production apps within Loopy Pro – effortlessly – and with a MIDI controller you can build your own looping setups, to suit your individual style.
10.1.Action Types #
Actions come in a number of different types, and are suited to different purposes:
- Impulse actions are triggered once and have no state; they are used for things like clearing a clip, initiating a parameter value change, or triggering a scene.
- Boolean actions have an on/off state; they’re used for things like enabling/disabling an effect, or toggling mute for a channel.
- Continuous actions have a numeric value; they’re used for an effect parameter, or a volume fader, or a send knob.
Depending on the control, different actions will be available. A dial widget will allow you to bind continuous actions to it, and a button’s Press action, or a MIDI Controller Program Change trigger will only allow you to bind Impulse actions, while a button’s Hold/Release trigger will accept boolean actions.
The remainder of this section will describe all the actions currently available within Loopy Pro. This list is likely to grow as Loopy Pro develops further.
10.2.Clip Actions #
Actions that operate on clips.
Clip Selection
Loopy Pro provides a set of “Select” actions which control on-screen selection of clips. Selected clips appear on-screen with a white dot, and can then be used as an action target, allowing you to use the same action on whatever clip is selected. There are actions to select the next and previous tracks, in left-to-right, top-to-bottom order, as well as actions to select tracks to the left, or right, above, and below.
Targets
The following targets are supported by clip actions:
- One or more specific clips
- Next Tapped Clip – Loopy Pro will prompt you to tap a clip on-screen when triggering the action
- Last Tapped Clip – The last clip which was tapped on-screen, or selected via “Next Tapped Clip”
- Selected Clip – The clip which is selected (see “Clip Selection” above)
- All Clips – Every clip in the project
- Specific Color – All the clips in a specific color
- Next Selected Color – Prompts you to select a colour on-screen when triggering the action; action will then affect all clips in that colour
- Last Selected Color – The last colour that was selected
- Colour of Selected Clip – All the clips that have the same colour as the selected clip (see “Clip Selection” above)
- Color of Next Tapped Clip – Prompts you to select a clip on screen when triggering the action; action will then affect all clips with the same colour
- Color of Last Tapped Clip – All clips of the same colour as the last clip that was tapped on-screen or selected via “Next Tapped Clip”
Following is a list of all clip actions:
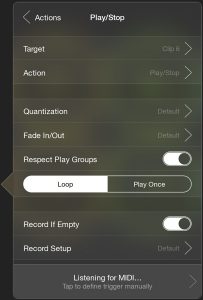
Play/Stop
Start or stop a clip playing.
Parameters:
- Action – whether to toggle playback on/off, depending on current state; always play, or always stop
- Quantization – how to synchronise start/stop with the master timeline: Default, None, Master (synchronise with the master clock’s cycle), Loop (synchronise with a specific loop, context-dependent), Custom.
- Fade In/Out – whether to apply a volume ramp in or out
- Respect Play Groups – when acting on a clip that’s a member of a Play Group, whether to perform Play Group logic
- Loop vs Play Once – when acting on a loop, whether to start the loop playing continuously, or play through once, then stop
- Record If Empty – if a clip is empty when the action is triggered, whether to begin recording
- Record Setup – If Record If Empty enabled, defines the recording configuration
Solo
Stop other clips playing when a clip is started, with a configurable context defining which other clips will be stopped.
Parameters:
- Action – whether to toggle solo, depending on current state; always solo, or always un-solo
- Solo Context – the context that defines the other clips that will be stopped as part of the solo: Color, or All Loops. You can specify a list of clips, colours or play groups which are excluded from this operation.
- Quantization – how to synchronise start/stop with the master timeline: Default, None, Master (synchronise with the master clock’s cycle), Loop (synchronise with a specific loop, context-dependent), Custom.
- Fade In/Out – whether to apply a volume ramp in or out
Mute
Silence a clip’s audio output; clip may continue playing, but silently.
Parameters:
- Action – whether to toggle mute, depending on current state; always mute, or always un-mute
- Ramp – duration over which to mute/unmute; a fade will be applied over this duration
Record
Start or stop recording a clip.
Parameters:
- Action – whether to toggle recording, depending on current state; always start recording, or always stop recording
- Use Default Settings – whether to use the settings defined at the applicable level (clip, colour, or global), or override these settings
- If Clip Has Audio – what to do if the clip is already recorded: Do Nothing, Toggle Playback, Play If Stopped/Overdub If Playing, Overdub, Rerecord)
- Other settings – see the record section in Clip Settings for details.
Adjust Parameter
Adjust volume, balance, pitch or speed for one or more clips.
Parameters:
- Parameter – the parameter to adjust
- Action – if trigger is impulse, whether to assign a specific value, or nudge the value by some amount
- Value – if trigger is impulse, the value to assign/nudge
- Ramp – if trigger is impulse, duration over which to apply the change. A smooth ramp will be applied.
- Minimum Value – if trigger is continuous, the minimum value to assign, at the lower end of the controller’s range
- Maximum Value – if trigger is continuous, the maximum value to assign, at the upper end of the controller’s range
- Controller Input Start – if trigger is continuous, the incoming controller value to treat as the lower end of the range. Incoming values outside this range will be clipped to the given bounds.
- Controller Input End – if trigger is continuous, the incoming controller value to treat as the upper end of the range.
Clear Clip
Clear all audio content from a clip.
Parameters:
- If Recording – What to do if the clip is currently recording: Stop Recording only, or Clear Clip.
Merge/Move
Copy or move the audio content from one clip to another, mixing audio with the destination clip
Parameters:
- Clear Source After Merge – Whether to clear the source clip once merge has completed (i.e. move, rather than copy)
- Play Target – Whether to start the target clip playing, if it is stopped
Multiply Clip Length
Extend the length of the clip by a factor of two.
Parameters:
- Pad with Silence – whether to extend the clip by padding with silence, instead of repeating the clip’s audio
Divide Clip Length
Truncate the length of the clip by a factor of two.
Show Detail Screen
Open the clip’s detail screen.
Select
Select a clip (see “Clip Selection” above).
Phase Align Clip
Re-set the clip playback position to be synchronized with other clips in the project. This is particularly useful when using a playback rate or speed adjustment as an effect, as changing playback speed/rate will make a loop go out of time.
You can specify:
- Set Phase Lock – whether Phase Lock will be turned on for the clip
- Phase Quantum – if Set Phase Lock is disabled, specify a custom time quantum to sync to. For example, set “Whole Loop Duration” to sync with a time period equal to the length of this clip, so that it’s in sync with all other clips of the same length. Or, set it to 1 Bar, to sync to just 1 Bar intervals. The shorter the interval, the less travel the clip may need to perform to reach a synchronised position.
- Transition – whether, and how, to perform a smooth transition to the new playback position. “None” will disable any transition, so that the clip jumps to the new position instantly. “Constant Pitch Speed Up/Slow Down” will speed up or slow down the clip over the specified duration, while keeping pitch constant. “Variable Pitch Speed Up/Slow Down” will speed up or slow down the playback rate, with a variable pitch like a type/vinyl effect.
- Reset Rate – whether to reset the playback rate to a final value
- Final Playback Rate – the final speed/rate to assign
10.3.Color Actions #
Actions that operate on colours.
Play/Stop
See Clip Play/Stop, above.
Solo
See Clip Solo, above. Note that this action operates on the clips of this colour, and starts/stops the clips as required. This is a different action from Mixer Solo below, which operates on the mixer channel strip.
Mixer Solo
Solo or unsolo the colour channel in the mixer.
Parameters:
- Action – Whether to solo/un-solo based on current state; always solo, or always un-solo
Mute
Mute the output of a colour.
Parameters:
- Action – Whether to mute/unmute based on current state; always mute, or always unmute
Adjust Parameter
See Clip Adjust Parameter, above.
10.4.Effect Actions #
Enable/Disable Effect
Toggles the effect on or off. When off, the effect is bypassed.
Parameters:
- Action – Whether to enable/disable based on current state (toggle); always enable, or always disable.
Adjust Effect Parameter
Adjust a parameter value.
Parameters:
- Target – the effect parameter to adjust
- Action – if trigger is impulse, whether to assign a specific value, or nudge the value by some amount
- Value – if trigger is impulse, the value to assign/nudge
- Ramp – if trigger is impulse, duration over which to apply the change. A smooth ramp will be applied.
- Minimum Value – if trigger is continuous, the minimum value to assign, at the lower end of the controller’s range
- Maximum Value – if trigger is continuous, the maximum value to assign, at the upper end of the controller’s range
- Controller Input Start – if trigger is continuous, the incoming controller value to treat as the lower end of the range. Incoming values outside this range will be clipped to the given bounds.
- Controller Input End – if trigger is continuous, the incoming controller value to treat as the upper end of the range.
Select Effect Preset
Load a saved preset for an effect. Presets can be provided by the effect manufacturer, or user presets you create.
Open Effect Interface
Show the user interface for the effect. If the effect is built-in or AUv3, opens a window to reveal the effect. If the effect is an Inter-App Audio app, switches to that app.
Parameters:
- Action – Whether to show/hide UI based on current state (toggle); show, or hide. Note that “hide” only applies to non-IAA effects.
10.5.Audio Source Actions #
This section coming soon.
10.6.MIDI Source Actions #
10.7.Bus Actions #
This section coming soon.
10.9.Page Actions #
Switch Page
Switch to another page.
Parameters:
- Action – The kind of switch to perform:
- Show: Show the page, without playing or stopping anything
- Switch: Stop playing the current page, switch and start playing the new one
- Solo: Toggle solo of the page: stops playing all loops from other pages
- Start: Start playing loops in the page
- Stop: Stop playing loops in the page
- Target – The page to act on: Next Page, Previous Page, or a specific page.
- Quantization – How to synchronise start/stop with the master timeline: None, Master (synchronise with the master clock’s cycle), Loop (synchronise with a specific loop, context-dependent), Custom.
Copy Page
Copy the layout and optionally content of the current page to a new page.
Parameters:
- Source – The copy source: Current Page, Next Page, Previous Page, or a specific page.
- Copy Clip Content – Whether to copy contents of the clips to the new page.
10.10.Session Actions #
Toggle Clock Pause
Pause or unpause the timeline.
Parameters:
- Reset Timeline After Pause – Whether to move the playhead back to zero after pausing (on by default).
- Perform Count-In – When unpausing from the start of the timeline, whether to perform a count-in with metronome prior to playback.
Undo
Undo the last action.
Redo
Redo the last undo step
Tap Tempo
Update the tempo by tapping out a new one (for impulse triggers only).
Adjust Tempo
Modify the current tempo.
Parameters:
- Action – if trigger is impulse, whether to assign a specific value, or nudge the value by some amount
- Value – if trigger is impulse, the value to assign/nudge
- Ramp – if trigger is impulse, duration over which to apply the change. A smooth ramp will be applied.
- Minimum Value – if trigger is continuous, the minimum value to assign, at the lower end of the controller’s range
- Maximum Value – if trigger is continuous, the maximum value to assign, at the upper end of the controller’s range
- Controller Input Start – if trigger is continuous, the incoming controller value to treat as the lower end of the range. Incoming values outside this range will be clipped to the given bounds.
- Controller Input End – if trigger is continuous, the incoming controller value to treat as the upper end of the range.
Reset Clock
Stop playback, reset the tempo and master length to an unset state. The next recorded loop will define the tempo and master length.
Set Master Length
Assign the clock master length.
Parameters:
- Action – double, halve, or set a specific value.
Start New Project
Begin a new project.
Parameters:
- Confirm – whether to confirm first (if enabled, a second activation of the action will confirm).
- Save first – whether to save the current project before starting the new one.
- Template – if you have defined any project templates, the one to use for the new project.
Load Project
Load a project, with an optional cross-project transition.
Parameters:
- Confirm – whether to confirm first (if enabled, a second activation of the action will confirm).
- Save first – whether to save the current project before starting the new one.
- Quantization – how to synchronise the project load relative to the current timeline.
- Crossfade – The duration of crossfade from the current project to the new one.
- Effect Tails – Whether to blend audio from the current project with the new one, until effect tails (e.g. reverb or delay) go silent.
- Start Clock – Whether to start the clock of the new project running.
- Load Audio Units First – Whether to wait for audio units in the new project to load before beginning a transition.
- Copy Levels – Whether to copy the currently-assigned mixer levels from the current project to the new one.
- Project – The target project:
- The next project in the same folder as the current project.
- The next project in the current set list.
- A specific project
Adjust Master Volume
Modify the main output volume.
Parameters:
- Action – if trigger is impulse, whether to assign a specific value, or nudge the value by some amount
- Value – if trigger is impulse, the value to assign/nudge
- Ramp – if trigger is impulse, duration over which to apply the change. A smooth ramp will be applied.
- Minimum Value – if trigger is continuous, the minimum value to assign, at the lower end of the controller’s range
- Maximum Value – if trigger is continuous, the maximum value to assign, at the upper end of the controller’s range
- Controller Input Start – if trigger is continuous, the incoming controller value to treat as the lower end of the range. Incoming values outside this range will be clipped to the given bounds.
- Controller Input End – if trigger is continuous, the incoming controller value to treat as the upper end of the range.
Toggle Metronome
Turn on/off the metronome.
Parameters:
- Action – Whether to toggle the metronome based on current state; turn metronome on, or turn it off.
- Sound – Whether to enable metronome sound
- Flash – Whether to enable screen flash
Adjust Metronome Volume
Modify the volume of the metronome.
Parameters:
- Action – if trigger is impulse, whether to assign a specific value, or nudge the value by some amount
- Value – if trigger is impulse, the value to assign/nudge
- Ramp – if trigger is impulse, duration over which to apply the change. A smooth ramp will be applied.
- Minimum Value – if trigger is continuous, the minimum value to assign, at the lower end of the controller’s range
- Maximum Value – if trigger is continuous, the maximum value to assign, at the upper end of the controller’s range
- Controller Input Start – if trigger is continuous, the incoming controller value to treat as the lower end of the range. Incoming values outside this range will be clipped to the given bounds.
- Controller Input End – if trigger is continuous, the incoming controller value to treat as the upper end of the range.
10.11.MIDI Actions #
Send MIDI Message
Send some MIDI to a MIDI target.
Parameters:
- Target – The target of the message: A connected MIDI device, an AUv3, another app running in the background, or a network MIDI destination.
- Message – The message to send: A PC, CC, Note, or a custom string (e.g. SysEx message). When configuring, tap “Send” to immediately send the message, for testing purposes.
10.12.Controller Actions #
This section coming soon.
10.13.Follow Actions #
Use clip and colour Follow Actions to perform actions when certain clip events occur. For example, you can configure a clip to turn on an effect when it begins recording, and turn off the effect again upon record end. Or you can make a clip start another clip playing when it starts. You can even make chains of clips that start each other playing in turn, one after another.
You can define Follow Actions at the clip level, from the clip detail screen, the colour level, from the colour settings screen, and the global Clip Settings.
The following events are defined for Follow Actions:
- Load Project
- Begin Record
- Finish Record
- Begin Initial Record
- Finish Initial Record
- Begin Overdub
- Finish Overdub
- Play
- Stop
- Clear, and a special follow action:
- Amplitude Envelope
Amplitude Envelope Follow
Loopy Pro provides a special Follow Action – Amplitude Envelope – which allows you to specify continuous value actions which map to the current clip volume as a clip plays.
You use this to implement sidechaining, where a parameter is controlled by an amplitude envelope. For example, you could configure an Amplitude Envelope on a colour representing your drum loops to drive the volume fader on a different colour for synth pads, for a sidechain compression effect.
11.Controlling Loopy Pro #
Loopy Pro can be controlled via on-screen widgets, or an external MIDI controller, via its flexible actions system.
Loopy Pro has built-in support for a number of popular controllers, including the Launchpad, the Akai APC40 mk2, and the MIDI Fighter Twister, and can be effortlessly set up to work with any other MIDI controller, via MIDI Learn.
11.1.MIDI Learn #
With MIDI Learn, you can program Loopy Pro to respond to incoming messages from a connected MIDI Controller, either connected wirelessly over Bluetooth, or via a USB interface connected to your device.
There are two ways to configure how Loopy Pro responds to incoming MIDI: via MIDI Learn itself, or via Loopy Pro’s Control Settings screen.
MIDI Learn provides a simple, immediate way to attach an action to an on-screen element. Open up MIDI Learn by either selecting “MIDI Learn” from the top-right menu, or by tapping the icon on the canvas editor.
In MIDI Learn mode, hotspots are shown with a shaded background: tap one of these elements to open the MIDI Learn panel for that item.
The panel displays settings relevant to the given action, and may provide a list of alternative actions by tapping the top-left “Actions” button.
While the MIDI Learn panel is active, Loopy Pro is listening for incoming MIDI messages from any connected device (tap to connect any Bluetooth hardware you may have). Pressing a button or moving a knob on your MIDI controller will cause Loopy Pro to select that as the trigger for the shown action, thus creating a binding between the action and the incoming trigger.
11.2.Triggers #
A trigger is an incoming MIDI message which can be bound to one or more actions. You can customise the trigger by tapping on the bottom trigger panel, shown with a shaded background.
Impulse Triggers
For impulse action types (as opposed to continuous actions that you might map to a dial), you can configure Loopy Pro to respond to:
- On state (e.g. a Note On, or nonzero CC),
- Off state (e.g. Note Off, on a zero CC),
- Either On or Off: Useful for MIDI controllers that only support toggle buttons, rather than momentary ones
- Hold
- Double Tap
Hold and Double Tap
Hold and Double Tap triggers are special cases, as Loopy Pro must wait a short interval after the initial incoming message to evaluate the gesture. By default, if you bind a Hold or Double Tap to a button in addition to a separate On or Off binding, Loopy Pro will trigger the other bindings in addition to the Hold or Double Tap.
If you would prefer Loopy Pro to only perform the On or Off action if a Hold or Double Tap is not detected, then you can enable the “Defer Other Actions” setting for the Hold or Double Tap binding. When this is enabled, On or Off bindings will be delayed until the Hold/Double Tap timeout interval is reached (for time-sensitive actions like toggle record, the time of the action will actually correspond to the initial On message).
Continuous Triggers
For continuous action types (such as a parameter adjustment), you can specify an incoming CC as Absolute or Relative; Loopy Pro will automatically detect this when you move the relevant controller knob.
For most continuous actions, you can also specify two ranges: A minimum and maximum value for the action (e.g. from -∞ dB to 0 dB), and a sub-range of the controller input. The former is used to limit the range of values of the parameter, while the latter can be used to allocate a sub-range of the available incoming values from the controller – to, for example, use the first half of a slider’s throw to adjust one parameter, and the second half of the throw to affect a different parameter.
11.3.Bindings #
A binding is a mapping between an incoming trigger, and one or more actions to perform when that trigger is received.
Hotspots with bound actions in MIDI Learn are shown with a lighter shaded background. You can also view a complete list of bindings in the Control Settings screen, accessible from the main top-right menu in Loopy Pro.
See Control Settings for more details on editing bindings.
11.4.Profiles #
Loopy Pro control profiles are collections of action bindings. There are two kinds of profiles: project profiles, and global profiles.
Project profiles allow you to store bindings that are saved within a project. You can reference specific project objects like clips and widgets, and references are persistent.
Global profiles exist outside of your projects, and are always available regardless of which project is loaded. You can have multiple global profiles and switch between them, either manually or via an action. Specific clips and widgets referenced from actions within a global profile are identified by their order on-screen, so rearranging your project canvas may result in the targets of some actions changing.
11.5.MIDI State Feedback #
By default, for most connected MIDI controllers, Loopy Pro will send MIDI feedback for any currently-bound actions.
For example, if you have a CC bound to a clip’s Play/Pause state, then whenever that state changes Loopy Pro will send the same CC back to the MIDI controller, with a value corresponding to the current clip state. Similarly, if you have a CC set to control an AUv3 effect parameter, for example, then whenever that parameter changes, Loopy Pro will send that CC back to the MIDI controller with the corresponding value.
This allows compatible hardware to display the current state of Loopy Pro.
If this is not desired, this can be disabled by opening up Control Settings, tapping the device name, and turning off the switch beside “Feedback Enabled”.
11.6.Special Hardware Support #
Loopy Pro supports any controller capable of communicating via MIDI. However, there is enhanced support for certain controllers, to implement special features like RGB lighting.
This list is growing – see the Loopy Pro roadmap for details, or to request support for your hardware.
- Akai APC40 Mk2
- Launchpad Pro Mk3
- Launchpad X
- Launchpad Mini Mk3
- MIDI Fighter Twister
12.The Sequencer #
You can also automate a live-looping session by sequencing your clips, and using the sequencer to trigger record and playback.
Open the Sequencer by tapping the button in the bottom-left navigation area.
Each row in the Sequencer represents an individual clip on the main canvas of Loopy Pro. You can reorder these rows by tapping and holding in the left area, and dragging up or down.
Zoom in or out by pinching in the main area to expand or contract the number of bars visible. Pinch to zoom vertically in the left row header area to grow or shrink each row.
When a sequence exists, a new SEQ button appears on the top toolbar. Tap this to enable or disable the sequence.
12.1.Creating a Sequence #
Creating Sequences Manually
Create segments on the sequencer by tapping in the main area. Press and hold a segment from the middle then drag left or right to move it in the timeline. Drag from the end to expand the segment along the timeline, and drag from the start to contract it forwards. Tap a segment to select it, and to copy or delete it.
Segments will snap to the grid determined by the current zoom level. Zoom in – by pinching with two fingers in the main area – to zoom in and decrease the grid snap size. When zoomed all the way in, no snap-to-grid is applied.
Tap in the bottom right of the screen to toggle selection mode; when active, you can tap and drag over segments to select them as a group.
Using the Sequence Recorder
You can also record sequences as you perform in Loopy Pro. Tap the button on the top toolbar to open the Session Recording pop-up, then tap “Record Sequence”, to enable sequence recording.
Tap “Start Recording” to begin; Loopy Pro will count in for 4 beats, then begin recording. Any clips that are recorded, or played or muted, will be recorded to the sequencer timeline as segments.
Tap again to stop recording.
12.2.Automating Sessions #
You can use Loopy Pro’s sequencer to automate full performances, with recording actions and play/mute driven by the sequence.
When you have created a sequence, you can clear the audio out of sequenced clips – either via a swipe gesture on the clips on the main screen, or by double-tapping the waveform in the row header in the sequencer, and tapping “Clear” or “Clear All” – then an “Arm” option will be displayed in the row header.
Tap “Arm” to open the Arm Recording settings pop-up.
Arm Recording Options
Turn on the switch beside “Arm Recording” to arm the clip. When the playhead reaches the first segment within the timeline, the clip will begin recording, for the length defined by the “Loop Length” slider.
If the segment is positioned at the very beginning of the timeline, additional options are presented, to determine how the session will begin.
- Count-In will cause Loopy Pro to perform a 1, 2 or 4 bar count-in with a metronome. This requires you to set the tempo in advance, and use in-ear monitors/etc to hear the metronome.
- Immediate Start will cause Loopy Pro to begin recording immediately, as soon as you initiate playback; if no tempo has been set in advance, stop recording by tapping the playback button (or bound controller), or by toggling recording on the clip by tapping it, or using a controller.
- Detect Loop will use Loopy Pro’s automatic loop detection to detect the loop, and automatically end recording on time. Set a tempo first (or set the detection range) to give Loopy Pro a hint about the loop tempo for increased accuracy. As soon as playback begins, Loopy Pro will begin recording, and automatically end recording on the beat when a loop is detected.
12.3.Timeline Looping #
You can create looping regions on the sequencer timeline by tapping the icon at the bottom right, or by tapping the timeline marker and tapping “Loop From Here”. Drag the start and ends of the loop marker in the timeline header to adjust the start and end, or drag from the middle to move the loop region backwards and forwards in time.
During playback, when the playhead enters the loop region, Loopy Pro will loop through the defined region continually, until you tap the play/pause button which shows the symbol (or activate the controller bound to the Clock Pause action), whereupon playback will continue past the loop region when it is next reached.
You can use timeline looping in combination with sequence recording, to progressively record a sequence over several cycles. Timeline loops are also useful for marking a freeform part of a performance which may be of indeterminate length.
Tap the loop region in the timeline header to disable or delete the loop region, or tap to toggle between enabled or disabled state.
13.Managing Projects #
This section coming soon.
13.1.Exporting #
This section coming soon.
13.2.Save Points #
This section coming soon.
13.3.Using Folders #
This section coming soon.
13.4.Templates #
13.5.Set Lists #
Use Set Lists in Loopy Pro along with the Load Project action – connected to a button on-screen, a controller, or a follow action, for example – to chain projects together, with a seamless transition between them.
Manage Set Lists from within the Projects section. Tap “Create Set List” to begin; “Add Project” to begin adding projects to the list. Drag the handles at the left to change the order.
Then, you can select this Set List in the configuration for the Load Project action, under the “Next Project In Set List” option.
14.Session Recording #
This section coming soon.
15.Using Loopy as an AUv3 Audio Unit #
This section coming soon.
16.Settings #
16.1.Clip Settings #
The Clip Settings screen allows you to set the global configuration for clips – these can then be overridden at the colour, clip, and action level, if necessary.
Clip Settings are divided into four sections: Playback settings, recording settings, audio settings, and gestures.
The following will describe each setting in detail.
Playback Settings
The following settings define how clips play and stop. These can be overridden for particular colours and individual clips, as well as for individual playback actions.
Play/Stop Quantization
Configure the synchronisation intervals at which loop play and stop events occur. None: Play and stop loops immediately, with no delay. Master: Play and stop loops in sync with the current clock master cycle. Loop: Play and stop loops in sync with the top of the specific loop. This is context-dependent – when stopping a loop, for example, it will stop at the end of the loop being stopped. When starting a loop playing, it will sync with the longest currently-playing loop, if there is one – if not, it will start immediately. Custom: Define a custom sync interval. Default value: Loop
Phase Lock Loops
Keep loops synced with the timeline, even when they’re not playing. When Phase Lock is on, the position indicator of stopped loops will continue to move around the loop; when the loop is started again, it will start from that position, rather than from the start of the loop. Note that if you turn off Phase Lock, then Play/Stop Quantization determines how loops will be synchronised with each other, as this dictates the start synchronisation. Default value: On
Time Fitting
Determine whether and how clips are fit to the project’s tempo.
- None – Clips won’t follow the project tempo at all. They will play at whatever their original tempo is.
- Time Stretch – Clips will be time-stretched to follow the tempo, keeping the pitch constant while adjusting the speed. When the tempo changes, Loopy Pro will perform a high-quality time-stretch operation in the background, while playing the clip using a live time-stretch operation. When the time-stretch processing is complete, Loopy Pro will switch the new audio over.
- Fast Time Stretch – As above, clips are time-stretched, but the live time-stretch operation (performed while Loopy Pro is processing the audio in the background) is less CPU-intensive, at the cost of fidelity.
- Varispeed – Clips will alter their playback rate to follow the tempo, with tape-style variable-pitch playback.
- Time-Fit One-Shots – Whether to perform time-stretching on one-shots while changing the tempo.
- Never: Keep one-shots at original playback speed.
- Always: Always update one-shot speed to match tempo.
- Auto: Decide based on length of one-shot – only one-shots longer than 4 beats will be time-stretched. This is the default.
One-Shot Quantization
Configure the synchronisation intervals at which one-shot playback begins. None: Play one-shots immediately. Master: Synchronise one shots with the clock master cycle. Custom: Define a custom sync interval. Default value: None
Hold to Play One-Shots
Whether to only play one-shots while holding. When this setting is on, releasing a one-shot will stop playback. Default value: On
Fade In/Fade Out
The interval over which to fade in and out clip playback, rather than starting and stopping immediately. Set it to any duration, or:
- Microfade – No fade in/out, but Loopy Pro will perform a very short microfade to avoid clicks when starting and stopping. This is the default.
- Hard Zero – Disable even the microfade. You may hear clicks on start/stop if the clip does not already have appropriate audio boundaries. This is a reasonable setting if you don’t want to introduce additional smoothing on playback, which may interfere with initial transients.
Loop Boundary Crossfade
The amount of audio to blend across loop boundaries. When recording loops, Loopy Pro will begin recording a little early, and end recording a little late, and use this additional audio to blend smoothly across the loop boundary. Set this to longer values to create a very smooth, long fade (good for drones, for instance), or shorter values to create a shorter transition. Default value: 50ms
Record If Empty
Whether to begin recording empty clips when triggered. If you disable this setting, tapping a clip or triggering it via an action/MIDI will have no effect. With this setting on, tapping an empty clip will begin recording. Default value: On
Pause Clock When Idle
If you stop all loops playing in a session, the clock will be paused until you start a loop playing again. Default value: Off
Second Quantization
When you activate an action a second time during a quantisation count-in or out, then if this setting is enabled Loopy Pro will begin a second-level 1-bar quantisation interval. If this setting is off, then the quantisation will just be cancelled, and the action performed immediately. During the second-level count-in, the action can be activated again to cancel this second count-in, and perform the action immediately. Default value: Off
Recording Settings
The following settings define how clips record. These can be overridden for particular colours and individual clips, and can be customised for individual record actions.
Retrospective Recording
When this setting is on, Loopy Pro is continually recording into a buffer, set by the current clock master cycle length. When you trigger recording, this buffer is instantly copied to the triggered clip, allowing you to capture a loop after the fact. The audio that will be recorded depends on the Retrospective Quantization setting. Default value: Off
Retrospective Quantization
The quantisation interval to use when triggering Retrospective Recording. Immediate: Capture the immediately-preceding audio, regardless of position in the current cycle. Quantized: Capture the last cycle, aligned with the clock master cycle. If recording is triggered shortly before the start of a cycle boundary, Loopy Pro will capture the current cycle, continuing recording the live audio until the cycle is complete. Default value: Quantized
Auto Count Out
When this setting is enabled, loops will record for the Count Out Quantization interval, and then stop recording automatically. This allows you to record loops of a pre-defined length without needing to manually end recording. If you disable this setting, clips will continue recording indefinitely, until you stop recording, and Loopy Pro will select an appropriate quantised length for the clip, if Length Quantization is enabled. See Pre-Set or Free Loops for further discussion. Default value: On
Count In Quantization
The synchronisation interval for beginning loop recordings. None: Start recording loops immediately. Master: Wait until the beginning of the next clock master cycle to begin recording. Custom: Define a custom sync interval. Default value: Master
Count Out Quantization
The synchronisation interval for ending loop recordings. None: Stop recording loops immediately. Master: Wait until the beginning of the next clock master cycle to stop recording. Custom: Define a custom sync interval. Default value: Master
Length Quantization
Whether to constrain loop lengths to multiples or subdivisions of a bar. Default value: On
Pad Loop Length
When recording a new loop and ending record before the set quantisation interval, whether to extend the loop with silence to the full interval. Default value: Off.
Loop Audio Threshold Recording
When on, loops will wait for the input level to cross the defined audio threshold before recording starts. You can use this facility to “arm” a loop in advance, which will only start recording when you begin playing. Default value: Off
One-Shot Audio Threshold Recording
When on, one-shots will wait for the input level to cross the defined audio threshold before recording starts. Default value: On
Audio Threshold
The audio threshold to use for Audio Threshold Recording.
Record Intro
When enabled, Loopy Pro will begin listening immediately upon starting a record count-in. If the audio level crosses the threshold, recording will begin immediately, and the audio will be recorded to a special “intro” section of the loop, which will play back when starting the loop playing. This setting requires Count In Quantization to be enabled. See Intro and Tail for further discussion. Default value: Off
Record Tail
When enabled, Loopy Pro will continue recording for a short time after loop recording ends. Recording will continue until Loopy Pro detects that the audio level has dropped off. The audio will be recorded to a special “tail” section of the loop, which will play back in the second and latter repeats of a loop, and when the loop is stopped. See Intro and Tail for further discussion. Default value: Off
Simultaneous Recording
When enabled, you can record multiple loops at the same time. If disabled, when you start additional loops recording while a loop is already being recorded, the additional loops will enter a record queue, and each loop will be recorded one after another. Default value: Off
After Recording
Configure how a loop behaves after its initial recording has completed. Play: Loop will begin playback immediately after recording. Stop: Loop will be silent after recording. Overdub: Initially begin overdubbing, for recording additional layers. Default value: Play
Phase Preservation
Whether to rotate new loops so that the start point is aligned with the current musical phase. If you disable this setting, Loopy Pro will perform no adjustment, so the start of the loop will be the point at which you began recording, which may not be what you expect. Default value: On
Wait for Playback
With this setting enabled, when the clock is paused and you start a loop recording, Loopy Pro will not begin recording until you unpause the clock. If this setting is disabled, Loopy Pro will automatically unpause the clock and begin playing when you start recording. Default value: Off
Auto Loop Detection
When enabled, Loopy Pro will automatically detect and trim the first loop of a session, allowing you to create tight, well-timed loops without having to be precise with the record start and end timing. See Automatic Loop Detection for more discussion. Default value: Off
Auto-End Detected Loop
With this setting enabled, Loopy Pro can automatically detect a loop of the given length, end recording and begin playback, allowing you to record the first loop of a session entirely hands-free. You must first set either the master cycle length or a clip’s pre-set length, and it’s recommended that you also set a rough tempo to assist accurate detection. Default value: Off
Audio Settings
Set the default output channels for clips here. This can be overridden at the colour level.
Gestures
Configure the on-screen gestures for interacting with clips here. You can assign your own actions for Tap, Two-Finger Tap, Swipe, Swipe Up, Swipe Down, Swipe Left, Swipe Right and Long Swipe. These gestures can be overridden at the colour and clip levels.
Follow Actions
Set up Follow Actions here, in conjunction with Loopy Pro’s powerful actions system to perform actions when certain events occur, like clip playback, recording, or upon project load.
16.2.Colour Groups #
The Color Groups screen allows you to add, remove, and configure colours in Loopy Pro.
Here, you can provide a name for colours – which appear as tracks in the Mixer, as well as elsewhere – and set the volume, balance, pitch and playback speed of clips within each colour.
You can specify custom playback and record settings per colour.
16.3.Control Settings #
This area of Loopy Pro is where you can customise the behaviour of your controllers, as an alternative to MIDI Learn.
OSC
Here, you can enable Loopy Pro’s OSC server, allowing you to control Loopy Pro from other OSC-compatible software and devices.
Use the OSC Actions Directory to look up OSC addresses for actions, and enable feedback for individual addresses (requires a TCP OSC connection).
When using OSC, you can use the provided OSC addresses as listed in the directory, or you can use your own addresses and make bindings within Loopy Pro using the (uh, increasingly inaccurately-named) MIDI Learn feature.
Enable Network MIDI
If you wish to connect to Loopy Pro via MIDI over network, enable this here. This is disabled by default in Loopy Pro 1.1 and onwards due to an ongoing iOS MIDI bug, where network MIDI interferes with MIDI connections.
MIDI Devices
All MIDI devices connected to Loopy Pro appear in this section. Tap to configure the device.
- Device Type – Tell Loopy Pro if you want this device to be treated as one of the supported controllers, like the MIDI Fighter Twister. Note that Loopy Pro will automatically identify many supported devices, like the Akai APC40 mk2 and the Launchpad, via a MIDI Universal Device Inquiry exchange. Only those supported controllers that do not respond to MIDI Universal Device Inquiry will be shown here.
- Feedback Enabled – Whether to send feedback for bound actions to this device, such as playback state, or parameter values. This is on by default; if your device behaves unexpectedly, this can be disabled.
- Use MIDI Timestamps – By default, Loopy Pro will perform actions at the time a MIDI message is received. This generally gives the best response, but if you are experiencing timing issues, you can enable this setting to force Loopy Pro to use the MIDI timestamps provided by the device instead.
Current Project
Edit the control profiles for your currently-loaded project here.
Project profilesallow you to store bindings that are saved within a project. You can reference specific project objects like clips and widgets, and references are persistent.
You can also edit the global Follow Actions here.
See Editing Bindings below for further discussion.
Global Profiles
Edit global profiles here.
Global profiles exist outside of your projects, and are always available regardless of which project is loaded. You can have multiple global profiles and switch between them, either manually or via an action. Specific clips and widgets referenced from actions within a global profile are identified by their order on-screen, so rearranging your project canvas may result in the targets of some actions changing.
See Editing Bindings below for further discussion.
Editing Bindings
There are two primary ways to edit bindings in Loopy Pro: Here, in Control Settings, or via MIDI Learn.
MIDI Learn provides a fast, simple interface, allowing single actions to be bound quickly.
In Control Settings, you have more control over creating custom bindings, with the ability to chain multiple actions together in custom sequences, with support for doing something different with successive button presses, or performing a timed sequence of actions, or combinations of both.
Tap a control profile, either in Current Project or Global Profiles, to open the profile editor. Here, the bindings that are saved to the profile are shown, along with controls to rename the profile, duplicate it, or export it.
Tap “Add New Binding” to create a new binding. You will be presented with a directory of possible actions to perform. Select one, and configure it, then tap “Save” to store the action to your new binding. Loopy Pro will then listen for incoming MIDI/OSC messages – when it receives one, it will bind the action to this message. You can also manually select the trigger by tapping in the “Trigger” field.
You can add multiple actions by tapping “Add Action” – for example, you can have a dial adjust multiple parameters simultaneously, perhaps changing different parameters at different sections of the control’s value range. Or, you can have a button push perform multiple different things, such as enabling an audio source before beginning a loop recording.
Action Timing/Sequence
- After Last – perform the action after the previous one has completed. This includes waiting for any count-in for playback/record actions, for instance.
- With Last – perform the action at the same time as the previous one (do not wait).
- Next Trigger – perform the action the next time the trigger occurs (e.g. the next button press).
Use the Delay/Quantization slider to set when the action occurs. Delay will cause the action to occur after the given delay; Quantization will cause the action to occur in sync with intervals of the given quantum. Use Quantization to perform an action on the beat, for instance. Note that, for example, an action with Quantisation set to 1 beat, which is invoked on a beat boundary already, will have no delay at all.
16.4.Synchronization #
This section coming soon.
16.5.Metronome #
This section coming soon.
16.6.System Settings #
This section coming soon.
17.Frequently Asked Questions #
Why can’t I use my AirPods/other Bluetooth audio gear?
This is a quirk of Measurement Mode, a feature that Loopy Pro’s echo cancellation requires. If you turn off echo cancellation, Loopy Pro will also turn off Measurement Mode, allowing access to your Bluetooth hardware. Open the mixer, tap the microphone icon at the top of the hardware input channel strip, then turn off the switch beside “Echo Cancellation”.
Why does the speaker go quiet when I start screen recording?
Another Measurement Mode quirk, I’m afraid. See immediately above for instructions to disable echo cancellation. Note: you will lose the benefits of echo cancellation, so it’s important that if you plan to record from the mic that you use headphones, or external audio gear.
18.Troubleshooting #
This section coming soon.
19.Getting Help #
Need some more help? Loopy Pro has a number of active communities.
Prefer to talk to me directly? You can also email me at [email protected]
19.1.Reporting Crashes #
If Loopy Pro or another third-party app is crashing, and dumping you back to the home screen, it can be very helpful to see the associated crash log so that I or the developer of the third-party app can fix the issue. While we may get anonymised versions of these in a big lump, it can be difficult to tie certain events to individual crashes, which can sometimes be necessary for nailing a bug.
If you’re up for it, finding and sending me a crash log can go a long way towards solving the crash. Here’s how to find and send them in:
- Open the Settings app
- Find Privacy & Security; tap it
- Find Analytics & Improvements; tap it
- Find Analytics Data; tap it
- Look for entries with the app name (i.e. Loopy Pro, or Loopy Pro AU, if it’s Loopy Pro or its AUv3 that crashed), with the date/time that matches when you saw the crash. Note that any entries with “wakeups” in the name aren’t actually crashes, but another kind of log that isn’t much use for diagnosis: Ignore those ones.
- Select the entry, then tap the share button at the top right (a square with an upwards arrow) and email the contents to [email protected].
Crashes on Load
If Loopy Pro actually crashed on load, Loopy will move the current workspace away and then open a blank project. It may help diagnose the issue if you send me the crashed workspace: you can find this by opening up the Files app on your device, the navigating to “On My iPad” (or “On My iPhone”), then finding “Loopy Pro”. Long-press on the “Workspace (Crashed)” file within the Loopy Pro folder (or “Workspace”, if it hasn’t been moved away yet), then tap “Compress” to make it into a zip file. Then long-press on the newly-created zip file, tap “Share”, and email it to me at [email protected]. Thank you!
19.2.Sysdiagnose #
In some cases, it can be helpful to see some more diagnostics from your device, and I may ask you to send a sysdiagnose. Sysdiagnose is a built-in iOS utility which records a variety of diagnostic information to a file that can be sent to Apple or to developers.
To provide a sysdiagnose:
- Write down, as precisely as possible, the time that the issue we’re diagnosing occurred. That’ll help me find it in the (huge) log file.
- Simultaneously press and release both volume buttons + sleep/wake (power) button. The sysdiagnose is triggered upon button release; you won’t see or hear anything (iPhone will vibrate), but it’ll be running in the background.
- Wait a few minutes for the diagnostic gathering to complete.
- Open Settings, and find Privacy, Analytics, Analytics Data, then search for the sysdiagnose entry in the list. It’ll start with “sysdiagnose”; the list is alphabetically sorted, so scroll down a bit.
- Tap the entry, then tap the share button at the top, and email the file to me. The file is quite large so I recommend doing this on WiFi. If the email setup won’t send the file, we might need to work out an alternative, like using Dropbox instead.
20.Change Log #
Version 1.1.4
- Many stability fixes and rendering improvements
- Added “Recently Deleted” area for staging deletion from file browsers
- Fixed problem with AUv3s dropping MIDI output/transport sync when reconfiguring
Version 1.1.3
- Implemented collapsible mixer sections
- Allow wider vertical zoom in sequencer
- On load, set sequencer zoom to show whole sequence
- Fixed issue where scroll layer contents could become unresponsive after zooming
- Fixed sequence layer content height calculation (was chopping off the bottom)
- Fixed update of mixer layout when a section expands
- Fixed issue with hit testing which, among other things, broke bottom trigger area of MIDI learn popover
- Tweaked clip slicer transient detection
- Fixed issues with “toggle” parameter actions
- Fixed some crashes
Version 1.1.2
- Added Loop Peel/Replace action, for undoing and redoing layers
- Added support for “xx” value placeholders in custom Send MIDI continuous actions (e.g. for controlling SysEx messages via a slider, for coarse/fine CC controls, etc)
- Added editable fader/balance labels to mixer
- Made some significant UI optimisations
- Tweaked clip slicer algorithm to trim trailing silence
- Improved selection gesture in canvas editor
- Revised mixer layout to address UI issues with large numbers of destinations/sends
- Replaced Link “Force Tempo” setting with “Act as Master”, which also enables immediate playback start
- When sorting sequencer tracks by colour, use mixer order
- Removed dragging mechanic for play group assignment, in favour of marquee selection
- Fixed clip slicer triggering while loop is playing
- Fixed fade out
- Added preset state workaround for AUv3s that don’t report their selected preset
- Fixed crash related to triggering parameters when hosted as AUv3
- Don’t wait for playback start when a recording a one-shot
- Improved interaction within scrolling areas
Version 1.1.1
- Added “Continue Playback From Slices” option for clip slicer
- Added support for Pitch Bend messages with “Send MIDI” action
- Added sort by timeline position for sequence tracks
- Added “Force Tempo” option for Ableton Link
- Moved Fade In/Out settings into main clip settings area
- Fixed issue with clip intro playback in sequencer
- Fixed issue where a “Play Once” loop didn’t stop properly
- Fixed sequencer vertical scrolling when zoomed
- Fixed issues with export from sequencer
- Fixed some microfade issues that could cause lost transients on one-shots when fade in is set to “hard zero”
- Fixed fade-out duration for one-shots
- Fixed issue with missing quantisation when triggering widgets with quantised actions via MIDI/etc
- Fixed issue with clip slicer and speed/rate/tempo variation
- Fixed issue where pasted clips could fail to play back immediately
- Fixed slider title colouring
- Fixed issue with reverse clips in sequencer
- Fixed incorrect MIDI feedback state values when first reported after load/creation
- Fixed missing control feedback for clip slicer/button grid
- Revised radio/stepped dial behaviour: Don’t update position when individual items’ state changes
- Fixed a number of crashes
Version 1.1
- Added Varispeed & Reverse playback
- Added Time Fitting settings: Time Stretch, Fast Time Stretch, and Varispeed, and None
- Added Stepped Dial and Radio widgets *
- Added overdub feedback control *
- Added Audio source and MIDI source replacement, with long press on icon in mixer *
- Added support for multiple simultaneous control profiles *
- Added ability to seek to particular sequencer sections (absolute or relative) using Clock Seek action *
- Added Phase Align action *
- Added OSC support *
- Loopy Pro AUv3 additions: multi-inputs and outputs *
- Loopy Pro AUv3 additions: MIDI input and output, and custom parameter support
- Added support for overdub after retro record
- Added new control profile actions
- Added new Tutorial widget
- Added new “Pad Loop Length” behaviour
- Added global follow actions, and follow actions for project load, page switch, and start/stop clock
- Added began/ended initial record and overdub clip follow actions
- Added copy/paste and duplicate for actions, on long-press
- Added copying control profiles between project and global
- Added double-tap action for XY pad widget
- Added LP-707 sample project by Inkie
- Added mouse scrolling and right-click support
- Added per-clip input gain parameter
- Added search bars in new effect/source screens, action directory, and file managers
- Added support for driving the MIDI Control system from any AUv3 MIDI source
- Added “All Clips” option for parameter actions
- Added separate “Microfade” and “Hard Zero” settings for fade in/fade out, to disable all microfades if necessary
- Added support for “This Clip” target for follow actions
- Added settings for merge gesture
- Added switch for default tap action to disable, in gesture settings
- Added “Begin Overdub If Recording” option for record actions
- Added “Clear Target” option for merge action
- Added “Start Clock If Paused” option for playback actions
- Added undo/redo through each separate overdub layer
- Added font size/text alignment settings for button widgets
- “Record Start” action can now close loop and immediately enter overdub
- Enable multiply/divide while overdubbing
- Improved behaviour of action sequences, when retriggering during a count-in delay
- Remember mixer scroll position
- Revised file managers: show empty folders, added create folder button, and rename on long-press
- Added separate “Play” and “Stop” quantization settings
- Updated Set Master Length action to add “Copy from Clip” mode, and arbitrary “Scale” mode
- Master volume and metronome volume actions can now go up to 24dB
- Multiple characters for page names
- Added “Clear” function for device bindings in control profile editor
- Added Enable Network MIDI setting (now disabled by default, due to iOS bugs with Network MIDI)
- Added automatic clip mix-down after reaching a threshold number of overdub layers
- Added sort function for sequencer tracks
- Many, many performance optimisations and other improvements
* Additions marked with a “*” are paid upgrades: If it’s been more than 12 months since you purchased Loopy Pro, unlocking these will require a one-off in-app purchase, which will also unlock any new features released over the following 12 months. Upgrading will help me keep working on Loopy Pro for years to come. See loopypro.com/pricing for details.
Version 1.0.42
- Respect play group rules when targeted by play actions
- Fixed widget actions in global control profiles
- Tweaked mixer layout on smaller screens
- Fixed “Next Selected Color” for parameter actions
- Tweaked “Loop” play quantisation with stopped, phase-locked loops to work better if loop is offset
- Fixed “Play Once” loops not playing after offsetting or editing
Version 1.0.41
- Fixed issue with intro recording when overdub-after-record is enabled
- Fixed a potential crash when copying/pasting
- Fixed waveform update after rotation
- Fixed a couple of issues with AUv3 user presets
- Fixed potential crash when an AUv3 crashes
- Fixed possible glitch on initial loop playback
- Fixed issue with excessive timeline seeks with jittery clocks when hosted as an AUV3
Version 1.0.40
- Made “Selected Clip” page-specific, so it persists when switching pages
- Fixed count-out duration issue with intro recording
- Fixed loop intro playback upon timeline start, when phase lock is disabled
- Fixed a potential click when transitioning from intro to main loop
- Fixed issue where clip merge could be recognised on drag, even when disabled
- Fixed effect idle mode setting synchronisation across instances
- Fixed a mixer layout glitch when switching from edit screen
- Fixed issue with audio unit actions in global control profiles
- Fixed sequence selection outside of viewport
Version 1.0.39
- Optimisations for MIDI control system, especially performance improvements for MIDI Learn UI
- Fixed glitchy audio with newly-recorded loop when in a group with pitch- or tempo-adjusted loops
- Fixed a potential crash during un-quantized recording
- Fixed an issue with un-quantized overdubbing where layers could go missing
- Fixed crash when cancelling record of a loop in a pitch- or tempo-adjusted colour
- Fixed a potential a crash/memory leak when deleting a page
- Fixed a potential crash when deleting clips
- Fixed an AUv3-related crash when restoring after being suspended in the background
- Added a safety measure for validating purchase, in the event of an App Store failure
- Added support for “Second Quantisation” for Load Project action, and fixed count-in calculation with custom quantisation
- Set “Retrigger on Play” for row/scene actions on APC40mk2 and Launchpad
Version 1.0.38
- Added some layout optimisations to improve switching between edit mode and back
- Added optimisation to speed up deletion of multiple canvas items at a time
- Added increased memory limit entitlement
- Fixed some issues with sequence export
- Fixed an issue with non-seamless loop export
- Fixed some issues with cross-project transitions using Load Project action
- Fixed some memory leaks
- Fixed a potential crash when deleting clips targeted by actions
Version 1.0.37
- Fixed issue with final overdub layer being removed upon ending overdub
Version 1.0.36
- Added “Loops play independently” mode for play groups
- Added “State Saving” options for Audio Unit: Save whole project, or just project reference (to avoid memory issues with huge projects)
- Added Link phase indicator to clock/tempo button when not running
- Empty tracks (colours, with no clips in them) will now load presets properly, do monitoring thru, etc
- Increased max retro record buffer duration
- Fixed pick-up controller mode
- Fixed some memory leaks that could cause app slowdown after a while
- Fixed an issue with “Remember playback state” option for play actions
- Fixed a waveform analyser issue causing slow display
- Don’t send MIDI feedback after just receiving corresponding message, to avoid jitter
- Tweaked relative CC detection
- Apply Phase Correction after loop recording even when Length Quantization off, when appropriate
- Fixed some glitches associated with “Round to nearest BPM” setting
- Fixed spurious MIDI/Link clock start when tapping tempo/etc
- Fixed missing “Stop” follow action for one-shots, when reaching end of playback
- Made “Ignore Timestamps” the default for MIDI controllers
- Fixed Launchpad/etc colours for bound widget actions
- Fixed a couple of intro recording issues
- Fixed timing inaccuracy with consecutive sequencer segments when first segment causes record
- Fixed issue where armed sequence tracks could stop too soon during playback
Version 1.0.35
- Fixed issue where auto loop detection could engage during session
Version 1.0.34
- Fixed a MIDI clock sync receive issue that could cause jumps
- Fixed some issues with armed recording sequence start
- When “Record on Press” in use, show clip about to record in red, on press
- Added timeout for record on press
Version 1.0.33
- Added a workaround for some MIDI AUv3s sending incorrect MIDI times
- Fixed issue with divide on transients for clip slicer
Version 1.0.32
- Revised bottom-left navigation buttons in edit mode
- Fixed an issue in MIDI clock receiver which could cause jumps
- Fixed visual loop state update when toggling Phase Lock or when changing timeline while loop disabled
- Fixed “Count-In Only” metronome mode
- Fixed issue with “Retrigger” setting for play action
- Minor optimisation for faster project loads
- Optimisations for sequence screen
Version 1.0.31
- Fixed re-record count-out
- Fixed metronome flash when counting-in
- Fixed incorrect offset of phase-locked loops when recorded with an armed sequence and offset against loop boundary
- Fixed issue with one shot playback when pausing clock
- Fixed a couple of potential crashes
- Fixed issue where exclusive double-tap MIDI actions could stop on-press actions
Version 1.0.30
- Fixed issue with quantisation sliders below 1 bar
- Allow running timeline when synced to a stopped MIDI clock source
- Fixed a couple of recording issues
- Improved waveform display for drone loops
- Fixed slider/dial widget values when partial controller range applied
Version 1.0.29
- Added Toggle/Start/Stop/etc options for pause/unpause action
- Added “Retrigger” option for already-playing loops in play/solo action
- Added “Round to Closest BPM” setting for tempo detection
- Fixed occasional issues with loop phase correction after recording
- Fixed incorrect record count-in behaviour when using “Wait for Playback” (should be no count-in)
- Fixed cross-project-transition issue where sequenced project could continue playing
- Fixed issue that could cause auto-detected loop tempo to exceed specified detection range
- Fixed issues with unstable MIDI clock output
- Fixed a rare crash in playback
Version 1.0.28
- When putting instrument audio units into idle mode, clear MIDI notes and audio decays
- Improved mixer solo implementation
- Added hide/show and enable/disable buttons to long press popup on effect icons in mixer
- Fixed issue with sending MIDI to MIDI-capable effects
- Fixed some potential issues on project load
- Fixed a possible crash when using “Wait for Playback”
- Added missing disable-effect-with-decay feature to effect toggle buttons on mixer and AUv3 window toolbar
- Fixed issue with opening exported controller profiles
- Fixed clock seek action when using non-phase-locked loops
- Fixed issue with undo action on hold/double-tap, when alongside tap to toggle record (as on some hardware loopstations)
- Fixed incorrect loop offset in sequencer when recording non-phase-locked loops from a stopped timeline
- Fixed some issues with multiply/divide
- Revised decay end trigger when disabling effects, and added a 10s timeout in case effect doesn’t go silent
- Fixed issue where cancelled tail recording could cancel whole loop record
- Fixed issue that could break undo/redo when clearing a clip
- Fixed file renaming in App Extension folder
- Only apply audio source send reset if bus has route to output
- Fixed some MIDI clock send issues, particularly when synced via Link
- Fixed phase locked loop playback with time stretching disabled
- Fixed disappearing AUv3 windows on device rotation, and associated AUv3 crashes
- Tweaked glid slicer playback of even subdivisions
- Fixed crash when playing back using slicer with a loop crossfade duration of zero
- Fixed spurious audio input when LP is hosted as an instrument AUv3
Version 1.0.27
- Fixed playback issues with clip speed slider
- Fixed issue with New MIDI screen mixing up AUv3s with the same manufacturer/subtypes
- Improved clip length slider
- Fixed potential incorrect clock phase offset at end of loop record when simultaneous record in use
- Disable renaming if not allowed by iOS (e.g. opened project from Files)
- Block iOS 16 3-finger editing gesture
Version 1.0.26
- Added “Seek Timeline” action
- Fixed issue with multiple XY pads addressing the same AUv3 instance
- Added instrument and MIDI AUv3 parameter support to XY pads
- Improvements to Ableton Link outward sync when recording first loop or bridging from incoming MIDI clock
- Improved filenames when exporting recordings
- Improved tempo estimate for imported files
- Added UI to re-join Link tempo after clock tempo has been reset
- Added more stopping points to quantization slider
- Fixed issue with free loops coming in at incorrect position after clock count-in
- Fixed loop alignment issue when using overdub-after-record mode
- Fixed zipper noise when adjusting volume sliders
- Fixed a crash when loading some projects
- Fixed an issue with “Finish Record” follow actions on the first loop that sets the tempo
- Fixed issue with sequence recording of ‘stop’ play actions being interpreted as ‘play’ action
- Fixed audio artefacts when removing the only send to a bus
- Fixed “Combined Input” recording with non-monitored sources
- Fixed issue with stuck notes when muting MIDI sources
- Fixed a possible crash when setting buffer duration
- Fixed a crash which could occur when switching projects with MIDI sources
- Fixed issue with tempo slider randomly entering fine adjustment mode
- Fixed a number of memory leaks
- Fixed a rare crash when auto-saving with AUv3 effects
Version 1.0.25
- Revised mutually-exclusive play group implementation for greater flexibility
- Enabled “All Loops” solo context to apply across all pages in project, not just current one
- Addressed issue where undo/redo may become disabled after cancelling a recording
- Fixed audio phasing issue when incoming MIDI clock is a little unstable
- Fixed excessive seek crossfade when using clip slicer
- Fixed some play group outline visual glitches
- Fixed laggy AUv3 window movement
- Fixed a number of issues with tail/outro playback, and with overdub layers
- Fixed issue where short loops could stop immediately instead of doing outro/count-out
- Fixed some issues with shorter loop fade-out settings
- Fixed possible glitch on initial loop playback start
- Fixed crash when using ‘multiply’ action
- Fixed issues when hosted as an instrument in GarageBand
- Fixed issue with degraded initial loop audio when recording first two loops consecutively
- Fixed some clip waveform rendering issues
- In AUv3 windows, require tap directly upon pencil icon to edit audio unit name, rather than anywhere on titlebar
- Fixed a number of potential crashes
Version 1.0.24
- Fixed potential save error when saving from within AUv3
- Fixed a crash when playing across end of sequencer timeline loop boundaries
Version 1.0.23
- Added new “Save Session” action
- Added “Save As New” option to Load Project action
- Fixed live time-stretch errors with non-phase-locked clips
- Fixed issue where monitored inputs were doubled in “Combined Input and Output” recordings
- Fixed AUv3 keyboard state save
- Fixed some crackles and pops associated with loop boundaries of successive overdubbed layers
- Fixed a glitch that could occur after initial loop recording with some audio interfaces
- Fixed “Play Once” setting not being respected on initial clip playback upon loading project
- Tweaked clip waveform display to better handle loop boundaries
- Fixed MIDI hardware support in LP AUv3
- Fixed issue with logarithmic parameter curves
- Fixed an issue where dragged items might become rearranged unexpectedly after dragging
- Fixed incorrect change to clip “Original Tempo” setting when turning off time-stretch
- Fixed issue with resizing of canvas to accomodate pasted items
- Fixed rendering of play group outlines, with some geometries
- Added missing copy of resources from clip tail and intro, when copying
- When reconnecting MIDI destinations, fall back to matching on name if unique identifier match fails
Version 1.0.22
- Fixed delays due to interaction between play and record actions on tap and double-tap or vice versa
- Fixed incorrect playback duration for armed loops in sequencer
- Fixed “Send MIDI” action Program Change value issues
- Fixes a crash when triggering record from a swipe gesture
Version 1.0.21
- Fixed an issue where loops may offset incorrectly after record, if time stretch disabled
- Fixed an issue where phase lock may not work in loops at the master tempo, if time stretch disabled
- Allow sub-bar timeline realignment after loop record (e.g. record 2 initial beats, then timeline will start at bar 2 afterwards, as expected)
Version 1.0.20
- Fixed an issue with MIDI control when hosted as an AUv3
- Fixed an issue with preset loop length slider refusing to go to “Unset” state at some time signatures
Version 1.0.19
- Enable phase lock for non-time-stretching loops that match the current clock tempo
- Fixed missing transients at beginning when retriggering oneshots
- Fixed a memory leak
Version 1.0.18
- Improved latency/lag with record start/stop:
- Implemented immediate record stop from audio thread, to reduce interval until initial audio playback
- Added “Ignore Timestamps” option for MIDI devices, which can reduce lag with some configurations, at the expense of possible timing jitter
- Fixed issue where loop rotation/circle gesture interferes with record timing when “Record On Press” on
- Improved time-stretching logic and track tempo management
- Full drag/drop rewrite for improved importing and better workflow with multi-file drops
- Added “Loop Boundary Crossfade” setting
- Added recording action option: “Preempt Other Actions” (on by default, matching prior behaviour)
- Improved clip screen tempo controls (and hide them when time-stretch disabled)
- Made “Play Target” option for merge/move action three-phase: Never, If Source Playing, and Always
- Increased max fade duration to 120 seconds
- Fixed crashes associated with EQ/Lowpass/Highpass/Bandpass/etc modules
- Fixed file browser crash
- Fixed click at first loop playback when overdub-after-record in use
- Fixed loop boundary crossfade for imported loops
- Fixed loop outro, when setup via trimming in clip screen
- Fixed intro playback for non-phase-locked loops
- Fixed a glitch when transitioning from intro to main loop
- Fixed clip analyser issues when time-scaled
- Fixed initial clip fade-in
- Fixed issue with stopping one-shots by colour
- Mute all incoming MIDI from muted sources, not just notes
- Copy clip gestures too, when copying
- Added some missing clip property assignments, when copying
- Update non-phase-locked clips’ phase too, when making MIDI Clock/Link phase corrections
- Fixed clip waveform analyser when offsetting backwards
- Fixed some assorted crashes when adjusting clip boundaries
- Fixed floating-point error issue when fading in, which could result in permanent fading-in state
- Fixed skip back to beginning of clip when tapping again to abort fade-in
- Fixed “tap” gesture actions on oneshots
- Fixed spurious count-in if a loop has intro disabled
- Don’t try to time-stretch when dragging to import, if stretching disabled
- Fixed an issue where playback could fail after time-stretching
- Added diagnostics to support email when tapping email address in Help
- Don’t try to set nonsense clip titles when dragging files into LP
- Fixed a number of memory leaks
- Cleaned up some initialisation inefficiencies
Version 1.0.17
- Fixed issue where overdub layers could be offset incorrectly post-record
- Automatically stop session recording if app terminates or suspends in the background
- Attempt to recover unfinished session recordings on startup
- Fixed cleanup of old temporary files on launch
- Do clock phase shifting for non-phase-locked loops too, as long as phase shift is on
Version 1.0.16
- Fixed playback of initial loop when “Wait for Playback” is enabled
- Fixed undo/redo issue when recording second loop immediately after initial one
- Fixed issue where clock could pause after initial loop if loop threshold recording on at global level, but off at clip level
- When trimming a recording, offer to make a copy or trim original, instead of always trimming original
- Improved automatic loop detection with already-tight loops
- Fixed reset clock tempo when there are one-shots present
- Fixed non-phase-locked loops not beginning playback correctly after redo
- Fixed sequence recorder issue creating spurious segments for already-present segments when starting record
- Fixed rounding/snap of sequence layer segment endpoint when dragging
- Fixed overdub count in/out when “Loop” quantisation setting used
- Reset loop playback offset when cleared
- Fixed issue where offset tracks may not reset phase correctly on clock pause when idle
- Fixed sequencer segment dragging when at max zoom level
- Memory leak fixes
Version 1.0.15
- Fixed issue with first loop alignment in some cases
- Fixed issue with stuck notes if multiple consecutive note ons received
- Fixed issue where turning off playback/recording settings at group level then saving does not persist
- Fixed slider value assignment when editing using keyboard (long press/double-tap on label)
- Disable initial record count-outs with “Loop” setting if Length Quantization is off
Version 1.0.14
- Fixed issues with Phase Correction when Phase Lock on
- Fixed an issue with bindings with long chains of actions
- Fixed hold/double-tap interfering with record on tap
- Fixed some issues with undo/redo when recording
- Fixed slider widget gesture direction when square aspect
- Fixed a “lengths are too different” error for track merging
- Tweaked AUv3 parameter assignment to avoid crashes in some AUv3s
Version 1.0.13
- Added “Phase Preservation” recording setting, which controls whether or not LP will rotate a new loop to align the start (on by default).
- When on, loops will now reliably maintain the phase with current playing loops
- Added “Loop” mode for record count-in/out quantization setting
- When counting-out record with no count-in, count out based on recording length rather than clock position
- Added “Auto Count Out” setting for one-shots (in clip details screen, or via actions; off, by default)
- Added title field to clip details popover, visible above waveform after pulling up
- Added double-tap or hold on value label on any slider to open text field
- Added support for one-shot playback quantisation using UI
- Set clip title to filename on import of audio file
- Fixed post-record initial loop playback delay when auto loop detection is on
- Fixed a save points issue with large AUv3 save state, where only latest save state was kept
- Fixed a project save issue that could result in missing AUv3 saved state
- Fixed second tap to stop current fade-out and stop immediately
- Fixed layer progression error with overdub on a hold action
- Fixed X-Y pad mapping reset issue when reloading projects
- Fixed white sequencer segments
- Fixed some one-shot overdubbing issues
- Allow MIDI trigger holds and double-taps resulting in a record toggle to pre-empt taps and perform immediately, to avoid delays
- Remember metronome on/off state when saving projects
- Revised EQ/Lowpass/etc node UI to hide callout when ending drag, rather than showing larger callout
- Fixed conflict issue with overdub-after-record and tail recording
- Stop recording non-hold-to-play one shots on release, not on press
- Restart timeline to beginning on MIDI clock stop
- When overdubbing a playing one-shot, disable audio threshold record start
- Fixed count-ins when using clock “Perform Count-In” setting
- Enable record count-in for “hold to record” actions
- Fixed stuck on/highlit loop state when using “Wait For Playback” and count-in, and stopping clock before count-in ends
- Improved count-in/out display indication to reflect actual delay interval
- Fixed a possible crash on paste
- Fixed issue with clip exporter if project, group, or clip name contains non-filesystem-safe characters
- Fixed a possible crash during recording
- Some optimisations for directory listing with large folder structures
- Fixed crash when opening initial loop edit screen after recording empty audio source
- Fixed incorrect step size for “MIDI Controller” AUv3 parameter unit type
- Fixed memory leak of pre-fader effects on master output channel when starting new projects
- Revised AUv3 parameter value update to use different iOS AUv3 API mechanism: prior one was buggy and caused hangs. This should fix a lot of hang crashes when using AUv3s.
- Moved AUv3 allocation to background thread to avoid possible hangs due to AUv3 bug
Version 1.0.12
- Added support for “Pause Clock When Idle” when finishing recording a track in stop-after-record mode
- Include “Monitor Through” signals in level analysis for colours
- Reset “Pick Up” controller state when underlying value is changed substantially
- Added “Mute Speaker Beside Mic” setting to System Settings (for iPhone only; on by default)
- Fixed fractional clock lengths for Set Master Length action
- Sped up directory scanning in Projects screen
- Fixed issue with APC40mk2 automatic bindings re-establishing on project load even if disabled
- Added app version number to bottom of system settings screen
- Wait for finish of save process when terminating app
- Fixed remnant IAA info panel after removing using delete button
- Fixed issue with Link count-in with un-phase-locked loops
- Tweaked clock count-in to fix missing downbeat of metronome count-in
Version 1.0.11
- Added global AUv3 icon cache for faster loading
- When identifying phase of recorded loop, use longest playing loop, rather than longest loop for phase master
- Fixed navigation with MIDI receiver settings screen
- Launchpad support: treat MK3’s “DIN” port as generic device
- Fixed out-of-bounds value for master volume action
- Fixed incorrect update of clock tempo when causing record end by pausing the clock
- Only preempt ‘clear’ actions (on additional hold/double-tap binding) from play/record actions
- Fixed a record start/stop timestamp handling issue that could result in incorrect timing
- Added some help tips about global control profiles (see also Profiles)
- Fixed issue with sporadic feedback monitoring of AUv3 parameters
- Fixed a crash when rapidly toggling AUv3 windows
Version 1.0.10
- Ableton Link sync improvements
- Fixed an issue that could cause some widget buttons to become unresponsive
- Fixed issue with action chaining for play actions that cause record start
- Fixed mute action when targeting colour of next/previous tapped clip
- Addressed glitches on some hardware at certain sample rates
- Allow exclusive group recording with stop-after-record mode to stop playing clips in other groups
- Allow exclusive group playback to stop recordings in other groups when stop-after-record mode in use
- Fixed “Next Tapped Clip” target for record action
- Support for IAP refund + subsequent re-purchase
Version 1.0.9
- Implemented actions for selecting AUv3 presets
- Added MIDI source actions (mute, solo, gain, and all AUv3-related actions)
- Added “Copy Levels” option to Load Project action (to copy all mixer channel levels to new project)
- Added support for connecting MIDI controllers through a secondary hub/wireless adapter: Implemented SysEx Universal Device Inquiry to identify MIDI devices not directly connected via
- USB, and added option to manually select device type
- Added SysEx/custom MIDI string support for Send MIDI action
- Added “Save” button to update existing presets
- Made loop analyser more robust when analysing loops that are already reasonably tight
- Improved AUv3 keyboard layout on smaller screens
- Fixed tempo estimation issue with auto loop detection
- Fixed MIDI sync receive issues with some devices
- Fixed send adjust actions for sends beyond 10th
- Revised app icon and launch screen
- Added MIDI learn for select preset actions
- Fixed an AUv3 state restore issue associated with AUv3s missing parameter change notifications
- Fixed error in AUv3 preset assignment on load
- Fixed issue with passing SysEx messages to AUv3s
- Fixed issue with using “Selected Clip” source/target with merge action across different pages
- Fixed missing “This Clip” option in clip merge/move action, for gestures/follow actions
- Fixed missing “Next Tapped Clip” target for merge source
- Enabled page switching while prompting for tapped track
- Fixed crash when selecting built-in effect presets for preset action
- Fixed issue with no-quantization play/stop action being overridden by clip intro/outro
- Fixed possible click when switching projects
- Fixed mixer layout issue when adding a send + bus
- Added a workaround for audio timestamp jitter from audio system, causing audio artefacts
Version 1.0.8
- Added support for count-in on main playback
- Added support for exceptions for Solo action for all targets
- Added “Panic” and Hide/Show buttons to audio source settings screens
- Added long press on IAA icon on mixer to show settings screen
- Added option to show system status bar (in system Settings app)
- Added mouse cursor interaction
- Allow maximum value for volume parameter actions to be set above 0dB
- Fixed incorrect quantisation on clip start after a merge/move action
- Fixed playback scheduling issues when triggering retro record
- Fixed issue with MIDI sources that also take audio input
- Fixed an issue where orphaned play groups aren’t removed
- Fixed parameter action binding with multiple instances of the same AUv3 audio source
- Fixed “Remember Playback State” issues for play actions
- Fixed MIDI/Link sync issues on pause/play
- Fixed issue with CC Pick Up at ends of range
- Revised playback action interaction with other gestures (like hold/double tap): Always wait, unless it’s a “Clear” action
Version 1.0.7
- Added “Cancel Count Ins/Outs” action
- Added selection shortcuts to “Specific Clip” selector (“Select Playing Loops”, “Select Filled Loops”, etc)
- Added configuration to select between Quantization and Delay timing modes for actions
- Added workaround for AUv3 hosts like GarageBand that don’t send proper audio timestamps
- Added MIDI device configuration, with ability to disable MIDI feedback feature (now off by default for the Morningstar MC8, which had issues with this)
- Respect clip fade in/out in sequencer
- Revised playback to catch initial impulse on first loop after recording
- Stop clip recording when stopping playback as well
- When toggling clip currently playing in clip slicer, start normal playback rather than stopping
- Allow “Pause Clock When Idle” while Ableton Link in use
- Fixed “Switch Control Profile” actions
- Fixed double-tap on window titlebars to toggle fullscreen
- Fixed “Next Tapped Clip”, “Color of Next Tapped Clip”, “Play Group of Next Tapped Clip” targets for some actions
- Fixed issue with missing options for “Next Tapped Clip” for some actions
- Improved “Finish Record” follow action behaviour and timing
- Fixed some issues with AUv3 state restore
- Enabled playback scheduling even if clips to play are all empty (e.g. switching to empty row via solo action)
- Fixed “Play Once” setting when triggered from actions
- Make “Play Target” option for merge/move action respect Play Group settings
- Fixed missing MIDI Learn UI for some widgets when using global profile
- Fixed play sync issue when starting an un-phase-synced loop while recording another
- Fixed clip playback issue when unpausing which could miss transients at start of clip
- Fixed cut-off start of clips when playback triggered from some actions
- Fixed “Stop After Recording” mode
Version 1.0.6
- Added project templates
- Added exceptions list for “Solo” actions
- Added support for 32 frame hardware buffer duration/latency
- Improvements to playback scheduling when targeting multiple clips across different groups
- Improved co-existence of tap and double-tap/hold actions (eg. make record on tap wait for double-tap/hold)
- Added support for cancelling waiting load project action by tapping button at top left
- Save configuration for special devices (in MIDI Control screen) with each project
- Fixed a rare project save error
- Fixed some minor audio playback issues
- Fixed issue copying offset/rotated loops to one-shots, causing silent regions
- Fixed crash when disconnecting MIDI controller with current flash animations
- Fixed initial playback of record-armed clips in sequencer
- Don’t truncate loops with a pre-set duration when ending recording early (pad with silence instead)
- Permanently mute all clips when transitioning away from project, to avoid accidental restarts of clips
- Fixed double-downbeat when using Load Project to switch to project with active sequence
- Fixed issue with missing MIDI clock start when loading new projects with auto-clock start
- Fixed deleting projects from set lists
Version 1.0.5
- Added seamless crossproject transitions and set lists, with configurable crossfade and effect tails, via the “Load Project” action.
- Added MIDI Fighter Twister support with colours and perloop playhead animations.
- Added Audio Source AUv3 parameter actions
- Added a secondlevel quantization interval, invoked when cancelling a countin (see “Second Quantization” in clip settings)
- Added “Toggle” action variant for parameters, to switch between two fixed values
- Added full support for crossproject session recording
- Added “Individual Buses” support for session recording
- Added project title to toolbar
- Added ability to rename audio source channels
- Added MIDI learn hotspots to effect buttons in mixer
- Added effect parameter action to MIDI learn hotspot for effect buttons on mixer and bottom bar
- Added Absolute/Relative settings for CCs in trigger setup for manual configuration
- Added green metronome flash on downbeat
- Added “Reset Audio Source Sends” system setting
- Reset APC40 cursor when changing page or project
- Fixed some initialisation and load issues with AUv3
- Fixed delays when loading file managers with large numbers of items
- Fixed some interaction issues with play group edit screen
- Fixed individual input session recording when multiple inputs present
- Fixed oneshot playback velocity for APC40mk2
- Fixed crashes and issues with audio units when switching/transitioning projects
- Fixed armed sequence launch crash
- Fixed a rare crash when changing audio route
- Fixed issue with saving imported projects
- Fixed some effect parameter action issues
- Fixed some session recording playback screen issues
- Fixed default relative CC adjust speed
- Tweaked relative CC detection
- Fixed issues with audio source balance
- Fixed MIDI Learn hotspot initial state update
- Fixed crash when an IAA audio unit registration has no title
- Fixed crash when encountering invalid Core MIDI endpoints
- Fixed glitches introduced when truncating a clip
- Fixed playback issue that could cause high power/CPU consumption
- Added workaround for audio interface unique ID resetting over reconnections
- Revised postrecord loop phase correction: only perform phase realignment if there are no other loops of same length or longer
- Fixed possible race condition which could cause some crashes
- Added AU instance number to MIDI action targets
- Fixed MIDI action targets selection
- Fixed potential crashes when saving effects
- Fixed missing AUv3 effects in sequence export, and a few other export issues
- Fixed crash when setting clip playback rate to very small numbers
- Fixed issues with record action chaining
- Fixed consecutive clip play/stop action issues
- Fixed an issue with pitch/speed reverting after background process if using sample rate greater than 48k
- Fixed missing AUv3 state in project export
- Fixed user preset saving for AUv3s with spaces in their AudioComponentDescriptions (eg. Beathawk)
- Fixed clock controls screen when heightconstrained (added scrolling)
- Fixed missing audio unit delay line reset (e.g. on enable/disable)
- Fixed missing initial downbeat when receiving MIDI clock
- Fixed saving of custom record configuration for play actions
- Fixed a number of issues with Ableton Link start countin
- Fixed issues with remaining loop phase lock override when disabling sequence
- Fixed recording trimming
- Tweaked canvas editor interaction: tap and hold will bypass select mode, to facilitate easier moving of elements
- When stopping timeline, move to loop region start, if present, rather than start of timeline
Version 1.0.4
- Added support for Inter-App Audio effects and audio sources
- Added search fields to effect/audio source pickers
- Fixed some issues with using AUv3 effects as MIDI sources (like MIDI Guitar 2)
Version 1.0.3
- Added loop and one-shot time stretch settings
- Added support for APC40 mk2 features: shift key, modes for top knobs and device knobs
- Added bank select for APC40 mk2, for scrolling around clips
- Tweaked “Record” binding behaviour for Launchpad/APC40: Use “play if stopped” option only for taps (fixes record issues on double tap/hold)
- Increased max ramp duration for all “Mute” actions to 10 seconds
- Fixed some pops/crackles and audio drop-outs
- Fixed an issue with endlessly-flashing track controls
- Added fallback identification for MIDI Action targets, to work around an IDAM issue
- Fixed crash in “Mixer Solo” action configuration, when changing action
- Fixed some wacky play group outline rendering issues
- Fixed continuous Adjust Tempo actions
- Fixed issue with handling of incoming MIDI timestamps, affecting GeoShred and MIDI Guitar 2
- Fixed a number of memory leaks, particularly affecting LP when hosted as AUv3
- Fixed issue with lingering AU windows when deleting a MIDI source AU
- Fixed crash when recording two initial loops simultaneously
Version 1.0.2
- Implemented bus actions
- Fixed MIDI Learn for audio source gain
- Added ability to use impulse triggers bound to “Toggle” button widget actions
- Fixed an issue with “trigger widget” actions not showing feedback on load
- Fixed some issues with “trigger widget” actions bound to a global control profile
- Fixed an issue with some interfaces (eg. RME BabyFace Pro) not showing all available ins/outs
- Fixed relative CC detection issues
- Suspend AUv3 frame size changes while resizing windows
- Always start clock when starting record, unless “Auto End Detected Loops” is on
Version 1.0.1
- Added support for iOS 12 and 13
- Added MIDI clock receiving
- Fixed a crash when adding an FX AUv3 as a MIDI source
- Fixed track waveform update issue (e.g. after twisting loops)
- Fixed lost/stuck notes from some MIDI sequencers
- Fixed playback/solo configuration screen missing some configuration items in certain contexts
- A number of other crash fixes
21.Loopy Pro Roadmap #
Open the Loopy Pro roadmap below to view and vote on current roadmap items, suggest ideas and leave feedback, and subscribe to receive email notifications on when individual roadmap items are implemented.
Приложение Loopy Pro доступно только на iOS, вот ссылка в App Store 
Для жителей РФ оплатить приложение можно со счета МТС или Билайн. Если нет симки, но есть айфон с esim и аккаунт в госуслугах, то можно удаленно оформить симку, пополнить счет и оплатить приложение.
Приложение скачивается бесплатно. Но есть встроенные покупки:
— пробный период 7 дней — 0,00 ₽
— полная версия приложения с обновлениями в течение года — 2 790,00 ₽/навсегда
— дальнейшие обновления — 1 750,00 ₽/год.
Приложения «Loopy Pro» нет на Android. Гугл подкидывает приложение «Loopify», но я за него не могу ручаться)
В целом, я рекомендовал бы купить на вторичном рынке 6s, например, вместо покупки лупера-педали или loop station. И использовать его именно для музицирования.
На данный момент в App Store указано, что поддерживаются устройства, где стоит версия операционной системы iOS 12. А вот список этих устройств в википедии
Лично я пользуюсь Loopy Pro на iPad 9 и на iPhone 11. И там и там мощности устройства хватает с большущим запасом 
Никак не ограничен. Вы покупаете доступ не на один или на два месяца, а на постоянно.
✔ Наш обзор
1. The built-in mixer lets you set up insert and send effects for every channel in your project, and load AUv3 Audio Unit instruments, effects, and MIDI sequencers.
2. You can set up Loopy Pro to work however you do, with features like hands-free looping with count-in, count-out and automatic loop detection; or «free» looping, where you can choose on-the-fly how long to make loops.
3. • A completely optional «Upgrade» In-App Purchase, available any time from 12 months after initial purchase, to buy the latest features and all those released in the following 12 months, to keep forever.
4. You can also drag-and-drop audio straight onto loops in Loopy Pro, with sophisticated tempo and pitch adjustments, and use Loopy Pro as a clip launcher, with all kinds of options for song sectioning.
5. There’s extensive MIDI controller support, including built-in support for the Launchpad, the APC40 mk2 and the MIDI Fighter Twister, and effortless MIDI Learn for setting up your controllers.
Скриншоты


загрузить и установить Loopy Pro: Looper DAW Sampler на вашем персональном компьютере и Mac
Проверить совместимые приложения для ПК или альтернативы
Или следуйте инструкциям ниже для использования на ПК
Выберите версию для ПК:
- Windows 7-10
- Windows 11
Если вы хотите установить и использовать Loopy Pro: Looper DAW Sampler на вашем ПК или Mac, вам нужно будет загрузить и установить эмулятор Desktop App для своего компьютера. Мы усердно работали, чтобы помочь вам понять, как использовать app для вашего компьютера в 4 простых шагах ниже:
Шаг 1: Загрузите эмулятор Android для ПК и Mac
Хорошо. Прежде всего. Если вы хотите использовать приложение на своем компьютере, сначала посетите магазин Mac или Windows AppStore и найдите либо приложение Bluestacks, либо Приложение Nox . Большинство учебных пособий в Интернете рекомендуют приложение Bluestacks, и у меня может возникнуть соблазн рекомендовать его, потому что вы с большей вероятностью сможете легко найти решения в Интернете, если у вас возникнут проблемы с использованием приложения Bluestacks на вашем компьютере. Вы можете загрузить программное обеспечение Bluestacks Pc или Mac here .
Шаг 2: установите эмулятор на ПК или Mac
Шаг 3: Loopy Pro: Looper DAW Sampler для ПК — Windows 7/8 / 10/ 11
Теперь откройте приложение Emulator, которое вы установили, и найдите его панель поиска. Найдя его, введите Loopy Pro: Looper DAW Sampler в строке поиска и нажмите «Поиск». Нажмите на Loopy Pro: Looper DAW Samplerзначок приложения. Окно Loopy Pro: Looper DAW Sampler в Play Маркете или магазине приложений, и он отобразит Store в вашем приложении эмулятора. Теперь нажмите кнопку «Установить» и, например, на устройстве iPhone или Android, ваше приложение начнет загрузку. Теперь мы все закончили.
Вы увидите значок под названием «Все приложения».
Нажмите на нее, и она перенесет вас на страницу, содержащую все установленные вами приложения.
Вы должны увидеть . Нажмите на нее и начните использовать приложение.
Спасибо за чтение этого урока. Хорошего дня!
Получить совместимый APK для ПК
| Скачать | Разработчик | Рейтинг | Score | Текущая версия | Совместимость |
|---|---|---|---|---|---|
| Проверить APK → | A Tasty Pixel | 40 | 4.325 | 1.0.39 | 4+ |
Скачать Android
Loopy Pro: Looper DAW Sampler На iTunes
| Скачать | Разработчик | Рейтинг | Score | Текущая версия | Взрослый рейтинг |
|---|---|---|---|---|---|
| Бесплатно На iTunes | A Tasty Pixel | 40 | 4.325 | 1.0.39 | 4+ |
Шаги по настройке компьютера и загрузке приложения Loopy Pro в Windows 11:
Чтобы использовать мобильные приложения в Windows 11, необходимо установить Amazon Appstore. Как только он будет настроен, вы сможете просматривать и устанавливать мобильные приложения из кураторского каталога. Если вы хотите запускать приложения Android на своей Windows 11, это руководство для вас..
- Проверьте, совместим ли ваш компьютер: Вот минимальные требования:
- RAM: 8GB (минимум), 16GB (рекомендованный)
- Хранение: SSD
- Processor:
- Intel Core i3 8th Gen (минимум или выше)
- AMD Ryzen 3000 (минимум или выше)
- Qualcomm Snapdragon 8c (минимум или выше)
- Processor Architecture: x64 or ARM64
- Проверьте, имеет ли Loopy Pro: Looper DAW Sampler собственную версию Windows. Сделай это здесь ». Если собственная версия отсутствует, перейдите к шагу 3.
Подробнее ❯
Особенности и описания
Loopy Pro is a live-looper. And a sampler. And a sequencer. And a very capable AUv3 Audio Unit host. And a DAW. And an AUv3 Audio Unit.
You get the idea. Loopy Pro is deep. But it’s also designed to be friendly, and a great deal of fun.
You can set up Loopy Pro to work however you do, with features like hands-free looping with count-in, count-out and automatic loop detection; or «free» looping, where you can choose on-the-fly how long to make loops. There’s even retrospective recording, where you can lock in a loop after the fact.
There’s extensive MIDI controller support, including built-in support for the Launchpad, the APC40 mk2 and the MIDI Fighter Twister, and effortless MIDI Learn for setting up your controllers.
You can also drag-and-drop audio straight onto loops in Loopy Pro, with sophisticated tempo and pitch adjustments, and use Loopy Pro as a clip launcher, with all kinds of options for song sectioning.
The built-in mixer lets you set up insert and send effects for every channel in your project, and load AUv3 Audio Unit instruments, effects, and MIDI sequencers.
And there’s a built-in sequencer, for arranging songs, and even performing them live, totally automated and hands-free.
There’s also a great deal still to come.
So, what are you reading this for? Go take Loopy Pro for a spin – there’s a 7-day free trial just waiting for you.
Have fun!
— Michael
loopypro.com
Join other Loopy Pro users on Discord, Facebook or the forums — loopypro.com/communities
Loopy Pro’s Pricing Structure:
Loopy Pro has a pricing structure that mimics the classic desktop software model, in order to enable continued development:
• A 7-Day Free Trial, so you can make an informed purchasing decision.
• A one-off In-App Purchase to buy the app: to keep, forever.
– This gets you permanent access to all current features, and all those added in the following 12 months.
– It also gets you bug and compatibility fixes for the lifetime of the app.
• A completely optional «Upgrade» In-App Purchase, available any time from 12 months after initial purchase, to buy the latest features and all those released in the following 12 months, to keep forever. Upgrade once, or every year, or just when there’s a new feature you want, or never upgrade after the initial purchase – it’s completely up to you. And you keep what you buy, forever.
• This will allow Loopy Pro to continue evolving for years to come, while letting me support my family.
If you can’t afford Loopy Pro, or you represent an educational institution, please reach out to support@atastypixel.com.
12 подробностей о Loopy Pro: Looper DAW Sampler
1. The built-in mixer lets you set up insert and send effects for every channel in your project, and load AUv3 Audio Unit instruments, effects, and MIDI sequencers.
2. You can set up Loopy Pro to work however you do, with features like hands-free looping with count-in, count-out and automatic loop detection; or «free» looping, where you can choose on-the-fly how long to make loops.
3. • A completely optional «Upgrade» In-App Purchase, available any time from 12 months after initial purchase, to buy the latest features and all those released in the following 12 months, to keep forever.
4. You can also drag-and-drop audio straight onto loops in Loopy Pro, with sophisticated tempo and pitch adjustments, and use Loopy Pro as a clip launcher, with all kinds of options for song sectioning.
5. There’s extensive MIDI controller support, including built-in support for the Launchpad, the APC40 mk2 and the MIDI Fighter Twister, and effortless MIDI Learn for setting up your controllers.
6. So, what are you reading this for? Go take Loopy Pro for a spin – there’s a 7-day free trial just waiting for you.
7. And there’s a built-in sequencer, for arranging songs, and even performing them live, totally automated and hands-free.
8. Upgrade once, or every year, or just when there’s a new feature you want, or never upgrade after the initial purchase – it’s completely up to you.
9. And a very capable AUv3 Audio Unit host.
10. – This gets you permanent access to all current features, and all those added in the following 12 months.
11. • A one-off In-App Purchase to buy the app: to keep, forever.
Если вам нравится Loopy Pro, вам понравятся Music такие приложения, как; Music Ringtones for iPhone; SESHapp; Coastal Radio; ChristKlang; BitHills Music; ChordAid: Chord Finder; Mela 4 – AUv3: Synth, FX, MIDI; Clix Converter; Clear Wave App; Music Stats for Spotify; Composify; Meerstemmig inzingen; Metro: Modern Metronome; GenuineSounds Vol. I; Transposable Chromatic Tuner; БИМ-радио; Altered#; The Generator FM; Radio WFM; Anthems Piano;
Автор: Ярушкин
Название: Loopy Pro. Быстрый старт в live-looping для акустических гитаристов (2022)
Описание:
Что такое Loopy Pro?
На мой взгляд, это самый лучший лупер на сегодня. И самый гибкий. Каким вы захотите, таким он и будет. Такого невозможно получить от луп-педалей и луп-станций, а вот в приложении легко. Поэтому «Loopy Pro» – это приложение для iOS
Почему я выбрал именно его для курса?
- количество дорожек бесконечное – вы сами решаете, сколько треков будет в вашем проекте, и управляете ими как вам захочется
- легко начать, особенно уже имея в кармане iPhone или iPad
- огромный функционал и гибкие настройки
- можно подключить почти что угодно: аудиокарту, рекордер, гитарный процессор эффектов, настольные или напольные midi-контроллеры…
- разберётся даже новичок и даже с неидеальным чувством ритма – программа помогает вам записать ровный луп
Этот лупер не надо заказывать – достаточно зайти в App Store и скачать его. А микрофон, встроенный в яблочные девайсы, отлично справляется с акустической гитарой. Таким образом, вот вам уже идеальный набор для старта.
Но и более профессиональные «наборы» легко подключаются к Loopy.
Смотрите видео
А сам курс поможет вам в мире live-looping, сэкономив при этом кучу времени, сил и денег, которые бы вы тратили на выбор и поиски лупера-педали. Это время приятнее уделить музицированию!)
Подробнее:
Скачать:


