To CD changer/DAB tuner or another external component (see
diagram )
An CD-Wechsler/DAB-Tuner oder andere externe Komponente (siehe
Schaltplan )
К устройству автоматической смены компакт-дисков/тюнеру
DAB или к другому внешнему устройству (см. схему )
ENGLISH
DEUTSCH
3
A
Typical Connections / Typische Anschlüsse / Типичные подключения
Before connecting: Check the wiring in the vehicle
carefully. Incorrect connection may cause serious damage to
this receiver.
The leads of the power cord and those of the connector from
the car body may be different in color.
1
Connect the colored leads of the power cord in the order
specified in the illustration below.
2
Connect the aerial cord.
3
Finally connect the wiring harness to the receiver.
Note: If your vehicle does not have any accessory terminal,
move the fuse from the fuse position 1 (initial position) to fuse
position 2, and connect the red lead (A7) to the positive (+)
battery terminal.
• The yellow lead (A4) is not used in this case.
Перед началом подключений: Тщательно проверьте
проводку в автомобиле. Неправильное подключение
может привести к серьезному повреждению устройства.
Жилы силового кабеля и жилы соединителя от кузова
автомобиля могут быть разного цвета.
1
Подсоедините цветные провода шнура питания в
указанном ниже порядке.
2
Подключите кабель антенны.
3
В последнюю очередь подключите электропроводку к
устройству.
Примечание: Если в Вашем автомобиле никакого
вспомогательного разъема не имеется, переставьте
предохранитель из положения 1 предохранителя
(первоначальное положение) в положение 2
предохранителя и подключите красный провод (А7) к
положительному (+) полюсу аккумулятора.
•
Желтый провод (А4) в этом случае не используется.
*
2
Before checking the operation of this receiver prior to
installation, this lead must be connected, otherwise
power cannot be turned on.
*
2
Vor der Überprüfung der Funktionsfähigkeit
des Geräts vor dem Einbau, muß diese Leitung
angeschlossen werden, da sonst die Stromversorgung
nicht eingeschaltet werden kann.
*
2
Перед проверкой работы устройства подключите
этот провод, иначе питание не включится.
Line out (see diagram )
Schutz kappen Signalausgang (siehe Schaltplan )
К выходу (см. схему )
Rear ground terminal
Hintere Erdungsc-
anschlußklemme
Задний разъем
заземления
To steering wheel remote controller (see diagram )
An Lenkradfernbedienung (siehe Schaltplan )
К рулевому пульту дистанционного управления (см. схему )
15 A fuse
15 A Sicherung
Предохранитель 15 A
Aerial terminal
Antennen-
anschlußklemme
Разъем антенны
Black
Schwarz
Черный
Blue with white stripe
Blau mit weißem Streifen
Синий с белой полосой
Red
Rot
Красный
Yellow*
2
Gelb*
2
Желтый*
2
Brown
Braun
Коричневый
*
1
Not included for this receiver
*
1
Wird nicht mit Gerät mitgeliefert
*
1
Не входит в комплект
To metallic body or chassis of the car
Zur metallenen Karosserie oder zum Fahrwerk des Autos
К металлическому корпусу или шасси автомобиля
To a live terminal in the fuse block connecting to the car battery
(bypassing the ignition switch) (constant 12 V)
Zur einer stromführenden Anschlußklemme im Sicherungsblock
zum Anschließen an die Autobatterie (Umgehen des Zündschalters)
(konstant 12 V)
К разъему фазы в блоке предохранителя (минуя блок
зажигания) (постоянный 12 В)
Ignition switch
Zündschalter
Переключатель зажигания
Fuse block
Sicherungsblock
Блок предохранителя
To an accessory terminal in the fuse block
Zur einer Zubehöranschlußklemme im Sicherungsblock
К вспомогательному разъему в блоке предохранителя
To the remote lead of other equipment or power aerial if any
(200 mA max.)
Zum Zusatzkabel des anderen Geräts oder der Motorantenne, sofern
vorhanden (max. 200 mA)
К удаленному проводу другого оборудования или антенны
(макс. 200 мА)
To cellular phone system
Zur Mobiltelefon
К системе сотового телефона
Left speaker (front)
Linker Lautsprecher (vorne)
Левый громкоговоритель (передний)
Right speaker (front)
Rechter Lautsprecher (vorne)
Правый громкоговоритель
(передний)
Left speaker (rear)
Linker Lautsprecher (hinten)
Левый громкоговоритель
(задний)
Right speaker (rear)
Rechter Lautsprecher (hinten)
Правый громкоговоритель
(задний)
Purple
Lila
Пурпурный
Purple with black stripe
Lila mit schwarzem
Streifen
Пурпурный с черной
полосой
Green
Grün
Зеленый
Green with black stripe
Grün mit schwarzem
Streifen
Зеленый с черной
полосой
Gray
Grau
Серый
Gray with black stripe
Grau mit schwarzem
Streifen
Серый с черной
полосой
White
Weiß
Белый
White with black stripe
Weiß mit schwarzem
Streifen
Белый с черной
полосой
Fuse position 2 / 2. Sicherungsposition / Положение 2
предохранителя
Vor dem Anschließen: Die Verdrahtung im Fahrzeug sorgfältig
überprüfen. Falsche Anschlüsse können ernsthafte Schäden am Gerät
hervorrufen.
Die Leiter des Stromkabels und die Leiter des Anschlusses im
Fahrzeug können sich farblich unterscheiden.
1
Die farbigen Adern des Stromkabels in der Reihenfolge
anschließen, wie in der Abbildung unten gezeigt.
2
Das Antennenkabel anschließen.
3
Die Kabelbäume am Gerät anschließen.
Hinweis: Verfügt Ihr Fahrzeug nicht über eine
Zubehöranschlußklemme, die Sicherung von der 1.
Sicherungsposition (Erstposition) in die 2. Sicherungsposition
versetzen, die rote Leitung (A7) an der (+) Batterieanschlußklemme
anschließen.
• Die gelbe Leitung (A4) wird in diesem Fall nicht verwendet.
РУССКИЙ
Fuse position 1 / 1. Sicherungsposition / Положение 1
предохранителя
SUBWOOFER—Only for KD-G612/KD-G611 (see diagram )
SUBWOOFER—Nur bei KD-G612/KD-G611 (siehe Schaltplan )
SUBWOOFER—Tолько для KD-G612/KD-G611 (см. схему )
Orange with white stripe
Orange mit weißem Streifen
Оранжевый с белой полосой
To car light control switch
Zum Autobeleuchtungssteuerung-Schalter
К контрольному переключателю освещения автомобиля
Instal3-4_KD-G612_013A_f.indd 4
Instal3-4_KD-G612_013A_f.indd 4
11/26/04 10:52:47 AM
11/26/04 10:52:47 AM

ENGLISH
FRANÇAIS
CD RECEIVER
RECEPTEUR CD
KD-G612/KD-G611/KD-G511
For installation and connections, refer to the separate manual.
Pour l’installation et les raccordements, se référer au manuel séparé.
INSTRUCTIONS
MANUEL D’INSTRUCTIONS
GET0266-003A
[EX/EU]
For canceling the display demonstration, see page 8.
Pour annuler la démonstration des affichages, référez-vous à la page 8.
Cover_KD-G612[EX_EU]1.indd 2Cover_KD-G612[EX_EU]1.indd 2 10/26/04 8:55:59 PM10/26/04 8:55:59 PM
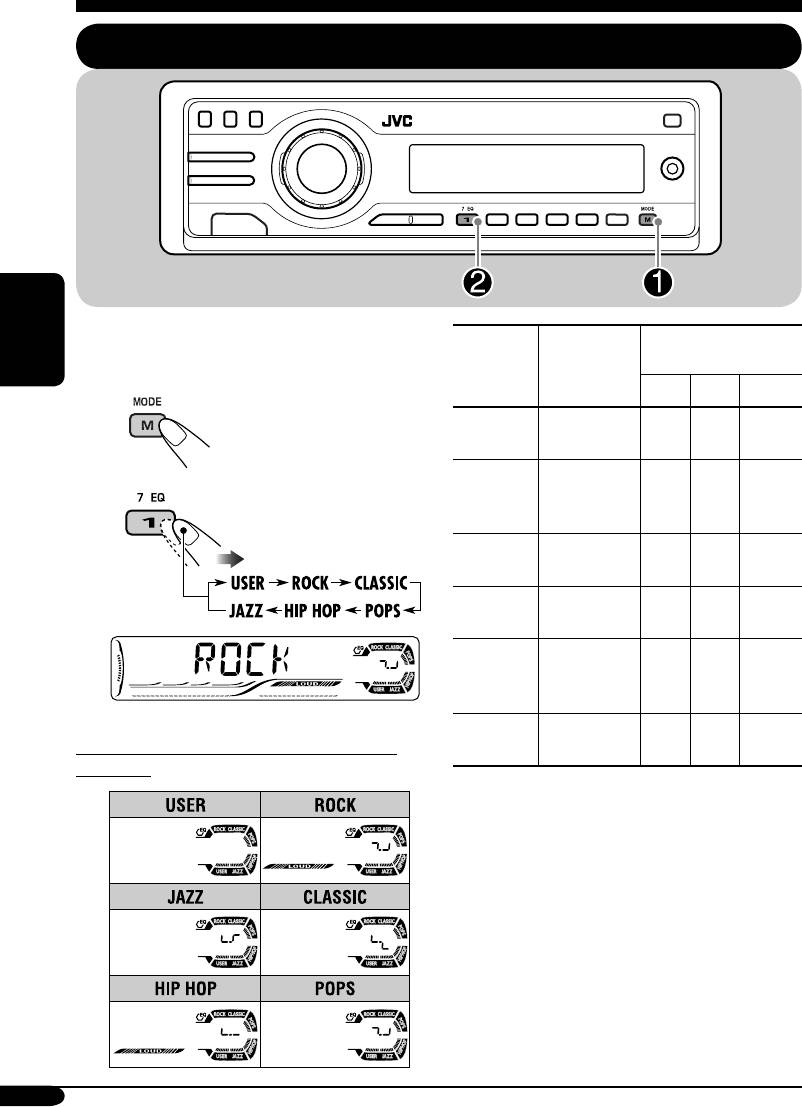
Настройки звучания
Выбор запрограммированных режимов звучания (C-EQ: настраиваемый эквалайзер)
Можно выбрать режим звучания,
Запрограммиров-
соответствующий музыкальному жанру.
анные настройки
Индикатор Для:
РУCCKИЙ
1
2
3
BAS
*
TRE
*
LOUD
*
~
USER
(Бемольный
00 00 OFF
звук)
ROCK Музыка в
+03 +01 ON
Ÿ
стиле рок
или диско
CLASSIC
Классическая
+01 –02 OFF
музыка
POPS Легкая
+04 +01 OFF
музыка
HIP HOP Музыка в
+02 00 ON
стиле фанк
или рэп
Пример: Если выбран “ROCK”
JAZZ Джазовая
+02 +03 OFF
Шаблон индикации для каждого режима
музыка
звучания:
1
*
BAS: Низкие частоты
2
*
TRE: Верхние частоты
3
*
LOUD: Громкость
20
RU18—23_G612[EY]f.indd 20RU18-23_G612[EY]f.indd 20 11/24/04 11:27:38 PM11/24/04 11:27:38 PM
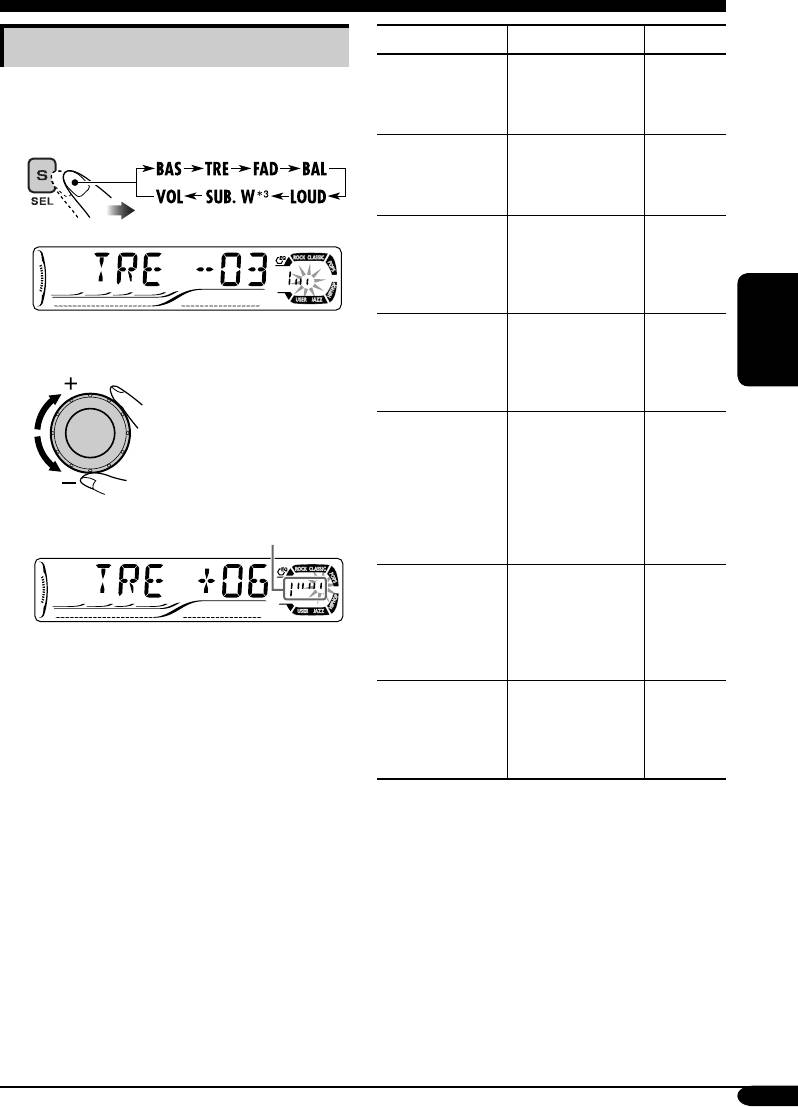
Индикатор Действие: Диапазон
Настройка звучания
1
BAS
*
Настройте
–06 (мин.)
Характеристики звучания можно настроить
(низкие
низкие частоты.
до
частоты)
+06
по своему желанию.
(макс.)
1
TRE
*
Настройте
–06 (мин.)
1
(верхние
верхние частоты.
до
частоты)
+06
(макс.)
2
FAD
*
Настройка
R06 (только
(микшер)
баланса передних
задние)
и задних
до
динамиков.
F06 (только
передние)
Пример: Если выбрано “TRE”
BAL
Настройка
L06 (только
(баланс)
баланса левых
левые)
и правых
до
РУCCKИЙ
2
динамиков.
R06 (только
правые)
1
LOUD
*
Увеличьте низкие
LOUD
(громкость)
и высокие частоты
ON
для получения
J
хорошо
LOUD
сбалансированного
OFF
Шаблон индикации изменяется
звучания при
при настройке уровня.
низком уровне
громкости.
3
SUB. W
*
Настройте
00 (мин.)
(низкочастотный
уровень
до
динамик)
выходного
08 (макс.)
сигнала
низкочастотного
динамика.
4
VOL
*
Настройте
От 00
(громкость)
громкость.
(мин.)
до
30 до 50
5
(макс.)
*
1
*
При настройке верхних и нижних частот
или громкости выполненная настройка
сохраняется для текущего выбранного
режима звучания (C-EQ), включая режим
“USER” (пользовательский).
2
*
При использовании системы с двумя динамиками
установите для микшера уровень “00”.
3
*
Только для KD-G612/KD-G611: Это
действует только тогда, когда подключен
низкочастотный динамик.
4
*
Обычно диск управления выполняет функции
регулятора громкости. Поэтому нет
необходимости выбирать “VOL” (громкость)
для настройки уровня громкости.
5
*
В зависимости от настройки регулятора
усиления. (Подробнее см. на стр. 24).
21
RU18—23_G612[EY]f.indd 21RU18-23_G612[EY]f.indd 21 11/26/04 10:09:03 AM11/26/04 10:09:03 AM
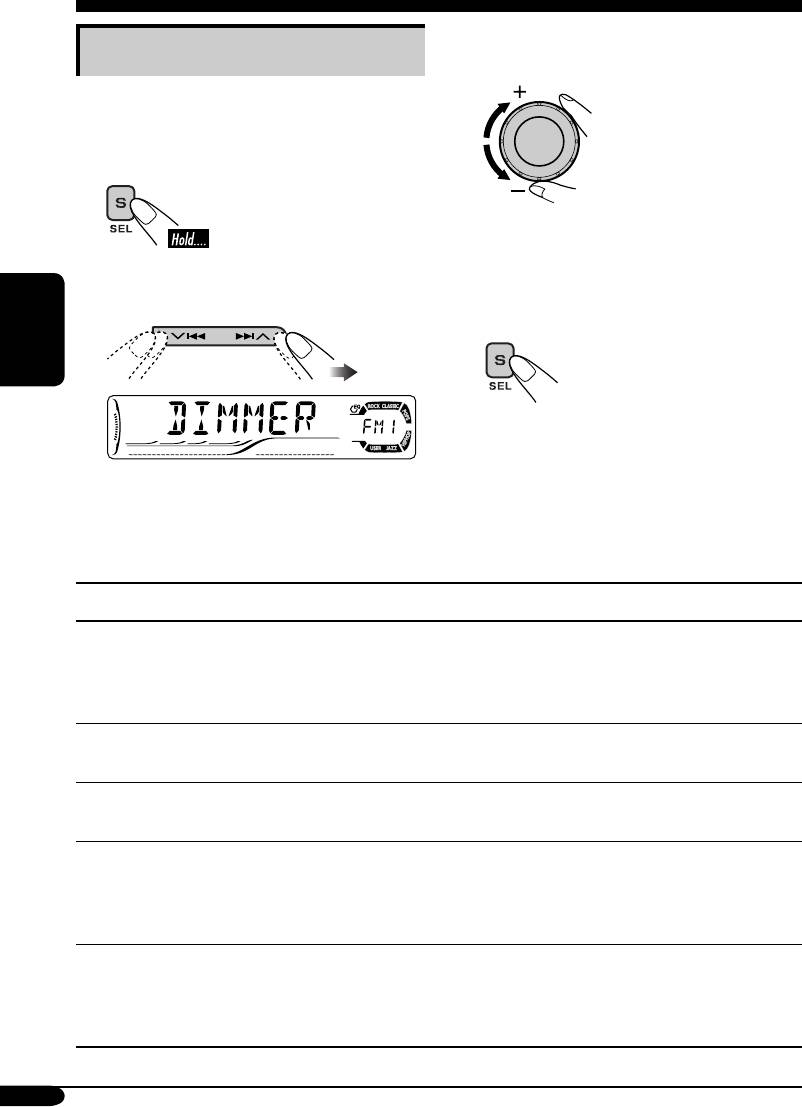
Общие настройки — PSM
3 Настройте выбранный параметр
Стандартная процедура
PSM.
Можно изменять параметры PSM
(предпочитаемый режим настройки),
которые перечислены в таблице ниже.
1
4 Повторите действия 2 и 3 для
настройки других параметров PSM,
если необходимо.
2
Выберите параметр PSM.
5 Завершите процедуру.
РУCCKИЙ
Пример: Если выбрано “DIMMER”
Индикация Выбираемые настройки, [страница для справки]
DEMO
DEMO ON: [По умолчанию]; Если в течение 20 секунд
Демонстрация функций
не будет выполнено операций, начнется
дисплея
демонстрация функций дисплея, [8].
DEMO OFF: Отмена.
CLOCK H
0 – 23 (1 – 12), [8]
Настройка часа
[По умолчанию: 0 (0:00)]
CLOCK M
00 – 59, [8]
Настройка минуты
[По умолчанию: 00 (0:00)]
24H/12H
12H O 24H, [8]
Отображение времени
[По умолчанию: 24H]
в 24-часовом или 12-
часовом формате
CLK ADJ
AUTO: [По умолчанию]; Встроенные часы автоматически
Настройка часов
настраиваются с помощью данных CT (время на
часах) в сигнале RDS.
OFF: Отмена.
22
RU18—23_G612[EY]f.indd 22RU18-23_G612[EY]f.indd 22 11/24/04 11:27:38 PM11/24/04 11:27:38 PM

Индикация Выбираемые настройки, [страница для справки]
AF-REG
Когда принимаемые от текущей радиостанции сигналы
Прием на
становятся слабыми…
альтернативных
AF: [По умолчанию]; Переключение на другую
частотах/прием
радиостанцию (программа может отличаться от
региональных передач
принимаемой в настоящее время), [13].
• Загорается индикатор AF.
AF REG: Переключение на другую радиостанцию,
передающую ту же программу.
• Загораются индикаторы AF и REG.
OFF: Отмена (нельзя выбрать, если для “DAB AF”
установлено значение “AF ON”).
PTY-STBY
Включение функции резервного приема PTY с помощью
Резервный PTY
одного из 29 кодов PTY, [13].
OFF [По умолчанию] = 29 кодов PTY, [11] = (возврат в начало)
РУCCKИЙ
TA VOL
[По умолчанию: VOL 20]; VOL 00 — VOL 30 или 50
*
1
, [12]
Громкость передачи
сообщений о движении
на дорогах
P-SEARCH
ON: Используя данные AF, приемник настраивается
Поиск программ
на другую частоту, передающую ту же программу,
прием которой осуществляется на первоначальной
запрограммированной радиостанции RDS
если уровень сигналов запрограммированной
радиостанции недостаточен.
OFF: [По умолчанию]; Отмена.
2
DAB AF*
AF ON: [По умолчанию]; Oтслеживание программы среди
Поиск альтернативной
служб DAB и радиостанций FM RDS, [29].
частоты
AF OFF: Отмена.
2
DAB VOL*
Можно настроить уровень громкости (VOL –12 — VOL +12)
Настройка громкости
тюнера DAB в соответствии с уровнем звучания FM-
DAB
радиостанции и сохранить это в памяти.
[По умолчанию: VOL 00]
LEVEL
ON: [По умолчанию]; Bключение индикатора уровня звука.
Аудиометр
OFF: Отмена; отображение индикатора режима звучания,
[20].
DIMMER
AUTO: [По умолчанию]; Затемнение дисплея при включении
Затемнение
фар.
ON: Включение затемнения.
OFF: Отмена.
1
*
Зависит от использования регулятора усиления.
2
*
Отображается только при подключении тюнера DAB.
Продолжение на следующей странице…
23
RU18—23_G612[EY]f.indd 23RU18-23_G612[EY]f.indd 23 11/24/04 11:27:39 PM11/24/04 11:27:39 PM

Индикация Выбираемые настройки, [страница для справки]
TEL
MUTING 1/MUTING 2: Выберите любой из параметров,
Отключение звука
обеспечивающий отключение
телефона
звука при использовании сотового
телефона.
OFF: [По умолчанию]; Отмена.
1
SCROLL*
ONCE: [По умолчанию]; однократная прокрутка информации
Прокрутка
на диске.
AUTO:
Повторение прокрутки (
с интервалом 5 секунд
).
OFF: Отмена.
• При нажатии кнопки D DISP в течение более одной секунды
происходит включение функции прокрутки информации на
дисплее независимо от имеющейся настройки.
2
WOOFER*
LOW: Низкочастотный динамик воспроизводит частоты ниже
РУCCKИЙ
Предельная частота
55 Гц.
низкочастотного
MID: [По умолчанию]; низкочастотный динамик
динамика
воспроизводит частоты ниже 85 Гц.
HIGH: Низкочастотный динамик воспроизводит частоты ниже
115 Гц.
3
EXT IN*
CHANGER:
[
По умолчанию
];
использование устройства
Ввод внешних
автоматической смены компакт-дисков компании
сигналов
JVC, [15] или тюнера DAB, [28].
EXT IN: Используется любое внешнее устройство, [27].
2
AUX ADJ*
A.ADJ 00 – A.ADJ 05: Соответствующая настройка уровня
Настройка уровня
дополнительного входного сигнала во избежание
дополнительного
неожиданного увеличения уровня выходного
входного сигнала
сигнала при переходе с внешнего устройства,
подключенного к входному разъему AUX на
панели управления, на другой источник.
[По умолчанию: A.ADJ 00]
TAG DISP
TAG ON: [По умолчанию]; отображение тега ID3 во время
Отображение тегов
воспроизведения дорожек MP3/WMA, [18].
TAG OFF: Отмена.
AMP GAIN
Можно изменить максимальный уровень громкости данного
Регулятор усиления
приемника.
LOW PWR: VOL 00 – VOL 30 (
Выберите этот параметр для
предотвращения повреждения динамика, если
максимальная мощность динамика меньше 50 Вт.
)
HIGH PWR: [По умолчанию]; VOL 00 – VOL 50
1
*
Некоторые символы не будут отображаться (будет отображаться пустое место) на
дисплее (Пример: “ABCå!d#” ]“ABCA D ”).
2
*
Только для KD-G612/KD-G611.
3
*
Отображается только при выборе одного из следующих источников — FM, AM, CD или
(AUX IN: только для KD-G612/KD-G611).
24
RU24—29_G612[EY]f.indd 24RU24-29_G612[EY]f.indd 24 11/24/04 11:27:56 PM11/24/04 11:27:56 PM
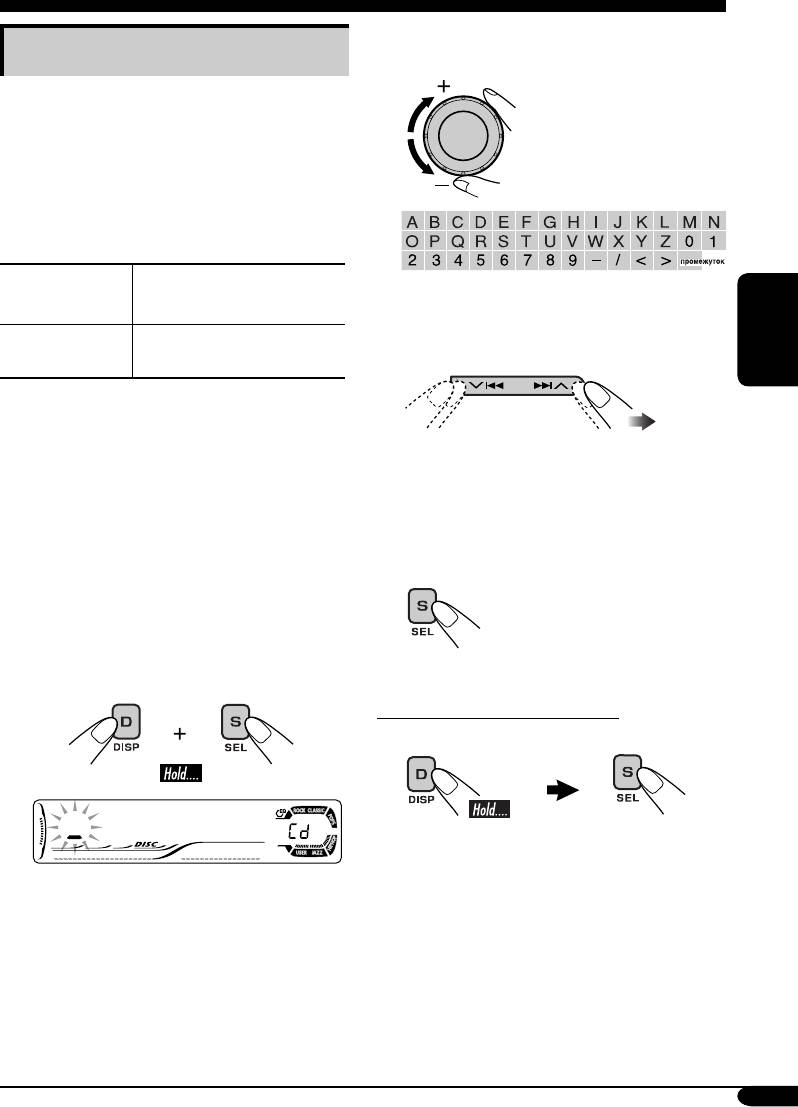
Другие основные функции
3 Присвоение названия.
Присвоение названий источникам
1 Выберите символ.
Данный раздел относится только к модели
KD-G612/KD-G611.
Вы можете присвоить названия компакт-
дискам (как в данном приемнике, так и в
устройстве автоматической смены компакт-
дисков).
Источники
Максимальное число
звука
символов
2 Перейдите к положению
следующего (предыдущего)
Компакт-диски
До 32 символов (до 30
символа.
или CD-CH
дисков)
РУCCKИЙ
* Невозможно назначить название для CD-
текста или диска MP3/WMA.
1 Выбор источников.
3 Повторяйте действия 1 и 2,
• Для компакт-диска в данном
пока не завершите ввод
приемнике: Вставьте диск.
названия.
• Для компакт-дисков в устройстве
автоматической смены компакт-
4 Завершите процедуру.
дисков: Выберите “CD-CH”, затем
выберите номер диска.
2 Переход в режим присвоения
названия.
Удаление названия полностью
В действии 2 слева…
Пример: Bыбор “CD” в качестве
источника звука
25
RU24—29_G612[EY]f.indd 25RU24-29_G612[EY]f.indd 25 11/24/04 11:27:58 PM11/24/04 11:27:58 PM
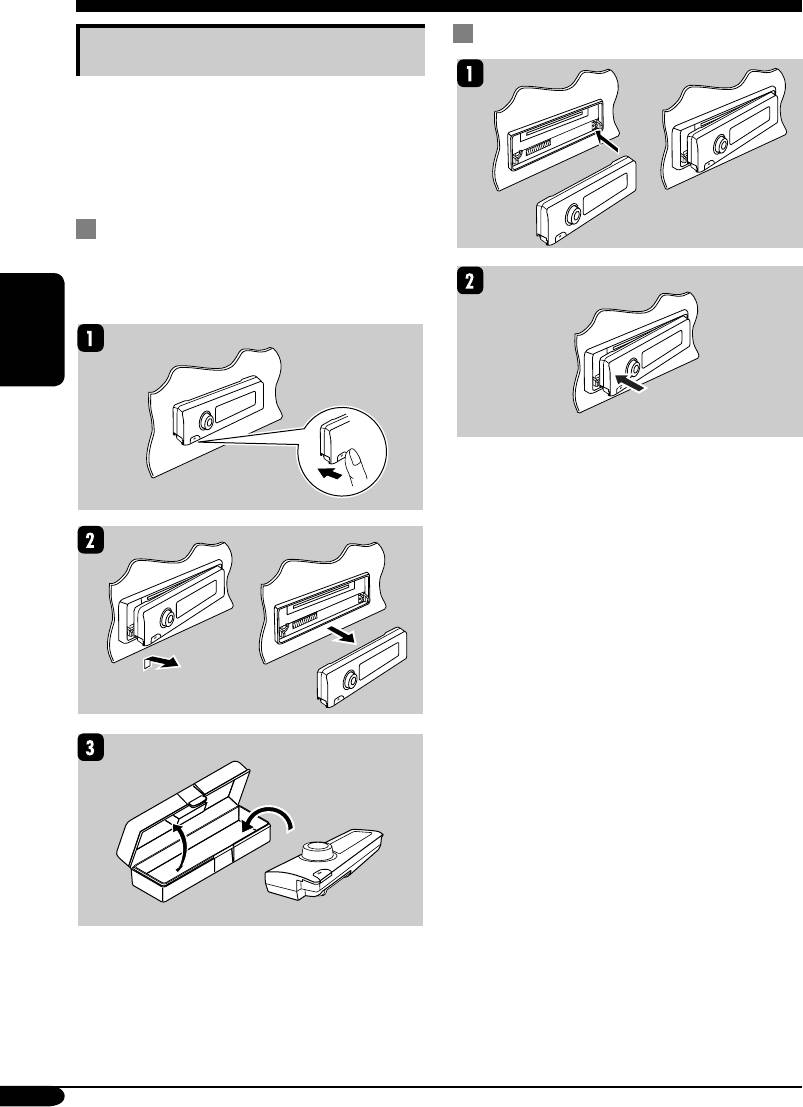
Подключение панели управления
Отсоединение панели управления
При отсоединении или подсоединении
панели управления следует соблюдать
меры предосторожности во избежание
повреждения разъемов в задней части
панели управления и на ее держателе.
Отсоединение панели управления
Прежде чем отсоединить панель
управления, обязательно отключите подачу
питания.
РУCCKИЙ
26
RU24—29_G612[EY]f.indd 26RU24-29_G612[EY]f.indd 26 11/24/04 11:27:58 PM11/24/04 11:27:58 PM
Краткое содержание страницы № 1
CD RECEIVER
RECEPTEUR CD
KD-G612/KD-G611/KD-G511
For canceling the display demonstration, see page 8.
Pour annuler la démonstration des affichages, référez-vous à la page 8.
For installation and connections, refer to the separate manual.
Pour l’installation et les raccordements, se référer au manuel séparé.
INSTRUCTIONS
MANUEL D’INSTRUCTIONS
GET0266-003A
[EX/EU]
Cover_KD-G612[EX_EU]1.indd 2 Cover_KD-G612[EX_EU]1.indd 2 1 10/26/04 8:55:59 PM 0/26/04 8:55:59 PM
FRANÇAIS ENGLISH
Краткое содержание страницы № 2
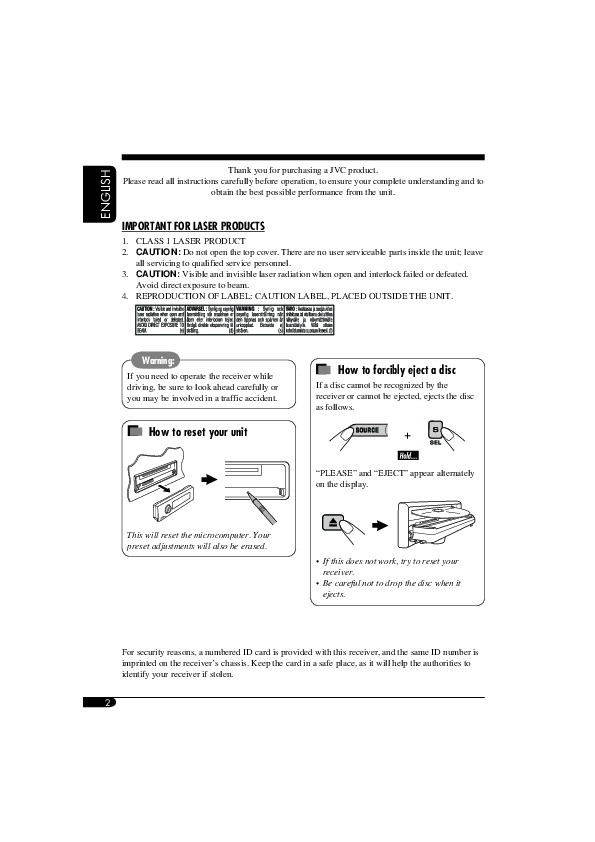
Thank you for purchasing a JVC product. Please read all instructions carefully before operation, to ensure your complete understanding and to obtain the best possible performance from the unit. IMPORTANT FOR LASER PRODUCTS 1. CLASS 1 LASER PRODUCT 2. CAUTION: Do not open the top cover. There are no user serviceable parts inside the unit; leave all servicing to qualified service personnel. 3. CAUTION: Visible and invisible laser radiation when open and interlock failed or defeated. Avoid dire
Краткое содержание страницы № 3
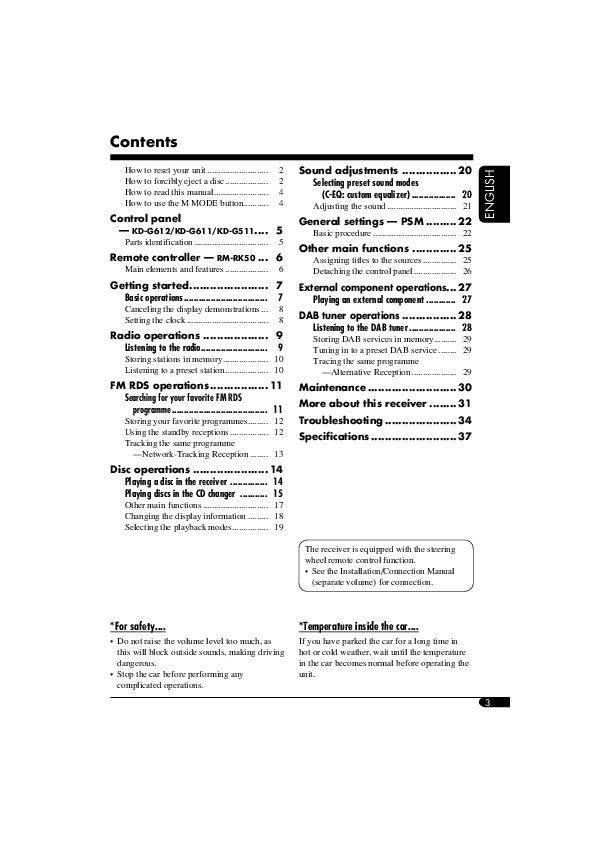
Contents How to reset your unit ……………………… 2 Sound adjustments ……………. 20 How to forcibly eject a disc ………………. 2 Selecting preset sound modes How to read this manual …………………… 4 (C-EQ: custom equalizer) ……………… 20 How to use the M MODE button ……….. 4 Adjusting the sound …………………………. 21 Control panel General settings — PSM ……… 22 — KD-G612/KD-G611/KD-G511 …. 5 Basic procedure …………………..
Краткое содержание страницы № 4
How to read this manual How to use the M MODE button The following methods are used to made the If you press M MODE, the receiver goes into explanations simple and easy-to-understand: functions mode, then the number buttons and Some related tips and notes are explained in 5/∞ buttons work as different function buttons. “More about this receiver” (see pages 31 – 33). Ex.: When number button 2 works as Button operations are mainly explained with MO (monaural) button. the illustrations as
Краткое содержание страницы № 5
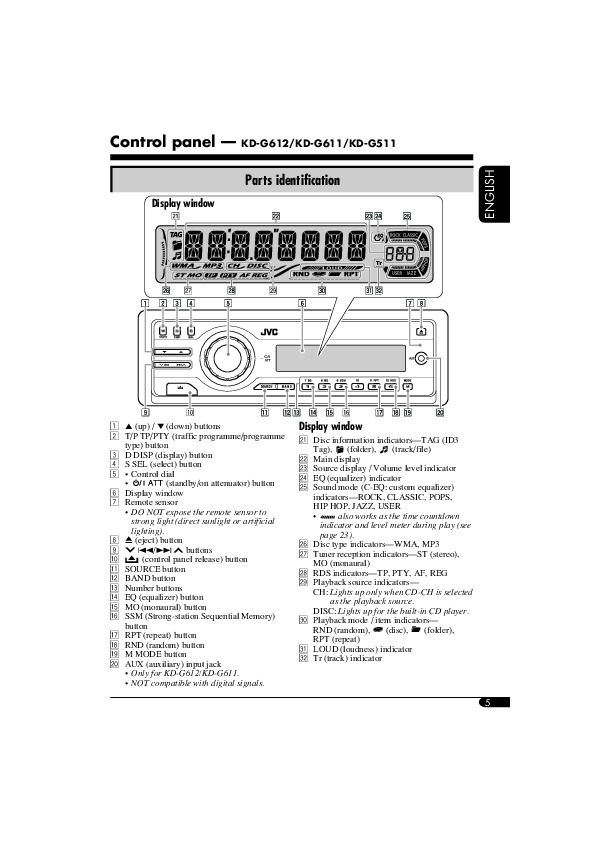
Control panel — KD-G612/KD-G611/KD-G511 Parts identification Display window 1 5 (up) / ∞ (down) buttons Display window 2 T/P TP/PTY (traffic programme/programme a Disc information indicators—TAG (ID3 type) button Tag), (folder), (track/file) 3 D DISP (display) button s Main display 4 S SEL (select) button d Source display / Volume level indicator 5 Control dial f EQ (equalizer) indicator (standby/on attenuator) button g Sound mode (C-EQ: custom equalizer) 6 Display window indicators—R
Краткое содержание страницы № 6
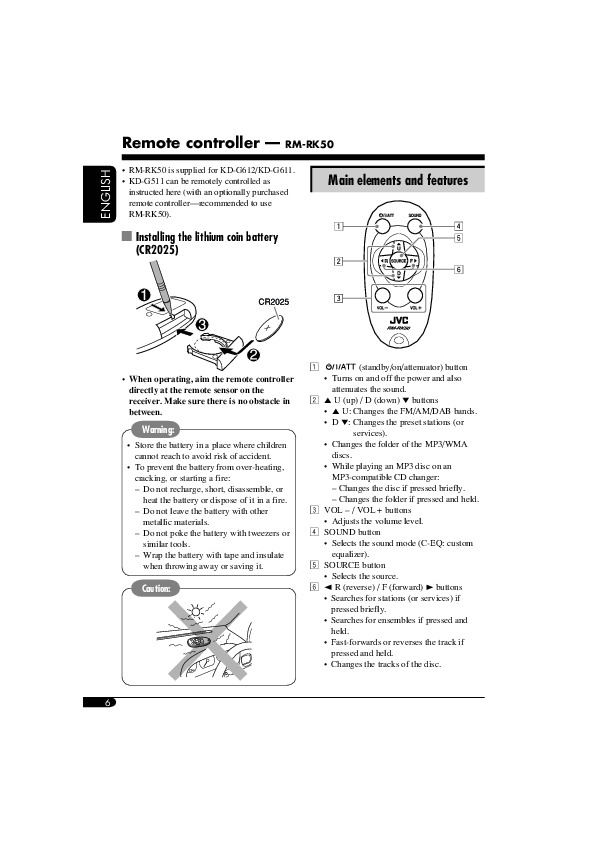
Remote controller — RM-RK50 RM-RK50 is supplied for KD-G612/KD-G611. KD-G511 can be remotely controlled as Main elements and features instructed here (with an optionally purchased remote controller—recommended to use RM-RK50). Installing the lithium coin battery (CR2025) 1 (standby/on/attenuator) button Turns on and off the power and also When operating, aim the remote controller attenuates the sound. directly at the remote sensor on the 2 5 U (up) / D (down) ∞ buttons receive
Краткое содержание страницы № 7
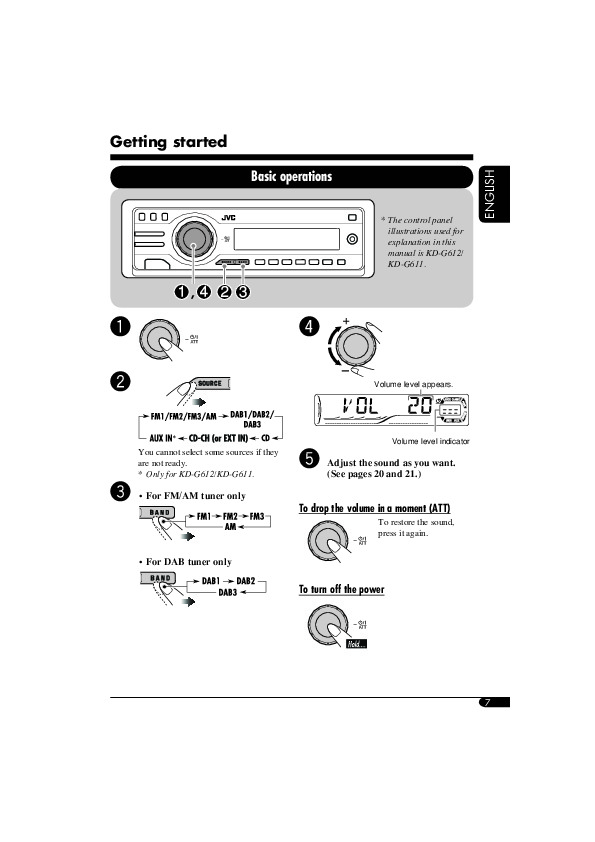
Getting started Basic operations * The control panel illustrations used for explanation in this manual is KD-G612/ KD-G611. ~ ⁄ Volume level appears. Ÿ Volume level indicator You cannot select some sources if they @ Adjust the sound as you want. are not ready. (See pages 20 and 21.) * Only for KD-G612/KD-G611. ! For FM/AM tuner only To drop the volume in a moment (ATT) To restore the sound, press it again. For DAB tuner only To turn off the power 7 EN06-11_G612[EX_EU]f.indd 7 E
Краткое содержание страницы № 8
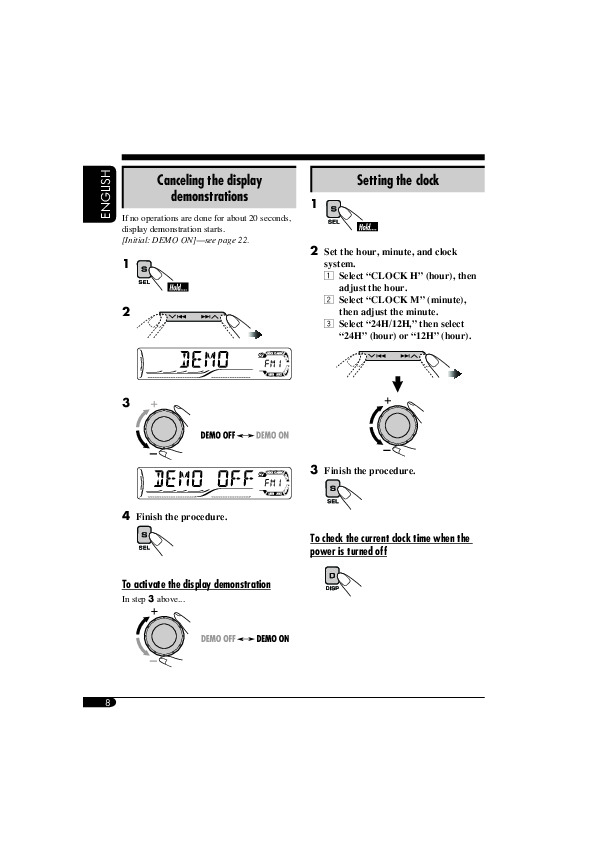
Canceling the display Setting the clock demonstrations 1 If no operations are done for about 20 seconds, display demonstration starts. [Initial: DEMO ON]—see page 22. 2 Set the hour, minute, and clock system. 1 1 Select “CLOCK H” (hour), then adjust the hour. 2 Select “CLOCK M” (minute), then adjust the minute. 2 3 Select “24H/12H,” then select “24H” (hour) or “12H” (hour). 3 3 Finish the procedure. 4 Finish the procedure. To check the current clock time when the power is turned of
Краткое содержание страницы № 9
Radio operations Listening to the radio To tune in to a station manually ~ In step ! on the left… 1 Ÿ Selected band appears. 2 Select the desired station frequencies. When an FM stereo broadcast is hard to Lights up when receiving an FM stereo receive broadcast with sufficient signal strength. 1 ! Start searching for a station. 2 When a station is received, searching stops. Lights up when monaural To stop searching, press the same mode is activated. button again. Reception improves
Краткое содержание страницы № 10
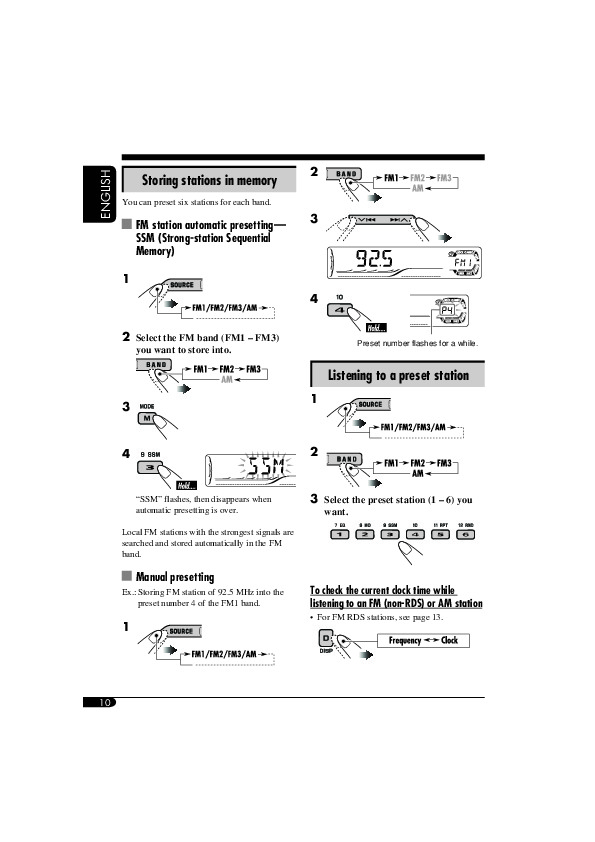
2 Storing stations in memory You can preset six stations for each band. 3 FM station automatic presetting — SSM (Strong-station Sequential Memory) 1 4 2 Select the FM band (FM1 – FM3) Preset number flashes for a while. you want to store into. Listening to a preset station 1 3 2 4 “SSM” flashes, then disappears when 3 Select the preset station (1 – 6) you automatic presetting is over. want. Local FM stations with the strongest signals are searched and stored automatically in the FM
Краткое содержание страницы № 11
FM RDS operations Searching for your favorite FM RDS programme You can tune in to a station broadcasting your favorite programme by searching for a PTY code. ! Start searching for your favorite programme. ~ If there is a station broadcasting a The last selected PTY code appears. programme of the same PTY code as you have selected, that station is tuned Ÿ Select one of your favorite in. programme type. PTY codes NEWS, AFFAIRS, INFO, SPORT, or EDUCATE, DRAMA, CULTURE, SCIENCE, VARIED, PO
Краткое содержание страницы № 12
3 Repeat steps 1 and 2 to store What you can do with RDS other PTY codes into other preset RDS (Radio Data System) allows FM numbers. stations to send an additional signal along with their regular programme signals. 4 Finish the procedure. By receiving the RDS data, this receiver can do the following: Programme Type (PTY) Search (see page 11) Standby Reception of Traffic Announcement—TA (see the following) or your favorite programme (PTY) (see pages 13 and 23) Using the standby rec
Краткое содержание страницы № 13
PTY Standby Reception Tracking the same programme— PTY Standby Reception allows the receiver to switch temporarily to your favorite PTY Network-Tracking Reception programme from any source other than AM. When driving in an area where FM reception is not sufficient enough, this receiver To activate and select your favorite PTY automatically tunes in to another FM RDS code for PTY Standby Reception, see page station of the same network, possibly 23. broadcasting the same programme with st
Краткое содержание страницы № 14
Disc operations Playing a disc in the receiver All tracks will be played repeatedly until you change the source or eject the disc. When inserting an audio CD or a CD Text About MP3 and WMA discs disc: ® MP3 and WMA (Windows Media Audio) Total playing time Total track number “tracks” (words “file” and “track” are used of the inserted disc of the inserted disc interchangeably) are recorded in “folders.” When inserting an MP3 or a WMA disc: CD Text: Disc title/performer = Track title ap
Краткое содержание страницы № 15
Playing discs in the CD changer About the CD changer ~ It is recommended to use the JVC MP3- compatible CD changer with your receiver. You can also connect other CH-X series * If you have changed “EXT IN” setting CD changers (except CH-X99 and to “EXT IN” (see page 24), you CH-X100). However, they are not cannot select the CD changer. compatible with MP3 discs, so you cannot play back MP3 discs. You cannot use the KD-MK series CD changers with this receiver. Disc text information
Краткое содержание страницы № 16
When the current disc is an MP3 disc: To fast-forward or reverse the track Fast-forwards. Folder name* Reverses. To go to the next or previous tracks Selected folder number Disc information appears automatically (see page 18). Elapsed playing Current track To the following tracks. time number To the beginning of the current track, then the previous tracks. To go to the next or previous folders (only * “ROOT” appears if no folder is included in for MP3 or WMA discs) the disc. For MP3 discs:
Краткое содержание страницы № 17
To locate a particular track (for CD) or 2 folder (for MP3 or WMA discs) directly To select a number from 01 – 06: First time you press +10 or –10 button, the track skips to the nearest higher or lower track with a track number of multiple ten (ex. 10th, 20th, 30th). Then each time you press the button, you can skip 10 tracks. To select a number from 07 – 12: After the last track, the first track will be selected and vice versa. 3 To use folder search on MP3/WMA discs, it is require
Краткое содержание страницы № 18
Changing the display information While playing an audio CD or a CD Text ( / ) 1 * For KD-G612/KD-G611: If no title is assigned to an audio CD, “NO NAME” appears. To assign a title to an audio CD, see page 25. For KD-G511: “NO NAME” appears. While playing an MP3 ( / ) or WMA ( ) disc When “TAG DISP” is set to “TAG ON” (see page 24) 2 * If an MP3/WMA file does not have ID3 tags, folder name and file name appear. In this case, the TAG indicator will not light up. When “TAG DISP” i
Краткое содержание страницы № 19
Selecting the playback modes You can use only one of the following playback modes at a time. 1 2 Select your desired playback mode. Repeat play Mode Plays repeatedly TRK RPT: The current track. RPT lights up. 1 FLDR RPT* : All tracks of the current folder. and RPT light up. 2 DISC RPT* : All tracks of the current disc. and RPT light up. RPT OFF: Cancels. Ex.: When “TRK RPT” is selected while playing an MP3 disc in the receiver Random play Mode Plays at random 1 FLDR RND* : All track
Краткое содержание страницы № 20
Sound adjustments Selecting preset sound modes (C-EQ: custom equalizer) You can select a preset sound mode suitable to Preset values the music genre. Indication For: 1 2 3 * * * BAS TRE LOUD USER (Flat sound) 00 00 OFF ~ ROCK Rock or +03 +01 ON disco music CLASSIC Classical +01 –02 OFF Ÿ music POPS Light music +04 +01 OFF HIP HOP Funk or rap +02 00 ON music JAZZ Jazz music +02 +03 OFF 1 * BAS: Bass 2 * TRE: Treble 3 * LOUD: Loudness Ex.: When “ROCK” is selected Indication pattern for each so
Перед Вами Инструкция автомагнитолы JVC KD-G612. Вы можете ознакомиться и скачать данное руководство по эксплуатации бесплатно.
Инструкция по применению на русском языке, предложенная производителем, позволяет
правильно использовать Вашу бытовую технику и электронику.
-
 1
1
-
2
-
3
-
4
-
5
-
6
-
7
-
8
-
9
-
10
-
11