
CDX-GT200S
CDX-GT200
Operating Instructions
Bedienungsanleitung
Mode d’emploi
Istruzioni per l’uso
Gebruiksaanwijzing
2-651-185-22 (1)
© 2005 Sony Corporation
GB
DE
FR
IT
NL
To cancel the demonstration (DEMO) display, see page 9.
Zum Deaktivieren der Demo-Anzeige (DEMO) schlagen Sie bitte auf Seite 10 nach.
Pour annuler la démonstration (DEMO), reportez-vous à la page 10.
Per annullare la dimostrazione (DEMO), vedere pagina 10.
Om de demonstratie (DEMO) te annuleren, zie pagina 10.
FM
/
MW
/
LW
Compact Disc Player
Раздел: Авто, мото оборудование и транспорт
Тип: Автомобильная магнитола с CD MP3
Характеристики, спецификации
Макс. выходная мощность:
4 x 50 Вт
Ном. выходная мощность:
4 x 26 Вт
Воспроизведение CD/-R/-RW:
Да
Фиксированные настройки тюнера:
18 FM/6 MW/LW
Тип дисплея:
текст./символьный
Тип дистанционного управления:
ИК
Тип батарей пульта ДУ:
1 x CR2025
Размер установочного места:
1 DIN
Инструкция к Автомобильной магнитоле с CD MP3 Sony CDX-GT200
2-651-185-33 (1)
FM
/
MW/LW
Compact Disc Player
GB
Operating Instructions
RU
Инструкция по эксплуатации
To cancel the demonstration (DEMO) display, see page 7.
Для отмены демонстрации на дисплее (режим DEMO) см. стр. 9.
CDX-GT200E
© 2005 Sony Corporation
Welcome !
Warning if your car’s ignition has no
ACC position
Thank you for purchasing this Sony Compact
After turning the ignition off, be sure to press
Disc Player. You can enjoy your drive with the
and hold (OFF) on the unit until the display
following functions.
disappears.
• CD playback
Otherwise, the display does not turn off and
You can play CD-DA (also containing CD
this causes battery drain.
TEXT*), CD-R/CD-RW (MP3/WMA files also
containing Multi Session (
page 10)) and
ATRAC CD (ATRAC3 and ATRAC3plus
format (
page 10)).
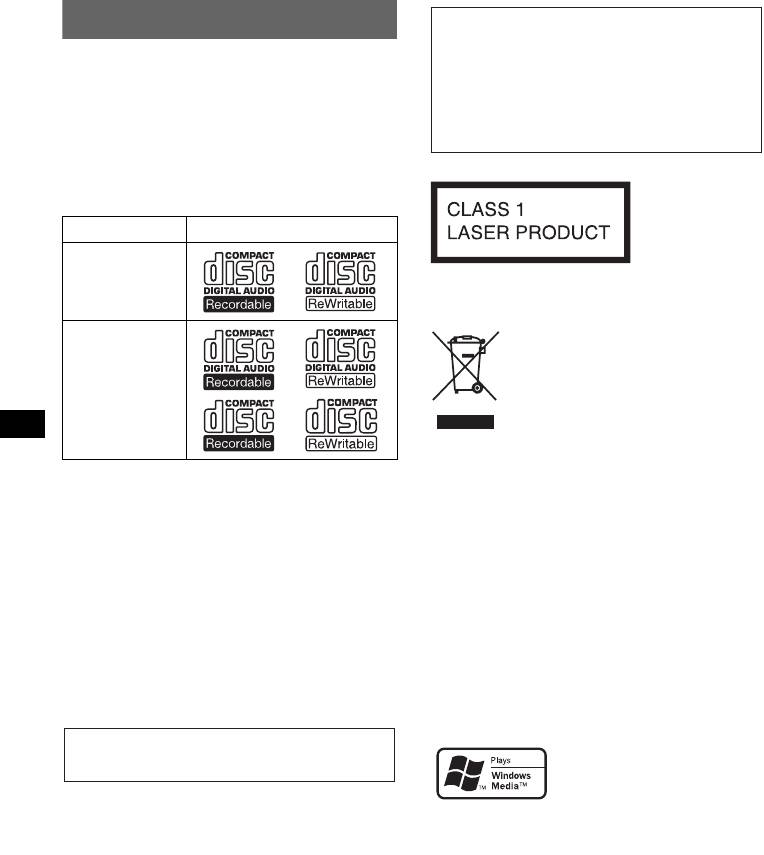
Type of discs Label on the disc
CD-DA
This label is located on the bottom of the
chassis.
Disposal of Old Electrical &
Electronic Equipment (Applicable in
MP3
the European Union and other
WMA
European countries with separate
ATRAC CD
collection systems)
This symbol on the product or on its
packaging indicates that this product shall not be treated
as household waste. Instead it shall be handed over to the
• Radio reception
applicable collection point for the recycling of electrical
– You can store up to 6 stations per band (FM1,
and electronic equipment. By ensuring this product is
FM2, FM3, MW and LW).
disposed of correctly, you will help prevent potential
– BTM (Best Tuning Memory): the unit selects
negative consequences for the environment and human
health, which could otherwise be caused by inappropriate
strong signal stations and stores them.
waste handling of this product. The recycling of materials
• Sound adjustment
will help to conserve natural resources. For more detailed
– EQ3: You can select an equalizer curve for 7
information about recycling of this product, please contact
music types.
your local Civic Office, your household waste disposal
• Auxiliary equipment connection
service or the shop where you purchased the product.
An AUX input jack on the front of the unit
allows connection of a portable audio device.
SonicStage and its logo are trademarks of Sony
* A CD TEXT disc is a CD-DA that includes
Corporation.
information such as disc, artist and track name.
ATRAC, ATRAC3, ATRAC3plus and their logos
are trademarks of Sony Corporation.
For installation and connections, see the
Microsoft, Windows Media,
supplied installation/connections manual.
and the Windows logo are
trademarks or registered
trademarks of Microsoft
Corporation in the United States and/or other
countries.
2

Table of Contents
Getting Started
Other functions
Resetting the unit. . . . . . . . . . . . . . . . . . . . . . . . 4
Changing the sound settings . . . . . . . . . . . . . . . 7
Setting the clock . . . . . . . . . . . . . . . . . . . . . . . . 4
Adjusting the sound characteristics
Detaching the front panel . . . . . . . . . . . . . . . . . 4
— BAL/FAD/SUB . . . . . . . . . . . . . . . . . . . 7
Attaching the front panel . . . . . . . . . . . . . . . 4
Customizing the equalizer curve
— EQ3 . . . . . . . . . . . . . . . . . . . . . . . . . . . . 7
Adjusting setup items — SET . . . . . . . . . . . . . 7
Location of controls and basic
Using optional equipment. . . . . . . . . . . . . . . . . 8
operations
Auxiliary audio equipment . . . . . . . . . . . . . 8
Card remote commander RM-X114 . . . . . . 8
Main unit . . . . . . . . . . . . . . . . . . . . . . . . . . . 5
Additional Information
CD
Precautions . . . . . . . . . . . . . . . . . . . . . . . . . . . . 9
Display items . . . . . . . . . . . . . . . . . . . . . . . . 6
Notes on discs . . . . . . . . . . . . . . . . . . . . . . . 9
Repeat and shuffle play . . . . . . . . . . . . . . . . 6
About MP3/WMA files . . . . . . . . . . . . . . . 10
About ATRAC CD . . . . . . . . . . . . . . . . . . 10
Radio
Maintenance . . . . . . . . . . . . . . . . . . . . . . . . . . 11
Removing the unit. . . . . . . . . . . . . . . . . . . . . . 11
Storing and receiving stations . . . . . . . . . . . . . . 6
Specifications . . . . . . . . . . . . . . . . . . . . . . . . . 12
Storing automatically — BTM . . . . . . . . . . 6
Troubleshooting . . . . . . . . . . . . . . . . . . . . . . . 12
Storing manually . . . . . . . . . . . . . . . . . . . . . 6
Error displays/Messages . . . . . . . . . . . . . . 13
Receiving the stored stations . . . . . . . . . . . . 6
Tuning automatically . . . . . . . . . . . . . . . . . . 6
3
Getting Started
Detaching the front panel
You can detach the front panel of this unit to
Resetting the unit
prevent theft.
Before operating the unit for the first time, or
after replacing the car battery or changing the
Caution alarm
connections, you must reset the unit.
If you turn the ignition switch to the OFF
Detach the front panel and press the RESET
position without detaching the front panel, the
button with a pointed object, such as a ballpoint
caution alarm will sound for a few seconds.
pen.
The alarm will only sound if the built-in
amplifier is used.
1 Press (OFF).
RESET
The unit is turned off.
button
2 Press , then pull it off towards you.
Note
Pressing the RESET button will erase the clock setting
and some stored contents.
Setting the clock
The clock uses a 24-hour digital indication.
1 Press and hold the select button.
Notes
The setup display appears.
• Do not drop or put excessive pressure on the front
panel and display window.
2 Press the select button repeatedly
• Do not subject the front panel to heat/high
until “CLOCK-ADJ” appears.
temperature or moisture. Avoid leaving it in a parked
car or on a dashboard/rear tray.
3 Press (DSPL).
The hour indication flashes.
4 Rotate the volume control dial to set
Attaching the front panel
the hour and minute.
Engage part A of the front panel with part B of
To move the digital indication, press (DSPL).
the unit, as illustrated, and push the left side into
position until it clicks.
5 Press the select button.
The setup is complete and the clock starts.
To display the clock, press (DSPL). Press
(DSPL) again to return to the previous display.
With the card remote commander
In step 4, to set the hour and minute, press M or m.
A
B
Note
Do not put anything on the inner surface of the front
panel.
4
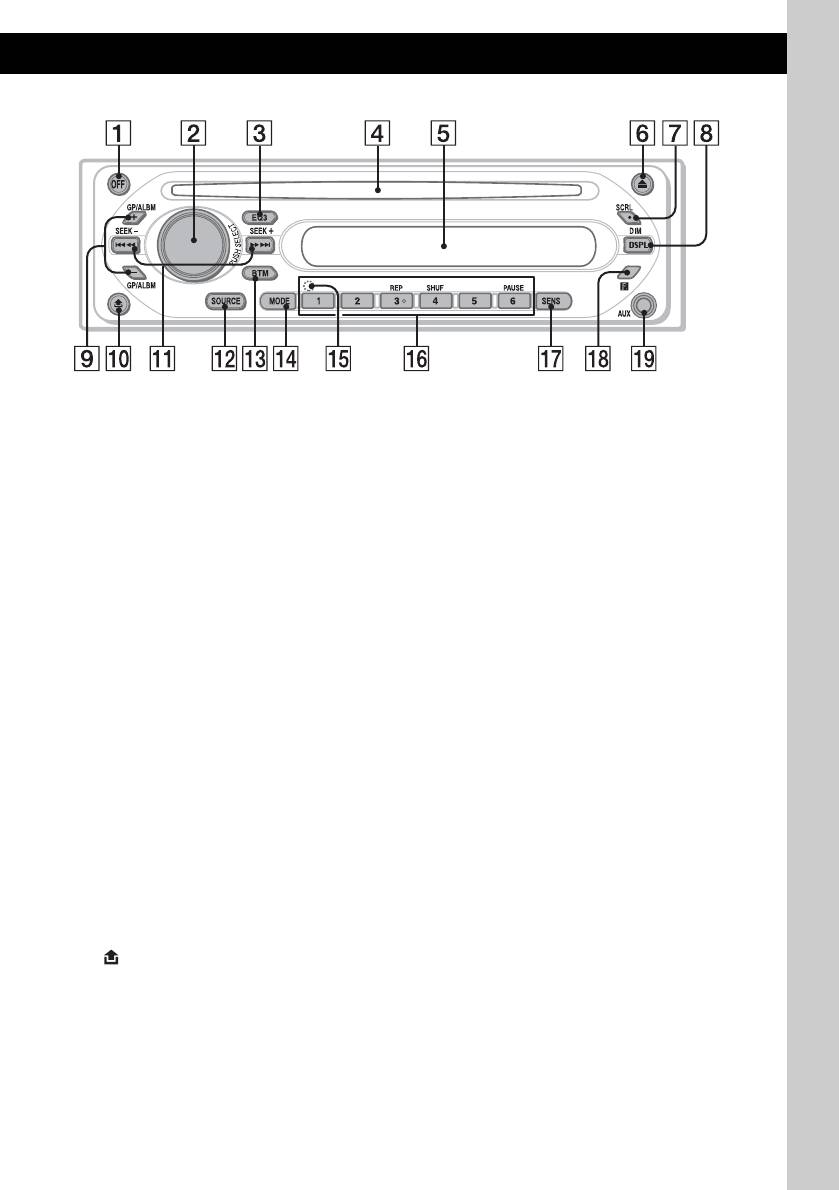
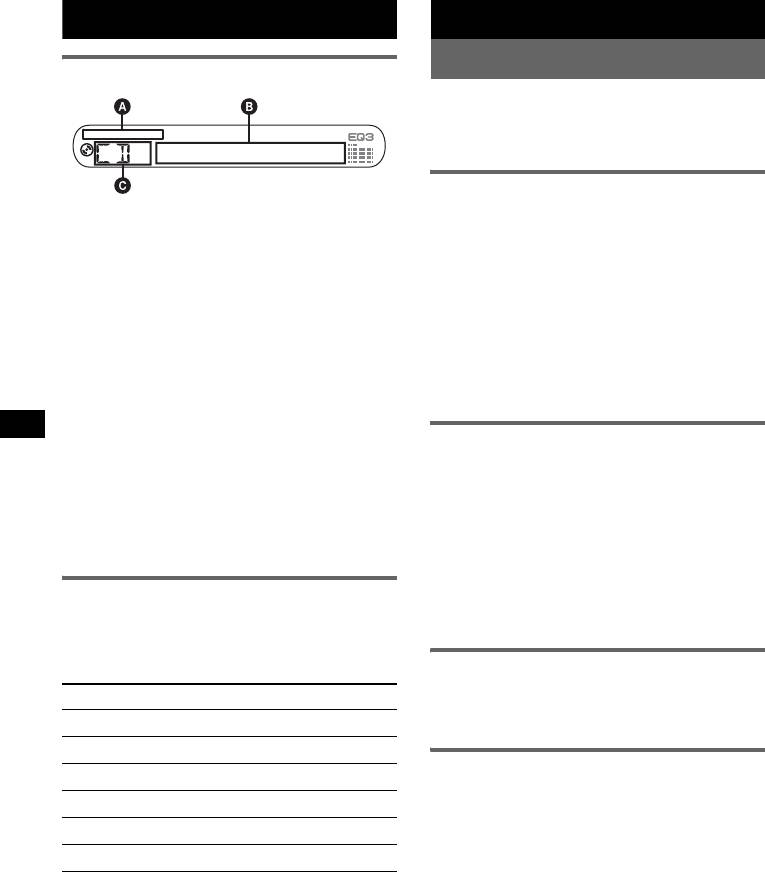
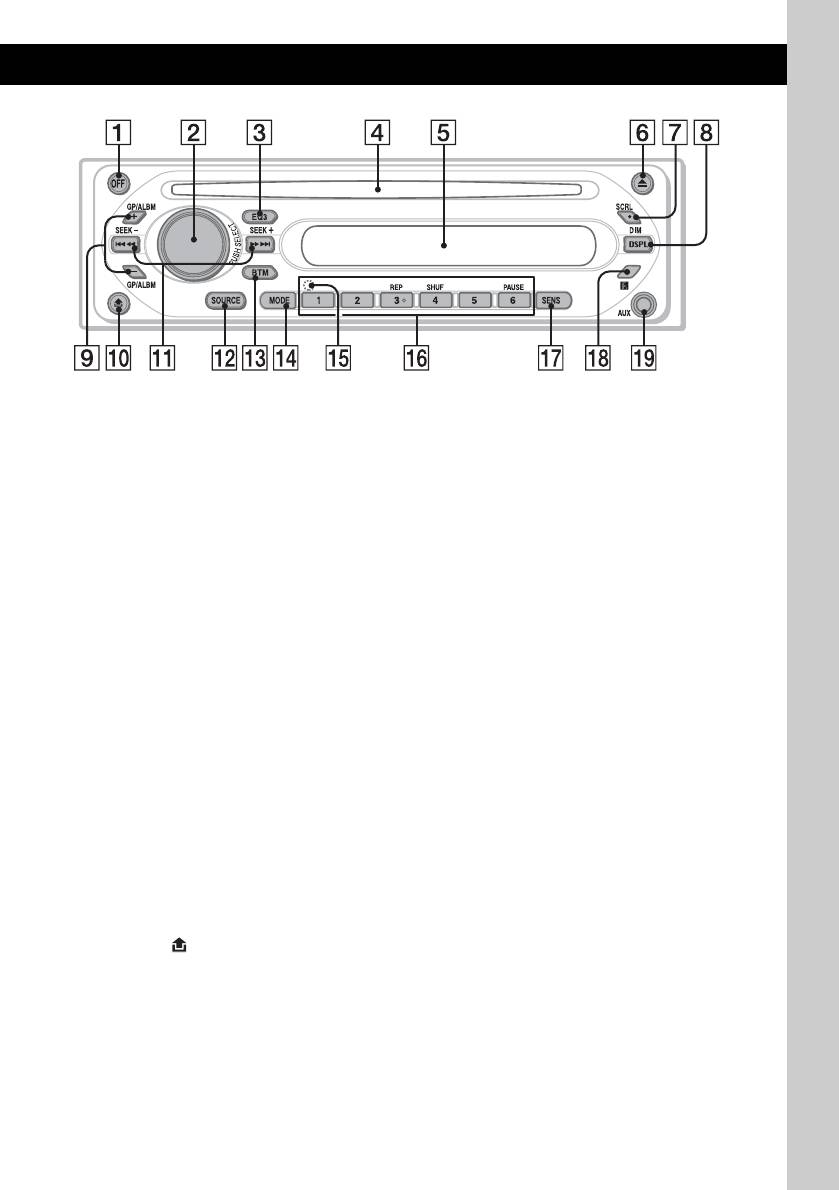
Location of controls and basic operations
Main unit
CDX-GT200E
Refer to the pages listed for details.
Radio:
To tune in stations automatically (press); find
A OFF button
a station manually (press and hold).
To power off; stop the source.
L SOURCE button
B Volume control dial/select button 7
To power on; change the source (Radio/CD/
To adjust volume (rotate); select setup items
AUX).
(press and rotate).
M BTM button 6
C EQ3 (equalizer) button 7
To start the BTM function (press and hold).
To select an equalizer type (XPLOD,
VOCAL, CLUB, JAZZ, NEW AGE, ROCK,
N MODE button 6
CUSTOM or OFF).
To select the radio band (FM/MW/LW).
D Disc slot
O RESET button (located behind the front
To insert the disc (label side up), playback
panel)
4
starts.
P Number buttons
E Display window
CD:
(3): REP 6
F Z (eject) button
(4): SHUF 6
To eject the disc.
(6): PAUSE
G SCRL (scroll) button 6
To pause playback. To cancel, press
To scroll the display item.
again.
Radio:
H DSPL (display)/DIM (dimmer) button
To receive stored stations (press); store
4, 6
stations (press and hold).
To change display items (press); change the
Q SENS button
display brightness (press and hold).
To improve weak reception: LOCAL/
1
2
I GP*
/ALBM*
+/– buttons
MONO.
To skip groups/albums (press); skip groups/
R Receptor for the card remote
albums continuously (press and hold).
commander 8
J (front panel release) button 4
S AUX input jack 8
K SEEK –/+ buttons
To connect a portable audio device.
CD:
To skip tracks (press); skip tracks
*1 When an ATRAC CD is played.
continuously (press, then press again within
*2 When an MP3/WMA is played.
about 1 second and hold); reverse/fast-
forward a track (press and hold).
5
CD
Radio
Storing and receiving stations
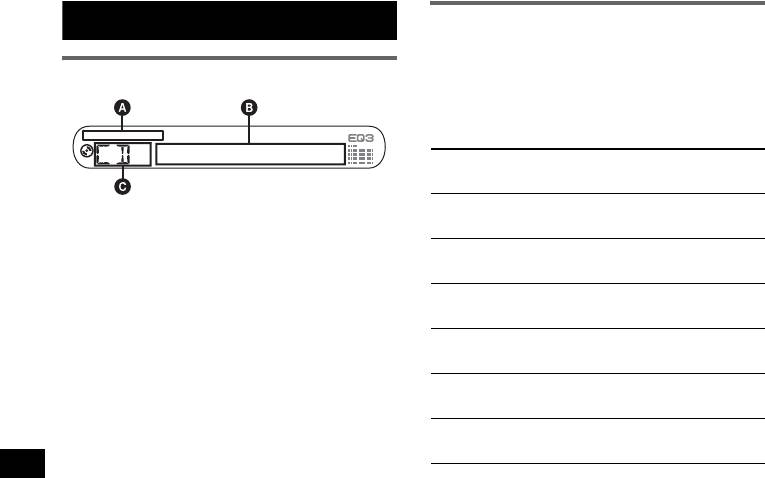
Display items
Caution
When tuning in stations while driving, use Best
Tuning Memory (BTM) to prevent an accident.
Storing automatically — BTM
A MP3/ATRAC CD/WMA indication
1 Press (SOURCE) repeatedly until
B Track number/Elapsed playing time, Disc/
“TUNER” appears.
1
artist name, Album/group number*
, Album/
To change the band, press (MODE)
2
group name, Track name, Text information*
,
repeatedly. You can select from FM1, FM2,
Clock
FM3, MW or LW.
C Source
2 Press and hold (BTM) until “BTM”
*1 Album/group number is displayed only when the
flashes.
album/group is changed.
The unit stores stations in order of frequency
*2 When playing an MP3, ID3 tag is displayed, when
on the number buttons.
playing ATRAC CD, text information written by
SonicStage, etc., is displayed, and when playing
A beep sounds when the setting is stored.
WMA, WMA tag is displayed.
To change display items B, press (DSPL);
Storing manually
scroll display items B, press (SCRL) or set
“A.SCRL-ON” (
page 7).
1 While receiving the station that you
want to store, press and hold a
Tip
number button ((1) to (6)) until
Displayed items will differ, depending on the disc type,
recorded format and settings. For details on MP3/
“MEM” appears.
WMA, see
page 10; ATRAC CD, see page 10.
The number button indication appears in the
display.
Note
Repeat and shuffle play
If you try to store another station on the same number
button, the previous stored station will be replaced.
1 During playback, press (3) (REP) or
(4) (SHUF) repeatedly until the
desired setting appears.
Receiving the stored stations
Select To play
1 Select the band, then press a number
button ((1) to (6)).
REP-TRACK track repeatedly.
1
REP-ALBM*
album repeatedly.
Tuning automatically
2
REP-GP*
group repeatedly.
1
1 Select the band, then press (SEEK) –/+
SHUF-ALBM*
album in random order.
to search for the station.
2
SHUF-GP*
group in random order.
Scanning stops when the unit receives a
station. Repeat this procedure until the
SHUF-DISC disc in random order.
desired station is received.
*1 When an MP3/WMA is played.
Tip
*2 When an ATRAC CD is played.
If you know the frequency of the station you want to
listen to, press and hold (SEEK)
–/+ to locate the
To return to normal play mode, select “REP-
approximate frequency, then press (SEEK)
–/+
OFF” or “SHUF-OFF.”
repeatedly to fine adjust to the desired frequency
(manual tuning).
6
Tip
Other functions
Other equalizer types are also adjustable.
With the card remote commander
Changing the sound settings
In step 3, to adjust the selected item, press <, M, ,
or m.
Adjusting the sound
Adjusting setup items — SET
characteristics — BAL/FAD/SUB
You can adjust the balance, fader, and subwoofer
1 Press and hold the select button.
volume.
The setup display appears.
1 Press the select button repeatedly
2 Press the select button repeatedly
until “BAL,” “FAD” or “SUB” appears.
until the desired item appears.
The item changes as follows:
3 Rotate the volume control dial to
1
1
1
LOW*
t MID*
t HI*
t
select the setting (example “ON” or
BAL (left-right) t FAD (front-rear) t
“OFF”).
2
3
SUB (subwoofer volume)*
t AUX*
4 Press and hold the select button.
*1 When EQ3 is activated (page 7).
The setup is complete and the display returns
*2 When the audio output is set to “SUB” (page 7).
to normal play/reception mode.
“ATT” is displayed at the lowest setting, and can
be adjusted up to 20 steps.
Note
*3 When AUX source is activated (page 8).
Displayed items will differ, depending on the source
and setting.
2 Rotate the volume control dial to
adjust the selected item.
With the card remote commander
After 3 seconds, the setting is complete and
In step 3, to select the setting, press < or ,.
the display returns to normal play/reception
The following items can be set (follow the page
mode.
reference for details):
With the card remote commander
“z” indicates the default settings.
In step 2, to adjust the selected item, press <, M, ,
or m.
CLOCK-ADJ (Clock Adjust) (page 4)
BEEP
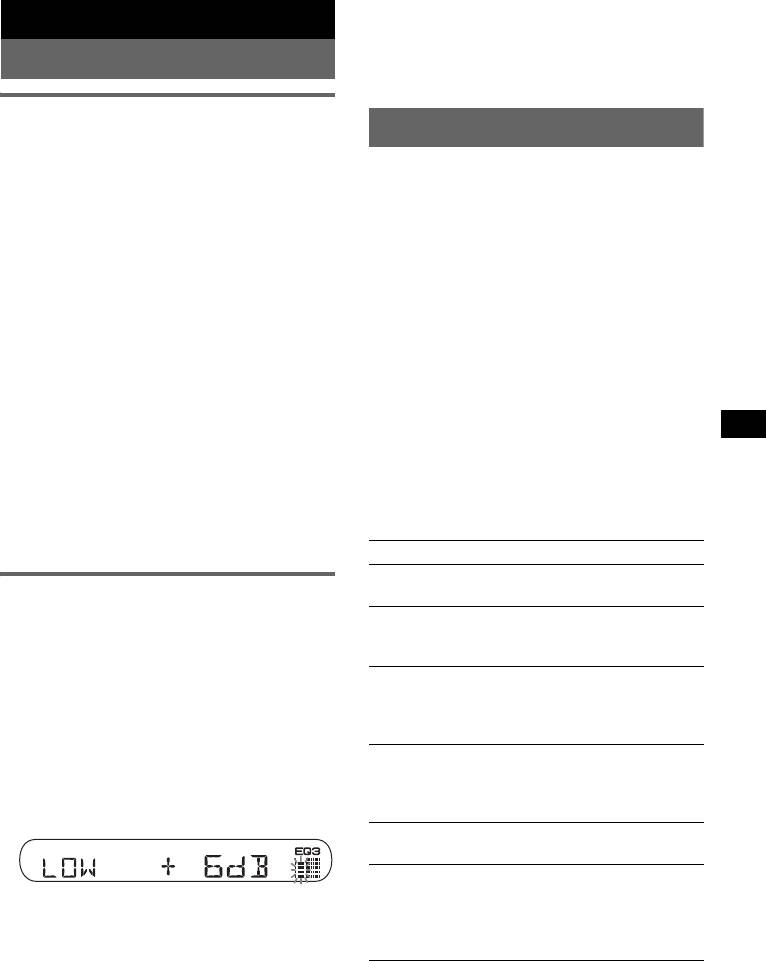
Customizing the equalizer curve
To set “BEEP-ON” (z) or “BEEP-OFF.”
— EQ3
1
AUX-A*
(AUX Audio)
“CUSTOM” of EQ3 allows you to make your
To turn the AUX source display “AUX-A-ON”
own equalizer settings.
(
z) or “AUX-A-OFF” (page 8).
1
1 Select a source, then press (EQ3)
SUB/REAR*
repeatedly to select “CUSTOM.”
To switch the audio output.
– “SUB-OUT” (
z): to output to a subwoofer.
2 Press the select button repeatedly
– “REAR-OUT”: to output to a power amplifier.
until “LOW,” “MID” or “HI” appears.
DIM (Dimmer)
3 Rotate the volume control dial to
To change the brightness of the display.
adjust the selected item.
– “DIM-ON”: to dim the display.
The volume level is adjustable in 1 dB steps,
– “DIM-OFF” (
z): to deactivate the dimmer.
from –10 dB to +10 dB.
1
DEMO*
(Demonstration)
To set “DEMO-ON” (z) or “DEMO-OFF.”
A.SCRL (Auto Scroll)
Repeat steps 2 and 3 to adjust the equalizer
To scroll long displayed item automatically
curve.
when the disc/group/track/album is changed.
To restore the factory-set equalizer curve,
– “A.SCRL-ON”: to scroll.
press and hold the select button before the
– “A.SCRL-OFF” (
z): to not scroll.
setting is complete.
After 3 seconds, the setting is complete and
the display returns to normal play/reception
mode.
continue to next page t
7
2
5 Press the select button repeatedly until “AUX”
LPF*
(Low Pass Filter)
appears, and rotate the volume control dial to
To select the subwoofer cut-off frequency: “LPF
adjust the input level (±6 dB).
OFF” (
z), “LPF125Hz” or “LPF 78Hz.”
*1 When the unit is turned off.
Card remote commander
*2 When the audio output is set to “SUB.”
RM-X114
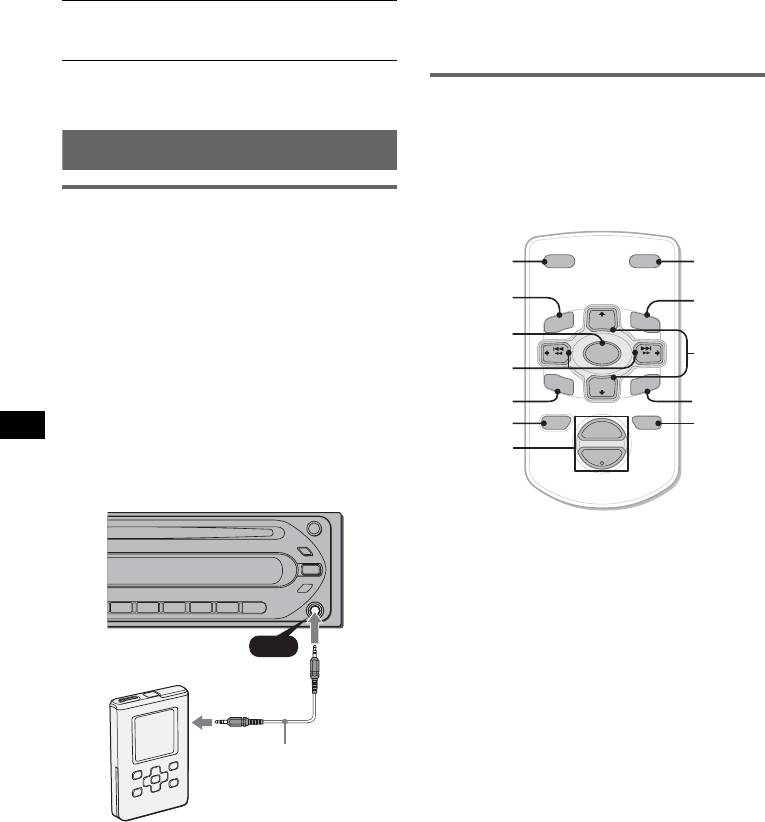
Using optional equipment
Location of controls
The corresponding buttons on the card remote
commander control the same functions as those
Auxiliary audio equipment
on this unit.
By connecting an optional portable audio device
to the AUX input jack (stereo mini jack) on the
unit and then simply selecting the source, you
DSPL
DSPL MODE
MODE
can listen on your car speakers. The volume level
is adjustable for any difference between the unit
MENU
*
PRESET
+
LIST
*
and the portable audio device. Follow the
LIST
MENU
DISC
+
m/M
procedure below:
SOURCE
(DISC
*
/
SOURCE
SEEK
–
SEEK
+
</,
PRESET
Connecting the portable audio
(SEEK –/+ )
SOUND
E
R
+/ –)
DISC
–
E
N
T
device
SOUND
PRESET –
ENTER
*
1 Turn off the portable audio device.
OFF
+
ATTOFF
ATT
VOL
2 Turn down the volume on the unit.
VOL (+/ –)
–
3 Connect to the unit.
The following buttons on the card remote
commander have also different buttons/functions
from the unit.
• SOUND button
AUX
The same as the select button on the unit.
• </, (SEEK –/+) buttons
AUX
To control CD/radio, the same as (SEEK)
–/+ on the unit. (For details of other operations,
see “With the card remote commander” on each
pages.)
• M/m (DISC*/PRESET +/–) buttons
To control CD, the same as (GP/ALBM) –/+
Connecting cord*
buttons on the unit. (For details of other
(not supplied)
operations, see “With the card remote
commander” on each pages.)
• ATT (attenuate) button
To attenuate the sound. To cancel, press again.
* Be sure to use a straight type plug.
* Not available for this unit.
Note
Adjusting the volume level
If the unit is turned off and the display disappears, it
cannot be operated with the card remote commander
Be sure to adjust the volume for each connected
unless (SOURCE) on the unit is pressed, or a disc is
audio device before playback.
inserted to activate the unit first.
1 Turn down the volume on the unit.
2 Press (SOURCE) repeatedly until “AUX
FRONT IN” appears.
3 Start playback of the portable audio device at a
moderate volume.
4 Set your usual listening volume on the unit.
8
Replacing the lithium battery
Under normal conditions, the battery will last
Additional Information
approximately 1 year. (The service life may be
shorter, depending on the conditions of use.)
Precautions
When the battery becomes weak, the range of the
card remote commander becomes shorter.
• If your car has been parked in direct sunlight,
Replace the battery with a new CR2025 lithium
allow the unit to cool off before operating it.
battery. Use of any other battery may present a
• Power aerial will extend automatically while the
unit is operating.
risk of fire or explosion.
Moisture condensation
On a rainy day or in a very damp area, moisture
condensation may occur inside the lenses and
display of the unit. Should this occur, the unit will
not operate properly. In such a case, remove the disc
and wait for about an hour until the moisture has
evaporated.
x
To maintain high sound quality
Be careful not to splash juice or other soft drinks
+ side up
onto the unit or discs.
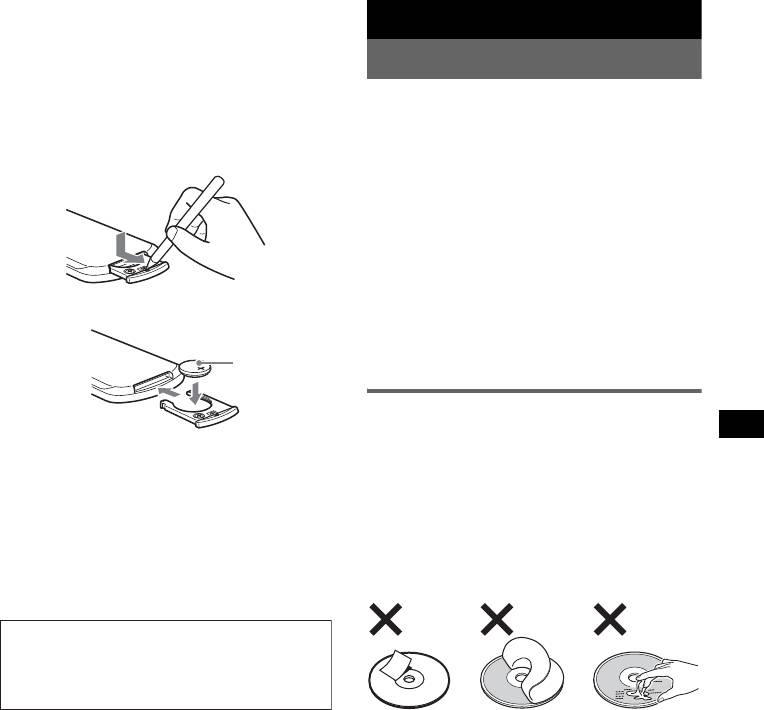
Notes on discs
• To keep a disc clean, do not touch its surface.
Handle the disc by its edge.
Notes on the lithium battery
• Keep your discs in their cases or disc magazines
• Keep the lithium battery out of the reach of children.
when not in use.
Should the battery be swallowed, immediately
• Do not subject discs to heat/high temperature.
consult a doctor.
• Wipe the battery with a dry cloth to assure a good
Avoid leaving them in a parked car or on a
contact.
dashboard/rear tray.
• Be sure to observe the correct polarity when
• Do not attach labels, or use discs with sticky ink/
installing the battery.
residue. Such discs may stop spinning when used,
• Do not hold the battery with metallic tweezers,
causing a malfunction, or may ruin the disc.
otherwise a short-circuit may occur.
WARNING
Battery may explode if mistreated.
Do not recharge, disassemble, or dispose of
in fire.
• Do not use any discs with labels or stickers
attached.
The following malfunctions may result from using
such discs:
– Inability to eject a disc (due to a label or sticker
peeling off and jamming the eject mechanism).
– Inability to read audio data correctly (e.g.,
playback skipping, or no playback) due to heat
shrinking of a sticker or label causing a disc to
warp.
• Discs with non-standard shapes (e.g., heart,
square, star) cannot be played on this unit.
Attempting to do so may damage the unit. Do not
use such discs.
• You cannot play 8 cm CDs.
continue to next page t
9
• Before playing, clean the discs
Playback order of MP3/WMA files
with a commercially available
Folder
cleaning cloth. Wipe each disc
MP3/WMA
(album)
from the centre out. Do not use
solvents such as benzine,
MP3/WMA file
thinner, commercially available
(track)
cleaners, or antistatic spray
intended for analogue discs.
Notes on CD-R/CD-RW discs
• Some CD-Rs/CD-RWs (depending on the
equipment used for its recording or the condition
of the disc) may not play on this unit.
• You cannot play a CD-R/a CD-RW that is not
finalized.
Music discs encoded with copyright
Notes
protection technologies
• When naming an MP3/WMA file, be sure to add the
This product is designed to play back discs that
file expansion “.mp3” / “.wma” to the file name.
conform to the Compact Disc (CD) standard.
• During playback of a VBR (variable bit rate) MP3/
WMA file or fast-forward/reverse, elapsed playing
Recently, various music discs encoded with
time may not display accurately.
copyright protection technologies are marketed by
• When the disc is recorded in Multi Session, only the
some record companies. Please be aware that among
first track of the first session format is recognized
those discs, there are some that do not conform to
and played (any other format is skipped). The
the CD standard and may not be playable by this
priority of the format is CD-DA, ATRAC CD and
product.
MP3/WMA.
– When the first track is a CD-DA, only CD-DA of the
Note on DualDiscs
first session is played.
A DualDisc is a two sided disc product which
– When the first track is not a CD-DA, an ATRAC CD
or MP3/WMA session is played. If the disc has no
mates DVD recorded material on one side with
data in any of these formats, “NO MUSIC” is
digital audio material on the other side. However,
displayed.
since the audio material side does not conform to
the Compact Disc (CD) standard, playback on this
Notes on MP3
product is not guaranteed.
• Be sure to finalize the disc before using on the unit.
• If you play a high-bit-rate MP3, such as 320 kbps,
sound may be intermittent.
About MP3/WMA files
Notes on WMA
MP3, which stands for MPEG-1 Audio Layer-3, is a
• Files made with lossless compression are not
music file compression format standard. It
playable.
compresses audio CD data to approximately 1/10 of
• Files protected by copyright are not playable.
its original size.
WMA, which stands for Windows Media Audio, is
About ATRAC CD
another music file compression format standard. It
compresses audio CD data to approximately 1/22*
ATRAC3plus format
of its original size.
ATRAC3, which stands for Adaptive Transform
* only for 64 kbps
Acoustic Coding3, is audio compression
technology. It compresses audio CD data to
• The unit is compatible with the ISO 9660 level 1/
approximately 1/10 of its original size.
level 2 format, Joliet/Romeo in the expansion
ATRAC3plus, which is an extended format of
format and Multi Session.
ATRAC3, compresses the audio CD data to
• The maximum number of:
approximately 1/20 of its original size. The unit
– folders (albums): 150 (including root and empty
accepts both ATRAC3 and ATRAC3plus format.
folders).
– MP3/WMA files (tracks) and folders contained
ATRAC CD
in a disc: 300 (if a folder/file names contain
ATRAC CD is recorded audio CD data which is
many characters, this number may become less
compressed to ATRAC3 or ATRAC3plus format
than 300).
using authorized software, such as SonicStage 2.0 or
– displayable characters for a folder/file name is
later, or SonicStage Simple Burner.
32 (Joliet), or 64 (Romeo).
• The maximum number of:
• ID3 tag versions 1.0, 1.1, 2.2, 2.3 and 2.4 apply to
– folders (groups): 255
MP3 only. ID tag is 15/30 characters (1.0 and 1.1),
– files (tracks): 999
or 63/126 characters (2.2, 2.3 and 2.4). WMA tag
• The characters for a folder/file name and text
is 63 characters.
information written by SonicStage is displayed.
10
For details on ATRAC CD, see the SonicStage or
SonicStage Simple Burner manual.
Removing the unit
Note
1 Remove the protection collar.
Be sure to create the ATRAC CD using authorized
software, such as SonicStage 2.0 or later, or
1 Detach the front panel (page 4).
SonicStage Simple Burner 1.0 or 1.1.
2 Engage the release keys together with the
If you have any questions or problems concerning
protection collar.
your unit that are not covered in this manual, consult
your nearest Sony dealer.
Maintenance
Fuse replacement
Orient the release
When replacing the fuse, be
keys as shown.
sure to use one matching the
3 Pull out the release keys to remove the
amperage rating stated on the
protection collar.
original fuse. If the fuse blows,
check the power connection and
replace the fuse. If the fuse
blows again after replacement,
there may be an internal
malfunction. In such a case,
Fuse (10A)
consult your nearest Sony
dealer.
Cleaning the connectors
2 Remove the unit.
The unit may not function properly if the connectors
between the unit and the front panel are not clean. In
1 Insert both release keys simultaneously
order to prevent this, detach the front panel (page 4)
until they click.
and clean the connectors with a cotton swab dipped
in alcohol. Do not apply too much force. Otherwise,
the connectors may be damaged.
Hook facing
inwards.
2 Pull the release keys to unseat the unit.
Main unit
Back of the front
panel
Notes
• For safety, turn off the ignition before cleaning the
connectors, and remove the key from the ignition
switch.
• Never touch the connectors directly with your fingers
or with any metal device.
3 Slide the unit out of the mounting.
11
MPEG Layer-3 audio coding technology and
Specifications
patents licensed from Fraunhofer IIS and
Thomson.
CD Player section
Signal-to-noise ratio: 120 dB
Design and specifications are subject to change
Frequency response: 10 – 20,000 Hz
without notice.
Wow and flutter: Below measurable limit
Tuner section
FM
Tuning range: 87.5 – 108.0 MHz
• Lead-free solder is used for soldering certain parts.
Aerial terminal: External aerial connector
(more than 80 %)
Intermediate frequency: 10.7 MHz/450 kHz
• Halogenated flame retardants are not used in the
Usable sensitivity: 9 dBf
certain printed wiring boards.
Selectivity: 75 dB at 400 kHz
• Halogenated flame retardants are not used in
Signal-to-noise ratio: 67 dB (stereo), 69 dB (mono)
cabinets.
Harmonic distortion at 1 kHz: 0.5 % (stereo),
• VOC (Volatile Organic Compound)-free vegetable
0.3 % (mono)
oil based ink is used for printing the carton.
Separation: 35 dB at 1 kHz
• Packaging cushions do not use polystyrene foam.
Frequency response: 30 – 15,000 Hz
MW/LW
Tuning range:
Troubleshooting
MW: 531 — 1,602 kHz
LW: 153 — 279 kHz
The following checklist will help you remedy
Aerial terminal: External aerial connector
problems you may encounter with your unit.
Intermediate frequency: 10.7 MHz/450 kHz
Before going through the checklist below, check the
Sensitivity: 30 µV
connection and operating procedures.
Power amplifier section
General
Outputs: Speaker outputs (sure seal connectors)
Speaker impedance: 4 – 8 ohms
No power is being supplied to the unit.
Maximum power output: 50 W × 4 (at 4 ohms)
• Check the connection. If everything is in order, check
the fuse.
General
• If the unit is turned off and the display disappears, it
cannot be operated with the remote commander.
Outputs:
Audio outputs terminal (sub/rear switchable)
t Turn on the unit.
Power aerial relay control terminal
The power aerial does not extend.
Power amplifier control terminal
The power aerial does not have a relay box.
Inputs:
No sound.
Aerial input terminal
• The volume is too low.
AUX input jack (stereo mini jack)
• The ATT function is activated.
Tone controls:
Low: ±10 dB at 60 Hz (XPLOD)
• The position of the fader control “FAD” is not set for
Mid: ±10 dB at 1 kHz (XPLOD)
a 2-speaker system.
High: ±10 dB at 10 kHz (XPLOD)
No beep sound.
Power requirements: 12 V DC car battery
• The beep sound is cancelled (page 7).
(negative earth)
• An optional power amplifier is connected and you are
Dimensions: Approx. 178 × 50 × 179 mm (w/h/d)
not using the built-in amplifier.
Mounting dimensions: Approx. 182 × 53 × 161 mm
(w/h/d)
The contents of the memory have been erased.
Mass: Approx. 1.2 kg
• The RESET button has been pressed.
Supplied accessory:
t Store again into the memory.
Parts for installation and connections (1 set)
• The power connecting lead or battery has been
Optional accessory:
disconnected.
Card remote commander: RM-X114
• The power connecting lead is not connected properly.
Stored stations and correct time are erased.
Your dealer may not handle some of the above
The fuse has blown.
listed accessories. Please ask the dealer for
Makes noise when the position of the ignition
detailed information.
key is switched.
The leads are not matched correctly with the car’s
US and foreign patents licensed from Dolby
accessory power connector.
Laboratories.
12
The display disappears from/does not appear
Radio reception
in the display window.
The stations cannot be received.
• The dimmer is set “DIM-ON” (page 7).
The sound is hampered by noises.
• The display disappears if you press and hold (OFF).
• Connect a power aerial control lead (blue) or
t Press and hold (OFF) on the unit until the
accessory power supply lead (red) to the power
display appears.
supply lead of a car’s aerial booster (only when your
• The connectors are dirty (page 11).
car has built-in FM/MW/LW aerial in the rear/side
glass).
• Check the connection of the car aerial.
CD playback
• The auto aerial will not go up.
The disc cannot be loaded.
t Check the connection of the power aerial control
• Another disc is already loaded.
lead.
• The disc has been forcibly inserted upside down or in
• Check the frequency.
the wrong way.
Preset tuning is not possible.
The disc does not playback.
• Store the correct frequency in the memory.
• Defective or dirty disc.
• The broadcast signal is too weak.
• The CD-Rs/CD-RWs are not for audio use (page 10).
Automatic tuning is not possible.
MP3/WMA files cannot be played back.
• Setting of the local seek mode is not correct.
The disc is incompatible with the MP3/WMA format
t Tuning stops too frequently:
and version (page 10).
Press (SENS) until “LOCAL-ON” appears.
MP3/WMA files take longer to play back than
t Tuning does not stop at a station:
others.
Press (SENS) repeatedly until “MONO-ON” or
The following discs take a longer time to start
“MONO-OFF” (FM), or “LOCAL-OFF” (MW/
playback.
LW) appears.
– a disc recorded with a complicated tree structure.
• The broadcast signal is too weak.
– a disc recorded in Multi Session.
t Perform manual tuning.
– a disc to which data can be added.
During FM reception, the “ST” indication
The ATRAC CD cannot play.
flashes.
• The disc is not created by authorized software, such
• Tune in the frequency accurately.
as SonicStage or SonicStage Simple Burner.
• The broadcast signal is too weak.
• Tracks that are not included in the group cannot be
t Press (SENS) to set the monaural reception
played.
mode to “MONO-ON.”
The display items do not scroll.
An FM programme broadcast in stereo is heard
• For discs with very many characters, those may not
in monaural.
scroll.
The unit is in monaural reception mode.
• “A.SCRL” is set to “OFF.”
t Press (SENS) until “MONO-OFF” appears.
t Set “A.SCRL-ON” (page 7) or press (SCRL).
The sound skips.
Error displays/Messages
• Installation is not correct.
t Install the unit at an angle of less than 45° in a
sturdy part of the car.
ERROR
• Defective or dirty disc.
• The disc is dirty or inserted upside down.
t Clean or insert the disc correctly.
The operation buttons do not function.
• A blank disc has been inserted.
The disc will not eject.
• The disc cannot play because of some problem.
Press the RESET button (page 4).
t Insert another disc.
FAILURE
The connection of speaker/amplifier is incorrect.
t See the supplied installation/connections manual to
check the connection.
L.SEEK +/–
The local seek mode is on during automatic tuning.
NO ID3
ID3 tag information is not written in the MP3 file.
NO INFO
Text information is not written in the ATRAC3/
ATRAC3plus or WMA file.
continue to next page t
13
NO MUSIC
The disc is not a music file.
t Insert a music CD.
NO NAME
A track/album/group name is not written in the track.
OFFSET
There may be an internal malfunction.
t Check the connection. If the error indication
remains on in the display, consult your nearest
Sony dealer.
READ
The unit is reading all track and group information on
the disc.
t Wait until reading is complete and playback starts
automatically. Depending on the disc structure, it
may take more than a minute.
RESET
The unit cannot be operated because of some problem.
t Press the RESET button (page 4).
“ ” or “ ”
During reverse or fast-forward, you have reached the
beginning or the end of the disc and you cannot go any
further.
“ ”
The character cannot be displayed with the unit.
If these solutions do not help improve the situation,
consult your nearest Sony dealer.
If you take the unit to be repaired because of CD
playback trouble, bring the disc that was used at the
time the problem began.
14
Поздравляем с покупкой!
Благодарим Вас за то, что Вы остановили
свой выбор на проигрывателе компакт-
дисков Sony. В поездке Вы сможете
использовать следующие функции
проигрывателя.
• Воспроизведение компакт-дисков
Можно воспроизводить диски CD-DA
(содержащие также CD TEXT*), CD-R/
CD-RW (с файлами MP3/WMA и диски в
формате Multi Session (стр. 12 )), а также
диски ATRAC CD (форматы ATRAC3 и
ATRAC3plus (стр. 13 )).
Тип диска Метка на диске
CD-DA
MP3
WMA
ATRAC CD
• Прием радиостанций
– Можно хранить в памяти до 6 станций в
каждом диапазоне (FM1, FM2, FM3,
MW и LW).
– BTM (Память оптимальной настройки):
устройство выбирает радиостанции с
наиболее сильным сигналом и
сохраняет их в памяти.
• Настройка звучания
– EQ3: кривую эквалайзера можно
выбрать для 7 музыкальных типов.
• Подключение дополнительной
аппаратуры
Входное гнездо AUX на передней панели
проигрывателя позволяет подсоединять
переносное аудиоустройство.
* Диск с CD TEXT — это компакт-диск CD-DA,
содержащий такую информацию, как название
компакт-диска, имя исполнителя и названия
композиций.
Проигрыватель компакт-
дисков с диапазоном FM/AM
Сделано в Китае
2
Содержание
Начало работы
Другие функции
Сброс параметров устройства . . . . . . . . . . 4
Изменение настроек звука . . . . . . . . . . . . . 8
Установка часов . . . . . . . . . . . . . . . . . . . . . . 4
Подстройка характеристик звука
Снятие передней панели . . . . . . . . . . . . . . . 4
— BAL/FAD/SUB . . . . . . . . . . . . . . . . . . 8
Установка передней панели . . . . . . . . . . 4
Настройка кривой эквалайзера
— EQ3. . . . . . . . . . . . . . . . . . . . . . . . . . . . . 8
Настройка параметров установки
Расположение органов
— SET . . . . . . . . . . . . . . . . . . . . . . . . . . . . . . . 8
управления и основные
Использование дополнительного
операции
оборудования. . . . . . . . . . . . . . . . . . . . . . . . . 9
Вспомогательное
Основное устройство . . . . . . . . . . . . . . . . 5
аудиооборудование . . . . . . . . . . . . . . . . . 9
Пульт дистанционного управления
Компакт-диск
RM-X114 . . . . . . . . . . . . . . . . . . . . . . . . . 10
Дополнительная информация
Индикация на дисплее . . . . . . . . . . . . . . . 6
Повторное и перетасованное
Меры предосторожности . . . . . . . . . . . . . 11
воспроизведение . . . . . . . . . . . . . . . . . . . . 6
Примечания относительно компакт—
дисков . . . . . . . . . . . . . . . . . . . . . . . . . . . . 11
Радиоприемник
О файлах MP3/WMA . . . . . . . . . . . . . . 12
О компакт-дисках ATRAC CD. . . . . . 13
Сохранение и прием радиостанций . . . . . . 7
Уход за устройством . . . . . . . . . . . . . . . . . 14
Автоматическое сохранение
Извлечение устройства . . . . . . . . . . . . . . . 14
— BTM (Память оптимальной
Технические характеристики. . . . . . . . . . 15
настройки) . . . . . . . . . . . . . . . . . . . . . . . . . 7
Поиск и устранение неисправностей . . . 15
Сохранение вручную . . . . . . . . . . . . . . . . 7
Индикация/сообщения
Прием радиостанций, сохраненных в
об ошибках . . . . . . . . . . . . . . . . . . . . . . . 17
памяти . . . . . . . . . . . . . . . . . . . . . . . . . . . . . 7
Автоматическая настройка . . . . . . . . . . 7
SonicStage и ее логотип являются
товарными знаками корпорации Sony.
ATRAC, ATRAC3, ATRAC3plus и их
логотипы являются товарными знаками
корпорации Sony.
3
Начало работы
Снятие передней панели
Во избежание кражи устройства можно
Сброс параметров
снять с него переднюю панель.
устройства
Предупреждающий сигнал
Перед первым включением устройства
Если до поворота ключа зажигания в
или после замены автомобильного
положение OFF с устройства не была
аккумулятора, а также после изменения
снята передняя панель, то в течение
схемы подключения следует
нескольких секунд будет слышен
переустановить параметры устройства.
предупредительный звуковой сигнал.
Снимите переднюю панель и нажмите
Звуковой сигнал будет слышен только в
кнопку RESET с помощью заостренного
том случае, если используется встроенный
предмета, например шариковой ручки.
усилитель.
1 Нажмите кнопку (OFF).
Устройство выключится.
Кнопка
2 Нажмите кнопку , затем снимите
RESET
панель, потянув ее на себя.
Примечание
При нажатии кнопки RESET выполняется
стирание установок времени и некоторых других
занесенных в память параметров.
Установка часов
Часы данного устройства имеют 24-
Примечания
часовую индикацию.
• Старайтесь не ронять переднюю панель. Не
надавливайте слишком сильно на переднюю
1 Нажмите и удерживайте кнопку
панель и окошко дисплея.
выбора.
• Не подвергайте переднюю панель воздействию
тепла/высокой температуры или влажности.
Отобразится дисплей установок.
Старайтесь не оставлять ее в припаркованной
2 Нажимайте кнопку выбора, пока не
машине или на приборной доске/полочке за
появится индикация “CLOCK-ADJ”.
задним сиденьем.
3 Нажмите кнопку (DSPL).
Начнет мигать индикация часа.
Установка передней панели
4 Поверните регулятор громкости
Прикрепите часть A передней панели к
для установки значения часов и
части B устройства, как показано на
минут.
рисунке, и установите левую сторону на
Чтобы переместиться по знакам,
место до щелчка.
нажмите кнопку (DSPL).
5 Нажмите кнопку выбора.
Установка завершена, и часы начинают
отсчет времени.
Чтобы отобразить часы, нажмите кнопку
(DSPL). Нажмите кнопку (DSPL) еще раз,
чтобы вернуться к предыдущей индикации
дисплея.
A
При использовании пульта дистанционного
управления
B
Для установки значений часа и минут в шаге 4
нажмите кнопку M или m.
Примечание
Не ставьте ничего на внутреннюю поверхность
4
передней панели.
Расположение органов управления и основные операции
Основное устройство
CDX-GT200E
Подробную информацию см. на
Радиоприемник:
указанных страницах.
Aвтоматическая настройки на
радиостанции (нажмите); поиск станций
A Кнопка OFF
вручную (нажмите и удерживайте).
Выключение питания/остановка
источника.
L Кнопка SOURCE
Включение питания, смена источника
B
Регулятор громкости/кнопка выбора
8
(радиоприемник/компакт-диск/AUX).
Настройка громкости (поверните);
выбор элементов настройки (нажмите
M Кнопка BTM 7
и поверните).
Включение функции BTM (нажмите и
удерживайте).
C Кнопка EQ3 (эквалайзер) 8
Выбор типа эквалайзера (XPLOD,
N Кнопка MODE 7
VOCAL, CLUB, JAZZ, NEW AGE,
Выбор радиодиапазона (FM/MW/LW).
ROCK, CUSTOM или OFF).
O Кнопка RESET (расположена под
D Слот для дисков
передней панелью)
4
Вставьте диск (этикеткой вверх),
P Номерные кнопки
начнется воспроизведение.
Компакт-диск:
E Окно дисплея
(3): REP 6
(4): SHUF 6
F Кнопка Z (извлечение)
(6): PAUSE
Извлечение диска.
Для приостановки
G Кнопка SCRL (прокрутка) 6
воспроизведения. Чтобы
Прокрутка индикации дисплея
отменить приостановку, нажмите
H Кнопка DSPL (дисплей)/DIM
кнопку еще раз.
(диммер)
4, 6
Радиоприемник:
Смена индикаций на дисплее
прием хранящихся в памяти
(нажмите); изменение яркости дисплея
радиостанций (нажмите); сохранение
(нажмите и удерживайте).
радиостанций в памяти (нажмите и
1
2
I Кнопки GP*
/ALBM*
+/–
удерживайте).
Пропуска групп/альбомов (нажмите);
Q Кнопка SENS
непрерывный пропуск групп/альбомов
Улучшение качества приема слабого
(нажмите и удерживайте).
сигнала: LOCAL/MONO.
J Кнопка (для снятия передней
R Датчик пульта дистанционного
панели) 4
управления
10
K Кнопки SEEK –/+
S Входное гнездо AUX 9
Компакт-диск:
Для подсоединения переносного
Пропуск композиций (нажмите);
аудиоустройства.
непрерывный пропуск композиций
(нажмите, затем нажмите еще раз
*1 При воспроизведении компакт-диска
примерно через 1 секунду и
ATRAC CD.
удерживайте нажатой); перемещение
*2 При воспроизведении компакт-диска MP3/
WMA.
вперед/назад на одну композицию
(нажмите и удерживайте кнопку).
5
Компакт-диск
Повторное и перетасованное
воспроизведение
Индикация на дисплее
1 Во время воспроизведения
нажимайте кнопку (3) (REP) или (4)
(SHUF), пока на дисплее не
появится нужный параметр.
Для
Выберите
воспроизведения
REP-TRACK композиции
A Обозначение компакт-диска MP3/
неоднократно.
ATRAC CD/WMA
1
B Номер композиции/время с начала
REP-ALBM*
альбома
воспроизведения, название диска/имя
неоднократно.
1
исполнителя, номер альбома/группы*
,
2
REP-GP*
группы
название альбома/группы, название
2
неоднократно.
композиции, текстовая информация*
,
1
часы
SHUF-ALBM*
альбома в случайной
C Источник
последовательности.
*1 Номер альбома/группы отображается только
2
SHUF-GP*
группы в случайной
при смене альбома/группы.
последовательности.
*2 При воспроизведении компакт-диска MP3
отображается тег ID3, при воспроизведении
SHUF-DISC диска в случайной
компакт-диска ATRAC CD — текстовая
последовательности.
информация, созданная в программе
SonicStage и т.д., а при воспроизведении
*1 При воспроизведении компакт-диска MP3/
компакт-диска WMA — тег WMA.
WMA.
*2 При воспроизведении компакт-диска
Чтобы изменить индикации B, нажмите
ATRAC CD.
кнопку (DSPL); чтобы прокрутить
Чтобы вернуться в режим обычного
индикации B, нажмите (SCRL) или
воспроизведения, выберите “REP-OFF”
установите “A.SCRL-ON” (
стр. 9).
или “SHUF-OFF”.
Совет
Отображаемая индикация будет отличаться в
зависимости от типа компакт-диска, формата
записи и параметров. Подробную информацию о
компакт-дисках MP3/WMA см. на
стр. 12; о
компакт-дисках ATRAC CD см. на стр. 13.
6
- 1
- 2
Аннотация для Автомобильной магнитолы с CD MP3 Sony CDX-GT200 в формате PDF
Топ 10 инструкций
Другие инструкции
-
Page 1: Sony CDX-GT200S
CDX-GT200S CDX-GT2 00 Opera ting Instru ctions Bedi enung san leitun g Mode d’ emplo i Istruzioni per l’uso Gebruiksaa nwijzing 2-651-185- 22 (1) © 2005 Sony Cor poration GB DE FR IT NL T o cancel th e demonstrati on (DEMO) dis play , see pa ge 9. Zum Deakti vieren der Demo-Anze ige (DEMO) schlag en Sie bitt e auf Seite 10 nach . Pour ann uler[…]
-
Page 2: Sony CDX-GT200S
2 W elcome ! Thank you for purch asing t his Sony Com pact Disc Pla yer . Y ou can enjoy your drive with the following f unctio ns. • CD playbac k Y ou ca n play CD -DA (also contai ning CD TEXT*), CD-R/CD-R W (MP3/WMA files a lso contai ning M ulti Sess ion ( pag e 12 )) , a nd A TRAC CD (A TRA C3 and A T RA C3 plus form at ( page 12 )). • Rad[…]
-
Page 3: Sony CDX-GT200S
3 T able of Contents Getting S tarted Resetting th e unit . . . . . . . . . . . . . . . . . . . . . . . . 4 Setting th e clock . . . . . . . . . . . . . . . . . . . . . . . . 4 Detaching t he front panel . . . . . . . . . . . . . . . . . 4 Attachin g the front panel . . . . . . . . . . . . . . . 4 Location of controls and basic operations Main unit[…]
-
Page 4: Sony CDX-GT200S
4 Getting Started Resetting the unit Before o perating th e unit for t h e f irst time , or after r eplacin g the car battery o r chan ging the connection s, you must reset the unit. Detach the front panel a nd press the RESET butto n wi th a p oin ted obje ct , suc h as a ba llp oin t pen. Note Pressing the RESET b utton will erase the clock se tt[…]
-
Page 5: Sony CDX-GT200S
5 Location of controls and basic operations Main unit Refer t o the page s listed for details . A OFF button T o power off; st op th e so urce . B V olume co ntrol dial/select b utton 9 T o adjust v o lume (r otate); se lect se tup items (pre ss and rota te). C EQ3 (equal izer) button 9 T o sele ct an equa lizer typ e ( XPLOD , V OCA L, CLUB, J A Z[…]
-
Page 6: Sony CDX-GT200S
6 CD Display items A WMA/MP3/A TRA C CD indication B T rack number/Elap sed playing t ime, Disc/ artist name, Alb um/group number* 1 , Alb um/ group n ame , T rac k name, T ext info rmat ion* 2 , Clock C Source *1 Album/group number is displ ayed only when the album/grou p is cha nged. *2 When playing an MP3, ID3 t ag is displayed, when playing A T[…]
-
Page 7: Sony CDX-GT200S
7 RDS Over view FM stations with Radio Data Sys tem (RDS) serv ice sen d inaudi ble dig ital info rm ation al ong with t he regular radio pro gramm e si gnal. Display items A Rad io band , Func ti on B Frequ ency* 1 (S tati on n am e), RD S data C TA / T P * 2 *1 While receiving the RDS station, “ * ” is displayed on the l eft of the f reque nc[…]
-
Page 8: Sony CDX-GT200S
8 Local Link function (UK only) This func tion enables you to selec t other loca l station s in the ar ea, even if they are no t store d on your n umber buttons. 1 Dur ing FM re cepti on, pres s a numb er button ( (1) to (6) ) on w hich a lo cal s ta tion is st ored . 2 Within 5 second s, pres s again a nu mbe r button of the loca l station. Rep ea[…]
-
Page 9: Sony CDX-GT200S
9 Other functions Changing the sound settings Adjusting the sound characteristic s — BAL/F AD/SUB Y ou c an a djust the ba lance, fader, and su bwoo fer volu me. 1 Press t he select button repeatedly until “BAL, ” “F A D” or “SUB ” appears. The it em chan ges as follows: LO W * 1 t MID * 1 t HI * 1 t BAL (left-ri ght) t FA D (front-re[…]
-
Page 10: Sony CDX-GT200S
10 *1 When the unit is tur ned off. *2 When FM is r eceived. *3 When the audi o output is set to “ SUB. ” Using optional equipment A uxi liary audio equipment By connec ting an op tiona l portab le audi o device to the A UX input jack (ste reo mini ja ck) on the unit an d then si mply selectin g the sour ce, you can liste n on your car speak er[…]
-
Page 11: Sony CDX-GT200S
11 Note If the uni t is tur ned off and the dis play disappears, i t cannot be operate d with th e card remote co mmand er unless (SOURCE) on t he uni t is p ress ed, or a disc is inser ted to activate the un it first. Replacing the lithium battery Under normal conditions , the batte ry will la st approx imate ly 1 year. (Th e serv ice life ma y be[…]
-
Page 12: Sony CDX-GT200S
12 • B efore playi ng, clea n the discs with a comme rciall y av ailable cleaning cloth . Wipe each disc from the cen tre out. Do no t use solvents such as benz ine, thinne r, comme rciall y av ailable cleane rs, or an tistati c spray intended for analogue discs. Notes on CD-R/CD-RW discs • S ome CD-R s/CD-R Ws (depen ding on the equipm ent use[…]
-
Page 13: Sony CDX-GT200S
13 For details on A TRAC CD, see the Son icStage or SonicSt age Simple B urner m anual. Note Be sure to create the A TRAC CD using a uthori zed software, such as S onicSta ge 2.0 or later, or Sonic Stage Si mple Bur n er 1.0 or 1.1. If you have any quest ions or proble ms concer ning y our unit th at are no t covered in this manua l, consul t your […]
-
Page 14: Sony CDX-GT200S
14 Specifications CD Pla yer section Signal-to- noise ratio: 120 dB Fr equency r esponse: 10 – 20,000 Hz W ow and fl utter: Below me asurab le l imit T uner secti on FM T uning range : 87.5 – 108.0 MHz Aerial t erminal: E xtern al aer ial co nnec tor Intermed iate fr equency: 10.7 MHz/450 kHz Usable se nsitivit y: 9 dBf Selecti v ity: 75 dB at […]
-
Page 15: Sony CDX-GT200S
15 Error displays/Mess ages The display disappears from/does not appear in the display window . • The dimmer is set “DIM-ON” (p age 9). • The disp lay disapp ears if you pres s and hold (OFF) . t Press a nd hold (OFF) on the unit until the dis play a ppe ars. • The co nnectors are dir ty (page 1 3). C D p lay b ack The disc cannot be load[…]
-
Page 16: Sony CDX-GT200S
16 If these solutio ns do not help improve the situa tion, consult you r neares t Sony dealer. If you t ake the unit to be repaire d beca use of C D playback trouble, bring t he disc th at was used at the time th e pro ble m began. NO AF There is no alter native frequency for th e current statio n. t Press (SEEK ) –/+ while the station name is fl[…]
-
Page 17: Sony CDX-GT200S
[…]
-
Page 18: Sony CDX-GT200S
2 Willkommen! Dank e, dass S ie si ch für di esen C D-Pla yer v on Sony entsch ieden ha ben. Mi t diesem Gerä t ste hen Ihne n im Aut o die fol gende n Funkt ion en zur V erf ügung. • CD-Wiedergabe W ieder gabe von CD-D As (auch solche mit CD TEXT*), CD-R s/CD-R Ws (MP3-/WMA- Dateien, au ch auf Multises sion-CDs ( Seite 14 )) sowie A TRAC-CDs […]
-
Page 19: Sony CDX-GT200S
3 Inhalt Vorbereitunge n Zurücksetzen des Geräts . . . . . . . . . . . . . . . . . . 4 Einstellen d er Uhr . . . . . . . . . . . . . . . . . . . . . . . 4 Abnehmen der Fr ontplatte . . . . . . . . . . . . . . . . . 4 Anbringen de r Frontplatte. . . . . . . . . . . . . . . 4 Lage und Grundfunktione n der Teile und Bedienelemente Hauptgerät. . . .[…]
-
Page 20: Sony CDX-GT200S
4 Vorbereitungen Zurücksetzen des Geräts Be vo r Sie das Gerät zu m ersten Mal benutze n oder we nn Sie di e Autob atterie ausge tausch t oder die V erbindu ngen gew echse lt haben, müsse n Sie das G erä t zurück setzen . Nehmen Sie die Fr ontplatte ab und dr ücken Sie die T aste RESET mit einem spitzen Gege nstand, wie z. B. einem K ugelsch[…]
-
Page 21: Sony CDX-GT200S
5 Lage und Grundfunktionen der T eile und Bedienelemente Hauptgerät Nähe res f inden S ie a uf d en ang eg ebene n Se iten . A T a ste OFF Ausscha lten bzw . S topp en der T onqu elle. B Laut stärke reg ler/ Aus wahlta ste 9 Einstell en der La utstär ke (dre hen) bzw. Auswäh len von Eins tellop tione n (drü cken und dreh en). C T a ste EQ3 (E[…]
-
Page 22: Sony CDX-GT200S
6 CD Informationen im Display A WMA-/ MP3-/A TRA C-CD -A nzei ge B T itelnummer/V erstrichene Spieldauer , CD-/ Interpre tenname, Alb um-/Gruppennummer * 1 , Album-/Gr u ppenname, T itelname, T extinfor matione n* 2 , Uhrzeit C T onquel le *1 Die A lbum-/Grup pennumm er wird nur beim Wechseln des A lbums bzw. der Grup pe angezeigt. *2 Bei der Wie d[…]
-
Page 23: Sony CDX-GT200S
7 Radio Speichern und Empfangen von Sendern Achtung W enn Sie währen d der Fahrt S ender ei nstelle n, sollten Sie die BTM -Funk tion (Be st T uning Memory — Speicherb elegu ngsautomatik ) ver wenden. A ndern falls be steht Un fal lgef ahr . A utomatisches Speichern v on Sendern — BTM 1 Drücken Sie (SOURCE ) so oft, bis „TUNER“ angezeigt wi[…]
-
Page 24: Sony CDX-GT200S
8 Hinweise • Je nach La nd bzw. Region ste hen mögl icherweise nicht alle RDS-F unktion en zur V erfügung . • Die RDS-Funktion arbeitet mö glicherweise nicht, wenn die Sen designa le zu schwach sin d oder we nn der ei ngestellte Sender keine RDS- Daten a usstrahlt. Einstellen v on AF und T A /TP 1 Drücken Sie (AF/ TA) so of t, bis die gewü[…]
-
Page 25: Sony CDX-GT200S
9 A uswählen des Progr ammtyps (PTY) 1 Drücken Sie während des UKW- Empfangs (PTY) . Der Name des ak tuellen Prog rammtyps ersch eint, w enn der Se nder P TY -Dat en ausstrah lt. 2 Drücken Sie (PTY) so of t, bis de r gewünschte P rogrammtyp an gez eigt wird. 3 Drücken Sie (SEEK) –/+. Das G erät b eginnt, na ch einem Sen der zu suchen, der […]
-
Page 26: Sony CDX-GT200S
10 3 Stellen Sie du rc h Dreh en des Lautst ärkeregle rs die ausgewählt e Option ein. Die Lautstärk e lässt s ich in Schritt e n v on 1 dB auf ei nen W ert zw ische n –10 dB un d +10 dB eins tellen. Gehe n Sie wie in Sch ritt 2 und 3 e rläute rt vor , wenn Si e w eit ere Fre quenz bereiche der Equalize r-Kurve einste llen m öcht en. W enn S[…]
-
Page 27: Sony CDX-GT200S
11 Verwenden gesondert erhältlicher Geräte Zusätzliche A udiogeräte W enn Sie ein g esond ert erhäl tliches trag bar es Audi ogerät an die Eingang sbuchse A U X (Ste reomi nib uchse) a m Gerät an schl ießen und dann ein fach die T onq uelle aus wähle n, könne n Sie den T on über die La utspr echer de s Fahrzeu gs wieder geben lass en. Un[…]
-
Page 28: Sony CDX-GT200S
12 • T a ste LIST Beim Ste uern von Radiofu nktionen entspr icht diese T as ten der T as te (PT Y) am Gerä t. * Bei diesem Gerä t nicht verfüg bar . Hinweis Wenn Sie das Ger ät aussc halten u nd die Anzeige aus geblen det ist, könn en Si e es ni cht mit de r Kar tenfern bedienun g bedie nen. Dr ücken Sie zunäch st (SOURCE) am Ger ät oder […]
-
Page 29: Sony CDX-GT200S
13 Weitere Informationen Sicherheitsmaßnahmen • W enn das Fahrzeu g längere Zeit in direktem Sonnenli cht gep arkt w ar , lassen Sie das Gerät etwa s abk ühlen, be vor Si e es einsch alte n. • Motoran tennen we rden autom atisch ausgefahren , wenn d as Gerät ei ngeschal tet wi rd. Feuchtigkeitskondensation Bei Regen oder bei sehr hoher Luf[…]
-
Page 30: Sony CDX-GT200S
14 MP3-/WM A-Dateie n MP3 steht für MPEG-1 Audio Layer-3. Dabei hand elt es sich um einen F ormatstan dard zum K omprimi eren von Musikdate ien. Hierbei we rden Audio-CD -Daten a uf etwa 1/10 ihre r ursprüngli chen Größ e komp rimi ert. WMA steht für W indo ws Media Audio. Dabei hand elt es sich um einen weit eren Forma tstandard zum Komprim i[…]
-
Page 31: Sony CDX-GT200S
15 Wartung Au stauschen der Sicherung W enn Sie ei ne Si cheru ng austausche n, achten Sie dara uf, eine Ersatz sicherung m it dem gleich en A mpere -W ert wie d ie Original sicherun g zu verwenden. Dieser ist au f der Original sicherun g angegeben . W enn d ie Sicher ung durch brennt, über prüfen Si e den Stromanschl uss und tauschen die Sic her[…]
-
Page 32: Sony CDX-GT200S
16 T ec hnische Daten CD-P layer Signal-Rau schabsta nd: 120 dB Fr equenzgang : 10 – 20 .00 0 Hz Gleic hlaufschwa nkungen: Unte rhalb der Mes sgrenze Tu n e r UKW Empfangs berei ch: 87,5 – 108,0 MHz Antennen anschlu ss: Ansc hl uss für Au ßenant enn e Zwisch enfrequenz: 10,7 MHz/450 kHz Nutzbar e Empfin dlichkeit: 9 d Bf T rennschärfe: 75 dB[…]
-
Page 33: Sony CDX-GT200S
17 Gespeic herte Sender und die korrekte Uhrzeit werden g elö scht. Die Sicherung ist durchgebrannt. Störgeräusche si nd zu hören, wenn der Zündschlüssel gedreht wird. Die Leitunge n sind nicht korrekt an den Stroma nschluss fü r Zubehörgeräte ange schlossen. Die Anzei ge wir d ausgeblende t bzw . ersc heint nicht im Displ ay . • Der Dim[…]
-
Page 34: Sony CDX-GT200S
18 Fehleran zeige n/Meld ungen W en n sic h das P rob lem mit di esen Abhilfe maßnah men nich t beheben lä sst, wenden Si e sich an ei nen Sony-Händl er . W enn Sie das Gerät auf grund einer Stör ung bei der CD-Wiedergabe zur Re paratur bringe n, bringen Sie bitte auch die CD mit, di e eingele gt war , als d as Problem z um ersten Mal a uftrat[…]
-
Page 35: Sony CDX-GT200S
[…]
-
Page 36: Sony CDX-GT200S
2 Félicitations ! Nous vo us remerci ons d’a voi r fai t l’ acquisit ion de ce lect eur de di sque s compa cts Sony . V ous pouv ez prof iter de cet appare il grâce aux foncti ons ci- dessous . • Lec tur e de CD Possibil ité de lecture de CD-D A (contenant égal ement des inf ormatio ns CD TEXT*), de CD-R /CD- R W (fichiers M P3/W MA c ont[…]
-
Page 37: Sony CDX-GT200S
3 T able des matières Prépar ation Réinitialis ation de l’ appareil . . . . . . . . . . . . . . . 4 Réglage de l’h orloge . . . . . . . . . . . . . . . . . . . . . 4 Retrait de la façade . . . . . . . . . . . . . . . . . . . . . . 4 Installa tion de la façade . . . . . . . . . . . . . . . . 4 Emplaceme nt des comm andes et opérations de […]
-
Page 38: Sony CDX-GT200S
4 Préparation Réinitialisation de l’appareil A vant la pre miè re m ise e n serv ic e de l’ ap pare il, après a voir re mp lacé la batteri e du véhic ule ou modifié les raccor dement s, vous devez réini tialiser l’ appareil. Retirez la façad e et appuyez su r la to uche RESE T a vec un obje t po intu, comme un styl o à bille. Remarq[…]
-
Page 39: Sony CDX-GT200S
5 Emplacement des commandes et opérations de base Appareil pri ncipal Pour plus de détails , report ez- vou s aux num éros de pa ges indi qués ent re pare nthèses. A T o uche OFF Permet d e mettre l’a ppareil hors tensio n, d’arrê ter l a sour ce. B Molette de réglage du v olume/touche de sélecti on 9 Perme t de régl er le volum e (tou[…]
-
Page 40: Sony CDX-GT200S
6 CD Rubriques d’aff ichage A Indi cati on WMA/MP 3/CD A T RA C B Numéro de plag e/Duré e de lec ture éc oulé e, Nom du disqu e/de l’artis te, Numéro d e groupe /d’a lbum* 1 , Nu méro de gr oupe/ d’album , Nom de la pla ge, In forma tions text uelles* 2 , Ho rloge C Source *1 Le numér o d’album/d e groupe s’affiche uniqu ement lo[…]
-
Page 41: Sony CDX-GT200S
7 Radio Réception et mémorisation des stations Attention Pour sy ntoniser de s stati ons pendant que v o us conduisez, utilisez la fonct ion de mémori sation des meille urs acco rds (BTM) af in d’éviter les accide nts. Mém ori sa tion au toma ti que — BT M 1 Appuyez plu sieurs fois s ur (SOURCE) jusqu’à ce que l’indicati on « TUNER ?[…]
-
Page 42: Sony CDX-GT200S
8 Services RDS Cet appare il propose automatiquement les serv ices RD S, com me sui t : Remarques • Sel on le pa ys ou la ré gion où v ous vo us trouv ez, il est pos sible que les ser vice s RDS ne soient pas tous dis ponibles. • La fonction RDS ne fonctionne p as corr ectement si le signal de retransmission est faible ou si la station synton[…]
-
Page 43: Sony CDX-GT200S
9 Sélection de PTY 1 Appuyez sur (PTY) en cour s de réception FM. Le nom du type d’émissi on di f fusé a ppara ît si la stat ion tra nsmet d es donné es PTY . 2 Appuyez plu sieurs fois s ur (PTY) jusqu’à ce que le type d’é mission souha ité s’ affic he. 3 Appuyez sur (SEEK) –/+. L ’appare il commence à recherch er une st atio […]
-
Page 44: Sony CDX-GT200S
10 3 T ournez la mo lette de réglage du v olume pour régler le paramètre sélectionné . Le ni veau de v olume pe ut êt re ré glé pa r incré ments de 1 dB, de – 10 dB à + 10 dB. Répéte z les étap es 2 et 3 pour régl er la cour be de l’ éga lis eu r . Pour resta urer la c ourbe de l’ égaliseur par déf aut , appu yez sur l a tou […]
-
Page 45: Sony CDX-GT200S
11 Utilisation d’un appareil en option Appareil audio auxiliaire En racc orda nt un appa reil au dio portab le en opti on à la p ris e d’e nt rée AUX (m in i-pr ise stér éo) de l’appar eil, pui s en sé lect ionnant simp lemen t la source , vous pou vez l’écou ter pa r l’interméd iaire des h aut-parleurs d u véhicule . Le niveau de[…]
-
Page 46: Sony CDX-GT200S
12 Remplacement de la pile au lith ium Dans de s cond itions d’ utilis ation no rmal es, la pile dure e n viron 1 an. (E n foncti on des conditi ons d’ut ilisation, sa duré e de vie p eut être plus c ourte.) Lorsque la pile est f aible, la portée de la mini- télécommande di minue. Remplacez la pile par une nouvelle p ile au lithi um CR202 […]
-
Page 47: Sony CDX-GT200S
13 • Les disques de form e non standa rd (p. ex. en forme de cœur, de carré ou d’étoile) ne peuvent pas être lus avec cet appareil . V ous risque z d’end ommage r v otre appar eil si vous es sayez de le faire . N’utilis ez pas de tels d isques. • Cet appareil ne pe rmet pa s la lecture des CD de 8 cm. • A vant l a lecture, net toyez[…]
-
Page 48: Sony CDX-GT200S
14 • Lors de l ’enregi strement d’un di sque en multisessi on, seule l a prem ière pla ge du p remier format de session e st reconnue et lue ( tout autre format est ignoré). L a pr iorité d u format es t CD-DA, CD A TRAC et MP3/WMA. – Lorsque la p remière p lage est un CD-DA, seul le CD-D A de la pr emière session est lu. – Lorsque l[…]
-
Page 49: Sony CDX-GT200S
15 Démontage de l’appareil 1 Retirez le tour de protection . 1 Reti rez la façade ( page 4 ). 2 Insér ez les clés de dé blocag e da ns le tour de prot ection. 3 Tirez sur l es clés de débl ocag e pou r retire r le tour de protecti on. 2 Retirez l’appareil. 1 Insére z simult anément deu x clés de débloc age jus qu’au déc lic. 2 Tir[…]
-
Page 50: Sony CDX-GT200S
16 Il est p ossi ble qu e votre dé taillan t ne dispos e pas de cert ains ac cessoi res déc rits ci- dessus . V euill ez vous adress er à lui p our tout rensei gneme nt complémenta ire. La conc eption et les spé cifications sont suje ttes à modificat ion sans préavis. Dépannage La liste de cont rôles suivante vous aidera à remédier aux p[…]
-
Page 51: Sony CDX-GT200S
17 Affichage d es erreu rs et messages Le son saute . • L ’installatio n est incorr ecte. t Installe z l’ appareil s uiv ant un angle de mo ins de 45° dans un en droi t sta ble de l a voi ture. • Le d isque est défect ueux ou sale . Les touches de comm ande sont i nopérantes. Le disque ne s’éjecte p as. Appuyez sur la touche R ESET (p[…]
-
Page 52: Sony CDX-GT200S
18 Si ces solutions ne per mettent pas d’am éliorer la situa tion, contacte z votre r ev endeur Son y le p lus proche. Si vous portez l’ap pareil à répare r en ra ison d’un problèm e de lecture de CD, ap portez le di sque util isé au mo ment où le prob lème s’ est produ it. NO TP L ’appareil continue à r echerche r les station s d[…]
-
Page 53: Sony CDX-GT200S
[…]
-
Page 54: Sony CDX-GT200S
2 Congratulazioni! Complimenti per l’a cquisto del present e lettore CD Sony . Durante la guida, è pos sibile util izzare le funzioni rip ortate di segu ito. • Riproduzione di CD È poss ibile riprod urre CD-DA (con tenen ti inoltre CD TEXT*), CD-R/CD-R W (file MP3/ WMA 3 conten enti in oltre registrazi oni in multise ssione ( pagina 13 )) e C[…]
-
Page 55: Sony CDX-GT200S
3 Indice Operazioni preliminari Azzeramento de ll’apparecch io . . . . . . . . . . . . . 4 Regolazione de ll’orologio . . . . . . . . . . . . . . . . . 4 Rimozione del p annello ante riore . . . . . . . . . . . 4 Installa zione del pannello anteri o re . . . . . . . 4 Posizione dei comandi e operazioni di base Unità pri ncipale. . . . . . . . […]
-
Page 56: Sony CDX-GT200S
4 Operazioni preliminari Azzeramento dell’apparecchio Prima di utilizza re l’ap pare cchio pe r la prim a volta, dopo la s ostituz ione d ella batteri a dell’ auto o dopo avere effettuato m odifiche ai collegamen ti, è ne cessar io azzer are l’a pparec chio stesso . Rimuovere il pa nnello an terior e, quin di preme re il tasto R ESET utili[…]
-
Page 57: Sony CDX-GT200S
5 Posizione dei comandi e operazioni di base Unità pri ncipale Per u lterior i infor mazioni, fa re ri feriment o alle pagine i ndicate. A Ta s t o O F F Per d isatti vare l’al imenta zion e; ar restar e la riprod uzione del la so rgente. B Manopola di con tr ollo del volume/ tasto di selezione 9 Per rego lare il volum e (ruot are); per selezion[…]
-
Page 58: Sony CDX-GT200S
6 CD V oci del display A Indica tore WMA/MP 3/CD A TRA C B Num ero del bra no/temp o di ripr oduz ione trascors o, titol o del disco/n ome dell’a rtista, numer o dell’al bum/del gr uppo* 1 , nome dell’al bum/del gr uppo, titol o del bra no, infor mazio ni di test o* 2 , ora C Sorgente *1 Il numero dell’album/del g r uppo viene visualizzato […]
-
Page 59: Sony CDX-GT200S
7 Radio Memorizzazione e ricezione delle stazioni Attenzio ne Per la si ntoni zzazio ne del le stazio ni duran te la guida, utilizz are la fu nzione BTM (Be st Tuning Memory , memorizzazione auto matica delle emittenti co n sintonia miglio re) per evit a re incidenti. Memorizzazion e automat ica — BTM 1 Prem ere più v olte (SOU RCE) fi no a visu[…]
-
Page 60: Sony CDX-GT200S
8 Note • È possibile che non tu tte le funzion i RDS siano disponibili, a seconda de l paese/della regione. • La funz ione RDS non è d isponi bile qua ndo il segnale è troppo debole o se la stazione sintonizzata non trasmett e dati RDS. Impostazione dei modi AF e T A/TP 1 Pre mere pi ù vol te (AF/ TA) fino a visualizzare l’impos tazione d[…]
-
Page 61: Sony CDX-GT200S
9 Selezione di PTY 1 Prem ere (PTY) durante la ricezione FM. Se la stazio ne sta tras mettendo dati PTY , vie ne v isu aliz zato il n om e de l tip o di progra mma corrente. 2 Prem ere più v olte (PTY) fino a visualizzare i l tipo di pr o gramma deside rato . 3 Prem ere (SEEK) –/+. L ’appa recchi o avvi a la r icerc a di una st azi one che tra[…]
-
Page 62: Sony CDX-GT200S
10 3 Ruotare la manopola di contr ollo del vo lume per regolare la vo ce desiderata. Il li vello del vol ume può esse re reg olato pe r unit à di 1 dB da –10 dB a +10 dB . Ripeter e i punti 2 e 3 pe r regolar e la curva dell’equ alizzato re. Per ri prist inare l a curv a dell’e qualizza tore predefin ita, tene re prem uto il ta sto di selez[…]
-
Page 63: Sony CDX-GT200S
11 Collegamento del disp ositivo audio por tatile 1 Speg nere il d ispositi vo audio po rtatile. 2 Abbassare il v olume dell’app arecchio. 3 Effettuare i l collegame nto all’a pparecc hio. * Utilizza re una pr esa dir itta. Regolazione del livello de l v olu me Prima di av viar e la ripr oduz ione, ass icur arsi di regolare il volume p er ogni […]
-
Page 64: Sony CDX-GT200S
12 Sostituzione della batteria al litio In condiz ioni normali , la batteria dura circa 1 anno. Il ciclo d i vita può ri sulta re più breve in fun zion e del le c ondi zio ni di util izz o. Quan do la batteri a si scarica , il rag gio d’azi one del tele comando a s cheda risu lta ridott o. Sostitu ire la bat teria con u na batteria al litio CR2[…]
-
Page 65: Sony CDX-GT200S
13 • Non rip rodurre d ischi da lla f orma i rregolare (ad esempi o a forma di cuore, qua drato o stel la) con questo ap parecch io, onde evitare proble mi di funzion amento al l’apparecc hio stesso. Non utilizzare que sto genere di disch i. • Non è possibile ripr odurre CD da 8 cm. • Prima del la ripr oduzione , pulir e i dischi con un pa[…]
-
Page 66: Sony CDX-GT200S
14 Informazioni sui CD A TRAC Formato A T RA C3 plus A TRAC3, l’acro nimo di Adap ti ve T ransform Acoustic Codi ng3, è una t ecnologia di comp ressione audio che con sen te di co mprime re i dati audio di un CD fino a circ a 1/10 delle dimensioni original i. A TRAC3plus, un formato esteso di A TRAC 3, compri me i da ti di un CD audi o f ino a c[…]
-
Page 67: Sony CDX-GT200S
15 Rimozione dell’apparecchio 1 Rimuo vere la cornice di protezione. 1 Rimu ov ere il pannel lo anterior e ( pagina 4 ). 2 Inseri re le chia vi di rilascio ne lla corni ce di prote zione. 3 Estrarre le chia vi di rilasc io per rimuo vere la corn ice di pr otezi one. 2 Rim uo ver e l’ap p ar ecch io. 1 Inser ire contem poran eam ente entr ambe l[…]
-
Page 68: Sony CDX-GT200S
16 È possib ile che il rivenditor e non su pporti al cuni de gli acces sori di c ui so pra. Per ul teriori info rmaz ioni , rivolgers i al rivendito re. Il design e le carat teris tiche tecni che sono so ggetti a modifiche se nza preavviso. Guida alla soluzione dei problemi Fare riferimento alla seguente lista di verifica per risolvere la maggior […]
-
Page 69: Sony CDX-GT200S
17 Messaggi e indicazioni di errore I tasti per le operazioni non funzionano. Il disco non viene espul so. Premere il tast o RESET (pagin a 4). Ricezion e radiofonica Non è possibile ricevere le stazioni. L ’audio è disturbato. • C ollegare il cavo di contr ollo dell’ antenna e lettrica (blu) o il ca vo di al imentazi one acces soria (ro ss[…]
-
Page 70: Sony CDX-GT200S
18 Se le soluzioni riportat e non risolvono il prob lema, ri vol gers i al pi ù vicino ri ve ndit ore So ny . Se l’appar ecchio viene porta to in un ce ntro di assistenza a causa di un prob lema relativo alla riproduzi one di un CD, assi curars i di portare il disco util izzato al momen to in cu i si è verifi cato il problema. RESET L ’appare[…]
-
Page 71: Sony CDX-GT200S
[…]
-
Page 72: Sony CDX-GT200S
2 W elkom! Dank u voor de aankoo p van deze Sony Compa ct Disc Pla yer . U kunt tijd ens he t rijden ge nieten van de volgen de fun cties . • CD’s afsp elen U kunt CD-DA’ s (met CD T EXT*), CD-R’s/ CD-R W’s ( ook MP3- /WMA -bes tanden d ie in meer dere se ssies zij n opgenom en ( pa gina 13 )) en A TRAC CD’s (A TRAC3- en […]
-
Page 73: Sony CDX-GT200S
3 Inhoudsopgave Aan de slag Het apparaat o pnieuw inst ellen . . . . . . . . . . . . . 4 De klok ins tellen . . . . . . . . . . . . . . . . . . . . . . . . 4 Het voorpane el verwijderen. . . . . . . . . . . . . . . . 4 Het voorpaneel bevestige n . . . . . . . . . . . . . . 4 Bedieningselementen en algemene handelingen Hoofdeenheid . . . . . . . . .[…]
-
Page 74: Sony CDX-GT200S
4 Aan de slag Het apparaat opnieuw instellen V oorda t u het apparaa t voor het eerst gaat gebrui ken of na het ver vangen van de ac cu of het wijzigen van de aansluitin gen, moet u het appa raat opnieu w instel len. Maa k het v oorpa neel los en dr uk me t een puntig voorwerp, zo als een balpen, op de RESET toet s. Opmerking Als u op de RESET toe […]
-
Page 75: Sony CDX-GT200S
5 Bedieningselementen en algemene handelingen Hoofdeenheid Zie de v olgend e pagi na’s v oor mee r inf ormatie. A OFF toets Uitsch akelen; d e bron st oppen. B V olum eregelknop/se lectietoets 9 V olume aanpasse n (draaien); in stelitems select eren (i ndru kken en draa ien) . C EQ3 (equ alizer) to ets 9 Een e qualiz erty pe (XPLO D, V OCAL, C[…]
-
Page 76: Sony CDX-GT200S
6 CD Displayitems A Aandui ding voor W MA/M P3/A TRAC CD B T racknummer/v erstreke n speelduur , disc-/ artiest ennaam, alb um-/groepsnu mmer* 1 , alb um-/groepsn aam, track naam, tekstinfo rmatie* 2 , klo k C Bron *1 Het album -/groeps nummer wo rdt allee n weerge gev e n als he t album/de groep word t gewijzigd. *2 Bij h et afspel en van een MP 3[…]
-
Page 77: Sony CDX-GT200S
7 Radio Zenders opslaan en ontvangen Let op Als u afst e mt op zen ders tijden s het rijd en, moet u de BTM- functi e (Best T uni ng Mem ory) gebruike n om ongelukk e n te v ermijden. A utomatis ch opslaan — BTM 1 Druk h erhaa ldelijk op (SOURCE) tot «TUNER» wor dt weergegeven. Druk herhaalde lijk o p (MOD E) om de band te wij zigen . U[…]
-
Page 78: Sony CDX-GT200S
8 Opmerking en • In bepaalde landen/reg io’s zijn wellicht niet alle RDS-functies be schikbaar. • RDS functionee r t wellicht ni et als het ontvangstsign aal zwak is of als de z ender waarop u hebt afge stemd, geen RDS -gegevens verzendt. AF en T A/TP ins tellen 1 Druk herhaalde lijk op (AF/ TA) tot de gewenste ins telling wor dt weer gege[…]
-
Page 79: Sony CDX-GT200S
9 Programmatypen Opmerki ng U kunt deze fun ctie ni et gebr uiken in be paalde landen/ regio’s waar geen P TY -gegevens beschikb aar zijn. CT instellen 1 Stel «CT -ON» in bij de instelli n gen ( pagina 10 ). Opmerki ngen • Het is mogelijk da t de CT — functie niet wer kt, ook al wordt er wel een RD S-zender ontvangen . • Er kan e[…]
-
Page 80: Sony CDX-GT200S
10 Als u de f abrieks instell ing vo or d e equal izerc urve wi lt herst ellen , ho udt u d e selectiet o ets i ngedrukt v oordat het in stellen i s volto oid . Na 3 se conde n is het ins tellen voltooi d en keert he t display terug naa r de no rmale weer gav e-/o ntv angststa nd. Tip Andere equ alizer typen kunnen ook worden aangepast . Met de k a[…]
-
Page 81: Sony CDX-GT200S
11 Het draagbare audioapparaat aansluiten 1 Schakel he t draag bare audi oappar aat uit. 2 V erlaa g het volum e op het vaste a ppara at. 3 Slu it het draagb are audioa pparaat aa n. * Gebru ik een r echte stekker. Het vo lume aanpassen Pas het v olume v oor elk aangeslo ten audioa ppar aat aan voord at u het afsp elen start. 1 V erlaa g het volume[…]
-
Page 82: Sony CDX-GT200S
12 De lithiumbatterij vervangen In norm ale om standi ghed en gaat de ba tterij ongeveer 1 jaar me e. (Af hankeli jk van de gebrui ksoms tandighe den kan de levensduur korter zi jn.) W anneer de batte rij verzwakt, wordt het be reik v an de kaar tafstands bedienin g kleine r . V erv ang de batte rij door e en nieuw e CR20 25 lithiu mbatterij. Bij e[…]
-
Page 83: Sony CDX-GT200S
13 • Maak een disc voor het afspel en alt ijd schoon me t een in de hand el verkri jgbare reiniging sdoek. V eeg de di sc van binnen naar buiten schoon. Gebruik ge en oplosmid delen zoals benzi ne, thinne r en in de handel verkrijgb are rein igin gsmi dd elen of antis tatis che s prays voor g rammof oonpl aten. Opmerkingen over CD-R’s/CD-RW&[…]
-
Page 84: Sony CDX-GT200S
14 Informatie o ver A TRAC CD’s A TRAC3plus-indeling A TRAC3 (Adaptive Transform Ac oustic Co ding3) is een com pressietech nologie voor audio. Audio — CD-gegevens worden gecom primee rd tot ongeveer 1/10 van de oorspronkelijke gr ootte. Met A TRA C3plu s, een uitge breide i ndeling v an A TRAC3, worden audi o-CD-gegevens tot ongeveer 1/20 van[…]
-
Page 85: Sony CDX-GT200S
15 2 V erwij der het ap paraat . 1 Plaats b eide ontgre ndelingssl e utels tegeli jkertijd en duw hi erop tot deze vas tk li k ken . 2 Trek de ontgrende lings sleutels naar u to e om het apparaat los te make n. 3 Schuif het appa raat ui t de houde r . T echnische gegevens CD-sp eler Signaal/r uis-afstan d: 120 dB Fre quentiebe reik: 10 – 20 .00 0[…]
-
Page 86: Sony CDX-GT200S
16 Problemen oplossen De on derstaan de c ontroleli jst kan u he lpen b ij het oplossen van problem en die zich me t het apparaa t kunnen voordoen . V oo rdat u de ond erstaand e control elijst doorne emt, moet u ee rst de aanwi jzingen voor aansluiting e n gebruik co ntroleren. Algemeen Het apparaat wordt niet van stroom v oorzien. • Controlee r[…]
-
Page 87: Sony CDX-GT200S
17 Foutmeldingen/berichten Als deze oplossingen niet helpen , moet u de dicht stbijzijnd e Sony-hand elaar raadp legen. Als u het ap paraat ter re paratie wegbrengt omda t een C D niet go ed wordt afgespe eld, kunt u het beste de dis c meen emen wa armee het p robl eem is begonnen. Tijdens FM-ontvangst knippert de aanduiding «ST» . • St[…]
-
Page 88: Sony CDX-GT200S
Sony Corporation Printed in China Bitte kreuzen Sie zunächst die genaue Modellbezeichnung i n dem dafür vorgesehenen F eld an. T ragen Sie danach die Seriennummer (SERIAL NO.) in dem reser vier ten Fel d ein. Sie finden diese auf einem A ufkleber , der auf dem Gerätegehäuse angebracht ist. Nehmen Sie den ausgefüllten Geräte-P ass anschließen[…]
Краткое содержание страницы № 1
2-651-185-22 (1)
FM/MW/LW
Compact Disc Player
GB
Operating Instructions
DE
Bedienungsanleitung
FR
Mode d’emploi
IT
Istruzioni per l’uso
NL
Gebruiksaanwijzing
To cancel the demonstration (DEMO) display, see page 9.
Zum Deaktivieren der Demo-Anzeige (DEMO) schlagen Sie bitte auf Seite 10 nach.
Pour annuler la démonstration (DEMO), reportez-vous à la page 10.
Per annullare la dimostrazione (DEMO), vedere pagina 10.
Om de demonstratie (DEMO) te annuleren, zie pagina 10.
CDX-GT200S
CDX-GT200
©
Краткое содержание страницы № 2
Welcome ! Warning if your car’s ignition has no ACC position Thank you for purchasing this Sony Compact After turning the ignition off, be sure to press Disc Player. You can enjoy your drive with the and hold (OFF) on the unit until the display following functions. disappears. CD playback Otherwise, the display does not turn off and You can play CD-DA (also containing CD this causes battery drain. TEXT*), CD-R/CD-RW (MP3/WMA files also containing Multi Session (page 12)), and ATRAC C
Краткое содержание страницы № 3
Table of Contents Getting Started Other functions Resetting the unit. . . . . . . . . . . . . . . . . . . . . . . . 4 Changing the sound settings . . . . . . . . . . . . . . . 9 Setting the clock . . . . . . . . . . . . . . . . . . . . . . . . 4 Adjusting the sound Detaching the front panel . . . . . . . . . . . . . . . . . 4 characteristics — BAL/FAD/SUB. . . . . . . . 9 Attaching the front panel . . . . . . . . . . . . . . . 4 Customizing the equalizer curve — EQ3 . . . . . . . . . . . . .
Краткое содержание страницы № 4
Getting Started Detaching the front panel You can detach the front panel of this unit to Resetting the unit prevent theft. Before operating the unit for the first time, or Caution alarm after replacing the car battery or changing the If you turn the ignition switch to the OFF connections, you must reset the unit. position without detaching the front panel, the Detach the front panel and press the RESET caution alarm will sound for a few seconds. button with a pointed object, such as a ball
Краткое содержание страницы № 5
Location of controls and basic operations Main unit CDX-GT200S CDX-GT200 Refer to the pages listed for details. Radio: To tune in stations automatically (press); find A OFF button a station manually (press and hold). To power off; stop the source. L SOURCE button B Volume control dial/select button 9 To power on; change the source (Radio/CD/ To adjust volume (rotate); select setup items AUX). (press and rotate). M PTY (Programme Type) button 8 C EQ3 (equalizer) button 9 To select PTY in RDS
Краткое содержание страницы № 6
CD Radio Storing and receiving stations Display items Caution When tuning in stations while driving, use Best Tuning Memory (BTM) to prevent an accident. Storing automatically — BTM A WMA/MP3/ATRAC CD indication 1 Press (SOURCE) repeatedly until B Track number/Elapsed playing time, Disc/ “TUNER” appears. 1 artist name, Album/group number* , Album/ To change the band, press (MODE) 2 group name, Track name, Text information* , repeatedly. You can select from FM1, FM2, Clock FM3, MW or LW. C S
Краткое содержание страницы № 7
Setting AF and TA/TP RDS 1 Press (AF/TA) repeatedly until the desired setting appears. Overview FM stations with Radio Data System (RDS) Select To service send inaudible digital information along AF-ON activate AF and deactivate TA. with the regular radio programme signal. TA-ON activate TA and deactivate AF. Display items AF, TA-ON activate both AF and TA. AF, TA-OFF deactivate both AF and TA. Storing RDS stations with the AF and TA setting A Radio band, Function You can preset RDS stations
Краткое содержание страницы № 8
Local Link function (UK only) Setting CT This function enables you to select other local stations in the area, even if they are not stored on 1 Set “CT-ON” in setup (page 9). your number buttons. Notes 1 During FM reception, press a number button The CT function may not work even though an RDS ((1) to (6)) on which a local station is stored. station is being received. There might be a difference between the time set by 2 Within 5 seconds, press again a number button the CT function and
Краткое содержание страницы № 9
Tip Other equalizer types are also adjustable. Other functions With the card remote commander Changing the sound settings In step 3, to adjust the selected item, press <, M, , or m. Adjusting the sound Adjusting setup items — SET characteristics — BAL/FAD/SUB You can adjust the balance, fader, and subwoofer 1 Press and hold the select button. volume. The setup display appears. 1 Press the select button repeatedly 2 Press the select button repeatedly until “BAL,” “FAD” or “SUB” appears. un
Краткое содержание страницы № 10
LIST SOUND 2 Adjusting the volume level REG* (Regional) To set “REG-ON” (z) or “REG-OFF” (page 7). Be sure to adjust the volume for each connected 3 audio device before playback. LPF* (Low Pass Filter) To select the subwoofer cut-off frequency: “LPF 1 Turn down the volume on the unit. OFF” (z), “LPF125Hz” or “LPF 78Hz.” 2 Press (SOURCE) repeatedly until “AUX FRONT IN” appears. *1 When the unit is turned off. *2 When FM is received. 3 Start playback of the portable audio device at a *3 When t
Краткое содержание страницы № 11
Note If the unit is turned off and the display disappears, it Additional Information cannot be operated with the card remote commander unless (SOURCE) on the unit is pressed, or a disc is Precautions inserted to activate the unit first. If your car has been parked in direct sunlight, Replacing the lithium battery allow the unit to cool off before operating it. Under normal conditions, the battery will last Power aerial will extend automatically while the approximately 1 year. (The serv
Краткое содержание страницы № 12
Before playing, clean the discs Playback order of MP3/WMA files with a commercially available Folder cleaning cloth. Wipe each disc MP3/WMA (album) from the centre out. Do not use solvents such as benzine, MP3/WMA file (track) thinner, commercially available cleaners, or antistatic spray intended for analogue discs. Notes on CD-R/CD-RW discs Some CD-Rs/CD-RWs (depending on the equipment used for its recording or the condition of the disc) may not play on this unit. You cannot play
Краткое содержание страницы № 13
For details on ATRAC CD, see the SonicStage or SonicStage Simple Burner manual. Removing the unit Note 1 Remove the protection collar. Be sure to create the ATRAC CD using authorized software, such as SonicStage 2.0 or later, or 1Detach the front panel (page 4). SonicStage Simple Burner 1.0 or 1.1. 2Engage the release keys together with the protection collar. If you have any questions or problems concerning your unit that are not covered in this manual, consult your nearest Sony dealer. Ma
Краткое содержание страницы № 14
MPEG Layer-3 audio coding technology and Specifications patents licensed from Fraunhofer IIS and Thomson. CD Player section Signal-to-noise ratio: 120 dB Design and specifications are subject to change Frequency response: 10 – 20,000 Hz without notice. Wow and flutter: Below measurable limit Tuner section FM Tuning range: 87.5 – 108.0 MHz Lead-free solder is used for soldering certain parts. Aerial terminal: External aerial connector (more than 80 %) Intermediate frequency: 10.7 MHz/450 kHz
Краткое содержание страницы № 15
The display disappears from/does not appear Preset tuning is not possible. in the display window. Store the correct frequency in the memory. The dimmer is set “DIM-ON” (page 9). The broadcast signal is too weak. The display disappears if you press and hold (OFF). Automatic tuning is not possible. t Press and hold (OFF) on the unit until the Setting of the local seek mode is not correct. display appears. t Tuning stops too frequently: The connectors are dirty (page 13). Press (SENS)
Краткое содержание страницы № 16
NO AF There is no alternative frequency for the current station. t Press (SEEK) –/+ while the station name is flashing. The unit starts searching for another frequency with the same PI (Programme Identification) data (“PI SEEK” appears). NO ID3 ID3 tag information is not written in the MP3 file. NO INFO Text information is not written in the ATRAC3/ ATRAC3plus or WMA file. NO MUSIC The disc is not a music file. t Insert a music CD. NO NAME A track/album/group/disk name is not written in the
Краткое содержание страницы № 17
Краткое содержание страницы № 18
Wichtig! Warnhinweis, wenn die Zündung Ihres Bitte nehmen Sie sich etwas Zeit, um Fahrzeugs nicht über eine Zubehörposition (ACC oder I) verfügt den Geräte-Pass vollständig Nachdem Sie die Zündung ausgeschaltet auszufüllen. Dieser befindet sich auf haben, halten Sie am Gerät unbedingt (OFF) der hinteren Umschlagseite dieser gedrückt, bis die Anzeige ausgeblendet wird. Bedienungsanleitung. Andernfalls wird die Anzeige nicht ausgeschaltet und der Autobatterie wird Strom entzogen. Willkomm
Краткое содержание страницы № 19
Inhalt Vorbereitungen Weitere Funktionen Zurücksetzen des Geräts . . . . . . . . . . . . . . . . . . 4 Ändern der Klangeinstellungen . . . . . . . . . . . . 9 Einstellen der Uhr . . . . . . . . . . . . . . . . . . . . . . . 4 Einstellen der Klangeigenschaften Abnehmen der Frontplatte. . . . . . . . . . . . . . . . . 4 — BAL/FAD/SUB. . . . . . . . . . . . . . . . . . . . 9 Anbringen der Frontplatte. . . . . . . . . . . . . . . 4 Individuelles Einstellen der Equalizer-Kurve — EQ3 . . . . . . .
Краткое содержание страницы № 20
Vorbereitungen Abnehmen der Frontplatte Um zu verhindern, dass das Gerät gestohlen Zurücksetzen des Geräts wird, können Sie die Frontplatte abnehmen. Bevor Sie das Gerät zum ersten Mal benutzen Warnton oder wenn Sie die Autobatterie ausgetauscht Wenn Sie den Zündschlüssel in die Position OFF oder die Verbindungen gewechselt haben, stellen, ohne die Frontplatte abzunehmen, ertönt müssen Sie das Gerät zurücksetzen. einige Sekunden lang ein Warnton. Nehmen Sie die Frontplatte ab und drücken S

4
Начало работы
Сброс параметров
устройства
Перед первым включением устройства
или после замены автомобильного
аккумулятора, а также после изменения
схемы подключения следует
переустановить параметры устройства.
Снимите переднюю панель и нажмите
кнопку RESET с помощью заостренного
предмета, например шариковой ручки.
Примечание
При нажатии кнопки RESET выполняется
стирание установок времени и некоторых других
занесенных в память параметров.
Установка часов
Часы данного устройства имеют 24-
часовую индикацию.
1
Нажмите и удерживайте кнопку
выбора.
Отобразится дисплей установок.
2
Нажимайте кнопку выбора, пока не
появится индикация “CLOCK-ADJ”.
3
Нажмите кнопку (DSPL).
Начнет мигать индикация часа.
4
Поверните регулятор громкости
для установки значения часов и
минут.
Чтобы переместиться по знакам,
нажмите кнопку (DSPL).
5
Нажмите кнопку выбора.
Установка завершена, и часы начинают
отсчет времени.
Чтобы отобразить часы, нажмите кнопку
(DSPL). Нажмите кнопку (DSPL) еще раз,
чтобы вернуться к предыдущей индикации
дисплея.
При использовании пульта дистанционного
управления
Для установки значений часа и минут в шаге 4
нажмите кнопку
M или m.
Снятие передней панели
Во избежание кражи устройства можно
снять с него переднюю панель.
Предупреждающий сигнал
Если до поворота ключа зажигания в
положение OFF с устройства не была
снята передняя панель, то в течение
нескольких секунд будет слышен
предупредительный звуковой сигнал.
Звуковой сигнал будет слышен только в
том случае, если используется встроенный
усилитель.
1
Нажмите кнопку (OFF).
Устройство выключится.
2
Нажмите кнопку
, затем снимите
панель, потянув ее на себя.
Примечания
• Старайтесь не ронять переднюю панель. Не
надавливайте слишком сильно на переднюю
панель и окошко дисплея.
• Не подвергайте переднюю панель воздействию
тепла/высокой температуры или влажности.
Старайтесь не оставлять ее в припаркованной
машине или на приборной доске/полочке за
задним сиденьем.
Установка передней панели
Прикрепите часть A передней панели к
части B устройства, как показано на
рисунке, и установите левую сторону на
место до щелчка.
Примечание
Не ставьте ничего на внутреннюю поверхность
передней панели.
Кнопка
RESET
B
A