перейти к содержанию
интегрированный marantz Ampруководство пользователя lifier

Добро пожаловать
Спасибо, что выбрали Marantz ampпожизненнее. Это руководство содержит пошаговые инструкции по настройке вашего ampпожизненнее.
Прежде чем вы начнете

Установка
Процесс установки состоит из шести шагов.
- Установите батарейки в пульт дистанционного управления.
- Подключите колонки к PM6007
- Подключите проигрыватель компакт-дисков к PM6007
- Вставьте шнур питания в розетку.
- Включите питание PM6007, а затем установите
- динамики для вывода звука на SPEAKERS A
- Начать воспроизведение компакт-диска
Установите батареи в пульте дистанционного управления

Подключите колонки к PM6007

Подключите проигрыватель компакт-дисков к PM6007

Вставьте шнур питания в розетку.

Включите питание PM6007, а затем установите динамики для вывода звука на SPEAKERS A.

Начать воспроизведение компакт-диска

Инструкция по применению
• Обратитесь к онлайн-руководству для получения информации о других функциях и
подробности процедуры работы.
manuals.marantz.com/PM6007/NA/EN/


Для получения дополнительной информации посетите www.marantz.com
![]() зарегистрированная торговая марка.
зарегистрированная торговая марка.
Напечатано во Вьетнаме 5411 11863 00:XNUMX
© 2020 Sound United. Все права защищены.
Документы / Ресурсы
Рекомендации

- Manuals
- Brands
- Marantz Manuals
- Amplifier
- PM6007
- Owner’s manual
-
Contents
-
Table of Contents
-
Troubleshooting
-
Bookmarks
Quick Links
Connections
Playback
Settings
Appendix
.
Integrated Amplifier
PM6007
Owner’s Manual
Remote control
1
unit
Related Manuals for Marantz PM6007
Summary of Contents for Marantz PM6007
-
Page 1
Contents Connections Playback Settings Tips Appendix Integrated Amplifier PM6007 Owner’s Manual Remote control Front panel Rear panel Index unit… -
Page 2
Connecting a recording device Connecting to a device with digital audio output connectors Connecting devices with remote control connectors Performing operations by RC on this unit without visual contact Remotely connecting Marantz audio devices Connecting the power cord Playback Turning the power on… -
Page 3
Contents Connections Playback Settings Tips Appendix Settings Tips Setting the Auto Standby mode Tips Setting the remote signal receiving function Troubleshooting Disabling the remote signal receiving function of the remote Power does not turn on / Power is turned off control unit Operations cannot be performed through the remote control unit Enabling the remote signal receiving function of the remote… -
Page 4
Playback Settings Tips Appendix Thank you for purchasing this Marantz product. To ensure proper operation, please read this owner’s manual carefully before using the product. After reading this manual, be sure to keep it for future reference. Accessories Check that the following parts are supplied with the product. -
Page 5
Contents Connections Playback Settings Tips Appendix Inserting the batteries NOTE 0 To prevent damage or leakage of battery fluid: 0 Do not use a new battery together with an old one. Remove the rear lid in the direction of the arrow and 0 Do not use two different types of batteries. -
Page 6
Contents Connections Playback Settings Tips Appendix Part names and functions Front panel o Q0 Q1 For details, see the next page. Remote control Front panel Rear panel Index unit… -
Page 7
Contents Connections Playback Settings Tips Appendix F Headphones jack (PHONES) Used to connect headphones. Turn off speaker output when using headphones. (v p. 27) NOTE 0 To prevent hearing loss, do not raise the volume level excessively when using headphones. G BASS control knob This setting adjusts the volume level for the bass. -
Page 8
Contents Connections Playback Settings Tips Appendix Rear panel For details, see the next page. Remote control Front panel Rear panel Index unit… -
Page 9
Tips Appendix E Remote control input/output connectors (REMOTE CONTROL) Used to connect to a Marantz audio device that is compatible with the remote control function. (v p. 23) F AC inlet (AC IN) Used to connect the power cord. (v p. 24) -
Page 10
Appendix Remote control unit The remote control provided with this unit can control a network audio player in addition to a Marantz CD player. “CD player operations” (v p. 11) “Network audio player operations” (v p. 13) o Operating this unit A Remote control signal transmitter This transmits signals from the remote control unit. -
Page 11
Tips Appendix o CD player operations You can operate a Marantz CD player. To operate a Marantz CD player, press the REMOTE MODE CD button to switch the remote control to the CD player operation mode. REMOTE MODE CD button lights for approximately two seconds. -
Page 12
Contents Connections Playback Settings Tips Appendix M OPTION button N SETUP button O CLEAR button P DIMMER button Q REPEAT button (L) 0 The remote control may not operate some products. 0 The amp can be operated with the amp operation buttons even when the remote control operation mode is set to CD. -
Page 13
Tips Appendix o Network audio player operations You can operate a Marantz network audio player. To operate a Marantz network audio player, press the REMOTE MODE NET button to switch the remote control to the network audio player operation mode. -
Page 14
Contents Connections Playback Settings Tips Appendix K FAVORITES ADD / CALL buttons L OPTION button M SETUP button N Number/letter buttons (0 – 9, +10) O CLEAR button P DIMMER button Q REPEAT button (L) 0 The remote control may not operate some products. 0 The amp can be operated with the amp operation buttons even when the remote control mode is NET. -
Page 15
Contents Connections Playback Settings Tips Appendix o Contents o Cables used for connections Provide necessary cables according to the devices you want to Connecting speakers connect. Connecting a playback device Connecting a recording device Speaker cable Connecting to a device with digital audio output connectors Connecting devices with remote control connectors Connecting the power cord Subwoofer cable… -
Page 16
Contents Connections Playback Settings Tips Appendix Connecting speakers o Connecting the speaker cables NOTE 0 Disconnect this unit’s power plug from the power outlet before connecting the Carefully check the left (L) and right (R) channels and + (red) and – speakers. -
Page 17
Contents Connections Playback Settings Tips Appendix Speaker A/B connection This unit is equipped with two sets of speaker terminals (SPEAKER A and SPEAKER B). One set of speakers can be connected to each set of terminals, and a total of two sets of speakers can be connected. The same signal is output from the SPEAKERS A and SPEAKERS B terminals. -
Page 18
Contents Connections Playback Settings Tips Appendix Bi-wiring connection This connection limits the effects of signal interference between the high range speakers (tweeters) and low range speakers (woofers), allowing you to enjoy high quality playback. When bi-wiring with bi-wireable speakers, connect the mid and high range terminals to SPEAKERS B (or SPEAKERS A), the low range terminals to SPEAKERS A (or SPEAKERS B). -
Page 19
Contents Connections Playback Settings Tips Appendix Subwoofer connection Use a subwoofer cable to connect the subwoofer. Subwoofer 0 The subwoofer volume is linked to the Speaker A volume. 0 This unit does not output to the subwoofer when not set to output audio from the SPEAKERS A terminal. (v p. 27) Remote control Front panel Rear panel… -
Page 20
Contents Connections Playback Settings Tips Appendix Connecting a playback device You can connect turntables, CD players, network audio players and tuners to this unit. This unit is compatible with turntables equipped with a moving magnet (MM) phono cartridge. When you connect to a turntable with a low output moving coil (MC) cartridge, use a commercially available MC head amp or a step-up transformer. -
Page 21
Contents Connections Playback Settings Tips Appendix Connecting a recording device Recording device AUDIO OUT AUDIO IN NOTE 0 Never insert the short-circuiting pin plug into the recording output connectors (AUDIO OUT RECORDER). Doing so could result in damage. Remote control Front panel Rear panel Index… -
Page 22
Contents Connections Playback Settings Tips Appendix Connecting to a device with digital audio output connectors Use this connection to input digital audio signals to this unit, and convert the signals for playback using the D/A converter of this unit. (v p. 29) TV / Satellite receiver etc. -
Page 23
You can connect an external IR receiver to the REMOTE CONTROL You can transmit remote control signals simply by connecting a Marantz connectors to perform operations on this unit with the supplied remote audio device to the REMOTE CONTROL IN/OUT connectors using the control unit without visual contact. -
Page 24
Contents Connections Playback Settings Tips Appendix Connecting the power cord After completing all the connections, insert the power plug into the power outlet. To household power outlet (AC 120 V, 60 Hz) Power cord (supplied) Remote control Front panel Rear panel Index unit… -
Page 25
Contents Connections Playback Settings Tips Appendix o Contents Turning the power on Switching the power to standby Selecting the speakers for audio output Selecting the input source Adjusting the volume Turning off the sound temporarily (Muting) Adjusting the tone and balance Playing CDs Connect and playback from a digital device (Coaxial/Optical) Recording… -
Page 26
Contents Connections Playback Settings Tips Appendix Turning the power on AMP POWER X Press X on the main unit to turn the power on. Input source Input indicator for the selected source lights in blue. select buttons 0 Press AMP POWER X on the remote control unit to turn on power from standby SOURCE mode. -
Page 27
Contents Connections Playback Settings Tips Appendix Selecting the speakers for audio output Adjusting the volume Use SPEAKERS A/B on the main unit to select the Use VOLUME df to adjust the volume. speaker system to be used for playback. The indicator of the selected speakers lights. 0 You can also adjust the master volume by turning VOLUME on the main unit. -
Page 28
Contents Connections Playback Settings Tips Appendix Adjusting the tone and balance Playing CDs This section uses playback from a CD as an example. Press SOURCE DIRECT to turn off source direct mode. Press X on the main unit to turn the power on. The SOURCE DIRECT indicator turns off. -
Page 29
Contents Connections Playback Settings Tips Appendix o Switching the filter characteristics Connecting and playing back from a digital device (Coaxial/Optical) This unit is equipped with a sound quality adjusting function which allows users to enjoy the desired playback sound quality. This function only works when a digital audio signal is input. -
Page 30
Contents Connections Playback Settings Tips Appendix o Specifications of supported audio formats Recording See “D/A converter” (v p. 43). Audio signals input into this unit can be output to an external recording device. When recording audio from a playback device connected to this unit, audio can be recorded with the playback device still connected to this unit. -
Page 31
Contents Connections Playback Settings Tips Appendix o Contents Setting the Auto Standby mode Setting the remote signal receiving function Setting remote control codes Remote control Front panel Rear panel Index unit… -
Page 32
Contents Connections Playback Settings Tips Appendix Setting the Auto Standby mode You can set the unit to automatically switch to standby mode if the unit is Press and hold SOURCE DIRECT for 5 seconds or more not operated for 30 minutes when there is no audio input (Auto Standby to switch it on and off. -
Page 33
Contents Connections Playback Settings Tips Appendix Setting the remote signal receiving function When you connect a IR receiver (sold separately) to the REMOTE Disabling the remote signal receiving CONTROL IN connector of this unit, use the following procedure to function of the remote control unit disable the remote signal receiving function of this unit. -
Page 34
Be sure to check the operation of each unit after setting the remote control codes. The default setting is “AMP1”. 0 Set the remote control cord to “AMP 1” when controlling this unit from a Marantz network audio player or other device connected using a remote connection cable ENTER to this unit. -
Page 35
Contents Connections Playback Settings Tips Appendix Setting remote control codes for the Setting remote control codes for the remote control main unit o To set the remote control codes to AMP1, Point the remote control for which the remote control code was set at the main unit, and press REMOTE AMP2 or AMP3 MODE CD and ENTER. -
Page 36
I want to use bi-wiring compatible speakers Sound is interrupted or noise occurs I want to operate a Marantz CD player or network audio player FILTER 1 ・ 2 indicator does not light using the remote control of this unit… -
Page 37
This unit is compatible with bi-wiring connections. Enjoy high quality playback by using bi-wiring connections. (v p. 18) I want to operate a Marantz CD player or network audio player using the remote control of this unit Switch the remote control operating mode. (“CD player operations” (v p. 11), “Network audio player operations” (v p. 13)) Also refer to the CD player or network audio player instruction manuals. -
Page 38
Contents Connections Playback Settings Tips Appendix Troubleshooting If a problem should arise, first check the following: 1. Are the connections correct? 2. Is the set being operated as described in the owner’s manual? 3. Are the other devices operating properly? If this unit does not operate properly, check the corresponding symptoms in this section. -
Page 39
Contents Connections Playback Settings Tips Appendix Power does not turn on / Power is turned off Power is not turned on. Check whether the power plug is correctly inserted into the power outlet. (v p. 24) Power automatically turns off. The Auto Standby mode is on. -
Page 40
Contents Connections Playback Settings Tips Appendix Operations cannot be performed through the remote control unit Operations cannot be performed through the remote control unit. Batteries are worn out. Replace with new batteries. (v p. 5) Operate the remote control unit within a distance of about 23 ft/7 m from this unit and at an angle of within 30°. (v p. 5) Remove any obstacle between this unit and the remote control unit. -
Page 41
Contents Connections Playback Settings Tips Appendix No sound comes out No sound comes out of speakers. Check the connections for all devices. (v p. 15) Insert connection cables all the way in. Check that input connectors and output connectors are not reversely connected. Check cables for damage. -
Page 42
Contents Connections Playback Settings Tips Appendix Sound is interrupted or noise occurs When playing a record, the sound is distorted. Adjust to a proper needle pressure. Check the tip of the needle. Replace the cartridge. When playing a record, a humming noise comes out of the speakers. Check that the turntable is connected correctly. -
Page 43
Contents Connections Playback Settings Tips Appendix D/A converter Explanation of terms o Specifications of supported audio formats Sampling frequency Sampling involves taking a reading of a sound wave (analog signal) at Coaxial/Optical 1/Optical 2 regular intervals and expressing the height of the wave at each reading in digitized format (producing a digital signal). -
Page 44
Contents Connections Playback Settings Tips Appendix Trademark information Adobe, the Adobe logo and Reader are either registered trademarks or trademarks of Adobe Systems Incorporated in the United States and/or other countries. Remote control Front panel Rear panel Index unit… -
Page 45
Contents Connections Playback Settings Tips Appendix Specifications RMS Power output (20 Hz – 20 kHz simultaneous drive of both channels) : 45 W x 2 (8 Ω/ohms load) 60 W x 2 (4 Ω/ohms load) Total harmonic distortion (20 Hz – 20 kHz simultaneous drive of 0.08 % both channels, 8 Ω/ohms load) : Output band width (8 Ω/ohms load, 0.06 %) :… -
Page 46
Contents Connections Playback Settings Tips Appendix Tone Control ±10 dB BASS (50 Hz) : ±10 dB TREBLE (15 kHz) : Digital input 0.5 Vp-p Coaxial : –27 dBm or later Optical : Operating temperature: +5 ℃ — +35 ℃ Power supply : AC 120 V, 60 Hz Power consumption : 155 W… -
Page 47
Contents Connections Playback Settings Tips Appendix o Dimensions (Unit : in. (mm)) 17 3/8 (440) 2 1/4 (56) 2 (50) 2 (50) 13 1/2 (340) o Weight : 17 lb 3 oz (7.8 kg) Remote control Front panel Rear panel Index unit… -
Page 48
Contents Connections Playback Settings Tips Appendix Index Muting …………27 Source direct ……….28, 43 Speaker impedance ……..43 Speakers …………16 Auto Standby mode ……..32 Network audio player ……..20 Speaker (Bi-wiring) connection …… 18 BALANCE …………28 Protection circuit ………. -
Page 49
3520 10763 00AM © 2020 Sound United. All Rights Reserved.
Не можете найти ответ на свой вопрос в руководстве? Вы можете найти ответ на свой вопрос ниже, в разделе часто задаваемых вопросов о Marantz PM6007.
Когда звук считается слишком громким?
Могут ли устройства разных марок подключаться друг к другу при помощи Bluetooth?
Что такое Bluetooth?
Что такое HDMI?
Как лучше всего выполнять чистку приемник?
Что такое Dolby Atmos?
Инструкция Marantz PM6007 доступно в русский?
Не нашли свой вопрос? Задайте свой вопрос здесь
Интегральный усилитель с цифровыми входами и ММ-фонокорректором.
PM6007 обеспечивает самый музыкальный звук Marantz и является идеальным выбором для тех, кто готов сделать следующий шаг в своей 2-канальной системе Hi-Fi. Пришедший на смену модели PM6006, усилитель получил новый цифро-аналоговый преобразователь. Вместо чипа Cirrus Logic CS4398 теперь используется высококлассная микросхема AK4490, позволяющая принимать аудио в формате PCM до 24 бит/192 кГц.
В цепях новой модели установлены специально отобранные в течение длительных тестовых прослушиваний комплектующие и применяется обратная связь по току, позволяющая минимизировать искажения и расширить диапазон частот. Выходной каскад оснащается фирменными дискретными усилительными модулями HDAM-SA3, гарантирующими высокую скорость нарастания сигнала и низкий уровень помех. В блоке питания Marantz PM6007 установлен хорошо экранированный тороидальный трансформатор с низким электромагнитным излучением и набор сильноточных конденсаторов, размер которых (и, соответственно, емкость), по словам производителя, увеличен на 20% по сравнению с конденсаторами предшественника, а в выпрямителе задействованы сверхбыстрые диоды Шоттки. В итоге обеспечивается чистое питание, широкий динамический диапазон и способность легко справляться с низкоомными нагрузками. Усилитель выдает 45 Вт на канал при 8 Ом и уверенно работает даже с 4-омными акустическими системами.
Цифровая секция усилителя, которая также включает в себя один коаксиальный и два оптических входа, помещена в экранирующий металлический футляр с целью минимизации ее влияния на аналоговые цепи. В режиме ЦАПа имеется возможность выбора одного из двух доступных цифровых фильтров: Filter 1 (slow roll-off) с мягкой отсечкой спектра, и Filter 2 (sharp roll-off) с более крутым срезом.
Усилитель Marantz PM6007 оснащается высококачественным MM-фонокорректором, на входе которого установлены полевые транзисторы. Благодаря такой технологии удается обеспечить высокий входной импеданс, сократить пути прохождения сигнала, обойтись без ухудшающих звучание разделительных конденсаторов и минимизировать помехи и искажения.
Помимо цифровых разъемов модель получила четыре линейных входа, выход для записи и разъем для подключения сабвуфера. Также имеется ИК-гнездо и разъемы системной шины, а для подсоединения АС служат восемь винтовых клемм, с помощью которых можно легко организовать двухпроводное подключение. На фронтальной панели находится 6,3 мм гнездо для наушников. Пульт усилителя позволяет управлять CD-проигрывателем Marantz.
Особенности:
Экранированный тороидальный трансформатор, сильноточные конденсаторы и диоды Шоттки в блоке питания
ЦАП AK4490
Дискретная топология схем с обратной токовой связью, усилительные модули HDAM-SA3 последнего поколения
Качественный MM-фонокорректор с полевыми транзисторами
Приветствую всех )
Помогите пож-та в интерпретации мануала по Marantz PM6007.
Сам аппарат ещё жду, поэтому изучаю пока документацию.
Мой вопрос касается логики работы выходов на акустику А и В.
В мануале сказано, что данное устройство оснащено двумя наборами клемм (SPEAKER A и SPEAKER B). Можно подключить к каждому набору разъемов отдельную пару акустики и в общем можно подключить два набора акустики.
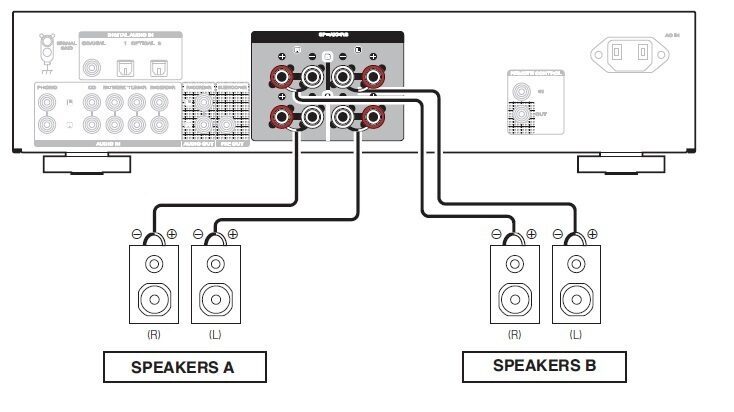
В мануале не сказано для чего это сделано, но подозреваю, что для прослушивания одного входящего аудиопотока в разных комнатах, например. Может кто-то захочет использовать данную возможность, чтобы слушать музыку сразу с четырёх колонок в одном помещении… не знаю, мало ли у кого какие желания возникнут по этому поводу )
Далее, в разделе «Воспроизведение», говорится о том, что для выбора той или иной пары (А или В) нужно нажать на лицевой панели усилителя соответствующую кнопку:
«Чтобы выбрать для воспроизведения акустическую систему, нажмите на основном блоке кнопку SPEAKERS A/B. Загорится индикатор выбранных динамиков».
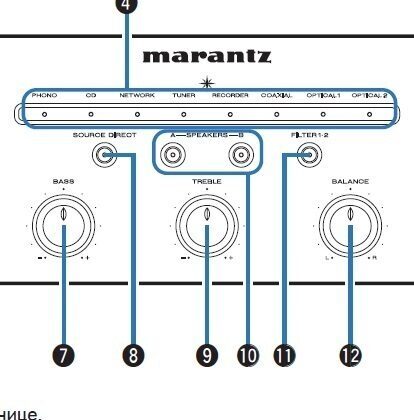
Получается, что я могу нажать либо левую, либо правую кнопку на лицевой панели усилителя и поэтому, слушать обе пары акустики сразу в двух комнатах не смогу…
В мануале нигде не говорится о том, что кнопки выбора спикеров на лицевой панели могут быть активированы одновременно. На фотографиях в интернете я тоже не увидел двух, одновременно активированных кнопок. Подсвечивается всегда одна из двух.
С пульта дистанционного управления такой возможности не задокументировано.
Прав я в своей интерпретации прочитанного в мануале или не прав?
И если нет, то как обстоят дела с этим вопросом на самом деле?
Буду признателен за ваши пояснения…