-
Contents
-
Table of Contents
-
Bookmarks
Quick Links
Related Manuals for Arturia KEYSTEP 37
Summary of Contents for Arturia KEYSTEP 37
-
Page 1
USER MANUAL… -
Page 2
Information contained in this manual is subject to change without notice and does not represent a commitment on the part of Arturia. The software described in this manual is provided under the terms of a license agreement or non-disclosure agreement. The software license agreement specifies the terms and conditions for its lawful use. -
Page 3
Also included in the purchase of your KeyStep is a free installation of Ableton Live Lite, a remarkably full-featured recording / sequencing application. The license number will be provided to you when you register your KeyStep on the Arturia website. Then you can download the installation file from ableton.com/live-lite. -
Page 4
The information contained in this manual is believed to be correct at the time of printing. However, Arturia reserves the right to change or modify any of the specifications without notice or obligation to update the hardware that has been purchased. -
Page 5
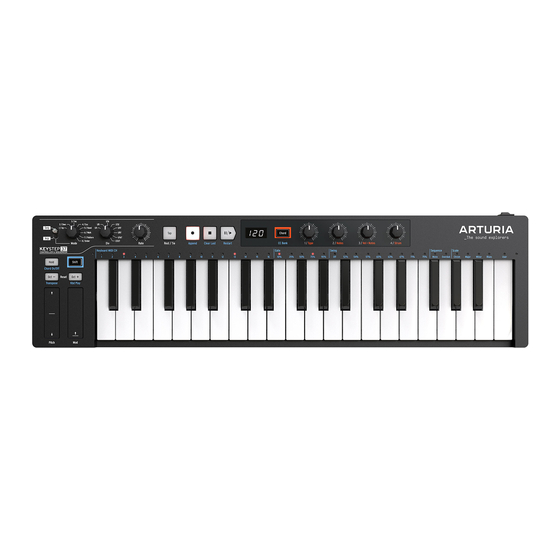
But this is no toy; as with all Arturia products, it’s built like a tank. All the essential features of a keyboard controller are here, including aftertouch, touch-strips for pitch bend and modulation, a footswitch input and a Hold button. -
Page 6: Table Of Contents
1.3. Installation ………………………………5 1.3.1. Warning ……………………………………….. 5 1.3.2. Register your Instrument………………………………..5 1.4. KeyStep and KeyStep 37 …………………………6 1.4.1. Sequencer and Arpeggiator ………………………………6 1.4.2. Scale and Root ……………………………………6 1.4.3. The Chord / CC unit ………………………………….7 1.4.4.
-
Page 7
3.1.5. Selecting Strum type………………………………… 29 3.1.6. Sequences & arpeggios ………………………………… 30 3.2. Transpose / Kbd Play in Seq mode ……………………31 3.3. Skip selections: Seq / Arp……………………….. 32 3.4. Skip selections: Time Division………………………. 32 3.5. Restart Seq / Arp from beginning …………………….. 33 3.6. -
Page 8
Project Browser …………………………….. 81 9.4.1. Building a library ………………………………….83 9.4.2. Revise a Template………………………………….83 9.4.3. Send one sequence to KeyStep 37 …………………………..85 9.5. Store To/Recall From…………………………. 86 9.5.1. The ‘Store To’ button …………………………………. 86 9.5.2. Recall edited sequences from KeyStep 37………………………… 86 9.5.3. -
Page 9: Introduction And Overview
Whatever you do, take the time to get to know the KeyStep 37 inside out. To sustain the fascination you feel, learn the functions of the KeyStep 37 one by one and test your knowledge continuously. The KeyStep 37 is an advanced controller with many levels of understanding.
-
Page 10: Installation
Registering your instrument establishes your legal ownership of it, which entitles you to access the Arturia Technical Support service and to be informed of updates. Additionally, you can subscribe to the Arturia newsletter to be informed of Arturia-related news as well as promotional offers. Connect to your Arturia account](https://www.arturia.com/login)), go to…
-
Page 11: Keystep And Keystep 37
On the KeyStep 37 there’s an easy way to set the length of a sequence; just hold Record and tap one of the first 16 keys to define a length. Repeatedly pressing a key while still holding the Record button will add its number to the length of the sequence.
-
Page 12: The Chord / Cc Unit
The Chord button on the Chord / CC unit enables you to create a chord that will play when pressing a single key. Chord mode on the KeyStep 37 is more flexible than on the KeyStep; you can use the four knobs to create various chord types and strum patterns.
-
Page 13: Overview
Below are some examples of potential setups: 1.5.1.1..with a Computer KeyStep 37 is a USB class-compliant controller, so at its most basic level it can be connected to any computer with a USB port and used as an input device for various applications.
-
Page 14
MIDI devices Many mid-vintage devices have MIDI jacks but don’t have CV/Gate connectors or USB ports. KeyStep 37 can plug directly into them and also serve as a USB MIDI converter. Sync sources/destinations The Sync input and output connectors allow KeyStep 37 to synchronize with lots of different clock types: a single pulse per step, two pulses per step, 24 pulses per quarter note (ppqn), and 48 ppqn. -
Page 15: Front Panel Overview
Keyboard functions (with Shift) 1.6.1. Sequencer/Arpeggiator KeyStep 37 provides a sequencer and an arpeggiator. You can record eight different sequences, each with up to 64 steps. The arpeggiator generates notes based on the keys you have pressed and plays them back according to the Arp Mode setting.
-
Page 16: Tap Tempo/Rest/Tie
MIDI Control Center. This button is also used to enter rests or to tie two notes together when creating a sequence. Chapter 4 [p.41] for information about this. Arturia — User Manual KeyStep 37 — Introduction and Overview…
-
Page 17: The Transport Section
The Stop button has an additional function. If for some reason you end up with a stuck note, just press the Stop button quickly three times in a row. KeyStep 37 will then send an All Notes Off command over MIDI.
-
Page 18: Shift Button
Transpose and Kbd Play modes are mutually exclusive. Pressing the Shift button will light up either the Oct Minus or Oct Plus button to indicate which of the two modes is active. More about these features in section 3.2.0.2 [p.31]. Arturia — User Manual KeyStep 37 — Introduction and Overview…
-
Page 19: Pitch & Mod Touch Strips
1.6.8. Pitch & Mod touch strips These innovative controls take the place of the standard ‘wheels’? found on traditional controllers. Arturia — User Manual KeyStep 37 — Introduction and Overview…
-
Page 20: Rear Panel Overview
Connect a momentary footswitch (optional) to this input. It is best to connect the pedal before supplying power to the KeyStep 37 so it can sense the pedal’s polarity. Be sure to keep your foot off the pedal when first making the connection or it could work backward. If this happens, power off the KeyStep 37, plug the sustain pedal, and turn on the KeyStep 37 again.
-
Page 21: Sync Input/Output
1.7.8. Kensington lock port KeyStep 37 is highly portable, and it should be carried only where you want it to go. So we’ve included a Kensington lock slot on the far right edge of the rear panel so you can secure it to the surface of your choice.
-
Page 22: Basic Operations
Chapter 9 [p.74] for details. 2.1.2. Keyboard MIDI channel selection If you need to match the KeyStep 37 MIDI channel to an external device, simply hold the Shift button and press the key that corresponds to the desired MIDI channel.» …
-
Page 23: Pitch And Mod Touch Strips
But there’s another way to use it, too: when Hold mode is active, you can keep adding notes to an arpeggio as long as you continue holding down at least one key. We’ll provide step-by-step instructions in chapter 5: The arpeggiator [p.52]. Arturia — User Manual KeyStep 37 — Basic Operations…
-
Page 24: Sustain Pedal
If you have a momentary footswitch, plug it into the Sustain jack on the rear panel. If it works backward, turn the KeyStep37 off then on again. KeyStep 37 will now sense the polarity of the pedal and it should work fine after that.
-
Page 25: Select And Play A Sequence
You can also restart the sequence while it’s still running by holding Shift and pressing Play/Pause. To start a sequence from the beginning, press the Stop button and then press Play again. Arturia — User Manual KeyStep 37 — Basic Operations…
-
Page 26: Rate Knob (Set Tempo)
♪: If you hold Shift then turn the Div knob, the time division does not change immediately, but only after you release the Shift button. This allows smooth transitions between different time divisions. Arturia — User Manual KeyStep 37 — Basic Operations…
-
Page 27: Using The Arpeggiator
A major part of learning to play the guitar is figuring out how to play different fingerpicking/arpeggio styles. The arpeggiator on the KeyStep 37 does all these things for you.
-
Page 28: Transport Section
Rate knob will respond when it is turned. See Chapter 9 [p.74] for more information. Remember: Tap tempo and the Rate knob will not function when KeyStep 37 is set to one of the external sync sources. ♪: Hold Shift+Rate to make decimal tempo adjustments 2.3.5.
-
Page 29: Hold Button
Chapter 5 [p.52]. 2.4. Scales & Chords Some of the most interesting features of the KeyStep 37 are its scale and chord options, which we’ll cover in more detail in Chapter 3 [p.25], but to get an idea of the impact that changing scale has on your sequences and arpeggios, try this neat trick while your sequence or arpeggio is running.
-
Page 30: Shift Functions
3.1. Chord mode In Chord mode the KeyStep 37 takes a single note and builds a chord from it. It will do so with every note, whether that note is part of a sequence or part of an arpeggio or played…
-
Page 31: Playing Single Notes
We’ll first have a look at how chords are formed in Keyboard mode. In this mode the KeyStep 37 will take the note you play as root note and add the notes of the chord type that you’ve selected with the Type knob.
-
Page 32: Setting Chord Span With Notes
C4, Eb4, G4, C5, Eb5, G5, C6, Eb6, G6, C7, Eb7 and G7. Note: When selecting the Oct type a maximum of three notes can be added. Arturia — User Manual KeyStep 37 — Shift Functions…
-
Page 33: Setting The Velocity To Notes Ratio
The KeyStep 37 uses this velocity value in a unique way: it is applied to the note span! In the fully clockwise position, all of the velocity speed is used to maximise the note span. If the number of notes is set to 12, all 12 notes will be played, if set to 16, 16 notes will be played.
-
Page 34: Selecting Strum Type
1/4th will have a length of 1.5 seconds. Values with ‘t’ attached to them are triplet values; a triplet quarter note is 2/3rd the length of a quarter note. Arturia — User Manual KeyStep 37 — Shift Functions…
-
Page 35: Sequences & Arpeggios
When you stop the sequence the KeyStep 37 will switch from chordifying the notes of the sequencer to chordifying the notes you play on the keyboard.
-
Page 36: Transpose / Kbd Play In Seq Mode
Note: The current transpose position lights up in white. Note: Sequences, can be transposed externally by feeding the KeyStep 37 notes on a transpose channel via MIDl. Select a channel to act as a transpose channel in the MCC. By default the KeyStep 37 will use channel 16 for external tranposition.
-
Page 37: Skip Selections: Seq / Arp
1/8 value, there’s a way to do that. • Hold the Shift button • Turn the Time Div knob until you reach the proper value • Release the Shift button and the new Time Division will take effect. Arturia — User Manual KeyStep 37 — Shift Functions…
-
Page 38: Restart Seq / Arp From Beginning
MIDI channel. When the MIDI channel is changed the Kbd Play MIDI channel will change to match it. To select an independent channel for Kbd Play mode, see section 3.2.0.2 [p.31]. Arturia — User Manual KeyStep 37 — Shift Functions…
-
Page 39: Gate
The maximum Swing setting is 75%, at which point the 1/8th notes sound more like a 1/16th note figure than ‘shuffled’ 1/8th notes. Each sequence can have its own Swing setting. Arp mode has an independent Swing setting also. Arturia — User Manual KeyStep 37 — Shift Functions…
-
Page 40: Sequence
3.6.4. Sequence 3.6.4.1. Mono The KeyStep 37 is able to playback sequences in Mono, even when originally they were recorded Polyphonically. In Mono mode only the lowest note recorded in the step will sound. All other notes will be stripped away.
-
Page 41: Scales
This is known as the Dorian mode. If you now start on C and play a scale using this new series of intervals, you play a C Dorian scale. Arturia — User Manual KeyStep 37 — Shift Functions…
-
Page 42
Blues scale (C, Eb, F, Gb, G, Bb) To hear (and see) the effect of selecting a scale on your KeyStep 37, switch it ON if it isn’t on already and select a preset on your external synth with a fairly simple sound. -
Page 43
♪: If you want to know more about this fascinating subject, search «music theory» on a search engine or YouTube. Arturia — User Manual KeyStep 37 — Shift Functions… -
Page 44
3.6.5.3. User Scales From the Arturia factory, the KeyStep 37 comes complete with three predefined scales, but you can create your own custom scales and store them as User Scale. In the example below, we’ll add Bhairavi, a well-known and popular scale in Indian music. -
Page 45: Shift Function Chart
The new position of the knob will become active when the Shift button is released Time Div Fine tune of the BPM in cents. Note that KeyStep 37 sync must be set to internal for this Shift + Rate to work.
-
Page 46: Creating Sequences
4. CREATING SEQUENCES KeyStep 37 holds a total of 8 sequences, and each sequence can be up to 64 steps in length. The sequencer is polyphonic, capable of stacking up to 8 notes per step. In this chapter we will cover the front panel features, but there are more parameters available in the MIDI Control Center.
-
Page 47: Creating A Sequence
[p.20], so we’ll only discuss how to create and edit a sequence in this chapter. KeyStep 37 provides two ways to input notes into your sequences: a step at a time or in real time. We’ll go through those options next.
-
Page 48
4.2.1.1. Entering rests The spaces that sometimes happen between notes are called ‘rests’?. If you want to add rests while creating a sequence, KeyStep 37 provides an easy way to do it. Take a look at the Tap button: You’ll notice the words ‘Rest / Tie’? underneath the button. You will use this button to enter rests, and also to tie notes together (more about that later). -
Page 49
♪: You can adjust the behavior of tied notes through the Tie Mode option in the MIDI Control Center. This is covered in detail in the MIDI Control Center chapter of this guide. Arturia — User Manual KeyStep 37 — Creating Sequences… -
Page 50
On a mono synth the process above will result in a ‘legato’? response (voltage change without any gate events between the notes). Press Play to hear your sequence. A combination of tied notes and legato notes might sound something like this: Arturia — User Manual KeyStep 37 — Creating Sequences… -
Page 51
In the example above, for the chord to hold through the final step you would need to set the Gate time to 90% for the sequence. Otherwise the final step will not sound like a quarter note. Arturia — User Manual KeyStep 37 — Creating Sequences… -
Page 52: Real-Time Record/Replace
Chapter 6 [p.61]. You can also create a sequence in the MIDI Control Center and send it to the KeyStep 37 over USB. Learn about the MIDI Control Center in Chapter 9 [p.74]. There are two methods you can use to record in real time.
-
Page 53
All you have to do is hold the Shift button and press Play/Pause. You will hear the sequence jump immediately to its beginning. KeyStep 37 will remain in Record mode, so when the proper step arrives, play the notes you want and they will replace the existing notes. -
Page 54: Adjusting The Sequence Length
8 notes of the chord will be entered. 4.2.4.1. A note about velocity KeyStep 37 will capture the velocity of each note the way it was played by default. But there’s an option in the MIDI Control Center to make sure every recorded note has the same velocity value.
-
Page 55: What Is Not Recorded
4.2.5. What is not recorded? Here are the types of data not captured by the KeyStep 37 sequencer: • The duration (gate time) of the note. However, a note will be tied into the next step if you hold it down long enough.
-
Page 56: Clear Last
4.4. Saving sequences KeyStep 37 allows you to carry 8 sequences with you at all times. But you can store an unlimited number of sequences using the MIDI Control Center. So be sure to back up your hard work to your computer often.
-
Page 57: The Arpeggiator
And you can play those three notes in any order and still have played an arpeggio in the key of C. An arpeggiator, then, is a form of music technology that will take a group of notes played simultaneously on a keyboard and turn them into an arpeggio. Arturia — User Manual KeyStep 37 — The Arpeggiator…
-
Page 58: Arpeggiator Features
5.2. Arpeggiator features The KeyStep 37 arpeggiator provides lots of different ways to arpeggiate the notes you play on the keyboard. These features we’ve covered previously: • Setting the rate or tempo section 2.3.4 [p.23] • Time division settings section 2.3.5 [p.23] •…
-
Page 59: Arpeggiator Modes
With the Arp mode encoder set to Dwn the arpeggiator will play the held notes in order from top to bottom. When it reaches the bottom it will start again from the top. Arturia — User Manual KeyStep 37 — The Arpeggiator…
-
Page 60: Arp Mode: Inclusive
It’s as if the arpeggiator ‘throws a dice’ at the end of each step: there’s a 50% chance it will play the next step, a 25% chance it will play the current step again and a 25% chance it will play the previous step. Arturia — User Manual KeyStep 37 — The Arpeggiator…
-
Page 61: Arp Mode: Pattern
Select Pattern to put the Arpeggiator in a semi-random mode. Keys you press in a legato fashion on the keyboard are used by the Pattern algorithm to generate arpeggio patterns. Each time you press a key the KeyStep 37 will generate a new pattern. It’s a bit like having a third sequencer.
-
Page 62: Adding Notes In Other Octave Ranges
Oct +/- buttons to access other octave ranges of the keyboard and add notes in that octave range. You can keep adding notes to the arpeggio for quite a while: the limit is 32 notes. Arturia — User Manual KeyStep 37 — The Arpeggiator…
-
Page 63: Building A Multi-Octave Arpeggio
Shift + Oct+ above held down notes plus the same notes repeated two octaves Shift + Oct+(x2) above held down notes plus the same notes repeated three octaves Shift + Oct+(x3) above Arturia — User Manual KeyStep 37 — The Arpeggiator…
-
Page 64: Pausing An Arpeggio
Hold/Sustain On: You let go of all keys and play a new note • You press the Stop button. Remember, if you want to force the arpeggio pattern to start again from the beginning, hold the Shift button and press Play/Pause. Arturia — User Manual KeyStep 37 — The Arpeggiator…
-
Page 65: Arpeggio Tricks
5.7. Arpeggio Tricks 5.7.1. Ratcheting chapter 3 [p.25] we’ve discussed one of the features that makes the KeyStep 37 rather unique: creating your own scale. This feature opens up a lot creative options when playing arpeggios, you could for instance create a scale with very few active notes;…
-
Page 66: Synchronization
6. SYNCHRONIZATION KeyStep 37 can be the master clock for a wide range of musical devices, or it can serve as a slave to any one of several sources. See section 1.1 [p.8] for connection diagrams. The Sync options are selected using different combinations of the rear panel switches.
-
Page 67: As Slave
6.2. As Slave KeyStep 37 functions as a slave to an external clock when one of those options is selected on the rear panel (USB, MIDI or Sync In). When KeyStep 37 is in Slave mode: • The Tempo controls will not control the internal sequencer or arpeggiator while the external source is running.
-
Page 68: Clock Connectors
You can use optional DIN sync adapters to connect to devices which utilize DIN sync messages. Check the owner’s manual for your device if you are not sure which sort of sync capabilities it has. Arturia — User Manual KeyStep 37 — Synchronization…
-
Page 69: Mod/Gate/Pitch Functions
7. MOD/GATE/PITCH FUNCTIONS The GATE/PITCH outputs at the back of the KeyStep 37 convert key presses to CV and Gate signals that are understood by modular systems. Nearly every module on a modular system accepts or generates voltages that control other modules. A gate signal can trigger an envelope or advance a sequencer.
-
Page 70: Modulation (Mod) Output
We’ve designed KeyStep 37 to be as flexible as possible, though: the MIDI Control Center allows you to configure the response of the MOD/GATE PITCH jacks in a number of ways.
-
Page 71: Controlling External Synths
8. CONTROLLING EXTERNAL SYNTHS 8.1. Control Mode In Chord mode, the KeyStep 37 knobs send note values and triggers over MIDI to external synths. The Chord button has a second function that, when activated, turns the knobs into CC controllers. In this mode, they can transmit control change messages to external devices that are connected to the MIDI Out port (5-pin DIN).
-
Page 72: Cc Messages And Midi
8.1.2. CC messages and MIDI When in Control Mode the knobs of the KeyStep 37 will send CC messages over MIDI. A knob is assigned to a specific MIDI channel. Knob 1 could be made to transmit on MIDI channel 1 and knob 2 on channel 5. Each message has Data encoded in it that determines which parameter on which MIDI channel will change.
-
Page 73: The Four Cc Banks
There’ll probably be a moment where you want to change the default CC values transmitted by the knobs. There are two ways to do this; on the KeyStep 37 itself or using the MCC. To change the values stored in a bank on the KeyStep 37;…
-
Page 74
MIDI channel field enables you to direct a stream of control value to a certain synth. ♪: If you’re a lucky owner of the Arturia Pigments software synth, you could map the four knobs to Pigment’s four macro knobs. -
Page 75: Examples
Open the DX7 V or any other synth of the V series • Click on the MIDI learn icon in the top right corner. Knobs and sliders that can be controlled using CC# values will turn purple. Arturia — User Manual KeyStep 37 — Controlling external synths…
-
Page 76
To summarise: to create a data stream between the KeyStep 37 and a hardware synth, change the CC# number of the knob on the KeyStep 37. To create a data stream between the KeyStep 37 and a software synth, it’s easier to use the MIDI learn feature of the software synth. -
Page 77: Controlling Parameters On The Microfreak
• Finally, we press the CC page button again to exit editing Play some notes on the KeyStep 37 and wiggle the first knob. You should hear the filter on the MicroFreak responding. The envelope on the MicroFreak will respond to CC# 105 (attack), 106 (Decay) and 29 (Sustain).
-
Page 78
This only scratches the surface of what is possible when you combine the possibilities of the KeyStep 37 and Eurorack Modules, software- and hardware synths. But it should be enough to whet your appetite and get you started on a fascinating journey. -
Page 79: The Midi Control Center
The MIDI Control Center is an application that allows you to configure the MIDI settings of your KeyStep 37. It works with most of Arturia’s devices, so if you have an earlier version of the software you’ll want to download the KeyStep 37 version. It will work with the other Arturia products as well.
-
Page 80: Connection
9.1.3. Connection Connect KeyStep 37 to your computer using the included USB cable. It’ll be ready to go after its LEDs go through the startup cycle. Now launch the MIDI Control Center. KeyStep 37 will be in the list of connected devices:…
-
Page 81: Back Up Your Sequences
9.1.4. Back up your sequences If you want to make a quick backup of your KeyStep 37 sequences, click the Sync button: This will grab whatever is in the sequence memory and pull it into your computer. MIDI Control Center will give this file the current date/time stamp for a name, but you can name it something else if you like.
-
Page 82: Where To Find The Manual
Center, such as ‘˜Working Project’ and ‘˜Template’. The next chapter explains how to use the MIDI Control Center software to configure the KeyStep 37 settings so they match your system and enhance your workflow. Arturia — User Manual KeyStep 37 — The MIDI Control Center…
-
Page 83: The Sync Option
[p.93]. If the MCC and KeyStep 37 are synced, every time you click on a Template in the Project Browser window it will be sent to the KeyStep 37 internal memory. Any changes you have made from the KeyStep 37 front panel will be lost.
-
Page 84: Non-Sync Operations
MCC functions such as sequence editing, file management and Template creation, among other things. Note: The MCC will do all of these things when the MCC and KeyStep 37 are also synced. Arturia — User Manual KeyStep 37 — The MIDI Control Center…
-
Page 85: Device Projects
KeyStep 37. This is called ‘live editing.’? Live editing works in one direction: from the MCC to KeyStep 37. Changes made from the KeyStep 37 front panel are not detected by the MCC. Use the Recall From button to back them up to your computer before selecting another Template.
-
Page 86: Project Browser
Center (MCC). They have been stored on your computer. These are divided into two main groups of Templates: Factory and User. The User Templates are the ones you have recalled from your KeyStep 37 with the MCC. See section 8.5 [p.86] to learn how to do this.
-
Page 87
User Templates: click +/- to expand or collapse Project view Arturia — User Manual KeyStep 37 — The MIDI Control Center… -
Page 88: Building A Library
9.4.2. Revise a Template 9.4.2.1. While synced If the MIDI Control Center and KeyStep 37 are already in sync, it’s easy to modify an archived Template. Simply select one in the Project Browser and its sequences will appear in the Seq Editor window. They will also be transmitted to the KeyStep 37 internal memory.
-
Page 89
9.4.2.2. Not synced If the MIDI Control Center and the KeyStep 37 are not in sync you can still edit the sequences of an archived Template. Simply select the Template in the Project Browser and its sequences will appear in the MCC Seq Editor window, ready for editing. -
Page 90: Send One Sequence To Keystep 37
Important: The following process will send a single sequence to KeyStep 37 and will overwrite the sequence in the target memory location. There are two ways to send a single sequence to the KeyStep 37 when it is synced to the MIDI Control Center.
-
Page 91: Store To/Recall From
Recall From button. If there is a particular Template you would like to transmit to your KeyStep 37, select it in the Project Browser window.
-
Page 92: Save, Delete, Import/Export, Etc
[p.87]). Their files have the extension .KeyStep 37. They contain all of the internal KeyStep 37 parameters: a complete set of eight sequences and all of the Device Settings. Use these files to share settings and sequences with other users.
-
Page 93: Import Device Settings
To import the Device Settings, click the Import button. Then navigate to the appropriate location in your computer and follow the screen prompts to load in the .KeyStep 37_ds file. Arturia — User Manual KeyStep 37 — The MIDI Control Center…
-
Page 94: Editing Basics
To edit Swing %, for example, click and drag the knob graphic or double-click in the value field and enter a new value: Editing a knob value To edit a parameter such as Gate Length, click its pull-down menu and make a selection: Arturia — User Manual KeyStep 37 — The MIDI Control Center…
-
Page 95: Selecting The Tabs
The middle window of the MIDI Control Center has two main tabs: Seq and Device Settings. Seq contains all 8 sequences from the KeyStep 37 memory, and Device Settings has all of the parameters for the various KeyStep 37 functions.
-
Page 96: Sequence Window
To zoom in and out of the vertical view, place the cursor over the keyboard graphic first. Then press Command (Mac) or Control (Windows) and use the scroll wheel to zoom in and out. Arturia — User Manual KeyStep 37 — The MIDI Control Center…
-
Page 97: Per-Sequence Parameters
The patterns can be up to 64 steps long, and the unused steps are darkened because they are outside the pattern length area. The steps are numbered along the bottom of the window: Arturia — User Manual KeyStep 37 — The MIDI Control Center…
-
Page 98: Sequence Events
Then press the Delete key on your computer keyboard. Remember, KeyStep 37 has a polyphonic sequencer. The four orange bars stacked on top of each other in the next graphic mean that the first step will play four notes at the same time.
-
Page 99
Just hold the Alt key (Option on a Mac), select one of the notes, and drag them all into the new area. The new notes will have the same velocity and gate time values as the original notes. Arturia — User Manual KeyStep 37 — The MIDI Control Center… -
Page 100
Drag the cursor left and right to change the gate time of that note. There are only two possible values: the Gate Length you selected for the entire sequence (10, 25, 50, 75, or 90%) or a value of TIE. Arturia — User Manual KeyStep 37 — The MIDI Control Center… -
Page 101
9.8.3.6. Tie a note If you drag the horizontal cursor far enough to the right a value of TIE will appear. The right edge of the note box will become an arrow: Arturia — User Manual KeyStep 37 — The MIDI Control Center… -
Page 102
MIDI output: the Note Off command for the first note happens after the Note On • command for the second note. This allows for ‘legato’? playing on a monophonic synthesizer. Arturia — User Manual KeyStep 37 — The MIDI Control Center… -
Page 103: Sequence Management
Seq window. If the MCC and KeyStep 37 have been synced this process will overwrite the target sequences in the KeyStep 37 internal memory.
-
Page 104: Drag/Drop Onto A Tab
It’s possible to build a ‘˜Greatest Hits’ group of sequences inside your KeyStep 37 using sequences from different Templates. If the MCC and KeyStep 37 have been synced this process will overwrite the target sequences in the KeyStep 37 internal memory. Here’s how to do this: •…
-
Page 105: Working With Device Settings
When pressing sync So for each assignable parameter you can choose whether they will be locked to a particular MIDI channel or will ‘float’ with the keyboard MIDI channel. Arturia — User Manual KeyStep 37 — The MIDI Control Center…
-
Page 106
9.10.1.2. Synchronizing To synchronize the settings in the MIDI control center with the settings on the KeyStep 37 click ‘Sync’ in the topleft corner of the MCC interface: Arturia — User Manual KeyStep 37 — The MIDI Control Center… -
Page 107: Midi Controller Settings
These MIDI messages can either arrive via USB or the MIDI Input connector. 9.10.2.3. MIDI Thru This parameter will turn the KeyStep 37 MIDI Output into a MIDI Thru. Incoming MIDI data will be routed directly to the Output instead of being used to transpose sequences, etc.
-
Page 108
The Sustain Pedal can be configured to toggle Hold/Chord modes on/off, send a sustain message or do both.Your choice. 9.10.2.8. Hold Button Function The Hold button can be configured to toggle Hold/Chord modes on/off, send a sustain message or do both. Arturia — User Manual KeyStep 37 — The MIDI Control Center… -
Page 109: Sequence Settings
Sequence Keep content beyond sequence length, Specifies behavior of sequencer when user Length Clear content beyond sequence length shortens a sequence Update Next we’ll go through those parameters one-by-one. Arturia — User Manual KeyStep 37 — The MIDI Control Center…
-
Page 110
9.10.3.1. Sync Clock In/Out settings KeyStep 37 is endowed with the ability to transmit or receive clocking signals from a huge range of vintage devices. Here’s a brief look at each setting: 1step (Gate): Interprets the rising edge of the voltage as a Note On command and •… -
Page 111
When Latch is On the sequences will stay transposed after the key is released, and continue at that transposition until another key is pressed. This parameter also affects the way the KeyStep 37 responds to incoming MIDI notes on the Transposition Input channel. -
Page 112
!: If the sequencer is stopped and external clock signals are being received, pressing Play will start the KeyStep 37 sequence at the position it would have been if it had been playing all along. For example, if you have a 32 step sequence, KeyStep 37 is stopped and you press play on the clock master device, the KeyStep 37 will pass the clock master’s synchronization signal but not play the sequence until you press Play. -
Page 113: Cv/Gate Settings
‘˜Voltage/positive’ triggers. Now we’ll take a look at each of those parameters. 9.10.4.1. Pitch CV Output The various models of vintage gear respond differently to electricity. KeyStep 37 works well with the most common types. • (*) 1 Volt per octave ‘“ This is the standard used on most Eurorack modules and on our very own Mini- and MicroBrute synthesizers.
-
Page 114
9.10.4.2. MIDI Note reference (0V, 1V) KeyStep 37 provides the option to set a separate reference note for both Volt per Octave and Hertz per Volt formats. This parameter will change from a 0V reference to a 1V reference depending on which Pitch CV Output option is selected. -
Page 115: Transport Settings
Transport Mode: You can define how transport commands are transmitted: MIDI CC, MMC, or both. Parameter Range/Values Description/Function Play/Pause Pause, Reset Pause or ‘stutter’ sequence Transport Mode OFF, MIDI CC, MMC, Both Covers most devices Arturia — User Manual KeyStep 37 — The MIDI Control Center…
-
Page 116: Cc Bank Settings
9.10.6. CC Bank settings This is were you set the value the CC knobs will transmit when turned. Although editing these values is also possible on the KeyStep 37 itself, editing the values here is more quicker. For each knob you can set:…
-
Page 117: Software License Agreement
The License is not a sale of the original SOFTWARE. 2. Grant of License Arturia grants you a non-exclusive license for the use of the software according to the terms and conditions of this Agreement. You may not lease, loan or sub- license the software.
-
Page 118
(a) return of the purchase price or (b) replacement of the disk that does not meet the Limited Warranty and which is returned to Arturia with a copy of your receipt. This limited Warranty is void if failure of the software has resulted from accident, abuse, modification, or misapplication. -
Page 119: Declaration Of Conformity
Important notice: DO NOT MODIFY THE UNIT! This product, when installed as indicate in the instructions contained in this manual, meets FCC requirement. Modifications not expressly approved by Arturia may avoid your authority, granted by the FCC, to use the product.
ARTURIA – MiniLab mkII – краткое руководство пользователя v1.0
4
Основы MIDI CONTROL CENTER
The MIDI Control Center is an application that allows you to configure the MIDI settings
of your MiniLab mkII. It works with most of Arturia’s devices, so if you have an earlier
version of the software you’ll want to download the MiniLab mkII version. It will work
with the other Arturia products as well.
4.1 Системные требования
PC:
2 GB RAM; CPU 2 GHz (Windows 7 либо выше)
Mac: 2 GB RAM; CPU 2 GHz (OS X 10.7 либо выше)
4.2 Установка ПО
Загрузите с веб-сайта Arturia MIDI Control Center на ваш компьютер, дважды
щелкните на файле для запуска программы установки и следуйте инструкциям.
Программа установки размещает MIDI Control Center в папку с другими
установленными приложениями Arturia. В операционной системе Windows, смотрите
меню Пуск. На компьютере Macintosh OS X вы найдете его внутри папки Applications/
Arturia.
4.3 Подключение
Подключите MiniLab mkII к компьютеру используя USB кабель идущий в комплекте.
Подключение поизойдет почти мгновенно.
Теперь запустите MIDI Control Center. MiniLab MkII будет находиться в списке
подключенных устройств:
Посмотреть инструкция для Arturia Midi Control Center бесплатно. Руководство относится к категории без категории, 1 человек(а) дали ему среднюю оценку 7.5. Руководство доступно на следующих языках: английский. У вас есть вопрос о Arturia Midi Control Center или вам нужна помощь? Задайте свой вопрос здесь
Не можете найти ответ на свой вопрос в руководстве? Вы можете найти ответ на свой вопрос ниже, в разделе часто задаваемых вопросов о Arturia Midi Control Center.
Инструкция Arturia Midi Control Center доступно в русский?
Не нашли свой вопрос? Задайте свой вопрос здесь
Сегодня я постараюсь обойтись без лишних предисловий.
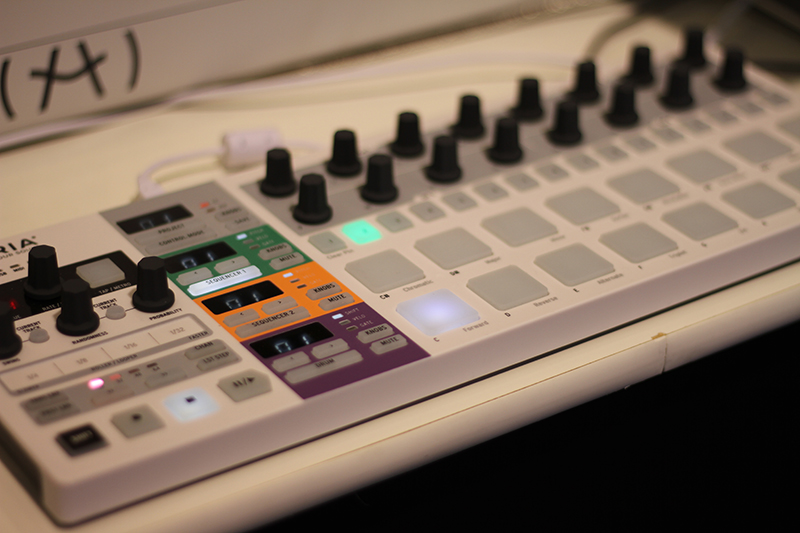
Дело в том, что Arturia BeatStep Pro – прибор довольно специфический.
Любители винтажных аналоговых синтезаторов, «железных» секвенсоров и модульных систем и так знают, что такое Arturia BeatStep Pro. Все остальные – милости просим на курсы истории электронной музыки. Ведь объяснить, что такое XOX-sequencing, не вдаваясь в рассуждения о зарождении электронной музыки или, например, сущности техно, практически невозможно.
В целом, если свести рассуждения к нескольким предложениям, можно сказать так: в электронной музыке, как известно, далеко не каждую синтезаторную партию можно наиграть на клавиатуре. Попробуйте-ка, например, наиграть нечто подобное:
Кстати, некоторые синтезаторы клавиатуры вообще не имеют.
Что делать? Ответ прост – использовать секвенсор, позволяющий программировать синтезаторные партии.
Однако, большинство современных секвенсоров (да и компьютер тоже) совершенно не приспособлены для управления, например, винтажными устройствами. Ну а таких секвенсоров, которые позволяли бы одинаково успешно справляться с управлением винтажными и современными инструментами, да еще и компьютерными VST-плагинами одновременно, вообще практически нет.
Точнее, не было…
Именно таким замысловатым путем мы и возвращаемся к предмету нашей сегодняшней статьи – универсальному контроллеру и секвенсору Arturia BeatStep Pro.
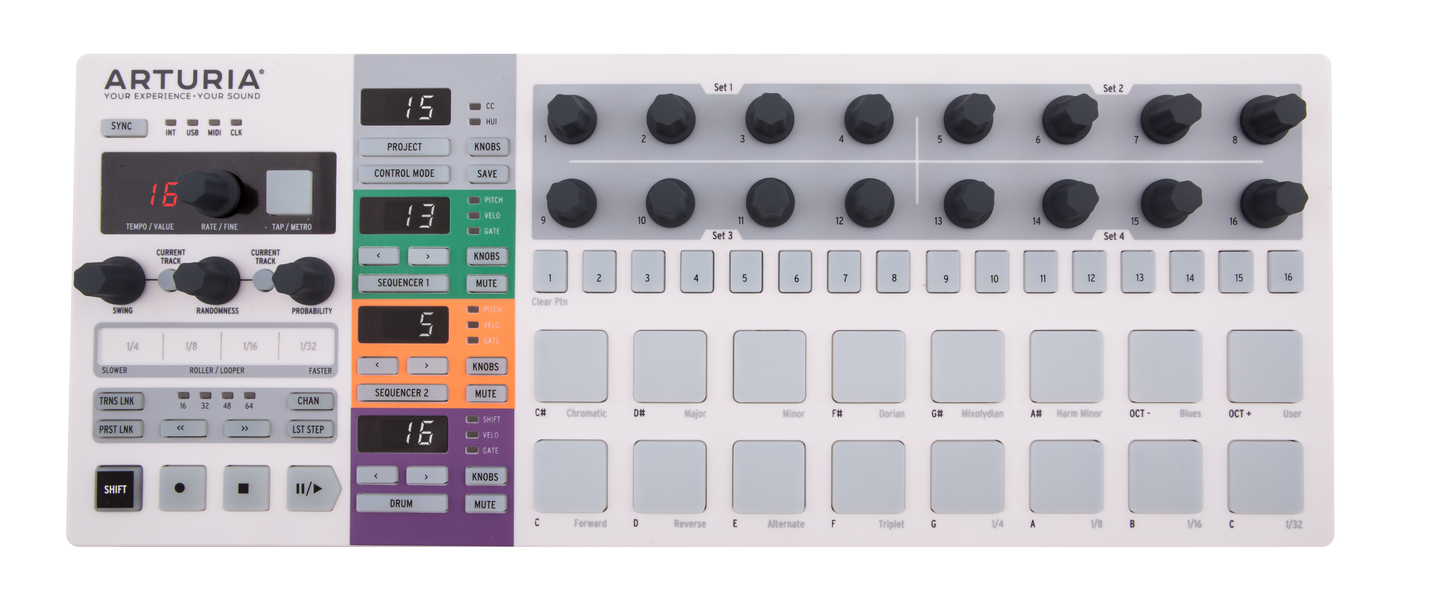
Arturia BeatStep Pro
Концепция Arturia BeatStep Pro проста и лаконична – новинка явно претендует на звание «центрального пульта управления» вашим сетапом. И заявка это отнюдь не беспочвенная. Инструментарий нового BeatStep Pro содержит всё необходимое для того, чтобы объединить любые Hardware и Software решения в единый полноценно синхронизированный setup.
Пожалуй, можно сравнить BeatStep Pro с современным техно-грувбоксом нового поколения, звучание которого не привязано к тесным рамкам встроенного звукового движка. Наоборот – нам дана долгожданная свобода выбора источников звукогенерации! Это первое.
Второе. Естественно, что для создания полноценного электронного паттерна одной дорожки (как это было в оригинальном BeatStep) не достаточно. Теперь их у нас целых три – 2 мелодические дорожки и одна барабанная.
 Тем, кто считает, что и этого недостаточно, я отвечу так: наличие именно трёх дорожек секвенсора в Arturia BeatStep Pro – не случайность. Скорее это атрибут, указывающий на природу нового девайса: BeatStep Pro выполнен в явно ощутимом «немецком» стиле. «Немецкий» в данном случае стоит читать как «техно». Ну, а что значит техно – не мне вам рассказывать. Мы ведь договорились не отвлекаться
 Об техно-природе BeatStep Pro, кстати, свидетельствует и множество других функций прибора – например, наличие встроенного рандомайзера или настроек индивидуальной длины дорожек.
Длина дорожек секвенсора BeatStep Pro составляет максимум 64 шага. Это в 4 раза больше, чем предлагал нам оригинальный BeatStep. При этом (как я уже упомянул), длина каждой дорожки может быть абсолютно любой – от 1 до 64 шагов. Причем, используя функцию Last Step, мы можем изменять эти настройки прямо во время воспроизведения секвенции!
Запись дорожек осуществляется как пошагово (программировать «ноты» мы можем с помощью энкодеров или пэдов), так и вживую. Пэды в данном случае выполняют роль клавиатуры – на мелодических дорожках, и собственно, триггерных пэдов – на дорожке ударных.
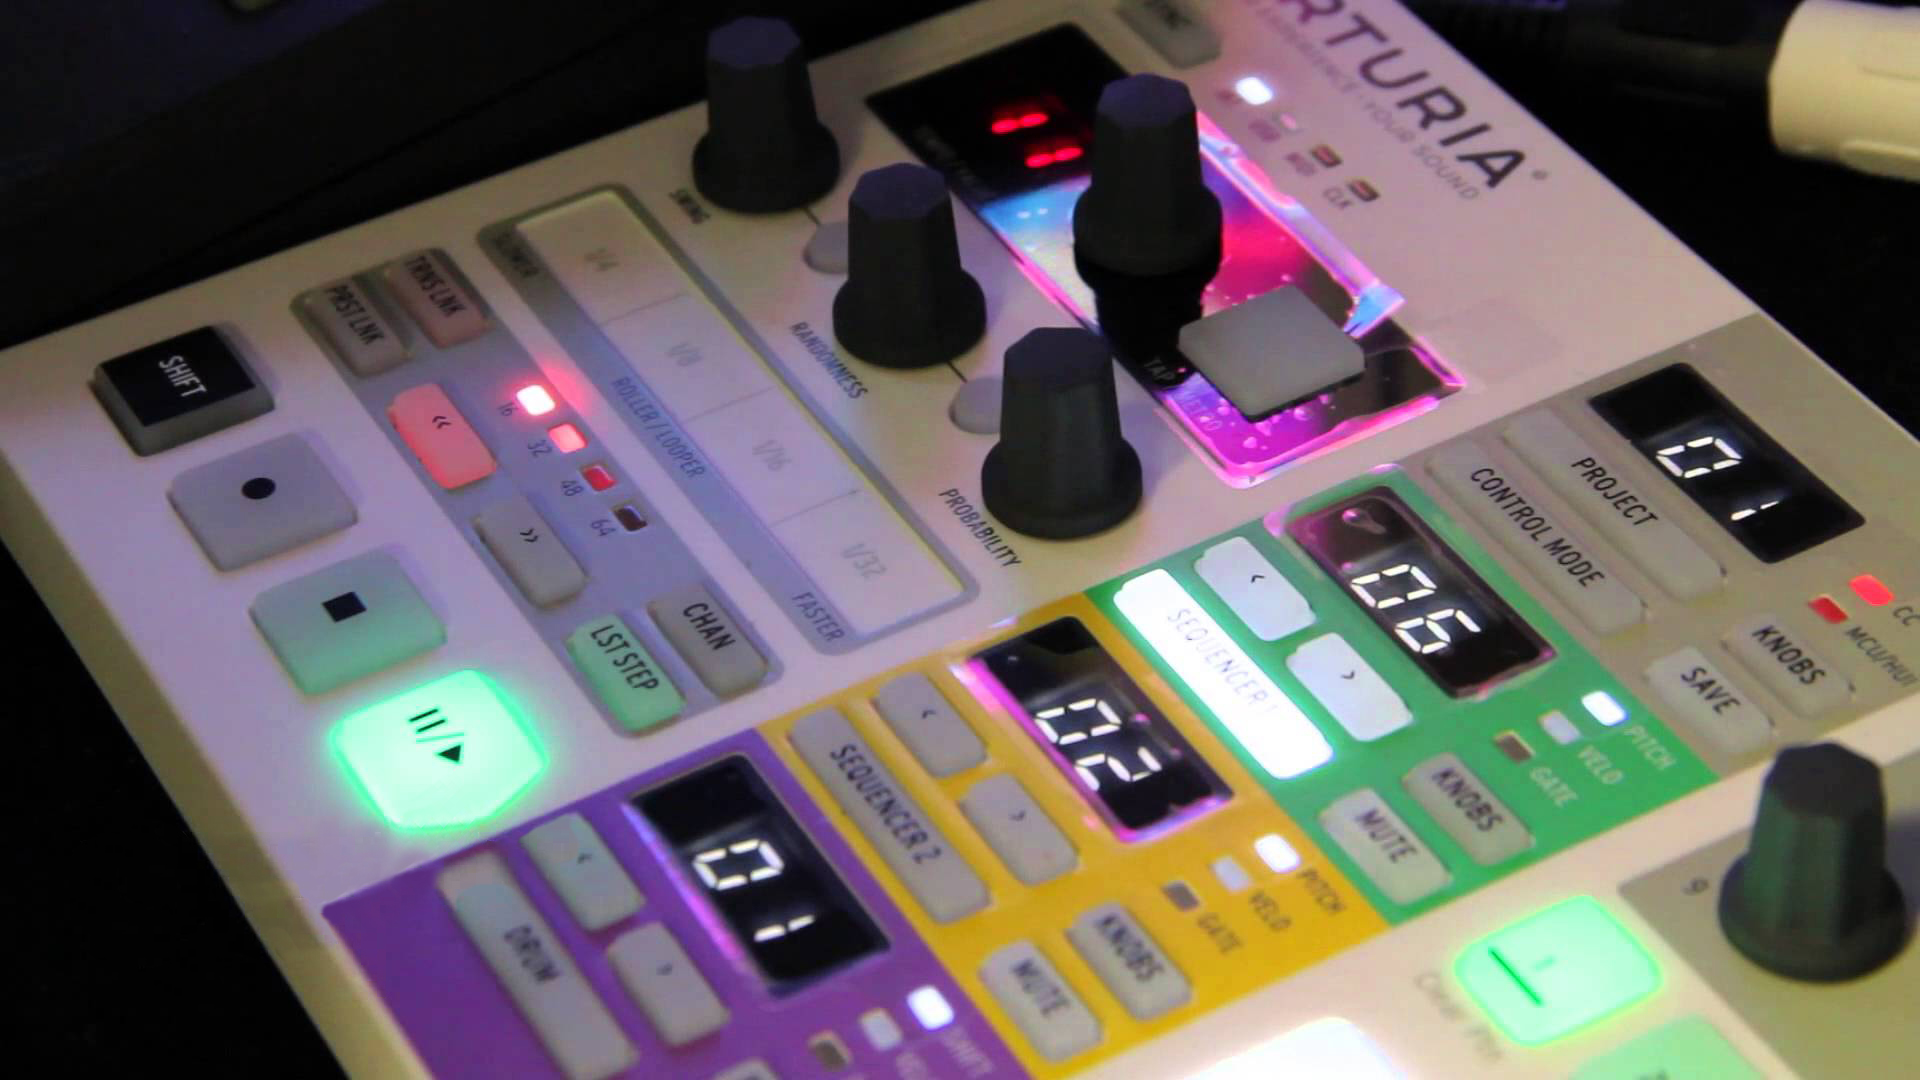
Как и на оригинальном Beat Step, энкодеры в режиме секвенсора используются для программирования значений. Приятная мелочь – при прикосновении к энкодеру мы сможем сразу увидеть запрограммированное значение на экране BeatStep Pro.
Запрограммировать (как и записать «вживую») мы можем 3 типа данных. На мелодических дорожках это высота, продолжительность ноты и параметр velocity. При использовании секвенсора в CV-режиме, мы, соответственно, имеет 2 CV-параметра и один Gate-параметр, которые можно «воткнуть» туда, куда вздумается. И это совершенно не обязательно должны быть нотные CV-Gate входы синтезатора. Техно, помните?
Кстати, мелодический секвенсор поддерживает режим «легато», позволяющий создавать секвенции в духе легендарного TB-303.

Секвенсор ударных позволяет прописывать до 16 дорожек ударных в MIDI-режиме и 8 дорожек в режиме Trigger Gate. Здесь, для каждой ноты мы можем запрограммировать значения динамики (velocity, работает только по MIDI), продолжительности звучания (Gate) и микротайминга (Shift). Последнее значение позволяет искусственно вносить небольшие отклонения от стандартной сетки квантизации, что может весьма ощутимо «оживить» барабанный грув. Оживить грув также помогут настройки свинга, индивидуальные для каждой дорожки секвенсора.
Еще один «финт» BeatStep Pro из разряда техно-приемов. Каждая из дорожек может иметь индивидуальные множители скорости: нормальный (1x, 1/16), в 2 раза быстрее (2x, 1/32), а также в 2 или 4 раза медленнее (0,5, 1/8 или 0,25x, 1/4). Имеется еще и режим триолей! Применений у этой функции может быть множество – например, удлинить секвенцию до полных 8 тактов, увеличить дискретность сетки квантизации или создать мощную полиритмическую структуру на BeatStep Pro не проблема!
{youtube}XtT00rxFsmc{/youtube}
Теперь о секвенциях и памяти. Arturia BeatStep Pro – это уже «взрослый» прибор, так что организация данных здесь выстроена по принципу грувбокса. Имеется 16 проектов, каждый из которых содержит по 16 паттернов в каждой из дорожек: 16 «зеленых» и 16 «желтых» мелодических паттернов, а также 16 паттернов ударных.
Кстати, как и на оригинальном BeatStep, секвенции могут воспроизводиться как в прямом, так и в противоположном направлении, либо даже зигзагом, т.е. «туда-сюда».
Гениальная, на мой взгляд, находка инженеров – это возможность раздельного переключения паттернов для каждой из дорожек. Как плавно перейти на следующий трек? С Arturia BeatStep Pro этот вопрос больше не актуален. Просто по очереди переключите дорожки, и всё. Впрочем, имеется возможность переключать и «комплексные паттерны» — для этого прибор оснащен режимом PRST link. Такой же переключатель есть и для режима транспонирования – он позволяет транспонировать обе мелодические дорожки одновременно (TRNS link).
И, напоследок – самое «вкусное». Секвенсор BeatStep Pro оснащен двумя дополнительными инструментами, позволяющими ощутимо разнообразить ваши секвенции. Первый – это встроенный «лупер» в духе Ableton-овского «Beat Repeat», срабатывающий для всех треков проекта одновременно. Данный инструмент «зацикливает» текущий фрагмент секвенции и повторяет его по кругу указанное количество раз – незаменимый прием для создания музыкального напряжения в переходах.
Второй инструмент представляет собой рандомайзер, который может работать как с отдельными дорожками, так и с целым проектом. Рандомайзер оснащен 2 рукоятками – Randomness (степень изменения) и Prorability (шанс срабатывания). Работает этот инструмент невероятно мелодично и музыкально. Новых данных или новых нот он не вводит, а, скорее, перемешивает значения нот, октав, динамики и т.д. внутри секвенции. Результат звучит именно так, как должен звучать мелодический рандомайзер – секвенция остается «вашей», но перестает утомлять своей однообразностью, она как бы постоянно плывет и живет, так, как это нужно в Techno и Minimal музыке. Браво!
Закончить обзор секции секвенсора стоит, упомянув о том, что новый прибор наконец-то обзавелся кнопкой Tap Tempo, что радует. Темп, кстати, мы можем указать с точностью до 1 знака после запятой
Синхронизация
Никакой речи о «универсальном пульте управления» и идти бы не могло, если бы разработчики не поработали над недостатками предыдущей версии устройства – Arturia BeatStep.
В плане синхронизации, BeatStep Pro наконец-то стал абсолютно универсальным – в качестве синхронизационного сигнала мы можем принимать и раздавать любой тип данных, включая MIDI-clock по USB и 5-din, а также большинство существующих clock sync форматов. Кроме того, имеется и обязательный встроенный генератор Clock, за которым могут следовать любые подключенные приборы или даже компьютер.
MIDI-контроллер
Arturia BeatStep Pro – это еще и MIDI-контроллер, не забыли? Именно MIDI-контроллер, т.к. управления параметрами подключенных устройств по CV здесь нет. Впрочем, это особо и не нужно.
Естественно, режим MIDI-контроллера доступен одновременно с режимом секвенсора, так что использование компьютерных плагинов и винтажных синтезаторов в рамках одного трека вполне возможны.
В режиме контроллера мы можем использовать динамически пэды (которые, кстати, умеют реагировать и на давление), сенсорные энкодеры и кнопки секвенсора. Управлять все это может практически всем, чем вы пожелаете. Хотите, используйте пэды как MIDI-клавиатуру, хотите – запускайте клипы Ableton или переключайте пресеты синтезаторов.
Каждый из органов управления может передавать большинство известных типов MIDI-сообщений – PC, CC, RPN/NRPN, или Aftertouch, а пэды – еще и нотные данные. Кроме того, для каждого из регуляторов мы можем отдельно указать MIDI-канал, а также выбрать – будет ли он передавать данные по USB, по MIDI или по обоим портам одновременно.
Для тех, кто был недоволен энкодерами оригинального BeatStep – радостная новость. Теперь энкодеры имеют 4 типа скорости, которые можно назначить как глобально, так и индивидуально для каждого из энкодеров. Обновленные энкодеры вполне способны уместить весь CC-диапазон от 0 до 127 в один оборот!
Кстати, транспортная панель и лупер BeatStep Pro работают и в режиме контроллера! Транспортная панель будет запускать/останавливать воспроизведение любых подключенных устройств или DAW на компьютере. Для этого используется старый-добрый Mackie Kontrol протокол. Лупер в режиме контроллера превращается в переключатель ретриггеринга нот, который работает вместе с пэдами: активируя лупер, мы поучим зацикленное воспроизведение удерживаемой ноты в указанных длительностях. Словом, всё как на классических драм-машинах, типа AKAI MPC.
Настройки контроллера хранятся внутри одного из проектов устройства (коих имеется 16) и могут быть быстро переключены.
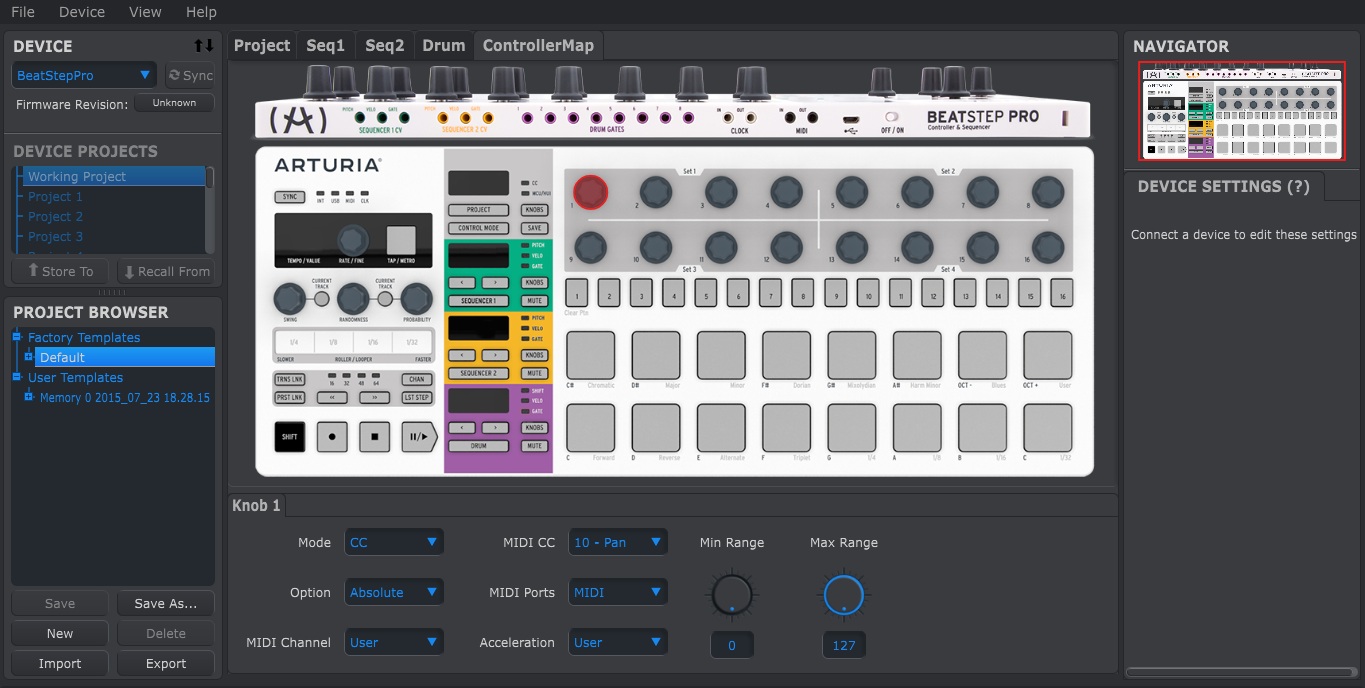
MIDI Control Center
Создавать и редактировать пресеты контроллера Arturia BeatStep Pro можно с помощью бесплатного редактора — MIDI Control Center.
Редактор является универсальной программой для всех MIDI-устройств от Arturia и предлагает удобное и наглядное редактирование любых параметров Arturia BeatStep Pro, хранение неиспользуемых темплейтов и обновление ОС. Это один из самых удобных и «неглючных» редакторов, которые мне доводилось встречать — MIDI Control Center тут же «подхватывает» Arturia BeatStep Pro, подключенный «горячим» способом к уже работающему приложению и сразу предлагает обновить ОС!
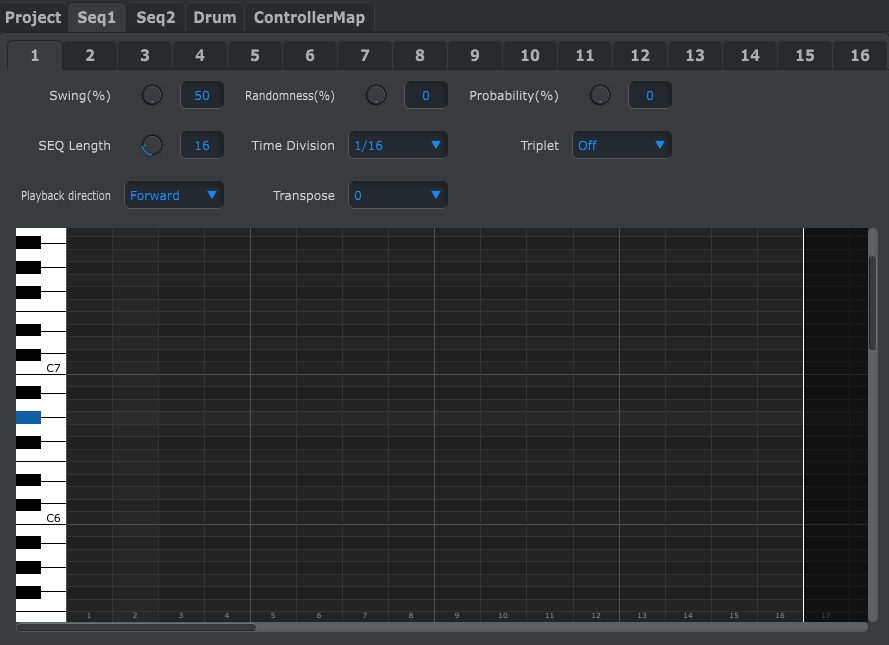
Кстати, помимо настроек контроллера MIDI Control Center позволяет редактировать и секвенции – для этого используется наглядный и всем давно привычный редактор типа Piano Roll.
Эпилог
Наконец-то производители многочисленных новомодных аналоговых синтезаторов с CV-управлением осознали, что без хорошего секвенсора их «игрушки» далеко не так интересны. В результате, в нынешнем году мы получили несколько интересных девайсов, среди которых новый Arturia BeatStep Pro занимает, пожалуй, лидирующее положение.
Недорогой, мощный, лишенный всех недостатков предшественника, BeatStep Pro кажется оптимальным прибором для всех владельцев аналоговых CV-gate устройств или «коробочных» Hardware-модулей. Ну а наличие мощной полиритмической составляющей и многочисленных приятных бонусов типа рандомайзера, делают этот прибор идеальным техно-секвенсором!
В самом деле, такие возможности как индивидуальное переключение дорожек или множители скорости я до сих пор встречал только на мощных железных «монстрах» секвенсинга (например, на винтажном Yamaha RS7000 или современном Elektron Octatrack). При этом, стоимость Arturia BeatStep Pro в разы ниже стоимости вышеуказанных устройств — всего 250 евро!
Так что, если вам нужен небольшой, но мощный секвенсор с универсальным управлением и функционалом MIDI-контроллера – теперь вы знаете где его искать!
Arturia BeatStep Pro

35003 Р
MIDI-контроллер с расширенными возможностями, можно управлять как MIDI-устройствами, так и секвенсором. 3 встроенных типа секвенсоров, порты ввода/вывода USB и MIDI, 3 выхода mini-Jack, 8 выходов Drums Gate, 2 независимых шаговых секвенсора и отдельный барабанный секвенсор, разъемы на задней панели имеют цветовую кодировку.Подробнее
Содержание
- Инструкция обслуживания Arturia KeyLab 49
- Похожие инструкции обслуживания
- У вас вопрос, касающийся Arturia KeyLab 49?
- Комментарии (1)
- Как настроить arturia keylab essential 49
- Arturia KeyLab 61 Essential, KeyLab 49 Essential – дополнительные MIDI-клавиатуры для работы в Analog Lab
- Выводы
- Как настроить arturia keylab essential 49
- Customize your Keylab Essential parameters
- DAW Command center
- Command center with your favourite DAW:
- Ableton Live
- Logic
- Cubase
- Pro Tools
- Reaper
- Studio One
- FL Studio
Инструкция обслуживания Arturia KeyLab 49
Перейти на страницу of 40
- 1
- 2
- 3
- 4
- 5
- 6
- 7
- 8
- 9
- 10
- 11
- 12
- 13
- 14
- 15
- 16
- 17
- 18
- 19
- 20
- 21
- 22
- 23
- 24
- 25
- 26
- 27
- 28
- 29
- 30
- 31
- 32
- 33
- 34
- 35
- 36
- 37
- 38
- 39
- 40
Документы, которые мы получаем от производителя устройства Arturia KeyLab 49 мы можем разделить на несколько групп. Это в частности:
— технические чертежи Arturia
— инструкции обслуживания KeyLab 49
— паспорта изделия Arturia
— информационные брошюры
— энергетические этикетки Arturia KeyLab 49
Все из них важны, однако самую важную информацию с точки зрения пользователя мы найдем в инструкции обслуживания Arturia KeyLab 49.
Группа документов, определяемая как инструкции обслуживания, делится также на более подробные типы, такие как: Инструкции монтажа Arturia KeyLab 49, инструкции обслуживания, короткие инструкции или инструкции пользователя Arturia KeyLab 49. В зависимости от потребностей, Вам необходимо поискать требуемый документ. На нашем сайте Вы можете просмотреть самую популярную инструкцию использования изделия Arturia KeyLab 49.
Похожие инструкции обслуживания
Полная инструкция обслуживания устройства Arturia KeyLab 49, как должна выглядеть?
Инструкция обслуживания, определяемая также как пособие пользователя, или просто «руководство» — это технический документ, цель которого заключается в использовании Arturia KeyLab 49 пользователями. Инструкции пишет, как правило технический писатель, языком, доступным для всех пользователей Arturia KeyLab 49.
Полная инструкция обслуживания Arturia, должна заключать несколько основных элементов. Часть из них менее важная, как например: обложка / титульный лист или авторские страницы. Однако остальная часть, должна дать нам важную с точки зрения пользователя информацию.
1. Вступление и рекомендации, как пользоваться инструкцией Arturia KeyLab 49 — В начале каждой инструкции, необходимо найти указания, как пользоваться данным пособием. Здесь должна находится информация, касающаяся местонахождения содержания Arturia KeyLab 49, FAQ и самых распространенных проблем — то есть мест, которые чаще всего ищут пользователи в каждой инструкции обслуживания
2. Содержание — индекс всех советов, касающихся Arturia KeyLab 49, которое найдем в данном документе
3. Советы по использованию основных функций устройства Arturia KeyLab 49 — которые должны облегчить нам первые шаги во время использования Arturia KeyLab 49
4. Troubleshooting — систематизированный ряд действия, который поможет нам диагностировать а в дальнейшем очередность решения важнейших проблем Arturia KeyLab 49
5. FAQ — чаще всего задаваемые вопросы
6. Контактные данные Информация о том, где искать контактные данные производителя / сервисного центра Arturia KeyLab 49 в данной стране, если самостоятельно не получится решить проблему.
У вас вопрос, касающийся Arturia KeyLab 49?
Воспользуйтесь формуляром, находящимся ниже
Если с помощью найденной инструкции Вы не решили свою проблему с Arturia KeyLab 49, задайте вопрос, заполнив следующий формуляр. Если у какого то из пользователей была похожая проблема с Arturia KeyLab 49 со всей вероятностью он захочет поделиться методом ее решения.
Комментарии (1)
Анатолий
Где можно приобрести инструкцию для Arturia KeyLab 49 на русском языке?
Источник
Как настроить arturia keylab essential 49

Arturia KeyLab 61 Essential, KeyLab 49 Essential – дополнительные MIDI-клавиатуры для работы в Analog Lab
В 2017 году серия MIDI-клавиатур Arturia KeyLab пополнилась двумя интересными моделями KeyLab 49 Essential и KeyLab 61 Essential. Появившиеся клавиатуры дополняют серию контроллеров для управления фирменным софтом Arturia и призваны облегчить творческий процесс.
Как и прежде MIDI-клавиатуры KeyLab рассчитаны, в первую очередь, на работу с виртуальным инструментом Arturia Analog Lab. Стоит напомнить, что Analog Lab является мощным инструментом, эмулирующим звучание классических аналоговых синтезаторов. Он включает в себя более 6000 пресетов таких синтезаторов как Mini Moog, CS-80, ARP 2600, Prophet, SEM, Jupiter-8, Wurlitzer, Matrix-12, VOX и т.п. Все доступные синтезаторы объединены в одну унифицированную графическую оболочку с минимальным набором настроек и изменяемых параметров. В свою очередь, на MIDI-клавиатурах предусмотрены разнообразные контроллеры, позволяющие с удобством управлять этими выведенными параметрами.

В появившихся моделях KeyLab Essential производитель постарался сделать работу в Analog Lab еще более легкой и продуктивной. Устройства получили более эргономичное расположение контроллеров и новые возможности управления. Клавиатуры KeyLab 61 Essential и KeyLab 49 Essential отличаются лишь количеством клавиш. В остальном модели идентичны друг другу.
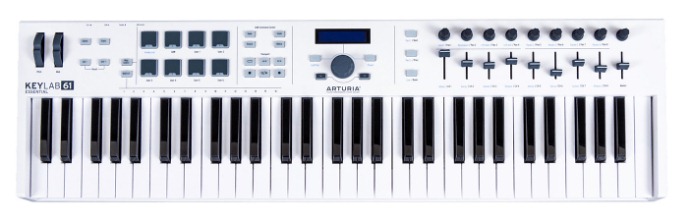
Новые модели Essential выполнены в дизайне всех последних инструментов Arturia. Органы управления выглядят более аккуратными и расположены намного удобнее. Традиционно, устройства доступны в двух вариантах цветового оформления, черном и белом.
Для работы в музыкальных приложениях в клавиатурах предусмотрено 8 глобальных пресетов, отличающихся между собой назначением контроллеров. Первый пресет «Analog Lab» создан для работы с Analog Lab. Второй, «DAW» — для управления секвенсором. Остальные шесть предусмотрены для пользовательских конфигураций, которые можно создавать в отдельной программе MIDI Control Center.
Нас интересует, в большей степени, каким образом происходит взаимодействие клавиатуры и фирменного софта Analog Lab. Также интересно, чем именно управляют контроллеры в режиме секвенсора.
Теперь дисплей в MIDI-клавиатурах находится по центру и для быстрого перемещения по пресетам предусмотрен большой регулятор. Впрочем, переключение между последующими пресетами возможно как и раньше, кнопками. На экранчике отображается выбранный инструмент и регулируемый параметр.
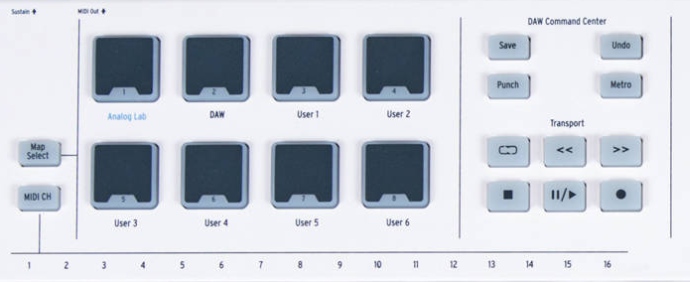
Клавиатуры KeyLab Essential оснащены пэдами, чувствительными к скорости и силе нажатия. По умолчанию они назначены на стандартные миди команды, обычно использующиеся в виртуальных ударных инструментах. Но могут быть переназначены на любой другой MIDI параметр или ноты через приложение Arturia MIDI Control Center.
При удерживании кнопки Map Select пэдами можно осуществлять мгновенную смену глобального пресета. А с помощью кнопки MIDI channel и соответствующей клавиши производится быстрая смена MIDI- канала клавиатуры. Очень важно, что эти функции находятся на виду, а не спрятаны глубоко в меню. Смена канала или режима на лету особенно необходима при использовании клавиатуры с большими проектами и с внешними аппаратными синтезаторами и модулями.
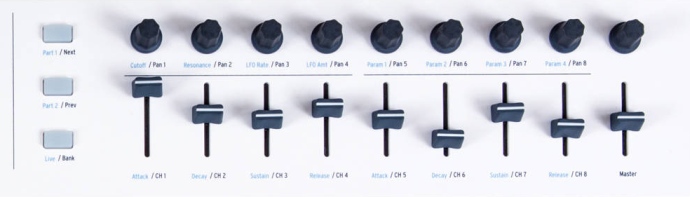
Фейдеры и безупорные регуляторы в режиме Analog Lab управляют соответствующими параметрами инструмента, отображаемого в Analog Lab. В секвенсорном режиме позволяют регулировать панораму и громкость первых восьми каналов микшера. В пользовательских пресетах их можно назначить на любые другие параметры.
Для быстрого доступа и управления мультитембральным режимом Analog Lab на клавиатуре предусмотрены отдельные кнопки. С помощью Part 1 и Part 2 осуществляется переключение на соответствующие вкладки. Кнопка Live позволяет регулировать выведенные параметры MACRO, громкость, панораму и посыл на эффекты. В режиме секвенсора этими кнопками можно перемещаться по каналам микшера. Кнопкой Bank переключается шаг смещения, по одному каналу или сразу по восемь.
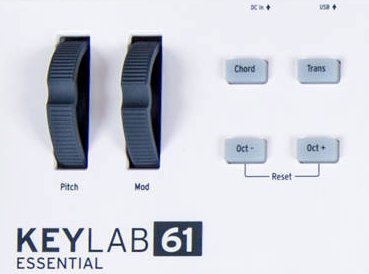
Интересной особенностью клавиатур KeyLab Essential является режим Chord. Для его активации необходимо удерживая одноименную кнопку сыграть требуемый аккорд. После только, как кнопка будет отпущена, этот аккорд можно воспроизводить, нажав лишь одну клавишу. Аккорд может состоять из 10 разных нот и сохранится в памяти до смены или выключения питания.
Подключение клавиатур к компьютеру осуществляется через USB-порт. При таком подключении питание берется от шины USB. Для использования устройств с внешними синтезаторами понадобиться блок питания, который в комплект не входит. Среди разъемов для подключения можно видеть MIDI-выход и разъем для подключения Sustain педали.
В комплекте с MIDI-клавиатурами Arturia KeyLab Essential идет программа Analog Lab, секвенсор Ableton Live Lite и виртуальный инструмент UVI Grand Piano Model D, о которых мы уже подробно рассказывали в предыдущих обзорах устройств Arturia.
Что касается музыкальных клавиш, то в клавиатурах KeyLab Essential используется обычная синтезаторная механика с чувствительностью к скорости нажатия. В целом, механика выглядит неплохо и является типичным представителем своего класса.
Выводы
Новые MIDI-клавиатуры Arturia KeyLab Essential являются важным дополнением, существенно облегчающим жизнь многочисленным пользователям виртульных инструментов Arturia. По сравнению с обычными устройствами KeyLab версии Essential имеют более совершенную систему управления библиотекой Analog Lab и работой с DAW. Кроме того, благодаря сокращению количества набортных контроллеров MIDI-клавиатуры Essential выглядят более компактными.
Ориентировочная стоимость MIDI-клавиатуры Arturia KeyLab 61 Essential составляет 24 тыс. рублей и 19 тыс. рублей на KeyLab 49 Essential.
Источник
Как настроить arturia keylab essential 49
Once the unit has powered up, press the Jog-wheel to confirm.
Panic
(All notes off)
Left Arrow + Right Arrow simultaneously.
Customize your Keylab Essential parameters
The Keylab Essential has 8 memories. Two of them are not editable (read-only), however the six remaining can be fully customised.
Here’s some easy to follow steps on how to customize KeyLab Essential’s memory.
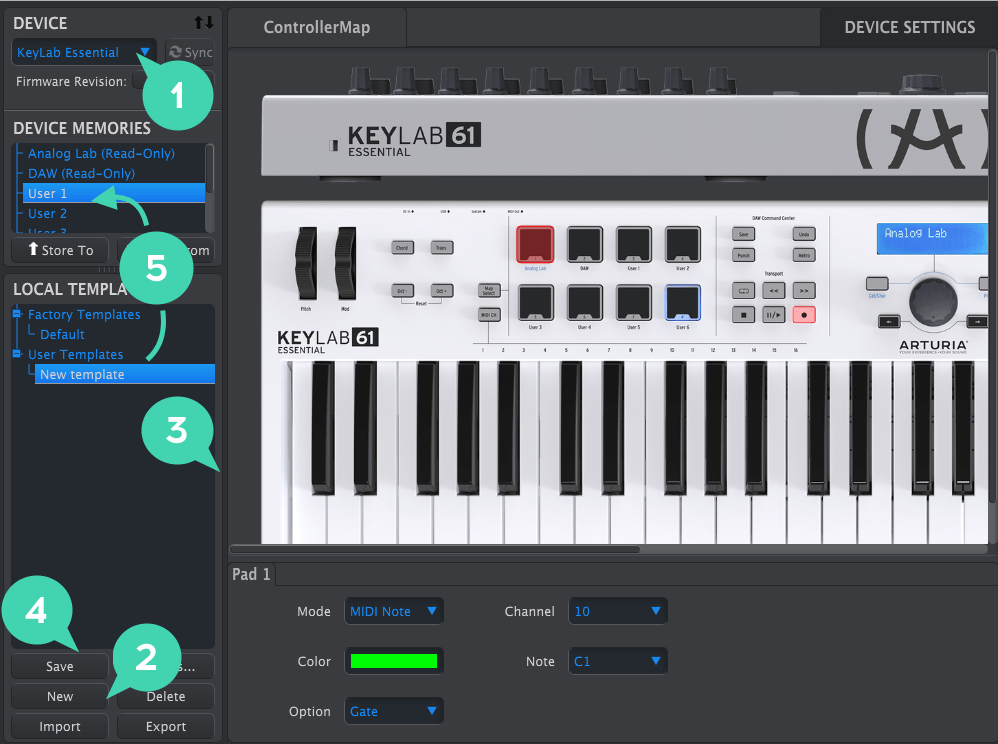
A/ Create a new configuration
1 — Open the Midi Control Center & select your Keylab Essential.
2 — Click on the «New» Button
3 — Edit the parameters to your convenience.
4 — Click the «Save» to save the changes made on the template.
5 — Drag & Drop the template in one of the user memories.
B/ Recall your configuration
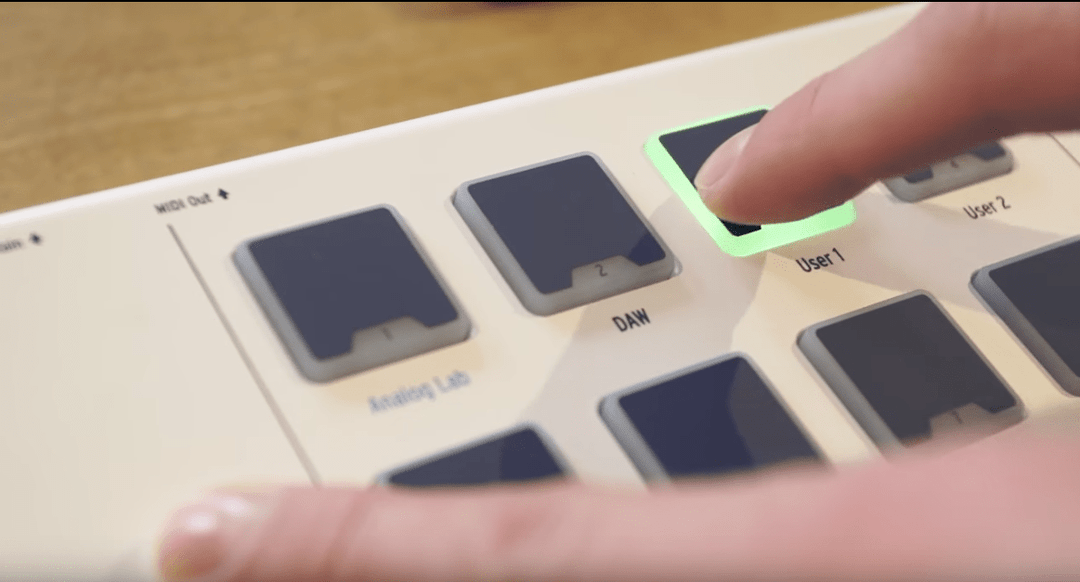
1- Press the Map Select button
2- Press the pad corresponding to the memory where you stored the configuration.
3- The memory associated parameters should now be recalled.
DAW Command center
Here’s a list of the recommended protocols for some common DAWs.
| MCU | HUI |
| Ableton Live 9 | ProTools 12 |
Depending on each DAW and the way they are managing the MCU/HUI protocols, some features may not be properly working.
See below the unsupported functions per DAW.
Adblock
detector
| Function | Not compatible with | |
| Save | Ableton Live 9 Bitwig 2 |
|
| Metronome | FL Studio 12 ProTools 12 Cubase 9 |
FL Studio 12 |
| Punch | FL Studio 12 Reaper 5 |
|
| Forward/Rewind No led feedback |
Reaper 5 Bitwig 2 |
|
| Save No led feedback |
Cubase 9 | |
| Undo No led feedback |
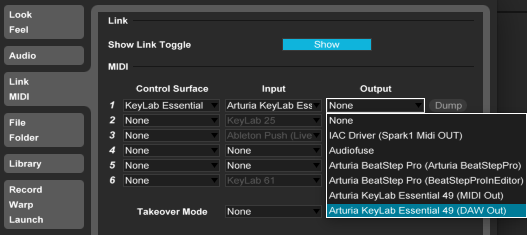
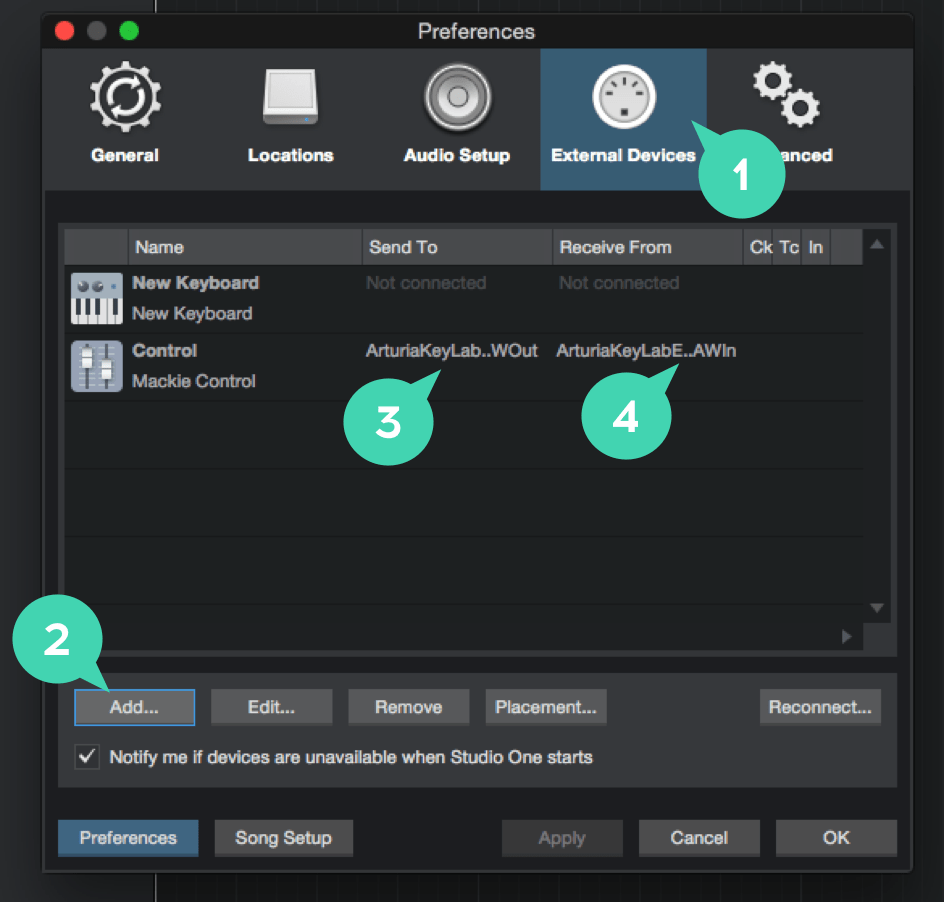
Studio One 3 Cubase 9 Command center with your favourite DAW:Below, you’ll find instructions on how to use KeyLab Essential’s DAW Command Center with your favorite DAW. Ableton LiveThe Keylab Essential is deeply integrated as a control surface device since Ableton Live 9.7.4. To use it as a control surface device: 1- Open Ableton Live preferences and go to the MIDI section 2- In the Control Surface section > Control Surface dropdown list > select «Keylab Essential« 3- Select «Keylab Essential DAW In» in the Input drop down list. (On Windows, select Arturia Keylab Essential Port 2)
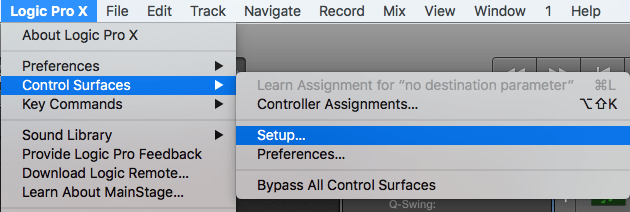
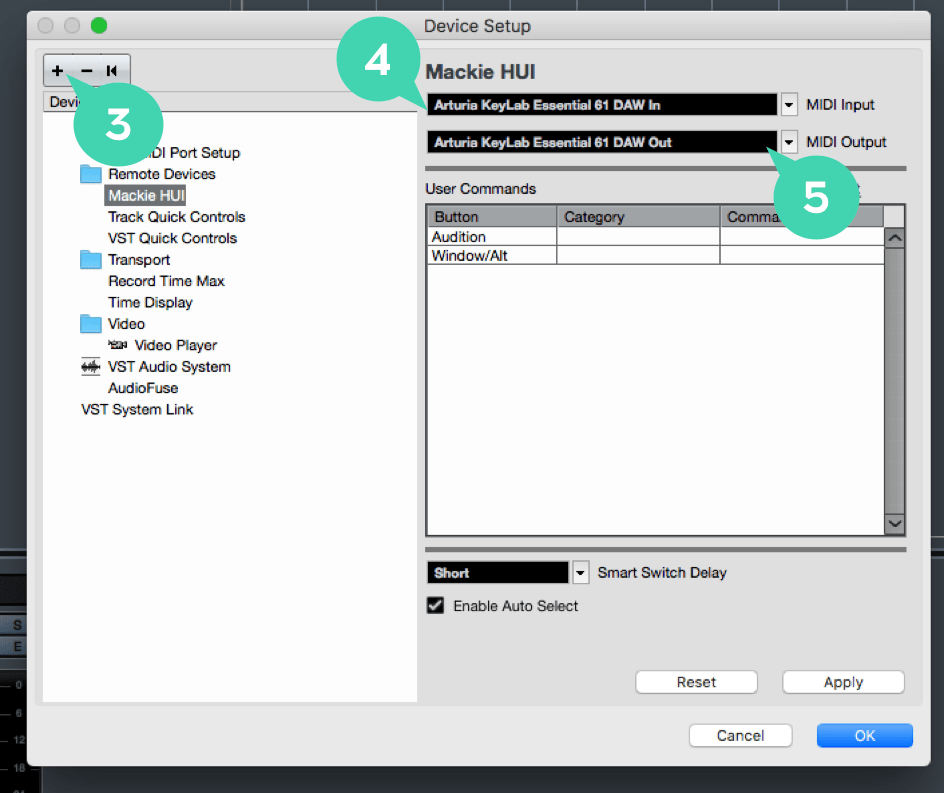
Logic1 — Go to Logic preferences > Control Surfaces > Setup.
3 — In the Control Surfaces list, select Mackie Designs > Mackie Control
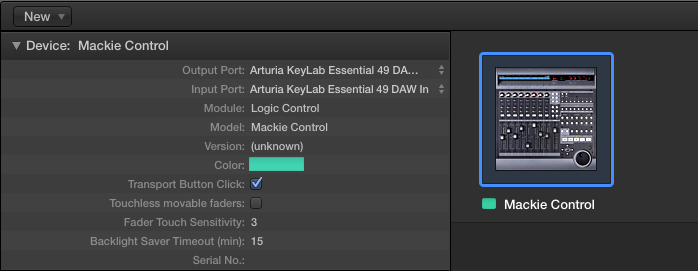
5 — In Output Port select «Arturia Keylab Essential 61 DAW Output« In Input Port select «Arturia Keylab Essential 61 DAW Output«
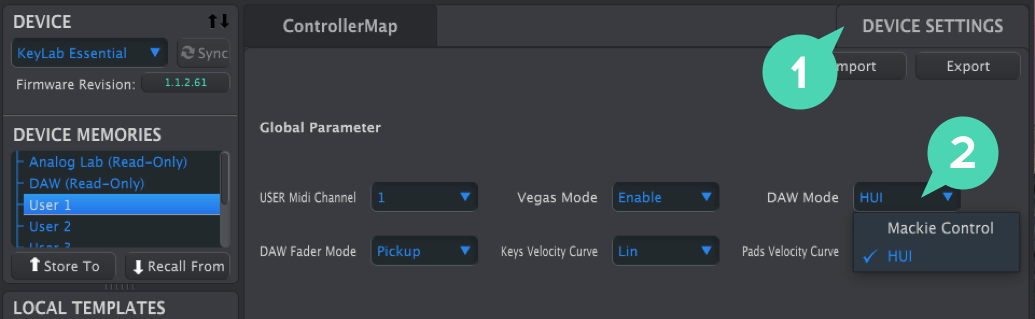
Cubase1 — Open the MIDI Control Center, select your Keylab Essential in the device list and click on the Device Settings tab. 2 — In DAW Mode select HUI
4 — In MIDI Input Select «Arturia Keylab Essential DAW In« 5 — In MIDI Output Select «Arturia Keylab Essential DAW Out«
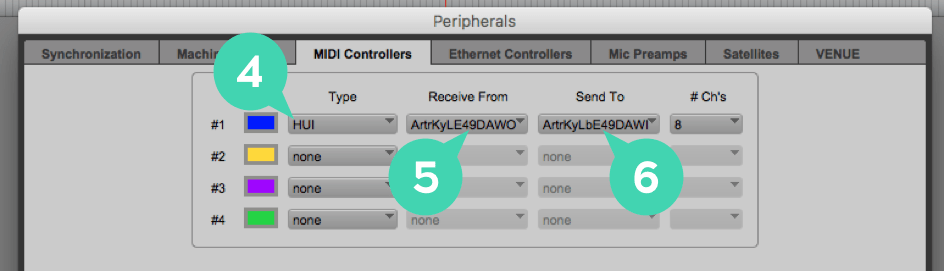
Pro Tools1 — Open the MIDI Control Center, select your Keylab Essential in the device list and click on the Device Settings tab. 2 — In DAW Mode select HUI
4 — In Type, select HUI 5 — In Receive From: Select «Arturia Keylab Essential DAW Out« 6 — In Sent To: Select «Arturia Keylab Essential DAW In«
Reaper1 — Open Reaper’s preferences menu 2 — Go to the Control Surface section 3 — Click Add 4 — In Control Surface Mode, select Mackie Control Universal 5 — In MIDI Input Select «Arturia — Keylab Essential DAW In« 6 — In MIDI Output Select «Arturia — Keylab Essential DAW Out«
Note 2: To avoid any erratic fader behavior, please set them to Jump Mode in the MIDI Control Center. Studio One1 — Open Studio One’s preferences > External Devices 2 — Click on Add and in the list, go to Mackie and select Control 3 — In Receive From: Select «Arturia Keylab Essential DAW In« 4 — In Sent To: Select «Arturia Keylab Essential DAW Out«
FL Studio1 — Open FL Studio preferences > MIDI 2 — In the Output section: Set Arturia Keylab Essential MIDIOUT2 to Mackie Control Universal port 2 3 — In the Input section: Set Arturia Keylab Essential as a Generic Controller on Port 1 Set Arturia Keylab Essential MIDIIN2 to Mackie Control Universal Port 2 Источник |

 2 — Then click on New > Install
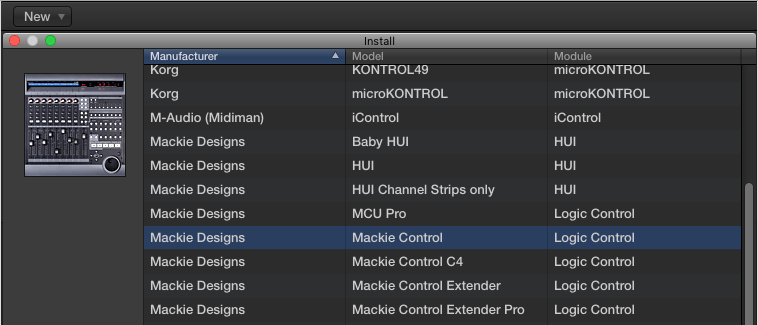

The MIDI Control Center is an application that you download from the Arturia site to your
computer. There are versions for both macOS and Windows systems.
With the MIDI Control Center you can:
•
move presets from the MicroFreak to your computer or from your computer to
the MicroFreak
•
change settings on the MicroFreak
The MIDI Control Center manual has general descriptions of the features that are common
to all Arturia products. In the section below we will only refer to settings specific to the
MicroFreak.
14.2.1. MIDI Control Center settings
The MIDI settings are all using the MIDI Control Center’s Device tab. Again, download the
software from www.arturia.com.
MIDI Input Channel — All, 1-16, none. MicroFreak sends and receives on one 16-channel MIDI
port.
MIDI Output Channel — 1-16. Choose one of the 16 MIDI channels as the transmit channel.
MIDI Output Destination — The choices are Off, USB, MIDI, or MIDI + USB. Defines how MIDI
data is transmitted. USB has the advantage of connecting directly to a Mac or PC without a
MIDI interface, but you can run MIDI cables over longer distances.
Arturia — User Manual MicroFreak — MicroFreak Configuration
MIDI and Tempo settings
86