инструкцияSound Devices MixPre-6 II

Multichannel Recorder | Mixer | USB Audio Interface
MixPre II Series
QUICK START GUIDE
Post Ofce Box 576
E7556 State Rd. 23 and 33
Reedsburg, Wisconsin 53959 USA
support@sounddevices.com
+1 608.524.0625 main
800.505.0625 toll free
www.sounddevices.com
Versatile. Durable. High-Performance.
If you record eld audio, sound effects, audio for lm, podcasts, voice-overs, music, or are just starting your audio journey,
the MixPre II Series is for you. Lightweight, durable, and small, this powerhouse audio recorder and USB interface will help
you capture audio for any application.
This Quick Start Guide will help you quickly set up your new MixPre II.
For further details and instructions, please download the full user guide.
We are honored to be part of your kit.
Посмотреть инструкция для Sound Devices MixPre-6 II бесплатно. Руководство относится к категории диктофоны, 1 человек(а) дали ему среднюю оценку 9.7. Руководство доступно на следующих языках: английский. У вас есть вопрос о Sound Devices MixPre-6 II или вам нужна помощь? Задайте свой вопрос здесь
Главная
Не можете найти ответ на свой вопрос в руководстве? Вы можете найти ответ на свой вопрос ниже, в разделе часто задаваемых вопросов о Sound Devices MixPre-6 II.
Не нашли свой вопрос? Задайте свой вопрос здесь
-
Contents
-
Table of Contents
-
Bookmarks
Quick Links
****Insert MixPre II stack photo*****
MixPre II Series
Multichannel Recorders | Mixers | USB Audio Interfaces
User Guide
Related Manuals for Sound Devices Kashmir MixPre II Series
Summary of Contents for Sound Devices Kashmir MixPre II Series
-
Page 1
****Insert MixPre II stack photo***** MixPre II Series Multichannel Recorders | Mixers | USB Audio Interfaces User Guide… -
Page 2
MixPre II User Guide | Rev 1-A | 08/29/19 trademarks herein are the property of their respective owners. This document is distributed by Sound Devices, LLC in online electronic (PDF) format only. Published in the USA. This table provides the revision history and cross-reference links to “what’s new”… -
Page 3
192 kHz sample rate. This newest genera- 360° audio and monitor binaurally with an ambisonic tion of Sound Devices’ award-winning MixPre Series microphone like the Sennheiser AMBEO and a Mix- has been redesigned for increased performance and an Pre-6 II or MixPre-10 II. -
Page 4: Table Of Contents
Table of Contents PANEL VIEWS MIXPRE-10 II MIXPRE-6 II MIXPRE-3 II POWERING TOUCHSCREEN NAVIGATING MENUS BASIC VS ADVANCE MODE CUSTOM MODE FILE LIST INPUTS INPUT LINKING LIMITERS METERING OUTPUTS HEADPHONE PRESETS PROJECTS TRANSPORT CONTROL STAR SHORTCUTS SYSTEM MENU MEDIA AND FORMATTING RECORD AND PLAY REMIX AND RERECORD CUE MARKS…
-
Page 5: Panel Views
Panel Views MIXP R E-3 II Battery Mounts Allen Wrench and Stop Button Touchscreen Anti-Rotational Pin Play Button Record Button SD Card Slot Power Light Channel Knobs FRON T REA R Channel Ring LED Power Switch USB-A Port Aux/Mic/Timecode Input XLR / 1/4-inch TRS Inputs USB-C Port XLR / 1/4-inch TRS Input…
-
Page 6
MIXPRE- 6 I I Allen Wrench and Battery Mounts Star Button Stop Button Touchscreen Anti-Rotational Pin Record Button SD Card Slot Play Button Power Light Channel Knobs FRON T REA R Channel Ring LED XLR / 1/4-inch TRS Inputs Aux/Mic/Timecode Input USB-A Port Power Switch XLR / 1/4-inch TRS Inputs… -
Page 7
MIXPR E-10 II Allen Wrench and Battery Mounts Transport Controls Channel LED Ring Power Light Touchscreen Anti-Rotational Pin Channel Knobs SD Card Slot 4-Pin Hirose DC Input Star Switch FRO NT REA R XLR / 1/4-inch TRS Inputs Aux/Mic/Timecode Input USB-A Port Power Switch BNC Timecode/… -
Page 8: Powering
Flexible Powering Options Powering the MixPre II In designing the MixPre II, we felt that it was important to be able to Apply your choice of power source. Turn the master power switch operate in a wide array of applications and environments. To support located in the upper right corner of the left side panel to the On that goal, power can be supplied from several possible sources.
-
Page 9: Touchscreen
Touchscreen The MixPre II has a sunlight-viewable, high-resolution, touch-screen-based user interface, which consists of the Home screen, Main Menu screen, and Channel screen views. There are several touch zones on the touch screen for controls. As you become familiar with the user interface, chang- ing settings for inputs, outputs, recording and metering will become fast and intuitive.
-
Page 10: Navigating Menus
Navigating Menus CHANNEL SCREEN Access Channel Screens by pressing the associated channel knob. Additional software controlled channels on the MixPre-6 II (channel 5,6) and MixPre-10 II (channels 9, 10) are found in the Inputs menu. Most features and functions are selected and set up in the Menu. The Channel screen is where you will find channel-specific settings, Touch the Menu icon from the Home Screen to enter the Menu.
-
Page 11: Basic Vs Advance Mode
Choosing your Mode The MixPre II has three differend modes of operation to suit you and your application, Basic, Advanced, and Custom. Basic mode is intended for hassle-free, plug-and-play use. This mode is ideal for the new user and amateur or any job where you want to keep things simple.
-
Page 12
MIXPRE-6 II BASIC VS ADVANCED FEATURE BASIC ADVANCED Gain Channel knob controls all gain for a Dual gain stage. Input gain is set in the Channel Screen. Channel channel. knob controls post-fade levels to mix bus. Channel Screen Options Pan (Left, Center, Right) Solo Input Mute… -
Page 13
MIXPRE-10 II BASIC VS ADVANCED FEATURE BASIC ADVANCED Gain Channel knob controls all gain for a Dual gain stage. Input gain is set in the Channel Screen. Channel channel. knob controls post-fade levels to mix bus. Channel Screen Options Pan (Left, Center, Right) Solo Input Mute… -
Page 14: Custom Mode
Custom Mode Custom mode is intended for users who want to customize the fea- tures and functionality and operate somewhere between basic and advanced modes. This mode grants access to select categories of Advanced Mode. features, To configure Custom Setup: Set System >…
-
Page 15: File List
File List — Basic Mode Scroll through the chronological list of all files in an active project with the headphone encoder. The top item in the list is the next file to be recorded. Directly below that is the last recorded file or file currently being recorded, followed by all previously recorded files.
-
Page 16
File List — Advanced Mode Scroll through the chronological list of all files in an active project with the headphone encoder. The top item in the list is the next file to be recorded. Directly below that is the last recorded file or file currently being recorded, followed by all previously recorded files. -
Page 17: Inputs
Channel Inputs — Basic Mode The MixPre II’s flexibility is enhanced by its ability to select various input types to its mixer channels. Each of the MixPre II’s channels can be sourced from an XLR or TRS mic/line input, 3.5 mm Aux line or mic input (with or without plug-in-power) or from USB channels from a computer.
-
Page 18
Channel Inputs — Advanced Mode The MixPre II’s flexibility is enhanced by its ability to select various input types to its mixer channels. Each of the MixPre II’s channels can be sourced from an XLR or TRS mic/line input, 3.5 mm Aux line or mic input (with or without plug-in-power) or from USB channels from a computer. -
Page 19: Input Linking
Inputs Menu Input Types Description The Inputs menu allows you to access software-controlled channels Use for microphones. For condenser mics (5/6 on MixPre-6 II and 9/10 on MixPre-10 II) and Aux In Mode requiring 48 V phantom power, set Phantom settings.
-
Page 20: Limiters
Limiters Metering The MixPre II has fully adjustable limiter parameters giving control over There are five basic methods for observing input and output levels on Ratio, Release and Threshold. The limiters can be fine tuned for dialog, the MixPre II. foley, nature recording, and even live instruments.
-
Page 21: Metering
Metering Ballistics Outputs Audio meter ballistics is the manner in which a visual meter responds The MixPre II features multiple Output configurations for flexible re- to audio signal levels. Peak-reading ballistics correspond to actual cording scenarios. The Outputs menu is available in Advanced mode. signal peaks, but do not necessarily correspond to perceived signal In the Outputs menu, you may send any channel, aux input, USB loudness.
-
Page 22: Headphone
Headphone Out Presets The MixPre II’s high quality headphone amplifier provides high power If you plan to use the MixPre II in a wide variety of situations, you can and very low noise performance so that you can accurately hear the store and recall snapshots of all of the MixPre II’s settings.
-
Page 23: Transport Control
Transport Controls MIXPRE-3 II AND MIXPRE-6 II The three Transport controls (illuminated buttons) on the front panel are used to perform recording and playback functions. unction ontrol ction Press to begin recording a new file. The button illuminates red while recording is in underway.
-
Page 24: Star Shortcuts
UDPATE FIRMWARE Update the firmware f St Out Mute (MixPre-6 II) from a file on the SD card. The latest firmware can be downloaded from the Sound Devices f L/R Mute (MixPre-10 II) website: www.sounddevices.com/support/downloads f X1/X2 Mute (MixPre-10 II) PLUGINS View and apply plugins.
-
Page 25: Media And Formatting
We highly recommend using Sound Devices branded SD cards as REC TRIGGER Sets record triggering from either timecode or HDMI these have been optimized to provide the best performance. If these flags.
-
Page 26: Cue Marks
Cue Marks Use cue marks to make it easy to locate quickly to points of interest. The MixPre automatically renumbers cue marks if one is inserted between existing cue marks to maintain their ascending numerical order from start to finish—01, 02, 03, etc. You may have a maximum of 99 per file. Cues appear in numerical order in the Cue List, such as those shown in following image.
-
Page 27: Timecode
Timecode When timecode is enabled, it is displayed on the home screen beneath the current filename. Standard timecode is displayed as HH:MM:SS:FF. Drop-frame timecode is displayed with a semi-colon between the seconds and frames fields: HH:MM:SS;FF. Each time you press record, the current timecode value is stored in- side the Broadcast WAV file.
-
Page 28
Timecode Modes FREE RUN Timecode runs continuously. Timecode continues count- ing accurately for up to four hours after power-down. REC RUN Timecode runs while recording and is stationary when not recording. In this mode, timecode defaults to the last stationary val- ue at power-up. -
Page 29: Usb Audio Interface
Using MixPre II as a USB Audio Interface For PC users, the the MixPre-6 II and MixPre-10 II will appear as a 2×2 audio interface unless a specific ASIO® driver is installed. The latest ASIO driver is available for free at www.sounddevices.com/ download To work with the USB audio from a host computer, it is necessary…
-
Page 30: Wingman
Wingman Application Status Bar Sound Devices Wingman is a free app that allows wireless remote Connection control of the Bluetooth Smart-enabled MixPre Series from iOS or Android devices. Icon Viewing Area VIEWING AREA On smaller devices, the viewing area displays transport and track views.
-
Page 31
CONNECTION ICON Tap the Connection icon to efficiently switch connection from one device to another from within the app. Tapping the Circled-I icon helps identify a listed MixPre by dis- playing an “Identifying from Wingman” message on the chosen recorder’s screen. CONNECTION ICON STATUS COLORS Gray Disconnected — either no activity or… -
Page 32: Usb Keyboard Control
USB Keyboard A connected USB keyboard may be used as a wired remote control for certain functions. KEYSTROKE DESCRIPTION Escape Back. Also cancels out of editing mode when virtual keyboard is on screen F1 or Menu key Accesses the Main menu Home File list Cycles between available Meters views and the Main…
-
Page 33: Usb Control Surfaces
USB Controllers The MixPre II Series can be connected to select third party con- trollers for tactile control of mixing and recording. These control surfaces provide a varied range of physical sliders, pots, and buttons to set fader levels, trim gains, pans, reverb sends, solos, mutes, record arming, transport control and more.
-
Page 34
Akai MidiMix Interface Functions FUNCTION ACTION Fader Bank Switching User-Definable Shortcut Buttons Solo + Bank Left Solo + Bank Right Record via user-definable shortcut PLAY via user-definable shortcut STOP via user-definable shortcut FFWD X2, X16 via user-definable shortcut RWD X2, X16 via user-definable shortcut Skip Next File via user-definable shortcut… -
Page 35
Korg NanoKontrol 2 Interface Functions FUNCTION ACTION Fader Bank Switching User-Definable Shortcut Buttons Cycle + Marker Set Cycle + Marker < Cycle + Marker > Cycle + << Cycle + >> Record Record button PLAY/Pause Play button STOP Stop button FFWD X2, X16 Hold >>… -
Page 36
Functions Korg NanoKontrol Studio Interface FUNCTION ACTION Fader Bank Switching User-Definable Shortcut Buttons Cycle + Marker Set Cycle + Marker < Cycle + Marker > Cycle + << Cycle + >> Record Record button PLAY Play button STOP Stop button FFWD X2, X16 Hold >>… -
Page 37
Novation LaunchControl XL Interface Functions FUNCTION ACTION Fader Bank Switching User-Definable Shortcut Buttons DOWN Device + UP Device + Down Device + Left Device + Right Record via user-definable shortcut PLAY via user-definable shortcut STOP via user-definable shortcut FFWD X2, X16 via user-definable shortcut RWD X2, X16 via user-definable shortcut… -
Page 38: Specifications
MixPre-3 II Specifications Specifications are subject to change without prior notice. For the latest information available on all Sound Devices products, visit our website: www.sounddevices.com. FREQUENCY RESPONSE Audio Interface (USB-C): 5-in/2-out (from computer); 44.1 kHz/48 10 Hz to 80 kHz +/- 0.5 dB re 1 kHz @ 192 kHz sample rate kHz/96 kHz;…
-
Page 39: Mixpre-6 Ii
MixPre-6 II Specifications Specifications are subject to change without prior notice. For the latest information available on all Sound Devices products, visit our website: www.sounddevices.com. FREQUENCY RESPONSE Audio Interface (USB-C): 8-in/4-out; 44.1 to 96 kHz; 16/24-bit; Class- 10 Hz to 80 kHz +/- 0.5 dB re 1 kHz @ 192 kHz sample rate compliant USB 2.0 high speed or ASIO®…
-
Page 40: Mixpre-10 Ii
MixPre-10 II Specifications Specifications are subject to change without prior notice. For the latest information available on all Sound Devices products, visit our website: www.sounddevices.com. DAC FEEDING STEREO OUT, HEADPHONE OUT 32 bit precision; 115 dB dynamic range (A-weighted) FREQUENCY RESPONSE 10 Hz to 80 kHz +/- 0.5 dB re 1 kHz @ 192 kHz sample rate…
-
Page 41
Post Office Box 576 E7556 State Rd. 23 and 33 Reedsburg, Wisconsin 53959 USA support@sounddevices.com +1 608.524.0625 main +1 608.524.0655 fax 800.505.0625 toll free www.sounddevices.com…
Смотреть руководство для Sound Devices MixPre-6 II ниже. Все руководства на ManualsCat.com могут просматриваться абсолютно бесплатно. Нажав кнопку «Выбор языка» вы можете изменить язык руководства, которое хотите просмотреть.

MANUALSCAT | RU
Вопросы и ответы
У вас есть вопрос о Sound Devices MixPre-6 II, но вы не можете найти ответ в пользовательском руководстве? Возможно, пользователи ManualsCat.com смогут помочь вам и ответят на ваш вопрос. Заполните форму ниже — и ваш вопрос будет отображаться под руководством для Sound Devices MixPre-6 II. Пожалуйста, убедитесь, что вы опишите свои трудности с Sound Devices MixPre-6 II как можно более детально. Чем более детальным является ваш вопрос, тем более высоки шансы, что другой пользователь быстро ответит на него. Вам будет автоматически отправлено электронное письмо, чтобы проинформировать вас, когда кто-то из пользователей ответит на ваш вопрос.
Задать вопрос о Sound Devices MixPre-6 II
- Бренд:
- Sound Devices
- Продукт:
- диктофоны
- Модель/название:
- MixPre-6 II
- Тип файла:
- Доступные языки:
- английский
Сопутствующие товары Sound Devices MixPre-6 II
Sound Devices MixPre-6 II — портативный аудио рекордер с микшером для записи полевого аудио, звуковых эффектов, музыки, подкастов, аудио для фильмов, а также для наложения голоса. Устройство оснащено четырьмя ультра малошумящими предусилителями Kashmir, позволяющими одновременно записывать, например, нескольких актеров, нескольких подкастеров или музыку для фильма с высочайшим качеством до 32 бит с плавающей запятой/192 кГц. Серия MixPre II была перепроектирована для обеспечения лучшей производительности и имеет впечатляющий динамический диапазон 142 дБ.
Рекордер легко приспособить для любых задач записи. Он может записывать материал на SD карту или передавать поток на компьютер через USB подключение, может питаться от компьютера, от сети и от батареек. Устройство позволяет настраивать лимиттеры, устанавливать разрешение и частоту дискретизации, регулировать гейн, панораму, срез НЧ, инвертировать фазу и включать фантомное питание. Можно запускать камеру от внутреннего генератора таймкода или вводить таймкод через HDMI и USB. Предусмотрен упрощенный базовый режим. Прочный, легкий и компактный рекордер, который поместится в небольшую сумку, может быть установлен на треногу или камеру. Можно использовать MixPre-6 II с приложением Wingman App и USB панелью управления.
Основные особенности MixPre-6 II:
- портативный аудио рекордер с USB интерфейсом;
- 4 микрофонных предусилителя Kashmir с лимиттерами;
- встроенный 6 x 2 микшер;
- запись 8 треков на встроенную SD карту, бэкап на USB флеш-драйв;
- разрядность до 32 бит с плавающей запятой;
- частота дискретизации до 192 кГц;
- внутренний LTC генератор таймкода с выходом;
- цветной тачскрин;
- мощный 300 мВт + 300 мВт усилитель для наушников.
- Sound Devices
- Студия Sound Devices
- Рекордеры, портостудии Sound Devices
Файлы для скачивания
- Инструкция для Sound Devices MixPre-6 II (English) (PDF 8 Мб 299 Кб)
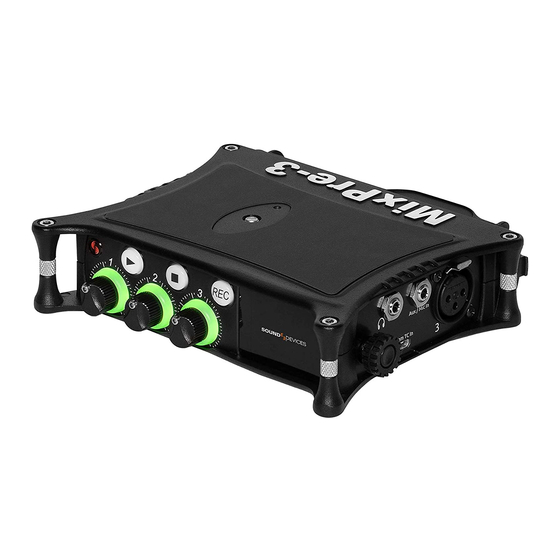
MIXPRE- 6 I I
Star Button
Stop Button
Play Button
Power Light
Channel Knobs
FRON T
Channel Ring LED
USB-A Port
XLR / 1/4-inch TRS Inputs
LEFT
POWER LIGHT Glows when the MixPre II is powered on.
CHANNEL KNOBS Sets the input sensitivity for the channel. Press
in on knob to access channel screen.
CHANNEL LED RING Provides visual indication of channel signal
condition, solo and mute.
STAR (* & **) BUTTON Provides a user-assignable hardware but-
ton to frequently used functions. See Shortcuts
PLAY BUTTON Press to begin playback. While in playback the button
glows green. See Transport.
STOP BUTTON Press to stop recording or playback. While stopped
the button glows orange. See Transport.
RECORD BUTTON Press to begin a recording. While recording the
button glows red. See Transport.
TOUCH SCREEN The sunlight-viewable, high-resolution, touch-
screen is used to navigate the MixPre II user interface.
BATTERY MOUNTS Accepts power sled accessories designed for
MixPre. Allows powering the MixPre II from AA or Sony L-Mount batter-
is, such as the included MX-4AA.
SD CARD SLOT Insert SD card for recording.
ALLEN WRENCH & ANTI-ROTATIONAL PIN Magnetically at-
taches to the MixPre II for safe keeping. Used to attach MixPre II to
cameras and tripods via ¼-inch-20-thread captive screw on MixPre II
top panel.
INPUTS 1-4 FEMALE XLR / 1/4″ TRS COMBO JACKS Active-bal-
anced analog microphone or line-level inputs. Inputs 1-2 on left
panel, inputs 3-4 on the right. [pin-1 = ground, pin-2 = hot (+), and
pin-3 = cold (-)]
MixPre II User Guide
Touchscreen
Record Button
Power Switch
USB-C Port
Stereo or Timecode
Output
Battery Mounts
SD Card Slot
REA R
XLR / 1/4-inch TRS Inputs
Aux/Mic/Timecode Input
Headphone Output
Headphone Knob
R IGH T
HDMI TC Input
USB-A PORT
1. USB keyboard
2. Auto-copy to USB drives
3. USB to approved 3rd party fader controllers
USB-C PORT
1. Provides power to the unit.
2. Connects to computer as a USB Audio Interface.
3. Connects to computer for transfering files from the SD card.
STEREO OR TIMECODE OUTPUT Unbalanced stereo 3.5 mm
female connector. Routing determined in the Outputs menu. [Sleeve =
ground, tip = X1, ring = X2].
POWER SWITCH Turns the power on and off.
HEADPHONE OUTPUT 3.5 mm TRS headphone output. Warning!
This output can drive headphones to potentially dangerous levels.
[Sleeve = ground, tip = left, ring = right]
HEADPHONE KNOB
1. Rotate to control headphone volume.
2. Rotate to navigate some menus and the virtual keyboard. Press in
to select items.
AUX/MIC/TIMECODE INPUT Menu-selectable input. Accepts
unbalanced stereo audio signal, Plug in Power microphones, or LTC
timecode.
HDMI TC INPUT Connect to select cameras to receive HDMI time-
code and record start/stop flags.
Allen Wrench and
Anti-Rotational Pin
4