steriliser box
Please read and retain this important information for future reference:
The Mothercare Steri Box is a quick and convenient way of sterilising your
baby’s soothers to ensure they are safe for use. The microwave Steri Box is
suitable for use with 750 – 1100 watt microwave ovens.
Instructions for use:
Wash soothers in warm water with a mild liquid detergent before sterilising.
Open the Steri Box.
For best results, using a suitable measure, pour 20ml of water into one part of
the Steri Box. Alternatively, half fill one part of the Steri Box with water and tip
excess water out until water is level with the frosted corner of the Steri Box.
Line up the pins and holes. Press the capsule together to close.
Microwave on full power for 90 seconds.
Allow to cool for at least 2 minutes before handling.
Ensure the Steri Box is fully cooled before handling. Open the Steri Box and
carefully, keeping hands and body away from the opening to prevent
scalding from any escape of steam, pour away any leftover water. Use the lid
to prevent the sterilised soothers from falling out.
Remove the soothers when required, taking care not to touch the baglet.
Drain the box fully before re-use. Squeeze out any trapped water in the
soother by squeezing the teat using sterilised teat tongs.
Care instructions:
Clean the Steri Box using a damp cloth and a mild liquid detergent.
WARNING!
Do not touch the box until it has had time to cool, it may be hot and scald or
burn.
Keep your face away from the box when removing the lid as the steam may
escape. Take care when removing the soothers as they may be very hot.
Advice
Made for Mothercare
Watford, England, WD24 6SH,
www.mothercare.com
Please keep a note of our company name and address. Dispose of all
packaging safely.
UK
Need a manual for your Mothercare Spin Car Seat? Below you can view and download the PDF manual for free. There are also frequently asked questions, a product rating and feedback from users to enable you to optimally use your product. If this is not the manual you want, please contact us.
Is your product defective and the manual offers no solution? Go to a Repair Café for free repair services.
Manual

Rating
Let us know what you think about the Mothercare Spin Car Seat by leaving a product rating. Want to share your experiences with this product or ask a question? Please leave a comment at the bottom of the page.
Are you satisfied with this Mothercare product?
Yes No
Be the first to rate this product
0 votes
Frequently Asked Questions
Our support team searches for useful product information and answers to frequently asked questions. If you find an inaccuracy in our frequently asked questions, please let us know by using our contact form.
Can Isofix car seats be placed in cars without Isofix? Verified
Most available Isofix car seats have universal approval to secure with seat belts, in addition to car specific approval. This allows the seat to be secured with seat belts. Read the manual of the car seat for details. There are Isofix car seats that can’t be secured with seat belts.
This was helpful (659)
What is the safest location to place a car seat? Verified
This partially depends on the car, but generally speaking the middle of the back seat is the safest place. Here the child is as far away as possible from the sides and thus best protected in case of an accident. However this only the case if there is a full 3-point seatbelt. If there is only a lap belt available it is safer to use a back window seat.
This was helpful (613)
Can I use the car sear in an airplane? Verified
There are no international guidelines for using car seats in airplanes. Depending on the model it is possible that the car seat is suited to do so. Whether or not it is allowed depends on the airline. Always contact the airline in advance to verify this.
This was helpful (189)
Can all Isofix car seats be mounted in all cars with Isofix? Verified
No, there are universal and non-universal Isofix car seats. A non-universal Isofix car seat can only be used in designated cars. The seat comes with a list a car models that are suited for use with that seat. A universal Isofix car seat can only be used in cars that are equipped with Isofix and a Top Tether attachment point.
This was helpful (137)
How long can my child be in a car seat? Verified
Don’t let your child sit in a car seat for longer than 1,5 to 2 hours a day. Many modern strollers offer the option to attach the car seat on top, allowing quick transportation of your child. Also in that case, don’t exceed 1,5 to 2 hours a day.
This was helpful (131)
What is Isofix? Verified
Isofix is an internationally standardised system for mountiung car seats in cars. There are Isofix mounting brackets in the car. These brackets are located between the backrest and the seat of the back seat and are connected to the car body. The Isofix car seat is equipped with hooks that can be easily attached to the mounting brackets.
This was helpful (130)
- Manuals
- Brands
- mothercare Manuals
- Car Seat
- Travel System Car Seat
- User instruction
-
Contents
-
Table of Contents
-
Bookmarks
Quick Links
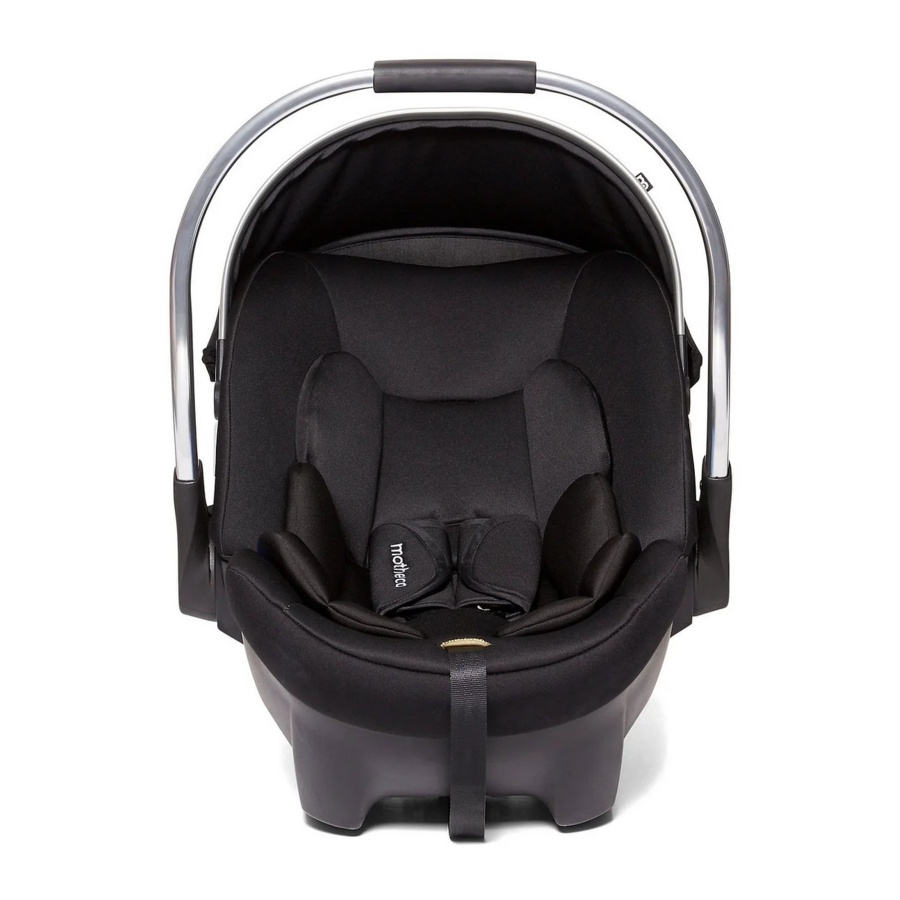
Travel System Car Seat
For infants up to 13 Kg (Group 0+)
IMPORTANT
Read carefully and keep for future reference.
EXTREME HAZARD: Parents should not under
Conforms to
any circumstances use this child restraint in a
ECE R44.03
passenger seat equipped with an air bag.
Universal
Related Manuals for mothercare Travel System Car Seat
Summary of Contents for mothercare Travel System Car Seat
-
Page 1
Travel System Car Seat For infants up to 13 Kg (Group 0+) IMPORTANT Read carefully and keep for future reference. EXTREME HAZARD: Parents should not under Conforms to any circumstances use this child restraint in a ECE R44.03 passenger seat equipped with an air bag. -
Page 2: Safety Warnings
Safety Warnings KEEP THIS OWNER’S MANUAL ALWAYS WITH THE CAR SEAT. PROVISIONS ARE MADE ON THE REAR OF THE SEAT SHELL. PLEASE READ THOROUGHLY BEFORE COMMENCING INSTALLATION AS AN INCORRECT INSTALLATION COULD BE DANGEROUS. DO NOT USE THIS CHILD SEAT IN PASSENGER SEATS EQUIPPED WITH AIR BAGS.
-
Page 3
Safety Warnings It is recommended that this car seat should be changed when it has been subjected to violent stresses in an accident or has become badly worn. Periodically inspect the harness for wear, paying particular attention to the attachment points, stitching and adjusting devices. -
Page 4: Front View
Getting To Know Your Child Seat This seat is classified as Group 0+ and is suitable for children from birth to 13 Kg (Birth to 12-15 months). A VELCRO © strap is attached to your pushchair to attach your child seat securely to the pushchair. Please refer to your pushchair user guide. Front view Handle Shoulder…
-
Page 5: Rear View
Getting To Know Your Child Seat Rear view Hood Pushchair release Centre handle belt guide Level indicator Pushchair Pushchair attachment mountings latch Owner’s manual compartment Metal plate…
-
Page 6
Getting To Know Your Child Seat • Certain models only • Buckle Shoulder pads Apron (Not to be used Head while seat is in hugger vehicle.) -
Page 7
The Type of Approved Seat Belt You Must Have Your Mothercare child seat can only be installed rearward facing using a lap and diagonal seat belt in the front or rear passenger seats of the car. Diagonal DO NOT USE THIS CHILD SEAT IN… -
Page 8: Legal Requirements
Legal Requirements This child seat is approved to ECE R44.03 and is only suitable for use with 3 point lap and diagonal seat belts approved to UN/ECE Regulation No. 16 or other equivalent safety standards. Front Seat Anyone, especially children, travelling in the front seat of a car must be properly restrained.
-
Page 9: Important Notes
Important Notes Keep this user guide in a safe place where it can easily be found. When child seats are not in use, it is recommended that they be fastened into the car with a seat belt to avoid being thrown about in the event of an accident.
-
Page 10: Adjusting The Handle
Adjusting The Handle Squeeze handle release button on both sides at bottom of handle to alter handle position. Rotate handle into one of three lock- ing positions — carrying (1), rocking or reclining (2) or sitting (3). Be sure it locks into desired position and that the release buttons pop out.
-
Page 11
Fastening & Adjusting the Harness To open the harness: if handle is up, move it to a down position. Press red button on buckle to open harness. Drape harness straps over Incorrect seat back. Place baby in seat. (Make sure baby’s back and bottom are flat against seat.) Correct… -
Page 12
The Harness — Fastening & Adjusting Fit the two shoulder strap buckle parts together. The shape of the shoulder strap buckle parts prevents incorrect insertion. Push the shoulder buckle parts into the buckle. A positive click will be heard indicating the buckle is secure. Check that the buckle is secure by pulling the shoulder straps and the crotch strap. -
Page 13
The Harness — Fastening & Adjusting To tighten the harness, pull the harness adjustment strap at the front of the seat. DO NOT allow harness straps to become twisted. Keep them flat against your baby’s body. CHECK that harness is snug. You should not be able to insert more than two fingers between the harness and your baby’s chest. -
Page 14
The Harness — Fastening & Adjusting As your child grows you will need to move the shoulder straps to the higher slots. The correct slots are those at or below the height of your child’s shoulders. Correct DO NOT use upper harness slots with a small infant. -
Page 15
The Harness – Adjusting the Shoulder Height To change harness slots, first remove your baby. Press the release button at the front of the seat and pull on the harness to slacken it. Behind the seat, take the two shoulder strap ends off the metal plate and pull the ends of the straps through the slots in the seat cover. -
Page 16
The Harness – Adjusting the Shoulder Height The ends of the harness straps have two loops. For a smaller baby, use the lower shoulder slots and the upper strap loops. For a larger baby, use the upper shoulder slots and the end strap loops. WARNING: Use extreme care in threading the straps according to the diagram. -
Page 17
The Harness – Adjusting the Shoulder Height Do not leave the strap ends hanging in front of the junction plate as shown. A poor connection may not be noticed. Do not just thread the straps through the junction plate openings. They will slide out. -
Page 18
The Rocking Feature The seat features a curved base for use as a rocker on a flat surface. To put the seat in a non-rocking position put the handle in position 3. Never place the seat on a raised surface whether rocking or not – it could fall off. -
Page 19
Attaching the Apron – (certain models only) WARNING: The seat apron is not to be used while seat is in your vehicle as it will obstruct access to the buckle in an emergency. Place apron on seat as shown. Make sure apron is covering the edges of your seat. -
Page 20
Fitting Your Child Seat Into Your Car IMPORTANT: Always use with the handle in the up (carrying) Shoulder position when using the child belt Belt seat in a vehicle. hooks Pull the lap section of seat belt over the child seat and under the two lap belt hooks. -
Page 21
Fitting Your Child Seat Into Your Car Push the child seat down into the vehicle seat. If using a retractor belt, help the retractor take up all the safety belt slack. If using a manual belt, tighten the belt as fully as possible. Check that the seat is securely installed. -
Page 22
Fitting Your Child Seat Into Your Car Attached to the side of your child seat is a level indicator to help properly recline the child seat on the vehicle seat. It is very important for your child’s safety that your child seat be properly reclined. -
Page 23: Removing The Cover
Removing The Cover Pull up the side flap of fabric and unhook the elastic strap on each side of the car seat. Pull the fabric seat cover off the front and rear of the seat and proceed to remove the harness belts.
-
Page 24
Removing The Cover Remove shoulder pads A, buckle pad B, and head hugger C. Push the shoulder harness through the slots in the fabric cover. Push the crotch strap and harness buckle through the slot in the seat pad. -
Page 25: Care Of Your Product
Care of Your Product Car seat may be used as an infant carrier. Be sure handle is locked in carrying position before carrying your child. Put handle into one of the back positions to use as a stand for reclining or sitting up. FROM TIME TO TIME CHECK YOUR CAR SEAT for worn parts, torn material or stitching.
-
Page 26
Care of Your Product Do not lubricate the buckle. DO NOT USE CAR SEAT without the seat cover. DISCONTINUE USING YOUR CAR SEAT should it become damaged or broken. Never use this seat after it is involved in a vehicle crash. Due to the effects of normal wear-and-tear, changing vehicle restraint systems, and European standard revisions, we recommend that this car seat be replaced with a new model after five years. -
Page 27
Do not put your child’s safety at risk by using without a seat cover. The seat cover should not be replaced with any other than the one recommended by Mothercare, because the cover constitutes an integral part of the restraint performance. -
Page 28: Final Checklist
Final Checklist However safe a child seat is, however well built it is, your child’s safety depends on you. Read this final checklist once you have fitted your child seat in your car. Check that you have adjusted the harness to suit your child. A fitting for winter clothes will be too loose for a child wearing summer clothes.
-
Page 29: Customer Care
Customer Care If you have a problem with this product or require replacement parts, please contact your nearest Mothercare store or telephone the Mothercare Customer Care Line on 01923 210 210. Alternatively, write to: Customer Care Mothercare Cherry Tree Road Watford, Herts WD24 6SH.
-
Page 30
Only suitable if the approved vehicles are fitted with 3 point static or 3 point retractor safety belts, approved to UN/ECE Regulation No. 16 or other equivalent standards. Approval Number 44.03.44.160 Rev 01 10-01 Imported for Mothercare, Watford, Herts. WD24 6SH UK438-12-01…
Требуется руководство для вашей Mothercare Brompton Гардероб? Ниже вы можете просмотреть и загрузить бесплатно руководство в формате PDF. Кроме того, приведены часто задаваемые вопросы, рейтинг изделия и отзывы пользователей, что позволит оптимально использовать ваше изделие. Если это не то руководство, которое вы искали, – свяжитесь с нами.
Ваше устройство неисправно, и в руководстве отсутствует решение? Перейдите в Repair Café для получения бесплатных ремонтных услуг.
Руководство

Рейтинг
Сообщите нам, что вы думаете о Mothercare Brompton Гардероб, оставив оценку продукта. Хотите поделиться вашими впечатлениями от данного изделия или задать вопрос? Вы можете оставить комментарий в нижней части страницы.
Довольны ли вы данным изделием Mothercare?
Да Нет
Будьте первым, кто оценит это изделие
0 голоса
Download Operation & user’s manual of mothercare Bedguard Indoor Furnishing for Free or View it Online on All-Guides.com.

Bedguard
User guide
IMPORTANT.
KEEP FOR
FUTURE
REFERENCE
Bedguard
Guia para el
usuario
IMPORTANTE.
RETENGA PARA
REFERENCIA
FUTURA
Your Child’s Safety
Is Your Responsibility
If you have a problem with this product or
require replacement parts, please contact
your nearest Mothercare store or telephone
the Mothercare Customer Care Line
on 01923 210 210
Alternatively write to:
Customer Care
Mothercare
Cherry Tree Road
Watford
Herts.
WD24 6SH
www.mothercare.com
La seguridad de su nino
es su responsabilidad
Si surgiera algun problema con este producto o
si necesita piezas de recambio sirvase ponerse
en contacto con el almacen Mothercare mas proximo
o llamar a la linea de Atencion al Cliente de Mothercare numero (+44)
1923 210210
Tambien puede escribir a:
Customer Care
Mothercare
Cherry Tree Road
Watford
Herts.
WD24 6SH
England
www.mothercare.com
Made in EU Art. No. L19r3