- Manuals
- Brands
- MSI Manuals
- Motherboard
- Z370 GAMING PLUS
- Manual
-
Contents
-
Table of Contents
-
Troubleshooting
-
Bookmarks
Quick Links
Unpacking
Thank you for buying the MSI
Z370 GAMING PLUS
motherboard. Check to make sure
®
your motherboard box contains the following items. If something is missing, contact
your dealer as soon as possible.
Drivers & Utilities
Motherboard User
Disc
Guide
Motherboard
I/O Shield
SATA Cable x2
1
Unpacking
Related Manuals for MSI Z370 GAMING PLUS
Summary of Contents for MSI Z370 GAMING PLUS
-
Page 1: Unpacking
Unpacking Thank you for buying the MSI Z370 GAMING PLUS motherboard. Check to make sure ® your motherboard box contains the following items. If something is missing, contact your dealer as soon as possible. Drivers & Utilities Motherboard User Disc…
-
Page 2: Safety Information
Safety Information y The components included in this package are prone to damage from electrostatic discharge (ESD). Please adhere to the following instructions to ensure successful computer assembly. y Ensure that all components are securely connected. Loose connections may cause the computer to not recognize a component or fail to start.
-
Page 3: Quick Start
Quick Start Preparing Tools and Components Intel LGA 1151 CPU ® CPU Fan Thermal Paste DDR4 Memory Power Supply Unit Chassis SATA Hard Disk Drive Graphics Card SATA DVD Drive A Package of Screws Phillips Screwdriver Quick Start…
-
Page 4: Installing A Processor
Installing a Processor http://youtu.be/bf5La099urI Quick Start…
-
Page 5: Installing Ddr4 Memory
Installing DDR4 memory http://youtu.be/T03aDrJPyQs DIMMB2 DIMMB2 DIMMB1 DIMMA2 DIMMA2 DIMMA2 DIMMA1 Quick Start…
-
Page 6: Connecting The Front Panel Header
Connecting the Front Panel Header http://youtu.be/DPELIdVNZUI HDD LED + Power LED + HDD LED — Power LED — Reset Switch Power Switch Reset Switch Power Switch JFP1 Reserved No Pin JFP1 HDD LED — HDD LED HDD LED + POWER LED — POWER LED POWER LED + Quick Start…
-
Page 7: Installing The Motherboard
Installing the Motherboard Quick Start…
-
Page 8: Installing Sata Drives
Installing SATA Drives http://youtu.be/RZsMpqxythc Quick Start…
-
Page 9: Installing A Graphics Card
Installing a Graphics Card http://youtu.be/mG0GZpr9w_A Quick Start…
-
Page 10: Connecting Peripheral Devices
Connecting Peripheral Devices Quick Start…
-
Page 11: Connecting The Power Connectors
Connecting the Power Connectors http://youtu.be/gkDYyR_83I4 ATX_PWR1 CPU_PWR1 Quick Start…
-
Page 12: Power On
Power On Quick Start…
-
Page 13: Table Of Contents
Contents Unpacking ………………….1 Safety Information ………………..2 Quick Start ………………….3 Preparing Tools and Components …………….3 Installing a Processor ………………… 4 Installing DDR4 memory ………………5 Connecting the Front Panel Header …………… 6 Installing the Motherboard ………………7 Installing SATA Drives…………………
-
Page 14
LIVE UPDATE 6 …………………. 66 COMMAND CENTER ………………… 68 GAMING APP ………………….72 X-BOOST ………………….. 77 MYSTICLIGHT ………………….79 MSI SMART TOOL ………………..81 RAMDISK………………….. 83 GAMING LAN MANAGER ………………84 DRAGON EYE ………………….86 SteelSeries Engine 3 ……………….. 87 Intel Extreme Tuning Utility ……………. -
Page 15
Using Intel Rapid Storage Technology Option ROM ……….. 95 ® Degraded RAID Array ………………. 98 Intel Optane™ Memory Configuration …………100 ® System Requirements ………………100 Installing the Intel Optane™ memory ………….. 100 ® Removing the Intel Optane™ memory …………. 102 ®… -
Page 16: Specifications
Supports non-ECC UDIMM memory y Supports Intel Extreme Memory Profile (XMP) ® *Please refer to www.msi.com for more information on compatible memory. y 2x PCIe 3.0 x16 slots Expansion Slots y 4x PCIe 3.0 x1 slots y 1x VGA port, supports a maximum resolution of…
-
Page 17
Continued from previous page Intel Z370 Chipset ® RAID y Supports RAID 0, RAID 1, RAID 5 and RAID 10 for SATA storage devices y Intel Z370 Chipset ® ƒ 8x USB 3.1 Gen1 (SuperSpeed USB) ports (4 Type-A ports on the back panel, 4 ports available through the internal USB connectors) ƒ… -
Page 18
Continued from previous page y 1x 24-pin ATX main power connector y 1x 8-pin ATX 12V power connector y 6x SATA 6Gb/s connectors y 2x USB 3.1 Gen1 connectors (supports additional 4 USB 3.1 Gen1 ports) y 2x USB 2.0 connectors (supports additional 4 USB 2.0 ports) y 1x 4-pin CPU fan connector y 1x 4-pin water pump fan connector… -
Page 19
GAMING LAN MANAGER y Open Broadcaster Software y Tridef VR & Smart Cam ® y SteelSeries Engine 3 y WTFast* y CPU-Z MSI GAMING y Intel Extreme Tuning Utility ® y Norton Internet Security Solution ™ y Google Chrome , Google Toolbar, Google Drive ™… -
Page 20
Continued from previous page y Audio ƒ Audio Boost y Network ƒ GAMING LAN with Gaming LAN Manager y Storage ƒ Turbo M.2 y Fan ƒ Pump Fan ƒ Smart Fan Control y LED ƒ Mystic Light ƒ Mystic Light Extension (RGB) ƒ… -
Page 21: Block Diagram
Block Diagram DVI-D DisplayPort 2 Channel DDR4 Memory PCI Express Bus DMI 3.0 PCIe x1 slot PCIe x1 slot 1 x M.2 PCIe x1 slot PCIe x1 slot 6 x SATA 6Gb/s Z370 8 x USB 3.1 Gen1 6 x USB 2.0 LPC Bus NV6795 Realtek…
-
Page 22: Rear I/O Panel
Rear I/O Panel Audio Ports PS/2 Port USB 2.0 DisplayPort USB 3.1 Gen1 USB 3.1 Gen1 DVI-D LAN Port LED Status Table Link/ Activity LED Speed LED Status Description Status Description No link 10 Mbps connection Yellow Linked Green 100 Mbps connection Blinking Data activity Orange…
-
Page 23: Realtek Hd Audio Manager
Realtek HD Audio Manager After installing the Realtek HD Audio driver, the Realtek HD Audio Manager icon will appear in the system tray. Double click on the icon to launch. Device Selection Advanced Settings Jack Status Application Enhancement Connector Main Volume Strings Profiles y Device Selection — allows you to select a audio output source to change the related…
-
Page 24
Audio jacks to headphone and microphone diagram Audio jacks to stereo speakers diagram AUDIO INPUT Audio jacks to 7.1-channel speakers diagram AUDIO INPUT Rear Front Side Center/ Subwoofer Rear I/O Panel… -
Page 25: Overview Of Components
Overview of Components DIMMA1 SYS_FAN4 DIMMA2 CPU_FAN1 DIMMB1 CPU_PWR1 DIMMB2 CPU Socket PUMP_FAN1 SYS_FAN2 EZ Debug LED ATX_PWR1 JUSB3 JBAT1 M2_1 PCI_E1 JUSB4 PCI_E2 SATA▼1▲2 PCI_E3 SATA▼3▲4 PCI_E4 SATA5 PCI_E5 SATA6 JTPM1 PCI_E6 JCI1 JFP1 JAUD1 JFP2 JRGB1 SYS_FAN1 JUSB1 SYS_FAN3 JCOM1 JUSB2…
-
Page 26
Component Contents Port Name Port Type Page CPU_FAN1,SYS_FAN1~4, PUMP_ Fan Connectors FAN1 CPU_PWR1, ATX_PWR1 Power Connectors CPU Socket LGA1151 CPU Socket DIMMA1/ A2/ B1/ B2 DIMM Slots JAUD1 Front Audio Connector JBAT1 Clear CMOS (Reset BIOS) Jumper JCI1 Chassis Intrusion Connector JCOM1 Serial Port Connector JFP1, JFP2… -
Page 27: Cpu Socket
Always unplug the power cord from the power outlet before installing or removing the CPU. Please retain the CPU protective cap after installing the processor. MSI will deal with Return Merchandise Authorization (RMA) requests if only the motherboard comes with the protective cap on the CPU socket.
-
Page 28: Dimm Slots
DIMM Slots DIMMA1 DIMMB1 Channel A Channel B DIMMA2 DIMMB2 Memory module installation recommendation DIMMB2 DIMMB2 DIMMB1 DIMMA2 DIMMA2 DIMMA2 DIMMA1 Important Always insert memory modules in the DIMMA2 slot first. Due to chipset resource usage, the available capacity of memory will be a little less than the amount of installed.
-
Page 29: Pci_E1~6: Pcie Expansion Slots
If you install a large and heavy graphics card, you need to use a tool such as MSI Gaming Series Graphics Card Bolster to support its weight and to prevent deformation of the slot. Overview of Components…
-
Page 30: M2_1: M.2 Slot (Key M)
M2_1: M.2 Slot (Key M) Important Intel Optane Memory Ready. ® Video Demonstration Watch the video to learn how to Install M.2 module. http://youtu.be/JCTFABytrYA Installing M.2 module 1. Remove the screw from the base screw. 2. Remove the base screw. 3.
-
Page 31: Sata1~6: Sata 6Gb/S Connectors
SATA1~6: SATA 6Gb/s Connectors These connectors are SATA 6Gb/s interface ports. Each connector can connect to one SATA device. SATA2 SATA1 SATA4 SATA3 SATA5 SATA6 Important The SATA1 port will be unavailable when an M.2 SATA SSD module has been installed in the M.2 slot.
-
Page 32: Cpu_Pwr1, Atx_Pwr1: Power Connectors
CPU_PWR1, ATX_PWR1: Power Connectors These connectors allow you to connect an ATX power supply. CPU_PWR1 Ground +12V Ground +12V Ground +12V Ground +12V +3.3V +3.3V +3.3V -12V Ground Ground PS-ON# Ground Ground Ground ATX_PWR1 Ground Ground PWR OK 5VSB +12V +12V +3.3V Ground…
-
Page 33: Jusb1~2: Usb 2.0 Connectors
JUSB1~2: USB 2.0 Connectors These connectors allow you to connect USB 2.0 ports on the front panel. USB0- USB1- USB0+ USB1+ Ground Ground No Pin Important Note that the VCC and Ground pins must be connected correctly to avoid possible damage.
-
Page 34: Cpu_Fan1,Sys_Fan1~4, Pump_Fan1: Fan Connectors
CPU_FAN1,SYS_FAN1~4, PUMP_FAN1: Fan Connectors Fan connectors can be classified as PWM (Pulse Width Modulation) Mode or DC Mode. PWM Mode fan connectors provide constant 12V output and adjust fan speed with speed control signal. DC Mode fan connectors control fan speed by changing voltage. When you plug a 3-pin (Non-PWM) fan to a fan connector in PWM mode, the fan speed will always maintain at 100%, which might create a lot of noise.
-
Page 35: Jaud1: Front Audio Connector
JAUD1: Front Audio Connector This connector allows you to connect audio jacks on the front panel. MIC L Ground MIC R Head Phone R MIC Detection SENSE_SEND No Pin Head Phone L Head Phone Detection JCI1: Chassis Intrusion Connector This connector allows you to connect the chassis intrusion switch cable. Normal Trigger the chassis intrusion event…
-
Page 36: Jtpm1: Tpm Module Connector
JTPM1: TPM Module Connector This connector is for TPM (Trusted Platform Module). Please refer to the TPM security platform manual for more details and usages. LPC Clock 3V Standby power LPC Reset 3.3V Power LPC address & data pin0 Serial IRQ LPC address &…
-
Page 37: Jbat1: Clear Cmos (Reset Bios) Jumper
JBAT1: Clear CMOS (Reset BIOS) Jumper There is CMOS memory onboard that is external powered from a battery located on the motherboard to save system configuration data. If you want to clear the system configuration, set the jumper to clear the CMOS memory. Keep Data Clear CMOS/ Reset BIOS…
-
Page 38: Jrgb1: Rgb Led Connector
Always turn off the power supply and unplug the power cord from the power outlet before installing or removing the RGB LED strip. Please use MSI’ s software to control the extended LED strip. PCIe x16 slot LEDs These LED indicate the PCIe x16 slots status.
-
Page 39: Bios Setup
Press Delete key, when the Press DEL key to enter Setup Menu, F11 to enter Boot Menu message appears on the screen during the boot process. y Use MSI FAST BOOT application. Click on GO2BIOS button and choose OK. The system will reboot and enter BIOS setup directly.
-
Page 40: Resetting Bios
Updating BIOS Updating BIOS with M-FLASH Before updating: Please download the latest BIOS file that matches your motherboard model from MSI website. And then save the BIOS file into the USB flash drive. Updating BIOS: 1. Press Del key to enter the BIOS Setup during POST.
-
Page 41: Ez Mode
EZ Mode At EZ mode, it provides the basic system information and allows you to configure the basic setting. To configure the advanced BIOS settings, please enter the Advanced Mode by pressing the Setup Mode switch or F7 function key. XMP switch Setup Mode switch Screenshot…
-
Page 42
y Information display — click on the CPU, Memory, Storage, Fan Info and Help buttons on left side to display related information. y Function buttons — enable or disable the LAN Option ROM, M.2/ Optane Genie, HD audio controller, AHCI, RAID, CPU Fan Fail Warning Control and BIOS Log Review by clicking on their respective button. -
Page 43: Advanced Mode
Advanced Mode Press Setup Mode switch or F7 function key can switch between EZ Mode and Advanced Mode in BIOS setup. XMP switch Setup Mode switch Screenshot Search Language System information GAME BOOST switch Boot device priority bar BIOS menu BIOS menu selection selection…
-
Page 44: Settings
SETTINGS System Status f System Date Sets the system date. Use tab key to switch between date elements. The format is <day> <month> <date> <year>. <day> Day of the week, from Sun to Sat, determined by BIOS. Read-only. <month> The month from Jan. through Dec. <date>…
-
Page 45
fPEG X — Max Link Speed [Auto] Sets PCI Express protocol of PCIe x16 slots for matching different installed devices. [Auto] This item will be configured automatically by BIOS. [Gen1] Enables PCIe Gen1 support only. [Gen2] Enables PCIe Gen2 support only. [Gen3] Enables PCIe Gen3 support only. -
Page 46
fIpv6 PXE Support [Enabled] When Enabled, the system UEFI network stack will support Ipv6 protocol. This item will appear when Network Stack is enabled. [Enabled] Enables the Ipv6 PXE boot support. [Disabled] Disables the Ipv6 PXE boot support. fSATA Mode [AHCI Mode] Sets the operation mode of the onboard SATA controller. -
Page 47
f USB Configuration Sets the onboard USB controller and device function. Press Enter to enter the sub- menu. fUSB Controller [Enabled] Enables or disables all USB controller. fXHCI Hand-off [Diasbled] Enables or disables XHCI hand-off support for the operating system without XHCI hand-off feature. -
Page 48
Disables this function. fMSI Fast Boot [Disabled] MSI Fast Boot is the fastest way to boot the system. It will disable more devices to speed up system boot time which is faster than the boot time of Fast Boot. [Enabled] Enables the MSI Fast Boot function to speed up booting time. -
Page 49
fInternal GOP Configuration Manages the onboard Graphics Output Protocol (GOP). Press Enter to enter the sub-menu. This sub-menu will appear when Windows 10 WHQL Support is enabled. fSecure Boot Sets the Windows secure boot to prevent the unauthorized accessing. Press Enter to enter the sub-menu. -
Page 50: Boot
fResume By Onboard Intel LAN [Disabled] Enables or disables the system wake up by Onboard Intel LAN. [Enabled] Enables the system to be awakened from the power saving modes when activity or input signal of Intel LAN device is detected. [Disabled] Disables this function.
-
Page 51: Security
f Bootup NumLock State [On] Select the keyboard NumLock state upon bootup. f Info Block effect [Unlock] Sets the state of Help information block. [Unlock] Sliding effect. [Lock] Fix the Help information block on the screen. f AUTO CLR_CMOS [Disabled] Enables or disables the CMOS data to be resumed automatically when the booting process hang-up over 5 seconds.
-
Page 52: Save & Exit
Important When selecting the Administrator / User Password items, a password box will appear on the screen. Type the password then press <Enter>. The password typed now will replace any previous set password from CMOS memory. You will be prompted to confirm the password.
-
Page 53: Oc
Important Overclocking your PC manually is only recommended for advanced users. Overclocking is not guaranteed, and if done improperly, it could void your warranty or severely damage your hardware. If you are unfamiliar with overclocking, we advise you to use GAME BOOST function for easy overclocking.
-
Page 54
f CPU Ratio Offset When Running AVX [Auto] Sets a offset value to lower the CPU core ratio. It could be helpful for heat dissipation when running AVX instruction set. If set to Auto, BIOS will configure this setting automatically. This item appears when the installed CPU supports this function. f Ring Ratio [Auto] Sets the ring ratio. -
Page 55
f CPU Base Clock Apply Mode [Auto]* Sets the applying mode for adjusted CPU base clock. [Auto] This setting will be configured automatically by BIOS. [Next Boot] CPU will run the adjusted CPU base clock at next boot. [Immediate] CPU runs the adjusted CPU base clock immediately. [During Boot] CPU will run the adjusted CPU base clock during boot. -
Page 56
f Memory Fast Boot [Auto]* Enables or disables the initiation and training for memory every booting. [Auto] The setting will be configured automatically by BIOS. [Enabled] System will completely keep the archives of first intiation and training for memory. So the memory will not be initialed and trained when booting to accelerate the system booting time. -
Page 57
fCPU GT Over Voltage Protection [Auto] Sets the voltage limit for CPU GT over-voltage protection. If set to Auto, BIOS will configure this setting automatically. Higher voltage provides less protection and may damage the system. fCPU GT Under Voltage Protection [Auto] Sets the voltage limit for CPU GT under-voltage protection. -
Page 58
f CPU Memory Changed Detect [Enabled]* Enables or disables the system to issue a warning message during boot when the CPU or memory has been replaced. [Enabled] The system will issue a warning message during boot and then you have to load the default settings for new devices. -
Page 59
fIntel Virtualization Tech [Enabled] Enables or disables Intel Virtualization technology. [Enabled] Enables Intel Virtualization technology and allows a platform to run multiple operating systems in independent partitions. The system can function as multiple systems virtually. [Disabled] Disables this function. fIntel VT-D Tech [Disabled] Enables or disables Intel VT-D (Intel Virtualization for Directed I/O) technology. -
Page 60
fPackage C State limit [Auto] This item allows you to select a CPU C-state level for power-saving when system is idle. The options of C-state depend on the installed CPU. This item appears when Intel C-State is enabled. fCFG Lock [Enabled] Lock or un-lock the MSR 0xE2[15], CFG lock bit. -
Page 61: M-Flash
M-FLASH provides the way to update BIOS with a USB flash drive. Please down-load the latest BIOS file that matches your motherboard model from MSI website, save the BIOS file into your USB flash drive. And then follow the steps below to update BIOS.
-
Page 62: Oc Profile
OC PROFILE f Overclocking Profile 1/ 2/ 3/ 4/ 5/ 6 Overclocking Profile 1/ 2/ 3/ 4/ 5/ 6 management. Press <Enter> to enter the sub- menu. fSet Name for Overclocking Profile 1/ 2/ 3/ 4/ 5/ 6 Name the current overclocking profile. fSave Overclocking Profile 1/ 2/ 3/ 4/ 5/ 6 Save the current overclocking profile.
-
Page 63: Hardware Monitor
HARDWARE MONITOR Temperature & Speed Fan Manage Setting Buttons Voltage display f Temperature & Speed Shows the current CPU temperature, system temperature and fans’ speeds. f Fan Manage ƒ PWM — allows you to select the PWM mode for fan operation. ƒ…
-
Page 64: Software Description
Software Description Please download and update the latest utilities and drivers at www.msi.com Installing Windows ® 1. Power on the computer. 2. Insert the Windows 10 disc into your optical drive. ® 3. Press the Restart button on the computer case.
-
Page 65: App Manager
Motherboard Information — shows the model name of motherboard. y Total Install/ Update — click on this tab to update/ install all the applications. Important Please note that, once you uninstall the APP MANAGER, all the MSI applications and software will be uninstalled simultaneously. Software Description…
-
Page 66: Live Update 6
LIVE UPDATE 6 LIVE UPDATE 6 is an application for the MSI system to scan and download the latest ® drivers, BIOS and utilities. With LIVE UPDATE 6, you don’ t need to search the drivers on websites, and don’ t need to know the models of motherboard and graphics cards.
-
Page 67: Total Installer
1. Select the Live Update tab. 2. Choose Automatic scan, system will automatically scan all the items and search for the latest update files. Or you can choose Manual scan and select the items you wish to scan. 3. Click the Scan button at the bottom. It may take several moments to complete the process.
-
Page 68: Command Center
COMMAND CENTER COMMAND CENTER is an user-friendly software and exclusively developed by MSI, helping users to adjust system settings and monitor status under OS. With the help of COMMAND CENTER, making it possible to achieve easier and efficient monitoring process and adjustments than that under BIOS. In addition, the COMMAND CENTER can be a server for mobile remote control application.
-
Page 69
CPU Fan CPU Fan control panel provides Smart mode and Manual Mode. You can switch the control mode by clicking the Smart Mode and Manual Mode buttons on the top of the CPU Fan control panel. y Manual Mode — allows you to manually control the CPU fan speed by percentage. -
Page 70
GAME BOOST GAME BOOST provides a specified CPU frequency for overclocking the CPU. Option Buttons — Advanced When click the Advanced button, The Voltage, Fan and DRAM icons will appear. y Voltage — allows you to adjust advanced voltage values of CPU and chipset. y Fan — allows you to control the system fans speed. -
Page 71
7. Find the IP address on the SoftAP Management Setting area, and enter the IP address on your MSI COMMAND CENTER APP to link your system. ® 8. Press Refresh on the MSI COMMAND CENTER APP to verify that monitoring and ® OC functions are working properly. -
Page 72: Gaming App
3. Connect your android device and motherboard to the same local area network. 4. Run MSI GAMING APP APP on your android device. ® 5. Press the Remote Control Setting icon on the MSI GAMING APP APP to find the ® paired device Name you set in the Remote Control Setting panel.
-
Page 73
OSD Setting Panel Use the OSD setting panel to specify information within on-screen display (OSD). y Apply Button — applies above settings to OSD. Eye Rest Eye Rest allows you to optimize the display on your monitor. y EyeRest — reduces blue-light of your LED backlit screen, in order to protect your eyes. -
Page 74
VR Ready It will optimize the performance of your system to ensure everything is VR Ready. VR ON/ OFF Applications y VR ON/ OFF -enables or disables VR settings. y Applications — appears when you turn on the VR support. It allows you to close some applications to optimize the system for better VR experience. -
Page 75
ƒ Login Keys — provides hotkey login function. ƒ MSI Smart Keys — allows you to define hotkeys for MSI Smart Keys. y Hotkey Manager — allows you to create, edit and delete hotkeys. y Current Hotkeys — shows all existing hotkeys. -
Page 76
Mouse Master Mouse Master provides mouse macro function. You can also use it to change DPI of your mouse. DPI Setting Delay Time Default Button Macro Hot Key DPI Hot Key Mouse Action Action List Test Area Edit Buttons Clear Button Load Button Save Button y Delay Time — allows you to apply a delay time in mouse macro. -
Page 77: X-Boost
X-BOOST The MSI X-BOOST allows you to select the system performance mode to meet your current system environment or support faster storage access speed for your external storage or memory cards. Easy In Easy page, you can select one system performance mode to meet the current system environment.
-
Page 78
OPTANE BOOST — supports faster access speed of Intel Optane memory (require a reboot). Important Please note that you can only select one mode at a time from Easy or Advance page as MSI X-BOOST function. The improved transfer rate/ access speed will vary with the USB/ storage device. Software Description… -
Page 79: Mysticlight
MYSTICLIGHT MYSTICLIGHT is an application allows you to control LED lights of MSI products. Main Screen The Main screen is used to configure what devices need to be synchronized and LED light effect options. Sync Devices ON/ OFF All LED…
-
Page 80
Motherboard Screen The motherboard screen is used to configure the LED light effect of the motherboard. Sync All Return Button Motherboard ON/ OFF All LED Name Profile Live Preview LED Area Light Effect Apply Button Options Save Button Note: The motherboard picture and name may vary according to different models. y Return Button — returns to the main screen. -
Page 81: Msi Smart Tool
MSI SMART TOOL MSI SMART TOOL is a convenient tool that can help you to create your Windows installation USB flash drive with USB 3.0 drivers, and it can also create a software RAID. Main menu After installing and activating MSI SMART TOOL, it will display a main menu for you to choose Win7 Smart Tool or Software RAID.
-
Page 82
SOFTWARE RAID This utility allows you to create a software RAID in Windows system. To create a software RAID: 1. Use checkboxs to select the disks you want included in your RAID. 2. Choose Speed Up or Backup for RAID type. y Speed Up = RAID0 y Backup = RAID1 3. -
Page 83: Ramdisk
RAMDISK RAMDISK creates a virtual RAM drive using the available memory in your computer, the performance of the RAMDISK is faster than an SSD and hard drive. RAMDISK allows you to store any temporary information on it. Furthermore, using the RAMDISK will extend your SSD’…
-
Page 84: Gaming Lan Manager
GAMING LAN MANAGER GAMING LAN MANAGER is an utility for traffic shaping for the Windows 10. It can keep your internet fast during heavy upload/ download and improve your ping for online games. If your motherboard has a Wi-Fi module, GAMING LAN MANAGER provides virtual access point function for traffic shaping for your mobile devices.
-
Page 85
Speed Testing The speed testing is used to optimize bandwidth usage. To test the Upload and Down- load speed, please follow the steps below: 1. Click the Network Test block in GAMING LAN MANAGER. 2. Click Test Network Speed button. The test takes several minutes to test your network speed. -
Page 86: Dragon Eye
DRAGON EYE DRAGON EYE allows you to watch game guides, tutorials, live match or tournament stream while gaming. In game, you can use hotkeys to control/adjust the settings of DRAGON EYE. Size Settings Position Settings On / Off Switch Help Transparency Settings Video List Hotkeys Information…
-
Page 87: Steelseries Engine 3
SteelSeries Engine 3 SteelSeries Engine 3 is a unified platform built to support all of SteelSeries products. It can deploy your saved device settings automatically when switching between your favorite games or applications. After installation the SteelSeries Engine background processes will start and the interface will open automatically.
-
Page 88
Configuring Your Devices You can custom configurations for SteelSeries devices in their Configuration Windows. The top left displays the name of the configuration you are viewing, the body features widgets for customizing various functions of the device, and at the bottom are Save/ Revert buttons, a Live Preview toggle, and a button to open/close the collapsible Configuration List Panel. -
Page 89: Intel ® Extreme Tuning Utility
Intel Extreme Tuning Utility ® Intel Extreme Tuning Utility (Intel XTU) is a simple overclocking software for you to ® tune, test and monitor your system. Tuning Controls Views Settings Help System Navigation Table System System Monitors Graphs y Views Settings Help ƒ…
-
Page 90: Cpu-Z
CPU-Z CPU-Z is an utility that gathers information on some of the main devices of your system. y CPU Tab — shows processor name, code name, package, specification, instructions sets, core speed and cache levels. y Caches Tab — shows extended information related to the cache capabilities. y Mainboard Tab — shows motherboard manufacturer, model name, chipset, BIOS version and graphic interface.
-
Page 91: Tridef Vr
TriDef VR With TriDef VR you can play your favorite PC games on a huge 3D screen inside your virtual reality headset. It is compatible with the Oculus Rift and HTC Vive. After installation, please ensure that your VR headset is set up and working correctly, then double-click TriDef VR Games on the Desktop, or from: Start >…
-
Page 92
Games Tab The first tab you’ ll see on the main window is the Games tab. As mentioned, apps or games launched from the desktop will appear in 2D on the virtual screen. However, if you launch a supported game from the Games tab, it will be displayed on the virtual screen in stereoscopic 3D! The first time you launch TriDef VR, the application will scan your PC and automatically add supported games to the list. -
Page 93
Settings Popup Look at the Settings item for 1 second to display the Settings popup. This popup window appears in front of the virtual screen. Use your mouse to adjust the slider values. y Screen Settings — adjust the virtual screen’ s size, distance and curvature. y Game Settings — adjust 3D settings for that game. -
Page 94: Tridef Smartcam
TriDef SmartCam Use TriDef SmartCam to replace or SmartBlur your background in video chat applications or to remove your background in XSplit. Just select TriDef SmartCam wherever you see a list of cameras or choose your webcam application. The following description uses XSplit Gamecaster for an example. TriDef SmartCam for XSplit Gamecaster After installation TriDef SmartCam is integrated into XSplit Gamecaster version 2.5 and newer.
-
Page 95: Raid Configuration
RAID Configuration Below are the different types of a RAID. RAID 0 breaks the data into blocks which are written to separate hard drives. Spreading the hard drive I/O load across independent channels greatly improves I/O performance. RAID 1 provides data redundancy by mirroring data between the hard drives and provides enhanced read performance.
-
Page 96
Creating s RAID Volume 1. Select option Create RAID Volume and press Enter key. The following screen appears. CREATE VOLUME MENU Name : Volume0 RAID Level : RAID1(Mirror) Disks : Select Disks Strip Size : N / A Capacity : XXX.X GB Sync : N / A… -
Page 97
Removing a RAID Volume Here you can delete the RAID volume, but please be noted that all data on RAID drives will be lost. Important If your system currently boots to RAID and you delete the RAID volume in the IRST Option ROM, your system will become unbootable. -
Page 98: Degraded Raid Array
Important You will lose all data on the RAID drives and any internal RAID structures when you perform this operation. Possible reasons to Reset Disks to Non-RAID could include issues such as incompatible RAID configurations or a failed volume or failed disk. Recovery Volume Options Select option Recovery Volume Options from the main menu screen and press Enter to change recovery volume mode.
-
Page 99: Failed Hard Drive Member
2. Reconnect the hard drive. 3. Reboot to Windows ; the rebuild will occur automatically. ® Failed Hard Drive Member 1. Power off. 2. Replace the failed hard drive with a new one that is of equal or greater capacity. 3.
-
Page 100: Intel ® Optane™ Memory Configuration
Optane™ memory can accelerate the Windows 10 64bit operating system. This ® section describes how to install and remove the Intel Optane™ memory. ® System Requirements y Intel Optane™ memory ready MSI motherboards ® ® y Supported 7th Gen, or later, Intel Core™ — i Processor ®…
-
Page 101
5. Enable Intel Optane™ Memory. ® ˜ Enable Intel Optane™ Memory via the Intel Optane™ memory application ® ® (auto-launches upon reboot). ˜ Click Yes in the dialog. ˜ Reboot System. WARNING Once you enable Intel Optane™ memory, in order to prevent seriously damage your ®… -
Page 102: Removing The Intel ® Optane™ Memory
Removing the Intel Optane™ memory ® If you no longer want to use Intel Optane™ memory, you have to disable the Intel ® ® Optane™ memory before removing the Intel Optane™ memory module to avoid ® operating system damage. Please follow the steps below to remove the Intel Optane™…
-
Page 103: Troubleshooting
® Optane Memory and switch BIOS setting from RAID/ Optane mode back to AHCI mode, that may cause operating system damage. MSI has developed a software assistance for this problem. You can disable Intel Optane™ Memory and switch back to AHCI ®…
-
Page 104: Troubleshooting
Troubleshooting Lost BIOS password Before sending the motherboard for RMA repair, try to go over troubleshooting y Clear the CMOS, but that will cause guide first to see if your got similar you to lose all customized settings in the symptoms as mentioned below.
-
Page 105: Regulatory Notices
EMC Directive 2014/30/EU; RoHS Directive 2011/65/EU. Compliance with these directives is assessed using applicable European Harmonized Standards. The point of contact for regulatory matters is MSI, MSI-NL Eindhoven 5706 5692 ER Son. B급 기기 (가정용 방송통신기자재) 이 기기는 가정용(B급) 전자파적합기기로서 주…
-
Page 106
MSI will comply with the product take entregar a una empresa autorizada para la recogida de back requirements at the end of life of MSI-branded estos residuos. -
Page 107
MSI si adeguerà a tale Direttiva ritirando tutti i prodotti marchiati MSI che sono stati venduti all’interno dell’Unione Europea alla fine del loro ciclo di vita. -
Page 108
Alternatively, please try the following help resources for further guidance. y Visit the MSI website for technical guide, BIOS updates, driver updates, and other information: http://www.msi.com y Register your product at: http://register.msi.com…
Выпустив материнские платы для процессоров Intel 8-го поколения под сокет Intel LGA1151-2, компания MSI не забыла и об игровом направлении с бюджетным уклоном. Ведь многим будет достаточно платы, не…

Выпустив материнские платы для процессоров Intel 8-го поколения под сокет Intel LGA1151-2, компания MSI не забыла и об игровом направлении с бюджетным уклоном. Ведь многим будет достаточно платы, не перегруженной дополнительными возможностями, повышающими конечную стоимость изделия, но в то же время имеющуювыделяющийся дизайн.
Примером такой платы является MSI Z370 GAMING PLUS из серии ARSENAL GAMING которую можно купить по цене от 9000 рублей.
Технические характеристики
-
Сокет: Intel LGA1151-2;
-
Поддерживаемые процессоры: 8-е поколение процессоров Intel Core/Pentium/Celeron;
-
Чипсет: Intel Z370;
-
Оперативная память: 4 x DIMM DDR4-2133–4000+(O.C.), макс. до 64 Гбайт;
-
Слоты расширения: 2 x PCI-E x16 v3.0 и 4 x PCI-E x1 v3.0;
-
Встроенная графика: интегрирована в процессор, порты 1 x VGA (макс. разрешение 2048×1536@50Гц), 1 x DisplayPort (макс. разрешение 4096×2304@24Гц или 2560×1600@60Гц), 1 x DVI-D (макс. разрешение 1920×1200@60Гц);
-
Поддержка Multi-GPU: 2-Way AMD CrossFire;
-
Интерфейсы системы хранения: чипсет Intel Z370 – 6 x SATA 6 Гбит/сек (поддержка RAID 0/1/5/10), 1 x слот M.2 (Key M) 2242/ 2260/ 2280/ 22110 (режим работы PCIe 3.0 x4 32 Гбит/сек и SATA 6 Гбит/сек). Есть поддержка Intel Optane Memory. Примечание: порт SATA1 не доступен при использовании слота M.2 в режиме SATA;
-
Порты USB: чипсет чипсет Intel Z370 – 8 x USB 3.1 Gen1 (5 Гбит/сек) (4 порта на задней панели, 4 порта доступны через внутренние коннекторы USB), 6 x USB 2.0 (480 Мбит/сек) (2 порта на задней панели, 4 порта доступны через внутренние коннекторы USB);
-
Звук: HD-кодек 7.1, Realtek ALC892;
-
Сетевая карта: 1 х 10/100/1000 Мбит/сек, Intel I219-V;
-
Форм-фактор: ATX;
-
Размеры: 30,5 см х 24,4 см.
Разъемы на плате:
-
1 x 24-пин ATX основной коннектор питания;
-
1 x 8-пин ATX 12V коннектор питания;
-
6 x коннекторов SATA 6 Гбит/сек;
-
2 x коннектора USB 2.0;
-
2 x коннектора USB 3.1 Gen1;
-
1 x 4-пин коннектор вентилятора CPU;
-
1 x 4-пин коннектор подключения помпы;
-
4 x 4-пин коннектора системных вентиляторов;
-
1 x коннектор звуковых разъемов передней панели;
-
2 x коннектора для подключения индикаторов и органов управления передней панели;
-
1 х RGB LED коннектор;
-
1 x коннектор TPM модуля;
-
1 x разъем датчика открытия корпуса;
-
1 x LPT-порт;
-
1 x COM-порт;
-
1 x Clear CMOS джампер.
Порты ввода/вывода задней панели:
-
1 x комбинированный PS/2 клавиатура/мышь;
-
2 x USB 2.0;
-
1 x VGA;
-
1 x DVI-D;
-
1 x DisplayPort;
-
4 x USB 3.1 Gen1 тип А;
-
1 x LAN (RJ45);
-
6 x звуковых разъемов OFC.
Упаковка и комплектация
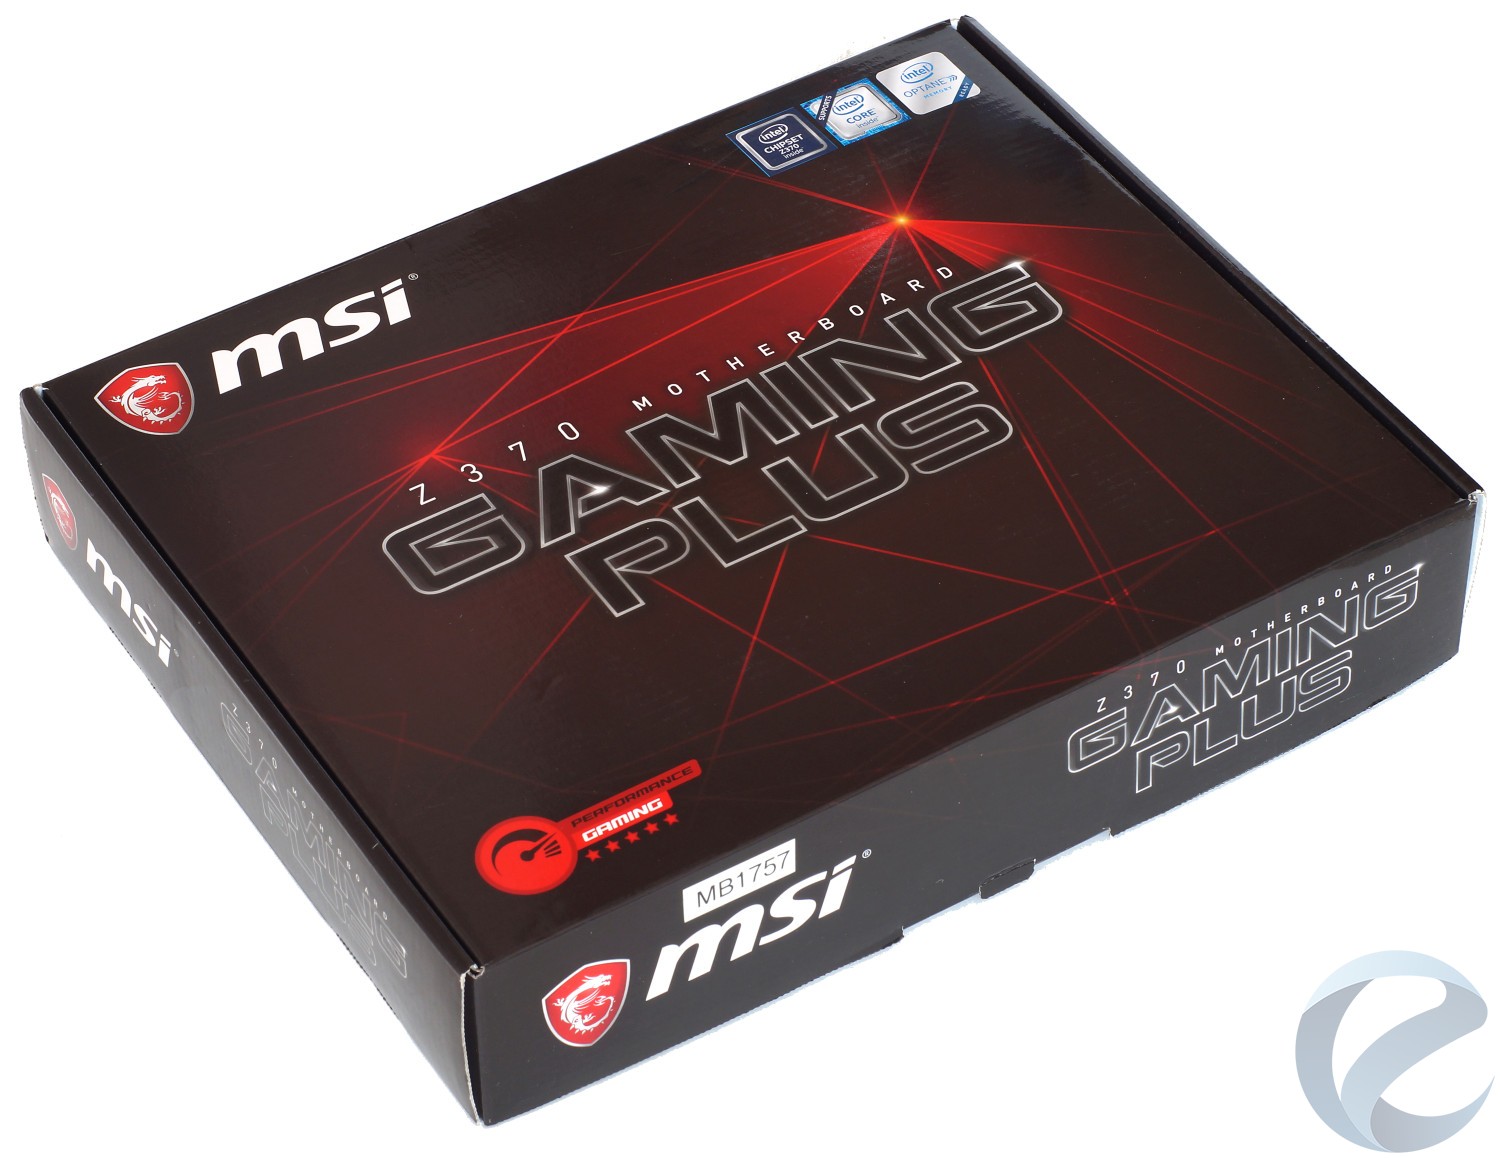
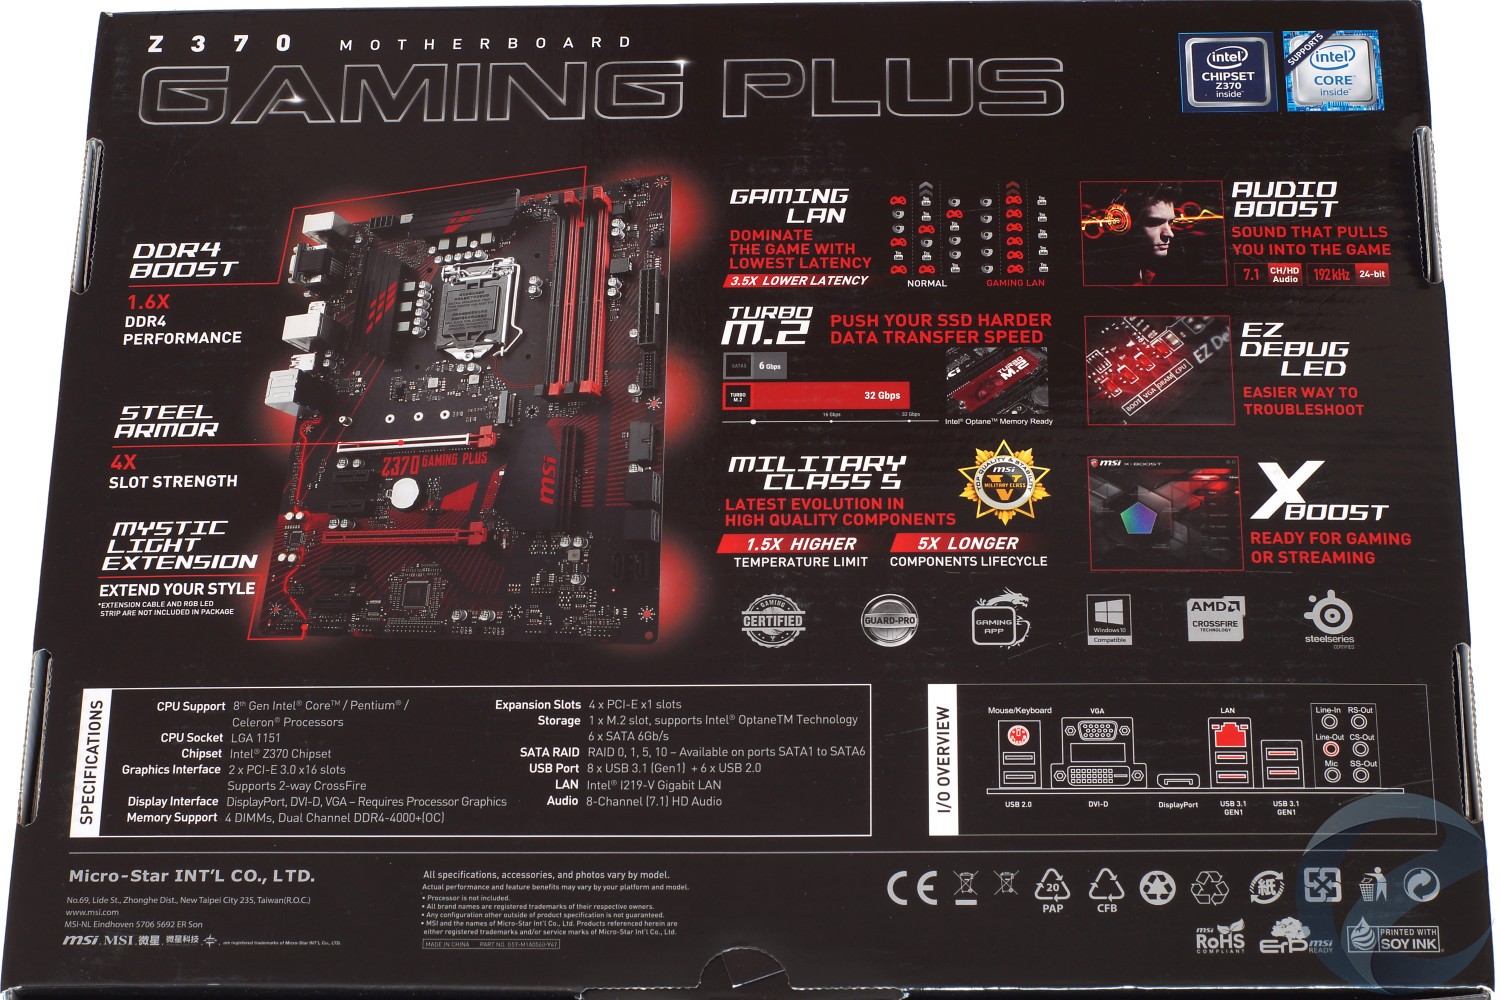
Так же, как и у модели MSI Z370 SLI PLUS, дизайн коробки материнской платы MSI Z370 GAMING PLUS нельзя назвать ярким, но в то же время сохранена игровая концепция в оформлении. Информации на упаковкенемного, и вся она размещена с обратной стороны. Там же расположено иизображениесамой платы. По большей части подчеркивается игровая направленность в виде технологий GAMING LAN (возможность менять приоритет для сетевого трафика), технологии ускорения X-Boost, возможности сборки системы с двумя видеокартами AMD в режиме CrossFire.
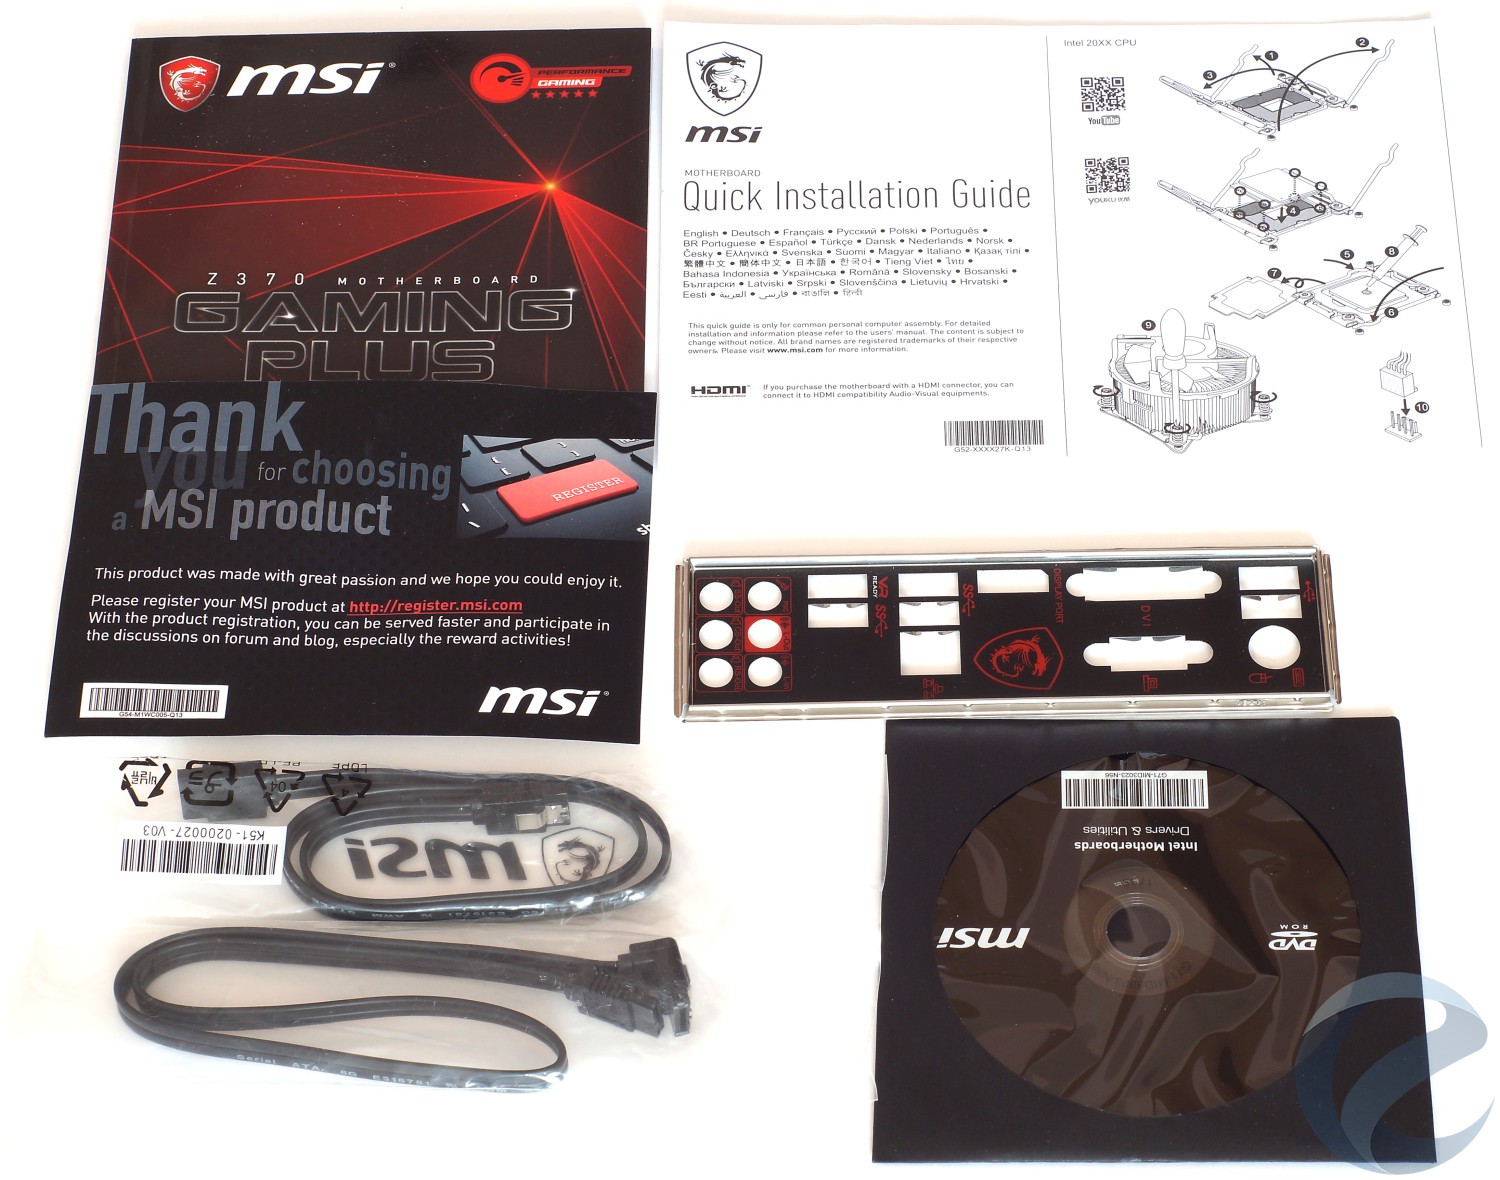
Подчеркивает«бюджетный» уровень платы скромный набор аксессуаров: руководство пользователя, краткое руководство, листочек регистрации продукции MSI, два SATA кабеля, DVD-диск и задняя панель ввода-вывода.
Внешний вид и особенности
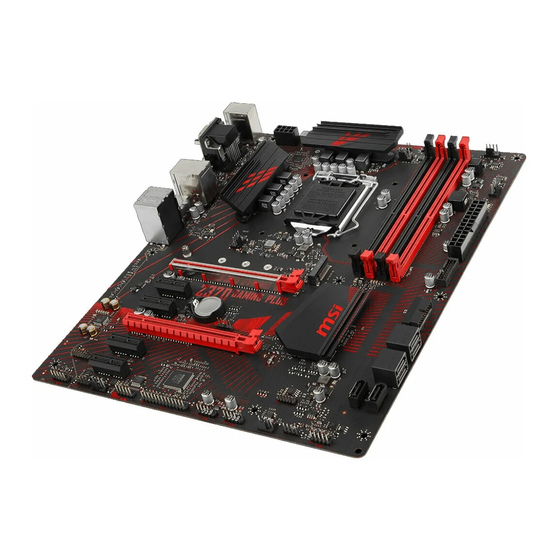
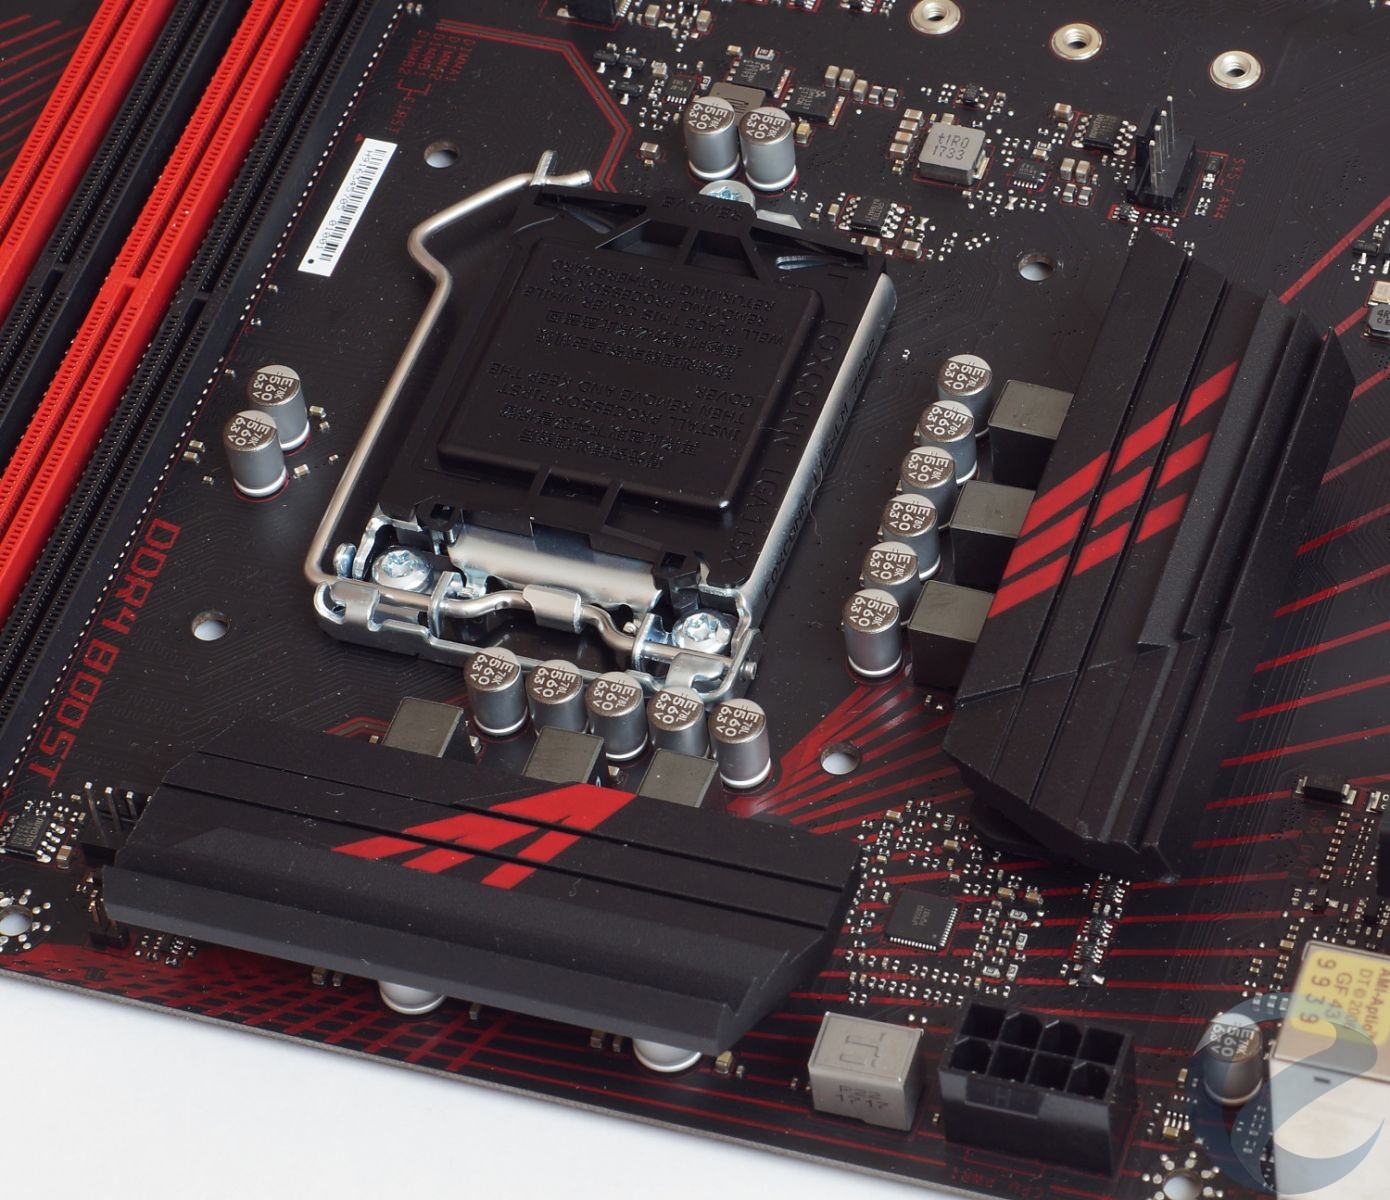
Производитель постарался и придал материнской плате MSI Z370 GAMING PLUS яркий красно-черный «игровой» дизайн с наличием красной LED подсветки, что, конечно, должны оценить пользователи. В плане всего остального перед нами стандартная материнская плата на чипсете Intel Z370 форм-фактора ATX, предназначенная для использования с процессорами Intel 8-го поколения архитектуры Coffee Lake (сокет LGA1151-2).
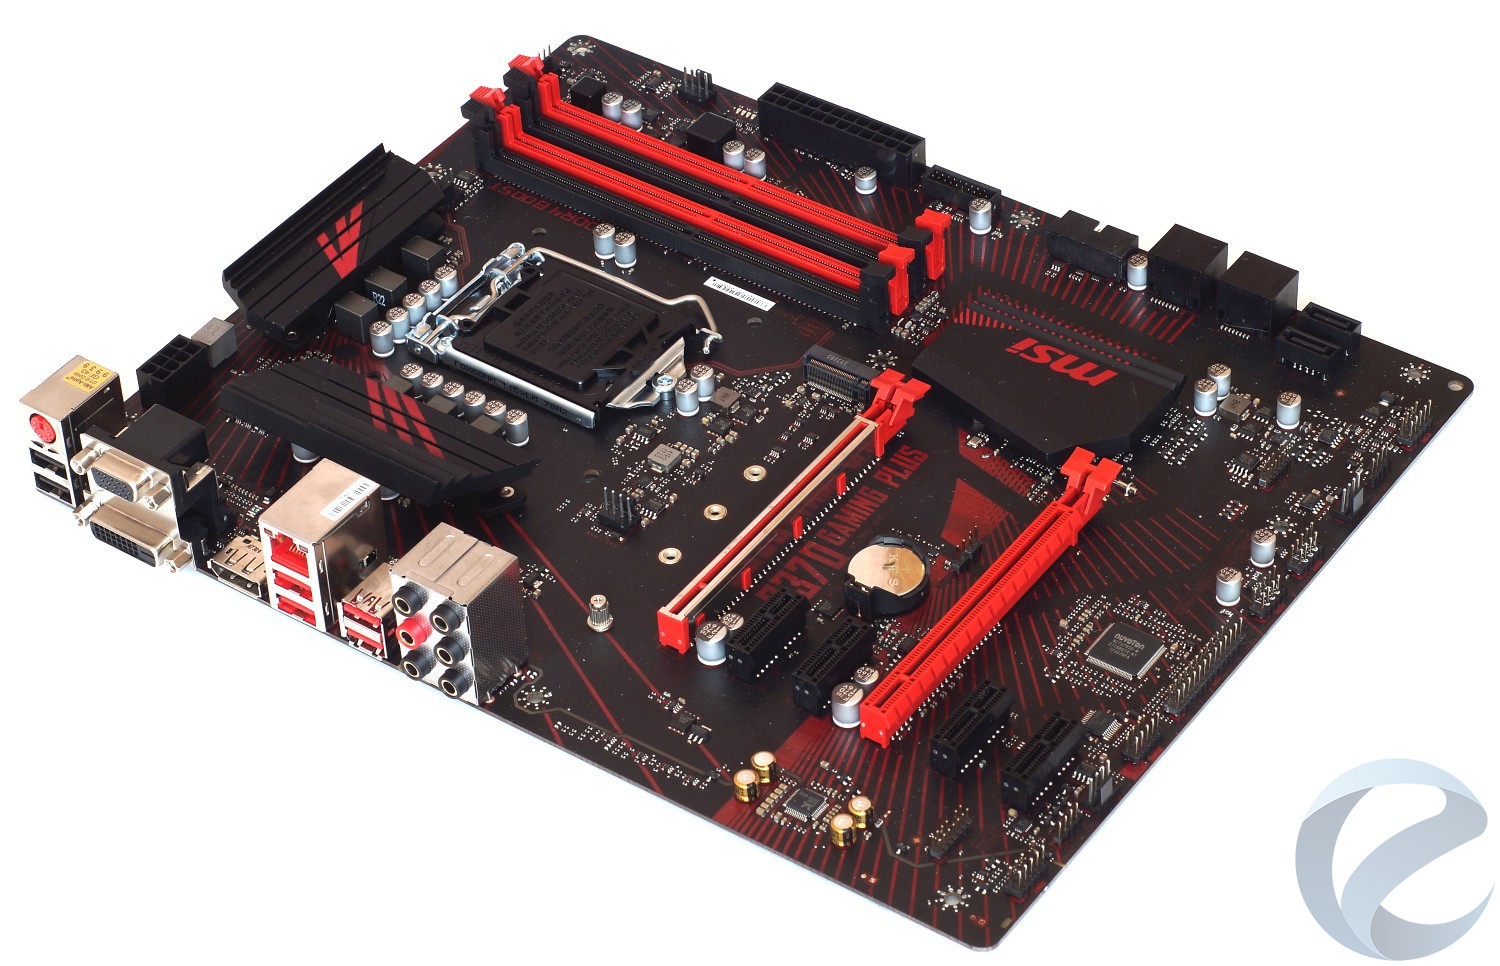
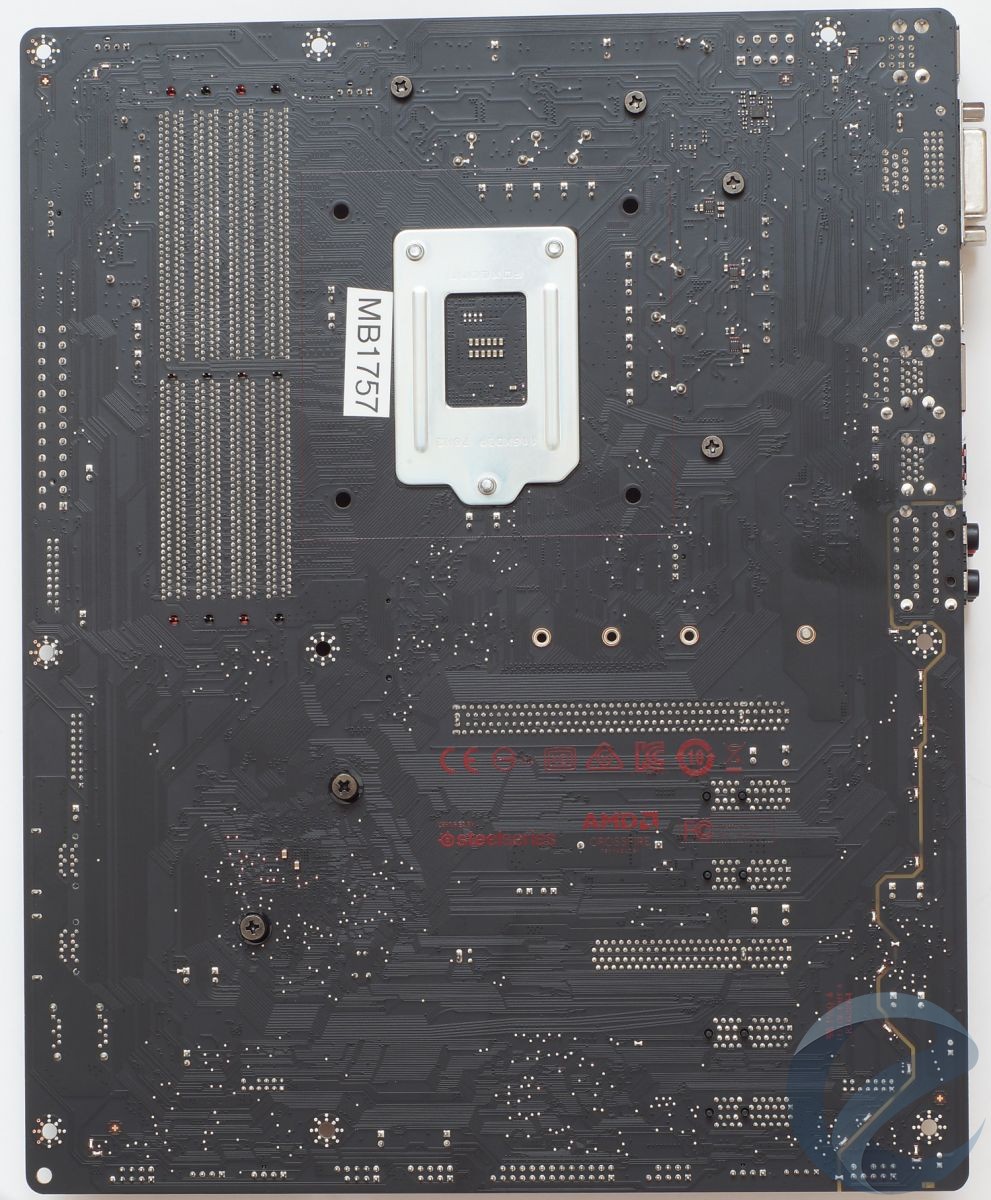
Набор интерфейсов/портов у платы можно охарактеризовать как минимальный для игрового уровня: имеется один слот M.2, два слота PCI-E x16 3.0 позволяют использовать две видеокарты, но поддерживается только режим работы AMD CrossFire. При размерах 30,5 см х 24,4 см производитель мог реализовать куда больше, но это в итоге повысило бы стоимость, да и дополнительный функционал нужен далеко не каждому игроку(хотяс обратной стороны все-таки разместились красные светодиоды, предназначенные для придания эффектного внешнего вида). «Бюджетный» уровень подчеркивает минимальное количество компонент в звуковой части Audio Boost (не видно усилителей) с отсутствием металлического экрана на звуковом HD-кодеке Realtek ALC892 (по современным меркам это тоже бюджетное решение), использование небольших радиаторов в системе питания и чипсете.
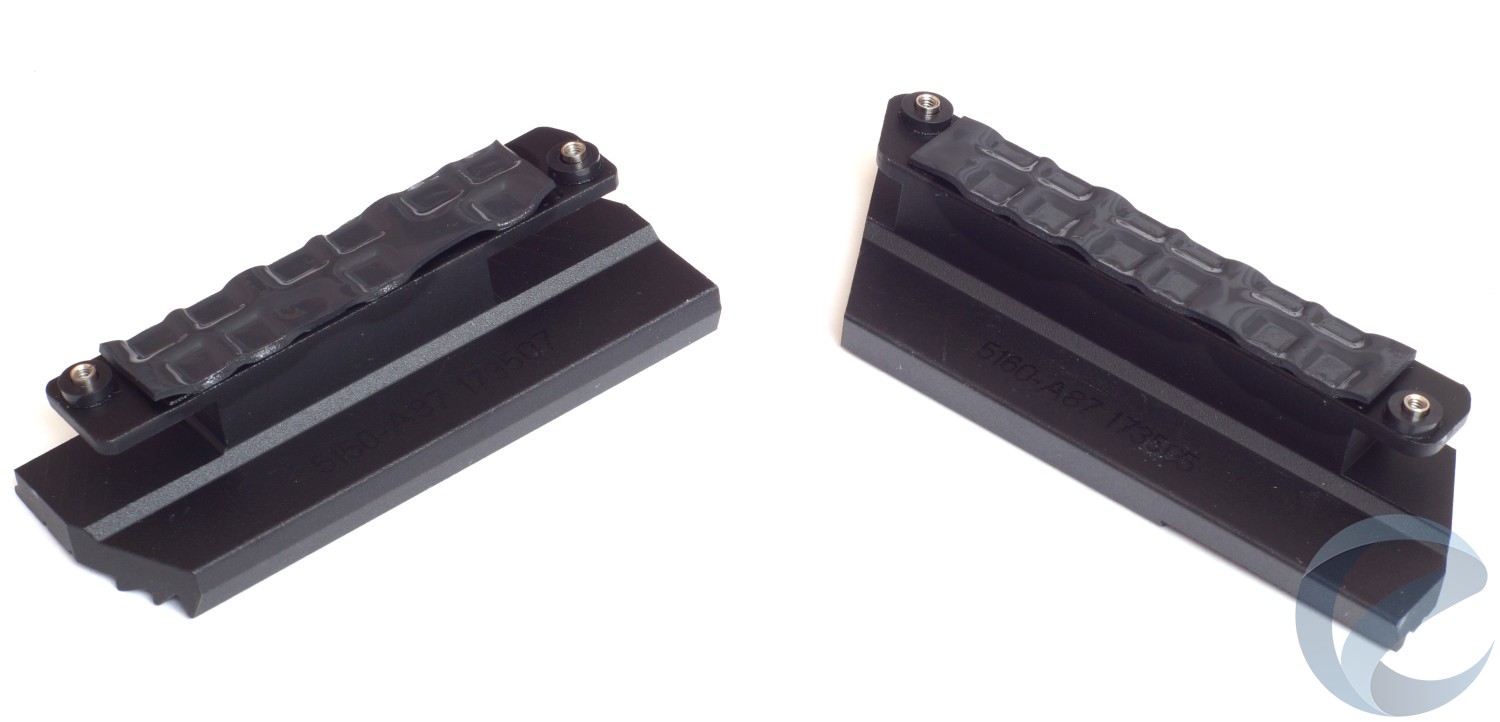
Пространство рядом с сокетом Intel LGA1151-2 получилось просторным, что связано с реализацией не такой «мощной», как у старших плат, подсистемы питания и типовым набором разъемов: 8-пин ATX12V, два 4-пин разъема под вентиляторы (процессора и системный). Красно-черный окрас радиаторов системы питания гармонично дополняет общий дизайн платы.
Сами радиаторы относительно небольшие, но их наличие положительно сказывается на температурном режиме мосфетов при разгоне, пусть и греются они несколько сильнее, чем радиаторы у ранее рассмотренной платы MSI Z370 SLI PLUS – 50,6 °С против 47,2 °С.
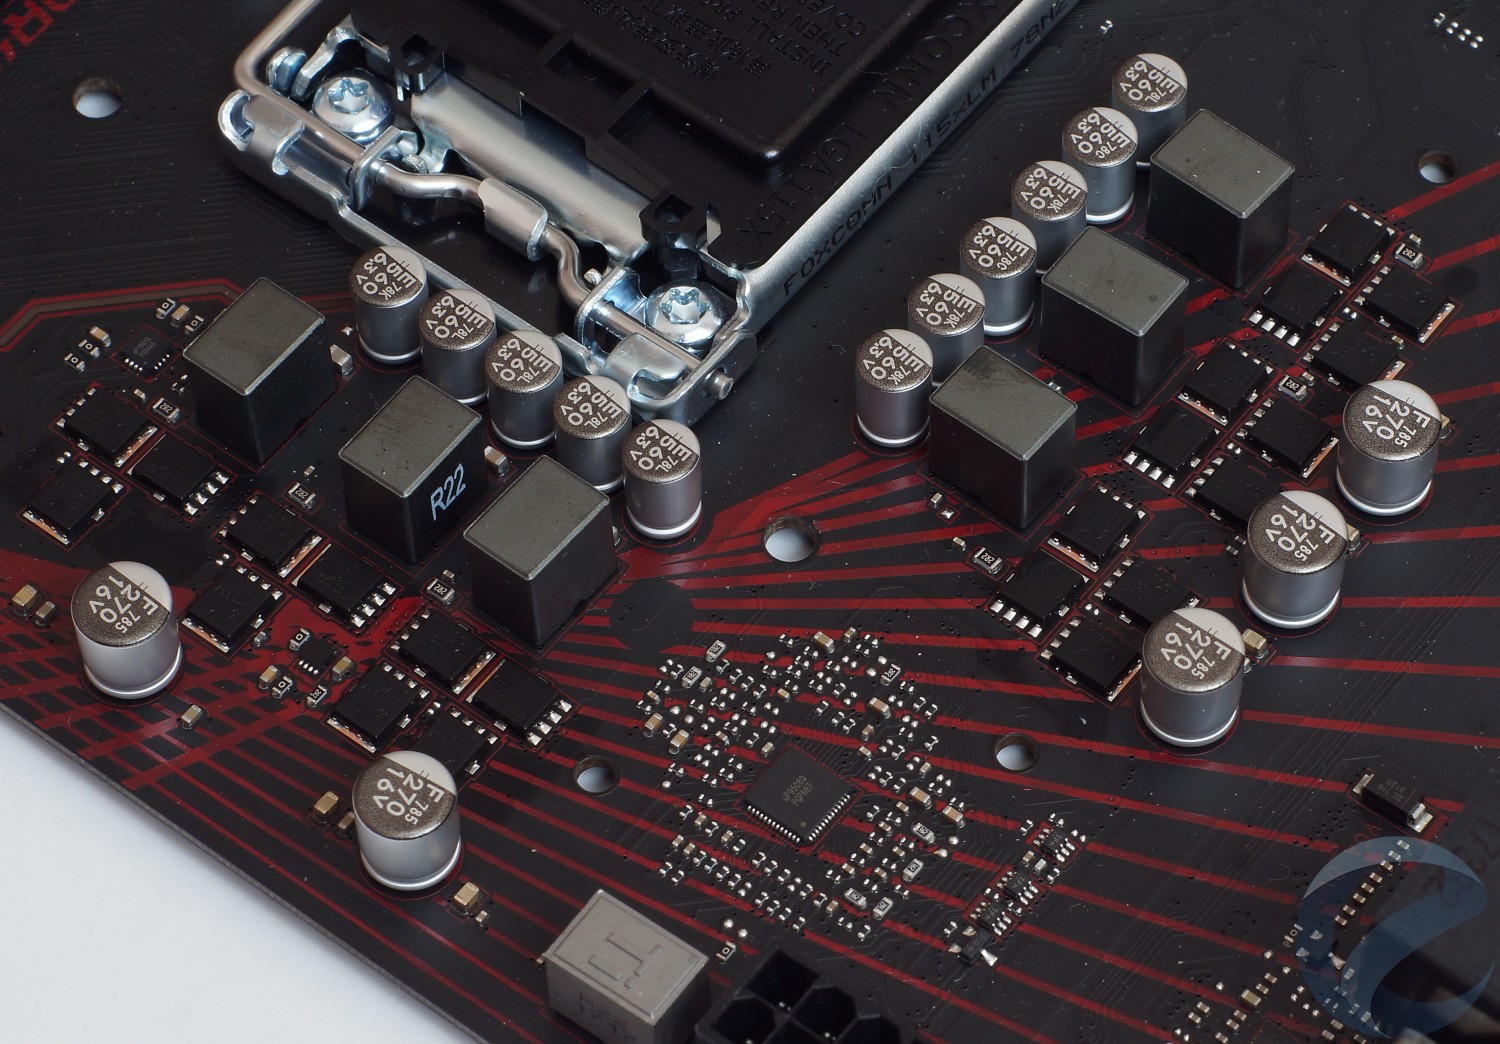
Частично на несколько больший нагрев радиаторов повлияла и несколько упрощенная 4+2 фазная система питания, хотя уровень MSI Military Class 5 для компонент сохранился. В ней используется ШИМ-контроллер uPI Semiconductor uP9508Q. На каждую из четырех фаз CPU приходится по четыре мосфета, а на пару фаз GPU, полученных через удвоитель uP1961S – по три.
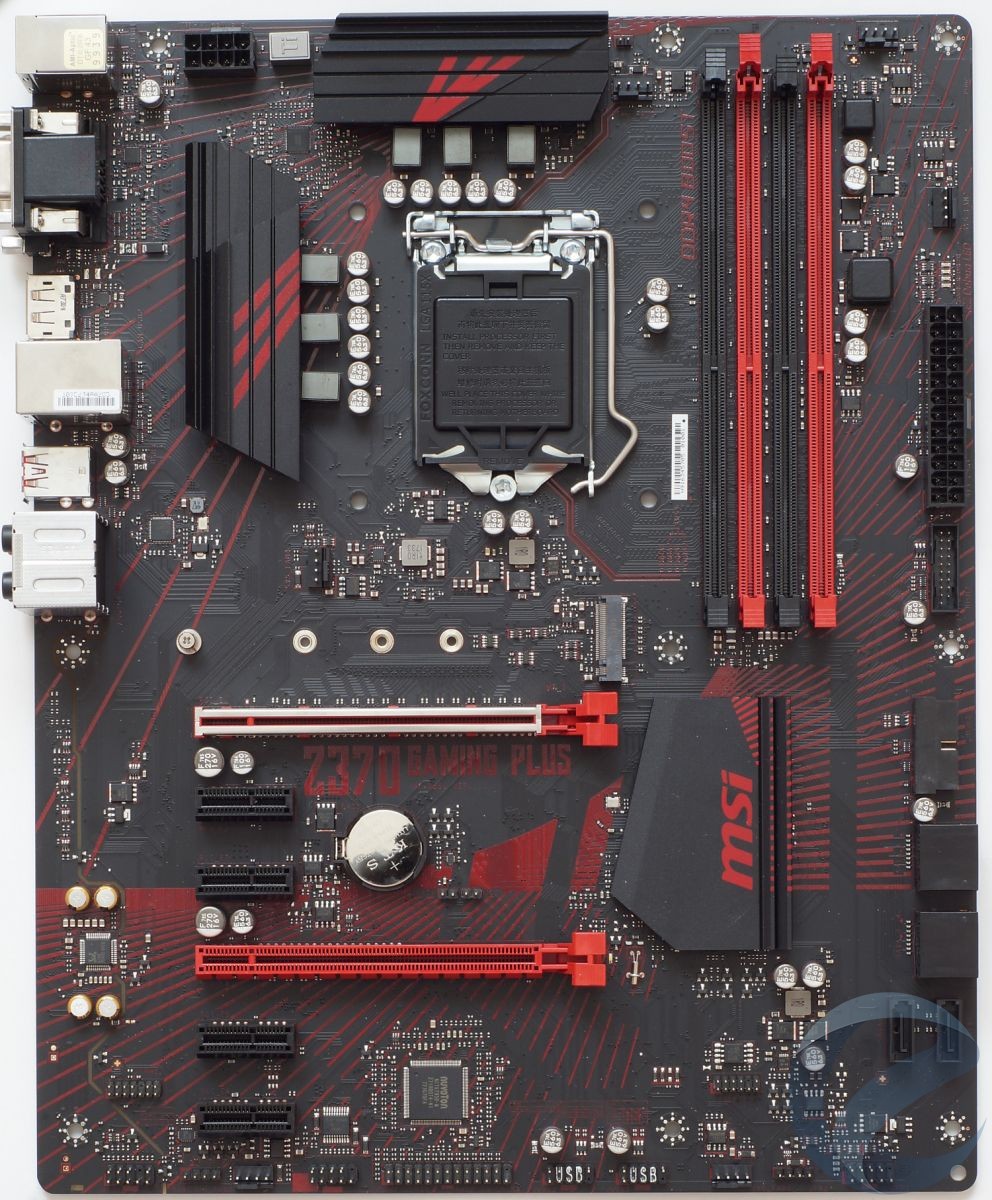
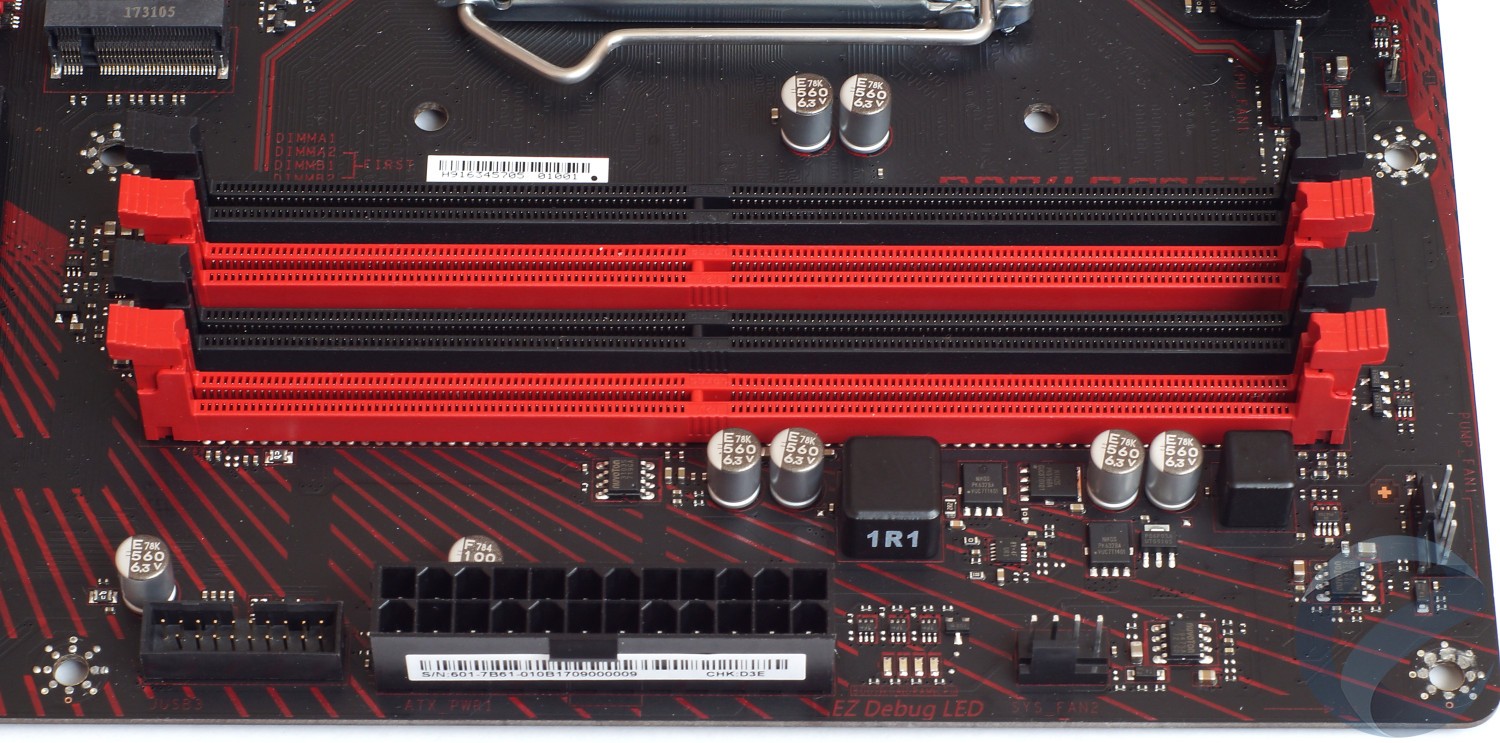
Наличие четырех слотов оперативной памяти DDR4 обеспечивает максимальный возможный объем 64 Гбайта для платформы Intel LGA1151-2, при этом плата поддерживает работу с высокочастотными модулями (заявлено 4000+ МГц) и, естественно, двухканальный режим (красные слоты подсказывают, куда именно устанавливаться память в первую очередь). Вокруг слотовпо правому краю платыприсутствует: пара 4-пин разъемов под системный вентилятор и помпу, индикация EZ LED Debug, разъем питания 24-пин EATX и колодка на два порта USB 3.1 Gen1 (5 Гбит/сек).
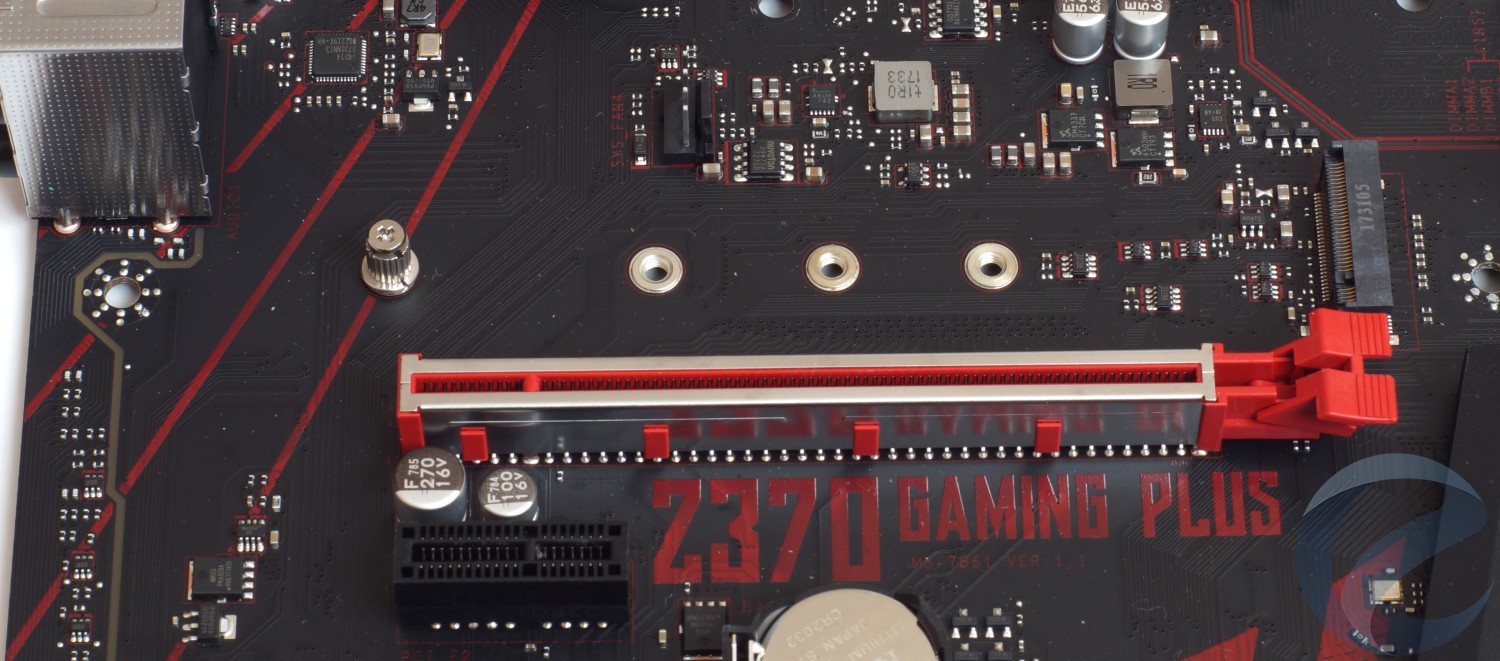
Над самым верхним слотом PCI-E x16 3.0 (х16) сусиленнымметаллом конструкцией(технология Steel Armor)находится единственный слот M.2 под высокоскоростные накопители типоразмера 2242/2260/2280/22110 с режимом работы SATA или PCIe x4 3.0, в том числе и модули Intel Optane Memory. Но, конечно же, не обошлось без ограничений на работу слота M.2, который в режиме SATA делает невозможным использованиепорта SATA1. Из контроллеров в этой области(левый верхний угол) заметна микросхема гигабитного сетевого кодека Intel I219-V- распространенное решение в платах игрового уровня (и не только).
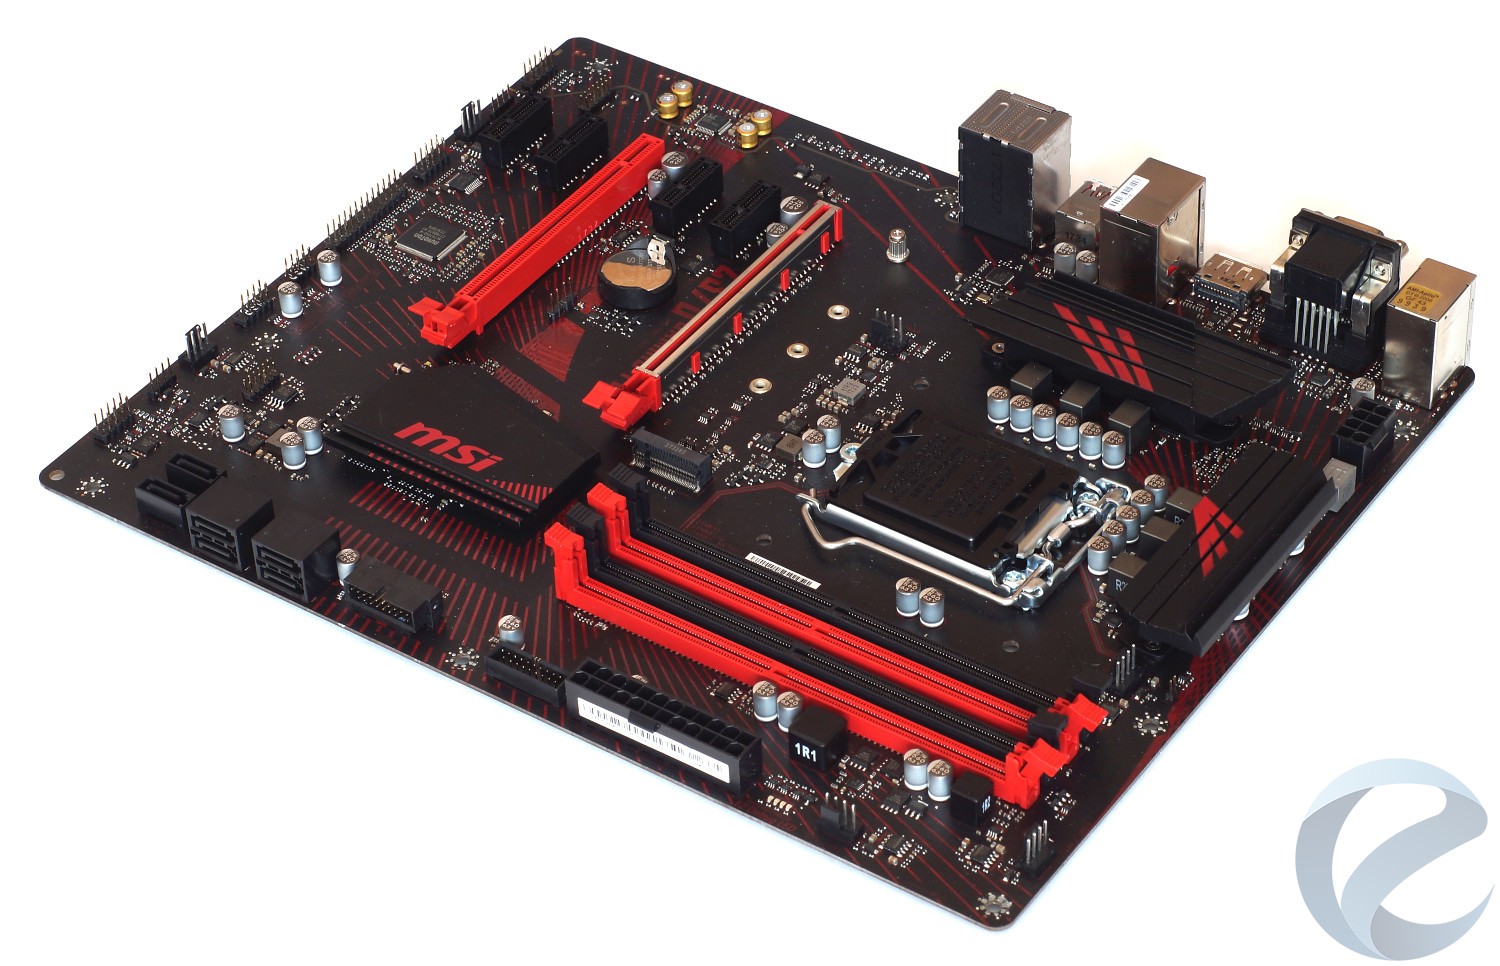
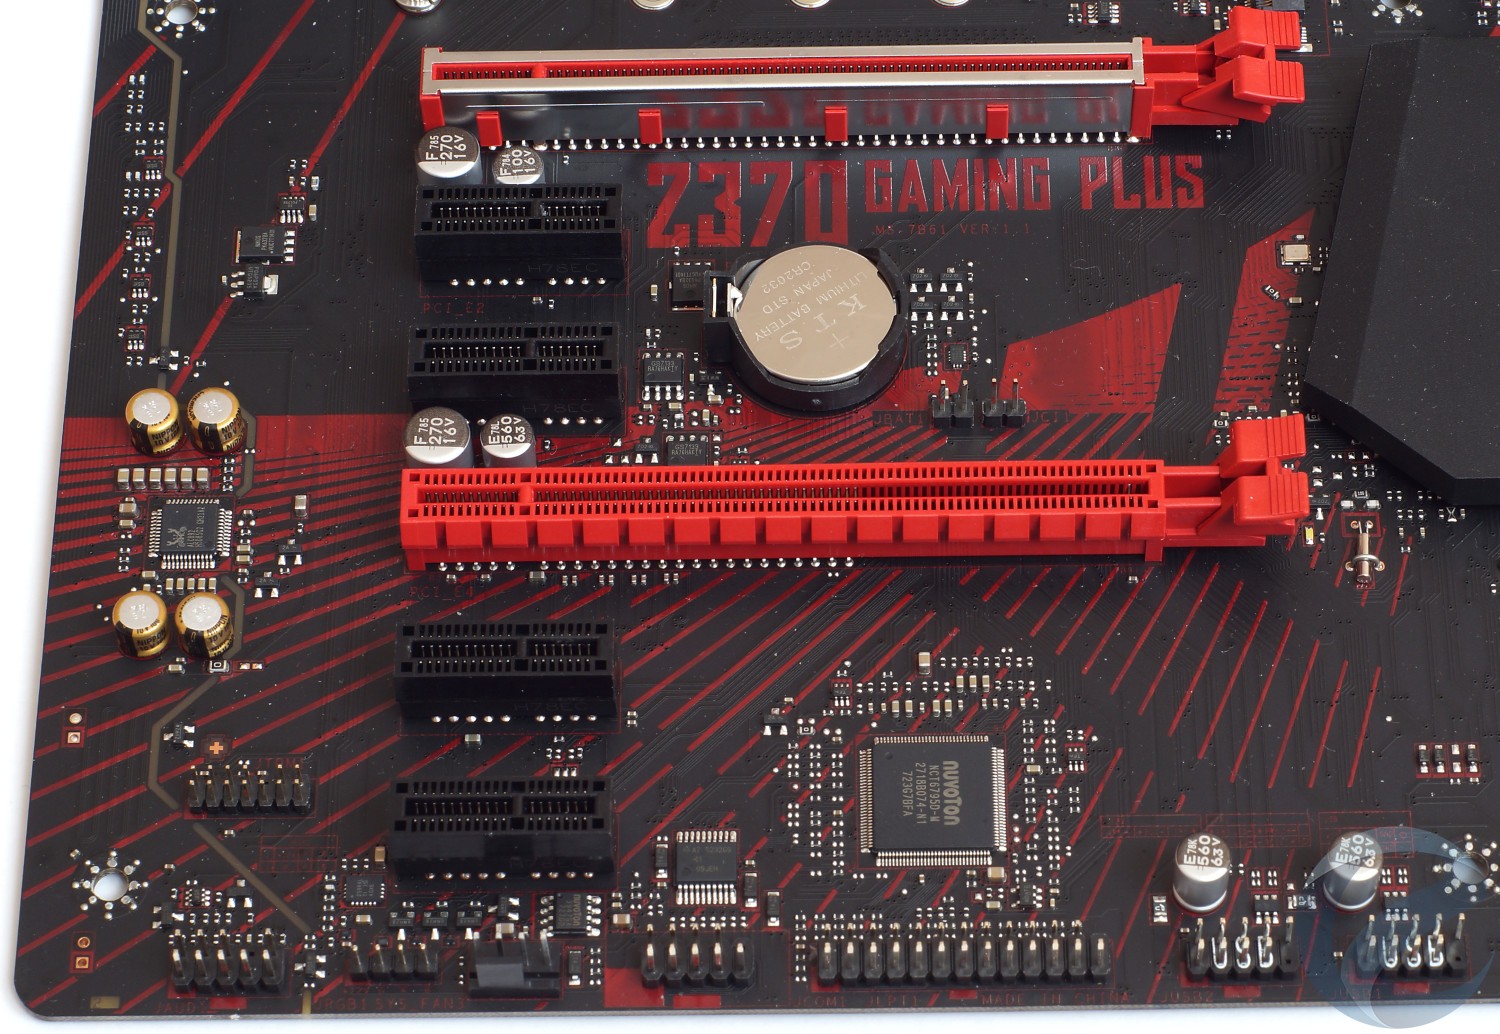
Ниже слота PCI-E x16 3.0, через два PCI-E x1 3.0 (а всего их 4), находится еще один слот PCI-E x16 3.0 (x4). Таким образом возможна работа пары видеокарт на базе GPU AMD в режиме CrossFire, но только в режиме x16+x4, и, к сожалению, не поддерживается режим Nvidia SLI. Так что по сути получается второй слот сделан для «галочки» или подойдет под установку второго SSD (через адаптер) с режимом работы PCIe. Здесь же присутствуют два дополнительных контроллера: на отдельной части текстолита (слева) звуковой HD-кодек Realtek ACL892, окруженный четырьмя «аудиокондесаторами» Nippon, и микросхемасистемного мониторинга и портов ввода-вывода Nuvoton NCT6795D-M. Благодаря последнему на плане снизу имеются порты COM и LPT, что в современных платах, особенно «игровых»,можно встретить очень редко.
Вместе с тем имеется и «современный» набор: 4-пин коннектор для подключения RGB-ленты, разъемы передней аудиопанели, 4-пин системного вентилятора, 2 х USB 2.0 (по 2 порта).
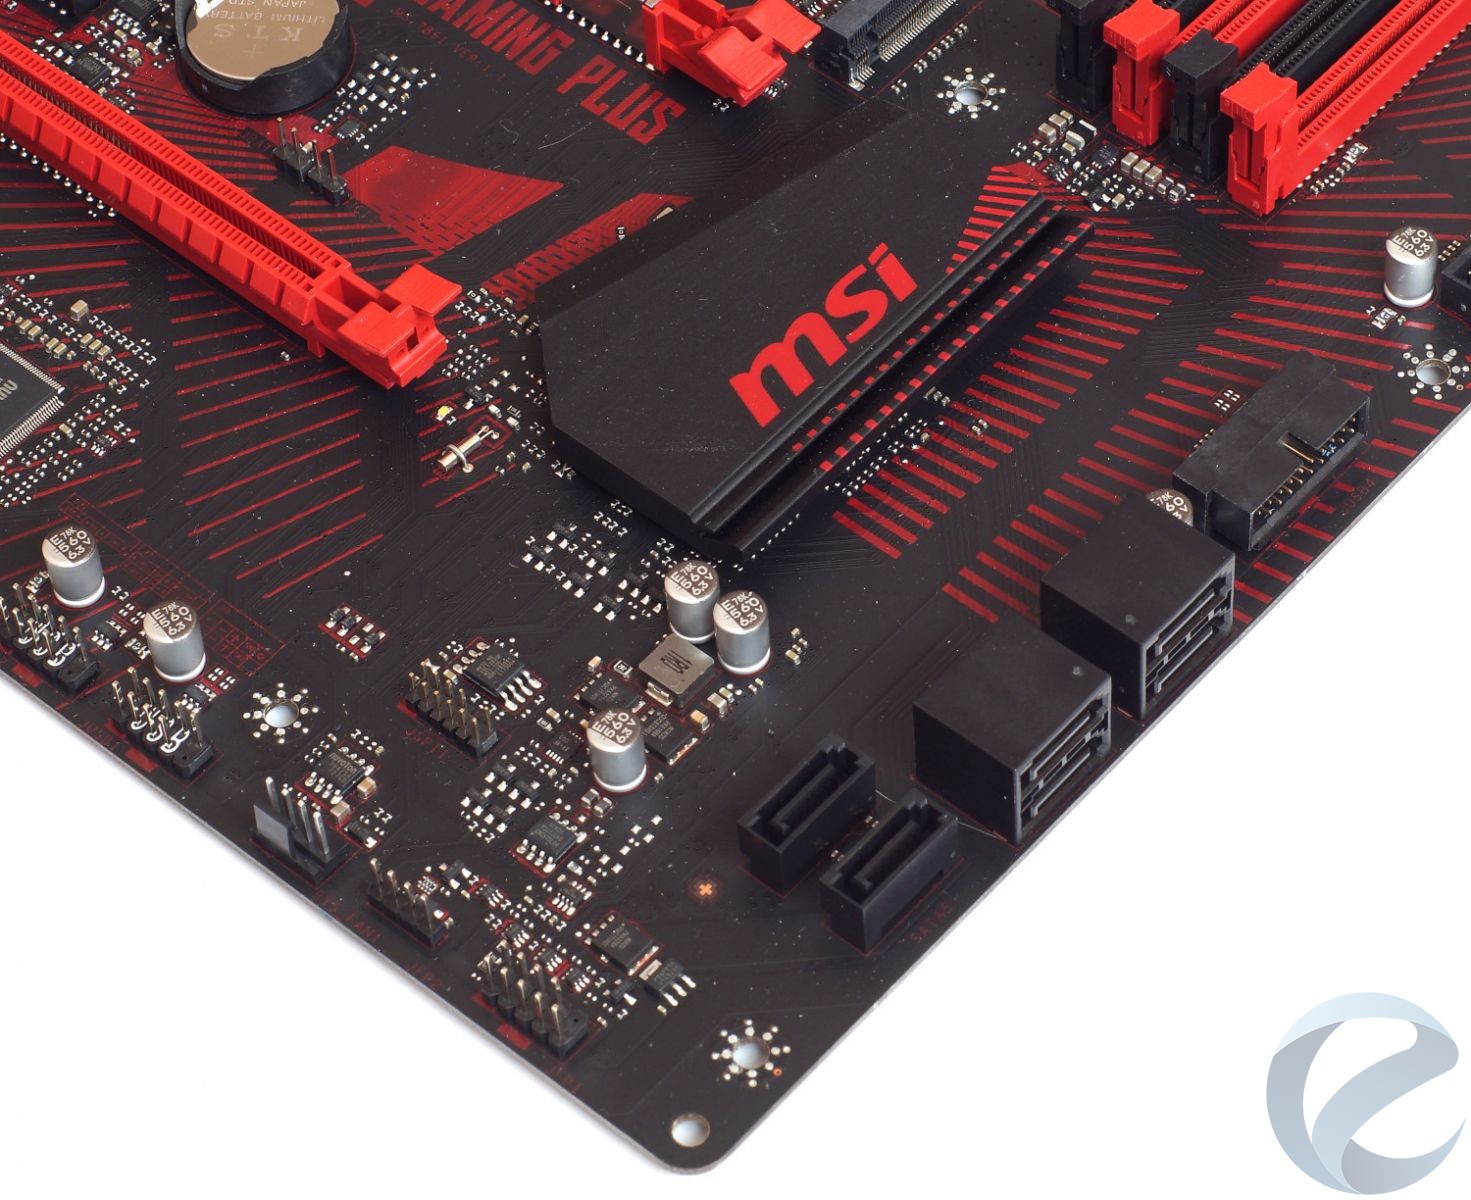
В правой части доступенеще один 4-пин разъем системного вентилятора, пара коннекторов системной панели и на торце — порты 6 x SATA, а также еще один коннектор USB 3.1 Gen1 на два порта. Как SATA, так и USB, реализованы за счет возможностей чипсета Intel Z370. За его охлаждение отвечает небольшой радиатор, также окрашенный под стиль материнской платы. В процессе тестирования он нагревался до 39,2 °С, чтонесколько выше (на пару градусов) температуры радиатора чипсета платы MSI Z370 SLI PLUS.
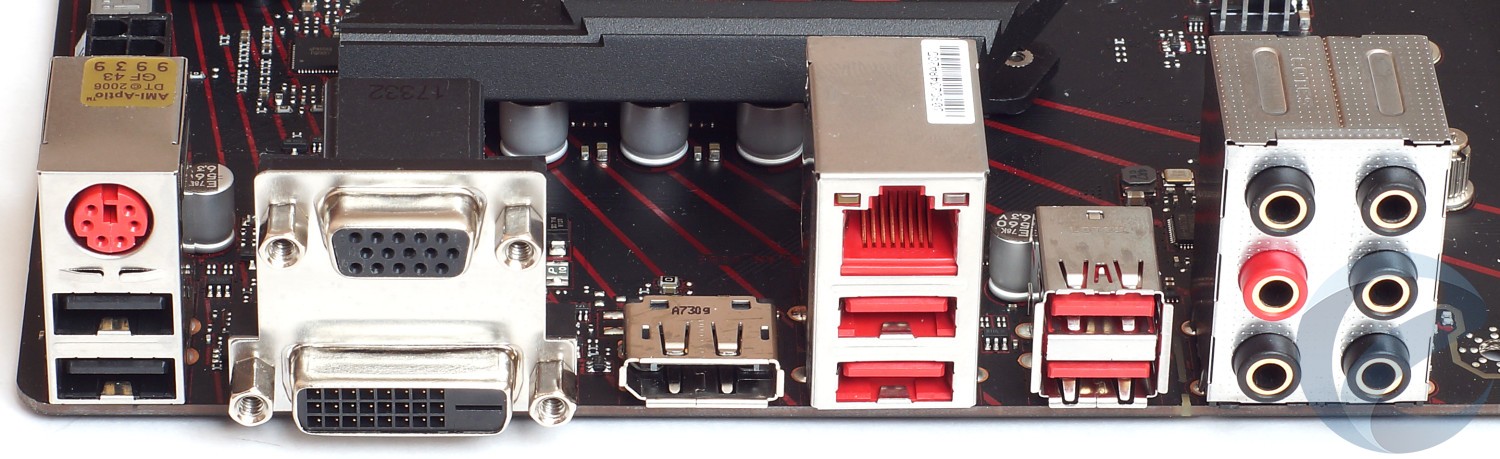
Набор интерфейсов на задней панели ввода-вывода несколько упрощен – нет популярного HDMI, оптического звукового выхода и портов USB типа С (только А). Остальное стандартно:
-
1 x комбинированный PS/2 клавиатура/мышь;
-
2 x USB 2.0;
-
1 x VGA;
-
1 x DVI-D;
-
1 x DisplayPort;
-
4 x USB 3.1 Gen1 тип А;
-
1 x LAN (RJ45);
-
5 x звуковых разъемов OFC (позолоченные).
Интерфейс UEFI BIOS
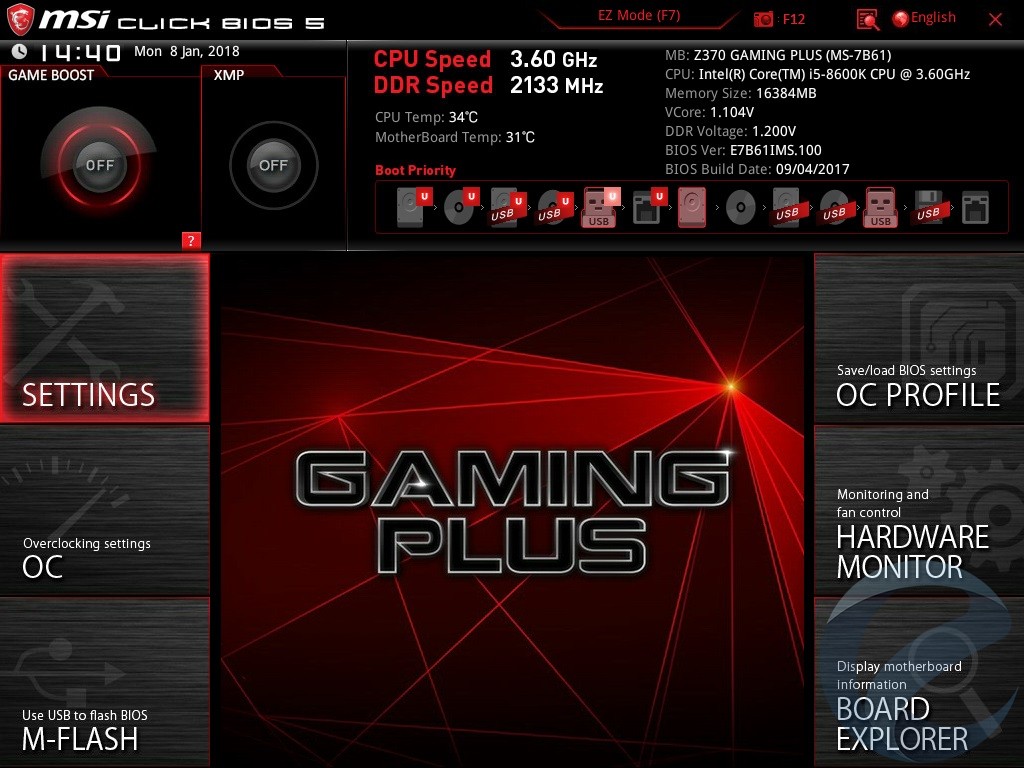
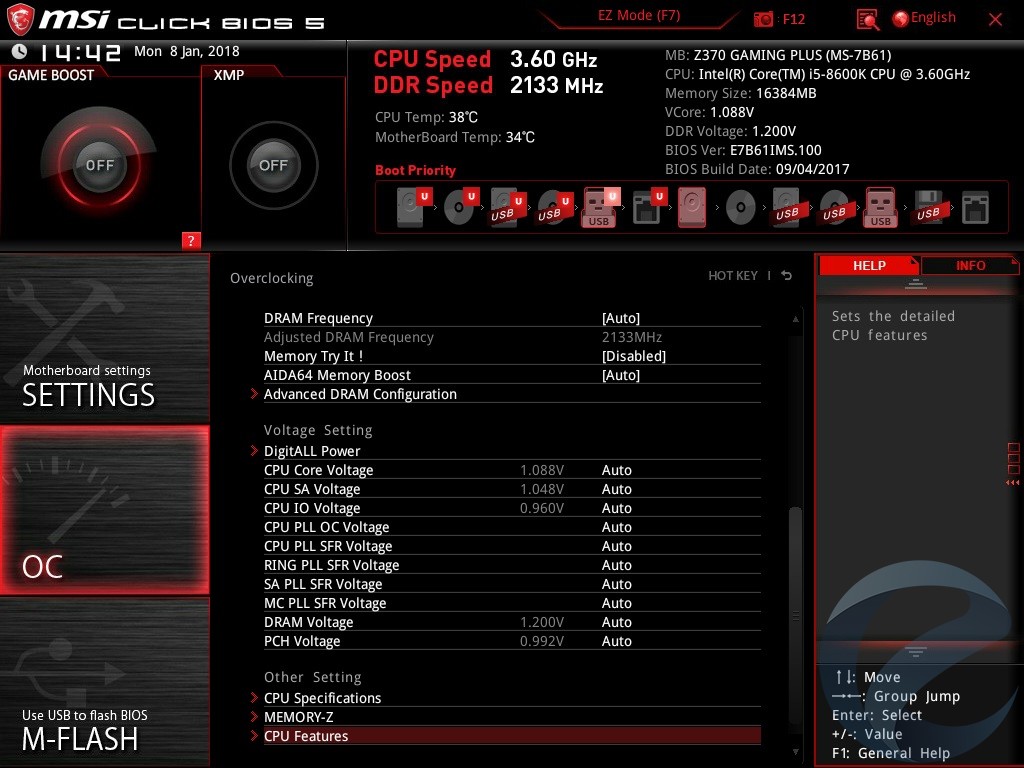
В материнской плате MSI Z370 GAMING PLUSтак же, как и у предшественников, используется «проверенная» и хорошо знакомая версия Click BIOS 5, в которой имеются два режима работы: EZ Mode (простейший) и Advanced (расширенный). Отличия в интерфейсе, в первую очередь, касаются подчеркиванием игровой направленности в виде соответствующего красно-черного дизайна.
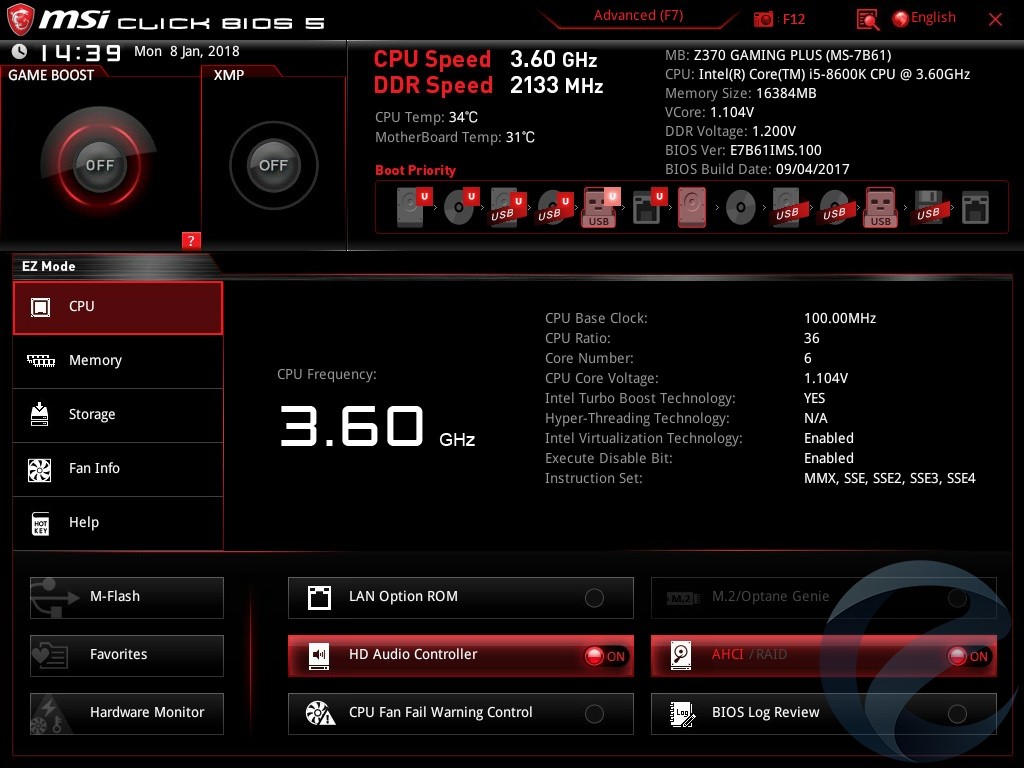
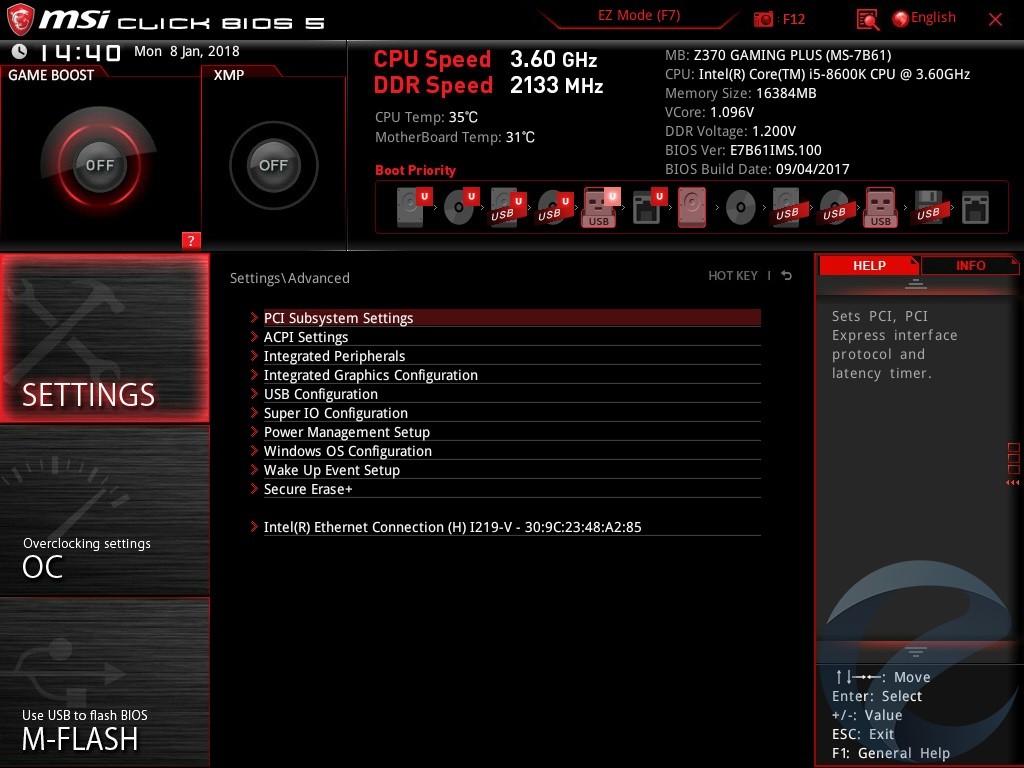
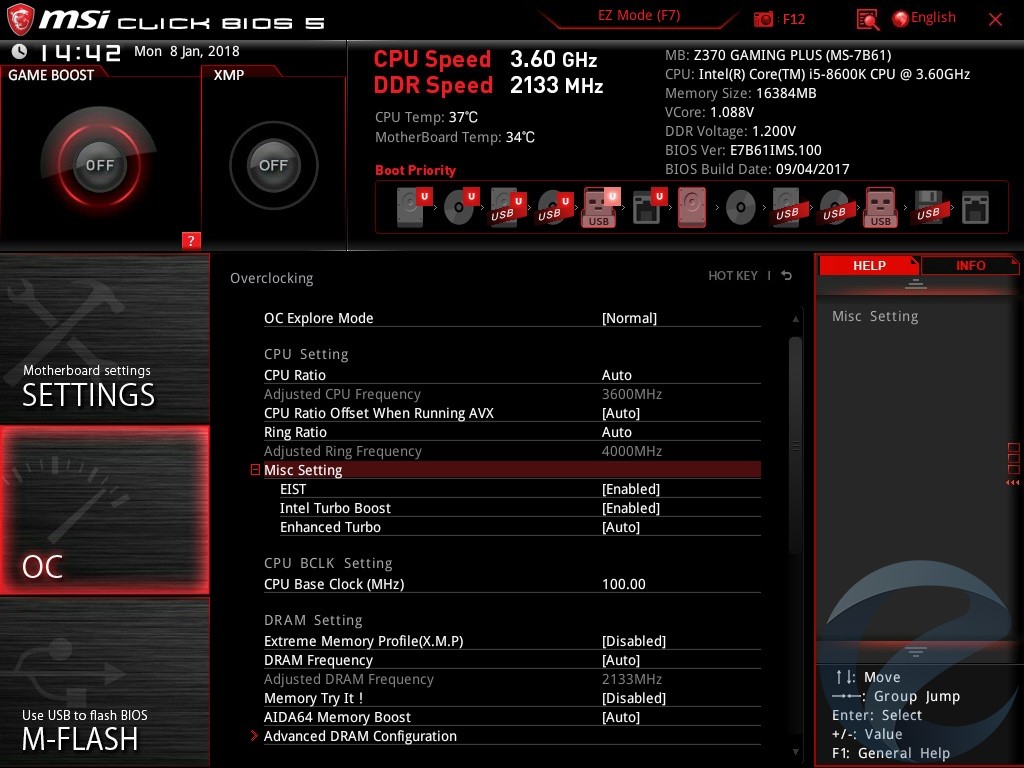
Как и подобает платам на чипсете Intel Z370, в рассматриваемой плате имеются основные параметры, позволяющиеся осуществить разгонпроцессора, памяти. Настройкидоступны режиме Advanced и находятся в разделе «OC».
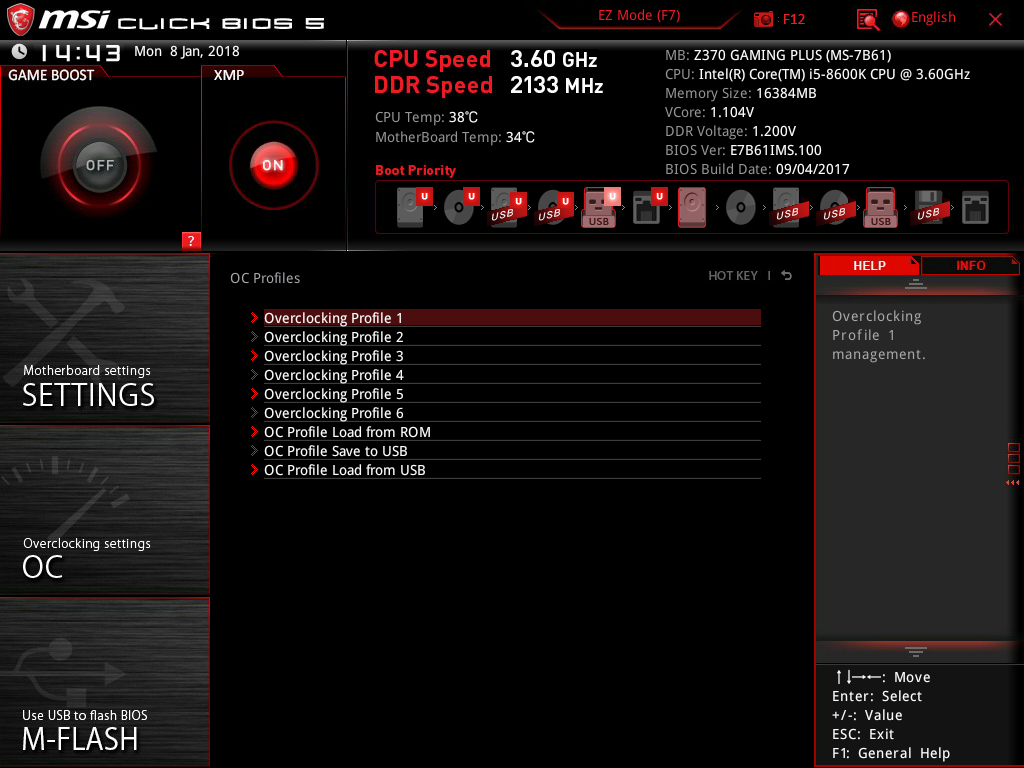
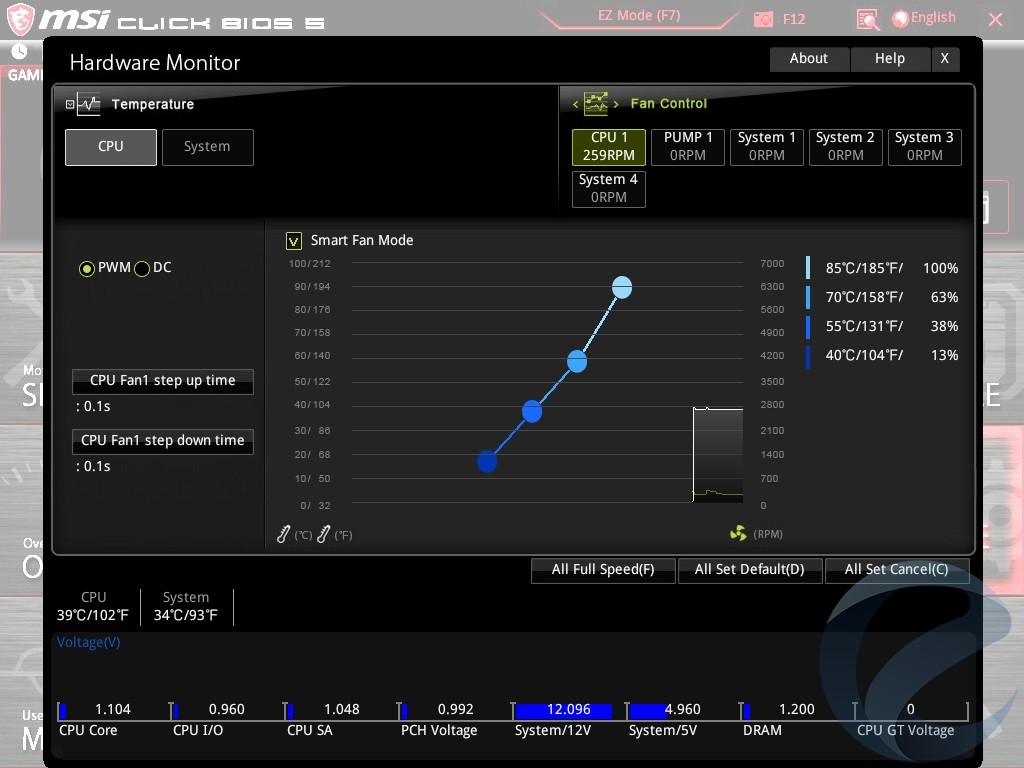
Не забыта возможность сохранения профилей и, конечно же, имеется раздел мониторинга,настройки работы вентиляторов.
Программное обеспечение
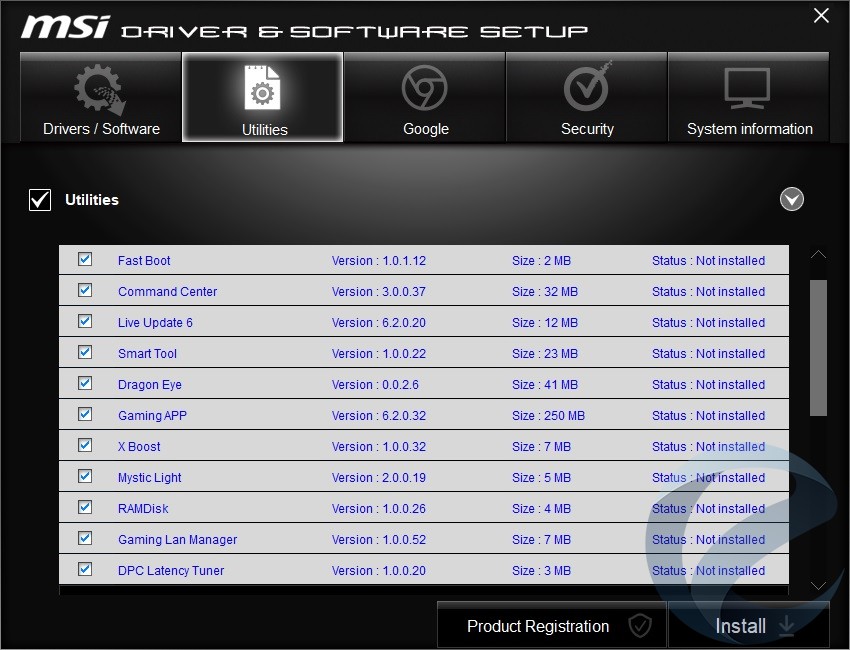
Принадлежность материнской платы MSI Z370 GAMING PLUS к игровой серии ARSENAL GAMING предопределило наличие расширенного «игрового» набора утилит (Gaming App, Dragon Eye, Gaming LAN Manager и прочие), поставляемого на DVD диске, и интерфейс которых неоднократно упоминали в обзорах.
Тестовый стенд
-
Процессор Intel Core i5 8600K
-
Материнская плата MSI Z370 GAMING PLUS
-
Система охлаждения Noctua NH-D15 (с одним 140 мм вентилятором)
-
Термоинтерфейс ARCTIC MX-2
-
Оперативная память 2 x 8 Гбайт DDR4-3200 GeIL EVO X GEX416GB3200C16ADC
-
Видеокарта ASUS Radeon R9 390 8Gb DirectCUII
-
SSD накопитель Kingston HyperX FURY 240Gb (SHFS37A/240G)
-
Блок питания SilverStone SX600-G (600 Вт)
-
Корпус открытый стенд
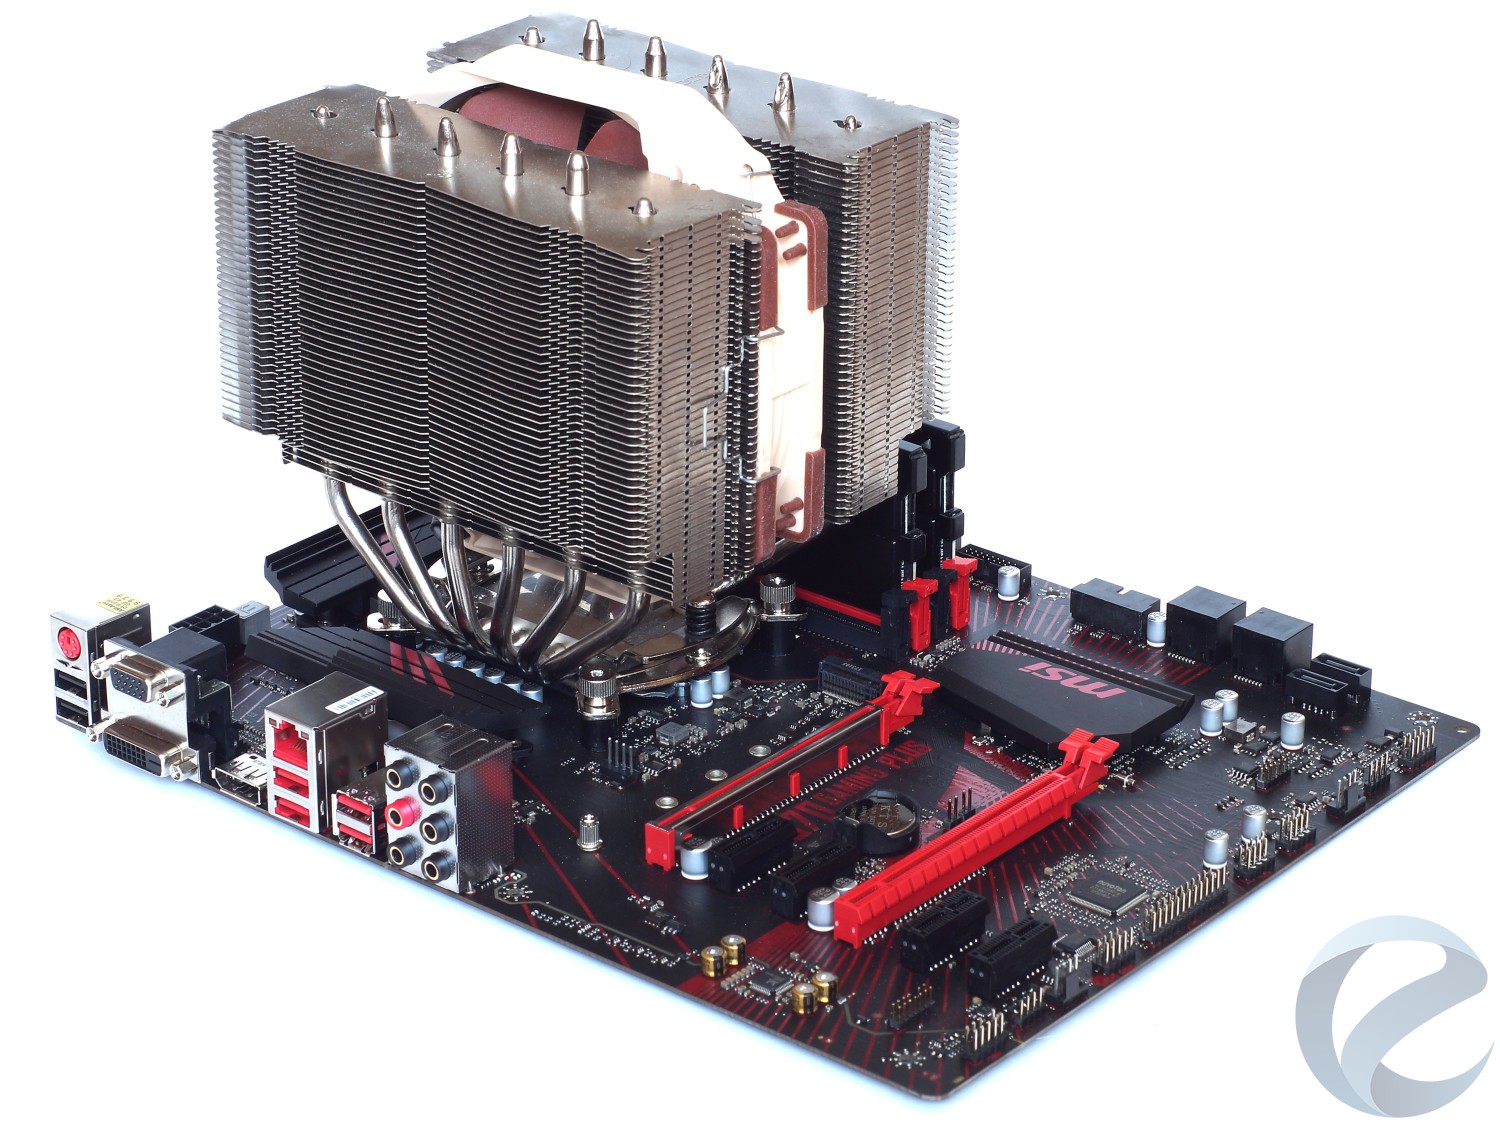
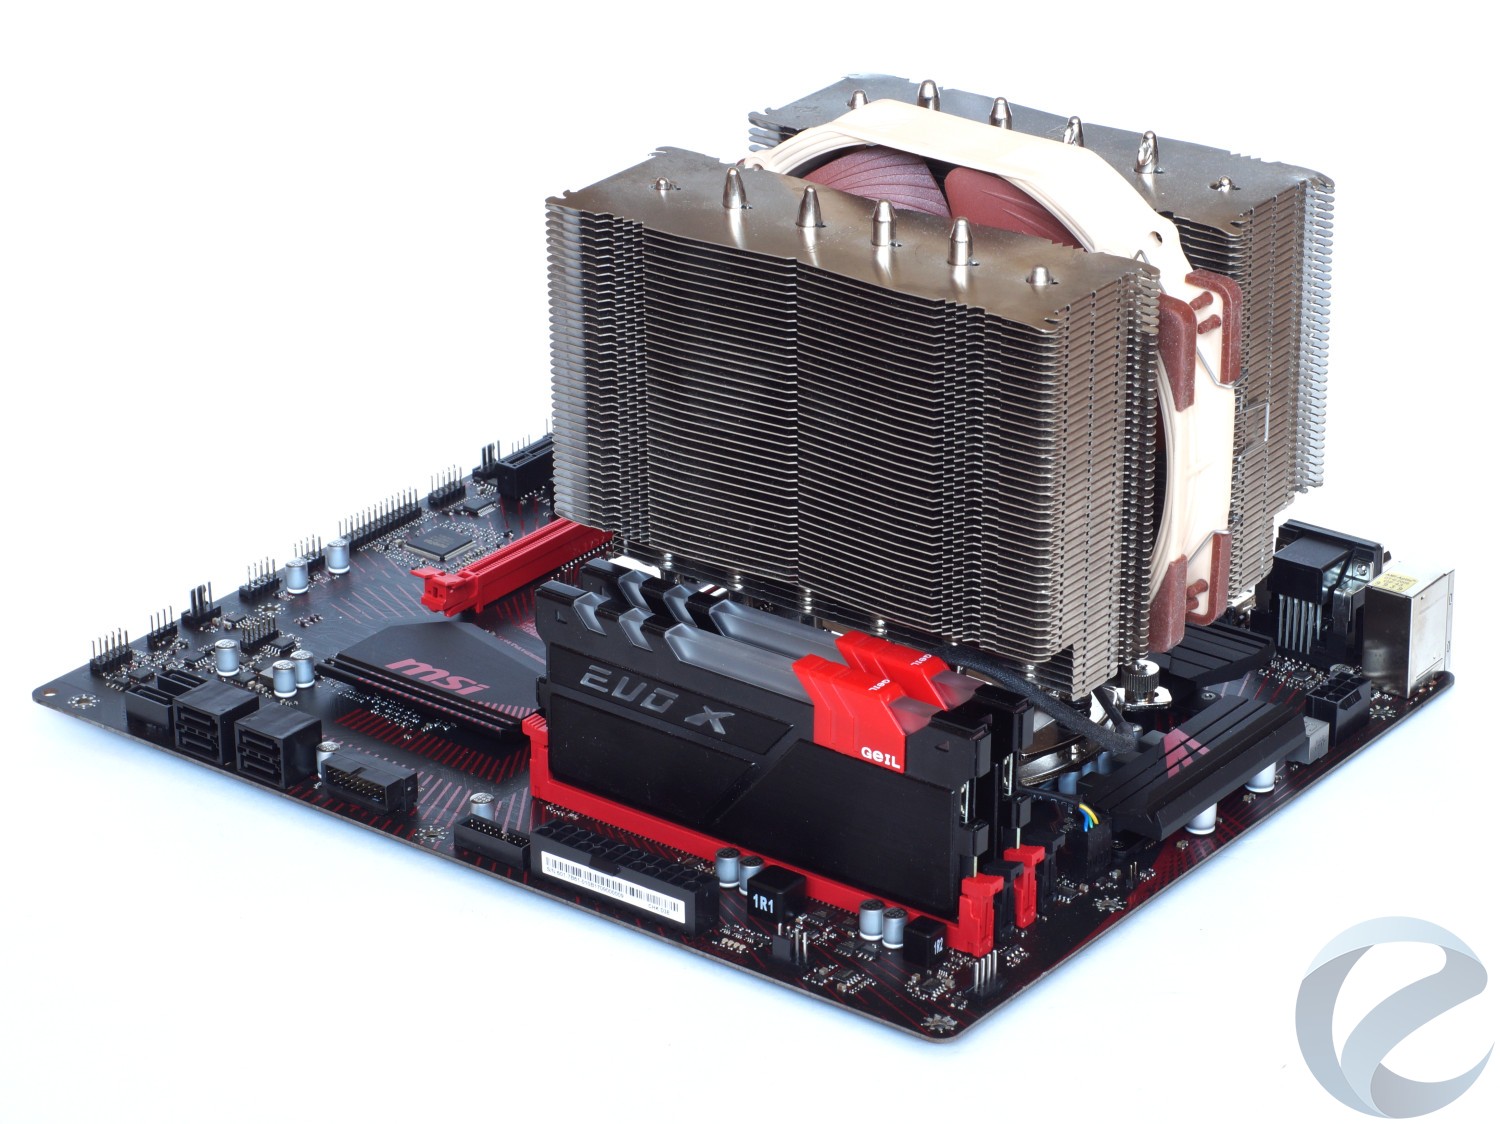
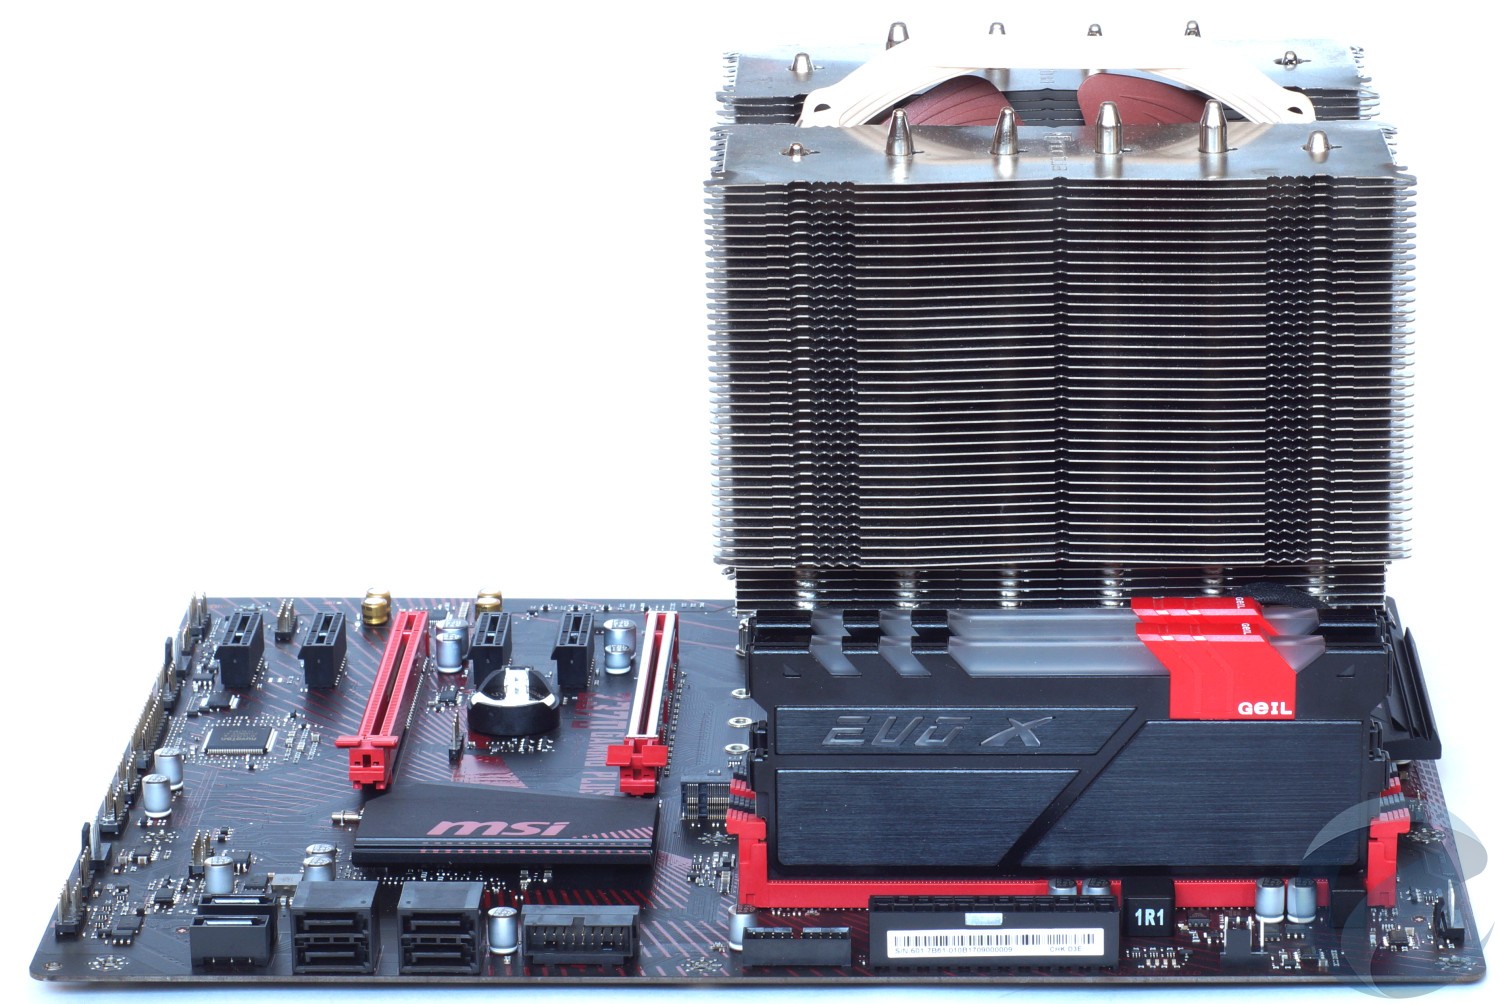
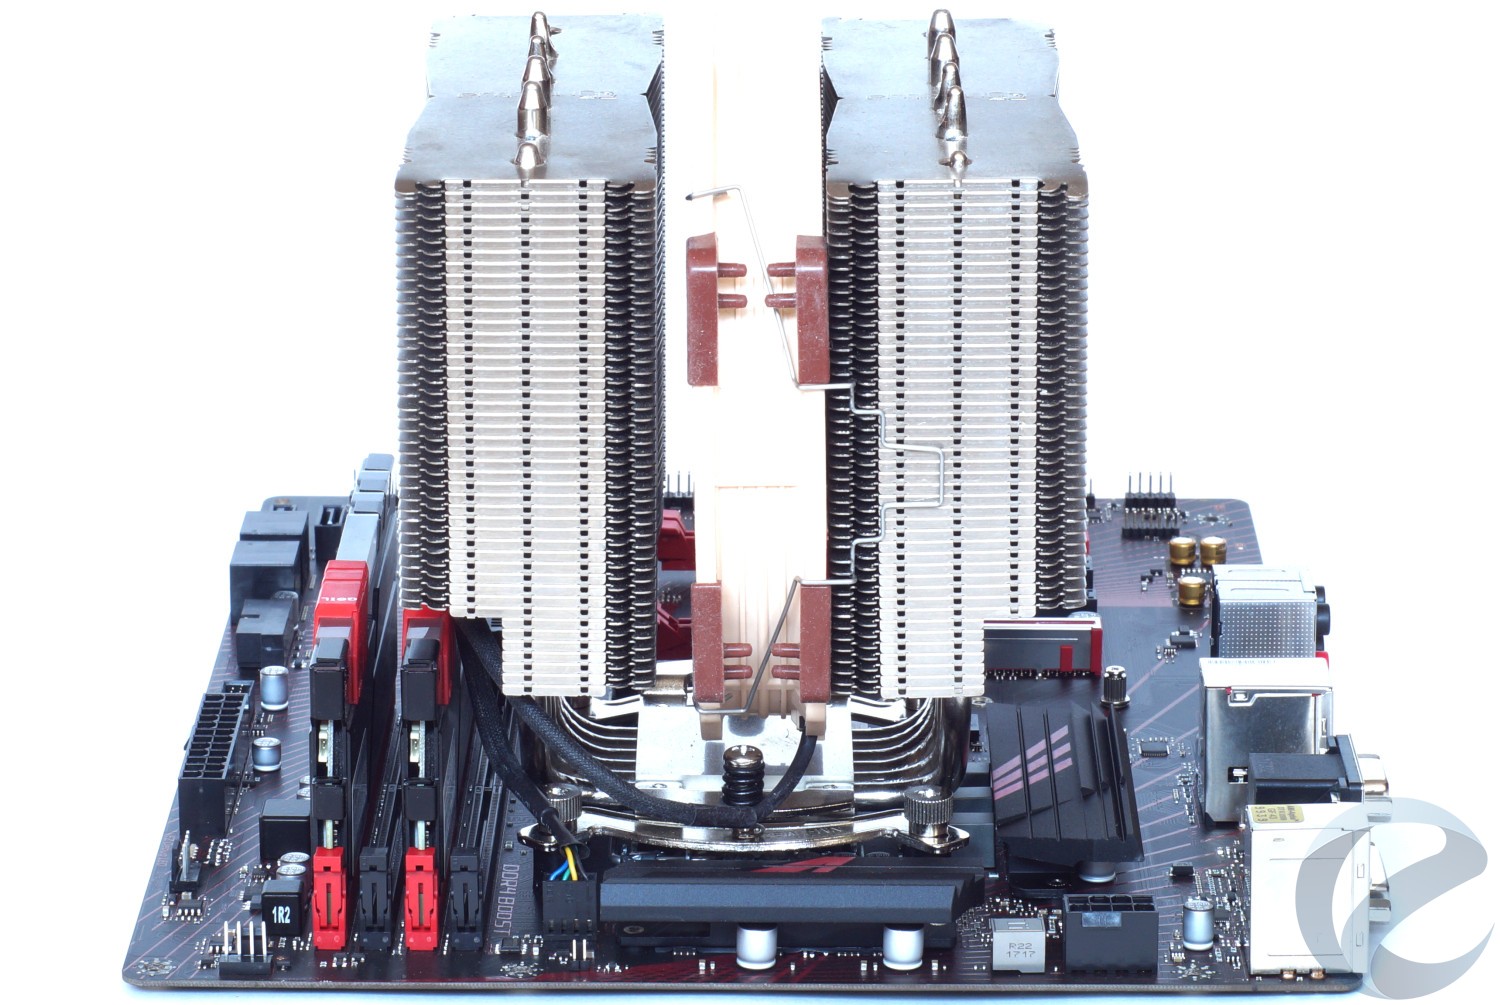
Вид платы с установленными процессором, кулером и памятью. Проблем с установкой компонентов на материнскую плату MSI Z370 GAMING PLUS и совместимостью возникнуть не должно.
Разгон
С минимальным изменением параметров (множитель х48, отключение снижения частоты для инструкций AVX =0, напряжение ядер = 1.280 V) на материнской платеMSI Z370 GAMING PLUS процессор Intel Core i5 8600K был разогнан до частоты 4800 МГц.
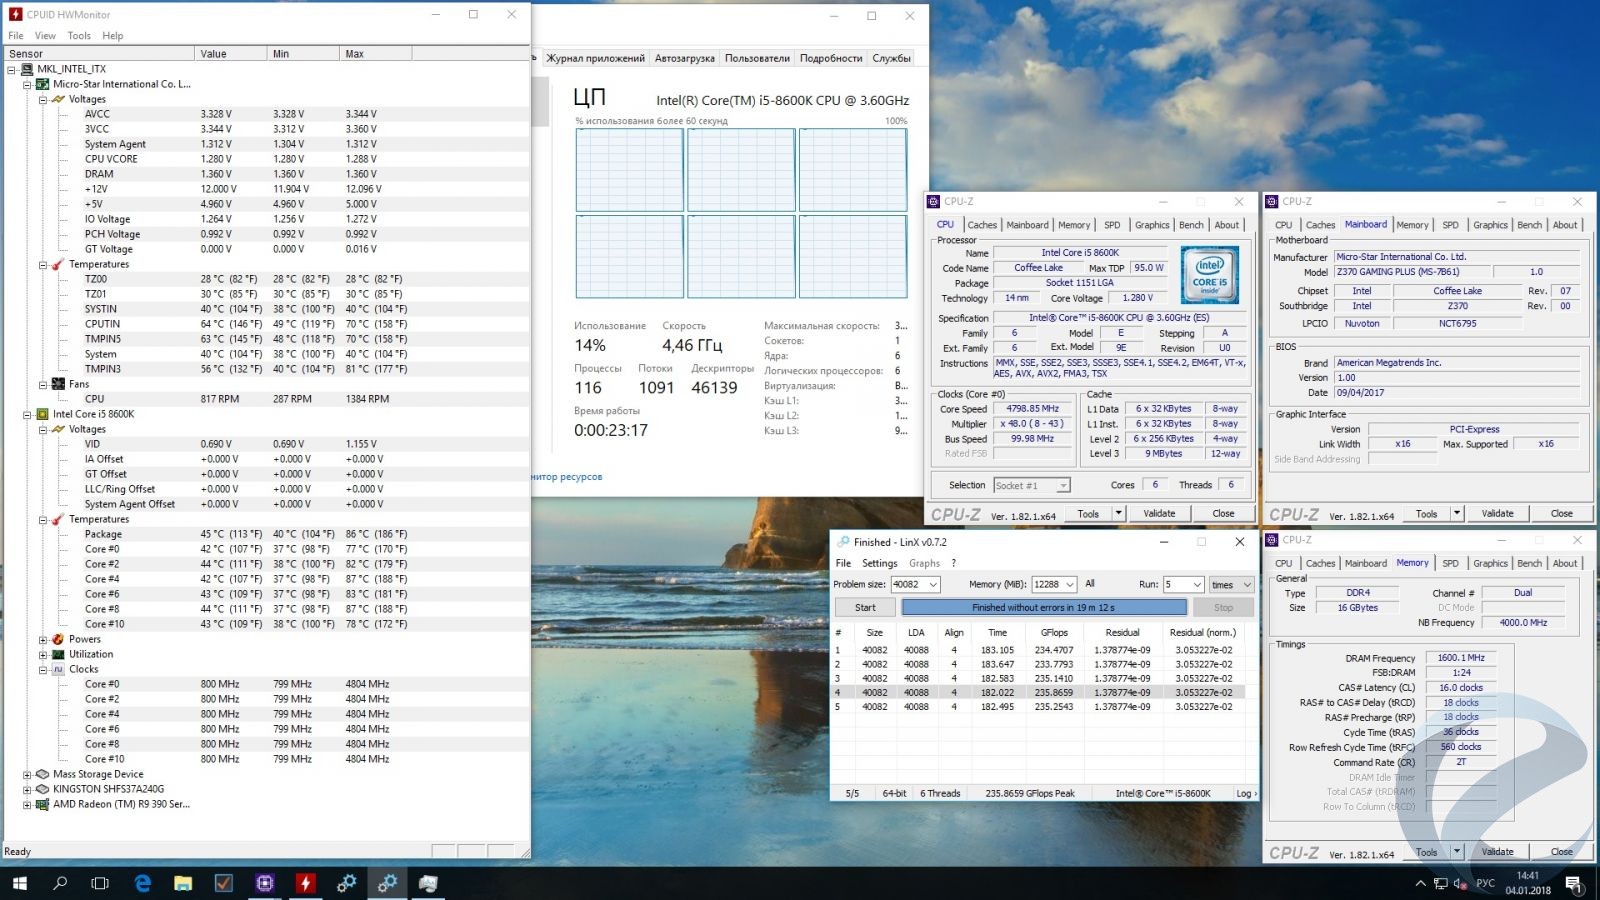
Напомним, что 4+2 фазная подсистема питания платы все-таки не оптимальна для «экстремального» разгона, так что результат получился отличным идолжен устроить большинство потенциальных владельцев данной платы, если вдруг будет планироваться разгон.
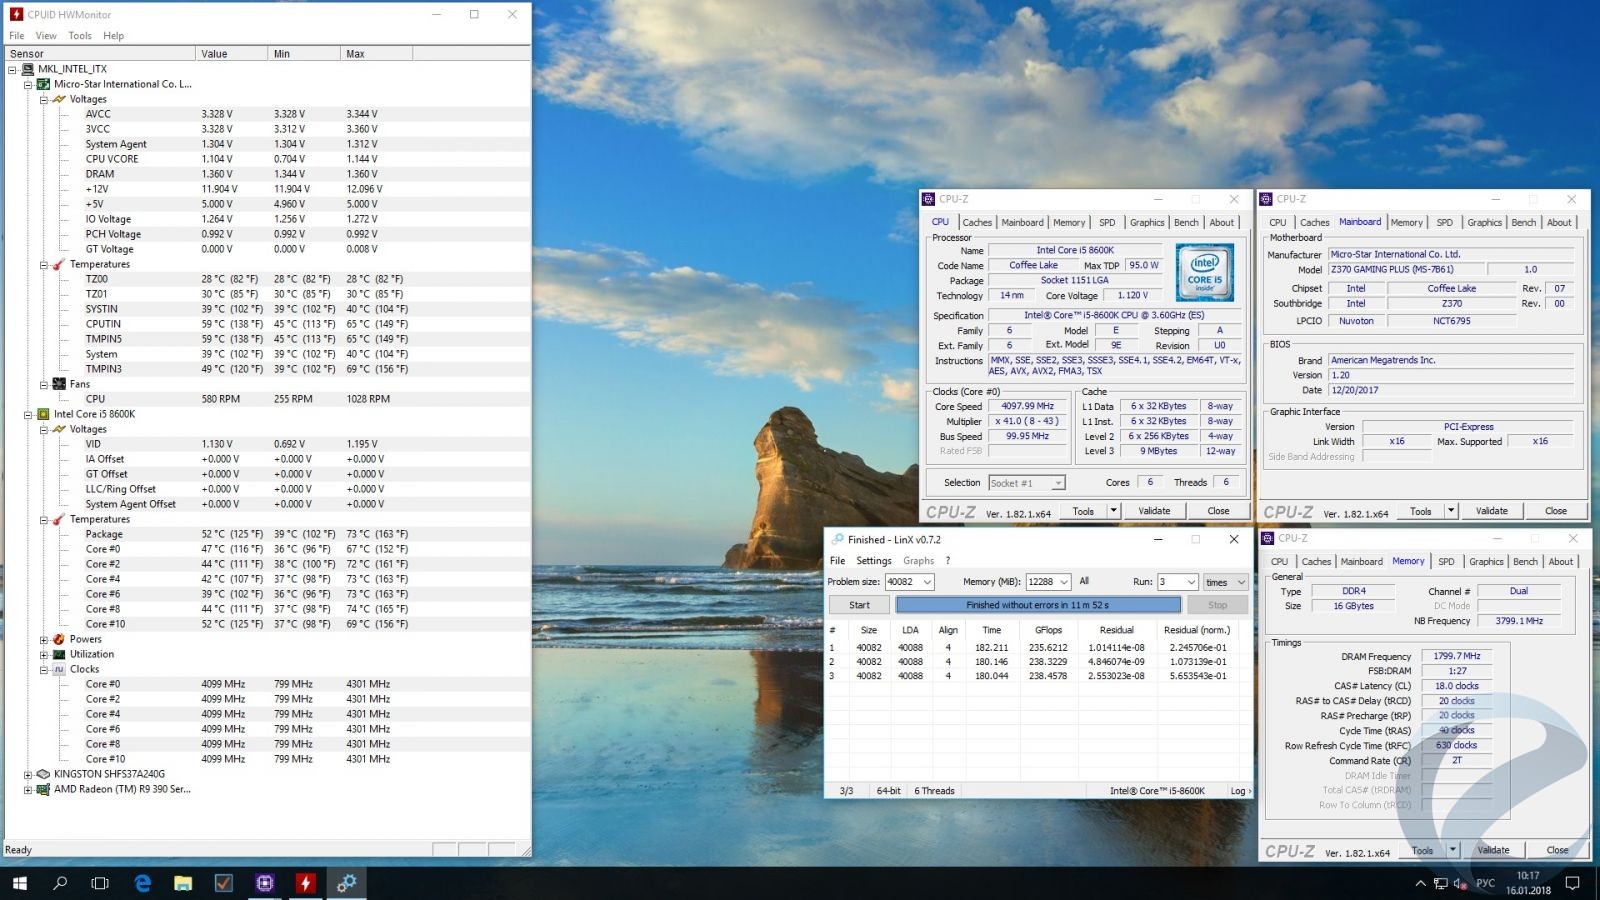
По используемому комплекту памяти 2 x 8 Гбайт DDR4-3200 GeIL EVO X GEX416GB3200C16ADC разгон составил 3600 МГц. Тайминги 18-20-20-40, напряжение памяти 1.350 В.
Результаты тестирования
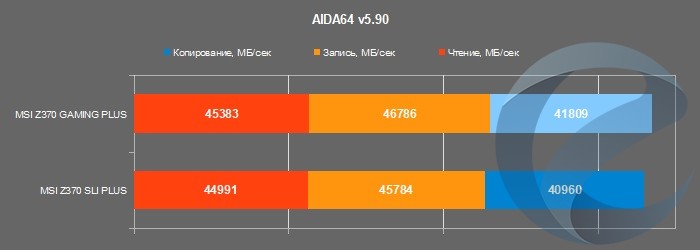
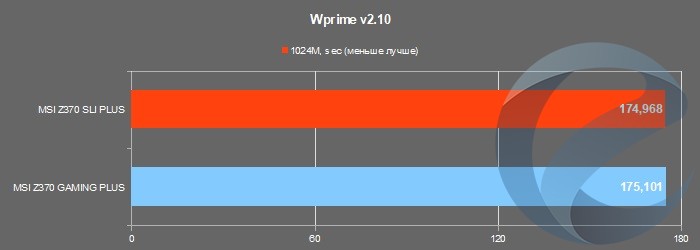
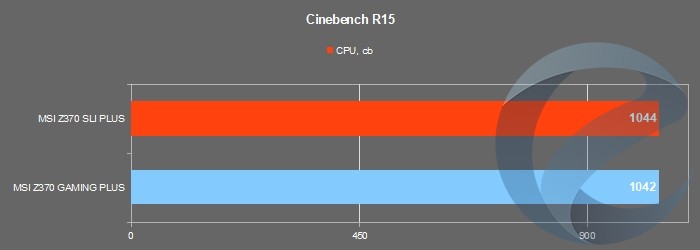

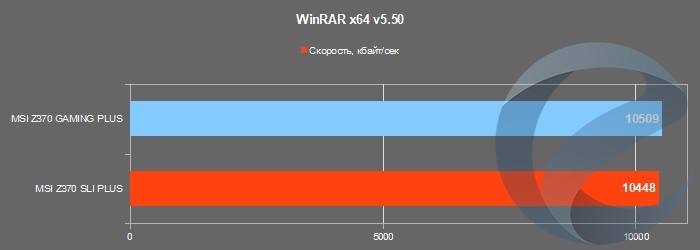
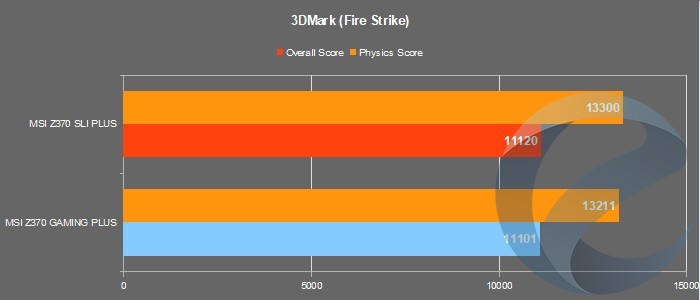
В плане производительности проблем с материнской платой MSI Z370 GAMING PLUS и работой компонентов не выявлено. Результат достойный и не уступает другим платам MSI на чипсете Intel Z370.
Заключение
MSI Z370 GAMING PLUS получилась добротной материнской платой с выделяющимся дизайном, ориентированной на игроков без претензий на максимальный функционал, хотя с точки зрения набора программного обеспечения она не уступает старшим моделям. К тому же в ней есть элементы моддинга: красная подсветка и возможность подключения RGB-лент с управлением через фирменную утилиту Mystic Light. Да и в плане разгона возможности у платы остались, все-таки используется «топовый» чипсет Intel Z370, проверенная версия UEFI BIOS Click BIOS 5 и фирменный набор утилит управления.
По большей части ограничения функционала связаны с набором реализованных портов. Например, в ней мы не найдем второго слота M.2, нет поддержки USB 3.1 Gen2 с портами типа С, да и режим AMD CrossFire позволит работать двум видеокартам только в асинхронном режиме х16+х4.
В итоге «минимализм» по набору интерфейсов обеспечил материнской плате MSI Z370 GAMING PLUS относительно невысокую стоимость (от 9100 рублей), что естественно повышает ее привлекательность в плане покупки.
Плюсы:
-
Эффектный внешний вид с красной подсветкой;
-
Наличие радиаторов в системе питания;
-
Поддержка AMD CrossFire для двух видеокарт;
-
Поддержка Mystic Light с возможностью подключенияRGB лент;
-
Наличие COM- и LPT-портов;
-
Неплохие возможности разгона;
-
«Игровой» набор программного обеспечения;
-
Невысокая стоимость.
Недостатки:
-
Нет портов USB 3.1 Gen2;
-
Асинхронный режим работы слотов PCI-E x16 (x16+x4);
-
Скромная комплектация.
21 марта 2018, среда
03:00
-50 000р на Xiaomi 12 — смотри цену
iPhone 14 128Gb — цена упала на порядок
4К TV до 30 тр — куча 55″, но есть и большие
-37 000р на iPhone 14 Pro Max
65″ 4K TV Philips дешевле 50 тр
4К телевизоры до 20.000р — целая гора 43″
iPhone 11 дешевле 50 тр, цена в рублях падает
Оглавление
- Вступление
- Обзор MSI Z370 Gaming Plus
- Технические характеристики
- Упаковка и комплектация
- Дизайн и особенности платы, декоративная подсветка
- Система охлаждения
- Подсистемы питания процессора и оперативной памяти
- Дизайн, прочая элементная база и особенности
- Задняя интерфейсная панель
- Слоты расширения
- Аппаратная составляющая BIOS
- Возможности BIOS Setup
- Setup BIOS
- Тестовый стенд
- Разгон и нагрев
- Подсистема хранения данных
- Заключение
Вступление
На Overclockers.ru уже были ранее обзоры материнских плат на наборе системной логики Intel Z370. Их общность – ценники, стартующие с отметки примерно в 10 тысяч рублей и выше. А вот более дешевые модели были как-то обойдены стороной. Их немного. Как-то не совсем справедливо.
И в этом материале мы исправим эту ситуацию: рассматриваемую MSI Z370 Gaming Plus можно найти в свободной рознице по цене от порядка 8-8.5 тысяч рублей, а средневзвешенная цена составляет 9 тысяч рублей. Есть ли жизнь на Марсе в сегменте ценников с четырехзначным, а не пятизначным значением?
Обзор MSI Z370 Gaming Plus

Технические характеристики
| Модель | MSI Z370 Gaming Plus |
| Ссылка на сайт | Страница материнской платы на сайте производителя |
| Средняя цена*, руб. | ~9 000 |
| Процессоры | Intel Core i3, Core i5, Core i7 В исполнении LGA 1151-v2 |
| Набор системной логики | Intel Z370 |
| Оперативная память | 4 x DDR4 разъема DIMM До 64 Гбайт (небуферизованной, не-ECC и ECC) Поддержка двухканального режима и Intel X.M.P. Поддержка DDR4 4000(O.C.) / 3866(O.C.) / 3800(O.C.) / 3733(O.C.) / 3666(O.C.) / 3600(O.C.) / 3466(O.C.) / 3400(O.C.) / 3333(O.C.) / 3300(O.C.) / 3200(O.C.) / 3000(O.C.) / 2800(O.C.) / 2666 / 2400 / 2133 МГц |
| Аудио | Realtek ALC892 (до 8 каналов) |
| Сеть | 1 x Intel I219-V (10/100/1000 Мбит/с) |
| Слоты расширения | 1 слот PCI Express x16 3.0**, физически как x16 1 слот PCI-Express x16 физически как 3.0 х4 4 слота PCI Express 3.0 х1 |
| Поддержка графических тандемов | AMD CrossFire |
| Дисковая подсистема | — 6 х SATA 6 Гбит/с Поддержка ACHI, NCQ, RAID 0, RAID 1, RAID 0+1, Intel Optane 1 х M.2 2242/2260/2280/22110 PCIe 3.0 x4 и SATA 6 Гбит/с |
| USB | — 8 портов USB 3.1 Gen1 (2 разъема на плате для подключения 4 портов и 4 порта на задней панели платы) — 6 портов USB 2.0 (2 разъема на задней панели платы, 2 разъема на плате для подключения 4 портов) |
| Разъемы и прочая функциональность на материнской плате | 1 x 24-pin ATX 1 x 8-pin ATX 12V 6 x SATA 6 Гбит/с 1 разъем для подключения вентиляторов системы охлаждения процессора (1 х 4-pin) 4 разъема для подключения дополнительных вентиляторов (4 х 4-pin) 1 разъем для подключения СЖО (4-pin) 2 колодки лицевой панели корпуса 1 колодка аудиоразъемов корпуса 2 колодки USB 2.0 для подключения 4 портов 2 колодки USB 3.1 Gen1 для подключения 4 портов 1 колодка COM 1 колодка LPT 1 колодка TPM перемычка сброса настроек CMOS 1 разъем для подключения светодиодной подсветки |
| Разъемы и прочая функциональность на задней панели | 1 разъем PS/2 для подключения мыши или клавиатуры 4 порта USB 3.1 Gen1 D-Sub DVI-D DisplayPort 2 порта USB 2.0 1 сетевых порта RJ-45 6 аудиоразъемов |
| Контроллер I/O | Nuvoton NCT6795D |
| BIOS | Одна несъемная микросхема флеш-памяти емкостью 128 Мбит; AMI EFI BIOS; Поддержка многоязычной локализации интерфейса (русский присутствует) |
| Размеры, мм | 305 х 244 |
| Форм-фактор | ATX |
*По данным Яндекс.Маркет на момент публикации материала.
рекомендации
43″ TV Hyundai за 15 тр — цена не растет
iPhone 14 Pro Max — цена в рублях круто пошла вниз
В ДВА раза подешевел Xiaomi 12
65″ 4K TV Hyundai дешевле 40 тр
Круто подешевел iPhone 14 Plus
85″ TV Samsung подешевел на треть в рублях
в ДВА раза упал и так дешевый Xiaomi Poco C40
iPhone 14 Pro дешевеет в рублях тоже смотри
4080 Gigabyte Gaming — за копейки в Регарде
-50 000р на Xiaomi 12 — смотри цену
65″ 4K TV Haier дешевле 50 тр
70″ TV 4K Samsung — цена упала на порядок
65″ 4K TV Supra за 40 тр — пора брать
Новейшая 4060 Gigabyte дешевле 40 тр
65″ 4K TV Hisense дешевле 50 тр
13900K в Регарде дешевле чем при курсе 60
Упаковка и комплектация
В качестве упаковки используется картонная коробка стандартных для форм-фактора ATX размеров. Какие-либо ручки, прозрачные окошки и прочее отсутствуют.

Комплектация – типична для бюджетного класса:

- Инструкция и буклет по сборке и эксплуатации;
- Два шлейфа SATA с угловыми и прямыми коннекторами и защелками;
- Планка-заглушка на заднюю панель корпуса системного блока (в нашем образце отсутствует – осталась «на память» у кого-то из предыдущих обозревателей;
- Диск DVD c программным обеспечением;
- Карточка с благодарностью MSI за приобретение платы;
- Крепежный винт для установки плат расширения в посадочные места M.2 на материнской плате, он сразу вкручен в стойку на плате.
Напомним, что последний терять крайне нежелательно: нет единого стандарта, один и тот же производитель для разных моделей своих плат может использовать несовместимые между собой винты и стойки.
Вступление, ТХ, упаковка и комплектация
Оценитe материал
рейтинг: 4.4
из 5
голосов: 16
Лента материалов раздела
Интересные материалы

30 июня 2023
80

11 июля 2023
40
Возможно вас заинтересует
Download
Table of Contents
Add to my manuals
Share
URL of this page:
HTML Link:
Bookmark this page
Manual will be automatically added to «My Manuals»
Print this page
- Manuals
- Brands
- MSI Manuals
- Motherboard
- Z370 GAMING PLUS
- Manual
Hide thumbs
1
2
3
4
5
6
7
8
9
10
11
12
Table Of Contents
13
14
15
16
17
18
19
20
21
22
23
24
25
26
27
28
29
30
31
32
33
34
35
36
37
38
39
40
41
42
43
44
45
46
47
48
49
50
51
52
53
54
55
56
57
58
59
60
61
62
63
64
65
66
67
68
69
70
71
72
73
74
75
76
77
78
79
80
81
82
83
84
85
86
87
88
89
90
91
92
93
94
95
96
97
98
99
100
101
102
103
104
105
106
107
108
-
page
of
108/
108 -
Contents
-
Table of Contents
-
Troubleshooting
-
Bookmarks
Table of Contents
Advertisement
Installing the Motherboard
1
2
7
Quick Start
Table of Contents
Previous Page
Next Page
- 1
- …
- 4
- 5
- 6
- 7
- 8
- 9
- 10
- 11
Show Quick Links
- Quick Links:
-
Connecting the Front Panel Header
-
Connecting the Power Connectors
-
Cpu_Fan1,Sys_Fan1~4, Pump_Fan1: Fan Connectors
-
Resetting BIOS to Default Values
Hide quick links:
Advertisement
Table of Contents
Troubleshooting
-
Troubleshooting
103 -
Troubleshooting
104
Related Manuals for MSI Z370 GAMING PLUS
-

Motherboard MSI Z370 GAMING PRO CARBON Manual
(120 pages)
-
Motherboard MSI Z370 GODLIKE GAMING Manual
(140 pages)
-
Motherboard MSI Z370 GAMING PRO CARBON Quick Start Manual
(196 pages)
-
Motherboard MSI Z370 GODLIKE GAMING Quick Start Manual
(260 pages)
-
Motherboard MSI Z390-A PRO Quick Start Manual
(78 pages)
-
Motherboard MSI Z390-A PRO Manual
(158 pages)
-
Motherboard MSI Z370I GAMING PRO CARBON AC Manual
(156 pages)
-
Motherboard MSI Z370M MORTAR Quick Start Manual
(162 pages)


-
Motherboard MSI Z370M MORTAR Quick Start Manual
(83 pages)
-
Motherboard MSI Z370-A PRO Quick Start Manual
(164 pages)
-
Motherboard MSI Z370-A PRO User Manual
(95 pages)
-
Motherboard MSI Z370-A Manual
(95 pages)
-
Motherboard MSI Z390-S01 User Manual
(165 pages)
-
Motherboard MSI Z77A User Manual
Z77a-g45/z75a-g45 series ms-7752 (v1.x) mainboard (88 pages)
-
Motherboard MSI Z87-G41 PC Mate User Manual
Motherboard (104 pages)
-
Motherboard MSI Z87-G41 PC Mate Preface
(219 pages)


Related Content for MSI Z370 GAMING PLUS
-
TPM 2.0 Installing Tpm 2.0 Card Onto The Motherboard
MSI TPM 2.0
-
Z170A-G43 PLUS Installing The Motherboard
MSI Z170A-G43 PLUS
-
H310-A PRO Installing The Motherboard
MSI H310-A PRO
-
Z370-A PRO Installing The Motherboard
MSI Z370-A PRO
-
7C04-001R Installing The Motherboard
MSI 7C04-001R
-
H170M-A PRO Installing The Motherboard
MSI H170M-A PRO
-
GAMING Series Installing The Motherboard
MSI GAMING Series
-
MEG Z590 UNIFY-X Installing The Motherboard
MSI MEG Z590 UNIFY-X


-
MEG Z690 ACE Installing The Motherboard
MSI MEG Z690 ACE
-
MPG X570 Gaming Edge WIFI Installing The Motherboard
MSI MPG X570 Gaming Edge WIFI
-
Z370-A Installing The Motherboard
MSI Z370-A
-
MPG B550 GAMING EDGE WIFI Installing The Motherboard
MSI MPG B550 GAMING EDGE WIFI
-
MPG Z590 GAMING CARBON WIFI Installing The Motherboard
MSI MPG Z590 GAMING CARBON WIFI
-
MEG Z590 ACE Installing The Motherboard
MSI MEG Z590 ACE
-
X299-A PRO Installing The Motherboard
MSI X299-A PRO
-
MPG Z490M GAMING EDGE WIFI Installing The Motherboard
MSI MPG Z490M GAMING EDGE WIFI


