
EE
Ru
Ur
Инструкция по эксплуатации
DVD-стереосистема
Mодель №
SC-VK960
SC-VK860
SC-VK760
На иллюстрации изображена модель SC-VK960
RQTV0242-1R
L0507KE1067
Перед подключением, работой или регулировкой данного
устройства, пожалуйста, прочтите данную инструкцию
полностью.
Сохраните, пожалуйста, данную инструкцию для того, чтобы
иметь возможность сверяться с ней в будущем.
Операции в данной инструкции описаны для управления
с помощью пульта ДУ, но Вы также можете осуществлять
управление с основного блока устройства, если кнопки
управления совпадают.
Приобретенный Вами аппарат может отличаться от
аппарата, изображенного на рисунке.
Если не оговорено иначе, на иллюстрациях показана
модель SC-VK960.
Региональный код
Проигрыватель воспроизводит диски DVD-Video,
маркированные этикетками, содержащими региональный
код “5” или “ALL”.
Например:
RQTV0242_R-1RU.indd 1
RQTV0242_R-1RU.indd 1
6/12/07 2:40:13 PM
6/12/07 2:40:13 PM
Q
Q
Q
Q
AMPLIFIER SECTION
RMS Output Power: Dolby Digital Mode
O
Front Ch (High Ch)
110 W per channel (3
Ω
), 1 kHz,
10% THD
O
Front Ch (Low Ch)
55 W per channel (6
Ω
), 100 Hz,
10% THD
O
Surround Ch
110 W per channel (3
Ω
), 1 kHz,
10% THD
O
Center Ch
110 W per channel (3
Ω
), 1 kHz,
10% THD
O
Subwoofer Ch
110 W per channel (3
Ω
), 100 Hz,
10% THD
O
Total RMS Dolby Digital mode power
SA-VK960EE
Colour
(K)… Black Type
880 W
PMPO output power
10000 W
Q
Q
Q
Q
FM/AM TUNER, TERMINALS SECTION
Preset station
FM 20 stations
AM 15 stations
Frequency Modulation (FM)
O
Frequency range
87.50 to 108.00 MHz (50 kHz
step)
O
Sensitivity
4.0 µV (IHF)
O
S/N 26 dB
2.2 µV
O
Antenna terminals
75
Ω
(unbalanced)
Amplitude Modulation (AM)
DVD Stereo System
Notes: This model’s DVD changer mechanism unit is CRS1D. Please refer to the original Service Manual
(Order No. MD0603065A3) for this mechanism.
Specifications
ORDER NO. MD0707014CE
O
Frequency range
522 to 1629 kHz (9 kHz step)
AM Sensitivity S/N 20 dB at 999 kHz
1000 µV/m
Music Port input jack
O
Sensitivity
100 mV, 4.7 k
Ω
O
Terminal
Stereo, 3.5 mm jack
Phone jack
O
Terminal
Stereo, 3.5 mm jack
Mic jack
O
Sensitivity
0.7 mV, 600
Ω
O
Terminal
Mono, 6.3 mm jack (2 system)
AUX
O
Sensitivity
2 V, 8 k
Ω
O
Terminal
Stereo, RCA jack
USB Port
O
USB standard
USB 2.0 full speed
O
Media file format support
MP3 (*.mp3)
WMA (*.wma)
JPEG (*.jpg, *.jpeg)
MPEG4 (*.asf)
O
USB device file system
FAT12, FAT16, FAT32
O
USB port power
500 mA (Max)
Q
Q
Q
Q
CASSETTE DECK SECTION
O
Type
1 way, Auto Reverse
O
Track system
4-Track, 2 Channel
Heads
O
Record/Playback
Solid permalloy head
O
Erasure
Double gap ferrite head
Motor
DC servo motor
Recording system
AC bias 100 kHz
Erasing system
AC erase 100 kHz
Tape speed
4.8 cm/s
Overall frequency response (+3, -6 dB) at DECK OUT
O
Normal
35 Hz to 14 kHz
S/N ratio
50 dB (A weighted)
Wow and flutter
0.18% (WRMS)
Fast forward and rewind time
Approx. 120 seconds with C-60 cassette tape
Q
Q
Q
Q
VIDEO SECTION
Video system
PAL625/50, PAL525/60, NTSC
Composite video output
O
Output level
1 Vp-p (75
Ω
)
O
Terminal
Pin jack (1 system)
Component video output
[NTSC: 480p/480i, PAL: 576p/576i]
O
Y output level
1 Vp-p (75
Ω
)
O
P
B
output level
0.7 Vp-p (75
Ω
)
O
P
R
output level
0.7 Vp-p (75
Ω
)
O
Terminal
Pin jack (Y: green, P
B
: blue, P
R
: red) (1 system)
Q
Q
Q
Q
DISC SECTION
Disc played [8 cm or 12 cm]
(1) DVD (DVD-Video, DivX
#6, #7
)
(2) DVD-RAM (DVD-VR, JPEG
# 4, #7
, MP3
# 2, #7
, MPEG4
# 5, #7
, DivX
# 6,
#7
)
(3) DVD-R (DVD-Video, DVD-VR, JPEG
# 4, #7,
MP3
# 2, #7
, MPEG4
# 5, #7
,
DivX
# 6, #7
)
(4) DVD-R DL (DVD-Video, DVD-VR)
(5) DVD-RW (DVD-Video, DVD-VR, JPEG
# 4, #7
, MP3
# 2, #7
, MPEG4
# 5,
#7
, DivX
# 6, #7
)
(6) +R/+RW (Video)
(7) +R DL (Video)
(8) CD,CD-R/RW [CD-DA, Video CD, SVCD
# 1
, MP3
# 2, #7
, WMA
# 3, #7
,
JPEG
# 4, #7
, MPEG4
# 5, #7
, DivX
# 6, #7
, HighMAT Level 2 (Audio and
Image)]
# 1
Conforming to IEC62107
# 2
MPEG-1 Layer 3, MPEG-2 Layer 3
# 3
Windows Media Audio Ver. 9.0 L3
Not compatible with Multiple Bit Rate (MBR)
# 4
Exif Ver 2.1 JPEG Baseline files
Picture resolution: between 160 x 120 and 6144 x 4096 pixels
(Sub sampling is 4:0:0, 4:2:0, 4:2:2 or 4:4:4). Extremely long and
narrow pictures may not be displayed.
# 5
MPEG4 data recorded with the Panasonic SD multi cameras or
DVD video recorders.
Conforming to SD VIDEO specifications (ASF standard) / MPEG4
(Simple Profile) video system/ G.726 audio system.
# 6
Plays all versions of DivX
®
video (including DivX
®
6) with standard
playback of DivX
®
media files. Certified to the DivX Stereo System
Profile.
# 7
The total combined maximum number of recognizable audio,
picture and video contents and groups: 4000 audio, picture and video
contents and 400 groups.
Pick up
Wavelength
O
CD
785 nm
O
DVD
662 nm
Laser power
O
CD
CLASS 1M
O
DVD
CLASS 1
Audio output (Disc)
O
Number of channels
(FL, FR, C, SL, SR, SW) 5.1 ch
Audio performance (measurement at: Rec out terminal)
O
Frequency response (CD-Audio)
4 Hz to 20 kHz
Q
Q
Q
Q
GENERAL
Power supply
AC 230 V, 50 Hz
Power consumption
360 W
Power consumption in standby mode
0.9 W (approximate)
Dimensions (W x H x D)
250 x 330 x 334.6 mm
Mass
5.5 kg
Operating temperature range
+5°C to +35°C
Operating humidity range
5% to 90% RH (no condensation)
Notes:
1.
Specifications are subject to change without notice.
Mass and dimensions are approximate.
2.
Total harmonic distortion is measured by the digital spectrum
analyzer.
Q
Q
Q
Q
SYSTEM
2
SA-VK960EE
Refer to the respective original service manuals for *1, *2, *3, *4.
This model uses CRS1D mechanism (DVD/CD changer mechanism).
You can refer to the original service manual for information on this
mechanism.
3
SA-VK960EE
1
Safety Precautions
6
1.1.
General Guidelines
6
1.2.
Before Repair and Adjustment
6
1.3.
Protection Circuitry
6
1.4.
Safety Parts Information
7
2
Prevention of Electrostatic Discharge (ESD) to
Electrostatically Sensitive (ES) Devices
8
3
Precaution of Laser Diode
9
4
About Lead Free Solder (PbF)
10
4.1.
Service caution based on legal restrictions
10
5
Handling Precautions for Traverse Unit
11
5.1.
Handling Optical Pickup in Traverse Unit
11
5.2.
Replacing Precautions for Optical Pickup Unit
11
5.3.
Grounding for Preventing Electrostatic Destruction
11
6
Accessories
13
7
Operation Procedures
14
7.1.
Main Unit Key Buttons Operations
14
7.2.
Remote Control Key Buttons Operations
15
7.3.
Portable Audio Equipment Connection & Operation
16
7.4.
USB Connection & Operation
17
7.5.
About DivX VOD Content
18
7.6.
Disc Information
19
8
DVD/CD Changer Mechanism Unit
21
8.1.
CRS1D Mechanism Overview
21
9
Self Diagnosis and Special Mode Setting
24
9.1.
Service Mode Summary Table
24
9.2.
Service Mode Table (For DVD)
25
9.3.
Service Mode Table (For Inspection)
32
9.4.
DVD Self Diagnostic Function-Error Code
37
9.5.
Sales Demonstration Lock Function
44
9.6.
Service Precautions
44
10 Assembling and Disassembling
46
10.1. Disassembly Flow Chart
48
10.2. Main Components and P.C.B. Locations
49
10.3. Disassembly of Top Cabinet
50
10.4. Disassembly of the DVD/CD Changer Mechanism Unit 50
10.5. Disassembly of DVD Module P.C.B.
51
10.6. Disassembly of USB Relay P.C.B.
51
10.7. Disassembly of Rear Panel
52
10.8. Disassembly of Main P.C.B.
52
10.9. Replacement of Regulator IC (IC2810)
53
10.10. Disassembly of Front Panel
53
10.11. Disassembly of Mic P.C.B.
55
10.12. Disassembly of Panel P.C.B
55
10.13. Disassembly of Tact Switch P.C.B
55
10.14. Disassembly of USB P.C.B
56
10.15. Replacement of CD Lid
56
10.16. Disassembly of Deck Mechanism Unit
56
10.17. Replacement of Cassette Lid
57
10.18. Disassembly of Deck P.C.B
57
10.19. Disassembly of D-Amp P.C.B. & Speaker P.C.B.
58
10.20. Replacement of Digital Amp IC (IC5100)
58
10.21. Disassembly of SMPS P.C.B.
59
10.22. Replacement of Switch Regulator IC (IC5701)
59
10.23. Replacement of Regulator Diode (D5904/D5905)
60
10.24. Replacement of Regulator Diode (D5702)
60
10.25. Disassembly of Traverse Unit
61
10.26. Disassembly of Deck Mechanism
62
10.27. Rectification for Tape Jam Problem
65
11 Service Position
67
11.1. Checking & Repairing Main P.C.B.
67
11.2. Checking & Repairing Speaker P.C.B.
67
11.3. Checking & Repairing Panel P.C.B.
67
11.4. Checking & Repairing Deck P.C.B.
68
11.5. Checking & Repairing Deck Mechanism P.C.B.
68
11.6. Checking & Repairing Mic P.C.B.
68
11.7. Checking & Repairing DVD Module P.C.B.
69
11.8. Checking & Repairing D-Amp P.C.B.
69
11.9. Checking & Repairing SMPS P.C.B.
71
12 Adjustment Procedures
72
12.1. Cassette Deck Section
72
12.2. Tuner section
73
12.3. Alignment Points
73
13 Illustration of ICs, Transistors and Diodes
74
14 Voltage and Waveform Chart
75
14.1. DVD Module P.C.B.
75
14.2. Main P.C.B.
76
14.3. Panel P.C.B.
77
14.4. Deck/Deck Mechanism & Mic P.C.B.
78
14.5. D-Amp P.C.B.
78
14.6. SMPS P.C.B.
79
14.7. Waveform Chart
80
15 Wiring Connection Diagram
83
16 Block Diagram
85
16.1. System Control
85
16.2. DVD (Servo)
86
16.3. DVD (Audio)
87
16.4. DVD (Video)
88
16.5. Deck
89
16.6. Audio
90
16.7. Audio Digital Amp
91
16.8. Power
92
17 Schematic Diagram Notes
93
18 Schematic Diagram
95
18.1. DVD Module Circuit
95
18.2. Main Circuit
99
18.3. Panel Circuit
103
18.4. Tact Switch/Mic/Deck Mechanism/USB Relay/USB Circuit
104
18.5. Deck Circuit
105
18.6. D-Amp Circuit
106
18.7. SMPS Circuit
108
CONTENTS
Page
Page
4
SA-VK960EE
Простая настройка (продолжение)
РУССКИЙ ЯЗЫК
RQTV0242
6
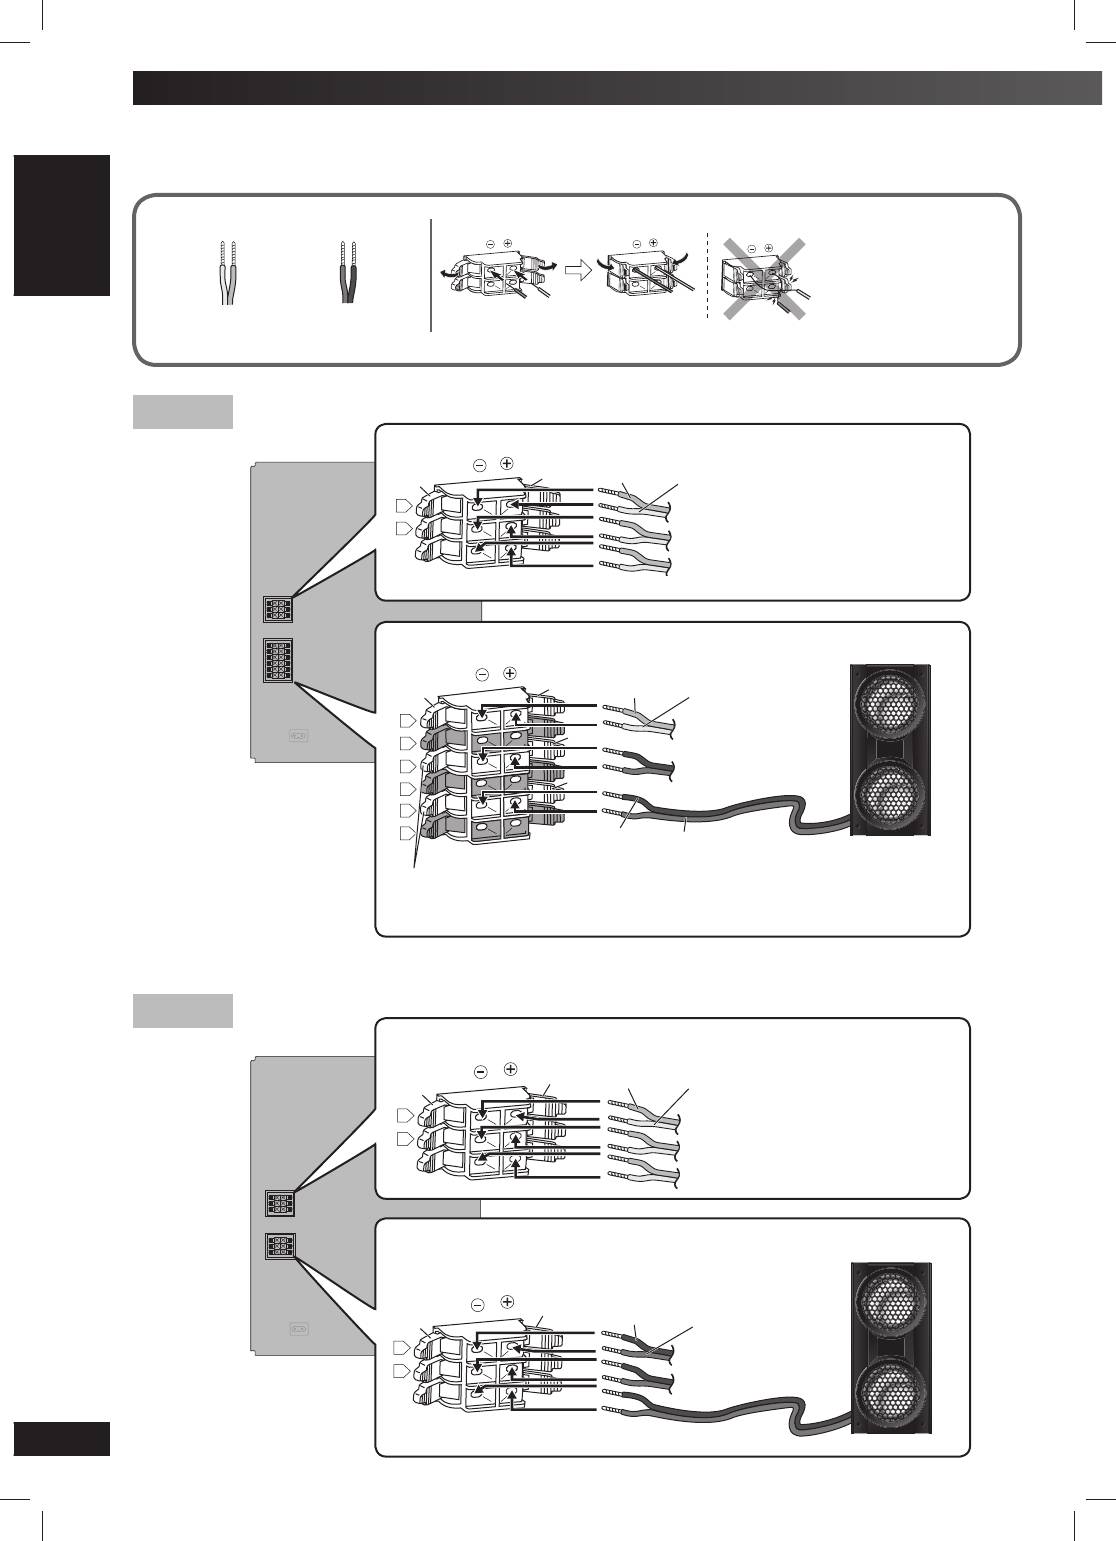
Подключение динамиков
Подключение динамиков
Подключите все акустические системы, как показано на рисунке.
Примечание:
Запрещается замыкать
Красный
положительные (+)
Серый (+)
(+)
и отрицательные
Черный
(–) жилы провода динамика.
Голубой (–)
(–)
Неправильное подключение
может повредить динамики.
Подключайте таким образом, чтобы цвета проводов
совпадали с цветом разъемов.
VK960
Подключение центрального динамика и динамиков объемного звука
Го лу б ой
Серый
Голубой (–)
Серый (+)
L
Динамики объемного звука (левый)
R
Динамики объемного звука (правый)
Центральный динамик
Подключение передних динамиков и сабвуферов
Го лу б ой
Серый
Голубой (–)
Серый (+)
L
Фронтальные динамики
(левый)
Красный
R
(высокие частоты)
L
Фронтальные динамики
(правый)
Красный
R
(низкие частоты)
L
R
Черный
(–) Красный (+)
Сабвуфер (левый)
Черный
Примечание:
Подключите правую (R) сторону таким же образом.
VK860
Подключение центрального динамика и динамиков объемного звука
Серый
Го лу б ой
Голубой (–) Серый (+)
L
Динамики объемного звука (левый)
R
Динамики объемного звука (правый)
Центральный динамик
Подключение передних динамиков и сабвуферов
Красный
Черный
Черный (–) Красный (+)
L
Фронтальные динамики
(левый)
R
Фронтальные динамики
(правый)
Сабвуфер
RQTV0242_R-1RU.indd 6RQTV0242_R-1RU.indd 6 6/12/07 2:41:11 PM6/12/07 2:41:11 PM
Краткое содержание страницы № 1
Operating Instructions
DVD Stereo System
Model No. SC-VK960
SC-VK860
SC-VK760
The illustration shows SC-VK960
Before connecting, operating or adjusting this product,
Region number
please read the instructions completely.
The player plays DVD-Video marked with labels
Please keep this manual for future reference.
containing the region number or “ALL”.
Operations in these instructions are described using
Region Number
the remote control, but you can perform the operations
on the main unit if t
Краткое содержание страницы № 2
VK960 Dear customer : indicates features applicable to SC-VK960 only Thank you for purchasing this product. VK860 : SC-VK860 only For optimum performance and safety, please read these VK760 : SC-VK760 only instructions carefully. System SC-VK960 SC-VK860 SC-VK760 Main unit SA-VK960 (1 unit) SA-VK860 (1 unit) SA-VK760 (1 unit) Front speakers SB-PF960 (2 units) SB-PF860 (2 units) SB-PF760 (2 units) Center speaker SB-PC960 (1 unit) SB-PC860 (1 unit) SB-PC760 (1 unit) Surround speakers SB-PS960 (
Краткое содержание страницы № 3
Safety precautions HighMAT™ and the HighMAT logo are either trademarks or registered trademarks of Microsoft Corporation in Placement the United States and/or other countries. Set the unit up on an even surface away from direct sunlight, high temperatures, high humidity, and excessive vibration. These conditions can damage the cabinet and This product is licensed under the MPEG-4 Visual patent other components, thereby shortening the unit’s service life. portfolio license for the personal
Краткое содержание страницы № 4
S SUPPLIED ACCESSORIES UPPLIED ACCESSORIES Table of contents Please check and identify the supplied accessories. 1 x AC power supply cord GETTING STARTED For Southeast Asia For Australia and N.Z. Safety precautions ………………………………. 3 Simple setup ……………………………………….. 5 Disc information ………………………………….11 QUICK SETUP ……………………………………. 12 Overview of controls ………………………….. 12 DISC
Краткое содержание страницы № 5
Simple setup Placement of speakers Placement of speakers Place the front, center, and surround Center speaker speakers at approximately the same distance from the seating position. (SB-PC960/ (SB-PC760) Front speakers SB-PC860) (SB-PF960/ (SB-PF760) (SB-PF760) (SB-PF960/ Speakers are designed identically so SB-PF860) SB-PF860) that no left or right channel orientation is necessary. Front speaker (left) Front speaker (right) Television (not included) Subwoofer (left) Subwoofer (right) Center
Краткое содержание страницы № 6
Simple setup (continued) Speaker connections Speaker connections Connect all the speakers as illustrated. Note: Never short-circuit positive (+) and negative (–) Gray (+) Red (+) speaker wires. Incorrect connection can damage the Blue (–) Black (–) speakers. Connect so cord colors match the terminal colors. VK960 Connecting center and surround speakers Gray Blue (–) Gray (+) Blue L Surround speaker (left) R Surround speaker (right) Center speaker Connecting front speakers and subwoofers Blue
Краткое содержание страницы № 7
VK760 Connecting center and surround speakers Gray Blue (–) Gray (+) Blue L Surround speaker (left) R Surround speaker (right) Center speaker Connecting front speakers and subwoofer Red Black Black (–) Red (+) L Front speaker (left) R Front speaker (right) Subwoofer Other speaker setup options – attaching to a wall Other speaker setup options – attaching to a wall You can attach the surround and center speakers to a wall. 1 Drive a screw (not included) into the wall. VK960 VK860 Surround spea
Краткое содержание страницы № 8
Simple setup (continued) M Making the connections aking the connections Connect the AC power supply cord only after all other connections have been made. Conserving power The unit consumes power (approx. 0.9 W) even when it is turned off with [ ] (main unit: [ /I]). To save power when the unit is not to be used for a long time, unplug it from the household AC power socket. You will need to reset some memory items after plugging in the unit. V Viideo connections deo connections � Do not connect
Краткое содержание страницы № 9
3 A Antenna connections ntenna connections ■ AM loop antenna ■ FM indoor antenna Tape the antenna where reception is best. Stand the antenna up on its base. Black 2 1 Adhesive Red tape White LOOP ANT GROUND ( O Optional antenna connections ptional antenna connections Use outdoor antenna if radio reception is poor. Note: Disconnect the outdoor antenna when the unit is not in use. Do not use the outdoor antenna during a lightning storm. FM outdoor antenna FM outdoor antenna (not included) 75
Краткое содержание страницы № 10
Simple setup (continued) Preparing the remote control Do not: � mix old and new batteries. Insert so the � use different types of the batteries at the same time. poles (+ and –) � heat or expose batteries to fl ame. match those in the � take apart or short circuit the batteries. remote control. � attempt to recharge alkaline or manganese batteries. � use batteries if the covering has been peeled off. Mishandling of batteries can cause electrolyte leakage which can severely damage the remote c
Краткое содержание страницы № 11
Disc information Discs that can be played Discs that can be played ■ Commercial discs Indicated in Disc Logo these Remarks instructions by DVD-Video High quality movie and music discs. Music discs with video. Video CD Including SVCD (Conforming to IEC62107). CD Music discs. ■ Recorded discs (‡: Playable, —: Not playable) Recorded on a DVD Recorded on a personal computer, etc. video recorder, etc. *6 Disc Logo Finalizing *2 *4 *8 *9 Not DVD-RAM —— ‡ ‡‡ ‡ ‡ necessary DVD-R/RW — Necessary
Краткое содержание страницы № 12
QUICK SETUP The QUICK SETUP screen assists you to make necessary settings. Turn on the television and select the appropriate video input on the television. 1 2 3 4 5 6 (Press and hold) Switch on the Select “DVD/CD”. Shows the QUICK Follow the Finish the QUICK Exit. unit. SETUP screen. messages SETUP. and make the settings. Overview of controls M Main unit ain unit Refer to the numbers in parentheses for page reference. Buttons such as ➊ function the same as the controls on the remote control.
Краткое содержание страницы № 13
Overview of controls (continued) Remote control Remote control Buttons labeled such as ➊ function in exactly the same way as the buttons on the main unit. Television operations (33) 1 [CLOCK/TIMER] (31) [SLEEP/A.OFF] (32) [˚ PLAY/ REC] (31) Numeric (15, 17, 20) 7 [DISC] (14, 16) [] (14) 3 [] (14) 4 2 5 6 [DIMMER] [PLAY MODE, – CD MODE] (16, 17, 26) [SURROUND ENHANCER] (30) [ , , , ], [ENTER] (12, 15) [FUNCTIONS] (18, 19, 20) [DIRECT NAVIGATOR, TOP MENU] For Southeast Asia (14, 18, 19) [RETURN,
Краткое содержание страницы № 14
Discs — Basic play Handling of the disc trays and discs Handling of the disc trays and discs Not doing the following will cause damage to the unit. Inserting a disc Removing the power plug Press [ /I] to turn off the unit and then remove the power plug only after all the displays have disappeared. Tray caution � Place the disc correctly label-up as shown in the diagram. � Insert only one disc into each tray. � Always press [ , OPEN/CLOSE] to insert or remove a disc. � Do not push or pull out
Краткое содержание страницы № 15
Search (during play) Selecting a disc Play speed increases up to 5 steps. Select or Slow-motion play (during pause) Confi rm � Play speed increases up to 5 steps. � Slow motion play is for forward direction only. Disc menus Skip (while stopped) Shows a disc top menu. —— Show the programs ( page 19). (while stopped) [ , ]: Group skip. Shows a disc menu. [ , ]: Content skip. This feature does not work Shows a playlist. during program and random play ( page 17). with Playback co
Краткое содержание страницы № 16
Discs — Advanced play Disc information Disc information R Repeat play epeat play You can select the disc after checking the discs loaded (Only when the elapsed play time can be displayed. with the “Disc Information” screen. : Works with all JPEG contents.) During play You can also select the disc directly with the disc Press [REPEAT] several times to select an item to be buttons on the main unit. repeated. Press [DISC] to show the “Disc Information” 1 E Example: xample: screen. Example: Fu
Краткое содержание страницы № 17
Discs — Program and Random play Program and random playback screens appear sequentially. Every time you press the button: Program → Random → Off (Normal play) (While stopped or in RESUME mode) To exit program or random play mode Press [PLAY MODE] several times while stopped. Start program/random Note: Disable HighMAT disc play to use program and random play. Select “Play as Data Disc” in Other Menu Play and select the ( page 22). desired mode. Program play (up to 32 items) Program play (up to
Краткое содержание страницы № 18
Discs — Using navigation menus P Playing data discs laying data discs Using the sub menu You can play JPEG, MPEG4 and DivX video contents While the Navigation Menu is displayed on DVD-VR or play HighMAT discs without using the 1 Press [FUNCTIONS]. HighMAT function ( page 22, “Play as Data Disc” in Items shown differ depending on the type of disc. Other Menu). Multi Groups and contents are displayed. List Contents only T ree Playing items in order Playing items in order Groups only (
Краткое содержание страницы № 19
Playing RAM and DVD-R/-R Playing RAM and DVD-R/-RW W (DVD-VR) (DVD-VR) P Playing from the selected laying from the selected discs discs track in the CD track in the CD � Titles appear only if the titles are recorded on the Titles appear with CD Text disc playback. disc. Press [TOP MENU] or [MENU]. � You cannot edit programs, playlists and disc titles. 1 Example: CD text CD Text 1/14 0:53 T T Disc Title : Celine Dion One Heart Disc Artist : Celine Dion Track Title : I D
Краткое содержание страницы № 20
Discs — Using on-screen menus Select Go to the 1 2 3 4 Select next menu Select Return to the Confi rm previous menu Confi rm Displays the Select the menu. Make the settings. Exit. “Functions” screen. Items shown differ depending on the type of disc as well as the recording format. F Functions Menu unctions Menu Program To start from a specifi c item Thumbnail To show thumbnail images Group Example: To select program 12 Subtitle Title (with multiple subtitles) Press the numeric buttons: Ch