-
Contents
-
Table of Contents
-
Troubleshooting
-
Bookmarks
Quick Links
350 East Plumeria Drive
San Jose, CA 95134
USA
April 2012
202-10986-01
v1.0
N300 Wireless Gigabit
Router with USB JNR3210
User Manual
Related Manuals for NETGEAR JNR3210
Summary of Contents for NETGEAR JNR3210
-
Page 1: User Manual
N300 Wireless Gigabit Router with USB JNR3210 User Manual 350 East Plumeria Drive San Jose, CA 95134 April 2012 202-10986-01 v1.0…
-
Page 2: Technical Support
NETGEAR, Inc. Technical Support Thank you for choosing NETGEAR. To register your product, get the latest product updates, or get support online, visit us at http://support.netgear.com.
-
Page 3: Table Of Contents
NETGEAR Downloader ……..
-
Page 4
Desktop NETGEAR Genie …….. -
Page 5
N900 Wireless Dual Band Gigabit Router WNDR4500 Chapter 8 Administration Upgrade the Router Firmware ……..75 View Router Status. -
Page 6
N900 Wireless Dual Band Gigabit Router WNDR4500 LEDs Never Turn Off ……..110 Internet or Ethernet Port LEDs Are Off. -
Page 7: Chapter 1 Hardware Setup
Hardware Setup Getting to know your router The N300 Wireless Gigabit Router with USB JNR3210 provides you with an easy and secure way to set up a wireless home network with fast access to the Internet over a high-speed digital subscriber line (DSL).
-
Page 8: Unpack Your Router
• Installation guide with cabling and router setup instructions If any parts are incorrect, missing, or damaged, contact your NETGEAR dealer. Keep the carton and original packing materials, in case you need to return the product for repair. Position Your Router The router lets you access your network from virtually anywhere within the operating range of your wireless network.
-
Page 9: Hardware Features
N300 Wireless Gigabit Router with USB JNR3210 • In an elevated location such as a high shelf, keeping the number of walls and ceilings between the router and your other devices to a minimum. • Away from electrical devices that are potential sources of interference, such as ceiling fans, home security systems, microwaves, PCs, or the base of a cordless phone or 2.4…
-
Page 10
Description Power/Test • Solid green. The startup is completed, and the router is ready. • Blinking green. The firmware is corrupted (see http://www.netgear.com/support). • Blinking amber. The firmware is upgrading, or the Reset button was pressed. • Off. Power is not supplied to the router. -
Page 11: Back Panel
N300 Wireless Gigabit Router with USB JNR3210 Back Panel The back panel has the connections shown in the following figure. Reset Power Ethernet LAN On/Off button Internet Figure 3. Router, rear view Factory Default Settings on page 118 for information about restoring factory settings.
-
Page 12: Chapter 2 Getting Started With Netgear Genie
Getting Started with NETGEAR Genie Connecting to the router This chapter explains how to use NETGEAR Genie to set up your router after you complete cabling as described in the installation guide and in the previous chapter in this book.
-
Page 13: Router Setup Preparation
N300 Wireless Gigabit Router with USB JNR3210 Router Setup Preparation You can set up your router with the NETGEAR Genie automatically, or you can use the Genie menus and screens to set up your router manually. However, before you start the setup process, you need to have your ISP information on hand and make sure the laptops, PCs, and other devices in the network have the settings described here.
-
Page 14: Netgear Genie Setup
N300 Wireless Gigabit Router with USB JNR3210 NETGEAR Genie Setup NETGEAR Genie runs on any device with a web browser. It is the easiest way to set up the router because it automates many of the steps and verifies that those steps have been successfully completed.
-
Page 15: Use Netgear Genie After Installation
N300 Wireless Gigabit Router with USB JNR3210 Use NETGEAR Genie after Installation When you first set up your router, NETGEAR Genie automatically starts when you launch an Internet browser on a computer that is connected to the router. You can use NETGEAR Genie again if you want to view or change settings for the router.
-
Page 16: Router Dashboard (Basic Home Screen)
Using this tab requires a solid understanding of networking concepts. • Help & Support. Go to the NETGEAR support site to get information, help, and product documentation. These links work once you have an Internet connection. Getting Started with NETGEAR Genie…
-
Page 17: Add Wireless Devices Or Computers To Your Network
N300 Wireless Gigabit Router with USB JNR3210 Add Wireless Devices or Computers to Your Network Choose either the manual or the WPS method to add wireless devices and other equipment to your wireless network. See Guest Networks on page 26 for instructions on how to set up a guest network.
-
Page 18: Chapter 3 Genie Basic Settings
This chapter explains the features available from the Genie Basic Home screen, shown in the following figure: This chapter contains the following sections: • Internet Setup • Attached Devices • Parental Controls • ReadySHARE USB Storage • Basic Wireless Settings • Guest Networks • FastLane • NETGEAR Downloader (feature not available in North America)
-
Page 19: Internet Setup
Enter the settings for the IP address and DNS server. The default settings usually work fine. If you have problems with your connection, check the ISP settings. Click Apply to save your settings. Click Test to test your Internet connection. If the NETGEAR website does not display within 1 minute, see Chapter 10, Troubleshooting.
-
Page 20
N300 Wireless Gigabit Router with USB JNR3210 These fields display when your ISP requires a login: • Internet Service Provider Encapsulation. ISP types. The choices are PPPoE, PPTP, or L2TP. • Login. The login name provided by your ISP. This is often an email address. -
Page 21: Attached Devices
N300 Wireless Gigabit Router with USB JNR3210 Attached Devices You can view all computers or devices that are currently connected to your network here. From the Basic Home screen, select Attached Devices to display the following screen: Wired devices are connected to the router with Ethernet cables. Wireless devices have joined the wireless network.
-
Page 22: Parental Controls
N300 Wireless Gigabit Router with USB JNR3210 Parental Controls The first time you select Parental Controls from the Basic Home screen, you are automatically directed to the Internet, where you can learn more about Live Parental Controls or download the application. The following screen displays: ReadySHARE USB Storage You can view information about a USB storage device that is connected to the router’s USB…
-
Page 23: Basic Wireless Settings
To view or change basic wireless settings: NETGEAR recommends that you do not change your preset security settings. If you do decide to change your preset security settings, make a note of the new settings and store it in a safe place where you can easily find it.
-
Page 24: Wireless Settings Screen Fields
N300 Wireless Gigabit Router with USB JNR3210 If you use a wireless computer to change the wireless network name (SSID) or other wireless security settings, you are disconnected when you click Apply. To avoid this problem, use a computer with a wired connection to access the router.
-
Page 25: Change Wpa Security Option And Passphrase
Internet, but cannot access each other or access Ethernet devices on the network. Enable NETGEAR Badge LED. This setting lets you enable the NETGEAR Badge LED. Name (SSID). The SSID is also known as the wireless network name. Enter a 32-character (maximum) name in this field.
-
Page 26: Guest Networks
N300 Wireless Gigabit Router with USB JNR3210 Guest Networks Adding a guest network allows visitors at your home to use the Internet without giving them your wireless security key. To set up a guest network: Select Basic > Guest Network to display the following screen: Select any of the following wireless settings: Enable Guest Network.
-
Page 27: Guest Network Wireless Security Options
N300 Wireless Gigabit Router with USB JNR3210 Guest Network Wireless Security Options A security option is the type of security protocol applied to your wireless network. The security protocol in force encrypts data transmissions and ensures that only trusted devices receive authorization to connect to your network.
-
Page 28: Fastlane
N300 Wireless Gigabit Router with USB JNR3210 FastLane FastLane lets you specify the bandwidth that you want reserved when you are connecting from a trusted IP address, and push the FastLane button. FastLane gives you guaranteed bandwidth for video streaming applications.
-
Page 29: Netgear Downloader
NETGEAR Downloader lets you download files using a USB disk drive plugged into the USB port on your JNR3210 router. All files are downloaded to the USB disk drive. You can then copy the downloaded files to your computer using \readysharexxxx.
-
Page 30
N300 Wireless Gigabit Router with USB JNR3210 Select NETGEAR Downloader from the Basic screen menu. The Download Manager screen appears.: First, specify what you would like to store by browsing to the path where that data is stored. Select a download type from the drop-down list. -
Page 31: Chapter 4 Genie Advanced Home
WAN Setup • LAN Setup • Quality of Service (QoS) Setup • NETGEAR Downloader (feature not available in North America) Some selections on the Advanced Home screen are described in separate chapters: • USB Storage. See Chapter 5, USB Storage.
-
Page 32: Setup Wizard
N300 Wireless Gigabit Router with USB JNR3210 Setup Wizard The NETGEAR Genie installation process is launched the first time you set up the router. After setting up the router the first time, if you want to perform this task again, you can run Setup Wizard from the Advanced tab of the Genie.
-
Page 33: Wps Wizard
N300 Wireless Gigabit Router with USB JNR3210 WPS Wizard The WPS Wizard helps you add a WPS-capable client device (a wireless device or computer) to your network. On the client device you need to either press its WPS button or locate its WPS PIN.
-
Page 34: Setup Menu
N300 Wireless Gigabit Router with USB JNR3210 Within 2 minutes, go to the client device and use its WPS software to join the network without entering a password. The router attempts to add the WPS-capable device. The WPS LED on the front of the router blinks green.
-
Page 35: Wan Setup
N300 Wireless Gigabit Router with USB JNR3210 WAN Setup The WAN Setup screen lets you configure a DMZ (demilitarized zone) server, change the Maximum Transmit Unit (MTU) size, and enable the router to respond to a ping on the WAN (Internet) port.
-
Page 36: Default Dmz Server
MTU setting than the other devices, the data packets have to be split or “fragmented” to accommodate the device with the smallest MTU. The best MTU setting for NETGEAR equipment is often just the default value, and changing the value might fix one problem but cause another. Leave MTU unchanged unless one of these situations occurs: •…
-
Page 37
Table 2. Common MTU Sizes Application 1500 The largest Ethernet packet size and the default value. This is the typical setting for non-PPPoE, non-VPN connections, and is the default value for NETGEAR routers, adapters, and switches. 1492 Used in PPPoE environments. -
Page 38: Lan Setup
N300 Wireless Gigabit Router with USB JNR3210 LAN Setup The LAN Setup screen allows configuration of LAN IP services such as Dynamic Host Configuration Protocol (DHCP) and Routing Information Protocol (RIP). The router is shipped preconfigured to use private IP addresses on the LAN side and to act as a DHCP server.
-
Page 39: Lan Setup Screen Settings
N300 Wireless Gigabit Router with USB JNR3210 LAN Setup Screen Settings LAN TCP/IP Setup • IP Address. The LAN IP address of the router. • IP Subnet Mask. The LAN subnet mask of the router. Combined with the IP address, the IP subnet mask allows a device to know which other addresses are local to it, and which have to be reached through a gateway or router.
-
Page 40: Address Reservation
N300 Wireless Gigabit Router with USB JNR3210 You can specify the pool of IP addresses to be assigned by setting the starting IP address and ending IP address. These addresses should be part of the same IP address subnet as the router’s LAN IP address.
-
Page 41: Quality Of Service (Qos) Setup
N300 Wireless Gigabit Router with USB JNR3210 Quality of Service (QoS) Setup QoS is an advanced feature that can be used to prioritize some types of traffic ahead of others. The N300 Wireless Gigabit Router with USB can provide QoS prioritization over the wireless link and on the Internet connection.
-
Page 42
N300 Wireless Gigabit Router with USB JNR3210 To specify prioritization of traffic, you have to create a policy for the type of traffic and add the policy to the QoS Policy table in the QoS Setup screen. For convenience, the QoS Policy table lists many common applications and online games that can benefit from QoS handling. -
Page 43
N300 Wireless Gigabit Router with USB JNR3210 In the Priority Category list, select either Applications or Online Gaming. In either case, a list of applications or games displays in the list. You can select an existing item from the list, or you can scroll and select Add a New Application or Add a New Game, as applicable. -
Page 44
N300 Wireless Gigabit Router with USB JNR3210 From the Priority Category list, select Ethernet LAN Port, as shown in the following figure: From the LAN port list, select the LAN port that will have a QoS policy. From the Priority list, select the priority that this port’s traffic should receive relative to other applications and traffic when accessing the Internet. -
Page 45
N300 Wireless Gigabit Router with USB JNR3210 From the Priority Category list, select MAC Address to display the following screen: If the device to be prioritized appears in the MAC Device List, select its radio button. The information from the MAC Device List populates the policy name, MAC Address, and Device Name fields. -
Page 46: Netgear Downloader
NETGEAR Downloader lets you download files using a USB disk drive plugged into the USB port on your JNR3210 router. All files are downloaded to the USB disk drive. You can then copy the downloaded files to your computer using \readysharexxxx.
-
Page 47
Specify the maximum upload speed (zero means no limit). Specify the maximum number of download tasks. Check the Allow system to manage your NETGEAR Download automatically check box if you want the system to automatically remove your completed download tasks to save bandwidth. -
Page 48: Chapter 5 Usb Storage
• USB Storage Advanced Settings • Safely Remove a USB Drive • Media Server Settings • Specify Approved USB Devices For information about using the ReadySHARE Printer feature, see Chapter 6, ReadySHARE Printer. For additional about ReadySHARE features, see www.netgear.com/readyshare.
-
Page 49: Usb Drive Requirements
N300 Wireless Gigabit Router with USB JNR3210 USB Drive Requirements The router works with 2.0 (USB High Speed) standards. The approximate USB bus speed are shown in the following table. Actual bus speeds can vary, depending on the CPU speed, memory, speed of the network, and other variables.
-
Page 50
N300 Wireless Gigabit Router with USB JNR3210 • Sharing multimedia with friends and family such as MP3 files, pictures, and other multimedia with local and remote users. • Sharing resources on your network. You might want to store files in a central location so that you do not have to power up a computer to perform local sharing. -
Page 51: Basic Settings
The ReadySHARE print feature allows you to share a printer that you connect to the USB port on your router. To use the ReadySHARE print feature on a Windows PC, you need to use the NETGEAR USB Control Center utility. For information about this feature, see Chapter 6, ReadySHARE Printer.
-
Page 52: Add Or Edit A Network Folder
N300 Wireless Gigabit Router with USB JNR3210 To access your USB device: Click the network device name or the share name in your computer’s network folders list. For SMB://readyshare, click Connect. Note: If you logged in to the router before you connected your USB device, you might not see your USB device in the router screens until you log out and then log back in again.
-
Page 53: Usb Storage Advanced Settings
N300 Wireless Gigabit Router with USB JNR3210 • To add a folder, click Create Network Folder. • To edit a folder, select its radio button, and then click Edit. You can use this screen to select a folder, to change the share name, or to change the read Access or write access from All –…
-
Page 54: Available Network Folders
N300 Wireless Gigabit Router with USB JNR3210 • Network Device Name. The default is readyshare. This is the name used to access the USB device connected to the router. • Workgroup. If you are using a Windows workgroup rather than a domain, the workgroup name is displayed here.
-
Page 55: Safely Remove A Usb Drive
N300 Wireless Gigabit Router with USB JNR3210 • Read/Write Access. Shows the permissions and access controls on the network folder: All — no password (the default) allows all users to access the network folder. The password for admin is the same one that you use to log in to the router.
-
Page 56: Specify Approved Usb Devices
N300 Wireless Gigabit Router with USB JNR3210 Specify Approved USB Devices For more security, you can set up the router to share approved USB devices only. You can access this feature from the Advanced Setup menu on the Advanced tab.
-
Page 57: Connect To The Usb Drive From A Remote Computer
N300 Wireless Gigabit Router with USB JNR3210 Click Apply so that your change takes effect. If you want to work with another USB device, you have to first click the Safely Remove USB Device button for the currently connected USB device. Connect the other USB device, and repeat this process.
-
Page 58: Chapter 6 Readyshare Printer
ReadySHARE Printer is compatible with Macs and Windows PCs. It lets you connect a USB printer to the router’s USB port, and access it wirelessly. This chapter contains the following sections: • ReadySHARE Printer • USB Control Center Utility • Desktop NETGEAR Genie For additional about ReadySHARE features, see www.netgear.com/readyshare.
-
Page 59: Readyshare Printer
On each computer that will share the printer, download the NETGEAR USB Control Center utility. The NETGEAR USB utility has a Mac version and a Windows version, which you can access in two different ways: •…
-
Page 60
N300 Wireless Gigabit Router with USB JNR3210 Follow the instructions to install the NETGEAR USB Control Center utility. After you have installed the utility, select the language. ReadySHARE Printer… -
Page 61
N300 Wireless Gigabit Router with USB JNR3210 If this is the first time you are accessing the utility, you are asked to select the printer and click the Connect button. Once the connection is established, the status changes to Manually connected by xxx. -
Page 62
N300 Wireless Gigabit Router with USB JNR3210 Note that you can click the Disconnect button at any time to release the connection. The status then changes to Available. Once the Connect button has been clicked once on all of the computers in the network, the utility on each of them automatically handles the printing queue and handling. -
Page 63
N300 Wireless Gigabit Router with USB JNR3210 • You can set the value for the default time-out time from the Tools > Configuration screen. • The USB Control Center utility must be running for the computer to be able to print to the USB printer attached to the router. -
Page 64: Usb Control Center Utility
N300 Wireless Gigabit Router with USB JNR3210 USB Control Center Utility The USB Control Center Utility allows you to control a shared USB device from your computer that is connected to the USB port on your router. The utility allows you to control a printer, a scanner, or an audio speaker.
-
Page 65: Control Center Configuration
N300 Wireless Gigabit Router with USB JNR3210 Control Center Configuration Select Tools >Configuration to display the following screen: Automatically execute when logging on Windows. Enable this utility to start automatically when you are logged in to Windows. Timeout. Specify the timeout value for holding the USB resource when it is not in use.
-
Page 66: Scan With A Multi-Function Printer
N300 Wireless Gigabit Router with USB JNR3210 Once the printer shows Available status, it is no longer grayed out in a Paused state in the Windows Printers window. This USB printer is ready. The utility does not need to always hold the connection of this USB printer.
-
Page 67: Desktop Netgear Genie
Have easy access to router features like Live Parental Controls, guest access, broadband usage meter, speed test, and more. • Use the Network map to see all devices on your home network. To download the free NETGEAR Genie, go to this page at the NETGEAR website: www.NETGEAR.com/genie. ReadySHARE Printer…
-
Page 68: Chapter 7 Security
Security Keeping unwanted content out of your network This chapter explains how to use the basic firewall features of the router to prevent objectionable content from reaching the PCs and other devices connected to your network. This chapter includes the following sections: •…
-
Page 69: Keyword Blocking Of Http Traffic
N300 Wireless Gigabit Router with USB JNR3210 Keyword Blocking of HTTP Traffic Use keyword blocking to prevent certain types of HTTP traffic from accessing your network. The blocking can be always or according to a schedule. Select Advanced > Security > Block Sites to display the following screen: Select one of the keyword blocking options: •…
-
Page 70: Block Services (Port Filtering)
N300 Wireless Gigabit Router with USB JNR3210 Block Services (Port Filtering) Services are functions performed by server computers at the request of client computers. For example, web servers serve web pages, time servers serve time and date information, and game hosts serve data about other players’ moves. When a computer on the Internet sends a request for service to a server computer, the requested service is identified by a service or port number.
-
Page 71: Schedule Blocking
N300 Wireless Gigabit Router with USB JNR3210 Click Add to add a service. The Block Services Setup screen displays: From the Service Type list, select the application or service to allow or block. The list already displays several common services, but you are not limited to these choices. To add any additional services or applications that do not already appear, select User Defined.
-
Page 72: Security Event Email Notifications
N300 Wireless Gigabit Router with USB JNR3210 To schedule blocking: Select Advanced > Security > Schedule to display the following screen: Set up the schedule for blocking keywords and services. • Days to Block. Select days on which you want to apply blocking by selecting the appropriate check boxes, or select Every Day to select the check boxes for all days.
-
Page 73
N300 Wireless Gigabit Router with USB JNR3210 To set up email notifications: Select Advanced > Security > Email to display the following screen: To receive email logs and alerts from the router, select the Turn Email Notification On check box. -
Page 74: Chapter 8 Administration
Administration Managing your network This chapter describes the router settings for administering and maintaining your router and home network. See also Remote Management on page 103 for information about upgrading or checking the status of your router over the Internet, and Traffic Meter on page 106 for information about monitoring the volume of Internet traffic passing through your router’s Internet…
-
Page 75: Upgrade The Router Firmware
N300 Wireless Gigabit Router with USB JNR3210 Upgrade the Router Firmware The router firmware (routing software) is stored in flash memory. You can update the firmware from the Administration menu on the Advanced tab. You might see a message at the top of the Genie screens when new firmware is available for your product.
-
Page 76: View Router Status
N300 Wireless Gigabit Router with USB JNR3210 View Router Status To view router status and usage information, select Advanced Home or select Administration > Router Status to display the following screen: Router Information Hardware Version. The router model. Firmware Version. The version of the router firmware. It changes if you upgrade the router firmware.
-
Page 77
N300 Wireless Gigabit Router with USB JNR3210 Connection. This shows if the router is using a fixed IP address on the WAN. If the value is DHCP Client, the router obtains an IP address dynamically from the ISP. IP Subnet Mask. The IP subnet mask being used by the Internet (WAN) port of the router. -
Page 78
N300 Wireless Gigabit Router with USB JNR3210 Connection Status Button On the Router Status screen in the Internet Connection pane, click the Connection Status button to view connection status information. Figure 7. View connection status information The Release button returns the status of all items to 0. The Renew button refreshes the items. -
Page 79: Wireless Settings
N300 Wireless Gigabit Router with USB JNR3210 Wireless Settings The following settings are displayed: Name (SSID). The wireless network name (SSID) used by the router. Region. The geographic region where the router is being used. It might be illegal to use the wireless features of the router in some parts of the world.
-
Page 80: Guest Network
N300 Wireless Gigabit Router with USB JNR3210 Guest Network Name (SSID). The 11N wireless network name (SSID) used by the router. The default names are NETGEAR-Guest and NETGEAR-5G-Guest. Wireless AP. Indicates whether the radio feature of the router is enabled. If this feature is not enabled, the Wireless LED on the front panel is off.
-
Page 81: Manage The Configuration File
N300 Wireless Gigabit Router with USB JNR3210 Select Advanced > Administration > Logs. The Logs screen displays. The log screen shows the following information: • Date and time. The date and time the log entry was recorded. • Source IP. The IP address of the initiating device for this log entry.
-
Page 82: Back Up Settings
N300 Wireless Gigabit Router with USB JNR3210 Back Up Settings To back up the router’s configuration settings: Select Advanced > Administration > Backup Settings to display the following screen: Click Back Up to save a copy of the current settings.
-
Page 83: Set Password
Click Apply so that your changes take effect. Password Recovery NETGEAR recommends that you enable password recovery if you change the password for the router’s user name of admin. Then you will have an easy way to recover the password if it is forgotten.
-
Page 84: Chapter 9 Advanced Settings
Advanced Settings This chapter describes the advanced features of your router. The information is for users with a solid understanding of networking concepts who want to set the router up for unique situations such as when remote access from the Internet by IP or domain name is needed. This chapter includes the following sections: •…
-
Page 85: Advanced Wireless Settings
WPS Settings.You can add WPS devices to your network. AP Mode. You can make the JNR3210 function as an access point. Wireless Card Access List. Click the Set Up Access List button display the Wireless Card Access List screen.
-
Page 86: Wireless Repeating Function (Wds)
N300 Wireless Gigabit Router with USB JNR3210 Wireless Repeating Function (WDS) You can set the N300 Wireless Gigabit Router with USB up to be used as a wireless access point (AP). Doing this enables the router to act as a wireless repeater. A wireless repeater connects to another wireless router as a client where the network to which it connects becomes the ISP service.
-
Page 87: Wireless Repeating Function
To configure this mode, you have to know the MAC address of the remote parent access point. The JNR3210 router is always in dual band concurrent mode, unless you turn off one radio. Be aware that if you enable the wireless repeater in either radio band, the wireless base station or wireless repeater cannot be enabled in the other radio band.
-
Page 88: Set Up The Base Station
N300 Wireless Gigabit Router with USB JNR3210 • Wireless Repeater. If your router is the repeater, select this check box. Repeater IP Address. If your router is the repeater, enter the IP address of the other access point. Disable Wireless Client Association. If your router is the repeater, selecting this check box means that wireless clients cannot associate with it.
-
Page 89: Set Up A Repeater Unit
Use a wired Ethernet connection to set up the repeater unit to avoid conflicts with the wireless connection to the base station. Note: If you are using the JNR3210 base station with a non-NETGEAR router as the repeater, you might need to change additional configuration settings. In particular, you should disable the DHCP server function on the wireless repeater AP.
-
Page 90: Port Forwarding And Triggering
N300 Wireless Gigabit Router with USB JNR3210 Fill in the Repeater IP Address field. This IP address has to be in the same subnet as the base station, but different from the LAN IP address of the base station. Click Apply to save your changes.
-
Page 91: Port Triggering To Open Incoming Ports
N300 Wireless Gigabit Router with USB JNR3210 the web page request message to www.example.com, your router stores the original information and then modifies the source information in the request message, performing Network Address Translation (NAT): • The source address is replaced with your router’s public IP address. This is necessary because your computer uses a private IP address that is not globally unique and cannot be used on the Internet.
-
Page 92
N300 Wireless Gigabit Router with USB JNR3210 An example is Internet Relay Chat (IRC). Your computer connects to an IRC server at destination port 6667. The IRC server not only responds to your originating source port, but also sends an “identify” message to your computer on port 113. Using port triggering, you can tell the router, “When you initiate a session with destination port 6667, you have to also allow… -
Page 93: Port Forwarding To Permit External Host Communications
N300 Wireless Gigabit Router with USB JNR3210 Port Forwarding to Permit External Host Communications In both of the preceding examples, your computer initiates an application session with a server computer on the Internet. However, you might need to allow a client computer on the Internet to initiate a connection to a server computer on your network.
-
Page 94: How Port Forwarding Differs From Port Triggering
N300 Wireless Gigabit Router with USB JNR3210 How Port Forwarding Differs from Port Triggering The following points summarize the differences between port forwarding and port triggering: • Port triggering can be used by any computer on your network, although only one computer can use it at a time.
-
Page 95: Add A Custom Service
N300 Wireless Gigabit Router with USB JNR3210 Select Advanced Setup > Port Forwarding/Port Triggering to display the following screen: Port Forwarding is selected as the service type. From the Service Name list, select the service or game that you will host on your network. If…
-
Page 96: Editing Or Deleting A Port Forwarding Entry
N300 Wireless Gigabit Router with USB JNR3210 Click the Add Custom Service button to display the following screen: In the Service Name field, enter a descriptive name. In the Protocol list, select the protocol. If you are unsure, select TCP/UDP.
-
Page 97: Set Up Port Triggering
N300 Wireless Gigabit Router with USB JNR3210 To make a local web server public: Assign your web server either a fixed IP address or a dynamic IP address using DHCP address reservation. In this example, your router will always give your web server an IP address of 192.168.1.33.
-
Page 98
N300 Wireless Gigabit Router with USB JNR3210 Select the Port Triggering radio button to display the port triggering information. Clear the Disable Port Triggering check box if it is selected. Note: If the Disable Port Triggering check box is selected after you configure port triggering, port triggering is disabled. -
Page 99: Dynamic Dns
N300 Wireless Gigabit Router with USB JNR3210 Click Add Service to display the following screen: In the Service Name field, type a descriptive service name. In the Service User list, select Any (the default) to allow this service to be used by any computer on the Internet.
-
Page 100
N300 Wireless Gigabit Router with USB JNR3210 host name that you configure in the router. Then, whenever your ISP-assigned IP address changes, your router automatically contacts the Dynamic DNS service provider, logs in to your account, and registers your new IP address. If your host name is hostname, for example, you can reach your router at http://hostname.dyndns.org. -
Page 101: Static Routes
N300 Wireless Gigabit Router with USB JNR3210 Static Routes Static routes provide additional routing information to your router. Under usual circumstances, the router has adequate routing information after it has been configured for Internet access, and you do not need to configure additional static routes. You have to configure static routes only for unusual cases such as multiple routers or multiple IP subnets located on your network.
-
Page 102
N300 Wireless Gigabit Router with USB JNR3210 To set up a static route: Select Advanced > Advanced Setup > Static Routes, and click Add to display the following screen: In the Route Name field, type a name for this static route (for identification purposes only.) Select the Private check box if you want to limit access to the LAN only. -
Page 103: Remote Management
N300 Wireless Gigabit Router with USB JNR3210 Remote Management The remote management feature lets you upgrade or check the status of your N300 Wireless Gigabit Router with USB over the Internet. To set up remote management: Select Advanced > Advanced Setup > Remote Management.
-
Page 104: Usb Settings
N300 Wireless Gigabit Router with USB JNR3210 Normal web browser access uses the standard HTTP service port 80. For greater security, enter a custom port number for the remote web management nterface. Choose a number between 1024 and 65535, but do not use the number of any common service port.
-
Page 105
N300 Wireless Gigabit Router with USB JNR3210 To turn on Universal Plug and Play: Select Advanced > Advanced Setup > UPnP. The UPnP screen displays. The available settings and information in this screen are: Turn UPnP On. UPnP can be enabled or disabled for automatic device configuration. -
Page 106: Traffic Meter
N300 Wireless Gigabit Router with USB JNR3210 Traffic Meter Traffic metering allows you to monitor the volume of Internet traffic passing through your router’s Internet port. With the Traffic Meter utility, you can set limits for traffic volume, set a monthly limit, and get a live update of traffic usage.
-
Page 107: Chapter 10 Troubleshooting
Troubleshooting This chapter provides information to help you diagnose and solve problems you might have with your router. If you do not find the solution here, check the NETGEAR support site at http://support.netgear.com for product and contact information. This chapter contains the following sections: •…
-
Page 108: Quick Tips
N300 Wireless Gigabit Router with USB JNR3210 Quick Tips This section describes tips for troubleshooting some common problems Sequence to Restart Your Network Be sure to restart your network in this sequence: Turn off and unplug the modem. Turn off the router and computers.
-
Page 109: Troubleshooting With The Leds
Make sure that the power cord is securely connected to your router and that the power adapter is securely connected to a functioning power outlet. • Check that you are using the 12V DC, 1.5A power adapter that NETGEAR supplied for this product. •…
-
Page 110: Leds Never Turn Off
N300 Wireless Gigabit Router with USB JNR3210 LEDs Never Turn Off When the router is turned on, the LEDs turn on for about 10 seconds and then turn off. If all the LEDs stay on, there is a fault within the router.
-
Page 111: Cannot Log In To The Router
Make sure that Caps Lock is off when you enter this information. • If you are attempting to set up your NETGEAR router as an additional router behind an existing router in your network, consider replacing the existing router instead. NETGEAR does not support such a configuration.
-
Page 112
N300 Wireless Gigabit Router with USB JNR3210 Check that an IP address is shown for the Internet port. If 0.0.0.0 is shown, your router has not obtained an IP address from your ISP. If your router cannot obtain an IP address from the ISP, you might need to force your cable or… -
Page 113: Troubleshooting Pppoe
N300 Wireless Gigabit Router with USB JNR3210 Troubleshooting PPPoE If you are using PPPoE, try troubleshooting your Internet connection. To troubleshoot a PPPoE connection: Log in to the router. Select Administration > Router Status. Click Connection Status. If all of the steps indicate OK, then your PPPoE connection is up and working.
-
Page 114: Changes Not Saved
N300 Wireless Gigabit Router with USB JNR3210 Changes Not Saved If the router does not save the changes you make in the router interface, check the following: • When entering configuration settings, always click the Apply button before moving to another screen or tab, or your changes are lost.
-
Page 115: Restore The Factory Settings And Password
N300 Wireless Gigabit Router with USB JNR3210 Restore the Factory Settings and Password This section explains how to restore the factory settings, changing the router’s administration password back to password. You can erase the current configuration and restore factory defaults in two ways: •…
-
Page 116: Test The Path From Your Computer To A Remote Device
N300 Wireless Gigabit Router with USB JNR3210 Check that the appropriate LEDs are on for your network devices. If your router and computer are connected to a separate Ethernet switch, make sure that the link LEDs are on for the switch ports that are connected to your computer and router.
-
Page 117: Appendix A Supplemental Information
Supplemental Information This appendix provides factory default settings and technical specifications for the router • Factory Default Settings • Specifications Appendix A. Supplemental Information | 117…
-
Page 118: Factory Default Settings
NETGEAR N300 Wireless Gigabit Router with USB JNR3210 User Manual Factory Default Settings Table 4. Router Default Settings Feature Default Setting Router Login URL http://www.routerlogin.net or http://www.routerlogin.com Login name (case-sensitive) admin (printed on product label) Login password (case-sensitive) password (printed on product label)
-
Page 119: Specifications
NETGEAR N300 Wireless Gigabit Router with USB JNR3210 User Manual Specifications Table 5. Router Technical Specifications Feature Specification Data and routing protocols TCP/IP, RIP-1, RIP-2, DHCP, PPPoE, PPTP, Bigpond, Dynamic DNS, and UPnP Power adapter • North America: 120V, 60Hz, input •…
-
Page 120: Appendix B Notification Of Compliance
For GNU General Public License (GPL) related information, please visit http://support.netgear.com/app/answers/detail/a_id/2649 . Interference Reduction Table The table below shows the Recommended Minimum Distance between NETGEAR equipment and household appliances to reduce interference (in feet and meters). Household Appliance Recommended Minimum Distance…
-
Page 121: Index
Index repeater unit access user-defined services remote connecting wirelessly viewing logs country setting access points crossover cable accessing remote computer CTS/RTS Threshold adding custom service (port forwarding) custom service priority rules address reservation advertisement period dashboard alerts, emailing data packets, fragmented applications, QoS for online gaming default DMZ server approved USB devices…
-
Page 122
N300 Wireless Gigabit Router with USB JNR3210 factory default settings, restoring keywords factory settings resetting FastLane label, product file sharing LAN port firmware version QoS for firmware, upgrading settings fragmentation length LAN setup fragmented data packets language setting front panel… -
Page 123
N300 Wireless Gigabit Router with USB JNR3210 reserved IP adresses restarting network outgoing mail server restoring configuration file default factory settings router interface, described packets, fragmented router status, viewing Parental Controls passphrases changing product label scheduling keyword and service blocking… -
Page 124
N300 Wireless Gigabit Router with USB JNR3210 WPA2-PSK encryption WPA-PSK/WPA2-PSK mixed mode Universal Plug and Play (UPnP) WPS button up time, system WPS-PSK encryption upgrading firmware WPS-PSK+ WPA2-PSK encryption advanced configuration basic storage settings drive requirements file sharing ReadySHARE access…
This manual is also suitable for:
N300
Инструкция по настройке роутера NetGear JNR3210
- Авторизация
- Смена заводского пароля
- Настройка подключения к Интернет
- Настройка PPPoE подключения (Ростелеком, Dom.ru)
- Настройка L2TP подключения (Билайн)
- Настройка подключения при автоматическом получении IP адреса
- Настройка подключения при статическом IP адресе
- Настройка PPtP (VPN) при автоматическом получении локального IP адреса (DHCP)
- Настройка PPtP (VPN) при статическом локальном IP адресе
- Настройка Wi-Fi на роутере
- Настройка IP-TV
- Переадресация/проброс портов
Авторизация
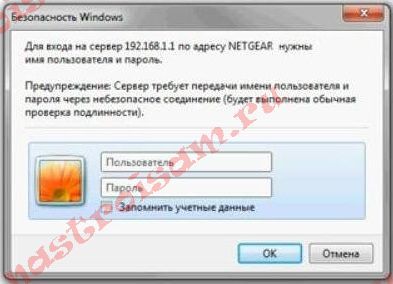
Для того, что бы попасть в веб-интерфейс роутера, необходимо открыть ваш Интернет браузер и в строке адреса набрать routerlogin.net или 192. 168.1.1. В появившемся окне вводим admin» в качестве имени пользователя и «password» в качестве пароля.
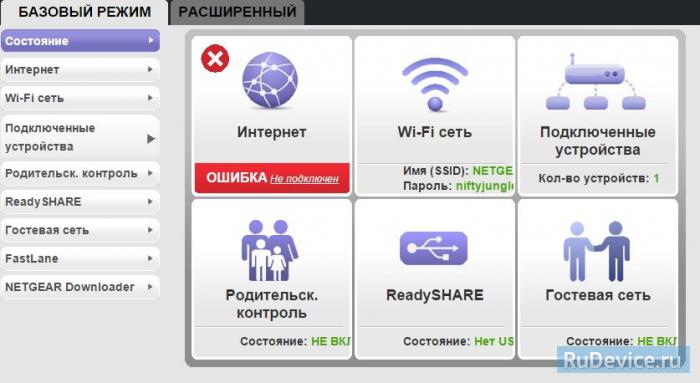
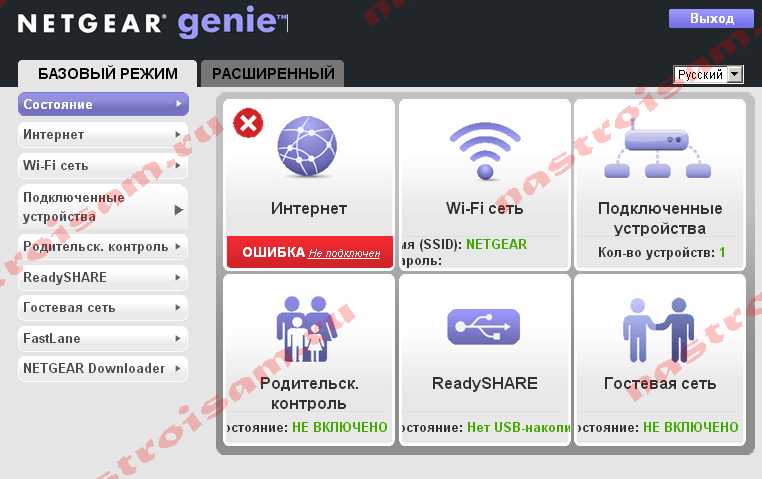
После этого у Вас открывается окно веб-интерфейса. Здесь вы можете выбрать один из двух режимов настройки — «Базовый» и «Расширенный». Рассмотрим второй режим.
После этого у Вас открывается окно веб-интерфейса. Здесь вы можете выбрать один из двух режимов настройки — «Базовый» и «Расширенный». Рассмотрим второй режим.
Смена заводского пароля
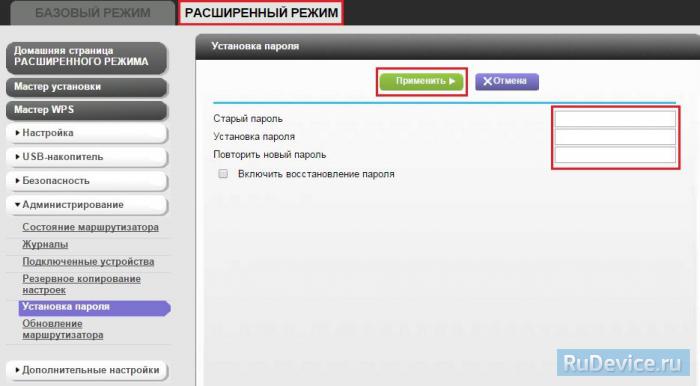
В целях безопасности рекомендуется сменить заводской пароль. Для этого необходимо перейти в Расширенные настройки, меню Администрирование — Установка пароля.
- Старый пароль вводите пароль по умолчанию, то есть «password«
- Установить пароль и Повторить новый пароль — вводите новый пароль
Нажимаете на кнопку «Применить«. После применения новых настроек необходимо снова авторизоваться в системе, введя Ваш новый пароль.
Настройка подключения к Интернет
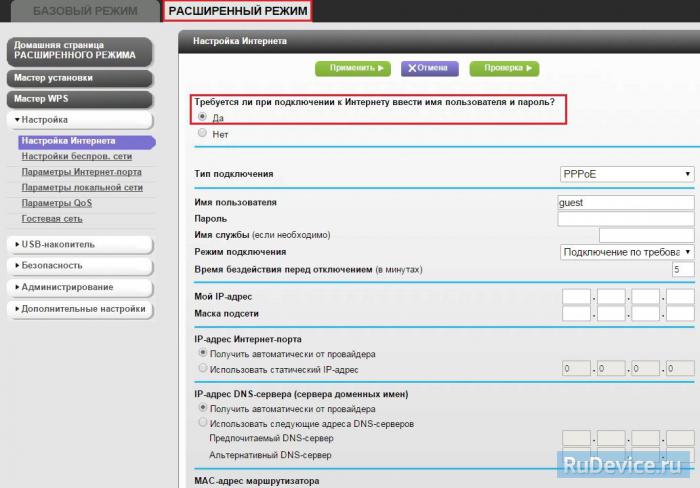
В зависимости от Вашего провайдера и его настроек необходимо выбрать тот или иной режим подключения. Если для подключения к интернету у Вашего провайдера требуется вводить логин и пароль, то в графе Требуется ли при подключении к Интернету ввести имя пользователя и пароль вы выбираете ДА (например, у Ростелеком, Билайн, Дом.ру, ТТК и т.д.). Если же вы подключаете роутер к другому устройству (на котором уже есть интернет) или тип Вашего подключения к интернету не требует ввода логина и пароля, то в этой графе ставите точку напротив НЕТ.
Настройка подключения в режиме DHCP (динамический IP)
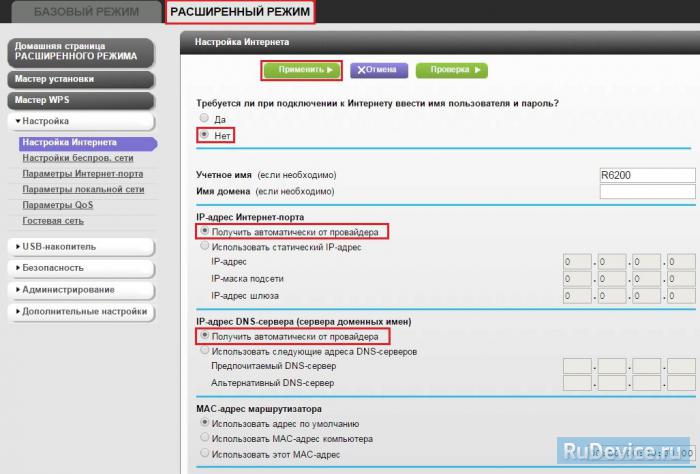
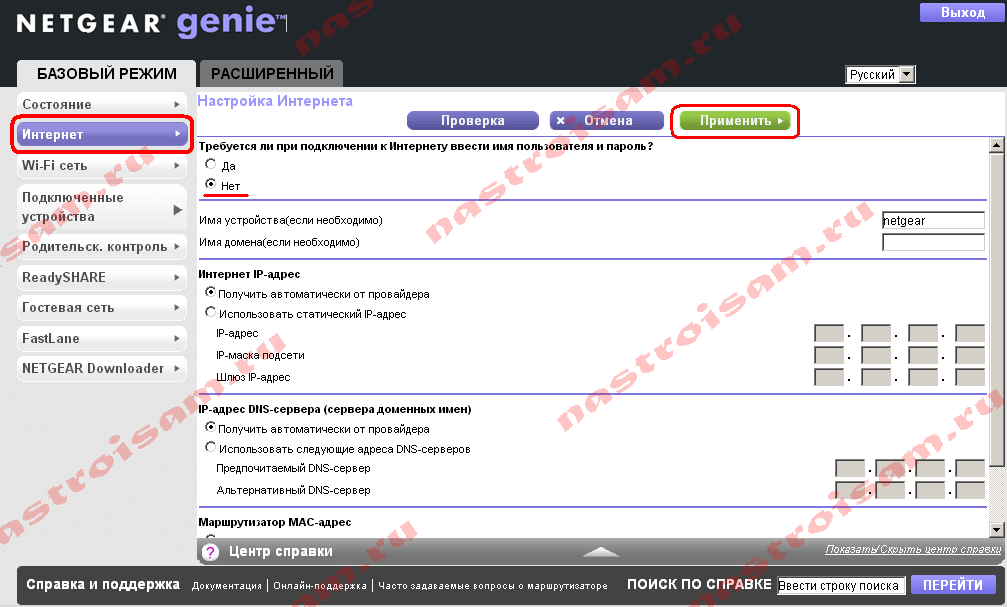
Первый режим — режим DHCP, назначающий автоматическое получение настроек сети от провайдера. В этом случае необходимо выбрать «Нет» на вопрос «Требуется ли при подключении к интернету ввести информацию о подключении«.
IP-адрес Интернет-порта и IP-адрес DNS-сервера (сервера доменных имен) — ставим точку напротив Получить автоматически от провайдера.
Если провайдер использует привязку по MAC-адресу, и Вы настраиваете маршрутизатор с ПК, который до этого был подключён к сети интернет, то для поля «MAC-адрес маршрутизатора» укажите опцию «Использовать MAC-адрес компьютера«. Если привязка по MAC-адресу у провайдера отсутствует, то оставляем опцию по умолчанию — опцию «Использовать MAC-адрес по умолчанию«. И нажимаем кнопку «Применить«.
После применения настроек мы можем успешно пользоваться интернетом.
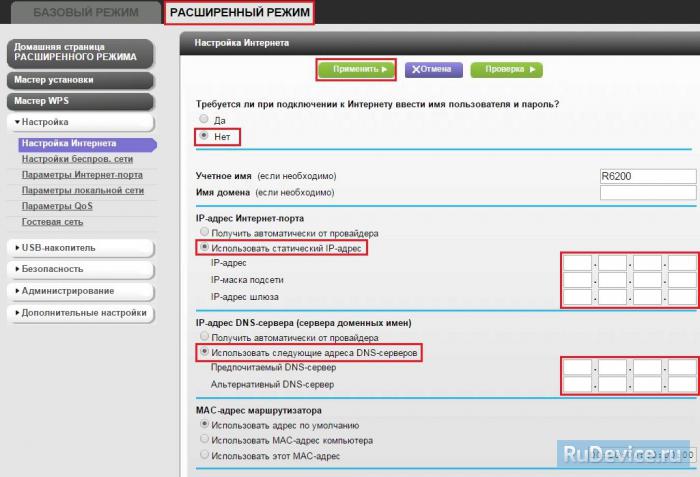
Настройка подключения в режиме статического IP
Второй режим — это статические или по-другому фиксированные настройки, которые обычно указываются в договоре, заключённом с Вашим провайдером. Для настройки данного режима аналогично отвечаем «Нет» на вопрос «Требуется ли при подключении к интернету ввести информацию о подключении«.
IP-адрес Интернет-порта — ставим точку напротив Использовать статический IP-адрес. В графы IP-адрес, IP-маска подсети, IP-адрес шлюза — вводите данные из договора или параметры Вашей сети.
Аналогично случаю настройки в первом режиме выбираем использовать MAC-адрес компьютера, если провайдер использует привязку по MAC-адресу. Или оставляем использовать MAC-адрес по умолчанию, если привязка отсутствует. Затем нажимаем кнопку «Применить«.
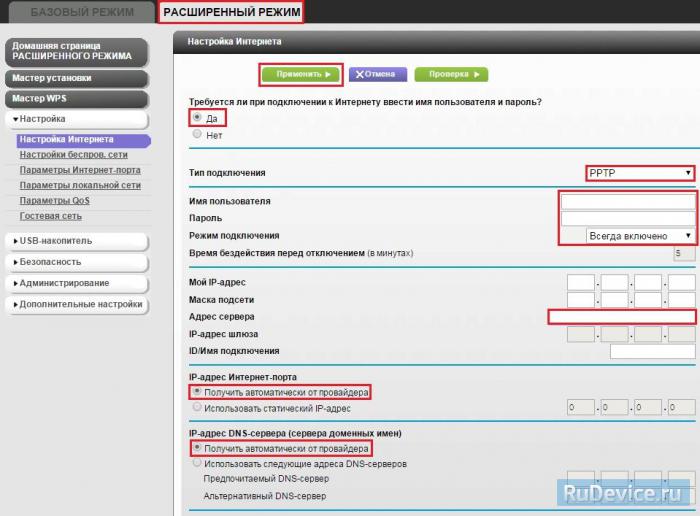
Настройка PPtP (VPN) при автоматическом получении локального IP адреса (DHCP)
Это разновидность VPN-подключения. Для его настройки необходимо выбрать «Да» на вопрос «Требуется ли при подключении к интернету ввести информацию о подключении» и из выпадающего списка поставщиков услуг интернета выбрать «PPTP«. Если Вы желаете, чтобы маршрутизатор оставался всегда подключённым к интернету выберите в качестве режима подключения «Всегда включено». В противном случае можно задать интервал бездействия в минутах, после которого маршрутизатор будет автоматически отключаться от интернета. Или можно выбрать полностью ручное подключение через web-интерфейс.
Протокол «PPTP» требует не только обязательного указания имени пользователя и пароля, адрес VPN-сервера для подключения, но так же подразделяется на два распространённых в России варианта. Их разница в том, каким образом назначаются настройки для подключения к локальной сети провайдера: динамически через протокол DHCP или задаются статически пользователем. В обоих случаях Вам необходимо сначала указать:
- Имя пользователя — логин из договора
- Пароль — пароль из договора
- Режим подключения — всегда включено
- Адрес сервера — нужно указать название или адрес сервера в поле «. Адрес сервера может быть в виде IP-адреса, к примеру, 10.0.0.138 или в виде доменного имени, например, vpn.internet.beeline.ru.
- IP-адрес Интернет-порта и IP-адрес DNS-сервера — Получить автоматически от провайдера
- Нажимаем Применить.
Настройка PPtP (VPN) при статическом локальном IP адресе
При наличии доступа к локальным ресурсам провайдера необходимо настроить дополнительные параметры подключения. Если они получаются автоматически или провайдер их Вам не предоставил, то обычно ничего дополнительного вводить не нужно! Если у Вас имеются данные по указанию IP-адреса, маски подсети, шлюза и DNS-серверов, то их необходимо ввести в соответствующие поля: «Мой IP-адрес», «Маска подсети», «IP-адрес шлюза» и «Главный DNS», «Дополнительный DNS» (некоторые поля не видны на рисунке). Если провайдер использует привязку по MAC-адресу, выберите так же опцию «Использовать MAC-адрес компьютера». Затем нажмите кнопку «Применить».
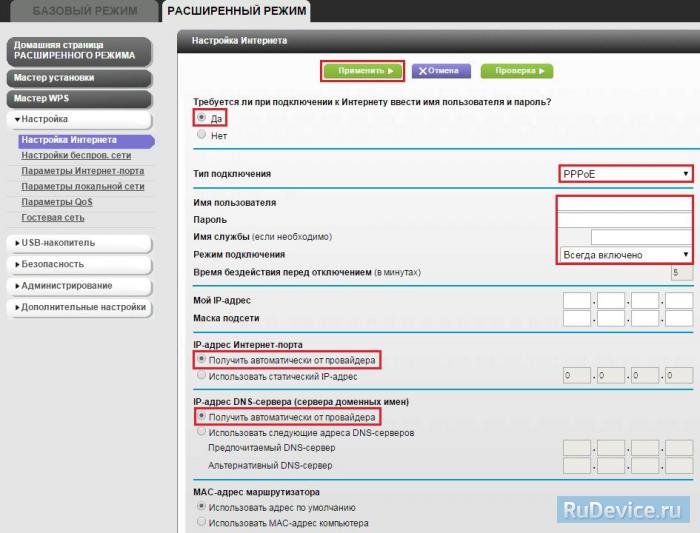
Настройка PPPoE подключения
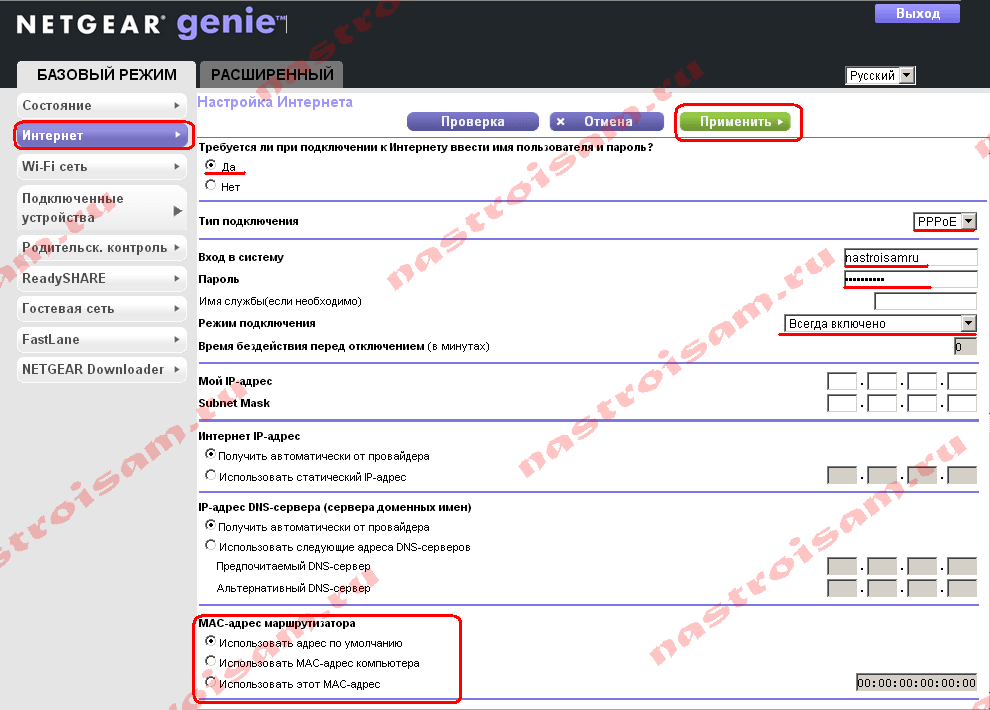
Режим подключения «PPPoE» по своим настройкам совершенно аналогичен предыдущим режимам. Заполняем графы:
- Имя пользователя и Пароль — вводите данные из договора
- Имя службы — вводим любое название будущего подключения
- Режим подключения — всегда включено
- IP-адрес Интернет-порта и IP-адрес DNS-сервера (сервера доменных имен) — ставим точку напротив Получить автоматически от провайдера.
Если провайдер использует привязку по MAC-адресу, и Вы настраиваете маршрутизатор с ПК, который до этого был подключён к сети интернет, то для поля «MAC-адрес маршрутизатора» укажите опцию «Использовать MAC-адрес компьютера«. Если привязка по MAC-адресу у провайдера отсутствует, то оставляем опцию по умолчанию — опцию «Использовать MAC-адрес по умолчанию«. И нажимаем кнопку «Применить«.
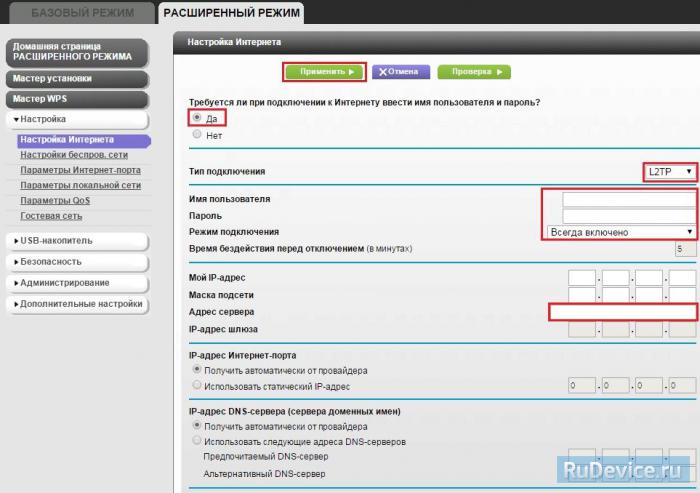
Настройка L2TP подключения
- Тип соединения — L2TP
- Имя пользователя и пароль — логин и пароль из договора
- Режим подключения — Всегда включено
- Адрес сервера — вводим ip-адрес или название vpn-сервера по договору
- IP-адрес DNS-сервера — получить автоматически от провайдера
- MAC-адрес маршрутизатора — использовать адрес по умолчанию
- Остальные параметры можно не менять. Нажимаем Применить.
Настройка Wi-Fi на роутере
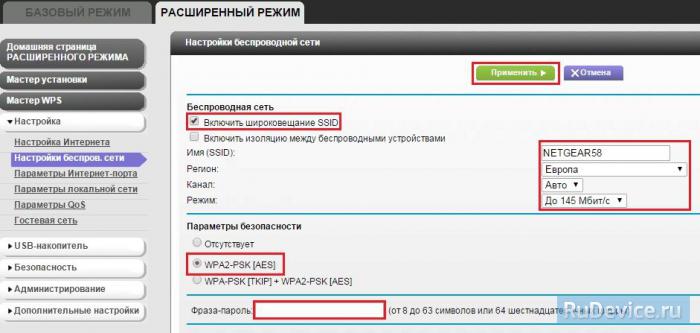
Заходим в пункт меню Настройки беспров. сети.
- Имя (SSID) — указываете название для первой и для второй сети, но они должны различаться
- Канал — Авто
- Режим — здесь выставляется максимальная скорость, на которой будет работать сеть
- Параметры безопасности — WPA2-PSK с шифрованием [AES], так как он даёт максимальную производительность и защиту сети
- Фраза-пароль — будет использоваться для подключения всех беспроводных wi-fi-устройств к маршрутизатору. Постарайтесь использовать сложную фразу и запишите её! Использование комбинаций типа «qwerty» или «1234567» могут быть взломаны злоумышленниками за считанные секунды.
- После этого нажмите кнопку «Применить«, и подключайте безопасно Ваши беспроводные устройства, ПК к маршрутизатору, используя данный ключ безопасности.
Переадресация/проброс портов
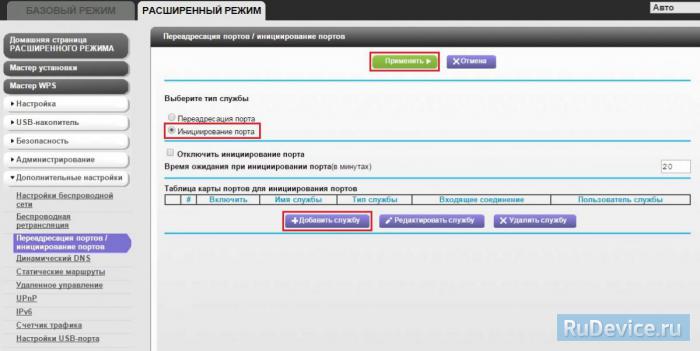
Заходим в Дополнительные настройки — Переадресация портов / инициирование портов.
Нажимаем Добавить службу.
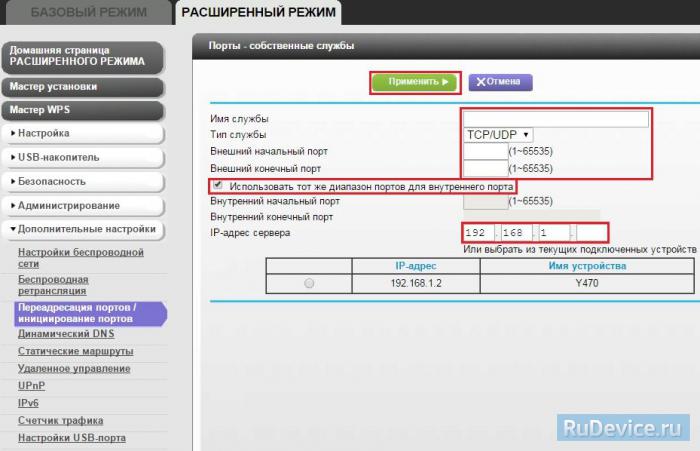
- Имя службы — название создаваемой службы
- Тип службы — выбираете нужный Вам протокол
- Внешний начальный/коченый порт и Внутренний начальный/конечный порт — диапазон портов
- IP-адрес сервера — сетевой адрес устройства, на который будет перенаправляться запрос
- Нажимаем Применить.
В этой статье краткий обзор и настройка основных функций на роутере Netgear JNR3210. Начнем с основных его преимуществ:
— Гигабитные порты для быстрого проводного соединения, Wi-Fi IEEE N- 300 Мбит/сек
— ReadySHARE® — общий доступ к USB- устройствам хранения
— Поддержка 3G/4G модемов
— Возможность подключить принтер и сделать его сетевым.
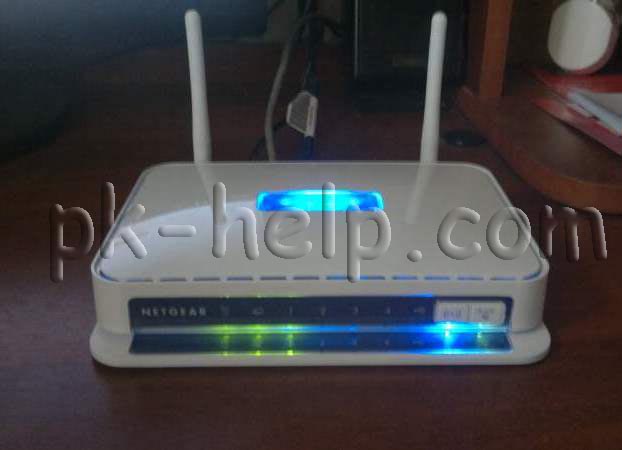
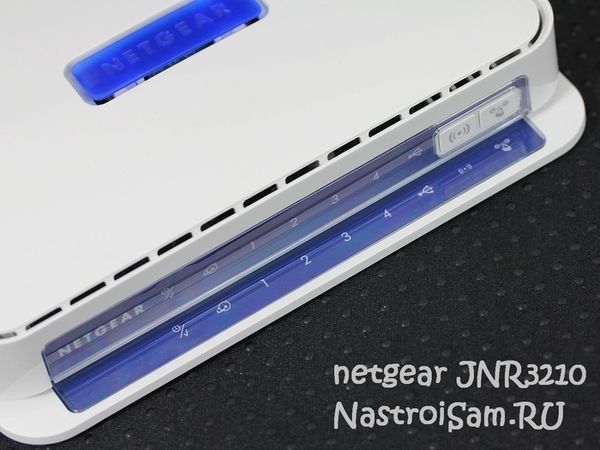
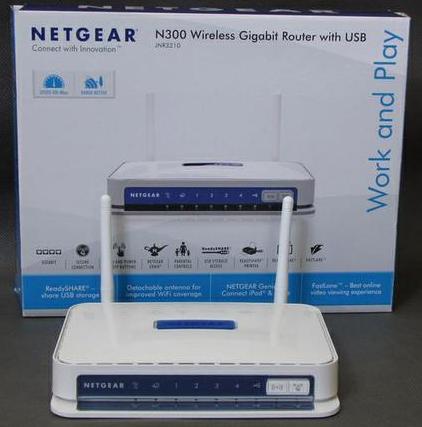
Немного о внешности- роутер ни чем особым не отличается от многих других (как говорят домохозяйки- коробочка с двумя антеннами). Выполнен в приятном белом цвете. Единственно, что необходимо учесть- у него (зачем то) светиться лейбл на верхней крышки. Этот факт меня очень огорчил, поскольку, если его оставить на ночь включенным, то зарево от него освещает не хуже лампочки. Но это поправимо, ниже в статье описано как выключить подсветку лейбла на роутере Netgear JNR3210.
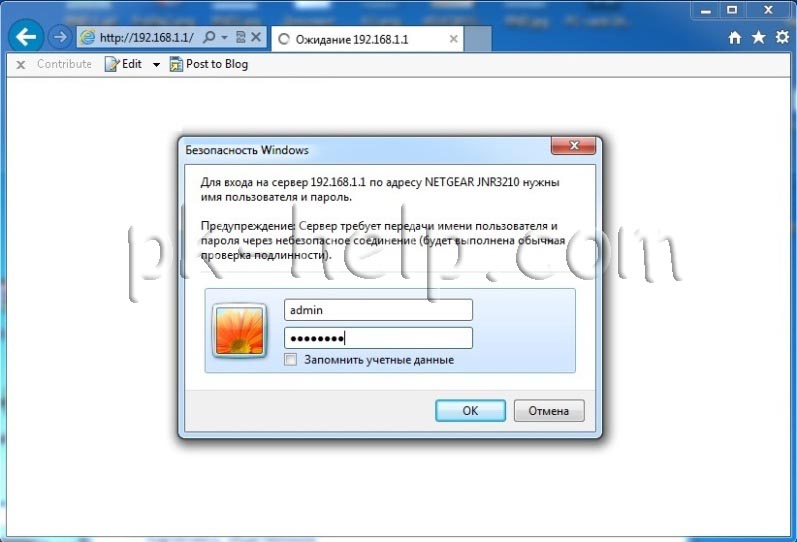
Перейдем к настройке Netgear 3210, нужно заметить, что есть дла способа попасть в настройки роутера- с помощью NETGEAR genie и старым добрым способом подключения к web интерфейсу. В этой статье все настройки будут происходить через web- интерфейс. Для того, что бы подключиться к web- интерфейсу- подключаем роутер к питанию, один конец сетевого кабеля подключаем к любому LAN порту роутера, второй в компьютер/ ноутбук. Настраиваем компьютер/ ноутбук на автоматическое получение сетевых настроек, запускаем любой браузер (Internet Explorer, Opera, Chrome…) вводим в адресной строке 192.168.1.1, нажимаем «Enter«, появится окно безопасности в котором необходимо ввести логин- admin и пароль- password.
Попадаем на web интерфейс маршрутизатора, где видим информацию о состоянии устройства- статус подключения к сети Интернет, состояние беспроводных сетей, состояние подключенных клиентов, настройки родительского контроля, функции ReadyShare и состояние гостевой сети.
Первым делом необходимо настроить Интернет. Для этого подключаете сетевой кабель Интернета в порт WAN, на web интерфейсе переходите во вкладку «Интернет» и справа выбираете ваши настройки Интернета (эту информацию можно найти в документации от провайдера или спросить у провайдера).
Обновление прошивки на Netgear JNR3210.
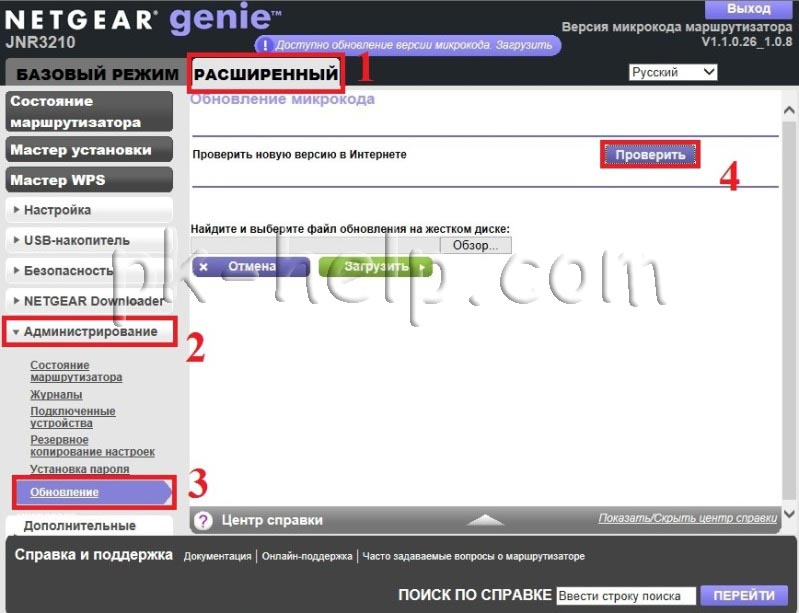
Что бы избавиться от ошибок предыдущей версии прошивки, необходимо обновить прошивку роутера, . Для этого выбираем «Расширенный» режим — «Администрирование«- «Обновление«, справа нажимаете кнопку «Проверить«, что бы проверить существование обновления для прошивки.
Если существует более новая прошивка, вы увидите ее версию и возможность обновить ее нажав кнопку «Да«.
Спустя несколько секунд роутер выполнит установку новой прошивки и перезагрузится.
Настройка Wi-Fi сети на роутере Netgear 3210.
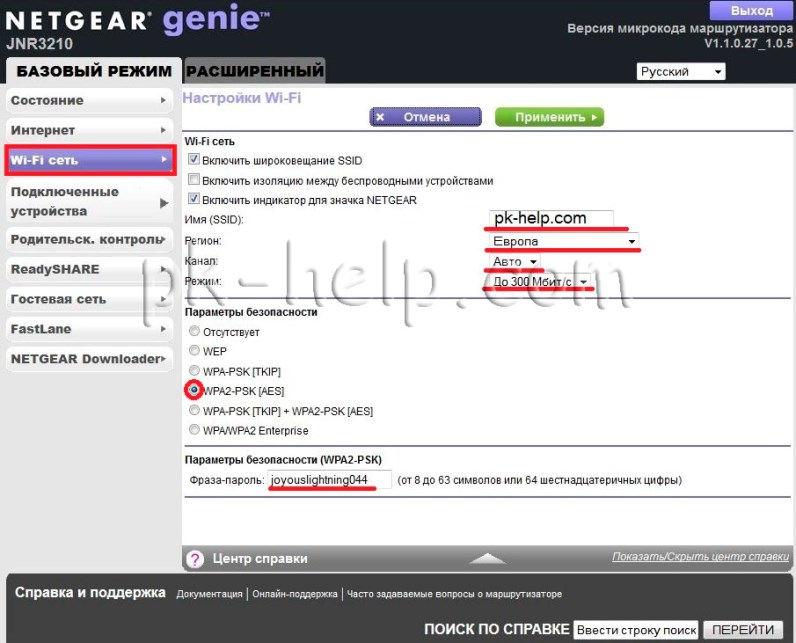
Для того, что бы настроить Wi-Fi сеть, необходимо перейти на вкладку «Беспроводная сеть» и в поле справа указать настройки Wi-Fi.
Имя (SSID) — вписываем как будет называться ваша сеть Wi-Fi, например pk-help.com
Регион выбираем «Европа«
Канал — «Авто«
Режим, максимально возможный — «300 Мбит/сек«
В параметрах безопасности — WPA2-PSK(AES)
Последним шагом вводим пароль для подключения к Wi-Fi сети. Рекомендую придумать сложный пароль, что бы защитить вашу Wi-Fi сеть.
Помимо этого можно настроить Гостевой Wi-Fi (зачастую его используют для доступа только в Интернет без предоставления локальных ресурсов).
Настройка сетевой папки на Netgear 3210.
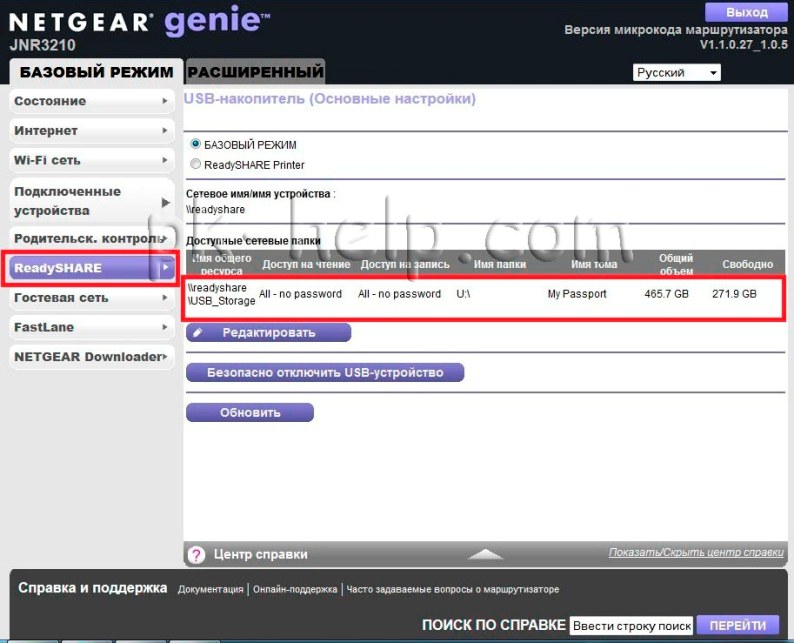
Как я писал ранее, этот роутер оснащен функцией ReadySHARE предназначенная для предоставления в общий доступ USB внешнего диска/ USB флешки подключенного к Netgear 3210. ReadySHARE поддерживает следующие расширения- FAT16/32, NTFS Read/Write. Суть проста, вы подключаете USB внешний диск/ USB флешку в разъем USB роутера. Зайдя на web интерфейс роутера во вкладку «ReadySHARE» вы увидите подключенное устройство (в данном примере внешний жесткий диск на 500 Гб).
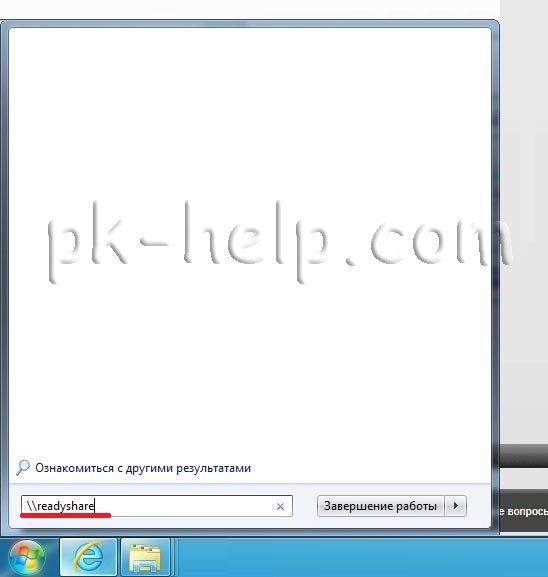
Без каких либо дополнительных настроек этот диск уже стал общедоступным, для того что бы его открыть необходимо в Windows, нажать кнопку «Пуск» в строке поиска ввести \readyshare.
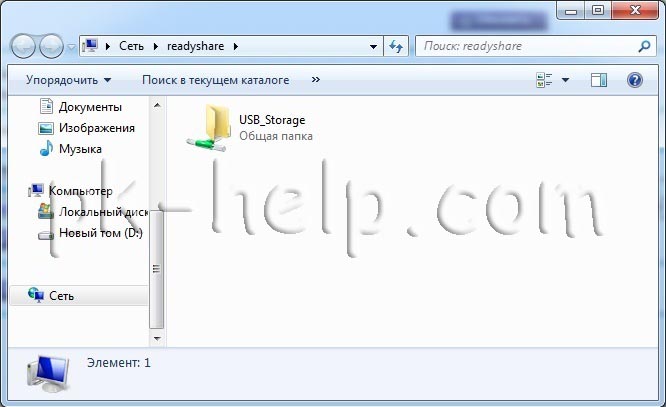
Перед вами откроется папка USB_storage с содержимым вашего USB устройства.
Если в web интерфейсе роутера, нажать кнопку «Редактировать» вы можете сделать общедоступным не весь диск/ флешку, а отдельную папку, так же возможно установить пароль на папку.
Отключение подсветки значка NETGEAR.
Для того, что бы отключить подсветку, необходимо на веб интерфейсе роутера зайти в «Wi-Fi сеть» и убрать галочку «Включить индикатор для значка NETGEAR«
После этого роутер можно оставлять на ночь включенным и не лицезреть от него зарево.
Подключение принтера к Netgear JNR3210
Для того, что бы настроить сетевой принтер, через Netgear 3210, необходимо:
— Подключить USB-принтер к порту USB маршрутизатора соответствующим кабелем.
— Установить программный драйвер USB-принтера на каждый компьютер, который будет использовать этот принтер.
Если у вас нет драйвера, зайдите на сайт производителя и скачайте свежую версию драйвера.
— На каждый компьютер, который будет использовать этот принтер, загрузите и установите утилиту ReadySHARE® Printer.
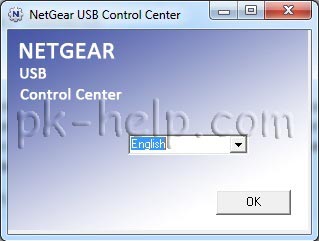
После ее установки откройте программу, выберите язык интерфейса, поскольку русского нет, придется довольствоваться английским.
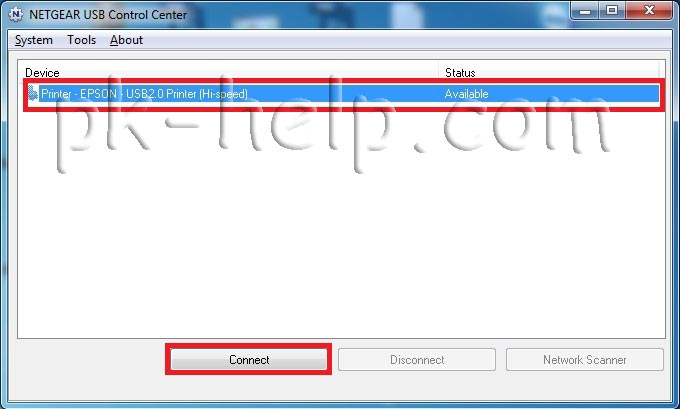
В окне программы вы увидите подключенный принтер, выберите его и нажмите кнопку «Connect«.
После подключения можете пользоваться принтером.
Использование торрента на Netgear 3210.
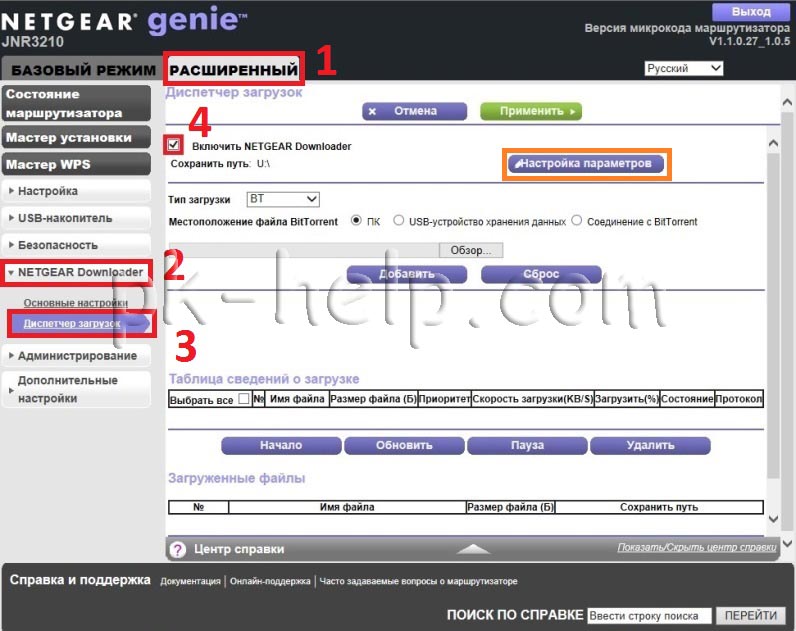
Netgear 3210, как заявлено производителем можно использовать для скачивания торрентов. Для того, что этим воспользоваться необходимо войти в «Расширенный режим«- «Netgear Downloader«- «Диспетчер загрузок«, поставить галочку «Включить NETGEAR Downloader«, если окно не доступно, необходимо проверить соединение с подключенным USB устройством (поскольку сохранить скаченный файл можно только на USB носитель). в Местоположение файла BitTorrent- указываете на скаченный файл торрента, в конце нажимаете «Добавить«.
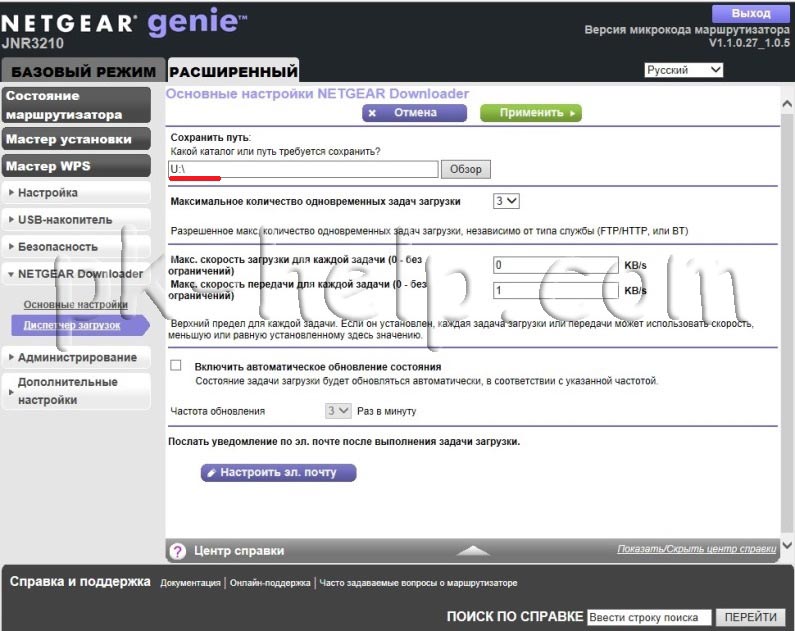
По умолчанию файл будет сохранен в корень USB диска/ флешки, для того, что бы изменить место сохранение, необходимо нажать «Настройка параметров» и выбирать папку для сохранения файла.
Как оказалось, при скачивании торрента, оказалось не все так гладко, Netgear3210 не способен сохранить скаченные файлы на сетевые диски, например на Seagate Central или на компьютер. только на USB носитель подключенный к роутеру. Но это еще не самое плохое, оказалось, что самые популярные торренты (ну или те коими я пользуюсь) не поддерживаются роутером- в ответ ошибка «Несовместимы торрент файл. Этот торрент-файл не поддерживается клиентом BT«.
Вполне возможно в следующих прошивках эта проблема исчезнет.
Вы можете не покупая устройство запустить Эмулятор веб-интерфейса Netgear3210 и посмотреть как выглядят настройки на веб интерфейсе.
После конфигурирования роутера, можно приступить к настройке локальной сети на Windows XP или Windows 7, сделать сетевую папку или настроить сетевой принтер.
Я очень надеюсь, моя статья помогла Вам! Просьба поделиться ссылкой с друзьями:
Беспроводной роутер Wireless N300 Netgear JNR3210-100RUS это современный гигабитный маршрутизатор. К основным достоинствам Netgear JNR3210 можно отнести поддержку 3g/4g/LTE-модемов, полная поддержка Wi-Fi стандарта 802.11n (до 300 мбит/с), наличие USB-порта, встроенный файловый сервер и принт-сервер.
Начинка роутера весьма неслабая — сами посудите: сердце роутера — чип Realtek 8198 с частотой 620 MHz и 128 мегабайт оперативной памяти. В некоторых организациях можно найти компьютеры с примерно такой же (а иногда и меньшей) производительностью.
Какие ещё есть плюсы у Netgear JNR3210?
— Поддержка IPTV (правда частичная, т.к. порт под приставку выделить можно, а вот прописать при необходимости VlanID — уже не получится).
— Возможность работы Netgear JNR3210 в качестве Wi-Fi повторителя (репитера). Правда покупать такое устройство, чтобы использовать его как репитер — это откровенная глупость.
— RP-SMA-антенны. Другими словами, при необходимости Вы можете сменить слабые 2dBi-антенны на более мощные.
— наличие отдельной кнопки включения-выключения Wi-Fi.
— поддержка WPS.
— возможность установить на Netgear JNR3210 DLNA-сервер, установив программный модуль расширения.
Минусов у Netgear JNR3210 относительно немного:
— малое количество поддерживаемых 3g/4g/lte-модемов
Yota LU150 RUS Yota
Yota LU156 RUS Yota
Huawei E392 RUS MTS
Huawei E392 RUS Megafon
Huawei M150-1 RUS Megafon
Yota WLTUBA-107 RUS Yota
— есть жалобы на отказ работать с некоторыми моделями флешек.
— очень яркий синий индикатор питания.
По стабильности работы — нареканий у Netgear JNR3210 пока не замечено: работает стабильно, сигнал Wi-Fi стабилен, сам роутер греется несильно.
Настройка роутера Netgear JNR3210-100RUS
IP-адрес беспроводного маршрутищзатора в локальной сети — 192.168.1.1, URL-адрес веб-интерфейса http://192.168.1.1 или routerlogin.net. Вводим адрес в браузере и получаем окно авторизации:
Логин на доступ в веб-интерфейс Netgear JNR3210 — admin, пароль по умолчанию — password. Если запрос авторизации роутера не появляется — читайте инструкцию Как зайти в настройки роутера.
Стартовая страница интерфейса настройки роутера Netgear JNR3210 выглядит следующим образом:
Настройка подключения по Dynamic IP.
Подключение по Dynamic IP используется например, на ТТК-Урал и Ростелеком-Удмуртия. Для настройки этого типа подключения переходим в раздел Интернет:
В запросе «Требуется ли при подключении вводить имя пользователя и пароль» — оставляем галочку «Нет». Если у Вашего провайдера используется привязка к MAC-адресу, то в самом низу страницы, в разделе «MAC-адрес маршрутизатора» — надо поставить галочку — «Использовать MAC-адрес компьютера». Нажимаем кнопку Применить.
Настройка подключения по PPPoE для Ростелеком, ТТК и Дом.ру.
Для настройки PPPoE на Netgear JNR3210, Вам надо перейти в раздел «Интернет»:
В запросе «Требуется ли при подключении вводить имя пользователя и пароль» — оставляем галочку «Да».
В списке «Тип подключения» надо выбрать тип «PPPoE», ниже в поле «Вход в систему» вводим логин на подключение к Интернет, а в поле «Пароль» — пароль на подключение.
В списке режим подключения выбираем «Всегда включено». Следим чтобы в разделе «Интернет IP-адрес» стояла галочка «Получить автоматически от провайдера».
В случае, если у Вас провайдер Дом.ru, то у него используется привязка к MAC-адресу, поэтому в разделе «MAC-адрес маршрутизатора «- надо поставить галочку — «Использовать MAC-адрес компьютера».
Нажимаем кнопку Применить.
Настройка подключения L2TP для Билайн.
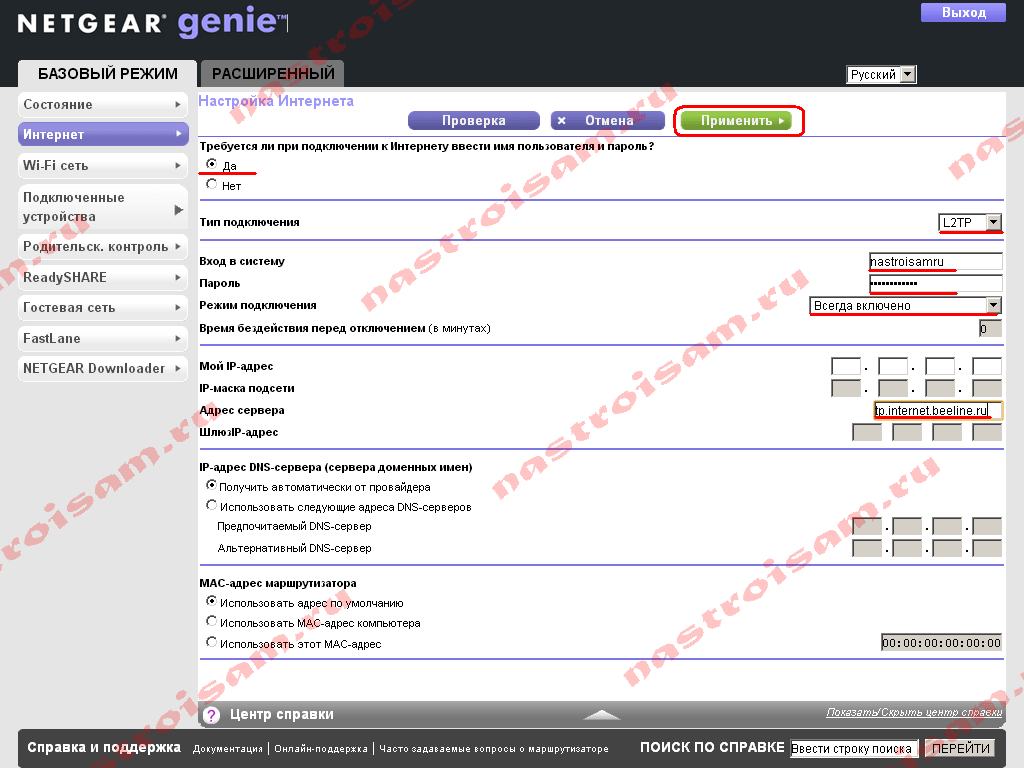
Тип подключения L2TP используется для подключения к Билайн. Для настройки L2TP на Netgear JNR3210, Вам надо перейти в раздел Интернет:
В запросе «Требуется ли при подключении вводить имя пользователя и пароль» — поставьте галочку «Да».
В списке «Тип подключения» надо выбрать тип «L2TP», ниже в поле «Вход в систему» вводим логин на подключение к Интернет, а в поле «Пароль» — пароль на подключение. IP-адрес сервера прописываем tp.internet.beeline.ru.
В списке режим подключения выбираем «Всегда включено». Следим чтобы в разделе «Интернет IP-адрес» стояла галочка «Получить автоматически от провайдера».
В случае, если Ваш провайдер использует привязку к MAC-адресу — в разделе «MAC-адрес маршрутизатора» — надо поставить галочку — «Использовать MAC-адрес компьютера».
Нажимаем кнопку Применить.
Настройка Wi-Fi.
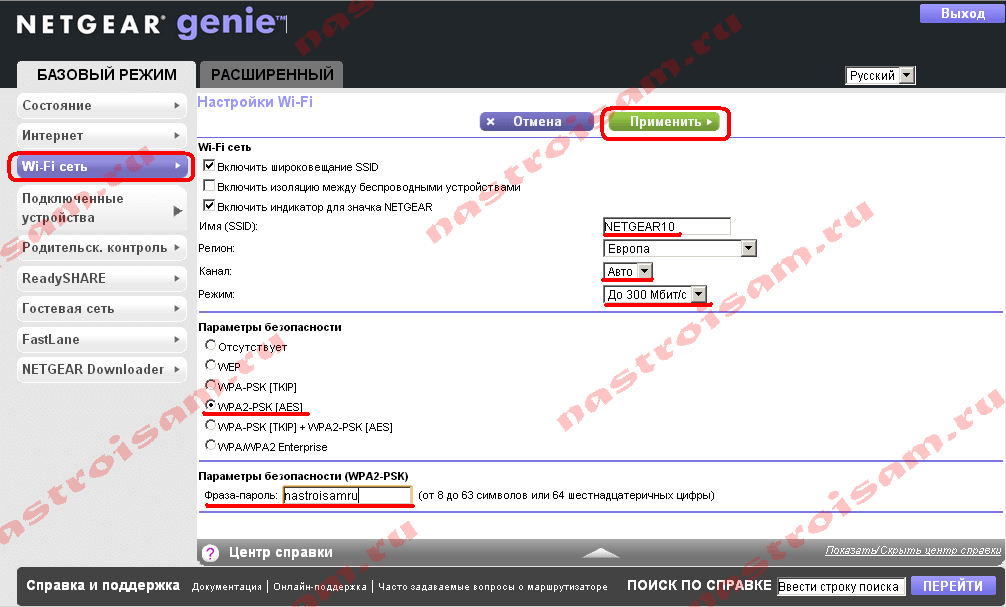
Для настройки беспроводной сети Wi-Fi на роутере Netgear JNR3210-100RUS, Вам надо перейти в раздел «Wi-Fi-сеть»:
В поле «Имя (SSID)» указываем название нашей беспроводной сети. «Канал» выбираем — «Авто», «Режим» — «До 300 Мбит/с». В разделе «Параметры безопасности» выбираем пункт «WPA2-PSK», а в поле «Фраза-пароль» — прописываем ключ для нашей беспроводной сети Wi-Fi. Им может быть любая буквенная или цифирная последовательность, не короче 8 символов. Нажимаем кнопку Применить.
Настройка IPTV.
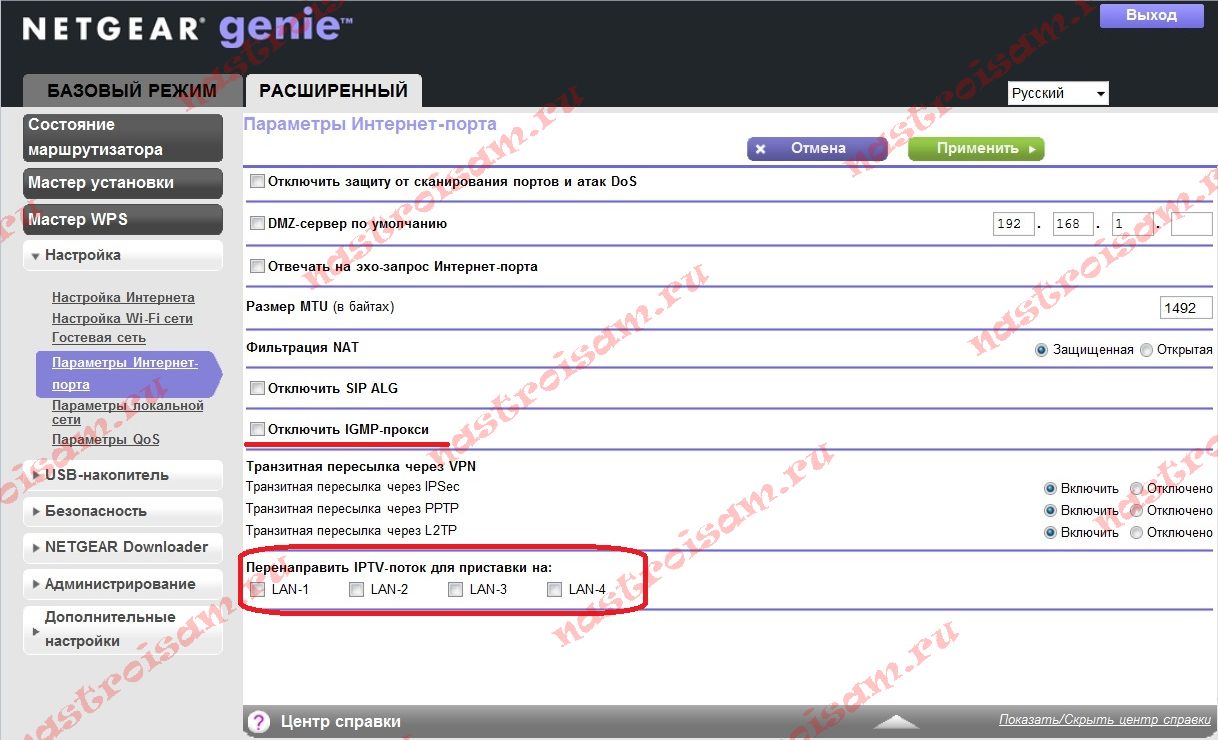
Роутер Netgear JNR3210 на текущий момент умеет только отделять порт и перенаправлять на него поток мультикаста, поэтому не подойдет в том случае, когда для IPTV необходимо указывать Vlan ID. В иных случаях достаточно всего лишь указать порт, в который будет включена STB-приставка. Для этого заходим в «Расширенный режим» => «Настройка» => «Параметры Интернет-порта»:
Смотрим, чтобы не стояла галочка «Отключить IGMP-прокси». Затем, в разделе «Перенаправить IPTV-поток для приставки» надо поставить галку на том порту, в который будет включена STB-приставка. После этого нажимаем кнопку Применить.
Посмотреть инструкция для Netgear JNR3210 бесплатно. Руководство относится к категории маршрутизаторы (роутеры), 1 человек(а) дали ему среднюю оценку 9.1. Руководство доступно на следующих языках: английский. У вас есть вопрос о Netgear JNR3210 или вам нужна помощь? Задайте свой вопрос здесь
Не можете найти ответ на свой вопрос в руководстве? Вы можете найти ответ на свой вопрос ниже, в разделе часто задаваемых вопросов о Netgear JNR3210.
В чем разница между роутером и модемом?
От чего зависит скорость загрузки в Интернете?
Вредно ли Wi-Fi-излучение?
Какой вес Netgear JNR3210?
Какая высота Netgear JNR3210?
Какая ширина Netgear JNR3210?
Какая толщина Netgear JNR3210?
Инструкция Netgear JNR3210 доступно в русский?
Не нашли свой вопрос? Задайте свой вопрос здесь


