Подробное руководство пользователя
Cодержание
Document Outline
- Оглавление
- Меры безопасности
- Уведомления
- Введение
- Знакомство с фотокамерой
- Корпус фотокамеры
- Диск выбора режимов
- Видоискатель
- Информационный экран
- Меню фотокамеры: Обзор
- Перед началом работы
- Знакомство с фотокамерой
- Режимы «Наведи и снимай» (Авто и Авто (вспышка выключена))
- Наведение снимков в видоискателе
- Просмотр фотографий
- Удаление ненужных снимков
- Наведение снимков на мониторе
- Просмотр фотографий
- Удаление ненужных снимков
- Запись видеороликов
- Просмотр видеороликов
- Удаление ненужных видеороликов
- Наведение снимков в видоискателе
- Режим справки
- Справка
- Меню режима справки
- Использование справки
- Справка
- Выбор настроек в соответствии с объектом или ситуацией (Сюжетный режим)
- Портрет
- Пейзаж
- Ребенок
- Спорт
- Макро
- Ночной портрет
- Специальные эффекты
- Ночное видение
- Суперяркие
- Поп
- Фотоиллюстрация
- Цветной эскиз
- Эффект игрушечной камеры
- Эффект миниатюры
- Выборочный цвет
- Силуэт
- Высокий ключ
- Низкий ключ
- Рисование HDR
- Простая панорама
- Параметры, доступные в режиме live view
- Простая панорама
- Дополнительная информация о фотосъемке
- Выбор режима съемки
- Непрерывная съемка (Режим серийной съемки)
- Тихий затвор
- Режим автоспуска
- Фокусировка (Фотосъемка с использованием видоискателя)
- Выбор способа фокусировки фотокамеры: Режим фокусировки
- Выбор способа выбора точки фокусировки: Режим зоны АФ
- Выбор точки фокусировки
- Блокировка фокусировки
- Ручная фокусировка
- Качество и размер изображения
- Качество изображения
- Размер изображения
- Использование встроенной вспышки
- Режимы автоматического подъема
- Режимы ручного подъема
- Чувствительность ISO
- Съемка с дистанционным управлением
- Использование дополнительного дистанционного управления ML-L3
- Режимы P, S, A и M
- Выдержка и диафрагма
- Режим P (Программный авто режим)
- Режим S (Автом. с приор. выдержки)
- Режим A (Авт. с приор. диафрагмы)
- Режим M (Ручной)
- Длительные экспозиции (только режим M)
- Экспозиция
- Замер экспозиции
- Блокировка автоматической экспозиции
- Коррекция экспозиции
- Коррекция вспышки
- Сохранение деталей в светлых и затененных участках
- Активный D-Lighting
- Баланс белого
- Тонкая настройка баланса белого
- Ручная настройка
- Режимы Picture Control
- Выбор Picture Control
- Изменение режимов Picture Control
- Выдержка и диафрагма
- Live view
- Наведение фотографий на мониторе
- Фокусировка в режиме Live view
- Экран Live view
- Наведение фотографий на мониторе
- Запись и просмотр видеороликов
- Запись видеороликов
- Настройки видео
- Просмотр видеороликов
- Редактирование видеороликов
- Обрезка видеороликов
- Сохранение выбранных кадров
- Запись видеороликов
- Просмотр и удаление
- Полнокадровый просмотр
- Информация о снимке
- Просмотр уменьшенных изображений
- Календарный просмотр
- Просмотр крупным планом: Увеличение при просмотре
- Защита фотографий от удаления
- Оценка снимков
- Оценка отдельных снимков
- Оценка нескольких снимков
- Выбор снимков для загрузки
- Выбор отдельных снимков для загрузки
- Выбор нескольких снимков для загрузки
- Удаление фотографий
- Полнокадровый просмотр, просмотр уменьшенных изображений, календарный просмотр
- Меню режима просмотра
- Показ слайдов
- Параметры показа слайдов
- Полнокадровый просмотр
- Подключения
- Установка ViewNX 2
- Использование ViewNX 2
- Копирование снимков на компьютер
- Просмотр снимков
- Печать фотографий
- Подключение принтера
- Печать снимков по очереди
- Печать нескольких снимков
- Создание задания печати DPOF: Установить печать
- Просмотр снимков на экране телевизора
- Устройства стандартной четкости
- Устройства высокой четкости
- Меню фотокамеры
- Меню режима просмотра: Управление изображениями
- Папка просмотра
- Настройки просмотра
- Просмотр изображения
- Повернуть вертикально
- Меню режима съемки: Параметры съемки
- Сброс меню режима съемки
- Авт. управление искаж-ями
- Цветовое пространство
- Понижение шума
- Настройки чувствит. ISO
- Встроенная подсветка АФ
- Управлен. встр. вспышкой
- Меню настройки: Настройка фотокамеры
- Сброс параметров настройки
- Форматировать карту памяти
- Яркость монитора
- Формат информ. экрана
- Авт. отображ. информации
- Эталон. снимок для уд. пыли
- Подавление мерцания
- Часовой пояс и дата
- Язык (Language)
- Авт. поворот изображения
- Комментарий к изображению
- Таймеры авт. выключения
- Автоспуск
- Время ожид. дист. упр. (ML-L3)
- Звуковой сигнал
- Дальномер
- Посл. нумерации файлов
- Кнопки
- Блокиров. спуск без карты
- Печатать дату
- Папка для хранения
- Разъём для доп. принадл-й
- Режим видеовыхода
- Адап-р для беспр. подкл.
- Загрузка Eye-Fi
- Версия прошивки
- Меню обработки: Создание обработанных копий
- Создание обработанных копий
- D-Lighting
- Подавление «красных глаз»
- Кадрирование
- Монохромный
- Эффекты фильтра
- Цветовой баланс
- Наложение изображений
- Обработка NEF (RAW)
- Изменить размер
- Быстрая обработка
- Выравнивание
- Управление искажениями
- «Рыбий глаз»
- Цветовой контур
- Фотоиллюстрация
- Цветной эскиз
- Управление перспективой
- Эффект миниатюры
- Выборочный цвет
- Наглядное сравнение
- Недавние настройки
- Меню режима просмотра: Управление изображениями
- Технические примечания
- Совместимые объективы
- Совместимые объективы со встроенным микропроцессором
- Совместимые объективы без микропроцессора
- Дополнительные вспышки (Speedlights)
- Вспышки, совместимые с системой креативного освещения Nikon (CLS)
- Прочие принадлежности
- Рекомендованные карты памяти
- Подключение разъема питания и сетевого блока питания
- Уход за фотокамерой
- Хранение
- Чистка
- Чистка матрицы
- Уход за фотокамерой и батареей: Меры предосторожности
- Уход за фотокамерой
- Уход за батареей
- Доступные настройки
- Поиск и устранение неисправностей
- Батарея/дисплей
- Съемка (все режимы)
- Съемка (P, S, A, M)
- Просмотр
- Прочее
- Сообщения об ошибках
- Технические характеристики
- AF-S DX NIKKOR 18–55 мм f/3,5–5,6G VR II
- Емкость карты памяти
- Ресурс работы батареи
- Индекс
- Совместимые объективы
Данная лицензия не предназначена для продажи этого Руководства и Вы не становитесь владельцем этого Руководства после приобретения любого продукта, загрузки и/или использования. Nikon сохраняет за собой право владения данным Руководством и, следовательно, всеми копиями и все соответствующие права, относящиеся к интеллектуальной собственности, и сохраняет за собой все права, которые явно не предоставлены Вам в рамках данного Соглашения. Данное Соглашение представляет собой полное и эксклюзивное соглашение, устное и письменное, между Вами и Nikon.
1. РУКОВОДСТВО
Руководство предназначено для клиентов, которые приобрели наши продукты. Мы можем не иметь возможности ответить на запрос физических лиц, которые не приобрели наши продукты. Пожалуйста, имейте в виду, что данное руководство и контактная информация, указанные здесь, могут быть изменены без уведомления.
Данное Руководство защищено Законом об авторском праве Японии и международными законами об авторском праве и международными договорами. Вам необходимо воспроизвести на каждой копии уведомление об авторском праве Nikon и любую другую информацию о праве собственности, которые присутствовали на оригинале.
2. ОГРАНИЧЕНИЯ
Кроме случаев, когда в данном Соглашении указано иное, нельзя делать или передавать копии данного Руководства другим или передавать в электронной форме Руководство с одного компьютера на другой по сети. НЕЛЬЗЯ ИЗМЕНЯТЬ ИЛИ УДАЛЯТЬ ЛЮБЫЕ УВЕДОМЛЕНИЯ ОБ АВТОРСКОМ ПРАВЕ, ТОРГОВОЙ МАРКЕ ИЛИ ДРУГИЕ ЗАЩИТНЫЕ УВЕДОМЛЕНИЯ, СОДЕРЖАЩИЕСЯ В ДАННОМ РУКОВОДСТВЕ. НЕЛЬЗЯ ПРИСВАИВАТЬ ИЛИ ИНЫМ ОБРАЗОМ ИЗБАВЛЯТЬСЯ, МОДИФИЦИРОВАТЬ, НАСТРАИВАТЬ, ПЕРЕВОДИТЬ, АРЕНДОВАТЬ, БРАТЬ В НАЕМ, ЗАНИМАТЬ, ПЕРЕПРОДАВАТЬ, РАСПРОСТРАНЯТЬ, ПЕРЕДАВАТЬ ПО СЕТИ ИЛИ СОЗДАВАТЬ ИЛИ ИМЕТЬ СОЗДАННЫЕ ПРОИЗВОДСТВЕННЫЕ РАБОТЫ, ОСНОВАННЫЕ НА ДАННОМ РУКОВОДСТВЕ ИЛИ ЛЮБОЙ ЧАСТИ ТАКОВОГО.
3. ОГРАНИЧЕННАЯ ГАРАНТИЯ И ОТКАЗ
В НАИБОЛЬШЕЙ СТЕПЕНИ, РАЗРЕШЕННОЙ В СИЛУ ДЕЙСТВУЮЩЕГО ЗАКОНОДАТЕЛЬСТВА, ДАННОЕ РУКОВОДСТВО ПРЕДОСТАВЛЕНО НА ОСНОВЕ ПРИНЦИПА «КАК ЕСТЬ», БЕЗ ГАРАНТИИ В ЛЮБОЙ ФОРМЕ, И КОМПАНИЯ NIKON, ЕЕ СОТРУДНИКИ, РАСПРОСТРАНИТЕЛИ, ДИЛЕРЫ И АГЕНТЫ ПРЯМО НЕ ПРИЗНАЮТ ЛЮБУЮ ГАРАНТИЮ В ЛЮБОЙ ФОРМЕ, ВЫРАЖЕННУЮ ИЛИ ПОДРАЗУМЕВАЕМУЮ, ВКЛЮЧАЯ, НО НЕ ОГРАНИЧИВАЯСЬ, ЛЮБОЙ ПОДРАЗУМЕВАЕМОЙ ГАРАНТИЕЙ ПРИГОДНОСТИ ДЛЯ ТОРГОВЛИ, ПРИГОДНОСТИ ДЛЯ ОПРЕДЕЛЕННОГО НАЗНАЧЕНИЯ ИЛИ ОТСУТСТВИЯ НАРУШЕНИЙ. В НАИБОЛЬШЕЙ СТЕПЕНИ, РАЗРЕШЕННОЙ В СИЛУ ДЕЙСТВУЮЩЕГО ЗАКОНОДАТЕЛЬСТВА, КОМПАНИЯ NIKON, ЕЕ СОТРУДНИКИ, РАСПРОСТРАНИТЕЛИ, ДИЛЕРЫ И АГЕНТЫ НЕ ГАРАНТИРУЮТ ИСПОЛНЕНИЕ ИЛИ РЕЗУЛЬТАТЫ, КОТОРЫЕ ВЫ МОЖЕТЕ ПОЛУЧИТЬ ИЗ ДАННОГО РУКОВОДСТВА, ИЛИ ЧТО ДАННОЕ РУКОВОДСТВО БУДЕТ СООТВЕТСТВОВАТЬ ВАШИМ ТРЕБОВАНИЯМ ИЛИ ЧТО РАБОТА РУКОВОДСТВА БУДЕТ БЕСПЕРЕБОЙНОЙ, БЕЗОШИБОЧНОЙ ИЛИ НЕ БУДЕТ СОДЕРЖАТЬ ВИРУСОВ. В НАИБОЛЬШЕЙ СТЕПЕНИ, РАЗРЕШЕННОЙ В СИЛУ ДЕЙСТВУЮЩЕГО ЗАКОНОДАТЕЛЬСТВА, НИ КОМПАНИЯ NIKON, НИ ЕЕ СОТРУДНИКИ, РАСПРОСТРАНИТЕЛИ, ДИЛЕРЫ И АГЕНТЫ НЕ ДОЛЖНЫ НЕСТИ ПЕРЕД ВАМИ ОТВЕТСТВЕННОСТЬ ЗА ЛЮБЫЕ КОСВЕННЫЕ, ПОСЛЕДУЮЩИЕ ИЛИ НЕПРЕДНАМЕРЕННЫЕ УБЫТКИ, ПОТЕРИ ИЛИ ИЗДЕРЖКИ ЛЮБОГО ТИПА, БУДЬ ТО ПОТЕРЯ ПРИБЫЛИ, ПЕРЕРЫВ В ДЕЯТЕЛЬНОСТИ ИЛИ ИНЫМ СПОСОБОМ ВОЗНИКАЮЩИЙ ИЛИ ЯВЛЯЮЩИЙСЯ СЛЕДСТВИЕМ ДАННОГО РУКОВОДСТВА, ВЫЗВАННЫЙ КАКИМ-ЛИБО СПОСОБОМ, ДАЖЕ ЕСЛИ КОМПАНИЯ NIKON, ЕЕ СОТРУДНИКИ, РАСПРОСТРАНИТЕЛИ, ДИЛЕРЫ ИЛИ АГЕНТЫ УВЕДОМЛЕНЫ О ВОЗМОЖНОСТИ ВОЗНИКНОВЕНИЯ ТАКИХ УБЫТКОВ, ПОТЕРЬ ИЛИ ИЗДЕРЖЕК. ЭТОТ ОТКАЗ СОСТАВЛЯЕТ СУЩЕСТВЕННУЮ ЧАСТЬ ДАННОГО СОГЛАШЕНИЯ, И НЕИСПОЛЬЗОВАНИЕ ДАННОГО РУКОВОДСТВА УПОЛНОМОЧЕНО, КРОМЕ СЛУЧАЕВ В РАМКАХ ДАННОГО ОТКАЗА.
4. ОБЩИЕ СВЕДЕНИЯ
Данное соглашение регулируется и должно истолковываться в соответствии с законами Японии независимо от его принципов коллизионного права. В случае возникновения спора в рамках или в связи с данным соглашением Вы, таким образом, даете согласие на персональную юрисдикцию Японии и отказываетесь от любого возражения, что такая дискуссия вызывает затруднение. Далее Вы соглашаетесь на получение судебных извещений в любом действии, возникающем из данного Соглашения по обычной почте или другими коммерчески оправданными способами доставки расписки в получении. Если любое положение данного Соглашения должно быть определено недействительным по какой-либо причине, то оставшиеся положения не должны быть признаны недействительными и должны остаться в силе без изменений. Данное Соглашение устанавливает в дальнейшем целое соглашение и понимание между Вами и компанией Nikon, и замещает собой и заменяет любые другие соглашения, относящиеся к сути дела данного Соглашения. Неуспех любой стороны в настаивании на строгом исполнении любого правила или положения данного соглашения, или выполнение любой опции, права или защиты прав, содержащихся в данном документе, не должны толковаться в качестве отказа от любого применения такого правила, положения, опции, права или защиты прав в будущем, и такое правило, положение, опция, право или защита прав должны продолжиться и сохранить полную юридическую силу и действие. Заголовки разделов данного Соглашения вставлены только для удобства и не должны составлять часть данного документа или влиять каким-либо образом на значение или толкование данного Соглашения. Кроме случаев, когда иначе явно указано в данном документе, положения раздела 3 и раздела 4 вместе с любыми положениями, которые с помощью своих прямо выраженных условий относятся к периодам после прекращения срока действия данного Соглашения, должны оставаться в силе после прекращения действия данного Соглашения по какой-либо причине.
Руководства для продуктов Nikon/ 2018/02/15/ Вер. 2.0.0
© 2014 Vasili-photo.com
Вернуться
Эта авторская инструкция к Nikon D3300 не является простым пересказом официального руководства пользователя, но содержит все необходимые сведения о том, как пользоваться D3300, изложенные в краткой и доступной форме. Вы узнаете об органах управления Nikon D3300, о меню, настройках и различных полезных функциях фотоаппарата. Я также расскажу о том, как правильно настроить Nikon D3300, чтобы получить отличные фотографии в любой ситуации.
Настоящая инструкция вряд ли поможет вам улучшить художественную ценность ваших фотографий. Способность распознавать живописный свет и находить выразительную композицию мало зависит от умения обращаться с камерой, но с моей помощью вы, по крайней мере, перестанете путаться в настройках фотоаппарата и сможете уделять больше внимания вещам, которые действительно важны для хорошего снимка.
Ответственность за нелепые названия некоторых пунктов меню лежит исключительно на никоновских переводчиках, занимавшихся русификацией интерфейса D3300.
Оглавление
Органы управления
Меню информационного экрана
Настройки автофокуса
Меню просмотра
Меню съёмки
Меню настройки
Меню обработки и недавние настройки
Описание и технические характеристики Nikon D3300
Посмотреть инструкция для Nikon D3300 бесплатно. Руководство относится к категории фотокамеры, 9 человек(а) дали ему среднюю оценку 9. Руководство доступно на следующих языках: русский. У вас есть вопрос о Nikon D3300 или вам нужна помощь? Задайте свой вопрос здесь
Не можете найти ответ на свой вопрос в руководстве? Вы можете найти ответ на свой вопрос ниже, в разделе часто задаваемых вопросов о Nikon D3300.
Какой размер экрана Nikon D3300?
Какая высота Nikon D3300?
Какая ширина Nikon D3300?
Какая толщина Nikon D3300?
Инструкция Nikon D3300 доступно в русский?
Не нашли свой вопрос? Задайте свой вопрос здесь
- Manuals
- Brands
- Nikon Manuals
- Digital Camera
- D3300
- User manual
-
Contents
-
Table of Contents
-
Bookmarks
Quick Links
DIGITAL CAMERA
User’s Manual
Nikon Manual Viewer 2
Use the Nikon Manual Viewer 2 app to view
manuals anytime, anywhere on your smartphone or
En
tablet.
Related Manuals for Nikon D3300
Summary of Contents for Nikon D3300
-
Page 1
DIGITAL CAMERA User’s Manual Nikon Manual Viewer 2 Use the Nikon Manual Viewer 2 app to view manuals anytime, anywhere on your smartphone or tablet. -
Page 2
The explanations in this manual assume that default settings are used. Nikon Manual Viewer 2 Install the Nikon Manual Viewer 2 app on your smartphone or tablet to view Nikon digital camera manuals, anytime, anywhere. Nikon Manual Viewer 2 can be downloaded free of charge from the App Store and Google Play. -
Page 3: Package Contents
Confirm that the package contains the following items: DK-25 rubber eyecup BF-1B body cap D3300 camera EN-EL14a rechargeable Li-ion battery (with terminal cover) MH-24 battery charger (plug adapter supplied in countries or regions where required; shape depends on country of sale)
-
Page 4: Quick Start Guide
Quick Start Guide Follow these steps for a quick start with the D3300. Attach the camera strap (0 11). Attach the strap as shown. Repeat for the second eyelet. Charge the battery (0 11). Insert the battery and memory card (0 12).
-
Page 5
Turn the camera on (0 14). Choose a language and set the camera clock (0 15). Frame the photograph (0 24). Press the shutter-release button halfway (0 24). Shoot (0 25). -
Page 6
The Reference Manual For more information on using your Nikon camera, download a pdf copy of the camera Reference Manual from the website listed below. The Reference Manual can be viewed using Adobe Reader or Adobe Acrobat Reader 5.0 or later. -
Page 7: Table Of Contents
Table of Contents Package Contents …………….i For Your Safety …………….viii Notices………………xii Introduction Getting to Know the Camera …………. 1 The Camera Body………………. 1 The Mode Dial………………4 The I (E/#) Button…………….6 The Viewfinder………………7 The Information Display…………..8 First Steps “Point-and-Shoot”…
-
Page 8
Matching Settings to the Subject or Situation (Scene Mode) k Portrait………………. 50 l Landscape ………………50 p Child ………………..50 m Sports ………………… 51 n Close up ………………51 o Night Portrait …………….51 Special Effects % Night Vision …………….. 53 S Super Vivid ………………. -
Page 9
Camera Menus Menu Options …………….76 Using Camera Menus ……………. 79 ViewNX 2 Installing ViewNX 2…………..82 Using ViewNX 2 …………….85 Copy Pictures to the Computer…………. 85 View Pictures ………………87 Technical Notes Compatible Lenses…………..89 Other Accessories…………… 91 Approved Memory Cards………….. -
Page 10: For Your Safety
For Your Safety To prevent damage to your Nikon product or injury to yourself or to others, read the following safety precautions in their entirety before using this equipment. Keep these safety instructions where all those who use the product will read them.
-
Page 11
(3 ft 4 in.) from AC adapter and then take the product the subject. Particular care should to a Nikon-authorized service center be observed when photographing for inspection. infants. Do not place the strap around the neck of… -
Page 12
Observe proper precautions when • Discontinue use immediately should you notice any changes in handling batteries Batteries may leak or explode if the battery, such as discoloration or improperly handled. Observe the deformation. following precautions when handling Observe proper precautions when batteries for use in this product: handling the charger •… -
Page 13
When connecting cables to the input hospital personnel and output jacks, use only the cables This camera transmits radio provided or sold by Nikon for the frequencies that could interfere with purpose to maintain compliance with medical equipment or aircraft product regulations. -
Page 14: Notices
Notices • No part of the manuals included • Nikon will not be held liable for any with this product may be damages resulting from the use of reproduced, transmitted, this product. transcribed, stored in a retrieval • While every effort has been made to…
-
Page 15
Wash hands • Connect the equipment into an after handling. outlet on a circuit different from that Nikon Inc., 1300 Walt Whitman Road, to which the receiver is connected. Melville, New York 11747-3064, U.S.A. • Consult the dealer or an experienced Tel.: 631-547-4200… -
Page 16
Notice Concerning Prohibition of Copying or Reproduction Note that simply being in possession of material that has been digitally copied or reproduced by means of a scanner, digital camera, or other device may be punishable by law. • Items prohibited by law from being copied •… -
Page 17
Only Nikon brand electronic accessories (including chargers, batteries, AC adapters, and flash accessories) certified by Nikon specifically for use with this Nikon digital camera are engineered and proven to operate within the operational and safety requirements of this electronic circuitry. -
Page 18
Use Only Nikon Brand Accessories Only Nikon brand accessories certified by Nikon specifically for use with your Nikon digital camera are engineered and proven to operate within its operational and safety requirements. T HE USE OF NON IKON ACCESSORIES COULD DAMAGE YOUR CAMERA AND MAY VOID YOUR… -
Page 19: Introduction
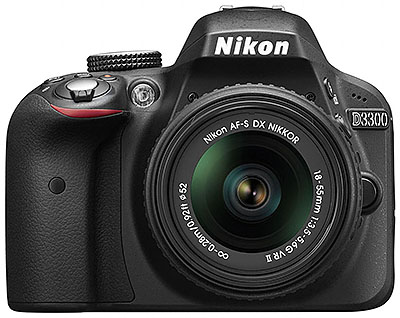
Introduction Getting to Know the Camera Take a few moments to familiarize yourself with camera controls and displays. You may find it helpful to bookmark this section and refer to it as you read through the rest of the manual. The Camera Body Movie-record button ….
-
Page 20
AF-assist illuminator CPU contacts Self-timer lamp Mirror Red-eye reduction lamp Lens mount……..13 Built-in flash……..29 Body cap M/ Y button……..68 Accessory terminal……94 Microphone ……..39 Connector for external Connector cover microphone……..94 Fn button ………77 USB and A/V connector ….85 Mounting mark ……13 HDMI mini-pin connector Lens release button…….21 Infrared receiver for ML-L3 remote… -
Page 21
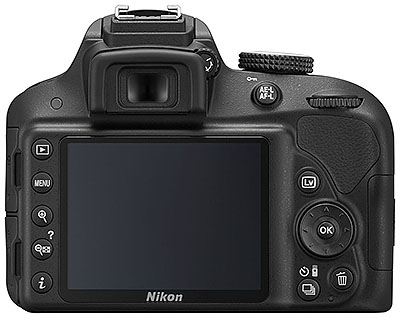
O button ……… 28 Rubber eyecup Viewfinder eyepiece….7, 17 Memory card access lamp..25 Diopter adjustment control ..17 Battery-chamber cover latch ………..12, 19 K button……..26 Battery-chamber cover ..12, 19 G button……..75 I/E/# button………6 X button ……… 26 Tripod socket W/Q button……26, 79 Monitor ………8, 26, 30… -
Page 22: The Mode Dial
The Mode Dial The camera offers a choice of the following shooting modes and g mode: P, S, A, and M Modes Select these modes for full control over camera settings. • P—Programmed auto (0 68, 69) • S —Shutter-priority auto (0 68, 69) •…
-
Page 23
Special Effects Modes Use special effects during shooting. • % Night vision (0 53) • 3 Selective color (0 54, 62) • S Super vivid (0 53) • 1 Silhouette (0 54) • T Pop (0 53) • 2 High key (0 54) •… -
Page 24: The I (E/#) Button
The I (E/#) Button To choose how the shutter is released (release mode), press the I (E/#) button, then highlight the desired option and press J. I (E/#) button Mode Description Single frame: Camera takes one photograph each time shutter- release button is pressed.
-
Page 25: The Viewfinder
The Viewfinder Focus points ……..24 “k” (appears when memory remains for over 1000 exposures) Focus indicator ……24 …………16 Autoexposure (AE) lock indicator Flash-ready indicator….29 Shutter speed …….. 72 Flexible program indicator Aperture (f-number) ….72 Exposure indicator ……. 72 Special effects mode indicator ..
-
Page 26: The Information Display
The Information Display Viewing settings: To view the information display, press the R button. R button Shooting mode Print date indicator …….77 i auto/ Flash control indicator j auto (flash off)…..22 Flash compensation indicator for Scene modes ……50 optional flash units Special effects mode ….52 Active D-Lighting ……76 P, S, A, and M modes….68…
-
Page 27
Aperture (f-number) ….72 Number of exposures remaining Aperture display ……72 …………16 White balance recording indicator Shutter speed …….. 72 Shutter-speed display….72 “k” (appears when memory remains for over 1000 exposures) Autoexposure (AE) lock indicator …………16 Auto-area AF indicator Exposure indicator ……. -
Page 28
Changing settings: To change the settings at the bottom of the display, press the P button, then highlight items using the multi selector and press J to view options for the highlighted item. P button White balance Adjust settings for different types of lighting. Image size Choose a size for new photos. -
Page 29: First Steps
First Steps Always turn the camera off before inserting or removing batteries or memory cards. Attach the strap. Attach the strap as shown. Repeat for the second eyelet. Charge the battery. If a plug adapter is supplied, raise the wall plug and connect the plug adapter as shown below at left, making sure the plug is fully inserted.
-
Page 30: Insert The Battery And Memory Card (0
Insert the battery and memory card. Insert the battery in the orientation shown, using the battery to keep the orange battery latch pressed to one side. The latch locks the battery in place when the battery is fully inserted. Battery latch Slide the memory card in until it clicks into place.
-
Page 31: Taking Pictures
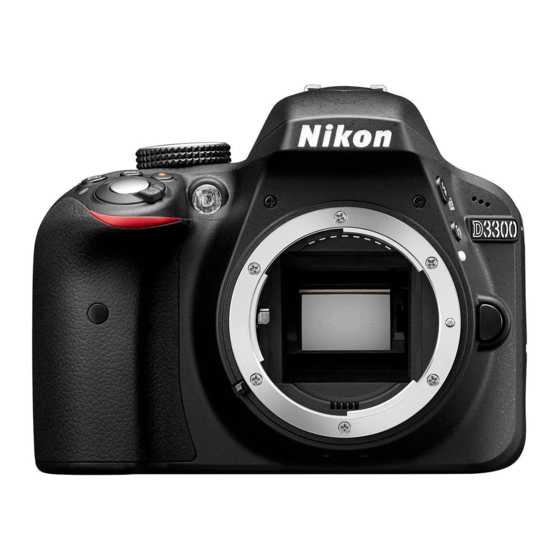
Attach a lens. Be careful to prevent dust from entering the camera when the lens or body cap is removed. Remove the camera body cap Remove the rear lens cap Mounting mark (camera) Align the mounting Mounting mark (lens) marks Rotate the lens as shown until it clicks into place.
-
Page 32
Turn the camera on. A language-selection dialog will be displayed. The Power Switch Rotate the power switch as shown to turn the camera on. Rotate the power switch as shown to turn the camera off. Lenses with Retractable Lens Barrel Buttons Before using the camera, unlock and extend the zoom ring. -
Page 33: Choose A Language And Set The Camera Clock (0
Choose a language and Move cursor up set the camera clock. J button: select Use the multi selector and highlighted item J button to select a Select highlighted language and set the item or display sub- camera clock. menu Move cursor down Select language Select time zone Select date format…
-
Page 34
Check the battery level and number of exposures remaining. Press the R button and check the battery level and number of exposures remaining. In the case of exposures remaining, values over 1000 are shown in thousands, indicated by the letter “k”. R button Battery level (0 18) Number of exposures… -
Page 35
Focus the viewfinder. After removing the lens cap, rotate the diopter adjustment control until the focus points are in sharp focus. When operating the control with your eye to the viewfinder, be careful not to put your fingers or fingernails in your eye. Focus points Viewfinder not in focus Viewfinder in focus… -
Page 36
If the problem persists, cease use immediately and take battery and charger to your retailer or a Nikon-authorized service representative. Use the charger with compatible batteries only. Unplug when not in use. -
Page 37
Removing the Battery To remove the battery, turn the camera off and open the battery-chamber cover. Press the battery latch in the direction shown by the arrow to release the battery and then remove the battery by hand. Formatting Memory Cards If this is the first time the memory card will be used in the camera or if the card has been formatted in another device, select Format… -
Page 38
Removing Memory Cards After confirming that the memory card access lamp is off, turn the camera off, open the memory card slot cover, and press the card in to eject it (q). The card can then be removed by hand (w). The Write Protect Switch SD memory cards are equipped with a write protect switch to… -
Page 39
Detaching the Lens Be sure the camera is off when removing or exchanging lenses. To remove the lens, press and hold the lens release button (q) while turning the lens clockwise (w). After removing the lens, replace the lens caps and camera body cap. -
Page 40: Point-And-Shoot» Modes (I And J)
“Point-and-Shoot” Modes (i and j) This section describes how to shoot photographs and movies in i and j modes, automatic “point-and-shoot” modes in which the majority of settings are controlled by the camera in response to shooting conditions. Before proceeding, turn the Mode dial camera on and rotate the mode dial to i or j (the only…
-
Page 41: Framing Photos In The Viewfinder
Framing Photos in the Viewfinder Ready the camera. When framing photographs in the viewfinder, hold the handgrip in your right hand and cradle the camera body or lens with your left. When framing photographs in portrait (tall) orientation, hold the camera as shown at right.
-
Page 42: Frame The Photograph (0
Frame the photograph. Frame a photograph in the viewfinder with the main subject in at least one of the 11 focus points. Focus point Press the shutter-release button halfway. Press the shutter-release button halfway to focus (if the subject is poorly lit, the flash may pop up and the In-focus Buffer…
-
Page 43
Shoot. Smoothly press the shutter- release button the rest of the way down to take the photograph. The memory card access lamp will light and the photograph will be Memory card access lamp displayed in the monitor for a few seconds. Do not eject the memory card or remove or disconnect the power source until the lamp has… -
Page 44: Viewing Photographs
Viewing Photographs Pressing K displays a picture in the monitor. K button Press 4 or 2 to view additional pictures. ❚❚ Thumbnail Playback To display images in “contact sheets” of four, nine, or 72 images (thumbnail playback), press the W (Q) button. Use the multi selector or command dial to highlight images and press J to display the highlighted image full frame.
-
Page 45
❚❚ Calendar Playback To view images taken on a selected date Date list (calendar playback), press the W (Q) button when 72 images are displayed. Press the W (Q) button to toggle between the date list and the list of thumbnails for the selected date. -
Page 46: Deleting Unwanted Pictures
Deleting Unwanted Pictures Display the photograph you wish to delete. K button Press O; a confirmation dialog will be displayed. O button Press the O button again to delete the picture.
-
Page 47
The Standby Timer The viewfinder and information display will turn off if no operations are performed for about eight seconds, reducing the drain on the battery. Press the shutter- release button halfway to reactivate the display. The length of time before the standby timer expires automatically can be selected using the Auto off timers option in the setup menu (0 77). -
Page 48: Framing Photos In The Monitor
Framing Photos in the Monitor Press the a button. The view through the lens will be displayed in the camera monitor (live view). a button Ready the camera. Hold the handgrip in your right hand and cradle the camera body or lens with your left. When framing photographs in portrait (tall) orientation, hold the camera as shown at right.
-
Page 49
Focus. Press the shutter-release button halfway. The focus point will flash green while the camera focuses. If the camera is able to focus, the Focus point focus point will be displayed in green; if the camera is unable to focus, the focus point will flash red. Take the picture. -
Page 50
Automatic Scene Selection (Scene Auto Selector) If live view is selected in i or j mode, the camera will automatically analyze the subject and select the appropriate shooting mode when autofocus is enabled. The selected mode is shown in the monitor. c Portrait Human portrait subjects d Landscape… -
Page 51
Shooting in Live View Mode Although it will not appear in the final picture, distortion may be visible in the monitor if the camera is panned horizontally or an object moves at high speed through frame. Bright light sources may leave after-images in the monitor when the camera is panned. -
Page 52: Viewing Photographs
Viewing Photographs Pressing K displays a picture in the monitor. K button Press 4 or 2 to view additional pictures.
-
Page 53: Deleting Unwanted Pictures
Deleting Unwanted Pictures Display the photograph you wish to delete. K button Press O; a confirmation dialog will be displayed. O button Press the O button again to delete the picture.
-
Page 54: Recording Movies
Recording Movies Movies can be recorded in live view mode. Press the a button. The view through the lens is displayed in the monitor. The 0 Icon A 0 icon indicates that movies can not be recorded. a button Ready the camera. Hold the handgrip in your right hand and cradle the camera body or lens with your left.
-
Page 55
Start recording. Press the movie-record button to start recording. A recording indicator and the time available are displayed in the monitor. Movie-record button Recording indicator Time remaining End recording. Press the movie-record button again to end recording. Recording will end automatically when the maximum length is reached, the memory card is full, or another mode is selected. -
Page 56
Maximum Length The maximum size for individual movie files is 4 GB; maximum length varies with the options selected for Movie settings > Frame size/ frame rate and Movie quality in the shooting menu (0 76) as shown below. Note that depending on memory card write speed, shooting may end before this length is reached. -
Page 57
Recording Movies Flicker, banding, or distortion may be visible in the monitor and in the final movie under fluorescent, mercury vapor, or sodium lamps or if the camera is panned horizontally or an object moves at high speed through frame (flicker and banding can be reduced using Flicker reduction;… -
Page 58
The Count-Down Display A count down will be displayed 30 s before live view ends automatically. Depending on shooting conditions, the timer may appear immediately when movie recording begins. Note that regardless of the amount of recording time available, live view will still end automatically when the timer expires. -
Page 59: Viewing Movies
Viewing Movies Press K to start playback and then scroll through pictures until a movie (indicated by a 1 icon) is displayed. K button Press J to start playback; your current position is indicated by the movie progress bar. 1 icon Length Current position/total length Movie progress bar…
-
Page 60
The following operations can be performed: Description Pause playback. Pause Resume playback when movie is paused or Play during rewind/advance. Speed increases with each press, from 2× to 4× to 8× to 16×; keep pressed to skip to beginning or end of movie (first frame is indicated by h in top right corner of Advance/rewind monitor, last frame by i). -
Page 61: Deleting Unwanted Movies
Deleting Unwanted Movies Display the movie you wish to delete (movies are indicated by 1 icons). K button Press O; a confirmation dialog will be displayed. O button Press the O button again to delete the movie.
-
Page 62: Guide Mode
Guide Mode The Guide Guide mode gives access to a variety of frequently-used and useful functions. The top level of the guide is displayed when the mode dial is rotated to g. Battery indicator (0 18) Number of exposures remaining (0 16) Shooting mode: A guide mode indicator appears on the shooting mode icon.
-
Page 63: Guide Mode Menus
Guide Mode Menus To access these menus, highlight Shoot, View/delete, Retouch, or Set up and press J. ❚❚ Shoot Easy operation Advanced operation 4 Auto Soften backgrounds Adjust aperture. 5 No flash Bring more into focus 9 Distant subjects Freeze motion (people) Select a shutter ! Close-ups Freeze motion (vehicles)
-
Page 64
“Start Shooting” Highlight an option and press J. • Use the viewfinder • Use live view • Shoot movies “More Settings” If More settings is displayed, you can highlight this option and press 2 to access the following settings (the settings available vary with the shooting option selected): •… -
Page 65
❚❚ Retouch Trim Photo illustration Filter effects (cross screen) Miniature effect Filter effects (soft) Selective color ❚❚ Set Up Image quality Playback folder Image size Playback display options Auto off timers DPOF print order Print date Clock and language Display and sound settings Time zone and date Monitor brightness Language… -
Page 66: Using The Guide
Using the Guide The following operations can be performed while the guide is displayed: Description Return to top level of guide Press G to turn the monitor on or return to the top level of the guide. Turn monitor G button Highlight a Press 1, 3, 4, or 2 to highlight a menu.
-
Page 67
Description Press 4 to return to the previous display. To cancel and return to the previous display from displays like that shown below, Return to highlight & and press J. previous display If a d icon is displayed at the bottom left corner of the monitor, help can be displayed by pressing the W (Q) button. -
Page 68: Matching Settings To The Subject Or Situation (Scene Mode)
Matching Settings to the Subject or Situation (Scene Mode) The camera offers a choice of “scene” modes. Choosing a scene mode automatically optimizes settings to suit the selected scene, making creative photography as simple as selecting a mode, framing a picture, and shooting as described on page 22. The following scenes can be Mode dial selected with the mode dial:…
-
Page 69: Sports
m Sports Fast shutter speeds freeze motion for dynamic sports shots in which the main subject stands out clearly. Note: The built-in flash and AF-assist illuminator turn off. n Close up Use for close-up shots of flowers, insects, and other small objects (a macro lens can be used to focus at very close ranges).
-
Page 70: Special Effects
Special Effects Special effects can be used when recording images. % Night Vision 3 Selective Color S Super Vivid 1 Silhouette T Pop 2 High Key U Photo Illustration 3 Low Key g Color Sketch ) HDR Painting ‘ Toy Camera Effect I Easy Panorama ( Miniature Effect The following effects can be selected by rotating the mode dial…
-
Page 71: Night Vision
% Night Vision Use under conditions of darkness to record monochrome images at high ISO sensitivities. Note: Pictures may be affected by noise in the form of randomly-spaced bright pixels, fog, or lines. Autofocus is available in live view only; manual focus can be used if the camera is unable to focus.
-
Page 72: Toy Camera Effect
‘ Toy Camera Effect Create photos and movies that appear to have been shot with a toy camera. The effect can be adjusted in live view (0 59). ( Miniature Effect Create photos that appear to be pictures of dioramas. Works best when shooting from a high vantage point.
-
Page 73: Low Key
3 Low Key Use with dark scenes to create dark, low-key images with prominent highlights. Note: The built-in flash turns off. ) HDR Painting Each time a photo is taken, the camera shoots two frames at different exposures and combines them for a painterly effect that emphasizes detail and color.
-
Page 74
Preventing Blur Use a tripod to prevent blur caused by camera shake at slow shutter speeds. NEF (RAW) NEF (RAW) recording is not available in %, S, T, U, g, ‘, (, 3, ), and I modes. Pictures taken when an NEF (RAW) or NEF (RAW) + JPEG fine option is selected in these modes will be recorded as JPEG images. -
Page 75: Options Available In Live View
Options Available in Live View ❚❚ U Photo Illustration Select live view. Press the a button. The view through the lens will be displayed in the monitor. a button Adjust outline thickness. Press J to display the options shown at right. Press 2 or 4 to make outlines thicker or thinner.
-
Page 76
❚❚ g Color Sketch Select live view. Press the a button. The view through the lens will be displayed in the monitor. a button Adjust options. Press J to display the options shown at right. Press 1 or 3 to highlight Vividness or Outlines and press 4 or 2 to change. -
Page 77
❚❚ ‘ Toy Camera Effect Select live view. Press the a button. The view through the lens will be displayed in the monitor. a button Adjust options. Press J to display the options shown at right. Press 1 or 3 to highlight Vividness or Vignetting and press 4 or 2 to change. -
Page 78
❚❚ ( Miniature Effect Select live view. Press the a button. The view through the lens will be displayed in the monitor. a button Position the focus point. Use the multi selector to position the focus point in the area that will be in focus and then press the shutter- release button halfway to focus. -
Page 79
Adjust options. Press 4 or 2 to choose the orientation of the area that will be in focus and press 1 or 3 to adjust its width. Press J. Press J to exit when settings are complete. To exit live view, press the a button. -
Page 80
❚❚ 3 Selective Color Select live view. Press the a button. The view through the lens will be displayed in the monitor. a button Display options. Press J to display selective color options. Select a color. Selected color Frame an object in the white square in the center of the display and press 1 to choose the color of the… -
Page 81
Choose the color range. Color range Press 1 or 3 to increase or decrease the range of similar hues that will be included in the final image. Choose from values between 1 and 7; note that higher values may include hues from other colors. -
Page 82: I Easy Panorama
I Easy Panorama Follow the steps below to shoot panoramas. Select live view. Press the a button. A framing grid and the view through the lens will be displayed in the monitor. a button Focus. Frame the start of the panorama and press the shutter-release button halfway.
-
Page 83
Pan the camera. Progress indicator Slowly pan the camera up, down, left, or right as shown below. Shooting will start when the camera detects the pan direction and a progress indicator will appear in the display. Shooting ends automatically when the end of the panorama is reached. -
Page 84
Panoramas Panorama size can be selected using the Image size item in the shooting menu; choose from Normal panorama and Wide panorama (0 76). An error message will be displayed if the camera is panned too quickly or unsteadily. Note that because panoramas are composed of multiple images, the joins between images may be visible and the desired results may not be achieved with moving subjects or with neon lights or other subjects that exhibit rapid changes in color or… -
Page 85
❚❚ Viewing Panoramas To view a panorama, display it in full-frame playback (0 26) and press . The start of the panorama will be displayed with the smallest dimension filling the display and the camera will then scroll through the picture in the original pan direction. Your current position is indicated by the navigation window. -
Page 86: P, S, A, And M Modes
P, S, A, and M Modes P, S, A, and M modes offer different degrees of control over shutter speed and aperture: Mode Description Recommended for snapshots and in other Programmed auto situations in which there is little time to (0 69) adjust camera settings.
-
Page 87: Mode P (Programmed Auto)
Mode P (Programmed Auto) This mode is recommended for snapshots or whenever you want to leave the camera in charge of shutter speed and aperture. The camera automatically adjusts shutter speed and aperture for optimal exposure in most situations. Mode S (Shutter-Priority Auto) In shutter-priority auto, you choose the shutter speed while the camera automatically selects the aperture that…
-
Page 88: Mode A (Aperture-Priority Auto)
Mode A (Aperture-Priority Auto) In aperture-priority auto, you choose the aperture while the camera automatically selects the shutter speed that will produce the optimal exposure. Rotate the command dial left for larger apertures (lower f-numbers), right for Command dial smaller apertures (higher f-numbers).
-
Page 89: Mode M (Manual)
Mode M (Manual) In manual mode, you control both shutter speed and aperture. Checking the exposure indicator (0 72), adjust shutter speed and aperture. Shutter speed is selected by rotating the command dial (right for faster speeds, left for slower). To adjust aperture, keep the E (N) button pressed while rotating the command dial (left for larger apertures/lower f-numbers and right for smaller apertures/higher f-numbers).
-
Page 90
Shutter Speed and Aperture Shutter speed and aperture are shown in the viewfinder and information display. Shutter speed Aperture Fast shutter speeds ( s in this Slow shutter speeds (here 1 s) blur 1600 example) freeze motion. motion. Large apertures (such as f/5.6; Small apertures (f/22 in this case) remember, the lower the f-number, bring both background and… -
Page 91: Exposure Compensation (P, S, A, M, % And I Modes Only)
Exposure Compensation (P, S, A, M, % and I modes only) Exposure compensation is used to alter exposure from the value suggested by the camera, making pictures brighter or darker (0 109). –1 EV No exposure +1 EV compensation…
-
Page 92
To choose a value for exposure compensation, keep the E (N) button pressed and rotate the command dial until the desired value is selected in the viewfinder or information display. Normal exposure can be restored by setting exposure compensation to ±0. -
Page 93: Camera Menus
Camera Menus Most shooting, playback, and setup options can be accessed from the camera menus. To view the menus, press the G button. G button Tabs Choose from the following menus: • D: Playback (0 76) • N: Retouch (0 78) •…
-
Page 94: Menu Options
Menu Options ❚❚ D Playback Menu: Managing Images Delete Slide show Playback folder DPOF print order Playback display options Rating Image review Select to send to smart device Rotate tall ❚❚ C Shooting Menu: Shooting Options Reset shooting menu Noise reduction Image quality ISO sensitivity settings Image size…
-
Page 95
❚❚ B Setup Menu: Camera Setup Reset setup options Remote on duration (ML-L3) Format memory card Beep Monitor brightness Rangefinder Info display format File number sequence Auto info display Buttons Clean image sensor Slot empty release lock Lock mirror up for cleaning Print date Image Dust Off ref photo Storage folder… -
Page 96
❚❚ N Retouch Menu: Creating Retouched Copies D-Lighting Distortion control Red-eye correction Fisheye Trim Color outline Monochrome Photo illustration Filter effects Color sketch Color balance Perspective control Image overlay Miniature effect NEF (RAW) processing Selective color Resize Edit movie Quick retouch Side-by-side comparison Straighten * Available only if retouch menu is displayed by pressing P and selecting Retouch in full-… -
Page 97: Using Camera Menus
Using Camera Menus The multi selector and J button are used to navigate the camera menus. Move cursor up J button: select highlighted item Cancel and return to Select highlighted item or previous menu display sub-menu Move cursor down Follow the steps below to navigate the menus. Display the menus.
-
Page 98
Highlight the icon for the current menu. Press 4 to highlight the icon for the current menu. Select a menu. Press 1 or 3 to select the desired menu. Position the cursor in the selected menu. Press 2 to position the cursor in the selected menu. -
Page 99
Display options. Press 2 to display options for the selected menu item. Highlight an option. Press 1 or 3 to highlight an option. Select the highlighted item. Press J to select the highlighted item. To exit without making a selection, press the G button. Note the following: •… -
Page 100: Viewnx 2
84. Be sure to use the latest version of ViewNX 2, which is available for download from the websites listed on page xvi, as earlier versions that do not support the D3300 may fail to transfer NEF (RAW) images correctly. Launch the installer.
-
Page 101
Start the installer. Click Install and follow the on-screen instructions. Click Install Exit the installer. Windows Click Yes Click OK Remove the installer CD from the CD-ROM drive. -
Page 102
System Requirements Windows • Photos: Intel Celeron, • Photos: Intel Core or Xeon Pentium 4, Core Series; series 1.6 GHz or better • Movies (playback): Core Duo • Movies (playback): Pentium D 2 GHz or better; Intel Core i5 3.0 GHz or better; Intel Core i5 or better recommended or better recommended when viewing movies with a… -
Page 103: Using Viewnx 2
If a message is displayed prompting you to choose a program, select Nikon Transfer 2. Windows 7 If the following dialog is displayed, select Nikon Transfer 2 as described below. 1 Under Import pictures and videos, click Change program. A program selection dialog will be displayed;…
-
Page 104
Click Start Transfer. At default settings, pictures on the memory card will be copied to the computer. Start Transfer During Transfer Do not turn the camera off or disconnect the USB cable while transfer is in progress. Terminate the connection. When transfer is complete, turn the camera off and disconnect the USB cable. -
Page 105: View Pictures
View Pictures Pictures are displayed in ViewNX 2 when transfer is complete. Starting ViewNX 2 Manually • Windows: Double-click the ViewNX 2 shortcut on the desktop. • Mac: Click the ViewNX 2 icon in the Dock. ❚❚ Retouching Photographs To crop pictures and perform such tasks as adjusting sharpness and tone levels, click the Edit button in the ViewNX 2 toolbar.
-
Page 106
For More Information Consult online help for more information on using ViewNX 2. Viewing the Nikon Website To visit the Nikon website after installing ViewNX 2, select All Programs > Link to Nikon from the Windows start menu (Internet connection required). -
Page 107: Technical Notes
Technical Notes Read this chapter for information on compatible accessories, cleaning and storing the camera, and what to do if an error message is displayed or you encounter problems using the camera. Compatible Lenses This camera supports autofocus with AF-S and AF-I CPU lenses only.
-
Page 108
4 Can not be used with shifting or tilting. 5 Optimal exposure will only be achieved if the lens is at maximum aperture and the lens is not shifted or tilted. 6 AF-S or AF-I lens required. 7 With maximum effective aperture of f/5.6 or faster. 8 When AF 80–200mm f/2.8, AF 35–70mm f/2.8, AF 28–85mm f/3.5–4.5 (New), or AF 28–85mm f/3.5–4.5 lenses are zoomed all the way in at the minimum focus distance, the in-focus indicator may be displayed when the image on the matte screen in the viewfinder is… -
Page 109: Other Accessories
• Filters intended for special-effects photography may interfere with autofocus or the electronic rangefinder. • The D3300 can not be used with linear polarizing filters. Use C-PL or C-PL II circular polarizing filters instead. • NC filters are recommended for protecting the lens.
-
Page 110
• Capture NX 2: A complete photo editing package offering such features as white balance adjustment and color control points. Note: Use the latest versions of Nikon software. Most Nikon Software software offers an auto update feature (Nikon Message Center 2) when the computer is connected to the Internet. -
Page 111
Body Cap BF-1B/Body Cap BF-1A: The body cap keeps the mirror, viewfinder screen, and image sensor free of dust when a Body cap lens is not in place. Accessory Accessory Shoe Cover BS-1: A cover protecting the accessory shoe. The accessory shoe is used for optional flash units. shoe covers •… -
Page 112
Microphones Stereo Microphone ME-1 The D3300 is equipped with an accessory terminal for WR-1 and WR-R10 wireless remote controllers (0 93), MC-DC2 remote cords, and Accessory terminal GP-1/GP-1A GPS units, which connect with the 4 mark on the accessories connector aligned with the 2 next to the accessory terminal (close the connector cover when the terminal is not in use). -
Page 113: Approved Memory Cards
Approved Memory Cards The following SD memory cards have been tested and approved for use in the D3300. Cards with class 6 or faster write speeds are recommended for movie recording. Recording may end unexpectedly when cards with slower write speeds are used.
-
Page 114: Caring For The Camera
Caring for the Camera Storage When the camera will not be used for an extended period, remove the battery and store it in a cool, dry area with the terminal cover in place. To prevent mold or mildew, store the camera in a dry, well-ventilated area.
-
Page 115: Caring For The Camera And Battery: Cautions
Caring for the Camera and Battery: Cautions Caring for the Camera Do not drop: The product may malfunction if subjected to strong shocks or vibration. Keep dry: This product is not waterproof, and may malfunction if immersed in water or exposed to high levels of humidity. Rusting of the internal mechanism can cause irreparable damage.
-
Page 116
Cleaning: When cleaning the camera body, use a blower to gently remove dust and lint, then wipe gently with a soft, dry cloth. After using the camera at the beach or seaside, wipe off any sand or salt using a cloth lightly dampened in pure water and then dry the camera thoroughly. -
Page 117
Servicing the Camera and Accessories The camera is a precision device and requires regular servicing. Nikon recommends that the camera be inspected by the original retailer or Nikon-authorized service representative once every one to two years, and that it be serviced once every three to five years (note that fees apply to these services). -
Page 118: Caring For The Battery
Caring for the Battery Batteries may leak or explode if improperly handled. Observe the following precautions when handling batteries: • Use only batteries approved for use in this equipment. • Do not expose the battery to flame or excessive heat. •…
-
Page 119
• A marked drop in the time a fully charged battery retains its charge when used at room temperature indicates that it requires replacement. Purchase a new EN-EL14a battery. • Charge the battery before use. When taking photographs on important occasions, ready a spare EN-EL14a battery and keep it fully charged. -
Page 120: Error Messages
Shutter release Turn camera off and recharge or replace disabled. Recharge (flashes) battery. battery. This battery cannot be used. Choose battery Use Nikon-approved battery. designated for use in (flashes) this camera.
-
Page 121
(flashes) position. position. • Use approved card. • Format card. If problem persists, card This memory card may be damaged. Contact Nikon- cannot be used. Card authorized service representative. may be damaged. (flashes) • Error creating new folder. Delete files Insert another card. -
Page 122
Indicator Monitor Viewfinder Solution • Use a lower ISO sensitivity. • Use commercial ND filter. • In mode: Subject is too bright S Increase shutter speed A Choose a smaller aperture (higher f-number) % Choose another shooting mode (flashes) • Use a higher ISO sensitivity. •… -
Page 123
(flashes) • Lens focal length is less than 18 mm: use a longer focal length. Release shutter. If error persists or Error. Press shutter appears frequently, consult Nikon- release button again. authorized service representative. Start-up error. Contact (flashes) a Nikon-authorized Consult Nikon-authorized service service representative. -
Page 124: Specifications
Type Type Single-lens reflex digital camera Lens mount Nikon F mount (with AF contacts) Effective angle of view Nikon DX format; focal length equivalent to approx. 1.5× that of lenses with FX format angle of view Effective pixels Effective pixels 24.2 million…
-
Page 125
Storage Picture Control System Standard, Neutral, Vivid, Monochrome, Portrait, Landscape; selected Picture Control can be modified Media SD (Secure Digital) and UHS-I compliant SDHC and SDXC memory cards DCF 2.0, DPOF, Exif 2.3, PictBridge File system Viewfinder Eye-level pentamirror single-lens reflex Viewfinder viewfinder Frame coverage… -
Page 126
Shutter Type Electronically-controlled vertical-travel focal- plane shutter – 30 s in steps of EV; Bulb; Time Speed 4000 Flash sync speed s; synchronizes with shutter at s or slower Release 8 (single frame), I (continuous), J (quiet Release mode shutter release), E (self-timer), » (delayed remote;… -
Page 127
12800; auto ISO sensitivity control available Exposure Index) On, off Active D-Lighting Focus Nikon Multi-CAM 1000 autofocus sensor module Autofocus with TTL phase detection, 11 focus points (including one cross-type sensor), and AF-assist illuminator (range approx. 0.5–3 m/1 ft 8 in.–9 ft 10 in.) -
Page 128
Focus Lens servo • Autofocus (AF): Single-servo AF (AF-S); continuous- servo AF (AF-C); auto AF-S/AF-C selection (AF-A); predictive focus tracking activated automatically according to subject status • Manual focus (MF): Electronic rangefinder can be used Focus point Can be selected from 11 focus points Single-point AF, dynamic-area AF, auto-area AF, AF-area mode 3D-tracking (11 points) -
Page 129
Accessory shoe ISO 518 hot-shoe with sync and data contacts and safety lock Advanced Wireless Lighting supported with Nikon Creative Lighting System (CLS) SB-910, SB-900, SB-800, or SB-700 as a master flash or SU-800 as commander; Flash Color Information Communication supported with all… -
Page 130
Movie Metering TTL exposure metering using main image sensor Metering method Matrix • 1920 × 1080, 60p (progressive)/50p/30p/25p/ Frame size (pixels) and 24p, ★ high/normal frame rate • 1280 × 720, 60p/50p, ★ high/normal • 640 × 424, 30p/25p, ★ high/normal Frame rates of 30p (actual frame rate 29.97 fps) and 60p (actual frame rate 59.94 fps) are available when NTSC is selected for video mode. -
Page 131
Interface Hi-Speed USB Video output NTSC, PAL Type C mini-pin HDMI connector HDMI output Wireless remote controllers: WR-1, WR-R10 (available Accessory terminal separately) Remote cords: MC-DC2 (available separately) GPS units: GP-1/GP-1A (available separately) Stereo mini-pin jack (3.5mm diameter); supports Audio input optional ME-1 stereo microphones Supported languages Supported languages… -
Page 132
• Nikon reserves the right to change the specifications of the hardware and software described in this manual at any time and without prior notice. Nikon will not be held liable for damages that may result from any mistakes that this manual may contain. -
Page 133
AC 100–240 V, 50/60 Hz, 0.2 A maximum Rated output DC 8.4 V/0.9 A Supported batteries Nikon Rechargeable Li-ion Battery EN-EL14a Charging time Approx. 1 hour and 50 minutes at an ambient temperature of 25 °C/77 °F when no charge remains Operating temperature 0 °C–40 °C (+32 °F–104 °F) -
Page 134: Fully Automatic
Nikon reserves the right to change the specifications of the hardware and software described in this manual at any time and without prior notice. Nikon will not be held liable for damages that may result from any mistakes that this manual may contain.
-
Page 135
The AF-S DX NIKKOR 18–55mm f/3.5–5.6G VR II The lens generally used in this manual for illustrative purposes is the AF-S DX NIKKOR 18–55mm f/3.5–5.6G VR II. Focal length mark Lens mounting mark Focal length scale (0 13) Retractable lens barrel CPU contacts button (0 14) Rear lens cap… -
Page 136
Interface are trademarks or registered trademarks of HDMI Licensing LLC. All other trade names mentioned in this manual or the other documentation provided with your Nikon product are trademarks or registered trademarks of their respective holders. FreeType License (FreeType2) Portions of this software are copyright © 2014 The FreeType Project (http://www.freetype.org). -
Page 137: Battery Life
• Photographs, single-frame release mode (CIPA standard Approximately 700 shots • Photographs, continuous release mode (Nikon standard Approximately 2500 shots • Movies: Approximately 55 minutes at 1080/60p and 1080/50p 1 Measured at 23 °C/73.4 °F (±3 °C/5.4 °F) with an AF-S DX NIKKOR 18–55mm f/3.5–5.6G VR II lens under the following test conditions: lens cycled from infinity to minimum range and one photograph taken at default settings once every 30 s;…
-
Page 138
• Using an Eye-Fi card • Using a WU-1a wireless mobile adapter • Using VR (vibration reduction) mode with VR lenses To ensure that you get the most from rechargeable Nikon EN-EL14a batteries: • Keep the battery contacts clean. Soiled contacts can reduce battery performance. -
Page 140
No reproduction in any form of this manual, in whole or in part (except for brief quotation in critical articles or reviews), may be made without written authorization from NIKON CORPORATION. Printed in Thailand 6MB20211-01…