
Варочная панель Novex NP 6403 S — инструкция пользователя по применению, эксплуатации и установке на русском языке. Мы надеемся, она поможет вам решить возникшие у вас вопросы при эксплуатации техники.
Вы можете скачать инструкцию к Novex NP 6403 S по ссылке ниже, если не хотите ждать загрузки. Если остались вопросы, задайте их в комментариях после инструкции.
«Загружаем инструкцию», означает, что нужно подождать пока файл загрузится и можно будет его читать онлайн. Некоторые инструкции очень большие и время их появления зависит от вашей скорости интернета.
Полезные видео
Характеристики
Остались вопросы?
Не нашли свой ответ в руководстве или возникли другие проблемы? Задайте свой вопрос в форме ниже с подробным описанием вашей ситуации, чтобы другие люди и специалисты смогли дать на него ответ. Если вы знаете как решить проблему другого человека, пожалуйста, подскажите ему


Часто задаваемые вопросы

Как посмотреть инструкцию к Novex NP 6403 S?
Необходимо подождать полной загрузки инструкции в сером окне на данной странице или скачать кликнув по специальной кнопке.
Руководство на русском языке?
Все наши руководства представлены на русском языке или схематично, поэтому вы без труда сможете разобраться с вашей моделью
Как можно распечатать инструкцию?
Скачайте ее по специальной кнопке над формой чтения на ваше устройства и отправьте на печать.
BUILT-IN
COOKTOP
USER MANUAL
GB
RU
H10-20-260-149 Rev 005
Electric
РУКОВОДСТВО ПОЛЬЗОВАТЕЛЯ
Электрическая варочная
поверхность
BUILT-IN
COOKTOP
USER MANUAL
GB
RU
H10-20-260-149 Rev 005
Electric
РУКОВОДСТВО ПОЛЬЗОВАТЕЛЯ
Электрическая варочная
поверхность

2
Dear User,
Our objective is to make this product provide you with the best output
which is manufactured in our modern facilities in a careful working
environment, in compliance with total quality concept.
Therefore, we suggest you to read the user manual carefully before using
the product and, keep it permanently at your disposal.
Note: This user manual is prepared for more than one model. Some of
the features specied in the Manual may not be available in your appliance.
All our appliances are only for domestic use, not for commercial use.
Products marked with (*) are optional.
“Conforms with the WEEE Regulations.”
GB

3
Contens
Important warnings
4
Methods for protecting ceramic glass cooking surface 10
Electrical connection
12
Introduction of the appliance
13
Technical features 14
Installation of cooktop 15
Counter cutting sizes 18
Control panel
19
Usage of your cooktop
20
Maintenance and cleaning 21
Troubles and solution proposals 22
Handling rules 22
Environmentally-friendly disposal
23
Package information
23

4
IMPORTANT WARNINGS
1. Installation and repair should always be performed
by “AUTHORIZED SERVICE”. Manufacturer shall not be
held responsible for operations performed by unauthorized
persons.
2. Please read this operating instructions carefully.
Only by this way you can use the appliance safely and
in a correct manner.
3. The cooker should be used according to operating
instructions.
4. Keep children below the age of 8 and pets away
when operating.
5. WARNING: Fire hazard; do not store the materials on
the cooking surface.
6. WARNING: The appliance and its accessible parts are
hot during operation.
7. Setting conditions of this device are specied on
the label. (Or on the data plate)
8. The accessible parts may be hot when the grill is
used. Small children should be kept away.
9. WARNING: This appliance is intended for cooking. It
should not be used for other purposes like heating a room.
10. To clean the appliance, do not use steam cleaners.
11. NEVER try to put out the re with water. Only shut
down the device circuit and then cover the ame with
a cover or a re blanket.
GB

5
12. Children under 8 years of age should be kept away,
if they cannot be monitored continuously.
13. Touching the heating elements should be avoided.
14. CAUTION: Cooking process shall be supervised.
Cooking process shall always be supervised.
15. The appliance is not suitable for use with an external
timer or a separate remote control system.
16. This device can be used by children over 8 years of
age, people with physical, hearing or mental challenges
or people with lack of experience or knowledge; as long
as control is ensured or information is provided regarding
the dangers.
17. This device has been designed for household use
only.
18. Children must not play with the appliance. Cleaning
or user maintenance of the appliance shall not be
performed by children unless they are older than 8
years and supervised by adults.
19. Keep the appliance and its power cord away from
children less than 8 years old.
20. Put curtains, tulles, paper or any flammable
(ignitable) material away from the appliance before
starting to use the appliance. Do not put ignitable or
ammable materials on or in the appliance.
21. Keep the ventilation channels open.
22. Do not heat closed cans and glass jars. The pressure
may lead jars to explode.

6
23. Do not use the product in states like medicated
and/or under inuence of alcohol which may affect your
ability of judgement.
24. After each use, check if the unit is turned off.
25. Be careful when using alcohol in your foods. Alcohol
will evaporate at high temperatures and may catch re
to cause a re if it comes in contact with hot surfaces.
26. If the appliance is faulty or has a visible damage,
do not operate the appliance.
27. Do not put objects that children may reach on the
appliance.
28. The packaging materials are dangerous for children.
Keep packaging materials away from the reach of
children.
29. Cooker supply can be disconnected during any
construction work at home. After completing the work,
re-connecting the cooker shall be done by authorized
service.
30. Do not place metal utensils such as knife, fork,
spoon on the surface of the appliance, since they will
get hot.
31. To prevent overheating, the appliance should not
be installed behind of a decorative cover.
32. Turn off the appliance before removing the
safeguards. After cleaning, install the safeguards
according to instructions.
GB

7
33. Cable xing point shall be protected.
34. CAUTION: If the glass of the stove is broken, turn
off any heating element immediately and disconnect the
appliance from power source, do not touch the surface of
the appliance and do not use the appliance.
35. User should not handle the cooker by himself.
36. When not turning of the cooker during cooking,
user can touch hot surfaces causing burns.
37. If heavier loads are places on the cooker, these
loads can trip over. It may cause personal injuries.
38. Allow disconnection of the appliance after
installation, by accessible plug or a switch in the xed
wiring, unless.

8
Electrical Safety
1. Plug the appliance in a grounded socket protected by
a fuse conforming to the values specied in the technical
specications chart.
2. Have an authorized electrician set grounding
equipment. Our company shall not be responsible for
the damages that shall be incurred due to using the
product without grounding according to local regulations.
3. WARNING: If the surface is cracked, turn off the
appliance to avoid risk of electric shock.
4. Never wash the appliance by spraying or pouring
water on it. There is a risk of electrocution.
5. Do not touch the plug with wet hands. Do not pull
the cord to plug off, always hold the plug.
6. Unplug the unit during installation, maintenance,
cleaning and repair.
7. Make sure the plug is inserted rmly into wall socket
to avoid sparks.
8. If the power supply cord (the cord with plug) is
damaged, this cord shall be replaced by the manufacturer
or its service agent or an equally qualied personnel to
prevent a hazardous situation.
9. Do not use cut or damaged cords or extension cords
other than the original cord.
10. Do not use steam cleaners for cleaning the appliance,
otherwise electric shock may occur.
GB

9
11. Make sure there is no liquid or humidity in the
outlet where the product plug is installed.
12. An omnipolar switch capable to disconnect power
supply is required for installation. Disconnection from
power supply shall be provided with a switch or an
integrated fuse installed on xed power supply according
to building code.
13. The power supply cord (the cord with plug) shall
not contact the hot parts of the appliance.
14. Unplug the unit during installation, maintenance,
cleaning and repair.
15. Appliance is equipped with a type ‘’Y’’ cord cable.
16. The circuit breaker switches of the cooker shall
be placed so that end user can reach them when the
cooker is installed.
17. Fixed connections shall be connected to a
power supply enabling omnipolar disconnection.
For appliances with over voltage category below III,
disconnection device shall be connected to xed power
supply according to wiring code.
18. Do not remove ignition switches from the appliance.
Otherwise, live electric cables can be accessed. It may
cause an electric shock.

10
Methods for Protecting Ceramic Glass Cooking Surface
Ceramic glass surface is unbreakable and scratch
resistant to a certain degree. However, to avoid any
damage, please do the following:
1. Never pour cold water on hot cookers.
2. Do not stand on a ceramic glass plate.
3. Sudden pressure, for example, the effect of a falling
salt shaker may be critical. So, do not place such objects
on a place above the hobs.
4. After each use, make sure that the base of the cooking
pot and surfaces of cooking zones are clean and dry.
5. Do not peel vegetables on the hob surfaces. Sand
grains falling from the vegetables may scratch the
ceramic glass plate.
6. Do not lay ammable materials such as cardboard
or plastic on the oven. Objects such as tin, zinc, or
aluminium (as well as aluminium foils or empty coffee
pots) may melt on hot cooking surfaces and thus cause
damage.
7. Take care not to let sugary foods or fruit juices contact
the hot cooking zones. The ceramic glass surface may
be stained by these.
GB

11
Intended Use
1. This product is designed for home use. Commercial
use of the appliance is not permitted.
2. This appliance may only be used for cooking
purposes. It shall not be used for other purposes like
heating a room.
3. The manufacturer assumes no responsibility for any
damage due to misuse or mishandling.
4. Operational life of the product you have purchased
is 10 years. This is the period for which the spare parts
required for the operation of this product as dened is
provided by the manufacturer.
12
Electrical Connection
1. Setting conditions of this appliance is indicated in tag or data plate.
2. Your appliance should be plugged in a fuse appropriate for electric
power. If necessary, it is recommended that installation is done by
authorized service.
3. Your appliance is congured in accordance with electrical supply of
220-240 V AC / 380-415 V 3N AC 50/60 Hz.
4. If main electrical network is different from these values, contact with
your authorized service.
5. Electrical connections of your appliance should only be made to the
fuses having suitably wired grounding (grounded) system. If no convenient
fuse is available in the place where your appliance is to be installed,
contact with authorized service immediately. Manufacturing rm is not
responsible denitely for the damages that fuses whose grounding is not
made and connected to the appliance can cause.
6. Plug of the appliance should be close to be accessed easily to the
fuse whose grounding is made without use of extension cord.
7. Do not allow contacting the power cable of your appliance with hot
regions. Similarly, keep away it from sharp edges and corners.
8. If feeder cord is damaged, this cord should be replaced either by
manufacturer or its service agency or same degree qualied personnel in
order to hinder a dangerous situation.
9. Wrong electrical connection may give damage to the appliance.In
this case, your appliance will remain out of guarantee scope. Electrical
connection of your appliance should be done by authorized service.
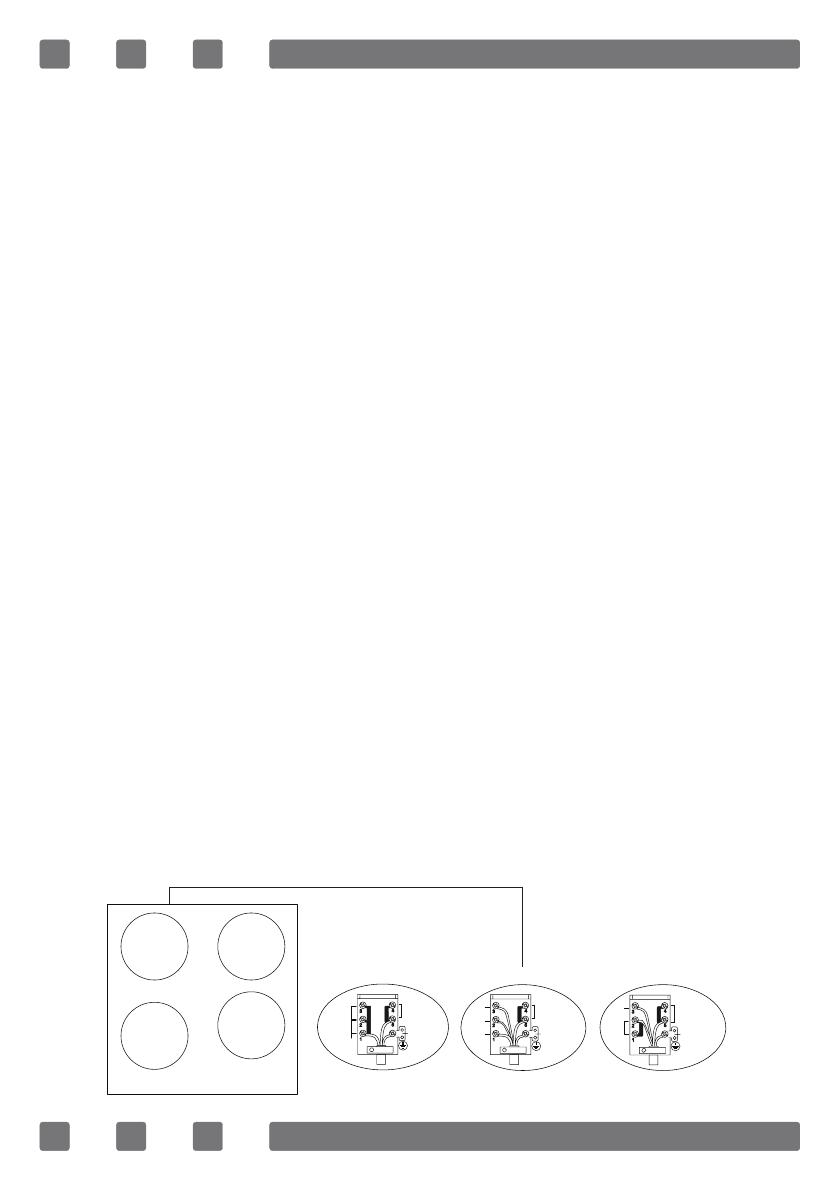
Electrical connection scheme
Get electrical connection of your appliance done to authorized person in
line with the following scheme.
H05 VV-F 4G 1,5 mm²
380-415 V 2N~50/60Hz
Earth
Terre
Erdung
Neutral
Neutre
L2
L1
H05 VV-F 5G 1,5 mm²
380-415 V 3N~50/60Hz
Earth
Terre
Erdung
Neutral
Neutre
L3
L2
L1
H05 VV-F 3G 4 mm²
220-240V~50/60Hz
Live
Phase
Neutral
Neutre
Earth
Terre
Erdung
220-240V~50/60H
GB
13
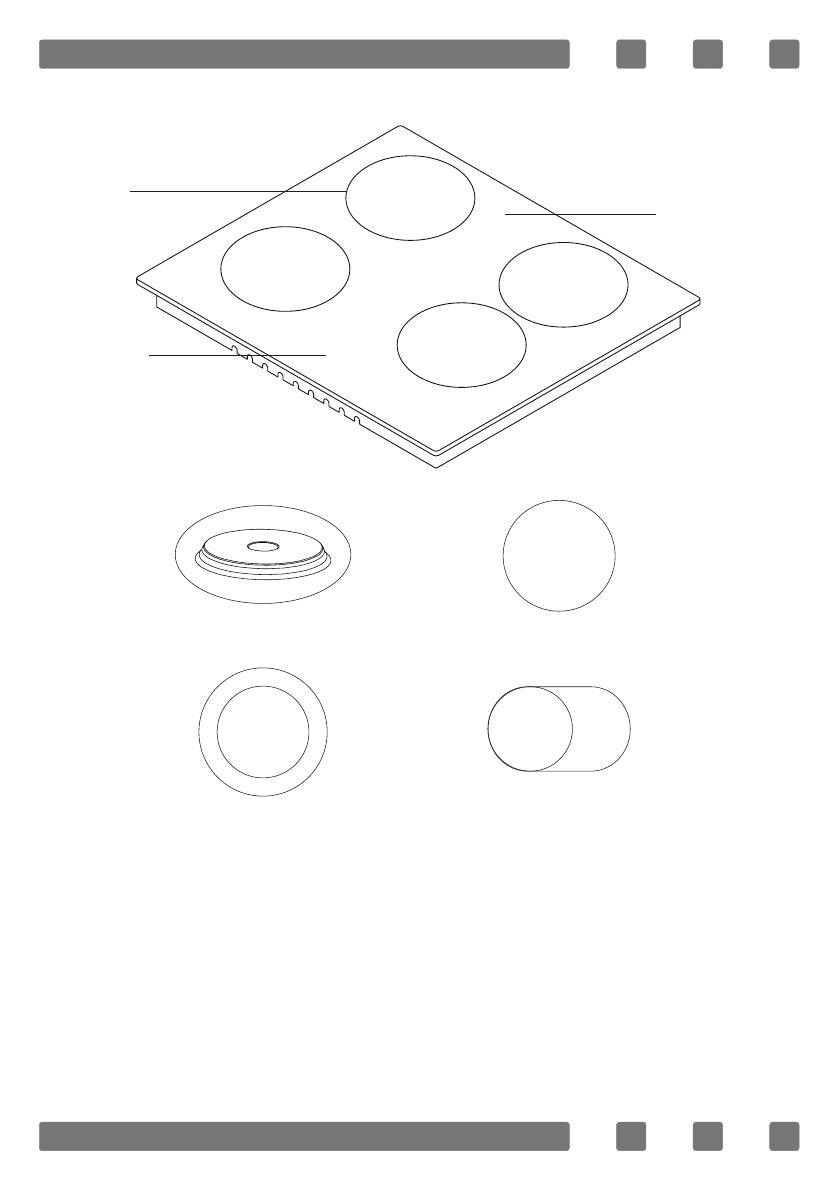
INTRODUCTION OF THE APPLIANCE
1. Heater positions
2. Glass or metal surface
3. Control switches
4. Hotplate (145 mm or 180 mm) *
5. Ceramic heater (180 mm or 140 mm) *
6. Double ceramic heater (120 mm / 180 mm or 220 mm / 300 mm) *
7. Ovaldual ceramic heater (140 mm / 250 mm) *
4
7
6
5
1
2
3
14
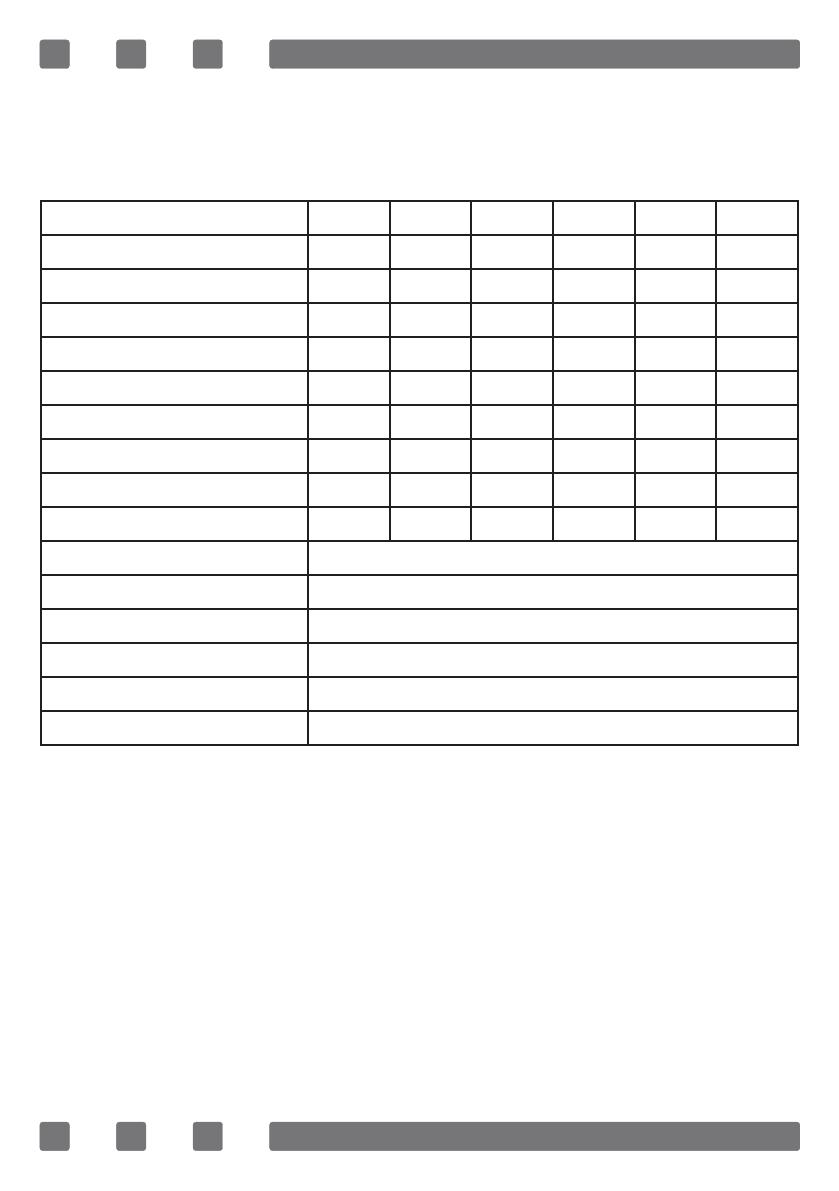
Technical features
You can operate electric cooktops by turning the button on control panel
you want to use to the level you desire. Cooktop powers as per levels are
given in the following table.
Specications Level 1 Level 2 Level 3 Level 4 Level 5 Level 6
80 mm hotplate 200 W 250 W 450 W — — —
145 mm hotplate 250 W 750 W 1000 W — — —
180 mm hotplate 500 W 750 W 1500 W — — —
145 mm rapid hotplate 500 W 1000 W 1500 W — — —
180 mm rapid hotplate 850 W 1150 W 2000 W — — —
145 mm hotplate 95 W 155 W 250 W 400 W 750 W 1000 W
180 mm hotplate 115 W 175 W 250 W 600 W 850 W 1500 W
145 mm rapid hotplate 135 W 165 W 250 W 500 W 750 W 1500 W
180 mm rapid hotplate 175 W 220 W 300 W 850 W 1150 W 2000 W
180 mm ceramic heater 1800 W
140 mm ceramic heater 1200 W
140 / 250 mm ceramic heater 1800 W
120 / 180 mm ceramic heater 1700 W
220 / 300 mm ceramic heater 2400 W
Supply voltage 220-240 V AC / 380-415 V 3N AC 50/60 Hz.
WARNING: For the modication to be done by authorized service, this
table should be considered. Manufacturer may not be held responsible for
any problems rising because of any faulty modication.
WARNING: In order to increase the product quality, the technical
specications may be changed without prior notice.
WARNING: The values provided with the appliance or its accompanying
documents are laboratory readings in accordance with the respective
standards. These values may differ depending on the use and ambient
conditions.
GB
15
INSTALLATION OF COOKTOP
Check if the electrical installation is proper to bring the appliance in
operating condition. If electricity installation is not suitable, call an
electrician and plumber to arrange the utilities as necessary. Manufacturer
shall not be held responsible for damages caused by operations performed
by unauthorized persons.
WARNING: It is customer’s responsibility to prepare the location the
product shall be placed on and also to have the electrical installation
prepared.
WARNING: The rules in local standards about electrical installations
shall be followed during product installation.
WARNING: Check for any damage on the appliance before installing it.
Do not have the product installed if it is damaged. Damaged products
cause a risk for your safety.
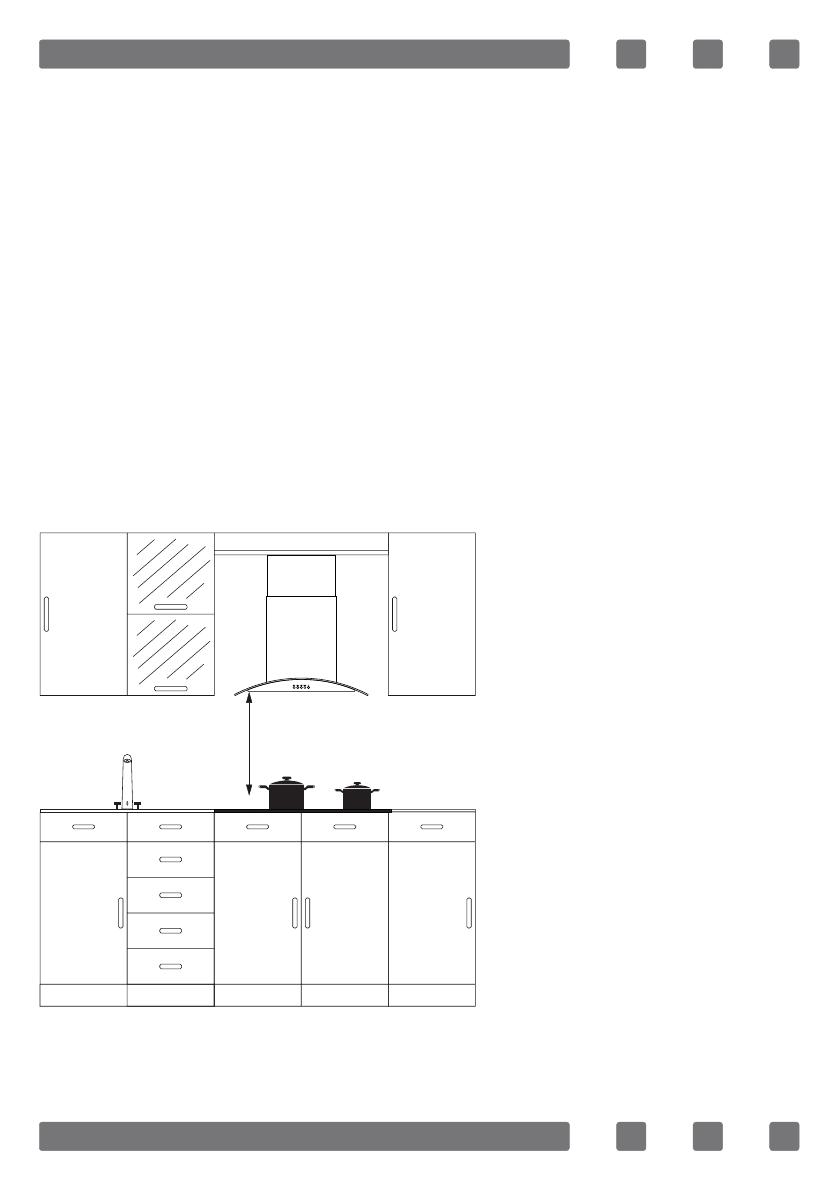
Correct Place For Installation
Product is designed in
accordance with the
kitchen counters supplied
from market. A safe
distance should be left
between the product and
kitchen walls and furniture.
If hood/aspirator will be
installed over your appliance,
obey to the recommendation
of hood / aspirator
manufacturer for assembly
height. (min. 65 cm)
The gap that cooktop is to
be placed on the counter
should be cut in line with
cooktop installation dimen—
sions.
For installation of the product, the rules specied in local standards
related to electricity should be complied.
650 mm min.
16
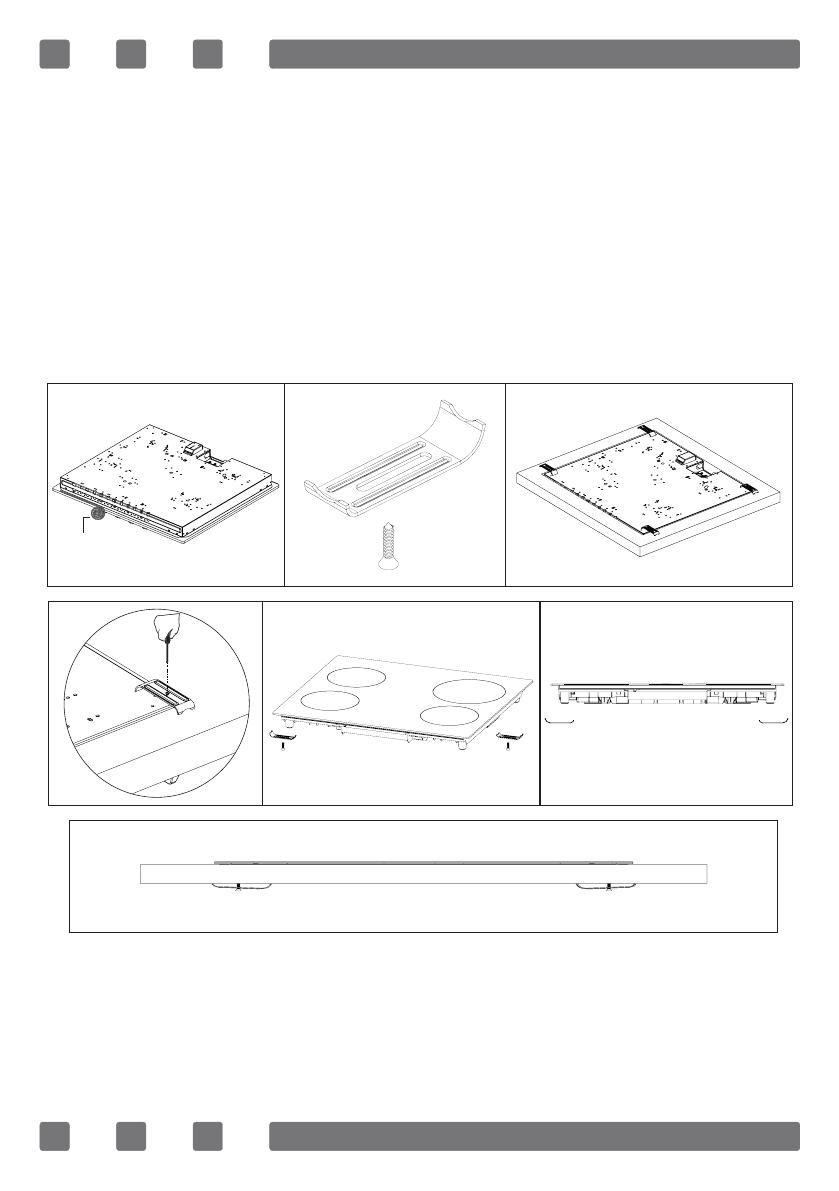
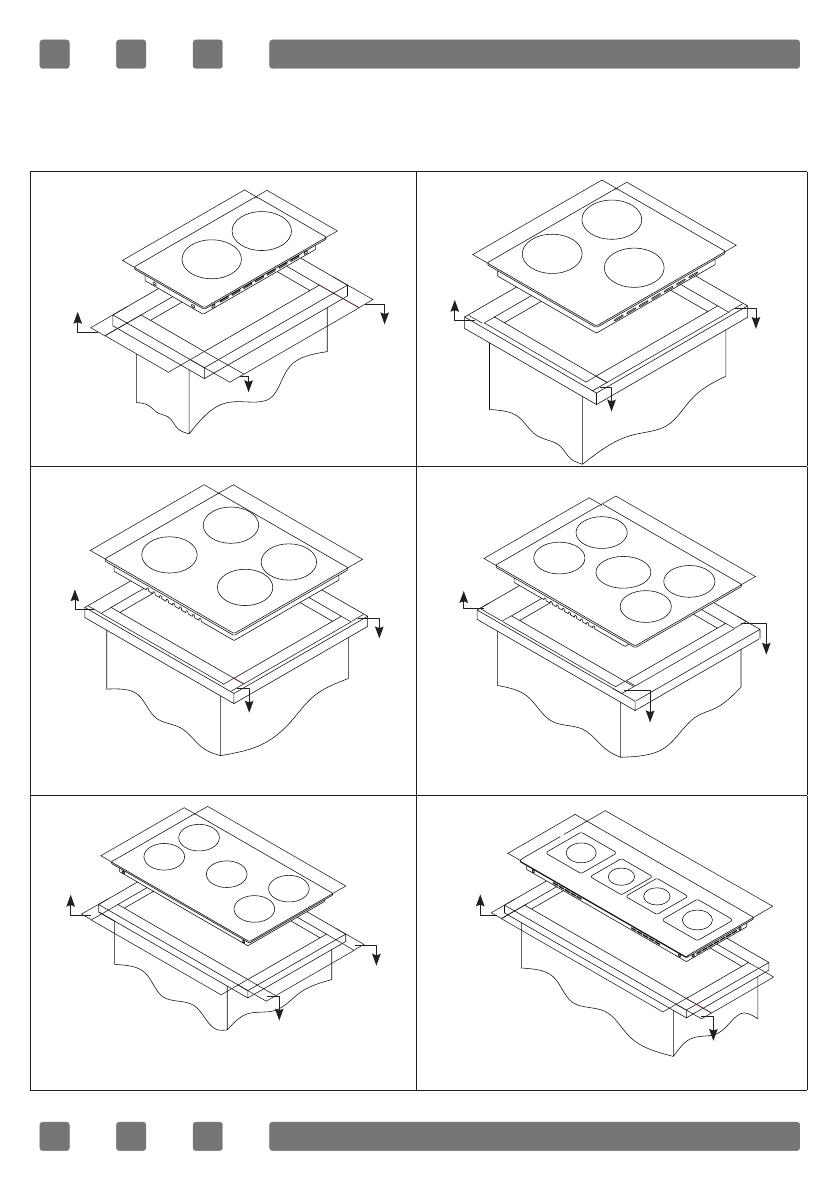
Installation
1. Turn the cooktop down and place on smooth ground.
2. In order to prevent entrance of foreign substances and liquids
between cooktop and counter, apply the paste given in package to the
sides of lower guard of counter. For corners, curl paste and increase curls
till lling corner gaps.
3. Turn cooktop again and align with and place on counter.
4. Fasten up your cooktop on counter by using the clamp and screws
supplied.
Installation Diagram
Wick
GB
17
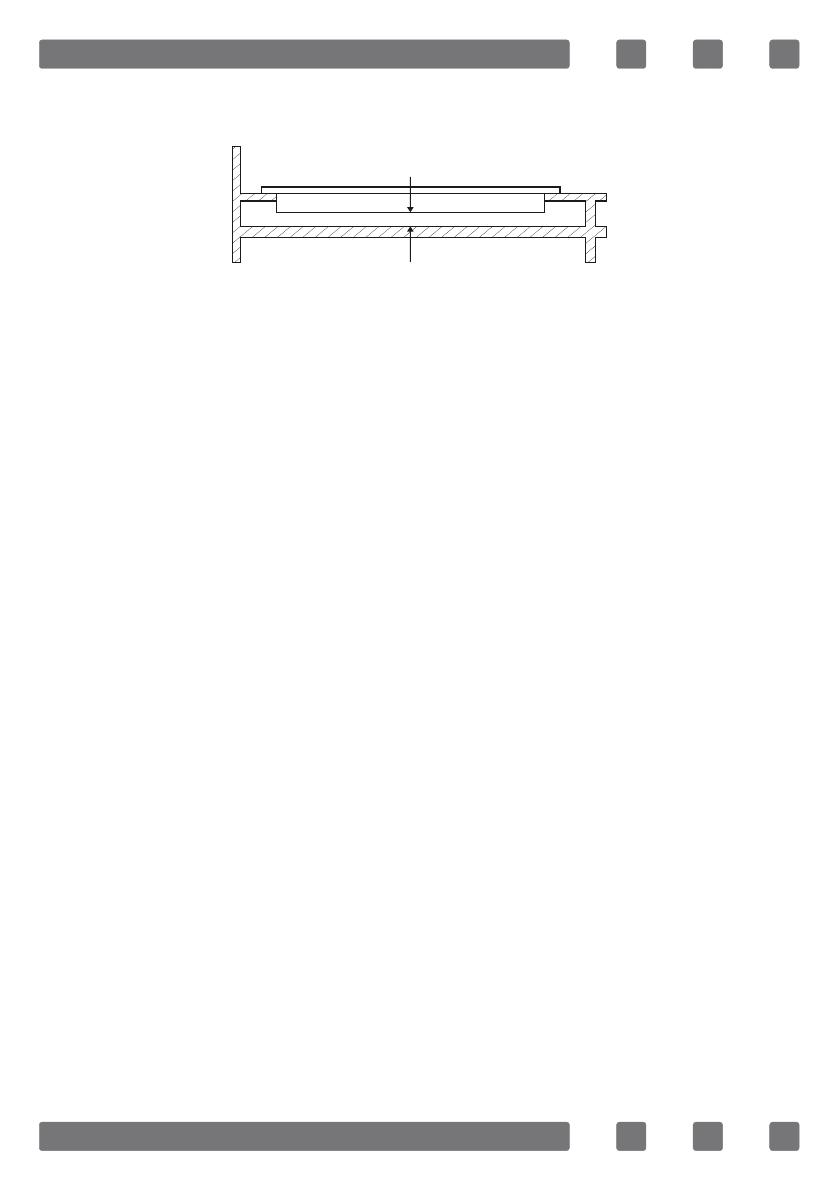
5. When product is mounted on a drawer, if it is possible to touch lower
side of product, this section should be separated with a wooden shelf.
6. While mounting cooktop on a closet, as shown in the gure above, in
order to separate between closet and cooktop, a shelf should be mounted.
If it is mounted on a built-in oven, there is no need to do that.
7. If your cooktop will be mounted next to right or left wall, the minimum
distance between wall and cooktop should be 50 mm.
min. 30 mm
18
Counter Cut-Off Dimensions
Pay attention to the drawings and dimensions given below while making
cooktop installation and adjusting counter cutting sizes.
Cooktop Of 30 cm
300 mm
520 mm
490 mm
270 mm
min. 60 mm
min. 60 mm
min. 60 mm
Cooktop Of 45 cm
520 mm
490 mm
440 mm
410 mm
min. 60 mm
min. 60 mm
min. 60 mm
Cooktop Of 60 cm
520 mm
490 mm
590 mm
560 mm
min. 60 mm
min. 60 mm
min. 60 mm
Cooktop Of 90 cm
520 mm
490 mm
860 mm
810 mm
min. 60 mm
min. 60 mm
min. 60 mm
Cooktop Of 100 cm
400 mm
370 mm
990 mm
960 mm
min. 60 mm
min. 60 mm
Cooktop Of 70 cm
690 mm
520 mm
560 mm
490 mm
min. 110 mm
min. 60 mm
min. 60 mm
GB
19
CONTROL PANEL
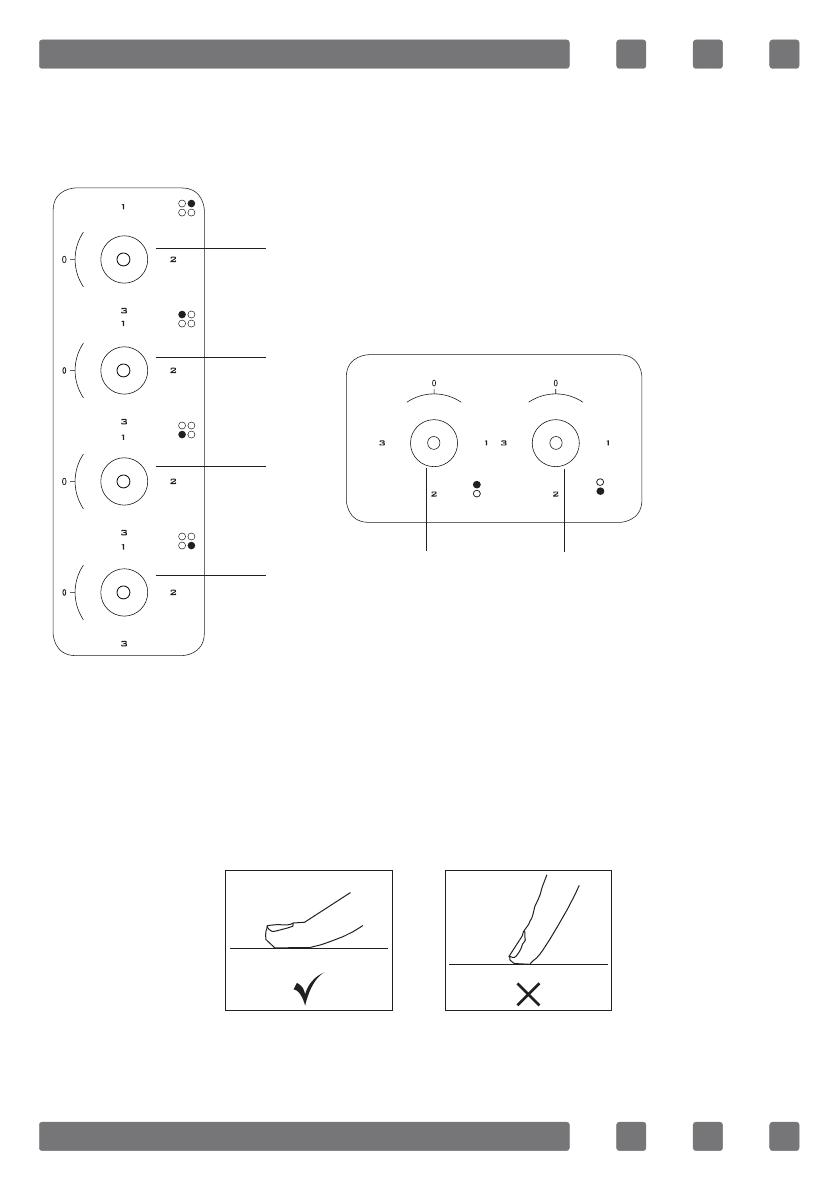
Elecrical Heater (hotplate) Cooktop Panel Visual
Cooktop Panel Visual Of 60 cm
WARNING: The control panel above is only for illustration purposes.
Consider the control panel on your device.
Warnings About Using The Touchmatic Control
1. The controls react to touching, so you do not need to apply any
pressure to the controls.
2. Use the bottom, not the tip of your nger while using the device.
3. Make sure that the touch controls are always clean and dry. Even a
thin layer of water may make it difcult for touch controls to work.
1. 180 mm electrical heater (hotplate)
2. 145 mm electrical heater (hotplate)
3. 180 mm electrical heater(hotplate)
4. 145 mm electrical heater (hotplate)
Cooktop Panel Visual Of 30 cm
1. 180 mm electrical heater (hotplate)
2. 145 mm electrical heater (hotplate)
1
2
1
2
3
4
Correct
Wrong
Инструкцию для Novex NP 6403 S на русском языке, в формате pdf можно скачать с нашего сайта. Наш каталог предоставляем Вам инструкцию производителя фирмы Novex, которая была взята из открытых источников. Ознакомившись с руководством по эксплуатации от Novex, Вы на все 100% и правильно сможете воспользоваться всеми функциями устройства.
Для сохранения инструкции «Встраиваемая электрическая панель Novex NP 6403 S» на русском языке на вашем компьютере либо телефоне, нажмите кнопку «Скачать инструкцию». Если активна кнопка «Инструкция онлайн», то Вы можете просмотреть документ (manual), в своём браузере онлайн.
Если у Вас нет возможности скачать инструкцию по эксплуатации либо просмотреть её, Вы можете поделиться ссылкой на эту страницу в социальных сетях и при удобном моменте скачать инструкцию. Либо добавьте эту страницу в закладки Вашего браузера, нажав кнопку «Добавить страницу в закладки браузера».

BUILT-IN
COOKTOP
Electric
H10-20-260-149 Rev 005
Электрическая варочная
поверхность
USER MANUAL GB
РУКОВОДСТВО ПОЛЬЗОВАТЕЛЯ RU
BUILT-IN
COOKTOP
Electric
H10-20-260-149 Rev 005
Электрическая варочная
поверхность
USER MANUAL GB
РУКОВОДСТВО ПОЛЬЗОВАТЕЛЯ RU
GB
Dear User,
Our objective is to make this product provide you with the best output
which is manufactured in our modern facilities in a careful working
environment, in compliance with total quality concept.
Therefore, we suggest you to read the user manual carefully before using
the product and, keep it permanently at your disposal.
Note: This user manual is prepared for more than one model. Some of
the features specified in the Manual may not be available in your appliance.
All our appliances are only for domestic use, not for commercial use.
Products marked with (*) are optional.
“Conforms with the WEEE Regulations.”
2
Contens
Important warnings
Methods for protecting ceramic glass cooking surface
Electrical connection
Introduction of the appliance
Technical features
Installation of cooktop
Counter cutting sizes
Control panel
Usage of your cooktop
Maintenance and cleaning
Troubles and solution proposals
Handling rules
Environmentally-friendly disposal
Package information
3
4
10
12
13
14
15
18
19
20
21
22
22
23
23
GB
IMPORTANT WARNINGS
1. Installation and repair should always be performed
by “AUTHORIZED SERVICE”. Manufacturer shall not be
held responsible for operations performed by unauthorized
persons.
2. Please read this operating instructions carefully.
Only by this way you can use the appliance safely and
in a correct manner.
3. The cooker should be used according to operating
instructions.
4. Keep children below the age of 8 and pets away
when operating.
5. WARNING: Fire hazard; do not store the materials on
the cooking surface.
6. WARNING: The appliance and its accessible parts are
hot during operation.
7. Setting conditions of this device are specified on
the label. (Or on the data plate)
8. The accessible parts may be hot when the grill is
used. Small children should be kept away.
9. WARNING: This appliance is intended for cooking. It
should not be used for other purposes like heating a room.
10. To clean the appliance, do not use steam cleaners.
11. NEVER try to put out the fire with water. Only shut
down the device circuit and then cover the flame with
a cover or a fire blanket.
4
12. Children under 8 years of age should be kept away,
if they cannot be monitored continuously.
13. Touching the heating elements should be avoided.
14. CAUTION: Cooking process shall be supervised.
Cooking process shall always be supervised.
15. The appliance is not suitable for use with an external
timer or a separate remote control system.
16. This device can be used by children over 8 years of
age, people with physical, hearing or mental challenges
or people with lack of experience or knowledge; as long
as control is ensured or information is provided regarding
the dangers.
17. This device has been designed for household use
only.
18. Children must not play with the appliance. Cleaning
or user maintenance of the appliance shall not be
performed by children unless they are older than 8
years and supervised by adults.
19. Keep the appliance and its power cord away from
children less than 8 years old.
20. Put curtains, tulles, paper or any flammable
(ignitable) material away from the appliance before
starting to use the appliance. Do not put ignitable or
flammable materials on or in the appliance.
21. Keep the ventilation channels open.
22. Do not heat closed cans and glass jars. The pressure
may lead jars to explode.
5
GB
23. Do not use the product in states like medicated
and/or under influence of alcohol which may affect your
ability of judgement.
24. After each use, check if the unit is turned off.
25. Be careful when using alcohol in your foods. Alcohol
will evaporate at high temperatures and may catch fire
to cause a fire if it comes in contact with hot surfaces.
26. If the appliance is faulty or has a visible damage,
do not operate the appliance.
27. Do not put objects that children may reach on the
appliance.
28. The packaging materials are dangerous for children.
Keep packaging materials away from the reach of
children.
29. Cooker supply can be disconnected during any
construction work at home. After completing the work,
re-connecting the cooker shall be done by authorized
service.
30. Do not place metal utensils such as knife, fork,
spoon on the surface of the appliance, since they will
get hot.
31. To prevent overheating, the appliance should not
be installed behind of a decorative cover.
32. Turn off the appliance before removing the
safeguards. After cleaning, install the safeguards
according to instructions.
6
33. Cable fixing point shall be protected.
34. CAUTION: If the glass of the stove is broken, turn
off any heating element immediately and disconnect the
appliance from power source, do not touch the surface of
the appliance and do not use the appliance.
35. User should not handle the cooker by himself.
36. When not turning of the cooker during cooking,
user can touch hot surfaces causing burns.
37. If heavier loads are places on the cooker, these
loads can trip over. It may cause personal injuries.
38. Allow disconnection of the appliance after
installation, by accessible plug or a switch in the fixed
wiring, unless.
7
GB
Electrical Safety
1. Plug the appliance in a grounded socket protected by
a fuse conforming to the values specified in the technical
specifications chart.
2. Have an authorized electrician set grounding
equipment. Our company shall not be responsible for
the damages that shall be incurred due to using the
product without grounding according to local regulations.
3. WARNING: If the surface is cracked, turn off the
appliance to avoid risk of electric shock.
4. Never wash the appliance by spraying or pouring
water on it. There is a risk of electrocution.
5. Do not touch the plug with wet hands. Do not pull
the cord to plug off, always hold the plug.
6. Unplug the unit during installation, maintenance,
cleaning and repair.
7. Make sure the plug is inserted firmly into wall socket
to avoid sparks.
8. If the power supply cord (the cord with plug) is
damaged, this cord shall be replaced by the manufacturer
or its service agent or an equally qualified personnel to
prevent a hazardous situation.
9. Do not use cut or damaged cords or extension cords
other than the original cord.
10. Do not use steam cleaners for cleaning the appliance,
otherwise electric shock may occur.
8
11. Make sure there is no liquid or humidity in the
outlet where the product plug is installed.
12. An omnipolar switch capable to disconnect power
supply is required for installation. Disconnection from
power supply shall be provided with a switch or an
integrated fuse installed on fixed power supply according
to building code.
13. The power supply cord (the cord with plug) shall
not contact the hot parts of the appliance.
14. Unplug the unit during installation, maintenance,
cleaning and repair.
15. Appliance is equipped with a type ‘’Y’’ cord cable.
16. The circuit breaker switches of the cooker shall
be placed so that end user can reach them when the
cooker is installed.
17. Fixed connections shall be connected to a
power supply enabling omnipolar disconnection.
For appliances with over voltage category below III,
disconnection device shall be connected to fixed power
supply according to wiring code.
18. Do not remove ignition switches from the appliance.
Otherwise, live electric cables can be accessed. It may
cause an electric shock.
9
GB
Methods for Protecting Ceramic Glass Cooking Surface
Ceramic glass surface is unbreakable and scratch
resistant to a certain degree. However, to avoid any
damage, please do the following:
1. Never pour cold water on hot cookers.
2. Do not stand on a ceramic glass plate.
3. Sudden pressure, for example, the effect of a falling
salt shaker may be critical. So, do not place such objects
on a place above the hobs.
4. After each use, make sure that the base of the cooking
pot and surfaces of cooking zones are clean and dry.
5. Do not peel vegetables on the hob surfaces. Sand
grains falling from the vegetables may scratch the
ceramic glass plate.
6. Do not lay flammable materials such as cardboard
or plastic on the oven. Objects such as tin, zinc, or
aluminium (as well as aluminium foils or empty coffee
pots) may melt on hot cooking surfaces and thus cause
damage.
7. Take care not to let sugary foods or fruit juices contact
the hot cooking zones. The ceramic glass surface may
be stained by these.
10
Intended Use
1. This product is designed for home use. Commercial
use of the appliance is not permitted.
2. This appliance may only be used for cooking
purposes. It shall not be used for other purposes like
heating a room.
3. The manufacturer assumes no responsibility for any
damage due to misuse or mishandling.
4. Operational life of the product you have purchased
is 10 years. This is the period for which the spare parts
required for the operation of this product as defined is
provided by the manufacturer.
11
GB
Electrical Connection
1. Setting conditions of this appliance is indicated in tag or data plate.
2. Your appliance should be plugged in a fuse appropriate for electric
power. If necessary, it is recommended that installation is done by
authorized service.
3. Your appliance is configured in accordance with electrical supply of
220-240 V AC / 380-415 V 3N AC 50/60 Hz.
4. If main electrical network is different from these values, contact with
your authorized service.
5. Electrical connections of your appliance should only be made to the
fuses having suitably wired grounding (grounded) system. If no convenient
fuse is available in the place where your appliance is to be installed,
contact with authorized service immediately. Manufacturing firm is not
responsible definitely for the damages that fuses whose grounding is not
made and connected to the appliance can cause.
6. Plug of the appliance should be close to be accessed easily to the
fuse whose grounding is made without use of extension cord.
7. Do not allow contacting the power cable of your appliance with hot
regions. Similarly, keep away it from sharp edges and corners.
8. If feeder cord is damaged, this cord should be replaced either by
manufacturer or its service agency or same degree qualified personnel in
order to hinder a dangerous situation.
9. Wrong electrical connection may give damage to the appliance.In
this case, your appliance will remain out of guarantee scope. Electrical
connection of your appliance should be done by authorized service.
Electrical connection scheme
Get electrical connection of your appliance done to authorized person in
line with the following scheme.
220-240V~50/60H
Live
Phase
220-240V~50/60Hz
Neutral
Neutre
Earth
Terre
Erdung
H05 VV-F 3G 4 mm²
12
380-415 V 3N~50/60Hz 380-415 V 2N~50/60Hz
L3
L2
L1
Neutral
Neutre
Earth
Terre
Erdung
H05 VV-F 5G 1,5 mm²
L2
L1
Neutral
Neutre
Earth
Terre
Erdung
H05 VV-F 4G 1,5 mm²
INTRODUCTION OF THE APPLIANCE
1
2
3
4
5
7
6
1.
2.
3.
4.
5.
6.
7.
Heater positions
Glass or metal surface
Control switches
Hotplate (145 mm or 180 mm) *
Ceramic heater (180 mm or 140 mm) *
Double ceramic heater (120 mm / 180 mm or 220 mm / 300 mm) *
Ovaldual ceramic heater (140 mm / 250 mm) *
13
GB
Technical features
You can operate electric cooktops by turning the button on control panel
you want to use to the level you desire. Cooktop powers as per levels are
given in the following table.
Specifications
Level 1
Level 2
Level 3
Level 4
Level 5
Level 6
80 mm hotplate
200 W
250 W
450 W
---
---
---
145 mm hotplate
250 W
750 W
1000 W
---
---
---
180 mm hotplate
500 W
750 W
1500 W
---
---
---
145 mm rapid hotplate
500 W
1000 W 1500 W
---
---
---
180 mm rapid hotplate
850 W
1150 W 2000 W
---
---
---
145 mm hotplate
95 W
155 W
250 W
400 W
750 W
1000 W
180 mm hotplate
115 W
175 W
250 W
600 W
850 W
1500 W
145 mm rapid hotplate
135 W
165 W
250 W
500 W
750 W
1500 W
180 mm rapid hotplate
175 W
220 W
300 W
850 W
180 mm ceramic heater
1800 W
140 mm ceramic heater
1200 W
140 / 250 mm ceramic heater
1800 W
120 / 180 mm ceramic heater
1700 W
220 / 300 mm ceramic heater
2400 W
Supply voltage
1150 W 2000 W
220-240 V AC / 380-415 V 3N AC 50/60 Hz.
WARNING: For the modification to be done by authorized service, this
table should be considered. Manufacturer may not be held responsible for
any problems rising because of any faulty modification.
WARNING: In order to increase the product quality, the technical
specifications may be changed without prior notice.
WARNING: The values provided with the appliance or its accompanying
documents are laboratory readings in accordance with the respective
standards. These values may differ depending on the use and ambient
conditions.
14
INSTALLATION OF COOKTOP
Check if the electrical installation is proper to bring the appliance in
operating condition. If electricity installation is not suitable, call an
electrician and plumber to arrange the utilities as necessary. Manufacturer
shall not be held responsible for damages caused by operations performed
by unauthorized persons.
WARNING: It is customer’s responsibility to prepare the location the
product shall be placed on and also to have the electrical installation
prepared.
WARNING: The rules in local standards about electrical installations
shall be followed during product installation.
WARNING: Check for any damage on the appliance before installing it.
Do not have the product installed if it is damaged. Damaged products
cause a risk for your safety.
Correct Place For Installation
650 mm min.
Product is designed in
accordance with the
kitchen counters supplied
from market. A safe
distance should be left
between the product and
kitchen walls and furniture.
If hood/aspirator will be
installed over your appliance,
obey to the recommendation
of hood / aspirator
manufacturer for assembly
height. (min. 65 cm)
The gap that cooktop is to
be placed on the counter
should be cut in line with
cooktop installation dimensions.
For installation of the product, the rules specified in local standards
related to electricity should be complied.
15
GB
Installation
1. Turn the cooktop down and place on smooth ground.
2. In order to prevent entrance of foreign substances and liquids
between cooktop and counter, apply the paste given in package to the
sides of lower guard of counter. For corners, curl paste and increase curls
till filling corner gaps.
3. Turn cooktop again and align with and place on counter.
4. Fasten up your cooktop on counter by using the clamp and screws
supplied.
Installation Diagram
Wick
16
5. When product is mounted on a drawer, if it is possible to touch lower
side of product, this section should be separated with a wooden shelf.
min. 30 mm
6. While mounting cooktop on a closet, as shown in the figure above, in
order to separate between closet and cooktop, a shelf should be mounted.
If it is mounted on a built-in oven, there is no need to do that.
7. If your cooktop will be mounted next to right or left wall, the minimum
distance between wall and cooktop should be 50 mm.
17
GB
Counter Cut-Off Dimensions
Pay attention to the drawings and dimensions given below while making
cooktop installation and adjusting counter cutting sizes.
30
0m
m
m
20
44
m
0m
0m
m
52
5
m
min. 60 mm
min. 60 mm
27
min. 60 mm
m
0m
0m
49
m
41
min. 60 mm
m
0m
0m
49
m
min. 60 mm
min. 60 mm
Cooktop Of 30 cm
59
m
0m
52
Cooktop Of 45 cm
0m
m
m
69
0m
52
min. 60 mm
0m
m
min. 110 mm
56
0m
m
0m
m
49
min. 60 mm
56
49
m
min. 60 mm
Cooktop Of 60 cm
m
0m
86
min. 60 mm
m
0m
.6
min
52
m
0m
0m
Cooktop Of 70 cm
m
0m
0m
40
m
99
0m
m
min. 60 mm
min. 60 mm
81
0m
m
m
0m
49
min. 60 mm
96
0m
m
m
0m
37
min. 60 mm
min. 60 mm
Cooktop Of 90 cm
Cooktop Of 100 cm
18
CONTROL PANEL
Elecrical Heater (hotplate) Cooktop Panel Visual
Cooktop Panel Visual Of 60 cm
1
1. 180 mm electrical heater (hotplate)
2. 145 mm electrical heater (hotplate)
3. 180 mm electrical heater(hotplate)
4. 145 mm electrical heater (hotplate)
Cooktop Panel Visual Of 30 cm
2
3
4
1
2
1. 180 mm electrical heater (hotplate)
2. 145 mm electrical heater (hotplate)
WARNING: The control panel above is only for illustration purposes.
Consider the control panel on your device.
Warnings About Using The Touchmatic Control
1. The controls react to touching, so you do not need to apply any
pressure to the controls.
2. Use the bottom, not the tip of your finger while using the device.
Correct
Wrong
3. Make sure that the touch controls are always clean and dry. Even a
thin layer of water may make it difficult for touch controls to work.
19
GB
USAGE OF YOUR COOKTOP
1. Place the pots and pans so that their handles are not placed above
the hobs to prevent heating of the handles.
2. Place suitable amount of food to the pots and pans. Thus, you may
prevent overflowing of meals and avoid unnecessary cleaning.
3. Do not use containers that are unstable and that may be easily tipped
over on the cooktop.
4. Do not put empty pots and pans on the hobs with their flames on.
5. Always turn off the hobs after each use.
6. Do not put containers that may be affected by heat on the product.
7. Do not operate the hobs without any pots and pans placed on them.
8. Do not place the lids of the pots and pans on the hobs.
9. When you want to put the pot on another hob, take the pot up and
place it again instead of sliding it.
10. Keep the lid of container you use for heating oil open.
11. Do not put oil with a volume more than one third of the pan. Do not
leave the oil unattended when the oil is being heated. Extremely hot oils
may cause fire.
12. Use pots and pans with machined bases only. Sharp edges cause
scratches on the surface.
13. Do not use aluminium pots and pans. Aluminium cause damages to
the hob surface.
Splashes and
overflow may
cause damage
to the cooktop
surface and
fire.
Do not use
containers with
convex or
concave bases.
If the diameter
of the pot is
smaller than
the diameter
of the hob,
thisshall waste
energy.
20
Use pots and
pans with flat
bases only.
MAINTENANCE AND CLEANING
Before starting to maintenance or cleaning, firstly unplug the plug
supplying electricity to cooktop and turn down gas valve. If cooktop is
hot, wait for cooling down.
1. For the purpose that your cooktop has long and economic life, regular
cleaning and maintenance should be performed on your cooktop.
2. Do not clean your cooktop with scratching tools such as bristle brush,
wire wool or knife. Do not use abrasive, scratching, acid materials or
detergent.
3. Following mopping parts of your cooktop with soapy cloth, rinse it,
later rinse well with a soft cloth.
4. Clean glass surfaces with special glass cleaning substances. As
scratching of glass surfaces leads to breaking, while cleaning glass
surfaces, do not use abrasive cleaners or sharp metal scrapers.
5. Do not clean your cooktop with steamy cleaners.
6. In the course of cleaning your cooktop, never use flammable materials
such as acid, thinner and gas.
7. Do not wash plastic and aluminium parts of your cooktop in dishwasher.
8. Clean vinegar, lemon, salt, coke and similar acid and alkaline
containing substances poured on your cooktop immediately.
9. In time, cooktop buttons turns hard or never turn any more, in such
circumstances, it may be necessary that buttons are changed. The change
should only be done by authorized service.
21
GB
TROUBLES AND SOLUTION PROPOSALS
You can solve the troubles you can encounter at your product by checking
the following points before calling technical service.
If cooktop does not operate;
1. Check if power cable of cooktop is plugged in.
2. Examine with safe ways if electric exists on network.
3. Audit fuses.
4. Control whether damage is available on power cable.
HANDLING RULES
1. Carry out the movement and transportation in the original packaging.
2. Pay maximum attention to the appliance while loading/unloading and
handling.
3. Make sure that the packaging is securely closed during handling and
transportation.
4. Protect from external factors (such as humidity, water, etc.) that may
damage the packaging.
5. Be careful not to damage the appliance due to bumps, crashes, drops,
etc. while handling and transporting and not to break or deform it during
operation.
22
ENVIRONMENTALLY-FRIENDLY DISPOSAL
Dispose of packaging in an environmentally-friendly
manner.
This appliance is labelled in accordance with European
Directive 2012/19/EU concerning used electrical and
electronic appliances (waste electrical and electronic
equipment - WEEE). The guideline determines the frame
work for the return and recycling of used appliances as
applicable throughout to the EU.
PACKAGE INFORMATION
Packaging materials of the product are manufactured from recyclable
materials in accordance with our National Environment Regulations.
Do not dispose of the packaging materials together with the domestic
or other wastes. Take them to the packaging material collection points
designated by the local authorities.
23
RU
УВАЖАЕМЫЙ ПОКУПАТЕЛЬ!
Благодарим Вас за то, что отдали предпочтение бытовой технике
1RYH[.
Novex– это качество, надёжность, и внимательное отношение
к потребностям покупателей. Надеемся, что Вам понравится
продукция нашей компании, и в будущем Вы отдадите предпочтение
технике Novex.
Данное изделие произведено на современном оборудовании без
нанесения вреда окружающей среде.
Соответствует требованиям положений Директивы ЕС об отходах
электрического и электронного оборудования (WEEE).
ПРИМЕЧАНИЕ
Данное руководство по эксплуатации предназначено для нескольких
моделей, наличие режимов и функций может отличаться. Все
рисунки схематичны. Функции и комплектующие, обозначенные
знаком «*», являются дополнительной опцией и могут отсутствовать
в Вашем изделии.
Внимательно прочтите руководство, в нём даются важные указания
по безопасной установке, эксплуатации и техобслуживанию.
Позаботьтесь о сохранности руководства по эксплуатации для
использования его в дальнейшем. При передаче данного устройства
новому владельцу не забудьте передать все документы.
24
Содержание
Важные предупреждения
Способы защиты стекла варочной поверхности
Электрическое соединение
Описание прибора
Технические характеристики
Установка варочной поверхности
Габаритные размеры прибора
Панель управлeния
Эксплуатация варочной поверхности
Техническое обслуживание и чистка
Проблемы и рекомендации по их устранению
Правила транспортировки
Экологически безопасная утилизация
Информация об упаковке
25
26
33
35
36
37
38
41
42
43
44
45
45
46
46
RU
ВАЖНЫЕ ПРЕДУПРЕЖДЕНИЯ
1. Установка и ремонт должны быть выполнены
АВТОРИЗОВАННЫМ СЕРВИСНЫМ ЦЕНТРОМ
Производитель не несет ответственности за работы,
осуществляемые неофициальными сервисами.
2. Внимательно изучите данную инструкцию по
эксплуатации, так вы сможете безопасно и правильно использовать прибор.
3.Поверхность должна использоваться в соответствии
правилами, указанными в инструкции по эксплуатации.
4. Не позволяйте детям младше 8 лет, и домашним
животным приближаться к прибору, когда он работает.
5. ПРЕДУПРЕЖДЕНИЕ: Пожароопасность: не
храните материалы на варочной поверхности.
6. ПРЕДУПРЕЖДЕНИЕ: Во время эксплуатации
данное устройство и его детали становятся
горячими.
7. Характеристики данного прибора находятся на
заводской этикетке.
8. Доступные поверхности могут быть горячими
Не подпускайте к панели маленьких детей.
9. ПРЕДУПРЕЖДЕНИЕ: Данный прибор предназначен для приготовления пищи. Его нельзя
использовать для других целей, таких как обогрев
комнаты.
26
10. Не используйте пароочистители для чистки
прибора.
11. НИКОГДА не пытайтесь потушить огонь водой.
Сначала выключите питание прибора, а затем
закройте пламя крышкой или пожарным одеялом.
12. Детей до 8 лет не следует подпускать к прибору,
если они не находятся под постоянным присмотром.
13. Следует избегать прикосновения к нагревательным элементам.
14. ВНИМАНИЕ: Не следует оставлять процесс
приготовления без присмотра.
15. Прибор не подходит для эксплуатации с внешним
таймером или отдельной системой дистанционного
управления.
16. Данный прибор может использоваться детьми
от 8 лет и старше, а так же лицами с ограниченными
физическими, сенсорными или умственными способностями или при отсутствии опыта и знаний, только
под присмотром, или в случае их инструктажа по
использованию прибора.
17. Прибор разработан исключительно для
использования в бытовых условиях.
18. Дети не должны играть с устройством.
Чистка или обслуживание прибора не должны
осуществляться детьми, если они младше 8 лет
и не находятся под присмотром взрослых.
27
RU
19. Храните прибор и шнур питания в месте,
недоступном для детей в возрасте младше 8 лет.
20. Перед тем, как начать использовать прибор,
уберите шторы, тюль, бумагу или любой
воспламеняющийся (воспламеняемый) материал
на безопасное расстояние. Не помещайте воспламеняющиеся или легковоспламеняющиеся материалы на прибор.
21. Держите вентиляционные каналы открытыми.
22. Не нагревайте консервы и стеклянные банки.
Давление может привести к взрыву банок.
23. Не используйте прибор в таких состояниях,
которое может повлиять на вашу умственную
деятельность и координацию. Например, под
воздействием лекарств и/или алкоголя.
24. После каждого использования проверьте,
выключен ли прибор.
25. Будьте осторожны при смешивании алкоголя
с едой. Алкоголь испаряется при высоких темпе ратурах и может вызвать пожар, если он соприкасается с горячими поверхностями.
26. Если прибор неисправен или имеет видимые
повреждения, не используйте его.
27. Не размещайте предметы на приборе, которые
могут быть доступными для детей.
28
28. Упаковочные материалы представляют опасность
для детей. Храните упаковочные материалы в
недоступном для детей месте.
29. Во время любых строительных работ дома
поверхность должна быть отключена. После
завершения работ повторное подключение поверхности должно выполняться специалистами авторизованных сервисных центров.
30. Не кладите металлические предметы, такие
как ножи, вилки, ложки на поверхность включенного
прибора, это может привести к ожогам.
31. Прибор нельзя устанавливать за декоративным
покрытием во избежание перегрева.
32. Перед операцией по очистке и уходу отключите
прибор от сети электропитания.
33. Места крепления кабеля должны быть защищены.
34. ВНИМАНИЕ! Если стекло варочной панели
имеет повреждения выключите все нагревательные элементы и отсоедините прибор от источника питания, не прикасайтесь к поверхности прибора и не используйте его.
35. Пользователь не должен ремонтировать
панель самостоятельно.
36. Поверхность включенной панели сильно нагревается. Существует опасность получить ожог.
29
RU
37. Розетка для подключения должна распологаться в доступном месте.
Электробезопасность
1. Подключите устройство в заземленную розетку,
защищенную предохранителем, соответствующим
значениям, приведенным в таблице технических
характеристик.
2. Заземление должно быть выполнено квалифицированным электриком.
Наша компания не несет ответственности за
ущерб, который может возникнуть в результате
эксплуатации прибора без заземления в
соответствии с местными правилами.
3. ПРЕДУПРЕЖДЕНИЕ: Если на поверхности
имеются трещины, следует отключать устройство
во избежание поражения электрическим током.
4. Никогда не мойте прибор путем распыления
или наливания на него воды. Имеется риск поражения
электрическим током.
5. Не касайтесь штепсельной вилки мокрыми
руками. Не тяните за шнур питания, чтобы
отключить прибор от сети электропитания; всегда
придерживайте вилку рукой.
30
6. Во время установки, обслуживания, очистки и
ремонта отключайте устройство.
7. Убедитесь, что штепсельная вилка плотно
вставлена в розетку, чтобы избежать образования
искр.
8. Если шнур питания (шнур со штепсельной вилкой)
поврежден, такой шнур должен быть заменен
производителем или его дилером по техническому
обслуживанию во избежании опасности.
9. Не используйте порванные или поврежденные
кабели или удлинители; используйте только
оригинальный кабель.
10. Не используйте пароочистители при очистке
прибора, в противном случае может возникнуть
поражение электрическим током.
11. При подключении штепсельной вилки к розетке,
убедитесь, что в розетке нет жидкости или влаги.
12. Следует использовать автоматические выключатели, автоматы защиты от тока утечки при подключении прибора.
31
RU
13. Шнур питания (шнур со штепсельной вилкой) не
должен соприкасаться с горячими частями прибора.
14. Для установки, технического обслуживания,
очистки и ремонта отключайте прибор от сети
электропитания.
15. Прибор оснащен шнуром питания типа «Y».
16. Автоматические выключатели варочной поверх
ности должны быть размещены так, чтобы они
были доступны после установки.
17. Неподвижные соединения должны быть
подключены к источнику питания, обеспечивающему многополюсное отключение. Для приборов с
защитой от перенапряжения ниже III категории,
устройство отключения должно быть подключено к
источнику питания с фиксированным напряжением
в соответствии с кодом проводки.
18. Не удаляйте выключатели зажигания с
прибора. В противном случае могут быть оголены
электрические кабели. Это может привести
к поражению электрическим током.
32
Способы защиты стекла варочной
поверхности
Поверхность из керамического стекла является
устойчивой к ударам и царапинам в определенной
степени. Следующие указания помогут избежать
повреждения панели.
1. Никогда не лейте холодную воду на горячие
конфорки.
2. Не наступайте на стеклокерамическую поверхность.
3. Падение предметов, например солонки,
может повредить поверхность. Поэтому не размещайте их над конфорками.
4. После каждого использования убедитесь, что
дно кастрюли и поверхности варочных зон чистые
и сухие.
5. Не очищайте овощи на поверхностях варочной
панели. Частицы песка, выпавшие из овощей, могут
поцарапать керамическую стеклянную плиту.
6. Не кладите на поверхность огнеопасные материалы, например: картон или пластик. Металлы, олово,
цинк или алюминий (а также алюминиевая фольга
или пустые кофейники) могут плавиться на горячей
варочной поверхности и, таким образом, вызвать
ее повреждение.
7. Следите за тем, чтобы сладкие продукты питания
или фруктовые соки не попадали в горячие зоны
приготовления. Они могут оставлять пятна на
поверхности керамического стекла.
33
RU
Использование варочной поверхности
1. Поверхность предназначена для использования
в бытовых условиях. Коммерческое использование
не допускается.
2. Данный прибор можно использовать только для
приготовления пищи. Его не следует использовать
для других целей, таких как обогрев комнаты.
3. Производитель не несет ответственности за
какие-либо повреждения, возникшие в результате
неправильного использования устройства или
обращения с ним.
4. Срок службы приобретенного Вами прибора
составляет 5 лет. В течение данного периода
времени запасные части, необходимые для работы
этого прибора, как определено, предоставляются
изготовителем.
34
Электрическое соединение
1. Установка и подключение устройства должно выполняться уполномоченным сервисом и в соответствии с указанием производителя.
2. Изделие необходимо подключить к предохранителю, соответствующему
электрической мощности.
3. Ваше устройство настроено на подачу электричества 220-240 B AC /
380-415 B 3N AC 50/60 Гц.
4. Если параметры электрической сети отличаются от указанных,
обратитесь в авторизованный сервисный центр.
5. Электрические соединения устройства должны выполняться только в
розетках, обладающих соответствующей системой заземления. Если в месте
расположения устройства не имеется розеток, соответствующих системе
заземления, немедленно обратитесь в авторизованный сервисный центр.
Фирма-изготовитель ни в коем случае не несет ответственность за повреждения, возникающие вследствие использования розеток без заземления.
6. Штепсельная вилка устройства должна находиться на расстоянии,
позволяющем легко включить ее в заземленную розетку.
7. Не допускайте контакта электрического кабеля устройства с горячими
частями. Также держите его вдали от острых краев и углов.
8. В случае повреждения силового кабеля, он должен быть заменен
изготовителем или его авторизованным сервисом.
9. Неправильное электрическое подключение может нанести вред Вашему
устройству. В таком случае устройство не будет обслуживаться в рамках
гарантии.
Схема электрического соединения
Подключение прибора осуществляется в соответствии со схемой.
Живая
фаза
220-240 B~50/60 Гц
Нейтра
ная
Заземлние
H05 VV-F 3G 4 мм²
35
380-415 B 3N~50/60 Гц
L3
L2
L1
Нейтра
ная
Заземлние
H05 VV-F 5G 1,5 мм²
380-415 B 2N~50/60 Гц
L2
L1
Нейтра
ная
Заземлние
H05 VV-F 4G 1,5 мм²
RU
ОПИСАНИЕ ПРИБОРА
1
2
3
4
5
7
6
1. Электроконфорка
2. Стеклянная или металлическая поверхность
3. Панель управления
4. Чугунная конфорка *
5. Керамический нагреватель (180 мм или 140 мм) *
6. Керамический нагреватель (120 мм / 180 мм или 220 мм / 300 мм) *
7. Керамический нагреватель (140 мм / 250 мм) *
36
Технические Характеристики
Мощность конфорок, в зависимости от степени нагрева приведена
в таблице ниже
Уровень
1
Уровень
2
Уровень
3
Уровень
4
Уровень
5
Уровень
6
80 мм чугунная конфорка
200 Вт
250 Вт
450 Вт
----
----
----
145 мм чугунная конфорка
250 Вт
750 Вт
1000 Вт
----
----
----
180 мм чугунная конфорка
500 Вт
750 Вт
1500 Вт
----
----
----
145 мм чугунная конфорка
500 Вт
1000 Вт
1500 Вт
----
----
----
180 мм чугунная конфорка
850 Вт
1150 Вт
2000 Вт
----
----
----
145 мм чугунная конфорка
95 Вт
155 Вт
250 Вт
400 Вт
750 Вт
1000 Вт
180 мм чугунная конфорка
115 Вт
175 Вт
250 Вт
600 Вт
850 Вт
1500 Вт
145 мм чугунная конфорка
135 Вт
165 Вт
250 Вт
500 Вт
750 Вт
1500 Вт
180 мм чугунная конфорка
175Вт
220Вт
300Вт
850Вт
1150Вт
2000 Вт
Технические характеристики
180 мм керамический нагреватель
1800 Вт
140 мм керамический нагреватель
1200 Вт
140 / 250 мм керамический нагреватель
1800 Вт
120 / 180 мм керамический нагреватель
1700 Вт
220 / 300 мм керамический нагреватель
2400 Вт
Напряжение питания
220-240 B AC / 380-415 B 3N AC 50/60 Гц.
ПРЕДУПРЕЖДЕНИЕ: Производитель не несет ответственности за любые
проблемы, возникающие из-за неправильного подключения.
ПРЕДУПРЕЖДЕНИЕ: Для повышения качества продукции технические
характеристики могут быть изменены без предварительного уведомления.
ПРЕДУПРЕЖДЕНИЕ: Значения, предоставленные в таблице, являются
лабораторными показаниями в соответствии со стандартами. Эти значения
могут различаться в зависи мости от условий использования и окружающей
среды.
37
RU
УСТАНОВКА ВАРОЧНОЙ ПОВЕРХНОСТИ
Перед подключением прибора проверьте правильность электромонтажа.
Производитель не несет ответственности за ущерб, причиненный в
результате операций, совершенных не авторизованными лицами.
ПРЕДУПРЕЖДЕНИЕ: Установка прибора должны выполняться в соответствии с правилами местных стандартов в отношении электроустановок.
ПРЕДУПРЕЖДЕНИЕ: Перед установкой проверьте наличие повреждений
устройства. Не устанавливайте прибор, если он поврежден. Поврежденный
прибор может вызывать риск поражения электрическим током.
Указание по монтажу
минимальный
650 мм
Дизайн изделия разработан в
соответствии с доступными на
рынке столешницами. Между стенами кухни и мебелью следует
оставить безопасное расстояние.
Если над поверхностью будет
установлена вытяжка, то руководствуйтесь рекомендациями
изготовителя вытяжки относительно высоты монтажа. (Мин. 65 см)
Установка варочной поверхности
на столешнице, должна производится в соответствии со схемой монтажа.
Во время монтажа изделия следует соблюдать правила, установленные
местными стандартами в части электрических работ.
38
Монтаж варочной поверхности
1. Переверните панель лицевой стороной вниз и положите на ровную
поверхность.
2. Для предотвращения попадания инородных тел и жидкостей между
поверхностью и столешницей нанесите мастику, предоставленную
вместе с изделием, по краям нижней части.
3. Переверните варочную поверхность и установите ее на столешнице.
4. Зафиксируйте поверхность на столешнице, используя зажим и винты.
Схема монтажа
Свеча
39
RU
5. В случае монтажа изделия на выдвижном ящике, если его нижняя
часть остается доступной, ее следует отделить деревянной полкой.
минимальный.
30 мм
6. Во время монтажа изделия на шкафу, необходимо установить
полку, как показано на рисунке выше, для того, чтобы оградить панель от
шкафа. Если панель монтируется поверх встроенной духовки, в этом нет
необходимости.
7. Если Ваше изделие монтируется рядом с боковой стеной,
минимальное расстояние между стеной и плитой должно быть 50 мм.
40
Габаритные размеры варочной поверхности
При монтаже поверхности и подготовке места для ее монтажа в
столешницу следуйте предоставленным размерам.
30
0
52
44
м
0м
0м
м
мм
0м
52
м
Мин. 60 мм
Мин. 60 мм
Мин. 60 мм
м
0м
27
м
Мин. 60 мм
м
41
49
0м
0м
0м
49
м
Мин. 60 мм
Мин. 60 мм
Поверхность 30 cм
Поверхность 45 cм
59
м
0м
0м
52
м
м
69
0м
0м
52
Мин. 60 мм
м
Мин. 110 мм
56
0м
м
0м
м
49
Мин. 60 мм
м
0м
56
Мин.
60 мм
49
0м
м
Мин. 60 мм
м
0м
.6
н
Ми
Поверхность 70 cм
Поверхность 60 cм
м
0м
м
0м
86
52
0м
40
м
99
0м
м
Мин. 60 мм
Мин. 60 мм
81
0м
м
м
0м
49
Мин. 60 мм
96
0м
м
м
0м
37
Мин. 60 mm
Мин. 60 мм
Поверхность 90 cм
Поверхность 100 cм
41
RU
ПАНЕЛЬ УПРАBЛEHИЯ
Изображение панели 60 см.
1
1. Электрический нагреватель 180 мм
2. Электрический нагреватель 145 мм
3. Электрический нагреватель 180 мм
4. Электрический нагреватель 145 мм
Изображение панели 30 см
2
3
1
4
2
1. Электрический нагреватель 180 мм
2. Электрический нагреватель 145 мм
ПРЕДУПРЕЖДЕНИЕ: Указанная панель управления, приведена только
в качестве примера. Принимайте во внимание панель управления,
установленную на вашем приборе.
Предупреждения при использовании сенсорного управления
1. Элементы управления реагируют на касание, поэтому вам не нужно
применять какое-либо давление на элементы управления.
2. При использовании устройства прикасайтесь всем пальцем, а не
только кончиком.
Неверно
Правильно
3. Убедитесь, что кнопки сенсорного управления всегда чистые и сухие.
Даже тонкий слой воды может затруднить работу сенсорного управления.
42
ЭКСПЛУАТАЦИЯ ВАРОЧНОЙ ПОВЕРХНОСТИ
1. Размещайте кастрюли и сковородки таким образом, чтобы их ручки не
располагались над конфорками, для предотвращения их нагрева.
2. Кладите в кастрюли и сковородки необходимое количество продуктов.
Таким образом, вы сможете предотвратить перелив продуктов и избежать
ненужной чистки.
3. Не используйте посуду, которая неустойчива и может быть легко
опрокинута на варочной панели.
4. Не ставьте пустые кастрюли и сковородки на панель со включенными конфорками.
5. После каждого использования всегда выключайте варочную панель.
6. Не ставьте контейнеры, на которые может воздействовать тепло.
7. Не используйте варочную панель без установленных на нее кастрюль
и сковородок.
8. Не кладите крышки от кастрюль и сковородок на варочную поверхность.
9. Когда вы хотите переместить кастрюлю на другую конфорку,
не двигайте ее, а переставьте.
10. Когда вы разогреваете масло, закрывайте емкость крышкой.
11. Не наливайте в кастрюлю масло объемом более одной трети самой
кастрюли. Не оставляйте кастрюлю без присмотра, когда масло нагревается.
Чрезвычайно горячие масла могут стать причиной пожара.
12. Используйте кастрюли и сковородки только с обработанными
основаниями. Острые края оставляют царапины на поверхности.
13. Не используйте алюминиевые кастрюли и сковородки. Алюминий
вызывает повреждение поверхности варочной панели.
Брызги и
переполнение
могут повредить
поверхность
варочной панели
и привести к
пожару.
Не используйте
посуду с
выпуклым
или вогнутым
основанием.
Если диаметр
кастрюли меньше
диаметра
конфорки, это
приведет к потере
энергии.
43
Используйте
кастрюли и
сковородки
только с
плоскими
основаниями.
RU
ТЕХНИЧЕСКОЕ ОБСЛУЖИВАНИЕ И ЧИСТКА
Перед тем, как начать техническое обслуживание или чистку, вначале
выньте из розетки штепсельную вилку, обеспечивающую поступление
электричества к поверхности.. Если поверхность горячая, дождитесь когда
она остынет.
1. Регулярно проводите очистку и техническое обслуживание варочной.
поверхности.
2. Для очистки плиты не пользуйтесь твердыми предметами, такими
как жесткая щетка, проволочная губка или нож. Не используйте абразивные
вещества, кислоты и едкие моющие средства.
3. Протрите поверхность мыльным раствором , смойте водой, а затем
тщательно вытрите мягкой тканью.
4. Очищайте стеклянные поверхности специальными средствами для
чистки стекол.
5. Не очищайте поверхность паровыми очистителями.
6. Для чистки поверхности не используйте кислоту, растворитель,
керосин и другие горючие вещества.
7. Не мойте пластиковые и алюминиевые детали поверхности в посудомоечной машине.
8. Избегайте попадания на поверхность уксуса, лимонного сока, соли,
колы и других кислотных и щелочных веществ.
44
ПОИСК И УСТРАНЕНИЕ НЕИСПРАВНОСТЕЙ
Перед тем, как обратиться в сервис, попробуйте воспользоваться
следующими рекомендациями по устранению неисправностей.
Если варочная поверхность не включается:
1. Проверьте, вставлена ли штепсельная вилка электрического кабеля в
розетку.
2. Проверьте безопасными способами наличие электричества в сети.
3. Проверьте предохранители.
4. Проверьте наличие повреждений электрического кабеля.
ПРАВИЛА ТРАНСПОРТИРОВКИ
1. Переносите и перевозите прибор в оригинальной упаковке.
2. При погрузке / разгрузке и перевозке соблюдайте крайнюю осторож ность.
3. Перед переносом и транспортировкой убедитесь, что прибор надежно
упакован.
4. Защищайте упаковку от внешних факторов (таких как влажность,
вода и т. д.), которые могут повредить упаковку.
45
RU
УТИЛИЗАЦИЯ БЫТОВОЙ ТЕХНИКИ
1. Данное изделие не содержит опасных и запрещенных веществ.
Соответствует требованиям положений Директивы ЕС об отходах
электрического и электронного оборудования
2 . Данное изделие произведено из высококачественных деталей и
материалов, которые могут быть переработаны и повторно
использованы.
3. Не следует выбрасывать ваше изделие вместе с бытовыми
отходами по истечении его срока службы. Необходимо сдать его в
пункт сбора для переработки отходов электрического и
электронного оборудования.
Помогите защитить окружающую среду и природные источники
путем переработки отработанных изделий.
УПАКОВКА
Материалы упаковки устройства произведены из
перерабатываемого материала в соответствии с нашим
национальным законодательством. Не выбрасывайте упаковочные
материалы вместе с бытовыми и иными отходами, сдавайте их в
пункты сбора упаковочных материалов.
В целях безопасности детей перед утилизацией данного изделия
необходимо отрезать электрический кабель, чтобы предотвратить
его включение.
RU
Страна происхождения - Турция
Изготовитель:
«СЕРСИМ ДАЙАНЫКЛЫ ТЮКЕТИМ МАЛЛАРЫ САНАЙИ ВЕ ТИДЖАРЕТ
КОЛЛЕКТИФ ШИРКЕТИ ИБРАХИМ ВЕ МУСТАФА УСТАОГЛУ»,
Юр.адрес: Кайсери Сербест Бёлгеси, Анбар SB Махаллеси, 12 Джадде,
Серсим ситеси KSR-125/130, Апартман №17, Меликгази, Кайсери, Турция
Адрес производства: Сербест Бёлге, 12 Джадде №18, Меликгази, Кайсери,
Турция
«SERSIM DAYANIKLI TUKETIM MALLARI SANAYI VE TIGARET KOLLEKTIF
SIRKETI IBRAHIM VE MUSTAFA USTAOGLU»,
Legal address: Kayseri Serbest Bolgesi, Anbar SB Mahallesi, 12 Cadde, Sersim Sitesi,
KSR-125/130, Apartman №17, Melikgazi, Kayseri, Turkiye
Manufacturer's address: Serbest Bolge 12. Cadde No.18, Melikgazi, Kayseri, Turkiye
Импортёр/Организация, уполномоченная на принятие претензий от покупателей:
ООО «СИМРУС» ИНН 7717705825, КПП 771901001, ОГРН 1117746641891
Юридический /фактический адрес: 105318, Москва, Ткацкая ул. д. 5, корп.7,
этаж 2
При возникновении гарантийного случая необходимо обращаться в
авторизованные сервисные центры. Список авторизованных сервисных центров
обслуживания в Вашем городе указан в данном руководстве по эксплуатации.
Если в Вашем городе отсутствует авторизованный сервисный центр, Вам
следует обратиться в магазин, где Вы приобрели товар.
Получить информацию о сервисном обслуживании в Вашем городе Вы можете
по телефонам: 8 (495) 969-02-86, 969-02-87
Срок гарантии - 12 месяцев
Срок службы - 5 лет
Дата изготовления – указана на изделии
47
Выбираете товар
Добавьте интересующие вас товары в корзину
Оформляете заказ
Заполните все поля формы, чтобы получить предложение
Получаете предложения
В ближайшее время с вами свяжется менеджер для уточнения деталей
Видео
Видео
Похожие товары
Отзывы
Достоинства
Производство с использованием современных технологий.
Недостатки
По существу они(изъны) отсутствуют!
Комментарий
Замечательную продукцию предоставляет компания Novex, а именно Разное! Купил я модель np 6403 s и правду говоря, очень доволен, что не ошибся. У данной модели присутствуют отличные характеристики, которые очень облегчают использование, такие как: ,и это здорово.
В работе все хорошо, ничего трудного нет, разберётся даже котенок. Все части работают исправно. Что могу сказать: за все время использования, косяков не обнаружено, все работает исправно как часы.
Сделано добротно.Неплохая по цене.
Достоинства
Эргономика очень потрясает воображение, а качество греет. Мы так впечатлились, что не смогли не написать отзыв.
Недостатки
Увеличили срок доставки.
Комментарий
Начнем отзыв на наш взгляд с самого важного, нам очень захотелось купить модель Шины Novex Snowspeed 3 XL 175/65 R15 88T, но ее не оказалось в наличии, и мы остановили свой выбор на модели Novex np 6403 s, и никапельки не ошиблись.
Опыт эксплуатации можно обозначить единственным словом словом — идеально. даже в начале использования у нас не появилось никаких трудностей, очень простая настройка.
Используем 2 дня, пока все в порядке.В результате эксплуатации np 6403 s остаются только добрые впечатленыия.
Достоинства
Легкое в эксплуатации.
Недостатки
Ребята, поработайте над логистикой! Ну как можно так долго доставлять?
Комментарий
Старый аналог, и после сервисных работ хотел долго жить, старался. В итоге сдался. Пошел на сайт и сравнил Разное. Остановил выбор на np 6403 s.
Впечатление от покупки остались только лишь позитивные. Рекомендую np 6403 s к приобретению в полной мере!
По цене np 6403 s не сильно кусается, при этом имеет необходимый спектр функций. И это главное. К покупке рекомендую!
Достоинства
У Novex np 6403 s куча преимуществ, все и не перечислить!
Недостатки
Несовершенств не выявил. В отличие от аналогичной модели.
Комментарий
Вижу, что Novex ставит во главу угла простоту применения, поэтому сомнений не возникало изначально. В работе уже есть пара девайсов этого производителя.
С Novex np 6403 s мне повезло. Простой, презентабельный дизайн модели, но с такими важными характеристиками типо .
Цена приемлемая. Качество на уровне, к покупке рекомендую.
Читать все отзывы