Search code, repositories, users, issues, pull requests…
Provide feedback
Saved searches
Use saved searches to filter your results more quickly
Sign up
NRF52832 Использование NRFConnect для обновления прошивки через мобильный телефон Android и Apple (iOS)
1 прошивка обновления телефона Android
Androd и Apple обновления в основном соответствуют, пожалуйста, обратитесь к прошивке браслета обновления IOS
2 Apple (iOS) Мобильный телефон Обновление Браслет Браслет Прошивка
2.1 Скачать программное обеспечение NRFConeCt, поиск загрузки в Apple App Store

2.2 Импорт прошивки для обновления
- Телефон iOS подключен к компьютеру через кабель данных. Загрузите официальный инструмент iOS iTunes, подключите мобильный телефон или планшет после подключения телефона, щелкните этот маленький значок.

-
Нажмите «Общий доступ к файлам» -> Нажмите «NRF Connect», а затем перетащите прошивку, которая будет обновлена в правую папку NRF Connect с помощью мыши.
-


2.3 Обновить прошивку
- Откройте программное обеспечение NRF Connect, откройте Bluetooth мобильного телефона и запустите устройство сканирования

- После успеха подключения нажмите «DFU» и введите интерфейс выбора файла.

- Нажмите «+» в правом верхнем углу, введите интерфейс просмотра файлов, выберите прошивку, которая просто поместите ее с компьютера, чтобы обновить


-
Нажмите «Прошивка», чтобы войти в интерфейс обновления
-
Нажмите «Пуск», чтобы начать обновление прошивки, браслеты и мобильные телефоны остаются более близкими диапазонами, чтобы избежать обновления
- Если обновление не удалось, сканирование, но имя изменено на DFutag, вам нужно нажать Dfutag


3 Спасибо за чтение, я желаю вам счастливой жизни! ! !
Overview
In this advanced tutorial, we will learn how to Send/Receive Data to nRF Connect Mobile App with the Seeed XIAO BLE nRF52840 Sense. This tutorial covers the details about the Mobile App called nRF Connect. The nRF Connect App for Mobile is a powerful generic tool that aids the development of Bluetooth Low Energy devices. The app allows users to scan and explore their devices and communicate with them.
Using the nRF Connect App, we will send one or zero commands to control the onboard LED of Seeed XIAO BLE nRF52840 Sense. The Seeed XIAO BLE Board also has a port for battery connection. This measures the battery voltage and sends it to the nRF Connect app. In the final part, we will be sending the DHT11 Humidity and temperature data to the nRF Connect app and monitor the data wirelessly.
This tutorial is very interesting as you will learn how to send any sensor data to any mobile app wirelessly over BLE Connection. But before this, you can check the earlier two tutorials related to Seeed XIAO nRF52840 Boards:
1. Getting Started with Seeed XIAO BLE nRF52840 Sense
2. Using IMU & Microphone on XIAO BLE nRF52840 Sense
Seeed XIAO BLE nRF52840 Sense
First, let’s have a short overview of these boards. These boards are based on Nordic nRF52840 BLE 5.0 Chip from Nordic Semiconductor. One of the boards is called Seeed XIAO BLE nRF52840 and the other is Seeed XIAO BLE nRF52840 Sense.

p>These boards are small-sized, ultra-low-power Bluetooth development boards. One of the boards features an onboard Bluetooth antenna, and onboard battery charging chip which makes it ideal for IoT projects. The other board called the XIAO Sense board has additional features like 6 DOF IMU and a PDM microphone which make it an ideal board to run AI using TinyML and TensorFlow Lite.

The topside of the board has a reset button, 6 DOF IMU LSM6DS3TR-C, Bluetooth Antenna, PDM Microphone, RGB LED & power LED. On the backside of the board, there are SWD Pins for Debugging and Reflashing Bootloader using JLink. There are pair of pins to connect the NFC Antenna & also a 3.7V Lithium-Ion Battery.
There are 11 digital I/O that can be used as PWM pins and 6 analog I/O that can be used as ADC pins. It supports UART, IIC, and SPI all three common serial ports.
BLE States
Before moving to the practical part, you need to have proper knowledge of BLE states. The BLE states include Standby state, Advertising state, Scanning state, Initiating state, Connection State and Synchronization state.

• Standby state: There is no transmission or reception of packets in this state. This state can be entered from any other BLE state.
• Advertising state: A BLE device in this state is called “Advertiser”. This state can be reached from the “standby state”. The link-layer will transmit advertising packets and listens to and responds to responses triggered due to advertising packets.
• Scanning state: In this state, the link-layer listens for advertising packets from other advertising devices. The BLE device in this state is known as a “scanner”. This state can be reached from the “standby state”.
• Initiating state: The BLE device in this state is known as the initiator. This BLE state can be reached from the “standby state”. Link-layer listens for advertising physical packets from specific BLE devices. It also responds to these packets to initiate a connection from another device.
• Connection State: This state can be reached either from the “initiating state” or “advertising state”. In this connection state, there are two roles of the BLE device either master or slave. When it has entered from “initiating state” it will be in the master role. When it has entered from “advertising state” it will be in a slave role. In the master role, the link-layer will communicate with the device in the slave role and defines the timings of transmissions.
• Synchronization state: This state can be entered from the “standby state”. The link layer in this state listens for periodic channel packets from a specified device transmitting periodic advertising.
What is nRF Connect App

nRF Connect for Mobile is a powerful generic tool that allows you to scan and explore your Bluetooth Low Energy devices and communicate with them. nRF Connect for Mobile supports a number of Bluetooth SIG adopted profiles, as well as the Device Firmware Update profile (DFU) from Nordic Semiconductor or Eddystone from Google.
- Scans for Bluetooth Low Energy devices
- Parses advertisement data
- Shows RSSI graph
- Connects to any connectable Bluetooth Low Energy device
- Discovers and parses services and characteristics
- Allows read/write of characteristics
- Allows enable/disable of notifications and indications
- Logs events and method calls
- Supports Device Firmware Update profile which allows users to upload a new application over-the-air (DFU OTA) from a HEX or Zip file
- Parses values of most of the known characteristics
- GATT server configuration
- Listing paired devices
- Bluetooth Low Energy Advertising (peripheral role)
- Simultaneous scanning, advertising, and maintaining multiple connections
- Full support for Eddystone beacons and iBeacons
- Supports Device Firmware Update (DFU) profile
Controlling XIAO BLE nRF52840 onboard LED with Mobile App
In the first example, we will control the onboard LED of XIAO BLE nRF52840 Sense using the Mobile App called nRF Connect.
For that go to your phone play store and search for nRF Connect App. Then install the app.

In order to use BLE functionalities, you need to download a library called Arduino BLE. From this GitHub repository download this library and add it to the Arduino Library folder using add zip option.
Now copy the following code and upload it to the Seeed XIAO BLE nRF52840 Sense Board.
|
1 2 3 4 5 6 7 8 9 10 11 12 13 14 15 16 17 18 19 20 21 22 23 24 25 26 27 28 29 30 31 32 33 34 35 36 37 38 39 40 41 42 43 44 45 46 47 48 49 50 51 52 53 54 55 56 57 58 59 60 61 62 63 64 65 66 67 68 69 70 |
#include <ArduinoBLE.h> BLEService ledService(«19B10000-E8F2-537E-4F6C-D104768A1214»); // Bluetooth® Low Energy LED Service // Bluetooth® Low Energy LED Switch Characteristic — custom 128-bit UUID, read and writable by central BLEByteCharacteristic switchCharacteristic(«19B10001-E8F2-537E-4F6C-D104768A1214», BLERead | BLEWrite); const int ledPin = LED_BUILTIN; // pin to use for the LED void setup() { Serial.begin(9600); while (!Serial); // set LED pin to output mode pinMode(ledPin, OUTPUT); // begin initialization if (!BLE.begin()) { Serial.println(«starting Bluetooth® Low Energy module failed!»); while (1); } // set advertised local name and service UUID: BLE.setLocalName(«LED»); BLE.setAdvertisedService(ledService); // add the characteristic to the service ledService.addCharacteristic(switchCharacteristic); // add service BLE.addService(ledService); // set the initial value for the characeristic: switchCharacteristic.writeValue(0); // start advertising BLE.advertise(); Serial.println(«BLE LED Peripheral»); } void loop() { // listen for Bluetooth® Low Energy peripherals to connect: BLEDevice central = BLE.central(); // if a central is connected to peripheral: if (central) { Serial.print(«Connected to central: «); // print the central’s MAC address: Serial.println(central.address()); // while the central is still connected to peripheral: while (central.connected()) { if (switchCharacteristic.written()) { if (switchCharacteristic.value()) { Serial.println(«LED on»); digitalWrite(ledPin, LOW); // changed from HIGH to LOW } else { Serial.println(F(«LED off»)); digitalWrite(ledPin, HIGH); // changed from LOW to HIGH } } } // when the central disconnects, print it out: Serial.print(F(«Disconnected from central: «)); Serial.println(central.address()); } } |
Once the code is uploaded, open the Serial Monitor. Then on your mobile phone open the nRF Connect App.
In the app part, when scanning is done the LED will appear on the app. Click on connect so that a connection between nRF52840 BLE Module and Mobile App will establish.

In the client part, three services will appear. Click on the 3rd one as Unknown service.

Click on the download sign again. A hex value will appear as 0x00. If you click on the upload sign, a pop-up will appear where you need to send either zero or one value.

If you send 0x01 the onboard LED will turn on. And then when you send 0x00 the onboard LED will turn off.

So this is how you can send commands from a mobile app to control an LED. You can also check the Serial Monitor part, it will show you the on-off status as per every command.

Reading XIAO BLE nRF52840 Battery Level on nRF Connect Mobile App
In this 2nd example, we will use an analog pin to read the battery level. In the XIAO BLE Module, if you look at the back you will see there are 2 gold-plated pins where you can connect a single cell Lithium-Ion Battery.

The module also has a battery charging chip BQ25101 which is internally connected to Analog pin A0. You can measure the battery voltage or you can convert the voltage into a percentage.
Here is the code for monitoring Battery voltage/ percentage of the nRF52840 Chip on the nRF Connect Mobile App.
|
1 2 3 4 5 6 7 8 9 10 11 12 13 14 15 16 17 18 19 20 21 22 23 24 25 26 27 28 29 30 31 32 33 34 35 36 37 38 39 40 41 42 43 44 45 46 47 48 49 50 51 52 53 54 55 56 57 58 59 60 61 62 63 64 65 66 67 68 69 70 71 72 73 74 75 76 77 78 79 80 81 82 83 84 85 86 87 88 89 90 |
#include <ArduinoBLE.h> // Bluetooth® Low Energy Battery Service BLEService batteryService(«180F»); // Bluetooth® Low Energy Battery Level Characteristic BLEUnsignedCharCharacteristic batteryLevelChar(«2A19», BLERead | BLENotify); // standard 16-bit characteristic UUID // remote clients will be able to get notifications if this characteristic changes int oldBatteryLevel = 0; // last battery level reading from analog input long previousMillis = 0; // last time the battery level was checked, in ms void setup() { Serial.begin(9600); // initialize serial communication while (!Serial); pinMode(LED_BUILTIN, OUTPUT); // initialize the built-in LED pin to indicate when a central is connected // begin initialization if (!BLE.begin()) { Serial.println(«starting BLE failed!»); while (1); } BLE.setLocalName(«BatteryMonitor»); BLE.setAdvertisedService(batteryService); // add the service UUID batteryService.addCharacteristic(batteryLevelChar); // add the battery level characteristic BLE.addService(batteryService); // Add the battery service batteryLevelChar.writeValue(oldBatteryLevel); // set initial value for this characteristic // start advertising BLE.advertise(); Serial.println(«Bluetooth® device active, waiting for connections…»); } void loop() { // wait for a Bluetooth® Low Energy central BLEDevice central = BLE.central(); // if a central is connected to the peripheral: if (central) { Serial.print(«Connected to central: «); // print the central’s BT address: Serial.println(central.address()); // turn on the LED to indicate the connection: digitalWrite(LED_BUILTIN, HIGH); // check the battery level every 200ms // while the central is connected: while (central.connected()) { long currentMillis = millis(); // if 200ms have passed, check the battery level: if (currentMillis — previousMillis >= 200) { previousMillis = currentMillis; updateBatteryLevel(); } } // when the central disconnects, turn off the LED: digitalWrite(LED_BUILTIN, LOW); Serial.print(«Disconnected from central: «); Serial.println(central.address()); } } void updateBatteryLevel() { /* Read the current voltage level on the A0 analog input pin. This is used here to simulate the charge level of a battery. */ int battery = analogRead(A0); int batteryLevel = map(battery, 0, 1023, 0, 100); if (batteryLevel != oldBatteryLevel) // if the battery level has changed { Serial.print(«Battery Level % is now: «); // print it Serial.println(batteryLevel); batteryLevelChar.writeValue(batteryLevel); // and update the battery level characteristic oldBatteryLevel = batteryLevel; // save the level for next comparison } } |
In this code, we assign BLE Service and also the 16 Bit UUID number.
Using the analog read function, we determine the battery voltage, and using the map function we convert the battery voltage into a percentage. Finally, with the help of Arduino BLE Library, we send the battery level to nRF Connect Mobile App.
Now upload this code to the XIAO BLE Board and then open the Serial Monitor. The BLE will get activated and will show waiting for a connection.

Open the nRF Connect app on your phone and connect to the Battery Level device. On the Client, part click on Battery Service. So Battery level UUID will be shown. Click on the download logo. Here the battery percentage will appear.

This is the battery percentage when nothing is connected to the analog pin. If you connect 3.3V to the A0 pin and then observe the battery percentage, it will appear as 100%. Similarly, if you connect the A0 pin to GND, the battery percentage will appear as 0%.
You can also check the battery percentage on Serial Monitor.

Sending DHT11 Sensor Data to nRF Connect App
Now let us interface DHT11 Humidity Temperature Sensor with Seeed XIAO BLE nRF52840 Sense Board & send the data to nRF Connect Mobile App.

For this connect the VCC, GND & Output pin of the DHT111 Sensor to Seeed XIAO BLE Board 3.3V, GND & D7 pin respectively. You can use jumper wires to connect it.
Now copy the following code and upload it to the BLE XIAO Board.
|
1 2 3 4 5 6 7 8 9 10 11 12 13 14 15 16 17 18 19 20 21 22 23 24 25 26 27 28 29 30 31 32 33 34 35 36 37 38 39 40 41 42 43 44 45 46 47 48 49 50 51 52 53 54 55 56 57 58 59 60 61 62 63 64 65 66 67 68 69 70 71 72 73 74 75 76 77 78 79 80 81 82 83 84 85 86 87 88 89 90 91 92 93 94 95 96 97 98 99 100 101 102 103 104 105 106 107 108 109 |
#include <ArduinoBLE.h> #include <dht.h> #define dht_pin 7 // Analog Pin sensor is connected to dht DHT; int temperature;; int humidity; int oldtemperature = 0; int oldhumidity = 0; // Bluetooth® Low Energy Service BLEService tempService(«1100»); BLEService humService(«1101»); // Bluetooth® Low Energy Battery Level Characteristic BLEUnsignedCharCharacteristic temperatureChar(«2803», BLERead | BLENotify); // standard 16-bit characteristic UUID BLEUnsignedCharCharacteristic humidityChar(«2804», BLERead | BLENotify); // standard 16-bit characteristic UUID // remote clients will be able to get notifications if this characteristic changes long previousMillis = 0; // last time the dht value was checked, in ms void setup() { Serial.begin(9600); // initialize serial communication while (!Serial); pinMode(LED_BUILTIN, OUTPUT); // initialize the built-in LED pin to indicate when a central is connected // begin initialization if (!BLE.begin()) { Serial.println(«starting BLE failed!»); while (1); } BLE.setLocalName(«DhtMonitor»); BLE.setAdvertisedService(tempService); // add the service UUID tempService.addCharacteristic(temperatureChar); // add the temperature characteristic BLE.addService(tempService); // Add the temperature service temperatureChar.writeValue(oldtemperature); // set initial value for this characteristic BLE.setAdvertisedService(humService); // add the service UUID humService.addCharacteristic(humidityChar); // add the humidity characteristic BLE.addService(humService); // Add the humidity service humidityChar.writeValue(oldhumidity); // set initial value for this characteristic // start advertising BLE.advertise(); Serial.println(«Bluetooth® device active, waiting for connections…»); } void loop() { // wait for a Bluetooth® Low Energy central BLEDevice central = BLE.central(); // if a central is connected to the peripheral: if (central) { Serial.print(«Connected to central: «); // print the central’s BT address: Serial.println(central.address()); // turn on the LED to indicate the connection: digitalWrite(LED_BUILTIN, HIGH); while (central.connected()) { long currentMillis = millis(); if (currentMillis — previousMillis >= 200) { previousMillis = currentMillis; updatedht(); } } // when the central disconnects, turn off the LED: digitalWrite(LED_BUILTIN, LOW); Serial.print(«Disconnected from central: «); Serial.println(central.address()); } } void updatedht() { DHT.read11(dht_pin); temperature = DHT.temperature; humidity = DHT.humidity; if ((temperature != oldtemperature) || (humidity != oldhumidity)) // if the dht value has changed { Serial.print(«Temperature: «); // print it Serial.print(temperature); Serial.println(«*C»); Serial.print(«Humidity: «); // print it Serial.print(humidity); Serial.println(«%»); temperatureChar.writeValue(temperature); // and update the temperature oldtemperature = temperature; // save the level for next comparison humidityChar.writeValue(humidity); // and update the humidity oldhumidity = humidity; // save the level for next comparison } } |
In BLE Service we assigned two services 1100 and 1101. Similarly, we assigned 2803 and 2804 as UUID numbers for temperature and humidity values.
Now upload this code. Then open the Serial Monitor. The BLE will be active again and Serial Monitor will show waiting for connections. Now go to nRF Connect App and scan it. The DHT Monitor will appear. So click on connect.

Once the phone establishes a connection, the temperature-humidity value is shown on the serial monitor.

After connection click on unknown service. One of the unknown services with UUID 2803 is for temperature and another unknown service with UUID 2804 is for humidity.

Click on the download logo. So it’s showing value as 1A. Now the 1A is a hex value which in decimal means 26. So the temperature is 26 degrees.

Similarly in the other unknown service, the hex value appears as 31. The 31 in hexadecimal is equivalent to 49. So the humidity is 49%.
So this is how you can Send/Receive Sensor Data to Mobile App with Seeed XIAO BLE nRF52840 Sense & on nRF Connect Application.
Video Tutorial & Guide
How to use 𝗫𝗜𝗔𝗢 𝗕𝗟𝗘 𝗻𝗥𝗙𝟱𝟮𝟴𝟰𝟬 𝗦𝗲𝗻𝘀𝗲 with Android/IOS App || IMU Sensor, Microphone, Pedometer

Doc. ID 4399_003 v2.0 2017-07-06
nRF Connect Bluetooth® low energy
User Guide
v2.0

Contents
Doc. ID 4399_003 v2.0 Page 2
Contents
Revision history…………………………………………………………………………………………………….. 3
Chapter1:nRF Connect Bluetooth® low energy……………………………………..4
Chapter2:Installing nRF Connect Bluetooth® low energy………………………5
Chapter3:Establishing serial port connection to a local device……………..6
Chapter4:Establishing Bluetooth® low energy connections…………………..8
Chapter5:Viewing service details………………………………………………………10
Chapter6:Updating connection parameters……………………………………… 11
Chapter7:Pairing devices…………………………………………………………………. 12
Chapter8:Configuring server setup………………………………………………….. 14
Chapter9:Setting up advertising……………………………………………………….16
Chapter10:Updating firmware over the air………………………………………..17
Chapter11:Adding UUID definitions…………………………………………………. 20
Chapter12:Troubleshooting………………………………………………………………21
Legal notices………………………………………………………………………………………………………..22
Doc. ID 4399_003 v2.0 Page 3
Revision history
Date Version Description
July 2017 2.0 • Application ported to new framework
• Added support for multiple custom properties in advertisement
data
• Added support for Buttonless DFU Service
January 2017 1.1 • Added Secure DFU
• Added support for nRF52 Development Kit PCA10056
July 2016 1.0 First release

Doc. ID 4399_003 v2.0 Page 4
Chapter 1
nRF Connect Bluetooth® low energy
nRF Connect Bluetooth® low energy is an app for the nRF Connect desktop application for getting familiar
with, developing, and testing Bluetooth® low energy devices. It allows you to set up a local device,
connect it to advertising devices and discover their services, maintain the connection and the connection
parameters, pair the devices, and change the server setup for your local device. It also offers a detailed log for
troubleshooting purposes.
Supported devices • PCA10028 nRF51 Development Kit
• PCA10040 nRF52 Development Kit
• PCA10056 nRF52 Development Kit
• PCA10031 nRF51 Dongle
Supported operating systems • Microsoft Windows 7, 8, and 10
• OS X 10.10 and above
• Ubuntu Linux 14.04 and 16.04
Doc. ID 4399_003 v2.0 Page 5
Chapter 2
Installing nRF Connect Bluetooth®
low energy
This section describes the installation procedure for the nRF Connect Bluetooth® low energy app.
To install the app, you need to have the nRF Connect desktop application installed.
After installing nRF Connect, you can install the nRF Connect Bluetooth® low energy app:
1. Open nRF Connect.
2. Click Add/remove apps.
3. Click Install next to Bluetooth low energy.
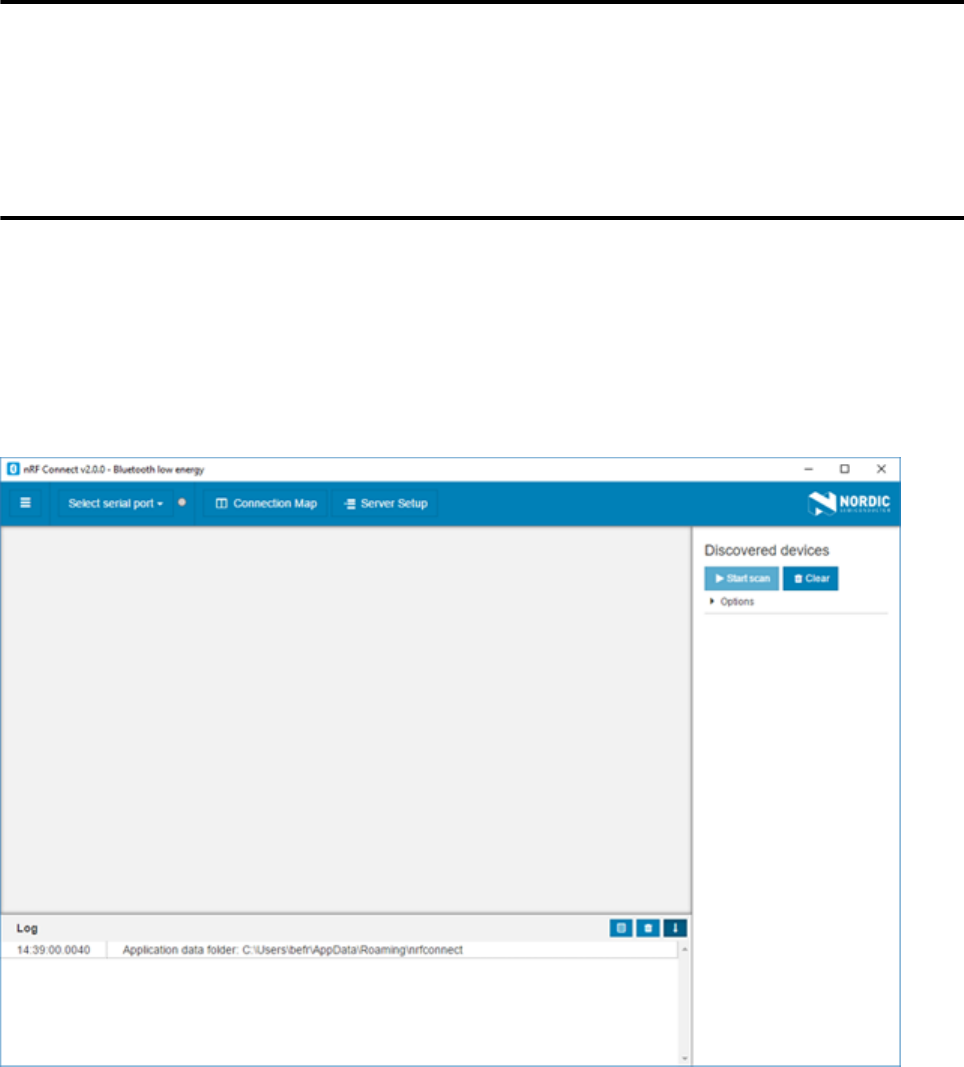
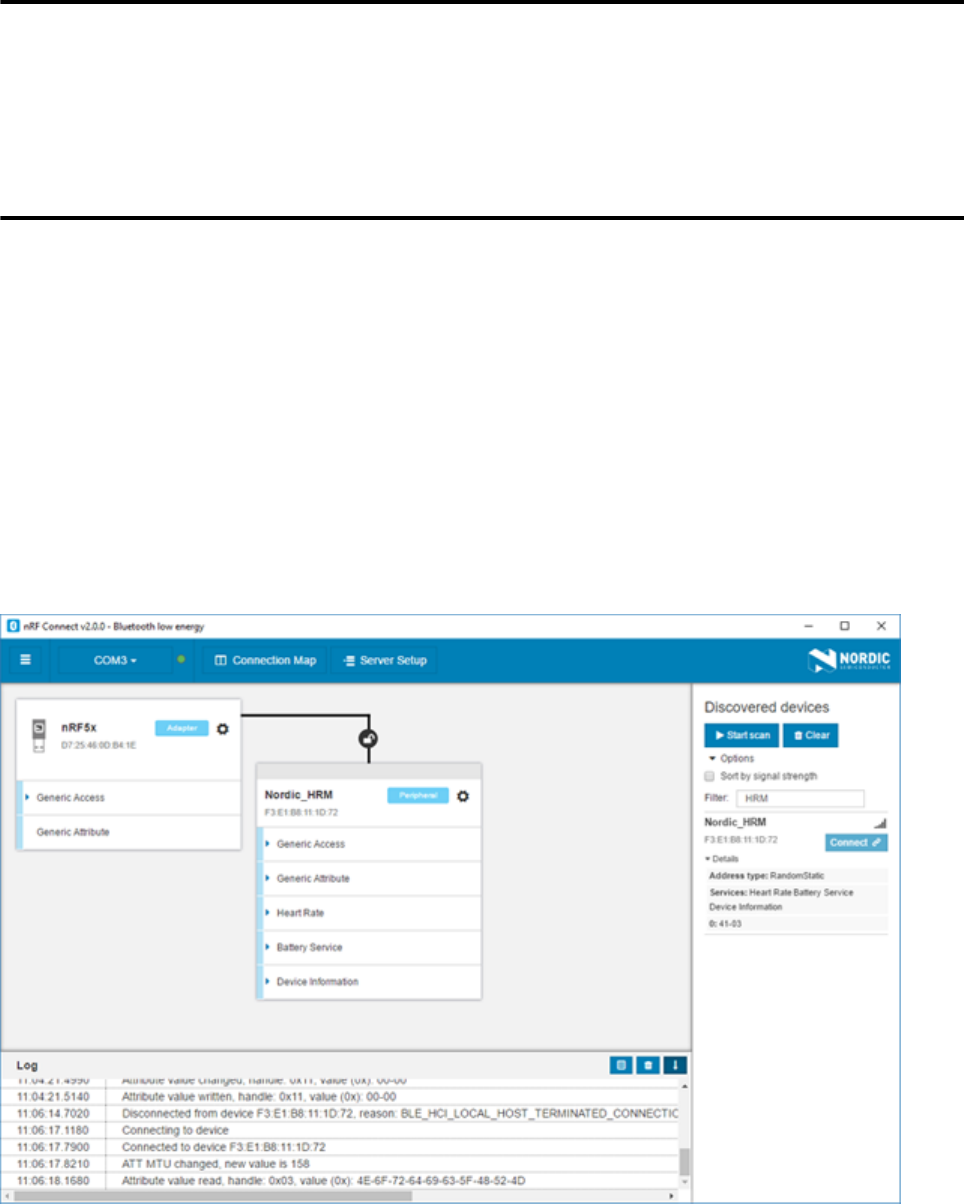
Figure 1: Application window
After starting the nRF Connect Bluetooth® low energy app, a window consisting of the following main
elements is displayed:
• Main view in the center: Initially empty, but will be populated with local and remote Bluetooth® low energy
devices
• Navigation bar at the top: Selecting serial port and application screen
• Three-dash button on the top-left corner of the navigation bar: Opening the nRF Connect app manager
• Discovered devices view on the right side: Starting scan and viewing discovered devices
• Log view at the bottom: Viewing the most important log events tagged with a timestamp
Doc. ID 4399_003 v2.0 Page 6
Chapter 3
Establishing serial port connection
to a local device
The nRF Connect Bluetooth® low energy app requires a serial port connection to a local development kit or
dongle. The nRF SoC (System on Chip) on the development kit or dongle is controlled by the app which sends
serialized commands to it over a serial port.
To set up a local device, complete the following steps:
1. Connect a development kit or dongle to the computer with USB.
2. In the navigation bar, click on the Select serial port menu.
3. Select a serial port for the device.
When the serial port is selected, the Select serial port menu shows the name of the selected port.
If the development kit or dongle has not been used with the nRF Connect Bluetooth® low energy app before,
you may be asked to update the J-Link firmware and connectivity firmware for the device. You need to have
the correct connectivity firmware on the nRF SoC to proceed. When the nRF SoC has been programmed with
the correct firmware, the nRF Connect Bluetooth® low energy app proceeds to connect to it over UART. When
the connection is established, the device appears in the main view.
Important: When using OS X, an issue with the SEGGER J-Link OB firmware leads to the corruption of
long packets over UART. See www.nordicsemi.com/nRFConnectOSXfix for more information.
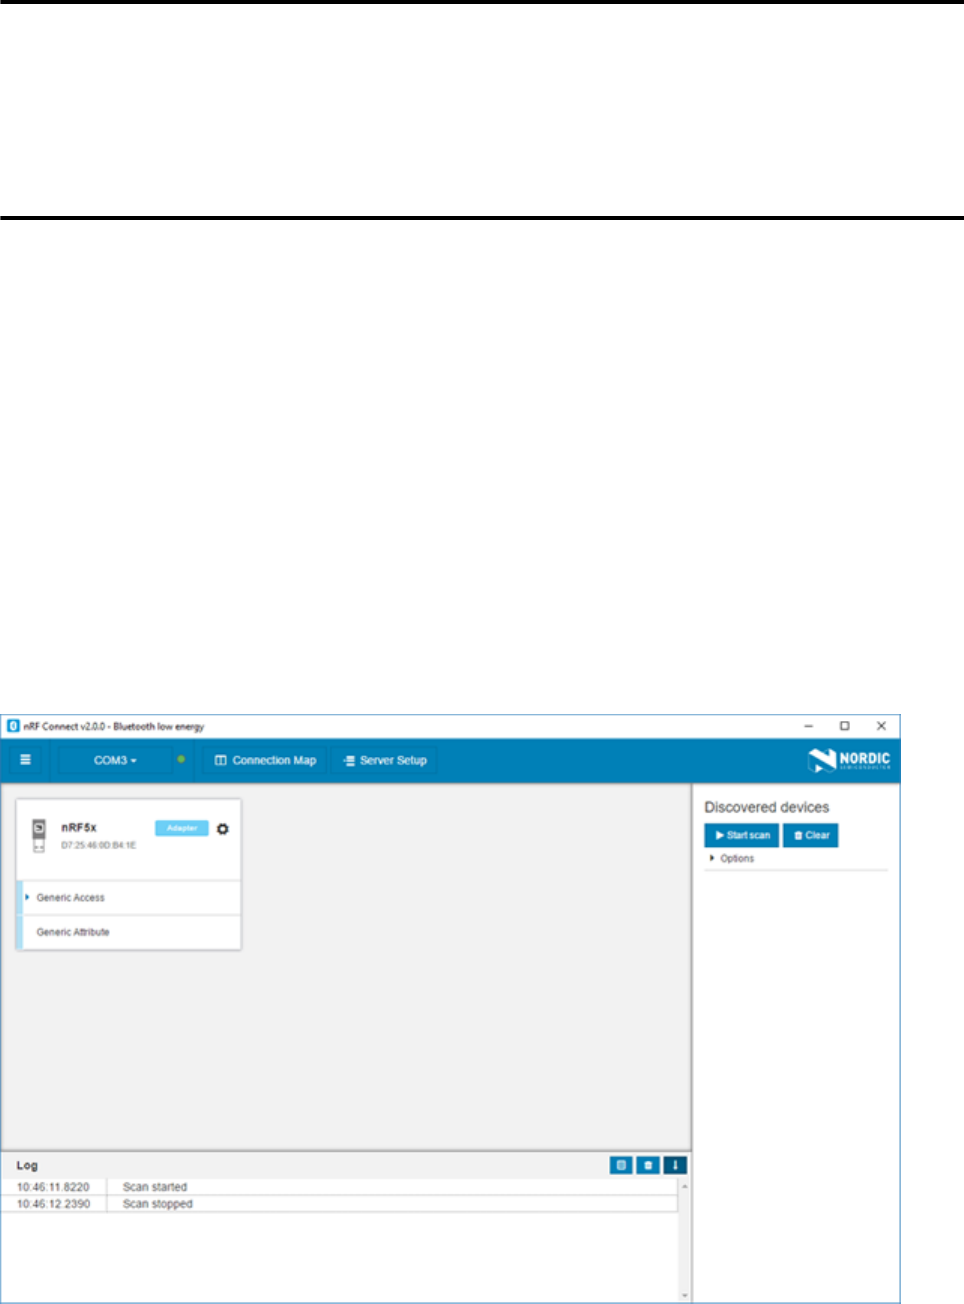
Figure 2: Local device view
3 Establishing serial port connection to a local device
Doc. ID 4399_003 v2.0 Page 7
The local device is labeled adapter to signal that it is connected locally to the computer. The device name and
Bluetooth® device address are shown at the top. The attribute table of the device is shown below them.
To expand a menu that shows actions and configurations available for the local device, click the Device
options icon .
Doc. ID 4399_003 v2.0 Page 8
Chapter 4
Establishing Bluetooth® low energy
connections
The nRF Connect Bluetooth® low energy app can establish and maintain up to eight simultaneous Bluetooth®
low energy connections.
To connect to devices, complete the following steps:
1. To scan for nearby Bluetooth® devices, click the Start scan button in the Discovered devices view.
The advertising devices start to appear in a list in the Discovered devices view. Each entry in the list
shows the name, address, and RSSI of the received advertising packet. For information on how to set up
advertising for a device, see Setting up advertising on page 16.
2. To view the advertising type and data fields of a packet, select the packet entry in the list.
3. To sort the list according to signal strength and thus according to which device is closest, click Options and
select Sort by signal strength.
4. To establish a Bluetooth® connection with a peer device, click the Connect button associated with the
device.
Figure 3: Discovered services
When the connection has been established, a new device appears in the main view to the right of the local
device. The nRF Connect Bluetooth® low energy app automatically performs an initial service discovery. The
discovered services are listed below the connected device. Attributes that are known to the application
are shown by their name. Attributes that are unknown to the application are shown by their UUID only. For
information on how to add UUID definitions, see Adding UUID definitions on page 20.
4 Establishing Bluetooth® low energy connections
Doc. ID 4399_003 v2.0 Page 9
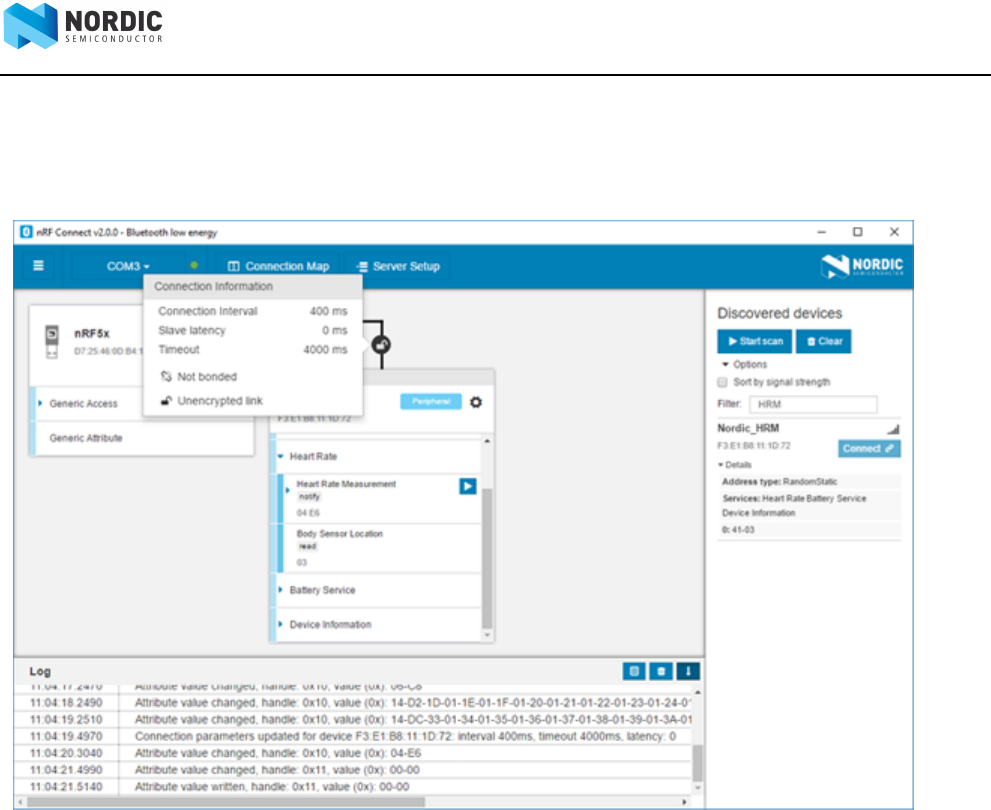
A line connects the local and remote device to signal that they are connected over Bluetooth®. Move the
mouse pointer over the padlock icon on the line to open a connection info dialog that shows the parameters
of the connection as well as the encryption and bond state.
Figure 4: Hovering over the padlock icon
Doc. ID 4399_003 v2.0 Page 10
Chapter 5
Viewing service details
The nRF Connect Bluetooth® low energy app can discover and display services, characteristics, and descriptors
of a connected peer device’s attribute table.
• To view the handle and UUID of an attribute, move the mouse pointer over the attribute name.
A hover text is displayed.
•To view the characteristics of a service, click the Expand/collapse icon .
The characteristics have different buttons available depending on the associated properties. Read, write,
and notify actions are available if the corresponding properties are available for the characteristic.
• To view descriptors, expand the characteristics.
• To configure the peer device to start sending notifications, click the Toggle notifications icon .
If a notification has been received on a device, it is displayed with a highlight color on the corresponding
attribute and its value is updated.
If a service or characteristic does not have any child attributes, the list is empty when you click the Expand/
collapse icon .
Doc. ID 4399_003 v2.0 Page 11
Chapter 6
Updating connection parameters
In a connection, you can request new connection parameters and respond to an incoming connection
parameter update request.
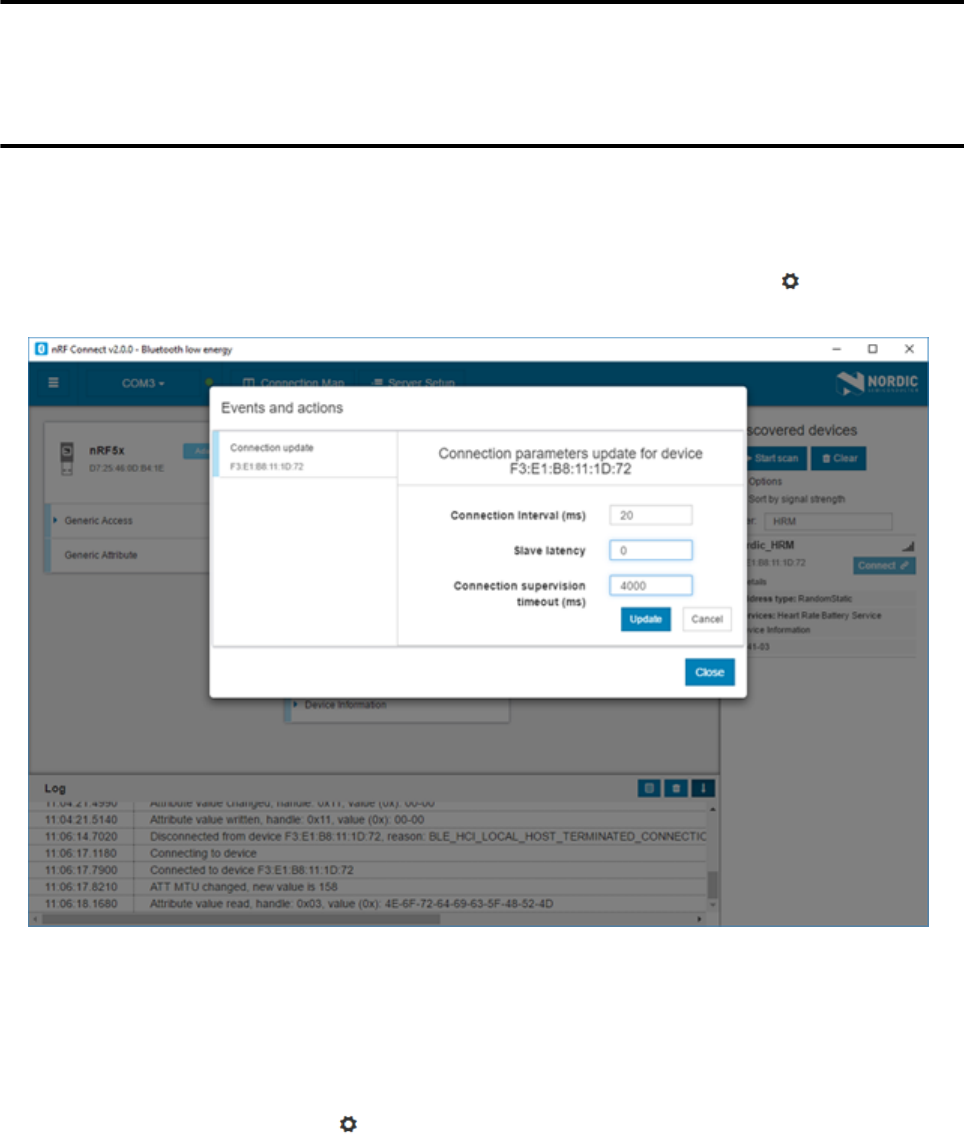
To define connection parameters, complete the following steps:
1. To expand the device options for the connected device, click the Device options icon .
2. To open the Connection update dialog, click Update connection….
3. Set the desired parameters in the dialog, then click Update.
4. To close the Connection update dialog, click Close.
There are two main options for responding to update requests: Letting the nRF Connect Bluetooth® low
energy app accept the request automatically (default) or responding to the request manually.
To select the responding option, complete the following steps:
1. Click the local Device options icon .
2. Select or deselect Auto accept update requests.
Doc. ID 4399_003 v2.0 Page 12
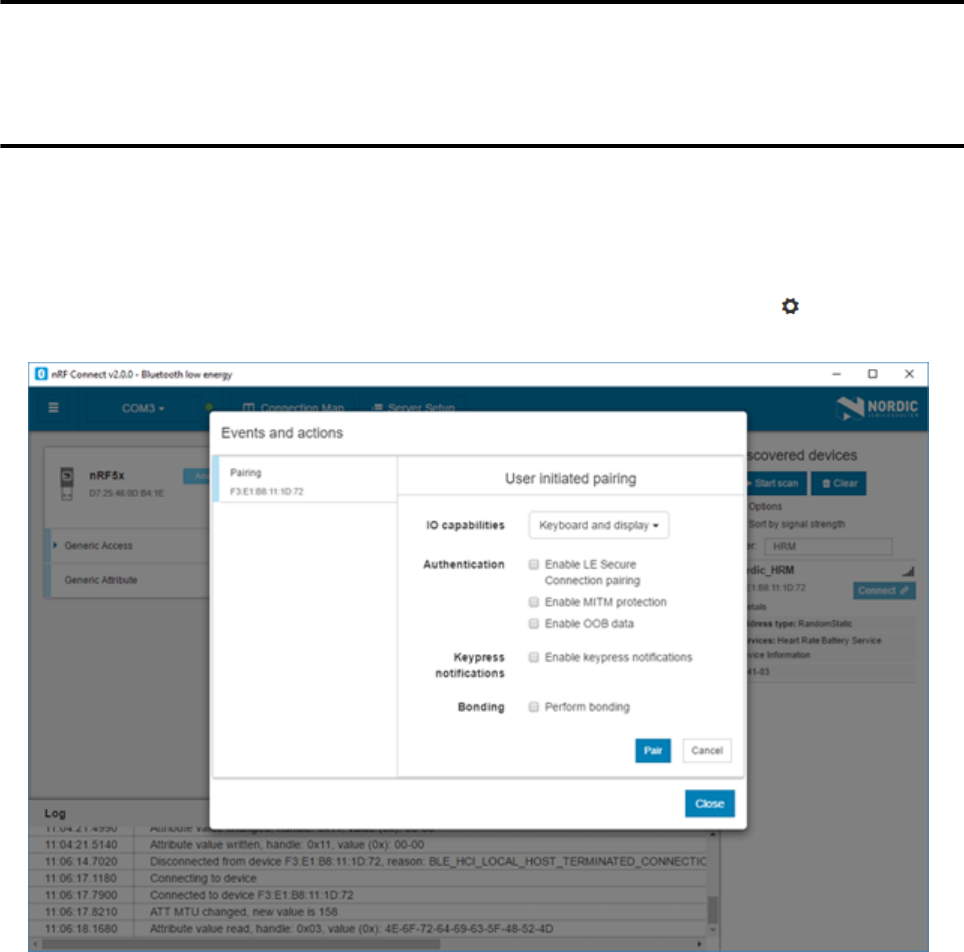
Chapter 7
Pairing devices
Pairing is the process of exchanging security keys and establishing an encrypted link. The level of security is
configurable, and it ranges from an unencrypted link with no security to an encrypted link with authentication
and protection against man-in-the-middle attacks.
To pair with a connected device, complete the following steps:
1. To expand the device options for the connected device, click the Device options icon .
2. To open the Pairing dialog, click Pair….
3. Set the desired parameters in the dialog, then click Pair.
Depending on the chosen security parameters, an additional dialog may be shown for passkey, out-of-
band data, or numerical comparison input.
4. To close the Pairing dialog, click Close.
When the pairing procedure has been completed, the following changes are displayed:
• A log entry shows the new security level of the connection.
• The connection info padlock changes to locked if the connection is encrypted.
• The event view text turns green to indicate success.
Bonding can also be established, which means creating and exchanging long-term keys that are used for
reestablishing an encrypted link without having to go through the pairing process.
Incoming pairing requests can be replied to automatically by the nRF Connect Bluetooth® low energy app
(default), or they can be handled by the user.
To select the replying option for pairing requests, complete the following steps:
7 Pairing devices
Doc. ID 4399_003 v2.0 Page 13
1. Click the local Device options icon .
2. Select or deselect Auto reply security requests.
When Auto reply security requests is selected, the nRF Connect Bluetooth® low energy app uses the
settings specified in Security parameters when automatically replying to the request.
To edit security parameters, complete the following steps:
1. Click the local Device options icon .
2. To open the Security parameters dialog, click Security parameters.
3. Click Apply when done.
Important:
• Bonding is supported, but the keys are not retained across application restarts.
• Address resolving is currently not supported. Therefore, using keys from a bond after the device has
changed address will most likely fail.

Doc. ID 4399_003 v2.0 Page 14
Chapter 8
Configuring server setup
The nRF Connect Bluetooth® low energy app supports the configuration of the local device’s GATT (Generic
Attribute profile) attribute table, also known as server setup. Adding attributes to the server setup allows the
local device to exchange data with a connected peer device.
The default server setup consists of two mandatory services: GATT and GAP (Generic Access Profile). These
services can be modified, but they cannot be removed, and you cannot extend them with more characteristics
or descriptors.
To add new attributes to the server setup, complete the following steps:
1. In the navigation bar, click the Server setup button.
Initially, the default server setup that is displayed contains only GAP and GATT services.
2. Click New service.
3. Select the added service.
A form is displayed.
4. Define the attribute values, then click Save.
5. To add a new characteristic, expand the added New Service, then click New characteristic.
6. Select the added characteristic.
A form is displayed.
7. Define the attribute values, then click Save.
Important: When adding a notify or indicate property on a characteristic, you need to add a Client
Characteristic Configuration Descriptor (CCCD) for that characteristic.
8. To add a new descriptor, expand the added New Characteristic, then click New descriptor.
9. Select the added descriptor.
A form is displayed.
10.Define the attribute values, then click Save.
11.When you have completed the server setup, click Apply to device to upload the setup to the local device.

8 Configuring server setup
Doc. ID 4399_003 v2.0 Page 15
Figure 5: Server setup
To save a server setup to file for later use, complete the following steps:
1. Click the local Device options icon .
2. Click Save setup….
3. Choose a directory and type a file name, then click Save.
To load a previously saved server setup from file, complete the following steps:
1. Click the local Device options icon .
2. Click Load setup….
3. Navigate to the right directory and select the file, then click Open.
Important: You cannot remove or overwrite a setup from the device. To enable the uploading of a
new server setup, hit the Reset button on the development kit. This updates the application state
appropriately. Alternatively, close and open the serial port in the device selector.
After the setup has been applied to the device, you can view the resulting setup by clicking the Connection
map button in the navigation bar. The new setup is reflected in the local device.
Doc. ID 4399_003 v2.0 Page 16
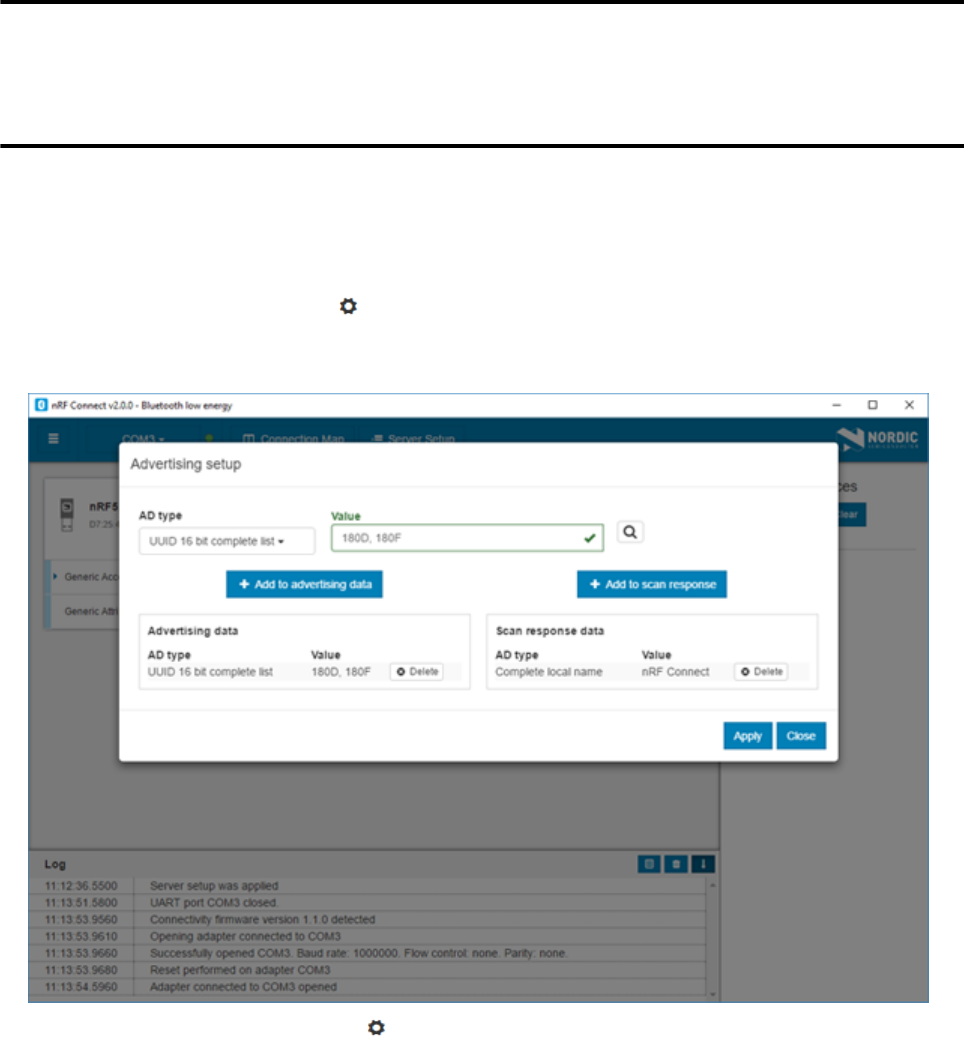
Chapter 9
Setting up advertising
The nRF Connect Bluetooth® low energy app can make the local device operate as a peripheral and start
sending connectable advertising packets. The contents of the advertising packets can be configured in the
advertising setup.
To start sending advertising packets, complete the following steps:
1. Click the local Device options icon .
2. To start advertising the device, click Start advertising.
3. Specify the contents of the advertising packets:
a) Click the local Device options icon .
b) To display the Advertising setup dialog, click Advertising setup.
c) From the AD type drop-down menu, select an AD type.
d) In the Value field, add a data value.
e) Select Add to advertising data or Add to scan response.
f) Repeat until all wanted fields are present.
g) Click Apply, then click Close.
Doc. ID 4399_003 v2.0 Page 17
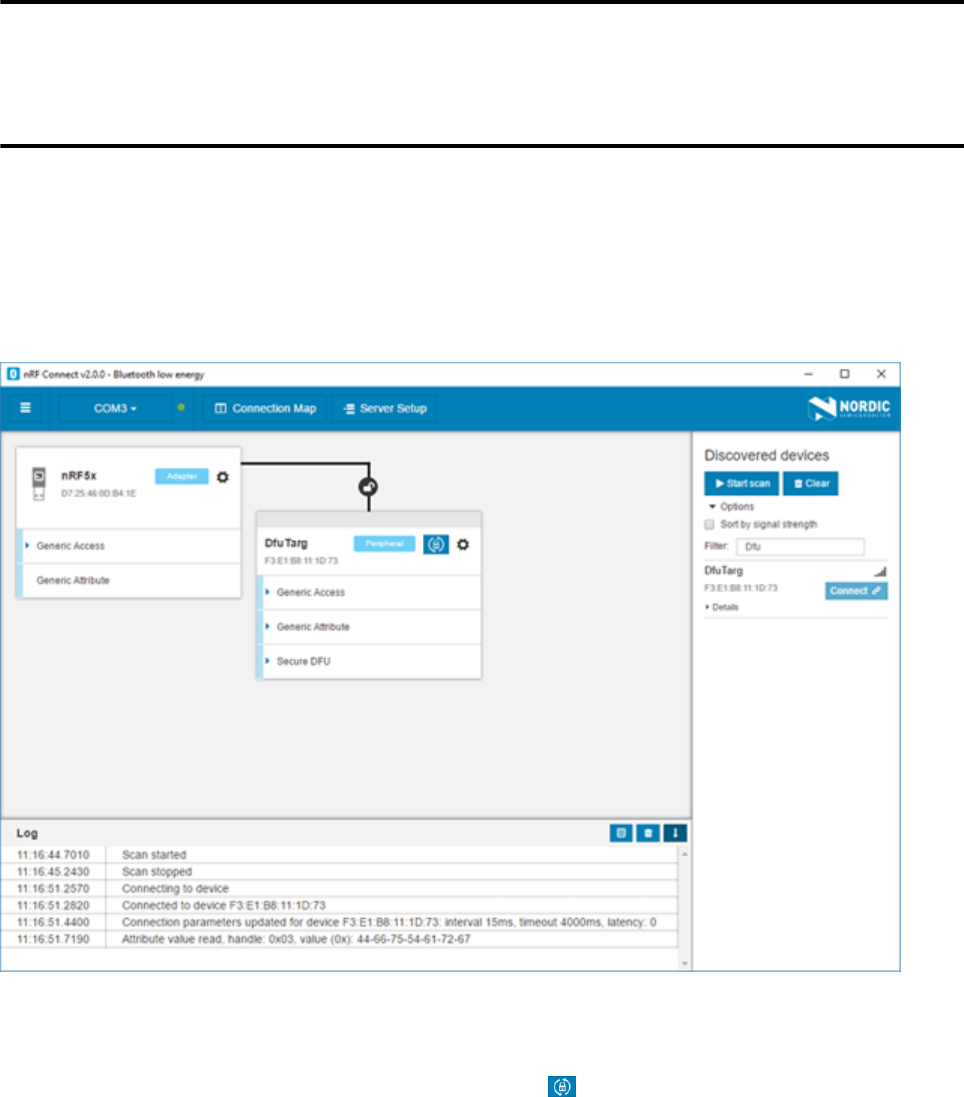
Chapter 10
Updating firmware over the air
If the connected device has Nordic Device Firmware Update (DFU) Service, you can update the firmware on
the device.
For more information on the DFU process, see Device Firmware Update process. For DFU bootloader
examples, see DFU bootloader examples.
For a device that has DFU Service, Secure DFU appears in the device’s list of discovered services and the Start
Secure DFU button appears in the list header.
Figure 6: Secure DFU in the list of discovered services
To update the firmware, complete the following steps:
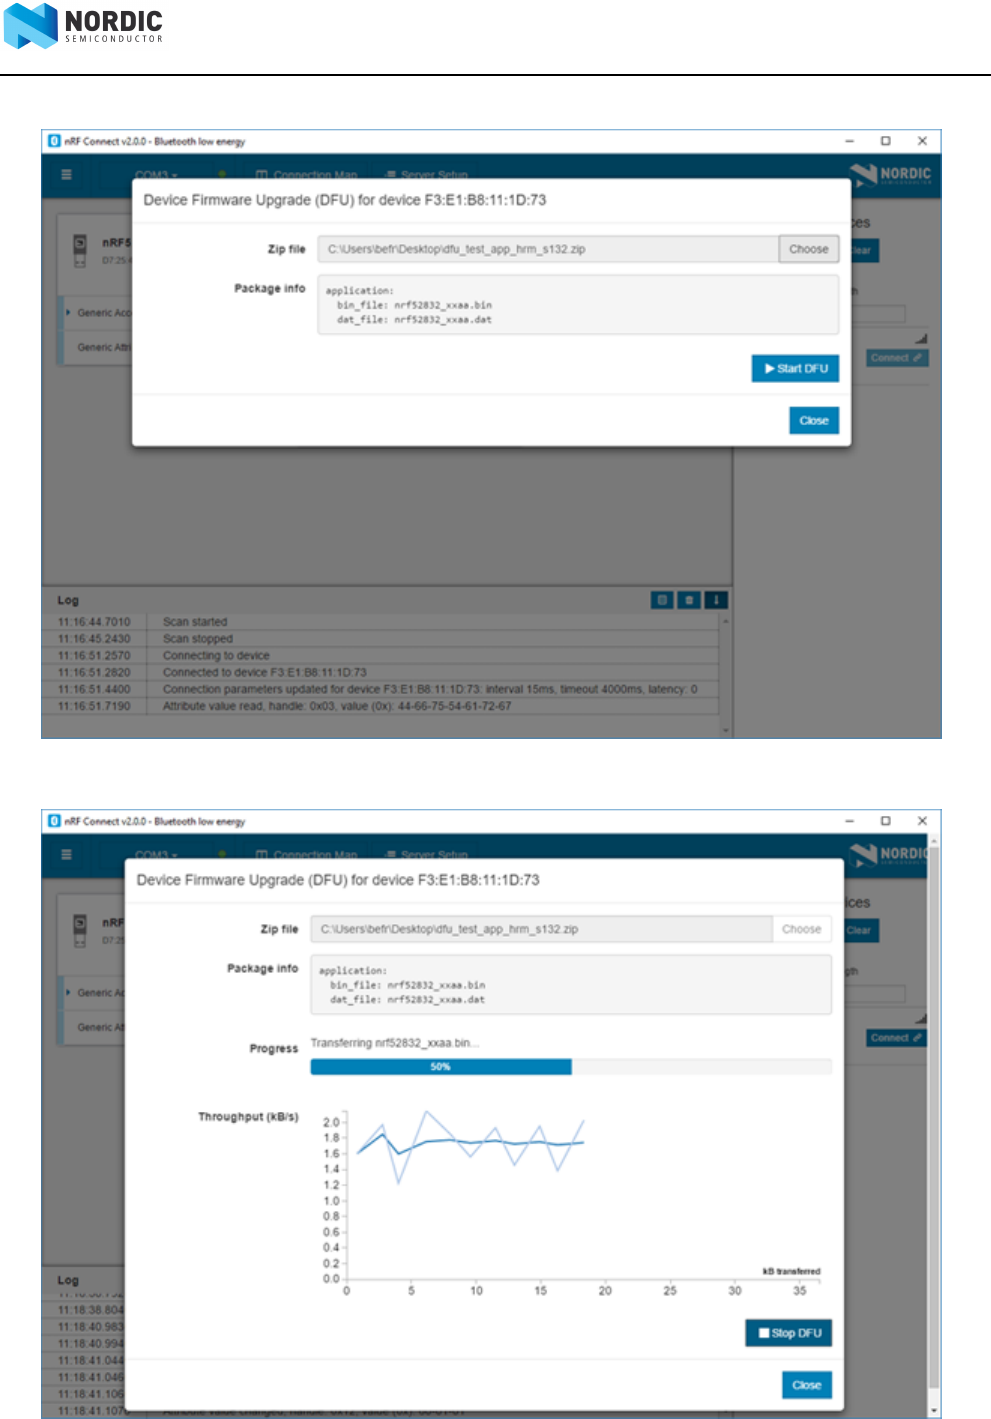
1. To open the DFU dialog, click the Start Secure DFU button .
2. Browse and select a DFU zip package file on your computer.
Important: To create the DFU zip package file, use the nrfutil tool. See the nrfutil documentation
for more information.
Information on the content of the DFU zip package is displayed in the Package info field.
10 Updating firmware over the air
Doc. ID 4399_003 v2.0 Page 18
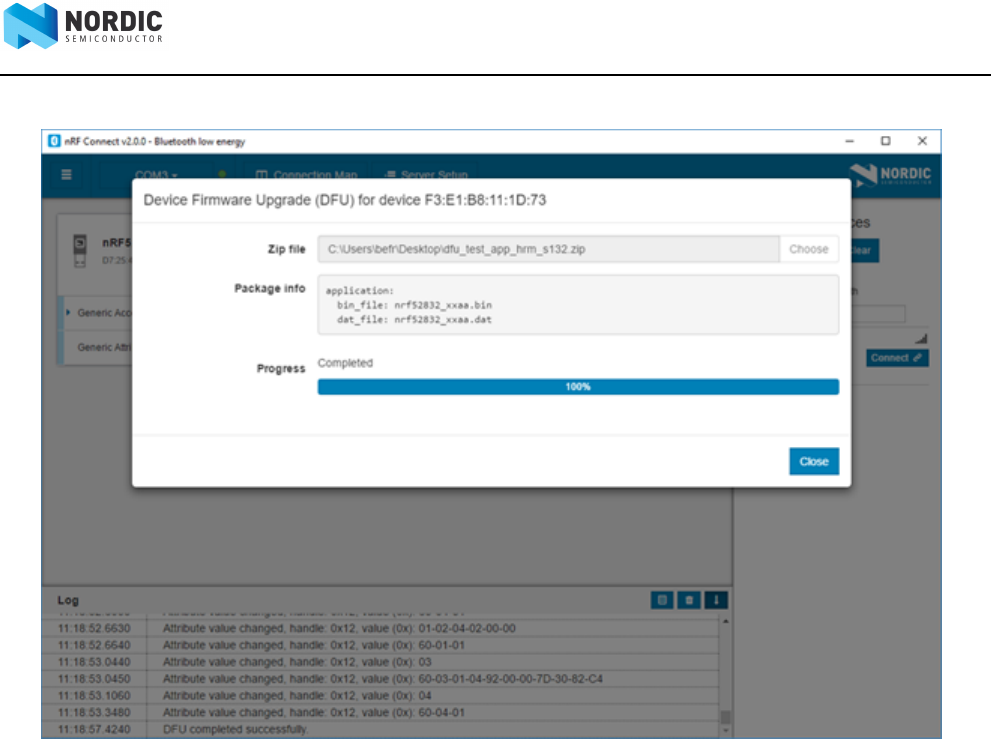
3. To start the transfer of the DFU package to the connected peer device, click Start DFU.
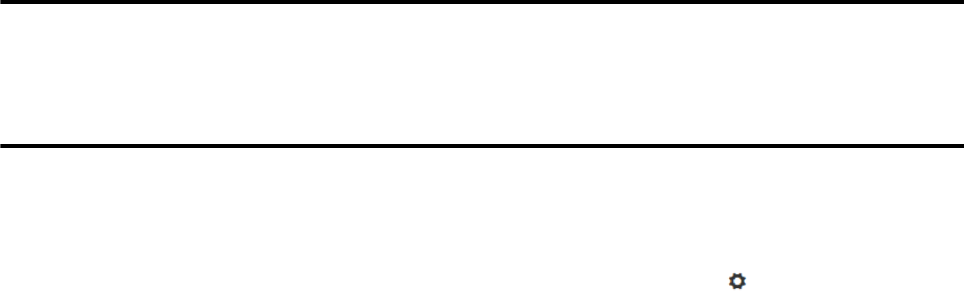
The progress bar shows the progress of the transfer.
4. When the progress bar has reached 100%, click Close.
10 Updating firmware over the air
Doc. ID 4399_003 v2.0 Page 19
To stop the transfer, click Stop DFU. The transfer continues from where it was stopped when you click Start
DFU again.
If you click Close before the DFU transfer has completed, a confirmation dialog appears. If you click OK in the
confirmation dialog, the transfer is canceled.
Doc. ID 4399_003 v2.0 Page 20
Chapter 11
Adding UUID definitions
The nRF Connect Bluetooth® low energy app comes with a list of predefined names and UUIDs for some well-
known profiles. You can extend this list with custom definitions.
To extend the list of known UUIDs, complete the following steps:
1. To expand the device options for the local device, click the Device options icon .
2. Click Open UUID definitions file.
The definitions file is opened in your default application for .json files.
3. Following the examples in the file, add your UUIDs, then save the file.
4. To load the changes, reconnect to the adapter or reload the application (CTRL + r).

Doc. ID 4399_003 v2.0 Page 21
Chapter 12
Troubleshooting
For troubleshooting, the nRF Connect Bluetooth® low energy app has a more detailed log file than the one
shown in the log view. To open the detailed log file, click the Open log file button in the log view.
Firmware programming If you receive the error Could not connect to debug
probe, verify that J-Link software is properly installed
on the system.
If the device has been programmed with memory
protection, the nRF Connect Bluetooth® low energy
app cannot program the firmware. To erase the
device, download nRF Command Line Tools from
Nordic Semiconductor and issue the following
command from the command line:
nrfjprog -e -f <nrf51 or nrf52>
In Windows: If you receive the error Could not load
nrfjprog DLL, verify that nRF Command Line Tools
are installed.
OS X J-Link issue In OS X: An issue with the SEGGER J-Link OB firmware
leads to the corruption of long packets over UART.
See www.nordicsemi.com/nRFConnectOSXfix for
more information.
Serial port access permissions on Ubuntu Linux If you receive errors when trying to open the serial
port in the nRF Connect Bluetooth® low energy app
on Ubuntu Linux, you may need to grant serial port
access permissions to your user. To do this, run the
following command:
sudo usermod -a -G dialout <username>
Doc. ID 4399_003 v2.0 Page 22
Legal notices
By using this documentation you agree to our terms and conditions of use. Nordic Semiconductor may
change these terms and conditions at any time without notice.
Liability disclaimer
Nordic Semiconductor ASA reserves the right to make changes without further notice to the product to
improve reliability, function or design. Nordic Semiconductor ASA does not assume any liability arising out of
the application or use of any product or circuits described herein.
All information contained in this document represents information on the product at the time of publication.
Nordic Semiconductor ASA reserves the right to make corrections, enhancements, and other changes to
this document without notice. While Nordic Semiconductor ASA has used reasonable care in preparing
the information included in this document, it may contain technical or other inaccuracies, omissions and
typographical errors. Nordic Semiconductor ASA assumes no liability whatsoever for any damages incurred by
you resulting from errors in or omissions from the information included herein.
Life support applications
Nordic Semiconductor products are not designed for use in life support appliances, devices, or systems where
malfunction of these products can reasonably be expected to result in personal injury.
Nordic Semiconductor ASA customers using or selling these products for use in such applications do so at
their own risk and agree to fully indemnify Nordic Semiconductor ASA for any damages resulting from such
improper use or sale.
RoHS and REACH statement
Nordic Semiconductor products meet the requirements of Directive 2002/95/EC of the European Parliament
and of the Council on the Restriction of Hazardous Substances (RoHS) and the requirements of the REACH
regulation (EC 1907/2006) on Registration, Evaluation, Authorization and Restriction of Chemicals.
The SVHC (Substances of Very High Concern) candidate list is continually being updated. Complete hazardous
substance reports, material composition reports and latest version of Nordic’s REACH statement can be found
on our website www.nordicsemi.com.
Trademarks
All trademarks, service marks, trade names, product names and logos appearing in this documentation are the
property of their respective owners.
Copyright notice
© 2017 Nordic Semiconductor ASA. All rights are reserved. Reproduction in whole or in part is prohibited
without the prior written permission of the copyright holder.
All rights reserved.
Reproduction in whole or in part is prohibited without the prior written permission of the copyright holder.