INTRODUCTION
This clock is supplied with a remote sensor (THGN122N) and can support up to 3 sensors in total (additional sensors sold separately).
NOTE
Please keep this manual handy as you use your new product. It contains practical step-by-step instructions, as well as technical specifications and warnings you should know about.
CLOCK OVERVIEW
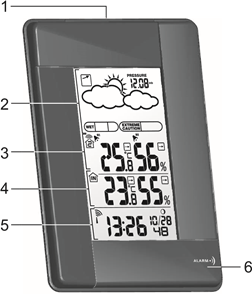
FRONT VIEW
- SNOOZE
- Weather Forecast Area
- Outdoor Temperature Area
- Indoor Temperature Area
- Clock / Alarm Area
: View alarm status; set alarm
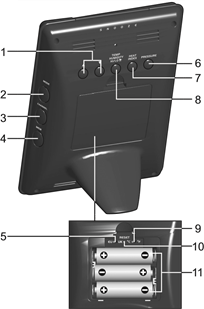
BACK VIEW
: Increase / decrease setting; activate / deactivate clock reception signal
- MODE: Change settings / display
- CHANNEL: Switch remote sensor display
- MEM: View current, maximum and minimum temperature / humidity
- EU / UK switch
- PRESSURE: Select pressure unit; set altitude
- HEAT INDEX: Display heat index
- TEMP / HUMIDITY HI / LO
: Change settings or enable / disable hi or lo temperature / humidity alarm for channel 1
- °C / °F: Select temperature unit
- RESET: Reset unit to default settings
- Battery compartment
LCD DISPLAY
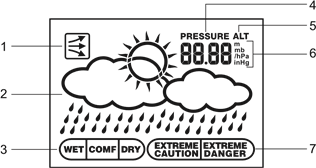
Weather Forecast Area:
- Pressure trend
- Weather forecast
- Comfort zone
- Pressure icon
- Altitude icon
- Pressure / altitude unit
- Heat index
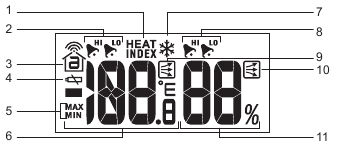
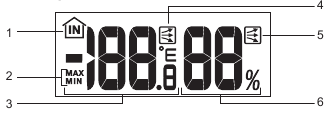
Outdoor Temperature Area:
- Heat index icon
- Hi / lo temperature alarm
- Sensor reception icon
- Sensor battery low
- Max / min icon
- Temperature display
- Ice warning is active
- Hi / lo humidity alarm
- Temperature trend
- Humidity trend
- Humidity display
Indoor Temperature Area:
- Indoor sensor icon
- Max / min icon
- Temperature display
- Temperature trend
- Humidity trend
- Humidity display
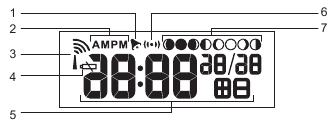
Clock / Alarm Area:
- Alarm set
- AM / PM icon
- Clock signal reception
- Low battery icon
- Clock
- Alarm mode icon
- Moon phase
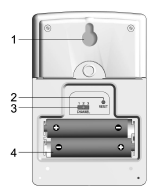
REMOTE SENSOR (THGN122N)
- LED status indicator: Blinks red during data transmission
- Wall mount hole
- RESET hole
- CHANNEL switch
- Battery compartment
GETTING STARTED
BATTERIES
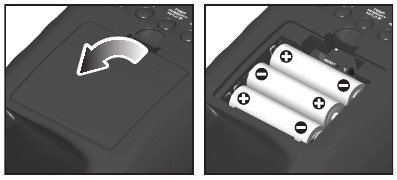
Insert batteries before first use, matching the polarity (+ and -). Press RESET after each battery change.
NOTE
Do not use rechargeable batteries. We recommend that you use alkaline batteries with this product for longer usage and lithium batteries in temperatures below freezing.
REMOTE SENSOR
The sensor collects temperature and humidity readings approx. every 40 seconds and sends them to the main unit. The main unit can collect data from up to 3 sensors.
To set up the sensor:
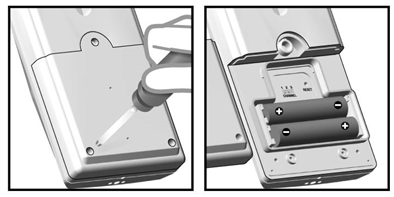
- Remove the screws from the battery door.
- Insert the batteries, matching the polarity (+ / -).
- Select a channel. Make sure you use a different channel for each sensor.
- Place the sensor near the main unit. Press RESET on the sensor.
- Simultaneously press CHANNEL and MEM on the main unit to initiate signal sending between the sensor and main unit.
- Close the battery door and secure the screws.
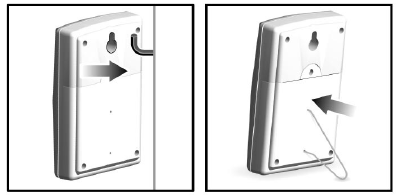
- Place the sensor in the desired location using the table stand or wall mount.
The transmission range may vary depending on many factors. You may need to experiment with various locations to get the best results.
Standard Alkaline batteries contain significant amounts of water. Because of this they will freeze in low temperatures of approximately -12°C (10°F). Disposable Lithium batteries have a much lower threshold for temperature with an estimated freezing range of below -30°C (-22°F). Wireless ranges can be impacted by a variety of factors such as extremely cold temperatures. Extreme cold may temporarily reduce the effective range between the sensor and the base station. If the unit’s performance fails due to low temperature, the unit will resume proper functioning as the temperature rises to within the normal temperature range (i.e. no permanent damage will occur to the unit due to low temperatures).
To search for a sensor:
Simultaneously, press and hold MEM and CHANNEL for 2 seconds.
NOTE
If the sensor is still not found, check the batteries, obstructions, and remote unit location.
CLOCK
CLOCK RECEPTION
This product is designed to synchronize its date and time automatically once it is within range of:
- DCF-77 generated from Frankfurt, Germany for Central Europe.
- MSF-60 generated from Rugby, England.
The clock collects the radio signals whenever it is within 1500 km (932 miles) of a signal.
NOTE
Slide the EU / UK switch to appropriate position for your location. Repeat each time you reset the unit.
NOTE
Initial reception takes 2-10 minutes for first set up or when RESET is pressed. Once complete, the reception icon will stop blinking. If the signal is weak, it can take up to 24 hours to get a valid signal.
RECEPTION SIGNAL
Clock signal reception indicator:
To enable and force a signal search:
Press and hold for 2 seconds.
To disable the signal reception:
Press and hold for 2 seconds.
SET CLOCK
If the clock signal reception is enabled and a signal is being received the clock does not need to be manually set.
NOTE
The time zone offset can be used to set the clock up to + / — 9 hours from the received clock signal time. If you have disabled the clock signal reception (i.e. manually setting the clock), do not set a value for time zone offset.
NOTE
The language options are English (E), German (D), French (F), Italian (I), and Spanish (S).
Press MODE to choose between the clock with seconds and clock with weekday display modes.
ALARM
To set the alarm:
- Press and hold ALARM for 2 seconds.
- Press
to set hour / minute.
- Press ALARM to confirm.
indicates alarm is ON.
To enable / disable the alarm:
- Press ALARM to display alarm time.
- Press ALARM again to turn alarm ON / OFF.
To silence the alarm:
- Press SNOOZE to silence it for 8 minutes.
OR - Press any key except SNOOZE to turn the alarm off and activate it again after 24 hours.
BAROMETER
Barometer readings from the past 24 hours are stored by the main unit and used to provide weather forecast.
To select barometer measurement unit:
Press PRESSURE to toggle between mb and inHg.
SET ALTITUDE
To ensure barometric readings are reliable set the altitude to reflect distance from sea level at your position.
NOTE
The maximum operating altitude for the barometer and weather forecast is 2500m (8202 ft).
WEATHER FORECAST
This product forecasts the next 12 to 24 hours of weather within a 30-50 km (19-31 mile) radius based on barometric pressure trend readings.
TEMPERATURE AND HUMIDITY
To toggle temperature unit:
Press °C / °F.
To view outdoor sensors temperature readings:
Press CHANNEL.
To auto-scan between sensors:
Press and hold CHANNEL for 2 seconds.
Each sensor’s data is displayed for 3 seconds.
To end auto-scan:
Press CHANNEL or MEM.
To toggle between current, minimum and maximum records for the selected sensor:
Press MEM repeatedly.
To clear the records:
Press and hold MEM for 2 seconds.
TEMPERATURE, HUMIDITY AND PRESSURE TREND
The temperature, humidity and pressure trend icons are based on recent sensor readings.
ICE WARNING
If the channel 1 sensor falls between 3°C to –2°C (37°F to 28°F), flashes to warn you that the temperature is approaching freezing.
NOTE
The warning will automatically stop if the temperature goes outside the ice-warning range.
HI / LO TEMPERATURE / HUMIDITY ALARMS
Temperature and humidity alerts can be set to sound if sensor set to channel 1 records above or below a temperature/humidity of your choice.
To set alarm ON / OFF:
To silence the hi / lo alarm:
Press any key. The alarm resets automatically and will resound if the hi / lo temperature is recorded again.
HEAT INDEX
The heat index combines temperature and humidity data to describe the actual temperature felt.
| WARNING | HEAT INDEX | MEANING |
| Extreme danger | 54.5°C / (130°F) or above | Strong risk of dehydration / sun stroke |
| Danger | 40.5 — 54°C (105 — 129°F) | Heat exhaustion likely |
| Extreme caution | 32.2 — 40°C (90 — 104°F) | Possibility of heat dehydration |
| Caution | 26.6 — 31.7°C (80 — 89°F) | Possibility of heat exhaustion |
- To display the heat index, press HEAT INDEX.
- To toggle between current / maximum / minimum readings, press HEAT INDEX, then press CHANNEL to select channel 1-3 or indoor, followed by MEM.
- To toggle between temperature / humidity and heat index display, press and hold HEAT INDEX for 2 seconds. Press HEAT INDEX again to stop this feature.
NOTE
If the heat index is below 80°F / 26°C, or the desired channel is not working, the heat index will display NA.
COMFORT ZONE
The comfort zone assesses the climate based on current temperature and humidity measurements.
| ICON | TEMPERATURE | HUMIDITY |
 |
Any | > 70% |
 |
20 — 25°C (68 — 77°F) |
40 — 70% |
 |
Any | < 40% |
RESET
Press RESET to return the unit to the default settings.
PRECAUTIONS
This product is engineered to give you years of satisfactory service if you handle it carefully. Here are a few precautions:
- Do not subject the unit to excessive force, shock, dust, temperature or humidity, which may result in malfunction, shorter electronic life span, damaged battery and distorted parts.
- Do not immerse the unit in water. If you spill liquid over it, dry it immediately with a soft, lint-free cloth.
- Do not clean the unit with abrasive or corrosive materials.
- Do not tamper with the unit’s internal components. Doing so will invalidate the warranty on the unit and may cause unnecessary damage. The unit contains no user-serviceable parts.
- Only use fresh batteries as specified in the user’s instructions. Do not mix new and old batteries.
- Due to printing limitations, the displays shown in this manual may differ from the actual display.
- The contents of this manual may not be reproduced without the permission of the manufacturer.
- Do not dispose this product as unsorted municipal waste. Collection of such waste separately for special treatment is necessary.
NOTE
The technical specifications for this product and the contents of the user manual are subject to change without notice.
SPECIFICATIONS
| TYPE | DESCRIPTION |
| MAIN UNIT | |
| L x W x H | 119 x 77 x 169 mm (4.7 x 3.0 x 6.7 in) |
| Weight | 249 g (8.8 oz) without battery |
| Temperature unit | °C / °F |
| Temperature range | -5°C to 50°C (23°F to 122°F) |
| Resolution | 0.1°C (0.2°F) |
| Clock frequency | DCF-77(EU) / MSF-60(UK) |
| Synchronization | Auto or disabled |
| Signal frequency | 433 MHz |
| Clock | Auto or manual (disabled) |
| Humidity range | 25% — 95% |
| Humidity resolution | 1% |
| Memory | Min / Max relative humidity and temperature |
| Alarm duration | 2 minutes |
| Snooze | 8 minutes |
| Clock display | HH:MM:SS HH:MM: Day of Week |
| Hour format | 12 / 24 hour format |
| Calendar | MM / DD or DD / MM language selectable: E, D, F, I and S |
| Power | 3 x UM-3 (AA) 1.5 V batteries |
| REMOTE UNIT | |
| L x W x H | 92 x 60 x 20 mm (3.6 x 2.4 x 0.8 in) |
| Weight | 62 g (2.22 oz) |
| Transmission range | 30 m (100 ft) unobstructed |
| Temperature range | -30°C to 60°C (-22°F to 140°F) |
| Power | 2 x UM-4 (AAA) 1.5 V batteries |
NOTE
We recommend that you use alkaline batteries with this product for longer usage and lithium batteries in temperatures below freezing.
Here you can download full pdf version of manual, it may contain additional safety instructions, warranty information, FCC rules, etc.
Узнавай о новинках и акциях первым
Вы успешно зарегистрированы на сайте.
Вам доступен личный кабинет пользователя.
Перейти к покупкам
Ваш пароль воcстановлен!
Теперь вы можете полноценно пользоваться
всеми возможностями нашего интернет-магазина.
Здравствуйте, Ваша претензия принята и зарегистрирована.
В течение 3-х рабочих дней Вам, на электронную почту, будет дан письменный ответ. В случае возникновения дополнительных вопросов, менеджер претензионного отдела свяжется с Вами.
Перейти к покупкам
Ваше сообщение об ошибке на сайте успешно отправлено.
Большое спасибо!
Добавить отзыв о магазине
Торг для данного товара сейчас не возможен!
Сколько вы готовы заплатить за этот товар?
Введите ваше ценовое предложение
Мы согласны с вашим предложением
Мы принимаем вашу цену, и вы можете купить товар по цене:
0 руб.
: View alarm status; set alarm
BACK VIEW
: Increase / decrease setting; activate / deactivate clock reception signal
- MODE: Change settings / display
- CHANNEL: Switch remote sensor display
- MEM: View current, maximum and minimum temperature / humidity
- EU / UK switch
- PRESSURE: Select pressure unit; set altitude
- HEAT INDEX: Display heat index
- TEMP / HUMIDITY HI / LO
: Change settings or enable / disable hi or lo temperature / humidity alarm for channel 1
- °C / °F: Select temperature unit
- RESET: Reset unit to default settings
- Battery compartment
LCD DISPLAY
Weather Forecast Area:
- Pressure trend
- Weather forecast
- Comfort zone
- Pressure icon
- Altitude icon
- Pressure / altitude unit
- Heat index
Outdoor Temperature Area:
- Heat index icon
- Hi / lo temperature alarm
- Sensor reception icon
- Sensor battery low
- Max / min icon
- Temperature display
- Ice warning is active
- Hi / lo humidity alarm
- Temperature trend
- Humidity trend
- Humidity display
Indoor Temperature Area:
- Indoor sensor icon
- Max / min icon
- Temperature display
- Temperature trend
- Humidity trend
- Humidity display
Clock / Alarm Area:
- Alarm set
- AM / PM icon
- Clock signal reception
- Low battery icon
- Clock
- Alarm mode icon
- Moon phase
REMOTE SENSOR (THGN122N)
- LED status indicator: Blinks red during data transmission
- Wall mount hole
- RESET hole
- CHANNEL switch
- Battery compartment
GETTING STARTED
BATTERIES
Insert batteries before first use, matching the polarity (+ and -). Press RESET after each battery change.
NOTE
Do not use rechargeable batteries. We recommend that you use alkaline batteries with this product for longer usage and lithium batteries in temperatures below freezing.
REMOTE SENSOR
The sensor collects temperature and humidity readings approx. every 40 seconds and sends them to the main unit. The main unit can collect data from up to 3 sensors.
To set up the sensor:
- Remove the screws from the battery door.
- Insert the batteries, matching the polarity (+ / -).
- Select a channel. Make sure you use a different channel for each sensor.
- Place the sensor near the main unit. Press RESET on the sensor.
- Simultaneously press CHANNEL and MEM on the main unit to initiate signal sending between the sensor and main unit.
- Close the battery door and secure the screws.
- Place the sensor in the desired location using the table stand or wall mount.
The transmission range may vary depending on many factors. You may need to experiment with various locations to get the best results.
Standard Alkaline batteries contain significant amounts of water. Because of this they will freeze in low temperatures of approximately -12°C (10°F). Disposable Lithium batteries have a much lower threshold for temperature with an estimated freezing range of below -30°C (-22°F). Wireless ranges can be impacted by a variety of factors such as extremely cold temperatures. Extreme cold may temporarily reduce the effective range between the sensor and the base station. If the unit’s performance fails due to low temperature, the unit will resume proper functioning as the temperature rises to within the normal temperature range (i.e. no permanent damage will occur to the unit due to low temperatures).
To search for a sensor:
Simultaneously, press and hold MEM and CHANNEL for 2 seconds.
NOTE
If the sensor is still not found, check the batteries, obstructions, and remote unit location.
CLOCK
CLOCK RECEPTION
This product is designed to synchronize its date and time automatically once it is within range of:
- DCF-77 generated from Frankfurt, Germany for Central Europe.
- MSF-60 generated from Rugby, England.
The clock collects the radio signals whenever it is within 1500 km (932 miles) of a signal.
NOTE
Slide the EU / UK switch to appropriate position for your location. Repeat each time you reset the unit.
NOTE
Initial reception takes 2-10 minutes for first set up or when RESET is pressed. Once complete, the reception icon will stop blinking. If the signal is weak, it can take up to 24 hours to get a valid signal.
RECEPTION SIGNAL
Clock signal reception indicator:
To enable and force a signal search:
Press and hold for 2 seconds.
To disable the signal reception:
Press and hold for 2 seconds.
SET CLOCK
If the clock signal reception is enabled and a signal is being received the clock does not need to be manually set.
NOTE
The time zone offset can be used to set the clock up to + / — 9 hours from the received clock signal time. If you have disabled the clock signal reception (i.e. manually setting the clock), do not set a value for time zone offset.
NOTE
The language options are English (E), German (D), French (F), Italian (I), and Spanish (S).
Press MODE to choose between the clock with seconds and clock with weekday display modes.
ALARM
To set the alarm:
- Press and hold ALARM for 2 seconds.
- Press
to set hour / minute.
- Press ALARM to confirm.
indicates alarm is ON.
To enable / disable the alarm:
- Press ALARM to display alarm time.
- Press ALARM again to turn alarm ON / OFF.
To silence the alarm:
- Press SNOOZE to silence it for 8 minutes.
OR - Press any key except SNOOZE to turn the alarm off and activate it again after 24 hours.
BAROMETER
Barometer readings from the past 24 hours are stored by the main unit and used to provide weather forecast.
To select barometer measurement unit:
Press PRESSURE to toggle between mb and inHg.
SET ALTITUDE
To ensure barometric readings are reliable set the altitude to reflect distance from sea level at your position.
NOTE
The maximum operating altitude for the barometer and weather forecast is 2500m (8202 ft).
WEATHER FORECAST
This product forecasts the next 12 to 24 hours of weather within a 30-50 km (19-31 mile) radius based on barometric pressure trend readings.
TEMPERATURE AND HUMIDITY
To toggle temperature unit:
Press °C / °F.
To view outdoor sensors temperature readings:
Press CHANNEL.
To auto-scan between sensors:
Press and hold CHANNEL for 2 seconds.
Each sensor’s data is displayed for 3 seconds.
To end auto-scan:
Press CHANNEL or MEM.
To toggle between current, minimum and maximum records for the selected sensor:
Press MEM repeatedly.
To clear the records:
Press and hold MEM for 2 seconds.
TEMPERATURE, HUMIDITY AND PRESSURE TREND
The temperature, humidity and pressure trend icons are based on recent sensor readings.
ICE WARNING
If the channel 1 sensor falls between 3°C to –2°C (37°F to 28°F), flashes to warn you that the temperature is approaching freezing.
NOTE
The warning will automatically stop if the temperature goes outside the ice-warning range.
HI / LO TEMPERATURE / HUMIDITY ALARMS
Temperature and humidity alerts can be set to sound if sensor set to channel 1 records above or below a temperature/humidity of your choice.
To set alarm ON / OFF:
To silence the hi / lo alarm:
Press any key. The alarm resets automatically and will resound if the hi / lo temperature is recorded again.
HEAT INDEX
The heat index combines temperature and humidity data to describe the actual temperature felt.
| WARNING | HEAT INDEX | MEANING |
| Extreme danger | 54.5°C / (130°F) or above | Strong risk of dehydration / sun stroke |
| Danger | 40.5 — 54°C (105 — 129°F) | Heat exhaustion likely |
| Extreme caution | 32.2 — 40°C (90 — 104°F) | Possibility of heat dehydration |
| Caution | 26.6 — 31.7°C (80 — 89°F) | Possibility of heat exhaustion |
- To display the heat index, press HEAT INDEX.
- To toggle between current / maximum / minimum readings, press HEAT INDEX, then press CHANNEL to select channel 1-3 or indoor, followed by MEM.
- To toggle between temperature / humidity and heat index display, press and hold HEAT INDEX for 2 seconds. Press HEAT INDEX again to stop this feature.
NOTE
If the heat index is below 80°F / 26°C, or the desired channel is not working, the heat index will display NA.
COMFORT ZONE
The comfort zone assesses the climate based on current temperature and humidity measurements.
| ICON | TEMPERATURE | HUMIDITY |
 |
Any | > 70% |
 |
20 — 25°C (68 — 77°F) |
40 — 70% |
 |
Any | < 40% |
RESET
Press RESET to return the unit to the default settings.
PRECAUTIONS
This product is engineered to give you years of satisfactory service if you handle it carefully. Here are a few precautions:
- Do not subject the unit to excessive force, shock, dust, temperature or humidity, which may result in malfunction, shorter electronic life span, damaged battery and distorted parts.
- Do not immerse the unit in water. If you spill liquid over it, dry it immediately with a soft, lint-free cloth.
- Do not clean the unit with abrasive or corrosive materials.
- Do not tamper with the unit’s internal components. Doing so will invalidate the warranty on the unit and may cause unnecessary damage. The unit contains no user-serviceable parts.
- Only use fresh batteries as specified in the user’s instructions. Do not mix new and old batteries.
- Due to printing limitations, the displays shown in this manual may differ from the actual display.
- The contents of this manual may not be reproduced without the permission of the manufacturer.
- Do not dispose this product as unsorted municipal waste. Collection of such waste separately for special treatment is necessary.
NOTE
The technical specifications for this product and the contents of the user manual are subject to change without notice.
SPECIFICATIONS
| TYPE | DESCRIPTION |
| MAIN UNIT | |
| L x W x H | 119 x 77 x 169 mm (4.7 x 3.0 x 6.7 in) |
| Weight | 249 g (8.8 oz) without battery |
| Temperature unit | °C / °F |
| Temperature range | -5°C to 50°C (23°F to 122°F) |
| Resolution | 0.1°C (0.2°F) |
| Clock frequency | DCF-77(EU) / MSF-60(UK) |
| Synchronization | Auto or disabled |
| Signal frequency | 433 MHz |
| Clock | Auto or manual (disabled) |
| Humidity range | 25% — 95% |
| Humidity resolution | 1% |
| Memory | Min / Max relative humidity and temperature |
| Alarm duration | 2 minutes |
| Snooze | 8 minutes |
| Clock display | HH:MM:SS HH:MM: Day of Week |
| Hour format | 12 / 24 hour format |
| Calendar | MM / DD or DD / MM language selectable: E, D, F, I and S |
| Power | 3 x UM-3 (AA) 1.5 V batteries |
| REMOTE UNIT | |
| L x W x H | 92 x 60 x 20 mm (3.6 x 2.4 x 0.8 in) |
| Weight | 62 g (2.22 oz) |
| Transmission range | 30 m (100 ft) unobstructed |
| Temperature range | -30°C to 60°C (-22°F to 140°F) |
| Power | 2 x UM-4 (AAA) 1.5 V batteries |
NOTE
We recommend that you use alkaline batteries with this product for longer usage and lithium batteries in temperatures below freezing.
Here you can download full pdf version of manual, it may contain additional safety instructions, warranty information, FCC rules, etc.
Узнавай о новинках и акциях первым
Вы успешно зарегистрированы на сайте.
Вам доступен личный кабинет пользователя.
Перейти к покупкам
Ваш пароль воcстановлен!
Теперь вы можете полноценно пользоваться
всеми возможностями нашего интернет-магазина.
Здравствуйте, Ваша претензия принята и зарегистрирована.
В течение 3-х рабочих дней Вам, на электронную почту, будет дан письменный ответ. В случае возникновения дополнительных вопросов, менеджер претензионного отдела свяжется с Вами.
Перейти к покупкам
Ваше сообщение об ошибке на сайте успешно отправлено.
Большое спасибо!
Добавить отзыв о магазине
Торг для данного товара сейчас не возможен!
Сколько вы готовы заплатить за этот товар?
Введите ваше ценовое предложение
Мы согласны с вашим предложением
Мы принимаем вашу цену, и вы можете купить товар по цене:
0 руб.
9
ЧАСЫ
ПРИЕМ СИГНАЛА ТОЧНОГО ВРЕМЕНИ
Устройство способно автоматически устанавливать текущие
дату и время при условии его нахождения в радиусе приема
сигнала DCF-77 из Франкфурта для Европы или MSF-60 для
Великобритании. Выбор сигнала зависит от положения
переключателя
устройства.
Сигнал
принимается
устройством в радиусе до 1500 км от местонахождения
радиостанции.
ПРИМЕЧАНИЕ
Продолжительность
первого
приема
колеблется в пределах от 2 до 10 минут. Первый сеанс
приема осуществляется непосредственно после установки
батареек в устройство, а также после каждого нажатия
кнопки СБРОС НАСТРОЕК (RESET). По окончании приема
перестанет мигать расположенный в Окне часов индикатор
приема сигнала радиостанции. Однако при слабом сигнале
продолжительность сеанса приема может достигать 24
часов.
ВАЖНО
Функция радиосинхронизации точного времени,
используемая в товарах Oregon Scientific, принимает сигнал
с передатчика, расположенного неподалеку от города
Франкфурт (Германия). Сигнал передатчика транслируется
раз в сутки и уверенно принимается на расстоянии до 1500
км, поэтому в России эта функция работает не во всех
регионах, что не является неисправностью. Сигнал передает
значение среднеевропейского времени, которое на 2 часа
отличается от Московского. В связи с этим в товарах,
которые используют функцию корректировки точного
времени, рекомендуем включить и настроить эту функцию с
учетом разницы во времени. Во всех остальных товарах
рекомендуем отключить функцию радиосинхронизации
времени.
О ПРИЕМЕ СИГНАЛА
В зависимости от силы сигнала индикатор приема
сигнала принимает следующий вид:
УСТОЙЧИВЫЙ
СИГНАЛ
НЕУСТОЙЧИВЫЙ
СИГНАЛ
ОТСУТСТВИЕ
СИГНАЛ
Для включения функции приема сигнала:
Нажмите кнопку
▲
и удерживайте ее в течение 2 секунд.
Для отключения функции приема сигнала:
Нажмите кнопку
▼
и удерживайте ее в течение 2 секунд.
УСТАНОВКА ЧАСОВ
1. Нажмите кнопку РЕЖИМ (MODE) и удерживайте ее в
течение 2 секунд.
2. Нажмите
▲
или
▼
для изменения настроек.
3. Для подтверждения каждой сделанной установки
используйте кнопку РЕЖИМ (MODE).
Метеостанции Oregon Scientific BAR388 — инструкция пользователя по применению, эксплуатации и установке на русском языке. Мы надеемся, она поможет вам решить возникшие у вас вопросы при эксплуатации техники.
Вы можете скачать инструкцию к Oregon Scientific BAR388 по ссылке ниже, если не хотите ждать загрузки. Если остались вопросы, задайте их в комментариях после инструкции.
«Загружаем инструкцию», означает, что нужно подождать пока файл загрузится и можно будет его читать онлайн. Некоторые инструкции очень большие и время их появления зависит от вашей скорости интернета.
Полезные видео
Характеристики
Остались вопросы?
Не нашли свой ответ в руководстве или возникли другие проблемы? Задайте свой вопрос в форме ниже с подробным описанием вашей ситуации, чтобы другие люди и специалисты смогли дать на него ответ. Если вы знаете как решить проблему другого человека, пожалуйста, подскажите ему

Часто задаваемые вопросы
Как посмотреть инструкцию к Oregon Scientific BAR388?
Необходимо подождать полной загрузки инструкции в сером окне на данной странице или скачать кликнув по специальной кнопке.
Руководство на русском языке?
Все наши руководства представлены на русском языке или схематично, поэтому вы без труда сможете разобраться с вашей моделью
Как можно распечатать инструкцию?
Скачайте ее по специальной кнопке над формой чтения на ваше устройства и отправьте на печать.


 : Increase / decrease setting; activate / deactivate clock reception signal

 indicates alarm is ON.
