Посмотреть инструкция для Pfaff coverlock 4852 бесплатно. Руководство относится к категории швейные машины, 7 человек(а) дали ему среднюю оценку 7.6. Руководство доступно на следующих языках: английский. У вас есть вопрос о Pfaff coverlock 4852 или вам нужна помощь? Задайте свой вопрос здесь
Не можете найти ответ на свой вопрос в руководстве? Вы можете найти ответ на свой вопрос ниже, в разделе часто задаваемых вопросов о Pfaff coverlock 4852.
Какой размер иглы лучше всего использовать?
Какой срок службы у швейной иглы?
Что может повредить иглу при шитье?
Инструкция Pfaff coverlock 4852 доступно в русский?
Не нашли свой вопрос? Задайте свой вопрос здесь
![]()
coverlock 4852
Owner´s manual

Parts of the coverlock 4852
1Upper needle-thread tension
2Upper needle-thread tension
3Carry handle
4Thread tension/upper looper thread
5Thread tension/lower looper thread
6Thread tension/two-thread chainstitch looper/cover stitch looper
7Looper cover
8Blade guard
9Looper disengaging lever
10Standard presser foot
11Needle plate
12Swivel plate
13Adjusting knob for seam width
14Seam width viewing window
15Needle holder
16Sewing light cover
17Adjusting knob for presser foot pressure
18Upper overedge looper
19Lower overedge looper
20Two-thread chainstitch looper
21Threading aid for the two-thread chainstitch looper/cover stitch looper
22Swiveling stitch width latch
23Movable upper blade
24Fixed lower blade
25Clamp spring for serging thread chains
26Needle plate disengaging lever
27Handwheel for lowering the upper blade
28Converter
29Tweezers
30Allen key
This household sewing machine is designed to comply with IEC/EN 60335-2-28 and UL1594
IMPORTANT SAFETY INSTRUCTIONS
When using an electrical appliance, basic safety precautions should always be followed, including the following:
Read all instructions before using this household sewing machine.
DANGER — To reduce the risk of electric shock:
•A sewing machine should never be left unattended when plugged in. Always unplug this sewing machine from the electric outlet immediately after using and before cleaning.
•Always unplug before relamping. Replace bulb with same type rated 15 Watt.
WARNING — To reduce the risk of burns, fire, electric shock, or injury to persons:
•Do not allow to be used as a toy. Close attention is necessary when this sewing machine is used by or near children and infirm persons.
•Use this sewing machine only for its intended use as described in this manual. Use only attachments recommended by the manufacturer as contained in this manual.
•Never operate this sewing machine if it has a damaged cord or plug, if it is not working properly, if it has been dropped or damaged, or dropped into water. Return the sewing machine to the nearest authorized dealer or service center for examination, repair, electrical or mechanical adjustment.
•Never operate the sewing machine with any air openings blocked. Keep ventilation openings of the sewing machine and foot controller free from the accumulation of lint, dust, and loose cloth.
•Keep fingers away from all moving parts. Special care is required around the sewing machine needle and blades.
•Always use the proper needle plate. The wrong plate can cause the needle to break.
•Do not use bent needles.
•Do not pull or push fabric while stitching. It may deflect the needle causing it to break.
•Switch the sewing machine off (“0”) when making any adjustment in the needle area, such as threading needle, changing needle, threading bobbin, or changing presser foot, etc.
•Always unplug sewing machine from the electrical outlet when removing covers, lubricating, or when making any other user servicing adjustments mentioned in the instruction manual.
•Never drop or insert any object into any opening.
•Do not use outdoors.
•Do not operate where aerosol (spray) products are being used or where oxygen is being administrated.
•To disconnect, turn all controls to the off (“0”) position, then remove plug from outlet.
•Do not unplug by pulling on cord. To unplug, grasp the plug, not the cord.
SAVE THESE INSTRUCTIONS

Simple, up-to-date sewing
Congratulations! You have bought a high-quality product that provides unique advantages. Your new coverlock 4852 can take any material in its stride and will sew through thick and thin for you.
Your PFAFF coverlock features the very latest in design and technology, and it is just as simple to operate as this instruction manual is to follow.
Before you start sewing, please take the time to read these instructions carefully. It is certainly time well spent, and is the best way to find out just what your machine can do and make full use of all its features.
If you have any further questions, just ask your authorized PFAFF dealer. Your dealer is happy to be of service with any help or advice.
Lets get started! We wish you many enjoyable hours creating your very own fashions and projects!
|
Contents |
|
|
Page |
|
|
Accessories …………………………………………………………………………………………………. |
6 |
|
Accessories, optional …………………………………………………………………………………… |
62, 63 |
|
Accessory box………………………………………………………………………………………………. |
6 |
|
Adjusting the machine to Prog. 01, 02……………………………………………………………. |
34, 35 |
|
Changing a spool on a threaded machine ……………………………………………………… |
24 |
|
Clamp spring………………………………………………………………………………………………… |
29 |
|
Cleaning the machine……………………………………………………………………………………. |
58 |
|
Cone thread adapter……………………………………………………………………………………… |
10 |
|
Converter, attaching ……………………………………………………………………………………… |
32 |
|
Cover stitch, important notes on sewing………………………………………………………… |
44, 45 |
|
Differential feed ……………………………………………………………………………………………. |
36, 37 |
|
Edge guide ………………………………………………………………………………………………….. |
45 |
|
Electrical connection ……………………………………………………………………………………. |
7 |
|
Electrical power master switch ……………………………………………………………………… |
7 |
|
Foot control, connecting ………………………………………………………………………………. |
7 |
|
Light bulb (sewing lamp), changing ……………………………………………………………… |
60 |
|
Loopercover …………………………………………………………………………………………………. |
8 |
|
Lubricating the machine ………………………………………………………………………………. |
58 |
|
Machine cover ……………………………………………………………………………………………… |
6 |
|
Maintenance ………………………………………………………………………………………………… |
58 — 60 |
|
Needle holder ……………………………………………………………………………………………… |
13 |
|
Needle inserting tool ……………………………………………………………………………………. |
13 |
|
Needle plate disengaging lever……………………………………………………………………… |
38 |
|
Needle plate, removing…………………………………………………………………………………. |
38 |
|
Needle position ……………………………………………………………………………………………. |
12 |
|
Needle threader ………………………………………………………………………………………….. |
25 |
|
Needle, changing …………………………………………………………………………………………. |
13 |
|
Power table …………………………………………………………………………………………………. |
35 |
|
Presser foot lifter ………………………………………………………………………………………….. |
10 |
|
Presser foot pressure ……………………………………………………………………………………. |
28 |
|
Presser foot ………………………………………………………………………………………………….. |
11 |
|
Presser foot, changing ………………………………………………………………………………….. |
11 |
|
Program overview ………………………………………………………………………………………… |
40 — 43 |
|
Rubber feet, cleaning ……………………………………………………………………………………. |
58 |
|
Safety instructions………………………………………………………………………………………… |
1, 2 |
|
eam width adjusting knob ……………………………………………………………………………. |
33 |
|
Seam width viewing window ……………………………………………………………………….. |
33 |
|
eam width, setting ……………………………………………………………………………………….. |
33 |
|
Sewing light cover ……………………………………………………………………………………….. |
60 |
6
|
Contents |
|
|
Page |
|
|
Sewing problems and their solutions ……………………………………………………………. |
61 |
|
Specifications ………………………………………………………………………………………………. |
64 |
|
Spool dise ……………………………………………………………………………………………………. |
10 |
|
Spool holder ………………………………………………………………………………………………… |
9 |
|
Stitch formation correction measures …………………………………………………………… |
46 — 56 |
|
Stitch length adjustment knob ……………………………………………………………………… |
38 |
|
Stitch length, adjusting ………………………………………………………………………………… |
38 |
|
Stitch width latch, swivelling ………………………………………………………………………… |
31 |
|
Telescoping thread guide ……………………………………………………………………………… |
9 |
|
Thread chain cutter ………………………………………………………………………………………. |
29 |
|
Thread chart ………………………………………………………………………………………………… |
57 |
|
Thread guide, clip on…………………………………………………………………………………….. |
10 |
|
Thread net ……………………………………………………………………………………………………. |
9 |
|
Thread tensions, setting………………………………………………………………………………… |
39 |
|
Thread unreeling disc……………………………………………………………………………………. |
9 |
|
Threading aid for the 2 thread chain stitch looped/cover stitch looped …………… |
19, 21 |
|
Threading paths/overview ……………………………………………………………………………. |
26 — 28 |
|
Threading the 2 thread chain stitch looped/cover stitch looped (violet) ………….. |
18 — 21 |
|
Threading the lower overedge looper (yellow) ………………………………………………. |
16, 17 |
|
Threading the needle(s) ……………………………………………………………………………….. |
22,23 |
|
Threading the upper overedge looper (pink) ………………………………………………….. |
15 |
|
Threading, important note…………………………………………………………………………….. |
24 |
|
Threading/Thread guides………………………………………………………………………………. |
14 |
|
Upper blade, changing………………………………………………………………………………….. |
59 |
|
Upper blade, disengaging …………………………………………………………………………….. |
30 |
|
Upper blade, securing ………………………………………………………………………………….. |
39 |
|
Waste container …………………………………………………………………………………………… |
8 |
7
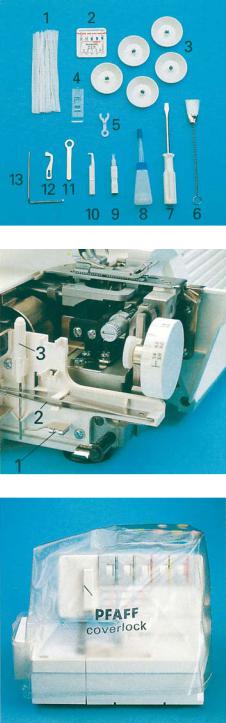
Accessory box
Open the accessory box 49 by gently pressing the bottom of the box inwards. The following accessories can be found in the box:
1Thread nets (5)
2Overlock needle system EL X 705, cat. no. 2002
3Thread unreeling discs (5)
4Transparent presser foot (F) for
cover stitch and two thread chainstitch
5Clip on thread guide
6Cleaning brush
7Screw driver
8Machine oil
9Needlethreader
10Needle inserting tool
11Wrench
12Replacement upper blade
13Edge guide
Further accessories
The following accessories can be found behind the swivel plate 12:
1Converter
2Tweezers
3Allen key
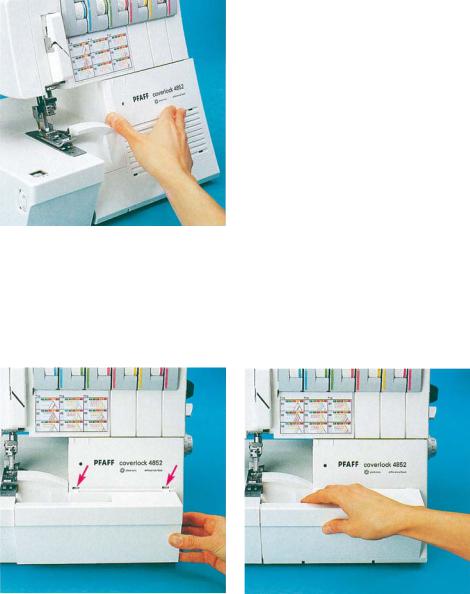
Machine cover
The machine cover protects the machine from dust and dirt. When the sewing process is finished, push the telescopic thread guide 32 together. The spool stand 34 must be pushed to its full extent in to the machine, regardless of whether a spool is attached. Place the cover over the machine.
The accessories should be stored in the accessory box or compartments behind the swivel plate.
8
![]()
Connecting the foot control
Connect the plug of the foot control to the connection socket 39 of the machine. The sewing speed is regulated by activating the foot control. You may also regulate the sewing speed by adjusting the slide on the front side of the foot control.
Setting 3 = half of final speed Setting 8 = full final speed
Electrical connection
Connect the foot control cord with the wall outlet.
Foot controls to be used:
AE040 — EU
AE044 — Australia
AE046 — United Kingdom
AE043 — USA/Canada
For the USA and Canada
This appliance has a polarized plug (one blade wider than the other).
To reduce the risk of electric shock, it is designed to fit into a plorized outlet only one way. If the plug does not fit correctly into the outlet, reverse the plug. If it still does not fit, contact a qualified electrician to install the proper outlet.
Do not modify the plug in any way.
Master switch
When you turn on the master switch 38 the sewing lamp is illuminated. The machine is now operational.
9
Waste container
Insert the upper latch of the waste container 45 into the upper slot of the looper cover 7.
Apply pressure to the lower part of the container until the lower latches flick into place in the lower slots of the looper cover.
Looper cover
Push the looper cover 7 fully to the right and then swivel it down. Five types of stitches and their threading paths are portrayed in color on the inside of the looper cover.
Note: The electricity supply of the machine is cut off as soon as the looper cover or swivel plate 12 is opened, for safety reasons, i.e. sewing with the machine is no longer possible.
To remove the waste container, repeat this procedure in the reverse order.
10
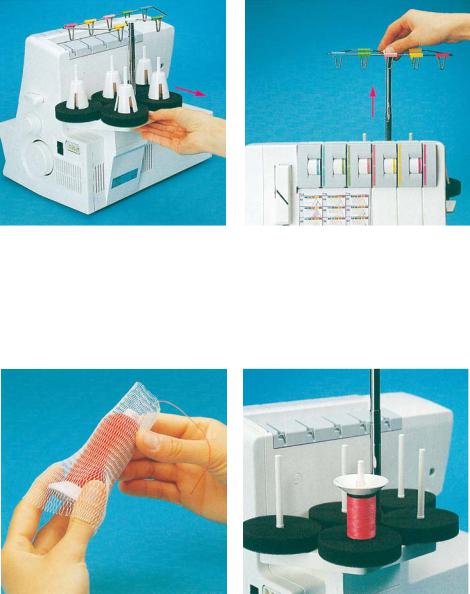
Spool holder
Before placing thread cones/spools on machine you must pull the spool holder 34 fully away from the back of machine.
Thread net
Synthetic threads generally unwind too quickly from the thread spool. Thread nets have been included to allow easy use of these threads. Pull the thread net (located in the accessory box) over the spool from below. Place the spool on the spool holder catching the bottom of the thread net with the spool pin.
Telescopic thread guide
Pull the telescopic thread guide 32 upwards to its highest position.
To ensure optimum thread feed, turn the telescopic parts slowly until you hear the locking balls flick into place.
Thread unreeling disc
The thread unreeling disc (in the accessory box) is used for small spools/spools with notched or rough ends. Place the spool on the spool pin 35. Place the thread unreeling disc on top of the spool. Make sure the spool dise 37 is used under the spool.
11

Spool disc/cone thread adapter
It is advantageous to use the spool dise
37 when sewing with large spools (5,000 10,000 m). To do this, place the cone thread adapter 36 onto the spool pin 35. With synthetic threads, the spool discs help eliminate vibration of the cones/spools aiding in smoother feeding of the threads.
Presser foot lifter
The presser foot can be raised and lowered using the presser foot lifter 43. The maximum vertical lift of 6.5 mm for the presser foot for particularly thick fabrics can be achieved by pressing the presser foot lifter towards the rear.
Clip on thread guide
Use the clip on thread guide accessory when sewing with decorative thread. Clip this onto the telescoping thread guide 32 and thread the machine as shown in the illustration. Use the thread net and/or the thread unreeling disc if needed.
Once an initial thread chain has been created, the presser foot lifter no longer needs to be raised if you continue working with the same thread and presser foot. It is sufficient to gently lift the front part of the presser foot using your thumb. Slide the fabric under the raised part of the presser foot. The fabric is automatically taken up and fed into the machine when you activate the foot control.
12
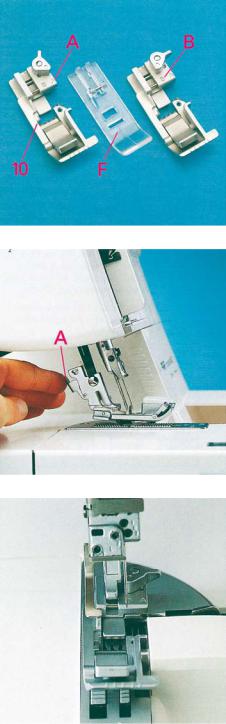
Presserfoot
With standard presser foot 10 use setting ”A” on the spring loaded presser foot latch for the cover stitch (Prog. 02), the 2 thread chainstitch (Prog. 01), the 5 thread safety stitch seam (Prog. 09) and the 4 thread safety stitch seam (Prog. 08).
Transparent presser foot F from the accessories can also be used for the cover stitch (Prog. 02).
For all other programs use standard presser foot 10 and setting ”B” on the springloaded presser foot latch.
Changing the presser foot
Switch off the electrical power
To remove: Raise the needle(s) to the highest position by turning the hand wheel towards you. Raise the presser foot and press lever A at the rear of the presser foot holder. The presser foot will be released automatically from the holder. Pivot the presser foot clockwise until the front half of presser foot clears holder and remove by sliding foot away from you towards back of machine.
To attach: Place the presser foot behind and perpendicular to the presser foot holder. Pivot the presser foot counterclockwise until the pin of the foot is directly under the
presser foot holder clamp. Lower the presser foot lever and press lever A, if necessary, until the foot then clicks into place.
Check: Please lift the presser foot lever to ensure that the presser foot is properly locked into place.
13
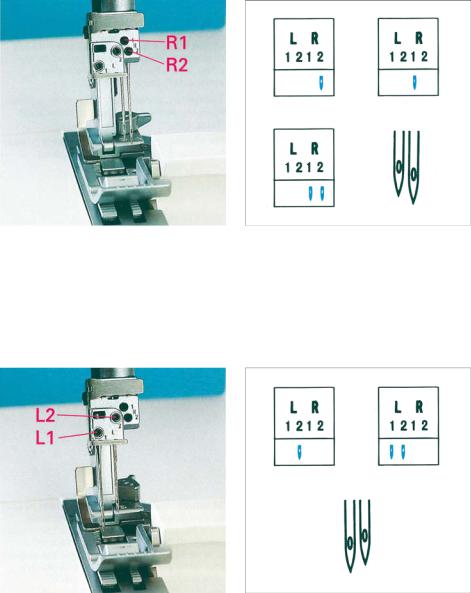
Needle position
This machine has 4 needle positions and can sew with a maximum of two needles at any one time. The needle positions are 1 1, L2, R11 and R2. The fastening screw is located directly above the corresponding needle.
Note: If the needles 1 11 and L2 have been inserted, the left needle will be somewhat lower than the right needle.
The different needle positions are depicted in a schematic drawing in the instruction manual. Also refer to the examples above and below. Insert the needle(s) as shown on the program overview (see pages 40-43).
Note: If the needles R2 and 131 have been inserted, the left needle will be somewhat higher than the right needle.
14
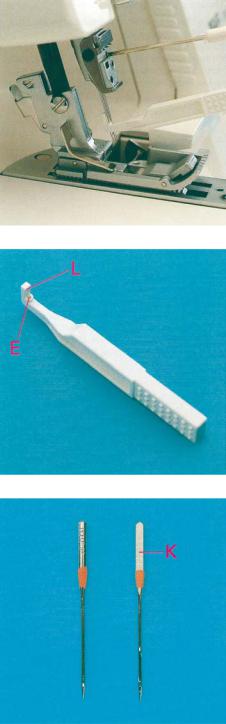
Changing the needle
Switch off the electrical power
To remove: Lower the presser foot and move the needle(s) to the highest position by turning the handwheel towards you. Push the needle inserting tool (from the accessory box 49) from below upward fully over the needle. Loosen the fastening screw of the needle (without removing it) with the Allen key (behind the swivel plate) and pull the needle down to remove.
To insert: Insert the needle into hole E of the needle inserting tool, so that the flat needle shank K faces the flat side L of the inserting tool. Insert the needle fully into the holder and tighten the fastening screws. Remove the needle inserting tool.
Overlock needles types EL X 705, cat. no. 2002 are required for this machine.
15
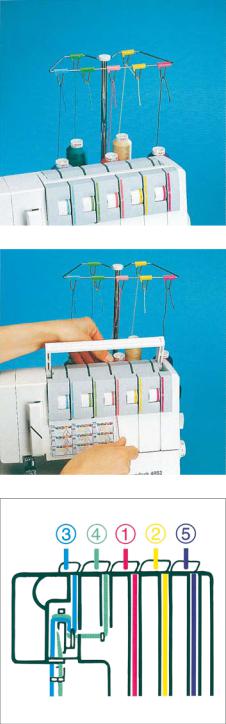
Threading the thread guides
Place the spools on the spool pins 35. You will find information on the thread net, thread unreeling disc, spool disc and cone thread adapter on pages 9 and 10. Thread through the thread guides 31 from the back to the front following the colored threading paths.
Lift the carry handle 3 upwards. Thread through the underside of the carrying handle and through the rear thread guides 44 using both hands to pull the thread down until
it slips under the thread guide. Guide the thread through the tension discs and pull it down until it is positioned firmly between the tension discs. Return the carrying handle to its original position.
Note:
Thread in a sequence of 1 to 5.
16
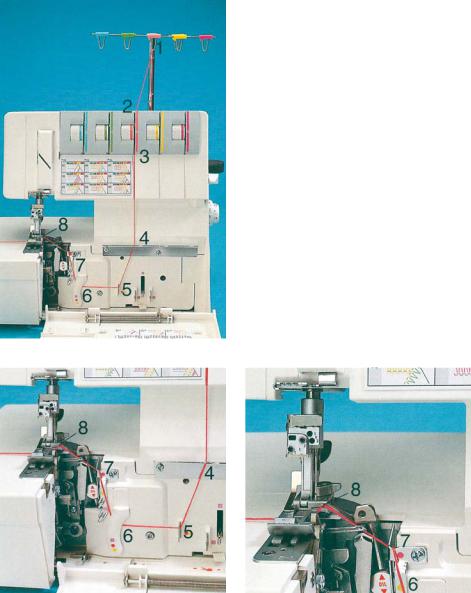
Thread through the thread guides 1 to 7, which are marked with a pink dot.
Threading the upper overedge looper (pink)
Turn the handwheel towards you until the upper overedge looper 18 is in its highest position. Thread in a sequence of 1 to 8.
Note:
To make this task easier, use the tweezers which can be found behind the swivel plate.
Thread from the front through the eye of the upper overedge looper 8. Pull approximately 4” (10 cm) of thread through the looper and place it to the left under the presser foot.
17
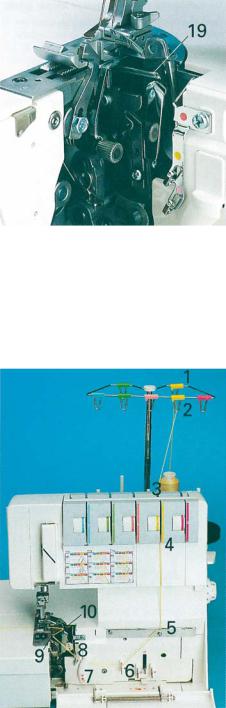
Threading the lower overedge looper
(yellow)
Turn the handwheel towards you until the lower overedge looper 19 is on the extreme right.
Thread in a sequence of 1 to 10.
Note:
To make this task easier, use the tweezers which can be found behind the swivel plate.
18
![]()
Thread through the thread guides 1 to 8, marked yellow.
Thread from the front through the eye of the lower overedge looper C (= threading point
10).
Press lever A downwards and hook the thread into guide B. Please also refer to the drawing below.
Note:
The lever returns automatically to its position as soon as you start sewing.
Pull approximately 4” (10 cm) of thread through the looper and place it to the left under the presser foot.
19
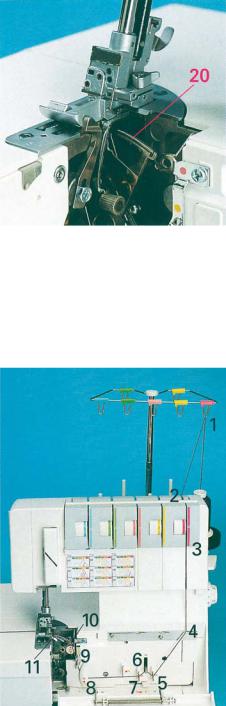
Threading the two thread chainstitch looper and cover stitch looper (violet) for the chainstitch
Turn the handwheel towards you until the two thread chainstitch looper 20 is on the extreme right.
Thread in a sequence of 1 to 11.
Note:
To make this task easier, use the tweezers which can be found behind the swivel plate.
20
 Loading…
Specifications:396/396661-coverlock_4852_owners_manual.pdf file (23 Dec 2022) |
Accompanying Data:
Pfaff coverlock 4852 Sewing Machine PDF Owner’s Manual (Updated: Friday 23rd of December 2022 03:32:51 PM)
Rating: 4.6 (rated by 27 users)
Compatible devices: COVERLOCK 4.0 -, 8390, 4, hobby 307, Creative 2140, 583, CREATIVE 2170 SEWING, 335.
Recommended Documentation:
Text Version of Owner’s Manual
(Ocr-Read Summary of Contents of some pages of the Pfaff coverlock 4852 Document (Main Content), UPD: 23 December 2022)
-
65, 6363 Sewing problems and their solutions This machine has been developed with ease of operation in mind. No diffi cult or tricky set tings need to be made. Sewing problems of the kind described below may occur as a result of minor adjustment and operating errors. They can be easily adjusted by following the in…
-
49, Pfaff coverlock 4852 4747 2. If sewing on a tubular item, i.e. pant or sleeve hem: Sew around tubular item, oversewing 4-5 stitches at the beginning of your seam ’ After the last stitch, turn the hand wheel towards you until the needles pierce the fabric and you have heard each needle ”click” (just before the needles …
-
5, This household sewing machine is designed to comply with IEC/EN 60335-2-28 and UL1594 IMPORTANT SAFETY INSTRUCTIONS When using an electrical appliance, basic safety precautions should always be followed, including the following: Read all instructions before using this household sewing machine. DANGER — To reduc…
-
43, 4141 Securing the upper blade Switch off the electrical power It is recommended to secure the movable upper blade 23 before sewing heavy fabrics. Raise the needle(s) to its highest position and open the swivel plate. Tighten the screw fully using the Allen key. This screw should always be slightl…
-
14, Pfaff coverlock 4852 1212 Spool disc/cone thread adapter It is advantageous to use the spool dise 37 when sewing with large spools (5,000 10,000 m). To do this, place the cone thread adapter 36 onto the spool pin 35. With synthetic threads, the spool discs help eliminate vibration of the cones/spools aiding in sm…
-
39, 3737 Press the power table 50 downwards into the designated slot on the looper cover. Close looper cover. Note: Please ensure that the upper overedge looper is disengaged before attaching the power table 50. To return the machine to its previous settings after sewing with the cover stitch or two thread chainsti…
-
69, Pfaff coverlock 4852 Intellectual property Patents protecting this product are listed on a label positioned underneath the sewing machine. PFAFF and IDT (image) are registered trademarks or trademarks of VSM Group AB.
…
-
Pfaff coverlock 4852 User Manual
-
Pfaff coverlock 4852 User Guide
-
Pfaff coverlock 4852 PDF Manual
-
Pfaff coverlock 4852 Owner’s Manuals
Recommended: Media Operator, B1432B2GB, R2002


-
UnionSpecial 39500 Series
FINEST QUALITY STYLE 39SOOMG CATALOG No. 103MG ® INDUSTRIAL SEWING LEWIS • COLUMBIA MACHINES CLASS 39500 HI-STYLED HIGH SPEED SINGLE NEEDLE TWO THREAD PLAIN FEED SERGING MACHINES FOR PRECLOSED TROUSER CUFFS · CHICAGO From the library of: Superior Sewing Machine & Supply LLC …
39500 Series 16
-
SunStar KM-815 KM-825
SSUUNNSSTTAARR MMAACCHHIINNEERRYY CCOO..,, LLTTDD..1) For proper use of the machine, thoroughlyread this manual before use.2) Keep this manual in a safe place for futurereference in case the machine breaksdown.User’s ManualKM-815 SeriesKM-825 SeriesHigh post, High speed,one-two needle, sewingmachine MMMMEE—005500 …
KM-815 KM-825 21
-
Brother MFC-8500
Setting Up the machine and PC to Work TogetherBefore You begin• Please see the README.WRI file in the root directory of the CD-ROM for the latest important installation and troubleshooting information.• If you have any problems with this installation, visit us at http://solutions.brother.com and view t …
MFC-8500 2
-
Duerkopp Adler 559
559Doppelkettenstich KnopflochautomatEinfachkettenstich SchnürlochautomatAutomatic double-chainstitch buttonholerAutomatic single-chainstitch eyelet machineBedienanleitung / Operating InstructionsAufstellanleitung / Installation InstructionsServiceanleitung / Service InstructionsPostfach 17 03 51, D-33703 Bie …
559 20
Operating Impressions, Questions and Answers: