Support for MVH-S520BT | Pioneer
- Главная
- Продукция
- Автомобильные ресиверы
- Support for MVH-S520BT
Support for MVH-S520BT
Автомобильный цифровой ресивер 1-DIN с FM/AM, USB, Bluetooth, встроенным звуковым процессором (DSP), поддержкой приложения Pioneer Smart Sync, совместимый с устройствами Apple и Android.
- Программное обеспечение
- Руководства
- Назад к обзору
Программное обеспечение
Open source notice
This Software includes open source software codes licensed under GNU General Public License 2 and/or GNU Lesser General Public License 2.1. Detailed license notice, full license texts and machine readable copy of the corresponding source code are readily available on our OSS website (*)
* For car navigation products: http://www.oss-pioneer.com/car/navi
* For car multimedia products: http://www.oss-pioneer.com/car/multimedia
You may obtain a complete machine-readable copy of the corresponding source code on a physical medium by contacting customer service center and sending model number or this product’s OSS website information.
This offer is valid to any third party within three years after last shipment of the product.
Costs of physical distribution will be charged.
Disclaimer
To the extent permitted by applicable law, and as provided in the GPL and LGPL, Pioneer and its licensors provide and you accept the firmware «As is» without warranty of any kind, express or implied, including but not limited to any implied warranties of merchantability or fitness for a particular purpose. You accept the entire risk as to the quality and performance of the firmware unless required by applicable law, and as provided in the GPL and LGPL, in no event will Pioneer or its licensors be liable to you or any third parties for damages of any kind arising out of your use or inability to use the firmware, including without limitation any direct, indirect, incidental, special, consequential, punitive or exemplary damages, even if advised of the possibility of such damages.
Руководства
Магнитолы Pioneer MVH-S520BT — инструкция пользователя по применению, эксплуатации и установке на русском языке. Мы надеемся, она поможет вам решить возникшие у вас вопросы при эксплуатации техники.
Вы можете скачать инструкцию к Pioneer MVH-S520BT по ссылке ниже, если не хотите ждать загрузки. Если остались вопросы, задайте их в комментариях после инструкции.
«Загружаем инструкцию», означает, что нужно подождать пока файл загрузится и можно будет его читать онлайн. Некоторые инструкции очень большие и время их появления зависит от вашей скорости интернета.
Полезные видео
Характеристики
Остались вопросы?
Не нашли свой ответ в руководстве или возникли другие проблемы? Задайте свой вопрос в форме ниже с подробным описанием вашей ситуации, чтобы другие люди и специалисты смогли дать на него ответ. Если вы знаете как решить проблему другого человека, пожалуйста, подскажите ему

Часто задаваемые вопросы
Как посмотреть инструкцию к Pioneer MVH-S520BT?
Необходимо подождать полной загрузки инструкции в сером окне на данной странице или скачать кликнув по специальной кнопке.
Руководство на русском языке?
Все наши руководства представлены на русском языке или схематично, поэтому вы без труда сможете разобраться с вашей моделью
Как можно распечатать инструкцию?
Скачайте ее по специальной кнопке над формой чтения на ваше устройства и отправьте на печать.
Автопроигрыватель Pioneer MVH-S520BT
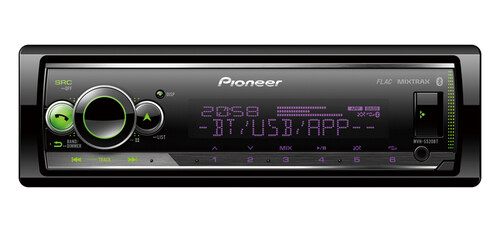
1DIN, 12V, USB/BT/AUX/FLAC, 6RCA, Многоцветный/Многоцветная, DSP/приложение
подробнее
360
Код товара: 1601697
Перейти к контенту
Support for MVH-S520BT | Pioneer
- Главная
- Продукция
- Автомобильные ресиверы
- Support for MVH-S520BT
Support for MVH-S520BT
Автомобильный цифровой ресивер 1-DIN с FM/AM, USB, Bluetooth, встроенным звуковым процессором (DSP), поддержкой приложения Pioneer Smart Sync, совместимый с устройствами Apple и Android.
- Программное обеспечение
- Руководства
- Назад к обзору
Программное обеспечение
10см — 13см — 17см — 20см — 25см
Open source notice
This Software includes open source software codes licensed under GNU General Public License 2 and/or GNU Lesser General Public License 2.1. Detailed license notice, full license texts and machine readable copy of the corresponding source code are readily available on our OSS website (*)
* For car navigation products: http://www.oss-pioneer.com/car/navi
* For car multimedia products: http://www.oss-pioneer.com/car/multimedia
You may obtain a complete machine-readable copy of the corresponding source code on a physical medium by contacting customer service center and sending model number or this product’s OSS website information.
This offer is valid to any third party within three years after last shipment of the product.
Costs of physical distribution will be charged.
Disclaimer
To the extent permitted by applicable law, and as provided in the GPL and LGPL, Pioneer and its licensors provide and you accept the firmware «As is» without warranty of any kind, express or implied, including but not limited to any implied warranties of merchantability or fitness for a particular purpose. You accept the entire risk as to the quality and performance of the firmware unless required by applicable law, and as provided in the GPL and LGPL, in no event will Pioneer or its licensors be liable to you or any third parties for damages of any kind arising out of your use or inability to use the firmware, including without limitation any direct, indirect, incidental, special, consequential, punitive or exemplary damages, even if advised of the possibility of such damages.
Руководства
Португальский, Португалия
Немецкий, Испанский, Голландский
Португальский, Португалия
Немецкий, Испанский, Голландский
Немецкий, Английский, Испанский, Французский, Итальянский, Голландский
Португальский, Португалия
Немецкий, Английский, Испанский, Французский, Итальянский, Голландский
Португальский, Португалия
Pioneer MVH-S520BT — Digital Media Receiver Quick Start Guide
Connections
In the following, «NW» represents network mode and «STD» represents standard mode. According to the connections you have established, change the speaker mode to standard mode (STD) or network mode (NW).
- When installing this unit in a vehicle without an ACC (accessory) position on the ignition switch, failure to connect the red cable to the terminal that detects operation of the ignition key may result in battery drain.
- Use of this unit in conditions other than the following could result in fire or malfunction.
- Vehicles with a 12-volt battery and negative grounding.
- When speaker output is used by 4 channels, use speakers over 50 W (maximum input power) and between 4 Ω to 8 Ω (impedance value). Do not use 1 Ω to 3 Ω speakers for this unit.
- When rear speaker output is used by 2 Ω of subwoofer, use speakers over 70 W (maximum input power).
* Please refer to connections for a connection method.
- To prevent a short-circuit, overheating or malfunction, be sure to follow the directions below.
- Disconnect the negative terminal of the battery before installation.
- Secure the wiring with cable clamps or adhesive tape. Wrap adhesive tape around wiring that comes into contact with metal parts to protect the wiring.
- Place all cables away from moving parts, such as the shift lever and seat rails.
- Place all cables away from hot places, such as near the heater outlet.
- Do not connect the yellow cable to the battery by passing it through the hole to the engine compartment.
- Cover any disconnected cable connectors with insulating tape.
- Do not shorten any cables.
- Never cut the insulation of the power cable of this unit in order to share the power with other devices. The current capacity of the cable is limited.
- Use a fuse of the rating prescribed.
- Never wire the negative speaker cable directly to ground.
- Never band together negative cables of multiple speakers.
- When this unit is on, control signals are sent through the blue/white cable. Connect this cable to the system remote control of an external power amp or the vehicle’s auto-antenna relay control terminal (max. 300 mA 12 V DC). If the vehicle is equipped with a glass antenna, connect it to the antenna booster power supply terminal.
- Never connect the blue/white cable to the power terminal of an external power amp. Also, never connect it to the power terminal of the auto antenna. Doing so may result in battery drain or a malfunction.
- The graphical symbol
placed on the product means direct current.
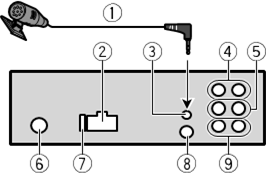
This unit
- Microphone (3 m)
- Power cord input
- Microphone input
- Rear output (STD) or middle range output (NW)
- Front output (STD) or high range output (NW)
- Antenna input
- Fuse (10 A)
- Wired remote input
Hard-wired remote control adapter can be connected (sold separately). - Subwoofer output
Removing the unit (installed with the supplied mounting sleeve)
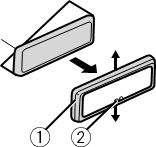
- Remove the trim ring.
- Trim ring
- Notched tab
- Releasing the front panel allows easier access to the trim ring.
- When reattaching the trim ring, point the side with the notched tab down.
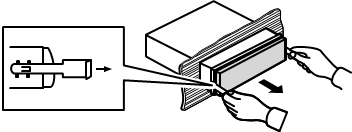
- Insert the supplied extraction keys into both sides of the unit until they click into place.
- Pull the unit out of the dashboard.
Installing the microphone
The microphone should be placed directly in front of the driver at a suitable distance to pick up their voice clearly.
It is extremely dangerous to allow the microphone lead to become wound around the steering column or shift lever. Be sure to install the microphone in such a way that it will not obstruct driving. It is recommended to use the clamps (sold separately) to arrange the lead.
NOTE
Depending on the vehicle model, the microphone cable length may be too short when you mount the microphone on the sun visor. In such cases, install the microphone on the steering column.
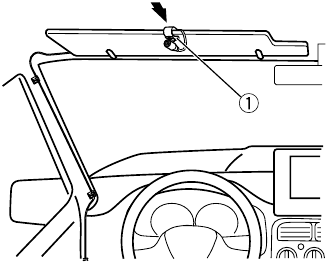
To install on the sun visor
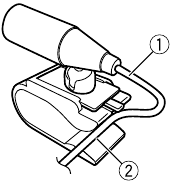
- Fit the microphone lead into the groove.
- Microphone lead
- Groove
- Install the microphone clip on the sun visor.
Lowering the sun visor reduces the voice recognition rate.- Microphone clip
Basic operation
MVH-S520BT
About the main menu
You can adjust various settings in the main menu.
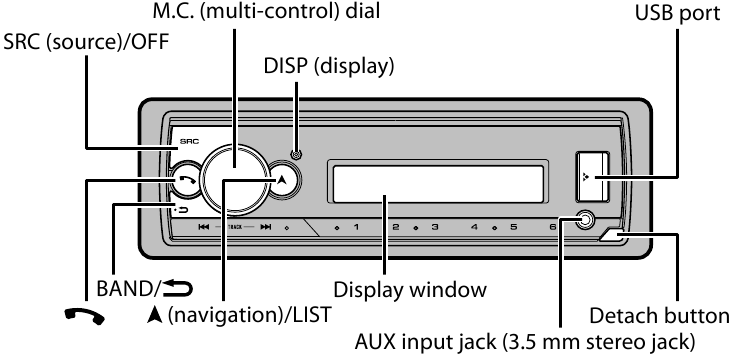
- Press the M.C. dial to display the main menu.
- Turn the M.C. dial to select one of the categories below, then press to confirm.
- FUNCTION settings
- AUDIO settings
- SYSTEM settings
- ILLUMINATION settings
- MIXTRAX settings
- MICROPHONE settings
- Turn the M.C. dial to select the options, then press to confirm.
Frequently used operations
| Purpose | Operation |
| Turn on the power |
Press SRC/OFF to turn on the power. Press and hold SRC/OFF to turn off the power. |
| Adjust the volume | Turn the M.C. dial. |
| Select a source | Press SRC/OFF repeatedly. |
| Change the display information | Press DISP repeatedly. |
| Return to the previous display/list | Press BAND/ . . |
| Return to the normal display from the menu | Press and hold BAND/ . . |
| Change the display brightness | Press and hold BAND/ . . |
Setup operation
When you turn the ignition switch to ON after installation, the setup menu appears in the display.
Do not use the unit in standard mode when a speaker system for network mode is connected to the unit. Do not use the unit in network mode when a speaker system for standard mode is connected to the unit. This may cause damage to the speakers.
- Turn the M.C. dial to select the options, then press to confirm.
To proceed to the next menu option, you need to confirm your selection.
| Menu Item | Description |
|
LANGUAGE [ENG](English), |
Select the language to display the text information from a compressed audio file. |
| CLOCK SET |
Set the clock.
|
|
FM STEP [100], [50] |
Select the FM tuning step from 100 kHz or 50 kHz. |
|
SPEAKER MODE [STANDARD], |
Switch between two operation modes: the 2-way network mode (NETWORK) and the standard mode (STANDARD) according to the connections you have established. After selecting the appropriate mode, turn the M.C. dial to select [YES], then press to confirm.
|
- [QUIT:YES] appears.
To return to the first item of the setup menu, turn the M.C. dial to select [QUIT:NO], then press to confirm. - Press the M.C. dial to confirm the settings.
MTP connection
A device installed with Android OS 4.0 or most of later versions can be connected to the unit via MTP, using the cable supplied with the Android device. However, depending on the connected device, OS version or the numbers of the files in the device, audio files/songs may not be able to be played back via MTP.
NOTE
If you use an MTP connection, [USB MTP] needs to be set to [ON] in the SYSTEM settings.
AUX
- Insert the stereo mini plug into the AUX input jack.
- Press SRC/OFF to select [AUX IN] as the source.
Bluetooth connection
Up to two Bluetooth telephones can be connected simultaneously.
- Turn on the Bluetooth function of the device.
- Select the unit name shown in the device display.
- Make sure the same 6-digit number appears on this unit and the device.
- Select [YES].
Bluetooth telephone
Basic operations
Activating voice recognition mode
- Press and hold
and then talk into the microphone to input voice commands.
To exit the voice recognition mode, press BAND/.
Making a connection with Pioneer Smart Sync
Pioneer Smart Sync is the application that intelligently brings your maps, messages, and music together in the vehicle.
Do not attempt to operate the application while driving. Make sure to pull off the road and park your vehicle in a safe location before attempting to use the controls on the application.
- Enter the SYSTEM menu (refer to «About the main menu»).
- Turn the M.C. dial to select [APP CONTROL], then press to confirm.
- Turn the M.C. dial to select one of the below.
- Select [WIRED] for the USB connection.
- Select [BLUETOOTH] for the Bluetooth connection.
- Turn the M.C. dial to select [AUTO APP CONN], then press to confirm.
- Turn the M.C. dial to select [ON], then press to confirm.
- Connect this unit with the mobile device via USB or Bluetooth. Pioneer Smart Sync on the iPhone/Android device starts automatically.
NOTE
Regardless of whether the [AUTO APP CONN] setting is set to [ON] or [OFF], you can also perform the following to start Pioneer Smart Sync.- For devices other than the USB-connected Android device, press SRC/OFF to select any source and press and hold the M.C. dial.
- For iPhone, launch Pioneer Smart Sync on the mobile device.
Listening to Spotify®
(Not available when [USB MTP] is set to [ON] in the SYSTEM settings.)
Update the firmware of the Spotify application to the latest version before use.
Before you start, connect this unit with the mobile device via USB (iPhone only) or Bluetooth.
- Enter the SYSTEM menu (refer to «About the main menu»).
- Turn the M.C. dial to select [APP CONTROL], then press to confirm.
- Turn the M.C. dial to select one of the below.
- Select [WIRED] for the USB connection.
- Select [BLUETOOTH] for the Bluetooth connection.
- Press SRC/OFF to select [SPOTIFY].
- Launch the Spotify application on the mobile device and start playback.
Documents / Resources
References
Download manual
Here you can download full pdf version of manual, it may contain additional safety instructions, warranty information, FCC rules, etc.
Download Pioneer MVH-S520BT — Digital Media Receiver Quick Start Guide
Магнитолы Pioneer MVH-S520BT — инструкция пользователя по применению, эксплуатации и установке на русском языке. Мы надеемся, она поможет вам решить возникшие у вас вопросы при эксплуатации техники.
Вы можете скачать инструкцию к Pioneer MVH-S520BT по ссылке ниже, если не хотите ждать загрузки. Если остались вопросы, задайте их в комментариях после инструкции.
«Загружаем инструкцию», означает, что нужно подождать пока файл загрузится и можно будет его читать онлайн. Некоторые инструкции очень большие и время их появления зависит от вашей скорости интернета.
Остались вопросы?
Не нашли свой ответ в руководстве или возникли другие проблемы? Задайте свой вопрос в форме ниже с подробным описанием вашей ситуации, чтобы другие люди и специалисты смогли дать на него ответ. Если вы знаете как решить проблему другого человека, пожалуйста, подскажите ему
![:)]()
Часто задаваемые вопросы
Как посмотреть инструкцию к Pioneer MVH-S520BT?
Необходимо подождать полной загрузки инструкции в сером окне на данной странице или скачать кликнув по специальной кнопке.
Руководство на русском языке?
Все наши руководства представлены на русском языке или схематично, поэтому вы без труда сможете разобраться с вашей моделью
Как можно распечатать инструкцию?
Скачайте ее по специальной кнопке над формой чтения на ваше устройства и отправьте на печать.
Автопроигрыватель Pioneer MVH-S520BT
1 DIN, 200 Вт (4×50 Вт), AUX, USB, BT, собственная ОС
подробнее
335
Код товара: 1601697
инструкцияPioneer FH-S520BT

English Français Español
CD RDS RECEIVER
AUTORADIO CD RDS
REPRODUCTOR DE CD CON
RECEPTOR RDS
FH-S720BS
FH-S722BS
FH-S52BT
Operation Manual
Mode d’emploi
Manual de operación
Important (Serial number)
The serial number is located on the bottom of this unit. For your own security and convenience, be sure to
record this number on the enclosed warranty card.
Important (Numéro de série)
Le numéro de série se trouve au bas de cet appareil. Pour votre sécurité et votre commodité, veillez à noter ce
numéro sur la carte de garantie fournie.
Importante (Número de serie)
El número de serie se encuentra en la parte inferior de esta unidad. Por su propia seguridad y comodidad,
asegúrese de anotar este número en la tarjeta de garantía que se adjunta.


 placed on the product means direct current.