Primare NP5 Prisma
Chromecast built-in Quick Start Guide
The instructions below will allow you to quickly and easily set up your Primare Prisma
product to your WiFi network and mobile device in order to cast music or stream from
hundreds of services with Chromecast built-In.
01
Install the NP5 Prisma in your system following
the instructions in the user guide. The NP5 Prisma
will turn on when the power cable is connected,
at which point you can begin the setup process.
05
Connecting to Primare NP5…
Your phone or tablet may disconnect from Wi-Fi during setup
Select the Prisma product you want to
configure by pressing Set Up. The display
of your Primare Prisma product will display
Configure network.
02
Settings
Wi-Fi
WiFi
Your WiFi Network
CHOOSE A NETWORK
DefaultWiFi
ScandiWiFi09
Enable Bluetooth and WiFi on your mobile
device. Connect the mobile device to the
network you want the Prisma device to use.
06
Primare NP5 found
Primare I35 found
Would you like to set up this device?
Would you like to set up this device?
The Google Home app will automatically
connect your mobile device to your Primare
Prisma Product.
Prisma product network name (SSID):
Chromecast built-in serial number:
03
The WiFi LED will flash blue, or green if you
have selected to connect using ethernet cable,
to indicate that the NP5 Prisma is in Setup mode.
The LED will stop flashing when setup is complete.
07
Did you hear the sound?
Primare I35 found
This lets you know you´re connected to the right Primare NP5
Would you like to set up this device?
Once connected you will hear a test tone and see
the graphic above on your mobile device.
04
Welcome home
Device setup
1 device found
Primare NP5
is ready for set up
SET UP
Download and open the Google Home app
on your mobile device. On the app’s home
page you will see a Device setup field for
any Prisma products to be setup.
08
Where is the device?
Choose a location for your Primare NP5. This will help name
and organize your devices.
My rooms
Backyard
NP5 Terry
Create new
Attic
Backyard
You then choose a location or name for the
device by either selecting a room name or by
using the «adding a custom room» function
at the bottom of the page.
09
Connecting to Wi-Fi
Choose the Wi-Fi network you would like to use with your
Primare NP5
Testnet2,4
Testnet5
Telia5GHz-2612BD
dlink-2814-5Ghz
Other Wi-Fi network…
Select the WiFi network (WLAN) you wish to
connect to and push connect.
Note: if connecting by Ethernet cable (LAN),
this step will be skipped, with network
connection being made immediately.
13
Almost done! – Review what you have done
so far. And upon pressing next at the bottom
of the screen you should see that your device
is setup and ready.
The information provided in this document is intended for informational purposes only and is subject to change without notice. The process may vary with different devices and services.
10
Connecting to Wi-Fi
Primare I35 found
Primare NP5 is now connecting to Testnet5
Would you like to set up this device?
It will take some time to connect to your
chosen WiFi network. During this time an
animated graphic will be in motion, indicating
that the process is underway.
14
The next steps will provide you with a tutorial
to show you how to use Chromecast or you
can press «Skip tutorial» to begin casting.
11
Primare I35 found
Connected
Once you are connected to the WiFi network,
the graphic will assemble into a stable image.
15
Chromecast
Cast Button
Select a music streaming app or a song
from your mobile device, and press the
Chromecast icon to start streaming.
12
Linking your Primare NP5
Primare I35 found
Your Primare NP5 uses your Google account to personalize
Would you like to set up this device?
your experience
At this stage you will have the opportunity
to link your Primare Prisma product to your
Google account, should you have one, to
personalize your experience.
Should you have any questions or
require further information, please
contact us at info@primare.net

CHOOSE A NETWORK
Settings
Wi-Fi
Your WiFi Network
WiFi
DefaultWiFi
ScandiWiFi09
1 device found
Primare NP5
is ready for set up
Device setup
SET UP
Welcome home
Connecting to Primare NP5…
Your phone or tablet may disconnect from Wi-Fi during setup
Primare I35 found
Would you like to set up this device?
Primare NP5 found
Would you like to set up this device?
Primare I35 found
Would you like to set up this device?
Did you hear the sound?
This lets you know you´re connected to the right Primare NP5
Where is the device?
Choose a location for your Primare NP5. This will help name
and organize your devices.
My rooms
Backyard
NP5 Terry
Create new
Attic
Backyard
Install the NP5 Prisma in your system following
the instructions in the user guide. The NP5 Prisma
will turn on when the power cable is connected,
at which point you can begin the setup process.
Enable Bluetooth and WiFi on your mobile
device. Connect the mobile device to the
network you want the Prisma device to use.
Download and open the Google Home app
on your mobile device. On the app’s home
page you will see a Device setup field for
any Prisma products to be setup.
Select the Prisma product you want to
configure by pressing Set Up. The display
of your Primare Prisma product will display
Configure network.
The Google Home app will automatically
connect your mobile device to your Primare
Prisma Product.
Once connected you will hear a test tone and see
the graphic above on your mobile device.
You then choose a location or name for the
device by either selecting a room name or by
using the “adding a custom room” function
at the bottom of the page.
The WiFi LED will flash blue, or green if you
have selected to connect using ethernet cable,
to indicate that the NP5 Prisma is in Setup mode.
The LED will stop flashing when setup is complete.
01 03
05 080706
02 04
Chromecast built-in Quick Start Guide
The instructions below will allow you to quickly and easily set up your Primare Prisma
product to your WiFi network and mobile device in order to cast music or stream from
hundreds of services with Chromecast built-In.
Prisma product network name (SSID):
Chromecast built-in serial number:
Стриминг давно вошел в жизнь меломанов, в том числе любителей качественного звука. В последнее время использование стриминговых сервисов находится под вопросом, но все же вполне возможно – аккаунты в Spotify и Tidal были у всех желающих раньше, будем надеяться – будут и впоследствии. Они предлагают почти безграничный выбор музыки, в том числе и в lossless-форматах, да и воспроизведение собственной медиатеки по сети — штука весьма удобная. Многие современные компоненты поддерживают все эти функции, что называется, из коробки, но бывает и так, что сетап давно собран и в целом вполне устраивает — менять в нем что-то глобально никакой мотивации нет. А вот добавить сетевые функции уже пора.
Тут и возникает необходимость в сетевом стримере, который обеспечит все необходимое. При этом очень желательно, чтобы он был не запредельно дорог, внешне подходил к дизайну других компонентов системы, либо был настолько мал, чтобы не привлекать к себе лишнего внимания. Вот о таком устройстве компании Primare, имеющей скандинавские корни и основанной в 1985 году промышленным дизайнером Бо Кристенсеном, мы сегодня и поговорим. Primare NP5 Prisma — это очень компактный сетевой плеер, поддерживающий фирменное ПО, которое изначально разрабатывалось для значительно более дорогих и «продвинутых» продуктов — существенная часть обзора будет посвящена именно ему.
Плеер поддерживает все самое необходимое — от банальной возможности воспроизведения музыкальных файлов с USB-носителей до AirPlay 2, Roon, Spotify Connect, а также Chromecast. Соответственно, благодаря NP5 Prisma у слушателя появляется возможность воспроизводить музыкальные файлы с устройств в домашней сети, пользоваться практически любыми стриминговыми сервисами, добавлять используемый сетап в мультирум-системы и так далее. В общем, крайне интересное устройство, хоть и не без своих ограничений и особенностей.
Технические характеристики
| Максимальное разрешение аудио | 24 бит/192 кГц |
|---|---|
| Выходы | цифровые: коаксиальный + оптический |
| Воспроизведение с USB-носителя | есть |
| Подключение к сети | Ethernet, Wi-Fi |
| Wi-Fi | 802.11n (2,4 / 5 ГГц) |
| Bluetooth | есть (кодек SBC) |
| Управление | ПО Primare Prisma |
| Потоковые протоколы | Chromecast, Roon, Spotify Connect, AirPlay 2 |
| Размеры | 143×36×125 мм |
| Вес | 500 г |
| Стоимость |
узнать цену |
Упаковка и комплектация
Упакован плеер в простую картонную коробку, на которую нанесены логотип производителя, краткие характеристики, значки использованных технологий…
Внутри пользователь обнаруживает само устройство, блок питания со сменными вилками для различных розеток, кабель для соединения с предыдущими моделями Primare с разъемами RS232, документацию.
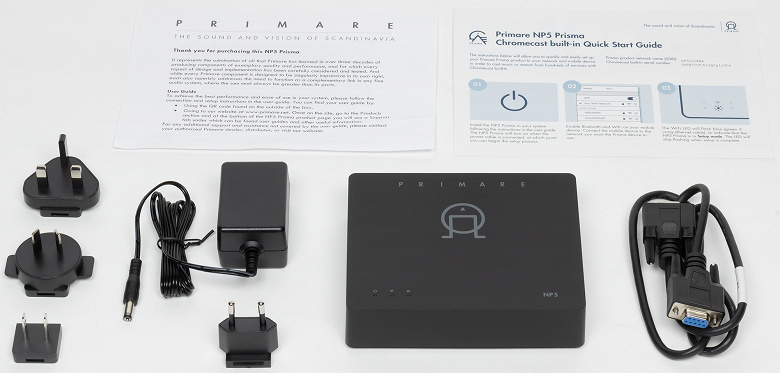
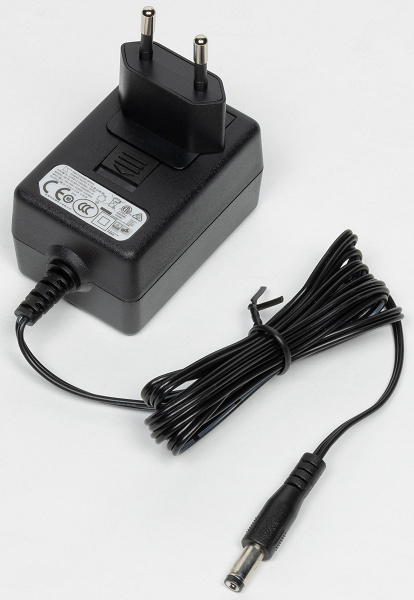
Корпус блока питания выполнен на хорошем уровне качества, съемные вилки устанавливаются легко и с приятным кликом, при этом не люфтят и крепко держатся на своем месте. Кабель имеет длину 140 см.
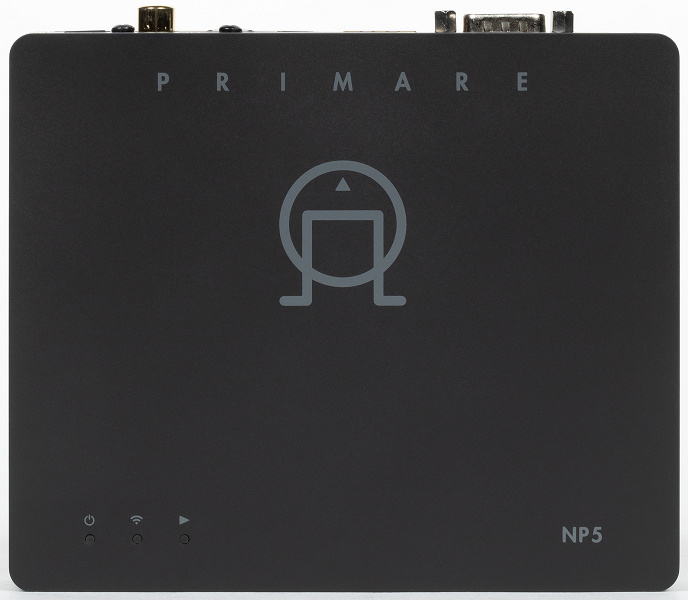
Дизайн
Оформление плеера выполнено в так называемом «скандинавском стиле» — просто, но элегантно. Черный матовый корпус, никаких лишних деталей и декоративных элементов… Дизайн позволит NP5 Prisma легко сочетаться по внешнему виду практически с любым комплектом оборудования. Размеры его при этом крайне невелики — всего 143×36×125 мм, при желании прибор можно разместить в каком-нибудь дальнем углу стойки, где он вообще не будет заметен.
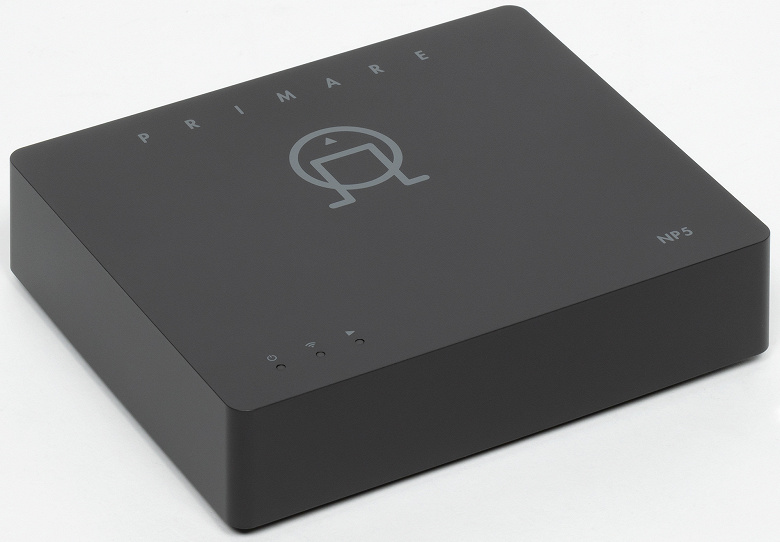
Корпус выполнен из немаркого черного матового пластика. На верхнюю панель нанесены название плеера и логотип производителя.
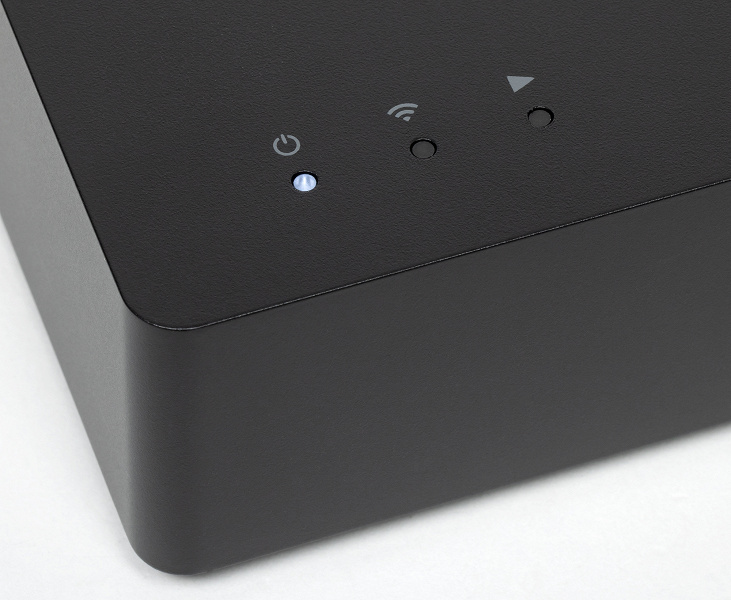
В левом нижнем углу верхней панели расположены три индикатора: питания, сетевого подключения и воспроизведения.
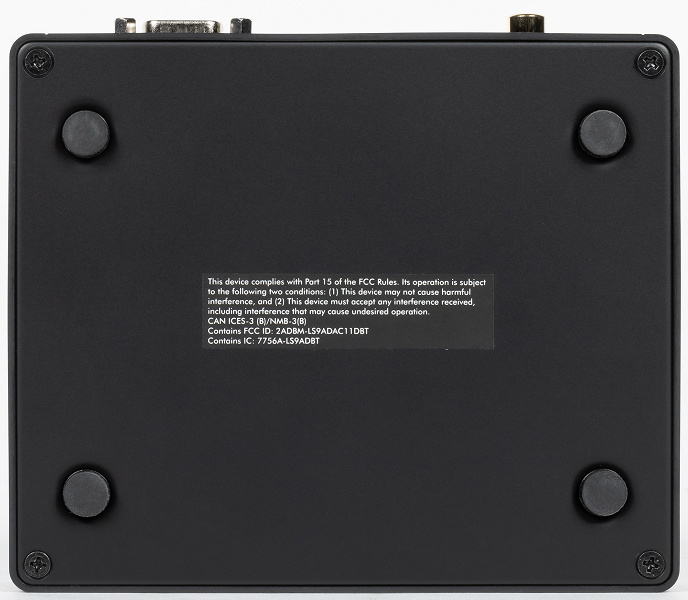
На дне расположены крепежные элементы, резиновые ножки и наклейка с серийными номерами.
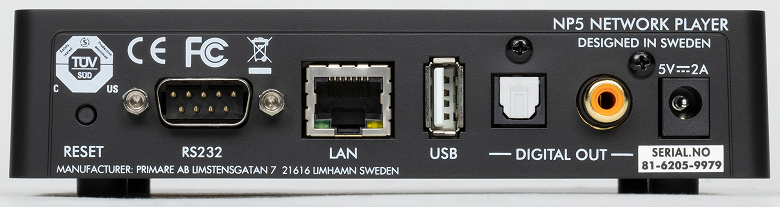
На заднюю панель нанесены серийный номер, логотипы систем сертификации, служебная информация и так далее. Но самое интересное там — это, конечно, разъемы для подключения.
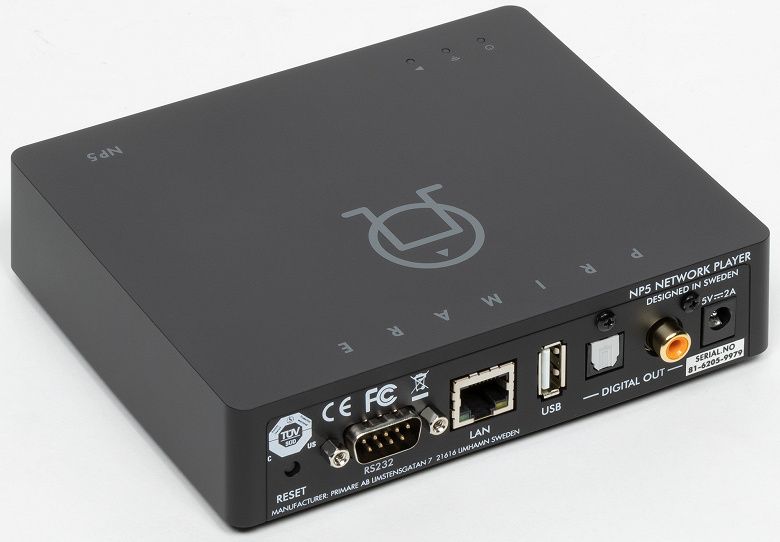
Слева мы видим кнопку сброса настроек, далее — разъем RS232 для соединения с ранними моделями устройств серии Primare. По центру — сетевой разъем RJ-45, плюс USB для подключения внешних накопителей. Следом идут два цифровых аудиовыхода — оптический и коаксиальный. Ну и справа находится разъем подключения блока питания.
Конструкция
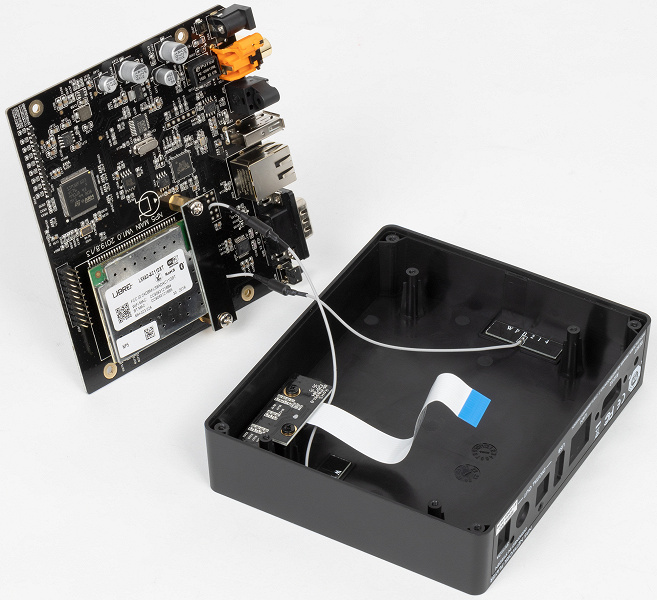
Заглянем внутрь устройства. Плата легко вынимается, под ней обнаруживаются две внутренних антенны, обеспечивающих работу беспроводной связи, а также шлейф, ведущий к блоку индикации.
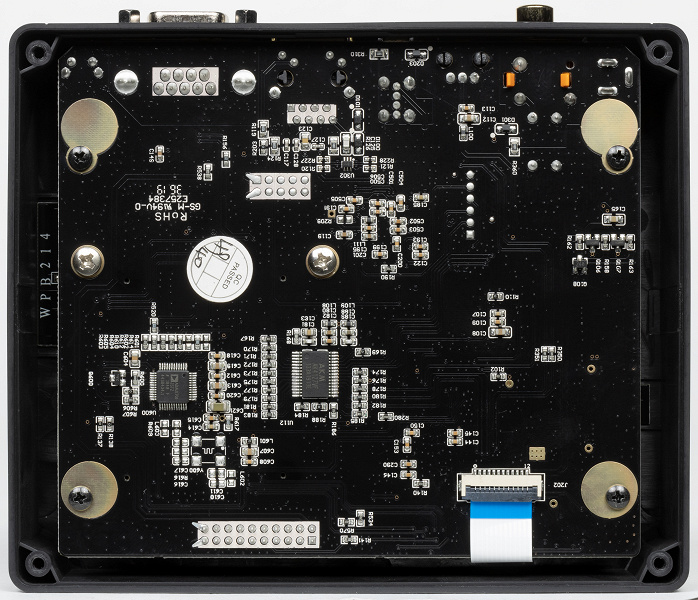
Качество сборки предсказуемо высокое — ничего другого мы и не ожидали. На задней стороне платы мы видим однокристальную аудиосистему ADAU1701, включающую в себя 28-/56-разрядный цифровой сигнальный аудиопроцессор, два АЦП, четыре ЦАП и интерфейсы управления. Рядом расположен конвертер частоты дискретизации AsahiKasei AK4127.
Вывод сигнала с плеера осуществляется только по оптике или коаксиалу, а они не пропускают частоту выше 192 кГц, соответственно перечень воспроизводимых форматов в документации к Primare NP5 заканчивается на PCM 24/192 кГц и DSD128. Однако в реальности корректно воспроизводятся и файлы с большей частотой дискретизации, понижением которой для дальнейшей работы, вполне вероятно, и занимается AK4127. Апсемплинг тоже присутствует, с возможностью его активации мы встретимся чуть ниже, когда будем говорить об эксплуатации плеера.
На верхней части сразу привлекает внимание крупный модуль медиастриминга Libre LS9AD-AC11DBT, содержащий двухъядерный процессор Cortex-A7 и две подсистемы Neon/VFPU, работающие на частоте 1,3 ГГц. Также присутствует 256 МБ памяти DDR3 DRAM и 256 МБ флэш-памяти NAND. Именно LS9AD-AC11DBT отвечает за все самое интересное: от связи посредством Wi-Fi и Bluetooth до декодинга музыкальных файлов разных форматов и поддержки Airplay, Chromecast и так далее. Передачей данных посредством S/PDIF занимается Wolfson WM8804, за поддержку USB 2.0 и Ethernet в ответе SMSC LAN9512, также на плате можно найти пару модулей памяти и ARM-микроконтроллер STM32F103VCT6.

Эксплуатация
Как уже говорилось выше, выходов у Primare NP5 Prisma два, и оба цифровые, так что у подключаемого устройства должен быть соответствующий вход и собственный ЦАП. Плеер «отдает» цифровой сигнал, поэтому его влияние на звучание сетапа минимально. Аудиокабелей для подключения в комплекте нет — их придется докупить отдельно. В остальном же все максимально просто: питание — в розетку, аудиокабель — в приемник сигнала. Ну а далее предстоит настроить сетевое подключение. Управление плеером осуществляется посредством программы Primare Prisma, доступной под Android и iOS. С ее установки и стоит начать общение с плеером.
Мы использовали Android-версию. Устанавливаем, запускаем — программа начинает искать «знакомые» устройства, но пока не находит. Внизу есть надпись, по которой нужно кликнуть для настройки Wi-Fi, что мы и делаем. Далее приложение предлагает включить плеер и дождаться, когда индикатор на корпусе сообщит о готовности к подключению. Делает он это, кстати, периодически мигая синим цветом. После этого нажимаем Start и попадаем на следующий экран, где видим кнопку перехода в меню настройки Wi-Fi нашего устройства.
В нем нам нужно подключиться к точке доступа, которую предлагает плеер. После этого появляется возможность выбрать сеть, к которой он будет подключаться для работы и ввести пароль к ней.
После небольшой паузы плеер появляется в списке устройств, после чего автоматически проверяется наличие обновлений. Если они есть — происходит установка. У нас она заняла пару минут, но тут все, конечно, зависит от размера загружаемого пакета и скорости интернета. Как только обновление окончено, устройство вновь появляется в списке на стартовой странице и готово к дальнейшей эксплуатации.
Экран приложения разбит на несколько вкладок. На первую вынесен выбор источников музыкального материала. Раскрываем первый пункт меню и видим весьма внушительный список стриминговых сервисов. По клику на каждый из пунктов открывается советующее приложение или страница для его установки. Пробуем открыть Tidal и видим, что возможности транслировать контент на плеер пока нет. Ничего страшного, это все потому, что мы выбрали базовый вариант настройки — ниже попробуем воспользоваться Chromecast, который даст нам гораздо более широкий список возможностей.
А вот у Spotify есть собственный Spotify Connect, который поддерживается NP5 Prisma — соответственно, все работает сразу и без каких-либо дополнительный действий. При этом управлять воспроизведением можно как из ПО самого Spotify, так и через Primare Prisma — последний вариант удобнее, поскольку появляется возможность изменять громкость.
Приложение позволяет транслировать на плеер медиафайлы, расположенные в памяти устройства, где оно установлено. Создаваемую им медиатеку, на наш взгляд, можно было бы сделать и удобнее, но это дело вкуса. Встроенный плеер для воспроизведения файлов с USB-носителей воспроизводит практически все распространенные форматы: MP3, FLAC, WAV, AAC, OGG, M4A, WMA…
При создании мультирум-конфигураций, устройства можно объединять в зоны, для которых выделена отдельная вкладка. Легко обнаружил NP5 Prisma и DLNA-сервер, хотя при наличии Chromecast и прочих технологий использовать его было бы не самым эффективным решением.
В настройках можно зафиксировать громкость на плеере, если пользователь планирует регулировать ее на усилителе, например. Там же можно настроить апсемплинг и даунсемплинг сигнала до фиксированной частоты дискретизации, ограничить максимальную и минимальную громкость, настроить автовыключение…
Идем по настройкам далее. Остается посмотреть на возможность сбросить все параметры до заводских значений, а также активировать Bluetooth-подключение.
Сопряжение посредством Bluetooth осуществляется стандартным образом, не будем останавливаться на нем подробно. Плеер мы с легкостью подключили как к смартфону под управлением Android, так и к ПК с Windows 10, чтобы с помощью утилиты Bluetooth Tweaker получить полный список поддерживаемых кодеков и их режимов.
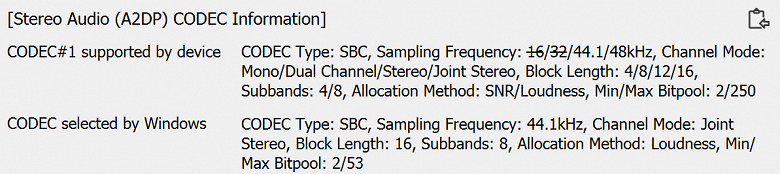
Как несложно заметить, кодек всего один, и это базовый SBC — подключение по Bluetooth явно можно рассматривать как «очень дополнительную» опцию. Наверное, иногда можно послушать какой-нибудь подкаст с телефона, ну а для всего остального лучше предпочесть более «продвинутые» технологии — благо их в устройство заложено немало.
Собственно, об одной из них — Chromecast — и поговорим. Помимо нее плеер поддерживает AirPlay 2, обладает сертификатом Roon Ready… Но обо всем рассказать невозможно, потому остановимся на одном примере. Как только устройство появляется в сети, устройства под управлением Android предлагают настроить Chromecast — остается только нажать на уведомление. Если приложение Google Home не установлено, откроется страница установки. В противном случае сразу запустится процесс настройки. Выбираем дом, в котором будет расположен плеер, ждем некоторое время — и готово, устройство обнаружено.
Далее ждем еще немного, после чего плеер воспроизводит тестовый сигнал, а приложение спрашивает, услышали ли мы его. Если все слышно, можно согласиться с передачей отчетов о сбоях или отказаться от него, выбрать комнату из существующих или добавить еще одну.
Выбираем сеть Wi-Fi, пароль к которой уже, вероятнее всего, сохранен на устройстве, которое используется для настройки — вводить его заново не придется.
«Почти готово», обнадеживает нас приложение. После чего предлагает ознакомиться с небольшой, но весьма полезной и информативной инструкцией. Помимо прочих бонусов, подключение к сервисам Google добавляет поддержку их голосового помощника. Описывать работу с ним в тексте малоэффективно, но упомянуть про эту возможность стоит.
А вот теперь действительно готово. Переходим в приложение Tidal и видим наш плеер, названный так же, как и комната, в которой он расположен — в случае построения мультирум-систем это самый удобный вариант, но при желании имя можно сменить. MQA не поддерживается, потому стриминг ограничен Hi-Fi-качеством. И тут мы снова возвращаемся к тому, что воспроизведения Hi-Res-контента многим пользователям будет очень не хватать.
Появляется возможность трансляции звука и из других приложений, в частности — популярной в России «Яндекс.Музыки».
Итоги
Primare NP5 Prisma обладает целым рядом очевидных достоинств. Он легкий и компактный, выполнен в сдержанном и стильном дизайне — легко впишется в интерьер либо будет вообще не заметен. Может не понравиться наличие только двух вариантов подключения, оба из которых не подразумевают прослушивание Hi-Res-записей. Но многим они и не особо нужны. Зато плеер дает возможность просто и легко добавить сетевые функции в существующий сетап, получив сразу все современные технологии — от Chromecast и AirPlay 2 до Roon, плюс поддержку стриминговых сервисов, хороший встроенный проигрыватель и так далее.
View a manual of the Primare NP5 Prisma below. All manuals on ManualsCat.com can be viewed completely free of charge. By using the ‘Select a language’ button, you can choose the language of the manual you want to view.
Page: 1
CHOOSE A NETWORK
Settings Wi-Fi
Your WiFi Network
WiFi
DefaultWiFi
ScandiWiFi09
1 device found
Primare NP5
is ready for set up
Device setup
SET UP
Welcome home
Connecting to Primare NP5…
Your phone or tablet may disconnect from Wi-Fi during setup
Primare I35 found
Would you like to set up this device?
Primare NP5 found
Would you like to set up this device?
Primare I35 found
Would you like to set up this device?
Did you hear the sound?
This lets you know you´re connected to the right Primare NP5
Where is the device?
Choose a location for your Primare NP5. This will help name
and organize your devices.
My rooms
Backyard
NP5 Terry
Create new
Attic
Backyard
Install the NP5 Prisma in your system following
the instructions in the user guide. The NP5 Prisma
will turn on when the power cable is connected,
at which point you can begin the setup process.
Enable Bluetooth and WiFi on your mobile
device. Connect the mobile device to the
network you want the Prisma device to use.
Download and open the Google Home app
on your mobile device. On the app’s home
page you will see a Device setup field for
any Prisma products to be setup.
Select the Prisma product you want to
configure by pressing Set Up. The display
of your Primare Prisma product will display
Configure network.
The Google Home app will automatically
connect your mobile device to your Primare
Prisma Product.
Once connected you will hear a test tone and see
the graphic above on your mobile device.
You then choose a location or name for the
device by either selecting a room name or by
using the “adding a custom room” function
at the bottom of the page.
The WiFi LED will flash blue, or green if you
have selected to connect using ethernet cable,
to indicate that the NP5 Prisma is in Setup mode.
The LED will stop flashing when setup is complete.
01 03
05 08
07
06
02 04
Primare NP5 Prisma
Chromecast built-in Quick Start Guide
The instructions below will allow you to quickly and easily set up your Primare Prisma
product to your WiFi network and mobile device in order to cast music or stream from
hundreds of services with Chromecast built-In.
Prisma product network name (SSID):
Chromecast built-in serial number:
Page: 2
Primare I35 found
Connected
Chromecast
Cast Button
Connecting to Wi-Fi
Choose the Wi-Fi network you would like to use with your
Primare NP5
Testnet5
Telia5GHz-2612BD
Testnet2,4
dlink-2814-5Ghz
Other Wi-Fi network…
Primare I35 found
Would you like to set up this device?
Connecting to Wi-Fi
Primare NP5 is now connecting to Testnet5
Primare I35 found
Would you like to set up this device?
Linking your Primare NP5
Your Primare NP5 uses your Google account to personalize
your experience
Select the WiFi network (WLAN) you wish to
connect to and push connect.
Note: if connecting by Ethernet cable (LAN),
this step will be skipped, with network
connection being made immediately.
It will take some time to connect to your
chosen WiFi network. During this time an
animated graphic will be in motion, indicating
that the process is underway.
Once you are connected to the WiFi network,
the graphic will assemble into a stable image.
At this stage you will have the opportunity
to link your Primare Prisma product to your
Google account, should you have one, to
personalize your experience.
Almost done! – Review what you have done
so far. And upon pressing next at the bottom
of the screen you should see that your device
is setup and ready.
The next steps will provide you with a tutorial
to show you how to use Chromecast or you
can press “Skip tutorial” to begin casting.
Should you have any questions or
require further information, please
contact us at info@primare.net
Select a music streaming app or a song
from your mobile device, and press the
Chromecast icon to start streaming.
12
13 14 15
11
09 10
The information provided in this document is intended for informational purposes only and is subject to change without notice. The process may vary with different devices and services.
Page: 3
NP5 Prisma MK2 Network Player User Guide
C O N T E N T S
Safety information
Welcome!
Getting started
Back-panel connections
Playing music from a drive or music server
Streaming music from a phone, tablet, or PC
Conöguring the settings
Technical speciöcation
Additional information
Page: 4
S A F E T Y I N F O R M A T I O N
CAUTION
TO REDUCE THE RISK OF FIRE, REPLACE WITH THE SAME TYPE AND RATING OF FUSE.
ATTENTION
UTILISER UN FUSIBLE DE RECHANGE MÊME TYPE.
Safety compliance
This product has been designed to meet the IEC 60065 international electrical safety standard.
CAUTION
RISK OF ELECTRIC SHOCK DO NOT OPEN
ATTENTION
RISQUE DE CHOC ELECTRIQUE NE PAS OUVRIR
The lightning ûash with an arrowhead symbol within an equilateral triangle, is intended to alert the user to
the presence of uninsulated ‘dangerous voltage’ within the product’s enclosure that may be of sufúcient
magnitude to constitute a risk of electric shock to persons.
Page: 5
CAUTION: To reduce the risk of electrical shock do not remove cover (or back). No user serviceable parts inside. Refer
servicing to qualiúed service personnel.
WARNING: To reduce the risk of úre or electrical shock, do not expose this apparatus to rain or moisture.
CAUTION: In Canada and the USA, to prevent electric shock, match the wide blade of the plug to the wide slot in the socket
and insert the plug fully into the socket.
This product is designed and manufactured to meet strict quality and safety standards. However, you should be aware of the
following installation and operation precautions.
1. Take heed of warnings & instructions
You should read all the safety and operating instructions before operating this appliance. Retain this handbook for future
reference and adhere to all warnings in the handbook or on the appliance.
2. Water and moisture
The presence of electricity near water can be dangerous. Do not use the appliance near water – for example next to a bathtub,
washbowl, kitchen sink, in a wet basement or near a swimming pool, etc.
3. Object or liquid entry
Take care that objects do not fall and liquids are not spilled into the enclosure through any openings. Liquid-úlled objects such as
vases should not be placed on the equipment.
4. Ventilation
Do not place the equipment on a bed, sofa, rug or similar soft surface, or in an enclosed bookcase or cabinet, since ventilation
may be impeded. We recommend a minimum distance of 50mm around the sides and top of the appliance to provide adequate
ventilation.
5. Heat
Locate the appliance away from naked ûames or heat producing equipment such as radiators, stoves or other appliances
(including other ampliúers) that produce heat.
6. Climate
The appliance has been designed for use in moderate climates.
7. Racks and stands
Only use a rack or stand that is recommended for use with audio equipment. If the equipment is on a portable rack it should be
moved with great care, to avoid overturning the combination.
8. Cleaning
Unplug the unit from the mains supply before cleaning.
The case should normally only require a wipe with a soft, damp, lint-free cloth. Do not use paint thinners or other chemical
solvents for cleaning.
Page: 6
9. Power sources
This appliance must be connected to a mains socket outlet using the supplied power supply. To disconnect this apparatus from
power, you must disconnect the power supply. Make sure the power supply is always easily accessible.
Only connect the appliance to the supplied power supply.
10. Power-cord protection
Power supply cords should be routed so that they are not likely to be walked on or pinched by items placed upon or against
them, paying particular attention to cords and plugs, and the point where they exit from the appliance.
11. Lightning storms
Unplug this device during lightning storms.
12. Non-use periods
If the unit is in standby, a small amount of current will continue to ûow into the equipment in this mode. Unplug the power supply
for the appliance from the outlet if left unused for a long period of time.
13. Abnormal smell
If an abnormal smell or smoke is detected from the appliance, unplug the power supply immediately from the wall outlet.
Contact your dealer immediately.
14. Servicing
You should not attempt to service the appliance beyond that described in this handbook. All other servicing should be referred
to qualiúed service personnel.
15. Damage requiring service
The appliance should be serviced by qualiúed service personnel when:
A. the power-supply cord or the plug has been damaged, or
B. objects have fallen, or liquid has spilled into the appliance, or
C. the appliance has been exposed to rain, or
D. the appliance does not appear to operate normally or exhibits a marked change in performance, or
E. the appliance has been dropped or the enclosure damaged.
2.4G and 5G FCC Statements
This device complies with Part 15 of the FCC Rules. Operation is subject to the following two conditions:
1. This device may not cause harmful interference, and
2. This device must accept any interference received, including interference that may cause undesired operation.
Page: 7
This product generates, uses, and can radiate radio frequency energy and, if not installed and used in accordance with the
instructions, may cause harmful interference to radio communications. However, there is no guarantee that interference will not
occur in a particular installation. If this product does cause harmful interference to radio or television reception, which can be
determined by turning the equipment off and on, the user is encouraged to try to correct the interference by one or more of the
following measures:
Reorient or relocate the receiving antenna.
Increase the separation between the equipment and receiver.
Connect the equipment into an outlet on a circuit different from that to which the receiver is connected.
Consult the dealer or an experienced radio/TV technician for help.
Please take attention that changes or modiúcation not expressly approved by the party responsible for compliance could void
the user’s authority to operate the equipment.
This equipment should be installed and operated with a minimum distance 20cm between the radiator and your body.
Cet équipement doit être installé et utilisé à une distance minimale de 20 cm entre le radiateur et votre corps.
This device complies with Industry Canada licence-exempt RSS standard(s). Operation is subject to the following two
conditions:
1. this device may not cause interference, and
2. this device must accept any interference, including interference that may cause undesired operation of the device.
Le présent appareil est conforme aux CNR d’Industrie Canada applicables aux appareils radioexempts de licence.
L’exploitation est autorisée aux deux conditions suivantes :
1. l’appareil ne doit pas produire de brouillage, et
2. l’utilisateur de l’appareil doit accepter tout brouillage radioélectrique subi, même si le brouillage est susceptible d’en
compromettre le fonctionnement.
Under Industry Canada regulations, this radio transmitter may only operate using an antenna of a type and maximum (or lesser)
gain approved for the transmitter by Industry Canada. To reduce potential radio interference to other users, the antenna type
and its gain should be so chosen that the equivalent isotropically radiated power (e.i.r.p.) is not more than that necessary for
successful communication.
Conformément à la réglementation d’Industrie Canada, le présent émetteur radio peut fonctionner avec une antenne d’un type
et d’un gain maximal (ou inférieur) approuvé pour l’émetteur par Industrie Canada. Dans le but de réduire les risques de
brouillage radioélectrique à l’intention des autres utilisateurs, il faut choisir le type d’antenne et son gain de sorte que la
puissance isotrope rayonnée équivalente (p.i.r.e.) ne dépasse pas l’intensité nécessaire à l’établissement d’une communication
satisfaisante.
The CE symbol indicates that this Primare product complies with the EMC (Electromagnetic Compatibility) and LVD (Low Voltage
Directive) standards of the European Community.
The WEEE symbol indicates this Primare product complies with the European Parliament and Council Directive 2002/96/EC
concerning Waste Electrical and Electronic Equipment (WEEE). This product must be appropriately recycled or processed in
accordance with these directives. Consult your local waste disposal authority for guidance.
•
•
•
•
Page: 8
W E L C O M E !
Congratulations on selecting your new NP5 Prisma MK2 Network Player
This user guide describes the features and explains how to set up the network player for the best sound quality and ease of
operation in order to allow for the most enjoyable reproduction of sound from all your sources.
For additional support and assistance please contact your local authorized Primare dealer, or visit our website at
www.primare.net.
Page: 9
G E T T I N G S T A R T E D
1 Unpack the NP5 Prisma MK2
Your NP5 Prisma MK2 is supplied with:
Chromecast Built-in Quick Start Guide
External power supply
Socket adapters for power supply
RS232 cable
If any of these items are missing please contact your supplier. We recommend you retain the packaging in case you need to
transport the unit at a later date.
2 Connect the outputs
The NP5 Prisma MK2 Network Player provides one coax digital output and one optical digital output for connection to a digital
input.
Connect one of the digital outputs from the NP5 Prisma MK2 to an appropriate digital input.
If you want to control the volume from the NP5 Prisma MK2:
Leave the Output option set to Variable (default).
■
■
■
■
■
■
Page: 10
Set the Output option to Fixed.
For more information see Audio settings.
The NP5 Prisma MK2 can also be connected to another Primare device via RS232 to provide control of basic functions (standby
on/off, mute, volume up/down, and input selection next/previous) from the Prisma application. For more information see
RS232 Link setup.
3 Connect power
If you want your NP5 Prisma MK2 connected via Ethernet cable, connect the cable before you connect your NP5 Prisma
MK2 to power. For best results we recommend connecting via cable.
Plug the power supply to DC input on the NP5 Prisma MK2, and connect it to a wall socket (use the appropriate socket
adapter).
WARNING: Always disconnect the NP5 Prisma MK2 from the mains power before connecting or disconnecting
any cables.
Once connected to power it will directly power on.
4 Connect to a network
For best results we recommend connecting using an Ethernet network cable. The NP5 Prisma MK2 requires one to two minutes
to completely start up; please be patient. The Power/Source LED will show solid white light when startup is complete.
Connecting via an Ethernet cable
Connect an Ethernet cable between your router and the LAN socket on the back panel of the NP5 Prisma MK2.
Using ethernet connection provides immediate access to your network and the network LED will show solid green. If the
network LED is ûashing blue, make sure your Ethernet cable is connected and it has a network connection.
To take advantage of Chromecast built-in related features and functionality – such as casting, voice control, and multi-
room/multi-zone conúguration and control – conúguration must be done through Google Home app, with a Google account.
Install the free Google Home app on your mobile device.
Open the Google Home app and follow the instructions for setting up the NP5 Prisma MK2 on your network in the
Chromecast Built-in Quick Start Guide, or the brief description below.
Enable Bluetooth and Wiú on your mobile device.
The Google Home app will display Set up NP5 Prisma.
Click SET UP and follow the instructions.
The network LED will ûash green and a test tone will be played and you will be prompted to select a name for your NP5
Prisma MK2. If you cannot hear the test sound you may need to increase the volume on your ampliúer.
Enter an appropriate name.
Once you have conúgured the NP5 Prisma MK2 using the Google Home app the network LED will change from ûashing
green to solid green.
You will now be able to cast music to your NP5 Prisma MK2.
To disconnect from the Ethernet network
Remove the Ethernet cable.
■
■
■
■
■
■
■
■
■
■
■
■
■
■
Page: 11
You can connect to Wiú either by using iOS AirPlay speaker setup, Prisma Android app or Google Home app.
Please note, to take advantage of Chromecast built-in related features and functionality – such as casting, voice control, and
multi-room/multi-zone conúguration and control – set up and conúguration must be done through Google Home, with a
Google account.
AirPlay speaker setup
Go to the Wi-Fi menu under Settings on your iOS device. Select the Prisma model you wish to setup under “SET
UP NEW AIRPLAY SPEAKER…” at the bottom of the list. Select the network you want your speaker to connect to and select
“Next”. Follow the instructions on the screen to complete setup.
Prisma Android app
Open the Android Prisma app and following the instructions found at the link in the discovery page.
Google Home app
Make sure Bluetooth and Wi-Fi are enabled on your mobile device.
Install the free Google Home app on your mobile device.
Open the Google Home app and follow the instructions for setting up the NP5 Prisma MK2 on your network in the
Chromecast Built-in Quick Start Guide, or the brief description below.
Run Google Home.
The Google Home app will display Set up NP5 Prisma.
Click SET UP and follow the instructions.
A test tone will be played and you will be prompted to select a name for your NP5 Prisma MK2. If you cannot hear the test
sound you may need to increase the volume on your ampliúer.
Enter an appropriate name.
Select the Wi-Fi network your NP5 Prisma MK2 should connect to.
Once you have conúgured the NP5 Prisma MK2 using the Google Home app the network LED will change from ûashing blue
to solid blue.
You will now be able to cast music to your NP5 Prisma MK2.
To disconnect from the Wi-Fi network
Either:
Select Wi-Fi settings for the NP5 Prisma MK2 in the Google Home app.
Select Forget this network.
Or:
Reset the NP5 Prisma MK2 to its factory defaults; see Factory reset.
5 Download the Prisma app
To view and change the NP5 Prisma MK2 settings you need the Primare Prisma app, which is available for free download on
iOS devices from the Apple App Store and on Android devices from the Google Play Store.
In either case search for Primare Prisma to únd the app.
■
■
■
■
■
■
■
■
■
■
Page: 12
B A C K — P A N E L C O N N E C T I O N S
The following diagram explains the function of each of the connectors on the back panel:
. . .
…_o ,
o o o o,·-··_
Rese b on RS232 Ehemet USB Opti a digital Coax digi a
output o pu
I
!11!!!!!~1
Power
d p or
Page: 13
P L A Y I N G M U S I C F R O M A D R I V E O R M U S I C S E R V E R
You can play audio úles from a USB ûash drive, external USB hard disk, or a network drive. These options are ideal if you
already have a digital library of CDs or music úles.
ta Music server
Rouf,
er
0 0 0 0 0 0 0 0 0 I
t——-,
r — · ~
Preampli’fier
0 J
Haird drive
Page: 14
y p p p
Note that playing music via the USB A input has the following restrictions:
No playlist.
No queue.
No album art.
The recommended arrangement for folders is alphabetical by artist folder.
The USB input is mainly for USB thumb and other portable hard drives and has been tested up to 2TB drives on NTFS and
FAT32. Please note exFAT is not supported.
The USB A connection is recommended for less critical listening, as both signal and power go through this connection point,
which we únd subtly compromises performance when compared to a network connected hard drive.
■
■
■
■
Page: 15
S T R E A M I N G M U S I C F R O M A P H O N E , T A B L E T , O R P C
The NP5 Prisma MK2 can use Chromecast built-in to connect directly to a music service that supports Chromecast, such as
Qobuz, Deezer, Tidal, TuneIn Radio and more. The music is streamed direct to the NP5 Prisma MK2; once set up you can use
your phone to make calls, or play other audio.
With a phone, tablet, or Mac/PC you can also play the audio wirelessly to the NP5 Prisma MK2, using Bluetooth or AirPlay
(iOS only), so the sound from any apps you run on your device will be played through the NP5 Prisma MK2.
Router
I 0 0 0 0 0 0 0 0 0
Preamplifier
NP5
Ethernet
cable
Internet music
services
0
PC/Mac
«‘
/ / —~
. J
0
Page: 16
To stream using Chromecast built-in
The NP5 Prisma MK2 has Chromecast built-in, which means you can stream (cast) music over your network directly to the NP5
Prisma MK2 from any Chromecast supported music service, using the music service’s app on your desktop or mobile device as
a controller. To be able to use Chromecast, please see Getting started and how to conúgure NP5 Prisma MK2 with Google
Home app.
Click the Cast button within your music service’s app and select the NP5 Prisma MK2 in the device list.
To stream using AirPlay
Use AirPlay to send audio over the network from your Apple device to the NP5 Prisma MK2. AirPlay is only available on Apple
devices.
To stream using Bluetooth
Use Bluetooth to send audio directly to the NP5 Prisma MK2 from your Bluetooth device using Bluetooth connection. You don’t
need a network to stream using Bluetooth.
To stream using Spotify Connect
The NP5 Prisma MK2 supports Spotify Connect, which means you can stream music directly to the NP5 Prisma MK2 from the
Spotify music service over your network, using the Spotify app on your desktop or mobile device as a controller.
Use your phone, tablet, or computer as a remote control for Spotify. Go to http://spotify.com/connect to learn how.
To stream using Roon Ready
The NP5 Prisma MK2 is certiúed as Roon Ready and as such should appear in the Roon Ready devices section of the Audio
settings menu in the Roon application, allowing the NP5 Prisma to be enabled for use with Roon.
For more information go to https://roonlabs.com/getting-started
■
Page: 17
C O N F I G U R I N G T H E S E T T I N G S
Using the settings menus
You can view and change the NP5 Prisma MK2 settings using the Prisma app. For more information see Download the Prisma
app.
Audio settings
The Audio settings menu allows you to customise the following settings:
Output
Speciúes whether the output is Variable (default) or Fixed.
Selecting Fixed will show a loud-volume warning. Select Yes to proceed or No to cancel the úxed gain setting.
If Variable is selected the following additional settings are available.
Balance
Allows you to adjust the balance between L (left) and R (right), where centered is default.
Default volume
Page: 18
Default setting is “speciúed” with volume 50.
Maximum volume
Sets the maximum volume limit between 0 and 99. The default is 99.
Mute volume
Sets the volume when the unit is muted. You can choose between 0 (default) and 30.
If the current volume is lower than the speciúed Mute volume, the volume will be set to 0 when pressing mute.
Digital output
Select preferred mode and sample rate for the digital outputs.
Native mode: Outputs the input sample rate (without up-sampling) up to the selected sample rate. Higher sample rates will be
down-sampled to selected sample rate.
Fixed mode: To up/down-sample all input sample rates to the selected sample rate. Choose between 44.1, 48, 88.2, 96,
176.4, 192 kHz.
Note: for MQA passthrough, set the digital output to Native and sample rate to 192 kHz, for connection to an MQA DAC.
DoP mode: select this option if wishing to play DSD over PCM úles when using Roon. Note: this is only available when using
Roon and requires connection to a DAC capable of accepting DoP úle input.
General settings
The General settings menu allows you to conúgure the general operation of the NP5 Prisma MK2:
Standby settings
Displays the Standby settings menu to allow you to specify the standby settings.
Auto-standby automatically switches the NP5 Prisma MK2 to standby if there is no user interaction or audio from the current
source for a speciúed delay: After 10min, After 15min, After 20min (default), or never.
Note: The Auto-standby function is disabled in Wi-Fi setup mode.
RS232 Link
The RS232 Link submenu lets you customise your RS232 link settings. For information about setting up a link see RS232 Link
setup.
Factory reset
Resets the NP5 Prisma MK2 to the factory default settings.
You are prompted to conúrm. Select Yes to proceed or No to cancel.
You can also perform a factory reset by pressing and holding the Reset button on the rear panel for 6 seconds. All LEDs will
begin to ûash red to warn you. Factory reset is in progress while all 3 LED are RED. Do not remove power during this process.
Page: 19
Bluetooth settings
Displays the Bluetooth settings menu.
Visible can be set to On to make the NP5 Prisma MK2 visible to other Bluetooth devices, or Off (default) to make the NP5
Prisma MK2 not visible.
Note: Visible allows any Bluetooth-enabled device within range to discover and pair with your NP5 Prisma MK2.
Auto-connect can be set to On to automatically reconnect to a paired mobile Bluetooth device when the Bluetooth input on the
NP5 Prisma MK2 is selected, or Off (default) to disable automatic connection.
AirPlay password
Allows you to set an optional password for connection by AirPlay. Leave empty for no password.
Information
Shows following information:
App version
Shows the Prisma app version you currently are using on your handheld device.
System information
Shows the following system information for all Prisma products connected to your network.
Connection: one of Connected by Wi-Fi or Connected by cable.
Network, the current SSID.
IP, the current IP address.
Device name, the device name.
NET MAC, the network MAC address.
BT MAC, the current Bluetooth MAC address.
Firmware versions, displays the current úrmware versions.
■
■
■
■
■
■
■
Page: 20
T E C H N I C A L S P E C I F I C A T I O N
Digital outputs
Digital outputs
Coaxial: RCA
Optical: TOSlink
Sample Rate
Selectable úxed or native: 44.1 kHz/16, 48, 88.2, 96, 176.4 or 192 kHz/24bit
Digital input
1x USB-A up to 192kHZ/24bit;
up to DSD128 (5.6MHz) converted to PCM for output
Network
Connectivity
Page: 21
LAN: 10/100Mbit Ethernet port
WLAN: IEE 802.1
1 a/b/g/n/ac compliant; 2.4/5GHz; b, g, n mode
Audio formats
WAV, LPCM, AIFF, FLAC, ALAC, WMA, OGG:
Up to 192kHz/24bit
MP3, MP4 (AAC):
Up to 48kHz/16bit, VBR & CBR 320kbps
DSD:
Up to DSD128 (5.6MHz) converted to PCM output
MQA: passthrough
Streaming
AirPlay 2
Bluetooth®
Chromecast built-in
Roon Ready
Spotify Connect
DLNA/UPnP
General
Control
RS232 – for use with external control systems
RS232 Link – for control of other Primare products using RS232 connection
External power supply
5 Volt, 2 Amp, DC
Power Consumption
Standby: <2.9W
Operate: <3.6W
Dimensions
143 x 125 x 36 mm (wxdxh) with knobs and connectors
143 x 120 x 36 mm (wxdxh) without knobs and connectors
Weight
Page: 22
A D D I T I O N A L I N F O R M A T I O N
These instructions help you get the best possible performance from your NP5 Prisma MK2.
RS232 Link setup
Your NP5 Prisma MK2 can be linked to another Primare product using the RS232 Link function to add Prisma capabilities to it. It
will allow you to control the input, volume, and standby on the linked device using the Prisma app.
The procedure is as follows:
Connect the RS232 cable provided with your NP5 Prisma MK2 to your NP5 Prisma MK2 and other Primare product.
Open the Prisma app, choose the Settings tab, and go to General settings.
Select RS232 link.
Press select device button to select the device you want to link NP5 Prisma MK2 with.
For best user experience, make sure that the Linked default volume and Linked maximum volume match your linked
product.
Set the Auto-On and Auto-Off settings as required. We recommend enabling both settings.
When you have selected the appropriate settings press the Connect button.
The Link status should now change to Connected and you can use the Prisma app to control the volume, step between inputs,
and switch between on and standby.
■
■
■
■
■
■
■
Page: 23
The table below explains the meaning of the top panel indicators:
Colours * Power/Source Network Playing
White ûash Starting up N/A N/A
White pulse Rebooting network module N/A N/A
White solid Chromecast, Roon Ready,
AirPlay and UPnP/DLNA
N/A Playing
Green ûash N/A Connected by cable. Conúgure
network **
N/A
Green solid Spotify Connect Connected by cable. N/A
Blue ûash N/A Set up Wi-Fi ** N/A
Blue solid Bluetooth Connected by Wi-Fi N/A
Red ûash Countdown to factory reset
Red pulse Restart in progress
Red solid Factory reset/úrmware update in progress
* Indicators are dimmed while in standby.
** Set up or conúgure the network using the Google Home app; see Connect to a network.
Factory reset
You can do a factory reset from the Prisma app from the General settings menu; see General settings, or by pressing and
holding the Reset button on the rear panel for 6 seconds.
Spotify Connect
The Spotify Software is subject to third party licenses found here:
https://www.spotify.com/connect/third-party-licenses
Page: 24
Copyright and acknowledgments
Copyright © 2021 Primare AB.
All rights reserved.
Primare AB
Limstensgatan 7
21616 Limhamn
Sweden
Issue: NP5Prisma/2 (27/5/2021)
The information in this guide is believed to be correct as of the date of publication. However, our policy is one of continuous
development and so the information is subject to change without notice, and does not represent a commitment on the part of
Primare AB.
Primare is a trademark of Primare AB.
This guide was produced by
Human-Computer Interface Ltd.
http://www.interface.co.uk
Page: 25
Protocol Settings
Buad Rate: 115200
Data bits: 8
Parity: None
Stop bits: 1
Tested with v1.99
Command special chars
<STX> = 0x02
<DLE> = 0x10
<ETX> = 0x03
Write = 0x57 (ASCII: W)
Read = 0x52 (ASCII: R)
Function Description Reply from device Require
Operate/Standby toggle 0x02 0x57 0x01 0x00 0x10 0x03 02 57 01 00 10 03 Operate/Standby toggle Current status, see below:
0x02 0x57 0x81 0x00 0x10 0x03 02 57 81 00 10 03 Standby 0x02 0x01 0x00 0x10 0x03
0x02 0x57 0x81 0x01 0x10 0x03 02 57 81 01 10 03 Operate 0x02 0x01 0x01 0x10 0x03
0x02 0x57 0x03 0xFF 0x10 0x03 02 57 03 FF 10 03 Volume decrease
0x02 0x57 0x03 0x01 0x10 0x03 02 57 03 01 10 03 Volume increse
0x02 0x57 0x83 0x00 0x10 0x03 02 57 83 00 10 03 vol 0 0x02 0x03 0x00 0x10 0x03
0x02 0x57 0x83 0x01 0x10 0x03 02 57 83 01 10 03 vol 1 0x02 0x03 0x01 0x10 0x03
0x02 0x57 0x83 0xYY 0x10 0x03 02 57 83 YY 10 03 vol X, where YY = 00 to 63 0x02 0x03 0xYY 0x10 0x03
0x02 0x57 0x83 0x63 0x10 0x03 02 57 83 63 10 03 vol 99 0x02 0x03 0x63 0x10 0x03
0x02 0x57 0x04 0xFF 0x10 0x03 02 57 04 FF 10 03 Balance one step right
0x02 0x57 0x04 0x01 0x10 0x03 02 57 04 01 10 03 Balance one step left
0x02 0x57 0x84 0x01 0x10 0x03 02 57 84 01 10 03 L9 0x02 0x04 0x01 0x10 0x03
0x02 0x57 0x84 0x02 0x10 0x03 02 57 84 02 10 03 L8 0x02 0x04 0x02 0x10 0x03
0x02 0x57 0x84 0x03 0x10 0x03 02 57 84 03 10 03 L7 0x02 0x04 0x03 0x10 0x03
0x02 0x57 0x84 0x04 0x10 0x03 02 57 84 04 10 03 L6 0x02 0x04 0x04 0x10 0x03
0x02 0x57 0x84 0x05 0x10 0x03 02 57 84 05 10 03 L5 0x02 0x04 0x05 0x10 0x03
0x02 0x57 0x84 0x06 0x10 0x03 02 57 84 06 10 03 L4 0x02 0x04 0x06 0x10 0x03
0x02 0x57 0x84 0x07 0x10 0x03 02 57 84 07 10 03 L3 0x02 0x04 0x07 0x10 0x03
0x02 0x57 0x84 0x08 0x10 0x03 02 57 84 08 10 03 L2 0x02 0x04 0x08 0x10 0x03
0x02 0x57 0x84 0x09 0x10 0x03 02 57 84 09 10 03 L1 0x02 0x04 0x09 0x10 0x03
0x02 0x57 0x84 0x0A 0x10 0x03 02 57 84 0A 10 03 Centered 0x02 0x04 0x0A 0x10 0x03
0x02 0x57 0x84 0x0B 0x10 0x03 02 57 84 0B 10 03 R1 0x02 0x04 0x0B 0x10 0x03
0x02 0x57 0x84 0x0C 0x10 0x03 02 57 84 0C 10 03 R2 0x02 0x04 0x0C 0x10 0x03
0x02 0x57 0x84 0x0D 0x10 0x03 02 57 84 0D 10 03 R3 0x02 0x04 0x0D 0x10 0x03
0x02 0x57 0x84 0x0E 0x10 0x03 02 57 84 0E 10 03 R4 0x02 0x04 0x0E 0x10 0x03
0x02 0x57 0x84 0x0F 0x10 0x03 02 57 84 0F 10 03 R5 0x02 0x04 0x0F 0x10 0x03
0x02 0x57 0x84 0x10 0x10 0x03 02 57 84 10 10 03 R6 0x02 0x04 0x10 0x10 0x03
0x02 0x57 0x84 0x11 0x10 0x03 02 57 84 11 10 03 R7 0x02 0x04 0x11 0x10 0x03
0x02 0x57 0x84 0x12 0x10 0x03 02 57 84 12 10 03 R8 0x02 0x04 0x12 0x10 0x03
0x02 0x57 0x84 0x13 0x10 0x03 02 57 84 13 10 03 R9 0x02 0x04 0x13 0x10 0x03
Mute toggle 0x02 0x57 0x09 0x00 0x10 0x03 02 57 09 00 10 03 Mute/Unmute toggle Current mute status, see below:
0x02 0x57 0x89 0x00 0x10 0x03 02 57 89 00 10 03 Mute disable (unmute) 0x02 0x09 0x00 0x10 0x03
0x02 0x57 0x89 0x01 0x10 0x03 02 57 89 01 10 03 Mute enable 0x02 0x09 0x01 0x10 0x03
Verbose toggle 0x02 0x57 0x0D 0x00 0x10 0x03 02 57 0D 00 10 03 Verbose toggle (enable for reply) Current verbose status, see below:
0x02 0x57 0x8D 0x00 0x10 0x03 02 57 8D 00 10 03 Disable verbose No reply
0x02 0x57 0x8D 0x01 0x10 0x03 02 57 8D 01 10 03 Enable verbose 0x02 0x0D 0x01 0x10 0x03
Factory reset 0x02 0x57 0x13 0x00 0x10 0x03 02 57 13 00 10 03 Resetting to factory default settings
Read current input name 0x02 0x52 0x14 0x00 0x10 0x03 02 52 14 00 10 03 Read alias of current input 0x02 0x14 [] 0x10 0x03 [Alias of current input]
Read manufacturer 0x02 0x52 0x15 0x00 0x10 0x03 02 52 15 00 10 03 Read manufacturer 0x02 0x15 [] 0x10 0x03 [PRIMARE]
Read model 0x02 0x52 0x16 0x00 0x10 0x03 02 52 16 00 10 03 Read model name 0x02 0x16 [] 0x10 0x03 [model]
Read version 0x02 0x52 0x17 0x00 0x10 0x03 02 52 17 00 10 03 Read current firmware version 0x02 0x17 [] 0x10 0x03 [firmware]
Read current volume 0x02 0x52 0x1F 0x00 0x10 0x03 02 52 1F 00 10 03 Read current volume 0x02 0x1F [] 0x10 0x03 [volume]
BT visible toggle 0x02 0x57 0x18 0x00 0x10 0x03 02 57 18 00 10 03 Bluetooth visible toggle See below
0x02 0x57 0x98 0x00 0x10 0x03 02 57 98 00 10 03 Bluetooth visible disable 0x02 0x18 0x00 0x10 0x03
0x02 0x57 0x98 0x01 0x10 0x03 02 57 98 01 10 03 Bluetooth visible enable 0x02 0x18 0x01 0x10 0x03
BT Auto-Connect toggle 0x02 0x57 0x19 0x00 0x10 0x03 02 57 19 00 10 03 Bluetooth Auto-Connect toggle See below
0x02 0x57 0x99 0x00 0x10 0x03 02 57 99 00 10 03 Bluetooth Auto-Connect disable 0x02 0x19 0x00 0x10 0x03
0x02 0x57 0x99 0x01 0x10 0x03 02 57 99 01 10 03 Bluetooth Auto-Connect enable 0x02 0x19 0x01 0x10 0x03
Read BT name 0x02 0x52 0x1C 0x00 0x10 0x03 02 52 1C 00 10 03 Read Bluetooth name 0x02 0x1C [] 0x10 0x03 [BT name]
Primare NP5 Prisma MK2 — RS232 Command List
Command structure
Commands are sent to the device using the following format, where each field is one byte sent to the device:
<STX> <command> <variable> [<value>] <DLE> <ETX>
The <command> can be either ‘W’ for write or ‘R’ for read.
If verbose is active, the device will send replies on the following format when a command is received:
<STX> <variable> [<value>] <DLE> <ETX>
Note that the <value> field can contain several bytes of data for certain commands.
Operate/Standby
Volume Decrease/Increase
Command sequence
Balance toggle
Current volume, see below:
Current balance, see below:
BT visible set
Mute set
Volume set
BT Auto-Connect set
Balance set
Verboser set
Page: 26
p R I M A R E
THE SOUND AND VISION OF SCANDINAVIA
Important Possible Immediate Update Information
• Complete network connection using LAN or WIFI following the instructions found on the
enclosed Chromecast Quick Start Guide or in the Getting Started section of the NP5
Prisma MK2 user guide under the Support tab of the product page on our website.
• After initial network connection has been made, please wait 1 to 2 minutes.
• If 3 RED LED lights are illuminated, the NP5 Prisma MK2 is in the process of
downloading and installing an OTA (Over The Air) software update.
• Before attempting any further setup of the NP5 Prisma MK2, please wait until the unit
has rebooted, the RED LED lights are gone, and the NETWORK LED light is glowing
again.
• When the NETWORK LED light is glowing again, you can continue setting up the NP5
Prisma MK2 using the Prisma application.
• Note: should no RED LED lights be shown within 1 to 2 minutes, feel free to continue
setting up your NP5 Prisma MK2.
• The latest firmware version numbers can be found in the FAQ section of our website.
Page: 27
p R I M A R E
THE S OU ND AND VISION OF SCANDINAVIA
Thank you for purchasing this NP5 Prisma MK2
User Guide
To achieve the best performance and ease of use in your system, please follow the
connection and setup instructions in the user guide. You can find your user guide by:
• Using the QR code found on the outside of the box.
• Going to our website at www.primare.net. Once on the site, go to the NP5 Prisma
MK2 product page where you will see a Support tab under which can be found
user guides and other useful information.
• For any additional support and assistance not covered by the user guide, please
contact your authorized Primare dealer, distributor, or visit our website.
Initial Installation
• Place the component on a stable, level shelf, with a minimum of one inch or three
centimetres of open space surrounding the case on all sides.
Page: 28
• Connect the power supply and digital output. Note: if using the NP5 Prisma MK2
with another Primare product that has an RS232 input, connect the units using the
enclosed RS232 cable.
• Download the Prisma opp from the App Store or Google Play and follow the
Chromecast Quick Start Guide for easy instructions for connecting to your network
using the Google Home application.
• Note: connection to your network using Google Home is required to be able to
use the Chromecast casting features and functionality.
• To see the other available options for connecting the NP5 Prisma MK2 to your
network, go to the Getting Started section of the user guide to see the available
options for connecting to your network.
• The menu system in the Prisma application allows you to individually customize the
setup to suit your system needs, as well as overall system control parameters.
• As with any high-quality audio component, your Primare will sound best after an
initial burn-in period of 48 hours of use, while further smaller improvements in
sound quality with may be heard with additional playing time.
From all of us here in Sweden, we hope you enjoy your Primare!
Limstensgatan 71SE-21616 Limhamn ISweden I+46 40 654 88 00 I primare.net