")
Некоторое время назад мне захотелось добавить на принтер автовыравнивание стола перед печатью, но родная прошивка Анетов этого не позволяет, а ковыряться с портированием Мерлина мне было ну очень лень. И тогда в сети была найдена уже портированная версия мерлина — SkyNet3D. Я ее скачал, прошил, изменил какие-то параметры под себя и долгое время пользовался ею, все было вполне удобно. Правда, автовыравниванием я быстро перестал пользоваться 
Но Мерлин развивается, а Скайнет прекратил свое существование. По прекрасной причине — теперь Мерлин сам поддерживает Анеты, вобрав в себя результаты работы автора Скайнета
Итак, установка Мерлина на Анет А8. На А6 тоже ставится, только некоторые значения в конфиге, возможно, придется изменить под свои требования. А можно ничего не менять, оставить по умолчанию.
Что для этого нужно:
1. Среда Arduino с настройками для платы Anet. Я не силен в ардуинах и их настройках, просто у меня осталась эта среда от Скайнета со всеми нужными настройками. Выкладываю — https://drive.google.com/open?id=1uE3Nb6RBP6NJoI5q0udWFwj4l65OoAKy (установка не требуется, просто распаковать).
2. Драйвер для платы Anet. Я его положил в папку drivers ардуины, это исполняемый файл CH341SER.EXE. На Windows 7 x32/x64 он точно работает, на десятке — не знаю, не проверял. Если что — просто ищите драйвер для USB-чипа CH340.
3. Сам Мерлин. Качается с официального сайта — http://marlinfw.org/meta/download/ . Или можете скачать мой вариант со всеми внесенными изменениями — https://drive.google.com/open?id=1AHrjKjkdDCrw0e_sYMsCcGfAPaskJPkT.
Итак, распаковали в отдельные папки Ардуину и Мерлина, что дальше?
Устанавливаем драйвер для платы Anet — запускаем файл CH341SER.EXE из папки drivers ардуины и соглашаемся со всеми предупреждениями об установке драйвера.
Если Вы скачали Мерлина с официального сайта, то необходимо сделать это: заходим в папку Мерлина и копируем файлы Configuration.h и Configuration_adv.h из папки Marlinexample_configurationsAnetA8 (или A6 если у Вас этот принтер) в папку Marlin. Соглашаемся с заменой файлов при запросе.
Если Мерлин скачан в моем варианте, то копировать конфиги не нужно.
1. Подключаем принтер к компьютеру (питание на принтер должно быть подано), убеждаемся, что он нормально виден в системе (в диспетчере устройств в разделе ‘Порты (COM и LPT)’ должен появиться пункт ‘USB-SERIAL CH430 (COMxx)’, где xx — это присвоенный ему номер порта).
2. Запускаем Ардуину файлом arduino.exe и в ней открываем файл Marlin.ino из папки Marlin. У Вас откроется скетч прошивки. Заходим в меню Инструменты->Плата и выбираем тем плату Anet V1.0 если она не выбрана. Потом меню Инструменты->Порт и выбираем тот COM-порт, который присвоен принтеру (см. п. 1).
Все, теперь прошивку можно скомпилировать (меню Скетч->Проверить/Компилировать или Control+R) и залить в принтер (меню Скетч->Загрузка или Control+U). В процессе компиляции и загрузки внизу будет отображаться ход процесса. После загрузки принтер автоматически перезагрузится и будет готов к работе.
При желании Вы можете изменить различные параметры прошивки и заново скомпилировать и загрузить ее, но в оригинальном Мерлине с конфигами для Анетов по умолчанию все настроено в рабочем варианте, можно загружать и пользоваться как есть.
Опишу какие параметры были изменены мной и которые, возможно, захотите изменить Вы сами под свои нужды.
В файле Configuration.h:
— раскомментировал CUSTOM_MACHINE_NAME и внес в него название принтера Anet A8. Это просто отображение названия при включении принтера.
— изменил значение HEATER_0_MAXTEMP на 300 — максимальная температура сопла.
— изменил значение BED_MAXTEMP на 150 — максимальная температура стола.
— закомментировал родные значения PID для экструдера:
#define DEFAULT_Kp 21.0
#define DEFAULT_Ki 1.25
#define DEFAULT_Kd 86.0
и вставил свои, полученные от калибровки:
// ANET A8 Standard Extruder at 220 Degree Celsius and 100% Fan
#define DEFAULT_Kp 20.40
#define DEFAULT_Ki 1.62
#define DEFAULT_Kd 64.35
— раскомментировал PIDTEMPBED и закомментировал BED_LIMIT_SWITCHING , однако это можно делать только если нагрев стола подключен не через реле. В оригинальной конструкции принтера — можно
— закомментировал родные значения PID для стола:
#define DEFAULT_bedKp 10.00
#define DEFAULT_bedKi .023
#define DEFAULT_bedKd 305.4
и вставил свои, полученные от калибровки:
//12V 120W aluminium + 12V 200W silicone with tempered glass Anycubic Ultrabase
//from autocalibrate at 120 degree
#define DEFAULT_bedKp 158.57
#define DEFAULT_bedKi 12.92
#define DEFAULT_bedKd 486.48
ВНИМАНИЕ: на оригинальном столе лучше оставить родные значения. У меня в дополнение к родному столу наклеена еще 300-ваттная силиконовая грелка, поэтому значения PID потребовали изменений.
— изменил значение Z_MIN_ENDSTOP_INVERTING на false, но у меня родной концевик заменен на оптический, в оригинальном принтере это делать не нужно.
— заменил значение DEFAULT_TRAVEL_ACCELERATION на 400
— раскомментировал PROBE_MANUALLY
— закомментировал MIN_SOFTWARE_ENDSTOPS
— раскомментировал MESH_BED_LEVELING — эта опция и PROBE_MANUALLY нужны для возможности время от времени выставить автовыравнивание в полуавтоматическом режиме, когда принтер двигает сопло к очередной из 9 точек, а пользователь кнопками ‘вверх’ и ‘вниз’ подгоняет сопло к столу. Затем результаты выравнивания можно сохранить в EPROM.
— изменил значение MESH_INSET на 20 — это отступ от краев стола для крайних точек авто выравнивания
— раскомментировал LCD_BED_LEVELING — для тех же целей, что и предыдущий пункт.
— изменил значение HOMING_FEEDRATE_XY на (30*60) , а то уж больно резво он мчится к концевикам по X и Y
— заменил блок
#define PREHEAT_1_TEMP_HOTEND 190
#define PREHEAT_1_TEMP_BED 60
#define PREHEAT_1_FAN_SPEED 0 // ANET A6 Default is 255
#define PREHEAT_2_TEMP_HOTEND 240
#define PREHEAT_2_TEMP_BED 90
#define PREHEAT_2_FAN_SPEED 0 // ANET A6 Default is 255
на
#define PREHEAT_1_TEMP_HOTEND 180
#define PREHEAT_1_TEMP_BED 60
#define PREHEAT_1_FAN_SPEED 0 // ANET A6 Default is 255
#define PREHEAT_2_TEMP_HOTEND 220
#define PREHEAT_2_TEMP_BED 105
#define PREHEAT_2_FAN_SPEED 0 // ANET A6 Default is 255
просто мне так удобнее. Первая группа — это установки преднагрева (включаемого через меню принтера) для PLA, вторая — для ABS.
— раскомментировал INDIVIDUAL_AXIS_HOMING_MENU — это позволяет из меню хомить оси по отдельности, а не только все скопом, иногда бывает удобно.
Все, сохраняем изменения, компилируем и загружаем в принтер, все работает, радуемся
Что заметил из плюсов по сравнению со Скайнетом 2.3.2:
— гораздо быстрее стал реагировать на нажатие кнопок, уже почти нормальная реакция, а не как было — жать надо было вдумчиво, не торопясь
— ось Z теперь можно двигать через меню не только по 0.1 и 1 мм, но и по 10. В Скайнете я для этого специально ковырялся в исходниках, делал эту возможность.
— при длительном удержании кнопки на изменение какого-то значения (температуры, координаты, скорости вентилятора и т.п.) после 10 изменений обычным шагом начинаются изменение с шагом х10, после 10 этих — с шагом по х100. Например, нужно увеличить скорость вентилятора через меню — захожу в соответствующий пункт и нажимаю кнопку ‘вверх’, значение вентилятора начинает расти с шагом 1, но после 10 таких шагов оно начинает увеличиваться уже с шагом 10, а после 10 этих больших шагов начинает расти с шагом 100. Очень стало удобно, потому что раньше был только минимальный шаг со скорость его изменения 2 шага в секунду.
— в меню преднагрева теперь можно выбрать три варианта — нагрев сопла, нагрев стола и нагрев их обоих. Раньше отдельно нагрева сопла не было. Тоже добавляет удобства.
Больше явных плюсов/минусов не заметил, но сам только сегодня прошился, еще не успел повозиться плотно
Getting Started #
Flashing your printer firmware is pretty easy once you go through the installation steps one or two times. We’ve simplified the firmware setup as much as possible so you don’t have to be an expert with code. Our firmware allows you to get more control over your printer, make repairs easier, add on upgrades, and really get into tuning your machine to make it print better.

The firmware update consists of downloading the firmware itself, opening it in Visual Studio Code, setting the options for your machine, compiling it, and then uploading it to the printer.
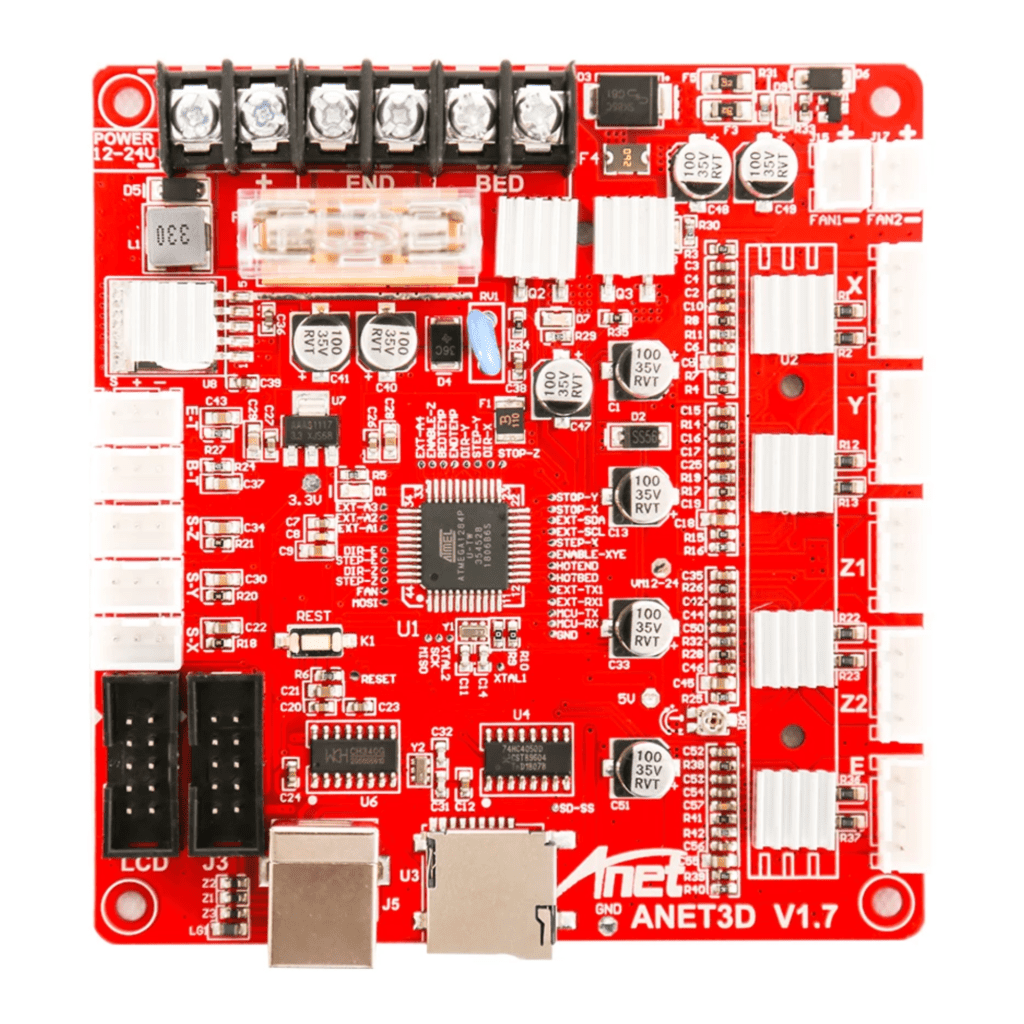
Board Compatibility #
This firmware is for the stock red Anet “Melzi” boards V1.0-V1.7
Setup Visual Studio Code First #
If you have not already installed and set up Visual Studio Code to compile the firmware please see our guide on how to do that before continuing. Click here to open the guide that we’ve written for you.
Flash a Bootloader #
These boards require a bootloader to be flashed before you can upload firmware to the board. This is a quick process and is only needed to be done once. After the bootloader is installed you will not need to update it again.
To do this follow our bootloader guide here: 8 Bit Board Bootloader Flashing guide – For 1284p CPUs. You will also need an Arduino Uno to flash the bootloader along with some jumper wires. To make this quick and easy we have a Bootloader Kit you can purchase from our website here: TH3D Uno Bootloader Flashing Kit for 8-Bit Boards
Download #
In the firmware download below you will get a ZIP file. Extract this to a folder on your PC
We also recommend you download the Unified 2 STL pack as well. This contains EZABL mounts, Gantry leveling Blocks, Solid bed mounts, and Bed Level test files.
Cloud Storage Note: Extract to a folder that is NOT in a “cloud” storage folder. Many users have reported issues using the firmware when the folder is in a cloud storage folder.
Using the Firmware #
Things to read BEFORE Starting #
File Locations #
Many users have been having issues due to odd folder setups on their computers. If you do not follow the below advice the firmware may have issues compiling.
- Do NOT put the firmware folder in a cloud storage folder (OneDrive, Google Drive, Dropbox, etc.)
- Do NOT use weird folder names (aka ones with anything other than letters and numbers)
- Do NOT use very deep paths. We work out of a folder on our main drive with a subfolder for the printer we are working on. Example: C:Printer FirmwareMyEnder3
Marlin Auto Build #
Our firmware does NOT use Marlin Auto Build. Do not use Marlin Auto Build with our firmware. Use the directions below instead.
Video Guide #
We now have a video guide you can follow as well.
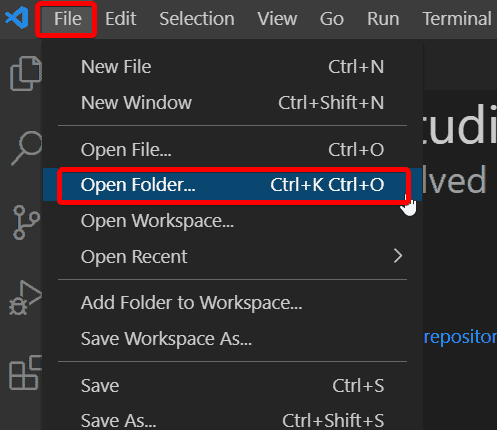
Opening the firmware in Visual Studio Code #
Once the files are extracted you will need to open the folder in Visual Studio Code. You must open the folder named Firmware and not any other one. Failure to open the firmware at the correct folder level will result in it not working.
First time using our firmware or having issues? Watch our video that is intended to clear up common mistakes people make when opening and using the firmware here: Unified 2 VSCode Tips for Noobs | EZTip #8 – YouTube
Once the folder is opened, you will expand the Marlin folder on the left and side and then double click on the file called “Configuration.h”. This file is where you will set up the firmware for your specific printer.
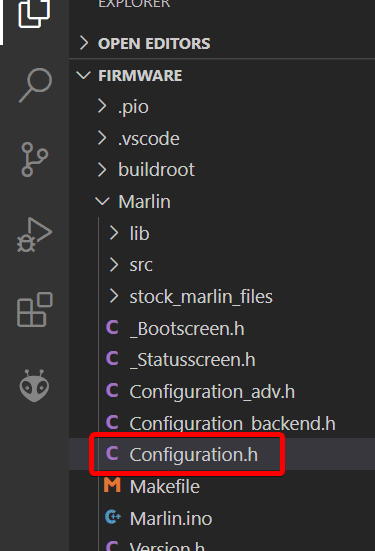
Editing The Configuration.h File #
In the configuration.h file there are printer models you can uncomment to tell the firmware what machine you are setting it up for. Uncomment means removing the // in front of a setting and you will be left with #define XXXXXX if an option is enabled.
There are many other options in the firmware for setting up upgrades, tuning, and other features. Read through the files configuration section to see all the features we’ve put in the firmware for you.
We have an article here with more details about the use of the configuration.h file.
Testing the Firmware Settings #
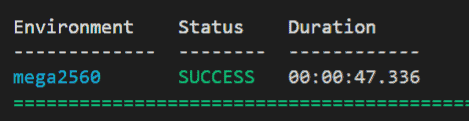
Once you have all the options you want and your printer model setting uncommented now it’s time to make sure it compiles with no issues. To do that just click the ✓ at the bottom-left of Visual Studio Code and it will build the firmware.

If the build succeeds it is ready for you to upload to your printer. You will know if it was successfully built because it will show a SUCCESS in green at the bottom of the window in Visual Studio Code.
Flashing the Firmware #
Upload the firmware to your board (USB Cable Method) #
Now that we have the firmware tested we can upload it to your printer. Your particular printer uses a USB cable to upload it to the printer board. Make sure you close out ALL slicers and any other programs that you may have open that could connect to your printer’s COM port. Once the printer is connected you can upload the firmware to the board by clicking the right-pointing arrow in the bottom-left-hand corner of Visual Studio Code.

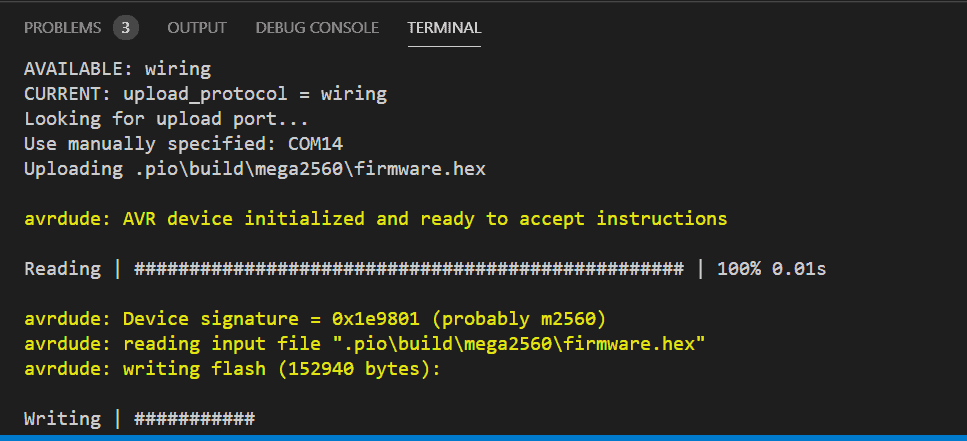
The firmware will now be uploaded to your printer board. It will display a success message as we saw in the test compile step above when it is done flashing. This typically takes about 30-60 seconds depending on the speed of your computer and/or control board.
DO NOT UNPLUG THE PRINTER OR RESET YOUR COMPUTER. Interrupting the flashing can “brick” your board and if this happens you will need to reflash the bootloader with a programmer (like an Arduino UNO) before you can flash again.
When the printer boots you may see the TH3D logo on your LCD, printers with older 8-bit boards or low-end CPUs may not show a TH3D logo but all will show a Marlin screen with TH3D Studio showing on the version information.
Reset your EEPROM! #
Make sure to reset your EEPROM on your printer after flashing any firmware. You can do this from your printer LCD by going to Configuration -> Reset EEPROM or by sending an M502 followed by M500 with your favorite Gcode sender application.
Anet A6 with Marlin 2.0
I’ve recently purchased Anet A6 — a very cheap 3D printer which I paid for with my time.
Some months ago when I ordered an Anet A6 from Aliexpress.
There were some issues, but finally the seller managed to send me exactly this model — Anet A6L as it’s stated.
There are some differences from the regular Anet A6 which I did not realized at first sight.
Mainly this exact printer is equipped with a Star 5-button LCD (found in Anet A8) instead of the fancy rotating button with larger screen.
I think this particular printer is kind of hybrid of Anet A6 and Anet A8.
But I’m fine with that as long as it works.

I have no previous experience with 3D printers and a very very little experience with microchips (like Arduino).
However, I’m quite experienced with higher level programming and a like these kinds of challenges.
Auto leveling
The L in Anet A6L stands for leveling.
A ROKO SN04-N sensor was included, which is an induction sensor.
Induction sensors detect metal, therefore it is not possible to print e.g. on a glass sheet.

The sensor is attached to the main board instead of the Z-stop.
Fix it just in the lowest position possible.
Later you can determine the NOZZLE_TO_PROBE_OFFSET following this process:
- Set
NOZZLE_TO_PROBE_OFFSETto0(the Z axis). - Home Z axis. Printer will say
Z=0. - Move manually the Z axis as low to the bed as possible until a sheet of paper will be «pinned» with the nozzle. You may need to disable Soft stops (to make the nozzle move beneath 0).
- Take current Z value a make it negative — that is you Z
NOZZLE_TO_PROBE_OFFSET(for example mine is-0.25)

Original firmware
The first printed boxes were fine and I was quite happy. But I noticed The original firmware was insufficient at all.
Due to the presence of a fan on the left side of extruder the printer could’t home X axis correctly.
As a result centering the nozzle did not actually move the nozzle to the center of heat bed but about 4 cm to right.
This means it was not possible to print full-sized (22×22 cm) objects.
Furthermore the original firmware does not support auto-leveling and is quite basic after all.
I have back the original firmware up when burning new bootloader, it is available here.
Marlin firmware
I decided to flash better firmware.
I’ve found printing community somewhat recommends Marlin community.
The procedure seemed to be easy — download Marlin sources, include Anet A6 related config, compile in Arduino IDE, flash and you’re ready.
Well… it was not.
Bootloader
After some hours of trial and error when I was unable to flash the firmware via Arduino IDE (avrdude sync error 0x00) I’ve learned there should be a tiny piece of that program called bootloader, which purpose is to allow flashing firmware via USB (from e.g. Arduino IDE).
And it is very likely that since Anet v1.5 main board this bootloader is missing (to save some memory).
Since my main board says Anet v1.7 I was convinced my board is missing bootloader and needs to be burned first.

There are plenty of guides how to burn bootloader using Arduino.
Unfortunately I don’t own Arduino.
However, I have an ESP32 and a Raspberry.
Long story short, the key words to google are raspberry as avr isp (in-system programmer).
Although I’ve found a guide how to turn my ESP32 into an AVR ISP, I did not succeed connecting ESP32 to the printer.
I suppose it is possible, but I was missing experiences.
If you wanted to give your ESP32 a try, keep in mind that you don’t want to connect power wires (ESP uses 3.5 V while Anet is on 5 V), but you want to connect the ground.
My idea was to use Raspberry as AVR programmer, connect to it via SSH and perform all operations via CLI tools.
I did it this way:
Connecting wires
Connect Raspberry pins with Anet J3 pins as follows:
| Anet J3 pin | Raspberry GPIO pin |
|---|---|
| MISO | GPIO 16 |
| SCK | GPIO 21 |
| RESET | GPIO 12 |
| MOSI | GPIO 20 |
| GND | Ground |
All the Raspberry pins are the bottom right pins.
You don’t have to connect power (VCC <-> 5V power), it’s enough just to power on the printer.


Installing Avrdude
This part is done on Raspberry.
I was using SSH connection.
Following this guide you will build and install avrdude with linuxgpio support:
sudo apt-get install bison flex libusb-dev
cd /tmp
wget http://download.savannah.gnu.org/releases/avrdude/avrdude-6.3.tar.gz
tar xf avrdude-6.1.tar.gz
cd avrdude-6.1
./configure --prefix=/opt/avrdude --enable-linuxgpio
make
sudo make install
It is possible that the latest Raspbian avrdude already supports linuxgpio, you can give it a try.
Specify the linuxgpio programmer for avrdude somewhere at the end of /opt/avrdude/etc/avrdude.conf:
programmer
  id    = "linuxgpio";
  desc  = "Use the Linux sysfs interface to bitbang GPIO lines";
  type  = "linuxgpio";
  reset = 12;
  sck   = 21;
  mosi  = 20;
  miso  = 16;
;
Backing current firmware up
Make sure the processor on your Anet board says it’s ATMEGA 1284P.
If not, you have to adjust all future commands.
Save your current firmware into anet-a6-original.hex:
sudo /opt/avrdude/bin/avrdude -p atmega1284p -c linuxgpio -v -U flash:r:anet-a6-original.hex:i
Burning bootloader
Following the guide of Marlin firmware competitor Klipper we first download Optiboot, which is memory-optimised bootloader allowing more program space (thus more Marlin features to be enabled).
Then we will lock some parts of memory. This step is crucial since later on Ardiuno IDE was overwriting bootloader with firmware.
Symptoms of overridden bootloader were printer unable to start when powering on (I had to press the hardware reset button multiple times, then it started) and mainly impossibility of flashing new firmware through Arduino IDE multiple times.
I had to re-burn bootloader every time through Raspberry before flashing firmware which was very annoying.
Finally we’ll burn the bootloader and again.. lock something.
I don’t really know what, but it just works.
cd /opt/avrdude/bin/

wget 'https://raw.githubusercontent.com/Lauszus/Sanguino/master/bootloaders/optiboot/optiboot_atmega1284p.hex'

sudo ./avrdude -p atmega1284p -c linuxgpio -v -e -u -U lock:w:0x3F:m -U efuse:w:0xFD:m -U hfuse:w:0xDE:m -U lfuse:w:0xFF:m
sudo ./avrdude -p atmega1284p -c linuxgpio -v -U flash:w:optiboot_atmega1284p.hex:i
sudo ./avrdude -p atmega1284p -c linuxgpio -v -U lock:w:0x0F:m
At this point Anet display is probably freezed and unresponsive.
When you unplug and plug power in again, you’ll probably see empty display.
So far so good.
Flashing Marlin 2.0
It looks like the aren’t many people who successfully flashed Marlin 2.0 to Anet A6.
I don’t really know why.
Once you have the bootloader, flashing Marlin is piece of cake.
First you will need to download Arduino IDE.
Then you must import Anet A6 board definition. Just follow instructions from SkyNet3D.
SkyNet3D is an old fork of Marlin 1 from ages when Marlin did not support Anet A6 and A8 printers.
Currently Marlin (both 1.x and 2.0) supports Anet out of the box.
However, the board definitions must be downloaded from SkyNet3D.
Install U8glib library into Arduino IDE via Sketch -> Include library -> Manage libraries.
Download Marlin 2.0 firmware from official website and follow installation guide.
Use my attached configuration for my specific Anet A6 or go with the recommended configuration for Anet A6.
As mentioned in the introduction, my Anet A6 has older display which must be enabled in the config file.
I have also enabled auto bed leveling and set up offsets of the probe (induction sensor).
In Arduino IDE select Anet V1.0 (Optiboot) under Tools -> Board and AVRISP mkII as Programmer.
Hit the Verify button.
If everything is correct, you can connect Anet to your computer via USB and hit Upload.
You may get a text overflow error during verification.
This means you’ve enabled to many features which can’t fit into the memory.
You must comment some features.
After uploading the firmware printer should boot automatically.
Final steps
You may see EEPROM init error.
This can be solved either right in the printer’s menu (Configuration -> Initialize EEPROM) or by sending commands M502 M500 M501 using e.g. Printrun and restarting the printer in both cases.
Actually, sending the 3 commands M502 M500 M501 is recommended after each firmware flashing to correctly load changes in compiled firmware.
Инструкция по обновлению прошивки Anet A6
1) Включить принтер
2) Скачать Arduino IDE (ВНИМАНИЕ!!! проверено на версии: 1.6.12) для исправления и загрузки прошивки в — https://www.arduino.cc/en/Main/Software
3) Установить Arduino IDE
4) Запустить Arduino IDE
5) Обеспечить поддержку платы Anet в Arduino IDE: для этого необходим Sanguino в меню
- Меню — Файл -> Настройки
- В поле ввода Additional Boards manager URLs: вставить адрес — https://raw.githubusercontent.com/Lauszus/Sanguino/master/package_lauszus_sanguino_index.json
- Нажать OK
- Меню — Инструменты -> Плата -> Boards Manager…
- В окне Boards Manager — найти Sanguino, выбрать его и появится кнопка Install, которую нужно нажать для установки поддержки плат Anet
- После установки появиться надпись INSTALLED
- Необходимо выбрать Плату — Sanguino, Процессор — ATmega1284 or ATmega1284P (16 MHz) и Порт
6) Добавить библиотеку U8glib.
Скачать библиотеку U8glib (https://yadi.sk/d/DgV1HGEyxkVrj в папке Firmware)
Скетч – подключить библиотеку – добавить .ZIP библиотеку.
7) Подготовка программатора Arduino SPI:
- Подключить плату Arduino (проверено на платах: UNO, MEGA и NANO) к компьютеру по USB
- Перейти в запущенный Arduino IDE или открыть
- Меню — Файл -> Примеры -> ArduinoISP -> ArduinoISP
- В открывшимся окне скетча необходимо выбрать Плату — в зависимости от типа платы Arduino, Процессор — если необходимо и Порт
- Меню — Файл -> Скетч -> Загрузка
- После загрузки скетча — отключить плату Arduino от компьютера
 Подготовка к загрузке Bootloader:
- Выключить принтер
- Соединить плату Arduino c платой Anet по 4-м проводам (ICSP/SPI):
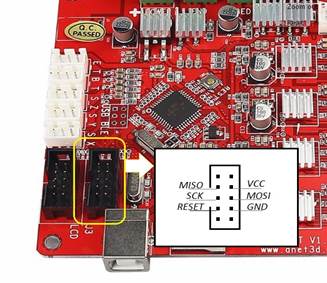
— Arduino UNO и NANO:
MISO (Anet) on pin 12 (Arduino)
SCK (Anet) on pin 13 (Arduino)
Reset(Anet) on pin 10 (Arduino)
MOSI (Anet) on pin 11 (Arduino)
— Arduino MEGA:
MISO (Anet) on pin 50 (Arduino)
SCK (Anet) on pin 52 (Arduino)
Reset(Anet) on pin 53 (Arduino)
MOSI (Anet) on pin 51 (Arduino)
9) Загрузка Bootloader в Anet:
· Подключить плату Anet к компьютеру по USB
· Подключить плату Arduino к компьютеру по USB
· Подать питание на плату Anet.
· Перейти в запущенный Arduino IDE или открыть
· Меню — Инструменты -> :: Плата — Sanguino, Процессор — ATmega1284 or ATmega1284P (16 MHz)
· Меню — Инструменты -> Порт — выбрать порт к которому подключена плата Arduino
· Меню — Инструменты -> Программатор -> Arduino as ISP
· Меню — Инструменты -> Записать загрузчик
· Важно!!! Дождаться завершения процесса
· Меню — Инструменты -> Программатор -> USBasp
Установка
1) Включить принтер
2) Подключить компьютер к блоку управления через USB
3) Запустить Arduino IDE
4) Открыть файл Marlin_Anet_A6-1.1.1.ino — из Arduino IDE
5) Меню — Файл -> Скетч -> Загрузка
Search code, repositories, users, issues, pull requests…
Provide feedback
Saved searches
Use saved searches to filter your results more quickly
Sign up