Радиоприемники Telefunken TF-1583UB — инструкция пользователя по применению, эксплуатации и установке на русском языке. Мы надеемся, она поможет вам решить возникшие у вас вопросы при эксплуатации техники.
Вы можете скачать инструкцию к Telefunken TF-1583UB по ссылке ниже, если не хотите ждать загрузки. Если остались вопросы, задайте их в комментариях после инструкции.
«Загружаем инструкцию», означает, что нужно подождать пока файл загрузится и можно будет его читать онлайн. Некоторые инструкции очень большие и время их появления зависит от вашей скорости интернета.
Полезные видео
Характеристики
Остались вопросы?
Не нашли свой ответ в руководстве или возникли другие проблемы? Задайте свой вопрос в форме ниже с подробным описанием вашей ситуации, чтобы другие люди и специалисты смогли дать на него ответ. Если вы знаете как решить проблему другого человека, пожалуйста, подскажите ему


Часто задаваемые вопросы

Как посмотреть инструкцию к Telefunken TF-1583UB?
Необходимо подождать полной загрузки инструкции в сером окне на данной странице или скачать кликнув по специальной кнопке.
Руководство на русском языке?
Все наши руководства представлены на русском языке или схематично, поэтому вы без труда сможете разобраться с вашей моделью
Как можно распечатать инструкцию?
Скачайте ее по специальной кнопке над формой чтения на ваше устройства и отправьте на печать.
RADIO WITH ALARM
РАДИОПРИЁМНИК С БУДИЛЬНИКОМ
TF-1583UB
Instruction manual
Руководство по
эксплуатации

Instruction manual
Dear customer!
Thank you for purchasing our product. For safety, it is strongly recommended to read
this manual carefully before connecting, operating and/or adjusting the product and keep
the manual for reference in future.
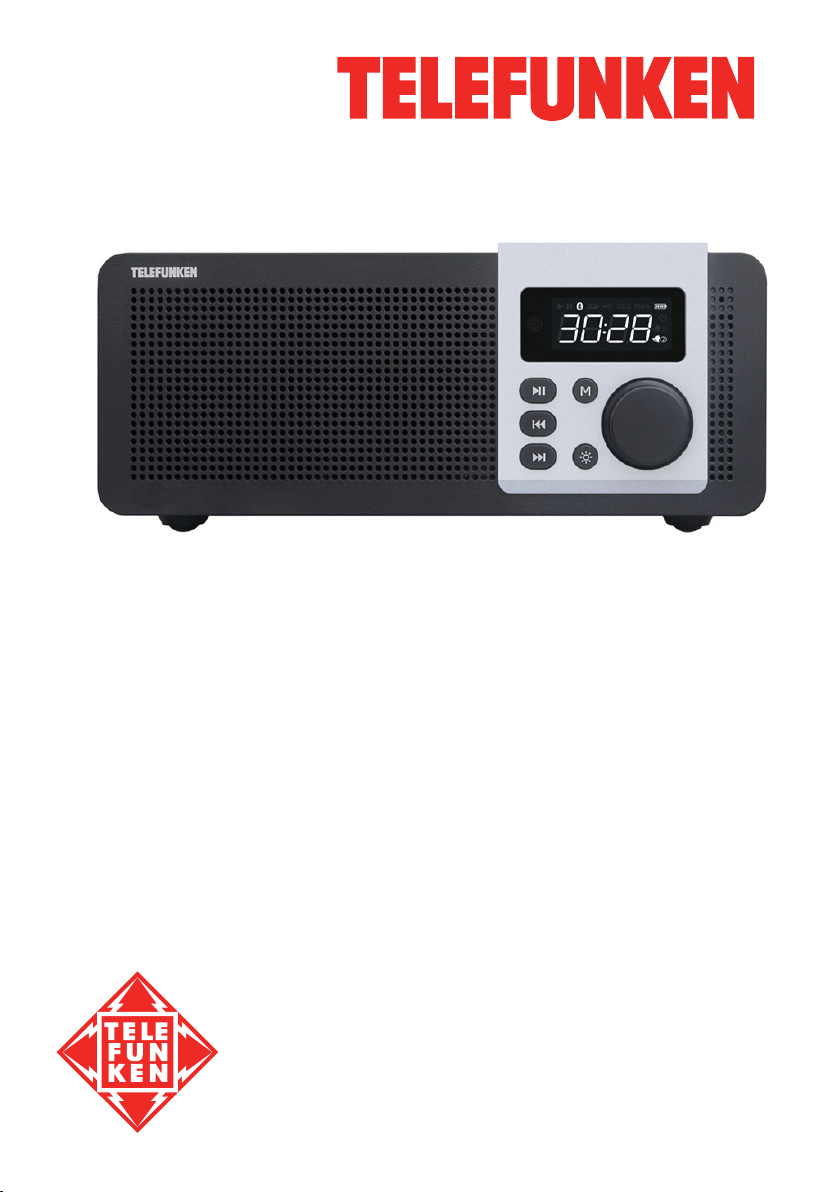
Description
01 0302
04 05
14 2015
1. Speaker
2. IR sensor
3. MODE button
4. Display
5. Microphone
6. PLAY/PAUSE button
7. PREVIOUS button
08 10090706
11 12 13
8. NEXT button
9. Brightness button
10. Volume knob
11. ALARM button
12. SNOOZE button
13. STANDBY button
19
18
17
16
14. Reset hole
15. AUX input
16. MicroSD/TF card slot
17. Slot
18. Indicator
19. USB port
20. Antenna
2
Instruction manual
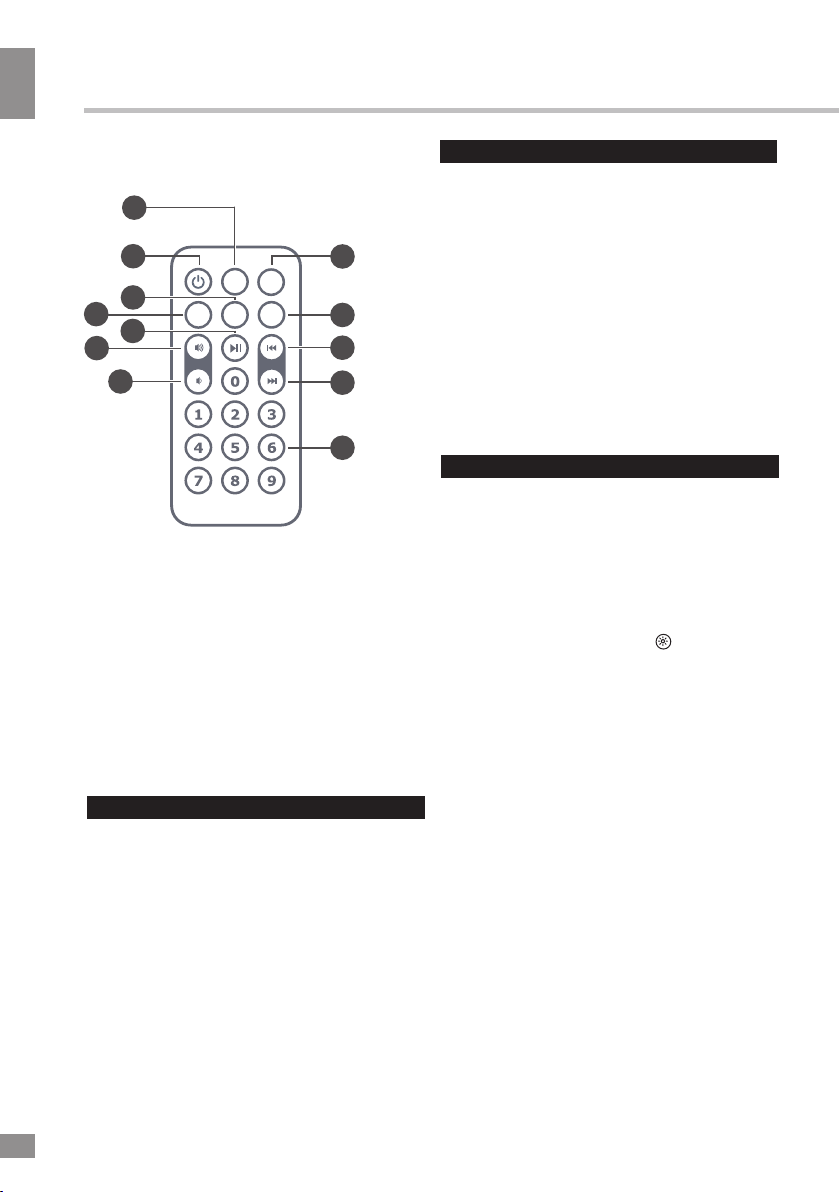
Remote control
01
04
06
07
05
02
03
SAVE
EQ/
REPEAT
LIGHT
SCAN
MODE
FM
1. REPEAT button
2. STANDBY button
3. LIGHT button
4. EQ/SAVE button
5. PLAY/PAUSE button
6. VOL+ button
7. VOL- button
8. FM/SCAN button
9. MODE button
10. PREVIOUS button
11. NEXT button
12. Number buttons
Important safeguards
•
The instruction manual contains important
operating and maintenance instructions. For
your safety, it is necessary to refer to the
manual. Keep the manual for future use.
• Do not hit or drop the unit
•
Do not expose the unit to vibration, direct
sunlight, too high or low temperatures or
humidity.
• Do not disassemble the unit yourselves
Refer servicing to qualified service personnel
All the illustrations in this manual are
schematic images, which may differ from
actual objects.
08
09
10
11
12
Power supply
Power adaptor
Plug the supplied Power adaptor into the
•
microUSB port on the back of the unit.
Connect the power cord to a household mains
outlet. The LED indicator will light red,
meaning is in process.
• Always remember to disconnect the power
cord from the mains before disconnecting it
from the unit.
• Disconnect the power cord from the mains
when not in use.
General operations
Turning On and Off
• Press and hold the STANDBY button to turn
the unit on. Press and hold this button to turn the
unit off.
Backlight brightness
• By default, the LED display backlight is set
to the 3rd level. Press the button on the
unit or LIGHT on the remote to choose one of
the 5 brightness levels.
Mode selection
• Press the MODE button to select the
operation mode. The mode cycle is as follows:
USB/SD/AUX/FM/BLUETOOTH.
Setting the clock
• Press and hold the STANDBY button
to power on the device. Then press this
button again to go to the clock mode.
• Press and hold the PLAY/PAUSE button.
Hour digits will flash. Rotate the volume knob to
adjust the hour setting.
• Press the PLAY/PAUSE button again.
Minute digits will flash. Rotate the volume knob
to adjust the minute setting.
• Press the PLAY/PAUSE button again
to confirm and go back to the clock mode.
3

Instruction manual
Setting the alarm
• This device supports up to 2 alarms.
Operations are as follows:
• Press and hold the STANDBY button
to turn the unit on.
• Short press the
to enter the alarm clock mode, press ALARM
again to select the alarm number (AL1/AL2).
• Press
Hour digits will flash. Rotate the volume knob to
adjust the hour setting.
• Press the PLAY/PAUSE button again.
Minute
to adjust the minute setting.
• Once the alarm setting is finished, press
the PLAY/PAUSE button to return to the
clock mode. An alarm indicator /
will appear on the screen.
• If you want to cancel the alarm,
press the ALARM button to select the alarm
you want to cancel and then press and hold
the ALARM button to switch it off. The
corresponding indicator will disappear from
the screen.
• When setting the alarm you can
select the alarm signal: BEEP (standard
buzzer ringing) or SONG (the last listened
FM radio station).
and hold the PLAY/PAUSE button.
digits will flash. Rotate the volume knob
ALARM button
Snooze control
• When the alarm time comes, the signal will
sound for 1 minute if no button is pressed.
Press any button except SNOOZE to stop the
ringing.
•
When the alarm is on, press the SNOOZE
button to interrupt the alarm signal. After
5 minutes the alarm will be on again.
• If you want to disable the alarm, press
and hold the SNOOZE button during the
alarm ringing.
Radio
• Press
and hold STANDBY to power on
the unit.
• Press the MODE button to select the
the radio mode. The display will show
the current frequency and the FM icon
will light on.
• To automatically scan and save
radio stations press and hold PLAY/PAUSE
on the unit or FM/SCAN on the RC. The unit
will scan and save up to 50 stations and save
them as P01, P02, P03… P50.
• Press NEXT or PREVIOUS to switch
to the next or previous radio station. Press and
hold these buttons to go to the nearest station
without saving.
Press the PLAY/PAUSE buttons to mute
•
or unmute the radio.
You can use the numeric buttons on the
•
remote control to directly input the frequency of
your favorite station. Press EQ/SAVE on the
RC to save the station.
USB/SD operation
• Insert a USB device into the USB port or
insert a memory card into the memory card
slot. The unit will start reading the device.
Press MODE button to select among USB
and SD modes, if several storage devices are
inserted.
4

Instruction manual
Playback operations
• During playback press button to pause
playback. Press this button again to resume
playback.
• During playback press or buttons
to go to previous or next track. Press and
hold the or buttons to decrease or
increase volume. Pressing and holding the
or buttons on the RC will scan the track
backwards or forwards.
• To adjust volume on the RC, press the
VOL+/- buttons.
• Press EQ/SAVE on the RC to select
among various sound modes: NORMAL/
ROCK/POP/CLASS/JAZZ/BASS.
• Press the REPEAT button on the RC to
choose between repeat all mode (ALL will
appear on display), random playback (rAnd)
and repeat single track (ONE). Press
REPEAT longer time to start repeating folder,
then “P-A” to be displayed, on screen “P—A”
is displayed, and that means has chosen this
time as for start repeating folder (this time the
speaker continues playing), repress REPEAT
longer time, “P—b” will be displayed on
screen, that means has chosen this time to
be the end
of repeating folder, then the unit will repeat
playing music from the chosen folder.
If want to cancel the repeat folder, repress
the key REPEAT longer time and then “P—E”
to be displayed on screen, then the repeating
folder is cancelled. Pressing REPEAT fast or
switching to other music also can cancel the
repeat folder.
• Press the number buttons on the RC to
choose the number of the track you wish to
play.
• In playback mode, press MODE to
switch off the player and go to radio/bluetooth
mode.
General USB/microSD/TF notes
• This unit is equipped with a USB socket
that can accept and play MP3 files stored on
standard USB flash (compatible with USB
version 2.0) up to 32 GB.
• This unit is also equipped with a
microSD/TF card socket that can accept and
play MP3 files stored on standard microSD/
TF cards up to 32GB.
Always switch off the unit or change
mode to another one before removing a USB
flash drive or microSD/TF card, to prevent
damage to your USB device or memory card.
Note: Although this product is fully
compatible with USB 2.0 and microSD/TF
card standard formats, a small percentage of
USB flash drives and cards might not be
readable, due to those device manufacturers’
non-compliance with the full (official) USB and
microSD/TF card standards.
• FAT32 file system is supported by USB
and microSD/TF of this unit.
According to the USB 1.1/2.0 Standard,
usage of a USB device with power current
consumption exceeding 500 mA is not
recommended without supplementary power
supply. Failure to use supplementary power for
connected USB drives with power consumption
exceeding this value as well as defective
USB drives may cause mechanical or thermal
changes of elements of this unit as well as
failure of internal elements of the USB port.
Such damages are not warranty cases.
Warning: usage of external USB drives
containing BIN files in the root directory may
cause malfunction of the unit or damage to the
software.
5
Instruction Manual
Bluetooth
• Press the MODE button until the
BLUE appears on the screen along with a
chime indicating the readiness for bluetooth
pairing.
• Access the bluetooth interface on your
phone or other device. The receiver will be
shown as TF-1583UB.
• You can now start playing music on your
device and it will be transmitted to the receiver.
Press the button to pause/resume playback.
Press the or buttons to choose the
previous or the next track.
Sleep to music
• In radio or music playback modes,
press the SNOOZE button to enter the sleep
mode. Sleep time will appear on the display.
Press SNOOZE to select the sleep time period
(10-120 minutes) or switch it off. The unit will
turn off automatically after the sleep time
period elapses.
AUX input
• To connect an external audio device
(e.g. MP3-player), please use a standard
stereo cable with 3.5 mm to 3.5 mm plugs to
connect the audio line-out of the external
device to the AUX input socket of this unit. You
can press the PLAY/PAUSE button to mute/
unmute the sound.
Maintenance and care
Switch off the unit, unplug from the power
supply. The outside of the appliance can be
cleaned with a slightly damp cloth.
Accessories
Receiver
Power adaptor
Remote control
AUX cable/Line in cable
Instruction manual
1 pc
1 pc
1 pc
1 pc
1 pc
Specifications
Input voltage of the adaptor
Nominal voltage
Power rating RMS 3 W x 2
Radio frequency FM: 87.5 — 108 MHz
Nominal power consumption 8 W
Unit dimensions
Net weight
Specifications and functions are subject to change without notice. It is connected with continual
improvement of the device.
4
~100 — 240 V, 50/60 Hz
5 V ≥ 2000 mA
230 x 135 x 95 mm
1.0 kg
6
 Loading…
Часы Telefunken TF-1583UB
будильник, радио, подсветка дисплея, тип питания — от сети
подробнее

12
Код товара: 1373328
Specifications:1527/1527082-tf1583ub.pdf file (03 Jun 2023) |
Accompanying Data:
Telefunken TF-1583UB Radio PDF Instruction Manual (Updated: Saturday 3rd of June 2023 02:32:48 AM)
Rating: 4.2 (rated by 90 users)
Compatible devices: TF-1568U, TF-1506, TF-1590, TF-1508, TF-1582UB, TF-1572, TF-1505, TF-1503U.
Recommended Documentation:
Text Version of Instruction Manual
(Ocr-Read Summary of Contents of some pages of the Telefunken TF-1583UB Document (Main Content), UPD: 03 June 2023)
-
3, Instruction manual 3 Important safeguards • The instruction manual contains important operating and maintenance instructions. For your safety, it is necessary to refer to the manual. Keep the manual for future use. • Do not hit or drop the unit • Do not expose the unit to vibration, direct sunl…
-
5, Instruction manual 5 Playback operations • During playback press button to pause playback. Press this button again to resume playback. • During playback press or buttons to go to previous or next track. Press and hold the or buttons to decrease or increase volume. Pressing and holding the or …
-
1, Telefunken TF-1583UB RADIO WITH ALARM РАДИОПРИЁМНИК С БУДИЛЬНИКОМ TF-1583UB Instruction manual Руководство по эксплуатации
… -
8, Telefunken TF-1583UB 8 Руководство по эксплуатации Общие операции руководством и сохраните его для после- дующего использования. • Не наносите ударов по устройству, не роняйте его. • Не п�…
-
10, Общая информация Общая информация 10 Операции с USB/microSD • Вставьте USB-накопитель в USB-порт данного устройства; вставьте карту памяти в слот для карт памяти. Нажмите кнопку…
-
6, Telefunken TF-1583UB Instruction Manual 4 Maintenance and care Switch off the unit, unplug from the power supply. The outside of the appliance can be cleaned with a slightly damp cloth. Accessories 1 pc 1 pc Receiver Power adaptor Remote control AUX cable/Line in cable Instruction manual 1 pc Specifications Specifications an…
-
14, Уважаемый покупатель! Благодарим Вас за покупку продукции торговой марки TELEFUNKEN и доверие к нашей компании. TELEFUNKEN гарантирует высокое качество и надежную работу св…
-
7, Руководство по эксплуатации 7 Уважаемый покупатель! Благодарим Вас за покупку нашего изделия. Чтобы понять, как правильно и без- опасно пользоваться Вашей моделью изделия…
-
Telefunken TF-1583UB User Manual
-
Telefunken TF-1583UB User Guide
-
Telefunken TF-1583UB PDF Manual
-
Telefunken TF-1583UB Owner’s Manuals
Recommended: DPF-7000P, CRT1350LS, F75


-
Audiovox GMRS122-2CH — 5 Mile GMRS Radio
General Mobile Radio Service (GMRS)General Mobile Radio Service (GMRS)General Mobile Radio Service (GMRS)General Mobile Radio Service (GMRS)General Mobile Radio Service (GMRS)ModelModelModelModelModel ::::: GMRS122-2CH GMRS122-2CH GMRS122-2CH GMRS122-2CH GMRS122-2CHOwnerOwnerOwnerOwnerOwner’ …
GMRS122-2CH — 5 Mile GMRS Radio 24
-
Uniden BC906W
Thank you for purchasing Uniden’s BC906W wireless microphone. Now you can be up to 100 meters away from your CB and still remain connected. Enjoy mobility while still being connected to your Uniden Bearcat CB.At Uniden, we’ll take care of you! If you need any assistance with this product, please call our Custome …
BC906W 2
-
Motorola XiR Series
EnglishmXiR Series Digital Mobile RadiosQuick Reference CardNOTE: Refer to User Guide for more details on your radio’s operations/features.For Models that are available in Thailand:This telecommunication equipment conforms to the requirements of the National Telecommunications Commission.Powering the Radio …
XiR Series 2
-
Ryobi R18R
R18RORIGINAL INSTRUCTIONSTRADUCTION DES INSTRUCTIONS ORIGINALESÜBERSETZUNG DER ORIGINALANLEITUNGTRADUCCIÓN DE LAS INSTRUCCIONES ORIGINALESTRADUZIONE DELLE ISTRUZIONI ORIGINALIVERTALING VAN DE ORIGINELE INSTRUCTIESTRADUÇÃO DAS INSTRUÇÕES ORIGINAISOVERSÆTTELSE AF DE ORIGINALE INSTRUKTIONERÖVERSÄTTNING AV …
R18R 180
Operating Impressions, Questions and Answers: