70mai Rearview Mirror Dash Cam User Manual

Product Introduction

∗ The product, user interface and other illustrations in the user manual serve as references only.
∗ Product images are for illustrative purposes only and may differ from the actual product due to product enhancements.
Packing List
- 70mai rearview mirror dash cam × 1
- Car charger × 1
- Power cord × 1
- Wiring crowbar × 1
- Fixing strap× 2
- User manual× 1
Online Guide
The online guide provides detailed function descriptions of the product. You may read the guide under the Help section on 70mai app or scanning the following QR code:

Download 70mai App
This product is to be used with the 70mai app. Please search for “70mai” in the app store or scan the following QR code to download and install the app:

Product Installation
1. Preparation
Insert the microSD card into the slot on the dash cam before inserting the power cord into the DC/IN interface on the dash cam.

2. Installation
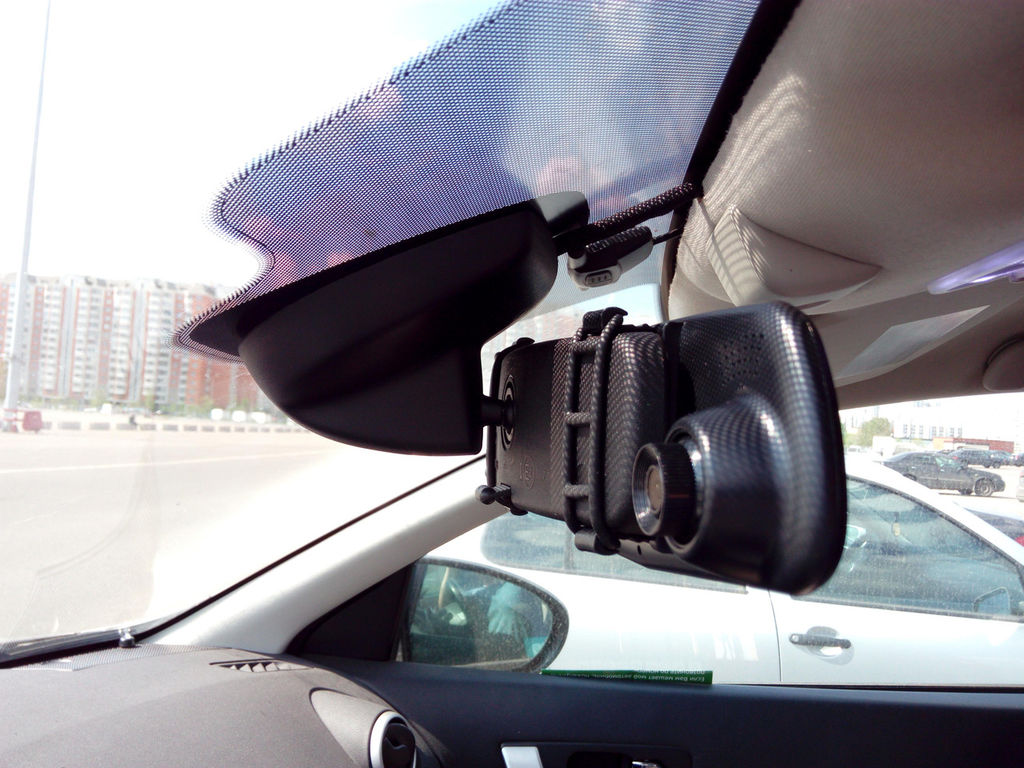
As shown in the figure below, attach the dash cam to the rearview mirror of your vehicle and adjust its position as appropriate to ensure that the camera is not blocked. Use the fixing straps in the packing box to fix the dash cam.

3. Connecting the power supply
As shown in the figure below, run the power cord along the front windshield, A-pillar, and co-pilot storage compartment to the cigarette lighter. Insert the car charger into the cigarette lighter receptacle.

∗ You can use the cable crowbar in the box to hide the power cord underneath a rubber sealing strip.
∗ As the positions of cigarette lighter receptacles vary with vehicles, the specific routing of power cords depends on the actual conditions. The preceding figure serves as a reference only.
4. Adjust the camera angle
Start the vehicle or rotate the key to the ACC gear position to supply power to the cigarette lighter. The dash cam will be turned on automatically.
The camera supports universal angle adjustment, with a rotational range of ±4°. Please adjust the angle according to the preview screen to ensure that the camera is forward-facing.

Startup/Shutdown
1. Startup
Use any of the following ways to start the dash cam:
- Press the power button.
- Connect the cigarette lighter and start the vehicle. The cigarette lighter will be powered by the vehicle and the dash cam will be turned on automatically.
- Enable the parking surveillance function. The dash cam will be turned on automatically when any collision or movement of the vehicle is detected in parking surveillance mode.
∗ If no external power supply is connected and the built-in battery has a low capacity, the dash cam will not be started.
2. Shutdown
Use any of the following ways to shut down the dash cam:
- Press and hold the power button.
- Connect the cigarette lighter and turn off the vehicle. When the power supply from the vehicle to the cigarette lighter is discontinued, the dash cam will be turned off automatically.
The dash cam will be automatically turned off in any of the following circumstances:
- If no external power supply is connected and the built-in battery has a low capacity;
- If no external power supply is connected and the ambient temperature exceeds the discharge temperature limit of the built-in battery;
- If the dash cam is working under high temperature that exceeds its operating temperature limit;
- If the microSD card is removed while the dash cam is working;
- When the engine is turned off and there is residual power in the cigarette lighter, if the vehicle is kept stationary for 20 minutes and the dash cam is left untouched, the product will switch off automatically. If the parking surveillance function is enabled, the dash cam will enter the parking surveillance mode.
∗ Some vehicles are still powering cigarette lighters after their engines have been turned off. To avoid the loss of battery power due to prolonged operations of the dash cam, please make sure to manually power off the dash cam or remove the car charger if the parking surveillance function has been disabled.
∗ Once the dash cam has been manually powered off, it needs to be manually powered on the next time you start your vehicle. The Company shall not be liable for any loss that results from your failure to switch off the dash cam manually.
Voice Control
The dash cam supports quick control by voice commands. When the dash cam is turned on, you may issue a shortcut command to trigger the corresponding function.
The dash cam supports the following voice commands:

Due to the complex sound environment within the vehicle and the diversity of user accents, we do not guarantee that every voice command will be able to trigger the respective function accurately, nor do we guarantee the complete avoidance of accidental triggering.
If you do not wish to use the voice control function, please disable this function under Settings > Advanced Settings.
Function Description
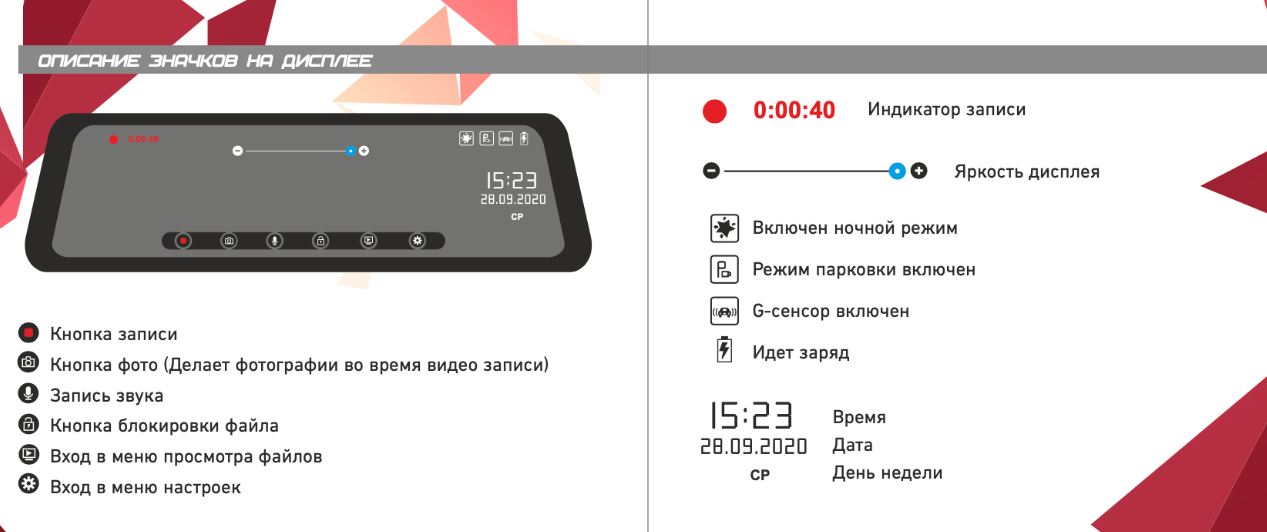
1. Main interface

Once the dash cam is turned on, it automatically starts to record videos. A flashing red dot in the upper-left corner of the screen indicates that a video is being recorded.
![]() : Sound recording is enabled by default. If you wish to disable sound recording, please press the key below this icon. Once disabled, the icon will change to
: Sound recording is enabled by default. If you wish to disable sound recording, please press the key below this icon. Once disabled, the icon will change to![]() . If dual (front/rear) recording function is enabled, the icon will change to
. If dual (front/rear) recording function is enabled, the icon will change to![]() .
.
![]() : Press the key below this icon to record an emergency video and save it to the emergency video directory.
: Press the key below this icon to record an emergency video and save it to the emergency video directory.![]() :Press and hold the key below this icon to turn off the dash cam. Press the key below this icon to start the dash cam.
:Press and hold the key below this icon to turn off the dash cam. Press the key below this icon to start the dash cam.![]() : Press the key below this icon to enter the album.
: Press the key below this icon to enter the album.![]() : Press the key below this icon to enter Settings.
: Press the key below this icon to enter Settings.
Icons in the status bar:![]() : This icon indicates that the rear-recording function has been enabled.
: This icon indicates that the rear-recording function has been enabled.![]() : This icon indicates that the parking surveillance function has been enabled.
: This icon indicates that the parking surveillance function has been enabled.![]() : This icon indicates that the Wi-Fi hotspot has been enabled.
: This icon indicates that the Wi-Fi hotspot has been enabled.![]() : This icon indicates that the Wi-Fi hotspot has been disabled.
: This icon indicates that the Wi-Fi hotspot has been disabled.
∗ The rear-recording function must be used with the rearview camera.
∗ You may enable/disable the Wi-Fi hotspot under Settings > Wi-Fi Hotspot.
2. Recording mode
Once the dash cam is turned on, it automatically enters the recording mode to record videos. A flashing red dot in the upper-left corner of the screen indicates that a video is being recorded. The dash cam is not in the recording mode and video recording is suspended in any of the following circumstances:
- When the dash cam is providing operating guidance after you start it for the first time;
- When the microSD card is being formatted;
- When the dash cam is being upgraded;
- When the dash cam is restoring its factory settings;
- When the dash cam is receiving its upgrade package from 70mai app;
- When you perform any operation after accessing the album either from the dash cam itself or from the mobile phone app.
When the dash cam returns to the main interface or exits the preceding procedure, it reverts back to video recording automatically.
3. Emergency video recording
You may choose one of the following ways to record an emergency video:
- Press the key below the”
 “icon on the main interface to record an emergency video;
 - Start the dash cam so that it can automatically record an emergency video when it detects any collision.
The process of recording an emergency video cannot be interrupted. When the emergency video recording is completed, the dash cam automatically enters the normal video recording mode.
You may adjust the sensitivity of the sensor that triggers the emergency video recording mode under Settings > Collision Sensitivity. The higher the sensitivity, the easier it is to trigger the emergency video recording mode. If you do not want the dash cam to automatically enter the emergency video recording mode, you may disable this function under Settings.
You may view the recorded emergency video in the emergency video directory in the album. Due to the complexity of road conditions, the dash cam may not save every emergency video to the emergency video directory. If you are unable to locate an emergency video in the emergency video directory, please search the normal video directory. The system allocates specific storage space for emergency videos during the process of microSD card formatting. When the storage limit is reached, the earliest emergency video will be deleted if a new emergency video is added. Please export important emergency videos to your mobile phone or computer for backup in a timely manner.
4. Parking surveillance
The parking surveillance function is disabled by default. You may enable this function under Settings > Advanced Settings.
Once the parking surveillance function is enabled, the dash cam enters the parking surveillance mode automatically when the vehicle is parked and turned off. In the event of a collision whilst the vehicle is parked, the dash cam automatically records a video and saves it to the parking surveillance video directory. The device will remind you to view the video the next time you start the vehicle. The parking surveillance function is ineffective in any of the following circumstances:
- If no external power supply is connected when the dash cam is turned off and the built-in battery has a low capacity, the parking surveillance mode cannot be enabled.
- When the dash cam enters parking surveillance mode for a long time without an external power supply, it will deplete its built-in battery. When the battery is low or completely
depleted, the dash cam will not be able to record parking surveillance videos in the event of a collision. - When the dash cam enters parking surveillance mode, and there is no external power supply while the temperature inside the vehicle is below 0 or above 50 , the built-in battery cannot work, and the dash cam will not be able to record parking surveillance videos in the event of a collision.
If your vehicle is parked but continues to supply power to the cigarette lighter, the dash cam will enter the parking surveillance mode after 20 minutes and the parking surveillance function shall consume the storage battery of your vehicle. When your vehicle is kept idle for a prolonged period of time, this may result in reduced storage battery power. For such circumstances, it is recommended that you use the parking surveillance cord with the storage battery protection function.
The parking surveillance function relies on an acceleration sensor to detect collision of parked vehicles. Due to the complexity of the environment, we are unable to guarantee that every collision of your parked vehicle can be accurately identified. In addition, there may be missing or false alarms. If frequent false alarms are given due to vibration rather than collision, you may disable the parking surveillance function under Settings.
For more information on product functions, please read the online guide.
Precautions
- This device is an ancillary product designed to record external videos of your vehicle. The use of this product shall not guarantee your driving safety. The Company shall not be liable for any traffic accidents caused by faults, loss of information, or operation of the product, nor shall the Company bear any loss thereof.
- Some functions of this product may not work properly due to the differences in vehicle conditions, driving modes and driving environments. The Company shall not guarantee that the product will be able to work normally under any conditions such as power failure, use beyond the normal temperature/humidity range, collision, microSD card damage, as well as other conditions that may result in functional anomalies. The videos recorded by the dash cam are for reference only.
- To avoid product failure or personal injury, please ensure that the dash cam has been installed properly and does not block the driver’s line of sight nor the airbags.
- Please use the standard car charger, power cord and other accessories of this product to avoid any failure caused by non-conformances. The Company shall not be liable for any loss caused by the use of a non-standard car charger or power cord.
- The microSD card is not included in the packing list of the product. Please purchase the microSD card separately.
- The default file partition format of the microSD card may be inconsistent with the format supported by this product. When inserting the microSD card for the first time, please format it in the dash cam before use.
- Please purchase high-quality microSD cards through proper channels. Low-quality microSD cards may lead to issues such as inconsistencies between the nominal read/write speed and the actual read/write speed, as well as inconsistencies between the nominal capacity and the actual capacity. The Company shall not be liable for any loss or damage of videos as a result of the use of low-quality microSD cards.
- In the event of battery deformation, swelling or leakage during the use or storage of the product, please discontinue use and contact our after-sales service center to avoid safety problems.
- Please keep this product away from strong magnetic fields, which may cause damage to the product.
- Do not use this product at temperatures above 60 or below -10ºC.
- Please use this product to the extent permitted by law. Keep the product at least 20cm away from the driver and passengers.
Product Specifications
Model: Midriver D04
Image sensor: SONY IMX335
Resolution: 2560 × 1600
Camera: FOV 140°F1.86-glass lens
Wireless connection: Wi-Fi IEEE 802.11 b/g/n 2.4 GHz
Sensor: Acceleration sensor
Supported OS: Android 4.4 or iOS 9.0 and above
Expandable memory: Supports 16~64 GB MicroSD cards that
have a rating of Class 10 or above.
Power supply: Car cigarette lighter
Battery capacity: 500 mash
Battery type: Lithium-ion polymer battery
Input: 5V =2A
Dimensions: 304.3 × 76.7 × 15.2 mm
Disposal and Recycling Information
![]() Hereby, 70mai declares that the radio equipment type Midriver D04 is in compliance with Directive 2014/53/EU. The full text of the EU declaration of conformity is available at the following internet address: http://www.mi.com/global/service/support/declaration.html
Hereby, 70mai declares that the radio equipment type Midriver D04 is in compliance with Directive 2014/53/EU. The full text of the EU declaration of conformity is available at the following internet address: http://www.mi.com/global/service/support/declaration.html
![]() All products bearing this symbol are waste electrical and electronic equipment (WEEE as in directive 2012/19/EU) which should not be mixed with unsorted household waste. Instead, you should protect human health and the environment by handing over your waste equipment to a designated collection point for the recycling of waste electrical and electronic equipment, appointed by the government or local authorities. Correct disposal and recycling will help prevent potential negative consequences to the environment and human health. Please contact the installer or local authorities for more information about the location as well as terms and conditions of such collection points.
All products bearing this symbol are waste electrical and electronic equipment (WEEE as in directive 2012/19/EU) which should not be mixed with unsorted household waste. Instead, you should protect human health and the environment by handing over your waste equipment to a designated collection point for the recycling of waste electrical and electronic equipment, appointed by the government or local authorities. Correct disposal and recycling will help prevent potential negative consequences to the environment and human health. Please contact the installer or local authorities for more information about the location as well as terms and conditions of such collection points.
FCC
Changes or modifications not expressly approved by the party responsible for compliance could void the user’s authority to operate the equipment.
This equipment has been tested and found to comply with the limits for a Class B digital device, pursuant to Part 15 of the FCC Rules. These limits are designed to provide reasonable protection against harmful interference in a residential installation. This equipment generates, uses and can radiate radio frequency energy and, if not installed and used in accordance with the instructions, may cause harmful interference to radio communications. However, there is no guarantee that interference will not occur in a particular installation.
If this equipment does cause harmful interference to radio or television reception, which can be determined by turning the equipment off and on, the user is encouraged to try to correct the interference by one or more of the following measures:
— Reorient or relocate the receiving antenna.
— Increase the separation between the equipment and receiver.
— Connect the equipment into an outlet on a circuit different from that to which the receiver is connected.
— Consult the dealer or an experienced radio/TV technician for help.
This device complies with Part 15 of the FCC Rules. Operation is subject to the following two conditions: (1) this device may not cause harmful interference, and (2) this device must accept any interference received, including interference that may cause undesired operation. This equipment complies with FCC radiation exposure limits set forth for an uncontrolled environment. This equipment should be installed and operated with a minimum distance of 20cm between the radiator & your body. This transmitter must not be co-located or operating in conjunction with any other antenna or transmitter.
Service: help@70mai.com
For further information, please go to www.70mai.com
V.1.0_20190617
Documents / Resources
References

Amazon Using Global Shipping Services in Seller Central Instructions — Manuals+
Содержание статьи
- Комплектация видеорегистратора-зеркало
- Особенности крепления
- Подключение и настройка видеорегистратора-зеркала своими руками пошагово
- Основные режимы работы
- Как правильно вставить карту памяти
- Включение камеры заднего вида
- Велокрепление Thule Xpress 970 с креплением на фаркоп: инструкция, отзывы
- Включение камеры переднего вида
- Глонасс на автомобиль: на что нужно устанавливать по закону, цена, устройство системы
- Специальные возможности видеорегистраторов
- Как убрать затемнение экрана в зеркале
Одно из последних новшеств в электронных приборах для автомобилей — видеорегистратор-зеркало. Это удобный прибор, выполняющий несколько функций. Он укомплектован различными датчиками, которые в точности выполняют свои функции при покупке качественного устройства. Если куплен видеорегистратор-зеркало, инструкция читается в первую очередь, чтобы пользователь понимал, как настраивать прибор, по каким этапам установить его на лобовое стекло.
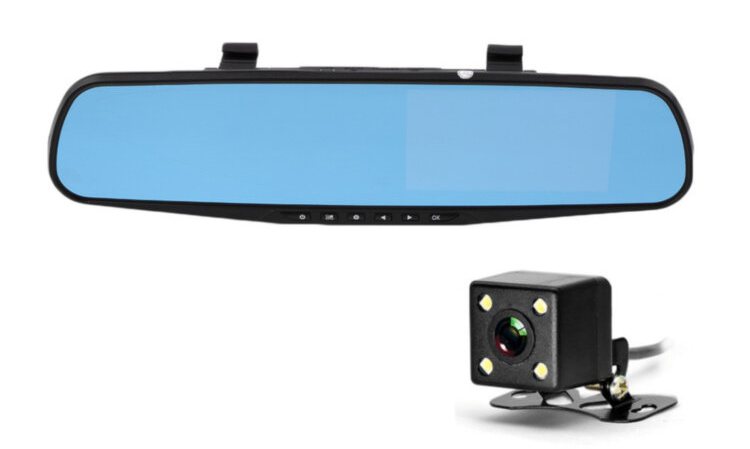
Комплектация видеорегистратора-зеркало
Чтобы аппаратура правильно работала, она должна быть качественно укомплектована. В коробке содержатся следующие компоненты:
- видеорегистратор в форме зеркала;
- амера заднего вида;
- длинный шнур, который должен доставать до блока питания (прикуриватель);
- 2 крепления, через которые осуществляется фиксация к лобовому стеклу;
- карта памяти, чтобы сохранять большой объем информации;
- адаптер питания.
Для дорогих приборов в комплект добавляют необходимые детали для замены. Например, дополнительные крепления, USB шнур, адаптер питания. Если первоначальные элементы повредятся, пользователю не понадобится искать дополнение.

Особенности крепления
Сразу после покупки требуется проверить содержимое коробки. Внутри должны находиться элементы для крепления. Фиксацию осуществляют по правилам:
- снимают обычное зеркало, но оставляют кронштейн;
- подстраивают камеру на верхней части лобового стекла;
- устанавливают ракурс камеры.
Как только удалось закрепить основную конструкцию, приступают к фиксации задней камеры. Ее нужно устанавливать по инструкции:
- С багажника снимают накладку.
- Убирают лампочку, подсвечивающую номера.
- Оставляют пометку для будущего прикрепления камеры.
- Фиксируют при помощи скотча, который расположен в упаковке.
- Вырезают отверстия, к которым будут крепиться саморезы.
- Устанавливают шурупы отвертками с передней и задней стороны.
- Проводят кабель, если для него нет места, вырезают отверстие ножом.
- Устанавливают подсветку для номеров обратно.
- Фиксируют кабель изолентой, чтобы он не мешался, не свисал.
- Устанавливают панель багажника на обратное место.
Если установить требующуюся конструкцию затруднительно, номера можно передвинуть немного ниже. Тогда камера будет осуществлять съемку под правильным углом.
Подключение и настройка видеорегистратора-зеркала своими руками пошагово
После первоначальной фиксации требуется выяснить, как настроить зеркало-регистратор, чтобы оно начало работать. Когда произошло подключение к сети питания, переходят к следующим пошаговым действиям в соответствии с инструкцией по эксплуатации:
- кликают на клавишу «Вкл/Выкл», удерживая ее 3-5 секунд до того момента, пока не будет произведено включение или выключение;
- так как в аппарат начало поступать питание, экран включается, поэтому на кнопку больше нажимать не требуется;
- ожидают появления основного меню, где регулируют дальнейшие настройки.
Этими действиями можно включить устройство, далее приступают к непосредственным настройкам:
- Нажимают на кнопку «Меню», затем кликают на клавишу «Настройки системы».
- Просматривают открывшееся окошко, где находят различные виды ползунков для регулировки функций.
- Если настройка находится немного ниже или по бокам, последовательно нажимают на клавиши «вверх, вниз», «влево, вправо».
После настроек нажимают на «Запись» или «Сохранить». Это поможет подтвердить изменения, привести их в действие.
Благодаря изменению настроек регулируют опции:
- качество и разрешение видеозаписи;
- цикличность записи;
- цветовой диапазон, баланс оттенков;
- включение, выключение звука;
- коррекция даты, времени, языка;
- автоматическое подключение при заведении машины;
- форматирование SD карты памяти.
Если произошел сбой, можно воспользоваться сбросом до заводских настроек.
Основные режимы работы
Перед покупкой читают руководство по эксплуатации. В нем описано, через какие режимы осуществляется работа устройства.
- Автоматический. То есть аппарат подключается сразу же, когда была заведена машина. Экран загорается, начинается запись. Это удобно для пользователей, которые забывают нажать на кнопку включения.
- Запись во время движения. Как только машина начинает двигаться, формируется видеоизображение. Если она включена, но стоит на парковке, опция отключается.
- Запись на парковке. Пользователь сможет получить видео даже в том случае, если автомобиль припаркован и не работает.
- Беспрерывная съемка (цикличная). Камера фиксирует все моменты, перенося их на флеш-карту. Затем автомобилист может извлечь ее, чтобы получить информацию. При завершении памяти данные полностью стирают, чтобы записывать новое изображение.
- Съемка. Первоначально устанавливают период, в течение которого осуществляется запись. Если время завершается, она начинается повторно, перемещая видео на уже имеющиеся файлы. Это позволяет сохранить свободный объем на карте памяти.
Чаще всего выбирают цикличную запись. В этом случае каждое новое видео записывается поверх самого старого на карте памяти. При использовании microSD, объемом порядка 16 Гб, в любой момент времени на флешке будет записано примерно 2 последних часа.
Прежде чем осуществить покупку, требуется внимательно изучить режимы. Так клиенту будет понятно, стоит ли покупать прибор.
Как правильно вставить карту памяти
Прежде чем разбираться, как правильно настроить видеорегистратор-зеркало, требуется подготовить его к работе. В первую очередь нужна флеш-карта, на которой будет записываться информация. Вставляют ее по последовательным этапам:
- нажимают на кнопку для извлечения карты памяти, если в разъеме стоит другая флешка (без нажатия на кнопку доставать карту не рекомендуется, это приведет в негодность механизм);
- устраняют карту из емкости, слегка подтягивая на себя;
- требуется вставить новую флешку в разъем аккуратно, прижимая вовнутрь до щелчка.
Производить какие-либо настройки не требуется. Благодаря самостоятельным действиям аппарат подсоединяется к карте, чтобы передавать на нее информацию.
Для видеорегистраторов покупают microSD объемом 16-32 Гб, со скоростью записи class 10.
Включение камеры заднего вида
Камера заднего вида крайне важна, так как с этой стороны чаще всего происходят дорожно-транспортные происшествия. Поэтому узнают, как включить ее, чтобы воспроизвести опции.
- Подключение видео входов. К одному из них подключается передняя камера, а к другому задняя. Требуется не перепутать их, обычно на корпусе содержится маркировка в виде символов определенного цвета.
- Запуск устройства. Зеркало включают, чтобы начало подаваться электропитание, которое будет достигать передней и задней камеры.
В современных моделях нередко доступно беспроводное соединение. Оно образуется без подсоединения проводов, посредством прикрепления специального радиомодуля. Он совмещен с видеокамерой, поэтому успешно транслирует видеозапись. Пользователю не требуется осуществлять проводку кабеля внутри салона, достаточно зафиксировать радиомодуль, соединив с зеркалом.
Как только аппарат начнет работать, включают запись заднего вида, которая автоматически сохраняется на флешке.
Включение камеры переднего вида
Чтобы записывать видео, последовательно выполняют ряд действий:
- включают основное зеркало, начиная видеозапись, это подключит переднюю камеру в автоматическом режиме;
- чтобы камера перестала работать, ее требуется выключить принудительно посредством зажатия знака треугольника, затем ромба.
Как только запись завершится, пользователь окажется в основном меню, где можно просмотреть сохраненные файлы.
Специальные возможности видеорегистраторов
Помимо основных опций, аппаратура имеет множество дополнений, за счет которых улучшается качество работы.
- G-датчик. Он активируется, если произошло ДТП со столкновением. Фиксируемый файл удалить невозможно, это можно сделать только с компьютера.
- Блокиратор файлов. Предотвращает случайное удаление записи.
- Управление парковкой. Если автомобиль находится на парковке, регистратор не работает. Его применение начинается в случае, если возникает какая-либо вибрация.
- Детекция перемещений. На мониторе возникает запись, свидетельствующая о появлении других автомобилей или иных объектов в ближайшем радиусе.
Одной из специальных возможностей также является размещение камеры заднего вида. Это удобно для большинства пользователей, но не все устройства записи имеют такой функционал.

Как убрать затемнение экрана в зеркале
Чтобы устранить затемнение, существует дополнительная функция WDR. Она работает в автоматическом режиме, позволяет корректировать видеозапись, делать ее более яркой, контрастной, без участков затемнений или осветлений.
Важно знать, как настроить регистратор-зеркало китайский, американский, российский. В зависимости от производителя настройки могут немного меняться. Однако их примерный функционал остается идентичным. Действия осуществить просто, достаточно первоначально зафиксировать устройство, после чего подключить его. Благодаря созданию видеозаписи каждый человек почувствует себя в безопасности, в надежных и комфортных условиях.
![]() Download Article
Download Article
![]() Download Article
Download Article
- Adjusting the Mirror
- Using the Mirror While Driving
- Expert Q&A
- Tips
|
|
|
The rear view mirror is one of the first things you learn about in driver’s ed, but few people know (or remember) the best ways to use it to keep you safe on the road. In this article, we’ll show you exactly how to adjust it before you start driving so your view is unobstructed, plus when to check it while you’re cruising down the street to keep you (and everyone else on the road) safe. Let’s get to it!
Things You Should Know
- Position your seat and buckle up before adjusting your rear view mirror. Move the mirror so you can clearly see the road and horizon line behind you.
- Adjust your mirror every time you drive and check it about once every 5-8 seconds while you’re on the road.
- Make sure to look in your mirror when you’re backing up, switching lanes, navigating heavy traffic, or making quick stops.
-

1
Position your seat. Before you adjust your mirror, you want to make sure that your seat is in the right position for driving. Move the seat forward or back, adjust the seat back, and move the seat up or down, if your seat has that type of adjustment.[1]
- It’s important to adjust the seat so that you can easily reach the pedals of the car. Make sure your feet can reach the gas pedal, the brake pedal, and if you have one, the clutch pedal.
-
2
Buckle your seatbelt. With your seatbelt buckled, you will be in your final driving position. If you adjust your mirrors before buckling your seatbelt, you may be in a different position when actually driving.
- It is important for your safety to always drive with your seatbelt buckled.
Advertisement
-
3
Move the rearview mirror. You want to assure that you can see the traffic behind you clearly. You should be able to see the road behind you, with the horizon line and a bit of the space above the horizon line visible as well.[2]
[3]
To be able to do this, make sure that you can see your whole rear window in your rearview mirror.- To adjust the mirror simply move the body of the mirror to a different angle. The mirror should move easily, although not so easily that it falls out of place once you position it.
- Don’t adjust the mirror so that you can see out one side of the rear window more than another. This will only limit your overall vision of the road. If you are concerned about seeing one side of the car, you should use your side view mirrors for that.[4]
-
4
Make small adjustments while stopped. If you feel that your mirror needs additional adjustment after you start driving, make this adjustment while stopped. It can be a hazard to adjust the mirror while in motion, as you should be focused on your driving and the traffic around you.
- While driving, the vibration of the vehicle can cause the position of the rearview mirror to change. Pay attention to its position as you drive and adjust it as needed when stopped.
-
5
Adjust your mirror every time you drive. To be safe, take the time to adjust the rearview mirror before every drive. It is not enough to rely on your positioning from the last time you drove. You may have been sitting in a slightly different position or someone else could have adjusted the mirror without you knowing.[5]


Advertisement
-
1
Check your rearview mirror on a regular basis. Even if you are just driving straight ahead on an open highway, it’s important to know what is going on behind you. This means you should be looking at your rearview mirror every 5-8 seconds.[6]
- This will keep your understanding of the traffic conditions behind you up to date.
- It will also allow you to keep track of cars that are passing you, and even cars that are acting sporadically or dangerously behind you.
-
2
Look in your rearview mirror before adjusting your position on the road. You should look in the mirror before you stop or start, pass a car, turn, switch lanes, pull over, or make any other adjustment to your position on the road. Basically, if you want to make any movements, other than straight ahead, you should check your rearview mirror before doing it, so that you can make the change safely.
- When changing lanes, you use a combination of your rearview mirror and your side mirror to see if where you are moving is clear, as well as turning around to see if there is anyone in your blind spot. The combination of all of these checks will make switching lanes safer.[7]
- When changing lanes, you use a combination of your rearview mirror and your side mirror to see if where you are moving is clear, as well as turning around to see if there is anyone in your blind spot. The combination of all of these checks will make switching lanes safer.[7]
-
3
Use your rearview mirror when backing up. The rear-view mirror is especially important when you are moving your vehicle in reverse. The mirror will help you to know the course is clear and that you can move without coming into contact with another car, person, or property.
- When moving in reverse, it is also important to rely on things other than the rear-view mirror. Check your side mirrors and turn around and look behind the car with your own eyes in order to assess the situation. After all, it is always better to be safe than sorry.
-
4
Look at your rearview mirror when navigating heavy or irregular traffic. The rearview mirror can give you a lot of good information when trying to get through a stressful and busy driving situation. For example, look in your mirror to assess whether moving in reverse will help you get out of a tight space or just lock you into an even more tenuous position.
-
5
Look before you make a quick stop if you can. Before you brake hard, take a quick second to assess whether any cars are too close to your rear end to stop. If that is the case, consider adjusting your lane or your braking speed if you can. If you can’t, then knowing a car behind you may hit you will give you a second to brace for an impact.
- If you are looking in your rearview mirror at regular intervals already, you may already have a good idea if a vehicle is close behind you. This will help you to make a quick judgement about the following distance and if a vehicle will have time to stop before hitting you.
- Being good at judging the following distance of vehicles behind you should help you adjust your braking measures in order to prevent a rear-end collision from happening.


Advertisement
Add New Question
-
Question
What angle should the side mirrors sit at?

Simon Miyerov is the President and Driving Instructor for Drive Rite Academy, a driving academy based out of New York City. Simon has over 8 years of driving instruction experience. His mission is to ensure the safety of everyday drivers and continue to make New York a safer and efficient driving environment.
Driving Instructor
Expert Answer
For the side mirrors, I recommend adjusting it from your natural seated position until you can see the tip of one door handle on the left side and both door handles on the right side. You should be able to see the full view of the street.
-
Question
Is it illegal to have anything on your rearview mirror?
Simon Miyerov is the President and Driving Instructor for Drive Rite Academy, a driving academy based out of New York City. Simon has over 8 years of driving instruction experience. His mission is to ensure the safety of everyday drivers and continue to make New York a safer and efficient driving environment.
Driving Instructor
Expert Answer
It totally depends on the laws where you live. This kind of thing is going to be different from state to state. However, I would generally recommend keeping your windshield totally clear, though. Even if it’s legal, it isn’t necessarily a good idea.
-
Question
What should I be able to see in my rear view?
Simon Miyerov is the President and Driving Instructor for Drive Rite Academy, a driving academy based out of New York City. Simon has over 8 years of driving instruction experience. His mission is to ensure the safety of everyday drivers and continue to make New York a safer and efficient driving environment.
Driving Instructor
Expert Answer
You should be able to see everything behind you through the rear windshield. You should be able to just move your eyes and see everything in the mirror without moving your head. If you can do that, your rearview is in the right place.

See more answers
Ask a Question
200 characters left
Include your email address to get a message when this question is answered.
Submit
Advertisement
-
If you are driving at night, you might want to use the anti-glare function of your rearview mirror. This will help to reduce the light from headlights behind you that are reflected into your eyes.[8]
Use the tilt function of the mirror to switch to this anti-glare function. -
If you have a detached rear-view mirror, re-attach it using glue before driving.
Advertisement
About This Article
Thanks to all authors for creating a page that has been read 120,776 times.