-
Инструкции по эксплуатации
1

Pioneer VSX-D812 инструкция по эксплуатации
(76 страниц)
- Языки:Русский
-
Тип:
ZIP -
Размер:
2.48 MB
Просмотр
На NoDevice можно скачать инструкцию по эксплуатации для Pioneer VSX-D812. Руководство пользователя необходимо для ознакомления с правилами установки и эксплуатации Pioneer VSX-D812. Инструкции по использованию помогут правильно настроить Pioneer VSX-D812, исправить ошибки и выявить неполадки.
Краткое содержание страницы № 1
VSX_712_812_912.book 1 ページ 2003年2月6日 木曜日 午前10時51分
AUDIO/VIDEO MULTI-CHANNEL
RECEIVER
SINTOAMPLIFICATORE
AUDIO/VIDEO MULTICANALE
VSX-D712
VSX-D812
VSX-D912
Operating Instructions
Istruzioni per l’uso
Краткое содержание страницы № 2
VSX_712_812_912.book 2 ページ 2003年2月6日 木曜日 午前10時51分 Installing the Receiver VENTILATION: When installing this unit, make sure to leave space around the unit for ventilation to improve heat radiation (at least 60 cm at top, 10 cm at rear, and 30 cm at each side). WARNING: Slot and openings in the cabinet are provided for ventilation and to ensure reliable operation of the product and to protect it from overheating, to prevent fire hazard, the openings should never be blocked and covered with items,
Краткое содержание страницы № 3
English Italiano Français Deutsch Nederlands Español VSX_712_812_912.book 1 ページ 2003年2月6日 木曜日 午前10時51分 Thank you for buying this Pioneer product. Please read through these operating instructions so that you will know how to operate your model properly. After you have finished reading the instructions, put them in a safe place for future reference. Operating other Pioneer components . . . .27 01 Before you start
Краткое содержание страницы № 4
VSX_712_812_912.book 2 ページ 2003年2月6日 木曜日 午前10時51分 Surround left speaker distance Programming signals from other setting . . . . . . . . . . . . . . . . . . . . . . . . . . 47 remote controls (VSX-D812/D912 only) . . .61 Subwoofer distance setting . . . . . . . . . . 47 Erasing all of your programmed Dynamic range control setting. . . . . . . . 48 settings (VSX-D812/D912 only) . . . . . . . . .62 Dual mono set
Краткое содержание страницы № 5
English Italiano Français Deutsch Nederlands Español VSX_712_812_912.book 5 ページ 2003年2月6日 木曜日 午前10時51分 Before you start 01 Chapter 1: Before you start Checking what’s in the box Making cable connections Please check that you’ve received the Make sure not to bend the cables over the top following supplied accessories: of this unit (as shown in the illustration). If this happens, the magnetic field produced by the • AM loop antenna transformers in this unit may cause a • FM wire
Краткое содержание страницы № 6
VSX_712_812_912.book 6 ページ 2003年2月6日 木曜日 午前10時51分 01 Before you start Incorrect use of batteries may result in such hazards as leakage and bursting. Observe the following precautions: • Never use new and old batteries together. • Insert the plus and minus sides of the batteries properly according to the marks in the battery case. • Batteries with the same shape may have different voltages. Do not use different batteries together. • When disposing of used batteries, please comply wit
Краткое содержание страницы № 7
English Italiano Français Deutsch Nederlands Español VSX_712_812_912.book 7 ページ 2003年2月6日 木曜日 午前10時51分 5 minute guide 02 Chapter 2: 5 minute guide Introduction to home theater You are probably used to using stereo equipment to listen to music, but may not be used to home theater systems that give you many more options (such as surround sound) when listening to soundtracks. Home theater refers to the use of multiple audio tracks to create a surround sound effect, making you feel li
Краткое содержание страницы № 8
VSX_712_812_912.book 8 ページ 2003年2月6日 木曜日 午前10時51分 02 5 minute guide Listening to Surround Sound This receiver was designed with the easiest possible setup in mind, so with the following quick setup guide, you should have your system hooked up for surround sound in no time at all. In most cases, you can simply leave the receiver in the default settings. Be sure to complete all connections before connecting this unit to the AC power source. 1 Hook up your DVD player. For surround
Краткое содержание страницы № 9
English Italiano Français Deutsch Nederlands Español VSX_712_812_912.book 9 ページ 2003年2月6日 木曜日 午前10時51分 5 minute guide 02 3 Connect your speakers. A complete setup of speakers is shown here (six speakers for the VSX-D712, and eight for the VSX-D812/D912), but everyone’s home setup will vary. Simply connect the speakers you have in the manner shown below. The receiver will work with just two stereo speakers (the front speakers in the diagram) but using at least three speakers
Краткое содержание страницы № 10
VSX_712_812_912.book 10 ページ 2003年2月6日 木曜日 午前10時51分 02 5 minute guide Front speakers Center speaker Surround speakers Surround back speakers LR C LS RS SBL SBR CEN- SUB WOOFER TER AUX IN PREOUT L L SURROUND DIGITAL SURROUND BACK OUT CD OPT IN ANTENNA R L MONITOR OUT SURROUND BACK OPT R L OUT VCR / OUT IN DVR 2 RR CONTROL DVD 7.1CH INPUT (CD-R/TAPE/MD) OUT FRONT SURROUND CENTER IN OPT VIDEO VCR / FRONT CENTER SURROUND BACK SURROUND FRONT IN DVR RL RL R LR L 1 TV / S OUT SAT (TV / IN SA
Краткое содержание страницы № 11
English Italiano Français Deutsch Nederlands Español VSX_712_812_912.book 11 ページ 2003年2月6日 木曜日 午前10時51分 5 minute guide 02 • If you are using only one surround back speaker, connect the positive wire to the right channel (+) terminal, and the negative wire to the left channel (–) terminal (shown below). • If you select subwoofer (SB SW) in the Surround back speaker setting on page 45 you can hook up a subwoofer instead of speakers to the surround b
Краткое содержание страницы № 12
VSX_712_812_912.book 12 ページ 2003年2月6日 木曜日 午前10時51分 02 5 minute guide 3 Use the MULTI JOG dial to choose your Using the Quick Setup speaker setup. You can use the Quick Setup to get your When a subwoofer was detected in step 2, you system up and running with just a few button can cycle between the following choices: presses. The receiver automatically makes the necessary settings after you have selected 2.1ch 3.1ch your speaker setup, room size and listening
Краткое содержание страницы № 13
English Italiano Français Deutsch Nederlands Español VSX_712_812_912.book 13 ページ 2003年2月6日 木曜日 午前10時51分 5 minute guide 02 4 Press ENTER. 5 Use the MULTI JOG dial to choose your room size. Depending on the distance of your speakers from the listening position, choose between small, medium, or large (S, M or L), M being an average-sized room. 6 Press ENTER. 7 Use the MULTI JOG dial to choose your listening position. You can cycle between the following choices: FWD MI
Краткое содержание страницы № 14
VSX_712_812_912.book 14 ページ 2003年2月6日 木曜日 午前10時51分 03 Quick surround sound setup Chapter 3: Quick surround sound setup VSX-D912 only 1 Connect the microphone to the SETUP Automatically calibrating MIC jack on the front panel. your listening area (MCACC) 2 Place the microphone at your normal The Multi-Channel Acoustic Calibration listening position. (MCACC) system measures the acoustic Place the mic about ear level at your normal characteristics of your l
Краткое содержание страницы № 15
English Italiano Français Deutsch Nederlands Español VSX_712_812_912.book 15 ページ 2003年2月6日 木曜日 午前10時51分 Quick surround sound setup 03 • ERR Fch – Check the front speaker connections. • ERR Sch – Check the surround or • If the room environment is not optimal for surround back speaker connections. the auto surround setup (too much ambient noise, echo off the walls, obsta- • ERR SW – Make sure the subwoofer has cles blocking the speakers from
Краткое содержание страницы № 16
L VIDEO R S VIDEO VSX_712_812_912.book 16 ページ 2003年2月6日 木曜日 午前10時51分 04 Connecting up Chapter 4: Connecting up Digital audio coaxial cords/ Optical cables • Before making or changing any Commercially available digital audio coaxial connections, switch off the power and cords (standard video cords can also be used) disconnect the power cord from the AC or optical cables (not supplied) are used to outlet. connect digital components to this receiver. Be sure to insert completely
Краткое содержание страницы № 17
English Italiano Français Deutsch Nederlands Español VSX_712_812_912.book 17 ページ 2003年2月6日 木曜日 午前10時51分 Connecting up 04 Connecting digital components The easiest way to hook up this receiver for surround sound is to use a digital input. You can do this by either coaxial or optical connections (you do not need to do both). The quality of these two types of connections is the same but since some digital components only have one type of digital terminal, it is a matter of matching l
Краткое содержание страницы № 18
VSX_712_812_912.book 18 ページ 2003年2月6日 木曜日 午前10時51分 04 Connecting up • If you have an LD player, you need to make special connections to ensure you can play 2 RF format LDs on your system. If this is the case, hook up your DVD or LD player directly to an RF demodulator using both the 2 RF output and either a coaxial or optical digital connection. We also recommend hooking up your digital components to analog audio jacks as well. Make sure the RF demodulator digital in switch is se
Краткое содержание страницы № 19
English Italiano Français Deutsch Nederlands Español 04_connecting_up.fm 19 ページ 2003年2月6日 木曜日 午後11時46分 Connecting up 04 Connecting DVD multi-channel components If you prefer to use a seperate component for decoding DVDs, you can connect a decoder or a DVD player with multi-channel analog outputs to the multi-channel inputs of this receiver. When connecting your equipment, always make sure the power is turned off and the power cord is disconnected from the AC outlet. • The arrows indicate the
Краткое содержание страницы № 20
VSX_712_812_912.book 20 ページ 2003年2月6日 木曜日 午前10時51分 04 Connecting up Connecting video components Connect your video components to the jacks as shown below. With digital video components (like a DVD player), you must use the connections shown on this page for the video signal, but in order to hear a digital source (like a DVD) you should hook up the audio to a digital input (see page 17). It is also a good idea to hook up your digital components with analog audio connections (see pa
инструкцияPioneer VSX-D812

AUDIO/VIDEO MULTI-CHANNEL
RECEIVER
VSX-D712
VSX-D812
Operating Instructions
Посмотреть инструкция для Pioneer VSX-D812 бесплатно. Руководство относится к категории приемники, 4 человек(а) дали ему среднюю оценку 8.5. Руководство доступно на следующих языках: английский. У вас есть вопрос о Pioneer VSX-D812 или вам нужна помощь? Задайте свой вопрос здесь
- Contents
- Before you start
- 02_5_min_guide.fm.pdf
- VSX_D712_812.book2.pdf
- VSX_D712_812.book3.pdf
Нужна помощь?
У вас есть вопрос о Pioneer а ответа нет в руководстве? Задайте свой вопрос здесь Дай исчерпывающее описание проблемы и четко задайте свой вопрос. Чем детальнее описание проблемы или вопроса, тем легче будет другим пользователям Pioneer предоставить вам исчерпывающий ответ.
Количество вопросов: 0

Главная
Не можете найти ответ на свой вопрос в руководстве? Вы можете найти ответ на свой вопрос ниже, в разделе часто задаваемых вопросов о Pioneer VSX-D812.
Когда звук считается слишком громким?
Могут ли устройства разных марок подключаться друг к другу при помощи Bluetooth?
Как лучше всего выполнять чистку приемник?
Инструкция Pioneer VSX-D812 доступно в русский?
Не нашли свой вопрос? Задайте свой вопрос здесь
-
Page 1: Pioneer VSX-D812
AUDIO/VIDEO MULTI-CHANNEL RECEIVER SINTOAMPLIFICATORE AUDIO/VIDEO MULTICANALE VSX-D712 VSX-D812 VSX-D912 Operating Instructions Istruzioni per l’uso VSX_712_812_912.book 1 ページ 2003年2月6日 木曜日 午前10時51分[…]
-
Page 2: Pioneer VSX-D812
Operating Environment H045 En Operating environment temperature and humidity: +5 ° C – +35 ° C (+41 ° F – +95 ° F); less than 85%RH (cooling vents not blocked) Do not install in the following locations • Location exposed to direct sunlight or strong artificial light • Location exposed to high humidity , or poorly ventilated location VEN[…]
-
Page 3: Pioneer VSX-D812
English Italiano Français Nederlands Español Deutsch Thank you for buying this Pioneer product. Please read through these operating instructions so that you will know how to operate your model properly. After you have finished reading the instructions, put them in a safe place for future reference. 01 Before you start Checking what’s in the box[…]
-
Page 4: Pioneer VSX-D812
Surround left speaker distance setting . . . . . . . . . . . . . . . . . . . . . . . . . . 47 Subwoofer distance setting . . . . . . . . . . 47 Dynamic range control setting . . . . . . . . 48 Dual mono setting . . . . . . . . . . . . . . . . . 48 Surround back channel input setting (VSX-D812/D912 only) . . . . . . . . 48 Digital input settings . .[…]
-
Page 5: Pioneer VSX-D812
Before you start 01 5 En English Italiano Français Nederlands Español Deutsch Chapter 1: Before you start Checking what’s in the box Please check that you’ve received the following supplied accessories: • AM loop antenna • FM wire antenna • Dry cell batteries (AA size IEC R6) x2 • Remote control • Microphone (VSX-D912 only) • M[…]
-
Page 6: Pioneer VSX-D812
Before you start 01 6 En Incorrect use of batteries may result in such hazards as leakage and bursting. Observe the following precautions: • Never use new and old batteries together. • Insert the plus and minus sides of the batteries properly according to the marks in the battery case. • Batteries with the same shape may have different voltag[…]
-
Page 7: Pioneer VSX-D812
5 minute guide 02 7 En English Italiano Français Nederlands Español Deutsch Chapter 2: 5 minute guide Introduction to home theater You are probably used to using stereo equipment to listen to music, but may not be used to home theater systems that give you many more options (such as surround sound) when listening to soundtracks. Home theater refe[…]
-
Page 8: Pioneer VSX-D812
5 minute guide 02 8 En Listening to Surround Sound This receiver was designed with the easiest possible setup in mind, so with the following quick setup guide, you should have your system hooked up for surround sound in no time at all. In most cases, you can simply leave the receiver in the default settings. Be sure to complete all connections befo[…]
-
Page 9: Pioneer VSX-D812
5 minute guide 02 9 En English Italiano Français Nederlands Español Deutsch 3 Connect your speakers. A complete setup of speakers is shown here (six speakers for the VSX-D712, and eight for the VSX-D812/D912), but everyone’s home setup will vary. Simply connect the speakers you have in the manner shown below. The receiver will work with just tw[…]
-
Page 10: Pioneer VSX-D812
5 minute guide 02 10 En VSX-D812/D912 only • To use the speaker on your TV as the center speaker ( C ), connect the CENTER PREOUT jack on this unit to the audio input jack on your TV. In this case the center speaker shown is unnecessary. VCR / DVR TV/ SAT DVD/ LD CONTROL OUT IN IN IN IN IN IN IN SURROUND BACK MONITOR OUT MONITOR OU T S UB W OO FE[…]
-
Page 11: Pioneer VSX-D812
5 minute guide 02 11 En English Italiano Français Nederlands Español Deutsch • If you are using only one surround back speaker, connect the positive wire to the right channel ( + ) terminal, and the negative wire to the left channel ( – ) terminal (shown below). • If you select subwoofer ( SB SW ) in the Surround back speaker setting on pag[…]
-
Page 12: Pioneer VSX-D812
5 minute guide 02 12 En Using the Quick Setup You can use the Quick Setup to get your system up and running with just a few button presses. The receiver automatically makes the necessary settings after you have selected your speaker setup, room size and listening position. Note that with the VSX-D912 you don’t have to make these settings if you u[…]
-
Page 13: Pioneer VSX-D812
5 minute guide 02 13 En English Italiano Français Nederlands Español Deutsch 4 Press ENTER. 5 Use the MULTI JOG dial to choose your room size. Depending on the distance of your speakers from the listening position, choose between small, medium, or large ( S , M or L ), M being an average-sized room. 6 Press ENTER. 7 Use the MULTI JOG dial to choo[…]
-
Page 14: Pioneer VSX-D812
Quick surround sound setup 03 14 En Chapter 3: Quick surround sound setup VSX-D912 only Automatically calibrating your listening area (MCACC) The Multi-Channel Acoustic Calibration (MCACC) system measures the acoustic characteristics of your listening area, taking into account ambient noise, speaker size and distance, and tests for both channel del[…]
-
Page 15: Pioneer VSX-D812
Quick surround sound setup 03 15 En English Italiano Français Nederlands Español Deutsch • ERR Fch – Check the front speaker connections. • ERR Sch – Check the surround or surround back speaker connections. • ERR SW – Make sure the subwoofer has been switched on and volume on the subwoofer is turned up. 7 Use and to select the[…]
-
Page 16: Pioneer VSX-D812
Connecting up 04 16 En Chapter 4: Connecting up • Before making or changing any connections, switch off the power and disconnect the power cord from the AC outlet. Audio/Video cords Use audio/video cords (not supplied) to connect the audio/video components and a video cord to connect the monitor TV. Connect red plugs to R (right), white plugs to […]
-
Page 17: Pioneer VSX-D812
Connecting up 04 17 En English Italiano Français Nederlands Español Deutsch Connecting digital components The easiest way to hook up this receiver for surround sound is to use a digital input. You can do this by either coaxial or optical connections (you do not need to do both). The quality of these two types of connections is the same but since […]
-
Page 18: Pioneer VSX-D812
Connecting up 04 18 En • If you have an LD player, you need to make special connections to ensure you can play 2 RF format LDs on your system. If this is the case, hook up your DVD or LD player directly to an RF demodulator using both the 2 RF output and either a coaxial or optical digital connection. We also recommend hooking up your digital com[…]
-
Page 19: Pioneer VSX-D812
Connecting up 04 19 En English Italiano Français Nederlands Español Deutsch Connecting DVD multi-channel components If you prefer to use a seperate component for decoding DVDs, you can connect a decoder or a DVD player with multi-channel analog outputs to the multi-channel inputs of this receiver. When connecting your equipment, always make sure […]
-
Page 20: Pioneer VSX-D812
Connecting up 04 20 En Connecting video components Connect your video components to the jacks as shown below. With digital video components (like a DVD player), you must use the connections shown on this page for the video signal, but in order to hear a digital source (like a DVD) you should hook up the audio to a digital input (see page 17). It is[…]
-
Page 21: Pioneer VSX-D812
Connecting up 04 21 En English Italiano Français Nederlands Español Deutsch Connecting antennas Connect the AM loop antenna and the FM wire antenna as shown below. To improve reception and sound quality, connect external antennas (see Using external antennas below). Always make sure that the receiver is switched off and unplugged from the wall ou[…]
-
Page 22: Pioneer VSX-D812
Connecting up 04 22 En Connecting the speakers (VSX-D712) A complete setup of six speakers (including the subwoofer) is shown below, but everyone’s home setup will vary. Simply connect the speakers you have in the manner shown below. The receiver will work with just two stereo speakers (the front speakers in the diagram) but using at least three […]
-
Page 23: Pioneer VSX-D812
Connecting up 04 23 En English Italiano Français Nederlands Español Deutsch Connecting the speakers (VSX-D812/D912) A complete setup of eight speakers (including the subwoofer) is shown below, but everyone’s home setup will vary. Simply connect the speakers you have in the manner shown below. The receiver will work with just two stereo speakers[…]
-
Page 24: Pioneer VSX-D812
Connecting up 04 24 En • When using the speaker on your TV as the center speaker ( C ), connect the CENTER PREOUT jack on this unit to the audio input jack on your TV. In this case the center speaker shown is unnecessary. • If you are using only one surround back speaker, connect the positive wire to the right channel ( + ) terminal, and the ne[…]
-
Page 25: Pioneer VSX-D812
Connecting up 04 25 En English Italiano Français Nederlands Español Deutsch • Place the center speaker above or below the TV so that the sound of the center channel is localized at the TV screen. • If possible, place the surround speakers slightly above ear level. • Try not to place the surround speakers further away from the listening posi[…]
-
Page 26: Pioneer VSX-D812
Connecting up 04 26 En Connecting additional amplifiers This receiver has more than sufficient power for any home use, however it is possible to add additional amplifiers to every channel on the VSX-D812/D912 or the surround back channel of the VSX-D712. Make the connections shown below to add amplifiers to power your speakers. Always make sure tha[…]
-
Page 27: Pioneer VSX-D812
Connecting up 04 27 En English Italiano Français Nederlands Español Deutsch • To hear sound only from the pre-outs, disconnect any speakers that are connected directly to the receiver. • If you’re not using a subwoofer, change the front speaker setting (see Speaker setting on page 44) to large. • VSX-D712 only – If you connect to a surr[…]
-
Page 28: Pioneer VSX-D812
Controls and displays 05 28 En Chapter 5: Controls and displays Front panel 1 STANDBY/ON Switches the receiver between on and standby. 2 Input select buttons Press to select an input source. 3 STANDBY indicator Lights when the receiver is in standby. 4 Remote sensor Receives the signals from the remote control. 5 ENTER 6 MULTI JOG dial The MULT[…]
-
Page 29: Pioneer VSX-D812
Controls and displays 05 29 En English Italiano Français Nederlands Español Deutsch 9 STATION +/– buttons Selects station presets when using the tuner (page 55). 10 TUNING +/– buttons Selects the frequency when using the tuner (page 52). 11 LISTENING MODE buttons STANDARD Press for Standard decoding and to switch between the various Pro Logic[…]
-
Page 30: Pioneer VSX-D812
Controls and displays 05 30 En Display 1 SIGNAL SELECT indicators Lights to indicate the type of input signal assigned for the current component: AUTO Lights when AUTO signal select is on. SB Depending on the source, this lights when a signal with surround back channel encoding is detected. DIGITAL Lights when a digital audio signal is detected. 2 […]
-
Page 31: Pioneer VSX-D812
Controls and displays 05 31 En English Italiano Français Nederlands Español Deutsch 11 Speaker indicator Shows the speaker system currently in use. 12 EON When the EON mode is set. the EON indicator lights, but during actual reception of an EON broadcast the EON indicator will flash. 13 indicator The indicator lights to inform you that the curren[…]
-
Page 32: Pioneer VSX-D812
Controls and displays 05 32 En Remote control 1 RECEIVER This switches between standby and on for this receiver. 2 MULTI CONTROL buttons Press to select control of other components (see Controlling the rest of your system on page 60). RECEIVER Switches the remote to control the receiver (used to select the features such as SLEEP , MCACC SETUP ,[…]
-
Page 33: Pioneer VSX-D812
Controls and displays 05 33 En English Italiano Français Nederlands Español Deutsch FL DIMMER Dims or brightens the display. 4 MASTER VOLUME +/– Use to set the listening volume. 5 Receiver and component control buttons (Press the corresponding MULTI CONTROL button first to access). These controls function according to the component you’ve sel[…]
-
Page 34: Pioneer VSX-D812
Controls and displays 05 34 En D.ACCESS After pressing, you can access a radio station directly using the number buttons (page 52). 8 Number buttons Use the number buttons to directly select a radio frequency (page 52) or the tracks on a CD, DVD, etc. 9 CHANNEL +/– Use to select channels when using a VCR, DVR, etc. 10 INPUT SELECT Use to select t[…]
-
Page 35: Pioneer VSX-D812
Playing sources 06 35 En English Italiano Français Nederlands Español Deutsch Chapter 6: Playing sources Introduction to Sound Modes There are three basic sound options: Stereo/ Direct ( STEREO/DIRECT ), Standard ( STAN- DARD ) or Advanced Surround ( ADVANCED SURROUND ). Stereo/Direct When you select STEREO or DIRECT , you will hear the source th[…]
-
Page 36: Pioneer VSX-D812
Playing sources 06 36 En Neo:6 Music (MUSIC) This mode gives 6.1 channel surround sound and is suitable for music. The Neo:6 Music mode plays the stereo source as is through the front left/right speakers, and generates a natural, ambient surround and center sound. Advanced Surround modes These are designed to be used with multi- channel surround so[…]
-
Page 37: Pioneer VSX-D812
Playing sources 06 37 En English Italiano Français Nederlands Español Deutsch • Press SIGNAL SELECT (front panel) to select the input signal corresponding to the source component. Each press cycles through the options as follows: The AUTO setting automatically switches to DIGITAL if a digital source is detected, other- wise the signal select wi[…]
-
Page 38: Pioneer VSX-D812
Playing sources 06 38 En 5 Start playback of the component you selected in step 1. • You can’t use the STANDARD mode with 96kHz PCM or DTS 96kHz/24-bit stereo sources. Using Stereo/Direct When you select STEREO or DIRECT , you will hear the source through just the front left and right speakers (and possibly your subwoofer depending on your spea[…]
-
Page 39: Pioneer VSX-D812
Playing sources 06 39 En English Italiano Français Nederlands Español Deutsch Using the Surround Back Channel (SB CH) • Default setting: SB ON (VSX-D812/D912), SB OFF (VSX-D712) You can have the receiver automatically switch to Dolby Digital EX or DTS-ES decoding for 6.1 encoded sources ( SB AUTO ), or you can choose to listen to other kinds of[…]
-
Page 40: Pioneer VSX-D812
Playing sources 06 40 En Using the Virtual Surround Back mode (VSB) Selecting this mode allows you to hear a virtual back channel through your surround speakers. For example, you can choose to listen to sources with no surround back channel information (for example, 5.1 encoded material) with emulated 6.1 encoding ( VSB ON ). Sometimes the material[…]
-
Page 41: Pioneer VSX-D812
Playing sources 06 41 En English Italiano Français Nederlands Español Deutsch Using Midnight and Loudness listening The Midnight listening feature allows you to hear effective surround sound of movies at low volume levels. The effect automatically adjusts according to the volume at which you’re listening. The Loudness listening feature can be u[…]
-
Page 42: Pioneer VSX-D812
Playing sources 06 42 En 4 Start playback of the component you selected in step 1. Selecting the multi-channel analog inputs If you have connected a decoder or a DVD player with multi-channel analog outputs to this receiver (page 19), you must select the analog multi-channel inputs for surround sound playback. 1 Press DVD/LD. 2 Press SIGNAL SELECT […]
-
Page 43: Pioneer VSX-D812
Setting up 07 43 En English Italiano Français Nederlands Español Deutsch Chapter 7: Setting up Choosing your receiver setup To ensure the best possible surround sound, be sure to complete the following set up operations. This is particularly important when using DTS and Dolby surround. You only need to make these settings once (unless you change […]
-
Page 44: Pioneer VSX-D812
Setting up 07 44 En Surround back speaker distance setting (page 47) Specifies the distance from your listening position to your surround back speakers. Surround left speaker distance setting (page 47) Specify the distance from your listening position to your surround left speaker. Subwoofer distance setting (page 47) Specify the distance from your[…]
-
Page 45: Pioneer VSX-D812
Setting up 07 45 En English Italiano Français Nederlands Español Deutsch One of the following configurations should match your setup: Surround back speaker setting • Default setting: S (VSX-D812/D912), (VSX-D712) You must let the receiver know if surround back speaker(s) have been connected, and how big they are. The size you choose (large or s[…]
-
Page 46: Pioneer VSX-D812
Setting up 07 46 En We recommend setting this to 200Hz if your S speakers are smaller bookshelf-type speakers. • Use or to specify the crossover frequency for your small speakers (100 Hz, 150 Hz or 200 Hz). 100Hz Sends bass frequencies below 100 Hz to the subwoofer (or L speakers). 150Hz Sends bass frequencies below 150 Hz to the subwoofe[…]
-
Page 47: Pioneer VSX-D812
Setting up 07 47 En English Italiano Français Nederlands Español Deutsch • Use or to set the distance of the center speaker from the main listening position (within the range of 0.1 m to 9.0 m). • When C is selected in the speaker setting, the center speaker distance can’t be set. Front right speaker distance setting • Default set[…]
-
Page 48: Pioneer VSX-D812
Setting up 07 48 En • Use or to set the distance of the subwoofer from the main listening posi- tion (within the range of 0.1 m to 9.0 m). • When SW NO is selected in the subwoofer setting, the subwoofer distance can’t be set. Dynamic range control setting • Default setting: OFF Dynamic range is the difference between the loudest an[…]
-
Page 49: Pioneer VSX-D812
Setting up 07 49 En English Italiano Français Nederlands Español Deutsch Coaxial digital 1: • Default settings: DVD • Use or to assign the coaxial digital 1 input (DVD, TV, CD, CDR, VCR or OFF). Coaxial digital 2: • Default setting: CD • Use or to assign the coaxial digital 2 input (DVD, TV, CD, CDR, VCR or OFF). Optical d[…]
-
Page 50: Pioneer VSX-D812
Setting up 07 50 En 1 Press RECEIVER. 2 Press MCACC SETUP. The MCACC system uses the left front speaker as a reference point to calibrate the speaker level and channel delay. The front left speaker tone and the target speaker (the one that you’re trying to adjust) tone will sound in turns, so you can judge which needs to be louder. 3 Use and […]
-
Page 51: Pioneer VSX-D812
Setting up 07 51 En English Italiano Français Nederlands Español Deutsch Setting separate channel levels for listening modes • Default setting: 0 dB In addition to the MCACC setup, you can also set relative channel levels from the listening position using the method below. Using CH SELECT (see tip below), it is also possible to set separate cha[…]
-
Page 52: Pioneer VSX-D812
Using the tuner 08 52 En Chapter 8: Using the tuner Listening to the radio The following steps show you how to tune in to FM and AM radio broadcasts using the automatic (search) and manual (step) tuning functions. If you already know the frequency of the station you want, see Tuning directly to a station below. Once you are tuned to a station you c[…]
-
Page 53: Pioneer VSX-D812
Using the tuner 08 53 En English Italiano Français Nederlands Español Deutsch 1 Press the TUNER button to select the tuner. 2 Use the BAND button to change the band (FM or AM), if necessary. Each press switches the band between FM and AM. 3 Press D.ACCESS (Direct Access). 4 Use the number buttons to enter the frequency of the radio station. For e[…]
-
Page 54: Pioneer VSX-D812
Using the tuner 08 54 En 2 Press T.EDIT (TUNER EDIT). The display shows ST. MEMORY , then a blinking memory class. 3 Press CLASS to select one of the three classes then press ST +/– (STATION +/–) to select the station preset you want. You can also use the the MULTI JOG dial (front panel) to select a station preset. 4 Press ENTER. After pressing[…]
-
Page 55: Pioneer VSX-D812
Using the tuner 08 55 En English Italiano Français Nederlands Español Deutsch Listening to station presets You will need to have some presets stored to do this. See Saving station presets on page 53 if you haven’t done this already. 1 Press TUNER to select the tuner. 2 Press CLASS to select the class in which the station is stored. Press repeat[…]
-
Page 56: Pioneer VSX-D812
Using the tuner 08 56 En PHONE IN – Public expressing their views by phone TRAVEL – Holiday-type travel rather than traffic announcements LEISURE – Leisure interests and hobbies JAZZ – Jazz COUNTRY – Country music NATION M – Popular music in a language other than English OLDIES – Popular music from the ’50s and ’60s FOLK M – Fol[…]
-
Page 57: Pioneer VSX-D812
Using the tuner 08 57 En English Italiano Français Nederlands Español Deutsch 1 Press the BAND button to select the FM band. RDS is only possible in the FM band. 2 Press the PTY SEARCH button. SEARCH shows in the display. 3 Use the MULTI JOG dial to select the program type you want to hear. 4 Press ENTER to search for the program type. The system[…]
-
Page 58: Pioneer VSX-D812
Using the tuner 08 58 En Clearing all stations from the RDS and EON searches The receiver will automatically register an identifying marker (called a PI code) for any station you input into the memory classes which can receive RDS or EON data. If you want to remove the currently memorized stations from RDS and EON searches, you can do it by erasing[…]
-
Page 59: Pioneer VSX-D812
Making recordings 09 59 En English Italiano Français Nederlands Español Deutsch Chapter 9: Making recordings Making an audio or a video recording You can make an audio or a video recording from the built-in tuner, or from an audio or video source connected to the receiver (such as a CD player or TV). Keep in mind you can’t make a digital record[…]
-
Page 60: Pioneer VSX-D812
Controlling the rest of your system 10 60 En Chapter 10: Controlling the rest of your system Setting the remote to control other components There are several ways to set your remote to control the other components in your system. The easiest way to do this is to assign the component’s manufacturer preset code (starting on page 67) to one of the M[…]
-
Page 61: Pioneer VSX-D812
Controlling the rest of your system 10 61 En English Italiano Français Nederlands Español Deutsch 3 Use the number buttons to enter the preset code. You can find the preset codes on page 67 (VSX-D712) and page 68 (VSX-D812/912). The LED blinks again after you enter the code. If the correct code has been input the power of the component being inpu[…]
-
Page 62: Pioneer VSX-D812
Controlling the rest of your system 10 62 En 6 When you’re done, press RECEIVER to store the operation(s). • Some commands from other remote controls cannot be learned, but in most cases the remotes just need to be moved closer together or farther apart. • Certain buttons represent operations that cannot be learned from other remote controls.[…]
-
Page 63: Pioneer VSX-D812
Controlling the rest of your system 10 63 En English Italiano Français Nederlands Español Deutsch Controls for TVs This remote control can control components after entering the proper codes or teaching the receiver the commands (see Setting the remote to control other components on page 60 for more on this). Use the MULTI CONTROL buttons to selec[…]
-
Page 64: Pioneer VSX-D812
Controlling the rest of your system 10 64 En • The four TV CONTROL buttons on the remote control are dedicated to control the TV assigned to the TV CONT button. Thus if you only have one TV to hook up to this system assign it to the TV CONT MULTI CONTROL button. If you have two TVs, assign the main TV to the TV CONT button. Controls for other com[…]
-
Page 65: Pioneer VSX-D812
Controlling the rest of your system 10 65 En English Italiano Français Nederlands Español Deutsch P ause playback or recording. CD/MD/CD-R/VCR/DVD/LD/ DVR player/Cassette deck Start playback. CD/MD/CD-R/VCR/DVD/LD/ DVR player/Cassette deck Hold down for fast forward playback. CD/MD/CD-R/VCR/DVD/LD/ DVR player/Cassette deck Hold do[…]
-
Page 66: Pioneer VSX-D812
Controlling the rest of your system 10 66 En TOP MENU Displays the disc ‘top’ menu of a DVD. DVD/DVR Player AUDIO Changes the audio language or channel. DVD/DVR Player GUIDE Displays/changes the subtitles on multilingual DVDs. DVD/DVR Player Button (s) Function Components VSX_712_812_912.book 66 ページ 2003年2月6日 木曜日[…]
-
Page 67: Pioneer VSX-D812
Controlling the rest of your system 10 67 En English Italiano Français Nederlands Español Deutsch Preset Code List (VSX-D712 only) You should have no problem controlling a component if you find the manufacturer in this list, but please note that there are cases where codes for the manufacturer in the list will not work for the model that you are […]
-
Page 68: Pioneer VSX-D812
Controlling the rest of your system 10 68 En Preset Code List (VSX-D812/D912) You should have no problem controlling a component if you find the manufacturer in this list, but please note that there are cases where codes for the manufacturer in the list will not work for the model that you are using. There are also cases where only certain function[…]
-
Page 69: Pioneer VSX-D812
Controlling the rest of your system 10 69 En English Italiano Français Nederlands Español Deutsch JC PENNY 3064, 3065, 3066, 3067, 3068, 3069 JVC 3070, 3071, 3072 KENDO 3073 KENWOOD 3074, 3075, 3076 LOEWE 3077, 3078 LUXOR 3079 LXI 3080, 3081, 3082, 3083, 3084, 3085 , 3086 MARANTZ 3087, 3088 MARTA 3089 MATSUI 3090 MEMOREX 3091, 3092 MINOLTA 3093, […]
-
Page 70: Pioneer VSX-D812
Additional information 11 70 En Chapter 11: Additional information Troubleshooting Incorrect operations are often mistaken for trouble and malfunctions. If you think that there is something wrong with this component, check the points below. Sometimes the trouble may lie in another component. Investigate the other components and electrical appliance[…]
-
Page 71: Pioneer VSX-D812
Additional information 11 71 En English Italiano Français Nederlands Español Deutsch Broadcast stations cannot be selected automatically . • Connect an outdoor antenna (refer to page 21). No sound from surround or center speakers. • Refer to Speaker setting on page 44 to check the speaker settings. • Refer to Manually calibrating your liste[…]
-
Page 72: Pioneer VSX-D812
Additional information 11 72 En • If the unit does not operate normally due to external effects such as static electricity disconnect the power plug from the outlet and insert again to return to normal operating conditions. Resetting the main unit Use this procedure to reset all the receiver’s settings to the factory default. Use the front pane[…]
-
Page 73: Pioneer VSX-D812
Additional information 11 73 En English Italiano Français Nederlands Español Deutsch Specifications Amplifier section Continuous power output (stereo) These specifications are applicable when the power supply is 230 V. Front . . . . . . . . . . . . . . . . . . . 100 W per channel (DIN 1kHz, THD 1 %, 8 Ω ) Continuous power output (surround) Thes[…]
-
Page 74: Pioneer VSX-D812
Additional information 11 74 En Miscellaneous Power Requirements . . . AC 220-230 V, 50/60Hz Power Consumption VSX-D712 . . . . . . . . . . . . . . . . . . . . . . . . 250 W VSX-D812/D912 . . . . . . . . . . . . . . . . . . . 280 W In standby . . . . . . . . . . . . . . . . . . . . . . . . 0.5 W Dimensions . . . 420 (W) x 158 (H) x 401 (D) mm Weigh[…]
-
Page 75: Pioneer VSX-D812
Additional information 11 75 En English Italiano Français Nederlands Español Deutsch VSX_712_812_912.book 75 ページ 2003年2月6日 木曜日 午前10時51分[…]
-
Page 76: Pioneer VSX-D812
AVVERTENZA: QUESTO APPARECCCHIO NON E’ IMPERMEABILE. NON SISTEMARE VICINO AD ESSO NESSUN OGGETTO CONTENENTE ACQUA, COME VASI, CONTENITORI DI PRODOTTI DI BELLEZZA O FLACONI DI MEDICINALI. H001A It AVVERTENZA: PRIMA DI COLLEGARE L’UNITÀ PER LA PRIMA VOLTA, LEGGERE LA SEZIONE SEGUENTE CON ATTENZIONE. IL VOLTAGGIO PER L’ALIMENTAZIONE È DIVERSO […]
-
Page 77: Pioneer VSX-D812
English Italiano Français Nederlands Español Deutsch Grazie per aver acquistato questo prodotto Pioneer. Leggere attentamente questo manuale di istruzioni per familiarizzarsi con l’uso dell’apparec- chio. Conservare poi il manuale per ogni eventuale futuro riferimento. 01 Informazioni preliminari Controllo degli accessori in dotazione . . . .[…]
-
Page 78: Pioneer VSX-D812
Impostazione della distanza del diffusore anteriore destro . . . . . . . . . . . . 47 Impostazione della distanza del diffusore surround destro . . . . . . . . . . . 47 Impostazione della distanza di un diffusore surround posteriore . . . . . . . . 47 Impostazione della distanza del diffusore surround sinistro . . . . . . . . . . . 47 Impostazione […]
-
Page 79: Pioneer VSX-D812
Informazioni preliminari 01 5 It English Italiano Français Nederlands Español Deutsch Capitolo 1: Informazioni preliminari Controllo degli accessori in dotazione Si prega di controllare di aver ricevuto i seguenti accessori in dotazione: • Antenna AM a telaio • Antenna FM a filo • Pile a secco (Formato AA/IEC R6) x 2 • Telecomando • Mic[…]
-
Page 80: Pioneer VSX-D812
Informazioni preliminari 01 6 It L’utilizzo errato delle pile può avere conseguenze pericolose come perdita di liquido ed esplosione. Osservare le seguenti precauzioni: • Non utilizzare mai una batteria nuova ed una vecchia allo stesso tempo. • Inserire le pile con il polo positivo ed il negativo orientati come indicato dai segni all’inter[…]
-
Page 81: Pioneer VSX-D812
Guida in 5 minuti 02 7 It English Français Nederlands Español Deutsch Italiano Capitolo 2: Guida in 5 minuti Introduzione al teatro casalingo Se l’utilizzo di un apparato stereo per l’ascolto della musica è probabilmente un’abitudine quotidiana, ancora non si è familiarizzato con i sistemi di teatro casalingo che offrono un maggior numero[…]
-
Page 82: Pioneer VSX-D812
Guida in 5 minuti 02 8 It Per ascoltare il suono surround Il presente ricevitore è stato fabbricato utilizzando le impostazioni più semplici in modo da poter effettuare il collegamento in breve tempo, grazie anche alla seguente guida per la configurazione rapida. Nella maggior parte dei casi è possibile utilizzare il ricevitore con le impostazio[…]
-
Page 83: Pioneer VSX-D812
Guida in 5 minuti 02 9 It English Français Nederlands Español Deutsch Italiano 3 Collegare i diffusori. Viene qui illustrata una serie completa di diffusori (sei diffusori per il VSX-D712 e otto per il VSX- D812/D912) in ogni caso, la configurazione varia da casa a casa. Basta collegare i diffusori nella maniera descritta qui in seguito. Il ricev[…]
-
Page 84: Pioneer VSX-D812
Guida in 5 minuti 02 10 It Solo per VSX-D812/D912 • Per utilizzare il diffusore sul televisore come diffusore centrale ( C ), collegare la presa jack CENTER PREOUT del presente apparecchio alla presa jack di ingresso audio del televisore. In questo caso il diffusore centrale illustrato non è necessario. • Se si sta utilizzando un unico diffuso[…]
-
Page 85: Pioneer VSX-D812
Guida in 5 minuti 02 11 It English Français Nederlands Español Deutsch Italiano 4 Collegare e accendere successivamente il ricevitore, il lettore DVD, il subwoofer ed il televisore. Assicurarsi di aver impostato l’entrata video sul televisore al presente ricevitore. Nel caso in cui si verifichino delle difficoltà, controllare il manuale fornit[…]
-
Page 86: Pioneer VSX-D812
Guida in 5 minuti 02 12 It Per utilizzare la configurazione rapida È possibile utilizzare la configurazione rapida per mettere in funzionamento l’apparecchio premendo un paio di volte il tasto. Il ricevitore effettua automaticamente le impostazioni ne- cessarie dopo aver selezionato l’impostazione dei diffusori, la dimensione dell’ambi[…]
-
Page 87: Pioneer VSX-D812
Guida in 5 minuti 02 13 It English Français Nederlands Español Deutsch Italiano 4 Premere ENTER. 5 Utilizzare il selettore MULTI JOG per scegliere le dimensioni dell’ambiente. In base alla distanza dei diffusori dalla posizione di ascolto, scegliere tra Piccolo, Medio o Grande ( S , M o L ), dove M corrisponde ad un ambiente di dimensioni medie[…]
-
Page 88: Pioneer VSX-D812
Impostazione rapida del suono surround 03 14 It Capitolo 3: Impostazione rapida del suono surround Solo per VSX-D912 Regolazione automatica dell’area di ascolto (MCACC) Il sistema di regolazione acustica multicanale (Multi-Channel Acoustic Calibration) (MCACC) misura le caratteristiche audio dell’area d’ascolto, tenendo in consideraz[…]
-
Page 89: Pioneer VSX-D812
Impostazione rapida del suono surround 03 15 It English Italiano Français Nederlands Español Deutsch Disattivare l’alimentazione e verificare il problema indicato dal messaggio ERR (vedi di seguito), quindi riprovare ad eseguire l’impostazione automatica del suono surround. • ERR MIC – Verificare il collegamento del microfono. • E[…]
-
Page 90: Pioneer VSX-D812
Collegamento 04 16 It Capitolo 4: Collegamento • Prima di effettuare o modificare i collegamenti, spegnere l’apparecchio o scollegare il cavo di alimentazione dalla presa a muro di corrente alternata (CA). Cavi audio/video Utilizzare cavi audio/video (non forniti in dotazione) per collegare i componenti audio/ video e un cavo video per collegar[…]
-
Page 91: Pioneer VSX-D812
Collegamento 04 17 It English Français Nederlands Español Deutsch Italiano Collegamento di componenti digitali La maniera più semplice di collegare il presente ricevitore per ottenere un suono surround è di utilizzare una entrata digitale. Questo collegamento può venire effettuato mediante una connessione coassiale o ottica (non è necessario […]
-
Page 92: Pioneer VSX-D812
Collegamento 04 18 It • Se si possiede un lettore LD, è necessario eseguire dei collegamenti speciali per garantire la riproduzione di LD formattati 2 RF sull’apparecchio. In questo caso, collegare direttamente il lettore DVD o LD ad un demodulatore RF utilizzando una uscita 2 RF ed un collegamento digitale coassiale oppure ottico. Si consigli[…]
-
Page 93: Pioneer VSX-D812
Collegamento 04 19 It English Français Nederlands Español Deutsch Italiano Collegamento di componenti per un DVD a multicanali Se si preferisce utilizzare un componente separato per decodificare DVD, è possibile collegare un decodificatore o un lettore DVD con uscite analogiche multicanali alle entrate multicanali. Quando si collega l’apparecc[…]
-
Page 94: Pioneer VSX-D812
Collegamento 04 20 It Collegamento di componenti video Collegare i componenti video alle prese come mostrato in seguito. Per quanto riguarda i componenti video (come un lettore DVD), utilizzare i collegamenti illustrati nella presente pagina per il segnale video, ma per poter utilizzare una fonte digitale (come un DVD) si deve collegare l’audio a[…]
-
Page 95: Pioneer VSX-D812
Collegamento 04 21 It English Français Nederlands Español Deutsch Italiano Collegamento delle antenne Collegare l’antenna AM a telaio e l’antenna FM a filo come illustrato nella pagina successiva. Per migliorare la ricezione e la qualità del suono, collegare delle antenne esterne (vedere Utilizzo di antenne esterne qui di seguito) . Assicura[…]
-
Page 96: Pioneer VSX-D812
Collegamento 04 22 It Collegamento dei diffusori (VSX-D712) Viene qui di seguito illustrata una serie completa di sei diffusori (subwoofer incluso), ma la configurazione varia da casa a casa. Basta collegare i diffusori nella maniera descritta qui in seguito. Il ricevitore potrà funzionare anche solo con due diffusori stereo (i diffusori anteriori[…]
-
Page 97: Pioneer VSX-D812
Collegamento 04 23 It English Français Nederlands Español Deutsch Italiano Collegamento dei diffusori (VSX-D812/D912) Viene qui di seguito illustrata una serie completa di otto diffusori (subwoofer incluso), ma la configurazione varia da casa a casa. Basta collegare i diffusori nella maniera descritta qui in seguito. Il ricevitore potrà funziona[…]
-
Page 98: Pioneer VSX-D812
Collegamento 04 24 It • Quando si utilizza un diffusore sul televisore come il diffusore centrale ( C ), collegare la presa CENTER PREOUT del presente apparecchio alla presa di entrata audio del televisore. In questo caso il diffusore centrale illustrato non è necessario. • Se si sta utilizzando un unico diffusore sur- round posteriore, colleg[…]
-
Page 99: Pioneer VSX-D812
Collegamento 04 25 It English Français Nederlands Español Deutsch Italiano non si dispone di diffusori schermati magneticamente e si notano distorsioni nel colore dell’immagine televisiva, allontanare i diffusori dal televisore. • Sistemare il diffusore centrale sopra o sotto il televisore in modo che il suono del canale centrale sia localizz[…]
-
Page 100: Pioneer VSX-D812
Collegamento 04 26 It Collegamento di amplificatori supplementari Il presente ricevitore ha una potenza più che sufficiente per qualsiasi uso domestico, tuttavia è possibile aggiungere amplificatori supplementari a ciascun canale sul VSX-D812/D912 o il canale surround back del VSX-D712. Eseguire i collegamenti illustrati qui di seguito per aggiun[…]
-
Page 101: Pioneer VSX-D812
Collegamento 04 27 It English Français Nederlands Español Deutsch Italiano • Per sentire l’audio solo dalle uscite preamplificate, scollegare tutti i diffusori direttamente collegati al diffusore. • Se non si utilizza un subwoofer, cambiare l’impostazione dei diffusori anteriori (vedere Impostazione dei diffusori a pagina 44) su “large?[…]
-
Page 102: Pioneer VSX-D812
Comandi e display 05 28 It Capitolo 5: Comandi e display Pannello anteriore 1 STANDBY/ON Scorre tra il modo di accensione e quello di attesa del ricevitore. 2 Tasti per la selezione dell’ingresso Premere per selezionare una fonte d’ingresso. 3 Indicatore STANDBY Si illumina quando il ricevitore si trova in modo di attesa. 4 Sensore remot[…]
-
Page 103: Pioneer VSX-D812
Comandi e display 05 29 It English Italiano Français Nederlands Español Deutsch 9 Tasti STATION +/– Seleziona le stazioni preselezionate quando si utilizza il sintonizzatore (pagina 55). 10 Tasti TUNING +/– Seleziona la frequenza quando si utilizza il sintonizzatore (pagina 52). 11 Tasti LISTENING MODE STANDARD Premere per effettuare la decod[…]
-
Page 104: Pioneer VSX-D812
Comandi e display 05 30 It Display 1 Indicatori SIGNAL SELECT Si illuminano per indicare il tipo di segnale in entrata assegnato per il corrente componente: AUTO Si illumina quando la selezione del segnale AUTO è attivata. SB A seconda della fonte, si illumina quando viene ravvisato un segnale con il canale surround posteriore decodificato. DIGITA[…]
-
Page 105: Pioneer VSX-D812
Comandi e display 05 31 It English Italiano Français Nederlands Español Deutsch 9 SLEEP Si illumina quando il ricevitore è in modalità autospegnimento. 10 RF ATT Si illumina quando è attivo l’attenuatore RF (vedere pagina 52). 11 Indicatore dei diffusori Mostra il sistema dei diffusori attualmente in uso. 12 EON Una volta impostato il mod[…]
-
Page 106: Pioneer VSX-D812
Comandi e display 05 32 It Telecomando 1 RECEIVER Scorre tra il modo di accensione e quello di attesa del ricevitore. 2 Tasti MULTI CONTROL Premere per selezionare il controllo di altri componenti (vedere Controllo del resto del sistema a pagina 60). RECEIVER Attiva il telecomando per azionare il ricevitore (utilizzato per selezionare funzioni […]
-
Page 107: Pioneer VSX-D812
Comandi e display 05 33 It English Italiano Français Nederlands Español Deutsch EFFECT +/– Aggiunge o sottrae la quantità di effetti con diversi modi di ascolto avanzato (pagina 38). FL DIMMER Rende più oscuro o più chiaro il display. 4 MASTER VOLUME +/– Utilizzare per impostare il volume di ascolto. 5 Tasti del ricevitore e di controllo c[…]
-
Page 108: Pioneer VSX-D812
Comandi e display 05 34 It RF ATT Utilizzare per abbassare il livello di entrata di un segnale radio troppo potente o che presenta interferenze che causano quindi distorsioni del ricevitore (pagina 52). DISPLAY Per commutare il display tra nome predefinito della stazione, frequenza e dati RDS durante l’utilizzo del sintonizzatore. CLASS Scorre i […]
-
Page 109: Pioneer VSX-D812
Riproduzione delle fonti 06 35 It English Italiano Français Nederlands Español Deutsch Capitolo 6: Riproduzione delle fonti Introduzione ai modi audio Esistono tre opzioni sonore basiche: Stereo/ Diretto ( STEREO /DIRECT ), Standard ( STAN- DARD ) o Advanced Surround ( ADVANCED SURROUND ). Stereo/Diretto Se si seleziona STEREO o DIRECT , si perce[…]
-
Page 110: Pioneer VSX-D812
Riproduzione delle fonti 06 36 It Neo:6 Cinema (CINEMA) Il presente modo offre un suono surround a 6.1 canali ed è idoneo per film. Il modo Neo:6 Cinema offre una buona separazione dei canali per le colonne sonore dei film. Neo:6 Music (MUSIC) Il presente modo offre un suono surround a 6.1 canali ed è idoneo per la musica. Il modo Neo:6 Music rip[…]
-
Page 111: Pioneer VSX-D812
Riproduzione delle fonti 06 37 It English Italiano Français Nederlands Español Deutsch Scelta del segnale di entrata • Impostazione implicita: AUTO È necessario collegare un componente alle entrate analogiche e digitali sulla parte poste- riore del ricevitore per selezionare tra i segnali di entrata. • Premere SIGNAL SELECT (pannello anterio[…]
-
Page 112: Pioneer VSX-D812
Riproduzione delle fonti 06 38 It 4 Premere STANDARD. Se la fonte è decodificata con Dolby Digital, DTS o Dolby Surround, il corretto formato di decodificazione verrà selezionato automatica- mente e mostrato sul display. Se si ascolta una fonte a due canali, ad ogni pressione si modifica il display come segue: Rimettersi alla pagina 35 per ulteri[…]
-
Page 113: Pioneer VSX-D812
Riproduzione delle fonti 06 39 It English Italiano Français Nederlands Español Deutsch Utilizzo del canale surround posteriore (Surround Back Channel) (SB CH) • Impostazione implicita: SB ON (VSX- D812/D912), SB OFF (VSX-D712) É possibile fare in modo che il ricevitore commuti automaticamente sulla decodifica Dolby Digital EX o DTS-ES per le f[…]
-
Page 114: Pioneer VSX-D812
Riproduzione delle fonti 06 40 It Utilizzo della modalità virtuale surround posteriore (Virtual Surround Back) (VSB) Selezionando questa modalità, è possibile ascoltare un canale virtuale posteriore attra- verso i diffusori surround. Ad esempio, è possibile scegliere di ascoltare fonti sprov- viste di informazioni sui canali surround posteriori[…]
-
Page 115: Pioneer VSX-D812
Riproduzione delle fonti 06 41 It English Italiano Français Nederlands Español Deutsch Utilizzo del modo di ascolto Midnight e Loudness La proprietà di ascolto Midnight consente di ascoltare l’audio surround effettivo dei film a bassi livelli di volume. L’effetto si regola auto- maticamente secondo il volume al quale si sta ascoltando. La pr[…]
-
Page 116: Pioneer VSX-D812
Riproduzione delle fonti 06 42 It 4 Avviare la riproduzione del compo- nente nel passo 1. Selezione delle entrate analogiche multicanali Se si è collegato un decodificatore o un lettore DVD con uscite analogiche multica- nali al presente ricevitore (pagina 19), è necessario selezionare le entrate analogiche multicanali per la riproduzione del suo[…]
-
Page 117: Pioneer VSX-D812
Configurazione 07 43 It English Italiano Français Nederlands Español Deutsch Capitolo 7: Configurazione Scelta di configurazione per il ricevitore Assicurarsi di completare le seguenti operazioni di configurazione per garantire il miglior suono surround possibile. Questo è di particolare importanza se si utilizza il DTS e il Dolby Surround. È n[…]
-
Page 118: Pioneer VSX-D812
Configurazione 07 44 It Impostazione della distanza di un diffusore surround posteriore (pagina 47) Determinare la distanza tra la posizione di ascolto e i diffusori surround posteriori. Impostazione della distanza del diffusore surround sinistro (pagina 47) Specificare la distanza tra la posizione di ascolto e il diffusore surround sinistro. Impos[…]
-
Page 119: Pioneer VSX-D812
Configurazione 07 45 It English Italiano Français Nederlands Español Deutsch Una delle seguenti configurazioni dovrebbe corrispondere con la propria: Impostazione di un diffusore surround posteriore • Impostazione implicita: S (VSX-D812/ D912), (VSX-D712) È necessario informare il ricevitore del colle- gamento dei diffusori surround posteriori[…]
-
Page 120: Pioneer VSX-D812
Configurazione 07 46 It Si consiglia di impostarlo a 200Hz se i diffu- sori S hanno dimensioni inferiori a quelle per scaffali. • Usare o per specificare la frequenza di crossover dei diffusori piccoli (100 Hz, 150 Hz o 200 Hz). 100Hz Inviare le frequenze dei bassi inferiori ai 100 Hz al subwoofer (o ai diffusori L ). 150Hz Inviare le fre[…]
-
Page 121: Pioneer VSX-D812
Configurazione 07 47 It English Italiano Français Nederlands Español Deutsch • Se si è selezionato C nell’impostazione dei diffusori, non è possibile impostare la distanza centrale. Impostazione della distanza del diffusore anteriore destro • Impostazione implicita: 2 m Impostare la distanza tra il diffusore anteriori destro e la posizion[…]
-
Page 122: Pioneer VSX-D812
Configurazione 07 48 It • Qualora, nell’ambito delle impostazioni del subwoofer, è selezionato SW NO , l’impostazione del subwoofer non potrà essere regolata. Impostazione del controllo della gamma dinamica • Impostazione implicita: OFF La gamma dinamica è la differenza tra i suoni più alti e i più bassi di ciascun segnale dato. […]
-
Page 123: Pioneer VSX-D812
Configurazione 07 49 It English Italiano Français Nederlands Español Deutsch Digitale coassiale 1: • Impostazione implicita: DVD • Utilizzare o per assegnare l’entrata digitale coassiale 1 (DVD, TV, CD, CDR, VCR o OFF). Digitale coassiale 2: • Impostazione implicita: CD • Utilizzare o per assegnare l’entrata digitale c[…]
-
Page 124: Pioneer VSX-D812
Configurazione 07 50 It 1 Premere RECEIVER. 2 Premere MCACC SETUP. Il sistema MCACC utilizza il diffusore ante- riore sinistro come punto di riferimento per regolare il livello del diffusore e il tempo del canale. Il tono del diffusore anteriore sinistro e del diffusore di destinazione (quello che si sta regolando) suoneranno in sequenza, in modo t[…]
-
Page 125: Pioneer VSX-D812
Configurazione 07 51 It English Italiano Français Nederlands Español Deutsch Impostazione dei livelli separati dei canali per le modalità d’ascolto • Impostazione implicita: 0 dB Oltre all’impostazione MCACC, è possibile impostare i relativi livelli dei canali dalla posi- zione d’ascolto, utilizzando il metodo qui di seguito in[…]
-
Page 126: Pioneer VSX-D812
Utilizzo del sintonizzatore 08 52 It Capitolo 8: Utilizzo del sintonizzatore Per ascoltare la radio La procedura seguente mostra come sintoniz- zarsi sulle trasmissioni FM e AM utilizzando le funzioni di sintonizzazione automatica (ricerca) e manuale (graduale). Se si conosce di già la frequenza della stazione desiderata, vedere il paragrafo Sinto[…]
-
Page 127: Pioneer VSX-D812
Utilizzo del sintonizzatore 08 53 It English Italiano Français Nederlands Español Deutsch Sintonizzare direttamente su una stazione A volte si conosce già la frequenza della stazione che si desidera ascoltare. In questo caso si può semplicemente digitare la frequenza direttamente mediante i tasti numerici sul telecomando. 1 Premere il tasto TUN[…]
-
Page 128: Pioneer VSX-D812
Utilizzo del sintonizzatore 08 54 It 2 Premere T.EDIT (TUNER EDIT). Sul display appare ST. MEMORY , quindi lampeggia una categoria della memoria. 3 Premere CLASS per selezionare una delle tre categorie, quindi premere ST +/ – (STATION +/–) per selezionare la stazione preselezionata desiderata. È possibile inoltre utilizzare il selettore MULTI […]
-
Page 129: Pioneer VSX-D812
Utilizzo del sintonizzatore 08 55 It English Italiano Français Nederlands Español Deutsch Per ascoltare le stazioni preselezionate Per procedere in questo senso, è necessario che alcune preimpostazioni siano state memorizzate. Qualora tale operazione non sia stata effettuata, fare riferimento al paragrafo Per memorizzare le stazioni preseleziona[…]
-
Page 130: Pioneer VSX-D812
Utilizzo del sintonizzatore 08 56 It OTHER M – Musica di altro genere non appartenente alle categorie precedenti WEATHER – Bollettini meteorologici FINANCE – Report sul mercato azionario, commercio, trading, ecc. CHILDREN – Programmi per bambini SOCIAL – Programmi di interesse sociale RELIGION – Programmi a carattere religioso PHONE IN […]
-
Page 131: Pioneer VSX-D812
Utilizzo del sintonizzatore 08 57 It English Italiano Français Nederlands Español Deutsch Ricerca di programmi RDS Una delle funzioni più utili dell’RDS è la capa- cità di cercare un particolare tipo di programma radio. È possibile cercare uno qualsiasi dei tipi di programmi elencati alla pagina prece- dente. 1 Premere il tasto BAND per sel[…]
-
Page 132: Pioneer VSX-D812
Utilizzo del sintonizzatore 08 58 It Utilizzo del sistema EON 1 Premere il tasto BAND per selezionare la banda FM. É possibile attivare la modalità EON solamente nella banda FM. 2 Premere EON MODE per selezionare una delle modalità ammesse. Premere ripetutamente il pulsante per commutare tra: • TA (Bollettini sul traffico) – Questo modo fa s[…]
-
Page 133: Pioneer VSX-D812
Per eseguire una registrazione 09 59 It English Italiano Français Nederlands Español Deutsch Capitolo 9: Per eseguire una registrazione Per eseguire una registrazione audio o video È possibile eseguire una registrazione audio o video dal sintonizzatore incorporato o da una fonte audio o video collegata al ricevitore (come un lettore CD o un tele[…]
-
Page 134: Pioneer VSX-D812
Controllo del resto del sistema 10 60 It Capitolo 10: Controllo del resto del sistema Impostare il telecomando per controllare altri componenti Esistono vari modi di impostare il telecomando per controllare altri componenti dell’apparec-chio. La maniera più semplice di effettuare questa operazione è di richiamare il codice di preselezione del p[…]
-
Page 135: Pioneer VSX-D812
Controllo del resto del sistema 10 61 It English Italiano Français Nederlands Español Deutsch Qualora sia stato immesso il codice esatto, l’alimentazione del componente interessato sarà attivata o disattivata. Tale alimentazione sarà attivata o disattivata solamente qualora il componente possa essere attivato direttamente dal telecomando. […]
-
Page 136: Pioneer VSX-D812
Controllo del resto del sistema 10 62 It • Alcuni comandi di altri telecomandi non si possono programmare, ma nella maggior parte dei casi basta solo avvicinare o allontanare i telecomandi l’uno dall’altro. • Alcuni tasti rappresentano modi che non si possono programmare da altri telecomandi. Questi modi includono: RECEIVER ,il tasti MU[…]
-
Page 137: Pioneer VSX-D812
Controllo del resto del sistema 10 63 It English Italiano Français Nederlands Español Deutsch Comandi del televisore Il presente telecomando consente di controllare i componenti dopo aver digitato i codici adeguati o aver programmato i comandi del ricevitore (vedere Impostare il telecomando per controllare altri componenti a pagina 60 per ultirio[…]
-
Page 138: Pioneer VSX-D812
Controllo del resto del sistema 10 64 It •I quattro tasti TV CONTROL del telecomando sono adibiti al controllo del televisore assegnato al tasto TV CONT . Quindi, se si ha un solo televisore da collegare al presente apparecchio, assegnarlo al tasto TV CONT MULTI CONTROL . Se si hanno due televisori, assegnare il televisore principale al tasto TV […]
-
Page 139: Pioneer VSX-D812
Controllo del resto del sistema 10 65 It English Italiano Français Nederlands Español Deutsch Comandi di altri componenti Il presente telecomando consente di controllare i componenti dopo aver digitato i codici adeguati o aver programmato i comandi del ricevitore (vedere Impostare il telecomando per controllare altri componenti a pagina 60 per ul[…]
-
Page 140: Pioneer VSX-D812
Controllo del resto del sistema 10 66 It T asti numerici Accesso diretto alle tracce di una fonte di programma. CD/MD/CD -R/VCR/ lettore LD Utilizzare i tasti numerici per navigare nel display su schermo. DVD/lettore DVR T asto +10 Seleziona le tracce di numero superiore a 10 (per esempio, premere +10 , quindi 3 per selezionare la traccia 13). CD/M[…]
-
Page 141: Pioneer VSX-D812
Controllo del resto del sistema 10 67 It English Italiano Français Nederlands Español Deutsch Elenco dei codici di preselezione (solo per VSX-D712) Se il produttore è compreso in questo elenco, non dovrebbero esserci problemi per l’azionamento di un componente. Tenere tuttavia presente che in alcuni casi i codici dei produttori elencati non[…]
-
Page 142: Pioneer VSX-D812
Controllo del resto del sistema 10 68 It Elenco dei codici di preselezione (VSX-D812/D912) Se il produttore è compreso in questo elenco, non dovrebbero esserci problemi per l’azionamento di un componente. Tenere tuttavia presente che in alcuni casi i codici dei produttori elencati non funzioneranno con il modello da voi utilizzato. In altri c[…]
-
Page 143: Pioneer VSX-D812
Controllo del resto del sistema 10 69 It English Italiano Français Nederlands Español Deutsch JC PENNY 3064, 3065, 3066, 3067, 3068, 3069 JVC 3070, 3071, 3072 KENDO 3073 KENWOOD 3074, 3075, 3076 LOEWE 3077, 3078 LUXOR 3079 LXI 3080, 3081, 3082, 3083, 3084, 3085 , 3086 MARANTZ 3087, 3088 MARTA 3089 MATSUI 3090 MEMOREX 3091, 3092 MINOLTA 3093, 3094[…]
-
Page 144: Pioneer VSX-D812
Altre informazioni 11 70 It Capitolo 11: Altre informazioni Soluzione dei problemi Un funzionamento anomalo può essere spesso interpretato come un guasto o un problema di funzionamento. Se si ritiene che il presente componente non funzioni correttamente, eseguire i controlli seguendo la lista sottostante. Talvolta il problema può riguardare un al[…]
-
Page 145: Pioneer VSX-D812
Altre informazioni 11 71 It English Italiano Français Nederlands Español Deutsch Le stazioni radio non possono essere selezionate automaticamente. • Collegare un’antenna esterna (rimettersi alla pagina 21). Non viene emesso alcun suono dai diffusori surround posteriori. • P er verificare l’impostazione dei diffusori, fare riferimento a I[…]
-
Page 146: Pioneer VSX-D812
Altre informazioni 11 72 It • Se l’apparecchio non funziona normalmente per via di influenze esterne, come l’elettricità statica, staccare la spina dalla presa di corrente e reinserirla per tornare alle normali condizioni di funzionamento. Reset dell’unità principale Attenersi a questa procedura per ripristinare tutte le impostazioni d[…]
-
Page 147: Pioneer VSX-D812
Altre informazioni 11 73 It English Italiano Français Nederlands Español Deutsch Caratteristiche tecniche Sezione dell’amplificatore Uscita di potenza continua (stereo) Queste specifiche sono applicabili qualora l’alimentazione sia pari a 230 V. Anteriori . . . . . . . . . . . . . . . . . . 100 W per canale (DIN 1kHz, THD 1 %, 8 Ω ) Usci[…]
-
Page 148: Pioneer VSX-D812
Altre informazioni 11 74 It Vari Condizioni di alimentazione . . . . . . . . . . . . . . . . . . . . . CA 220-230 V, 50/60Hz Consumo VSX-D712 . . . . . . . . . . . . . . . . . . . . . . . . . 250 W VSX-D812/D912 . . . . . . . . . . . . . . . . . . . . 280 W Nel modo di attesa . . . . . . . . . . . . . . . . . . 0,5 W Dimensioni . . . . . 420 (L) x […]
-
Page 149: Pioneer VSX-D812
Altre informazioni 11 75 It English Italiano Français Nederlands Español Deutsch VSX_712_812_912.book 75 ページ 2003年2月7日 金曜日 午前12時30分[…]
-
Page 150: Pioneer VSX-D812
76 11_additional_info.fm 76 ページ 2003年2月7日 金曜日 午後3時21分[…]
-
Page 151: Pioneer VSX-D812
77 English Italiano Français Nederlands Español Deutsch 11_additional_info.fm 77 ページ 2003年2月7日 金曜日 午後3時21分[…]
-
Page 152: Pioneer VSX-D812
English Italiano Français Nederlands Español Deutsch Published by Pioneer Corporation Copyright©2003 Pioneer Corporation All rights reserved Pubblicato da Pioneer Corporation Copyright©2003 Pioneer Corporation Tutti i diritti reservati <TNGNW/03B00001> Printed in <XRE3070-A> PIONEER CORPORATION 4-1, Meguro 1-Chome, Meguro-ku, Tokyo […]
![]()
AUDIO/VIDEO MULTI-CHANNEL RECEIVER
SINTOAMPLIFICATORE AUDIO/VIDEO MULTICANALE
VSX-D712 VSX-D812 VSX-D912
Operating Instructions
Istruzioni per l’uso

K041_En
This product is for general household purposes. Any failure due to use for other than household purposes (such as long-term use for business purposes in a restaurant or use in a car or ship) and which requires repair will be charged for even during the warranty period.
Installing the Receiver
VENTILATION: When installing this unit, make sure to leave space around the unit for ventilation to improve heat radiation (at least 60 cm at top, 10 cm at rear, and 30 cm at each side). WARNING: Slot and openings in the cabinet are provided for ventilation and to ensure reliable operation of the product and to protect it from overheating, to prevent fire hazard, the openings should never be blocked and covered with items, such as newspapers, tablecloths, curtains, etc. Also do not put the apparatus on the thick carpet, bed,
|
sofa, or fabric having a thick pile. |
H040 En |
|
Operating Environment |
H045 En |
Operating environment temperature and humidity: +5°C – +35°C (+41°F – +95°F); less than 85%RH (cooling vents not blocked)
Do not install in the following locations
•Location exposed to direct sunlight or strong artificial light
•Location exposed to high humidity, or poorly ventilated location

Thank you for buying this Pioneer product.
Please read through these operating instructions so that you will know how to operate your model properly. After you have finished reading the instructions, put them in a safe place for future reference.
|
01 Before you start |
Operating other Pioneer components . . . . |
27 |
|
|
Checking what’s in the box . . . . . . . . . . . . |
5 |
05 Controls and displays |
|
|
Installing the receiver. . . . . . . . . . . . . . . . . |
5 |
||
|
Making cable connections . . . . . . . . . . . . . |
5 |
Front panel . . . . . . . . . . . . . . . . . . . . . . . . |
28 |
|
Loading the batteries . . . . . . . . . . . . . . . . . |
5 |
Display . . . . . . . . . . . . . . . . . . . . . . . . . . . |
30 |
|
Operating range of remote control unit . . . |
6 |
Remote control . . . . . . . . . . . . . . . . . . . . . |
32 |
English
02 5 minute guide
Introduction to home theater . . . . . . . . . . . 7 Listening to Surround Sound . . . . . . . . . . . 8 Using the Quick Setup . . . . . . . . . . . . . . . 12
03 Quick surround sound setup
(VSX-D912 only)
Automatically calibrating your
listening area (MCACC) . . . . . . . . . . . . . . 14
04 Connecting up
Audio/Video cords . . . . . . . . . . . . . . . . . . 16 S-video cables . . . . . . . . . . . . . . . . . . . . . 16
Digital audio coaxial cords/
Optical cables . . . . . . . . . . . . . . . . . . . . . 16
Connecting digital components . . . . . . . . 17 Connecting audio components . . . . . . . . 18 Connecting DVD multi-channel
components . . . . . . . . . . . . . . . . . . . . . . . 19
Connecting video components. . . . . . . . . 20 Connecting to the front panel
video terminal . . . . . . . . . . . . . . . . . . . . 20
Connecting antennas . . . . . . . . . . . . . . . . 21
FM wire antenna . . . . . . . . . . . . . . . . . . 21 AM loop antenna . . . . . . . . . . . . . . . . . . 21
Using external antennas . . . . . . . . . . . . 21 Connecting the speakers (VSX-D712) . . . . 22 Connecting the speakers
(VSX-D812/D912) . . . . . . . . . . . . . . . . . . . 23 Speaker terminals . . . . . . . . . . . . . . . . . 24
A and B speaker systems. . . . . . . . . . . . 24 Hints on speaker placement . . . . . . . . . 24 Connecting additional amplifiers . . . . . . . 26
Power cord caution . . . . . . . . . . . . . . . . 27
06 Playing sources
Introduction to Sound Modes . . . . . . . . . .35
Stereo/Direct. . . . . . . . . . . . . . . . . . . . . . 35 Standard mode . . . . . . . . . . . . . . . . . . . . 35
Advanced Surround modes. . . . . . . . . . .36 Choosing the input signal . . . . . . . . . . . . .36 Listening to multi-channel playback . . . . .37
Using Stereo/Direct . . . . . . . . . . . . . . . . . . 38
Using Advanced Surround . . . . . . . . . . . .38 Using the Surround Back Channel
(SB CH) . . . . . . . . . . . . . . . . . . . . . . . . . . . 39
Using the Virtual Surround Back
mode (VSB) . . . . . . . . . . . . . . . . . . . . . . . . 40
Using Midnight and Loudness listening . .41 Using the tone controls . . . . . . . . . . . . . . . 41 Playing other sources . . . . . . . . . . . . . . . . 41 Selecting the multi-channel
analog inputs . . . . . . . . . . . . . . . . . . . . . . 42
Using the sleep timer . . . . . . . . . . . . . . . . 42
07 Setting up
Choosing your receiver setup . . . . . . . . . .43
Speaker setting . . . . . . . . . . . . . . . . . . . . 44
Surround back speaker setting . . . . . . . .45
Subwoofer setting . . . . . . . . . . . . . . . . . . 45
Crossover frequency setting . . . . . . . . . .45 LFE attenuator setting . . . . . . . . . . . . . . . 46 Front left speaker distance setting . . . . .46 Center speaker distance setting . . . . . . .46 Front right speaker distance setting . . . .47 Surround right speaker distance
setting. . . . . . . . . . . . . . . . . . . . . . . . . . . 47
Surround back speaker distance
setting. . . . . . . . . . . . . . . . . . . . . . . . . . . 47
Español Nederlands Deutsch Français Italiano

Surround left speaker distance
setting . . . . . . . . . . . . . . . . . . . . . . . . . . 47
Subwoofer distance setting . . . . . . . . . . 47 Dynamic range control setting. . . . . . . . 48
Dual mono setting . . . . . . . . . . . . . . . . . 48
Surround back channel input
setting (VSX-D812/D912 only) . . . . . . . . 48 Digital input settings . . . . . . . . . . . . . . . 48
Manually calibrating your listening
area (MCACC) . . . . . . . . . . . . . . . . . . . . . 49
Setting separate channel levels for
listening modes . . . . . . . . . . . . . . . . . . . . 51
08 Using the tuner
Listening to the radio . . . . . . . . . . . . . . . . 52 Improving FM stereo sound . . . . . . . . . . 52 Using the RF attenuator. . . . . . . . . . . . . 52 Tuning directly to a station. . . . . . . . . . . 52 Saving station presets . . . . . . . . . . . . . . . 53 Naming station presets . . . . . . . . . . . . . 54 Listening to station presets . . . . . . . . . . 55 An introduction to RDS . . . . . . . . . . . . . . 55 Displaying RDS information . . . . . . . . . 56 Searching for RDS programs. . . . . . . . . 56 An introduction to EON . . . . . . . . . . . . . . 57
Using EON. . . . . . . . . . . . . . . . . . . . . . . 57
Clearing all stations from the
RDS and EON searches. . . . . . . . . . . . . 58
09 Making recordings
Making an audio or a video recording . . . 59
10 Controlling the rest of your system
Setting the remote to control other components . . . . . . . . . . . . . . . . . . . . . . . 60
Selecting preset codes directly. . . . . . . . . 60
Programming signals from other
remote controls (VSX-D812/D912 only) . . .61 Erasing all of your programmed
settings (VSX-D812/D912 only) . . . . . . . . .62 Clearing all the remote control
settings . . . . . . . . . . . . . . . . . . . . . . . . . . . 62 Direct function . . . . . . . . . . . . . . . . . . . . . 62 Controls for TVs . . . . . . . . . . . . . . . . . . . . . 63
Controls for other components . . . . . . . . .64 Preset Code List (VSX-D712 only). . . . . . . .67 Preset Code List (VSX-D812/D912 only) . . .68
11 Additional information
Troubleshooting . . . . . . . . . . . . . . . . . . . . 70
Resetting the main unit . . . . . . . . . . . . . . .72
Specifications . . . . . . . . . . . . . . . . . . . . . . 73 Amplifier section. . . . . . . . . . . . . . . . . . . 73 Video Section . . . . . . . . . . . . . . . . . . . . . 73 FM Tuner Section . . . . . . . . . . . . . . . . . . 73 AM Tuner Section . . . . . . . . . . . . . . . . . . 73 Miscellaneous. . . . . . . . . . . . . . . . . . . . . 74 Cleaning the unit. . . . . . . . . . . . . . . . . . . 74
«DTS» ,»DTS-ES Extended Surround» and «Neo:6» are trademarks of Digital Theater Systems, Inc.
Manufactured under license from Dolby Laboratories. «Dolby», «Pro Logic», «Surround EX», and the double-D symbol are trademarks of Dolby Laboratories.

Before you start
Chapter 1:
Before you start
Checking what’s in the box
Please check that you’ve received the following supplied accessories:
•AM loop antenna
•FM wire antenna
•Dry cell batteries (AA size IEC R6) x2
•Remote control
•Microphone (VSX-D912 only)
•Microphone stand (VSX-D912 only)
•These operating instructions
Installing the receiver
Please note the following points:
•Do not place objects directly on top of this unit. This prevents proper heat dispersal.
•When installing on a rack, shelf, etc., be sure to leave more than 20 cm. of space above the receiver.
Making cable connections
Make sure not to bend the cables over the top of this unit (as shown in the illustration). If this happens, the magnetic field produced by the transformers in this unit may cause a humming noise from the speakers.
Loading the batteries
01
Español Nederlands Deutsch Français Italiano English
5
En

01 Before you start
Incorrect use of batteries may result in such hazards as leakage and bursting. Observe the following precautions:
•Never use new and old batteries together.
•Insert the plus and minus sides of the batteries properly according to the marks in the battery case.
•Batteries with the same shape may have different voltages. Do not use different batteries together.
•When disposing of used batteries, please comply with governmental regulations or environmental public instruction’s rules that apply in your country or area.
Operating range of remote control unit
The remote control may not work properly if:
•There are obstacles between the remote control and the receiver’s remote sensor.
•Direct sunlight or fluorescent light is shining onto the remote sensor.
•The receiver is located near a device that is emitting infrared rays.
•The receiver is operated simultaneously with another infrared remote control unit.
30
30
7m
6
En

5 minute guide
Chapter 2:
5 minute guide
Introduction to home theater
You are probably used to using stereo equipment to listen to music, but may not be used to home theater systems that give you many more options (such as surround sound) when listening to soundtracks.
Home theater refers to the use of multiple audio tracks to create a surround sound effect, making you feel like you’re in the middle of the action or concert. The surround sound you get from a home theater system depends not only on the speakers you have set up in your room, but also on the source and the sound settings of the receiver.
DVD-Video has become the basic source material for home theater due to its size, quality, and ease of use. Depending on the DVD, you can have up to seven different audio tracks coming from one disc, all of them being sent to different speakers in your system. This is what creates a surround sound effect and gives you the feeling of ‘being there’.
This receiver will automatically decode Dolby Digital, DTS, or Dolby Surround DVD-Video discs, according to your speaker setup. In most cases, you won’t have to make changes for realistic surround sound, but other possibilities (like listening to a CD with multi-channel surround sound) are explained in Playing sources on page 35.
02
Español Nederlands Deutsch Français Italiano English
7
En
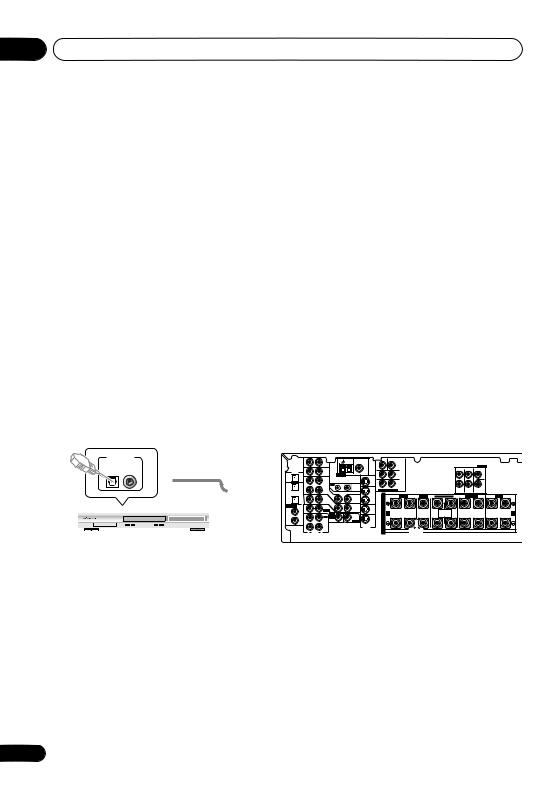
02 5 minute guide
Listening to Surround Sound
This receiver was designed with the easiest possible setup in mind, so with the following quick setup guide, you should have your system hooked up for surround sound in no time at all. In most cases, you can simply leave the receiver in the default settings.
Be sure to complete all connections before connecting this unit to the AC power source.
1 Hook up your DVD player.
For surround sound, you’ll want to hook up using a digital connection from the DVD player to the receiver. You can do this with either a coaxial, or an optical connection (you don’t need to connect both). If you hook up using an optical cable, you should refer to Digital input settings on page 48 to assign the optical input to DVD.
Use a video cord to connect the video output on your DVD player to the receiver using the jacks shown below.
2 Hook up your TV.
Use a video cord to connect your receiver to the TV using the jacks as shown below.
 Optical cable
VIDEO IN
TV
Video cord
|
DIGITAL |
|||
|
OUT |
OPT |
||
|
DIGITAL OUT |
Coaxial |
OPT |
|
|
2 |
|||
|
cable |
(CD-R/TAPE/MD) |
||
|
OPT |
|||
|
1 |
|||
|
(TV / |
|||
|
SAT) |
|||
|
ASSIGNABLE |
COAX |
||
|
DIGITAL |
2 |
||
|
IN |
(CD) |
||
|
COAX |
|||
|
1 |
|||
|
(DVD |
|||
|
/LD) |
DVD player
VIDEO OUT
S
This receiver*
|
AM |
FM UNBAL |
CEN- |
SUB WOOFER |
||||||||||||||||||||
|
TER |
|||||||||||||||||||||||
|
AUX |
LOOP |
75 Ω |
|||||||||||||||||||||
|
IN |
PREOUT |
||||||||||||||||||||||
|
DIGITAL |
L |
L |
SURROUND |
||||||||||||||||||||
|
OUT |
IN |
CD |
SURROUND |
||||||||||||||||||||
|
OPT |
ANTENNA |
MONITOR |
OUT |
R |
L |
||||||||||||||||||
|
SURROUND |
|||||||||||||||||||||||
|
OPT |
OUT |
VCR / |
OUT |
IN |
R |
L |
BACK |
||||||||||||||||
|
2 |
DVR |
R |
R |
||||||||||||||||||||
|
CONTROL |
DVD 7.1CH INPUT |
||||||||||||||||||||||
|
(CD-R/TAPE/MD) |
IN |
VIDEO |
OUT |
FRONT |
SURROUND |
CENTER |
|||||||||||||||||
|
OPT |
VCR/ |
S |
R |
FRONT |
L |
CENTER |
R SURROUND BACK |
L |
R |
SURROUND |
L |
R |
FRONT |
L |
|||||||||
|
1 |
TV / |
IN |
OUT |
DVR |
|||||||||||||||||||
|
(TV / |
IN |
SAT |
IN |
P |
VIDEO |
||||||||||||||||||
|
SAT) |
IN |
||||||||||||||||||||||
|
ASSIGNABLE |
COAX |
DVD |
E |
||||||||||||||||||||
|
MONITOR |
TV/ |
OUT |
|||||||||||||||||||||
|
DIGITAL |
2 |
/ LD |
|||||||||||||||||||||
|
FRONT |
OUT |
SAT |
A |
||||||||||||||||||||
|
IN |
(CD) |
IN |
D V D |
IN |
A |
SINGLE |
B |
||||||||||||||||
|
INSTRUCTION |
|||||||||||||||||||||||
|
COAX |
REC |
7.1CH |
SUB |
K |
SEE MANUAL |
||||||||||||||||||
|
INPUT |
DVD / |
||||||||||||||||||||||
|
1 |
IN |
WOOFER |
E IN |
||||||||||||||||||||
|
(DVD |
OUT |
CD-R |
PREOUT |
LD |
|||||||||||||||||||
|
/LD) |
/ TAPE |
IN |
R |
MONITOR |
|||||||||||||||||||
|
/ MD |
S-VIDEO |
||||||||||||||||||||||
|
IN |
AUDIO |
PLAY |
S |
OUT |
|||||||||||||||||||
|
R |
L |
||||||||||||||||||||||
|
SUB |
|||||||||||||||||||||||
|
WOOFER |
|||||||||||||||||||||||
|
DVD |
IN |
PREOUT |
|||||||||||||||||||||
|
/ |
LD |
||||||||||||||||||||||
|
FRONT |
|||||||||||||||||||||||
|
D V D |
|||||||||||||||||||||||
|
REC |
7.1CH |
||||||||||||||||||||||
|
INPUT |
|||||||||||||||||||||||
|
CD-R |
IN |
||||||||||||||||||||||
|
/ TAPE |
/ MD
 Video cord
* The illustration shows the VSX-D812/D912, but connections for the VSX-D712 are the same.
8
En
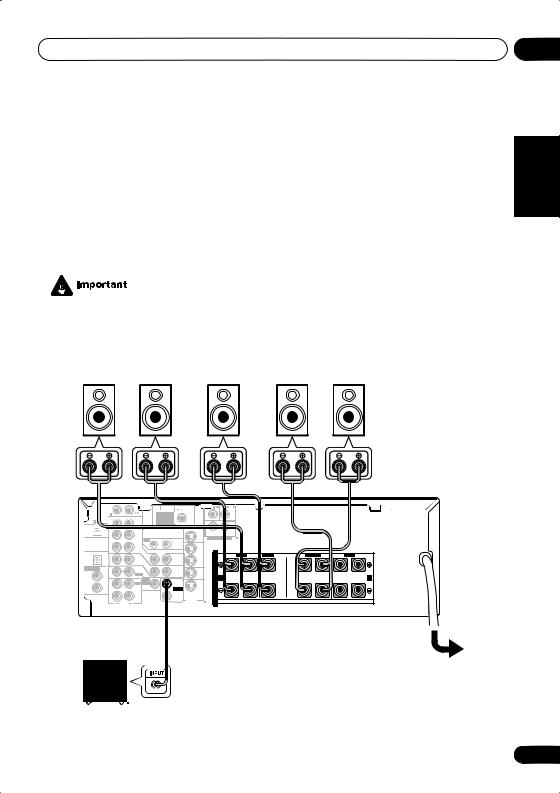
3 Connect your speakers.
A complete setup of speakers is shown here (six speakers for the VSX-D712, and eight for the VSX-D812/D912), but everyone’s home setup will vary. Simply connect the speakers you have in the manner shown below. The receiver will work with just two stereo speakers (the front speakers in the diagram) but using at least three speakers is recommended, and a complete setup is best.
Make sure you connect the speaker on the right to the right terminal and the speaker on the left to the left terminal. Also make sure the positive and negative (+/–) terminals on the receiver match those on the speakers.
•Use speakers with a nominal impedance of 8 Ω to 16 Ω.
•If you’re not using a subwoofer, change the front speaker setting (see Speaker setting on page 44) to large.
|
Front speakers |
Center speaker |
Surround speakers |
||
|
L |
R |
C |
LS |
RS |
|
AM |
FM UNBAL |
|||||||||||||||||
|
LOOP |
||||||||||||||||||
|
OUT |
||||||||||||||||||
|
MONITOR |
OUT |
|||||||||||||||||
|
SURROUND |
||||||||||||||||||
|
OUT |
VCR / |
OUT |
IN |
DVD 5.1CH INPUT |
||||||||||||||
|
DVR |
||||||||||||||||||
|
IN |
CONTROL |
OUT |
||||||||||||||||
|
OPT |
VIDEO |
FRONT |
CENTER |
SURROUND |
FRONT |
|||||||||||||
|
VCR/ |
S |
R |
L |
R |
L |
R |
L |
|||||||||||
|
1 |
TV / |
IN |
OUT |
DVR |
||||||||||||||
|
(TV / |
IN |
SAT |
IN |
P |
||||||||||||||
|
SAT) |
IN |
|||||||||||||||||
|
ASSIGNABLE |
COAX |
DVD |
E |
|||||||||||||||
|
DIGITAL |
2 |
/ LD |
MONITOR |
T V/ |
||||||||||||||
|
IN |
(CD) |
IN |
FRONT |
OUT |
IN |
A |
A |
B |
||||||||||
|
D V D |
||||||||||||||||||
|
COAX |
REC |
5.1CH |
SUB |
K |
||||||||||||||
|
INPUT |
WOOFER |
DVD / |
E |
|||||||||||||||
|
1 |
IN |
|||||||||||||||||
|
(DVD |
OUT |
CD-R |
PREOUT |
LD |
||||||||||||||
|
/ TAPE |
IN |
R |
||||||||||||||||
|
/LD) |
/ MD |
SURROUND |
||||||||||||||||
|
BACK |
||||||||||||||||||
|
IN |
AUDIO |
PLAY |
S-VIDEO |
S |
||||||||||||||
|
R |
L |
VSX-D712
Powered subwoofer
SW
Español Nederlands Deutsch Français Italiano English
9
En
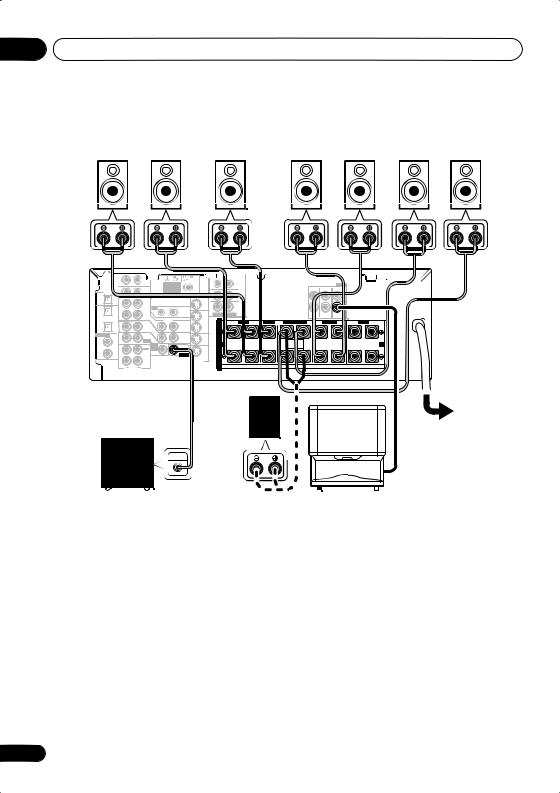
02 5 minute guide
|
Front speakers |
Center speaker |
Surround speakers |
Surround back speakers |
|||
|
L |
R |
C |
LS |
RS |
SBL |
SBR |
|
CEN- |
SUB WOOFER |
|||||||||||||
|
TER |
||||||||||||||
|
IN |
AUX |
PREOUT |
||||||||||||
|
DIGITAL |
L |
L |
SURROUND |
|||||||||||
|
SURROUND |
BACK |
|||||||||||||
|
OUT |
OPT |
IN |
CD |
ANTENNA |
R |
L |
||||||||
|
MONITOR |
OUT |
|||||||||||||
|
SURROUND |
||||||||||||||
|
OPT |
OUT |
VCR / |
OUT |
IN |
R |
L |
BACK |
|||||||
|
2 |
DVR |
R |
R |
|||||||||||
|
CONTROL |
DVD 7.1CH INPUT |
CENTER |
||||||||||||
|
(CD-R/TAPE/MD) |
IN |
OUT |
FRONT |
SURROUND |
||||||||||
|
OPT |
IN |
VIDEO |
VCR/ |
S |
R |
FRONT L |
CENTER |
R SURROUND BACK L |
R SURROUND L |
R FRONT L |
||||
|
1 |
TV / |
OUT |
DVR |
|||||||||||
|
(TV / |
IN |
SAT |
IN |
P |
||||||||||
|
SAT) |
IN |
|||||||||||||
|
ASSIGNABLE |
COAX |
DVD |
E |
|||||||||||
|
MONITOR |
TV/ |
|||||||||||||
|
DIGITAL |
2 |
/ LD |
OUT |
SAT |
A |
|||||||||
|
IN |
(CD) |
IN |
FRONT |
D V D |
IN |
A |
SINGLE |
B |
||||||
|
K |
SEEINSTRUCTION |
|||||||||||||
|
COAX |
REC |
7.1CH |
SUB |
DVD / |
MANUAL |
|||||||||
|
1 |
INPUT |
WOOFER |
E |
|||||||||||
|
OUT |
CD-R |
IN |
PREOUT |
LD |
||||||||||
|
(DVD |
/ TAPE |
IN |
R |
|||||||||||
|
/LD) |
/ MD |
S-VIDEO |
||||||||||||
|
IN |
PLAY |
S |
||||||||||||
|
R |
AUDIO L |
VSX-D812/D912
|
Passive |
|||
|
Powered subwoofer |
subwoofer |
||
|
or single |
TV |
||
|
SW |
|||
|
surround |
|||
|
back |
|||
|
INPUT |
speaker |
VSX-D812/D912 only
•To use the speaker on your TV as the center speaker (C), connect the CENTER PREOUT jack on this unit to the audio input jack on your TV. In this case the center speaker shown is unnecessary.
10
En
![]()
5 minute guide
•If you are using only one surround back speaker, connect the positive wire to the right channel (+) terminal, and the negative wire to the left channel (–) terminal (shown below).
•If you select subwoofer (SB SW) in the Surround back speaker setting on page 45 you can hook up a subwoofer instead of speakers to the surround back speaker terminals. Connect the wires just as above (and as shown below), connecting the positive wire to the right channel (+) terminal, and the negative wire to the left channel (–) terminal.
Surround back speaker (or subwoofer)
VSX-D812/D912
R SURROUND BACK L
4 Plug in the receiver and switch it on, followed by your DVD player, your subwoofer and the TV.
Make sure you’ve set the video input on your TV to this receiver. Check the manual that came with the TV if you don’t know how to do this.
Also make sure that DVD/LD is showing in the receiver’s display, indicating that the DVD input is selected. If it isn’t, press DVD on the remote control to set the receiver to the DVD input.
5 Press QUICK SETUP on the front panel to specify your speaker setup, room size and listening position.
Use the MULTI JOG dial to select and ENTER to confirm your selection. See Using the Quick Setup on page 12 if you’re unsure about the settings.
VSX-D912 only
•For a more complete surround sound setup, we recommend using the automatic MCACC setup in the Quick surround sound setup on page 14.
6 Play a DVD, and adjust the volume to your liking.
There are several other sound options you can select. See Introduction to Sound Modes on page 35 for more on this. See also Choosing your receiver setup on page 43 for more setup options.
•Depending on your DVD player or source discs, you may only get digital 2 channel stereo and analog sound. In this case, the listening mode must be set to STANDARD (it should already be set—see Listening to multi-channel playback on page 37 if you need to do this) if you want multi-channel surround sound.
02
Español Nederlands Deutsch Français Italiano English
11
En
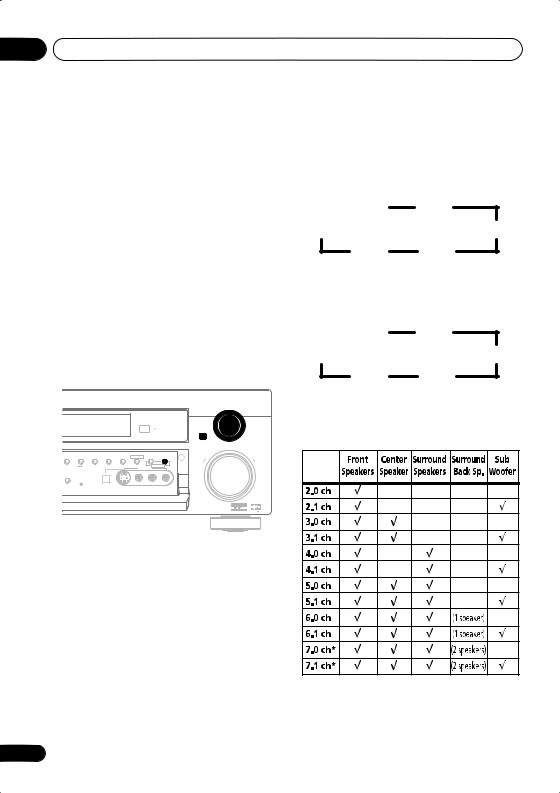
02 5 minute guide
Using the Quick Setup
You can use the Quick Setup to get your system up and running with just a few button presses. The receiver automatically makes the necessary settings after you have selected your speaker setup, room size and listening position.
Note that with the VSX-D912 you don’t have to make these settings if you use the automatic MCACC setup instead (in this case, go straight to the Quick surround sound setup on page 14).
If you want to make more specific settings, refer to Choosing your receiver setup on page 43.
Use the front panel controls for the steps below.
MULTI JOG
ENTER
MASTER VOLUME
|
DVANCED |
STEREO/ |
SIGNAL |
MIDNIGHT/ |
MONITOR |
TONE |
QUICK |
SETUP |
||
|
URROUND |
DIRECT |
SELECT |
LOUDNESS |
SPEAKERS |
|||||
|
DOWN |
UP |
||||||||
|
ENING MODE |
MULTI JOG |
||||||||
|
VIDEO INPUT |
|||||||||
|
L DIMMER |
|||||||||
|
DIGITAL IN |
S-VIDEO |
VIDEO |
L |
AUDIO |
R |
3 Use the MULTI JOG dial to choose your speaker setup.
When a subwoofer was detected in step 2, you can cycle between the following choices:
|
2.1ch |
3.1ch |
|
7.1ch* |
4.1ch |
|
6.1ch |
5.1ch |
* VSX-D812/D912 only
If a subwoofer wasn’t detected in step 2, you can cycle between the following choices:
|
2.0ch |
3.0ch |
|
7.0ch* |
4.0ch |
|
6.0ch |
5.0ch |
*VSX-D812/D912 only
•Check the table below to find the speaker setup that corresponds with your system.
1 If the receiver is off, press STANDBY/ON to turn the power on.
The STANDBY indicator goes out.
2 Press QUICK SETUP.
SW DET flashes in the display while the receiver checks your setup for a subwoofer. SW YES or SW NO confirms the subwoofer check, then the display prompts you to select your speaker setup.
* VSX-D812/D912 only
12
En
5 minute guide
4Press ENTER.
5Use the MULTI JOG dial to choose your room size.
Depending on the distance of your speakers from the listening position, choose between small, medium, or large (S, M or L), M being an average-sized room.
6Press ENTER.
7Use the MULTI JOG dial to choose your listening position.
You can cycle between the following choices:
FWD
MID
BACK
FWD – If you are nearer to the front speakers than the surround speakers
MID – If you are equal distance from the front and surround speakers
BACK – If you are nearer to the surround speakers than the front speakers
8 Press ENTER to confirm your setup.
The display shows the speaker setup, room size and listening position that you have selected.
02
Español Nederlands Deutsch Français Italiano English
13
En
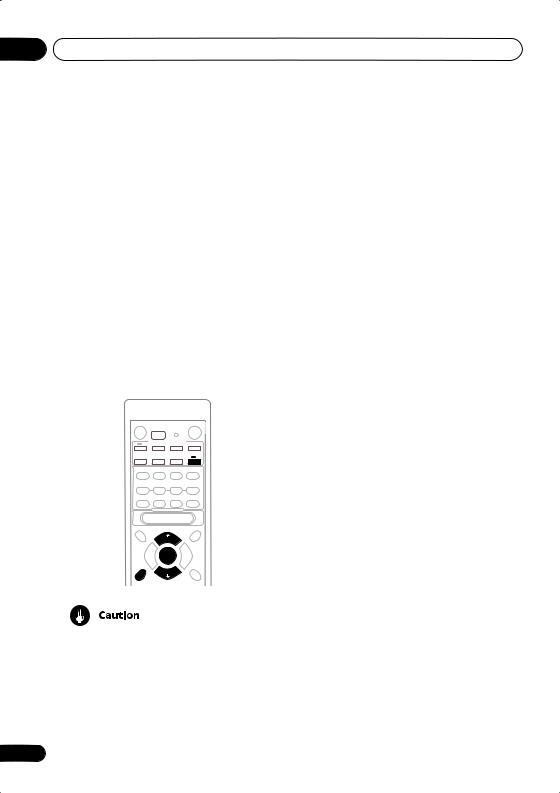
03 Quick surround sound setup
Chapter 3:
Quick surround sound setup
VSX-D912 only
Automatically calibrating your listening area (MCACC)
The Multi-Channel Acoustic Calibration (MCACC) system measures the acoustic characteristics of your listening area, taking into account ambient noise, speaker size and distance, and tests for both channel delay and channel level. After you have set up the microphone provided with your system, the receiver uses the information from a series of test tones to optimize the speaker settings and equalization for your particular room.
RECEIVER
ENTER
MCACC
SETUP
•These test tones can be loud, so take care that there is no one in the room who will be startled by the noise.
•Make sure the mic and speakers are not moved during the MCACC setup.
14
1Connect the microphone to the SETUP MIC jack on the front panel.
2Place the microphone at your normal listening position.
Place the mic about ear level at your normal listening position using the supplied microphone stand on a table or chair.
Make sure there are no obstacles between the speakers and the microphone.
3 If the receiver is off, press STANDBY/ON to turn the power on.
The STANDBY indicator goes out.
4If you have a subwoofer, turn it on.
5Press RECEIVER.
6Press MCACC SETUP.
Try to be as quiet as possible after pressing MCACC SETUP. The system outputs a series of test tones to establish the ambient noise level.
If the noise level is too high, NOISY! blinks in the display for five seconds. To exit and check the noise levels again, press MCACC SETUP (see the notes regarding ambient noise levels below) or press ENTER when you’re prompted to GO NEXT?
The system now checks the microphone and your speaker setup.
If you see an ERR message in the display, there may be a problem with your mic or the speaker connections.
Turn off the power, and check the problem indicated by the ERR message (see below), then try the auto surround setup again.
•ERR MIC – Check the microphone connection.
En
|
Quick surround sound setup |
03 |
•ERR Fch – Check the front speaker connections.
•ERR Sch – Check the surround or surround back speaker connections.
•ERR SW – Make sure the subwoofer has been switched on and volume on the subwoofer is turned up.
7 Use and to select the speaker system that corresponds to your setup.
Cycle between the following choices:
|
2.0ch |
2.1ch* |
3.0ch |
3.1ch* |
|
7.1ch* |
4.0ch |
||
|
7.0ch |
4.1ch* |
||
|
6.1ch* |
6.0ch |
5.1ch* |
5.0ch |
* Indicates a subwoofer is included in your speaker setup
See the table on page 12 if you’re unsure which speaker system to select.
8If you selected a speaker system that includes a subwoofer, press ENTER to check the subwoofer output level.
If the subwoofer output level is too high/low,
SW.VOL.UP/SW.VOL.DWN blinks in the display for five seconds. To exit and check your subwoofer output level, press MCACC SETUP (see the notes regarding noise levels below) or simply turn the subwoofer volume up or down (as indicated), then press ENTER when you’re prompted to GO NEXT?
9Press ENTER to finish the auto surround setup.
The system checks for speaker size, channel delay and channel level. If you have connected a subwoofer, it will check for ambient noise once again.
When the auto surround setup is complete, the volume level returns to normal and COMPLETE, then RESUME shows in the display.
|
English |
||||
|
• If the room environment is not optimal for |
||||
|
the auto surround setup (too much |
||||
|
ambient noise, echo off the walls, obsta- |
||||
|
cles blocking the speakers from the |
||||
|
microphone) the final settings may be |
||||
|
incorrect. Check for household appli- |
Italiano |
|||
|
ances (air conditioner, fridge, fan, etc.), |
||||
|
that may be affecting the environment |
||||
|
and switch them off if necessary. |
||||
|
• Some older TVs may interfere with the |
||||
|
operation of the mic. If this seems to be |
||||
|
happening, switch off the TV when doing |
||||
|
the auto surround setup. |
Français |
|||
|
• Using the MCACC system to set up your |
||||
|
speaker system overwrites any previous |
||||
|
settings you had for the STANDARD or |
||||
|
ADVANCED SURROUND modes. |
||||
|
• When the STANDARD or ADVANCED |
||||
|
SURROUND mode is selected, you can |
Deutsch |
|||
|
check the settings made with MCACC by |
||||
|
using CH SELECT (to check channel |
||||
|
levels) or by going through the steps in |
||||
|
Choosing your receiver setup on page 43 |
||||
|
to check other settings. |
||||
|
• Depending on the the characteristics of |
Nederlands |
|||
|
your room, sometimes identical speakers |
||||
|
with cone sizes of around 12cm will end |
||||
|
up with different size settings. You can |
||||
|
correct the setting manually using the |
||||
|
receiver setup on page 43. |
||||
|
Español |
15
En
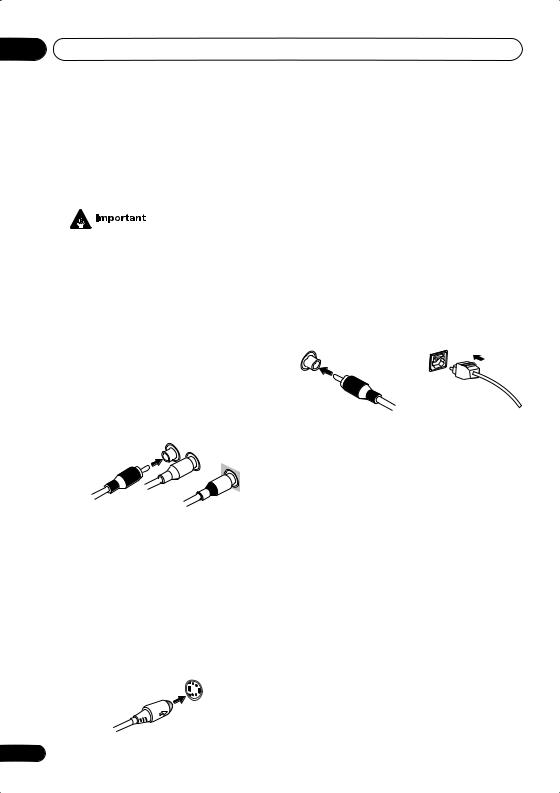
04 Connecting up
Chapter 4:
Connecting up
•Before making or changing any connections, switch off the power and disconnect the power cord from the AC outlet.
Audio/Video cords
Use audio/video cords (not supplied) to connect the audio/video components and a video cord to connect the monitor TV.
Connect red plugs to R (right), white plugs to L (left), and the yellow plugs to VIDEO.
Be sure to insert completely.
VIDEO
S-video cables
Use S-video cables (not supplied) to get clearer picture reproduction than regular video cords.
Connect from an S-video jack on the rear of the receiver to an S-video jack on the video component you are hooking up.
Be sure to insert completely.
S VIDEO
16
Digital audio coaxial cords/ Optical cables
Commercially available digital audio coaxial cords (standard video cords can also be used) or optical cables (not supplied) are used to connect digital components to this receiver.
Be sure to insert completely.
|
Digital audio coaxial cord |
Optical cable |
|
(or standard video cord) |
En
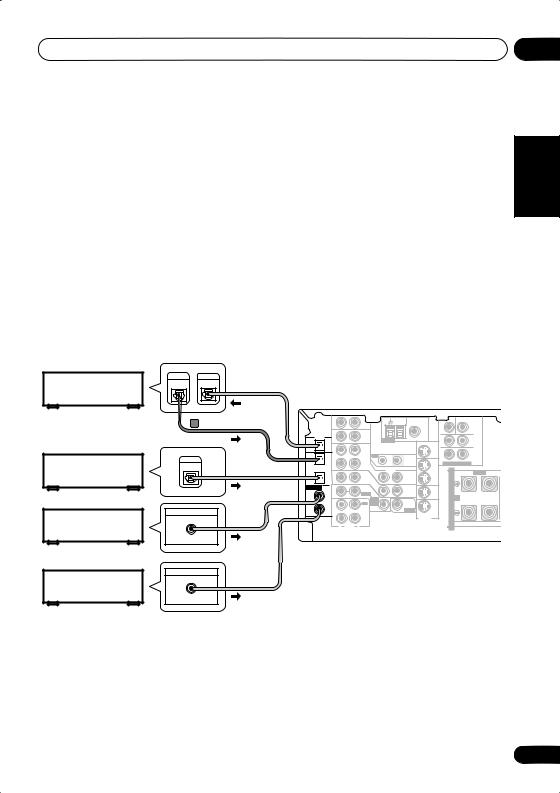
Connecting up
Connecting digital components
The easiest way to hook up this receiver for surround sound is to use a digital input. You can do this by either coaxial or optical connections (you do not need to do both). The quality of these two types of connections is the same but since some digital components only have one type of digital terminal, it is a matter of matching like with like (for example, the coaxial output from the component to coaxial input on the receiver). The VSX-D712 has three digital inputs on the rear panel (two coaxial inputs and an optical input) and both the VSX-D812 and VSX-D912 have four (two coaxial inputs and two optical inputs). Connect your digital components to the rear panel as shown below.
There is one digital output jack which is marked DIGITAL OUT. If you connect this to the optical input on a digital recorder (currently these include MD, DAT and CD-R) you can make direct digital recordings with this unit.
When connecting your equipment, always make sure the power is turned off and the power cord is disconnected from the AC outlet.
• The arrows indicate the direction of the digital audio signal.
|
CD recorder |
DIGITAL |
DIGITAL |
|
OUT |
IN |
This receiver*
|
VSX-D912/D812 only |
AM |
FM UNBAL |
CEN- |
SUB WOOFER |
|||||||||
|
IN |
AUX |
TER |
|||||||||||
|
LOOP |
75 Ω |
||||||||||||
|
DIGITAL |
SURROUND |
||||||||||||
|
OUT |
OPT |
IN |
CD |
ANTENNA |
MONITOR |
R |
L |
||||||
|
OUT |
|||||||||||||
|
SURROUND |
|||||||||||||
|
Satellite tuner |
DIGITAL |
OPT |
OUT |
VCR / |
OUT |
IN |
R |
L |
BACK |
||||
|
2 |
DVR |
||||||||||||
|
OUT |
(CD-R/TAPE/MD) |
IN |
CONTROL |
OUT |
DVD 7.1CH INPUT |
||||||||
|
OPT |
VIDEO |
VCR/ |
S |
R |
FRONT |
L |
|||||||
|
1 |
TV / |
IN |
OUT |
DVR |
|||||||||
|
(TV / |
IN |
SAT |
IN |
P |
|||||||||
|
SAT) |
IN |
||||||||||||
|
ASSIGNABLE |
COAX |
DVD |
E |
||||||||||
|
MONITOR |
T V/ |
||||||||||||
|
DIGITAL |
2 |
/ LD |
|||||||||||
|
FRONT |
OUT |
SAT |
A |
||||||||||
|
IN |
(CD) |
IN |
D V D |
IN |
A |
||||||||
|
K |
|||||||||||||
|
COAX |
REC |
7.1CH |
SUB |
||||||||||
|
INPUT |
DVD / |
||||||||||||
|
1 |
IN |
WOOFER |
E |
||||||||||
|
OUT |
CD-R |
PREOUT |
LD |
||||||||||
|
CD player |
DIGITAL OUT |
(DVD |
/ TAPE |
IN |
|||||||||
|
/LD) |
/ MD |
R |
|||||||||||
|
COAX |
IN |
PLAY |
S-VIDEO |
||||||||||
|
S |
|||||||||||||
|
R |
AUDIO |
L |
|
DVD player |
DIGITAL OUT |
|
COAX |
04
Nederlands Deutsch Français Italiano English
* The illustration shows the VSX-D812/D912, but connections for the VSX-D712 are the same.
En
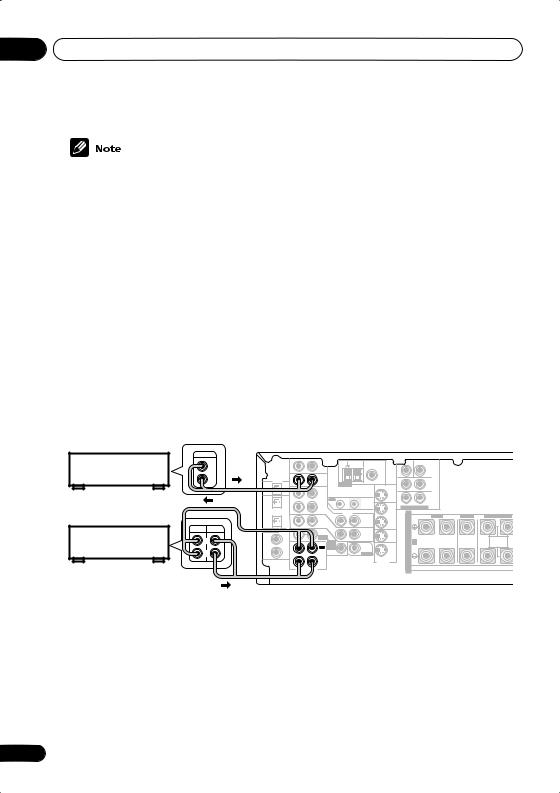
04 Connecting up
•If you have an LD player, you need to make special connections to ensure you can play 2 RF format LDs on your system. If this is the case, hook up your DVD or LD player directly to an RF demodulator using both the 2 RF output and either a coaxial or optical digital connection. We also recommend hooking up your digital components to analog audio jacks as well. Make sure the RF demodulator digital in switch is set correctly (optical or coaxial depending on the connection). See the component’s instruction manual if you are unsure about its input and output jacks.
Connecting audio components
To begin set up, connect your analog audio components (such as a cassette deck) to the jacks. For components you want to record with, you need to hook up four plugs to the receiver (a set of stereo inputs and a set of stereo outputs), but for components that only play, you only need to hook up one set of stereo plugs. You must also hook up your digital components to analog audio jacks if you want to record to/from digital components (like an MD) to/from analog components. See page 17 for more on digital connections.
When connecting your equipment, always make sure the power is turned off and the power cord is disconnected from the AC outlet.
• The arrows indicate the direction of the audio signal.
CD player
CD-R/Tape/MD deck
|
This receiver* |
|||||||||||||||||
|
OUTPUT |
|||||||||||||||||
|
L |
AM |
FM UNBAL |
CEN- |
SUB WOOFER |
|||||||||||||
|
TER |
|||||||||||||||||
|
AUX |
LOOP |
75 Ω |
|||||||||||||||
|
IN |
|||||||||||||||||
|
R |
DIGITAL |
SURROUND |
|||||||||||||||
|
OUT |
OPT |
IN |
CD |
ANTENNA |
MONITOR |
R |
L |
||||||||||
|
OUT |
|||||||||||||||||
|
SURROUND |
|||||||||||||||||
|
OPT |
OUT |
VCR / |
OUT |
IN |
R |
L |
BACK |
||||||||||
|
2 |
DVR |
||||||||||||||||
|
(CD-R/TAPE/MD) |
IN |
CONTROL |
OUT |
DVD 7.1CH INPUT |
|||||||||||||
|
VIDEO |
|||||||||||||||||
|
OPT |
VCR/ |
S |
R |
FRONT |
L |
CENTER |
R SURROUND BACK |
L |
|||||||||
|
1 |
TV / |
IN |
OUT |
DVR |
|||||||||||||
|
(TV / |
IN |
SAT |
IN |
P |
|||||||||||||
|
REC |
PLAY |
SAT) |
IN |
||||||||||||||
|
ASSIGNABLE |
COAX |
DVD |
E |
||||||||||||||
|
MONITOR |
TV / |
||||||||||||||||
|
DIGITAL |
2 |
/ LD |
|||||||||||||||
|
FRONT |
OUT |
SAT |
A |
||||||||||||||
|
L |
IN |
(CD) |
IN |
D V D |
IN |
A |
SINGLE |
||||||||||
|
K |
SEEINSTRUCTION |
||||||||||||||||
|
COAX |
REC |
7.1CH |
SUB |
MANUAL |
|||||||||||||
|
INPUT |
DVD / |
||||||||||||||||
|
R |
1 |
IN |
WOOFER |
E |
|||||||||||||
|
OUT |
CD-R |
PREOUT |
LD |
||||||||||||||
|
(DVD |
/ TAPE |
IN |
|||||||||||||||
|
/LD) |
/ MD |
S-VIDEO |
R |
||||||||||||||
|
IN |
PLAY |
S |
|||||||||||||||
|
AUDIO |
|||||||||||||||||
|
R |
L |
* The illustration shows the VSX-D812/D912, but connections for the VSX-D712 are the same.
18
En
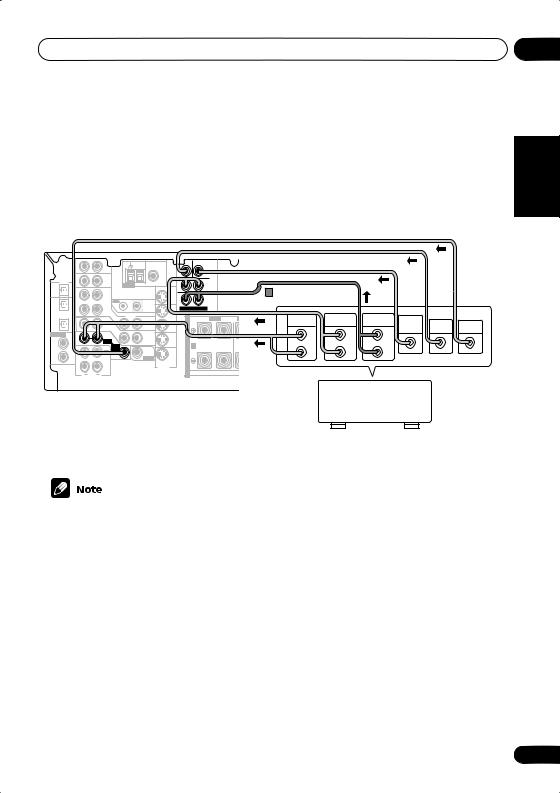
Connecting up
Connecting DVD multi-channel components
If you prefer to use a seperate component for decoding DVDs, you can connect a decoder or a DVD player with multi-channel analog outputs to the multi-channel inputs of this receiver.
When connecting your equipment, always make sure the power is turned off and the power cord is disconnected from the AC outlet.
• The arrows indicate the direction of the signal.
|
AM |
FM UNBAL |
CEN- |
SUB WOOFER |
|||||||||||||||||||
|
TER |
||||||||||||||||||||||
|
AUX |
LOOP |
75 Ω |
||||||||||||||||||||
|
IN |
PREOUT |
|||||||||||||||||||||
|
DIGITAL |
L |
L |
SURROUND |
|||||||||||||||||||
|
SURROUND |
BACK |
|||||||||||||||||||||
|
OUT |
OPT |
IN |
CD |
ANTENNA |
MONITOR |
R |
L |
|||||||||||||||
|
OUT |
VSX-D812/D912 only |
|||||||||||||||||||||
|
SURROUND |
||||||||||||||||||||||
|
OPT |
OUT |
VCR / |
OUT |
IN |
R |
L |
BACK |
|||||||||||||||
|
2 |
DVR |
R |
R |
|||||||||||||||||||
|
CONTROL |
DVD 7.1CH INPUT |
|||||||||||||||||||||
|
(CD-R/TAPE/MD) |
IN |
OUT |
FRONT SURROUND CENTER |
|||||||||||||||||||
|
VIDEO |
||||||||||||||||||||||
|
OPT |
TV / |
VCR/ |
S |
R |
FRONT |
L |
CENTER |
R |
SURROUND BACK |
L |
FRONTSURROUND |
FRO T |
SURROUND |
SUB |
||||||||
|
1 |
IN |
DVR |
R |
L SURROUND L |
CENTER |
VIDEO |
||||||||||||||||
|
(TV / |
SAT |
OUT |
IN |
P |
OUTPUT |
OUTPUT |
BACK OUTPUT |
WOOFER |
||||||||||||||
|
SAT) IN |
IN |
L |
L |
L |
OUTPUT |
OUTPUT |
OUTPUT |
|||||||||||||||
|
ASSIGNABLE |
COAX |
DVD |
MONITOR |
TV/ |
E |
|||||||||||||||||
|
DIGITAL |
2 |
/ LD |
||||||||||||||||||||
|
FRONT |
OUT |
SAT |
A |
|||||||||||||||||||
|
IN |
(CD) |
IN |
D V D |
IN |
A |
SINGLE |
B |
|||||||||||||||
|
K |
SEEINSTRUCTION |
R |
||||||||||||||||||||
|
COAX |
REC |
7.1CH |
SUB |
MANUAL |
R |
R |
||||||||||||||||
|
INPUT |
DVD/ |
|||||||||||||||||||||
|
1 |
IN |
WOOFER |
E |
|||||||||||||||||||
|
(DVD |
OUT |
CD-R |
PREOUT |
LD |
||||||||||||||||||
|
/ TAPE |
IN |
|||||||||||||||||||||
|
/LD) |
/ MD |
R |
||||||||||||||||||||
|
S-VIDEO |
||||||||||||||||||||||
|
IN |
AUDIO |
PLAY |
S |
|||||||||||||||||||
|
R |
L |
DVD/multi-channel decoder
This receiver* with multi-channel analog output jacks
* The illustration shows the VSX-D812/D912, but connections for the VSX-D712 are the same.
04
Deutsch Français Italiano English
•The multi-channel input can only be used when DVD 5.1 ch (VSX-D712) or DVD 7.1 ch (VSXD812/D912) is selected (see page 42).
VSX-D812/D-912 only
•If the component you are connecting only has one surround back channel output, change the Surround back channel input setting (page 48) to SB 1ch IN.
Español Nederlands
19
En
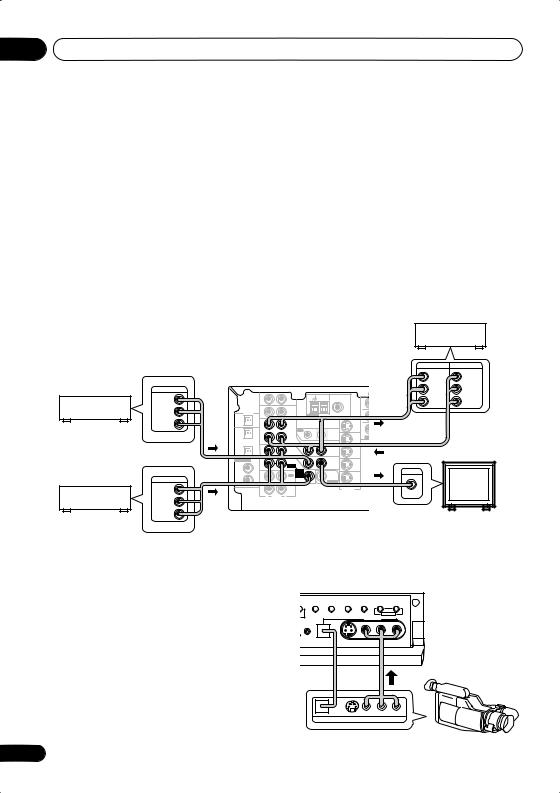
04 Connecting up
Connecting video components
Connect your video components to the jacks as shown below. With digital video components (like a DVD player), you must use the connections shown on this page for the video signal, but in order to hear a digital source (like a DVD) you should hook up the audio to a digital input (see page 17). It is also a good idea to hook up your digital components with analog audio connections (see page 18).
For better quality video, you can hook up using the S-video jacks on the rear of the receiver instead of the regular video jacks. Make sure they are connected to the video component using the same kind of connection.
When connecting your equipment, always make sure the power is turned off and the power cord is disconnected from the AC outlet.
• The arrows indicate the direction of the signal
|
Video deck |
||||||||||||||||||||
|
INPUT |
OUTPUT |
|||||||||||||||||||
|
This receiver* |
VIDEO |
VIDEO |
||||||||||||||||||
|
OUTPUT |
L |
L |
||||||||||||||||||
|
AM |
FM UNBAL |
CEN- |
SUB WOOFER |
|||||||||||||||||
|
TV tuner |
VIDEO |
AUX |
TER |
|||||||||||||||||
|
LOOP |
75 Ω |
R |
R |
|||||||||||||||||
|
IN |
L |
L |
PREOUT |
|||||||||||||||||
|
(or Satellite tuner) |
L |
DIGITAL |
SURROUND |
|||||||||||||||||
|
SURROUND |
BACK |
|||||||||||||||||||
|
OUT |
OPT |
IN |
CD |
ANTENNA |
MONITOR |
R |
L |
|||||||||||||
|
R |
OUT |
|||||||||||||||||||
|
SURROUND |
||||||||||||||||||||
|
OPT |
OUT |
VCR / |
OUT |
IN |
R |
L |
BACK |
|||||||||||||
|
2 |
DVR |
R |
R |
|||||||||||||||||
|
CONTROL |
DVD 7.1CH INPUT |
CENTER |
||||||||||||||||||
|
(CD-R/TAPE/MD) |
IN |
OUT |
FRONT |
SURROUND |
||||||||||||||||
|
OPT |
VIDEO |
VCR/ |
S |
R |
FRONT |
L |
CENTER |
R SURROUND BACK |
L |
R |
SURROUND L |
|||||||||
|
1 |
TV / |
IN |
OUT |
DVR |
||||||||||||||||
|
(TV / |
SAT |
IN |
P |
|||||||||||||||||
|
SAT) IN |
IN |
|||||||||||||||||||
|
ASSIGNABLE |
COAX |
DVD |
E |
|||||||||||||||||
|
MONITOR |
TV / |
|||||||||||||||||||
|
DIGITAL |
2 |
/ LD |
||||||||||||||||||
|
FRONT |
OUT |
SAT |
A |
|||||||||||||||||
|
IN |
(CD) |
IN |
D V D |
IN |
A |
INPUT |
SINGLE |
|||||||||||||
|
K |
SEEINSTRUCTION |
|||||||||||||||||||
|
COAX |
REC |
7.1CH |
SUB |
MANUAL |
||||||||||||||||
|
INPUT |
DVD / |
|||||||||||||||||||
|
OUTPUT |
1 |
IN |
WOOFER |
E |
||||||||||||||||
|
OUT |
CD-R |
PREOUT |
LD |
|||||||||||||||||
|
(DVD |
||||||||||||||||||||
|
/ TAPE |
IN |
R |
||||||||||||||||||
|
DVD or LD player |
VIDEO |
/LD) |
IN |
/ MD |
S-VIDEO |
|||||||||||||||
|
PLAY |
S |
VIDEO |
||||||||||||||||||
|
R |
AUDIO |
L |
||||||||||||||||||
|
L |
||||||||||||||||||||
|
R |
TV (monitor) |
|||||||||||||||||||
* The illustration shows the VSX-D812/D912, but connections for the VSX-D712 are the same.
|
Connecting to the front panel video |
EO/ |
SIGNAL |
MIDNIGHT/ |
SB CH |
TONE |
QUICK |
|
terminal |
CT |
SELECT |
LOUDNESS SPEAKERS |
MODE |
SETUP |
|
|
MULTI JOG |
||||||
|
Front video connections are accessed via the |
VIDEO INPUT |
|||||
|
front panel using the VIDEO button. There are |
SETUP |
DIGITAL IN |
||||
|
MIC |
VIDEO |
L |
AUDIO R |
|||
|
S-VIDEO |
||||||
|
standard audio/video jacks as well as an |
||||||
|
S-video jack (the VSX-D912 also has an optical |
||||||
|
input). Hook them up the same way you made |
||||||
|
the rear panel connections. |
||||||
|
V |
L |
R |
||||
|
DIGITAL OUT |
VIDEO OUTPUT |
20
En
![]()
Connecting up
Connecting antennas
Connect the AM loop antenna and the FM wire antenna as shown below. To improve reception and sound quality, connect external antennas (see Using external antennas below). Always make sure that the receiver is switched off and unplugged from the wall outlet before making or changing any connections.
|
AM loop |
|||||||||||
|
antenna |
|||||||||||
|
FM wire |
|||||||||||
|
75 Ω |
antenna |
||||||||||
|
AM |
FM UNBAL |
CEN- |
SUB WOOFER |
||||||||
|
TER |
|||||||||||
|
AUX |
LOOP |
||||||||||
|
IN |
|||||||||||
|
DIGITAL |
SURROUND |
||||||||||
|
OUT |
OPT |
IN |
CD |
ANTENNA |
MONITOR |
R |
L |
||||
|
OUT |
|||||||||||
|
SURROUND |
|||||||||||
|
OPT |
OUT |
VCR / |
OUT |
IN |
R |
L |
BACK |
||||
|
2 |
DVR |
||||||||||
|
(CD-R/TAPE/MD) |
IN |
CONTROL |
OUT |
DVD 7.1CH INPUT |
|||||||
|
VIDEO |
|||||||||||
|
OPT |
VCR/ |
S |
R |
FRONT |
L |
||||||
|
1 |
TV / |
IN |
OUT |
DVR |
|||||||
|
(TV / |
IN |
SAT |
IN |
P |
|||||||
|
SAT) |
IN |
||||||||||
|
ASSIGNABLE |
COAX |
DVD |
E |
||||||||
|
MONITOR |
T V / |
||||||||||
|
DIGITAL |
2 |
/ LD |
|||||||||
|
FRONT |
OUT |
SAT |
A A |
||||||||
|
IN |
(CD) |
IN |
IN |
||||||||
|
D V D |
|||||||||||
|
COAX |
REC |
7.1CH |
SUB |
K |
|||||||
|
INPUT |
DVD / |
||||||||||
|
1 |
IN |
WOOFER |
E |
||||||||
|
OUT |
CD-R |
PREOUT |
LD |
||||||||
|
(DVD |
/ TAPE |
IN |
|||||||||
|
/LD) |
/ MD |
S-VIDEO |
R |
||||||||
|
IN |
AUDIO |
PLAY |
S |
||||||||
|
R |
L |
FM wire antenna
Connect the FM wire antenna and fully extend vertically along a window frame or another suitable place that gives good reception.
AM loop antenna
Assemble the antenna and connect to the receiver. Attach (if necessary) and face in the direction that gives the best reception.
Antenna snap connectors
Twist the exposed wire strands together and insert into the hole, then snap the connector shut.
10mm
Using external antennas
To improve FM reception
Connect an external FM antenna.
|
One-touch |
75Ω coaxial |
|
|
PAL connector |
cable |
|
|
AM |
FM UNBAL |
|
|
LOOP |
75 Ω |
ANTENNA
To improve AM reception
Connect a 5–6 metre length of vinyl-coated wire to the AM antenna terminal without disconnecting the supplied AM loop antenna.
For the best possible reception, suspend horizontally outdoors.
Outdoor antenna
5–6m
Indoor antenna (vinyl-coated wire)
ANTENNA
04
Español Nederlands Deutsch Français Italiano English
21
En
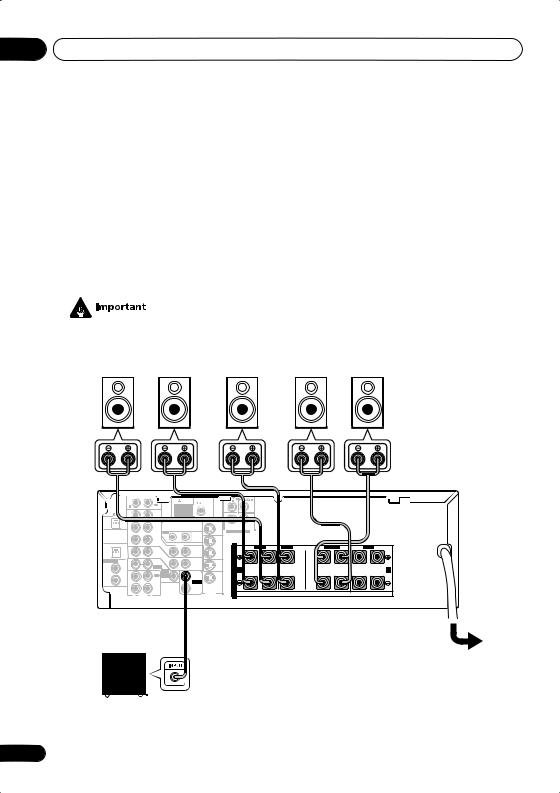
04 Connecting up
Connecting the speakers (VSX-D712)
A complete setup of six speakers (including the subwoofer) is shown below, but everyone’s home setup will vary. Simply connect the speakers you have in the manner shown below. The receiver will work with just two stereo speakers (the front speakers in the diagram) but using at least three speakers is recommended, and a complete setup is best. If you’re not using a subwoofer, change the front speaker setting (see Speaker setting on page 44) to large.
Make sure you connect the speaker on the right to the right terminal and the speaker on the left to the left terminal. Also make sure the positive and negative (+/–) terminals on the receiver match those on the speakers.
Be sure to complete all connections before connecting this unit to the AC power source.
• Use speakers with a nominal impedance of 8 Ω to 16 Ω.
|
Front speakers |
Center speaker |
Surround speakers |
||
|
L |
R |
C |
LS |
RS |
|
AM |
FM UNBAL |
|||||||||||||||||
|
LOOP |
||||||||||||||||||
|
OUT |
||||||||||||||||||
|
MONITOR |
OUT |
|||||||||||||||||
|
SURROUND |
||||||||||||||||||
|
OUT |
VCR / |
OUT |
IN |
DVD 5.1CH INPUT |
||||||||||||||
|
DVR |
||||||||||||||||||
|
IN |
CONTROL |
OUT |
||||||||||||||||
|
OPT |
VIDEO |
FRONT |
CENTER |
SURROUND |
FRONT |
|||||||||||||
|
VCR/ |
S |
R |
L |
R |
L |
R |
L |
|||||||||||
|
1 |
TV / |
IN |
OUT |
DVR |
||||||||||||||
|
(TV / |
IN |
SAT |
IN |
P |
||||||||||||||
|
SAT) |
IN |
|||||||||||||||||
|
ASSIGNABLE |
COAX |
DVD |
E |
|||||||||||||||
|
MONITOR |
TV/ |
|||||||||||||||||
|
DIGITAL |
2 |
/ LD |
||||||||||||||||
|
FRONT |
OUT |
SAT |
A |
|||||||||||||||
|
IN |
(CD) |
IN |
IN |
A |
B |
|||||||||||||
|
D V D |
||||||||||||||||||
|
COAX |
REC |
5.1CH |
SUB |
K |
||||||||||||||
|
INPUT |
WOOFER |
DVD / |
E |
|||||||||||||||
|
1 |
IN |
|||||||||||||||||
|
(DVD |
OUT |
CD-R |
PREOUT |
LD |
||||||||||||||
|
/ TAPE |
IN |
R |
||||||||||||||||
|
/LD) |
/ MD |
SURROUND |
||||||||||||||||
|
BACK |
||||||||||||||||||
|
IN |
AUDIO |
PLAY |
S-VIDEO |
S |
||||||||||||||
|
R |
L |
VSX-D712
Powered subwoofer
SW
22
En
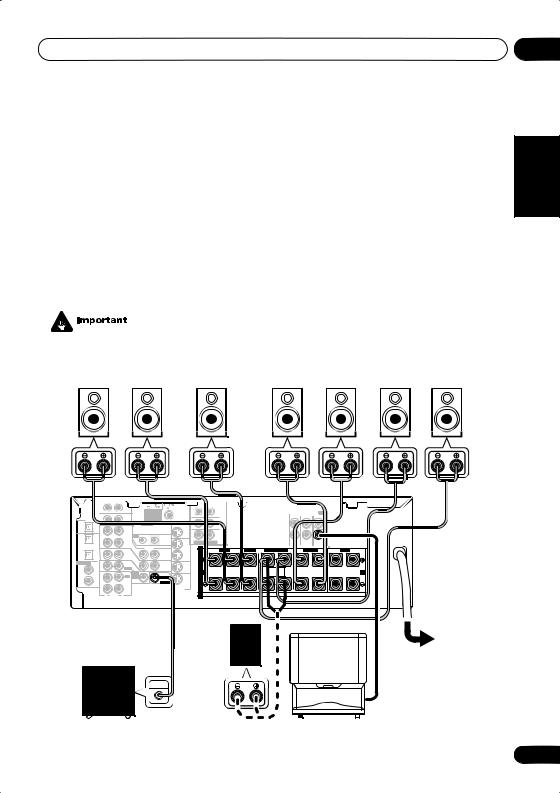
Connecting up
Connecting the speakers (VSX-D812/D912)
A complete setup of eight speakers (including the subwoofer) is shown below, but everyone’s home setup will vary. Simply connect the speakers you have in the manner shown below. The receiver will work with just two stereo speakers (the front speakers in the diagram) but using at least three speakers is recommended, and a complete setup is best for surround sound. If you’re not using a subwoofer, change the front speaker setting (see Speaker setting on page 44) to large.
Make sure you connect the speaker on the right to the right terminal and the speaker on the left to the left terminal. Also make sure the positive and negative (+/–) terminals on the receiver match those on the speakers.
Be sure to complete all connections before connecting this unit to the AC power source.
• Use speakers with a nominal impedance of 8 Ω to 16 Ω.
|
Front speakers |
Center speaker |
Surround speakers |
Surround back speakers |
|||
|
L |
R |
C |
LS |
RS |
SBL |
SBR |
|
CEN- |
SUB WOOFER |
|||||||||||||
|
TER |
||||||||||||||
|
IN |
AUX |
PREOUT |
||||||||||||
|
DIGITAL |
L |
L |
SURROUND |
|||||||||||
|
SURROUND |
BACK |
|||||||||||||
|
OUT |
OPT |
IN |
CD |
ANTENNA |
R |
L |
||||||||
|
MONITOR |
OUT |
|||||||||||||
|
SURROUND |
||||||||||||||
|
OPT |
OUT |
VCR / |
OUT |
IN |
R |
L |
BACK |
|||||||
|
2 |
DVR |
R |
R |
|||||||||||
|
CONTROL |
DVD 7.1CH INPUT |
CENTER |
||||||||||||
|
(CD-R/TAPE/MD) |
IN |
OUT |
FRONT |
SURROUND |
||||||||||
|
OPT |
IN |
VIDEO |
VCR/ |
S |
R |
FRONT L |
CENTER |
R SURROUND BACK L |
R SURROUND L |
R FRONT L |
||||
|
1 |
TV / |
OUT |
DVR |
|||||||||||
|
(TV / |
IN |
SAT |
IN |
P |
||||||||||
|
SAT) |
IN |
|||||||||||||
|
ASSIGNABLE |
COAX |
DVD |
E |
|||||||||||
|
MONITOR |
T V / |
|||||||||||||
|
DIGITAL |
2 |
/ LD |
OUT |
SAT |
A |
|||||||||
|
IN |
(CD) |
IN |
FRONT |
D V D |
IN |
A |
SINGLE |
B |
||||||
|
K |
SEEINSTRUCTION |
|||||||||||||
|
COAX |
REC |
7.1CH |
SUB |
DVD / |
MANUAL |
|||||||||
|
1 |
INPUT |
WOOFER |
E |
|||||||||||
|
OUT |
CD-R |
IN |
PREOUT |
LD |
||||||||||
|
(DVD |
/ TAPE |
IN |
R |
|||||||||||
|
/LD) |
/ MD |
S-VIDEO |
||||||||||||
|
IN |
PLAY |
S |
||||||||||||
|
R |
AUDIO L |
VSX-D812/D912
|
Passive |
|||
|
Powered subwoofer |
subwoofer |
||
|
or single |
TV |
||
|
SW |
|||
|
surround |
|||
|
back |
|||
|
INPUT |
speaker |
04
Español Nederlands Deutsch Français Italiano English
23
En
04 Connecting up
•When using the speaker on your TV as the center speaker (C), connect the CENTER PREOUT jack on this unit to the audio input jack on your TV. In this case the center speaker shown is unnecessary.
•If you are using only one surround back speaker, connect the positive wire to the right channel (+) terminal, and the negative wire to the left channel (–) terminal (see illustration on page 11).
•If you select subwoofer (SB SW) in the
Surround back speaker setting on page 45 you can hook up a subwoofer instead of speakers to the surround back speaker terminals. Connect the positive wire to the right channel (+) terminal, and the negative wire to the left channel (–) terminal (see illustration on page 11).
Speaker terminals
10mm
1Twist exposed wire strands together.
2Loosen speaker terminal and insert exposed wire.
Make sure that all the bare speaker wire is twisted together and inserted fully into the speaker terminal. If any of the bare speaker wire is touching the back panel when you switch the unit on, the power may cut off as a safety measure. Use good quality speaker wire to connect the speakers to the receiver.
3Tighten terminal.
24
A and B speaker systems
The receiver has two speaker systems: A and B. A is the main system supporting the full speaker setup. If you switch on both A and B speaker systems, only the front speakers and the (active) subwoofer will be audible. No sound will come from the center, surround, or surround back speakers, but multi-channel sources will be down-mixed to the active speakers so no sound will be lost. Similarly, if you choose just the B system you‘ll only hear the front speakers connected to the B system and multi channel sources will be downmixed to these two speakers.
• Press the SPEAKERS button on the front panel to switch between speaker systems (A, B or both).
Hints on speaker placement
Speakers are usually designed with a particular placement in mind. Some are designed to be floorstanding, while others should be placed on stands to sound their best. Some should be placed near a wall; others should be placed away from walls. We have provided a few tips on getting the best sound from your speakers (following), but you should also follow the guidelines on placement that the speaker manufacturer provided with your particular speakers to get the most out of them.
•Place the front left and right speakers at equal distances from the TV.
•When placing speakers near the TV, we recommend using magnetically shielded speakers to prevent possible interference, such as discoloration of the picture when the TV is switched on. If you do not have magnetically shielded speakers and notice discoloration of the TV picture, move the speakers farther away from the TV.
En
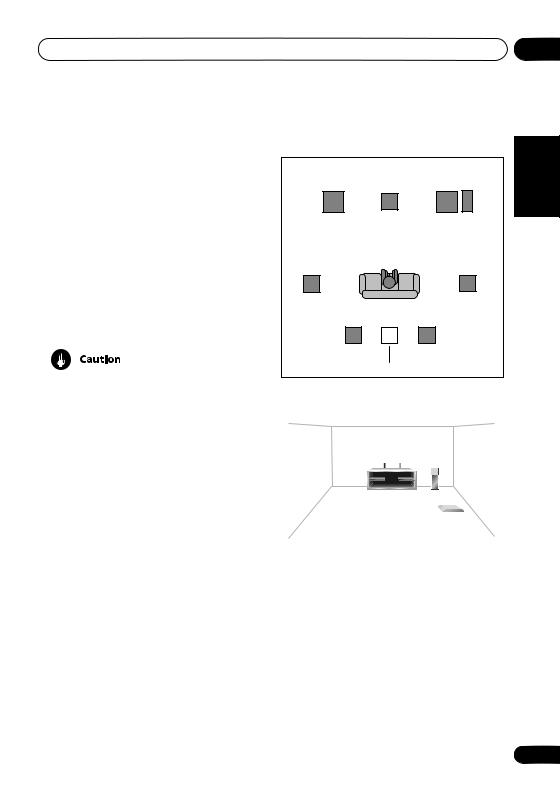
Connecting up
•Place the center speaker above or below the TV so that the sound of the center channel is localized at the TV screen.
•If possible, place the surround speakers slightly above ear level.
•Try not to place the surround speakers further away from the listening position than the front and center speakers. Doing so can weaken the surround sound effect.
•To achieve the best possible surround sound, install your speakers as shown below. Be sure all speakers are installed securely to prevent accidents and improve sound quality.
•If you choose to install the center speaker on top of the TV, be sure to secure it with putty, or by other suitable means, to reduce the risk of damage or injury resulting from the speaker falling from the TV in the event of external shocks such as earthquakes.
Overhead view of speaker setup
|
Front |
Front |
|
|
Left |
Center |
Right |
|
Subwoofer |
||
|
Surround |
Surround |
|
|
Left |
Right |
|
|
Listening Position |
||
|
Surround Back Left |
Surround Back Right |
Single Surround Back Speaker
3-D view of 6.1 channel speaker setup
3-D view of 7.1 channel speaker setup
04
Español Nederlands Deutsch Français Italiano English
25
En
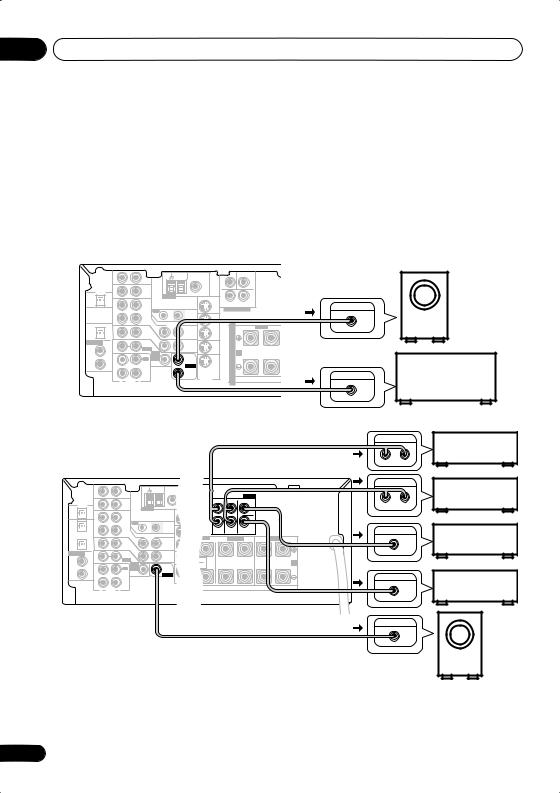
04 Connecting up
Connecting additional amplifiers
This receiver has more than sufficient power for any home use, however it is possible to add additional amplifiers to every channel on the VSX-D812/D912 or the surround back channel of the VSX-D712. Make the connections shown below to add amplifiers to power your speakers. Always make sure that the receiver is switched off and unplugged from the wall outlet before making or changing any connections.
• The arrows indicate the direction of the audio signal.
|
VSX-D712 |
||||||||||||||||||
|
AM |
FM UNBAL |
TERCEN- |
SUB WOOFER |
|||||||||||||||
|
AUX |
LOOP |
75 Ω |
Powered |
|||||||||||||||
|
IN |
||||||||||||||||||
|
DIGITAL |
||||||||||||||||||
|
OUT |
OPT |
IN |
CD |
ANTENNA |
MONITOR |
OUT |
R |
L |
subwoofer |
|||||||||
|
SURROUND |
INPUT |
|||||||||||||||||
|
OUT |
VCR / |
DVD 5.1CH INPUT |
||||||||||||||||
|
OUT |
IN |
|||||||||||||||||
|
DVR |
||||||||||||||||||
|
IN |
CONTROL |
OUT |
||||||||||||||||
|
OPT |
VIDEO |
|||||||||||||||||
|
VCR/ |
S |
R |
FRONT |
L |
CENTER |
R |
SURROUND |
L |
R |
FRONT |
L |
|||||||
|
1 |
TV / |
IN |
OUT |
DVR |
||||||||||||||
|
(TV / |
IN |
|||||||||||||||||
|
SAT |
P |
|||||||||||||||||
|
SAT) IN |
IN |
|||||||||||||||||
|
ASSIGNABLE |
COAX |
DVD |
E |
|||||||||||||||
|
DIGITAL |
2 |
/ LD |
MONITOR |
T V/ |
||||||||||||||
|
FRONT |
OUT |
SAT |
A |
|||||||||||||||
|
IN |
(CD) |
IN |
IN |
A |
B |
|||||||||||||
|
D V D |
||||||||||||||||||
|
COAX |
REC |
5.1CH |
SUB |
K |
Surround back |
|||||||||||||
|
OUT |
INPUT |
PREOUT |
DVD / |
|||||||||||||||
|
(DVD |
/ TAPE |
|||||||||||||||||
|
1 |
IN |
WOOFER |
E |
|||||||||||||||
|
CD-R |
LD |
|||||||||||||||||
|
/LD) |
IN |
/ MD |
SURROUND |
IN |
S |
ANALOG IN |
channel amplifier |
|||||||||||
|
PLAY |
S-VIDEO |
|||||||||||||||||
|
BACK |
R |
|||||||||||||||||
|
R |
AUDIO |
L |
or powered speaker |
|||||||||||||||
|
VSX-D812/D912 |
|||||||||||||||||||
|
OPT |
OPT |
AM |
FM |
||||||||||||||||
|
AUX |
LOOP |
75 Ω |
|||||||||||||||||
|
IN |
PREOUT |
||||||||||||||||||
|
COMPONENT |
L |
L |
SURROUND |
||||||||||||||||
|
DIGITAL |
VIDEO |
ASSIGNABLESSIG |
|||||||||||||||||
|
( TV / |
¥ |
(CD-R/ |
ø |
1 |
2 |
COMPONENT |
BACK |
||||||||||||
|
OUT |
VIDEO |
||||||||||||||||||
|
OPT |
IN |
SAT) |
/ TAPECD |
DIGITALANTENNAOUT |
|||||||||||||||
|
/ MD) |
MONITOR |
OUT |
|||||||||||||||||
|
OPT |
OUT |
VCR / |
OUT |
IN |
|||||||||||||||
|
2 |
DVR |
Y |
PPBB |
PPRR |
R |
R |
|||||||||||||
|
(CD-R/TAPE/MD) |
IN |
CONTROL |
FRONT |
SURROUND |
CENTER |
||||||||||||||
|
FRONT |
VIDEO |
CENTER |
|||||||||||||||||
|
OPT |
S |
R |
SURROUND |
FRONT |
|||||||||||||||
|
1 |
L |
L |
R |
L |
R |
L |
|||||||||||||
|
TV / |
IN |
OUT |
|||||||||||||||||
|
(TV / |
P |
||||||||||||||||||
|
IN |
SAT |
||||||||||||||||||
|
SAT) |
IN |
||||||||||||||||||
|
ASSIGNABLE |
COAX |
E |
DVD |
||||||||||||||||
|
MONITOR |
|||||||||||||||||||
|
DIGITAL |
2 |
A |
/ |
LD |
|||||||||||||||
|
A FRONT |
OUT |
B |
|||||||||||||||||
|
IN |
(CD) |
IN |
D V D |
||||||||||||||||
|
COAX |
K |
7.1CH |
SUB |
||||||||||||||||
|
E |
REC |
INPUT |
|||||||||||||||||
|
1 |
WOOFER |
||||||||||||||||||
|
OUT |
CD-R |
IN |
PREOUT |
||||||||||||||||
|
(DVD |
R |
/ TAPE |
|||||||||||||||||
|
/LD) |
/ MD |
||||||||||||||||||
|
IN |
S |
PLAY |
|||||||||||||||||
|
R |
AUDIO |
L |
ANALOG IN
L R
ANALOG IN
L R
ANALOG IN
ANALOG IN
Front channel amplifier
Surround channel amplifier
Surround back channel amplifier
Center channel amplifier
INPUT
Powered subwoofer
26
En
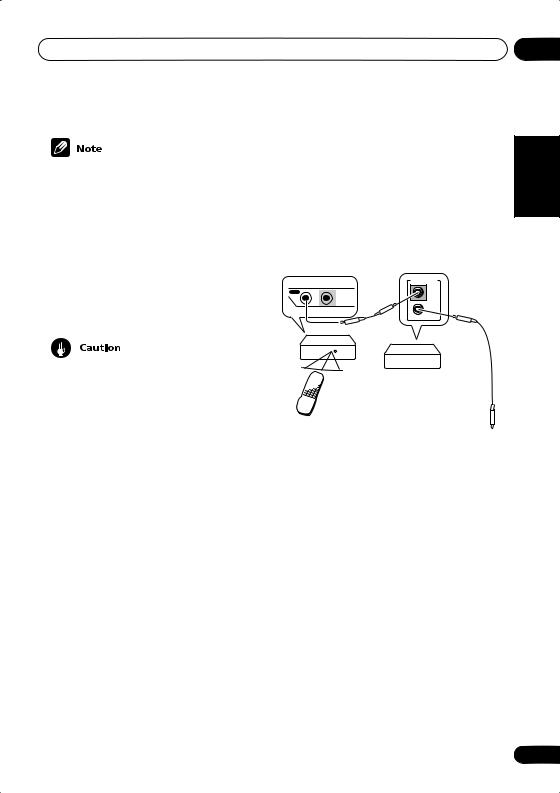
Connecting up
•To hear sound only from the pre-outs, disconnect any speakers that are connected directly to the receiver.
•If you’re not using a subwoofer, change the front speaker setting (see Speaker setting on page 44) to large.
•VSX-D712 only – If you connect to a surround back speaker, make sure the
Surround back speaker setting on page 45 is switched on and set to the proper speaker size.
•These speaker terminals are hazardous when live. To prevent the risk of electric shock when connecting or disconnecting the speaker cables, disconnect the power cord.
Power cord caution
Handle the power cord by the plug. Do not pull out the plug by tugging the cord and never touch the power cord when your hands are wet as this could cause a short circuit or an electric shock. Do not place the unit, a piece of furniture, etc., on the power cord, or pinch the cord. Never make a knot in the cord or tie it with other cords. The power cords should be routed such that they are not likely to be stepped on. A damaged power cord can cause a fire or give you an electrical shock. Check the power cord once in a while. When you find it damaged, ask your nearest Pioneer authorized service center or your dealer for a replacement.
04
|
Operating other Pioneer |
English |
|||
|
components |
||||
|
By connecting a control cord (optional), you |
||||
|
can point the remote controls of other Pioneer |
||||
|
components at the receiver’s remote sensor. |
||||
|
The remote control signals are received by the |
||||
|
remote sensor of this unit, and sent to the |
||||
|
other devices via the CONTROL OUT terminal |
Italiano |
|||
|
of the receiver. |
||||
|
CONTROL |
||||
|
OUT |
IN |
IN |
||
|
CONTROL |
OUT |
|||
|
Receiver |
Français |
|||
|
Remote |
with CONTROL terminals |
|||
|
Other Pioneer products |
||||
|
control |
Connect to CONTROL |
|||
|
unit |
||||
|
terminal of other |
Deutsch |
|||
|
compatible Pioneer products |
||||
|
Nederlands |
||||
|
Español |
27
En
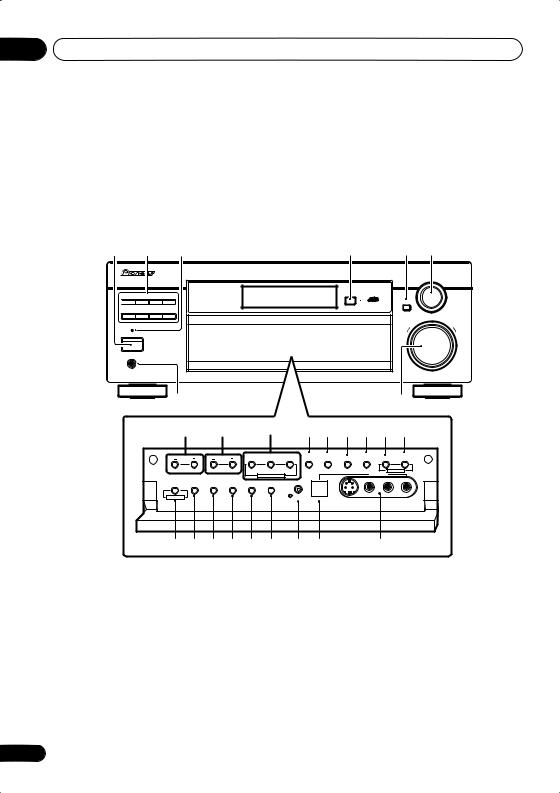
05 Controls and displays
Chapter 5:
Controls and displays
Front panel
|
1 |
2 |
3 |
4 |
5 |
6 |
DVD/LD TV/SAT VCR/DVR VIDEO
CD-R/
CD TAPE/MD TUNER AUX
STANDBY
 STANDBY/ON
|
MULTI JOG |
|
|
ENTER |
|
|
MASTER VOLUME |
|
|
DOWN |
UP |
|
8 |
7 |
||||||||||
|
9 |
10 |
11 |
12 |
13 |
14 |
15 |
16 |
17 |
|||
|
ADVANCED |
STEREO/ |
SIGNAL |
MIDNIGHT/ |
SB CH |
TONE |
QUICK |
|||||
|
STATION |
TUNING |
STANDARD |
SURROUND |
DIRECT |
SELECT |
LOUDNESS |
SPEAKERS |
MODE |
SETUP |
||
|
PHONES SURR. |
MULTI JOG |
||||||||||
|
LISTENING MODE |
VIDEO INPUT |
||||||||||
|
MPX |
PTY |
EON |
|||||||||
|
TUNER EDIT CLASS |
BAND |
SEARCH |
MODE |
|
MULTI JOG |
SETUP |
DIGITAL IN |
||||||||
|
MIC |
S-VIDEO |
VIDEO |
L AUDIO R |
|||||||
|
26 |
25 |
24 |
23 |
22 |
21 |
20 |
19 |
18 |
1 STANDBY/ON
Switches the receiver between on and standby.
2Input select buttons
Press to select an input source.
3STANDBY indicator
Lights when the receiver is in standby.
4 Remote sensor
Receives the signals from the remote control.
5ENTER
6MULTI JOG dial
The MULTI JOG dial performs a number of tasks. Use it to select options after pressing
TONE, QUICK SETUP or TUNER EDIT.
7MASTER VOLUME
8PHONES jack
Use to connect headphones. When the headphones are connected, there is no sound output from the speakers.
28
En

Controls and displays
9 STATION +/– buttons
Selects station presets when using the tuner (page 55).
10 TUNING +/– buttons
Selects the frequency when using the tuner (page 52).
11LISTENING MODE buttons
STANDARD
Press for Standard decoding and to switch between the various Pro Logic II and Neo:6 options (page 37).
ADVANCED SURROUND
Use to switch between the various surround modes (page 38).
STEREO/DIRECT
Switches between direct and stereo playback. Direct playback bypasses the tone controls and channel levels for the most accurate reproduction of a source (page 38).
12SIGNAL SELECT
Use to select an input signal (page 36).
13 MIDNIGHT/LOUDNESS
Use Midnight when listening to movie soundtracks at low volume. Use Loudness to boost the bass and treble at low volume (page 41).
14 SPEAKERS
Use to cycle through the speaker system: A B A+B (page 24)
15 SB CH MODE
Selects the Surround back channel mode (page 39) and the Virtual Surround Back (VSB) mode (page 40).
16 TONE
Press this button to access the bass and treble controls, which you can then adjust with the MULTI JOG dial (page 41).
05
|
17 QUICK SETUP |
English |
||
|
See Using the Quick Setup on page 12. |
|||
|
18 VIDEO INPUT |
|||
|
See Connecting to the front panel video |
|||
|
terminal on page 20. |
|||
|
19 DIGITAL IN |
|||
|
VSX-D912 only |
|||
|
Italiano |
|||
|
See Connecting to the front panel video |
|||
|
terminal on page 20. |
|||
|
20 SETUP MIC |
|||
|
VSX-D912 only |
|||
|
Connect the microphone supplied with your |
|||
|
system to the SETUP MIC jack when using the |
Français |
||
|
auto surround setup (MCACC) (page 14). |
|||
|
21 EON MODE |
|||
|
Use to search for different programs that are |
|||
|
transmitting traffic or news information (this |
|||
|
search method is called EON) (page 57). |
|||
|
22 PTY SEARCH |
Deutsch |
||
|
Use to search for different program types in |
|||
|
RDS mode (page 56). |
|||
|
23 MPX |
|||
|
Press to receive a radio broadcast in mono |
|||
|
(page 52). |
Nederlands |
||
|
24 BAND |
|||
|
Switches between AM and FM radio bands |
|||
|
(page 52). |
|||
|
25 CLASS |
|||
|
Switches between the three banks (classes) |
|||
|
of station presets (page 53). |
|||
|
26 TUNER EDIT |
Español |
||
|
Press to memorize and name a station for |
|||
|
recall (page 53). |
29
En
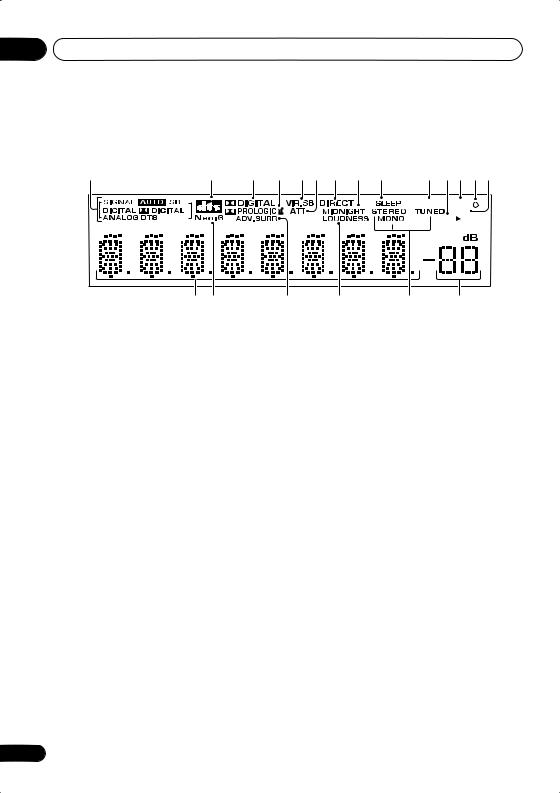
05 Controls and displays
Display
|
1 |
2 |
3 |
4 |
5 |
6 |
7 |
8 |
9 |
10 |
1112 1314 |
|
15 16 |
17 |
18 |
19 |
20 |
|
1 SIGNAL SELECT indicators |
3 |
2 DIGITAL |
||
|
Lights to indicate the type of input signal |
When the STANDARD mode of the receiver is |
|||
|
assigned for the current component: |
on, this lights to indicate decoding of a Dolby |
|||
|
AUTO |
Digital signal. |
|||
Lights when AUTO signal select is on.
SB
Depending on the source, this lights when a signal with surround back channel encoding is detected.
DIGITAL
Lights when a digital audio signal is detected.
2 DIGITAL
Lights when a Dolby Digital encoded signal is detected.
ANALOG
Lights when an analog signal is detected.
DTS
Lights when a source with DTS encoded audio signals is detected.
2 DTS
When the STANDARD mode of the receiver is on, this lights to indicate decoding of a DTS signal.
4 2 PRO LOGIC II
When the (STANDARD) Pro Logic II mode of the receiver is on, this lights to indicate Pro Logic II decoding.
5 VIR.SB
Lights during Virtual surround back processing.
6 ATT
Lights when INPUT ATT is used to attenuate (reduce) the level of the analog input signal.
7 DIRECT
Lights when source direct playback is in use. Direct playback bypasses the tone controls and channel levels for the most accurate reproduction of a source.
8 MIDNIGHT
Lights during Midnight listening.
9 SLEEP
Lights when the receiver is in sleep mode.
10 RF ATT
Lights when the RF attenuator is on (page 52).
30
En
![]()
Controls and displays
11 Speaker indicator
Shows the speaker system currently in use.
12 EON
When the EON mode is set. the EON indicator lights, but during actual reception of an EON broadcast the EON indicator will flash.
13  indicator
The  indicator lights to inform you that the currently tuned station carries the EON data service.
14 RDS
Lights when an RDS broadcast is received.
15Character display
16Neo:6
When the (STANDARD) NEO:6 mode of the receiver is on, this lights to indicate NEO:6 processing.
17ADV.SURR. (Advanced Surround)
Lights when one of the Advanced Surround modes has been selected.
18LOUDNESS
Lights when LOUDNESS has been selected.
19TUNER indicators
STEREO
Lights when a stereo FM broadcast is being received in auto stereo mode.
MONO
Lights when the mono mode is set using the MPX button.
TUNED
Lights when a broadcast is being received.
20Master volume level
Shows the overall volume level. —dB indicates the minimum level, and — 0 dB indicates the maximum level.
Depending on your level settings for each channel, the maximum volume can range between –10 dB and –0 dB.
05
Español Nederlands Deutsch Français Italiano English
31
En

05 Controls and displays
Remote control
|
10 |
||||||||
|
RECEIVER |
SOURCE |
11 |
||||||
|
1 |
INPUT SELECT |
12 |
||||||
|
MULTI CONTROL |
||||||||
|
2 |
DVD/LD |
TV / SAT |
VCR/DVR |
TV CONT |
||||
|
C D |
CD-R/TAPE |
TUNER |
RECEIVER |
|||||
|
STANDARD |
ADVANCED |
STEREO/ |
MIDNIGHT/ |
|||||
|
SURROUND |
DIRECT |
LOUDNESS |
||||||
|
3 |
CH |
TEST |
||||||
|
SELECT |
LEVEL |
TONE |
||||||
|
EFFECT |
FL |
|||||||
|
DIMMER |
||||||||
|
MUTE |
||||||||
|
RECEIVER CONTROL |
||||||||
|
4 |
MASTER |
|||||||
|
VOLUME |
||||||||
|
5 |
TOP MENU |
SETUP |
MENU |
5 |
||||
|
T U N E |
||||||||
|
INPUT ATT |
||||||||
|
6 |
ST |
ST |
T.EDIT |
|||||
|
ENTER |
||||||||
|
GUIDE |
||||||||
|
AUDIO |
SUBTITLE |
|||||||
|
T U N E |
||||||||
|
MCACC |
||||||||
|
SETUP |
SLEEP |
|||||||
|
RETURN |
BAND |
A |
RF ATT |
|||||
|
7 |
B DISPLAY |
C CLASS |
D |
MPX |
E D.ACCESS |
|||
|
1 |
2 |
3 |
DISC |
13 |
||||
|
ENTER |
||||||||
|
8 |
+10 |
|||||||
|
4 |
5 |
6 |
||||||
|
7 |
8 |
9 |
0 |
|||||
|
T V |
CONTROL |
|||||||
|
9 |
CHANNEL |
INPUT |
CHANNEL |
VOLUME |
14 |
|||
|
SELECT |
RECEIVER
1 RECEIVER
This switches between standby and on for this receiver.
2 MULTI CONTROL buttons
Press to select control of other components (see Controlling the rest of your system on page 60).
32
RECEIVER
Switches the remote to control the receiver (used to select the features such as SLEEP, MCACC SETUP, etc). Also use this button to set up surround sound (page 43, page 49).
3RECEIVER CONTROL buttons
STANDARD
Press for Standard decoding and to switch between the various Pro Logic II and Neo:6 options (page 37).
ADVANCED SURROUND
Use to switch between the various surround modes (page 38).
STEREO/DIRECT
Switches between direct and stereo playback. Direct playback bypasses the tone controls and channel levels for the most accurate reproduction of a source (page 38).
MIDNIGHT/LOUDNESS
Switches to Midnight or Loudness listening (page 41).
CH SELECT
Selects a speaker when setting up the surround sound of the receiver (page 51).
LEVEL +/–
Adjusts the levels of the surround sound of the receiver (page 51).
TEST TONE
Sounds the test tone when setting up the surround sound of the receiver (page 51).
MUTE
Mutes the sound (or restores the sound if it has been muted).
EFFECT +/–
Adds or subtracts the amount of effect with different advanced surround modes (page 38).
En

Controls and displays
FL DIMMER
Dims or brightens the display.
4MASTER VOLUME +/–
Use to set the listening volume.
5Receiver and component control buttons (Press the corresponding MULTI CONTROL button first to access).
These controls function according to the component you’ve selected.
TOP MENU
Displays the disc ‘top’ menu of a DVD.
AUDIO
Changes the audio language or channel with DVD discs.
MCACC SETUP
Use to setup your speaker system using the multi-channel acoustic calibration system.
MENU
Displays the disc menu of DVD-Video discs. It also displays TV and DTV menus.
INPUT ATT
Attenuates (lowers) the level of an analog input signal to prevent distortion.
T.EDIT
Use to memorize and name a station for recall using the STATION +/– buttons (page 53).
GUIDE
Displays the guides on a digital TV.
SUBTITLE
Displays/changes the subtitles included in multilingual DVD-Video discs.
SLEEP
Use to put the receiver in sleep mode and select the amount of time before the receiver turns off.
6(TUNE +/–, ST +/–) /ENTER
Use the arrow buttons when setting up your surround sound system (see page 43). Also used to control DVD
menus/options and for deck 1 of a double cassette deck player. Use the TUNE +/– buttons to find radio frequencies and use ST +/– to find preset stations (page 55).
7Component/Tuner control buttons
The main buttons ( , , etc.) are used to control a component after you have selected it using the MULTI CONTROL buttons. The tuner/DTV controls above these buttons can be accessed after you have selected the corresponding MULTI CONTROL button (TUNER or TV/SAT (when connected to DTV)).
RETURN
Returns to the last screen selected when using a digital TV tuner.
BAND
Switches between the tuner AM and FM bands (page 52).
RF ATT
Use to lower the input level of a radio signal that is too powerful or contains interference that causes the sound to distort (page 52).
DISPLAY
Use to switch the display between the station preset name, frequency and RDS data when using the tuner.
CLASS
Switches between the three banks (classes) of radio station presets (page 53).
MPX
Switches between stereo and mono reception of FM broadcasts. If the signal is weak then switching to mono will improve the sound quality (page 52).
05
Español Nederlands Deutsch Français Italiano English
33
En

05 Controls and displays
D.ACCESS
After pressing, you can access a radio station directly using the number buttons (page 52).
8 Number buttons
Use the number buttons to directly select a radio frequency (page 52) or the tracks on a CD, DVD, etc.
9 CHANNEL +/–
Use to select channels when using a VCR, DVR, etc.
10 INPUT SELECT
Use to select the input source.
11 LED
This lights when a command is sent from the remote control.
12 SOURCE
Press to turn on/off other components connected to the receiver.
13 DISC (ENTER)
The button’s use depends on the component selected. It can be used to enter commands for TV or DTV, and can also be used to select a disc in a multi-CD player.
14 TV CONTROL buttons
These buttons are dedicated to control the TV assigned to the TV CONT button. Thus if you only have one TV to hook up to this system assign it to the TV CONT MULTI CONTROL button. If you have two TVs, assign the main TV to the TV CONT button.
Use to turn on/off the power of the TV.
(TV CONTROL) INPUT SELECT
Use select the TV function.
CHANNEL +/–
Use to select channels.
VOLUME +/–
Use to adjust the volume on your TV.
34
En

Playing sources
Chapter 6:
Playing sources
Introduction to Sound Modes
There are three basic sound options: Stereo/ Direct (STEREO/DIRECT), Standard (STANDARD) or Advanced Surround (ADVANCED SURROUND).
Stereo/Direct
When you select STEREO or DIRECT, you will hear the source through just the front left and right speakers (and possibly your subwoofer depending on your speaker settings). Dolby Digital and DTS multichannel sources are downmixed to stereo.
In STEREO, you’ll hear the audio with your surround settings and you can still use the Midnight, Loudness, and Tone control functions.
With DIRECT, you will bypass all effects and surround settings so that the audio remains as close to the source audio signal as possible.
•If you switch on Midnight listening, Loudness, or the Tone controls when DIRECT is selected, the receiver automatically switches to STEREO.
Standard mode
The Standard mode can be used to decode Dolby Digital, DTS, and Dolby Surround sources.
The other surround sound options (next column) can add multi-channel sound to regular stereo sources.
You can identify Dolby Digital software by the
1 or  marks. Most Dolby Surround software is marked 3, but unmarked software may also incorporate Dolby Surround. Depending on the source and the sound mode you have selected, you may not get sound from the surround back speakers in your setup. For more on this, refer to Using the Virtual Surround Back mode (VSB) on page 40 and Using the Surround Back Channel (SB CH) on page 39.
Choose one of the following to add depth to a 2 channel source:
Pro Logic II Movie (MOVIE)
This mode gives 5.1 channel surround sound. It is suitable for movies, especially those recorded in Dolby Surround. The channel separation and movement of surround effects is comparable to Dolby Digital 5.1.
Pro Logic II Music (MUSIC)
This mode gives 5.1 channel surround sound and is suitable for music. The surround effect is more enveloping than Pro Logic II Movie.
Pro Logic (PROLOGIC)
This mode gives 4.1 channel surround sound. It is less sensitive to the quality of the source material, so may be useful when Pro Logic II Movie/ Music modes don’t give good results.
Neo:6 Cinema (CINEMA)
This mode gives 6.1 channel surround sound and is suitable for movies. The Neo:6 Cinema mode delivers good channel separation for movie soundtracks.
06
Español Nederlands Deutsch Français Italiano English
35
En

06 Playing sources
Neo:6 Music (MUSIC)
This mode gives 6.1 channel surround sound and is suitable for music. The Neo:6 Music mode plays the stereo source as is through the front left/right speakers, and generates a natural, ambient surround and center sound.
Advanced Surround modes
These are designed to be used with multichannel surround sound audio/visual sources (like DVDs and LDs). Most Advanced Surround modes are designed to be used with film soundtracks, but some modes are also suited for music sources. Try different settings with various soundtracks to see which you like.
Sports (SPORTS)
This is designed for sports programs with alot of action, adding to the excitement by bringing background action to the forefront.
Game (GAME)
Useful when playing video games. It works especially well with sound moving from left to right in game software with alot of movement.
Expanded (EXPANDED)
This mode is especially designed to give sound depth to stereo sources, and lets you hear two-channel (stereo) signals as simulated multi-channel surround sound. Use with Dolby Pro Logic for a stereo surround effect. You can also use with Dolby Digital sources for a wider stereo field than the STANDARD modes.
•Depending on the source and the sound mode you have selected, you may not get sound from the surround back speakers in your setup. For more on this, refer to
Using the Virtual Surround Back mode (VSB) on page 40 and Using the Surround Back Channel (SB CH) on page 39.
Advanced Movie (ADV. MOVIE)
Simulates the relaxed environment of a movie theater, and is suitable for watching movies.
Advanced Music (ADV. MUSIC)
Simulates the acoustic environment of a large concert hall and is suitable for music or musical sources.
6-Channel Stereo (6-STEREO)
This can be selected to give multi-channel sound to a stereo source, using all of the speakers in your setup.
Phones Surround (PHONES SURROUND)
When listening through headphones, you can still get the effect of overall surround.
Choosing the input signal
• Default setting: AUTO
You need to hook up a component to both analog and digital inputs on the rear of the receiver to select between input signals.
TV Surround (TV. SURR.)
This mode produces surround sound for both mono and stereo TV sources. It is useful for older movies recorded with mono soundtracks.
|
ADVANCED |
STEREO/ |
SIGNAL |
MIDNIGHT/ |
SB CH |
TONE |
QUICK |
|||||
|
STANDARD SURROUND |
DIRECT |
SELECT |
LOUDNESS SPEAKERS |
MODE |
SETUP |
||||||
|
PHONES SURR. |
MULTI JOG |
|||
|
LISTENING MODE |
VIDEO INPUT |
|||
|
PTY |
EON |
|||
|
SEARCH |
MODE |
|||
|
SETUP |
DIGITAL IN |
|||
|
MIC |
||||
|
S-VIDEO |
VIDEO |
L AUDIO R |
36
En

Playing sources
• Press SIGNAL SELECT (front panel) to select the input signal corresponding to the source component.
Each press cycles through the options as follows:
|
AUTO |
||
|
DIGITAL |
DVD 5.1 ch/ |
|
|
DVD 7.1 ch |
||
|
ANALOG |
The AUTO setting automatically switches to DIGITAL if a digital source is detected, otherwise the signal select will be ANALOG.
DVD 5.1ch (VSX-D712) and DVD 7.1ch (VSXD812/D912) will only appear when DVD/LD is selected.
When set to DIGITAL or AUTO, 2 DIGITAL lights when a Dolby Digital signal is input, and DTS lights when a DTS signal is input.
•This receiver can only play back Dolby Digital, PCM (32kHz–96 kHz) and DTS digital signal formats (however, only the VSX-D812 and VSX-D912 can decode DTS 96kHz/24 bit signal formats). With other digital signal formats, set to ANALOG.
•You may get digital noise when a LD or CD player compatible with DTS is playing an analog signal. To prevent noise, make the proper digital connections (page 17) and set the signal input to DIGITAL.
•Some DVD players don’t output DTS signals. For more details, refer to the instruction manual supplied with your DVD player.
Listening to multi-channel playback
RECEIVER
INPUT SELECT
MULTI CONTROL
|
DVD/LD |
TV/SAT |
VCR/DVR |
TV CONT |
|
CD |
CD-R/TAPE |
TUNER |
|
|
STANDARD |
1Switch on the playback component.
2Turn on the power of the receiver.
3Select the source you want to playback.
Use the MULTI CONTROL buttons (or INPUT SELECT).
4Press STANDARD.
If the source is Dolby Digital, DTS, or Dolby Surround encoded, the proper decoding format will automatically be selected and shows in the display.
If you are listening to a two channel source, each press changes the display as follows:
MOVIE
(2 Pro Logic II)
|
MUSIC |
MUSIC |
|
(Neo:6) |
(2 Pro Logic II) |
|
CINEMA |
PROLOGIC |
|
(Neo:6) |
Refer to page 35 for more details about each mode.
06
Español Nederlands Deutsch Français Italiano English
37
En

06 Playing sources
5 Start playback of the component you selected in step 1.
•You can’t use the STANDARD mode with 96kHz PCM or DTS 96kHz/24-bit stereo sources.
Using Stereo/Direct
When you select STEREO or DIRECT, you will hear the source through just the front left and right speakers (and possibly your subwoofer depending on your speaker settings). Dolby Digital and DTS multichannel sources are downmixed to stereo. See page 35 for more on these modes.
• Press STEREO/DIRECT repeatedly to switch between the two options.
•If you switch on Midnight listening, Loudness, or the Tone controls when DIRECT is selected, the receiver automatically switches to STEREO.
Using Advanced Surround
When you select one of the Advanced Surround options, Dolby Pro Logic, Dolby Digital and DTS decoding is done automatically corresponding to the input signal. Use Advanced Surround to add effects to the surround sound.
• Press ADVANCED SURROUND repeatedly to cycle the sound options.
Each press changes the display as follows:
|
ADV. |
ADV. |
TV SURR. |
||
|
MOVIE |
MUSIC |
|||
|
6-STEREO |
SPORTS |
|||
|
EXPANDED |
GAME |
Refer to page 36 for more details about each surround effect.
•If you press ADVANCED SURROUND when the headphones are connected, the PHONES SURROUND mode will automatically be selected.
•You can’t use the Advanced Surround listening modes with 96kHz PCM or DTS 96kHz/24 bit signal formats.
•The Advanced Surround effects can be adjusted in the range of 10 to 90 by pressing EFFECT +/– . The effect level can be set for each Advanced Surround mode. The Standard (STANDARD) mode cannot be changed.
38
En

Playing sources
Using the Surround Back
Channel (SB CH)
•Default setting: SB ON (VSX-D812/D912), SB OFF (VSX-D712)
You can have the receiver automatically switch to Dolby Digital EX or DTS-ES decoding for 6.1 encoded sources (SB AUTO), or you can choose to listen to other kinds of sources (for example, 5.1 encoded material) with 6.1 encoding (SB ON). With 5.1 encoded sources, a surround back channel will be generated, but the material may sound better in the 5.1 format for which it was originally encoded, in which case you can simply switch the surround back channel off (SB OFF).
The table indicates when you will hear the surround back channel.
• Press SB CH MODE (front panel) repeatedly to cycle the surround back channel options.
Each press cycles through the options as follows:
 SB ON
SB ON
SB OFF
SB AUTO
•You can’t use the surround back channel if the Surround back speaker setting on
page 45 is set to SB  .or SB SW (VSXD812/D912 only).
•You can’t hear the surround back channel with DTS 96kHz/24 bit sources.
06
Français Italiano English
|
STANDARD |
ADVANCED SURROUND |
|||||
|
Type of source |
SB CH |
STANDARD |
PL ll MOVIE/ |
NEO:6 CINEMA/ |
||
|
MODE |
PL ll MUSIC/ |
All modes |
||||
|
decoding |
NEO:6 MUSIC |
|||||
|
PRO LOGIC |
||||||
|
DTS-ES/Dolby Digital |
ON |
|||||
|
Matrix encoded |
||||||
|
multi-channel sources |
AUTO |
|||||
|
with 6.1 surround |
||||||
|
Dolby Digital/DTS |
ON |
|||||
|
encoded multi-channel |
||||||
|
sources |
AUTO |
|||||
|
Dolby Digital/DTS |
ON |
|||||
|
encoded stereo sources, |
||||||
|
Stereo sources |
AUTO |
|||||
|
Analog 2-channel |
ON |
|||||
|
(stereo) source |
||||||
|
AUTO |
Español Nederlands Deutsch
39
En

06 Playing sources
Using the Virtual Surround Back mode (VSB)
Selecting this mode allows you to hear a virtual back channel through your surround speakers. For example, you can choose to listen to sources with no surround back channel information (for example, 5.1 encoded material) with emulated 6.1 encoding (VSB ON). Sometimes the material may sound better in the 5.1 format for which it was originally encoded. In this case you can have the receiver only apply this effect to 6.1 encoded sources like Dolby Digital EX or DTSES (VSB AUTO), or you can simply switch it off (VSB OFF).
The table indicates when you will hear the virtual surround back channel.
• Press SB CH MODE (front panel) repeatedly to cycle the virtual surround back channel options.
Each press cycles through the options as follows:
 VSB ON
VSB OFF
VSB AUTO
•You can’t use the Virtual Surround Back mode if the Speaker setting on page 44 is set to S .
.
•You can only use the Virtual Surround Back mode if the Surround back speaker
setting on page 45 is set to SB  or SB SW (VSX-D812/D912 only).
•You can’t adjust the surround back channel level when you’re listening to the virtual surround back channel.
|
Virtual |
STANDARD |
ADVANCED SURROUND |
||||
|
PL ll MOVIE/ |
||||||
|
Type of source |
Surround |
STANDARD |
NEO:6 CINEMA/ |
|||
|
PL ll MUSIC/ |
All modes |
|||||
|
Back mode |
decoding |
NEO:6 MUSIC |
||||
|
PRO LOGIC |
||||||
|
DTS-ES/Dolby Digital |
ON |
|||||
|
Matrix encoded |
||||||
|
multi-channel sources |
AUTO |
|||||
|
with 6.1 surround |
||||||
|
Dolby Digital/DTS |
ON |
|||||
|
encoded multi-channel |
||||||
|
sources |
AUTO |
|||||
|
Dolby Digital/DTS |
ON |
|||||
|
encoded stereo sources, |
||||||
|
Stereo sources |
AUTO |
|||||
|
Analog 2-channel |
ON |
|||||
|
(stereo) source |
||||||
|
AUTO |
40
En
![]()
Playing sources
Using Midnight and Loudness listening
The Midnight listening feature allows you to hear effective surround sound of movies at low volume levels. The effect automatically adjusts according to the volume at which you’re listening.
The Loudness listening feature can be used to get good bass and treble from music sources at low volume levels.
• Press MIDNIGHT/LOUDNESS.
Each press cycles through the effects as follows:
 MIDNIGHT
Off
LOUDNESS
1Press TONE to select the frequency you want to adjust.
Each press switches between BASS and
TREBLE.
2Use the MULTI JOG dial to change the amount of bass or treble as necessary.
Wait about five seconds for your changes to be input automatically.
•You can only use the tone controls when
STEREO/DIRECT is selected. DIRECT will switch to STEREO when the tone controls are used.
•The tone controls affect SPEAKER A only. They can’t be used when SPEAKER A is switched off.
•You can’t use MIDNIGHT/LOUDNESS when DVD 5.1 ch/DVD 7.1 ch has been selected, or when listening to a DTS 96kHz/24 bit source.
Using the tone controls
Depending on what you are listening to, you may want to adjust the bass or treble using the front panel tone control.
Playing other sources
RECEIVER
INPUT SELECT
MULTI CONTROL
|
DVD/LD |
TV/SAT |
VCR/DVR |
TV CONT |
|
CD |
CD-R/TAPE |
TUNER |
MULTI JOG
ENTER
|
MASTER VOLUME |
||||||
|
SIGNAL |
MIDNIGHT/ |
SB CH |
TONE |
QUICK |
||
|
SELECT |
LOUDNESS SPEAKERS |
MODE |
SETUP |
|||
|
DOWN |
UP |
|||||
|
MULTI JOG |
||||||
|
VIDEO INPUT |
||||||
|
SETUP |
DIGITAL IN |
|||||
|
MIC |
||||||
|
S-VIDEO |
VIDEO |
L |
AUDIO R |
1Turn on the power of the playback component.
2Turn on the power of the receiver.
3Select the source you want to playback.
Use the MULTI CONTROL buttons (or INPUT SELECT).
06
Español Nederlands Deutsch Français Italiano English
41
En

06 Playing sources
4 Start playback of the component you selected in step 1.
Selecting the multi-channel analog inputs
If you have connected a decoder or a DVD player with multi-channel analog outputs to this receiver (page 19), you must select the analog multi-channel inputs for surround sound playback.
•When playback from the multi-channel inputs is selected, you can’t use the
INPUT ATT, TONE, and MIDNIGHT/ LOUDNESS buttons, as well as the STANDARD, ADVANCED SURROUND, and STEREO/DIRECT sound modes.
•When playback from the multi-channel inputs is selected, only the volume and channel levels can be set.
Using the sleep timer
|
DVD/LD |
TV/SAT |
VCR/DVR |
VIDEO |
The sleep timer switches the receiver into |
||||
|
CD |
CD-R/ |
AUX |
standby after a specified amount of time so |
|||||
|
TAPE/MD |
TUNER |
you can fall asleep without worrying about the |
||||||
|
STATION |
TUNING |
ADVANCED |
STEREO/ |
|||||
|
STANDBY |
STANDARD SURROUND |
DIRECT |
||||||
|
receiver being left on all night. Use the remote |
||||||||
|
STANDBY/ON |
TUNER EDIT CLASS |
BAND MPX SEARCH |
MODE |
|||||
|
PHONES SURR. |
||||||||
|
LISTENING MODE |
||||||||
|
PTY |
EON |
control to set the sleep timer. |
||||||
|
MULTI JOG |
||||||||
|
PHONES |
||||||||
|
1 Press RECEIVER. |
||||||||
|
2 Press SLEEP repeatedly to set the sleep |
||||||||
|
time. |
|
ADVANCED |
STEREO/ |
SIGNAL |
MIDNIGHT/ |
SB CH |
TONE |
QUICK |
|||||
|
STANDARD SURROUND |
DIRECT |
SELECT |
LOUDNESS SPEAKERS |
MODE |
SETUP |
||||||
|
PHONES SURR. |
MULTI JOG |
|||
|
LISTENING MODE |
VIDEO INPUT |
|||
|
PTY |
EON |
|||
|
SEARCH |
MODE |
|||
|
SETUP |
DIGITAL IN |
|||
|
MIC |
||||
|
S-VIDEO |
VIDEO |
L AUDIO R |
1 Press DVD/LD.
2 Press SIGNAL SELECT repeatedly to select DVD 5.1ch/DVD 7.1ch.
To cancel playback from the multi-channel inputs, use the SIGNAL SELECT button to select a different input signal.
•You can check the remaning sleep time at any time by pressing SLEEP once. Pressing repeatedly will cycle through the sleep options again.
•You can also switch off the sleep timer simply by switching off the receiver.
42
En

Setting up
Chapter 7:
Setting up
Choosing your receiver setup
To ensure the best possible surround sound, be sure to complete the following set up operations. This is particularly important when using DTS and Dolby surround. You only need to make these settings once (unless you change the placement of your current speaker system or add new speakers, etc.). Refer to the following pages for details on each of the settings.
RECEIVER
RECEIVER
ENTER
1 Press RECEIVER to turn the power on.
The STANDBY indicator goes out.
2Press RECEIVER.
3Use or to choose the option you want to adjust.
It will be easiest to adjust each of the settings in turn, following the order below (and on the following pages). The current setting is shown for each option as you cycle through the display.
Speaker setting (page 44)
Specify the number and type of speakers you have connected.
Surround back speaker setting
(page 45)
Specify your surround back speaker/ surround back subwoofer setup.
Subwoofer setting (page 45) Specify how the subwoofer is used.
Crossover frequency setting (page 45) Determine which frequencies will be sent to the subwoofer (or large speakers).
LFE attenuator setting (page 46) Choose the attenuator level for the LFE channel.
Front left speaker distance setting
(page 46)
Specify the distance from your listening position to your front left speaker.
Center speaker distance setting
(page 46)
Specify the distance from your listening position to your center speaker.
Front right speaker distance setting
(page 47)
Specify the distance from your listening position to your front right speaker.
Surround right speaker distance setting (page 47)
Specify the distance from your listening position to your surround right speaker.
07
Español Nederlands Deutsch Français Italiano English
43
En

07 Setting up
Surround back speaker distance setting (page 47)
Specifies the distance from your listening position to your surround back speakers.
Surround left speaker distance setting
(page 47)
Specify the distance from your listening position to your surround left speaker.
Subwoofer distance setting (page 47) Specify the distance from your listening position to your subwoofer.
Dynamic range control setting
(page 48)
Compress the dynamic range of the sound track.
Dual mono setting (page 48) Isolate one channel when listening to discs with dual mono encoding.
Surround back channel input setting
(VSX-D812/D912 only) (page 48) Specify the number of surround back analog inputs you have connected.
Digital input settings (page 48) Specify the components to be assigned to the digital inputs (below).
•Coaxial digital input 1 setting
•Coaxial digital input 2 setting
•Optical digital input 1 setting
•Optical digital input 2 setting (VSXD812/D912 only)
4 Use or to adjust the setting.
The setting is entered automatically.
5Repeat steps 3 and 4 to adjust other setup options.
6When you’re done, press ENTER to exit.
•The setting display is automatically exited after 3 minutes of inactivity.
Speaker setting
•Default setting: FL-CS-SS (If a subwoofer is detected when you turn the receiver on, the default is FS-CS-SS.)
You must let the receiver know how many speakers you have, and how big they are. The size you choose (large or small) determines how much bass is sent from the receiver to the speakers.
In the display, F, C, and S refer to front, center, and surround speakers respectively. Speaker size is denoted as L for large speakers, S for small speakers, and  (asterisk) if no speaker is connected.
•If the cone size (diameter) of the speaker is larger than 15 cm, set the speaker size to L.
•If you’re not using a subwoofer, we recommend setting the front speakers to
L.
•Cycle through the available choices using or and choose a configuration that matches your speaker setup.
44
En

Setting up
One of the following configurations should match your setup:
|
FS-CS-SS |
||||||
|
FL-C -S |
FS-CS-S |
|||||
|
FL-C |
-SS |
FS-C -SS |
||||
|
FL-C |
-SL |
FS-C -S |
FL-CS-S FL-CL-SL
FL-CS-SS FL-CL-SS
FL-CS-SL FL-CL-S
•To select SB L, you must have SL selected in the Speaker setting.
Subwoofer setting
You can choose whether the subwoofer is used or not. Use the plus (PLUS) setting for extra bass.
• Use or to select subwoofer YES,
PLUS or NO.
YES PLUS
NO
Surround back speaker setting
•Default setting: S (VSX-D812/D912),  (VSX-D712)
You must let the receiver know if surround back speaker(s) have been connected, and how big they are. The size you choose (large or small) determines how much bass is sent from the receiver to the speakers. If you have connected a surround back subwoofer (VSXD812/D912), you should select the surround back subwoofer setting (SB SW) from the options. Choose  (asterisk) if no speaker is connected.
• Use or to select SB S, SB  , SB SW or SB L.
* VSX-D812/D912 only
•If you chose the small front speaker setting, SW YES is automatically set and locked.
•When you select the PLUS setting, you will get the bass sounds from the subwoofer even if the front speakers are set to L.
Crossover frequency setting
• Default setting: 100 Hz
Crossover frequency is the point where the receiver divides the high and low sounds (the frequencies) between the speakers. Since most smaller speakers can’t handle deep bass tones, you can send these sounds to the subwoofer (or if you don’t have a subwoofer, the large (L) speakers in your system) instead of the speakers set to small (S) in your setup. Choose the point at which you want the frequency routed to the subwoofer (or L speakers).
07
Español Nederlands Deutsch Français Italiano English
45
En

07 Setting up
We recommend setting this to 200Hz if your S speakers are smaller bookshelf-type speakers.
• Use or to specify the crossover frequency for your small speakers (100 Hz, 150 Hz or 200 Hz).
100Hz 150Hz
200Hz
100Hz
Sends bass frequencies below 100 Hz to the subwoofer (or L speakers).
150Hz
Sends bass frequencies below 150 Hz to the subwoofer (or L speakers).
200Hz
Sends bass frequencies below 200 Hz to the subwoofer (or L speakers).
• Use or to set the attenuation level (0 dB, 10 dB or 
 dB(∞)).
∞(displays  )
)
•When ∞ is selected (
 appears in the display), LFE cannot be heard.
Front left speaker distance setting
• Default setting: 2 m
Sets the distance from the front left speaker to the listening position.
• Use or to set the distance of the front left speaker from the main listening position (within the range of 0.1 m to 9.0 m).
•If all speakers (front, center, and surround) are set to L, the crossover frequency can’t be set because there are
no S speakers (

 appears in the display).
LFE attenuator setting
• Default setting: 0 dB
Dolby Digital and DTS audio sources include ultra-low bass tones. Set the LFE attenuator as necessary to prevent the ultra-low bass tones from distorting the sound from the speakers.
Center speaker distance setting
• Default setting: 2 m
The center speaker is normally placed directly in the front of the listening room and closer to the listening position than the front speakers. This means that the sound from the center speaker will be heard before the front speakers. To prevent this, set the center speaker distance setting to delay the sound from the center speaker so that the sound from the front and center speakers will be heard at the same time.
46
En
 Loading…