Roborock S5 MAX Manual

Product introduction
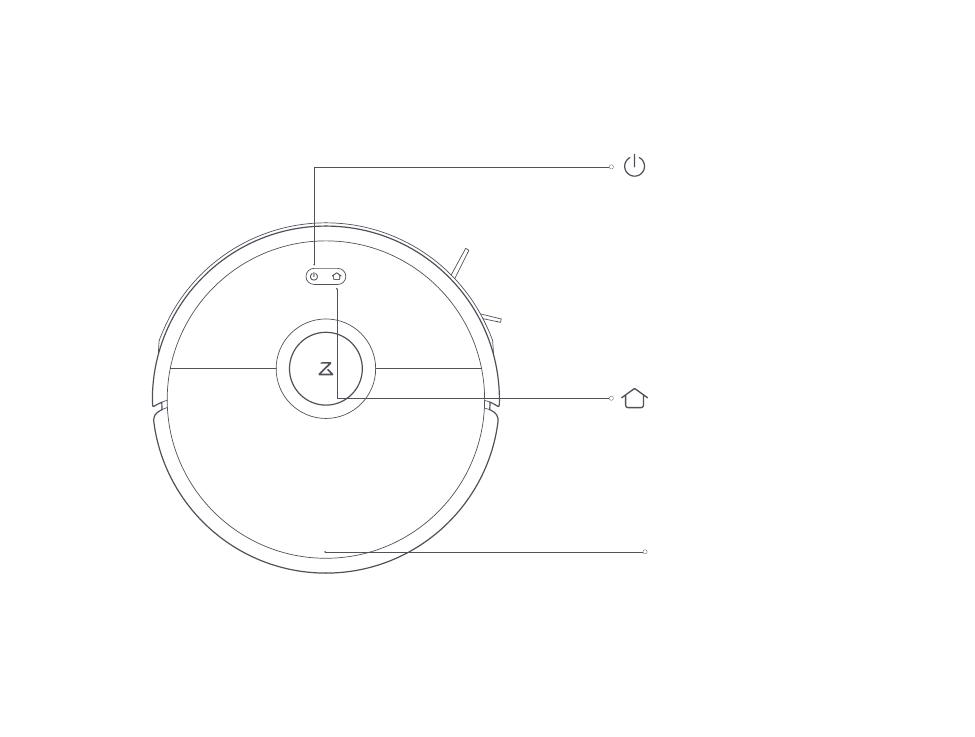
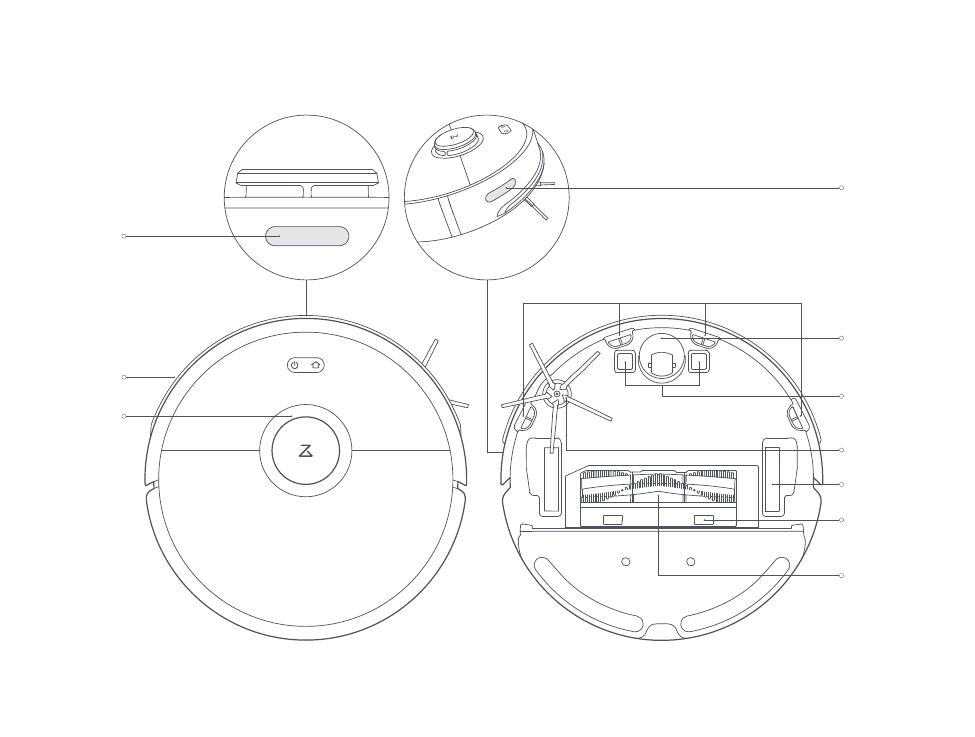
Robot

 On/Off
- Press to start cleaning
- Press and hold to power on or off
Power indicator
- White: Battery level ≥ 20%
- Red: Battery level < 20%
- Flashing: Charging or starting up
- Flashing red: Error
 Dock/Spot Clean
- Press to return to the dock
- Press and hold to spot clean
Note:
Press any button to pause cleaning, returning to dock, or spot cleaning.
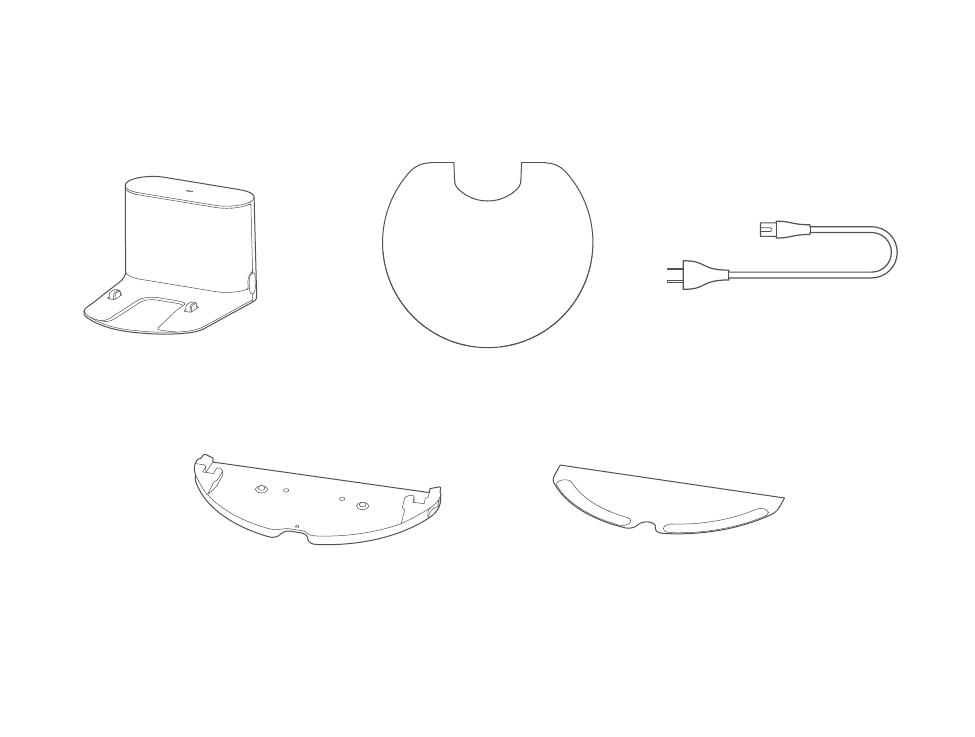
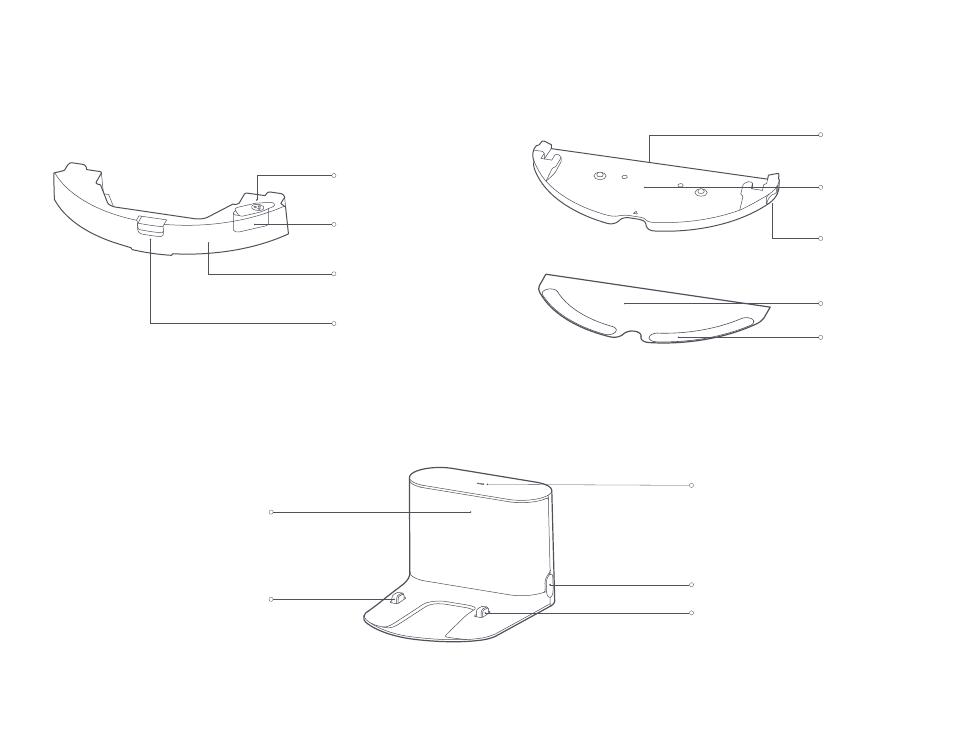
Parts list

Charging dock
Moisture-proof mat
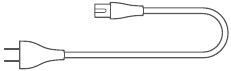
Power cable
Mop cloth mount

Mop cloth
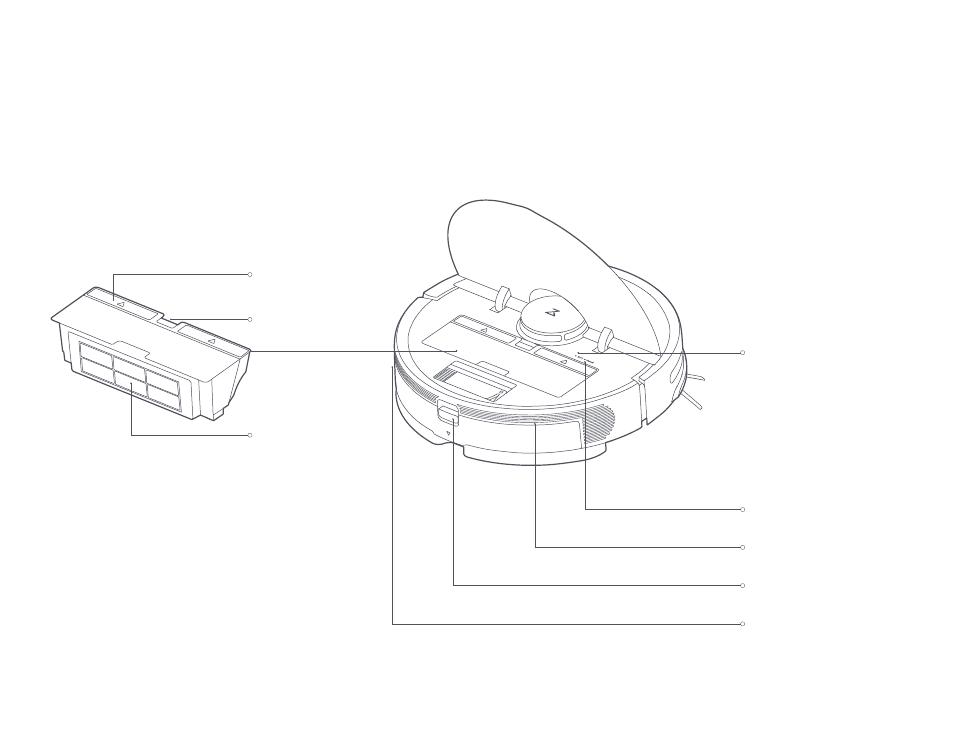
Dustbin

WiFi indicator light
- Off: WiFi disabled
- Slow flashing: Waiting for connection
- Fast flashing: Connecting
- Steady: WiFi connected
Machine and sensors

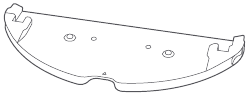
Mopping module

Charging dock

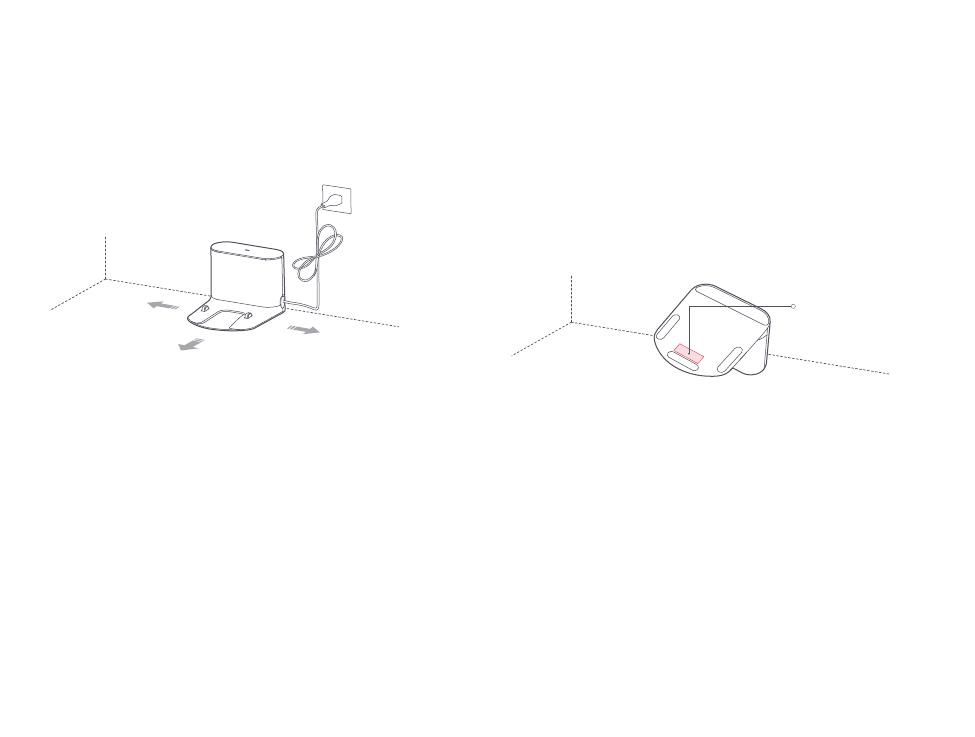
Installation
Using the robot
- Place the charging dock against the wall on a flat surface and plug it into the mains power.

Note:- The charging dock should have more than 0.5m (1.6ft) of clearance on each side, and more than 1.5m (5ft) in the front.
- If the power cable is vertical to the ground, it may be caught by the machine, causing the charging dock to be disconnected.
- The charging dock indicator is on when the charging dock is electrified, and off when the robot is charging.
- Secure the charging dock with the adhesive tape.
Wipe the floor of the area where the charging dock will be placed with a dry cloth, then stick the enclosed double-sided tape to the floor. Place the dock onto the double-sided tape to secure it in place.
Note:- Use of the double-sided tape to secure the charging dock is optional.
- When necessary, remove the double-sided adhesive tape slowly to reduce residue glue.
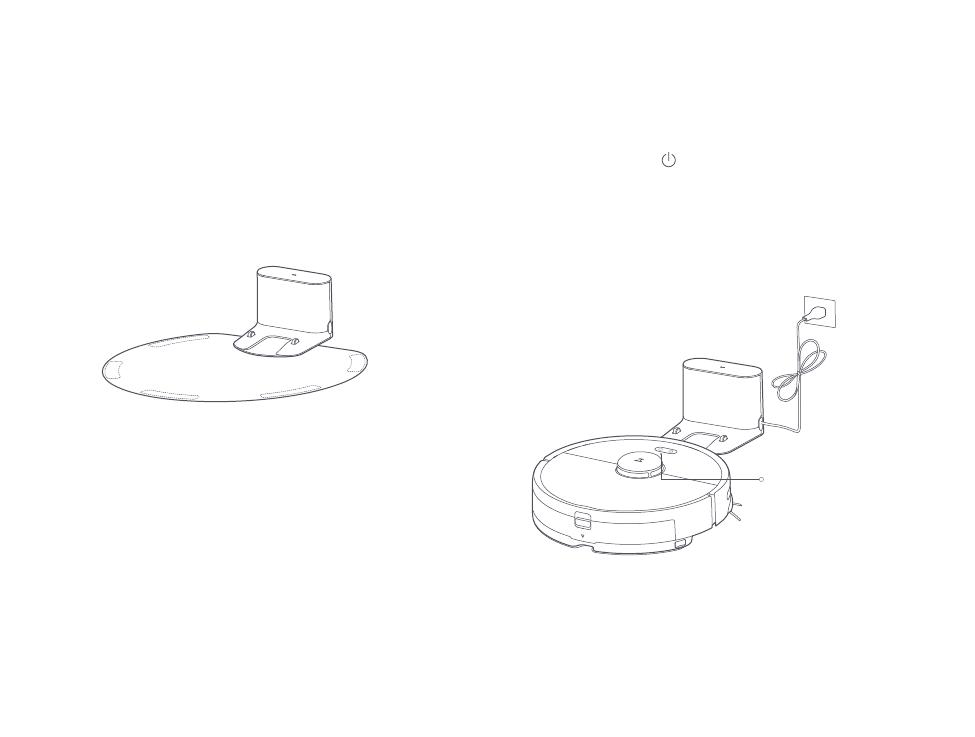
- Secure the moisture-proof mat.
After securing the charging dock, wipe the area where the moisture-proof mat will be placed with a dry cloth as shown. Stick the double-sided tape first to the moisture-proof mat then in position on the floor.
Note:
Always place the moisture-proof mat on a wooden floor - Power on and charge.
Press and hold the button to turn on the robot. When the power indicator lights up, place the robot onto the charging dock to begin charging. The robot uses a high-performance lithium-ion rechargeable battery. To maintain peak battery performance, always keep the robot charged.
The color of the power indicator indicates the battery level.- White: ≥ 20%
- Red: < 20%
Note:
The robot will not turn on when the battery is low. Place the robot directly onto the charging dock to begin charging.


 button to turn on the robot. When the power indicator lights up, place the robot onto the charging dock to begin charging. The robot uses a high-performance lithium-ion rechargeable battery. To maintain peak battery performance, always keep the robot charged.
Connect to the app
- Connect to the app.(recommended)
- Download the Roborock app or Xiaomi home app
- Search «Roborock» in the App Store or Google Play, Or scan the QR code below, then download and install the app.
- Download the Roborock app or Xiaomi home app
- Search «Xiaomi home» in the App Store or Google Play, Or scan the QR code below, then download and install the app.

- Reset WiFi
- Open the top cover of the robot to reveal the WiFi indicator light.
- Press and hold the button and the button until you hear the «Reset WiFi» voice alert. When the WiFi indicator light is flashing slowly, the robot has entered network configuration mode.
Note:
If you cannot connect your phone to the robot, reset the WiFi, and add your robot as a new device.
- Add device
Open the app and click «+» in the top right corner, then follow the instructions in-app. Once your robot has been added, it will be found in a list on the homepage.
Note:- Due to ongoing app development, the actual process may differ slightly from the above description. Always follow the instructions given in the app.
- Only 2.4GHz WiFi is supported.
WiFi indicator light - Off: WiFi disabled
- Slow flashing: Waiting for connection
- Fast flashing: Connecting
- Steady: WiFi connected
- Reset WiFi

 button until you hear the «Reset WiFi» voice alert. When the WiFi indicator light is flashing slowly, the robot has entered network configuration mode.
Using the robot
- Mopping
Note:
It is recommended that all floors are vacuumed at least three times before the first mopping session to reduce excessive dirt buildup on the mop.- Remove the water tank
Press down the water tank latch and slide the tank backwards to remove it. - Fill the water tank
Open the water tank, fill it with water, and close it tightly.
Note:
Do not use hot water, which may cause the tank to deform. To prevent corrosion or damage, do not use cleaning fluid or disinfectant in the water tank. - Install the water tank
Slide the water tank into the robot until you hear it lock with a click. - Install the mop cloth
If mopping immediately, dampen the mop cloth and squeeze it dry then attach it to the mop cloth bracket.
Note:
Use a barrier tape or no-mop zones to separate prevent mopping on carpeted floors. - Attach the mop cloth bracket
Slide the mop cloth bracket under the water tank following the alignment marks, until you hear a click.
Note:
Cleaning the mop cloth after 60-minutes of mopping is recommended to ensure water flow and cleaning quality.
- Remove the water tank
- Adjust water flow rate
Use the mobile app to adjust the water flow as required. - Start cleaning
When the battery is fully charged, the power indicator will remain lit. Press the button or use the app to start cleanup. - Remove the mop cloth bracket
To remove the mop cloth bracket, press the two clips inwards and pull the bracket backwards.
Note:- When the charging dock is placed on a wooden floor, always use it with the moisture-proof mat to prevent moisture damage.
- Removing and washing the mop cloth bracket, and emptying the water tank frequently is recommended to prevent odors or mildew.
- Remove the mop cloth bracket if not mopping.
- Separating the water tank from the mop cloth bracket
As shown in the figure, press the two side clips inwards and slide the mop cloth bracket backwards to separate it from the water tank.


 button or use the app to start cleanup.

On/Off
Press and hold the  button to turn on the robot. The power indicator will turn on and the robot will enter Standby mode. If the robot is in Sleep mode, press and hold the button to turn it off and end the current cleanup.
Note: The robot cannot be turned off when it is charging.
Start cleanup
Press the  button to start cleaning. Once started, the robot will plan its cleaning route based on its scan of the area. It cleans along the edges of a zone first and then moves in a Z-shaped cleaning route to cover the internal area efficiently and thoroughly.
Note:
- Cleaning cannot start if the battery level is too low. Allow the robot to charge before restarting cleanup.
- Tidy away any cables on the ground (including the power cable of the charging dock) before cleaning to avoid losing power or damaging either the robot or the connected device.
- If a cleanup finishes within 10 minutes, cleaning repeats by default
- If the battery runs low before cleanup is complete, the robot will carry out a top-up charge before resuming cleanup from where it left off.
Pause
When the robot is cleaning, press any button to pause it.
Then press the button to continue cleaning or the  button to return it to the charging dock and stop the cleaning cycle.
Note: Placing a paused robot on the charging dock manually will end the current cleanup.
Sleep
If the robot is paused for over 10-minutes, it will go to sleep, and its power indicator will flash slowly. Press any button to wake it back up.
Note:
- The robot will not go to sleep when it is on the charging dock.
- The robot will automatically shut down if left in sleep mode for more than hours.
Charging
Auto: After cleaning, the robot will automatically return to the charging dock to recharge.
Manual: In Pause mode, press the button to send the robot back to the charging dock.
The power indicator will flash slowly as the robot charges.
Note: If the cleaning cycle was started away from the charging dock and the robot could not return to the dock after cleaning, it will instead return to its starting point. Place the robot directly on the dock to recharge it.
Error
If an error occurs while the robot is cleaning, the power indi-cator will flash red quickly, and you will hear a voice alert. See «Troubleshooting» for resolution options.
Note:
- The robot will go to sleep automatically if left in an Error state for over 10-minutes.
- Placing the robot on the charging dock in an error state will stop the current cleanup.
Reset WiFi
If your phone cannot connect to the robot because you have changed your router configuration, forgotten your password, or any other reason, open the top cover to see the WiFi indi-cator light then press and hold the  button and the button until you hear the» Resetting WiFi» voice alert. When the WiFi indicator light flashes slowly, reset is complete.
Note: If the robot is left connecting to the network for over an hour, its WiFi will be disabled. Reset WiFi before attempting reconnection.
Spot Cleaning
In the Standby or Pause mode, press and hold the button to start spot cleaning. This mode is used to clean a 1.5m x 1.5m square area centered on the robot. After cleanup, the robot will return to the center of the square. 
Note: Pressing any button will cancel the current spot cleaning cycle.
Selective Room Cleaning
Select specific rooms for cleaning in the APP. In this mode, the robot will only clean the selected rooms.
Note:
- A full map must be created and Map Saving mode switched on before this function can be used.
- After cleaning starts, the robot may move beyond the defined areas. Make sure there are no obstacles preventing the robot’s access to the target rooms.
Scheduled Cleaning
Use the APP to set start times and suction levels for scheduled cleanups. The robot will return to the charging dock after each cleanup.
Zone Cleaning
Use the APP to draw a specific zone for the robot to clean.
Note:
While cleaning the designated zone, the robot may move outside zone borders. Make sure that there are no cables or obstacles placed close to the cleanup zone.
Pin n Go
Use the APP to set a destination for the robot to go to.
Cleaning mode
Use the APP to choose from Quiet, Balanced, Strong, or MAX modes. Balanced mode is the default.
Do Not Disturb (DND) mode
In DND mode, no cleanups will start, no voice alerts will play, and the power indicator will dim. DND mode set from 22:00 to 08:00 by default and can be disabled or modified in the APP.
No-go zones / Invisible Wall / Mopping No-Go Zone
The app can be used to draw Virtual No-Go Zones and Walls, as well as Virtual No-Mop Zones and Walls to keep the robot from entering the areas you define. Virtual No-Mop Zones and Walls are only activated when the mopping cloth bracket is installed.
Note:
- «Map Saving Mode» must be turned on in the app to use virtual no-go zones.
- Virtual no-go zones and walls should only be used to customize the cleaning area. They should not be used to isolate hazards.
- Moving the robot manually or making significant changes to the home environment may cause the loss of Virtual No-Go Zones and Walls.

More app functions
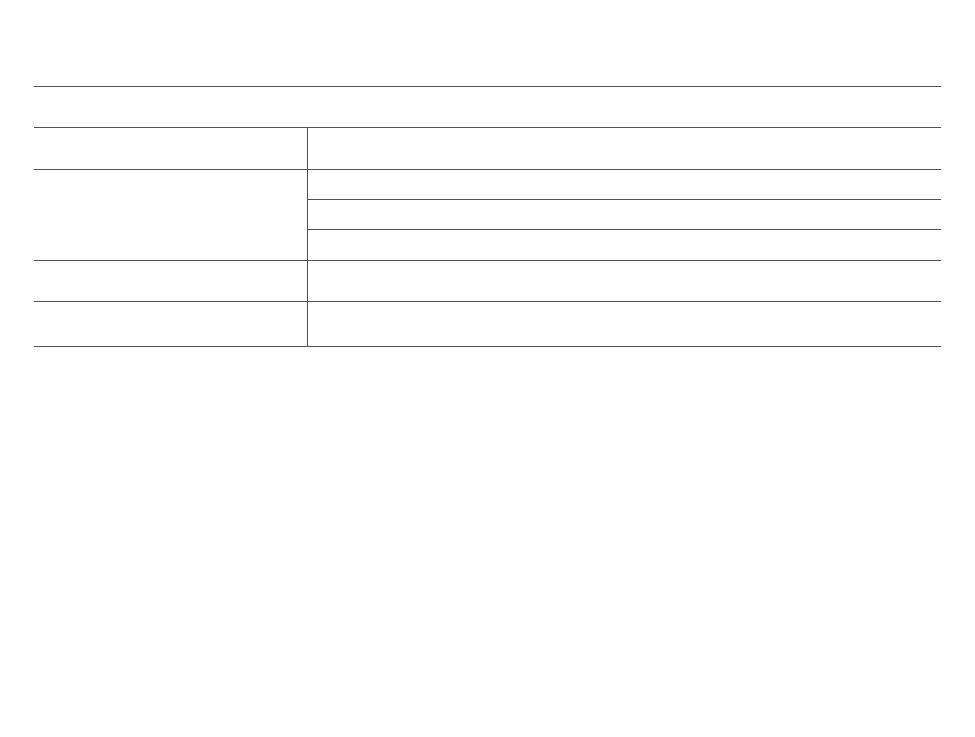
| Real-Time Map Updates | Carpet Boost | Robot Location |
| Change Cleaning Mode | Part Replacement Schedule | Do Not Disturb (DND) mode |
| View Cleaning History | Remote Control | Firmware Update |
| Change Robot Voice | View robot status |
Note: Functions and details of the app may vary slightly due to continuous app development and upgrades.
Refilling the water tank or cleaning the mopping cloth midway
To refill the water tank or clean the mop cloth during a cleanup, pause cleaning by pressing any button and remove the mop module. Refill the water tank and/or clean the mop cloth as required. Reinstall the mop module and press the  button to continue cleaning.
Charging dock
The charging dock should be plugged in and placed against a wall on level ground, with more than 0.5m (1.6ft) of clearance on each side, and more than 1.5m (5ft) in front. For the best experience when using the mobile app, place the charging dock in an area with strong WiFi coverage. 
Note: Do not place the charging dock in direct sunlight or block the locator beacon; otherwise, the robot may not be able to return to the charging dock.
Routine maintenance
Main brush
* Clean weekly
- Turn the robot over then unlatch and remove the main brush cover.
- Take out the main brush, remove and clean its bearings.
- Remove the main brush cap, rotating in the unlock direction.
- Use the supplied main brush cleaning tool to remove any entangled hair.
- Re-install the cap and bearings following the lock direction.
- Re-insert the main brush and replace the brush cover.

Note: Main brush replacement every 6-12 months is recommended.
Using the main brush cleaning tool
Use the main brush cleaning tool to remove any hair entangled around the main brush. 
Note: If there is a large amount of hair, or hair is tightly entangled, remove it carefully to avoid damage to the main brush.
Dustbin and filter
* Weekly cleaning is recommended
- Open the top cover of the robot, squeeze the dustbin latch, and remove the dustbin.
- Open the dustbin lid as indicated by the arrow and pour out the contents.


Clean the washable filter
* Clean every two weeks
- Open the dustbin lid as indicated by the arrow and pour out the contents.
- Fill the dustbin with clean water and close the cover. Gently shake the dustbin, then pour out the dirty water.
Note:
Only use fresh water without cleaning liquid. - Remove the filter and clean it with water.
Note:
To avoid damage, do not touch the surface of the filter with hands, brushes, or sharp objects. - Rinse repeatedly and tap the filter frame to remove as much dirt as possible.
- Leave the filter to dry before reinstalling it.
Note:
Allow the filter to dry thoroughly before use. 24-hours of drying is recommended.


Battery
The robot is equipped with a high-performance lithium-ion rechargeable battery pack. To maintain battery performance, keep the robot charged.
Note: If the robot is to be left unused for an extended period, turn it off before storage and charge it at least once every three months to avoid battery damage resulting from over-discharging.
Charging dock
* Monthly cleaning recommended
Use a soft dry cloth to clean the charging contacts of the charging dock.
Side brush
* Monthly cleaning recommended
- Turn the robot over and remove the screw holding the side brush.
- Remove and clean the side brush.
- Reinstall the side brush and tighten the screw.
Note:
Side brush replacement every 3-6 months is recommended.

Water tank
* Frequent cleaning is recommended
- Open the water tank.
- Fill the filter with water
- Shake it, and pour out the water
Mop cloth
* Clean after use
- Remove the mop cloth from the mop cloth bracket.
- Clean the mop cloth and dry it.
Note:- If the mop cloth gets excessively dirty, cleaning quality will be affected. Cleaning it before use is recommended.
- Replacing the mop cloth every 3-6 months is recommended to maintain cleaning quality.

Omnidirectional wheel
* Frequent cleaning is recommended
- Turn the robot over.
- Use a small screwdriver to separate the axle and the tire.
- Rinse the axle and tire with water to remove any hair and dirt.
- Dry and rebuild the wheel, then press it back in place.
Note:
The omnidirectional wheel bracket cannot be removed.

System Reset
If the robot does not respond when you press a button or the robot cannot be shut down, press the Reset button. The robot will then restart.
Note: After a system reset, cleaning schedules, WiFi and other settings will be restored to factory settings.
Restore factory settings
If the robot is not functioning after a system reset, turn it on, then press the Reset button. Then press and hold the button until you hear the «Start restoring initial version» voice alert. The robot will then be restored to factory settings.
Machine sensors
* Monthly cleaning recommended
Use a soft dry cloth to wipe and clean all sensors, including:
- Four cliff sensors at the bottom of the robot.
- The wall sensor on the right of the robot.
- The charging contact on the bottom of the robot.

Firmware update
Update the robot using the app. Place the robot on the charging dock and ensure that the battery level is higher than 20% before updating. The power indicator will flash white quickly during a firmware update.
Holiday Energy Saving Function
When the robot is docked, press and hold «Recharge» for seconds or until you hear an alert sound. This will activate Holiday mode. In this mode the robot will switch to Low Power mode to minimize power consumption. This includes a dimming of the LED indicator, and the stopping of all non-charging related functions including cleaning, remote control over WiFi, and more. To deactivate Holiday mode, press and hold «Recharge» for seconds until the LED indicator brightens.
Basic parameters
Robot
| Name | Parameters |
| Model | roborock S5 Max |
| Dimensions | 353×350×96.5mm |
| Battery | 14.4V/5200mAh lithium battery |
| Weight | Approx. 3.5 kg |
| Wireless connection | WiFi Smart Connect |
| Rated voltage | 14.4VDC |
| Rated power | 58W |
Charging dock
| Name | Parameters |
| Model | CDZ11RR or CDZ12RR |
| Dimensions | 151×130×98mm |
| Rated power | 28W |
| Rated input | 100-240VAC |
| Rated output | 20VDC 1.2A |
| Rated frequency | 50-60Hz |
Note: The serial number is on a sticker on the underside of the robot.
Troubleshooting
If an error occurs during cleanup, the power indicator will flash red quickly, and a voice alert will play. Refer to the table below for resolution options.
| Error | Solution |
| Error 1: Rotate the laser head to check that it turns freely. | The LDS unit is jammed. Remove any items blocking it then move the robot to a new location and restart. |
| Error 2: Clean and lightly tap the bumper. | The bumper is stuck. Tap the bumper repeatedly to dislodge any jammed items. If nothing falls out, move the robot to a new location and restart. |
| Error 3: Move the robot to a new location and restart. | A wheel is suspended. Move the robot to a new location and restart. |
| Error 4: Wipe the cliff sensors, move the robot away from raised edges, and restart. | The robot is suspended. Move it to a new location and restart. If the problem persists, clean the cliff sensors. This error may also be caused by a dirty cliff sensor. Try wiping all sensors clean. |
| Error 5: Remove the main brush and clean the brush and bearing. | The main brush may be tangled up. Remove and clean it. |
| Error 6: Remove and clean the side brush. | The side brush may be tangled up. Remove and clean it. |
| Error 7: Look for anything stuck in the main wheels then move the robot to a new location and restart. | The main wheels may be jammed. Remove and clean them. |
| Error 8: Clear away any obstacles around the robot. | The robot may be stuck. Clear any obstacles around it. |
| Error 9: Install the dustbin and filter. | Reinstall the dustbin and filter and check that they are installed properly. If the problem persists, try replacing the filter. |
| Error 10: The filter is either wet or blocked. | The filter is not completely dry. Dry the filter for at least 24 hours. The filter may also require cleaning. If the problem persists, replace the filter. |
| Error 11: High-intensity magnetic field detected. Move the robot away from the magnetic tape and restart. | The robot is too close to a magnetic tape and cannot start. Move it to a new location and restart. |
| Error 12: The battery is too low. Recharge before use. | Low battery. Recharge before use. |
| Error 13: Charging error. Clean the charging contact area. | Use a dry cloth to clean the charging contacts on the robot and on the charging dock. |
| Error 14: Battery error. | The battery temperature is either too high or too low. Wait until it returns to normal. |
| Error 16: Robot is tilted. Place it on flat ground and restart. | The robot is tilted. Move it to flat ground and restart. |
| Error 17: Side brush module error. Reset the system. | The side brush module is experiencing a fault. Reset the system. |
| Error 18: Vacuum fan error. Reset the system. | The vacuum fan is experiencing a fault. Reset the system. |
| Error 22: Please wipe the recharge sensor. | The recharge sensor is blocked by dust. Please wipe the dust off. |
| Error 23: Please clear the signal emission area of the dock charger. | The charging dock is jammed. Clear and retry. |
| Error 24: Virtual no-go zone or wall detected. Move the robot to a new location and restart. | Move the robot away from the virtual no-go zone or barrier and restart. |
| Error 26: Wipe the wall sensor. | The wall sensor is dirty. Wipe it clean. |
| Internal error. Reset the system. | Malfunction due to an internal error. Reset the system. |
Note: A system reset may not resolve all problems.
If the problem persists after using the recommendations in the table above, please email our after-sales service team:
US/Non-Europe Support: support@roborock.com
Europe Support: support@roborock-eu.com
FAQs
| Problem | Solution |
| Unable to power on | The battery level is low. Put the robot on the charging dock to charge it before use. The battery temperature is too low or too high. Only use the robot within the range of 0-40°C (32-104°F). |
| Unable to charge | If the charging dock is not receiving power, check that both ends of the power cable are properly connected. If contact is poor, clean the contact areas of the charging dock and the robot. Power is restored when the power indicator light turns on. |
| Slow charging | When used at high or low temperatures, the machine will automatically reduce charging speed to extend battery life. The charging contact areas may be dirty. Use a dry cloth to clean them. |
| Unable to recharge | There are too many obstacles near the charging dock. Move it to an open area. The robot is too far from the charging dock. Place it closer and retry. |
| Abnormal behavior | Restart the robot. |
| Noise during cleaning | The main brush, side brush, or main wheels may jammed. Turn off the robot and clean them. If the omnidirectional wheel gets jammed, use a screwdriver to remove it for cleaning. |
| Poor cleaning ability or dust falling out | The dustbin is full and needs emptying. The filter is blocked and needs cleaning. The main brush is jammed and needs cleaning. |
| Unable to connect to WiFi | WiFi is disabled. Reset the WiFi and try again. WiFi signal is poor. Make sure that the robot is in an area with good WiFi signal reception. Abnormal WiFi connection. Reset the WiFi and download the latest mobile app and retry. The current device is not supported. You can find supported models inside the app. Unable to connect to WiFi. There may be an error with your router settings. Contact Roborock customer service for help with troubleshooting. |
| Scheduled cleaning is not working | The battery level is too low. Scheduled cleaning can only begin when the battery level is above 20%. Please confirm whether the timed cleaning setting is set to «effective once»? |
| Is power always being drawn when the robot is on the charging dock? | The robot will draw power while it is docked to maintain battery performance, but power consumption is extremely low. |
| Does the robot need to be charged for at least 16 hours the first three times it is used? | No. The robot can be used any time after it has been fully charged once. |
| No or little water during mopping | Check whether there is water in the water tank and use the app mobile app to set water flow or see the manual for full mop setup instructions. |
| Cleaning does not resume after recharging | Make sure that the robot is not in DND mode. DND mode will prevent cleanup. When cleaning a space requiring a top-up charge, if the robot was placed manually on the charging dock before it recharged automatically, it will not be able to continue cleanup. |
| The robot cannot return to the charging dock after spot cleaning or when it has been moved manually. | After spot cleaning or a significant position change, the robot will re-generate the map. If the charging dock is too far away, it may not be able to return for recharging and must be placed on the charger manually. |
| The robot suddenly misses a certain spot | The wall sensor or cliff sensors may be dirty. Clean them with a soft dry cloth. |
| It takes a long time to fill the water tank | The filter may be blocked and need cleaning. |
Robot Vacuum Cleaner
Manufacturer: Beijing Roborock Technology Co.,Ltd.
Product Model: roborock S5 Max
Address of Manufacturer: Floor 6, Suite 6016, 6017, 6018, Building C, Kangjian Baosheng Plaza,
No.8 Heiquan Road, Haidian District, Bejing, P.R.CHINA
For more product information, visit our website: www.roborock.com
For after-sales support, email our after-sales service team:
US/Non-Europe Support: support@roborock.com
Europe Support: support@roborock-eu.com

Videos
Roborock S5 Max Review Video
Roborock S5 Max Mopping Test Video
Documents / Resources
References
Download manual
Here you can download full pdf version of manual, it may contain additional safety instructions, warranty information, FCC rules, etc.
Download Roborock S5 MAX Manual
-

- Reset WiFi
- Open the top cover of the robot to reveal the WiFi indicator light.
- Press and hold the button and the button until you hear the «Reset WiFi» voice alert. When the WiFi indicator light is flashing slowly, the robot has entered network configuration mode.
Note:
If you cannot connect your phone to the robot, reset the WiFi, and add your robot as a new device.
- Add device
Open the app and click «+» in the top right corner, then follow the instructions in-app. Once your robot has been added, it will be found in a list on the homepage.
Note:- Due to ongoing app development, the actual process may differ slightly from the above description. Always follow the instructions given in the app.
- Only 2.4GHz WiFi is supported.
WiFi indicator light - Off: WiFi disabled
- Slow flashing: Waiting for connection
- Fast flashing: Connecting
- Steady: WiFi connected
Using the robot
- Mopping
Note:
It is recommended that all floors are vacuumed at least three times before the first mopping session to reduce excessive dirt buildup on the mop.- Remove the water tank
Press down the water tank latch and slide the tank backwards to remove it. - Fill the water tank
Open the water tank, fill it with water, and close it tightly.
Note:
Do not use hot water, which may cause the tank to deform. To prevent corrosion or damage, do not use cleaning fluid or disinfectant in the water tank. - Install the water tank
Slide the water tank into the robot until you hear it lock with a click. - Install the mop cloth
If mopping immediately, dampen the mop cloth and squeeze it dry then attach it to the mop cloth bracket.
Note:
Use a barrier tape or no-mop zones to separate prevent mopping on carpeted floors. - Attach the mop cloth bracket
Slide the mop cloth bracket under the water tank following the alignment marks, until you hear a click.
Note:
Cleaning the mop cloth after 60-minutes of mopping is recommended to ensure water flow and cleaning quality.
- Remove the water tank
- Adjust water flow rate
Use the mobile app to adjust the water flow as required. - Start cleaning
When the battery is fully charged, the power indicator will remain lit. Press the button or use the app to start cleanup. - Remove the mop cloth bracket
To remove the mop cloth bracket, press the two clips inwards and pull the bracket backwards.
Note:- When the charging dock is placed on a wooden floor, always use it with the moisture-proof mat to prevent moisture damage.
- Removing and washing the mop cloth bracket, and emptying the water tank frequently is recommended to prevent odors or mildew.
- Remove the mop cloth bracket if not mopping.
- Separating the water tank from the mop cloth bracket
As shown in the figure, press the two side clips inwards and slide the mop cloth bracket backwards to separate it from the water tank.
On/Off
Press and hold the
button to turn on the robot. The power indicator will turn on and the robot will enter Standby mode. If the robot is in Sleep mode, press and hold the button to turn it off and end the current cleanup.Note: The robot cannot be turned off when it is charging.
Start cleanup
Press the
button to start cleaning. Once started, the robot will plan its cleaning route based on its scan of the area. It cleans along the edges of a zone first and then moves in a Z-shaped cleaning route to cover the internal area efficiently and thoroughly. Note:
- Cleaning cannot start if the battery level is too low. Allow the robot to charge before restarting cleanup.
- Tidy away any cables on the ground (including the power cable of the charging dock) before cleaning to avoid losing power or damaging either the robot or the connected device.
- If a cleanup finishes within 10 minutes, cleaning repeats by default
- If the battery runs low before cleanup is complete, the robot will carry out a top-up charge before resuming cleanup from where it left off.
Pause
When the robot is cleaning, press any button to pause it.
Then press the
button to continue cleaning or the button to return it to the charging dock and stop the cleaning cycle.Note: Placing a paused robot on the charging dock manually will end the current cleanup.
Sleep
If the robot is paused for over 10-minutes, it will go to sleep, and its power indicator will flash slowly. Press any button to wake it back up.
Note:
- The robot will not go to sleep when it is on the charging dock.
- The robot will automatically shut down if left in sleep mode for more than hours.
Charging
Auto: After cleaning, the robot will automatically return to the charging dock to recharge.
Manual: In Pause mode, press the button to send the robot back to the charging dock.
The power indicator will flash slowly as the robot charges.Note: If the cleaning cycle was started away from the charging dock and the robot could not return to the dock after cleaning, it will instead return to its starting point. Place the robot directly on the dock to recharge it.
Error
If an error occurs while the robot is cleaning, the power indi-cator will flash red quickly, and you will hear a voice alert. See «Troubleshooting» for resolution options.
Note:
- The robot will go to sleep automatically if left in an Error state for over 10-minutes.
- Placing the robot on the charging dock in an error state will stop the current cleanup.
Reset WiFi
If your phone cannot connect to the robot because you have changed your router configuration, forgotten your password, or any other reason, open the top cover to see the WiFi indi-cator light then press and hold the
button and the button until you hear the» Resetting WiFi» voice alert. When the WiFi indicator light flashes slowly, reset is complete.Note: If the robot is left connecting to the network for over an hour, its WiFi will be disabled. Reset WiFi before attempting reconnection.
Spot Cleaning
In the Standby or Pause mode, press and hold the
button to start spot cleaning. This mode is used to clean a 1.5m x 1.5m square area centered on the robot. After cleanup, the robot will return to the center of the square. Note: Pressing any button will cancel the current spot cleaning cycle.
Selective Room Cleaning
Select specific rooms for cleaning in the APP. In this mode, the robot will only clean the selected rooms.
Note:
- A full map must be created and Map Saving mode switched on before this function can be used.
- After cleaning starts, the robot may move beyond the defined areas. Make sure there are no obstacles preventing the robot’s access to the target rooms.
Scheduled Cleaning
Use the APP to set start times and suction levels for scheduled cleanups. The robot will return to the charging dock after each cleanup.
Zone Cleaning
Use the APP to draw a specific zone for the robot to clean.
Note:
While cleaning the designated zone, the robot may move outside zone borders. Make sure that there are no cables or obstacles placed close to the cleanup zone.Pin n Go
Use the APP to set a destination for the robot to go to.
Cleaning mode
Use the APP to choose from Quiet, Balanced, Strong, or MAX modes. Balanced mode is the default.
Do Not Disturb (DND) mode
In DND mode, no cleanups will start, no voice alerts will play, and the power indicator will dim. DND mode set from 22:00 to 08:00 by default and can be disabled or modified in the APP.
No-go zones / Invisible Wall / Mopping No-Go Zone
The app can be used to draw Virtual No-Go Zones and Walls, as well as Virtual No-Mop Zones and Walls to keep the robot from entering the areas you define. Virtual No-Mop Zones and Walls are only activated when the mopping cloth bracket is installed.
Note:
- «Map Saving Mode» must be turned on in the app to use virtual no-go zones.
- Virtual no-go zones and walls should only be used to customize the cleaning area. They should not be used to isolate hazards.
- Moving the robot manually or making significant changes to the home environment may cause the loss of Virtual No-Go Zones and Walls.
More app functions
Real-Time Map Updates Carpet Boost Robot Location Change Cleaning Mode Part Replacement Schedule Do Not Disturb (DND) mode View Cleaning History Remote Control Firmware Update Change Robot Voice View robot status Note: Functions and details of the app may vary slightly due to continuous app development and upgrades.
Refilling the water tank or cleaning the mopping cloth midway
To refill the water tank or clean the mop cloth during a cleanup, pause cleaning by pressing any button and remove the mop module. Refill the water tank and/or clean the mop cloth as required. Reinstall the mop module and press the
button to continue cleaning.Charging dock
The charging dock should be plugged in and placed against a wall on level ground, with more than 0.5m (1.6ft) of clearance on each side, and more than 1.5m (5ft) in front. For the best experience when using the mobile app, place the charging dock in an area with strong WiFi coverage.
Note: Do not place the charging dock in direct sunlight or block the locator beacon; otherwise, the robot may not be able to return to the charging dock.
Routine maintenance
Main brush
* Clean weekly
- Turn the robot over then unlatch and remove the main brush cover.
- Take out the main brush, remove and clean its bearings.
- Remove the main brush cap, rotating in the unlock direction.
- Use the supplied main brush cleaning tool to remove any entangled hair.
- Re-install the cap and bearings following the lock direction.
- Re-insert the main brush and replace the brush cover.
Note: Main brush replacement every 6-12 months is recommended.
Using the main brush cleaning tool
Use the main brush cleaning tool to remove any hair entangled around the main brush.
Note: If there is a large amount of hair, or hair is tightly entangled, remove it carefully to avoid damage to the main brush.
Dustbin and filter
* Weekly cleaning is recommended
- Open the top cover of the robot, squeeze the dustbin latch, and remove the dustbin.
- Open the dustbin lid as indicated by the arrow and pour out the contents.
Clean the washable filter
* Clean every two weeks
- Open the dustbin lid as indicated by the arrow and pour out the contents.
- Fill the dustbin with clean water and close the cover. Gently shake the dustbin, then pour out the dirty water.
Note:
Only use fresh water without cleaning liquid. - Remove the filter and clean it with water.
Note:
To avoid damage, do not touch the surface of the filter with hands, brushes, or sharp objects. - Rinse repeatedly and tap the filter frame to remove as much dirt as possible.
- Leave the filter to dry before reinstalling it.
Note:
Allow the filter to dry thoroughly before use. 24-hours of drying is recommended.
Battery
The robot is equipped with a high-performance lithium-ion rechargeable battery pack. To maintain battery performance, keep the robot charged.
Note: If the robot is to be left unused for an extended period, turn it off before storage and charge it at least once every three months to avoid battery damage resulting from over-discharging.
Charging dock
* Monthly cleaning recommended
Use a soft dry cloth to clean the charging contacts of the charging dock.
Side brush
* Monthly cleaning recommended
- Turn the robot over and remove the screw holding the side brush.
- Remove and clean the side brush.
- Reinstall the side brush and tighten the screw.
Note:
Side brush replacement every 3-6 months is recommended.
Water tank
* Frequent cleaning is recommended
- Open the water tank.
- Fill the filter with water
- Shake it, and pour out the water
Mop cloth
* Clean after use
- Remove the mop cloth from the mop cloth bracket.
- Clean the mop cloth and dry it.
Note:- If the mop cloth gets excessively dirty, cleaning quality will be affected. Cleaning it before use is recommended.
- Replacing the mop cloth every 3-6 months is recommended to maintain cleaning quality.
Omnidirectional wheel
* Frequent cleaning is recommended
- Turn the robot over.
- Use a small screwdriver to separate the axle and the tire.
- Rinse the axle and tire with water to remove any hair and dirt.
- Dry and rebuild the wheel, then press it back in place.
Note:
The omnidirectional wheel bracket cannot be removed.
System Reset
If the robot does not respond when you press a button or the robot cannot be shut down, press the Reset button. The robot will then restart.
Note: After a system reset, cleaning schedules, WiFi and other settings will be restored to factory settings.
Restore factory settings
If the robot is not functioning after a system reset, turn it on, then press the Reset button. Then press and hold the
button until you hear the «Start restoring initial version» voice alert. The robot will then be restored to factory settings.Machine sensors
* Monthly cleaning recommended
Use a soft dry cloth to wipe and clean all sensors, including:
- Four cliff sensors at the bottom of the robot.
- The wall sensor on the right of the robot.
- The charging contact on the bottom of the robot.
Firmware update
Update the robot using the app. Place the robot on the charging dock and ensure that the battery level is higher than 20% before updating. The power indicator will flash white quickly during a firmware update.
Holiday Energy Saving Function
When the robot is docked, press and hold «Recharge» for seconds or until you hear an alert sound. This will activate Holiday mode. In this mode the robot will switch to Low Power mode to minimize power consumption. This includes a dimming of the LED indicator, and the stopping of all non-charging related functions including cleaning, remote control over WiFi, and more. To deactivate Holiday mode, press and hold «Recharge» for seconds until the LED indicator brightens.
Basic parameters
Robot
Name Parameters Model roborock S5 Max Dimensions 353×350×96.5mm Battery 14.4V/5200mAh lithium battery Weight Approx. 3.5 kg Wireless connection WiFi Smart Connect Rated voltage 14.4VDC Rated power 58W Charging dock
Name Parameters Model CDZ11RR or CDZ12RR Dimensions 151×130×98mm Rated power 28W Rated input 100-240VAC Rated output 20VDC 1.2A Rated frequency 50-60Hz Note: The serial number is on a sticker on the underside of the robot.
Troubleshooting
If an error occurs during cleanup, the power indicator will flash red quickly, and a voice alert will play. Refer to the table below for resolution options.
Error Solution Error 1: Rotate the laser head to check that it turns freely. The LDS unit is jammed. Remove any items blocking it then move the robot to a new location and restart. Error 2: Clean and lightly tap the bumper. The bumper is stuck. Tap the bumper repeatedly to dislodge any jammed items. If nothing falls out, move the robot to a new location and restart. Error 3: Move the robot to a new location and restart. A wheel is suspended. Move the robot to a new location and restart. Error 4: Wipe the cliff sensors, move the robot away from raised edges, and restart. The robot is suspended. Move it to a new location and restart. If the problem persists, clean the cliff sensors. This error may also be caused by a dirty cliff sensor. Try wiping all sensors clean. Error 5: Remove the main brush and clean the brush and bearing. The main brush may be tangled up. Remove and clean it. Error 6: Remove and clean the side brush. The side brush may be tangled up. Remove and clean it. Error 7: Look for anything stuck in the main wheels then move the robot to a new location and restart. The main wheels may be jammed. Remove and clean them. Error 8: Clear away any obstacles around the robot. The robot may be stuck. Clear any obstacles around it. Error 9: Install the dustbin and filter. Reinstall the dustbin and filter and check that they are installed properly. If the problem persists, try replacing the filter. Error 10: The filter is either wet or blocked. The filter is not completely dry. Dry the filter for at least 24 hours. The filter may also require cleaning. If the problem persists, replace the filter. Error 11: High-intensity magnetic field detected. Move the robot away from the magnetic tape and restart. The robot is too close to a magnetic tape and cannot start. Move it to a new location and restart. Error 12: The battery is too low. Recharge before use. Low battery. Recharge before use. Error 13: Charging error. Clean the charging contact area. Use a dry cloth to clean the charging contacts on the robot and on the charging dock. Error 14: Battery error. The battery temperature is either too high or too low. Wait until it returns to normal. Error 16: Robot is tilted. Place it on flat ground and restart. The robot is tilted. Move it to flat ground and restart. Error 17: Side brush module error. Reset the system. The side brush module is experiencing a fault. Reset the system. Error 18: Vacuum fan error. Reset the system. The vacuum fan is experiencing a fault. Reset the system. Error 22: Please wipe the recharge sensor. The recharge sensor is blocked by dust. Please wipe the dust off. Error 23: Please clear the signal emission area of the dock charger. The charging dock is jammed. Clear and retry. Error 24: Virtual no-go zone or wall detected. Move the robot to a new location and restart. Move the robot away from the virtual no-go zone or barrier and restart. Error 26: Wipe the wall sensor. The wall sensor is dirty. Wipe it clean. Internal error. Reset the system. Malfunction due to an internal error. Reset the system. Note: A system reset may not resolve all problems.
If the problem persists after using the recommendations in the table above, please email our after-sales service team:
US/Non-Europe Support: support@roborock.com
Europe Support: support@roborock-eu.comFAQs
Problem Solution Unable to power on The battery level is low. Put the robot on the charging dock to charge it before use.
The battery temperature is too low or too high. Only use the robot within the range of 0-40°C (32-104°F).Unable to charge If the charging dock is not receiving power, check that both ends of the power cable are properly connected.
If contact is poor, clean the contact areas of the charging dock and the robot.
Power is restored when the power indicator light turns on.Slow charging When used at high or low temperatures, the machine will automatically reduce charging speed to extend battery life.
The charging contact areas may be dirty. Use a dry cloth to clean them.Unable to recharge There are too many obstacles near the charging dock. Move it to an open area.
The robot is too far from the charging dock. Place it closer and retry.Abnormal behavior Restart the robot. Noise during cleaning The main brush, side brush, or main wheels may jammed. Turn off the robot and clean them.
If the omnidirectional wheel gets jammed, use a screwdriver to remove it for cleaning.Poor cleaning ability or dust falling out The dustbin is full and needs emptying.
The filter is blocked and needs cleaning.
The main brush is jammed and needs cleaning.Unable to connect to WiFi WiFi is disabled. Reset the WiFi and try again.
WiFi signal is poor. Make sure that the robot is in an area with good WiFi signal reception.
Abnormal WiFi connection. Reset the WiFi and download the latest mobile app and retry.
The current device is not supported. You can find supported models inside the app.
Unable to connect to WiFi. There may be an error with your router settings. Contact Roborock customer service for help with troubleshooting.Scheduled cleaning is not working The battery level is too low. Scheduled cleaning can only begin when the battery level is above 20%.
Please confirm whether the timed cleaning setting is set to «effective once»?Is power always being drawn when the robot is on the charging dock? The robot will draw power while it is docked to maintain battery performance, but power consumption is extremely low. Does the robot need to be charged for at least 16 hours the first three times it is used? No. The robot can be used any time after it has been fully charged once. No or little water during mopping Check whether there is water in the water tank and use the app mobile app to set water flow or see the manual for full mop setup instructions. Cleaning does not resume after recharging Make sure that the robot is not in DND mode. DND mode will prevent cleanup. When cleaning a space requiring a top-up charge, if the robot was placed manually on the charging dock before it recharged automatically, it will not be able to continue cleanup. The robot cannot return to the charging dock after spot cleaning or when it has been moved manually. After spot cleaning or a significant position change, the robot will re-generate the map. If the charging dock is too far away, it may not be able to return for recharging and must be placed on the charger manually. The robot suddenly misses a certain spot The wall sensor or cliff sensors may be dirty. Clean them with a soft dry cloth. It takes a long time to fill the water tank The filter may be blocked and need cleaning. Robot Vacuum Cleaner
Manufacturer: Beijing Roborock Technology Co.,Ltd.
Product Model: roborock S5 Max
Address of Manufacturer: Floor 6, Suite 6016, 6017, 6018, Building C, Kangjian Baosheng Plaza,
No.8 Heiquan Road, Haidian District, Bejing, P.R.CHINAFor more product information, visit our website: www.roborock.com
For after-sales support, email our after-sales service team:
US/Non-Europe Support: support@roborock.com
Europe Support: support@roborock-eu.comVideos
Roborock S5 Max Review Video
Roborock S5 Max Mopping Test Video
Documents / Resources
References
Download manual
Here you can download full pdf version of manual, it may contain additional safety instructions, warranty information, FCC rules, etc.
Download Roborock S5 MAX Manual
- Reset WiFi
-

-
November 16 2020, 15:54
- Техника
- Cancel
Иногда я упоминал, что у меня есть устройства из серии «умный дом» от Xiaomi. На последней распродаже купил робот-пылесос от собренда — Roborock S5 MAX, который должен подключаться к единой системе управления с телефона и через нее к Wi-Fi.
С подключением часто возникают проблемы, так как большая часть устройств выпускается компанией Xiaomi для внутреннего рынка, потому в настройках программы часто ставят регион использования Китай (раньше Материковый Китай).
Как раз у меня Mi Home с регионом Китай для управления другими устройствами (ранее выкладывал схему беспроводного автоматического отключения воды на Arduino по сигналу беспроводных же датчиков протечки — лучших на сегодняшний день таблеток, которые можно разбросать где угодно, а дешевые батарейки за полтора годя я пока не менял — они сами сообщат, когда пора).
Шнур купленного робота-пылесоса S5 MAX оказался с европейской вилкой — версия Global, подключить к программе Mi Home с регионом Китай — и, соответственно, к Wi-Fi — не смог. Никакими доступными способами и программами, хотя установить русский язык получилось легко: Wi-Fi сеть на самом пылесосе работала.
Попробовал установить Mi Home с регионом Россия на другом смартфоне, менял роутер, отключал защиты сети — безрезультатно. Читал, что кто-то подключается, установив регион «США» — не уверен. Ставить другую операционную систему на пылесос и посвятить себя ее тонкостям не хотелось: я уже натанцевался с первыми смартфонами, уже не интересно.
Подключить получилось только через модифицированный Mi Home от Vevs ( https://www.kapiba.ru/2017/11/mi-home.html — версия на текущий момент 5.8.38 от 4.11.2020), установленный на другом смартфоне.
Чтобы управлять со своего смартфона, установил на него Roborock.apk (подключиться через эту программу ранее тоже не получалось) — качать с https://www.apkmirror.com/apk/roborock/roborock/ , так как Google Play пишет: «Программа не поддерживается в Вашем регионе», зато эта программа с одинаковым логином ставится на несколько смартфонов.
Теперь о том, зачем все эти танцы. Просто потому что предыдущий iRobot Roomba 564 Pet отработал 10 лет с двумя заменами аккумуляторов мной (последний литий-ионный) и настолько доказал свою эффективность, что последующий ремонт в квартире мы делали с упором на её уборку роботом. А Roborock S5 MAX на сегодня просто лучший именно с учетом особенностей нашей квартиры и стоит того, чтобы один раз уделить ему внимание.
При первом использовании S5 MAX показал себя как очень тихий по сравнению со старым, убирается значительно быстрее, не петляет хаотично, строит карту квартиры, зонирует комнаты, при желании протирает пол влажной насадкой. Воздух после первой же уборки, совмещенной с протиркой, как на берегу моря.
Удач всегда!
инструкцияXiaomi Roborock S5 Max

Roborock Robot Vacuum Cleaner
S5 Max User Manual
Read this user manual carefully before using this product and
store it properly for future reference.
Посмотреть инструкция для Xiaomi Roborock S5 Max бесплатно. Руководство относится к категории пылесосы, 1 человек(а) дали ему среднюю оценку 7.2. Руководство доступно на следующих языках: английский. У вас есть вопрос о Xiaomi Roborock S5 Max или вам нужна помощь? Задайте свой вопрос здесь

Главная
| Xiaomi | |
| Roborock S5 Max | 6970995781939 | |
| пылесос | |
| 6970995781892, 6970995781939 | |
| английский | |
| Руководство пользователя (PDF) |
Дизайн
| Тип пылесборника | Без мешка |
| Цвет товара | Черный |
| Форма | Круглый |
| Поддержка управления со смартфона | Да |
Производительность
| Объем пыли (всего) | 0.46 L |
| влажное протирание | Да |
| Функция програмированния | Да |
| Система фильтрации HEPA | — |
| Автоматический возврат на базу | Да |
| Поддерживаемые типы поверхности | Carpet, Hard floor |
| Встроенные датчики | Accelerometer, Infrared sensor, Laser |
| Уровень шума | — dB |
| Распознавание краев | Да |
Содержимое упаковки
Энергопитание
| Технология батареи | Литий-ионная (Li-Ion) |
| Емкость батареи | 5200 mAh |
| Время работы | 180 min |
| Время работы батареи | 200 m² |
| Перезаряжающийся | Да |
показать больше
Не можете найти ответ на свой вопрос в руководстве? Вы можете найти ответ на свой вопрос ниже, в разделе часто задаваемых вопросов о Xiaomi Roborock S5 Max.
Мой пылесос Xiaomi не всасывает как раньше. В чем может быть проблема?
Как часто следует проверять фильтр?
Что делать при появлении от пылесоса неприятного запаха?
С какой частотой необходимо пылесосить помещения?
Инструкция Xiaomi Roborock S5 Max доступно в русский?
Не нашли свой вопрос? Задайте свой вопрос здесь
Инструкция для Roborock S5 Max
Румиком
Инструкция для Roborock S5 Max — Mi92.ru
Благодарим за выбор Roborock S5 Max Vacuum Cleaner. 2. Благодаря мощным системам пылесоса и мытья полов, ваши полы подвергаются тщательной очистке и …
Инструкция для Roborock S5 Max — Mi92
2020-07-31 —
- PDF Viewer
- Universal Document Viewer
- Google Docs View
- Google Drive View
- Download Document [pdf]
Not Your Device? Search For Manuals / Datasheets:
File Info : application/pdf, 18 Pages, 4.45MB
Document
instrukcziya-dlya-robota-pylesosa-xiaomi-roborock-s5-max
   - Roborock S5 Max Vacuum Cleaner

   Roborock S5 Max Vacuum Cleaner
      ,           .       -     .  ,           .           .

-
 /:    :      3  :    ,
  :   >20 %
 :     :   <20 %  :
  /- ,   -  -        3 ,

2


 -


3

 -


     -,   .

  -          .    .
:     0.5    ,  1.5   -.   ,       .      ,  .


  -          .    .
:     0.5    ,  1.5   -.   ,       .      ,  .

   :      20% :    20%

     ,

 -   . -

 -


4


     Mi Home         Mi Home.    MIUI        Mi Home Smart Home.   Mi Home
  Mi Home.       QR . :        - Roborock      IOS  Android.
1.     « / device»   Mi Home,  «+»     ,   .          « / Device». :          ,   Mi Home,            . WIFI-      2.4 .

2.   WI-FI     -   WI-FI,   WI-FI  .   ,    WI-FI,         ,       « WI-FI».
 Wi-Fi   : Wi-Fi   :    :  : Wi-Fi
 ,   WI-FI  .     .
:         , ,     ,  WI-FI   .

5


1)         ,      ,   .

3)          .  ,
,     ,    .

2)       ,   ,    .
:        ,
   .

4)            .  -
        .

:     ,    .  ,        ,      .   -    ,

,      .

6


 1

 2

 4

 3

        -  ,   .        .
:        .

      .            .       ,    Z-  ,       ,     . : -         .    .      -   ,     -  .     ,      ,  .        (   -),  -    ,             .  -            10 ,         .    ,   -   .   ,   .   ,         -   -  .

:            .
      10 ,     ,      .   ,   . :           .   ,        12 .   :          .
 :        .    ,   .
:       -c,      .
    -  .    ,         .    «   ».
:        10     .
     -       .     -   WI-FI,   WI-FI  .   ,    WI-FI,      ,       « WI-FI».  ,   WI-FI  .     .
:         , ,     ,  WI-FI   .
7


         -     1.5 ,      . :          .

        . :     ,    .
  ,   ,    .       -.
:   ,      ,    ,        .
            .

          ,      .    , ,    .     .   (DND)       ,     ,       .       22:00  08:00      .


  /         ,       .
:    .         ,      .                 .

                      ,        .                ,    ,    .
8

 -
  -         0.5        1.5   ,     . .    -    .        -,          . :    -

  ( )


:     .         6-12 .
 ( )
1.
2.   ,      .

9

  (   )
1.   ,
2.  ,
:
    .
   (   )
3.


   -  .        . :         ,          3 ,     -  .
  ()
      .
  ()
1.        2.     3.

4.           ,   . ,   .

:          3-6 .
10

   ( )
1.      2.     .
:     ,       .      ,     .    .      3-6 .

  ( )
     . 2.          . 3.         .
:


  Mi Home   .        ,      20%  .


· ,      -

  (,  ).

·        .

·

 .

·     . -

,    .

    .

·

     . · ,

11

,          . ·        ,     ,     ,         ,     . · ,   ,    40 °    4 ° ,        .


+4° ~ +40°

  : 0.5C

   - +4° ~ +40°

  :0.5C


   1
   3

-20° ~ +60°  70%
-20° ~ 45°  70%

     +25 °    3 ,

   1

-20° ~ +20°  70%

12


  1:    ,       .  2:      .
 3:       .
 4:   ,     ,  .
 5:        .  6:     .

    -  ,        .   ,     ,         .     .         .     .       .        ,    .        .
   .

 7: ,    ,  - ,   .  ,   -

      .


 8:

      .     .

 9:    .

   ,    ,       -

 10:  .       .     24   -

.   ,     .

.     ,

 .   ,  .

 11:    .       .

         .    .

 12:     .    .   .  .
13

 13:  .      .

  ,        .

 14:  .

      . ,      ,   .

 15:   .

   .  .

 16:       .

     .       .

 17:    .  -      .  -

 .

   .

 18:  .   .     .     .

 19:    .     .

     .        .

 20:

   .  .

 . ,   -  -  .  . .

14


           ,      WIFI
      ,      ?


   . ,      ,     .       . ,      39 ° F (4 ° C) ~ 104 ° F (40 ° C).
-    . ,       .  . ,      -      . , ,    .
           ,     .    . ,
 -   . ,     .       . ,     -  .
 ,  ,        . ,    .
 . ,    . ,        . ,  .
WI-FI . ,  WI-FI   .   WI-FI. , ,           WI-FI.  WI-FI-.  WI-FI     ,    .
   .        ,      20%.

15

        16     ?


     ,      .
, ,       ,       ,     ,        ,       .
, ,         ,        .
,       « »,         .             -.
          .  -    , ,       . ,    -   .

16


    ,      : ·         . ·      . ·     ,        . ·        ·       . ·    ,  , ,       ,     . ·       ,     .     . ·      . ·     ,   .  ,   ,    . ·     ,        ,  . ·       .   ;    , ,   ,     . ·  , ,            . ·        ,        ,    . · ,      ,       ,    .


·    ,  -

.

  ,    ,

   .

·

 .    -

       .

    -

   .    -

    .

·

.

,      ,

      .

·         -

:    ,


·    ,

.    -

     ,

 ,     .

·

   .    -

  130 °     .

·         -

      , -

  .    ,

    ,

    .

·     -

       -

 .     .

·

17

,   ,       .       ,  . ·     ,     . ·      ,      . ·     ,      ,      . ·    c        .

-
 S5 Max  353x350x96.5   14.4V/5200 mAh  ~3.5    Wi-Fi (802.11 b/g/n), 2400-2483.5 MHz   14.4V DC   58 W
 -
 CDZ11RR  CDZ12RR  15113098    100-240V ~50-60Hz   20V/1.2A   28 W
18
ABBYY FineReader 14

Руководство пользователя робота-пылесоса
Roborock серии S5 Max
Внимательное прочитайте это руководство пользователя перед использованием устройства
и сохраните его в надежном месте.
Roborock Robot Vacuum Cleaner S5 Max User Manual
Read this user manual carefully before using this product and store it properly for future reference.


Roborock Robot Vacuum Cleaner S5 Max User Manual
Read this user manual carefully before using this product and store it properly for future reference.
Руководство пользователя робота-пылесоса
Roborock серии S5 Max
Внимательное прочитайте это руководство пользователя перед использованием
устройства и сохраните его в надежном месте.
1
37
Safety Information 1
Table of Faults 5
Welcome 6
Product Introduction 7
Installation 12
Instructions for Use 18
Routine Maintenance 21
Basic Parameters 26
Troubleshooting 27
FAQs 29
EU Declaration of Conformity 30
WEEE Information 34
Warranty Information 35
•
•
•
•
•
•
•
•
•
•
•
•
•

• This product is designed for indoor floor cleaning only, do not use it outdoors
(such as on an open-ended terrace), on any surface other than the ground (such
as a sofa), or in any commercial or industrial environment.
• Do not use this product on elevated surfaces without barriers such as the floor of
a loft, an open-ended terrace, or on top of furniture.
• Do not use the product when the ambient temperature is higher than 104°F
(40°C), lower than 39°F (4°C), or if there are liquids or tacky substances on the
floor.
• Before using the product, move wires off the ground or place them to the side to
prevent them being pulled on by the cleaner.
• To prevent blocking the product and to avoid damage to valuables, remove
lighweight items (such as plastic bags) and fragile objects (such as vases) from the
floor before cleaning.
• Children should be supervised to ensure that they do not play with the appliance.
• This product is not intended for use by persons (including children) with reduced
physical, sensory or mental capabilities, or lack of experience and knowledge,
unless they have been given supervision or instruction concerning use of the
product by a person responsible for their safety (CB).
• This product can be used by children aged from 8 years and above and persons
Safety Information
Restrictions
1

with reduced physical, sensory or mental capabilities or lack of experience and
knowledge if they have been given supervision or instruction concerning use of
the product in a safe way and understand the hazards involved. Children shall not
play with the product. Cleaning and user maintenance shall not be made by
children without supervision (EU).
• Keep the main brush cleaning tools out of reach of children.
• Do not place any object (including children and pets) on the product, whether it is
in operation or not.
• Keep hair, loose clothing, fingers, and all parts of the body away from openings
and moving parts.
• Do not use the product on burning objects (such as cigarette butts).
• Do not use the product on high pile carpets (product effectiveness may also be
reduced on dark carpets).
• Do not use the product to clean hard or sharp objects (such as decoration wastes,
glass and nails).
• Do not carry the product using the laser scanner cap, main unit cover, or collision
buffer.
• The product must be switched off and the plug must be removed from
socket-outlet before cleaning or maintaining the product.
Safety Information
2

• Do not use wet cloth or liquids for cleaning the product.
• Do not use the mopping module on carpets.
• Use the product according to the manual. Any loss or damage caused from
improper use will be borne by the user.
• This product contains batteries that are only replaceable by skilled persons.
Safety Information
• Do not charge non-rechargeable batteries.
• For the purposes of recharging the battery, only use the detachable supply unit
roborock CDZ11RR or CDZ12RR provided with this product.
• Do not dismantle, repair or modify the battery or charging dock.
• Keep the charging dock away from heat (such as heating vents).
• The battery must be removed from the appliance before it is scrapped.
• The product must be disconnected from the supply mains when removing the
battery.
• The battery must be disposed of safely. Do not discard waste batteries. Leave
them with a professional recycling organization.
• Do not wipe or clean the charger prongs with wet cloth or wet hands.
Battery and Charging
WARNING
3

Safety Information
• If the power cord is damaged, stop using it immediately. It must be replaced by
the manufacturer, its service agent, or similarly qualified persons to avoid a
hazard.
• Make sure the product is powered off before shipment.
• Use of the original packaging is advised.
• If to be left unused for a long period of time, fully charge the product and switch it
off before storing it in a cool, dry place.
• Charge it at least every three months to avoid over discharging the battery.
• To satisfy RF exposure requirements, a separation distance of 20 cm or more
should be maintained between this device and persons during device operation.
• To ensure compliance, operations at closer than this distance is not
recommended.
• The antenna used for this transmitter must not be co-located in conjunction with
any other antenna or transmitter.
4
Item
Main Unit
Charging dock Main unit does not charge.
Main brush, side brush, fan or main wheel issue.
Does not power on.
Functions do not work.
Power cable Charging dock has no power.
Fault
Table of Faults
Table of Faults
5

Welcome
Thank you for choosing a Roborock Robot Vacuum Cleaner.
Treat yourself to crisp, just-mopped floors every day with S5 Max. Engineered for a seamless
automated mopping, it has a super-sized water tank, precision water control, virtual no-mop zones,
and more. Combined with precision laser mapping, advanced navigation, and intense vacuum
suction, it makes spotless floors easier than ever. All you need to do is set it and get on with living.
Roborock is committed to putting advanced technologies to work for you, so that you can waste
less time on chores and do more of the things you love.
6
On/Off
• Press to start cleaning
• Press and hold to power on or off
Power indicator
• White: Battery level 20%
• Red: Battery level < 20%
• Flashing: Charging or starting up
• Flashing red: Error
Dock/Spot Clean
• Press to return to the dock
• Press and hold to spot clean
Cover latch
Product introduction
Robot
7
Note:
Press any button to pause cleaning, returning to
dock, or spot cleaning.
Product introduction
Parts list
8
Charging dock Power cable
Mop cloth mount Mop cloth
Moisture-proof mat
Product introduction
Dustbin Robot
System reset
Air vent
Air filter
Dustbin latch
Dustbin cover
Speaker
Water tank latch
WiFi indicator light
• Off: WiFi disabled
• Slow flashing: Waiting for
connection
• Fast flashing: Connecting
• Steady: WiFi connected
9
Product introduction
Machine and sensors
Bumper
Recharge
sensor
Laser
distance
sensor
Wall sensor
Side brush
Omnidirec-
tional wheel
Charging
contact
Main brush
Main brush
cover latch
Main wheels
Cliff sensor
10
Product introduction
Mopping module
Charging dock
Water tank
Water tank latch
Mop cloth att-
achment slot
Water tank stopper
Water filter
Mop cloth
Mop cloth
bracket clip
Attaching area
Mop cloth
bracket
Charging points
Signal transmitting area
Charging dock power indicator
Power socket
Charging points
11
Double-sided tape
Installation
Using the robot
1. Place the charging dock against the wall on a flat surface
and plug it into the mains power.
Note:
• The charging dock should have more than 0.5m (1.6ft) of clearance on each
side, and more than 1.5m (5ft) in the front.
• If the power cable is vertical to the ground, it may be caught by the
machine, causing the charging dock to be disconnected.
• The charging dock indicator is on when the charging dock is electrified, and
off when the robot is charging.
More than 0.5m (1.6ft)
More than 0.5m (1.6ft)
More than 1.5m (5ft)
2. Secure the charging dock with the adhesive tape.
Wipe the floor of the area where the charging dock will be
placed with a dry cloth, then stick the enclosed
double-sided tape to the floor. Place the dock onto the
double-sided tape to secure it in place.
Note
• Use of the double-sided tape to secure the charging dock is optional.
• When necessary, remove the double-sided adhesive tape slowly to reduce
residue glue.
12
The color of the power
indicator indicates the
battery level.
• White: 20%
• Red: < 20%
Installation
Using the robot
Note:
The robot will not turn on when the battery is low. Place the robot directly
onto the charging dock to begin charging.
13
3. Secure the moisture-proof mat.
After securing the charging dock, wipe the area where the
moisture-proof mat will be placed with a dry cloth as
shown. Stick the double-sided tape first to the
moisture-proof mat then in position on the floor.
Note:
Always place the moisture-proof mat on a wooden floor
4. Power on and charge.
Press and hold the button to turn on the robot. When
the power indicator lights up, place the robot onto the
charging dock to begin charging. The robot uses a
high-performance lithium-ion rechargeable battery. To
maintain peak battery performance, always keep the
robot charged.
Installation
Connect to the app
Add Device
Open Xiaomi Home app, tap «+» on the upper right, and then follow prompts to add your device.
5. Quick Setup
Download Xiaomi Home app
Scan the QR code to download and install the app. You will be directed to the connection setup page if the app is installed
already. Or search «Xiaomi Home» in the app Store to download and install it.
14
WiFi indicator light
• Off: WiFi disabled
• Slow flashing: Waiting for
connection
• Fast flashing: Connecting
• Steady: WiFi connected
This product works with Xiaomi Home app . Control your device, and interact it and other smart home devices with Xiaomi
Home app.
Note: For specific connection instructions, visit the Roborock website and download guidelines for iOS and Android devices.
Note: The version of the app might have been updated, please follow the instructions based on the current app version. WIFI connection only supports
networks in the 2.4 GHz band, not the 5 GHz band.
The app is referred to as Xiaomi Home app in Europe (except for Russia). The name of the app displayed on your device should be taken as the default.
*
Reset WIFI
If you experience any WIFI problems, reset the WIFI to
defaults. Open the top cover to expose the WIFI indicator
then press and hold the button and the button until
you hear the «Reset WIFI» voice prompt. Reset is complete
when the WIFI indicator flashes slowly. The product will then
wait for a connection.
Note: If a mobile phone has never been connected to the product, or if there is a
problem with the connection, reset the WIFI before attempting connection.
Note:
• To prevent corrosion or damage, do not use cleaning fluid or disinfectant
in the water tank.
• Do not use hot water, which may cause the tank to deform.
Installation
1
Remove the water tank
Press down the water tank latch and slide the tank
backwards to remove it.
3
Install the water tank
Slide the water tank into the robot until you hear it lock
with a click.
2
Fill the water tank
Open the water tank, fill it with water, and close it tightly.
Using the robot
6. Mopping
Note:
Use a barrier tape or no-mop zones to separate prevent mopping on
carpeted floors.
Install the mop cloth
If mopping immediately, dampen the mop cloth and
squeeze it dry then attach it to the mop cloth bracket.
4
15
Note:
It is recommended that all floors are vacuumed at least three times before the
first mopping session to reduce excessive dirt buildup on the mop.
Note:
Cleaning the mop cloth after 60-minutes of mopping is recommended
to ensure water flow and cleaning quality.
5
Note:
• When the charging dock is placed on a wooden floor, always use it with
the moisture-proof mat to prevent moisture damage.
• Removing and washing the mop cloth bracket, and emptying the water
tank frequently is recommended to prevent odors or mildew.
• Remove the mop cloth bracket if not mopping.
Installation
9. Remove the mop cloth bracket
To remove the mop cloth bracket, press the two clips
inwards and pull the bracket backwards.
10. Separating the water tank from the mop cloth bracket
As shown in the figure, press the two side clips inwards
and slide the mop cloth bracket backwards to separate it
from the water tank.
Using the robot
Attach the mop cloth bracket
Slide the mop cloth bracket under the water tank
following the alignment marks, until you hear a click.
8. Start cleaning
When the battery is fully charged, the power indicator will
remain lit. Press the button or use the app to start cleanup.
7. Adjust water flow rate
Use the mobile app to adjust the water flow as required.
Low
WaterLevel
Medium
Water Level
High
Water Level
16