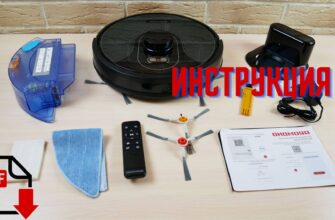
Умный робот-пылесос 4 в 1 со шваброй
Руководство пользователя
X-plorer Серия 60
X-plorer Serie 60 Умный робот-пылесос 4 в 1 со шваброй
Перед первым использованием внимательно прочтите буклет «Инструкции по технике безопасности и эксплуатации».
Чтобы получить больше информации
Ваш робот может столкнуться с некоторыми трудностями на коврах: с бахромой, слишком толстой, с длинным ворсом, слишком легким (например, ковер в ванной)
- Откидная крышка
- Прозрачное окно
- Кнопка управления
- Передний бампер
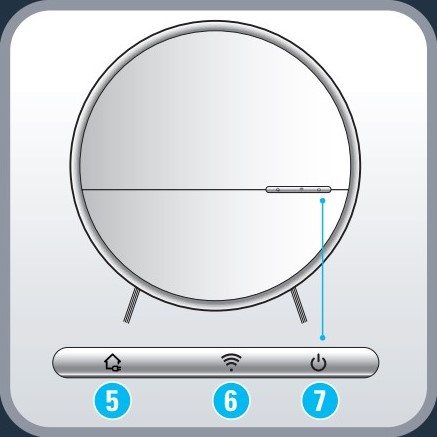
- Кнопка подзарядки
- Индикатор WIFI
- Кнопка Пуск / Пауза
- Пылесборник
- Кнопка ВКЛ ВЫКЛ
- Контейнер для мусора
- Крышка пылесборника
- Экран фильтра
Подключите адаптер питания к зарядной док-станции и блоку питания. Обязательно расположите кабель адаптера так, чтобы пылесос не запутался во время работы.
Чтобы разместить док-станцию, убедитесь, что есть свободное пространство шириной 1.5 м с каждой стороны и 2 м перед док-станцией. Не устанавливайте док-станцию рядом с лестницей. Кабель должен быть натянут. Всегда устанавливайте док-станцию на твердый пол. Не ставьте док-станцию на ковер.
Если пылесос не используется в течение длительного времени, полностью зарядите аккумулятор, затем извлеките его и храните в сухом прохладном месте. Когда продукт работает, удаление док-станции повлияет на подзарядку машины.
Чтобы зарядить робота, поместите его на док-станцию: пластины для зарядки робота должны соприкасаться с пластинами док-станции. Когда робот заряжается, индикатор зарядки устройства мигает синим; когда робот полностью заряжен, он полностью станет синим.
У робота есть датчики падения для обнаружения ступенек и проемов. Робот изменит направление при их обнаружении. Чтобы правильно определить перепад уровня пола, убедитесь, что на полу рядом с просветами, лестницей или на ступенях лестницы нет предметов (сумок, обуви…).
Чтобы очистить все доступные зоны вашего дома, используйте «Методический» режим. Нажмите кнопку питания, и робот начнет уборку, а кнопка питания станет полностью синей.
Для уборки определенного участка дома используйте режим «Точечный». Дважды нажмите кнопку питания, и робот начнет уборку, а кнопка питания станет полностью синей. Обратите внимание, что режим «Спот» недоступен, когда робот находится на док-станции.
Для уборки вдоль стен и в углах используйте режим «Следование за стеной». Нажмите кнопку питания три раза, и робот начнет уборку, а кнопка питания станет полностью синей.
Чтобы попросить робота вернуться на док-станцию и зарядить, нажмите кнопку «Перезарядка»; робот перейдет на зарядку, в то время как кнопка перезарядки станет красной.
Чтобы в полной мере воспользоваться всеми возможностями, предоставляемыми вашим роботом, загрузите на свой смартфон бесплатное приложение «Tefal Robots» (вы можете использовать приведенный выше QR-код, чтобы найти его в магазине приложений или Google play). Просто позвольте вам руководствоваться инструкциями в приложении, чтобы наслаждаться роботом!
Светодиодный индикатор WIFI указывает состояние вашего подключения: когда он полностью выделен синим цветом, робот подключен; мигает синим — робот пытается подключиться; в выключенном состоянии робот не подключен.
Чтобы очистить зарядный контакт, сначала откройте откидную крышку и выключите выключатель питания (или отсоедините шнур питания). Затем протрите их сухой тканью. Не трите масло. Очищайте зарядный контакт один раз в месяц.
Чтобы очистить пылесборник, откройте откидную крышку, поднимите ручку пылесборника и выньте пылесборник. Снимите пылезащитный кожух с левой стороны коробки, поднимите ленту сетки фильтра и выньте сетку фильтра. Вылейте пыль из пылесборника, используйте щетку для очистки пылесборника и промойте внутреннюю часть под проточной водой. Используйте чистящую щетку для очистки фильтра. Очищайте пылесборник раз в неделю.
Для очистки среднего скребка переместите рычаг блокировки в среднее положение и поднимите его, чтобы снять средний скребок. Возьмите среднюю щетку и поднимите ее, чтобы снять среднюю щетку. Используйте чистящую щетку для очистки элементов и регулярно счищайте волосы и другие запутанные части на подметальной щетке.
Чтобы очистить боковую щетку, снимите ее и используйте щетку для очистки, чтобы очистить боковую щетку и зацепления в прорези боковой щетки. Боковые щетки меняйте каждые 6 месяцев.
Боковые щетки меняйте каждые 6 месяцев.
Выбросьте старые щетки и замените их новыми. Накрутите на робота новые щетки.
Очищайте колеса робота раз в неделю, чтобы удалить спутанные волосы и волокна. Чтобы извлечь переднее колесо, воспользуйтесь инструментом из комплекта.
Рекомендуется каждый раз после завершения чистки использовать сухую хлопчатобумажную ткань, чтобы тщательно протирать светопропускающую пластину и датчик, чтобы предотвратить накопление пыли, которая повлияет на работу продукта.
| Компонент | Очистка компонента | Замена компонента |
| Аспирационный патрубок | После каждого использования | Непригодный |
| Фильтр | Раз в неделю | Два раза в год |
| Кисть | Раз в неделю | Если необходимо |
| Зарядное основание | Раз в неделю | Непригодный |
| Датчики падения | Раз в неделю | Непригодный |
| Переднее колесо | Раз в неделю | Непригодный |
| Головки щеток | Раз в месяц | Два раза в год |
Каждые 6 месяцев заменяйте фильтр тонкой очистки на новый для поддержания оптимальной производительности.
Не выбрасывайте робота в мусорное ведро.
Всегда надевайте перчатки и защиту.
Внимание: Перед извлечением аккумулятора выключите робот. Переверните робота вверх дном, чтобы получить доступ к аккумуляторному отсеку. Извлеките аккумулятор, нажав на защелки батарейного отсека и потянув аккумулятор вверх. Отключите аккумулятор от робота. Утилизируйте аккумулятор и робота.
Чтобы продлить срок службы аккумулятора, всегда держите робот заряженным на док-станции, пока он не используется.
Если робот хранится вне / вне док-станции, убедитесь, что робот ВЫКЛЮЧЕН и аккумулятор полностью заряжен. Храните робота в свежем и сухом месте. Пожалуйста, заряжайте робота каждые 3 месяца, когда вы его не используете.
ЕСТЬ ПРОБЛЕМА С ВАШИМ ПРИБОРОМ?
По модели:
- Зарядное устройство нагревается:
Это совершенно нормально. Пылесос может оставаться постоянно подключенным к зарядному устройству без какого-либо риска.
- Зарядное устройство подключено, но ваш прибор не заряжается:
– Зарядное устройство неправильно подключено к прибору или неисправно.Убедитесь, что зарядное устройство правильно подключено, или обратитесь в утвержденный сервисный центр для замены зарядного устройства.
- Ваш прибор останавливается во время использования:
– Ваш прибор может перегреваться.Остановите прибор и дайте ему остыть не менее 1 часа.
Если он неоднократно перегревается, обратитесь в утвержденный сервисный центр.
- Прибор остановился после того, как мигал индикатор зарядки:
– В приборе разрядился аккумулятор.Зарядите пылесос.
- Электрощетка работает неправильно или издает шум:
– Вращающаяся щетка или шланг заблокированы.Остановите пылесос и почистите их.
– Щетка изношена.Обратитесь в авторизованный сервисный центр, чтобы заменить щетку.
– Ремень надет.Обратитесь в авторизованный сервисный центр для замены ремня.
- Электрощетка останавливается во время уборки:
– Сработала функция безопасности.Остановите пылесос. Убедитесь, что ничто не препятствует вращению щетки; если есть препятствие, удалите его и очистите силовую щетку, затем включите пылесос.
- Ваш пылесос тоже плохо убирает, шумит и свистит:
– Впускной канал частично заблокирован.Разблокировать это
– Пылесборник заполнен.
Опорожните его и очистите.
– Пылеуловитель установлен неправильно.Правильно установите его.
– Засорена всасывающая головка.Снимите силовую щетку и очистите ее.
– Защитный поролоновый фильтр насыщен.Убери это.
| RG74XX | ||
| Серийный номер. | Ошибка | Описание ошибки |
| 1 | Ошибка левого колеса | Не работает левое колесо, перегрузка в левом колесе. Индикатор POWER дважды мигнет и один раз подаст звуковой сигнал. |
| 2 | Ошибка правого колеса | Не работает правое колесо, перегрузка в левом колесе. Индикатор POWER мигнет 3 раза и подаст один звуковой сигнал. |
| 3 | робот поднял ошибку | Робот поднимается более 1 секунды. Индикатор POWER мигает 4 раза и издает один звуковой сигнал. |
| 4 | Ошибка переднего колеса | Переднее колесо не работает, заклинило. Индикатор POWER мигает 5 раза и издает один звуковой сигнал. |
| 5 | Ошибка датчиков обрыва | Датчики обрыва не работают. Индикатор POWER мигает 6 раза и издает один звуковой сигнал. |
| 6 | Ошибка низкого заряда батареи | СИЛА будет мертва. Индикатор POWER мигает 7 раза и издает один звуковой сигнал. |
| 7 | Ошибка переднего бампера | Переключатель с левой или правой стороны бампера не восстанавливается. Индикатор POWER мигает 8 раз и издает один звуковой сигнал. |
| 8 | Ошибка средней кисти | Основная щетка не работает, перегрузка. Индикатор DOCKING мигает 2 раза и один раз издает звуковой сигнал. |
| 9 | Ошибка боковой щетки | Боковая щетка не работает, перегрузка. Индикатор DOCKING мигает 3 раза и один раз издает звуковой сигнал. |
| 10 | Ошибка датчика стены | Ошибка датчика стены. Индикатор DOCKING мигнет 4 раза и подаст один звуковой сигнал. |
| 11 | Ошибка двигателя вентилятора | Двигатель вентилятора не работает, перегрузка. Индикатор DOCKING мигает 5 раза и один раз издает звуковой сигнал. |
| 12 | Нет ошибки в мусорной корзине | Никакой помойки. Индикатор DOCKING мигает 6 раз и издает один звуковой сигнал. |
| 13 | Ошибка зарядки | Робот плохо подключен к док-станции. Индикатор DOCKING мигнет 7 раз и подаст один звуковой сигнал. |
Сохраните это руководство пользователя.
2220003387/05
Документы / Ресурсы
Рекомендации
Кухонная и бытовая техника — T-fal
Перейти к контенту
Русские электронные инструкции по эксплуатации
Постоянно обновляемый большой каталог документации по эксплуатации и использованию современных устройств и оборудования на русском языке. Бесплатное скачивание файлов.
Поиск:
Главная
Просмотр инструкции в pdf
Инструкция по эксплуатации робота-пылесоса Tefal X-plorer Serie 60 Allergy Kit.
Скачать инструкцию к роботу-пылесосу Tefal X-plorer Serie 60 Allergy Kit (12,98 МБ)
Инструкции по эксплуатации роботов-пылесосов Tefal
« Инструкция к роботу-пылесосу Rekam RVC-1555B
» Инструкция к роботу-пылесосу 360 Robot Vacuum Cleaner S5
Вам также может быть интересно
Инструкция к роботу-пылесосу Tefal X-Plorer Serie 75 Total Care RG7687WH
Инструкция к пылесосу Tefal X-Force Flex 11.60 Aqua TY9890WO
Инструкция к роботу-пылесосу Tefal RG7133RH Smart Force Extreme
Инструкция к кофеварке Tefal CM321832
Инструкция к пылесосу Tefal Smart Force Extreme RG7145RH
Инструкция к мультиварке Tefal Multicook&Stir RK901F32
Инструкция к электровафельнице Tefal Waffle Time WD170D38
Инструкция к мультиварке Tefal Multocook&Grain RK900132
Добавить комментарий
Имя *
Email *
Сайт
Комментарий


Сохранить моё имя, email и адрес сайта в этом браузере для последующих моих комментариев.
- Добавить инструкцию
- Заказать инструкцию
Перейти к содержанию
На чтение 1 мин
Инструкция на русском языке в pdf формате, tefal explorer series 60, здесь вы найдете ответы на вопросы: установка и подключение робота-пылесоса, как правильно заряжать, и эксплуатировать, настройка программ по уборке в помещении, возникшие проблемы с устройством, коды ошибок.
Скачать инструкцию по эксплуатации робота-пылесоса Tefal explorer series 60
Ссылка для скачивания tefal explorer 60 инструкция
Оцените статью
( 21 оценка, среднее 3.1 из 5 )
Вам также может понравиться
Инструкция на русском и украинском языке, Redmond
Инструкция на русском языке для робота-пылесоса самсунг
Беспроводной моющий пылесос Atvel F16 инструкция
Инструкция и руководство по эксплуатации моющего
Инструкция на русском языке к вертикальному пылесосу
Инструкция робота-пылесоса 360 C50 1, на русском
Руководство и инструкция робота пылесоса Neatsvor
Инструкция и правила эксплуатации Xiaomi dreame v12
-
Consumer services
>
-
User manual, instruction for use
>
-
Floor care
>
-
Robot vacuum cleaner
>
User manual and frequently asked questions ROBOT EXPLORER SERIE 60
The thinnest 4-in-1 robot (*)
With the Tefal Explorer 60 robot vacuum cleaner, clean your home and tackle dust allergens without lifting a finger! Its two lateral brushes reach all corners and optimize surface coverage. Its Turbo Brush, an active motorized central brush, catches all wastes on its way. Plus, its Aqua Force system mops your floor while vacuuming that ensures visibly perfect results! Its high performance filter ensures 99,9 % of dust containment. The thinnest 4-in-1 robot* vacuum on the market at only 6 cm high, it even passes under low furniture. Its methodical navigation system, Smart Exploration 4.0, covers your whole home with outstanding accuracy. Finally, it’s highly intuitive and easy to use: simply connect to the app and command your robot from anywhere, at any time.
Reference : RG7447WH
Frequent questions
The robot app is exclusively for smartphones.
Our products are compatible with all operators and the majority of the boxes on the market.
You can connect your product to any WEP, WPA and WPA2 type Wi-Fi on the 2.4GHz frequency band.
If your Wi-Fi network is not visible on the product, it is possible that 2.4GHz Wi-Fi is not enabled on your box.
Most boxes allow you to activate it. Consult your operator’s FAQ to find out how to do this.
Warning:
Your product cannot connect to a 5GHz Wi-Fi.
Wi-Fi with a password containing special characters will not work as well as open Wi-Fi (not requiring a password).
If your network isn’t visible in the list of available networks, please move your device closer to the internet box.
If the network still isn’t visible, it may not be compatible with your device. In particular, 5GHz networks are not supported. Please consult the compatibility list.
In «Settings» on the right side of your home screen, you must choose the «WiFi settings» and «activate WiFi».
Then select your WiFi network and enter your password.
Here is the list of the most common problems and solutions by the frequency order.
- Pairing succeeded but the appliance isn’t connected: if you see in the app that your appliance isn’t connected, close and reopen the app.
If you still don’t see the appliance after this action,
— Explorer Serie 40 products: put the robot out of its docking station and press the button 3 seconds. If you want to make another association with another phone, you may have to press the button several times to make it blink in orange.
— Explorer Serie 60 products: restart the robot by using the switch next to the dust bin.
— Explorer Serie 80 products: restart the robot by using the switch below the robot. - Wi-Fi connection: check the Wi-Fi password and type carefully.
- Keep your smartphone close to the appliance and the modem until the end of the pairing process.
- Access Point Android: make sure that you keep the connection to the appliance if you see a confirmation message. This message can appear twice during the pairing process.
- Access Point iOS: after several attempts, restart your smartphone.
- Access Point iOS: during the connection to the appliance, a popup will appear to ask you to connect to the «SEB_ACCESS_POINT» network. Press «Join«.
- Access Point: when you activated the access point,
— Explorer Serie 40 products: does the LED flash orange + double beep?
— Explorer Serie 60 products: does the Wi-Fi light flash quickly + beep?
— Explorer Serie 80 products: is the Wi-Fi light flashing?If not, try again.
- Access Point Android: after several attempts, remove the network «SEB_AccessPoint» from your smartphone setting if you see it.
- Access Point Android: some smartphones have an option in the Wi-Fi settings to avoid the connection to a Wi-Fi which has no internet connection.
For the pairing, please deactivate this option so that the smartphone allows the connection to the appliance. This option is identified in Xiaomi smartphones such as Pocophone F1 and Redmi note 8.
- Internet connection: be sure that the appliance that you are about to pair does not need a proxy.
- Android: you must allow the geolocation.
- Internet connection: check that you select a 2,4 GHz network in your Wi-Fi setting, not 5 GHz to connect your appliance.
- Connection to the cloud: check if the automatic reconnection to your home Wi-Fi is correct.
- Connection to the cloud: activate the mobile data of your smartphone.
- After several attempts: restart the Wi-Fi modem.
- After several attempts: unplug, wait for 20 seconds, and re-plug the appliance.
If the problem is still present, reset the appliance (hard reset).
If you still encounter an error after several unsuccessful attempts:
Press the device’s «Home» button for 5 seconds and check that the Wi-Fi light is flashing.
If not, turn the device off and on again using the switch next to the dustbin.
If the error persists, it may be due to improper use of the phone:
Android phone:
During the connection process, the app will automatically connect you to the robot. It’s important to stay connected to this new network.
Depending on your phone, different pop-ups may appear during connection:
• If the pop-up tells you that you are going to change network because the one you are connected to does not have internet, refuse.
• If the pop-up asks you if you would like to stay connected to the network without internet, accept.
• If the pop-up tells you that the network does not have internet but does not suggest changing networks, don’t do anything.
iPhone:
When connecting to the device, a pop-up will appear and ask you to connect to the «SEB_ACCESS_POINT» network. Accept by clicking «Join».
If you fail this step several times, restart your phone and try again.
After typing in your password, you encounter an error connecting to the cloud.
• When connecting to the cloud, an internet connection is required to successfully pair the devices. To do so, you can activate your mobile data or automatically reconnect to your home network.
• Ensure that the date and time on your phone are correct. Any difference will prevent the connection.
After several unsuccessful attempts:
• Restart your Wi-Fi box.
• Turn the device off and on again using the switch next to the dustbin.
After multiple unsuccessful attempts, you can reset your device:
Press the «Home» and start buttons at the same time for 5 seconds. The start button will flash several times to confirm the activation.
Important: turn the device off and then on again using the switch next to the dustbin.
After typing in your password, you encounter an error related to connecting to the Wi-Fi network.
1. Check the Wi-Fi password and carefully re-enter it.
2. Keep your smartphone near the device and internet modem until the connection process is complete.
3. The device can’t connect to public networks such as those available in hotels.
4. Android phone: When connecting to the device, a pop-up may appear. During the connection process, the app will automatically connect you to the robot. It’s important to stay connected to this new network.
Depending on your phone, here are some examples of problems you may encounter:
• If the pop-up tells you that you are going to change network because the one you are connected to does not have internet, refuse.
• If the pop-up asks you if you would like to stay connected to the network without internet, accept.
• If the pop-up tells you that the network does not have internet but does not suggest changing networks, don’t do anything.
After several unsuccessful attempts:
• Restart your Wi-Fi box.
• Turn the device off and on again using the switch next to the dustbin.
Some Xiaomi phones may experience problems when connecting. An unusually high number of pop-ups may appear.
The phones affected are those with MIUI system (such as Redmi and Pocophone models).
In this case, please try the following steps:
• Settings > Applications > Manage applications > Rowenta Robots > Other permissions. On this page, accept the permission to «Change Wi-Fi connectivity».
• Settings > Wi-Fi > Additional settings > Wi-Fi Assistant. On this page, deactivate the available options.
You can go to the setting of your smartphone and check that your smartphone is connected to your home WiFi. Your home WiFi must have an internet connection.
Several possible reasons exist:
• You didn’t enter the correct email address for the account. Please verify.
• You didn’t enter the correct password. To reset, request a temporary password by email and then change the password in the app’s Menu.
This is not mandatory at all but a user preference.
This is a Gyro map, a non-permanent map that allows you to have a live visual tracking of your cleaning session. This map has a reporting purpose only and is not cuztomizable. A new map will be created for each new cleaning session.
The Gyro map quality may be impacted if the robot encounters too many obstacles while cleaning. Before running the robot vacuum cleaner, ensure to remove obstacles, power cords, clothing, or other potentially obstacles which might cause robot difficulties.
The Gyro map quality may also be impacted if the robot had difficulties to climb on a carpet, a door threshold, a chair leg…
The Gyro map has a maximum surface coverage of 19x19m (360m²), so please make sure to install your docking station accordingly.
Do not vacuum wet surfaces, any type of liquids, hot substances (embers, cigarettes), super fine substances (plaster, cement, ash, etc.), large sharp waste (glass), harmful products (solvents, abrasives, etc.), aggressive products (acids, cleaning products, etc.), inflammable and explosive products (oil or alcohol based).
Place the charging base station against a wall, on a flat surface and where the robot vacuum cleaner can easily find it.
This location must be free of any obstacles (including rugs). Leave at least 1,5 metre of space free to the left and the right, and 2 metres at the front of the base station. If the station is placed in a corner or difficult to find, the robot vacuum cleaner will not be able to reach it.
Place the base station’s power cable along the wall.
For more information, refer to the instructions in your user manual.
Leave the charging base station plugged in permanently (the automatic recharge function will not be available if the charging station is not activated).
Yes, your robot vacuum cleaner is equipped with drop sensors that detect stairs and gaps.
However, in some situations, the sensors are not as efficient. For example, curved staircase edges, rugs next to stairs, slippery surfaces and obstructions might affect the sensors’ performance.
Before running the robot vacuum cleaner ensure space has no obstacles, power cords, clothing, or other potentially dangerous objects which might cause the appliance breakdown or other accidents.
Yes, the robot can be charged on the charging station, even when the robot’s main power switch is turned off.
Check that the switch underneath the robot is correctly in the ‘ON’ position.
The robot vacuum cleaner has 3 cleaning modes:
• «Methodic» (to clean all the accessible areas)
• «Wall follow» (to clean along the walls and in the corners)
• «Spot» (to clean a localised area)
To choose the «Methodic» mode, press once the power button on the robot.
To choose the «Spot» mode, press twice the power button on the robot.
To choose the «Wall follow» mode, press thrice the power button on the robot.
You also can activate different cleaning modes in the mobile application.
To pause the cleaning session press the power button on the robot.
To resume the cleaning session press the power button once again.
To send the robot back to its docking station press the recharge button on the robot. The recharge button will be lit up in red.
When the robot is charging, the charging base’s light indicator flashes blue.
When the robot is fully charged, the indicator stops flashing and stays on blue.
Always keep the robot vacuum cleaner on the docking station, while you are not using it.
If you plan not to use the robot for a long time, fully charge and then take the battery out of the robot (make sure the robot is switched off when you take the battery out). Store them in a cool dry place. Recharge the battery every 3 months.
It’s not recommended to use the mop with water on sensitive floors such as parquets or carpets and rugs.
No, the water tank and the humidified mop have to be installed just before the cleaning and removed right after the cleaning.
Turn off your robot vacuum cleaner immediately.
Remove the dust box, filter and main brush.
Let them dry completely before reinstalling.
Empty the dust container into a bin after each use. Clean the dust compartment seals with a cloth.
It is recommended to clean the central brush once a week.
For more details, please refer to the User Manual.
It is recommended to clean the filters at least once a week.
For more details, please refer to the User Manual.
It is necessary to clean left, right and front wheels regularly to remove entangled hair and threads.
It is recommended to wipe sensors and charging terminals (of the robot and charging base) with a clean dry cloth once a week.
Turn off the robot before cleaning the sensors and charging terminals.
Do not use any cleaning products to clean the robot vacuum cleaner.
For some parts you can use the water, for the others you can use the dry cloth only. For more details, refer to the instruction manual.
It is recommended to replace the fine dust and foam filter every 6 months.
The side brushes should be replaced by new every 6 months.
Do not use your appliance. In order to avoid any danger, you must have them replaced by an approved vacuum repair company.
Do not use your appliance. To avoid any danger, do not touch the terminals. You must unplug the charging station and have it replaced by an approved vacuum repair company.
Check:
• If the dust container is full.
• The cleanliness of the filters.
• If there is an object or rubbish which may be obstructing the suction hole underneath the robot.
Several possible reasons exist:
• If the robot did not start from its docking station, it will not return to it. In this case, the robot will return to its starting point.
• If the robot vacuumed in Spot mode, the robot will return to its starting point.
• If the robot is lifted up and put back down on the floor, it will try to relocate itself. If it can’t, it will return to its starting point.
Check the following:
• The charging station must not be installed on a rug.
• The charging station must not be exposed to sunlight or near a heat source.
• The free space to the side and the front of the charging station adheres to the instructions in the user manual.
• The plug is correctly connected to the charging station.
• The charger cable is connected to the power supply.
• There are no obstructing objects around the charging base.
• There are no objects near the charging station terminals.
• The charging station is activated (LED indicator is green).
If after checking these elements, the robot still cannot find the base station, contact an approved vacuum repair company.
You can perform the following actions:
• Turn off and then turn on the main power switch.
• Unplug the cable and plug it again into the charging station.
• Make sure that the charging terminals and the sensor windows are not clogged up, then wipe the main body and the charging station with a dry cloth. Do not forget to switch off the main power switch and to turn off the robot before drying carefully.
• Check if there is no obstacle such as a reflective object, a chair, etc. near the charging station.
If after these steps, the automatic charging still does not work well, contact an approved vacuum repair company.
This is a regular case. The vacuum cleaner can remain connected to the docking station without any risk.
Caution: use only designated charger.
Check the following:
• If the switch underneath the robot is correctly in the ‘ON’ position.
• If the display is lit up. If not, charge up the robot on the base station.
Check the following:
• There are no obstucting objects under the wheels.
• The robot is not blocked due to differences in the floor level.
• There is no error message displayed. (see the troubleshooting and error codes section in your user manual)
You can perform the following actions:
• Make sure there are no obstructing objects within 10 cm of the staircases/gaps.
• Wipe up the sensor windows with a dry cloth.
If after these steps, the problem persists, please contact an approved vacuum repair company.
Make sure that the brush is not obstructed. Clean the brush from entangled hair and threads.
If the brush is damaged, replace it with a new one.
Flashing light and sound signal indicates an error.
For more details about the error description and solution, refer to User Manual.
You can perform the following actions:
• Check if the intake channel is not obstructed.
• Check if the dust bin is well fitted.
• Empty the dust bin if it is full.
• Remove the central brush and clean it.
• Check if the filter is not saturated.
If after these steps, the problem persists, please contact an approved vacuum repair company.
The power-brush safety feature is activated when the robot identifies a risk.
Two situations may occur:
• The power-brush gets stuck: the robot attempts to free it and stops the vacuuming and the power-brush.
• The robot will try to free the brush: if it can’t, it will turn off and you will have to clear it manually.
If the power-brush gets stuck in thick carpeting due to its long and/or thick fibers, or the robot has vacuumed the carpet for a long time, the power-brush will stop turning and the robot will continue vacuuming without it.
The robot may experience certain problems represented by error codes.
For more details about the error codes description and solution, refer to User Manual.
The filter may be inserted incorrectly. Try positioning the filter correctly into the slot on its holder.
After following the instructions in the user manual for starting the appliance, make sure that your electrical socket is working by plugging another appliance. If it still does not work, do not try to dismantle or repair the appliance yourself, instead, take it to an approved repair centre
The robot can be reset by pressing both the home button and the start button during 5 seconds. A beep is heard and the start button blinks when the procedure is successful.
This is normal, because you are connected to the product, which has no internet connection.
For certain smartphones, after it is connected to the product Wi-Fi, you may see a message asking you to confirm that you want to stay on this network which has no internet connection. You have to answer that you want to connect to this network anyway for the association to be successful.
First, check if the robot is connected. If the Wi-Fi LED is blinking, the robot is trying to connect to the Wi-Fi network.
The LED is off: The robot is not connected. First, check your internet box.
The LED is blinking: The robot is trying to connect. Wait a few moments.
If the robot is in this state for several minutes, restart the robot by putting it off its base and using the switch located near the dust bin.
The LED is lit and stable: The robot is connected.
In this case, restart the robot by putting it off its base and using the switch located near the dust bin. If this does not work, use the reset procedure.
Restart the robot by using the switch next to the dustbin.
If the recharge indicator (5) blinks blue 3 times and then, after a beep, starts blinking red, change the battery or take your robot vacuum cleaner to an approved service centre.
No, the appliance is designed for indoor use only.
Yes, the robot vacuum cleaner’s sensors do not require the light to process the cleaning session.
The robot vacuum cleaner is efficient on the hard floor surfaces, including tile, parquet, laminate, vinyl, and carpets not thicker than 1,5cm.
Yes, it is recommended to use the robot vacuum cleaner to maintain the cleanliness, but there are still surfaces where the robot does not perform as efficient as non-robotic vacuum cleaners.
Yes, you can schedule a single cleaning session or set up a daily cleaning function through the mobile application.
The robot is limited to one program per day in order to ensure optimum cleaning of all accessible rooms.
Yes. The robot will switch to sleep mode when it is fully recharged.
Yes, the robot will automatically return to the charging base when the battery is low during cleaning.
Once charging is complete, the vacuum cleaner will restart the cleaning process.
This is because the robot didn’t start from its docking station: since the robot returns to its starting point, it will go back to where it began vacuuming in Spot mode.
Your appliance contains valuable materials which can be recovered or recycled. Leave it at a local civic waste collection point.
Please go to the “Accessories” section of the website to easily find whatever you need for your product.
Find more detailed information in the Guarantee section of this website.
If you believe that one part is missing, please call Consumer Services Center and we will help you find a suitable solution.
The robot vacuum cleaner has 3 power modes: Silent, Normal and Boost.
You also can activate different power modes in the mobile application.
Yes, the robot sensors allow identifying a rug surface, and the robot automatically switches to the Boost mode.
It will take 4-5 hours to charge an empty battery.
The robot can run up to 90 min before its battery is low.
You can share your robot by having each person download the Rowenta robot app and follow the connection instructions.
In order for your smartphone to detect your Wi-Fi around you, the application needs the location permission as required by Google.
If you don’t allow this permission, your smartphone won’t be able to find your product, and not be able to continue the pairing.
This information will not be used or stored.
If you want to sell your robot, think about deleting your data:
• Press the «Power» and «Home» buttons for 20 seconds.
• Open the Robots app.
• Click on settings.
• Click on the name of your robot and «Delete the product».
-
Warranty
View the product warranty conditions
-
Contact
Our advisors are at your service.


