- Manuals
- Brands
- Samsung Manuals
- Digital Camera
- S1050 — Digital Camera — Compact
- User manual
-
Contents
-
Table of Contents
-
Troubleshooting
-
Bookmarks
Quick Links
Related Manuals for Samsung S1050
Summary of Contents for Samsung S1050
-
Page 2
• Please check that the camera is operating properly prior to when you intend to CD-ROM, (p.86) use it (e.g.for a trip or an important event)to avoid disappointment. Samsung camera takes no responsibilityfor any loss or damages that may resultfrom camera malfunction. -
Page 3
_# only be carried out by your dealeror • For safety reasons keep this produc!a_l_accesseries out of reach of children or Samsung Camera Sewice centr_:_ _ animals to prevent accidents e.g.:_’_ _:{: • Please do not use this productj_ €lo_ ioxirnityto flammable or explosive •… -
Page 4
CAUTION indicates apotentially hazardous situation which, ifnot avoided, •Wise Shot ……result in aminor or m oderate injury, •How to use the S CENE mode ,..17 •System chart ……•Face recognition ….. • Leaking, overheating, or d amaged battery could result in fire o r i njury, •Identification of f eatures… -
Page 5: Table Of Contents
• How to use the menu ….31 • SpecialEffect (E button): Colour ..-39 • Voice memo / Up button …. 54 • PictBridge ……• Recording ……• Special Effect (E button) : • Play & Pause / Down button ..55 •…
-
Page 6
The contents can vary depending on the s ales region, To b uy the o ptional equipment, contact your nearest Samsung dealer or S amsung service centre, < Included items > User manual, Software CD Computer PictBridge compatible… -
Page 7
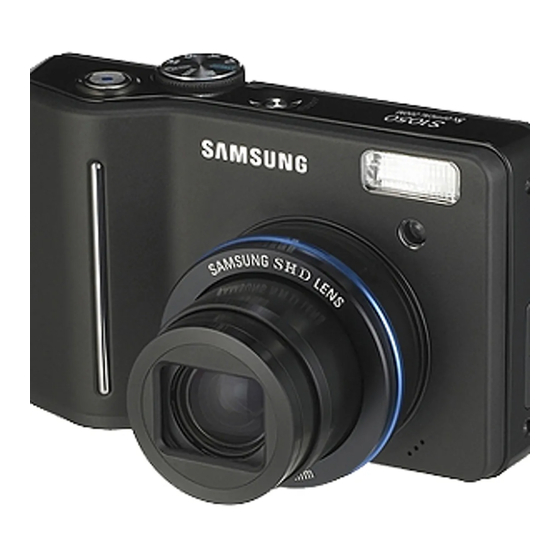
Mode dial Powerbutton Shutter button Speaker Flash Self-timer lamp / Auto focus lamp USB / AV connection terminal DC input connection port Lens / Lens covel Microphone… -
Page 8
Camera status lamp Zoom T button (Digitalzoom) Zoom W button (Thumbnail) E (Effects) button LCD monitor Strap eyelet 5 function button FR(Face Recogni_on)button Tripod socket +/- button, Delete button Play mode / Printerbutton… -
Page 9
• Self-timer lamp Icon Status Description Battery chamber cover ®2s Blinking For the 2 seconds, the lamp blinks quickly at 0.25-second intewals before taking a picture For the first 8 seconds the lamp blinks at 1 second intervals. Blinking For the final 2 seconds, the lamp blinks quickly at 0.25- second intervals. -
Page 10
• Mode icon :Refer to page 15-20 for m ore information about the c amera mode • We recommend using battery supplied with the camera. The available batteries setting. are listed below. MODEAUTOPROGRAM A — Non reohargeable batteries : 2 X AA Alkaline (High Capacity) — Rechargeable batteries :SNB-2512 (Ni-MH) Icon _ •… -
Page 11
• Insert the battery as shown • Insertthe memorycard as shown. — If the camera does not turn on after you — Turn off the camera’s power before have inserted battery, please check insertingthe memory card. whether the battery is inserted with the correct polanty (+/-), — Have the front of the memory card facing toward the front of the camera (lens) and… -
Page 12
Wear and tear on the m emory card is not covered by the S amsung • Samsung cannot be held responsible for lost data, warranty. • Itis advisable to copy important… -
Page 13
g When using a 256MB MMC (Multi Media Card),the specified shooting capacity will be as follows. These figures are approximate as image capacities can be affected by variables such as subject matter and memory card type. Recorded image size SuperFine Fine Normal 30FPS 20FPS… -
Page 14
• Charge the rechargeable battery fully before using the camera for the first time, • Setting up the date, time and date type 1. Select the [Date&Time] menu by pressing • When the camera is turned on for the first time, a menu will be displayed to set the UP/DOWN button and press date / time, language and battery type in the LCD monitor,This menu will net be the RIGHT button. -
Page 15
g The LCD monitor displays informationabout the shootingfunctions and Description Icons Page selections. Macro • • p.24 Contrast p.31 Sharpness p.31 Auto focus frame p.32 ® Camera shake warning p.20 ® Date/Time 2007/02/01 01:00PM p.34 Exposure compensation p.4g ® White Balance AWB_ _i_ @_ _ p.48… -
Page 16
• How to use the PROGRAM mode ( PROG • How to use the AUTO mode ( _ Please select this mode for quick and easy picture Selecting the automatic mode will configure the taking with minimal user interaction. camera with optimal settings. You can still manually configure all functions exceptthe aperture value 1. -
Page 17
• How to use the S HUTTER PRIORITY mode ( S ) • How to usethe ASR (Advanced Shake Reduction) 1. S elect the S HUTTER PRIORITY Mode mode (_))AaR) rotating the m ode dial. Advanced Shake Reduction (ASR) mode. 2. -
Page 18
R Wise Shot SCENE ) • How to use the SCENE mode ( 2 images are taken at a time. One is taken inthe Use the menu to easily configure optimal settings Fill-In Flash mode and the other is taken in the for a variety of shooting situations. -
Page 19
g Face recognition This mode detects the face position of the subject automatically and then sets the focus and exposure. Select this mode for quick and easyface picture. Selectable modes: _ 1. Press the FR (Face Recognition) button ( [@_) in the selectable modes. -
Page 20
• How to use the M OVIE CLIP mode (J, qi_ ) • Pausing while recording a movie clip (Successive Recording) Amovie clip can b e recorded for a s long as the This camera allows you to temporarily stop during unwanted scenes, while available recording time of t he m emory… -
Page 21
• How to use the V OICE RECORDING mode • Pressing the shutter button down half way. Lightly press the shutter button to confirm focus and flash battery charge. A voice can be recordedfor as long as the available Press the shutter button all way down to take the picture. recording time (max:lOhour) allows, 1. -
Page 22
• Under certain conditions the autofocus system may not perform as expected, • The recording mode function can be set up by using the camera buttons, — When photographing a subject that has little contrast, — If the subject is highly reflective or shiny. — If the subject is moving at high speed, — When there is strong reflected light,or when the background is very bright. -
Page 23
• WIDE Zoom • If the menu is not displayed, this button works as the OPTICAL ZOOM or DIGITAL ZOOM Opticalzoom WIDE : Pressing the ZOOM W button. This will zoom out from button. the subject i.e. the subject will appear farther away. Pressing the ZOOM W button continuously will set the camera to its minimum zoom setting i.e. -
Page 24
•While the m enu is showing, press the U P button to move up the s ub menu. When the m enu is not displayed on the L CD monitor, the U P button operates the v oice recording or v oice memo button. -
Page 25
• While the menu is showing, pressthe DOWN button to move from the main menu to a sub menu, or to move down the sub menu. When the menu is not showing, you can use the MACRO / DOWN burtonto take macro pictures.The distance ranges are shown below. -
Page 26
• Available focusing method, by recording mode • To focus on a subject not positioned in the centre of the picture, usethe focus lock function. (0: Selectable, X: Not selectable, _: Infinityfocus range) Mode r¢1 • Using the Focus Lock Non_al 1. -
Page 27
• When the m enu is displayed on the L CD monitor, pressing the L EFT button makes the c ursor shift to the l eft tab. • When the m enu is not displayed on the L CD monitor, the L EFT button operates… -
Page 28
• Flash mode indicator • Available flash mode, by recording mode (0 : Select_ble X : Not selectable .._. Icon Flash mode Description Auto flash If the subject or background is dark, the camera ÷ flash will operate automatically. ®… -
Page 29
• When the menu is displayed on the LCD monitor, pressingthe Right button makes the cursor shift to the righttab. • When the menu is not displayed on the LCD monitor,the RIGHT button operates as the Self-timer( _ ) button, This function is used when the photographer would also liketo be in the image. -
Page 30
• You can use the m enu on the L CD monitor to set up recording functions, In any Mode Menu Sub menu Camera working mode Page mode with the e xception of V OICE RECORDING mode, pressing the M ENU button displays the m enu… -
Page 31
Menu tab Main menu Sub menu Page Menu tab Main menu Sub menu Page File Reset p.34 Quick View …………..p.36 lsec 3sec _GL_$ FRANOAIS DEUTSCH ESPANOL ITALIANO lmin 5min Power Off p.36 lOmin PYCCKH_ PORTUGUES DUTCH Language p.34 seTup LOD Save DANSK SVENSKA SUOMI… -
Page 32
1. Turn on the camera and press the MENU button. A menu for each camera mode [ Sharpness ] appears. However, there is no menu for Voice Recording mode (_). • You can adjust the sharpness of the pictureyou want to take. You cannot check the sharpness 2. -
Page 33
[ Auto Focus type ] [ OSD (On Screen Display) information ] • You can selectyour preferred Auto Focus type • In any mode with the exception of VOICE according to the shooting condition. RECORDING mode, you can check the recording status inthe LCD monitor. -
Page 34
[ Volume ] [ Beep Sound ] • You can set select a volume of sound, start up • If you set sound to ON, various sounds will be sound, shutter sound, warning sound and AF sound. activated for camera startup, when buttons are pressed, so that you can be aware of the camera •… -
Page 35
[ File name ] [ Language ] • This function allows the user to select the file naming format. • There is a choice of languages that can be displayed on the LCD monitor. Even if the battery is removed and inserted again, the language setting will be •… -
Page 36: Imprinting The Recording Date
[ Imprinting the recording date ] [ Auto Focus lamp ] • There is an option to include DATE / TIME on still images. • You can turn on and off the Auto Focus lamp. • Sub menus • Sub menus [Oft] : The DATE &…
-
Page 37
[ Quick view ] [ LCD save ] • If you enable Quick View before capturing an image, you can view the image • If you set the [LCD save] to On and the camera isn’t operated duringthe you just captured on the LCD monitor for the durationset in the [Quick View] specified time, the LCD monitor will be tumed off automatically. -
Page 38
[ Selecting Video out type ] [ Formatting a memory] • The Movie output signalfrom the camera can be NTSC or PAL. • This is usedfor formatting the memory. If you run [Format] on the memory, all Your choice of outputwill be governed by the type of device (monitor or TV, images, including the protected images, will be deleted. -
Page 39
[ Initialisation ] • It is possible to add special effectsto your images by using this button. • Still image mode : You can select the colour, image editing and Fun menu. • All camera menu and function settings will be restored to their default values. However, values for DATE/TIME LANGUAGE, and VIDEO OUT will not be •… -
Page 40
• By using the camera’s digi_l processor, it is possible to add specialeffects to • Custom colour : You can change the R (Red), your images G (Green) and B (Blue) values of the image. 1. Press the E button in an available recording mode, 2. -
Page 41
• You can change the saturation of the image, • Press the E button in an available mode ( [], , _, I1_ ). Select Saturation menu ( 6″_ ) and a bar Change the saturation by pressing for changing the ,saturation will display. the Left / Right button. -
Page 42
• Moving and changing the focus frame You can change the focus frame after selecting a Range menu. • You can make the subject stand out from its surroundings, The subject will be 1. Pointthe camera towards the subject and compose the image by using the sharp and infocus while making the rest out of focus, LCD monitor. -
Page 43
÷ Selecting 2 composite shooting • You can c ombine 2-4different shots in astill image. • Press the E button in an available mode Pressing the shut’er button [ Ready for taking ) [ Firstshot ] Pressing the shutter button Select a desired menu by pressing the Left/Right button and press the OK Pressing the button. -
Page 44
• Changing a part of composite shot after taking the last shot • Changing a part of composite shot before taking the last shot Before taking the last composite shot, you can change a part of composite shot. 1. After taking the last shot, a cursor to select a frame will display. Press the Up / 1. -
Page 45
Select a desired sub menu by pressing the Left / Right button and press the OK button. • You can add 9 types of frame-like borders to a still image you want to capture. : The photo frame will not be added. •… -
Page 46
• You can u se the + • How to use the + / — menu / — button to set the following menus, 1. Press the +/- button in an available mode (0 : Selectable,X : Not Selectable) 2. Select a desired menu by pressing the Up/ Down button. And then a sub menu will displayon the left bottom side of the LCD monitor. -
Page 47
• You can select the compression ratio appropriate for your applicationof the • You can selectthe image size appropriate for your application, captured images. The higher the compression ratio, the lower the picture quality, Still Icon Mode STILL IMAGE mode MOVIE CLIP mode image 3648x… -
Page 48
• If you cannot obtain suitableexposure conditions, you can change the metering • You can select continuous shot, and AEB (Auto Exposure Bracketing). method to take brighter pictures. — [Single] : Take one picture only. — [Wise Shot] : 2 images are taken at a time. — [Multi] : Exposure will be calculated based on an One is taken in the FilMnFlash average of the available light in the image… -
Page 49
• ISO : You can select the ISO sensitivity when taking pictures, • The white balance control allows you to adjust the colours to appear more natural, The speed or specific light-sensitivityof a camera is rated by ISO numbers. If a menu other than the AWB, you can only select the Negative effect menu. — AUTO : The camera’s sensitivity is automatically AUTO… -
Page 50
• Using the Custom White Balance • Exposure compensation : This camera automatically adjusts the exposure White balance settings may vary slightly depending on the shooting according to the ambient lightingconditions. environment, You can select the most appropriate white balance settingfor a You can also select the exposure value by using the +/- button. -
Page 51
• This function helps stabilise images captured during movie recording, • If the memory card is inserted inthe camera, all the camera functions apply only You can select this menu only inthe MOVIE CLIP mode. to the memory card. • If the memory card is not inserted in the camera, all the camera functions apply — _&_ : Movie clip frame stabiliserfunction only to the internal memory, becomes disabled,… -
Page 52
• Movie clip capture function :capture still images from t he m ovie clip, • How to capture the movie clip Steps 1-3 are the same as those for playing back a movie clip. 4. Press the Play / Pause button while playing the movie clip.Then press the E button. -
Page 53
5. Press theT button and a confirmation window g When you select [Full] menu d [OSD information] menu, the LCD monitor will display. displays shooting information about the displayed image. 6. Select a desired sub menu by pressing the Up/ Down button and press the OK button. -
Page 54
• In Play mode, you can use the buttons on the camera to conveniently set upthe • Image enlargement Play mode functions. 1. Select an image that you want to enlarge and press the enlargement button. 2. Differentparts of the image can be viewed by pressing the 5 function button. -
Page 55
• The maximum enlargement rate in proportion to the image size • When the menu is displayed on the LCD monitor, pressingthe UP button makes the menu cursor move up, Image size [L»4[I • When the menu is not displayed on the LCD monitor,the UP button operates as Maximum 14,3x 14.3x… -
Page 56
5, T he (,_)icon will be displayed on the L CD • In Play mode, the p lay & pause/down button works as f ollows: monitor after voice memo recording has finished, — If the menu is displayed -Voice memos can’t be recorded onto movie clip… -
Page 57
• Change the resolution (size) of pictures taken. Select the [User Image] ( 2o ) to A large sized image can be resized to a smaller sized image, but not vice versa save an image to be the start-up image. The resized image will have a new file Only JPEG images can be resized. -
Page 58
• You can rotate the s tored images by various degrees. Once the p layback of t he • It is possible to add special effects to your images by using this button. rotated picture is finished, itwill switch back to the o riginal state. -
Page 59
• Custom colour : You can change the R (Red), G (Green) and B (Blue) values of the image. • With this menu, You can change the colour infon’nationof the image (excluding Red, Blue, Green and Yellow) to Black and White colour, 1, Select ( @ ) by pressing the Up / Down button. -
Page 60: Colour Mask
• With this menu, You can select a part you want to make outstand and the rest part of image is set to black & white colour. Select ( [] ) and a mark for Press the OK buttonand you can set selecting part willdisplay.
-
Page 61
1. Press the play back button and press the E button. • Contrast control :You can change the contrast of image. 2. Select [_ menut_bbypressingtheLeft/Rightbutton. 1. Select _ by pressing the Up / Down button and a bar for selecting the contrast will display. 2. -
Page 62
FUN menus can be selected in the following conditions:lOM, 7M, 5M, 3M, 1M image size • You can add a text box on the image to make the image as a cartoon. Cartoon frame will Select Cartoon ( [] Select a desired frame by display pressing the Left/Right button,… -
Page 63
• Before saving the cartoon image, you can change the selected image 1. Pressing the +/- button deletes the image in order. • You can make the subject stand out from its surroundings. The subject will be 2. Press the OK button and you can select images, sharp and in focus while making the rest out of focus. -
Page 64
• Moving and changing the focus frame You can change the focus frame after selecting a Range menu, • You can combine 2 — 4 differentshots in a still image. 1. Selecta focus frame by pressingthe Left/ Rightbuttonand pressthe OK button, 2. -
Page 65
Selecting 2composite shooting • Before selecting the last composite image, you can change a part of composite image. Pressing 1. Press the +/- button and previous image will be deleted. 5 fuPction 2. Press the OK button and you can select a new image. button [Changing the pos_iion… -
Page 66
• Select a desired sub menu by pressing the Left / Right buttn and press the OK button to save the image as a new file name, • You can add 9 types of frame-like borders to a still image you want to capture. •… -
Page 67
• You can add various stickers on the image, Select [] Select a desired sticker by pressing the Left / Right bditon and press the QK button Select the location of sticker by pressing the 5 function button Adding a sticker Select a additional sticker by Pressing the +/- button pressing the Left / Right button… -
Page 68
• This deletes images stored on the memory. — Deleting multi-image • Deleting Images in Play Mode T button : checks to delete the image 1. Selectan image that you want to delete by Left / Right button : select deleted image pressingthe LEFT / RIGHT button and press the DELETE ( t_ ) button. -
Page 69
• Deleting Images inThumbnail Display Mode • You can print images with this button after connecting the camera to a PictBridge printer, 1. Use the UP, DOWN, LEFT, and RIGHT buttonsto select the image you want to delete, and then press the DELETE ( t_ ) button. 2. -
Page 70
• LEFT / RIGHT / MENU / OK buttons activate the following. • PLAY mode functions can be changed by using the LCD monitor. In the PLAY mode, pressing the MENU button displays the menu on the LCD monitor,The — LEFT button :While the menu is showing, press the LEFT button to select menus you can set up in Play mode are as follows, To capture an image after the menu tab to the left of the cursor, While the menu is not… -
Page 71
Sub menu • This menu is available while the camera is connected to a PietBridgesupporting Menu tab Main menu Secondary menu Page printer (direct connection to the camera sold separately) with a USB cable. Auto Draft Quality Main menu Sub menu Normal Menu tab Secondary menu… -
Page 72: Playback
• Images can be displayed continuously at p re-set intervals. • Setting play intewal : Set the slide show play interval. You can view the s lide show by c onnecting the c amera to an extemal monitor. 1. Select the [Interval] sub menu by pressing the 1.
-
Page 73
• Configure slide show effects : Unique screen effectscan be used for the slide show. : This is used to protect specific shots from being accidentally erased (Lock). 1. Select the [Effect]sub menu by pressing the It also unprotects images that have been previously protected (Unlock). UP / DOWN button and press the RIGHT button. -
Page 74: Dpof
1. Press the Up / Down button and selectthe [Delete]menu tab. And then press the Right button. 2. Selecta desired sub menu by pressing the UP / DOWN button and press the OK button. [Select] : Selection window for an image to delete is displayed.
-
Page 75
• Standard : This function allows you to embed printing quantity infon’nationon a • Index : Images (exceptfor movie clips and voice file) are printed as index type. stored image. 1. Press the Up/ Down button and select the 1. Press the Up / Down button and select the [DPOF] menu tab. -
Page 76: Copy To Card
• Print size :You can specify the printsize when printingimages stared on the memory card. The [Size] menu is available only for DPOF 1.1 compatible printers. : This enables you to copy image files, movie clips and voice recording files to the memory card.
-
Page 77
: You can check shooting information about the displayed image. 1. Select the [OSD Info] menu tab by pressing the Up / Down button. And then press the Right button. 2. Select a desired sub menu by pressing the UP / DOWN button and press the OK button. -
Page 78
• You can use the USB cable to connect this camera to a printer that supports ÷ If the [USB] menu is set to the [Computer], you cannot connect a Pictbridge PictBridge (sold separately) and print the stored images directly, Movie clips and compatible printer to the camera through USB cable with [Connecting Computer] voice files cannot be printed, message, By pressingthe Printer button, at this point, you can connect the easy… -
Page 79
• You can select images you want to print You can select the Paper Size, Print Format, Paper Type, Print Quality, Date Print, and File Name Print menus for printed pictures. • Setting the Number of Copies to Print 1. Press the Menu button and the PictBridge menu 1. -
Page 80
• Initialises user-changed configurations. Be sure to observe the following precautions! 1. U se the U p / Down buttons to select the [Reset] • This unitcontains precision electronic components. Do not use or store this unit menu tab. And then press the Right button. in the following locations. -
Page 81
Before an important event or going on a trip, you should check the camera condition, protect the memory card, — Take a picture for testing the camera condition and prepare extra battery, — Samsung cannot be held responsible for camera malfunctions. {80}… -
Page 82
Low Battery! • There are several warnings that may appear on the LCD display, — There is low battery capacity Memory Error! Insert fresh batteries. • Memory card error Turn off the camera power and turn it on again Low Light! Insert the memory card again — When taking pictures in dark places Insert and format the memory card (p.37) -
Page 83
Battery power quickly drains The images are unclear • The Camera is being used in low temperatures • A picture was taken the subject without setting an appropriate macro mode Keep the camera in warm conditions (i.e. inside a coat or jacket) and only Select an appropriate macro mode to take a clear image, remove it in order to take images •… -
Page 84
Colour of image is different to the original scene Image Sensor — Type : 1/1.8″ CCD • White balance or effect setting is incorrect — EffectivePixel : Approx.10.1 Mega-pixel Select appropriate White balance and effect -Total Pixel :Approx. 10.3 Mega-pixel Images are too bright Lens — FocalLength : SliD Lens f = 7.8-39mm (35mmfilm equivalent… -
Page 85
2&9 The maximum file size of continuous movie clip is 2GB. ÷ These figures are measured under Samsung’s standard Size : 800X592, 720X480, 640X480, 320X240 conditions and may vary depending on shooting conditions 30 FPS cannot be used in 800×592 size. -
Page 86
• Using a Hand-made PC or a PC and OS that has not been guaranteed by the manufacturer is not covered by the Samsung warranty. Dimensions (WxHxD) • Before reading this manual, you should have a basic knowledge of computers 104.5… -
Page 87
PC and can be edited by an image editing program, Before connectingthe camera to the PC, you should first install the camera driver, • You can visit the Samsung web-site through the internet, ÷ Screen Captures illustratedon this manual http://www.samsungcamera.cem : English is based on English Edition of Windows, ht_://www.samsungcamera.ce,kr : Korean… -
Page 88
2. Installthe camera driver, DirectX and Digimax Master by selecting a button shown on the monitor, If an upper version of DirectX was installed on your computer, DirectX may not be installed. _87_… -
Page 89
3. After restarting the computer, connect the PC to the camera with the USB • If you connect the USB cable to a USB port on your PC and then turn on the cable, power, the camera will automatically switch to «computer connection mode», •… -
Page 90
R Connecting the camera to a PC • Downloading stored images You can download the still images stored on the camera to your PC’s hard disk and printthem or use a photo editingsoftware to edit them. 1. Connect the camera to your PC with the USB cable. 2. -
Page 91
6. Press the right mouse button and a pop-up • Windows 98SE menu will open. Click [Paste]. 1. Check whether the camera and PC are transferring a file. If the camera status lamp blinks, please wait until the lamp has finished blinking and is constantly on. -
Page 92
1. A USB Driver for MAC is not included with the software CD as MAC OS 5. A [Safe to Remove Hardware] window will open. Click the [OK] button. supports the camera driver. 2. Check the MAC OS version during start-up. This camera is compatible with MAC OS 9.2 — 10.3. -
Page 93
1. Connect the camera to your PC and turn them on. 2. Check whether the Removable Disk is on the [My Computer], • To startthe program, click [Start _ Programs _ Samsung _ Digimax Master 3. Remove the [Samsung Digital Camera] on the Device manager, Digimax Master]. -
Page 94
4. S elect adestination and make afolder • Image viewer :You can view the s tored images. save downloaded images and folders. -Folder names can b e made in order of date and images will be downloaded. -Folder name will be made as y ou w ant and images will be downloaded. -
Page 95
• Image edit :You can edit the still image, • Movie edit : You can get the still image, movie clip, narration, music files together in s movie clip. ® — Movie clip edit functions are listed below. — Image edit functions are listed below. ¢1)Edit menu :You canselect the following menus. -
Page 96
• Please check the following if the USB connection malfunctions. When Iopen the Device Manager (by clicking Start _ (Settings) Control Panel _ (Perfon’nance and Maintenance) _ System (Hardware) _ Device Manager), there are Unknown Devices or Other USB cable is not connected or it is not the supplied USB cable. Devices entries with a yellow question mark(?) beside them or devices .. -
Page 97
• If the movie clip can’t be deleted, removable disk can’t be extractedor an error message displays during the file transfer. If you install only the Digimax Master, the problems mentioned above Samsung Techwin cares for the environment at all product occasionally happen. manufacturing stages to preserve the environment, and is… -
Page 98
= Declaration of Conformity Trade Name : SAMSUNG TECHWIN Model No. : SAMSUNG $1050 Responsible Party : Samsung Opto-Electronics America, INC. Address :40 Seaview Dr. Secaucus,NJ 07094 Telephone No. : 201-902-0347 This device complies with Part 15 of the FCC Rules. Operation is subject to… -
Page 99
TEL :(33) 1-4279-2200 (freeferoar fremUK or/ly) UK Se_vbe Hotline:0193q455320 FAX: (82)31-740-8%_8 FAX: 53} 143%4510 vw_’w sameun_>_rnera r_rn wwwsamsungphete I r wwwsamsungcamere.,eo SAMSUNG OPTO-ELEDqRONICS A MERICA INC SAMSUNG OPTO-ELB.}TRONK}.9 GMBH RUSSIAINFORMATION CENTER SAMSDNG ELEC] RONICB HF_ADQUARTER8 AMKRONBERGER HANG6 40SEAVIEWDRIVE,SECAUCUS, D_;5824 SCH//?ALBACH/F?, GERMANY 117545 ST DOROZHN£YA BUILDING 3,…
-
Драйверы
2
-
Инструкции по эксплуатации
1

Samsung S1050 инструкция по эксплуатации
(98 страниц)
- Языки:Русский
-
Тип:
PDF -
Размер:
8.6 MB -
Описание:
Компактная камера
Просмотр
На NoDevice можно скачать инструкцию по эксплуатации для Samsung S1050. Руководство пользователя необходимо для ознакомления с правилами установки и эксплуатации Samsung S1050. Инструкции по использованию помогут правильно настроить Samsung S1050, исправить ошибки и выявить неполадки.
-
Contents
-
Table of Contents
-
Bookmarks
Quick Links
User Manual
Thank you for buying a Samsung camera.
This manual will guide you through using the camera, including
capturing images, downloading images and using the application software.
Please read this manual carefully before using your new camera.
ENGLISH
Related Manuals for Samsung S1050
Summary of Contents for Samsung S1050
-
Page 1: User Manual
User Manual Thank you for buying a Samsung camera. This manual will guide you through using the camera, including capturing images, downloading images and using the application software. Please read this manual carefully before using your new camera. ENGLISH…
-
Page 2: Getting To Know Your Camera
● Please check that the camera is operating properly prior to when you intend to use it (e.g. for a trip or an important event) to avoid disappointment. Samsung camera takes no responsibility for any loss or damages that may result from camera malfunction.
-
Page 3
■ Should any form of liquid or a foreign object enter the camera, do not use it. Switch off the camera, and then disconnect the power source. You must contact your dealer or Samsung Camera Service centre. Do not continue to use the camera as this may cause a fire or electric shock. -
Page 4: Table Of Contents
Caution CAUTION indicates a potentially hazardous situation which, if not avoided, may result in a minor or moderate injury. ■ Leaking, overheating, or damaged battery could result in fire or injury. •Use battery with the correct specification for the camera. •Do not short circuit, heat or dispose of battery in fire.
-
Page 5
Contents ●How to use the menu ……………31 ●Special Effect (E button) : Colour …39 ●Recording …………………………31 ●Special Effect (E button) : ■Sharpness ………………………31 Image editing………………………40 ■Contrast …………………………31 ■Saturation …………………………40 ■Auto Focus type …………………32 ●Special Effect (E button) : FUN …41 ■OSD (On Screen Display) ■Preset focus frames………………41 information ………………………32… -
Page 6: System Chart
System chart Please check that you have the correct contents before using this product. The contents can vary depending on the sales region. To buy the optional equipment, contact your nearest Samsung dealer or Samsung service centre. User manual, Camera case…
-
Page 7: Identification Of Features
Identification of features Front & Top Mode dial Shutter button Lens / Lens cover 《6》 Power button Speaker Flash Self-timer lamp / Auto focus lamp USB / AV connection terminal DC input connection port Microphone…
-
Page 8: Back & Bottom
Identification of features Back & Bottom Camera status lamp Zoom T button (Digital zoom) Zoom W button (Thumbnail) E (Effects) button LCD monitor Strap eyelet 5 function button FR(Face Recognition) button Tripod socket + / — button, Delete button Play mode / Printer button 《7》…
-
Page 9: Bottom/ 5-Function Button
Identification of features Bottom/ 5-function button Battery chamber Memory card slot Voice memo/ Voice Recording/ Up button Flash/ Left button Macro/ Down button Play & Pause button 《8》 ■ Self-timer lamp Icon Battery chamber cover ■ Camera Status Lamp Power on After taking a picture While voice memo recording…
-
Page 10: Mode Icon
Identification of features ■ Mode icon : Refer to page 15~20 for more information about the camera mode setting. MODE AUTO PROGRAM Icon MODE MOVIE VOICE RECORDING Icon SCENE MODE NIGHT PORTRAIT CHILDREN LANDSCAPE CLOSE UP Icon MODE SUNSET DAWN BACKLIGHT FIREWORKS BEACH &…
-
Page 11: Inserting The Memory Card
Connecting to a Power Source ■ Insert the battery as shown — If the camera does not turn on after you have inserted battery, please check whether the battery is inserted with the correct polarity (+ / -). — When the battery chamber cover is opened, do not press the battery chamber cover by force.
-
Page 12: Instructions On How To Use The Memory Card
● Repeated use of the memory card will eventually reduce the memory card’s performance. Should this be the case, you will need to purchase a new memory card. Wear and tear on the memory card is not covered by the Samsung warranty.
-
Page 13
Instructions on how to use the memory card INFORMATION ● Don’t remove the memory card when the camera status lamp is blinking as this may cause damage to data in the memory card. ■ The camera can use SD/SDHC Memory Cards and MMC (Multi Media Cards). Please consult the enclosed manual for using the MMC Cards. -
Page 14: When Using The Camera For The First Time
When Using the Camera for the First Time ■ Charge the rechargeable battery fully before using the camera for the first time. ■ When the camera is turned on for the first time, a menu will be displayed to set date / time, language and battery type in the LCD monitor.
-
Page 15: Lcd Monitor Indicator
LCD monitor indicator ■ The LCD monitor displays information about the shooting functions and selections. ① ② ③ ④ ⑤ ⑥ ⑦ ⑧ ⑨ ⑩ [ Image & Full Status ] Description Recording mode Aperture Value/ Shutter Speed Face Recognition Flash Self-timer 《14》…
-
Page 16: Starting The Recording Mode
Starting the recording mode ■ How to use the AUTO mode ( Please select this mode for quick and easy picture taking with minimal user interaction. 1. Insert the batteries (p.10). Insert the batteries taking note of the polarity (+ / -). 2.
-
Page 17: How To Use The Shutter Priority Mode
Starting the recording mode ■ How to use the SHUTTER PRIORITY mode ( 1. Select the SHUTTER PRIORITY Mode by rotating the mode dial. 2. Set the shutter speed by using the +/-, Left/Right button. 3. Press the + / — button twice and take an image. * High Shutter speeds can capture a moving object in a still image as if the object is not moving.
-
Page 18: Wise Shot
Starting the recording mode ■ Wise Shot 2 images are taken at a time. One is taken in the Fill-In Flash mode and the other is taken in the ASR mode. ● How to use the Wise Shot 1. Select the ASR mode by rotating the mode dial and press the +/- button. 2.
-
Page 19: Face Recognition
Starting the recording mode ■ Face recognition This mode detects the face position of the subject automatically and then sets the focus and exposure. Select this mode for quick and easy face picture. Selectable modes : 1. Press the FR (Face Recognition) button ( in the selectable modes.
-
Page 20: How To Use The Movie Clip Mode
Starting the recording mode ■ How to use the MOVIE CLIP mode ( A movie clip can be recorded for as long as the available recording time of the memory capacity allows. 1. Select the MOVIE CLIP mode by rotating the mode dial.
-
Page 21: How To Use The Voice Recording Mode
Starting the recording mode ■ How to use the VOICE RECORDING mode ( A voice can be recorded for as long as the available recording time (max:10hour) allows. 1. In any mode with the exception of Movie clip mode, select the VOICE RECORDING mode by pressing the Voice recording button twice.
-
Page 22: Using The Camera Buttons To Set The Camera
Things to Watch Out for When Taking Pictures ■ Under certain conditions the auto focus system may not perform as expected. — When photographing a subject that has little contrast. — If the subject is highly reflective or shiny. — If the subject is moving at high speed. — When there is strong reflected light, or when the background is very bright.
-
Page 23: Zoom W / T Button
ZOOM W / T button ● If the menu is not displayed, this button works as the OPTICAL ZOOM or DIGITAL ZOOM button. ● This camera has a 5X optical zoom and a 5X digital zoom function. Using both will offer a total zoom ratio of 25X. ●…
-
Page 24: Voice Recording / Voice Memo / Up Button
ZOOM W / T button INFORMATION ● Images taken using the digital zoom may take a little longer for the camera to process. Allow time for this to take place. ● The digital zoom cannot be used in movie clip shots. ●…
-
Page 25: Macro / Down Button
Macro ( ) / Down button ■ While the menu is showing, press the DOWN button to move from the main menu to a sub menu, or to move down the sub menu. When the menu is not showing, you can use the MACRO / DOWN button to take macro pictures. The distance ranges are shown below.
-
Page 26: Focus Lock
Macro ( ) / Down button ■ Available focusing method, by recording mode (O: Selectable , X: Not selectable, ∞: Infinity focus range) Mode Normal Macro Auto Macro Super Macro Manual focus SCENE Mode Normal Macro Auto Macro Super Macro Manual focus Mode Normal…
-
Page 27: Flash / Left Button
Flash ( ) / Left button ■ When the menu is displayed on the LCD monitor, pressing the LEFT button makes the cursor shift to the left tab. ■ When the menu is not displayed on the LCD monitor, the LEFT button operates as the FLASH ) button.
-
Page 28
Flash ( ) / Left button ● Flash mode indicator Icon Flash mode If the subject or background is dark, the camera Auto flash flash will operate automatically. Auto & If a subject or background is dark, the camera flash Red eye will work automatically and will reduce the red-eye reduction… -
Page 29: Self-Timer / Right Button
Self-timer ( ) / Right button ■ When the menu is displayed on the LCD monitor, pressing the Right button makes the cursor shift to the right tab. ■ When the menu is not displayed on the LCD monitor, the RIGHT button operates as the Self-timer ( ) button.
-
Page 30: Using The Lcd Monitor To Set The Camera Settings
Using the LCD monitor to set the camera settings ■ You can use the menu on the LCD monitor to set up recording functions. In any mode with the exception of VOICE RECORDING mode, pressing the MENU button displays the menu on the LCD monitor. ※…
-
Page 31
Using the LCD monitor to set the camera settings Menu tab Main menu Sub menu File Reset ENGLISH DEUTSCH PORTUGUÊS Language DANSK 07/02/01 SETUP1 Date&Time YYMMDD DDMMYY Imprint Date&Time Auto Normal AF Lamp Start Image User Image 《30》 Menu tab Page Series p.34… -
Page 32: How To Use The Menu
How to use the menu 1. Turn on the camera and press the MENU button. A menu for each camera mode appears. However, there is no menu for Voice Recording mode ( 2. Use the LEFT and RIGHT buttons to navigate through the menus. Press the RECORDING SOUND…
-
Page 33: Auto Focus Type
Recording ( [ Auto Focus type ] ■ You can select your preferred Auto Focus type according to the shooting condition. — [Center AF] : The rectangular area in the center of the LCD monitor will be focused — [Multi AF] : This camera selects a AF point from the 5 AF points. [ Center AF ] ※…
-
Page 34: Sound
Sound ( [ Volume ] ■ You can set select a volume of sound, start up sound, shutter sound, warning sound and AF sound. ● [Volume] sub menu: [Off], [Low], [Medium], [High] [ Start up sound ] ■ You can select the sound that is activated whenever the camera is turned on.
-
Page 35: Setup 1
Setup 1 ( [ File name ] ■ This function allows the user to select the file naming format. ● Assigning File Names [Reset] : After using the reset function, the next file name will be set from 0001 even after formatting, deleting all or inserting a new memory card.
-
Page 36: Imprinting The Recording Date
Setup 1 ( [ Imprinting the recording date ] ■ There is an option to include DATE / TIME on still images. ● Sub menus [Off] : The DATE & TIME will not be imprinted on the image file. [Date] : Only the DATE will be imprinted on the image file.
-
Page 37: Setup2
Setup 2 ( [ Quick view ] ■ If you enable Quick View before capturing an image, you can view the image you just captured on the LCD monitor for the duration set in the [Quick View] setup. Quick view is possible only with still images. ●…
-
Page 38: Selecting Video Out Type
Setup 2 ( [ Selecting Video out type ] ■ The Movie output signal from the camera can be NTSC or PAL. Your choice of output will be governed by the type of device (monitor or TV, etc.) to which the camera is connected. PAL mode can support only BDGHI. ■…
-
Page 39: Initialisation
Setup 2 ( [ Initialisation ] ■ All camera menu and function settings will be restored to their default values. However, values for DATE/ TIME, LANGUAGE, and VIDEO OUT will not be changed. ● Sub menus [No] : Settings will not be restored to their defaults.
-
Page 40: Special Effect (E Button) : Colour
Special Effect (E button) : Colour ■ By using the camera’s digital processor, it is possible to add special effects to your images 1. Press the E button in an available recording mode. 2. Select the menu tab by pressing the Left/ Right button. COLOR 이동…
-
Page 41: Image Editing
Special Effect (E button) : Image editing Saturation ■ You can change the saturation of the image. ● Press the E button in an available mode ( IMAGE ADJUST Select Saturation menu ( for changing the saturation will display. Move Exit Press the Shutter button to take a picture.
-
Page 42: Special Effect (E Button) : Fun
Special Effect (E button) : FUN Preset focus frames ■ You can make the subject stand out from its surroundings. The subject will be sharp and in focus while making the rest out of focus. ● Press the E button in an available mode Move Exit Select a proper menu by pressing the Left / Right button and press the OK…
-
Page 43: Composite Shooting
Special Effect (E button) : FUN Composite shooting ■ You can combine 2 — 4 different shots in a still image. ● Press the E button in an available mode Move Exit Select a desired menu by pressing the Left / Right button and press the OK button.
-
Page 44
Special Effect (E button) : FUN ● Changing a part of composite shot before taking the last shot Before taking the last composite shot, you can change a part of composite shot. 1. Pressing the + / — button. 2. A previous image will be deleted and new frame will display. If there is an image taken before, press the + / — button again and a previous image will be deleted again. -
Page 45: Photo Frame
Special Effect (E button) : FUN Photo Frame ■ You can add 9 types of frame-like borders to a still image you want to capture. ■ Date & Time information will not be printed on the stored image taken with Photo Frame menu.
-
Page 46: Button
+ / — button ■ You can use the + / — button to set the following menus. ○ ○ ○ ○ ○ Size ○ ○ ○ ○ ○ Quality ○ ○ ○ ○ Metering ○ ○ ○ ○ Shooting ○…
-
Page 47: Size
Size ■ You can select the image size appropriate for your application. Icon Still image 3648 x 3648 x 3072 x Size mode 2736 2432 2304 Movie clip Icon mode 800 x 592 720 x 480 Size SIZE 3648X2736 [ STILL IMAGE mode ] INFORMATION ●…
-
Page 48: Metering
Metering ■ If you cannot obtain suitable exposure conditions, you can change the metering method to take brighter pictures. — [Multi] : Exposure will be calculated based on an average of the available light in the image area. However, the calculation will be biased towards the centre of the image area.
-
Page 49: Iso
■ ISO : You can select the ISO sensitivity when taking pictures. The speed or specific light-sensitivity of a camera is rated by ISO numbers. — AUTO : The camera’s sensitivity is automatically changed by variables such as lighting value or subject brightness.
-
Page 50: Exposure Compensation
White balance ● Using the Custom White Balance White balance settings may vary slightly depending on the shooting environment. You can select the most appropriate white balance setting for a given shooting environment by setting up the custom white balance. 1.
-
Page 51: Movie Clip Frame Stabiliser
Movie Clip frame stabiliser ■ This function helps stabilise images captured during movie recording. You can select this menu only in the MOVIE CLIP mode. : Movie clip frame stabiliser function becomes disabled. : Reduces camera shake during movie recording. The recording frame range will become narrower than when you select the menu.
-
Page 52: Playing Back A Movie Clip
Starting play mode INFORMATION ● Manner mode : Pressing the play mode button for more than 3 seconds changes the buzzer and start-up sound setting to OFF, even though you may have set these to ON. ● Lightly press the shutter button in Play mode to switch to the currently set shooting mode.
-
Page 53: Playing Back A Recorded Voice
Starting play mode 5. Press theT button and a confirmation window will display. 6. Select a desired sub menu by pressing the Up/ Down button and press the OK button. [Yes] : The extracted frames are saved as a new file name. [No] : The movie trimming will cancel.
-
Page 54: Using The Camera Buttons To Set The Camera
Using the camera buttons to set the camera ■ In Play mode, you can use the buttons on the camera to conveniently set up the Play mode functions. Thumbnail ( ) / Enlargement ( ) button ● You can view multiple pictures, enlarge a selected picture, and crop and save a selected area of an image.
-
Page 55: Voice Memo / Up Button
Thumbnail ( ) / Enlargement ( ●The maximum enlargement rate in proportion to the image size Image size Maximum 14.3x 14.3x 12.0x enlargement rate ● Trimming : You can extract part of the image that you want and save it separately. 1.
-
Page 56: Play & Pause / Down Button
Voice ( ) memo / Up button 5. The ( ) icon will be displayed on the LCD monitor after voice memo recording has finished. — Voice memos can’t be recorded onto movie clip and voice recording files. — A distance of 40cm between you and the camera (microphone) is the best distance to record sound.
-
Page 57: Special Effect (E Button) : Resize
Special Effect (E button) : Resize ■ Change the resolution (size) of pictures taken. Select the [User Image] ( save an image to be the start-up image. The resized image will have a new file name. 1. Press the play mode button and press the E button.
-
Page 58: Special Effect (E Button) : Rotating An Image
Special Effect (E button) : Rotating an image ■ You can rotate the stored images by various degrees. Once the playback of the rotated picture is finished, it will switch back to the original state. 1. Press the play mode button and press the E button.
-
Page 59: Special Effect (E Button) : Special Colour
Special Effect (E button) : Colour ■ Custom colour : You can change the R (Red), G (Green) and B (Blue) values of the image. — Up / Down button : Selects R, G, B — Left / Right button : Change the values 《58》…
-
Page 60: Colour Mask
Special Effect (E button) : Special Colour Colour mask ● With this menu, You can select a part you want to make outstand and the rest part of image is set to black & white colour. SPECIAL COLOR Select ( selecting part will display.
-
Page 61: Image Editing
Special Effect (E button) : Image editing 1. Press the play back button and press the E button. 2. Select menu tab by pressing the Left / Right button. ● Red eye Removal : Red eye effect can be removed from the captured image. 1.
-
Page 62: Special Effect (E Button) : Fun
Special Effect (E button) : FUN FUN menus can be selected in the following conditions:10M, 7M, 5M, 3M , 1M image size Cartoon ■ You can add a text box on the image to make the image as a cartoon. Select Cartoon ( Move Exit…
-
Page 63: Preset Focus Frames
Special Effect (E button) : FUN ● Before saving the cartoon image, you can change the selected image 1. Pressing the +/- button deletes the image in order. 2. Press the OK button and you can select images. Pressing the +/- button Search Delete…
-
Page 64: Composite Image
Special Effect (E button) : FUN ● Moving and changing the focus frame You can change the focus frame after selecting a Range menu. 1. Select a focus frame by pressing the Left / Right button and press the OK button. 2.
-
Page 65
Special Effect (E button) : FUN ※ Selecting 2 composite shooting Pressing the 5 function button Move Pressing the OK button Save Move Delete Select a location by pressing the 5 function button and press the OK button 100-0054 [Final image] 《64》… -
Page 66: Photo Frame
Special Effect (E button) : FUN Photo Frame ■ You can add 9 types of frame-like borders to a still image you want to capture. ● Date & Time information will not be printed on the stored image taken with Photo Frame menu.
-
Page 67: Sticker
Special Effect (E button) : FUN Sticker ● You can add various stickers on the image. Select( Move Exit Select a additional sticker by pressing the Left / Right button and press the OK button Save Move Select the location of sticker by pressing the 5 function button ※…
-
Page 68
Delete ( ) button ■ This deletes images stored on the memory. ● Deleting Images in Play Mode 1. Select an image that you want to delete by pressing the LEFT / RIGHT button and press the DELETE ( ) button. 2. -
Page 69: Delete Button
Delete ( ) button ● Deleting Images in Thumbnail Display Mode 1. Use the UP, DOWN, LEFT, and RIGHT buttons to select the image you want to delete, and then press the DELETE ( 2. A message will display on the LCD monitor as shown below. 3.
-
Page 70: Left / Right / Menu / Ok Button
Left / Right / Menu / OK button ■ LEFT / RIGHT / MENU / OK buttons activate the following. — LEFT button : While the menu is showing, press the LEFT button to select the menu tab to the left of the cursor. While the menu is not showing, press the LEFT button to select the previous image.
-
Page 71
Setting up the play back function using the LCD monitor ■ This menu is available while the camera is connected to a PictBridge supporting printer (direct connection to the camera, sold separately) with a USB cable. Menu tab Main menu Sub menu One Pic Images… -
Page 72: Starting The Slide Show
Starting the slide show ( ■ Images can be displayed continuously at pre-set intervals. You can view the slide show by connecting the camera to an external monitor. 1. Press the play mode button and press the menu button. 2. Press the LEFT / RIGHT button and select the [SLIDE SHOW] menu tab. ●…
-
Page 73: Playback
Starting the slide show ( ● Configure slide show effects : Unique screen effects can be used for the slide show. 1. Select the [Effect] sub menu by pressing the UP / DOWN button and press the RIGHT button. 2. Use the Up / Down button to select the type of effect.
-
Page 74: Deleting Images
Playback ( Deleting images 1. Press the Up / Down button and select the [Delete] menu tab. And then press the Right button. 2. Select a desired sub menu by pressing the UP / DOWN button and press the OK button. [Select] : Selection window for an image to delete is displayed.
-
Page 75
Playback ( ■ Standard : This function allows you to embed printing quantity information on a stored image. 1. Press the Up / Down button and select the [DPOF] menu tab. And then press the Right button. 2. Press the Right button again and [Standard] sub menu will display. -
Page 76: Copy To Card
Playback ( ■ Print size : You can specify the print size when printing images stored on the memory card. The [Size] menu is available only for DPOF 1.1 compatible printers. 1. Press the Up / Down button and select the [DPOF] menu tab.
-
Page 77: On Screen Display Information
Playback ( INFORMATION ● When this menu is selected without inserting a memory card, the [No Card] message will display. ● If there is not enough space available in the memory card to copy saved images in the internal memory (48MB), the [Copy To Card] command will copy only some of the images and display [Memory Full!] message.
-
Page 78: Pictbridge
PictBridge ■ You can use the USB cable to connect this camera to a printer that supports PictBridge (sold separately) and print the stored images directly. Movie clips and voice files cannot be printed. ● Setting up the camera for connection to the printer 1.
-
Page 79: Pictbridge : Picture Selection
PictBridge : Picture Selection ■ You can select images you want to print ● Setting the Number of Copies to Print 1. Press the Menu button and the PictBridge menu will display. 2. Use the Up / Down buttons to select the [Images] menu and press the Right button.
-
Page 80: Pictbridge : Reset
PictBridge : Reset ■ Initialises user-changed configurations. 1. Use the Up / Down buttons to select the [Reset] menu tab. And then press the Right button. 2. Use the Up / Down buttons to select the desired sub menu value, and then press the OK button. If [Yes] is selected : All print and image settings will be reset.
-
Page 81
— Pay attention not to get fingerprints or foreign substances on the surface of the lens. ■ If the digital camera is not used for a long period, an electric discharge can occur. It is a good idea to remove the battery and the memory card if you do not intend using the camera for an extended period of time. -
Page 82: Warning Indicator
Warning indicator ■ There are several warnings that may appear on the LCD display. Memory Error! ㆍMemory card error → Turn off the camera power and turn it on again → Insert the memory card again → Insert and format the memory card (p.37) Card Locked! ㆍThe memory card is locked →…
-
Page 83
Before contacting a service centre Battery power quickly drains ㆍThe Camera is being used in low temperatures → Keep the camera in warm conditions (i.e. inside a coat or jacket) and only remove it in order to take images Camera does not take images when pressing the Shutter button ㆍThere is insufficient memory capacity →… -
Page 84: Specifications
Before contacting a service centre Colour of image is different to the original scene ㆍWhite balance or effect setting is incorrect → Select appropriate White balance and effect Images are too bright ㆍExposure is excessive → Reset exposure compensation No image on external monitor ㆍThe external monitor has not been connected properly with the camera →…
-
Page 85
2432 2304 2052 1944 — Capacity (256 MB MMC) ※ These figures are measured under Samsung’s standard conditions and may vary depending on shooting conditions and camera settings. — Effect : Color, Image Adjust, Fun (Highlight, Composite , Photo Frame) -
Page 86: Software
Battery & Charger) •Using a Hand-made PC or a PC and OS that has not been guaranteed by the manufacturer is not covered by the Samsung warranty. •Before reading this manual, you should have a basic knowledge of computers and O/S (Operating Systems).
-
Page 87: About The Software
● You should allow 5 ~ 10 seconds for running the automatic setup program according to the capability of your computer. If the frame does not show, run the [Windows Explorer] and select [Samsung.exe] in the CD-ROM Drive root directory.
-
Page 88
Setting up the application software 2. Install the camera driver, DirectX and Digimax Master by selecting a button shown on the monitor. If an upper version of DirectX was installed on your computer, DirectX may not be installed. 《87》… -
Page 89: Starting Pc Mode
Setting up the application software 3. After restarting the computer, connect the PC to the camera with the USB cable. 4. Turn the camera power on. The [Found New Hardware Wizard] will open and the computer will recognise the camera. ※…
-
Page 90
Starting PC mode ■ Connecting the camera to a PC ※If you selected [Printer] in Step 5, when you connect the camera to your computer, the [Connecting Printer] message will display and the connection will not be established. In this case, disconnect the USB cable, and then follow the procedure from Step 2 and onward. -
Page 91: Removing The Removable Disk
Starting PC mode 6. Press the right mouse button and a pop-up menu will open. Click [Paste]. 7. An image file is transferred from the camera to your PC. — By using [Digimax Master], you can see the stored images in the memory directly on the PC monitor and you can copy or move the image files.
-
Page 92: Setting Up The Usb Driver For Mac
Removing the removable disk 5. A [Safe to Remove Hardware] window will open. Click the [OK] button. 6. A [Unplug or Eject Hardware] window will open. Click the [Close] button and the removable disk will be removed safely. 7. Unplug the USB cable. Setting up the USB Driver for MAC 1.
-
Page 93: Removing The Usb Driver For Windows 98Se
■ You can download, view, edit and save your images and movies with this software. This software is only compatible with Windows. ■ To start the program, click [Start → Programs → Samsung → Digimax Master → Digimax Master]. ● Downloading images 1.
-
Page 94
Digimax Master 4. Select a destination and make a folder to save downloaded images and folders. — Folder names can be made in order of date and images will be downloaded. — Folder name will be made as you want and images will be downloaded. -
Page 95
Digimax Master ● Image edit : You can edit the still image. ① ② ③ — Image edit functions are listed below. ① Edit menu : You can select the following menus. [Tools] : You can resize or crop the selected image. See the [Help] menu. [Adjust] : You can modify image quality. -
Page 96: Faq
■ Please check the following if the USB connection malfunctions. Case 1 USB cable is not connected or it is not the supplied USB cable. → Connect the supplied USB cable. Case 2 The camera is not recognised by your PC. Sometimes, the camera may appear under [Unknown Devices] in Device Manager.
-
Page 97: Correct Disposal Of This Product
This product should not be mixed with other commercial wastes for disposal. Samsung Techwin cares for the environment at all product manufacturing stages to preserve the environment, and is taking a number of steps to provide customers with more environment-friendly products.
-
Page 98
■ ■ Declaration of Conformity Trade Name : SAMSUNG TECHWIN Model No. : SAMSUNG S1050 Responsible Party : Samsung Opto-Electronics America, INC. Address : 40 Seaview Dr. Secaucus,NJ 07094 Telephone No. : 201-902-0347 This device complies with Part 15 of the FCC Rules. Operation is subject to… -
Page 99
MEMO MEMO 《98》… -
Page 100
MEMO MEMO 《99》… -
Page 101
MEMO MEMO 《100》… -
Page 102
TEL : 49 ( 0 ) 6196 66 53 03 FAX : 49 ( 0 ) 6196 66 53 66 www.samsungcamera.de TIANJIN SAMSUNG OPTO-ELECTRONICS CO., LTD No.9 zhangheng Street. Micro-Electronic Industrial Park Jingang Road Tianjin China. POST CODE : 300385…

PDF инструкция · 102 страниц(ы) английский
инструкцияSamsung S1050

ENGLISH
User Manual
Thank you for buying a Samsung camera.
This manual will guide you through using the camera, including
capturing images, downloading images and using the application software.
Please read this manual carefully before using your new camera.
Посмотреть инструкция для Samsung S1050 бесплатно. Руководство относится к категории фотокамеры, 1 человек(а) дали ему среднюю оценку 6.1. Руководство доступно на следующих языках: английский. У вас есть вопрос о Samsung S1050 или вам нужна помощь? Задайте свой вопрос здесь
Главная
| Samsung | |
| S1050 | CJ050605C | |
| фото камера | |
| 8801089405524 | |
| английский | |
| Руководство пользователя (PDF) |
Качество изображения
| Мегапиксели | 10.1 MP |
| Максимальное разрешение изображения | 3648 x 2736 пикселей |
| Тип сенсора | CCD |
| Размер сенсора изображения | 1/1.8 « |
Объектив
| Цифровой зум | 5 x |
| Оптическое увеличение | 5 x |
| Фокусное расстояние | 7.8 — 39 mm |
Прочие свойства
| Цифровая зеркальная камера | Нет |
| Эквивалент расстояния для линз 35мм камеры | 38 — 190 mm |
| Скорость действия затвора | 1 — 1/2000 s |
| Встроенная вспышка | Да |
| Функция видео | Да |
| Интерфейс | USB 2.0 |
| Отображение даты | Да |
| Совместимые операционные системы | Windows 98/98SE/2000/ME/XPnMac OS 9.2-10.3 |
| Минимальные системные требования | CD-ROM |
| Минимальный объём жесткого диска | 200 MB |
| Минимальный объём ОЗУ | 128 MB |
| Минимальный процессор | Pentium II 450MHz / PowerMac G3 |
Фокус
| Фокус | TTL |
| Нормальное фокусное расстояние | 0.8 — ∞ m |
| Макро фокусирование (теле) | 0.5 — 0.8 m |
| Макро фокусирование (широкий угол) | 0.1 — 0.8 m |
| Супер макрофокусирование | 0.01 — 0.1 m |
| Диапазон автофокусирования (теле) | 0.5 — ∞ m |
| Диапазон автофокусирования (широкий угол) | 0.1 — ∞ m |
| Диапазон ручного фокусирования (теле) | 0.5 — ∞ m |
| Диапазон ручного фокусирования (широкоуг.) | 0.01 — ∞ m |
| Нормальное фокусное расстояние (широкий угол) | 0.8 — ∞ m |
| Нормальное фокусное расстояние (теле) | 0.8 — ∞ m |
Экспозиция
| Чувствительность по ISO | 80,100,200,400,800,1600,Auto |
| Режимы световой экспозиции | Авто |
| Экспонометр | Точечный |
Вспышка
| Диапазон вспышки (широкоуг.) | 0.2 — 5 m |
| Диапазон вспышки (теле) | 0.5 — 3 m |
| Время перезарядки вспышки | 4 s |
| Режимы вспышки | fill-in, Flash off, Red-eye reduction, Slow synchronization |
Память
| Оперативная память | 45 MB |
| Совместимые карты памяти | mmc, sd |
Аудио
| Встроенный микрофон | Да |
| Запись голоса | Да |
Экран
| Дисплей | ЖК |
| Диагональ экрана | 3 « |
| Разрешение дисплея (числовое) | 230000 пикселей |
Порты и интерфейсы
| PictBridge | Да |
| Версия USB | 2.0 |
Камера
| Задержка автоcпуска | 2 s |
| Масштабирование при воспроизведении (макс) | 1 x |
| Фотоэффекты | black&white, Negative film, Sepia |
| Сюжетные режимы | Backlight, beach, Children, Close-up (macro), Documents, dusk, Fireworks, Night, Portrait, Sunset, Landscape (scenery) |
| Баланс белого | auto, Cloudy, custom modes, daylight, Fluorescent, Tungsten |
| Редактирование изображения | resizing, rotating, trimming |
| Режимы воспроизведения | movie, single image, slide show, thumbnails |
Дизайн
Батарея
| Тип батареек | AA |
| Технология батареи | Щелочной |
| Число поддерживаемых батарей | 2 |
Содержимое упаковки
| Поставляемое ПО | Digimax Master |
Системные требования
Вес и размеры
| Ширина | 98.9 mm |
| Высота | 63.5 mm |
| Глубина | 25.5 mm |
Условия эксплуатации
| Диапазон относительной влажности при эксплуатации | 5 — 85 % |
| Диапазон температур при эксплуатации | 0 — 40 °C |
Затвор
| Тип затвора камеры | electronic, mechanical |
показать больше
Не можете найти ответ на свой вопрос в руководстве? Вы можете найти ответ на свой вопрос ниже, в разделе часто задаваемых вопросов о Samsung S1050.
Какой размер экрана Samsung S1050?
Какая высота Samsung S1050?
Какая ширина Samsung S1050?
Какая толщина Samsung S1050?
Инструкция Samsung S1050 доступно в русский?
Не нашли свой вопрос? Задайте свой вопрос здесь
 Модель: Компактная фотокамера Samsung S1050
Год выпуска: 2007
Количество страниц: 98
Язык: русский
Формат: pdf
Размер: 7,0 Mb
Описание:
Samsung S1050 – это цифровая камера с высокой разрешающей способностью, которая оснащена 10,3-мегапиксельным сенсором с компьютерным управлением с фильтрацией реальной цветопередачи. Вы можете использовать Digimax S1050 для получения изображений лучшего качества и получения детальных фотографий для печати на формате размером до постера. К тому же, Digimax S1050 оснащен пятикратным оптическим и пятикратным цифровым увеличением, что позволяет получить 25-кратное увеличение при их одновременном использовании.
Содержание
- ПОДГОТОВКА.
- Системная диаграмма.
- Рабочие элементы.
- Вид спереди и сверху.
- Вид сзади и снизу.
- Вид снизу/ 5-ти кнопочное меню.
- Индикатор автоспуска.
- Индикатор состояния фотокамеры.
- Значки режимов.
- Подсоединение к источнику питания.
- Как вставить карту памяти.
- Как пользоваться картой памяти.
- Если фотокамера используется в первый раз.
- СЪЕМКА.
- Информация, отображаемая на ЖК-дисплее.
- Начинаем съемку.
- Съемка в режиме АВТО.
- Работа в режиме ПРОГРАММА.
- Работа в режиме Приоритет диафрагмы.
- Работа в режиме Приоритет выдержки.
- Работа в режиме ВРУЧНУЮ.
- Как использовать режим ASR (Уменьшение дрожания).
- «Умный» снимок.
- Работа в режиме СЮЖЕТ.
- Обнаружение лица.
- Работа в режиме ВИДЕО.
- Запись видеоклипа без звукового сопровождения.
- Временная приостановка записи видеоклипа (последовательная запись).
- Видеосъемка с продолжением.
- Работа в режиме ЗАПИСЬ ЗВУКА.
- На что нужно обращать внимание при съемке.
- Настройка фотокамеры с помощью кнопок.
- Кнопка питания.
- Затвор.
- Кнопка зума W/T.
- Кнопка Звукозапись/ Звуковой комментарий/ВВЕРХ.
- Кнопка Макро/ВНИЗ.
- Фиксация фокусировки.
- Кнопка ФОТОВСПЫШКА/ ВЛЕВО.
- Кнопка Автоспуск/ ВПРАВО.
- Кнопка MENU/ ОК.
- НАСТРОЙКА.
- Настройка фотокамеры с помощью ЖК-дисплея.
- Работа с меню.
- Запись.
- РЕЗКОСТЬ.
- Контрастность.
- Способ автофокусировки.
- ИНФОРМАЦИЯ НА ЭКРАНЕ.
- Звук.
- Громкость.
- Звуковая заставка.
- Звуковой сигнал при срабатывании затвора.
- Звуковой сигнал при работе.
- ЗВУК AF.
- Настройки 1.
- Имя файла.
- Язык.
- Настройка даты/ времени/ формата отображения даты.
- Впечатывание даты.
- Яркость ЖК-дисплея.
- Индикатор автофокусировки.
- Графическая заставка.
- Настройки 2.
- Быстрый просмотр.
- Автовыключение после периода бездействия.
- ЭНЕРГОСБЕР.
- Выбор типа выходного видеосигнала.
- Форматирование карты памяти.
- Инициализация.
- Выбор типа батареи питания.
- Кнопка Е (эффекты).
- Спецэффекты (кнопка Е): цвет.
- Спецэффекты (кнопка Е): Редактирование изображения.
- Цветовая насыщенность.
- Спецэффекты (кнопка Е): Развлечения.
- Зона резкости.
- Составной снимок.
- Фоторамка.
- Кнопка +/-.
- Размер.
- Качество/ Частота кадров.
- Экспозамер.
- Непрерывная съемка.
- Светочувствительность ISO.
- Баланс белого.
- Экспокоррекция.
- Стабилизатор кадров видеоклипа.
- ВОСПРОИЗВЕДЕНИЕ.
- Включение режима воспроизведения.
- Просмотр фотоснимка.
- Воспроизведение видеоклипа.
- Как выполнить захват кадров видеоклипа.
- Воспроизведение звукозаписи.
- Информация, отображаемая на ЖК-дисплее.
- Настройка фотокамеры с помощью кнопок.
- Кнопка Эскиз/ Увеличение.
- Кнопка записи звукового комментария/ ВВЕРХ.
- Кнопка Воспроизведение и Пауза/ВНИЗ.
- Спецэффекты (кнопка Е): Изменить размер.
- Спецэффекты (кнопка Е): Поворот изображения.
- Спецэффекты (кнопка Е): Цвет.
- Спецэффекты (кнопка Е): Специальный цвет.
- Цветовой фильтр.
- Цветовая маска.
- Спецэффекты (кнопка Е): редактирование изображений.
- Спецэффекты (кнопка Е): Развлечения.
- Мультик.
- Зона резкости.
- Составной снимок.
- Фоторамка.
- Стикер.
- Кнопка Удалить.
- Кнопка Принтер.
- Кнопки ВЛЕВО/ ВПРАВО/ MENU/ OK.
- Настройка воспроизведения с помощью ЖК-дисплея.
- Включение слайдшоу.
- Воспроизведение.
- Защита изображений.
- Удаление изображений.
- DPOF.
- Копирование на карту памяти.
- Информация на ЖК-дисплее.
- PictBridge.
- PictBridge: выбор снимка.
- PictBridge: настройка печати.
- PictBridge: возврат к заводским установкам.
- Важные замечания.
- Предупреждающие сообщения.
- Перед тем как обратиться в центр обслуживания.
- Технические характеристики.
- Включение режима воспроизведения.
- ПРОГРАММНОЕ ОБЕСПЕЧЕНИЕ.
- Замечания по установке программного обеспечения.
- Системные требования.
- Об установке программного обеспечения.
- Настройка прилагаемого программного обеспечения.
- Включение режима ПК.
- Отключение съемного диска.
- Установка драйвера USB на компьютере Macintosh.
- Использование драйвера USB для MAC.
- Удаление драйвера USB для Windows 98SE.
- Digimax Master.
- Часто задаваемые вопросы (FAQ).
Скачать: disk.yandex.ru | mega.co.nz