-
Contents
-
Table of Contents
-
Troubleshooting
-
Bookmarks
Quick Links
1. Application Model
• CLX-925x/935x series
• SCX-8×30/8×40 series
2. Stack Capacity (A4/LT 80gsm)
• CLX-FIN40S : 1,000 sheets (Main) / 250 sheets (Top)
• CLX-FIN40L : 3,000 sheets (Main) / 250 sheets (Top)
3. Staple (Finisher)
• Capacity : 50 sheets (90gsm)
• Cartridge Capacity : 5,000 clinching/cartridge
Service Manual
Finisher Service Manual
CLX-FIN40S / CLX-FIN40L
4. Staple (Booklet maker)
• Staple/Fold capacity : 15 sheets
• Cartridge Capacity : 1,000 clinching/cartridge)
Summary of Contents for Samsung CLX-FIN40S

250 ₽
Инструкция (руководство пользователя) на Фотоаппарат SAMSUNG FINO 40 S
Артикул: samsung-fino-40-s
Категория: Samsung
-
Описание
-
Детали
Описание
Инструкцию по эксплуатации SAMSUNG FINO 40 S на русском языке можно будет скачать в личном кабинете после оформления и оплаты заказа.
Детали
| Формат файла |
|
|---|---|
| Размер инструкции в кб |
2704 |
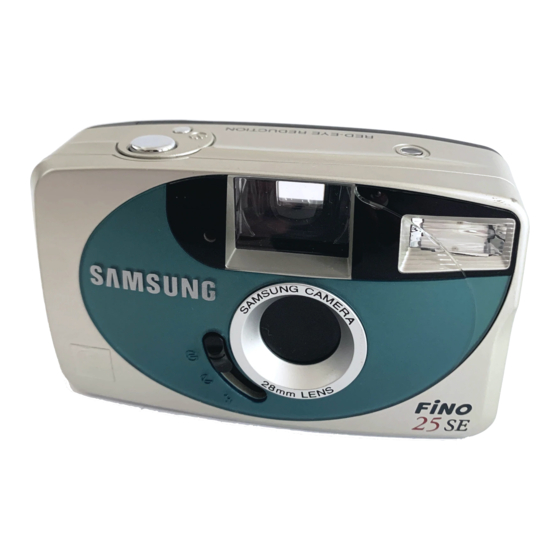
Samsung fino 40s panorama — винтажный пленочный фотоаппарат. Другое название модели Samsung maxima 40 AF panorama. Год выпуска 1998.
Широкоугольный объектив имеет фокусное расстояние 30 мм и светосилу f/4.5, что делает эту камеру отличной для многих видов фотографии. Эта камера может делать все: от пейзажей до путешествий и уличной фотографии. Она также имеет режим макро и режим панорамы, который раздвигает границы изображения для еще более широкого охвата.
Асферические линзы и стекло со сверхнизкой дисперсией в сочетании с переменным диафрагмой обеспечивают четкое изображение.
Усовершенствованная система автофокусировки позволяет просто и интуитивно фокусироваться на объектах, даже если они не находятся в центре кадра.
Универсальная вспышка предлагает несколько режимов, включая автоматическую вспышку, заполняющую вспышку, режим уменьшения эффекта красных глаз и принудительное отключение. Диапазон действия вспышки от 0.6 до 5.6 м (при ISO 400).
Яркий видоискатель и супер информативный ЖК-дисплей.
Таймер автоспуска с задержкой 10 секунд.
Диапазон выдержек от 1/4 до 1/250 с.
Режим панорамы.
Дистанция фокусировки от 0,5 м до бесконечности.
Определение чувствительности пленки по DX коду ISO 100/400 единиц.
Автоматическая транспортировка и перемотка пленки.
Размер 116,5 x 63,5 x 37 мм. Вес 188 г.
Питание от одной батареи CR123A (в комплект не входит).
Что входит в комплект: винтажная фотокамера Samsung fino 40s , ремешок на руку, гарантийный талон, крафтовая коробка.
Состояние оптики: идеальное. Состояние автоматики: идеальное. Внешнее состояние корпуса: незначительные потертости.
-
Contents
-
Table of Contents
-
Bookmarks
Quick Links
ENGLISH / FRANÇAIS / DEUTSCH /
ESPAÑOL / ITALIANO / DUTCH /
PORTUGUÊSE / SVENSKA /
/ –»——KN… fl«‹≤K
Related Manuals for Samsung FINO 20SE
Summary of Contents for Samsung FINO 20SE
-
Page 1
ENGLISH / FRANÇAIS / DEUTSCH / ESPAÑOL / ITALIANO / DUTCH / PORTUGUÊSE / SVENSKA / / –”——KN… fl«‹≤K… -
Page 2
IDENTIFICATION OF FEATURES Viewfinder Self-timer button (FINO 25SE/ MAXIMA 25SE only) Shutter button Lens cover (on/off switch) / Flash switch Lens Self-timer lamp/ Red-eye reduction lamp Flash Frame counter Back cover release… -
Page 3
IDENTIFICATION OF FEATURES Flash indicator (Green LED) Viewfinder Rewind control Battery chamber cover Spool Film sensor Film check window Strap eyelet Back cover DX decoding contacts… -
Page 4: Loading Batteries
LOADING BATTERIES Open the battery chamber cover. Insert two new batteries and be sure to place them in the correct position. Remember to reset the date and time after changing batteries. (Q.D. model ) Ouvrez la trappe du compartiment piles Insérez deux piles neuves en vérifiant qu elles sont bien positionnées.
-
Page 5
Open het deksel van het batterijcompartiment. Steek twee nieuwe batterijen in het batterijcompartiment. Let daarbij vooral op de juiste stand. (+ & -) Vergeet vooral niet om na het vervangen van de batterij datum en tijd gelijk te zetten. Abra a tampa do compartimento de bateria. Insira duas baterias novas e certifique-se de que elas foram inseridas na posição correta. -
Page 6: Loading The Film
LOADING THE FILM Open the back cover by sliding the release, as shown above. Insert film into the chamber. Do not use force. The film should lie flat. Close the back cover (you will hear a «Click»). Press the shutter button a number of times to advance the film until «1»…
-
Page 7
Schließen Sie die Rückwand, bis sie hörbar einrastet. Drücken Sie den Auslöser mehrmals solange, bis «1» im Bildzählwerk erscheint. Wenn Sie für eine Aufnahme den Auslöser betätigen, ohne dass ein Film eingelegt ist, funktioniert der Blitz nicht, sondern nur der Filmtransport. Legen Sie eine Filmpatrone ein, damit die Kamera normal funktionieren kann. -
Page 8
Open de achterwand door de sluiting ervan, als afgebeeld opzij te schuiven. Leg de filmcassette in het filmcompartiment. Forceer daarbij niets. Zorg dat de film vlak ligt. Sluit de achterwand tot die hoorbaar dichtklikt. Druk de ontspanknop zo vaak in tot in de opnameteller het cijfer «1»… -
Page 9
ŒÚÍÓÈÚ Á‡‰Ì˛˛ Í˚¯ÍÛ, ‚˚‰‚ËÌÛ‚ Û˜ÍÛ ‰Â·ÎÓÍËÓ‚ÍË, Í‡Í ÔÓ͇Á‡ÌÓ ‚˚¯Â. ¬ÒÚ‡‚¸Ú ͇ÒÒÂÚÛ Ò ÔÎÂÌÍÓÈ ‚ ÓÚ‰ÂÎÂÌËÂ. Õ ÔËÏÂÌˇÈÚ ÒËÎÛ ‰Îˇ ÛÒÚ‡ÌÓ‚ÍË ÔÎÂÌÍË Ì‡ ÏÂÒÚÓ. œÎÂÌ͇ ‰ÓÎÊ̇ ÎÂʇڸ Ó‚ÌÓ. 3‡ÍÓÈÚ Á‡‰Ì˛˛ Í˚¯ÍÛ ÙÓÚÓ‡ÔÔ‡‡Ú‡ Ò Î„ÍËÏ ¯ÂΘÍÓÏ. H‡ÊËχÈÚ ÍÌÓÔÍÛ ÒÔÛÒ͇ Á‡Ú‚Ó‡ ÙÓÚÓ‡ÔÔ‡‡Ú‡ ‰Ó ÔÓˇ‚ÎÂÌˡ ˆËÙ˚ 1 ̇ Ò˜ÂÚ˜ËÍÂ… -
Page 10: Taking Pictures
TAKING PICTURES 1.Open the lens cover to turn on the power. 2.Look through the viewfinder and compose the picture. 3.Press the shutter button gently to take a picture. If the subject is less than 1.5m from the camera, the picture may be out of focus. 1.Ouvrir le volet protecteur pour mettre l’appareil en marche.
-
Page 11
1.Schakel de camera in door de lenskap te openen. 2.Kijk door de zoeker en kader uw opname af. 3.Maak de opname door de ontspanknop helemaal in te drukken. Op afstanden korter dan 1,5m worden uw opnamen ontscherp. 1.Abra a tampa da lente para ligar a máquina. 2.Olhe pelo visor e componha a foto. -
Page 12: Rewinding The Film
REWINDING THE FILM 1.Slide the rewind control in the direction of arrow. 2.The motor stops when the rewinding is completed. Open the back cover and remove the film. To rewind the film in the middle of a roll, press the Mid-roll rewind knob. The film will be completely rewound, ready for processing.
-
Page 13
1.Fare scorrere la manopola di riavvolgimento nella direzione della freccia. 2.Il motore si ferma quando il riavvolgimento e’ completato. Aprire il coperchio posteriore e togliere la pellicola. Per riavvolgere la pellicola a metà rullino, premere il relativo pulsante. La pellicola verrà riavvolta completamente e sarà… -
Page 14
1.œÎ‡‚ÌÓ ÔÂÂÏÂÒÚËÚ ÍÌÓÔÍÛ Ó·‡ÚÌÓÈ ÔÂÂÏÓÚÍË ÔÎÂÌÍË ‚ ̇ԇ‚ÎÂÌËË ÒÚÂÎÍË. 2.œÂÂÏÓÚ͇ ÔÎÂÌÍË Á‡ÍÓ̘ËÚÒˇ ‡‚ÚÓχÚ˘ÂÒÍË. ŒÚÍÓÈÚ Á‡‰Ì˛˛ Í˚¯ÍÛ Ë ‰ÓÒڇ̸Ú ͇ÒÒÂÚÛ Ò ÔÎÂÌÍÓÈ. ƒÎˇ ÔÂÂÏÓÚÍË ÔÎÂÌÍË ‚ Ò‰ËÌ ÛÎÓ̇ ̇ʇڸ ̇ ÍÌÓÔÍÛ ÔÂÂÏÓÚÍË ‚ Ò‰ËÌ ÛÎÓ̇ (Mid-roll Rewind). œÎÂÌ͇ ·Û‰ÂÚ ÔÓÎÌÓÒÚ¸˛ ÔÂÂÏÓڇ̇ Ë „ÓÚÓ‚‡ Í ÔÓˇ‚ÎÂÌ˲. ¬˚ Ì ÒÏÓÊÂÚÂ… -
Page 15
1. Changer le format de la Date Pressez la touche MODE au dos de l’appareil pour choisir un des différents formats.(Reportez-vous aux séquences ci-dessus.) Pas d’impression Année/mois/jour (mode Date) Heure/-/minutes (mode Heure) 2. Réglage de la Date Choisissez le mode Date en pressant la touche mode. Pressez la touche Y,M, et D pour afficher la date voulue. -
Page 16
2.Ajuste de la fecha Seleccione el modo Date (fecha) presionando el botón MODE. Presione los botones Y (año), M (mes) y D (día) para ajustar la fecha deseada. Presione el botón MODE para acceder al modo Time (tiempo) y ajuste el tiempo presionando el botón H (horas) y M (minutos). -
Page 17
1.Mudando o formato da data Aperte o botão MODO para selecionar um dos diferentes formatos. (Referente a sequência abaixo.) Sem impressão Ano-mês-dia (modo de data) Hora / — / minutos (modo de tempo) 2.Ajustando a data Selecione o modo da data apertando o botão modo. Aperte os botões Y(ano), M (mês) e D (dia) para ajustar a data desejada. -
Page 18: Using The Flash Mode
2.”ÒÚ‡Ìӂ͇ ‰‡Ú˚ H‡Ê‡ÚËÂÏ ÍÌÓÔÍË –≈∆»M, ‚˚·ÂËÚ ÂÊËÏ «ƒ‡Ú‡» H‡ÊËχˇ ÍÌÓÔÍË Y,M,D ÛÒÚ‡ÌÓ‚ËÚ Ê·ÂÏÛ˛ ‰‡ÚÛ. H‡Ê‡ÚËÂÏ ÍÌÓÔÍË –≈∆»M ‚˚·ÂËÚ ÂÊËÏ «¬ÂÏˇ» H‡ÊËχˇ ÍÌÓÔÍË H Ë M, ÛÒÚ‡ÌÓ‚ËÚ ÚÂÍÛ˘Â ‚ÂÏˇ. USING THE FLASH MODE In low light conditions, flash will automatically fire to obtain the correct exposure.
-
Page 19
Um korrekt belichtete Aufnahmen zu erzielen, wird bei ungünstigen Lichtverhältnissen automatisch der Blitz gezündet. Sobald der Blitz vollständig geladen ist, leuchtet die Blitzanzeige auf. Diese grüne Anzeige leuchtet für 90 Sekunden, bevor sie zur Schonung der Batterie automatisch erlischt. Wird der Auslöser angetippt, erscheint sie wieder. -
Page 20
Omdat de flitser bij weinig licht automatisch ontsteekt, bent u altijd verzekerd van een juiste belichting. Zodra de flitser zich helemaal heeft opgeladen, gaat de “ flitserparaat-LED ” branden. Deze groene LED blijft ongeveer 90 seconden branden en dooft dan, om de batterijen te sparen. -
Page 21
œË ̉ÓÒÚ‡ÚÓ˜ÌÓÈ ÓÒ‚Â˘ÂÌÌÓÒÚË ‚ÒÔ˚¯Í‡ Ò‡·‡Ú˚‚‡ÂÚ ‡‚ÚÓχÚ˘ÂÒÍË Ë Ó·ÂÒÔ˜˂‡ÂÚ Ô‡‚ËθÌÓ ˝ÍÒÔÓÌËÓ‚‡ÌËÂ. œË ÔÓÎÌÓÈ Á‡ˇ‰Í ‚ÒÔ˚¯ÍË, Á‡„Ó‡ÂÚÒˇ ÁÂÎÂÌ˚È Ë̉Ë͇ÚÓ. ŒÌ ÓÒÚ‡ÂÚÒˇ Ò‚ÂÚˇ˘ËÏÒˇ ‚ Ú˜ÂÌËË 90 ÒÂÍÛ̉ Ë ÔÓÚÓÏ „‡ÒÌÂÚ, ˜ÚÓ·˚ ÔÓ‰ÎËÚ¸ ÒÓÍ ÒÎÛÊ·˚ ·‡Ú‡ÂË. »Ì‰Ë͇ÚÓ Á‡„Ó‡ÂÚÒˇ ÒÌÓ‚‡, ÍÓ„‰‡ ¬˚ ̇ÊÏÂÚ ÍÌÓÔÍÛ ÒÔÛÒ͇ Á‡Ú‚Ó‡ ÙÓÚÓ‡ÔÔ‡‡Ú‡ ̇ ÔÓÎÓ‚ËÌÛ… -
Page 22
SELF-TIMER Self-timer button You can select this mode by pressing the self-timer button once. You can take a picture of yourself by using this mode. When you press the self-timer button, the self-timer lamp blinks slowly for 7 seconds. The lamp will blink rapidly for a further 3 seconds before the picture is taken. -
Page 23
Podrá seleccionar este modo presionando el botón SELF una vez. Podrá tomar una fotografía de sí mismo utilizando este modo. Cuando presione el autodisparador, la lámpara del autodisparador parpadeará despacio durante 7 segundos. A continuación comenzará a parpadear rápidamente durante 3 segundos y el obturador se liberará. El auto-temporizador no funciona cuando se cierre la tapa de la lente. -
Page 24
Quando você pressionar o botão de disparador automático, a lâmpada do disparador automático piscará lentamente por sete segundos. Então a lâmpada piscara rapidamente por 3 segundos e o botão do obturador será solto. O disparador automático pode ser tirado com a tampa da lente fechado. -
Page 25
AUTO RED-EYE REDUCTION The camera will automatically operate the red-eye reduction feature when flash is selected. When the shutter button is pressed half way down, the red-eye reduction lamp will light up. The flash will fire when pressing the shutter button fully. Lorsque le flash est utilisé, cet appareil met automatiquement en oeuvre le système de réduction «d’yeux rouges». -
Page 26
Kiest u voor een geflitste opname, dan zorgt de camera er automatisch voor dat het verschijnsel «rode ogen» wordt onderdrukt. Drukt u de ontspanknop half in, dan gaat de LED voor het onderdrukken van rode ogen branden. Op het moment dat u de ontspanknop helemaal indrukt, ontsteekt de flitser. -
Page 27: Specifications
Film Speed ISO 100 or 400 Power loading, automatic advance Film Winding Power rewinding, Mid-roll rewinding Film rewinding 28mm SAMSUNG lens Lens F 5.6 (3 elements 3 groups, 1 glass lens) Mechanically controlled shutter Shutter Shutter speed 1/125 sec. Focus free Focusing Focusing range : 1.5m ~ infinity…
-
Page 28
110 x 67 x 46mm / 4.3 x 2.6 x 1.8in (Q.D. model) 150g / 5.3 oz Weight 160g / 5.6 oz (Q.D. model) (without batteries) *Specifications are subject to change without prior notice. *All data are based on SAMSUNG s standard test method. -
Page 29
MEMO… -
Page 30
MEMO… -
Page 31
MEMO… -
Page 32
18600 BROADWICK ST., RANCHO DOMINGUEZ, CA 90220 TEL : (1) 310-537-7000 FAX : (1) 310-537-1566 SAMSUNG U.K. LIMITED. PHOTO PRODUCTS DIV. SAMSUNG HOUSE, 3 RIVERBANK WAY, GREAT WEST ROAD, BRENTFORD, MIDDLESEX,TW8 9RE, U.K. TEL : (44)20-8232-3348 FAX : (44)20-8569-8385 SAMSUNG DEUTSCHLAND GmbH…
Discover incredible analogue photos shot with the Samsung fino 40s.
Head to our Online Shop to explore our full range of creative Lomography cameras.


×

Sign up to our newsletter and get 10% off a selection of items! We’ll send you exciting photography interviews, crazy tips and tricks, competitions giveaways, and unmissable offers. No funny business, just a whole heap of Lomography love right to your inbox.