Hide thumbs
Also See for Sound Blaster Audigy 2 ZS:
- User manual (77 pages)
-
Contents
-
Table of Contents
-
Bookmarks
Quick Links
Related Manuals for Creative Sound Blaster Audigy 2 ZS
Summary of Contents for Creative Sound Blaster Audigy 2 ZS
-
Page 2: Table Of Contents
Contents Movie Creation Guide Software Applications ………………………… 1-1 Computer Configuration ……………………….1-2 Optimizing Your Computer ……………………1-2 Processor speed and RAM memory ………………….1-3 Hard drive space ……………………….1-4 DVD writer …………………………. 1-4 USB 2.0 …………………………..1-5 Windows XP …………………………1-5 Graphics Cards …………………………
-
Page 3
Creating a WMV file for Zen Portable Media Center Starting VideoStudio 8 ……………………….. 4-1 Creating a WMV file from an existing video file ………………… 4-2 Capturing a WMV file ………………………… 4-6 Taking Control of Your DVD Project Planning Space and Organizing Your DVD ………………….. 5-1 Organization ………………………… -
Page 4
PerfectView® Pro MPEG encoding ……………………A-2 TrueView™ Pro: Motion Compensated Temporal Filtering …………..A-3 Video Formats …………………………..A-3 Analog Television Video Formats – NTSC, PAL and SECAM …………..A-4 Video Transmission — Composite Video and S-Video (SVHS) …………… A-5 Digital Video Formats – DV and MPEG ………………….A-6 Digital Audio Formats ………………………. -
Page 5: Movie Creation Guide
DVDs and movies on your computer. Read ahead to learn how to: • capture video using Audigy 2 ZS Video Editor into a digital video file on your computer and make professional-looking DVDs or SVCDs (See «Capturing Video from a Video Source»…
-
Page 6: Computer Configuration
Audigy 2 ZS Video Editor features hardware MPEG encoding, which greatly reduces Computer the burden on your computer during video capture. Configuration However, working on your DVD project will be easier if you have a computer configured for video capturing and editing. Performing basic computer maintenance can also make a difference when working on your video project.
-
Page 7: Processor Speed And Ram Memory
The more RAM and the faster the processor you have, the more responsive your Processor speed computer will be during the editing and rendering phases. and RAM memory While editing, for example, you would preview the results of your latest edit in real-time.
-
Page 8: Hard Drive Space
As mentioned in the note above for external drives, 1394 connectivity is preferred so there is no bus contention with the Audigy 2 ZS Video Editor, but USB works well too. See «Selecting the DVD Format and Media Type» on page 6-1.
-
Page 9: Usb 2.0
Audigy 2 ZS Video Editor will work well with either USB 1.1 or USB 2.0 connections USB 2.0 to your computer; Audigy 2 ZS Video Editor also serves as a USB hub. For flexibility, USB 2.0 is preferred. USB 1.1 does not support the data transfer speed required for capturing DV.
-
Page 10: Capturing Video From A Video Source
Capturing Video from a Video Source Follow the next few steps to successfully capture video. Your Quick Start guide has full instructions on how to connect your Audigy 2 ZS Video Editor. Be sure that you have properly connected and turned on your video source Step 1: Install and Audigy 2 ZS Video Editor.
-
Page 11: Step 2: Start Ulead Dvd Moviefactory 3
Run DVD MovieFactory and click Create Step 2: Start Ulead Video Disc. DVD MovieFactory Disable any scheduled tasks on your computer, such as virus scans, so that Select the New Project option and select they do not interfere with the video capture the Output disc format option you require process.
-
Page 12: Step 3: Set Video Capture Parameters
Audigy 2 ZS Video Editor. Select VCR Input when capturing from a VCR; You should defragment this allows the Audigy 2 ZS Video Editor to your hard drive before stabilize video from older VCRs. capturing video. Also,…
-
Page 13: Step 4: Set Audio Parameters
Go to Start -> Programs/All Programs -> Step 4: Set Audio Creative -> Sound Blaster Audigy 2 ZS Video Parameters and select Editor -> Creative Speaker Settings the Speaker or Headphone settings. Go to Start -> Programs/All Programs -> Creative -> Sound Blaster Audigy 2 ZS Video and enable or Editor ->…
-
Page 14: Step 5: Perform The Capture
— consider performing the capture in VideoStudio do not disconnect or which allows real-time color adjustments in hardware during the capture. This is turn off Audigy 2 ZS preferable to using software video filters after capture to make color adjustments. Video Editor, stop the video device or start Videos captured in VideoStudio are easily imported into DVD MovieFactory.
-
Page 15: Capturing Video Using Direct To Disc
DVD or other available format. Be sure you have properly connected and turned on your video source and Starting DVD Audigy 2 ZS Video Editor. See your Quick Start guide. MovieFactory 3 Insert a blank DVD into your DVD recorder.
-
Page 16
In the window that appears, select an Output disc format (DVD). Select the drive that you want to use to burn the DVD. If the drive you want does not appear, check your drive connections. If you have a blank DVD in the drive, disc information appears in the window. -
Page 17
In the dialog box that appears, select a DVD recording format. Select: • DVD-Video when you have no need to later edit or append to the DVD. This format is not as fast as the next format. • DVD-Video (fast re-editable) when you will be adding more video to the disc or for the quickest, on-the-fly, recording to DVD •… -
Page 18
On your video source, find the capture start point. Click the record button. Click the pause button to pause the recording. Click the stop button to end the recording, and burn your project to the DVD. When the DVD burning is complete, a dialog box appears. -
Page 19
10. Click option to save your video project and start a new Return to Start page one. Click to burn another copy of your project, or to burn a new Continue DVD with different settings. Click to save your project and close Close MovieFactory. -
Page 20: Creating A Wmv File For Zen Portable Media Center
Creating a WMV file for Zen Portable Media Center Use Ulead VideoStudio 8 Editor to create specially configured Windows Media Video (WMV) files for your Creative Zen Portable Media Center. These files have faster transfer times to your player than other types of digital video files. With VideoStudio, you can apply a wide range of video edits and effects, as well as optimize the video files for quick transfers to your Zen Portable Media Center.
-
Page 21: Creating A Wmv File From An Existing Video File
In the window that appears, Creating a click the Load Video WMV file from icon. an existing In the Open Video File video file window, locate the video file you want to use to create your WMV file. Click the Open button. For information on A thumbnail of the video using VideoStudio 8,…
-
Page 22
Using a drag-and-drop operation, move the video over to the StoryBoard view. If you want to make edits to your video, click one of the Step buttons located at the top of the window. Creating a WMV file for Zen Portable Media Center 4-3… -
Page 23
Otherwise, click the Share button (the last Step button). The left panel changes. Click Create Video File. A list of options appears. Click Custom. The Create Video File dialog box appears. Creating a WMV file for Zen Portable Media Center 4-4… -
Page 24
10. In the Save as type box, select Windows Media Video. 11. Click the Options… button. The Video Save Options window appears. Creating a WMV file for Zen Portable Media Center 4-5… -
Page 25: Capturing A Wmv File
Creative Zen PMC (NTSC 800Kbps) option if you want the video to be in NTSC format. Otherwise, select the WMV9 for Creative Zen PMC (PAL 800Kbps) option. 14. In the Create Video File dialog box, enter the name of your video file.
-
Page 26
In the window that appears, click the Capture button. In the Capture Settings tabbed page, in the Format list, select the WMV option. Click the Options icon. Select the Video and Audio Capture Property Settings option. options icon Creating a WMV file for Zen Portable Media Center 4-7… -
Page 27
If the Current profile is not WMV9 for Creative Zen PMC, click the Select button. In the list that appears, select the WMV9 for Creative Zen PMC option that best matches your TV display type (PAL or NTSC). Click the OK button. -
Page 28
Planning Your DVD Project The process of planning the layout and content of your DVD, then capturing, editing, and formatting the audio and video media, is called authoring. This chapter briefly highlights video format and compression considerations, which can affect the length of your video; for example, a lower compression level results in a larger video file. -
Page 29: Organization
There are several considerations when planning how to use the space on your DVD: DVD play time — how many minutes of video material you want to include in your DVD. For example, if you plan to create DVDs from the many home movies you’ve recorded over the years, you need to plan how to lay them out across multiple DVDs thematically (e.g.
-
Page 30
DVD MovieFactory shows you the Checking the remaining space on your DVD at the Available Space on bottom of the Add/Edit Media window. Your DVD To check the size of a video, right-click the video and select the Media Clip Properties option. -
Page 31: Capturing In Mpeg Or Dv/Avi
DV (Digital Video) format instead. Note that your project may contain videos of both types. See «Video Formats» on page A-3. The Audigy 2 ZS Video Editor can capture DV (sometimes referred to as AVI) from Capturing in DV both the analog video inputs and DV input.
-
Page 32
When significant editing is done, a project whose underlying video files are DV may better preserve video quality than one whose underlying videos were captured in MPEG. To appreciate this, imagine a compressed frame of video you have captured, upon which you would like to overlay a title. In order to render such a frame for output to a DVD, the original frame needs to be decompressed from its stored form (MPEG or DV) into raw video, the graphics of the title need to be composited or blended with the graphics of the frame, then it needs to be… -
Page 33: Capturing In Mpeg
VideoStudio. Using the Audigy 2 ZS Video Editor, video stored as DV (AVI files) can be transferred out to the Audigy 2 ZS Video Editor and printed to both DV and analog recorders (while MPEG video sent back out to the Audigy 2 ZS Video Editor can be printed only to analog recorders), and •…
-
Page 34: Controlling The Mpeg Capture Parameters
If the project will be printed back out to DV tape instead of output as a DVD, capture to DV is recommended since, within VideoStudio, DV (AVI files) can be output through the Audigy 2 ZS Video Editor to both the DV and analog outputs while MPEG files can be output to the analog outputs.
-
Page 35
Preset Video Audio Comments 384 Kbps DVD-High Quality 7 Mbps VBR Excellent Dolby Digital stereo (Approx. 60 min.) MPEG2 quality audio 384 Kbps DVD-Standard Play 4 Mbps VBR Very good Dolby Digital stereo (Approx. 120 min.) MPEG2 quality audio 384 Kbps DVD-Long Play 2.5 Mbps VBR Dolby Digital stereo… -
Page 36: Setting Capture Properties
From the Capture Video window, select Advanced Settings, then Capture Properties. Format: Selecting DVD means Audigy 2 ZS Video Editor will capture in DVD- compliant MPEG2. TV System: Set for the type of TV system you use. Resolution: Use 720×480 for NTSC or 720×576 for PAL.
-
Page 37: Controlling The Project Settings For Output
Audio Type: Use Dolby Digital most of the time as it has the best compatibility with DVD players. Use PCM for less audio compression. Use MPEG audio for compatibility with European DVD players or when you want the lowest audio bitrate (MPEG audio may not be compatible with some DVD players).
-
Page 38: Change Mpeg Settings
You can set the Project Settings to control the operation of the renderer; you have control over many of the same parameters as during capture. If the videos within the project do not have the same frame size, bitrate, audio format, etc. as these project settings, they will be converted before the final DVD is created.
-
Page 39: Selecting The Dvd Format And Media Type
Selecting the DVD Format and Media Type You’ll need to consider both the physical media type and logical format of the final DVD, then specify these through DVD MovieFactory’s choices. Confusingly, both of these concepts are sometimes referred to as DVD “formats”, and “formatting” is also a verb.
-
Page 40
You should select a media type that is supported for the format you’ve selected. This media type should be: • Supported by the desired DVD format (see table below) • Compatible with your DVD player • Compatible with your DVD writer – it is recommended to use a type and brand of recordable media that is documented to work well with your DVD writer. -
Page 41
Format DVD-Video fast Operation DVD-Video re-editable DVD-VR DVD+VR (Ulead only) DVD-R/RW, DVD-RW, DVD+RW DVD-RW, DVD+RW, DVD-RW* Media type DVD+R/RW DVD-R/+R DVD-RAM (*Ulead only) Must move all titles Appends the title Appends the title Appends the title Add video to HDD and re-burn directly (RW only) directly directly… -
Page 42
Format DVD-Video fast Operation DVD-Video re-editable DVD-VR DVD+VR (Ulead only) Menu space is Menu space is as pre-allocated at Menu space No menus — only 30 MB menu space large as menus formatting — handling playlists limitation need currently hardcoded to 240MB Compatible with –VR Compatible with +VR… -
Page 43: Video And Audio Monitoring
You can connect a video monitor (i.e. a TV) About to the video and audio outputs of your Monitoring Audigy 2 ZS Video Editor to monitor your video activities: • During video capture, or when no operation is being performed, the analog…
-
Page 44: Television Display
Listed below are some characteristics of TVs in relation to computer displays: Television • Colors can be more vivid on a TV. Display • Pixels are more blended, removing some detail and making text less crisp on a • Unseen overscan areas can dictate how you size and place pictures and text. For example, if you add a title that goes to the edges of the screen when displayed on your computer monitor, the far ends of the title may be off the screen on a TV.
-
Page 45: Audio Monitoring
Audio If you have a TV connected to the video and audio outputs of your Audigy 2 ZS Video Editor as described above, there are several different modes for monitoring Monitoring the audio of your video project: • Sync to PC, in which the audio is synchronized to the video shown on your computer (generally the Preview display) •…
-
Page 46
If you enable these two audio output signals in Creative Surround Mixer, they are directed through the Line Out connections (where you are most likely to connect your speakers as well). This can result in an echo because they are not synchronized, due to different signal paths. -
Page 47
To control the audio output from DVD MovieFactory, select or deselect the Sync Audio with TV button, just below the Preview screen within the capture window. This will automatically reverse the MUTE between the Wave (audio synchronized to PC) and the Line/Mic/ Video In (audio synchronized to TV). -
Page 48
→ Click Start Programs → Creative Sound Blaster → Audigy 2 ZS Video Editor Creative Surround Mixer. To sync Line Out audio to your computer display(Default setting): Click the Mute button to mute Line/ Mic/Video In and unmute Wave. Video and Audio Monitoring 7-6… -
Page 49
To sync Line Out audio to your Click the Mute button to mute Wave and unmute Line/Mic/Video In. Video and Audio Monitoring 7-7… -
Page 50: Technology Glossary
DoMiNoFX™ for crisp, smooth, glitch-free video encoding to MPEG. Encoding is accomplished with a dedicated video chip in the Audigy 2 ZS Video Editor, ensuring minimum overhead to the computer. The dedicated video chip contributes to: • no more dropped video frames •…
-
Page 51: Perfectview Pro Mpeg Encoding
Part of DoMiNoFX, PerfectView Pro is the result of decades of MPEG experience — ® PerfectView this 5th-generation, Emmy-winning compression technology is the most widely Pro MPEG used MPEG compression technology in the world, providing proven algorithms to avoid digital artifacts such as blockiness and loss of detail, even at low bitrates. encoding Poor compression PerfectView Pro Compression…
-
Page 52: Trueview™ Pro: Motion Compensated Temporal Filtering
Part of DoMiNoFX, Motion Compensated Temporal Filtering (MCTF) is a technique TrueView™ for reducing noise that is inherent in tape-based, broadcast and cable video Pro: Motion sources. Noise degrades digital video and requires more storage. During MPEG Compensated encoding from analog sources, MCTF provides 3D digital video pre-filtering to remove random noise, increasing the video quality and extending recording time.
-
Page 53: Analog Television Video Formats — Ntsc, Pal And Secam
The television standards define a video signal that is broadcast serially as a set of Analog Television horizontal scan lines with a varying brightness (luma) and color (chroma; Video Formats – originally not present in the black-and-white days). There are one luma signal and NTSC, PAL and two chroma signals.
-
Page 54: Video Transmission — Composite Video And S-Video (Svhs
Analog television programming is broadcast on a RF (radio frequency) carrier Video signal, a high frequency that can be selected by a tuner and demodulated to Transmission — extract the original video program. Consumer electronic devices that deal with Composite Video broadcast signals (e.g.
-
Page 55: Digital Video Formats — Dv And Mpeg
For capture into your computer, analog video signals from televisions, VCRs or Digital Video videocameras, are converted to digital samples and assembled into frames (or Formats – DV and fields) of digital video. The resolution, namely the number of horizontal and MPEG vertical samples packed into a digital frame, sometimes tracks the resolution of the analog signal –…
-
Page 56
the video stream is quite voluminous — one second of raw video from NTSC comprises approximately 166 Mbits of data (720 samples per line x 480 lines x 16 bits per sample x 30 frames per second). Raw video is sometimes referred to by the underlying color space of its samples, for example, YUV, YCrCb or RGB. -
Page 57: Digital Audio Formats
DV type 2 This is a form of DV often found when stored as an AVI file on a PC in which the video and audio streams are separated from each other. The value of this form is that it is compatible with a wide variety of video software applications. Use this form if you are capturing DV to make a DVD.
-
Page 58: Digital Video And Audio Resolutions And Bitrates
MPEG1 file (these are both MPEG1 streams), and SVCD, DVD and MPEG2 file Resolutions (these are all MPEG2 streams). These formats are supported by the Audigy 2 ZS Video Editor hardware MPEG encoder. Additionally, PCM audio is supported by the and Bitrates Ulead applications.
-
Page 59
MPEG1 MPEG2 MPEG1 SVCD MPEG2 DVD-Video 1.15 — 1.5 – 1.15 2.0 — 9.5 * 2.0 — 9.5 * Video Bitrate (Mbps) 2.375 CBR, CBR, VBR CBR, VBR Video Bitrate Control 352 x 352 x 480 x (352, 480, 544, 640, (352, 704, 720) NTSC 704, 720) x 480… -
Page 60
MPEG encoding (reducing overall clarity). In practice, half-D1 resolution can help maintain visual quality in bitrates below 4 Mbps. The following table summarizes the video resolutions available in the Audigy 2 ZS Video Editor targeted at DVD. Technology Glossary A-11… -
Page 61: Dvd Format
– the number of samples per second — controls the resolution of the digital audio. After sampling, the resultant digital audio stream will be stored as PCM or compressed into MPEG Audio or Dolby Digital. The Audigy 2 ZS Video Editor hardware produces MPEG Audio or Dolby Digital when compressing to MPEG (PCM audio is created in the Ulead application when specified by the user) and PCM when compressing or capturing DV.
-
Page 62
The physical disc medium can be: • DVD-ROM: read only, used for commercial content, manufactured by a commercial press • DVD+R/RW: R=Recordable once, RW = ReWritable • DVD-R/RW: R=Recordable once, RW = ReWritable • DVD-RAM: random access rewritable The disc may have one or two sides, and one or two layers of data per side. The number of sides and layers determines the disc capacity: •… -
Page 63
The audio data on a DVD movie can be of the format PCM, MPEG audio, Dolby Digital (AC-3) or DTS. In countries using the NTSC standard, DVD discs contain a sound track in PCM or Dolby Digital (AC-3) format, and any NTSC DVD player must support these two, while MPEG Audio and DTS are optional. -
Page 64: Frequently Asked Questions
Frequently Asked Questions This section covers common questions you might have while using your Audigy 2 ZS Video Editor. I hear echoes while capturing video. Questions You are likely hearing audio from two sources: About Video • audio directly from the video source, that is reflected to the Line Out (and synchronized with an external TV monitor if you have one connected to the analog video outputs), and •…
-
Page 65: General Usage
However, this may result in echoing. • Use a pair of headphones to hear what you are recording. USB devices connected to the Audigy 2 ZS Video Editor don’t seem to be recognized. This may be caused by connecting USB devices with an external power supply to your Audigy 2 ZS Video Editor without first turning it on.
-
Page 66
(thus resetting the device’s firmware). Ensure that the Audigy 2 ZS Video Editor is turned on. Ensure the Audigy 2 ZS Video Editor is connected to your computer via USB. Turn on your computer. Start the Ulead application and attempt the operation again. -
Page 67: General Precautions
Editor and use of low-speed USB devices, such as a USB mouse, connected to the Audigy 2 ZS Video Editor. Use of high-speed devices, such as external USB hard drives, should be avoided on the same USB 1.1 bus as the Audigy 2 ZS Video Editor during video capture.
Audigy 2 ZS
Срок обслуживания истек
Выбранное изделие относится к категории изделий с истекшим сроком обслуживания.
Для таких изделий техническая поддержка ограничивается предоставлением в интерактивном режиме материалов, размещенных на веб-узле технической поддержки пользователей Creative: решений из базы знаний, драйверов, обновленных версий приложений и документации по изделию.
База знаний: Самые популярные решения
Руководство пользователя по началу работы / инструкции по технике безопасности и нормативная информация
|
Ниже приведен список руководств пользователя по началу работы с Audigy 2 ZS. |
Последние материалы для загрузки
В следующем списке представлены последние совместимые с Audigy 2 ZS материалы для загрузки.
Просмотр: Драйвер | Приложение | Все
Все материалы для загрузки
Для получения полного списка загрузочных файлов, Вы можете вручную найти их в нашей базе данных.
Драйвер
Дата выпуска:
9 Apr 10
Размер файла:
40.42 MB
Загрузка
Дата выпуска:
13 Jul 09
Размер файла:
37.62 MB
Загрузка
Дата выпуска:
16 Mar 07
Размер файла:
38.3 MB
Загрузка
Приложение
Creative ALchemy 1.43.27
This download is an application for use with Creative audio products. It restores 3D audio and EAX® effects for certain DirectSound®3D games in Microsoft® Windows® 7 and Windows Vista®. For more details, read the rest of this web release note.
Показать сведения »
Дата выпуска:
16 Nov 12
Размер файла:
18.92 MB
Загрузка
Дата выпуска:
2 Oct 12
Размер файла:
14.19 MB
Загрузка
Дата выпуска:
20 Mar 09
Размер файла:
8.12 MB
Загрузка
Устройство:
Creative Labs Sound Blaster Audigy 2ZS
Размер: 1,19 MB
Добавлено: 2014-04-06 14:23:00
Количество страниц: 1
Печатать инструкцию
Скачать
Как пользоваться?
Наша цель — обеспечить Вам самый быстрый доступ к руководству по эксплуатации устройства Creative Labs Sound Blaster Audigy 2ZS. Пользуясь просмотром онлайн Вы можете быстро просмотреть содержание и перейти на страницу, на которой найдете решение своей проблемы с Creative Labs Sound Blaster Audigy 2ZS.
Для Вашего удобства
Если просмотр руководства Creative Labs Sound Blaster Audigy 2ZS непосредственно на этой странице для Вас неудобен, Вы можете воспользоваться двумя возможными решениями:
- Полноэкранный просмотр -, Чтобы удобно просматривать инструкцию (без скачивания на компьютер) Вы можете использовать режим полноэкранного просмотра. Чтобы запустить просмотр инструкции Creative Labs Sound Blaster Audigy 2ZS на полном экране, используйте кнопку Полный экран.
- Скачивание на компьютер — Вы можете также скачать инструкцию Creative Labs Sound Blaster Audigy 2ZS на свой компьютер и сохранить ее в своем архиве. Если ты все же не хотите занимать место на своем устройстве, Вы всегда можете скачать ее из ManualsBase.
Creative Labs Sound Blaster Audigy 2ZS Руководство по эксплуатации
Печатная версия
Многие предпочитают читать документы не на экране, а в печатной версии. Опция распечатки инструкции также предусмотрена и Вы можете воспользоваться ею нажав на ссылку, находящуюся выше — Печатать инструкцию. Вам не обязательно печатать всю инструкцию Creative Labs Sound Blaster Audigy 2ZS а только некоторые страницы. Берегите бумагу.
Резюме
Ниже Вы найдете заявки которые находятся на очередных страницах инструкции для Creative Labs Sound Blaster Audigy 2ZS. Если Вы хотите быстро просмотреть содержимое страниц, которые находятся на очередных страницах инструкции, Вы воспользоваться ими.
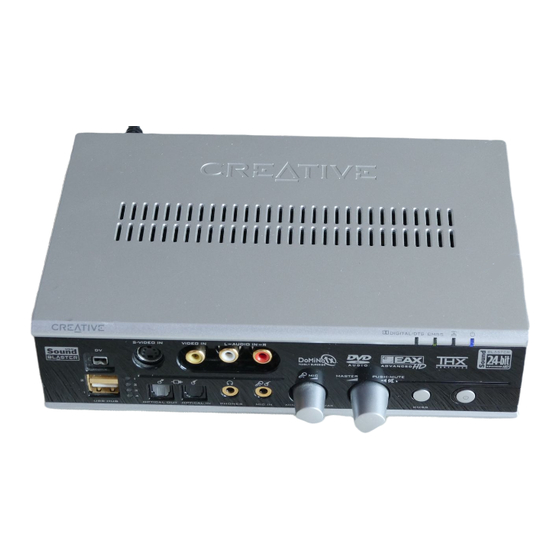
Your audio card has these jacks and connectors to enable the attachment of a wide variety of devices:
Jack or Connector
FireWire (IEEE 1394)
1.
connector
2.
Line Out 3 jack (LIN_OUT3)
3.
Line Out 2 jack (LIN_OUT2)
4.
Line Out 1 jack (LIN_OUT1)
M icrophone In jack
5.
(M IC_IN)
6.
Line In jack (LIN_IN)
7.
Digital Out jack
Telephone Answering Device
8.
connector (TAD)
CD Audio connector
9.
(CD_IN)
10.
Aux In connector (AUX_IN)
Internal FireWire (IEEE 1394)
11.
connector (SB1394)
CD SPDIF connector
12.
(CD_SPDIF)
Connects to a FireWire (IEEE 1394) compatible external device (for example, a digital video camcorder,
digital still camera, printer or scanner).
Connects to Front Center, Subwoofer, Side Left (only on 7.1 systems) and Rear Center (only on 6.1
systems) inputs on powered analog speakers or an external amplifier.
Connects to Rear Left, Rear Right, and Side Right (only on 7.1 systems) inputs on powered analog
speakers or an external amplifier.
Connects to Front Left and Front Right inputs on powered analog speakers or an external amplifier.
Also supports headphones.
Connects to an external microphone for voice input.
Connects to analog devices like music synthesizers and other line-level sources.
Connects to external digital devices or digital speaker systems (6-channel or compressed AC-3 SPDIF
output).
Provides a monaural connection from a standard voice modem, and transmits microphone signals to
the modem.
Connects to the Analog Audio output on a CD/DVD-ROM drive using an Analog CD audio cable
(available separately).
Connects to the analog output from a CD/DVD-ROM drive.
Connects to the internal FireWire (IEEE 1394) connector on the Platinum Drive (included with Audigy
2 ZS Platinum).
Connects to the digital output from a CD/DVD-ROM drive.
Description

How to use this manual
This document has been designed to provide you with complete product knowledge. You can resize the document window or print this
document, access linked web sites and get information from specially prepared graphics.
To jump to a linked topic or a web site, click the underlined blue text, or the hand symbol
whenever it appears.
To show a short description (tooltip) of an object, move your mouse cursor over it. A tooltip appears after a few seconds.
You can choose to print portions of this document:
1. On the Contents tabbed page to your left, click a topic heading.
On the menu, click the Print button.
In the dialog box that appears, click the option to print one topic only, or all topics under a heading.
About Your Hardware
To learn more about your product, refer to the corresponding section:
Your Audigy 2 ZS audio card
Your Joystick/MIDI Bracket
Your Platinum Drive (included with Audigy 2 ZS Platinum)
Your Remote Control (included with Audigy 2 ZS Platinum)
Your Audigy 2 ZS audio card
Your audio card has these jacks and connectors to enable the attachment of a wide variety of devices:
Jack or Connector
Description
1.
FireWire (IEEE 1394)
connector
Connects to a FireWire (IEEE 1394) compatible external device (for example, a digital video camcorder,
digital still camera, printer or scanner).
2.
Line Out 3 jack (LIN_OUT3)
Connects to Front Center, Subwoofer, Side Left (only on 7.1 systems) and Rear Center (only on 6.1
systems) inputs on powered analog speakers or an external amplifier.
3.
Line Out 2 jack (LIN_OUT2)
Connects to Rear Left, Rear Right, and Side Right (only on 7.1 systems) inputs on powered analog
speakers or an external amplifier.
4.
Line Out 1 jack (LIN_OUT1)
Connects to Front Left and Front Right inputs on powered analog speakers or an external amplifier.
Also supports headphones.
5.
M icrophone In jack
(M IC_IN)
Connects to an external microphone for voice input.
6.
Line In jack (LIN_IN)
Connects to analog devices like music synthesizers and other line-level sources.
7.
Digital Out jack
Connects to external digital devices or digital speaker systems (6-channel or compressed AC-3 SPDIF
output).
8.
Telephone Answering Device
connector (TAD)
Provides a monaural connection from a standard voice modem, and transmits microphone signals to
the modem.
9.
CD Audio connector
(CD_IN)
Connects to the Analog Audio output on a CD/DVD-ROM drive using an Analog CD audio cable
(available separately).
10.
Aux In connector (AUX_IN)
Connects to the analog output from a CD/DVD-ROM drive.
11.
Internal FireWire (IEEE 1394) Connects to the internal FireWire (IEEE 1394) connector on the Platinum Drive (included with Audigy
connector (SB1394)
2 ZS Platinum).
12.
CD SPDIF connector
(CD_SPDIF)
Connects to the digital output from a CD/DVD-ROM drive.
13.
14.
Joystick/M IDI connector
(JOYSTICK)
AD_EXT connector
(AD_EXT)
Connects to the Joystick/M IDI bracket for gaming or M IDI devices (optional).
Connects to the AD_EXT connector on the Platinum Drive (included with Audigy 2 ZS Platinum).
Your Joystick/MIDI Bracket
The Joystick/MIDI bracket is used to attach a joystick or MIDI device:
Jack or Connector
1.
Description
Joystick/M IDI connector Connects to a joystick or a M IDI device.
Your Platinum Drive (included with Audigy 2 ZS Platinum)
The Platinum Drive provides additional connectivity for a number of other devices.
Front panel
Jack or Connector
Description
1.
Optical SPDIF In/Out
connectors (OPTICAL
IN/OUT)
Connect to recording/playback devices with optical connectors (for example, M iniDisc recorders, Digital
Audio Tape recorders or external hard disk recorders).
2.
Auxiliary 2 Line In jacks
(AUX IN 2)
Connects to analog devices like VCRs, TVs and CD players.
3.
Infrared receiver
Lets you control your computer via the IR remote control.
4.
Coaxial SPDIF In/Out
connectors (SPDIF
IN/OUT)
Connect to digital audio recording/playback devices with optical connectors (for example, M iniDisc
recorders, Digital Audio Tape recorders or external hard disk recorders).
5.
FireWire (IEEE 1394)
connector
Connects to a FireWire (IEEE 1394) compatible external device (for example, a digital video camcorder,
digital still camera, printer or scanner).
6.
Headphones jack
Connects to headphones. Speaker output will be muted if selected in software (Creative Audio HQ or
Creative Audio Control).
7.
Headphones volume
knob
Controls the volume of your headphones. Turn clockwise to increase the volume, and counterclockwise to
decrease the volume.
8.
M ini M IDI In/Out
connectors (M IDI
IN/OUT)
Connects to M IDI devices using the mini-M IDI-to-standard-M IDI adapter cables provided.
9.
Line In 2/M ic In 2 jack
(LINE IN 2/M IC IN 2)
Connects to line sources (for example, electric guitars) or a microphone.
10.
Line In 2/M ic In 2 knob
(M icrophone gain)
Selects Line In 2 or M ic In 2. To increase microphone gain, continue to turn clockwise.
11.
Line In 2/M ic In 2
separator mark
To switch to Line In 2, turn the knob counter clockwise over the Line In 2/M ic In 2 separator mark until
you hear a "click". To switch back to M ic In 2, turn the knob clockwise over the separator mark until you
hear a "click".
Top panel
Jack or Connector
Description
1.
Jumper JP1
Connects to the supplied shunt. By default, your Platinum Drive is set for use with a condenser
microphone. Connect the supplied shunt to Jumper JP1 if you want to use a dynamic microphone.
2.
Power connector
Connects to the supplied power splitter cable.
3.
AD_EXT connector
(AD_EXT)
Connects to the AD_EXT connector on the Audigy 2 ZS audio card.
4.
Internal FireWire (IEEE
1394) connector (SB1394)
Connects to the internal FireWire (IEEE 1394) connector on the Audigy 2 ZS audio card.
Your Remote Control (included with Audigy 2 ZS Platinum)
The Platinum Drive has an infrared receiver for your Creative remote control. Your remote control lets you operate your computer from
the comfort of your sofa or bed, at a distance of four meters (13 feet).
Changing the battery
To insert your remote control's battery:
1. Release the battery compartment by depressing the small tab on the left, and then slide out the battery compartment.
Place the battery with its positive polarity indicator (+) facing up, and slide the battery compartment back in.
Using your remote control
Note
OSD - On Screen Display. The OSD appears on your computer monitor.
To select an option on the OSD, press the Up, Down, Reverse/Left and Fast-Forward/Right buttons to scroll the option, and then
press the Select/OK button on your remote control.
Depending on where you purchased your product, the actual remote control may vary from the one shown here.
Button
Description
Use to select tracks and menu items. To access a two-digit track such as track 10, press the 1 button followed by the
0 button (in quick succession).
1.
Number pad
When albums, tracks, genres or playlists are displayed on the OSD, you can search them by name using the number
pad. Each key on the number pad is assigned different letters (2abc to 9wxyz) or symbols (1&() and 0_-), and you
can use these to enter a name. Press once for the first character, twice for the second character, three times for the
third character, and so on. If you make a mistake, you can delete characters to the left of the cursor by pressing the
Rewind/Left button.
During playback, press the 0 button to display the track list on the OSD.
2.
CM SS
Turns on CM SS or CM SS 2.
3.
M ute
M utes audio.
4.
Power
Displays the OSD Power Settings submenu.
5.
EAX
Displays the OSD EAX submenu.
6.
Volume
Volume Up (+) and Volume Down (-) buttons control the master volume of your computer.
7.
Up
Scrolls up in the OSD menus.
8.
Rewind/Left
Rewinds a track during playback. Scrolls left in the OSD menus.
9.
Start
Opens the OSD main menu.
10.
Return
Returns to a previous OSD submenu.
11.
Rec
Records the track that is being played back.
12.
Play/Pause
Starts, pauses or resumes current playback.
13.
Previous
Goes to the previous track, or previous OSD submenu.
14.
Slow
Enables Time Scaling for M P3, WAV and VCD files (for Creative Sound Blaster Audigy series audio cards only).
Press repeatedly to select the speed. To resume normal playback, press the Play/Pause button.
15.
Select/OK
Executes a selected option in the OSD.
16.
Fast
Forward/Right
Fast forwards a track during playback. Scrolls right in the OSD menus.
17.
Down
Scrolls down in the OSD menus.
18.
Cancel
Closes the OSD or any application that you are controlling with your Creative remote control.
19.
Display
Displays (where applicable) the current play mode and track information, and OSD time and date.
20.
Options
Displays options for a selected task.
21.
Next
Goes to the next track or menu page.
22.
Step
Press once to pause playback, and press again to advance to the next video frame (for video only). To resume normal
playback, press the Play/Pause button.
23.
Stop/Eject
Stops the current playback. Ejects your CD/DVD-ROM drive tray when no track is being played back.
Installing Hardware
What You Need
Before you begin installation, be sure that you have these:
Note
In addition, you will also need on your computer, an available PCI slot for your audio card and an available adjacent slot for your
Joystick/MIDI bracket (optional).
The Analog CD audio cable is available separately.
If you are installing the Platinum Drive (available with Audigy 2 ZS Platinum), you will also need these following items:
Warning!
Use the AD_EXT cable ONLY with the Platinum Drive. Do not attempt to use a conventional IDE cable or any other cable with
the Platinum Drive as it may cause electrical shorts and permanent damage to your Audigy 2 ZS audio card, Platinum Drive and
computer. It will also void the warranty for this product.
Step 1: Prepare your computer
1. Turn off your computer and all peripheral devices.
Touch a metal plate on your computer to ground yourself and to discharge any static electricity, and then unplug the power cord from
the wall outlet.
Remove the computer casing.
Remove a metal bracket from an unused PCI slot. If you are installing the Joystick/MIDI bracket (optional), also remove an adjacent
metal bracket.
Component
1.
M etal brackets
2.
PCI slot
3.
ISA slot (may not be present on your computer)
Caution!
Turn off the main power supply and disconnect your computer's power cord. Systems using an ATX power supply unit with soft
power off may still be powering the PCI slot. This can damage your audio card when it is inserted into the slot.
Note
Remove any existing audio card or disable the onboard audio chipset. For more information, see Problems with Multiple Audio
Devices.
If you are installing the Platinum Drive (included with Audigy 2 ZS Platinum), remove the front panel cover from an unused 5 1/4-inch
drive bay.
Component
1.
5 1/4-inch drive bay cover
Step 2: Prepare your Platinum Drive
This step only applies if you are installing the Platinum Drive (included with Audigy 2 ZS Platinum). If you are not installing the
Platinum Drive, go to Step 6: Install the audio card.
There are two types of microphones that can be connected to your Platinum Drive: dynamic microphones and condenser microphones.
By default, your Platinum Drive is set for use with a condenser microphone. To use a dynamic microphone, you must place the provided
shunt onto Jumper JP1 of your Platinum Drive.
Component
1.
Shunt
2.
Jumper JP1
To use a condenser microphone, remove the shunt from Jumper JP1.
Component
1.
Shunt
2.
Jumper JP1
Note
The Jumper JP1 may not be available on certain models of the Platinum Drive.
The shunt for Jumper JP1 can be found together with the packet of screws provided.
Step 3: Connect cables to the Platinum Drive
This step only applies if you are installing the Platinum Drive (included with Audigy 2 ZS Platinum).
Component
1.
Internal FireWire (IEEE 1394) cable
2.
Jumper JP1
3.
Power splitter cable
4.
To system power supply unit
5.
Red-colored wire
6.
AD_EXT cable
7.
Black circle on the underside of the cable
8.
Platinum Drive
Warning!
Use the AD_EXT cable ONLY with the Platinum Drive. Do not attempt to use a conventional IDE cable or any other cable with
the Platinum Drive as it may cause electrical shorts and permanent damage to your Audigy 2 ZS audio card, Platinum Drive and
computer. It will also void the warranty for this product.
To prevent permanent damage, use only: the AD_EXT cable with the AD_EXT connector, and the Audigy 2 ZS audio card with the
Platinum Drive.
Do not force any cable into a connector. This can cause permanent damage to your hardware. If it does not fit properly, gently remove
it and try again. Make sure you are connecting to the correct connector, and that the cable is properly aligned with the connector.
Step 4: Install the Platinum Drive
This step only applies if you are installing the Platinum Drive (included with Audigy 2 ZS Platinum).
1. Carefully pass the cables attached to the Platinum Drive through the vacant drive bay of your computer. Make sure these cables
do not block the airflow of the fans and heatsinks in your computer.
Slide the Platinum Drive fully into the vacant drive bay.
Secure the sides of the Platinum Drive to the casing with the screws provided.
Step 5: Connect cables to the Audigy 2 ZS audio card
This step only applies if you are installing the Platinum Drive (included with Audigy 2 ZS Platinum).
Component
1.
Internal FireWire (IEEE 1394) cable
2.
Pin 1
3.
AD_EXT cable
4.
Red-colored wired
5.
Joystick/M IDI cable
Warning!
Use the AD_EXT cable ONLY with the Platinum Drive. Do not attempt to use a conventional IDE cable or any other cable with
the Platinum Drive as it may cause electrical shorts and permanent damage to your Audigy 2 ZS audio card, Platinum Drive and
computer. It will also void the warranty for this product.
Align the red-colored wire to Pin 1 of the connector.
Step 6: Install the audio card
1. Align the Audigy 2 ZS audio card with the PCI slot and press the card gently but firmly into the slot as shown here.
Secure the card to your computer. Depending on your computer's configuration, you may need a screw to secure your Audigy 2 ZS
audio card to the computer.
Warning!
Do not force the audio card into the slot. Be sure that the gold connectors of the card's PCI connector is aligned with the PCI
bus connector on the motherboard before you insert the card into the slot. If it does not fit properly, gently remove it and try
again.
Step 7: Install the Joystick/MIDI bracket
1. If you are installing a joystick or MIDI device (optional), secure the Joystick/MIDI bracket to the slot next to the Audigy 2 ZS
audio card. Depending on your computer's configuration, you may need a screw to secure your Audigy 2 ZS audio card to the
computer.
Connect the Joystick/MIDI cable to the Joystick/MIDI connector on the Audigy 2 ZS audio card as shown above.
Tip
You may also connect the Joystick/MIDI cable to the Audigy 2 ZS audio card before securing the Joystick/MIDI bracket in
place.
Warning!
Do not force any cable into a connector. This can cause permanent damage to your hardware. If it does not fit properly, gently
remove it and try again. Make sure you are connecting to the correct connector, and that the cable is properly aligned with the
connector.
Step 8: Connect CD/DVD-ROM drive
For analog CD audio output:
Connect an Analog CD audio cable (available separately) from the Analog Audio connector on your CD/DVD-ROM drive to the
CD_IN connector on the Audigy 2 ZS audio card.
For digital CD audio output:
Connect the Digital CD audio cable from the Digital Audio connector on your CD/DVD-ROM drive to the CD_SPDIF connector on
the Audigy 2 ZS audio card
Component
1.
CD/DVD-ROM drive
2.
Analog CD Audio cable (available separately)
3.
Digital CD audio cable
Note
If you connect both an analog and digital audio cable at the same time, do not select both the CD Audio or CD Digital option in
Surround Mixer.
Using Digital CD Audio Extraction, audio can be sent to your computer through your CD or DVD drive's IDE cable instead of via an
analog or digital SPDIF cable. See "Digital CD Audio Extraction" if you wish to use this feature.
Windows 98 SE users can listen to audio CDs via Windows Media Player 7.x or later, using the Digital Playback option. Your
CD/DVD-ROM drive must support sustained digital reads. Read the Media Player help for more information.
Digital CD Audio Extraction
To enable this feature in Windows 98 SE, Windows Me or Windows 2000 (SP3) (Windows XP has this feature enabled), follow the steps
below:
In Windows 98 SE
1. Click Start -> Settings -> Control Panel.
Double-click the Multimedia icon. The Multimedia Properties dialog box appears.
Click the CD Music tab, and then click the Enable Digital CD audio for this CD-ROM device
check box to select it.
In Windows 2000 (SP3)/Me
1. Click Start -> Settings -> Control Panel.
Double-click the System icon. The System Properties dialog box appears.
Click the Device Manager tab.
Double-click the CD-ROM or DVD-ROM icon.
Double-click the name of your drive.
Click the Properties tab, and then click the Enable Digital CD audio for this CD-ROM
device check box to select it.
Note
On a fresh installation of Windows Me, you may not hear audio from your CD-ROM
drive even after enabling Digital CD Audio. To solve this, disable Digital CD Audio
and then restart the computer. When the system has restarted, re-enable Digital CD
Audio and restart the system again.
Step 9: Connect to power outlet
1. Replace the computer casing.
Plug the power cord into the AC wall outlet, and turn on the computer.
To connect your Audigy 2 ZS audio card and Platinum Drive (included with Audigy 2 ZS Platinum) to other devices, see Connecting
Related Peripherals.
To install software, see Installing Drivers and Applications.
To connect speakers, see Connecting Speakers.
Installing and Uninstalling Software
Installing Drivers and Applications
You need to install device drivers and applications before using your Audigy 2 ZS or Audigy 2 ZS Platinum. The instructions below
apply to all supported Windows operating systems.
1. After you have installed your audio card, turn on your computer. Windows automatically detects your audio card and searches
for device drivers.
When prompted for the audio drivers, click the Cancel button.
Insert the Audigy 2 ZS Installation and Applications CD into your CD/DVD-ROM drive.
If Windows AutoPlay mode is enabled for your CD/DVD-ROM drive, the CD starts running automatically. If not, you need to enable
your CD/DVD-ROM drive's auto-insert notification feature. For more details, see Problems Installing Software.
Alternatively, from your Windows desktop, click Start->Run and type d:ctrunctrun.exe (replace d: with the drive letter of your
CD/DVD-ROM drive).
Follow the instructions on the screen to complete the installation.
When prompted, restart your computer.
Note
During the installation process, Windows 98 SE users will be prompted to insert the Windows 98 SE installation CD into the
CD/DVD-ROM drive. Insert the installation CD into the CD/DVD-ROM drive and then click the OK button.
If you did not receive a Windows 98 SE installation CD with your system, but received a Recovery Disk, the necessary Windows
files may be located at c:WINDOWSOptionsCabs (replace c: with the drive letter of your hard disk drive).
Audigy 2 ZS Feature Showcase Demonstration
To feel the audio card's awesome gaming, music reproduction and home studio capabilities, install the Audigy 2 ZS Feature Showcase
Demonstration. This demonstration requires high-quality 5.1, 6.1 or 7.1 speakers for optimal listening experience. See Audigy 2 ZS
Feature Showcase Demonstration.
1. Insert the Audigy 2 ZS Feature Showcase Demonstration CD into your CD/DVD-ROM drive.
If the drive supports Windows AutoPlay mode, the CD starts running automatically. If not, you need to enable your CD/DVDROM drive's auto-insert notification feature. For more details, see Problems Installing Software.
Follow the instructions on the screen to complete the installation, and to run the Demonstration.
Using Creative Software AutoUpdate
Locating, downloading and installing updates for your Creative products is now simpler and faster with the new web-based Creative
Software AutoUpdate system.
When you connect to creative Software AutoUpdate via the Internet, the web site will analyze your computer system to determine what
operating system (OS), language and Creative products are installed in our system.
After the online analysis, you will be able to select from a list of only the most relevant software and driver updates. The files will then
be dynamically retrieved and installed on your system for you.
To find out more about Creative Software AutoUpdate, go to www.soundblaster.com/support/.
Points to note:
First-time users of Creative Software AutoUpdate may be prompted to authorize the download of a browser component required
for system inspection. Ensure that the content is signed by Creative Labs, Inc., and then click the Yes button.
Ensure that all your Creative products are connected and installed on the same computer running Creative Software AutoUpdate.
Updating Windows 2000 (Service Pack 3)
Windows 2000 now provides better support for AC-3 SPDIF output (non-PCM through waveOut) for software DVD viewing. Download
the Windows 2000 Service Pack 3 to enjoy this support and to fix other issues in the Windows 2000 operating system.
Download this update from www.microsoft.com.
Updating DirectX
To download the latest the latest update for DirectX, go to www.microsoft.com.
Uninstalling and Reinstalling the Applications and Device Drivers
At times you may need to uninstall or reinstall some or all of the audio card's applications and device drivers to correct problems,
change configurations, or upgrade outdated drivers or applications. The following instructions tell you how to do so in all Windows
operating systems.
Before you begin, close all audio card applications. Applications that are still running during the uninstallation will not be removed.
Reinstalling all Audio Drivers and Applications
1. Click Start -> Settings -> Control Panel.
Double-click the Add/Remove Programs icon.
Click the Install/Uninstall tab (or Change or Remove Programs button).
Select the Audigy 2 ZS entry, and then click the Add/Remove (or Change/Remove) button.
In the InstallShield Wizard dialog box, select the Repair option.
If prompted, insert the Audigy 2 ZS Installation and Applications CD into your CD/DVD-ROM, and click the OK button.
Click the Yes button.
Restart your computer when prompted.
You can now check the computer to see if the reinstalled software works properly. If not, proceed to Troubleshooting and FAQs.
Uninstalling all Audio Drivers and Applications
1. Click Start -> Settings -> Control Panel.
Double-click the Add/Remove Programs icon.
Click the Install/Uninstall tab (or Change or Remove Programs button).
Select the Audigy 2 ZS entry, and then click the Add/Remove (or Change/Remove) button.
In the InstallShield Wizard dialog box, select the Remove option.
Click the Yes button.
Restart your computer when prompted.
You may now install existing or updated Audigy 2 ZS device drivers or applications. For more information, see Installing Drivers and
Applications.
Installing/Uninstalling selected Audio Drivers or Applications
1. Click Start -> Settings -> Control Panel.
Double-click the Add/Remove Programs icon.
Click the Install/Uninstall tab (or Change or Remove Programs button).
Select the Audigy 2 ZS entry, and then click the Add/Remove (or Change/Remove) button.
In the InstallShield Wizard dialog box, select the Modify option.
If you want to uninstall an application, click the application check box to clear it.
If you want to install an application, click the application check box to select it.
Click the Next button.
If prompted, insert the Audigy 2 ZS Installation and Applications CD into your CD/DVD-ROM, and click the OK button.
Restart your computer when prompted.
To uninstall a selected component in Creative MediaSource, do the following:
1. Click Start -> Settings -> Control Panel.
Double-click the Add/Remove Programs icon.
Click the Install/Uninstall tab (or Change or Remove Programs button).
Select the Creative MediaSource entry, and then click the Add/Remove (or Change/Remove) button.
In the InstallShield Wizard dialog box, click the Custom Uninstallation button, and then click the Next button.
Click the check box of the application that you want to uninstall to select it.
Click the Next button.
Restart your computer when prompted.
Connecting Related Peripherals
Your Audigy 2 ZS or Audigy 2 ZS Platinum will give you endless hours of listening pleasure. To connect related peripherals, refer to the
corresponding section. The cables shown here are available separately.
Playing Games
Watching DVDs
Playing/Recording Music
Creating Music
Transferring Data
Playing Games
Connector
1.
Description
Joystick/M IDI connector Connects to the Joystick/M IDI bracket for gaming or M IDI devices (optional).
Watching DVDs
Decoding with an external decoder or AV Amplifier
If you have a Dolby Digital/DTS external decoder or AV Amplifier, you can use it to decode Dolby Digital or DTS signals from your
Platinum Drive (included with Audigy 2 ZS Platinum) or Audigy 2 ZS audio card. For more information on external decoder or AV
Amplifier speaker connection settings, consult the User's Guide of your external decoder or AV Amplifier.
For optical connections:
Jack, Connector or Cable
Description
1.
Optical cable (available
separately)
Connects to the Optical SPDIF Out connector on the Platinum Drive and the SPDIF In connector on
your AV Amplifier.
2.
Optical SPDIF Out
connector
Connects to devices with SPDIF connectors.
For coaxial connections:
Jack, Connector or Cable
Description
1.
Coaxial cable (available
separately)
Connects to the Coaxial SPDIF Out connector on the Platinum Drive and the SPDIF In connector on
your AV Amplifier.
2.
Coaxial SPDIF Out
connector
Connects to devices with SPDIF connectors.
Alternatively, you can connect to an external decoder or AV Amplifier via the Digital Out jack on your Audigy 2 ZS audio card.
Jack, Connector or Cable
Description
1.
Digital Out jack
Connects to digital devices.
2.
3.50 mm (1/8-inch) mono-to-RCA cable
(available separately)
Connects to the Digital Out jack on the Audigy 2 ZS audio card and the SPDIF In
connector on your AV Amplifier.
Decoding with Audigy 2 ZS
If you have an external Dolby Digital/DTS DVD player, you can use your Platinum Drive (included with Audigy 2 ZS Platinum) to
decode the Dolby Digital or DTS signal.
For optical connections:
Jack, Connector or
Cable
Description
1.
Optical cable (available
separately)
Connects to the Optical SPDIF In connector on the Platinum Drive and the SPDIF Out connector on
your external DVD player.
2.
Optical SPDIF In connector
Connects to devices with SPDIF connectors.
For coaxial connections:
Jack, Connector or
Cable
Description
1.
Coaxial SPDIF In connector
Connects to external devices with Coaxial connectors.
2.
Coaxial cable (available
separately)
Connects to the Coaxial SPDIF In connector on the Platinum Drive and the SPDIF Out connector on
your external DVD player.
Connecting a multichannel AV Amplifier
If you have a multichannel AV Amplifier, connect it directly to the Audigy 2 ZS audio card's Line Out 1, Line Out 2 and Line Out 3 jacks
as shown below. For more information on multichannel AV Amplifier speaker connections, consult the User's Guide of your AV
Amplifier.
Jack, Connector or Cable
Description
1.
Front Left connector
Connects to the Line Out 1 jack on the Audigy 2 ZS audio card.
2.
Front Right connector
Connects to the Line Out 1 jack on the Audigy 2 ZS audio card.
3.
3.50 mm (1/8-inch) stereo-to-RCA cable (available
separately)
Connects the Audigy 2 ZS audio card and AV Amplifier.
4.
Line Out 1 jack
Connects to the Front Left and Front Right connectors on an AV
Amplifier.
Jack, Connector or Cable
Description
1.
Rear Left connector
Connects to the Line Out 2 jack on the Audigy 2 ZS audio card.
2.
Rear Right connector
Connects to the Line Out 2 jack on the Audigy 2 ZS audio card.
3.
Side Right connector
Connects to the Line Out 2 jack on your Audigy 2 ZS audio card.
4.
3.5mm (1/8-inch) surround-to-RCA cable (available
separately)
Connects the Audigy 2 ZS audio card and AV Amplifier.
5.
Line Out 2 jack
Connects to the Rear Left, Rear Right and Side Right connectors on an AV
Amplifier.
Jack, Connector or Cable
Description
1.
Side Left connector
Connects to the Line Out 3 jack on the Audigy 2 ZS audio card.
2.
Center connector
Connects to the Line Out 3 jack on the Audigy 2 ZS audio card.
3.
Subwoofer connector
Connects to the Line Out 3 jack on the Audigy 2 ZS audio card.
4.
3.5mm (1/8-inch) surround-to-RCA cable (available
Connects the Audigy 2 ZS audio card and AV Amplifier.
separately)
5.
Line Out 3 jack
Connects to the Side Left, Center and Subwoofer connectors on an AV
Amplifier.
Playing/Recording Music
You can connect playback devices (for example, Creative NOMAD Jukebox 3) to the Audigy 2 ZS audio card or Platinum Drive
(included with Audigy 2 ZS Platinum) using a FireWire (IEEE 1394) cable.
Connect stereo headphones to the Line Out 1 jack on your Audigy 2 ZS audio card. Use a convertor if your headphones come with a
larger connector.
Jack, Connector or Cable
Description
1.
FireWire (IEEE 1394) connector
Connects to FireWire (IEEE 1394)-compliant devices.
2.
Line Out 1 jack
Connects to stereo headphones with a 3.50 mm (1/8-inch) jack. Use a convertor if your
headphones come with a larger connector.
3.
FireWire (IEEE 1394) cable
(available separately)
Connects to the FireWire (IEEE 1394) connector on the Audigy 2 ZS audio card and your
playback/recording device.
If you installed the Platinum Drive (included with Audigy 2 ZS Platinum), you can also connect headphones and FireWire (IEEE 1394)compliant devices to the Platinum Drive.
If you want to record music to your DAT or MiniDisc recorder, connect your recording device to the Optical or Coaxial SPDIF Out
connector on the Platinum Drive.
You can play back music from your DAT or MiniDisc player by connecting it to the Optical or Coaxial SPDIF In connector.
Jack, Connector or Cable
Description
1.
Optical cables (available separately)
Connect to the Optical SPDIF In/Out connectors on your Platinum Drive and your
playback/recording device.
2.
Optical SPDIF In/Out connectors
Connect to recording/playback devices.
3.
FireWire (IEEE 1394) cable (available
separately)
Connects to the FireWire (IEEE 1394) connector on the Platinum Drive and your
playback/recording device.
4.
FireWire (IEEE 1394) connector
Connects to Firewire (IEEE 1394)-compliant devices.
5.
Headphones jack
Connects to stereo headphones with a 6.35 mm (1/4-inch) jack.
6.
Coaxial SPDIF In/Out connectors
Connect to recording/playback devices.
7.
Coaxial cables (available separately)
Connect to the Coaxial SPDIF In/Out connectors on your Platinum Drive and your
playback/recording device.
Creating Music
You can set up a home music studio using your Audigy 2 ZS or Audigy 2 ZS Platinum.
Put together your own productions consisting of multiple music tracks from a MIDI Synthesizer, an electric guitar or a microphone.
Alternatively, connect your electric guitar using a Pre-amp Box to the Line In jack.
Jack, Connector or Cable
Description
1.
Line In jack (LIN_IN)
Connects to line sources (for example, electric guitars).
2.
M icrophone In jack (M IC_IN)
Connects to a microphone.
3.
M IDI cable (15-pin-to-5-pin)
(available separately)
Connects to the M IDI connector on the Joystick/M IDI bracket and the M IDI In/Out
connectors on your M IDI keyboard.
4.
M IDI cable (15-pin) (available
separately)
Connects Creative BlasterKey to the Joystick/M IDI bracket.
If you have installed the Platinum Drive (included with Audigy 2 ZS Platinum), you can also connect a MIDI Synthesizer, an electric
guitar or a microphone to the Platinum Drive.
Jack, Connector or Cable
Description
1.
Optical cable (available
separately)
Connects to the Optical SPDIF Out connector on the Platinum Drive and the SPDIF In connector
on your M iniDisc recorder.
2.
Optical SPDIF Out connector
Connect to recording devices with optical connectors.
3.
Line In 2/M ic In 2 jack
Connects to an external microphone or electric guitar.
4.
M ini-M IDI-to-standard-M IDI
adapter cables
Connect to the M IDI In/Out connectors on the Platinum Drive and two standard M IDI cables
(available separately).
5.
Standard M IDI cables (available
separately)
Connect to the M IDI In/Out connectors on your M IDI keyboard and the two mini-M IDI-tostandard-M IDI adapter cables provided.
Transferring Data
If you want to transfer data from an external hard disk drive or a movie from your camcorder, connect the device to the FireWire (IEEE
1394) connector using a FireWire (IEEE 1394) cable. If you installed the Platinum Drive (included with Audigy 2 ZS Platinum), you can
use the FireWire (IEEE 1394) connector on either the Audigy 2 ZS audio card or Platinum Drive.
Jack, Connector or Cable
Description
1.
FireWire (IEEE 1394) connector
2.
FireWire (IEEE 1394) cable (available Connects to the FireWire (IEEE 1394) connector on the Audigy 2 ZS audio card and DV
separately)
camcorder or external hard disk drive.
Jack, Connector or Cable
Connects to FireWire (IEEE 1394)-compliant devices.
Description
1.
FireWire (IEEE 1394) connector
Connects to FireWire (IEEE 1394)-compliant devices.
2.
FireWire (IEEE 1394) cable (available Connects to the FireWire (IEEE 1394) connector on the Audigy 2 ZS audio card and DV
separately)
camcorder or external hard disk drive.
Connecting Speakers
The connectors and associated components shown here may be different from that of your speaker system. Consult the User's Guide of
your speaker system to identify similar input connectors. The cables shown here are available separately.
For interactive help on speaker connectivity, visit the Knowledgebase at www.creative.com.
Positioning your speakers
Good speaker placement can enhance your listening experience, while careless placement can make good audio systems sound bad.
Below are our recommendations for 5.1, 6.1 and 7.1 channel speakers. For detailed speaker placement tips, refer to the User's Guide of
your speaker system.
For 5.1 channel speakers:
Speaker component
For 6.1 channel speakers:
1.
Subwoofer
2.
Front Left
3.
Front Center
4.
Front Right
5.
Rear Left
6.
Rear Right
Speaker component
1.
Subwoofer
2.
Front Left
3.
Front Center
4.
Front Right
5.
Rear Left
6.
Rear Center
7.
Rear Right
For 7.1 channel speakers:
Speaker component
1.
Subwoofer
2.
Front Left
3.
Front Center
4.
Front Right
5.
Side Left
6.
Side Right
7.
Rear Left
8.
Rear Right
Note
If you have a 5.1 channel, 6.1 channel or 7.1 channel speaker system, you can upmix your stereo sources (for example, CD Audio,
MP3, WMA, MIDI, and Wave) to the respective channels by using Creative Multi-Speaker Surround (CMSS) technology. To
upmix, you need to enable the CMSS feature in Creative EAX Console. Refer to the Creative EAX Console online Help.
Connecting Digital Speaker Systems
The Digital Out output on your Audigy 2 ZS or Audigy 2 ZS Platinum is continuously active except during DVD-Audio playback.
Enabling the Digital Output Only selection in Creative Speaker Settings will disable analog speaker output. It is not necessary to enable
Digital Output Only to use the Digital Out connector.
Note
As with dedicated DVD-Audio player devices, output from DVD-Audio playback is limited to analog output. The digital output
is disabled and cannot be used during DVD-Audio playback.
2.1 channel digital speakers
Device/Cable
1.
Digital Out jack
2.
2 channel audio cable (available separately)
3.
Digital In jack
5.1 channel digital speakers
Device/Cable
1.
Digital Out jack
2.
M iniplug-to-DIN cable (available separately)
3.
Digital DIN cable (available separately)
4.
Digital DIN connector
Connecting Analog Speaker Systems
You can connect analog speakers systems of up to 7.1 channels.
2.1 channel analog speakers
Jack, Connector or Cable
1.
Line Out 1 jack
2.
2 channel audio cable (available separately)
3.
Audio Input jack
4.1 channel analog speakers
Jack, Connector or Cable
1.
Line Out 1 jack
2.
Line Out 2 jack
3.
4 channel audio cable (available separately)
4.
Front (Audio Input) jack
5.
Rear (Audio Input) jack
5.1 channel analog speakers
Jack, Connector or Cable
1.
Rear (Audio Input) jack
2.
Front (Audio Input) jack
3.
5.1 channel audio cable (available separately)
4.
Line Out 1 jack
5.
Line Out 2 jack
6.
Line Out 3 jack
7.
Center/Subwoofer (Audio Input) jack
6.1 channel analog speakers
Jack, Connector or Cable
1.
Line Out 1 jack
2.
Line Out 2 jack
3.
Line out 3 jack
4.
6.1 channel audio cable (available separately)
5.
Front (Audio Input) jack
6.
Rear (Audio Input) jack
7.
Center/Subwoofer/Rear Center (Audio Input) jack
7.1 channel analog speakers
Jack, Connector or Cable
1.
Line Out 1 jack
2.
Line Out 2 jack
3.
Line Out 3 jack
4.
7.1 channel audio cable (available separately)
5.
Rear (Audio Input) jack
6.
Front (Audio Input) jack
7.
Center/Subwoofer (Audio Input) jack
8.
Side (Audio Input) jack
Note
When you are using 7.1 channel analog speakers with your audio card, make sure you select the 7.1 Speakers option in Creative
Speaker Settings to experience 7.1 channel audio.
If you want 6.1 channel audio with 7.1 channel analog speakers, select the 6.1 Speakers option in Creative Speaker Settings, and move
your Side Left speaker to the Rear Center position.
General Specifications
This section displays the specifications of your Audigy 2 ZS audio card, Joystick/MIDI bracket and Platinum Drive (included with
Audigy 2 ZS Platinum).
PCI Bus Mastering
PCI Specification Version 2.1 compliant
Bus mastering reduces latency and speeds up system performance
Audigy 2 ZS Processor
Advanced hardware accelerated digital effects processing
32-bit digital processing, which maintains a 192 dB dynamic range
Patented 8-point interpolation that reduces distortion to inaudible levels
64-voice hardware wavetable synthesizer
Professional quality digital mixing and equalization
Versatile Audio Features
Playback of 64 audio channels, each at an arbitrary sample rate
32-bit mixing of all digital sources within Audigy 2 ZS's Digital Mixer
24-bit Analog-to-Digital conversion of analog inputs at 96 kHz sample rate
24-bit Digital-to-Analog conversion of digital sources at 96 kHz to analog 7.1 speaker output
24-bit Digital-to-Analog conversion of stereo digital sources at 192 kHz to stereo output
16-bit to 24-bit recording sampling rates: 8, 11.025, 16, 22.05, 24, 32, 44.1, 48 and 96 kHz, including ASIO2 support at 16-bit 48 kHz
resolution.
Professional Digital Audio Processing
Supports Sony/Philips Digital Interface (SPDIF) format of up to 24-bit/96 kHz quality
SPDIF output at selectable sampling rate of 48 or 96 kHz
SPDIF output not available during playback of protected digital audio contents authored with DRM (Digital Rights Management)
technology
Selectable 6-channel SPDIF output to matching digital speaker systems
Software switching of SPDIF Input-to-Output (bypass) to minimize cable connection hassle
Low latency multitrack recording with ASIO support
Flexible Mixer Control
Selectable input source or mixing of various audio sources for recording
Adjustable master volume control
Separate bass and treble control
Front and rear balance control
Muting and panning control for mixer sources
THX Certification
Audigy 2 ZS has received the prestigious THX Multimedia Certification award, making it the perfect choice for PC audiophiles
seeking the very best music and movie experiences.
Dolby Digital and Digital Surround EX Decoding
Decodes Dolby Digital Surround EX to 7.1 or 6.1 channels, or will pass through a compressed SPDIF bitstream to an external
decoder
Bass redirection: enhances bass output to subwoofer for small satellite speaker systems
Crossover bass frequency (10-200 Hz): adjustable to standalone subwoofer units for desired bass level
Adjustable Center, Rear Center and LFE level control
Creative MultiSpeaker Surround (CMSS)
Multispeaker technology
Upmixes mono or stereo sources to 7.1 channels
Professional-quality panning and mixing algorithm
DTS-ES
Support DTS decoding for 5.1 audio
Support DTS-CD playback and decoding for 5.1 audio
Support DTS-ES for 7.1/6.1 audio
DTS-ES Matrix 6.1 for decoding 5.1-channel soundtracks with a back surround channel matrix encoded into the left and right
surround channel
DTS-ES Discrete 6.1 for 6.1 soundtracks mastered with a discrete back surround channel
EAX ADVANCED HD
EAX ADVANCED HD brings a new level of performance, power, and flexibility to PC audio. The all-new EAX ADVANCED HD Game
Audio Library takes in-game audio and acoustic simulation to a whole new level.These innovative technologies bring tremendous
realism and total audio immersion to PC gaming:
New Multi-EnvironmentT M technology renders multiple environment audio effects in real time.
Environment Panning T M makes it easy for gamers to track, with three-dimensional precision, the location and movement of sounds
that usually represent enemies or team mates. This gives Audigy 2 ZS gamers a better advantage as they are more "attuned" to the
game scenario.
Environment Reflections T M offers localization of early reflections and echoes.
Environment Filtering T M accurately simulates the propagation of sound in both open and closed environments.
Environment Morphing T M allows for seamless transition from one environment to the next.
EAX ADVANCED HD Music Technologies also assure sonic superiority, rich environment effects and music enhancement features
such as Audio Clean-Up, Time Scaling and EAX ADVANCED HD audio effects.
Audio Clean-Up enables the removal of unwanted noise in a digital audio file.
Time Scaling speeds up and slows down music with no distortion.
EAX ADVANCED HD audio effects, developed especially for music listening, further enhance playback of songs.
EAX ADVANCED HD offers dramatically increased 3D audio performance and functionality. Delivering superior audio fidelity and
sophisticated reverb effects, this unsurpassed digital entertainment experience is available only from the Audigy 2 ZS family of
products.
FireWire (IEEE 1394) Compatibility
Compliant to IEEE 1394a specification
Supports data rates of 100, 200, and 400 Mbps
Supports up to 63 FireWire (IEEE 1394) compatible devices in a daisy-chain configuration
Supplies up to 3 watts to FireWire (IEEE 1394) compatible devices
Connectivity
Audigy 2 ZS audio card
Audio Inputs
Line-level analog Line input via stereo jack on rear bracket
Mono Microphone analog input via stereo jack on rear bracket
CD_IN line-level analog input via 4-pin Molex connector on card
AUX_IN line-level analog input via 4-pin Molex connector on card
TAD line-level analog input via 4-pin Molex connector on card
CD_SPDIF digital input via 2-pin Molex connector on card
Audio Outputs
Digital Out via 4-pole 3.50 mm (1/8-inch) minijack on rear bracket
Three line-level analog outputs via 4-pole 3.50 mm (1/8-inch) minijacks on rear bracket: Front Left, Front Right, Rear Left, Rear Right,
Side Right, Center, Subwoofer and Side Left channels
Stereo headphone (32-ohm load) support on Line Out 1
FireWire (IEEE 1394) Interfaces
2 x 5 pin internal FireWire (IEEE 1394) connector on card
6-pin FireWire (IEEE 1394) connector on rear bracket
Other Interfaces
2 x 8 pin header for connection to the Joystick/MIDI bracket (optional)
Joystick/MIDI bracket
15-pin Joystick/MIDI connector on rear bracket
Platinum Drive
Inputs and outputs on front panel
Two RCA jacks for coaxial SPDIF input and output
Headphone output and volume control with auto detection via 6.35 mm (1/4-inch) stereo jack
Shared line-level analog Line/Microphone input (Line In 2/Mic In 2) via 6.35 mm (1/4-inch) stereo jack. Shared input selectable via
knob with gain control for microphone.
Two mini MIDI female connectors for MIDI input and output
Two RCA jacks for Auxiliary input
Two optical connectors for optical SPDIF input and output
FireWire (IEEE 1394) connector for FireWire (IEEE 1394) compatible devices
Infrared receiver for receiving infrared signals from the remote control. Transmission range within four meters (13 feet) with 15-degree
deviation from the center axis.
Interfaces
4-pin power supply header for connection to system power supply unit
2 x 20 pin AD_EXT header for connection to Audigy 2 ZS audio card
2 x 5-pin FireWire (IEEE 1394) header for connection to Audigy 2 ZS audio card
Problems with Multiple Audio Devices
The other installed audio card is not working well.
You may have an existing audio device installed in your computer. The audio device may be an audio card or an onboard audio chipset.
Before you install your Audigy 2 ZS audio card, you are advised to completely uninstall and remove your existing audio device.
Operating multiple audio devices in your computer may introduce usability issues.
Alternatively, during the installation of your Audigy 2 ZS audio card, do the following:
If your computer detects an installed Sound Blaster Live! Series or Sound Blaster PCI512 audio card, a message box
recommending that you completely uninstall and remove the older audio device will appear. Click the Yes button and follow the
instructions on the screen to complete the removal of the old audio device. Remove the old audio card from your computer.
If your computer detects any other installed audio card, a message box recommending that you completely uninstall and remove the
older audio device will appear. Click the Yes button to continue with the installation of the Audigy 2 ZS audio card.
After the installation of the Audigy 2 ZS audio card, completely uninstall the existing card and remove the audio card from your
computer.
The onboard audio chipset is not working well.
Disable your computer's onboard audio chipset. See your computer's motherboard documentation for details.
Problems Installing Software
The installation does not start automatically after the Audigy 2 ZS Installation and Applications CD is inserted.
The AutoPlay feature in your Windows system may not be enabled.
To start the installation program through the My Computer shortcut menu:
1. Double-click the My Computer icon on your Windows desktop.
In the My Computer window, right-click the CD/DVD-ROM drive icon.
On the shortcut menu, click AutoPlay and follow the instructions on the screen.
To enable AutoPlay through Auto Insert Notification:
1. Click Start -> Settings -> Control Panel.
In the Control Panel window, double-click the System icon.
In the System Properties dialog box, click the Device Manager tab and select your CD/DVD-ROM drive.
Click the Properties button.
In the Properties dialog box, click the Settings tab and select Auto Insert Notification.
Click the OK button to exit from the dialog box.
Demonstrations
Two demonstration packages have been included to showcase the basic as well as the advanced features of your Audigy 2 ZS audio
card. We recommend that you play them at least once in order to have a good overview of your card's features.
Audigy 2 ZS Getting Started Demonstration
This is a good starting point from which you can learn about Audigy 2 ZS. The Audigy 2 ZS Getting Started Demonstration consists of
several interactive and informative demonstrations that highlight different aspects of Audigy 2 ZS: experiencing digital music and digital
gaming, watching movies, connecting speakers, and performing tasks.
Audigy 2 ZS Feature Showcase Demonstration
Use the Audigy 2 ZS Feature Showcase Demonstration to feel the audio card's awesome gaming, music reproduction and home studio
capabilities.
Experience the following exciting features of the new Audigy 2 ZS:
DVD-Audio Playback - Learn more about this new, high-resolution music format and experience the difference when a DVDAudio clip is being played.
EAX ADVANCED HD technologies - Experience complex multi-environment audio effects as you navigate through a fascinating
virtual 3D world. Run this demonstration and experience EAX ADVANCED HD technologies such as Environment Panning,
Environment Reflection and Environment Morphing. Compare the scenes with and without EAX ADVANCED HD, and you will
understand why more game developers are using EAX ADVANCED HD technologies for the best gaming experience.
Dolby Digital Surround EX and DTS-ES support - Listen to a THX audio demonstration containing an additional rear channel (rear
center) that produces a richer and more consistent surround effect than that of systems with only two rear channels.
Note
The Audigy 2 ZS Feature Showcase Demonstration can be installed using the Audigy 2 ZS Feature Showcase Demonstration
CD in your package. This demonstration will run only if a Audigy 2 ZS audio card is installed because the software utilizes the
card's hardware capabilities for the demonstrations.
Troubleshooting and FAQs
This section provides solutions to problems you may encounter during installation or normal use. This includes:
Problems Installing Software
Problems with Sound
Problems with Sound and CD-ROMs
Problems with File Transfers on Some VIA Chipset Motherboards
Insufficient SoundFont Cache
Problems with the Joystick
Problems with Multiple Audio Devices
Problems with Sound Blaster Live! Series or Sound Blaster PCI512 card
Resolving I/O Conflicts
Problems in Windows XP
Problems with Digital Audio Devices
Problems with Sound
There is unexpected excessive environmental sound or effects when an audio file is played.
The last selected preset is an inappropriate environment for the current audio file.
To switch to an appropriate environment:
1. Click the Audio Effects tab in Creative EAX Console.
Click the Enable/Disable Audio Effects check box to clear it.
The preset box title may change, depending on the effect you select.
You can also check the following:
In Surround Mixer, the source and master volume sliders are set to mid-range (50%).
The correct input is selected for speaker systems with multiple inputs.
No sound from the headphones.
Check the following:
The headphones are connected to the Headphones jack.
In the Speaker Selection tab of Creative Speaker Settings, the Headphones option is selected in the Speaker/Headphone Selection
box.
In the Basic tab of Creative Surround Mixer, the recording source selected is "What U Hear".
Individual analog recording sources are not displayed in Creative Surround Mixer.
The following analog recording sources are combined in one recording control called Analog Mix (Line/CD/TAD/Aux/PC), which is
found in the Record panel of the Basic tab:
Line-In
CD Audio
Auxiliary
TAD-In
PC Speaker
Individual analog recording sources cannot be selected in Creative Surround Mixer.
Five analog recording sources are combined under the selection Analog Mix (Line/ CD/TAD/Aux/PC). For more information, see the
previous Troubleshooting item.
To record an individual analog source:
In the Record panel of the Basic tab in Creative Surround Mixer, make sure the recording source selected is Analog Mix
(Line/CD/TAD/Aux/PC).
In the Source panel, mute the analog sources that you do not want to record by clicking the Speaker button to change it to a button
with a red cross sign on it.
No sound from the speakers.
Check the following:
You have connected your speakers to your card's output.
You have selected the correct source in the Source panel Creative Surround Mixer.
If both the above conditions have been met and you still do not get any sound, click the red plus sign above the Volume control and
check whether the Digital Output Only check box is selected. If it is, you are in the Digital Output Only mode and so must connect to
digital speakers to hear the sound from your audio card. See the section on "Speaker Selection Settings" in Creative Speaker Setting's
online Help for more information.
No audio output when playing digital files such as .WAV, MIDI files or AVI clips.
Check the following:
The speakers' volume control knob, if any, is set at mid-range. Use Creative Surround Mixer to adjust the volume, if necessary.
The powered speakers or external amplifier are connected to the card's Line Out or Rear Out jack.
There is no hardware conflict between the card and a peripheral device. See Resolving I/O Conflicts.
The Speaker selection in Creative Speaker Settings corresponds to your speaker or headphone configuration.
Panning a source sometimes turns off its sound.
This occurs when you are in the Digital Output Only mode and the source's left-right balance in a software mixer application other than
Creative Surround Mixer (for example, the Windows Volume Control application) is at the opposite end compared to the position to
which you have panned the source in the Basic tab of Creative Surround Mixer. For example, the CD Audio balance in Windows Volume
Control is on the left but in Creative Surround Mixer you have panned the CD Audio to the right.
To solve this problem:
Open that other mixer, and center the balances for all the audio input sources.
This ensures that your analog sources will not turn silent when you pan them in Creative Surround Mixer.
Problems with Sound and CD-ROMs
No audio output when playing audio CDs.
To solve this problem:
Make sure the Analog Audio connector on the CD/DVD-ROM drive and the CD In connector on the audio card are connected.
Enable digital CD playback:
For Windows 98 SE:
i. Click Start -> Settings -> Control Panel.
i. In the Control Panel dialog box, double-click the Multimedia icon.
In the Multimedia Properties dialog box, click the CD Music tab.
Click the Enable digital CD audio for this CD-ROM device check box to select it.
Click the OK button.
For Windows Me:
i. Click Start -> Settings -> Control Panel.
i. In the Control Panel dialog box, double-click the System icon.
In the System Properties dialog box, click the Device Manager tab.
Double-click the DVD/CD-ROM drives icon.
Your computer drives will appear.
Right-click the disk drive icon. A menu will appear.
Click Properties.
In the Digital CD Playback box of the next dialog box, click the Enable digital CD audio for this CD-ROM device check box to select
it.
Click the OK button.
For Windows 2000 and Windows XP:
i. Click Start -> Settings -> Control Panel.
i. In the Control Panel dialog box, double-click the System icon.
In the System Properties dialog box, click the Hardware tab.
Click the Device Manager button.
Double-click the DVD/CD-ROM drives icon.
Your computer drives will appear.
Right-click the disk drive icon. A menu will appear.
Click Properties.
In the Digital CD Playback box of the next dialog box, click the Enable digital CD audio for this CD-ROM device check box to select
it.
Problems with File Transfers on Some VIA Chipset Motherboards
After you install the Audigy 2 ZS audio card on a VIA chipset motherboard, you may have the slight chance of seeing one of the
following:
When transferring large amounts of data, the computer stops responding or restarts itself, OR
Files transferred from another drive are incomplete or corrupted.
These problems appear in a small number of computers, which contain the VIA VT82C686B controller chipset on their motherboards.
To verify if your motherboard has the VT82C686B chipset:
Refer to your computer or motherboard manual, or
In Windows:
i. Click Start -> Settings -> Control Panel.
Double-click the System icon.
Click the Device Manager or Hardware tab.
Click the Systems devices icon.
In the list that appears, see if the items highlighted in the diagram appear.
If the items appear, remove your computer cover and locate the VIA chipset on your
motherboard. (Take note of the safety precautions in Step 1: Prepare your computer.)
The VT82C686B chipset has its model number inscribed on the chip.
If you have the VT82C686B chipset:
Creative recommends that you first contact your computer vendor or motherboard
manufacturer for the latest solution.
Some users have solved the above problems by doing one or both of the following:
downloading the latest VIA 4in1 drivers from www.viatech.com.tw*,
obtaining the most current BIOS for your motherboard from the manufacturer's web
site*.
*Content in these web sites is controlled by other companies. Creative bears no
responsibility for information or downloads obtained from them. This information is
provided only as a convenience to you.
Insufficient SoundFont Cache
There is insufficient memory to load SoundFont banks.
This may occur when a SoundFont-compatible MIDI file is loaded or played while insufficient memory has been allocated to Creative
SoundFont Bank Manager.
To have sufficient SoundFont cache memory:
Remove one or more SoundFont banks from your SoundFont cache.
Do the following:
i. Click the Bank button.
The Configure Bank dialog box appears.
Click the Select Bank drop-down button, and select a bank index.
Highlight the bank and click the Remove button.
Click the OK button to finish configuring your banks.
Load smaller SoundFont banks instead; or add more RAM to your system.
Do one of the following:
In the Configure Bank dialog box of Creative SoundFont Bank Manager, select a smaller SoundFont bank, if available, from the
Select Bank box.
Increase the system RAM on your computer. For more details, visit www.soundblaster.com for technical help.
Note
The amount of SoundFont cache you can allocate depends on the system RAM available. Your computer may slow down if the
amount of cache used is too high.
Problems with the Joystick
The joystick connector is not working.
The audio card's Joystick/MIDI connector may be conflicting with the system's joystick port.
To solve this problem:
Disable the audio card's Joystick/MIDI connector and use the system port instead.
Do the following:
1. Click Start -> Settings -> Control Panel.
In the Control Panel window, double-click the System icon.
In the System Properties dialog box, click the Device Manager tab.
Double-click Sound, Video and Game Controllers, and then select Creative Sound Blaster Audigy 2 ZS Gameport (Creative
Gameport for Windows 2000).
Click the Properties button.
In the Properties dialog box:
If you see an Original Configuration (Current) option, clear the check box.
If you see a Disable In This Hardware Profile option, select the check box.
Click OK to restart Windows and for the change to take effect.
When the Gameport Joystick interface is disabled, the entry in Device Manager shows a red cross.
The joystick is not working properly with some programs.
The program may use the system processor timing to calculate the joystick position. When the processor is fast, the program may
determine the position of the joystick incorrectly, assuming that the position is out of range.
To solve this problem:
Increase your system's 8 bit I/O recovery time of the BIOS setting, usually under the Chipset Feature Settings section. Or, if available,
you may adjust the AT Bus speed to a slower clock. If the problem persists, try a different joystick.
Problems with Sound Blaster Live! Series or Sound Blaster PCI512 card
Sound Blaster Live! or Sound Blaster PCI512 applications are not working.
Other than normal playback and recording functions, older audio devices may not work well when Audigy 2 ZS or Audigy 2 ZS
Platinum is installed.
To solve this problem:
Uninstall and remove the older card from the computer. Otherwise, you can choose to disable the Sound Blaster Live! or Sound Blaster
PCI512 card:
1. Click Start -> Settings -> Control Panel.
In the Control Panel window, double-click the System icon.
In the System Properties dialog box, click the Device Manager tab.
Double-click Sound, Video And Game Controllers, and then select Creative Sound Blaster Live! Series or Creative Sound Blaster
PCI512.
Click the Properties button.
In the Properties dialog box:
If you see an Original Configuration (Current) option, clear the check box.
If you see a Disable In This Hardware Profile option, select the check box.
Click OK to restart Windows and for the change to take effect.
When the audio device is disabled, the entry in Device Manager shows a red cross.
Resolving I/O Conflicts
Conflicts between your audio card and another peripheral device may occur if your card and the other device are configured to use the
same I/O address.
To resolve I/O conflicts, change the resource settings of your audio card or the conflicting peripheral device in your system using the
Device Manager in Windows 98 SE/Me.
If you still do not know which card is causing the conflict, remove all cards except the audio card and other essential cards (for example,
disk controller and graphics cards). Add each card back until Device Manager indicates that a conflict has occurred.
To resolve hardware conflicts in Windows 98 SE/Me:
1. Click Start -> Settings -> Control Panel.
In the Control Panel window, double-click the System icon.
In the System Properties dialog box, click the Device Manager tab.
Under the Sound, Video And Game Controllers entry, select the conflicting audio card driver-indicated by an exclamation mark (!)-and
click the Properties button.
In the Properties dialog box, click the Resources tab.
Make sure that the Use automatic settings check box is selected, and click the OK button.
Restart your system to allow Windows 98 SE/Me to reassign resources to your audio card and/or the conflicting device.
Note
You can also refer to the Troubleshooting section in the online Help for Windows 98 SE/Me.
Problems in Windows XP
A Hardware Installation error message appears on a Windows XP operating system when non-Creative applications are being
installed.
At the time of this product's release, Microsoft strongly encouraged companies to submit their hardware solutions for certification. If a
hardware device driver is not submitted, or does not qualify, for Microsoft certification, a warning message similar to the one below
appears.
You may see the message when you install hardware drivers from companies other than Creative. If you do, you may choose to click the
Continue Anyway button. Device drivers not signed by Microsoft may be used in Windows XP, and need not impair or destabilize your
computer.
Should you need more XP-related information or help, you can contact the company that developed the driver, at the company's web
site or helpline.
Problems with Digital Audio Devices
Intermittent hissing or no sound is heard from my digital speakers.
Make sure you select the sampling rate of the PCM SPDIF output of your Digital Out connector to match the requirements of the
receiving device. You may need to select a lower digital output sampling rate. The choices available are 48 kHz and 96 kHz.
To solve this problem:
1. In Creative MediaSource Go! Launcher, click the Product Settings tab.
Double-click the Device Controls icon.
Click the Sampling Rate tab.
Click the required sampling rate from the Digital Output Sampling Rate list.
Popping noises are heard during playback.
The DMA feature may not be enabled for your computer's drives.
To solve this problem:
For Windows 98 SE and Windows Me:
1. Click Start -> Settings -> Control Panel.
In the Control Panel dialog box, double-click the System icon.
In the System Properties dialog box, click the Device Manager tab.
Double-click the Disk drives icon.
Your computer drives will appear.
Double-click the hard disk drive icon.
In the box that appears, click the Settings tab.
Click the DMA (direct memory access) check box to select it.
An alert message box appears.
Click the OK button.
Click the OK button in the next box.
Click the Close button on the System Properties dialog box.
When prompted to restart your computer, click the Yes button.
Repeat steps 4-11 if you have other drives, for example, other hard disk drives, CD/DVD-ROM, and CD-RW drives. In step 4, doubleclick the respective drive icon.
For Windows 2000 and Windows XP:
1. Click Start -> Settings -> Control Panel.
In the Control Panel dialog box, double-click the System icon.
In the System Properties dialog box, click the Hardware tab.
Click the Device Manager button.
Double-click the ATA/ATAPI IDE Controllers icon.
Your IDE channels will appear.
Right-click the Primary IDE Channel icon.
Click Properties.
In the Properties dialog box, click the Advanced Settings tab.
Click the DMA if available check box to select it.
Click the OK button.