
Многие задают вопрос как обновить прошивку до русской версии у популярных гарнитур SENA SRL-2, 50s и прочих. Мы решили опубликовать статью на эту тему. Статья носит исключительно информационный характер. Описанные далее в статье прошивки — официальные, никаких колхозов и взломов.
На момент написания статьи, актуальны следующие гарнитуры: — 50S, 50R, 20S, 30K, 33i, SRL, SRL2, Momentum, Momentum Pro, Momentum INC, Momentum INC Pro, Momentum EVO, LSE-01, SF Series, Tufftalk Lite, Tufftalk M, R1, R1 EVO, R1 EVO CS, R2, R2 EVO, ProRide, ProRide 2, ProRide EVO, Econo, +Mesh, MeshPort Blue/Red, 5S, OUTSTAR, OUTRUSH, OUTRUSH R, 3S PLUS, 3S PLUS-ZILL, Snowtalk2, Latitude S1, M1, M1 EVO, Rumba, pi, SPIDER RT1/ST1 — 50S, 50R, 20S, 30K, 33i, SRL, SRL2, Momentum, Momentum Pro, Momentum INC,
Momentum INC Pro, Momentum EVO, LSE-01, SF Series, Tufftalk Lite, Tufftalk M,
R1, R1 EVO, R1 EVO CS, R2, R2 EVO, ProRide, ProRide 2, ProRide EVO, Econo,
+Mesh, MeshPort Blue/Red, 5S, OUTSTAR, OUTRUSH, OUTRUSH R, 3S PLUS,
3S PLUS-ZILL, Snowtalk2, Latitude S1, M1, M1 EVO, Rumba, pi, SPIDER RT1/ST1.
Обновление прошивок происходит только через программу, которая устанавливается на ПК. Она скачивается с официального сайта Sena.com для гарнитур Sena и SHOEI: ссылка и гарнитур Schuberth: ссылка.
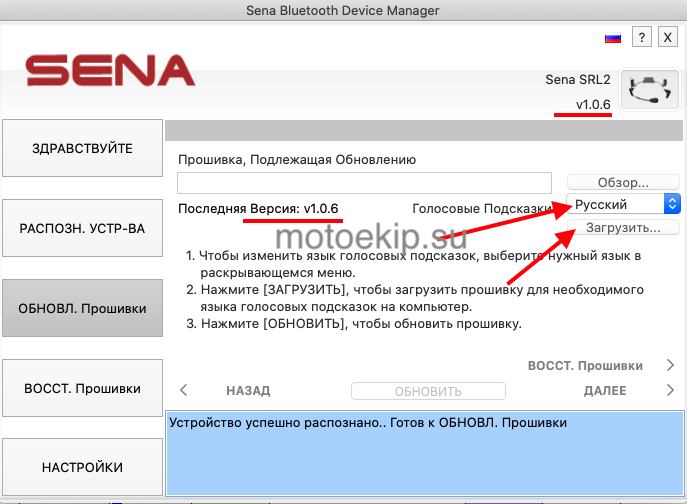
Рассмотрим подробнее на примере обновления прошивки для гарнитуры SHOEI SRL2
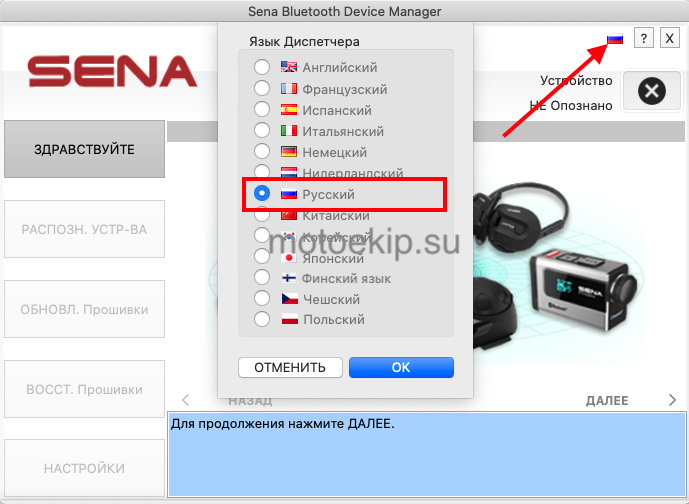
После скачивания и установки программы, запускаем и переключаем интерфейс на русский язык
Жмем «далее». На следующей вкладке Sena позаботились расписать порядок действий для каждой гарнитуры.
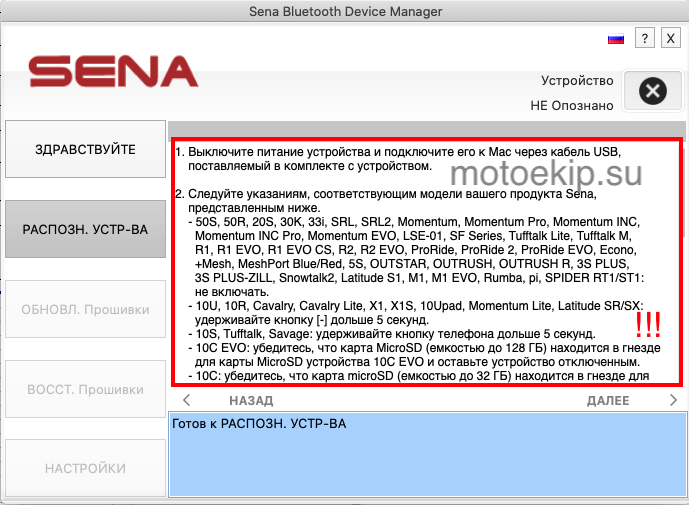
Не торопитесь жать кнопки, прочтите что нужно сделать, чтобы правильно обновить прошивку именно вашей гарнитуры. Для SRL2 не нужно дополнительных манипуляций, а вот для 10 серии сперва нужно зажать «-» на 5 сек. Итак, наша SRL2 должна быть выключена, после чего подключаем ее через USB к компьютеру и жмем «далее»
Программа сама покажет вашу текущую прошивку и последнюю. В появившемся окошке выбираем «Русский» (к сожалению, не для всех гарнитур он есть. К таким относятся гарнитуры для Schuberth). Жмем «Да».
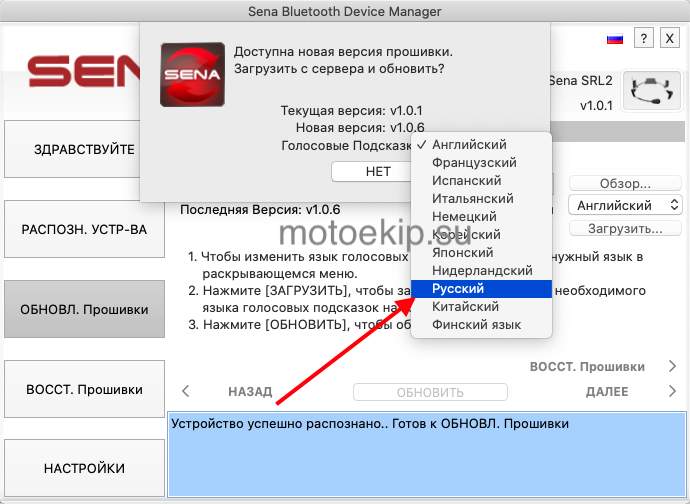
Затем программа предложит ее сохранить на жесткий диск, соглашаемся и обновление начнется автоматически.
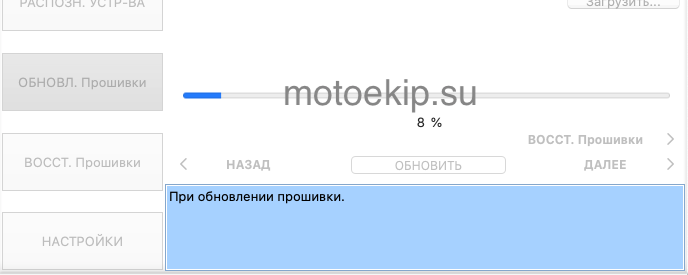
Во время обновления ничего не трогаем, если программа это Вас не попросит (для некоторых гарнитур во время обновления нужно будет нажать «-» на самом устройстве).
После обновления вы увидите актуальную последнюю версию для вашего устройства. Далее включаем гарнитуру и наслаждаемся родной речью (если оно у вас ее поддерживает).
Если же у вас установлена самая последняя прошивка и вы хотите сменить язык, то на вкладке обновления выбираете нужный и жмете загрузить. Сохраняете файл, затем обновляете, как описано абзацем выше.
Обращаем ваше внимание, что обновление прошивки для камер делается только со вставленной картой памяти.
Рекомендуем раз в 1-2 месяца проверять на наличие новых прошивок через приложение для ПК или смартфона. Все обновления делаются только через ПК, мобильное приложение лишь информирует о наличии возможности обновиться до новой версии. Всем удачи!
Вы можете приобрести у нас в магазине мотогарнитуры Sena, Shoei, Schuberth по самым выгодным ценам!
-
Главная
- FAQ: вопросы-ответы
- Все вопросы
-
О продукции
-
Гарантия
Где скачать приложение для смартфона SENA для настройки гарнитуры?
Вы можете скачать приложение Sena для смартфона на Android в Google Play, для iPhone – в App Store.
Выберете приложение соответствующее вашей гарнитуре:
- 50S и 50R – приложение Sena 50 Utility;
- 30К – приложение Sena 30K Utility;
- 20S EVO, 10S, 10U, 10R, Tufftalk – приложение Sena Utility;
- 10C EVO и 10С PRO – приложение Sena Сamera;
- Для гарнитур серии SF – приложение Sena SF Utility;
- Модели SMH5-FM, 3S, EXPAND и SPH10 не поддерживают работу с приложениями.
Как подключить гарнитуру к пульту ду SENA RS4?
В голосовом меню настроек гарнитуры выбрать пункт «сопряжение с пультом дистанционного управления». На пульте RC4 нажать и удерживать 8 секунд кнопку «+».
Есть ли гарантия на товар?
Фирменная Гарантия 2 года
Можно ли гарнитуры 10C EVO и 50C использовать как видеорегистратор?
Да, так как данные системы имеют функцию циклической записи.
Можно ли пользоваться гарнитурой во время зарядки?
Допускается эксплуатация гарнитур SENA во время их подзарядки.
Можно ли заряжать гарнитуру, зарядными устройствами других производителей?
Заряжать батарею можно только зарядным устройством, предоставленным производителем.
Можно ли подключить Bluetooth гарнитуру к рации?
Гарнитуры SENA соединяются с рациями через адаптер SENA SR10 и провода для определенной марки рации.
Как можно увеличить дальность работы интеркома?
Дальность и качество приема сигнала зависит от модели гарнитуры и рельефа местности. При необходимости увеличения расстояния для общения между райдерами, можно использовать рацию в сочетании с адаптером SENA SR10.
Какой радиус работы интеркома?
От 400 метров до 2 километров, в зависимости от выбранной модели гарнитуры SENA. Также дальность зависит от рельефа местности.
Можно ли мыть гарнитуру?
Мыть нельзя! Степень влагозащищённости у гарнитур SENA IP67 (защита от брызг).
На сколько хватает заряда батареи?
В зависимости от выбранной модели, время работы в режиме разговора (интерком, прослушивание музыки,…): от 8 до 13 часов. В режиме ожидания: от 7 до 10 дней. Заряд батареи может меняться от таких факторов, как температура окружающей среды, насколько давно гарнитура эксплуатируется и т.д.
Из какого количества участников может состоять группа для одновременного общения между собой?
Зависит от выбранной вами модели Bluetooth гарнитуры. Например, для SMH10 — до 4 человек, для 20S — до 8 человек.
Какое количество гарнитур может быть подключено для общения по внутренней связи?
В зависимости от выбранной модели, подключается разное количество гарнитур. Так, к модели 3S можно подключить одну гарнитуру. К гарнитуре 20S возможно подключение 8+1 человек.
Можно ли соединять Bluetooth гарнитуры SENA с гарнитурами других производителей и сколько?
Гарнитуры фирмы SENA могут соединяться с гарнитурами других производителей, можно подсоединить одну гарнитуру.
Sena Smartphone App — приложение Sena для смартфонов
Приложение Sena для смартфонов доступно для загрузки как пользователям iPhone, так и Android. Приложение позволяет изменять настройки устройства Sena. Предоставляет полный контроль за функционалом устройства, включая основные настройки конфигурации, настройки функции быстрого набора и установок FM радио станций.
Групповой интерком
Функция группового интеркома позволяет пользователю мгновенно создавать многосторонний интерком с несколькими участниками. Используя приложение Sena для смартфонов, пользователи могу легко создавать и управлять своей интерком группой для более быстрой и простой настройки.
Универсальный интерком
Универсальный интерком — технология, которая позволяет сопрягать вашу Bluetooth гарнитуру c гарнитурами друих производителей, чьи устройства поддерживают Bluetooth Hands-Free профиль (HFP).
Как обновить заводскую версию прошивки гарнитуры на прошивку с голосовыми подсказками на русском языке?
Установите на компьютер программу «Sena Device Manager» (скачайте программу с сайта производителя sena.com). Скачайте последнюю версию прошивки для вашей модели гарнитуры с сайта senamoto.ru или sena.com. Подключите гарнитуру к компьютеру, откройте программу «Sena Device Manager» и установите новую версию прошивки, следуя указаниям программы.
Чем отличаются соединения «интерком-конференция» и «групповая связь»?
В интерком-конференции соединение происходит по цепочке, когда первый участник цепочки вызывает второго, второй третьего, третий четвертого и т.д. Гарнитуры должны быть предварительно сопряжены в соответствии со своими номерами (первый со вторым, второй с третьим и т.д.)
В «групповой связи» соединение происходит от одной гарнитуры (ведущей) ко всем остальным. При повторном соединении участники конференции подключаются к ведущей гарнитуре автоматически.
Как отформатировать карту памяти с помощью гарнитуры Sena?
Для 10С PRO — вставьте карту памяти, включите гарнитуру, включите камеру (один раз нажмите кнопку «камера»). Для входа в меню настроек камеры нажмите и удерживайте кнопку «камера» 5 секунд. Вращайте поворотный переключатель пока не услышите голосовое сообщение «Форматирование карты памяти», один раз нажмите кнопку управления (кнопка сбоку) для подтверждения форматирования.
Для 10C EVO — вставьте карту памяти, включите гарнитуру, включите камеру (один раз нажмите кнопку «камера»). Нажмите и удерживайте кнопку камеры 5 секунд пока не услышите сообщение «Форматирование карты памяти». Для подтверждения форматирования нажмите кнопку управления (кнопка сбоку).
Какую карту памяти лучше использовать для гарнитуры 10С-PRO и 10C-EVO?
В гарнитуре 10С PRO можно использовать карту памяти с максимальным значением 64 Gb.
В гарнитуре 10C EVO – до 128Gb, не менее 10 класса.
Перед применением новой карты ее необходимо отформатировать с помощью гарнитуры Sena.
Documents
![]()
Quick start guide
A quick and easy to use guide for operating your device.
Download

![]()
User guide
A complete guide on how to use all of the features of your device.
Download
-
Contents
-
Table of Contents
-
Troubleshooting
-
Bookmarks
Quick Links
®
Motorcycle Bluetooth
Camera & Communication System
2
1
1
Audio
Multitasking
User’s Guide
www.sena.com
Related Manuals for Sena 10C EVO
Summary of Contents for Sena 10C EVO
-
Page 1
® Motorcycle Bluetooth Camera & Communication System Audio Multitasking User’s Guide www.sena.com… -
Page 2
® word mark and logos are owned by the Bluetooth SIG, Inc. and any use of such marks by Sena is under license. iPhone, iPod touch are registered trademarks of Apple Inc. Zumo™ is a trademark of Garmin Ltd. or its subsidiaries. TomTom™ is the trademark or registered… -
Page 3: Table Of Contents
3.4 Checking the Battery Level ………………..12 11 UNIVERSAL INTERCOM ………………24 3.5 Volume Adjustment …………………..12 12 FM RADIO ………………….25 3.6 Sena Softwares ……………………12 12.1 FM Radio On/Off ……………………25 CAMERA OPERATION ………………13 12.2 Preset Stations……………………25 4.1 Camera On or Off ……………………13 12.3 Seek and Save ……………………25…
-
Page 4: Package Contents
10C EVO Attachable Boom Microphone 1 PACKAGE CONTENTS • Attachable Boom Microphone • Microphone Sponges (2) • Headset Main Unit • Hook and Loop Fastener for Attachable Boom Microphone • Boom Microphone Holder • Gear Clamp Unit • Hook and Loop Fastener for Boom Microphone Holder • Clamp Unit Wired Microphone • Glued Surface Mounting Plate • Wired Microphone Speaker • Hook and Loop Fastener for Wired Microphone • Speakers Others • USB Power & Data Cable • Hook and Loop Fasteners for Speakers (4) • Allen Wrench • Foam Speaker Covers (2) • Cigarette Charger • Speaker Pads (Thick) (2) • Speaker Pads (Thin) (2)
-
Page 5: Installing The Headset On Your Helmet
10C EVO 2 INSTALLING THE HEADSET ON YOUR HELMET 2.1 Installing the Main Unit 2.1.1 Using the Gear Clamp Unit 1. Loosen the two screws on the back plate of the clamp unit with the included allen wrench. 2. Insert the back plate of the clamp unit between the internal padding and external shell of the left side of the helmet.
-
Page 6
10C EVO 2.1.2 Using the Clamp Unit 1. Loosen the two screws on the back plate of the clamp unit with the included allen wrench. 2. Insert the back plate of the clamp unit between the internal padding and external shell of the left side of the helmet. -
Page 7: Installing The Speakers
10C EVO 2.1.3 Using the Glued Surface Mounting Plate If you cannot install the clamp unit on the helmet, you can use the glued surface mounting plate to attach the clamp unit to the surface of the helmet. 1. Attach adhesive tape of the glued surface mounting plate to the helmet.
-
Page 8: Installing The Microphone
10C EVO 2.3 Installing the Microphone 2.3.1 Using the Attachable Boom Microphone 1. Attach the hook and loop fastener for attachable boom microphone on the inside surface of the left external shell. 2. Attach the attachable boom microphone’s mounting plate to the hook and loop fastener.
-
Page 9
10C EVO 2.3.2 Using the Wired Microphone If you have a full face helmet, you can use the wired microphone. 1. Attach the included hook and loop fastener for wired microphone to the inside of the helmet’s chin guard. 2. Attach the wired microphone to the hook and loop fastener for wired microphone. -
Page 10: Adjusting The Angle
10C EVO 2.4 Adjusting the angle 2.4.2 Using the Clamp Unit You can adjust the angle for taking photos or recording videos. You can change the vertical angle by 20º (Default), 8º or 32º. The vertical angle change shall be made before the clamp is mounted on You can rotate the horizontal angle by 30º.
-
Page 11: Getting Started
10C EVO to a power source and then use it. DC Power • If you connect the 10C EVO to the Powerbank while the camera is on, the Charging & 10C EVO will use the electricity stored in the Powerbank but the battery…
-
Page 12: Checking The Battery Level
4 flashes = High, 70~100% 3.6.2 Sena Utility App 3 flashes = Medium, 30~70% By simply pairing your phone with your headset, you can use the Sena 2 flashes = Low, 0~30% Utility App for quicker and easier set up and management.
-
Page 13: Camera Operation
4.1 Camera On or Off — You do not use WiFi on the product for 3 minutes. — You do not use the Sena Camera App for 3 minutes. To turn on the camera, tap the Camera Button. The camera turns off •…
-
Page 14: Video Recording
10C EVO 4.3 Video Recording 4.4 Video Mode (Default: Normal Recording Mode) Press and hold the Camera Button for 1 second to start video 4.4.1 Timelapse Video Mode recording. The green LED will flash and you will hear a voice prompt, Timelapse video records series of photos at timed intervals and makes “Recording”.
-
Page 15: Photo Taking
10C EVO 4.5 Photo Taking 4.6 Video Tagging Video Tagging allows the camera to record video continuously, but 4.5.1 Single Shot Mode save only the important events. To take a single photo, set the photo mode setting in the camera It creates video files of past, present, and future with each footage configuration to be single shot mode.
-
Page 16: Format Sd Card
YOU MUST CHANGE THE WiFi CHANNEL TO 2.4 GHz. 2. Search for Bluetooth devices on your mobile phone. Select the Sena 10C EVO in the list of the devices detected on the mobile phone. 3. If your mobile phone asks for a PIN, enter 0000.
-
Page 17: Second Mobile Phone Pairing — Second Mobile Phone, Gps, And Sr10
3. Search for Bluetooth devices on your mobile phone. Select the 1. Press the Phone Button for 5 seconds until the LED flashes red Sena 10C EVO in the list of the devices detected on the mobile and blue alternately and you hear multiple beeps.
-
Page 18: Intercom Pairing
10C EVO 5.4 Intercom Pairing 4. The intercom pairing queue is ‘Last-Come, First-Served’. If a headset has multiple paired headsets for intercom conversations, 5.4.1 Pairing with Other Headsets for Intercom Conversation the last paired headset is set as first intercom friend. The…
-
Page 19: Mobile Phone, Gps
10C EVO 6.2 Speed Dialing 6 MOBILE PHONE, GPS 1. Double tap the Phone Button and you will hear a voice prompt, “Speed dial”. 2. Rotate the Jog Dial clockwise or counter clockwise to navigate between the menus. You will hear prompts for each menu item.
-
Page 20: Stereo Music
3. Search for Bluetooth devices on the GPS navigation. Select the Sena 10C EVO in the list of the devices detected on the GPS. 2. To adjust the volume, rotate the Jog Dial. 4. Enter 0000 for the PIN.
-
Page 21: Music Sharing
10C EVO 7.2 Music Sharing 8 INTERCOM You can start sharing music with an intercom friend using Bluetooth stereo music during a two-way intercom conversation. When you terminate music sharing, you can go back to the intercom conversation. To start or terminate sharing music, press and hold the Jog Dial for 1 8.1 Two-way Intercom…
-
Page 22: Multi-Way Intercom
10C EVO 8.2 Multi-Way Intercom 8.2.2 Starting Four-way Intercom Multi-Way Intercom enables conference-call-style conversations with With three intercom friends connected, a new participant (D) can up to three intercom friends at the same time. While multi-way intercom make it a four-way intercom conference by making an intercom call to is in progress, mobile phone connection is temporarily disconnected.
-
Page 23: Three-Way Conference Phone Call With Intercom Participant
10C EVO 8.2.3 Ending Multi-Way Intercom 9 THREE-WAY CONFERENCE PHONE CALL You can completely terminate the conference intercom or just WITH INTERCOM PARTICIPANT disconnect an intercom connection with one of your active intercom friends. 1. Press and hold the Jog Dial for 3 seconds until you hear a beep to terminate all intercom connections.
-
Page 24: Group Intercom
Bluetooth headsets. Non-Sena Bluetooth headsets can be connected to the Sena Bluetooth headset if they support the 1. Go through intercom pairing with up to three headsets you want to Bluetooth Hands-Free Profile (HFP).
-
Page 25: Fm Radio
10C EVO 3. You can have a two-way intercom or multi-way intercom 12 FM RADIO communication with up to three intercom friends using non-Sena headset. 12.1 FM Radio On/Off To turn on or off the FM radio, press and hold the Phone Button for…
-
Page 26: Scan And Save
To terminate FM sharing, press and hold 1. Double tap the Phone Button. the Phone Button for 1 second or end the intercom call. 2. The Sena tuner pauses at each station it finds for 8 seconds before moving to the next. Note: 3.
-
Page 27: Region Selection
10C EVO 12.7 Region Selection 13 FUNCTION PRIORITY You can select the proper FM frequency region from the Sena Device Manager. With the region setting, you may optimize the seek function to avoid unnecessary frequency ranges. The headset operates in the following order of priority:…
-
Page 28: Configuration Setting
10C EVO 14.1.1 Remote Control Pairing 14 CONFIGURATION SETTING You can remotely control the headset using Sena Remote Control devices (sold separately). 1. Turn on the headset and the Remote Control device. 2. Execute Remote Control Pairing. 14.1 Headset Configuration Setting 3.
-
Page 29: Software Configuration Setting
10C EVO 14.2 Software Configuration Setting 14.2.4 VOX Phone (Default: Enable) You can change the settings of the headset through the Sena Device If this feature is enabled, you can answer incoming calls by voice. Manager or the Sena App.
-
Page 30
10C EVO 14.2.6 HD Voice (Default: Disable) 14.2.7 HD Intercom (Default: Enable) HD Voice allows you to communicate in high-definition during phone HD Intercom enhances the two-way intercom audio from normal calls. This feature increases the quality so that the audio will be crisp quality to HD quality. -
Page 31
10C EVO 14.2.10 FM Station Guide (Default: Enable) background audio that is heard can be adjusted using the Sena App. HD Intercom, HD Voice and Audio Source Priority become disabled When FM Station Guide is enabled, FM station frequencies are given temporarily when Audio Multitasking is enabled. -
Page 32: Camera Configuration Setting
10C EVO 14.3 Camera Configuration Setting Note: You can change the settings of the camera through the Sena Camera 1. Audio Multitasking will be activated during two-way intercom App. conversations with a headset that also supports this feature. 2. When Audio Multitasking is disabled, the background audio source will 14.3.1 Photo Mode (Default: Single Shot Mode)
-
Page 33
10C EVO 14.3.3 Video Resolution (Default: 2160P/30fps) 14.3.7 Smart Audio Mix™ (Always On) You can select the video resolution to be 2160P/30fps, 1440P/30fps, Smart Audio Mix allows you to record everything you hear through 1080P/60fps, or 1080P/30fps. your speakers as well as your voice during video recording. The function that governs Smart Audio Mix is called Speaker Sound 14.3.4 Timelapse Interval (Default: 1 sec) -
Page 34: Firmware Upgrade
The headset supports firmware upgrades. You can update the firmware 16.1 Fault Reset using the Sena Device Manager. Please visit Sena website at www.sena.com to check the latest software downloads. When the headset is not working properly, you can easily reset the unit: 1.
-
Page 35: Factory Reset
10C EVO 16.2 Factory Reset 1. To restore the headset to factory default settings, press and hold the Phone Button for 10 seconds until the LED shows solid red. 2. Press the Jog Dial to confirm reset. The headset will be restored…
-
Page 36
1.0.0 www.sena.com User’s Guide for Firmware v1.0…
QUICK START GUIDE
QUICK START GUIDE10C EVO
GETTING STARTED GETTING STARTED QUICK START GUIDE QUICK START GUIDE QUICK START GUIDE QUICK START GUIDE
GETTING STARTED10C EVO
SENA Technologies, Inc. sena.com Customer Support: support.sena.com
Checking the Battery Level
Bluetooth Pairing (Phone, MP3, GPS)
Installation
1 1
3
2
2 3 1
2
4 1
2
5 6
1 2
Basic Operations Powering On
= 1s HOLD
Volume Up
= ROTATE
R
Powering Off
= 1x TAP
Volume Down
= ROTATE
L
Visual Method
= 1s HOLD
= hIGh
= MED
= LOW
Audible Method
= 5s HOLD
Battery level high/medium/low
Mobile Phone Pairing
= 5s HOLD
= Alternating blue and red flashing lights indicate device is now discoverable.
LED StatuS
=
PIn nuMBEr
Product Details
Jog Dial
Antenna
Camera Button
Lens
Status LEDField of view: 125 degrees Aperture: F/2.4
MicroSD Card Slot
Phone Button
Speaker and Microphone Port
DC Power Charging & Firmware
Upgrade Port
QUICK START GUIDE
Icon Legend
1x TAP tap button/Jog Dial the
specified number of times 10s HOLD
Press and hold button/Jog Dial for the specified amount of time
ROTATE
L ROTATE
R ROTATE rotate Jog Dial clockwise (right) or
counterclockwise (left).
ROTATE
L ROTATE
R ROTATE
rotate while Pressing Jog Dial clockwise (right) or counterclockwise (left).
Hello audible prompt
how to use this Guide The legend and callouts are here to help you read the illustrations. New technology can be confusing, but weve created a simple way to perform actions using illustrations.
= 1s HOLD
Function = Button(s) to Tap or Hold
Buttons
Phone Button
Jog Dial
Camera Button
1. This product comes with a Quick Start Guide, which is a basic version of the Users Guide. a FuLL VErSIOn OF thE uSErS GuIDE Can BE DOWnLOaDED at SEna.COM.
2. Update this product for free with the latest firmware to fully enjoy the new advanced features built into this product. Visit sena.com to see how to update your product.
3. Users can follow Sena on Facebook, YouTube, Twitter and Instagram to receive the most up to date information on products, helpful tips and all other announcements regarding Sena products.
GETTING STARTED
Blast your favorite tunes, talk over the intercom with your buddies, hear directions from your GPS and more, all through your headset. With built-in Bluetooth capabilities, UHD camera, HD speakers and a microphone using Advanced Noise Control, technology has never felt so minimal or freeing.
Bluetooth Integrated
1.6 Km (1.0 Mile) Intercom
UHD Camera Integrated
Four-Way Intercom
Smart Audio Mix
Advanced Noise Control
WiFi Enabled
Audio Multitasking
Audio Source Priority
RIDE CONNECTED
Mobile Phone Camera Controls
Music Controls
Answer a Call
= or 1x TAP
End a Call
= 1x TAP
or
2s HOLD
Reject a call
= 2s HOLD
Make Call with Voice Dialer
= 1x TAP
Camera On
= 1x TAP
Camera Off
= 1x TAP
Taking Photos
= 1x TAP
note: If the video resolution is 2160p/30fps, you cannot take a photo during video recording.
Start Recording
= 1s HOLD
Stop Recording
= 1s HOLD
note: You cannot record videos
without a microSD card. Your microSD card needs to
be formatted before using the camera.
MicroSD cards up to 128 GB and U3 or higher cards are compatible.
Format SD Card
= 5s HOLD
= 1x TAP
Change WiFi Channel (Default: 5 GHz)
= 10s HOLD
note: IF YOur SMartPhOnE Or rEGIOn DOES nOt SuPPOrt 5 Ghz, YOu MuSt ChanGE thE WiFi ChannEL tO 2.4 Ghz.
Select 5 GHz
= 1x TAP
Select 2.4 GHz
= 1x TAP
Play/Pause
= 1s HOLD
Track forward
= ROTATE
R
Track backward
= ROTATE
L
10C EVO MOTORCYCLE BLUETOOTH CAMERA
AND COMMUNICATION SYSTEM
1.0.0
SENA
QUICK START GUIDE ENGLISH
QUICK REFERENCE10C EVO
QUICK START GUIDE QUICK START GUIDE QUICK START GUIDE QUICK START GUIDE QUICK START GUIDE QUICK REFERENCE QUICK REFERENCEQUICK START GUIDE
TYPE OPERATION BUTTON COMMANDS
Intercom
Intercom pairing 5s HOLD
1x TAP
Start/End intercom 1x TAP
QUICK REFERENCE
Sena Device Manager The Sena Device Manager allows you to upgrade the firmware and configure its settings directly from your PC or Apple computer. Download the Sena Device Manager, please visit sena.com.
Sena app The Sena App allows you to configure the headset settings. Download the Sena App for Android and Apple operating systems from sena.com.
TYPE OPERATION BUTTON COMMANDS
Music
Play/Pause music 1s HOLD
Track forward ROTATE
R
Track backward ROTATE
L
Camera
Camera On 1x TAP
Camera Off 1x TAP
Start/Stop recording 1s HOLD
Taking Photos 1x TAP
FM radio
FM radio on/off 1s HOLD
Seek forward ROTATE
R
Seek backward ROTATE
L
Scan up FM band/ stop scanning 2x
TAP
TYPE OPERATION BUTTON COMMANDS
Basic
Operations
Power on / Power off 1s HOLD
1x TAP
Volume up / Volume down ROTATE
R or ROTATE
L
Mobile Phone
Answer phone call or 1x TAP
End phone call
1x TAP
or
2s HOLD
Reject phone call 2s HOLD
Voice dial 1x TAP
Speed dial 2x TAP
Sena Camera app The Sena Camera App allows you to see a live preview from the camera, manage recorded videos as well as configure the video settings using the built-in WiFi feature on camera system. When the camera and the Sena Camera App are connected, the camera is synchronized with the smartphones date and time. Download the Sena Camera App for Android and Apple operating systems from sena.com.
radio headset Configuration Menu FM Radio On
= 1s HOLD
Scan Stations
= 2x TAP
= 2x TAP
FM Radio Off
= 1s HOLD
Seek Stations
= ROTATE
R
= ROTATE
L
Accessing the Headset Configuration Menu
= 10s HOLD
Execute Menu Options
= 1x TAP
Navigating Between Menu Options
= ROTATE
R
= ROTATE
L
troubleshooting Factory Reset
= 10s HOLD
= Solid red
= 1x TAP
Fault Reset
=
1x TAP
note: Fault Reset will not restore the headset to factory default settings.
1.0.0_EN_190627
Intercom Up to three other people can be paired with the headset for Bluetooth intercom conversations.
Pairing Headset A with Headset B
A
YOu
and = 5s HOLD
B
A
YOu