инструкцияSiemens EQ.6 Plus S100 TE651209RW

siemens-home.bsh-group.com/welcome
Register
your
product
online
TE65..
en Instruction manual
fr Mode d’emploi
nl Gebruiksaanwijzing
pl Instrukcjaobsługi
cs Návodkpoužití
ru Инструкцияпоэксплуатации
de Gebrauchsanleitung
Посмотреть инструкция для Siemens EQ.6 Plus S100 TE651209RW бесплатно. Руководство относится к категории кофеварки, 40 человек(а) дали ему среднюю оценку 8. Руководство доступно на следующих языках: английский. У вас есть вопрос о Siemens EQ.6 Plus S100 TE651209RW или вам нужна помощь? Задайте свой вопрос здесь
Главная
| Siemens | |
| EQ.6 Plus S100 TE651209RW | TE651209RW | |
| кофеварка | |
| 4242003806425 | |
| английский | |
| Руководство пользователя (PDF) |
Эргономика
| Цвет товара | Black, Titanium |
| Встроенный экран | Да |
| Тип управления | Сенсорный |
| Съемный резервуар для воды | Да |
| Легкая чистка | Да |
| Длина шнура | 1 m |
| Тип дисплея | ЖК |
| Съемный заварочный блок | Да |
| Индикатор накипи | Да |
| Съемный лоток для капель | Да |
| Подсветка кнопок | Да |
| Простота в использовании | Да |
Программы и функции приготовления пищи
| Приготовление эспрессо | Да |
| Приготовление капучино | Да |
| Приготовление латте макиато | Да |
| Приготовление сaffe crema | Да |
| Приготовление горячего молока | Да |
| Приготовление кофе | Да |
Производительность
| Размещение бытового устройства | Столешница |
| Тип продукта | Машина для эспрессо |
| Количество настроек температуры | 3 |
| Регулируемая температура | Да |
| Водяной фильтр | Да |
| Вместимость в чашках | 2 чашек |
| Емкость водного резервуара | 1.7 L |
| Емкость для молока | Да |
| Встроенная мельница | Да |
| Система подачи горячей воды | Да |
| Встроенное устройство для взбивания молока | Да |
| Тип кофеварки | Автоматическая |
| Тип кофе | Coffee beans, Ground coffee |
| Самоочистка | Да |
| Комплектующие пригодны для мытья в посудомоечной машине | Да |
| Функция очистки от накипи | Да |
| Вместимость кофейных зерен | 300 g |
| Регулируемые настройки кофемолки | Да |
| Емкость для сваренного кофе | Чашка |
| Переключатель жесткости воды | Да |
| Сертификация | CE, VDE |
| Регулируемая высота носика | Да |
| Программируемый | Да |
| Максимальное рабочее давление | 15 бар |
| Тип кофемолки | Керамическая кофемолка |
| Регулируемая крепость кофе | — |
| Паропровод | Да |
Прочие свойства
Энергопитание
| Программируемое автоматическое выключение | Да |
| Автовыключение | Да |
| Мощность | 1500 W |
| Входящее напряжение сети | 220–240 V |
| Частота входящего переменного тока | 50 — 60 Hz |
Вес и размеры
| Ширина | 280 mm |
| Глубина | 465 mm |
| Высота | 385 mm |
| Вес | 9600 g |
Данные об упаковке
| Ширина упаковки | 345 mm |
| Глубина упаковки | 430 mm |
| Высота упаковки | 515 mm |
| Масса брутто | 10700 g |
Логистические данные
| Ширина паллеты | 800 mm |
| Длина паллеты | 1200 mm |
| Высота паллеты | 2200 mm |
| Количество в паллете | 24 шт |
показать больше
Не можете найти ответ на свой вопрос в руководстве? Вы можете найти ответ на свой вопрос ниже, в разделе часто задаваемых вопросов о Siemens EQ.6 Plus S100 TE651209RW.
Какой вес Siemens EQ.6 Plus S100 TE651209RW?
Какие сертификаты Siemens EQ.6 Plus S100 TE651209RW имеет?
Как часто следует очищать кофеварку от накипи?
Какой лучший способ очистки кофеварки от накипи?
Как долго можно хранить кофе в зернах?
Как лучше всего хранить кофе?
Как помол сказывается на вкусе кофе?
Какая высота Siemens EQ.6 Plus S100 TE651209RW?
Какая ширина Siemens EQ.6 Plus S100 TE651209RW?
Какая толщина Siemens EQ.6 Plus S100 TE651209RW?
Инструкция Siemens EQ.6 Plus S100 TE651209RW доступно в русский?
Не нашли свой вопрос? Задайте свой вопрос здесь

Кофемашина Siemens EQ.6 Plus s100 (TE651209RW) — инструкция пользователя по применению, эксплуатации и установке на русском языке. Мы надеемся, она поможет вам решить возникшие у вас вопросы при эксплуатации техники.
Вы можете скачать инструкцию к Siemens EQ.6 Plus s100 (TE651209RW) по ссылке ниже, если не хотите ждать загрузки. Если остались вопросы, задайте их в комментариях после инструкции.
«Загружаем инструкцию», означает, что нужно подождать пока файл загрузится и можно будет его читать онлайн. Некоторые инструкции очень большие и время их появления зависит от вашей скорости интернета.
Полезные видео
Характеристики
Остались вопросы?
Не нашли свой ответ в руководстве или возникли другие проблемы? Задайте свой вопрос в форме ниже с подробным описанием вашей ситуации, чтобы другие люди и специалисты смогли дать на него ответ. Если вы знаете как решить проблему другого человека, пожалуйста, подскажите ему


Часто задаваемые вопросы

Как посмотреть инструкцию к Siemens EQ.6 Plus s100 (TE651209RW)?
Необходимо подождать полной загрузки инструкции в сером окне на данной странице или скачать кликнув по специальной кнопке.
Руководство на русском языке?
Все наши руководства представлены на русском языке или схематично, поэтому вы без труда сможете разобраться с вашей моделью
Как можно распечатать инструкцию?
Скачайте ее по специальной кнопке над формой чтения на ваше устройства и отправьте на печать.
siemens-home.bsh—group.com/welcome
Register
your
product
online
TE65..
en Instruction manual
fr Mode d’emploi
nl Gebruiksaanwijzing
pl Instrukcjaobsługi
cs Návodkpoužití
ru Инструкцияпоэксплуатации
de Gebrauchsanleitung
A
E-Nr. ……… FD… …
b
c
a
TZ80002N
d
g ie f
*
h
* *
en English 2
fr Français 26
nl Nederlands 52
pl Polski 77
cs Čeština 103
ru Pycckий 127
de Deutsch 154
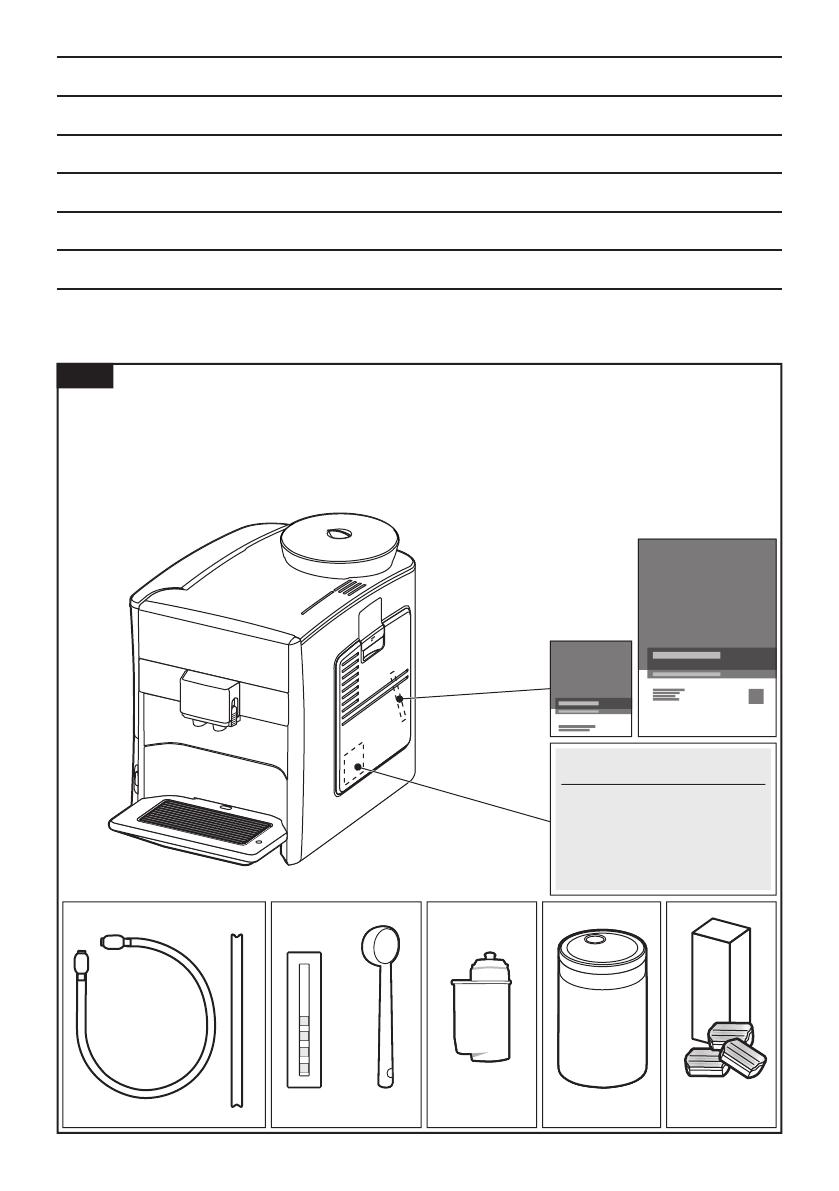
Included in delivery (see page 5)
Contenu de l’emballage (voir page 29)
Leveringsomvang (zie pagina 55)
Zakres dostawy (patrzstrona80)
Součást dodávky (vizstrana106)
Объем поставки (см.стр.130)
Lieferumfang (sieheSeite157)
4a
D
E F
8
7
18
4c
4d
17b
17a 17c
17d
4b

6
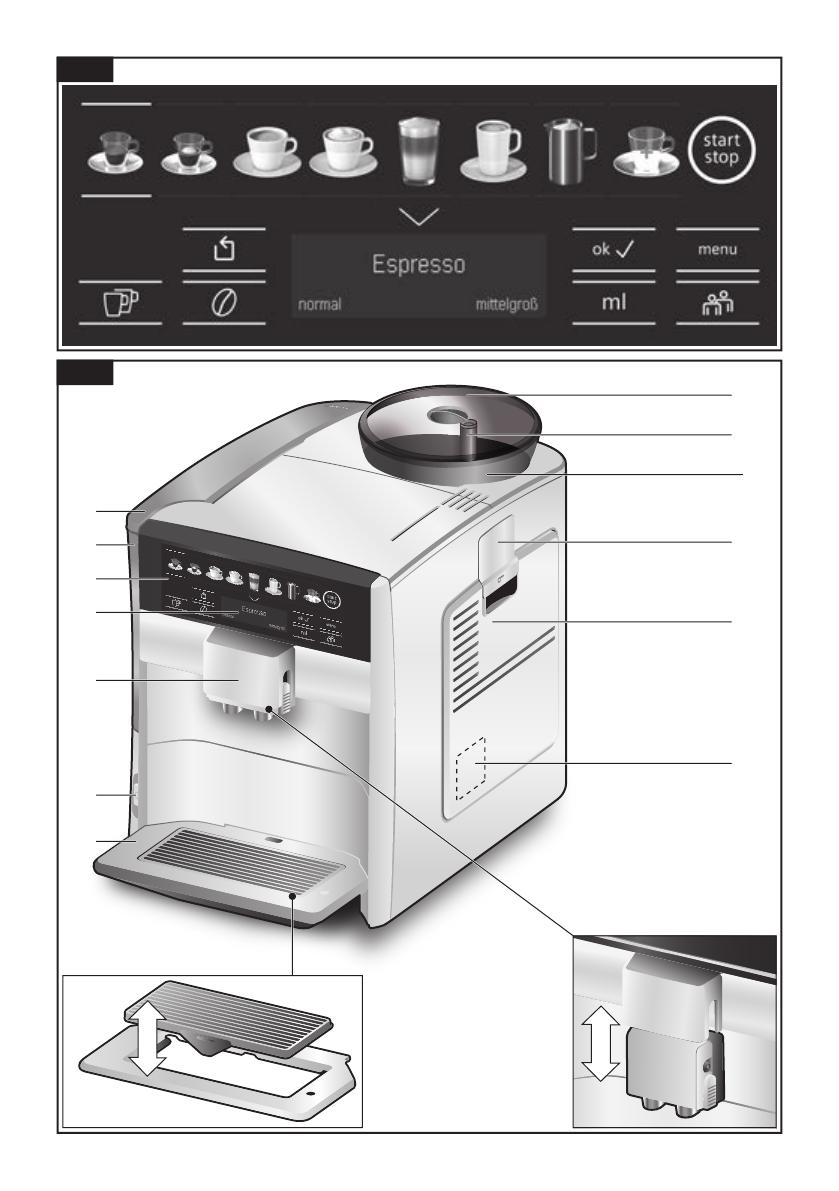
en Overviewofcontrolelements
Overview of control elements
(Figure Bonthefold-outpages)
F
Thefollowingsymbolsarevisibleorbacklitdependingontheappliance’scurrent
operatingmode:
Espresso Latte Macchiato
Espresso Macch. Caffe Latte
Coffee Milk froth
Cappuccino
Specialbeverages(seethe
section“Specialbeverages”).
start
stop
C–Start/stopbutton I–Selectiondown
F – Back
menu
A–Openmenu
G–Dispensetwocups
simultaneously
ok
B–Confirm/Store
H–Setcoffeestrength
D–Selectcupsize
R–CallupFavourite
(touchbriefly)andChildprooflock
(touchforatleast3seconds).
56
nl Overzicht–Bedieningselementen
Overzicht – Bedieningselementen
(Afbeelding Bopdeuitklapbarepagina’s)
F
Devolgendesymbolenzijnafhankelijkvandebedrijfstoestandvandemachinete
zienresp.verlicht:
Espresso Latte macchiato
Espresso macch. Koffie verkeerd
Koffie Melkschuim
Cappuccino
Specialedranken(ziehoofdstuk
„Specialedranken“).
start
stop
C–Start-Stop-toets I–Selectieomlaag
F – Terug
menu
A – Menu openen
G–Afnamevantweekopjes
tegelijkertijd
ok
B–Bevestigen/Opslaan
H–Koffiesterkteinstellen
D–Maatkopjeselecteren
R–Favorietoproepen
(kortaanraken)enkinderbevei-
liging(tenminste3seconden
aanraken).

70
nl Serviceprogramma’s
F
Let op!
Gebruikbijelkserviceprogramma
ontkalkings-enreinigingsmiddelen
volgensdegebruiksaanwijzing.
Onderbreekhetserviceprogrammain
geen geval!
Drinkdevloeistoenniet!
Nooitcitroenzuur,azijnofmiddelen
opazijnbasisgebruiken.
Doenooitontkalkingstabsof
andereontkalkingsmiddeleninde
koelade12!
Verwijdervóórdestartvanhetdesbetref-
fendeserviceprogramma(ontkalken,
reinigenofcalc‘nClean)dezetgroep,reinig
dezevolgensdeaanwijzingenenzetdeze
weerterug.
Speciaal ontwikkelde en geschikte
ontkalkings- en reinigingstabs zijn
verkrijgbaar in de handel, alsmede
via de servicedienst (zie hoofdstuk
“Toebehoren”)�
Melksysteem reinigen
Duur:ca.1minuut.
OpenhetmenumetA.
■ SelecteermetI Reiniging en
verzorgingenbevestigmetB.
■ SelecteermetI Melksysteem reinigen
enbevestigmetB.
■ Raak Caanomhetprogramma
testarten.
Ophetdisplay3zietudenodige
aanwijzingen:
■ Zeteenleegglasonderdeuitloop4 en
hanghetuiteindevanhetaanzuigbuisje
4dinhetglas.
■ Raak Caan.Hetmelksysteem
wordtnuautomatischgereinigd.
■ Maakhetglasvervolgensleegenreinig
hetaanzuigbuisje4d.
Reinighetmelksysteemdaarnaastregel-
matighandmatig(vaatwasserofmetde
hand).
Ontkalken
Duur:ca.30minuten.
Debalkonderinhetdisplaygeeftaanhoe
verhetprocesgevorderdis.
F
Alsereenwaterfilterinhetwater-
reservoir 5aanwezigis,moetudit
altijdeerstverwijderenalvorenshet
serviceprogrammatestarten.
■ OpenhetmenumetA.
■ SelecteermetI Reiniging en
verzorgingenbevestigmetB.
■ SelecteermetI Ontkalken en
bevestigmetB.
■ Raak Caanomhetprogramma
testarten.
Ophetdisplay3zietudenodige
aanwijzingen:
■ Maak de lekschaal 17leegenzetdeze
weerterug.
F
DeaanwijzingZo nodig waterfilter
uitnemen ¢startwordtweergegeven.
■ Verwijderhetwaterfilterenraak
Copnieuwaan.
■ Vullauwwarmwaterinhetlegewater-
reservoir 5totaandemarkering“0,5 l”
enloshierin1Siemensontkalkingstab
TZ80002Nop.
■ Raak Caan.
■ Zeteenkommeteeninhoudvan0,5l
onderdeuitloop4.
■ Hanghetuiteindevanhetaanzuigbuisje
4dindekom.
■ Raak Caan.
Hetontkalkingsprogrammalooptnuca.
20minuten.
F
Alserteweinigontkalkingsoplossing
inhetwaterreservoir5zit,verschijnt
demeldingOntkalker bijvullen ¢start.
■ Vulontkalkingsoplossingbijenraak
opnieuwCaan.
■ Spoelhetwaterreservoir5envulditmet
verswatertotaandemarkering“max”.
■ Plaatshetfilterterug(alsueenfilter
gebruikt).
■ Raak Caan.
73
nl
Toebehoren
Toebehoren
Onderstaandtoebehorenisindehandelen
viadeservicedienstverkrijgbaar:
Toebehoren Bestel nummer
handel/servicedienst
Reinigingstabs TZ80001N/00311807
Ontkalkingstabs TZ80002N/00576693
Waterfilter TZ70003/00575491
Verzorgingsset TZ80004/00576330
Melkreservoirmet
“freshLock”deksel
TZ80009N/00576166
Afval
J
Gooiverpakkingsmateriaalopeen
milieuvriendelijkemanierweg.Dit
apparaatisgekenmerktinovereen-
stemmingmetdeEuropeserichtlijn
2012/19/EUbetreffendeafgedankte
elektrischeenelektronischeappara-
tuur(wasteelectricalandelectronic
equipment–WEEE).Derichtlijn
geefthetkaderaanvoordeindeEU
geldigeterugnemingenverwerking
vanoudeapparaten.Raadpleeguw
gespecialiseerde handelaar voor
degeldendevoorschrifteninzake
afvalverwijdering.
Garantievoorwaarden
Voorditapparaatgeldendegarantievoor-
waardendiewordenuitgegevendoorde
vertegenwoordigingvanonsbedrijfinhet
landvanaankoop.Deleverancier,bijwieu
hetapparaatheeftgekocht,geeftuhierover
graagmeerinformatie.Omaanspraakte
makenopdegarantieheeftualtijduw
aankoopbewijsnodig.
Wijzigingenvoorbehouden.
Technische gegevens
Elektrischeaansluiting(spanning–frequentie) 220-240V–50/60Hz
Aangeslotenvermogen 1500W
Maximalepompdruk,statisch 15bar(TE651..,TE653..,TE654..)
19bar(TE655..,TE657..)
Maximalecapaciteitwaterreservoir(zonderfilter) 1,7l
Maximalecapaciteitbonenreservoir ~300g
Lengtenetsnoer 100cm
Afmetingen(hxbxd) 385x301x458mm
Gewicht,leeg 10-12kg
Typemaalwerk keramisch

81
pl
Przegląd-elementyobsługi
Przegląd — elementy obsługi
(Rysunek Bnarozkładanychstronach)
F
Poniższesymbolesąwidocznealbopodświetlonewzależnościodstanu
urządzenia:
Espresso Latte Macchiato
Espresso macch. Kawa z mlekiem
Kawa Pianka mleczna
Cappuccino
Napojespecjalne(patrzrozdział
„Napojespecjalne“).
start
stop
C–przyciskstart-stop I–wybórnadół
F–wróć
menu
A–otwórzmenu
G–zaparzdwiefiliżanki
jednocześnie
ok
B–potwierdź/zapisz
H–ustawmockawy
D–wybierzwielkośćfiliżanek
R–aktywacjaulubionegonapoju
(krótkiedotknięcie)izabezpie-
czenieprzeddziećmi(dotykanie
przezconajmniej3sekundy).

107
cs
Přehled–ovládacíprvky
Přehled – ovládací prvky
(obrázekBnarozklápěcíchstránkách)
F
Vzávislostinaprovoznímstavuspotřebičejsouviditelnéresp.podsvícenétyto
symboly:
Espresso Latte Macchiato
Espresso Macch. Káva s mlékem
Caffe Crema Mléčná pěna
Cappuccino
Speciálnínápoje(vizkapitola
„Speciálnínápoje“).
start
stop
C–tlačítkostart-stop I–volbasměremdolů
F–zpět
menu
A–otevřítmenu
G–současnýodběrdvoušálků
ok
B–potvrdit/uložit
H–nastavenísílykávy
D–volbavelikostišálku
R–vyvolejteoblíbenýnápoj
(krátkýdotyk)adětskoupojistku
(dotyknejméně3sekundy).

127
ru
Оглавление
Уважаемыелюбителикофе!
СердечнопоздравляемВассприоб-
ретениемполностьюавтоматической
кофемашиныпроизводствакомпании
Siemens.
Вэтойинструкциипоэксплуатации
описанымоделиприбора,которыев
деталяхотличаютсядруготдруга.
Просьбатакжеучитыватьприлагаемую
краткуюинструкцию.Ееможнохранитьв
специальномотсеке16додальнейшего
использования.
Об использовании данной
инструкции по эксплуатации:
Переднюючастьобложкиданной
инструкцииможноразложить.Там
приводятсярисункичастейкофемашины
суказаниемномеров,накоторыедается
ссылкавтекстеинструкции.
Пример:заварочныйблок14
Показаниянадисплееисимволытакже
оформленывэтойинструкцииособым
образом.БлагодаряэтомуВамсразу
становитсяясно,чторечьидетотекстах
илисимволах,выводимыхнадисплее
прибора,илиженанесенныхнаприбор.
Примертекстанадисплее:Эспрессо
Примерэлементауправления:C
Использование по назначению �������� 128
Важные правила техники
безопасности ���������������������������������������128
Объем поставки ����������������������������������130
Обзор ����������������������������������������������������130
Обзор – элементы управления ��������131
Дисплей ������������������������������������������������132
Подготовка к работе ���������������������������133
Собственные настройки
«Избранное» ����������������������������������������134
Блокировка для
безопасности детей ���������������������������� 134
Приготовление напитков ������������������� 134
Приготовлениекофейныхнапитков….136
Приготовлениенапитковсмолоком….136
Особыенапитки………………………………137
Приготовлениенапитков
измолотогокофе…………………………….139
Настройкастепенипомола………………139
Меню �����������������������������������������������������140
Уход и ежедневная очистка ��������������143
Очисткамолочнойсистемы……………..144
Очистказаварочногоблока(рис.G)…145
Сервисные программы ���������������������146
Очисткамолочнойсистемы……………..146
Удалениенакипи……………………………..146
Очистка…………………………………………..147
calc‘nClean………………………………………148
Советы по экономии
электроэнергии �����������������������������������149
Защита от замерзания ������������������������149
Хранение принадлежностей �������������149
Принадлежности ���������������������������������149
Утилизация �������������������������������������������150
Условия гарантийного
обслуживания �������������������������������������150
Самостоятельное устранение
небольших проблем ��������������������������� 150
Технические характеристики ������������153

128
ru Использованиепоназначению
Использование по
назначению
Этот прибор предназначен
только для домашнего
использования.
Используйте прибор только
внутри помещений при
комнатной температуре на
высоте не выше 2000 м над
уровнем моря.
Важные правила техники
безопасности
Внимательно прочтите
инструкцию по эксплуатации,
соблюдайте ее указания
и тщательно храните ее!
Передавая прибор другому
человеку, дайте ему эту
инструкцию.
Данный прибор может исполь—
зоваться детьми в возрасте
от 8 лет и старше, а также
лицами с ограниченными
физическими, сенсорными
или умственными способ—
ностями или с недостатком
опыта и/или знаний, если они
находятся под присмотром или
после получения указаний по
безопасному использованию
прибора и после того, как они
осознали опасности, связанные
с неправильным использо—
ванием. Детей младше 8 лет
нельзя подпускать к прибору
и шнуру питания; им нельзя
пользоваться прибором. Детям
запрещено играть с прибором.
Детям разрешается выполнять
очистку и пользовательское
обслуживание только в том
случае, если они достигли
возраста 8 лет и находятся под
присмотром.
W Предупреждение
Опасность поражения током!
■ Прибор можно подклю—
чать только к электросети
переменного тока через
установленную согласно
предписаниям розетку с
заземлением. Убедитесь,
что система заземления
в домашней электропро—
водке установлена согласно
предписаниям.
■ При подключении прибора
и его эксплуатации соблю—
дайте данные, приведенные
на фирменной табличке.
■ Пользоваться прибором
разрешается только при
отсутствии повреждений
кабеля и прибора.
■ Во избежание возникновения
опасной ситуации ремонт
прибора, например, замену
поврежденного сетевого
шнура, разрешается произ—
водить только нашей
сервисной службе.
■ Ни в коем случае не
погружать прибор или
сетевой кабель в воду.
■ В случае неисправности
немедленно извлечь
штепсельную вилку из
розетки или отключить
сетевое напряжение.
Использование по
назначению
Важные правила техники
безопасности

129
ru
Важныеправилатехникибезопасности
■ Избегать попадания
жидкости на разъем.
■ Соблюдать приведенные
в инструкции особые
указания по очистке.
W Предупреждение
Опасность, связанная с
магнитным полем!
Прибор содержит постоянные
магниты, которые могут оказать
воздействие на электронные
имплантаты, например, на
кардиостимуляторы или
инжекторы инсулина. Лицам,
пользующимся электронными
имплантатами, следует нахо—
диться на расстоянии не менее
10 см от прибора, а также при
разборке от следующих частей
прибора: емкость для молока,
система подачи молока,
резервуар для воды, поддон и
заварочный блок.
W Предупреждение
Опасность удушья!
■ Не позволяйте детям играть
с упаковочным материалом.
■ Храните мелкие детали
в надежном месте, так
как ребенок может их
проглотить.
W Предупреждение
Опасность травмирования!
■ Не прикасайтесь к
внутренним частям
кофемолки!
■ Неправильное применение
прибора может привести к
травмам.
W Предупреждение
Опасность ожога!
■ Молочная система сильно
разогревается. После
использования сначала
дождитесь ее охлаждения,
прежде чем прикасаться к
ней.
■ После использования
поверхности нагреватель—
ного элемента или нагре—
вательной пластины могут
оставаться горячими еще
определенное время.
■ Свежеприготовленные
напитки очень горячие. Если
потребуется, дайте немного
остыть.
Использование по
назначению
Этот прибор предназначен
только для домашнего
использования.
Используйте прибор только
внутри помещений при
комнатной температуре на
высоте не выше 2000 м над
уровнем моря.
Важные правила техники
безопасности
Внимательно прочтите
инструкцию по эксплуатации,
соблюдайте ее указания
и тщательно храните ее!
Передавая прибор другому
человеку, дайте ему эту
инструкцию.
Данный прибор может исполь—
зоваться детьми в возрасте
от 8 лет и старше, а также
лицами с ограниченными
физическими, сенсорными
или умственными способ—
ностями или с недостатком
опыта и/или знаний, если они
находятся под присмотром или
после получения указаний по
безопасному использованию
прибора и после того, как они
осознали опасности, связанные
с неправильным использо—
ванием. Детей младше 8 лет
нельзя подпускать к прибору
и шнуру питания; им нельзя
пользоваться прибором. Детям
запрещено играть с прибором.
Детям разрешается выполнять
очистку и пользовательское
обслуживание только в том
случае, если они достигли
возраста 8 лет и находятся под
присмотром.
W Предупреждение
Опасность поражения током!
■ Прибор можно подклю—
чать только к электросети
переменного тока через
установленную согласно
предписаниям розетку с
заземлением. Убедитесь,
что система заземления
в домашней электропро—
водке установлена согласно
предписаниям.
■ При подключении прибора
и его эксплуатации соблю—
дайте данные, приведенные
на фирменной табличке.
■ Пользоваться прибором
разрешается только при
отсутствии повреждений
кабеля и прибора.
■ Во избежание возникновения
опасной ситуации ремонт
прибора, например, замену
поврежденного сетевого
шнура, разрешается произ—
водить только нашей
сервисной службе.
■ Ни в коем случае не
погружать прибор или
сетевой кабель в воду.
■ В случае неисправности
немедленно извлечь
штепсельную вилку из
розетки или отключить
сетевое напряжение.

130
ru Объемпоставки
1 СетевойвыключательJ
2 Панельуправления
(см.след.страницу)
3 Дисплей
4 Устройстворазливанапитков
(кофе,молоко,горячаявода),
регулируемоеповысоте
a) Крышка
b) Молочнаясистема/устройстводля
разливакофе(издвухчастей)
c) Шлангдлямолока
d) Всасывающаятрубка
5 Съемныйконтейнердляводы
6 Крышкаконтейнерадляводы
7 Отсекдляхранениямернойложки
длямолотогокофе
8 Мернаяложкадлямолотогокофе
(приспособлениедляустановки
фильтрадляводы)
9 Емкостьдлякофейныхзерен
10 Крышка,сохраняющаяаромат
11 Поворотныйрегулятор
степенипомола
12 Выдвижнойотсекдлямолотогокофе
(молотыйкофе/таблеткадляочистки)
13 Дверцазаварочногоблока
14 Заварочныйблок
a) Фиксатор
b) Крышка
15 Рычагдлявыбрасывания
16 Отсекдляхранениякраткой
инструкции
17 Поддон
a) Заслонка
b) Лотокдлясборакапель
(издвухчастей)
c) Емкостьдлякофейнойгущи
d) Поплавок
18 Отсекдляхранениякабеля
19 Типоваятабличка(модель,FD-номер)
*Винструкциипоэксплуатации
описываютсяразличныеварианты.
Обозначенные*позицииимеютсятолько
вопределенныхмоделяхприбора.
Обзор
(Рис.B, C, D, E, FиGнараскладывающихсястраницах)
Объем поставки
(Рис.Анараскладывающихсястраницах)
a Полностьюавтоматическая
кофемашина
b Инструкцияпоэксплуатации
c Краткаяинструкция
d Шлангдлямолокаи
всасывающаятрубка
e Индикаторнаяполоскадля
определенияжесткостиводы
f Мернаяложкадлямолотогокофе
g Фильтрдляводы*
h Емкостьдлямолокаскрышкой
«freshLock»*
i Таблеткидляудалениянакипи*

131
ru
Обзор–элементыуправления
Обзор – элементы управления
(Рис.Внараскладывающихсястраницах)
F
Следующиесимволывидныилиподсвечиваютсявзависимостиотрабочего
состоянияприбора.
Эспрессо Латте Макиато
Эспрессо мак. Кофе с молок.
Кофе Молочная пена
Капучино
Особыенапитки(см.раздел
«Особыенапитки»).
start
stop
C–кнопка«Старт/стоп» I–выборвниз
F–назад
menu
A–открытьменю
G–приготовлениедвух
чашекодновременно
ok
B –
подтвердить/сохранить
H–настройкакрепостикофе
D–выборразмерачашки
R–вызов«Избранного»
(краткоекасание)иблокировка
длябезопасностидетей(прикос—
нутьсяминимумна3секунды).
132
ru Дисплей
Сетевой выключатель J
СетевымвыключателемJприборвклю-
чаетсяиливыключается.Привключении
ивыключенииприборапроизводитсяего
автоматическаяпромывка.
Промывкаприборанепроизводится,
если:
■ вмоментвключенияонещегорячий,
■ передвыключениемкофене
готовился.
Приборготовкработе,еслинапанели
управлениясветятсясимволыидисплей.
Панель управления (сенсорная
панель)
Навигациянапанелиуправления
производитсяприкасаниемксимволам
изнакам.Призадействованиираздается
звуковойсигнал.Звуксигналаможно
включатьивыключать(см.раздел
«Меню–Звуки для кнопок»).
Выбор напитка
Желаемыйнапитоквыбираетсянепо-
средственноприкасаниемксоответству-
ющемусимволу(см.раздел«Приготов-
лениенапитков»).
Кнопка «Старт / стоп»
ПрикасаниемксимволуC
запускаетсяприготовлениенапитковили
сервиснаяпрограмма.Приповторном
прикасанииксимволуCво
времяприготовлениянапиткапроцесс
сразужепрерывается.
Меню
ПрикасаниемкAвызываетсяменю,
навигационныесимволыактивируютсяи
подсвечиваются.ПрикасаниемкI,
BиFвыполняютсяперемещенияв
менюивызываетсяинформация,атакже
производятсянастройки(см.раздел
«Меню»).
Опции для напитков
ПрикасаниемкHилиDизменяется
крепостьилиобъемнапитка,если
прикоснутьсякG,тоготовятсясразу
двечашкисразу,кактолькозапуска-
етсяприготовлениенапиткасимволом
C(см.раздел«Приготовление
напитков»).
«Избранное» и блокировка для безо—
пасности детей
КраткимкасаниемRвыбираются
индивидуальныенапитки(см.раздел
«Собственныенастройки,Избранное»).
ЕслиприкасатьсяксимволуRне
менее3секунд,активируетсяилидеак-
тивируетсяблокировкадлябезопасности
детей(см.главу«Блокировкадлябезо-
пасностидетей»).
Дисплей
Надисплейвыводятсявыбранные
напиткиинастройки,атакжесообщения
орабочемсостоянии.
Эспрессо
нормальный средний
Заполнитьконтейнердляводы
Сообщениеисчезает,кактолько
операциявыполнена.

133
ru
Подготовкакработе
Подготовка к работе
Общее
Всоответствующиеемкостиследует
заливатьтолькочистую,холодную,
негазированнуюводуизасыпатьтолько
обжаренныекофейныезерна.Неисполь—
зуйтекофейныезерна,покрытыеглазурью,
карамельюилиобработанныедругими
сахаросодержащимидобавками-они
засоряютзаварочныйблок.Вданном
прибореможноустанавливатьжесткость
воды.Назаводеустановленастепень
жесткостиводы4.Жесткостьиспользуемой
водыопределитеспомощьюприлагаемой
индикаторнойполоски.Еслиотображается
не4-я,адругаястепеньжесткостиводы,
топослевключенияприборследуетзапро—
граммировать
соответствующимобразом
(см.раздел«Меню–Жесткость воды»).
Начало работы с прибором
■ Снимитевсезащитныепленки.
■ Поставьтеполностьюавтоматическую
кофемашинунаровнуюидостаточно
прочнуюдляеемассыводостойкую
поверхность.
■ Вентиляционныеотверстияприбора
должныоставатьсяоткрытыми.
F
Важно.Используйтеприбортолько
впомещениях,защищенныхот
мороза. Еслиприбортранспор-
тировалсяилихранилсяпри
температурахниже0°C,топеред
еговводомвэксплуатациюнужно
выждатьнеменее3часов�
■ Вставьтесетевойштекер(отсекдля
кабеля18)врозетку.Необходимую
длинуможноотрегулировать,убирая
кабельвверхиливытягиваяеговниз.
Дляэтогоустановитеприборзадней
кромкой,например,украястолаипотя—
нитекабельвнизиливверх.
■ Откиньтекрышкуконтейнерадляводы
6вверх.
■ Снимитеконтейнердляводы5,
промойтеегоизаполнитесвежей,
холоднойводой.Учитывайтеотметку
уровнязаполнения«max».
■ Ровноустановитеконтейнердляводы
5и,надавивнанее,вставьтедоупора.
■ Сновазакройтекрышкуконтейнера
дляводы6.
■ Наполнитеемкостьдлякофейных
зерен9кофейнымизернами.
■ Включитеприборсетевым
выключателем1 J.
Активируетсяпанельуправленияи
дисплей.Надисплеепоявляетсяпред-
варительновыбранныйязык,накотором
будутвыводитьсяпоследующиетексты
надисплее.Навыборпредлагается
несколькоязыков.
■ КасайтесьIдотехпор,покана
дисплеенебудетвыделеннужный
язык.
Deutsch
English
Français
■ ПрикоснитеськсимволуC,
чтобыподтвердитьвыбор.
Выбранныйязыксохраняетсявпамяти.
Надисплее3появляетсялоготип
торговоймарки.Приборпроизводит
нагревипромывку,изустройства
разливанапитков4вытекаетнебольшое
количествоводы.
Приборготовкработе,еслинапанели
управлениясветятсясимволыидисплей.

134
ru Собственныенастройки«Избранное»
F
Назаводе-изготовителезапрограм-
мированыстандартныенастройки,
обеспе-чивающиеоптимальный
режимработыполностьюавто-
матическойкофемашины.Через
настроенноепредварительно
времяприборавтоматически
выключается(см.раздел«Меню–
Автом. отключение»).
F
Припервомиспользовании
прибора,послевыполнения
сервиснойпрограммыилипосле
длительногоперерывавработе
ароматкофевпервойчашкене
раскрываетсявполноймере,этот
кофенерекомендуетсяпить.
F
Еслиавтоматическаякофемашина
неиспользоваласьранее,Вы
начнетеполучатьстабильнуюпену
необходимойтолщинытолько
послеприготовлениянескольких
чашек.
F
Придлительномиспользовании
являетсянормальным,чтона
вентиляционныхотверстияхобра-
зуютсякапелькиводы.
Собственные настройки
«Избранное»
Количествоизбранныхнапитковзависит
отмоделиприбора.Впунктеменю
«Избранное»можносохранитьиизме-
нитьиндивидуальныенапитки(см.главу
«Меню–Избранное»).
Вызов индивидуального напитка
■ КратковременнокоснитесьR.
■ Выберитеодинизранеесохраненных
избранныхнапитковсиндивидуаль-
ныминастройками.
■ ПрикоснитеськC,чтобы
начатьприготовлениенапитков.
Блокировка для
безопасности детей
Длязащитыдетейоттравмиожогов
приборможнозаблокировать.
■ ПрикасайтеськсимволуRнеменее
3секунд.Надисплее3появляется
ключ.Блокировкадлябезопасности
детейвключена.Теперьприбором
пользоватьсянельзя.
■ ПрикасайтеськсимволуRнеменее
3секунд.Ключнадисплее3снова
исчезает.Блокировкадлязащиты
детейдеактивирована.Теперьприбор
можноиспользовать,какобычно.
Приготовление напитков
Этаполностьюавтоматическаякофема-
шинадлякаждогозавариваниясмалы-
ваетсвежийкофе.Дляоптимального
сохранениякачествазеренихнужно
хранитьвпрохладномместеивплотно
закрытойупаковке.
F
Важно.Необходимоежедневно
наливатьвконтейнердляводы5
свежуюхолоднуюводу.Вконтей-
нере5постояннодолжнобыть
некотороеколичествоводы,доста-
точноедляработыкофемашины.
F
Чашку/чашки,особенно
маленькие,толстостенныечашки
дляэспрессонеобходимопредва-
рительноподогреть,прополоскав
горячейводой.
F
Некоторыенастройкипредпола-
гаютприготовлениекофевдва
этапа(см.«aromaDoubleShot»).
Подождите,покапроцессполно-
стьюнезакончится.
Различныенапиткиготовятсяочень
простонажатиемкнопки.

135
ru
Приготовлениенапитков
Выбор напитка
Желаемыйнапитоквыбирается
непосредственноприкасаниемксоот-
ветствующемусимволу.Выбранный
напитоквыделяетсялинияминадипод
символом.Названиенапиткаинастро-
енныевданноевремязначениякрепости
кофеиразмерачашкиотображаютсяна
дисплее3.
Навыборпредлагаютсяследующие
напитки:
Эспрессо Латте Макиато
Эспрессо мак. Кофе с молок.
Кофе Молочная пена
Капучино
Несколькоразприкоснувшиськкнопке
«Особыенапитки»,можнопоследова-
тельновыбратьразличныенапитки:
Горячая вода Американо *
Теплое молоко * Флэт уайт *
Кофейник * Кафе кортадо *
Обозначенные*позицииимеютсятолько
вопределенныхмоделяхприбора.
Настройка крепости кофе,
выбор молотого кофе
КасаниемHиндивидуальнонастраи-
ваетсякрепостькофейногонапиткаили
выбираетсяприготовлениенапиткаиз
молотогокофе.
Возможныследующиенастройки:
очень слабый оч. крепкий
слабый doubleshot крепкий
нормальный doubleshot крепкий+
крепкий Молот. Кофе
■ Выберитежелаемыйнапиток,прикос-
нувшиськсоответствующемусимволу.
■ Прикасайтеськсимволу Hдотехпор,
поканадисплеенепоявитсянужная
настройка,например,крепкийили
Молот. Кофе(см.раздел«Приготовление
кофейныхнапитковизмолотогокофе»).
aromaDouble Shot
Чемдольшезавариваетсякофе,тем
большегорькихвеществинежела-
тельныхароматовпопадаетвнапиток.
Этоотрицательносказываетсяна
вкусеиделаеткофеменееприятным
дляупотребления.Поэтомудля
приготовленияоченькрепкогокофе
прибороснащенспециальнойфункцией
aromaDoubleShot.Послеприготовления
половиныобъеманапиткакофепере-
малываетсяизавариваетсяещераз,
приэтомисходиттолькоегоприятный
аромат.
F
ФункциейaromaDoubleShot
можнопользоватьсядляприго-
товлениявсехкофейныхнапитков
собъемомкофенеменее35мл.
Длянапитковмалогообъема,
например,маленькойчашки
эспрессоилипринастройкеG
этафункциянедействует.
Выбор размера чашки
ПрикасаниемксимволуDиндивиду-
альновыбираетсяобъемнапитка.
Возможныследующиенастройки:
маленький средний большой
■ Выберитежелаемыйнапиток,прикос-
нувшиськсоответствующемусимволу.
■ КасайтесьсимволаDдотехпор,
поканадисплеенепоявитсянужная
настройка.
F
Стрелкаилистрелкирядомс
настройкой,например,«большой ˆ»
показывают,чтоустановленное
изготовителемколичествонапитка
(см.главу«Меню–Настройка разм.
чаш.»)былоизменено.
View a manual of the Siemens EQ.6 Plus S100 TE651209RW below. All manuals on ManualsCat.com can be viewed completely free of charge. By using the ‘Select a language’ button, you can choose the language of the manual you want to view.

MANUALSCAT | EN
Question & answers
Have a question about the Siemens EQ.6 Plus S100 TE651209RW but cannot find the answer in the user manual? Perhaps the users of ManualsCat.com can help you answer your question. By filling in the form below, your question will appear below the manual of the Siemens EQ.6 Plus S100 TE651209RW. Please make sure that you describe your difficulty with the Siemens EQ.6 Plus S100 TE651209RW as precisely as you can. The more precies your question is, the higher the chances of quickly receiving an answer from another user. You will automatically be sent an e-mail to inform you when someone has reacted to your question.
Can the milk to coffee ratio be adjusted in the EQ6 S100?
Tyrone Wray2021-08-23
The error rinse & refill is not going away. The start button is not taking command . The screen has frozen. Changed water, changed filter, cleaned the tank , no air escape . Yet not working.
Raj2022-11-28
Message staying on eq6 plus s100 . Replace drip tray . Machine was working fine turned it on on morning and message on since wont do anything machine only 2 months old
Stephen 2023-01-15
Siemens Eq6 plus s100 message staying on machine replace drip tray . Tried few things
Stephen 2023-01-15
The error rinse & refill is not going away. The start button is not taking command . The screen has frozen. Changed water, changed filter, cleaned the tank , no air escape . Yet not working.
Raj2022-11-28
Hi, my problem with my Siemens EQ6 s100 is that even at max. temperature my coffee is just not hot enough. I have tried everything- preheating the mug, using smaller mugs, using stainless mugs- but the coffee almost always is just lukewarm in under 2 mins. How can I get a nice hot cup of coffee after spending so much money on this coffee machine?
Neeti2022-11-22
I have a problem with machine Siemens EQ.6 plus s100
The problem is siemens eq.6 plus s100 idescaling overdue appliance is locked ???
Moosa 2020-01-19
I didn’t change the water hardness from 4 to water softerner right away and now it displays «Descaling required after 20 cups» and I don’t know how to get it to go away, machine is not even 2 weeks old and our water is not hard.
Simen Steinsland2019-12-13
Ask a question about the Siemens EQ.6 Plus S100 TE651209RW
Page: 1
B
C
1
12
9
10
11
13
3
2
5
6
4
17
19
Page: 2
2
en
Contents
Dear Coffee Connoisseur,
Congratulations on purchasing this fully
automatic coffee machine from Siemens.
This instruction manual describes a number
of versions of the appliance with minor
differences.
Please also take note of the enclosed Quick
reference guide, which you can then keep
in the specially provided compartment 16
until you need it again.
How to use these instructions:
You can open up the front cover of this
instruction manual to see illustrations of the
appliance with each part numbered. These
numbers will be referred to throughout the
text.
Example: brewing unit 14
These instructions also show display texts
and symbols in a special way so that you
can clearly see where we refer to texts
displayed by the appliance or symbols that
are marked on it.
Example of display texts: Espresso
Example of control elements: C
Intended use���������������������������������������������3
Important safety information�������������������3
Included in delivery����������������������������������5
Overview���������������������������������������������������5
Overview of control elements�����������������6
Display�������������������������������������������������������7
Initial use���������������������������������������������������8
Own settings “Favourite” �����������������������9
Childproof lock�����������������������������������������9
Preparing drinks���������������������������������������9
Preparing coffee drinks.
………………………..10
Preparation using milk………………………….11
Special beverages……………………………….12
Preparation using ground coffee……………13
Menu��������������������������������������������������������13
Care and daily cleaning�������������������������16
Cleaning the milk system……………………..17
Cleaning the brewing unit (Figure G)……..18
Service programmes������������������������������19
Cleaning the milk system……………………..19
Descaling.
…………………………………………..19
Cleaning…………………………………………….20
calc‘nClean…………………………………………20
Tips on energy saving����������������������������21
Frost protection��������������������������������������21
Storing accessories�������������������������������22
Accessories��������������������������������������������22
Disposal��������������������������������������������������22
Guarantee������������������������������������������������22
Simple troubleshooting�������������������������23
Technical specifications������������������������25
Page: 3
3
en
Intended use
Intended use
This appliance is intended for
domestic use only.
Only use the appliance indoors
at room temperature and up to
2000 m above sea level.
Important safety information
Please read and follow the
operating instructions carefully
and keep them for later refer-
ence! Enclose these instructions
when you give this appliance to
someone else.
This appliance can be used
by children aged from 8 years
and above and by persons with
reduced physical, sensory or
mental capabilities or lack of
experience and knowledge if
they have been given supervi-
sion or instruction concerning
use of the appliance in a safe
way and if they understand the
hazards involved. Keep children
under 8 years of age away from
the appliance and connecting
cable and do not allow them
to use the appliance. Children
shall not play with the appliance.
Cleaning and user maintenance
shall not be made by children
unless they are older than
8 years and supervised.
Intended use Important safety information
Page: 4
4
en Important safety information
W Warning
Risk of electric shock!
■ The appliance may only be
connected to a power supply
with alternating current via
a correctly installed socket
with earthing. Ensure that the
protective conductor system
of the domestic supply has
been correctly installed.
■ Connect and operate the
appliance only in accordance
with the specifications on the
rating plate.
■ Do not use the appliance if
the power cord and/or appli-
ance are damaged.
■ Only our customer service
may repair the appliance,
e.g. by replacing a damaged
power cord, in order to avoid
hazards.
■ Never immerse the appliance
or mains cord in water.
■ If there is a fault, pull out the
mains plug immediately or
switch off the power supply.
W Warning
Hazard due to magnetism!
The appliance contains perma-
nent magnets which can affect
electronic implants such as
pacemakers or insulin pumps.
Persons wearing electronic
implants must maintain a
minimum distance of 10 cm
from the appliance and from the
following parts upon removal:
milk container, milk system,
water tank and brewing unit.
W Warning
Risk of suffocation!
■ Do not allow children to play
with packaging material.
■ Store small parts safely as
they can be easily swallowed.
W Warning
Risk of injury!
■ Do not reach into the grinding
unit!
■ Improper use of this appliance
may result in injury.
W Warning
Risk of burns!
■ The milk system becomes
extremely hot. After use,
always let it cool down before
you touch it.
■ After use the surfaces of the
heating element or hotplate
can remain hot for some time.
Page: 5
5
en
Included in delivery
1 Mains switch J
2 Control panel (see next page)
3 Display
4 Drinks outlet (coffee, milk, hot water),
height-adjustable
a) Cover
b) Milk system/coffee outlet (two-part)
c) Milk tube
d) Suction pipe
5 Removable water tank
6 Lid for water tank
7 Storage compartment for measuring
spoon
8 Measuring spoon
(insertion aid for water filter)
9 Bean container
10 Aroma cover
11 Dial selector for grinding level
12 Drawer
(for ground coffee/cleaning tablet)
13 Door to brewing unit
14 Brewing unit
a) Locking mechanism
b) Cover
15 Eject lever
16 Storage compartment
for quick reference guide
17 Drip tray
a) Drip tray panel
b) Drip tray (two-section)
c) Coffee grounds container
d) Floater
18 Compartment for power cord
19 Rating plate (E number, FD)
* These user instructions describe a number
of appliance versions. Items marked * are
not present in all models.
Overview
(Figures B, C, D, E, F and G on the fold-out pages)
Included in delivery
(Figure A on the fold-out pages)
a Fully automatic coffee machine
b User Manual
c Quick reference guide
d Milk tube and suction pipe
e Water hardness testing strip
f Measuring spoon
g Water filter*
h Milk container with “freshLock” lid*
i Descaling tablets*
Page: 6
6
en Overview of control elements
Overview of control elements
(Figure B on the fold-out pages)
F
F The following symbols are visible or backlit depending on the appliance’s current
operating mode:
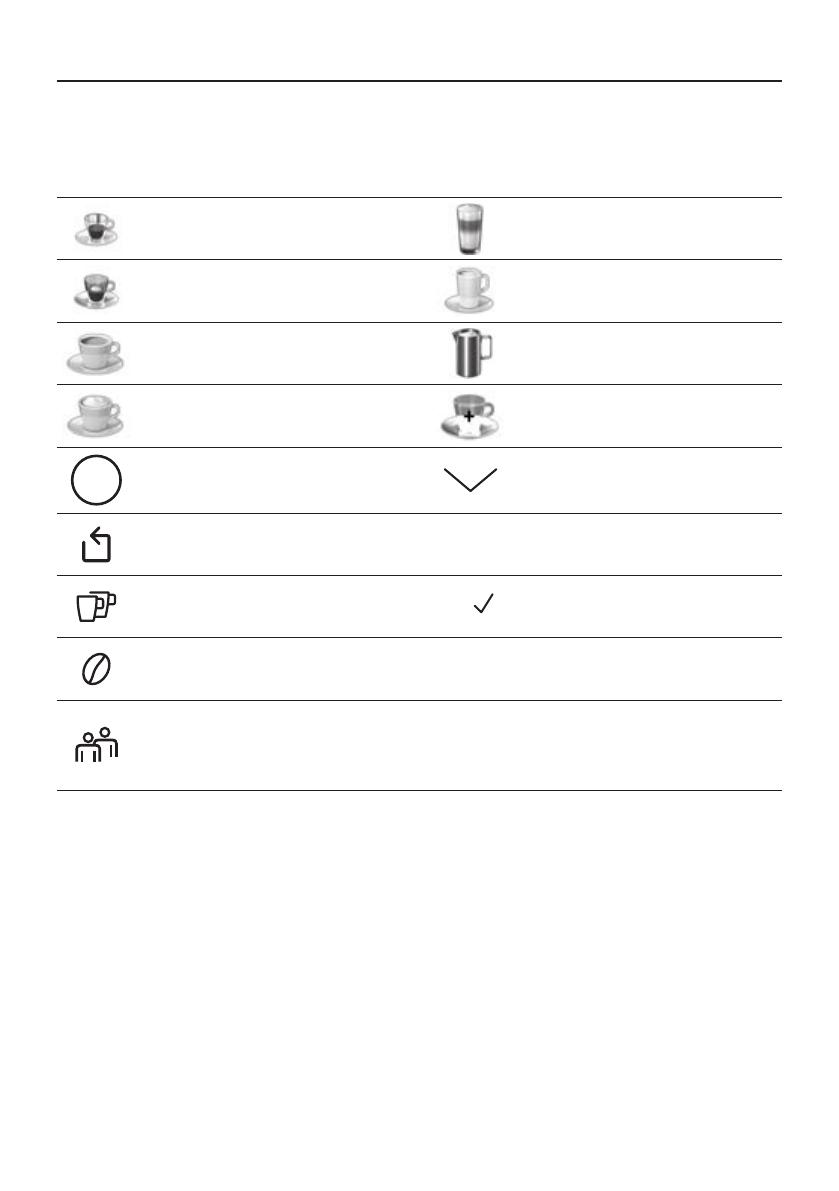
Espresso Latte Macchiato
Espresso Macch. Caffe Latte
Coffee Milk froth
Cappuccino
Special beverages (see the
section “Special beverages”).
start
stop C – Start/stop button I – Selection down
F – Back menu A – Open menu
G – Dispense two cups
simultaneously
ok B – Confirm/Store
H – Set coffee strength ml D – Select cup size
R – Call up Favourite
(touch briefly) and Childproof lock
(touch for at least 3 seconds).
Page: 7
7
en
Display
F
F Mains switch J
The mains switch J is used to switch
the appliance on or off. The appliance
rinses itself automatically when it is
switched on and off.
The appliance does not rinse if:
■
■ it is still warm when switched on, or
■
■ no coffee was dispensed before it was
switched off.
The appliance is ready for use when the
symbols and the display on the control
panel are lit.
Control panel (touch field)
In the control panel you can easily navigate
the controls just by touching the symbols
and characters.
You will hear an audible signal.
These audible signals can be switched on
or off (see the section “Menu – Key tones”).
Drink selection
Touching the corresponding symbol
selects the desired drink (see the section
“Preparing drinks”).
Start/stop button
Touching C either begins preparing
a drink or launches a service programme.
If you touch C again while the
drink is being prepared, dispensing will be
prematurely halted.
Menu
Touching A calls up the menu, the
navigation symbols will be activated and
light up. Touch I, B and F to
navigate through the menu and call up
information or change settings (see the
section “Menu”).
Drink options
Touching H or D adjusts the strength or
size of the drink, touching G prepares two
cups simultaneously as soon as you touch
C to begin dispensing (see the
section “Preparing drinks”).
“Favourite” and Childproof lock
Briefly touching R calls up person-
alised beverages (see the section
“Own settings Favourite”).
Touching R for 3 seconds or more acti-
vates or deactivates the childproof lock (see
the section “Childproof lock”).
Display
The display shows the selected drinks
and settings plus messages reporting the
appliance’s operating status.
Espresso
regular medium
Please refill water tank
These messages are cleared as soon as
the action has been carried out.
Page: 8
8
en Initial use
Initial use
General
Fill the appropriate container using only
pure, cold, uncarbonated water and solely
roasted beans. Do not use coffee beans
that have been glazed, caramelised or
treated with other additives containing
sugar, since they will block the brewing unit.
The water hardness setting on the
appliance can be adjusted. The factory
setting for the water hardness is 4. Use
the enclosed test strip to determine the
hardness of your water supply. If this
shows a value other than 4, you will need
to programme the appliance appropriately
after it has been taken into service (see
section “Menu – Water hardness”).
Setting up the appliance
■
■ Remove any protective plastic film.
■
■ Place the fully automatic coffee machine
on a level, waterproof surface that is able
to support its weight.
■
■ The appliance’s ventilation slits must not
be covered or obscured.
F
F Important: Only use the appliance
in a frost-free room. If it has been
transported or stored at temperatures
below 0°C, wait at least 3 hours
before taking it into operation.
■
■ Connect the power supply (cable storage
compartment 18) to the socket. You can
adjust the length of the cable by pulling it
further out or pushing it back in. To do this,
place the appliance with its back flush
with the edge of the work surface and
either pull the cable out downwards or
push it in upwards.
■
■ Flip up the lid of the water tank 6.
■
■ Remove the water tank 5, rinse it out and
fill it with fresh cold water. Do not fill it
past the “max” mark.
■
■ Replace the water tank 5, making sure
that it is straight, and push it right down
into place.
■
■ Reclose the lid of the water tank 6.
■
■ Fill the bean container 9 with coffee beans.
■
■ Use the main switch J 1 to switch on the
appliance.
The control panel and the display will
be activated. The display will show the
previously specified language, which will
also be used for all subsequent display
texts. A number of different languages are
available.
■
■ Touch I repeatedly until the display
indicates the desired language.
Deutsch
English
Français
■
■ Touch C to confirm your
selection.
The chosen language is now stored.
The brand logo will light up on the display 3.
The appliance will heat up and rinse itself,
a small amount of water will run out of the
drink outlet 4.
The appliance is ready for use when the
symbols and the display on the control
panel are lit.
F
F The factory settings of the fully
automatic coffee machine are
programmed for optimal perfor-
mance. The appliances switches off
automatically after a configured time
(see the section “Menu – Automatic
shut-down”).
Page: 9
9
en
Own settings “Favourite”
F
F When the appliance is used for the
first time, after a service program has
been run and when it has not been
operated for a long period, the first
beverage will not have the full aroma
and should not be consumed.
F
F When the fully automatic coffee
machine is first used, you will achieve
a suitably thick and stable “crema”
only after the first few cups have
been dispensed.
F
F If the appliance is in use for a long
period of time, water droplets will
form on the ventilation slits. This is
normal.
Own settings “Favourite”
The number of Favourites depends on
the model of the appliance. The menu
item “Favourite” can be used to store and
change individual (personalised) beverages
(see the section “Menu – Favourite”).
Call up individual beverage
■
■ Briefly touch R.
■
■ Select one of the Favourites already
stored with your own settings.
■
■ Touch C to begin dispensing
the beverage.
Childproof lock
The appliance can be locked to protect
children against scalding and burns.
■
■ Touch R for at least 3 seconds.
A key symbol appears on the display 3.
The childproof lock is now active.
It is no longer possible to operate the
appliance.
■
■ Touch R for at least 3 seconds.
The key symbol disappears from the
display 3. The childproof lock is now
deactivated. The appliance can be used in
the usual way.
Preparing drinks
This fully automatic coffee machine grinds
fresh beans for every brewing. For optimum
quality, store the beans in a cool place in
sealed containers.
F
F Important: Fill the water tank 5
with fresh clean water every day.
The tank 5 should always contain
sufficient water for operating the
appliance.
F
F Cups should be prewarmed, e.g. with
hot water. This applies particularly to
small thick-walled espresso cups.
F
F For a number of settings, coffee
is prepared in two stages (see
“
aromaDouble Shot”). Please wait
until the process is completely
finished.
Different beverages can be prepared just by
touching a key.
Drink selection
Touching the appropriate symbol selects
the desired drink. Your selection is indicated
by lines above and below the symbol. The
name of the drink and the currently active
values for strength and cup size are shown
in display 3.
You can choose from the following drinks:
Espresso Latte Macchiato
Espresso Macch. Caffe Latte
Coffee Milk froth
Cappuccino
Touch the “special beverages” button
several times to select different drinks one
after the other:
Hot water Americano *
Warm milk * Flat White *
Kleiner Brauner * Cafe Cortado *
Coffee pot *
Items marked * are not present in all models.
Page: 10
10
en Preparing drinks
Adjusting the strength,
selecting ground coffee
Touch H to set the strength of your coffee
individually or to specify that ground coffee
is to be used.
The following settings are possible:
very mild very strong
mild doubleshot strong
regular doubleshot strong+
strong Ground coffee
■
■ Touching the appropriate symbol selects
the desired drink.
■
■ Touch H repeatedly until the desired
setting e.g. strong or Ground coffee (see
the section “Preparation using ground
coffee”) appears on the display.
aromaDouble Shot
The longer the coffee is brewed, the more
bitter substances and undesired aromas
are released. This has a negative effect on
the taste and makes the coffee less easily
digestible. So for extra strong coffee, the
appliance has a special aromaDouble Shot
function. When half the quantity has been
prepared, it grinds and brews fresh coffee
beans so that only the pleasant, aromatic
scents are released.
F
F The aromaDouble Shot function can
be selected for any drink containing
a proportion of at least 35 ml coffee
volume. It is not available for small
drinks such as a small espresso or
when the G setting is enabled.
Select cup size
Touching D individually selects the
beverage volume desired.
The following settings are possible:
small medium large
■
■ Touching the appropriate symbol selects
the desired drink.
■
■ Touch D repeatedly until the display
indicates the desired setting.
F
F An arrow or multiple arrows next to
the setting, e.g. „large ˆ”,
indicate that
the preset capacity (see the section
“Menu – Set cup size”) has been
changed.
Two cups at once
Once you have selected a black coffee or
milky coffee drink (for some appliances, this
applies only to black coffee), touching G
prepares two cups simultaneously as soon
as you touch C to begin dispensing.
The setting is shown on the display.
■
■ Touching the appropriate symbol selects
the desired drink.
■
■ Touch G.
■
■ Place two prewarmed cups at left and
right underneath the beverage outlet 4.
■
■ Touch C to begin dispensing the
beverage.
The selected drink will be brewed and will
then be dispensed into the two cups.
F
F The drink is prepared in two stages
(two grinding operations). Please
wait until the process is completely
finished.
F
F Depending on the type of
appliance:
The function “Two cups at once” may
be available only for black coffee, not
for milky coffee drinks.
Preparing coffee drinks
The appliance must be ready for use.
■
■ Place a prewarmed cup underneath the
beverage outlet 4.
■
■ Touch the appropriate symbol to select
the desired drink, Espresso or Coffee.
The name of the drink and the currently
active values for strength and cup size are
shown in display.
Coffee
regular medium
Page: 11
11
en
Preparing drinks
F
F You can change the cup size and
coffee strength by touching D and
H. If you select Ground coffee,
follow the procedure described under
“Preparation using ground coffee”.
For example:
■
■ Touch D repeatedly until the display
shows large.
■
■ Touch H repeatedly until the display
shows mild.
■
■ Touch C to begin dispensing
the beverage.
The coffee is brewed and then dispensed
into the cup.
F
F You can touch C again to
prematurely halt dispensing.
Preparation using milk
This fully automatic coffee machine
possesses an integrated milk system that
enables you to prepare coffee with milk or
milk froth or warm milk alone.
B
BRisk of burns!
The upper and lower sections of the
milk system 4b become extremely
hot. After use, always let them cool
down before you touch them.
F
F Caution!
Dried milk residues are difficult to
remove, so you should always clean
the appliance after each use (see the
section “Cleaning the milk system”).
F
F While milk is being prepared you may
hear a whistling sound. This is due
to the technical nature of the milk
system 4b.
F
F Touch C again to
prematurely halt dispensing.
The appliance must be ready for use.
The milk tube and suction pipe must be
connected.
■
■ Insert the suction pipe 4d into the milk
container.
■
■ Place a prewarmed cup or glass under-
neath the beverage outlet.
Coffee-based drinks with milk
■
■ Touch the appropriate symbol to
select Espresso Macch., Caffe Latte,
Latte Macchiato or Cappuccino.
The name of the drink and the previously
specified values for strength and cup size
are shown in display.
F
F You can change the cup size and
coffee strength by touching D and
H. If you select Ground coffee,
follow the procedure described under
“Preparation using ground coffee”.
■
■ Touch C to begin dispensing the
beverage.
The milk or milk froth is dispensed into the
cup or glass first. Then the coffee is brewed
and runs into the cup or glass.
You can touch C again to prema-
turely halt dispensing of the milk or coffee,
touching C twice stops the entire
dispensing process.
Milk froth
■
■ Touch the symbol to select Milk froth.
■
■ Touch D to select the cup size.
■
■ Touch C to begin dispensing
the beverage.
Milk froth is dispensed from the beverage
outlet.
Page: 12
12
en Preparing drinks
Special beverages
Touch the “special beverages” button
several times to select different drinks one
after the other.
Items marked * are not present in all models.
Hot water
Before hot water is dispensed, the milk
system should be cleaned and the milk tube
removed (see the section “Cleaning the milk
system”). If the milk system is not cleaned,
small amounts of milk may be dispensed
together with the hot water.
B
BRisk of burns!
The milk system 4b becomes
extremely hot. After use, always let it
cool down before you touch it.
The appliance must be ready for use.
■
■ Place a cup or glass underneath the
beverage outlet 4.
■
■ Touch the “special beverages” symbol
repeatedly until Hot water appears on the
display.
■
■ Touch D to select the cup size.
■
■ Touch C to begin dispensing
the beverage.
F
F If you see the message Please
remove suction hose, proceed as
follows:
■
■ Take off the milk tube 4c and then touch
C again.
Hot water will flow out of the outlet 4.
F
F You can touch C again to
prematurely halt dispensing.
Warm milk *
Please read through first and take note of
the section “Preparation using milk”.
Then:
■
■ Touch the “special beverages” symbol
repeatedly until Warm milk appears on
the display.
■
■ Touch D to select the cup size.
■
■ Touch C to begin dispensing
the beverage.
Warm milk will flow out of the outlet 4.
F
F You can touch C again to
prematurely halt dispensing.
Americano *
■
■ Place a prewarmed cup underneath
the beverage outlet 4.
■
■ Touch the “special beverages” symbol
repeatedly until Americano appears on
the display.
■
■ Select settings such as the cup size
and strength as described in the section
“Preparing coffee drinks”.
■
■ Touch C to begin dispensing
the beverage.
The coffee is brewed and then dispensed
into the cup.
F
F You can touch C again to
prematurely halt dispensing.
Flat White*, Kleiner Brauner* or
Cafe Cortado*
Please read through first and take note of
the section “Preparation using milk”.
Then:
■
■ Place a cup or glass underneath the
beverage outlet 4.
■
■ Touch the “special beverages” symbol
repeatedly until Flat White, Kleiner Brauner
or Cafe Cortado appears on the display.
■
■ Select settings such as the cup size
and strength as described in the section
“Preparing coffee drinks”.
■
■ Touch C to begin dispensing
the beverage.
First, the milk is dispensed into the cup or
glass. Then the coffee is brewed and runs
into the cup or glass.
F
F You can touch C again to
prematurely halt dispensing of milk
or coffee. Touching C twice
stops the entire dispensing process.
Page: 13
13
en
Menu
Pot function *
■
■ Place a pot underneath the beverage
outlet 4.
■
■ Touch the “special beverages” symbol
repeatedly until Pot function appears on
the display.
■
■ Touch H to select the desired coffee
strength.
■
■ Touch D to select the desired quantity
(4 or 6 cups).
■
■ Touch C to begin dispensing the
beverage.
The coffee is brewed and then dispensed
into the pot.
F
F You can touch C again to
prematurely halt dispensing.
Preparation using ground coffee
This fully automatic coffee machine can
also be operated using ground coffee
(but not instant coffee).
F
F When using ground coffee, the
setting for the strength of the coffee,
dispensing two cups at once and
aromaDouble Shot is not available.
The appliance must be ready for use.
■
■ Place a prewarmed cup underneath the
beverage outlet 4.
■
■ Touch the appropriate symbol to select a
black or milky coffee drink.
■
■ Touch H repeatedly until the display
shows Ground coffee.
■
■ Open the ground coffee drawer 12.
■
■ Place no more than two level measuring
spoons of ground coffee in the drawer.
F
F Caution!
Do not place coffee beans or instant
coffee in this drawer.
■
■ Close the ground coffee drawer 12.
■
■ Touch C to begin dispensing the
beverage.
The coffee is brewed and then dispensed
into the cup.
F
F Touch C again to
prematurely halt dispensing.
Adjusting the grind setting
You can use the rotary selector 11 to adjust
the grind setting from coarse to fine.
F
F Caution!
Adjust the grind setting only while the
grinding unit is running, otherwise
you may damage the appliance.
A
ARisk of injury!
Do not reach into the grinding unit.
■
■ With the grinding unit running, adjust the
selector 11 from fine (a: turn anticlock-
wise) to coarse (b: turn clockwise).
a b
F
F The new setting will not become
apparent until after the second cup of
coffee.
F
F For dark roast coffee beans, choose
a finer grind, for lighter beans a
coarser grind.
Menu
The menu is used for changing individual
settings, accessing information and
launching processes.
■
■ Touch A to open the menu.
In the display you will see the various
setting options, the navigation symbols light
up. The current setting is marked on the
display.
Navigating through the menu:
I = move down
B = confirm / store
F =
go back
A =
open the menu/
exit from the menu
Page: 14
14
en Menu
F
F Touching I displays each setting
or selection option in order. After
you reach the lowest menu item the
topmost one is shown again.
For example:
Setting the coffee temperature to max.:
■
■ Touch A. The menu is opened.
■
■ Touch I repeatedly until the display
shows Coffee temperature.
■
■ Touch B, the display shows e.g. high
■
■ Touch I repeatedly until the display
shows max.
■
■ Touch B to store the setting. The
display shows the confirmation.
■
■ The menu item Coffee temperature appears.
■
■ Touch F to exit from the menu.
You can specify the following settings:
Cleaning and care
Starting the special service programmes.
You can select Rinse the milk system,
Descale, Clean or calc’nClean.
■
■ Use I to choose the desired
programme and touch B to confirm
your choice.
■
■ Touch C to begin running the
programme.
F
F Important: Be sure to take note of
the section on “Service programmes”.
Info Service programmes
(depending on the type of appliance)
Display how many beverages can still be
prepared before it will be necessary to run
one of the service programmes.
■
■ Use I to display Clean after — c or
Descale after — c.
■
■ Touch F to exit from the display.
F
F For technical reasons the counter
does not represent a precise number
of cups.
Coffee-milk ratio
The coffee-milk mixing ratio set in the
factory can be adjusted in several steps.
■
■ Use I to select the beverage (only
for coffee drinks with milk) and confirm
with B.
■
■ Use I to select the desired mixing
ratio (setting of milk content in %) and
confirm with B.
■
■ The setting is saved.
Example: If a value of 30% is selected,
30% milk and 70% coffee will be dispensed.
Favourite
The menu item Favourite can be used to
create or change personalised beverages.
The number of Favourites depends on the
model of the appliance.
■
■ Use I to select a new or existing
profile and confirm with B
■
■ Touch the desired beverage and confirm
with B.
■
■ Your selection for the beverage settings
appears on the display depending on the
beverage, e.g. ml or Coffee-milk ratio.
■
■ Make your settings and confirm with
B each time.
■
■ The beverage is now saved in the profile.
Set cup size
Set up the volume dispensed for each drink
and each size of cup. The volumes set up in
the factory can be adjusted stepwise.
■
■ Use I to choose a drink and touch
B to confirm your choice.
■
■ Use I to choose the desired volume
and touch B to confirm your choice.
The setting is then saved.
Water hardness
Set this to the hardness of the local water
supply.
Level 1, 2, 3, 4 or Softening system can be
selected. The preset level of water hard-
ness is level 4.
■
■ Use I to choose the desired water
hardness and touch B to confirm
your choice.
Page: 15
15
en
Menu
F
F It is important to set the water hard-
ness correctly, so that the appliance
indicates accurately when the
descaling programme should be run.
You can check the water hardness using
the enclosed test strip or by asking your
local water supplier. If a water softening
system is installed in the house, please
select the Softening system setting.
■
■ Briefly dip the test strip in the water and
check the result after one minute.
Level Water hardness
German (°dH) French (°fH)
1
2
3
4
1-7
8-14
15-21
22-30
1-13
14-25
26-38
39-54
Automatic shut-down
Setting how long the appliance should wait
after the last drink was prepared before it
automatically switches itself off.
You can specify values from 15 minutes to
8 hours. The factory setting is 30 minutes.
■
■ Use I to choose the desired interval
and touch B to confirm your choice.
Coffee temperature
Specifying the temperature for coffee drinks
and hot water.
You can choose normal, high, or max.
The setting applies to all types of drink
preparation.
■
■ Use I to choose the desired temper-
ature level and touch B to confirm
your choice.
Water filter
Specifying whether a water filter should be
activated or whether no filter is used.
You can choose Activate new filter or No
filter.
F
F Using a water filter can prevent the
build-up of limescale.
Water filters are available from retail outlets
or from customer services (see the section
“Accessories”).
F
F Important: Before you can use a
new water filter it will need to be
rinsed.
■
■ Use the measuring spoon 8 to press the
water filter firmly into the water tank 5.
■
■ Fill the water tank with water up to the
“max” mark.
■
■ Connect the milk tube 4c to the milk
system 4b and the suction pipe 4d.
■
■ Insert the end of the suction pipe 4d into
the drip plate 17b.
■
■ Touch A and use I to select
Water filter.
■
■ Touch B and use I to select
Activate new filter.
■
■ Empty the drip tray and re-insert.
■
■ Touch B to confirm.
Water will now flow through the filter to
rinse it.
■
■ Then empty the drip tray and re-insert.
The appliance is ready for use again.
Rinsing the filter simultaneously activates
the setting for displaying the message
“Please change water filter”.
When this message appears, or at the
latest after two months, the filter will no
longer be effective. It needs to be replaced
for reasons of hygiene and to prevent a
build-up of limescale (which could damage
the appliance).
If you do not intend to insert a new filter,
select the setting No filter and touch B
to confirm.
Page: 16
16
en Care and daily cleaning
F
F If the appliance has not been used
for a prolonged period (for example,
while you are on holiday), the existing
filter should be rinsed before the
appliance is used again. To do this,
simply dispense a cup of hot water.
Languages
Setting up the language to be used for
display texts.
■
■ Use I to choose the desired
language and touch B to confirm
your choice.
Frost protection
Service programme to prevent frost
damage during transportation and storage.
This programme completely empties the
appliance.
F
F The appliance must be ready for use
and the water tank 5 must be filled.
■
■ Touch C to begin running the
programme.
■
■ Remove the water tank; the appliance
automatically empties all its pipes and
then switches itself off.
■
■ Empty the water tank 5 and the drip tray 17.
Key tones
Switches on or off the tones that you hear
when you touch the control panel.
■
■ Touch B to confirm your choice.
■
■ Use I to choose Key tones ON
or Key tones OFF and touch B to
confirm your choice.
Beverage statistics
(depending on the type of appliance)
Shows the volume of drinks dispensed
since the appliance was taken into service.
■
■ Touch F to exit from the display.
Factory settings
Resets your own settings to the condition
when delivered.
■
■ Touch C to clear all your own
settings.
Care and daily cleaning
E
ERisk of electric shock!
Before cleaning the appliance, unplug
it from the mains. Never immerse
the appliance in water. Do not use a
steam cleaner.
■
■ Wipe the outside of the appliance with a
soft, damp cloth.
■
■ Clean the control panel with a microfibre
cloth.
■
■ Do not use any cleaning agents containing
alcohol or spirits.
■
■ Do not use abrasive cloths or cleaning
agents.
■
■ Always immediately remove any limes-
cale, or residues of coffee, milk, cleaning
or descaling solution. It is possible for
corrosion to form underneath such
deposits.
■
■ New sponge cloths may contain salts that
can cause rust films to form on stainless
steel, so such cloths should always be
thoroughly rinsed before use.
■
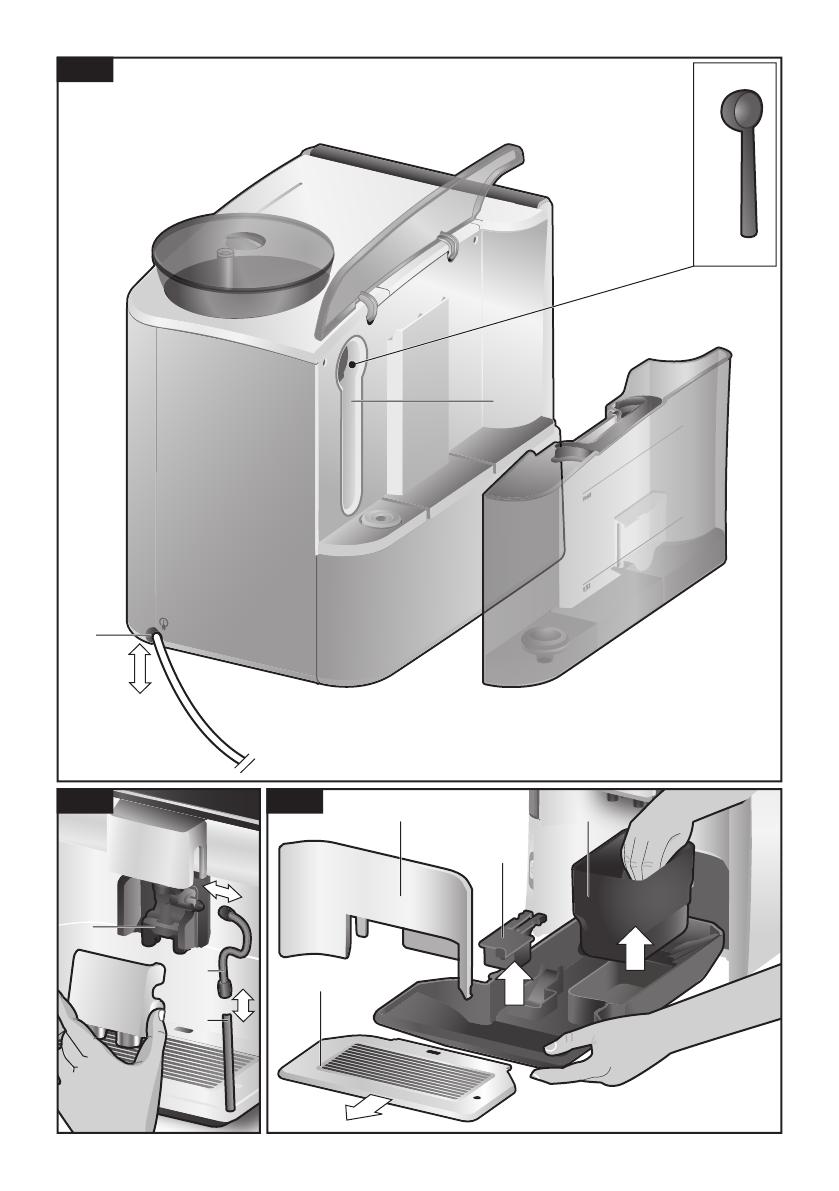
■ Pull the drip tray 17 and coffee grounds
container 17c towards the front and
remove them. Take off the panel 17a and
drip plate 17b. Empty and clean the drip
tray and coffee grounds container.
■
■ Wipe out the inside of the appliance
(holder, trays) and the drawer for ground
coffee (this cannot be removed).
■
■ Remove the float 17d and clean it with
a moist cloth (depends on the type of
appliance).
Page: 17
17
en
Care and daily cleaning
L
L Do not put the following parts in the
dishwasher:
Panel of drip tray 17a, cover 4a, brewing
unit 14, water tank 5 and aroma cover 10.
M
M The following parts may be cleaned in
the dishwasher:
Drip tray 17, drip plate 17b, coffee grounds
container 17c, measuring spoon 8 and
the upper and lower parts of the milk
system 4b.
F
F Important: The drip tray 17 and
coffee grounds container 17c should
be emptied and cleaned every day in
order to prevent deposits.
F
F If the appliance is cold when
switched on, or if it is switched off
after dispensing coffee, it rinses auto-
matically. The system is therefore
self-cleaning.
F
F Important: If at any time the appli-
ance is not used for a lengthy period
(e.g. holiday), clean the entire appli-
ance thoroughly, including the milk
system 4b and brewing unit 14.
Cleaning the milk system
A
ABe sure to clean the milk system 4b
every time you make a drink involving
milk!
F
F The milk system 4b is automatically
cleaned with a short jet of steam
directly after preparing a milk drink.
For particularly thorough cleaning,
the milk system 4b can be automat-
ically rinsed with the programme
“Cleaning the milk system” (see the
section “Service programmes –
Cleaning the milk system”).
Cleaning by hand
B
BRisk of burns!
The milk system 4b becomes
extremely hot. After use, always let
them cool down before you touch
them.
Take the milk system 4b apart to clean it:
■
■ Push the beverage outlet 4 right down.
■
■ Take off the cover 4a towards the front
and pull off the milk tube.
■
■ Remove the milk system 4b by pulling it
straight forward.
■
■ Take apart the upper and lower parts of
the milk system 4b.
■
■ Separate the milk tube from the suction
pipe.
■
■ Clean the individual parts with wash-
ing-up liquid and a soft cloth.
■
■ Rinse all parts with clean water and dry
them.
Page: 18
18
en Care and daily cleaning
F
F The upper and lower parts of the milk
system 4b, the milk tube 4c and the
suction pipe 4d can also be cleaned
in a dishwasher.
■
■ Reassemble the individual parts.
■
■ Place the milk system 4b back in the
appliance from the front, making sure it is
straight.
■
■ Replace the cover 4a.
Cleaning the brewing unit
(Figure G)
F
F See also the Quick reference guide in
the storage compartment 16.
In addition to the automatic cleaning
programme, the brewing unit 14 should be
removed regularly for cleaning.
■
■ Use the main switch J 1 to switch the
appliance completely off.
■
■ Open the door 13 to the brewing unit.
■
■ Slide the red latch 14a on the brewing
unit 14 all the way to the left.
■
■ Press the eject lever 15 right down. The
brewing unit will be released.
■
■ Take hold of the brewing unit 14 by the
recessed grips and carefully remove it.
F
F Important: Clean it without using
washing-up liquid and do not put it in
the dishwasher.
■
■ Remove the cover 14b and thoroughly
clean the brewing unit 14 under running
water.
■
■ Thoroughly clean the strainer of the
brewing unit under the water jet.
■
■ Thoroughly clean the inside of the appli-
ance with a moist cloth, removing any
coffee residues.
■
■ Allow the brewing unit 14 and the inside
of the appliance to dry.
■
■ Replace the cover 14b on the brewing
unit and then push the brewing unit 14
back into the appliance until it latches into
place.
■
■ Press the eject lever 15 right up.
■
■ Slide the red latch 14a all the way to the
right and close the door 13.
Page: 19
19
en
Service programmes
Service programmes
F
F See also the Quick reference guide in
the storage compartment 16.
Following prior notification, either
Descaling necessary or
Cleaning necessary or
calc’nClean necessary.
appears in display 3 at certain intervals.
The unit should immediately be cleaned or
descaled using the appropriate programme.
The two processes Descale and Clean can
optionally be carried out together using
the calc’nClean function (see the section
“calc’nClean”). Failure to carry out the
service programme according to the instruc-
tions may damage the appliance.
F
F Important: if descaling is not
performed on the appliance in good
time, then the following appears:
Descaling overdue. Appliance will soon
be locked —> press menu for 3 sec.
Immediately perform the descaling
process in accordance with the
instructions. If the appliance is
locked, it can only be operated again
once the descaling process has been
carried out.
F
F Caution!
For each of the service programmes,
use descaling and cleaning agents
as described in the instructions.
Never interrupt a service programme.
Do not swallow any cleaning fluids!
Never use vinegar, citric acid or any
vinegar-based or citric acid-based
agents. Never place descaling tablets
or other descaling materials in the
coffee drawer 12!
Before starting the service program
(Descale, Clean or calc’nClean) remove
the brewing unit, clean it as instructed and
replace it.
Specially developed suitable descaling
and cleaning tablets are available from
retail outlets or from customer services
(see the section “Accessories”).
Cleaning the milk system
Takes about 1 minute.
Touch A to open the menu.
■
■ Use I to choose Cleaning and care
and touch B to confirm your choice.
■
■ Use I to choose Rinse the milk
system and touch B to confirm your
choice.
■
■ Touch C to begin running the
programme.
The display 3 will indicate the progress of
the programme:
■
■ Place an empty glass under the beverage
outlet 4 and stand the end of the suction
pipe 4d in it.
■
■ Touch C. The milk system will
now clean itself automatically.
■
■ Then empty the glass and clean the
suction pipe 4d.
You should also regularly clean the milk
system manually (dishwasher or by hand).
Descaling
Takes about 30 minutes.
The line at the bottom of the display
indicates the progress of the descaling
process.
F
F If there is a water filter in the water
tank 5, be sure to remove it before
starting the service programme.
■
■ Touch A to open the menu.
■
■ Use I to choose Cleaning and care
and touch B to confirm your choice.
■
■ Use I to choose Descale and touch
B to confirm your choice.
■
■ Touch C to begin running the
programme.
The display 3 will indicate the progress of
the programme:
■
■ Empty and re-insert the drip tray 17.
F
F The following request appears:
Remove water filter if inserted ¢start.
Page: 20
20
en Service programmes
■
■ Remove the filter and then touch
C again.
■
■ Pour lukewarm water into the empty water
tank 5 up to the “0.5l” mark and then
dissolve one Siemens descaling tablet
TZ80002 in it.
■
■ Touch C.
■
■ Place a container with a capacity of 0.5 litre
under the beverage outlet 4.
■
■ Place the end of the suction pipe 4d in
the container.
■
■ Touch C.
The descaling programme will now run for
about 20 minutes.
F
F If there is not enough descaling solu-
tion in the water tank 5, you will see
the prompt Refill descaler ¢start.
■
■ Add more descaling solution and then
touch C again.
■
■ Rinse the water tank 5 and refill it with
fresh water up to the “max” mark.
■
■ If you use a filter, replace it now.
■
■ Touch C.
The descaling programme will now run for
about 1 minute and rinse the appliance.
■
■ Empty and re-insert the drip tray 17.
F
F Important: Wipe over the appliance
with a soft damp cloth to ensure that
you immediately remove any traces
of descaling solution. It is possible for
corrosion to form underneath such
deposits. New sponge cloths may
contain salts that can cause rust films
to form on stainless steel, so such
cloths should always be thoroughly
rinsed before use. Clean the suction
pipe 4d of the drinks outlet particu-
larly carefully.
The appliance has finished descaling and is
ready for use again.
Cleaning
Takes about 9 minutes.
The line at the bottom of the display
indicates the progress of the descaling
process.
■
■ Touch A to open the menu.
■
■ Use I to choose Cleaning and care
and touch B to confirm your choice.
■
■ Use I to choose Clean and touch
B to confirm your choice.
■
■ Touch C to begin running the
programme.
The display 3 will indicate the progress of
the programme:
■
■ Empty and re-insert the drip tray 17.
■
■ Open the ground coffee drawer 12.
■
■ Drop one Siemens cleaning tablet in the
drawer 12 and close it.
■
■ Touch C.
The cleaning programme will now run for
about 7 minutes.
■
■ Empty and re-insert the drip tray 17.
The appliance has finished cleaning and is
ready for use again.
calc‘nClean
Takes about 43 minutes.
calc’nClean combines the functions
Descale and Clean.
If both programmes are due to be carried
out close together the fully automatic coffee
machine will automatically suggest this
service programme.
The line at the bottom of the display indi-
cates the progress of the descaling process.
F
F If there is a water filter in the water
tank 5, be sure to remove it before
starting the service programme.
■
■ Touch A to open the menu.
■
■ Use I to choose Cleaning and care
and touch B to confirm your choice.
■
■ Use I to choose calc’nClean and
touch B to confirm your choice.
■
■ Touch C to begin running the
programme.
The display 3 will indicate the progress of
the programme:
Page: 21
21
en
Tips on energy saving
■
■ Empty and re-insert the drip tray 17.
■
■ Open the ground coffee drawer 12.
■
■ Drop one Siemens cleaning tablet in the
drawer 12 and close it.
■
■ Touch C.
F
F The following request appears:
Remove water filter if inserted ¢start.
■
■ Remove the filter and then touch
C again.
■
■ Pour lukewarm water into the empty water
tank 5 up to the “0.5l” mark and then
dissolve one Siemens descaling tablet
TZ80002 in it.
■
■ Touch C.
■
■ Place a container with a capacity of 1 litre
under the beverage outlet 4.
■
■ Place the end of the suction pipe 4d in
the container.
■
■ Touch C.
The descaling programme will now run for
about 28 minutes.
F
F If there is not enough descaling solu-
tion in the water tank 5, you will see
the prompt Refill descaler ¢start.
■
■ Add more descaling solution and then
touch C again.
■
■ Rinse the water tank 5 and refill it with
fresh water up to the “max” mark.
■
■ If you use a filter, replace it now.
■
■ Touch C.
The descaling programme will now run
for about one more minute, and then the
cleaning programme will run for about
7 minutes and rinse the appliance.
■
■ Empty and re-insert the drip tray 17.
F
F Important: Wipe over the appliance
with a soft damp cloth to ensure that
you immediately remove any traces
of descaling solution. It is possible for
corrosion to form underneath such
deposits. New sponge cloths may
contain salts that can cause rust films
to form on stainless steel, so such
cloths should always be
thoroughly
rinsed before use. Clean the suction
pipe 4d of the drinks outlet particu-
larly carefully.
The appliance has finished descaling and is
ready for use again.
F
F Important: If any of the service
programmes is ever interrupted, for
instance by a power failure, please
proceed as follows:
■
■ Rinse the water tank 5 and refill it with
fresh water up to the “max” mark.
■
■ Touch C.
The appliance will be rinsed for approx.
2 minutes for safety reasons.
■
■ Empty and re-insert the drip tray 17.
The aborted service programme must
be restarted.
Tips on energy saving
■
■ When the fully automatic coffee machine
is not in use, use the mains switch J 1 on
the front of the appliance to switch it off.
■
■ In the menu, set the Automatic shut-down
period to 15 minutes.
■
■ If possible, do not interrupt the dispensing
of coffee or milk froth. Stopping a process
prematurely results in higher energy
consumption and the drip tray fills up
more quickly.
■
■ Descale the appliance regularly to avoid a
build-up of limescale. Limescale residues
cause higher energy consumption.
Frost protection
F
F Caution!
To prevent frost damage during trans-
portation and storage, completely
empty the appliance beforehand.
See the section “Menu – Frost protection”.
Page: 22
22
en Storing accessories
Storing accessories
The fully automatic coffee machine has
special compartments to hold the meas-
uring spoon and the Quick reference guide.
■
■ To store the measuring spoon 8, lift off
the water tank 5 and place the spoon in
the preformed recess 7.
■
■ To store the Quick reference guide, open
the door to the brewing unit 13 and insert
the guide into the space provided 16.
Accessories
The following accessories are available
from retailers or from customer service:
Accessories Order number
Retail /
Customer service
Cleaning tablets TZ80001/00311807
Descaling tablets TZ80002 / 00576693
Water filter TZ70003 / 00575491
Care set TZ80004 / 00576330
Milk container with
“freshLock” lid
TZ80009N / 00576166
Disposal
J
Dispose of packaging in an environ-
mentally-friendly manner. This
appliance is labelled in accordance
with European Directive 2012/19/EU
concerning used electrical and
electronic appliances (waste electrical
and electronic equipment – WEEE).
The guideline determines the frame-
work for the return and recycling
of used appliances as applicable
throughout the EU. Please ask your
specialist retailer about current
disposal facilities.
Guarantee
The guarantee conditions for this appliance
are as defined by our representative in the
country in which it is sold. Details regarding
these conditions can be obtained from
the dealer from whom the appliance was
purchased. The bill of sale or receipt must
be produced when making any claim under
the terms of this guarantee.
Changes reserved.
Page: 23
23
en
Simple troubleshooting
Simple troubleshooting
Problem Cause Solution
Coffee or milk froth quality
varies considerably.
Build-up of limescale in the
appliance.
Descale the appliance as
described in the instructions.
No hot water dispensed. The milk system or its
holder is not clean.
Clean the milk system or
its holder (see the section
“Cleaning the milk system”).
Too little milk froth, or
none at all, or the milk
system is not taking in
any milk.
The milk system or its
holder is not clean.
Clean the milk system or
its holder (see the section
“Cleaning the milk system”).
Milk not suitable for
foaming.
Do not use milk that has already
been boiled. Use cold milk with a
fat content of at least 1.5%.
The milk system is incor-
rectly assembled.
Moisten the upper and lower
sections and fit them together.
Build-up of limescale in the
appliance.
Descale the appliance as
described in the instructions.
The selected per-cup
quantity is not reached.
Coffee dispensing slows
to a trickle or stops
completely.
Coffee is being ground too
finely, or the pre-ground
coffee is too fine.
Adjust the grinding unit to a
coarser setting. Use a coarser
ground coffee.
Heavy build-up of limes-
cale in the appliance.
Descale the appliance as
described in the instructions.
Coffee has no “crema”. Unsuitable type of coffee. Use a type of coffee with a
higher proportion of robusta
beans.
The beans are no longer
fresh.
Use fresh beans.
The grinding setting is not
suitable for the beans.
Adjust the grinding unit to a finer
setting.
Coffee is too “acidic”. The grinding setting is too
coarse or the pre-ground
coffee is too coarse.
Adjust the grinding unit to a finer
setting or use finer pre-ground
coffee.
Unsuitable type of coffee. Use a darker roast.
Coffee is too “bitter”. The grinding setting is
too fine or the pre-ground
coffee is too fine.
Adjust the grinding unit to a
coarser setting or use coarser
pre-ground coffee.
Unsuitable type of coffee. Change the type of coffee.
If you are unable to solve the problem, always call the hotline!
You will find the telephone numbers at the back of these instructions.
Page: 24
24
en Simple troubleshooting
Problem Cause Solution
The coffee tastes “burnt”. The brewing temperature is
too high
Reduce the temperature,
see the section
“Menu – Coffee temperature”.
The grinding setting is
too fine or the pre-ground
coffee is too fine.
Adjust the grinding unit to a
coarser setting or use coarser
pre-ground coffee.
Unsuitable type of coffee. Change the type of coffee.
The water filter does not
stay in position in the
water tank.
The water filter is not
mounted correctly.
Firmly press the water filter
straight down into the tank
connection.
The coffee grounds are
not compact and are too
wet.
The grinding setting is too
fine or too coarse, or not
enough ground coffee has
been used.
Adjust the grinding unit to a
coarser or finer setting, or use
2 level measuring spoons of
ground coffee.
Water dripped onto the
inner floor of the appli-
ance when the drip tray
was removed.
Drip tray was removed too
soon.
Wait a few seconds after the
last drink was dispensed before
removing the drip tray.
Display shows
Please refill bean container
although the container is
already full, or the grinder
is not grinding any beans.
Beans are not falling into
the grinding unit (beans too
oily).
Gently tap the bean container.
Possibly change the type of
coffee used. When the bean
container is empty, wipe it with a
dry cloth.
Display shows
Please empty drip tray
despite the drip tray being
empty.
Emptying is not detected
when the appliance is
switched off.
When the appliance is switched
on, remove and re-insert the
drip tray.
The drip tray is soiled. Clean the drip tray thoroughly.
Display shows
Refill with still water or
change filter
Water tank wrongly
inserted.
Insert water tank correctly.
Carbonated water in the
water tank.
Fill the water tank with fresh tap
water.
Float is stuck in the water
tank.
Remove the tank and clean
thoroughly.
New water filter did not
rinse according to the
instructions.
Rinse the water filter according
to instructions and then switch
on.
Air in the water filter. Dip the water filter into water
until no more air bubbles
escape, replace the filter.
Water filter is old. Insert a new water filter.
If you are unable to solve the problem, always call the hotline!
You will find the telephone numbers at the back of these instructions.
Page: 25
25
en
Technical specifications
Problem Cause Solution
Display shows
Please clean brewing unit,
then replace
Brewing unit is soiled. Clean the brewing unit.
Too much pre-ground
coffee in the brewing unit.
Clean the brewing unit. Place no
more than two level measuring
spoons of ground coffee in the
drawer.
The mechanism of the
brewing unit is stiff.
Clean the brewing unit (see the
section “Daily maintenance and
cleaning”).
Display shows
Please restart appliance
Appliance is too warm. Leave the appliance to cool
down.
Brewing unit is soiled. Clean the brewing unit.
Display shows
Descaling insufficient.
Repeat process
Incorrect or insufficient
descaler or excessive scale
existing on appliance.
Perform descaling programme
again.
Display shows
Please let appliance
cool down
Appliance is too hot. Switch off appliance for
30 minutes.
Display shows
Error
Please contact hotline
The appliance has a fault. Please contact the hotline.
If you are unable to solve the problem, always call the hotline!
You will find the telephone numbers at the back of these instructions.
Technical specifications
Power connection (voltage – frequency) 220-240 V – 50/60 Hz
Power rating 1500 W
Maximum static pump pressure 15 bar (TE651.., TE653.., TE654..)
19 bar (TE655.., TE657..)
Maximum water tank capacity (without filter) 1.7 l
Maximum capacity of the coffee bean container ~300g
Length of power cable 100 cm
Dimensions (H x B x D) 385 x 301 x 458 mm
Weight, empty 10-12 kg
Type of grinding unit Ceramic
Page: 26
01/17
BSH group is a Trademark Licensee of Siemens AG.
Manufacturer´s Service for Siemens Home Appliances.
DE Deutschland, Germany
BSH Hausgeräte Service GmbH
Zentralwerkstatt für kleine Hausgeräte
Trautskirchener Strasse 6-8
90431 Nürnberg
Online Auftragsstatus, Pickup Service für
Kaffeevollautomaten und viele weitere
Infos unter:
www.siemens-home.bsh-group.de
Reparaturservice, Ersatzteile &
Zubehör, Produkt-Informationen:
Tel.: 0911 70 440 044
mailto:cp-servicecenter@bshg.com
Wir sind an 365 Tagen rund um die Uhr
erreichbar.
AE United Arab Emirates,
BSH Home Appliances FZE
Round About 13, Plot Nr MO-0532A
Jebel Ali Free Zone – Dubai
Tel.: 04 881 4401
mailto:service.uae@bshg.com
www.siemens-home.bsh-group.com/ae
AL Republika e Shqiperise,
Albania
ELEKTRO-SERVIS sh.p.k
Rr. Shkelqim Fusha, Selite,
Pallati “Matrix Konstruksion”,
Kati 0 dhe +1
1023 Tirane
Tel.: 4 2278 130, -131
Fax: 4 2278 130
mailto:info@elektro-servis.com
EXPERT SERVIS
Rruga e Kavajes,
Kulla B Nr 223/1 Kati I
1023 Tirane
Tel.: 4 480 6061
Tel.: 4 227 4941
Fax: 4 227 0448
Cel: +355 069 60 45555
mailto:info@expert-servis.al
AT Österreich, Austria
BSH Hausgeräte Gesellschaft mbH
Werkskundendienst für Hausgeräte
Quellenstrasse 2a
1100 Wien
Online Reparaturannahme, Ersatzteile
und Zubehör und viele weitere Infos
unter: www.siemens-home.bsh-group.at
Reparaturservice, Ersatzteile & Zubehör,
Produktinformationen
Tel.: 0810 550 522
mailto:vie-stoerungsannahme@bshg.com
Wir sind an 365 Tagen rund um die Uhr für
Sie erreichbar.
AU Australia
BSH Home Appliances Pty. Ltd.
Gate 1, 1555 Centre Road
Clayton, Victoria 3168
Tel.: 1300 167 425*
Fax: 1300 306 818
mailto:aftersales.au@bshg.com
www.siemens-home.bsh-group.com/au
*Mo-Fr: 24 hours
BA Bosna i Hercegovina,
Bosnia-Herzegovina
“HIGH” d.o.o.
Gradačačka 29b
71000 Sarajevo
Tel.: 061 10 09 05
Fax: 033 21 35 13
mailto:bosch_siemens_sarajevo@
yahoo.com
BE Belgique, België, Belgium
BSH Home Appliances S.A.
Avenue du Laerbeek 74
Laarbeeklaan 74
1090 Bruxelles – Brussel
Tel.: 070 222 142
Fax: 024 757 292
mailto:bru-repairs@bshg.com
www.siemens-home.bsh-group.com/be
BG Bulgaria
BSH Domakinski Uredi
Bulgaria EOOD
115К Tsarigradsko Chausse Blvd.
European Trade Center Building,
5th floor
1784 Sofia
Tel.: 0700 208 18
Fax: 02 878 79 72
mailto:informacia.servis-bg@
bshg.com
www.siemens-home.bsh-group.com/bg
BH Bahrain,
Khalaifat Est.
P.O. Box 5111
Manama
Tel.: 01 7400 553
mailto:service@khalaifat.com
CH Schweiz, Suisse,
Svizzera, Switzerland
BSH Hausgeräte AG
Werkskundendienst für Hausgeräte
Fahrweidstrasse 80
8954 Geroldswil
mailto:ch-info.hausgeraete@
bshg.com
Service Tel.: 0848 840 040
Service Fax: 0848 840 041
mailto:ch-reparatur@bshg.com
Ersatzteile Tel.: 0848 880 080
Ersatzteile Fax: 0848 880 081
mailto:ch-ersatzteil@bshg.com
www.siemens-home.bsh-group.ch
CY Cyprus, Κύπρος
BSH Ikiakes Syskeves-Service
39, Arh. Makaariou III Str.
2407 Egomi/Nikosia (Lefkosia)
Tel.: 7777 8007
Fax: 022 65 81 28
mailto:bsh.service.cyprus@
cytanet.com.cy
CZ Česká Republika,
Czech Republic
BSH domácí spotřebiče s.r.o.
Firemní servis domácích spotřebičů
Pekařská 10b
155 00 Praha 5
Tel.: 0251 095 546
Fax: 0251 095 549
www.siemens-home.bsh-group.com/cz
DK Danmark, Denmark
BSH Hvidevarer A/S
Telegrafvej 4
2750 Ballerup
Tel.: 44 89 89 85
Fax: 44 89 89 86
mailto:BSH-Service-DK@BSHG.com
www.siemens-home.bsh-group.com/dk
EE Eesti, Estonia
SIMSON OÜ
Türi tn.5
11313 Tallinn
Tel.: 0627 8730
Fax: 0627 8733
mailto:servicenet@servicenet.ee
www.simson.ee
Renerki Kaubanduse OÜ
Tammsaare tee 134B
(Euronicsi kaupluses)
12918 Tallinn
Tel.: 0651 2222
Fax: 0516 7171
mailto klienditeenindus@renerk.ee
www.renerk.ee
Eliser OÜ
Mustamäe tee 24
10621 Tallinn
Tel.: 0665 0090
mailto:hooldus@eliser.ee
www.kodumasinate-remont.ee
ES España, Spain
En caso de avería puede ponerse en
contacto con nosotros, su aparato será
trasladado a nuestro taller especializado
de cafeteras.
BSH Electrodomésticos España S. A.
Servicio Oficial del Fabricante
Parque Empresarial PLAZA,
C/ Manfredonia, 6
50197 Zaragoza
Tel.: 902 118 821 o 976 305 714
mailto:CAU-Siemens@bshg.com
www.siemens-home.bsh-group.es
FI Suomi, Finland
BSH Kodinkoneet Oy
Itälahdenkatu 18 A
PL 123
00201 Helsinki
Tel.: 0207 510 700
Fax: 0207 510 780
mailto:Siemens-Service-FI@bshg.com
www.siemens-home.bsh-group.com/fi
Lankapuhelimesta 8,28 snt/puhelu
+ 7 snt/min (alv 24%)
Matkapuhelimesta 8,28 snt/puhelu
+ 17 snt/min (alv 24%)
Kundendienst-Zentren • Central-Service-Depots • Service Après-Vente • Servizio Assistenza • Centrale
Servicestation • Asistencia técnica • Servicevaerkter • Apparatservice • Huolto
Page: 27
01/17
BSH group is a Trademark Licensee of Siemens AG.
Manufacturer´s Service for Siemens Home Appliances.
DE Deutschland, Germany
BSH Hausgeräte Service GmbH
Zentralwerkstatt für kleine Hausgeräte
Trautskirchener Strasse 6-8
90431 Nürnberg
Online Auftragsstatus, Pickup Service für
Kaffeevollautomaten und viele weitere
Infos unter:
www.siemens-home.bsh-group.de
Reparaturservice, Ersatzteile &
Zubehör, Produkt-Informationen:
Tel.: 0911 70 440 044
mailto:cp-servicecenter@bshg.com
Wir sind an 365 Tagen rund um die Uhr
erreichbar.
AE United Arab Emirates,
BSH Home Appliances FZE
Round About 13, Plot Nr MO-0532A
Jebel Ali Free Zone – Dubai
Tel.: 04 881 4401
mailto:service.uae@bshg.com
www.siemens-home.bsh-group.com/ae
AL Republika e Shqiperise,
Albania
ELEKTRO-SERVIS sh.p.k
Rr. Shkelqim Fusha, Selite,
Pallati “Matrix Konstruksion”,
Kati 0 dhe +1
1023 Tirane
Tel.: 4 2278 130, -131
Fax: 4 2278 130
mailto:info@elektro-servis.com
EXPERT SERVIS
Rruga e Kavajes,
Kulla B Nr 223/1 Kati I
1023 Tirane
Tel.: 4 480 6061
Tel.: 4 227 4941
Fax: 4 227 0448
Cel: +355 069 60 45555
mailto:info@expert-servis.al
AT Österreich, Austria
BSH Hausgeräte Gesellschaft mbH
Werkskundendienst für Hausgeräte
Quellenstrasse 2a
1100 Wien
Online Reparaturannahme, Ersatzteile
und Zubehör und viele weitere Infos
unter: www.siemens-home.bsh-group.at
Reparaturservice, Ersatzteile & Zubehör,
Produktinformationen
Tel.: 0810 550 522
mailto:vie-stoerungsannahme@bshg.com
Wir sind an 365 Tagen rund um die Uhr für
Sie erreichbar.
AU Australia
BSH Home Appliances Pty. Ltd.
Gate 1, 1555 Centre Road
Clayton, Victoria 3168
Tel.: 1300 167 425*
Fax: 1300 306 818
mailto:aftersales.au@bshg.com
www.siemens-home.bsh-group.com/au
*Mo-Fr: 24 hours
BA Bosna i Hercegovina,
Bosnia-Herzegovina
“HIGH” d.o.o.
Gradačačka 29b
71000 Sarajevo
Tel.: 061 10 09 05
Fax: 033 21 35 13
mailto:bosch_siemens_sarajevo@
yahoo.com
BE Belgique, België, Belgium
BSH Home Appliances S.A.
Avenue du Laerbeek 74
Laarbeeklaan 74
1090 Bruxelles – Brussel
Tel.: 070 222 142
Fax: 024 757 292
mailto:bru-repairs@bshg.com
www.siemens-home.bsh-group.com/be
BG Bulgaria
BSH Domakinski Uredi
Bulgaria EOOD
115К Tsarigradsko Chausse Blvd.
European Trade Center Building,
5th floor
1784 Sofia
Tel.: 0700 208 18
Fax: 02 878 79 72
mailto:informacia.servis-bg@
bshg.com
www.siemens-home.bsh-group.com/bg
BH Bahrain,
Khalaifat Est.
P.O. Box 5111
Manama
Tel.: 01 7400 553
mailto:service@khalaifat.com
CH Schweiz, Suisse,
Svizzera, Switzerland
BSH Hausgeräte AG
Werkskundendienst für Hausgeräte
Fahrweidstrasse 80
8954 Geroldswil
mailto:ch-info.hausgeraete@
bshg.com
Service Tel.: 0848 840 040
Service Fax: 0848 840 041
mailto:ch-reparatur@bshg.com
Ersatzteile Tel.: 0848 880 080
Ersatzteile Fax: 0848 880 081
mailto:ch-ersatzteil@bshg.com
www.siemens-home.bsh-group.ch
CY Cyprus, Κύπρος
BSH Ikiakes Syskeves-Service
39, Arh. Makaariou III Str.
2407 Egomi/Nikosia (Lefkosia)
Tel.: 7777 8007
Fax: 022 65 81 28
mailto:bsh.service.cyprus@
cytanet.com.cy
CZ Česká Republika,
Czech Republic
BSH domácí spotřebiče s.r.o.
Firemní servis domácích spotřebičů
Pekařská 10b
155 00 Praha 5
Tel.: 0251 095 546
Fax: 0251 095 549
www.siemens-home.bsh-group.com/cz
DK Danmark, Denmark
BSH Hvidevarer A/S
Telegrafvej 4
2750 Ballerup
Tel.: 44 89 89 85
Fax: 44 89 89 86
mailto:BSH-Service-DK@BSHG.com
www.siemens-home.bsh-group.com/dk
EE Eesti, Estonia
SIMSON OÜ
Türi tn.5
11313 Tallinn
Tel.: 0627 8730
Fax: 0627 8733
mailto:servicenet@servicenet.ee
www.simson.ee
Renerki Kaubanduse OÜ
Tammsaare tee 134B
(Euronicsi kaupluses)
12918 Tallinn
Tel.: 0651 2222
Fax: 0516 7171
mailto klienditeenindus@renerk.ee
www.renerk.ee
Eliser OÜ
Mustamäe tee 24
10621 Tallinn
Tel.: 0665 0090
mailto:hooldus@eliser.ee
www.kodumasinate-remont.ee
ES España, Spain
En caso de avería puede ponerse en
contacto con nosotros, su aparato será
trasladado a nuestro taller especializado
de cafeteras.
BSH Electrodomésticos España S. A.
Servicio Oficial del Fabricante
Parque Empresarial PLAZA,
C/ Manfredonia, 6
50197 Zaragoza
Tel.: 902 118 821 o 976 305 714
mailto:CAU-Siemens@bshg.com
www.siemens-home.bsh-group.es
FI Suomi, Finland
BSH Kodinkoneet Oy
Itälahdenkatu 18 A
PL 123
00201 Helsinki
Tel.: 0207 510 700
Fax: 0207 510 780
mailto:Siemens-Service-FI@bshg.com
www.siemens-home.bsh-group.com/fi
Lankapuhelimesta 8,28 snt/puhelu
+ 7 snt/min (alv 24%)
Matkapuhelimesta 8,28 snt/puhelu
+ 17 snt/min (alv 24%)
Kundendienst-Zentren • Central-Service-Depots • Service Après-Vente • Servizio Assistenza • Centrale
Servicestation • Asistencia técnica • Servicevaerkter • Apparatservice • Huolto
Page: 28
01/17
BSH group is a Trademark Licensee of Siemens AG.
Manufacturer´s Service for Siemens Home Appliances.
MD Moldova
S.R.L. “Rialto-Studio”
ул. Щусева 98
2012 Кишинев
тел./факс: 022 23 81 80
MK Macedonia, Makeдoния
GORENEC
Jane Sandanski 69 lok. 3
1000 Skopje
Tel.: 02 2454 600
Mobil: 070 697 463
mailto:gorenec@yahoo.com
MT Malta
Aplan Limited
The Atrium
Mriehel by Pass
BKR3000 Birkirkara
Tel.: 025 495 122
Fax: 021 480 598
mailto:lapap@aplan.com.mt
NL Nederlande, Netherlands
BSH Huishoudapparaten B.V.
Taurusavenue 36
2132 LS Hoofddorp
Storingsmelding:
Tel.: 088 424 4020
Fax: 088 424 4845
mailto:siemens-contactcenter@
bshg.com
Onderdelenverkoop:
Tel.: 088 424 4020
Fax: 088 424 4801
mailto:siemens-onderdelen@bshg.com
www.siemens-home.bsh-group.nl
NO Norge, Norway
BSH Husholdningsapparater A/S
Grensesvingen 9
0661 Oslo
Tel.: 22 66 05 73
Fax: 22 66 05 55
mailto:Siemens-Service-NO@bshg.com
www.siemens-home.bsh-group.com/no
NZ New Zealand
BSH Home Appliances Ltd.
Unit F2, 4 Orbit Drive
Mairangi Bay
Auckland 0632
Tel.: 0800 245 700*
Fax: 0800 256 535
mailto:repairaction.nz@bshg.com
* Mo-Fr: 8.30am to 4.00pm
(exclude public holidays)
PL Polska, Poland
BSH Sprzęt Gospodarstwa
Domowego sp. z o.o.
Al. Jerozolimskie 183
02-222 Warszawa
Tel.: 801 191 534
Fax: 022 572 7709
mailto:Serwis.Fabryczny@bshg.com
www.siemens-home.bsh-group.pl
PT Portugal
BSHP Electrodomésticos,
Sociedade Unipessoal, Lda.
Rua Alto do Montijo, nº 15
2790-012 Carnaxide
Tel.: 214 250 720
Fax: 214 250 701
mailto:siemens.electrodomesticos.pt@
bshg.com
www.siemens-home.bsh-group.com/pt
RO România, Romania
BSH Electrocasnice srl.
Sos. Bucuresti-Ploiesti,
nr. 19-21, sect.1
13682 Bucuresti
Tel.: 021 203 9748
Fax: 021 203 9733
mailto:service.romania@bshg.com
www.siemens-home.bsh-group.com/ro
RU Russia, Россия
OOO “БСХ Бытовая техника”
Cepвис от производителя
Малая Калyжская 19/1
119071 Москва
тел.: 495 737 2962
mailto:mok-kdhl@bshg.com
www.siemens-home.bsh-group.ru
SE Sverige, Sweden
BSH Home Appliances AB
Landsvägen 32
169 29 Solna
Tel.: 0771 11 22 77 local rate
mailto:Siemens-Service-SE@bshg.com
www.siemens-home.bsh-group.com/se
SG Singapore,
BSH Home Appliances Pte. Ltd.
Block 4012, Ang Mo Kio Avenue 10
#01-01 Techplace 1
Singapore 569628
Tel.: 6751 5000*
Fax: 6751 5005
mailto:bshsgp.service@bshg.com
* Mo-Fr: 8.30am to 7.00pm, Sa: 8.30am to 5.30pm
(exclude public holidays)
SI Slovenija, Slovenia
BSH Hišni aparati d.o.o.
Litostrojska 48
1000 Ljubljana
Tel.: 01 583 07 01
Fax: 01 583 08 89
mailto:informacije.servis@bshg.com
www.siemens-home.bsh-group.com/si
SK Slovensko, Slovakia
BSH domáci spotřebiče s.r.o.
Organizačná zložka Bratislava
Galvaniho 17/C
821 04 Bratislava
Tel.: 02 44 45 20 41
mailto:opravy@bshg.com
www.siemens-home.bsh-group.com/sk
TR Türkiye, Turkey
BSH Ev Aletleri Sanayi
ve Ticaret A.S.
Fatih Sultan Mehmet Mahallesi
Balkan Caddesi No: 51
34771 Ümraniye, Istanbul
Tel.: 0 216 444 6688*
Fax: 0 216 528 9188*
mailto:careline.turkey@bshg.com
www.siemens-home.bsh-group.com/tr
* Çağrı merkezini sabit hatlardan
aramanın bedeli şehir içi ücretlendirme,
Cep telefonlarından ise kullanılan
tarifeye gore değişkenlik göstermektedir
UA Ukraine, Україна
TOB “БСХ Побутова Техніка”
тел.: 044 490 2095
mailto:bsh-service.ua@bshg.com
www.siemens-home.bsh-group.com/ua
XK Kosovo
SERVICE-GENERAL SH.P.K.
Rruga Mag Prishtine-Ferizaj
70000 Ferizaj
Tel.: 0290 321 434
Tel.: 0290 330 723
mailto:a_service@
gama-electronics.com
XS Srbija, Serbia
BSH Kućni aparati d.o.o.
Milutina Milankovića br. 9ž
11070 Novi Beograd
Tel.: 011 353 70 09
Fax: 011 205 23 89
mailto:informacije.servis-sr@bshg.com
www.siemens-home.bsh-group.com/rs
ZA South Africa
BSH Home Appliances (Pty) Ltd.
15th Road Randjespark
Private Bag X36, Randjespark
1685 Midrand – Johannesburg
Tel.: 086 002 6724
Fax: 086 617 1780
mailto:applianceserviceza@bshg.com
www.siemens-home.bsh-group.com/za
Page: 29
Beratung bei Störungen • Advice on troubleshooting • Conseils sur les problèmes •
Consejos sobre problemas de • Consulenza su problemi
Service-Hotlines
www.siemens-home.bsh-group.com
AE 04 803 0501
AL 066 206 47 94
AT 0810 550 522
AU 1300 368 339
BA 033 213 513
BE 070 222 142
BG 02 931 50 62
CH 043 455 4095
CN 400 889 9999
Call rates depend on the network used
CZ 0251 095 546
DE 0911 70 440 044
DK 44 89 89 85
EE 0627 8730
ES 902 11 88 21
FI 020 7510 700
Lankapuhelimesta 8,28 snt/puhelu + 7 snt/min (alv 24%)
Matkapuhelimesta 8,28 snt/puhelu + 17 snt/min (alv 24%)
FR 0140 10 1200
GB 0344 892 8999
Calls charged at local or mobile rate
GR 18 182 (Aστική χρέωση)
HR 01 3028 226
HU 0036 1 489 5461
IE 01450 2655
0.03 € per minute at peak. Off peak 0.0088 € per minute.
IL 08 9777 222
IS 0520 3000
IT 800 018 346 (Line Verde)
LI 05 274 1788
LU 26 349 300
LV 067 425 232
ME 050 432 575
MK 02 2454 600
NL 088 424 4020
NO 22 66 06 00
PL 801 191 534
PT 21 4250 720
RO 021 203 9748
RU 8 800 200 29 62
SE 0771 11 22 77 (local rate)
SK 02 444 520 41
SL 01 200 70 17
TR 444 6688
Çağrı merkezini sabit hatlardan aramanın bedeli şehir içi
ücretlendirme, Cep telefonlarından ise kullanılan tarifeye
gore değişkenlik göstermektedir
US 866 447 4363 (toll free)
XK 044 172 309
XS 011 21 39 552
01/17
BSH group is a Trademark Licensee of Siemens AG. Manufacturer´s Service for Siemens Home Appliances.