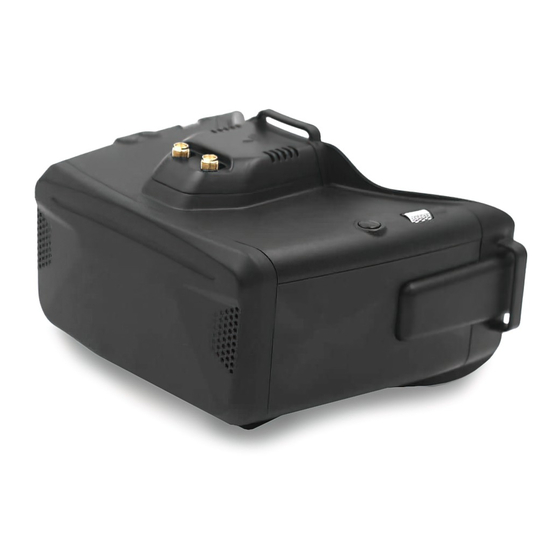
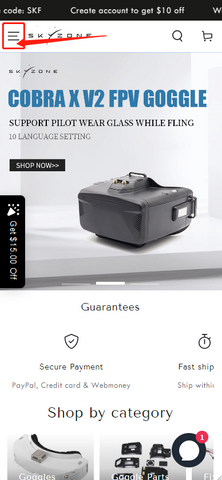
Набор SKY ZONE Cobra X V2 Extended Range Fpv Goggles

Характеристики
| Спецификации | |||
| Модель | Кобра X V2 | Кобра S | Кобра SD |
| экран | ЖК-дисплей | ЖК-дисплей | ЖК-дисплей |
| Постановления | 1280X720 | 800X480 | 800X480 |
| FOV (диагональ) | 50° | 50° | 50° |
| Соотношение сторон | 4: 3 / 16: 9 | 16:9 | 16:9 |
| Получатель | 5.8 ГГц 48 каналов устойчивыйView Получатель | 5.8 ГГц 48 каналов устойчивыйView Получатель | 5.8 ГГц 48-канальный разнесенный приемник |
| Язык | Язык 10 | Английский / китайский | Английский / китайский |
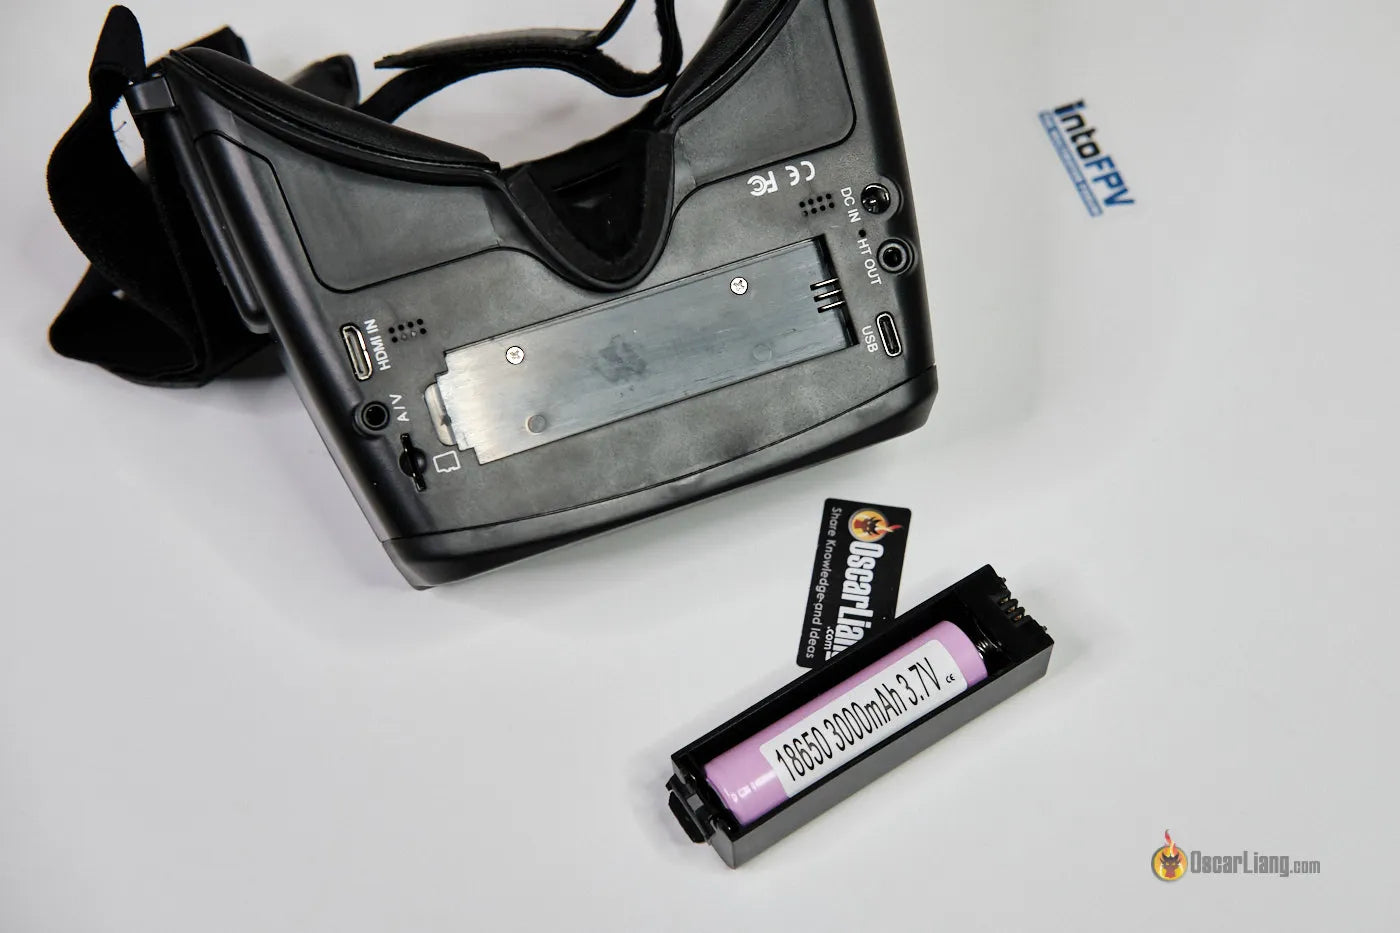
| Напряжение питания | 1 ячейка 18650 / DC 6.5-25.2V / USB 5V | 1 ячейка 18650 / DC 6.5-25.2V / USB 5V | 1 ячейка 18650 / DC 6.5-25.2V / USB 5V |
| потребляемая мощность | 12 В 0.63 А 5 В 1.5 В | 12 В 0.59 А 5 В 1.4 В | 12 В 0.59 А 5 В 1.4 В |
| DVR | H264, 60 кадров в секунду, MOV 6 Мбит / с, SD до 128 ГБ | MJEPG, 30 кадров в секунду | MJEPG, 30 кадров в секунду |
| Главный трекер | 3-осевой акселерометр, 3-осевой гироскоп | 3-осевой акселерометр, 3-осевой гироскоп | 3-осевой акселерометр, 3-осевой гироскоп |
| Размеры | 122 * 165 * 100мм | 122 * 165 * 100мм | 122 * 165 * 100мм |
| Вес | 332g | 332g | 332g |
Таблица BAND / CHANNEL
| Таблица BAND/CH | ||||||||
| ДИАПАЗОН / КАНАЛ | CH 1 | CH2 | CH3 | CH4 | CH5 | CH6 | CH7 | CH8 |
| A | 5865M | 5845M | 5825M | 5805M | 5785M | 5765M | 5745M | 5725M |
| B | 5733M | 5752M | 5771M | 5790M | 5809M | 5828M | 5847M | 5866M |
| E | 5705M | 5685M | 5665M | 5645M | 5885M | 5905M | 5925M | 5945M |
| F | 5740M | 5760M | 5780M | 5800M | 5820M | 5840M | 5860M | 5880M |
| R | 5658M | 5695M | 5732M | 5769M | 5806M | 5843M | 5880M | 5917M |
| L | 5362M | 5399M | 5436M | 5473M | 5510M | 5547M | 5584M | 5621M |
| чувствительность | -98 дБм ± 1 дБм | |||||||
| Антенный порт | 2 X SMA-K, 50 Ом |
В комплект поставки входят
- Очки * 1
- Модуль приемника * 1
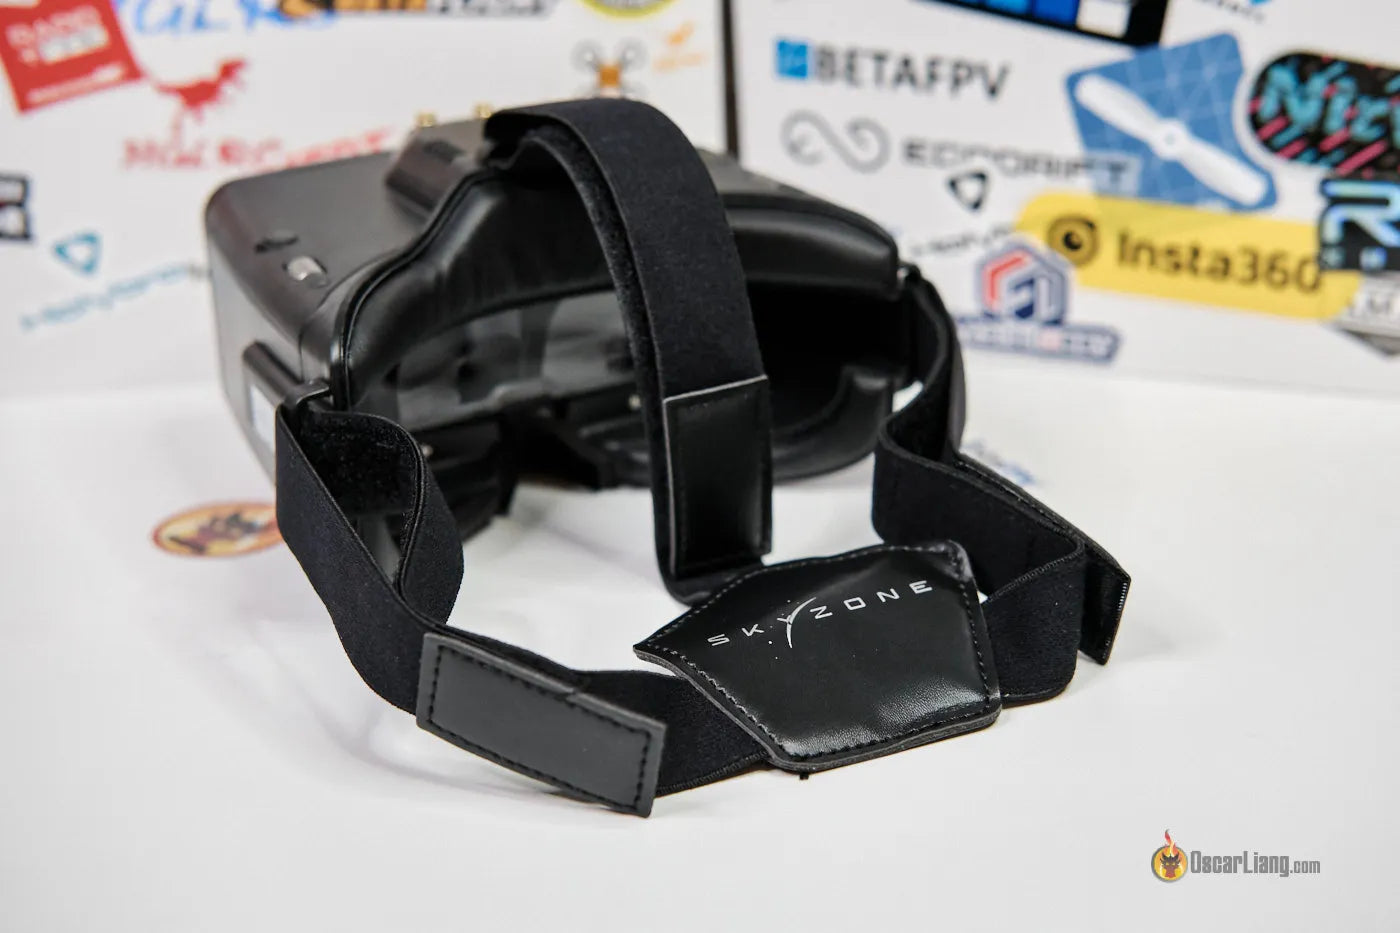
- Ремешок для головы * 1
- Силовой кабель * 1
- Кабель хедтрекера * 1
- 5.8dD антенны 2 ГГц * 2
- Видео / аудиокабель * 1
- Кабель USB-C * 1
- Руководство пользователя * 1
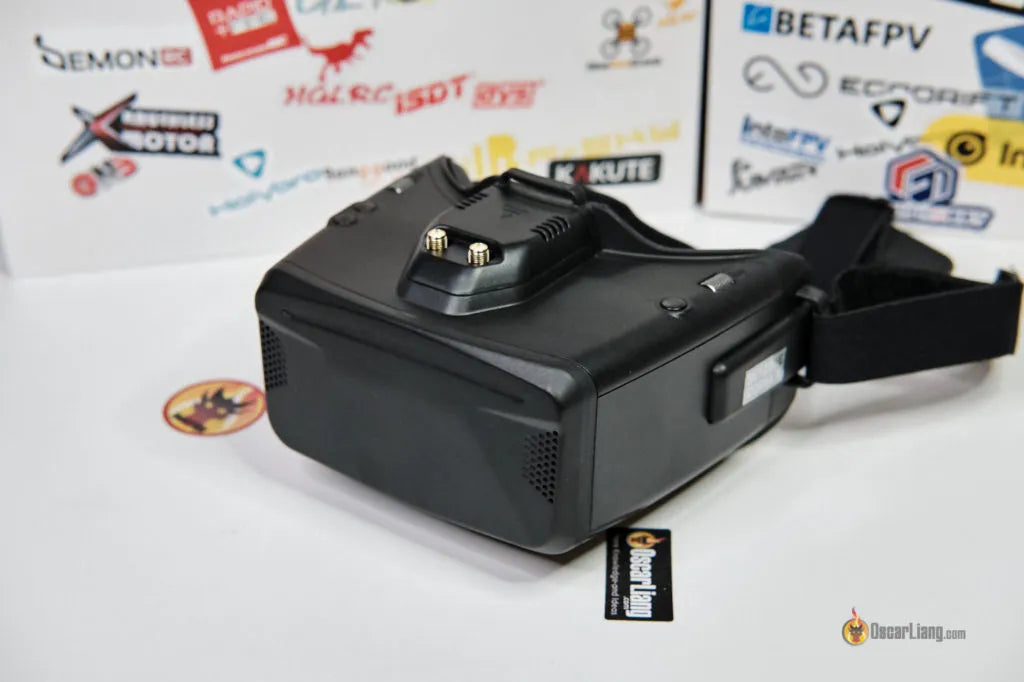
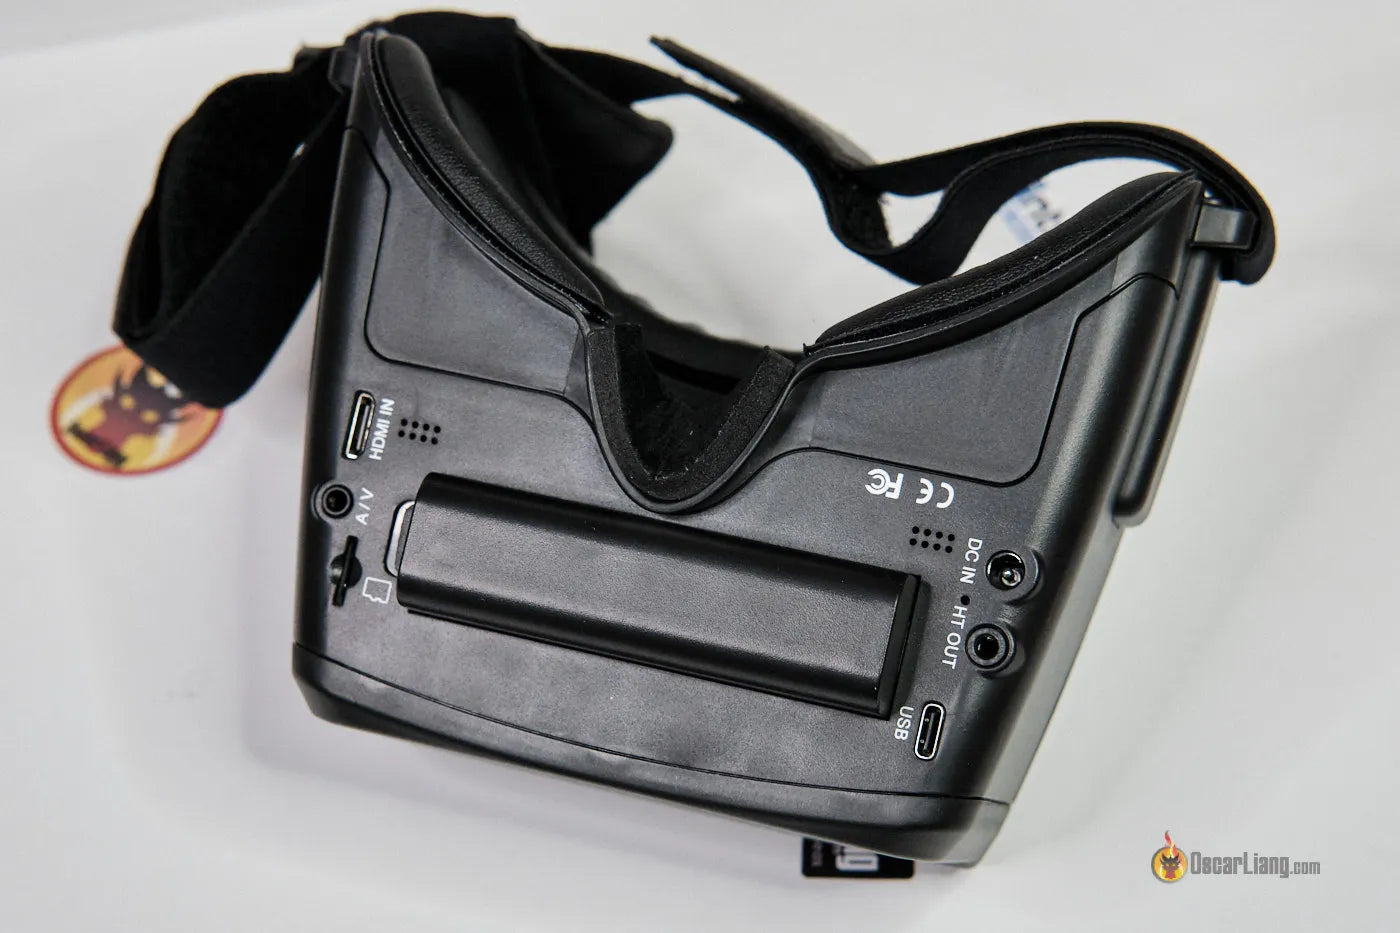
Диаграмма

- Мощность / Вентилятор
- Системное меню/Сброс хедтрекера
- CH / BAND / Поиск
- Запись / удаление
- режим
- Порт USB C
- 3.5 мм порт для отслеживания головы
- ПОРТ ПОСТОЯННОГО ТОКА (5.5 * 2.1 мм)
- слот для карт памяти SD
- AV ВХОД / ВЫХОД
- Вход HDMI

Введение
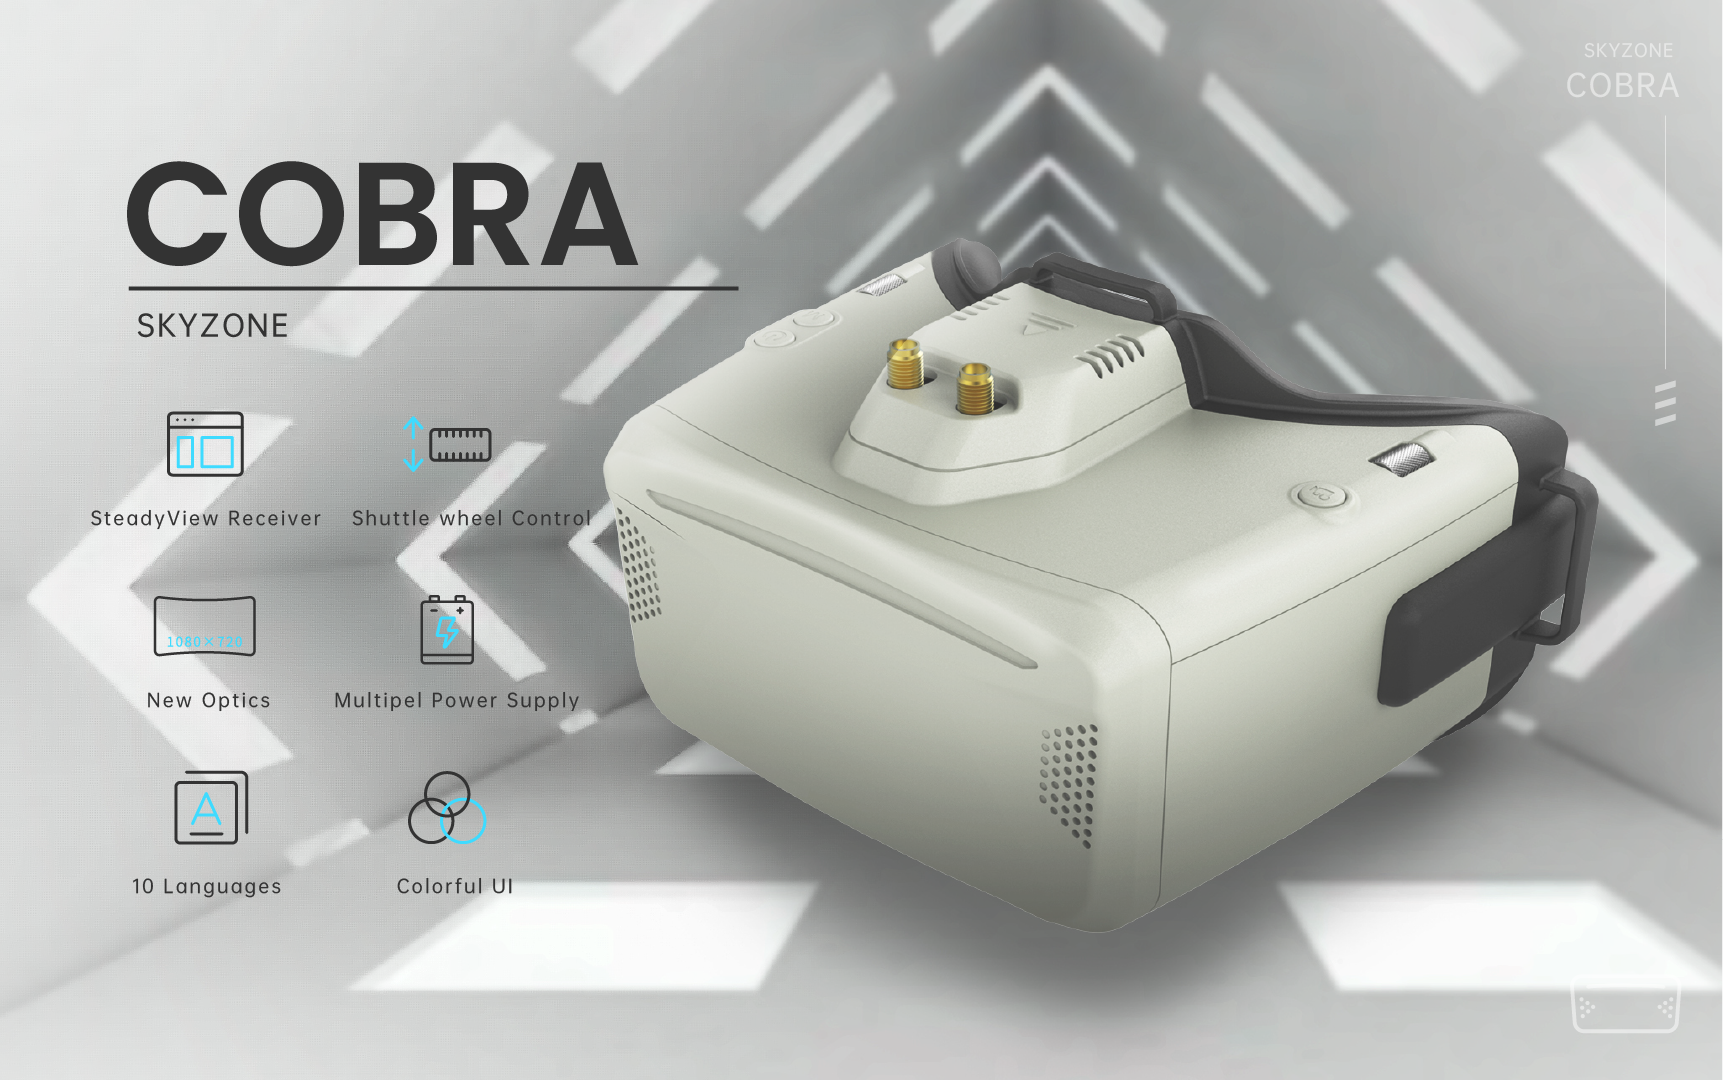
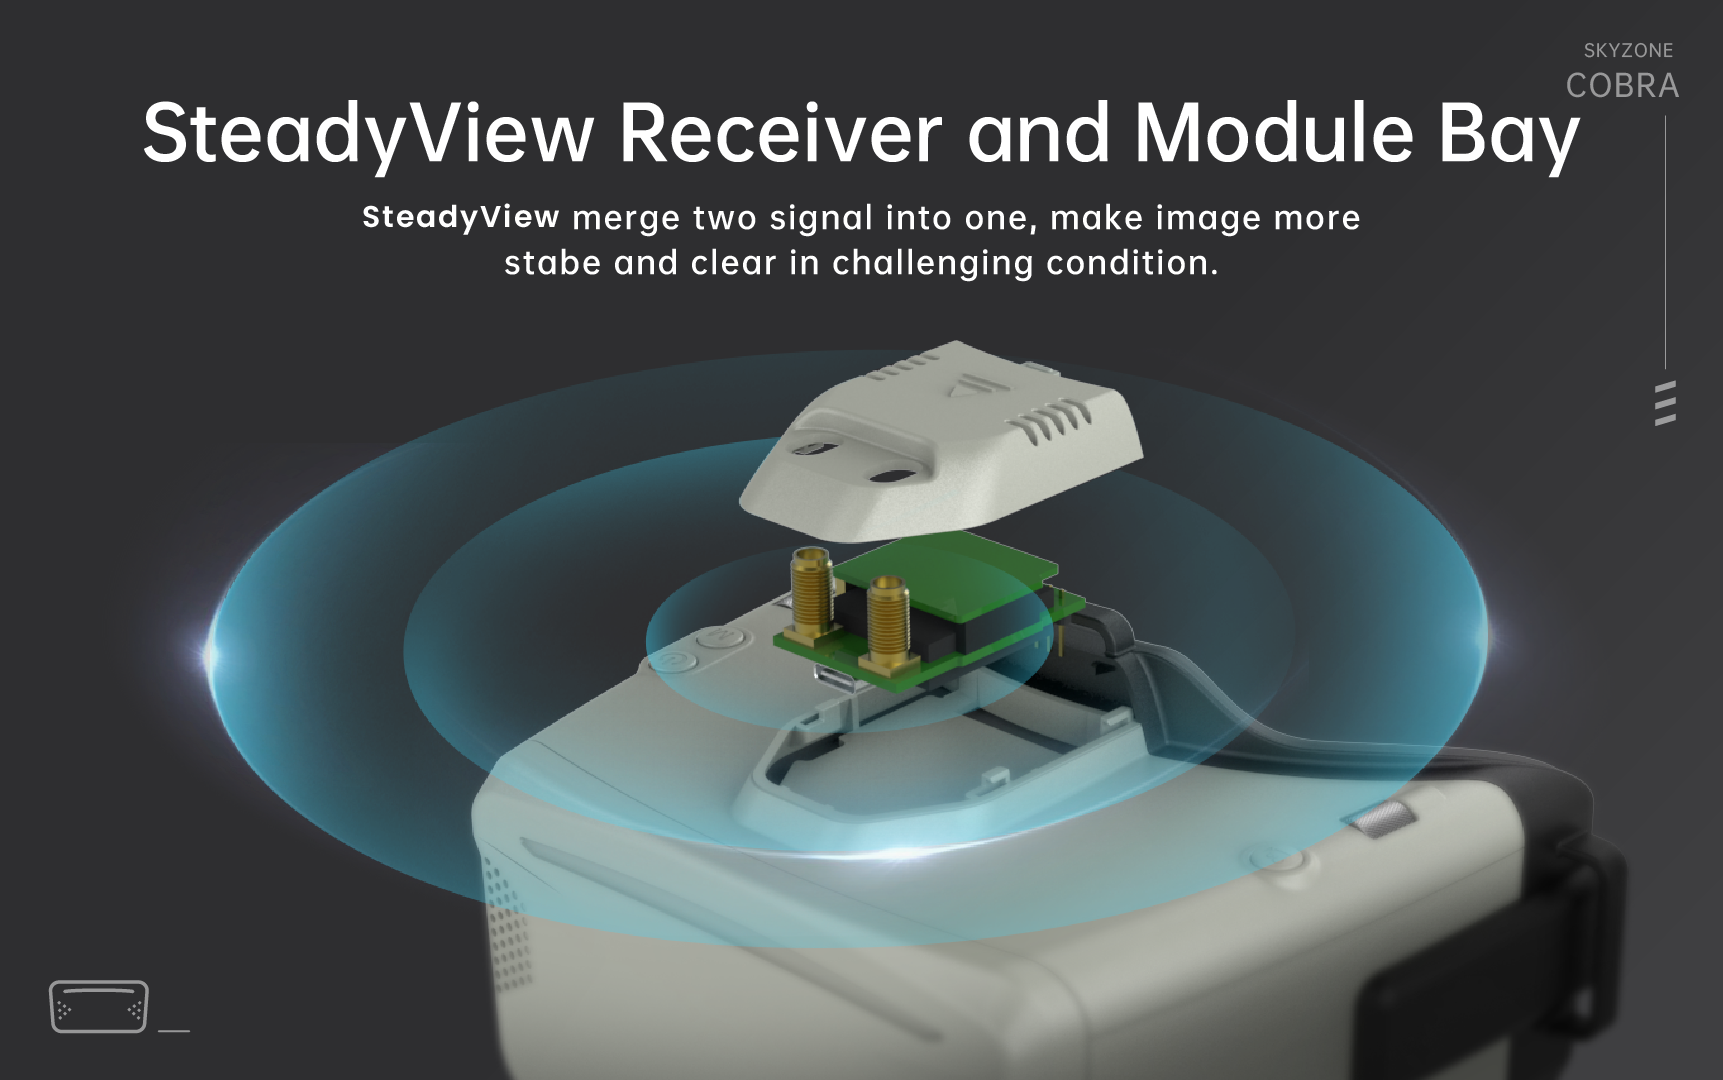
SKYZONE Cobra X * — это очки FPV с ЖК-экраном с высоким разрешением 1280 * 720, экран имеет яркие цвета и высокую яркость, и пилот может видеть больше деталей в гонках. С устойчивымView приемник, приемник объединяет два сигнала в один, избегает разрывов и скатывания изображения при слабом сигнале и делает изображение более стабильным и четким в сложных условиях. Пилот поддержки очков носит стекло во время полета. Новая ОС с 10 языками* для выбора, у пилота нет проблем с системой меню, с колесиком-челноком и новым пользовательским интерфейсом, пилот может установить все настройки, просто вращая колесико, не снимая очков. очки могут питаться от 1-элементной батареи 18650 или 2-6-секундной липо-батареи, зарядка через USB и зарядка постоянным током делают очки простыми в использовании в поле.
SKYZONE Cobra S имеет разрешение 800*480, а пользовательский интерфейс поддерживает только 2 языка.
НЕ ПОПАДАЙТЕ НА ОБЪЕКТИВ НА СОЛНЕЧНОМ СЛУЧАЕ, В противном случае экран будет гореть.
Руководство по быстрому старту
- Установите приемник и антенну.
- Вставьте аккумулятор в аккумуляторный отсек или используйте кабели питания для подключения аккумулятора к очкам, очки могут питаться от 2-6-элементной липо-батареи, удерживайте кнопку питания, чтобы включить.
Группа и настройка Chanel
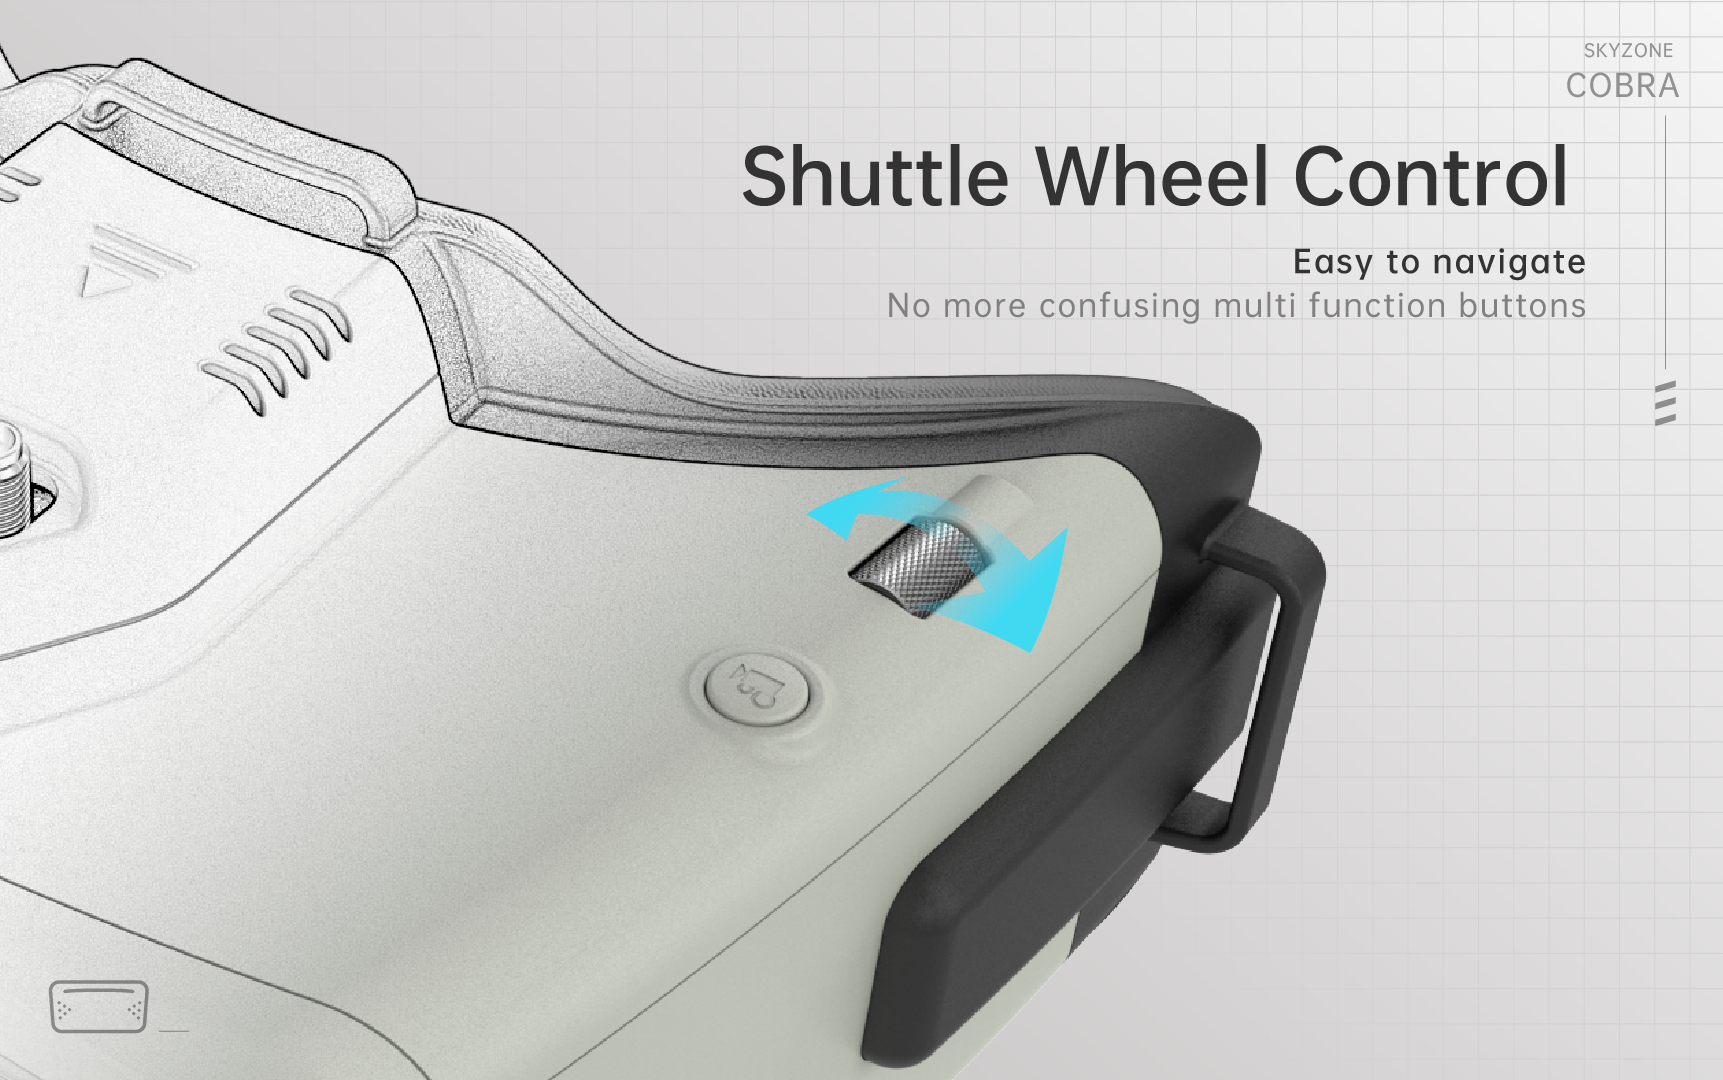
- Нажмите правое колесо, затем поверните правое колесо, чтобы изменить канал, снова нажмите колесо, чтобы перейти в режим настройки диапазона, затем поверните колесо, чтобы изменить диапазон.
- Колесо не работает в течение 3 секунд, очки выходят из режима настройки RF.
- Удерживайте правое колесо, чтобы открыть меню поиска, нажмите правое колесо, чтобы запустить автоматический поиск, после поиска по всей частоте приемник будет работать с самым сильным сигналом. прокрутите правое колесо, чтобы вручную выбрать каналы, коротко нажмите правое колесо, чтобы выйти из поиска.
Некоторые представленные на рынке камеры не поддерживают стандартный сигнал NTSC/PAL, что может привести к тому, что приемник будет путаться в режиме Mix. Это приведет к потемнению изображения, искажению цвета, вращению изображения. Для решения этой проблемы пользователь может переключиться в режим разнесения.
Иногда автоматический поиск канала неточен, пользователю может потребоваться вручную выбрать канал.
- Кратковременно нажмите левое колесико, чтобы открыть меню режима.
- RF normal: это нормальный режим приема 48 каналов.
- RF Racing: в этом режиме приемник будет работать только с RaceBand.
- Сторонний радиочастотный сигнал: в этом режиме кнопка очков не может управлять внешним приемником, а также экранное меню очков не может считывать диапазон / канал приемника.
- AVIN: при включении режима AV IN. Поддерживается автоматическое переключение системных форматов NTSC и PAL. Модуль приемника будет автоматически отключен для экономии энергии.
- HDMI IN: модуль приемника и модуль видеозаписи будут автоматически отключены для экономии энергии.
- Известно, что экран и соответствующая информация о разрешении будут автоматически отображаться в поддерживаемом формате разрешения.
- Воспроизведение: в этом режиме клиенты могут повторноview файлы DVR.
Поиск дронов:
Установите патч-антенну на RX, нажмите и удерживайте левое колесо, чтобы включить функцию поиска дрона (нажмите и удерживайте еще раз, чтобы отключить), частота зуммера будет синхронизироваться с RSSI, чем сильнее RSSI, тем быстрее звучит зуммер. * Эта функция есть только у Cobra X.
ВОСПРОИЗВЕДЕНИЕ
- В режиме воспроизведения поверните правое колесо, чтобы выбрать DVR, коротко нажмите правое колесо, чтобы воспроизвести и приостановить.
- Левое колесо для регулировки громкости.
- При воспроизведении на DVR поверните правое колесо для быстрой перемотки вперед или назад.
- Нажмите кнопку «Вправо», чтобы выйти из DVR.
- Нажмите левую кнопку, чтобы удалить DVR
Настройки
- Коротко нажмите правую кнопку, чтобы открыть меню настроек или выйти из него.
- Прокрутите правое колесо для навигации, нажмите правое колесо, чтобы выбрать.
Отслеживание головы
- Кнопка отслеживания головы находится на правой стороне очков.
- Гироскоп, необходимый для инициализации. Когда он включен, очки должны оставаться в горизонтальном положении и устойчивыми как можно дольше. Когда слышен звуковой сигнал, инициализация завершена.
- Удерживайте кнопку HT, чтобы сбросить сигнал PPM в центр, очки издадут звуковой сигнал при нажатии кнопки.
Отключение Headtracker может сэкономить время инициализации гироскопа, чтобы ускорить загрузку очков.
Фото товара
- В меню настройки изображения клиент может выбрать стандартный, яркий, яркий, мягкий и 3 настроенных. files, чтобы отрегулировать.
- Клиент может настроить яркость, контрастность CS, атурацию, оттенок и резкость в соответствии с различными условиями в 3 пользовательских 1/2/3, настройка изображения не может измениться в 4 предустановленных files
Прокрутите колесо, чтобы отрегулировать яркость.
ДИСПЛЕЙ
- В меню настройки дисплея пользователь может изменить соотношение сторон (4:3 или 16:9), по умолчанию 16:9*.
- В меню «Дисплей» пользователь может установить значок RSSI: значок + процент.tagе, значок, процентыtage, отключите, а также отрегулируйте вертикальное положение RSSI.
- Яркость экрана и регулировка в меню (3 сtagда, по умолчанию 2). Обычно не устанавливайте слишком высокую яркость, если изображение не тусклое. COBRA S имеет только режим 16:9.
DVR
- Левая кнопка — это кнопка записи и кнопка остановки.
- Встроенный видеорегистратор в кодировке H264, рекомендуется SD-карта класса 10, SD-карта может поддерживать до 128 ГБ.
- SD-карта должна быть отформатирована в FAT32, пользователь может войти в системное меню и выбрать «Форматировать SD».
- Функцию видеозаписи можно использовать как в режиме RF, так и в режиме AV IN.
- По умолчанию при записи видео (в том числе: записи звука) функция «запись звука» может быть отключена в системном меню, а запись видеосигнала возможна только.
- Автоматическая запись: включите эту функцию, если видеосигнал был обнаружен, функция записи будет активирована автоматически. Функцию записи также можно остановить вручную, нажав кнопку REC.
- DVR автоматически начнет запись при включении видеосигнала и остановит запись через 30 секунд после отключения сигнала. Если сигнал снова включен, DVR снова начнет запись.
- Нажмите кнопку записи, чтобы вручную начать запись. Видеорегистратор остановит запись через 30 сек. при отключении сигнала, но автоматически начнет запись при включении сигнала. нажмите кнопку записи, и вы можете вручную остановить запись, чтобы сэкономить место на SD-карте. *
- Циклическая запись: перезапись включения или выключения старых записей (в случае нехватки места для хранения).
- Видеозапись File будет автоматически разделен на несколько Fileс. В системе меню можно установить продолжительность видео: 5 минут, 10 минут, 20 минут и 30 минут. Продолжительность видео по умолчанию может быть установлена как 30 минут / для каждого file.
- Если во время записи видео было внезапно отключено питание, видеорегистратор выйдет из строя. Очки имеют ремонтную функцию. После входа в режим воспроизведения будет автоматически проверен последний видеорегистратор. Если он поврежден, цифровой видеорегистратор будет автоматически отремонтирован.
ДИСПЛЕЙ
- В меню настройки дисплея клиенты могут установить время экранного меню верхней панели, отключить время, экранное меню всегда включено.
- В меню «Дисплей» клиент может установить значок RSSI: значок + процентtagе, значок, процентыtagе, отключите, также отрегулируйте вертикальное положение RSSI.
- Яркость экрана и регулировка в меню (3 сtages, по умолчанию 2). Обычно не устанавливайте слишком высокую яркость, если изображение не тусклое.
- В меню настройки дисплея пользователь может изменить соотношение сторон (4: 3 или 16: 9), по умолчанию — 16: 9.
- В меню «Питание» пользователь может выбрать тип батареи (2S~6S), чтобы очки отображали реальную емкость батареи.
- VoltagКалибровка дает пользователю диапазон ± 0.9 В для регулировки громкости.tagе, при калибровке объемаtagе, используйте мультиметр, чтобы измерить нагруженный объемtagбатареи, затем используйте колесико-челнок для регулировки громкости.tage в экранном меню для соответствия реальной громкостиtage.
- Калибровка RSSI: выключите VTX, затем включите очки, убедитесь, что на экране очков есть снег. В системном меню выберите калибровку RSSI, выберите низкий уровень, подтвердите, очки дважды подадут звуковой сигнал.
- Затем включите VTX, убедитесь, что VTX и очки работают на одной частоте, и убедитесь, что VTX находится на расстоянии 2 м от очков, затем выберите High в калибровке RSSI, затем подтвердите, очки издадут четыре звуковых сигнала.
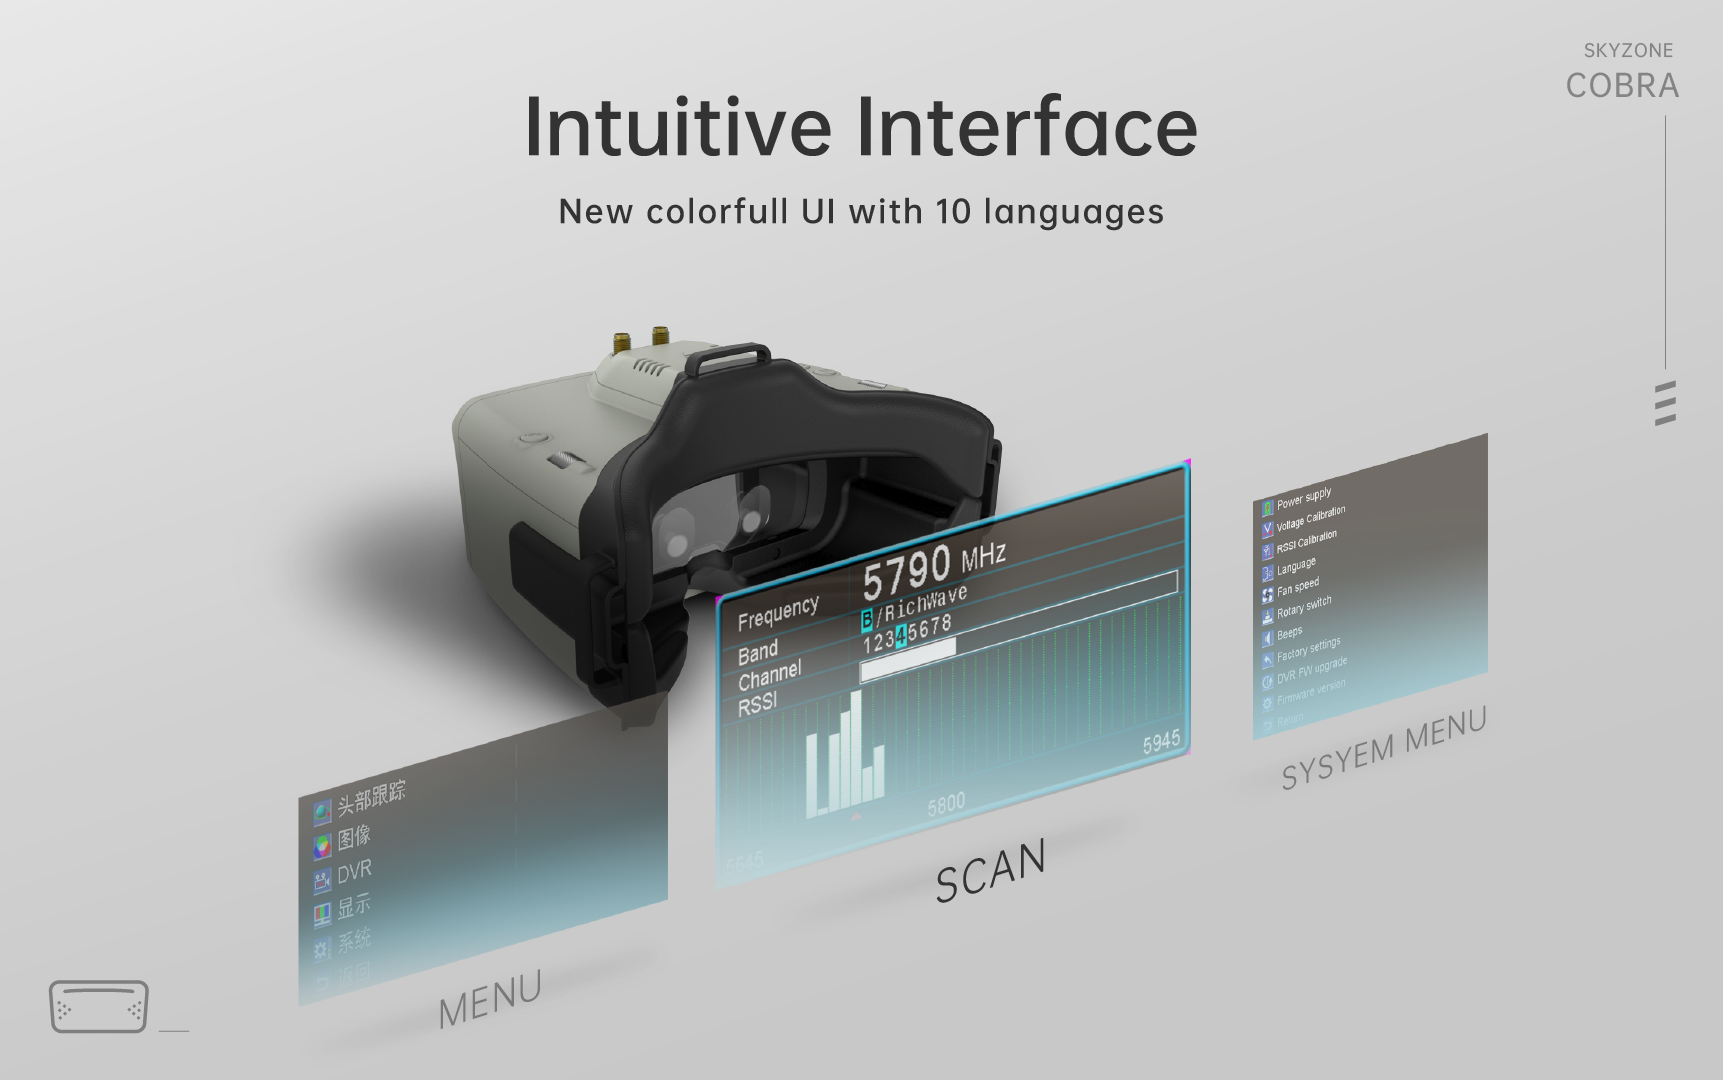
- Язык системы можно выбрать на английском, французском, немецком, русском, латинском, португальском, испанском, китайском, японском и корейском языках.
- РЧ РЕЖИМ: в В этом режиме пользователь может выбрать режим Diversity или режим MIX, есть некоторые видеосигналы камер с громкостью.tage не следовал стандарту NTSC или PAL, из-за чего изображение прокручивалось в режиме MIX, выберите режим Diversity, это решит проблему прокрутки.
- Встроенный вентилятор может не только использоваться в основном для удаления запотевания, но также может использоваться для отвода тепла внутри продукта. Скорость вентилятора можно установить в системном меню.
- Нажмите кнопку ПИТАНИЕ, чтобы запустить / остановить вентилятор для удаления запотевания.
- Пользователь может вручную установить скорость вентилятора, чтобы отрегулировать шум вентилятора.
Функции колеса и кнопок могут быть изменены с левой стороны на правую, что позволяет адаптировать левшу. когда поворотный переключатель включен, все функции в ручном режиме меняются слева направо
- Сброс всех настроек : Пользователь может сбросить все функции и настройки в этом меню.
- Обновление прошивки видеорегистратора: В этом меню пользователь может обновить прошивку DVR с SD-карты.
- Версия прошивки : Прошивка очков, версия прошивки DVR и серийный номер будут показаны в этом меню.
Обновление прошивки
- Подключите очки к компьютеру.
- Удерживайте левое колесо при включении очков, USB-кабель подаст питание на очки, отпустите левую кнопку, компьютер автоматически установит драйвер, компьютер покажет новое съемное хранилище.
- скопировать прошивку File в папку (не на SD-карту). очки установят обновление одновременно.
Даже при включенной функции поворотного переключателя кнопка загрузки все еще остается левой кнопкой. по завершении копирования будет выполнено обновление прошивки.
DVR
- Возьмите SD-карту и отформатируйте ее в FAT32.
- Скопируйте прошивку видеорегистратора на SD-карту, вставьте ее в очки и включите.
- Зайдите в системное меню и выберите «Обновление DVR FM».
COBRA S не может обновить прошивку DVR
Прошивка приемника
- Выньте приемник, при подключении приемника к компьютеру удерживайте кнопку загрузки.
- Компьютер автоматически установит драйвер, компьютер покажет новое съемное хранилище.
- Скопируйте прошивку File в папку (не на SD-карту). очки будут устанавливать обновление в то же время. когда копирование завершено, обновление прошивки выполнено.


Зарядка
- Очки интегрированы с зарядным модулем Th g, пользователь может выбрать зарядку через USB или использовать зарядку через бочкообразный разъем.
- когда очки питаются через цилиндрический разъем, внешнее питание также заряжает внутреннюю батарею 18650.
- Как DC, так и Type C могут заряжать внутреннюю батарею 18650.
- В целях безопасности не заряжайте аккумулятор без присмотра.
- Батарейный отсек 18650 имеет защитную схему, если извлечь батарею, не выключая очки, батарея будет находиться в состоянии защиты, чтобы выйти из защиты, очки должны использовать кабель постоянного тока или USB-кабель для зарядки батареи, чтобы выйти из этого режима.
Это содержимое может быть изменено, загрузите последнюю версию по адресу:
www.skyzonehobbies.com
Документы / Ресурсы
- Manuals
- Brands
- SkyZone Manuals
- 3D Glasses
- Cobra X
- User manual
-
Contents
-
Table of Contents
-
Bookmarks
Quick Links
COBRA
User Manual
V1.3
202011
Related Manuals for SkyZone Cobra X
Summary of Contents for SkyZone Cobra X
-
Page 1
COBRA User Manual V1.3 202011… -
Page 2: Specifications
Specifications Model Cobra X Cobra S Screen Resolution 1280X720 800X480 FOV(Diagonal) 50° 50° Aspect Ratio 4:3/16:9 16:9 Receiver 5.8Ghz 48 CH RapidMix Receiver 5.8Ghz 48 CH RapidMix Receiver Language 10 Language English/Chinese Power Supply 1Cell 18650/DC 6.5-25.2V/USB 5V 1Cell 18650/DC 6.5-25.2V/USB 5V Power Consumption 12V 0.63A 5V 1.5A…
-
Page 3
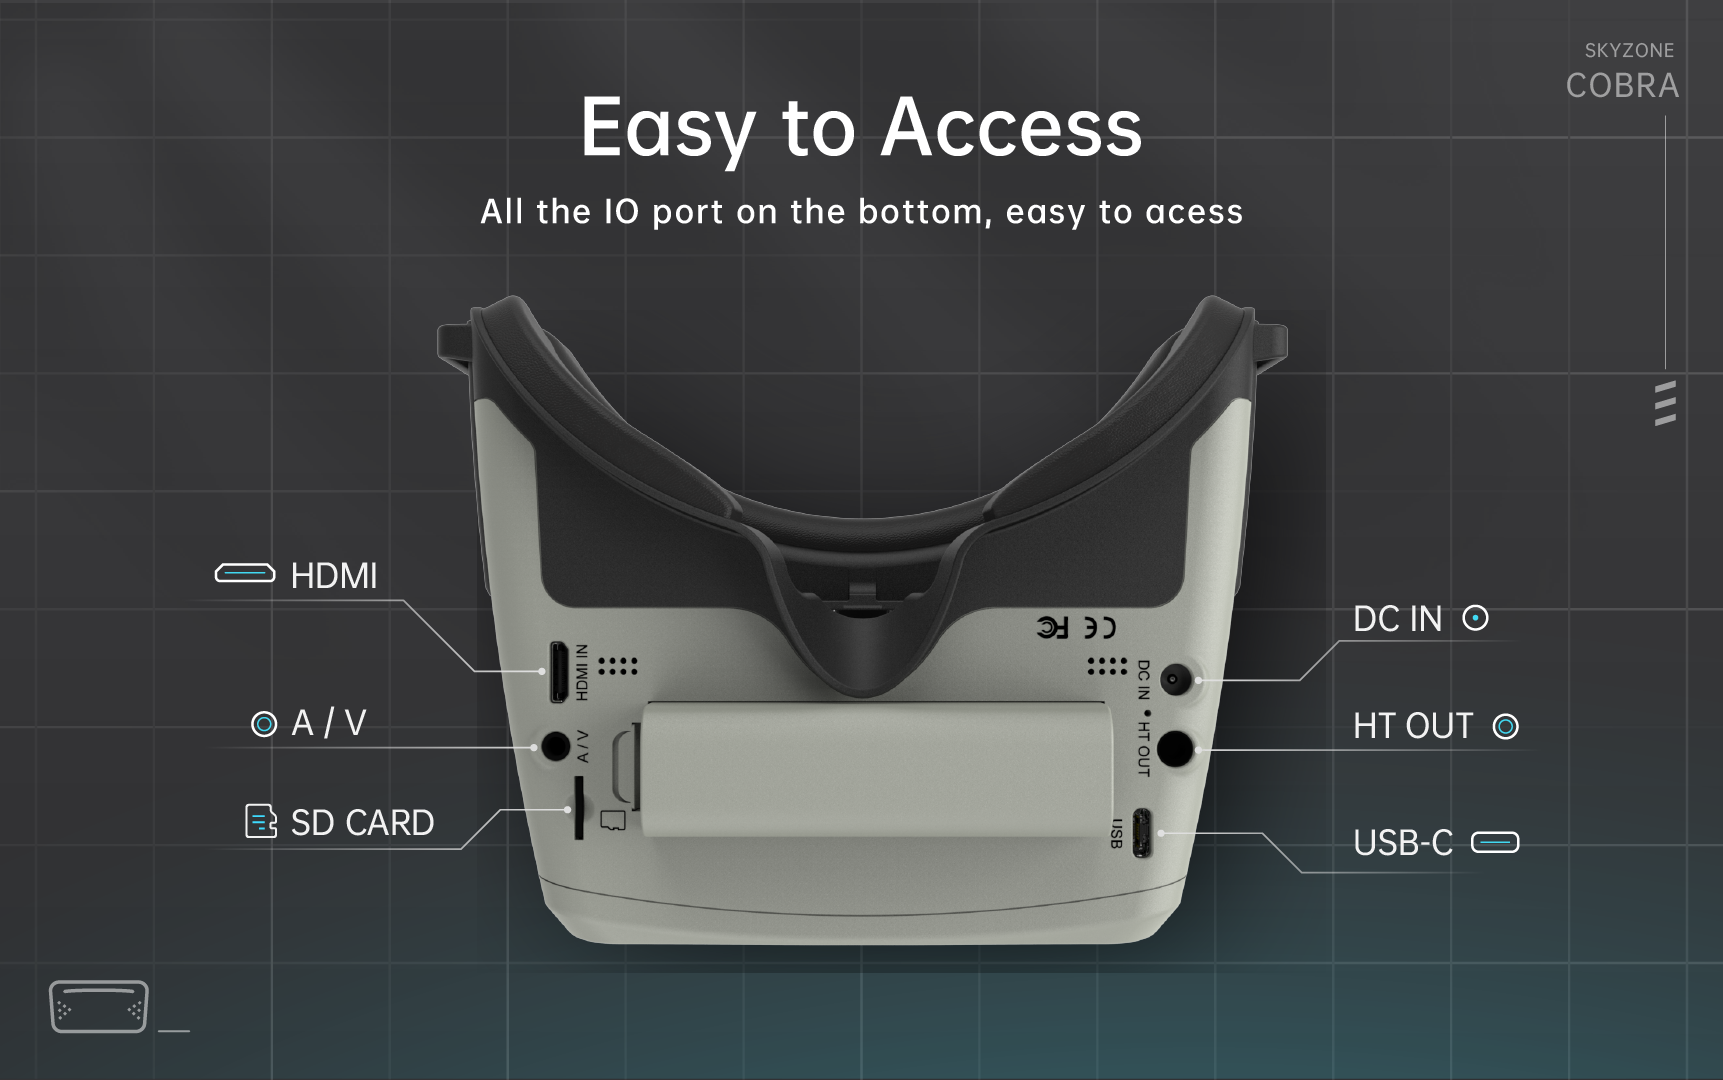
Diagram 1.Power/Fan 2.System Menu/Headtracker reset 3.CH/BAND/Search 4.Record/Delete 5.Mode 6.USB C por t 7.3.5mm Head tracker por t 8.DC PORT(5.5*2.1mm) 9.SD card slot 10.AV IN/OUTPUT 11.HDMI input VIDEO AudioR AudioL PPM OUT Headtracker Jack Pin-out AV Jack Pin-out… -
Page 4
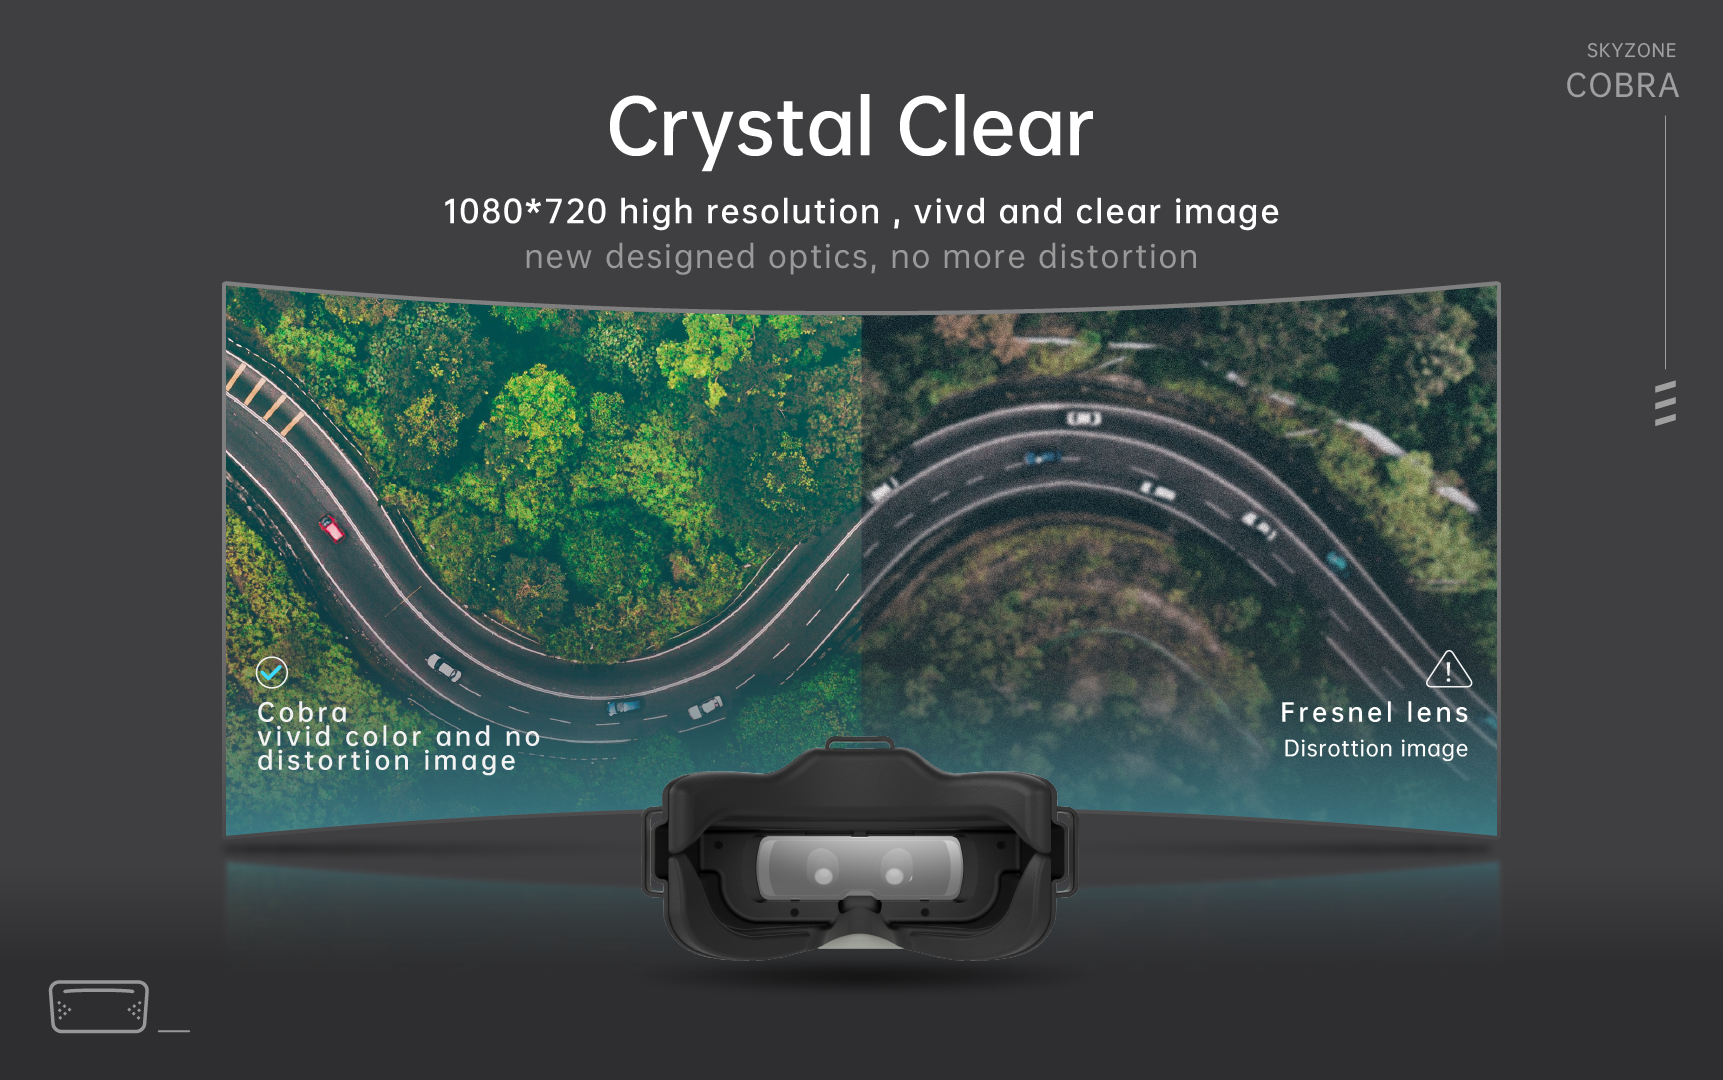
Introduction The SKYZONE Cobra X * is a FPV goggle with 1280*720 high resolution LCD screen , the screen have vivid color and high Luminance , pilot can see more details in the racing . With SteadyView receiver , the receiver merge two signal to one, avoid image tearing and rolling when signal is weak, make image more stable and clear in challenging condition. -
Page 5: Mode Menu
DO NOT EXPOSE THE LENS DIRECT TO SUNLIGHT, OTHERWISE THE SCREEN WILL BURN IN. Quick Start Guide 1.Install the receiver and antenna. 2.Plug the battery into battery bay or use power cables to connect battery to the goggle, goggle can power by 2~6cells lipo battery, hold the power button to turn on.
-
Page 6
ttings · Short press right button to pop up or quit setting menu. · Roll right wheel to navigate, press the right whee l to select . Head Tracking · The head tracking button is on the right side of the goggles. ·… -
Page 7: System Menu
DISPLAY · In Display setting menu, customer can set the topbar OSD time, turn off the time off, the OSD always on. · In Display menu, customer can set the RSSI icon: icon + percentage, Icon, Percentage, disable, also adjust the vertical position of the RSSI. ··…
-
Page 8: Firmware Upgrade
Firmware Upgrade Goggles 1,Connect goggles to the computer. 2,Hold the left wheel when turn on the goggles, the usb cable will power the goggles, release the left button, computer will automatically install the driver , computer will show a new removable storage . 3, copy the Firmware File to folder(Not the SD card).
This manual is also suitable for:
Cobra s
DO NOT EXPOSE THE LENS DIRECT TO SUNLIGHT, OTHERWISE
THE SCREEN WILL BURN IN.
Quick Start Guide
1.Install the receiver and antenna.
2.Plug the battery into battery bay or use power cables to connect battery to the goggle, goggle can
power by 2~6cells lipo battery, hold the power button to turn on.
Band and Chanel setting
.
1
Press the right wheel, then roll the right wheel to change channel, press the wheel again switch to band
setting mode, then roll the wheel to change the band.
2.No wheel operation for 3 seconds ,goggle will quit RF setting mode .
3. Hold the right wheel to pop up search menu, press the right wheel to start auto search, after searching
all the frequency, receiver will work on the strongest signal. roll the right wheel to manually select the
channels, short press the right wheel to quit search.
Sometime the auto search channel is not accurate, user may need manually select the channel.
· Short press the left wheel to pop up mode menu.
· RF normal: this mode is normal 48 CH receive mode.
· RF Racing: this mode will make receiver only working on RaceBand.
· RF Third-Party: in this mode, the goggles button cant control the external receiver, also the OSD of the
goggles cant read the band/channel of the receiver.
· AVIN: when enable the AV IN mode . The NTSC and PAL system format can be supported to be
automatically switched. The receiver module will be automatically turned off to save the power.
· HDMI IN : the receiver module and the video record module will be automatically turned off to save
the power.
· It is recognized that the screen and the corresponding resolution information will be automatically
displayed in the supported resolution format.
· Playback: in this mode, customer can review the DVR
PLAYBACK
PLAYBACK
·
·
In playback mode, roll right wheel to choose the DVR, short press right wheel to play and pause .
In playback mode, roll right wheel to choose the DVR, short press right wheel to play and pause .
·
·
Left wheel to adjust the volume.
Left wheel to adjust the volume.
·
·
When playing the DVR, roll the right wheel to Fast Forward or Fast backward.
When playing the DVR, roll the right wheel to Fast Forward or Fast backward.
·
·
Press the Right button to quit DVR
Press the Right button to quit DVR
·
·
Press the Left button to delete DVR.
Press the Left button to delete DVR.
files
.
.
4
.
SKYZONEFPV
5 total reviews
- Regular price
-
$249.00
- Regular price
-
- Sale price
-
$249.00
10K+ bought
In stock, ready to ship. Free worldwide shipping
Same-day shipping, 7-15 days delivery
Couldn’t load pickup availability
Refresh
SKYZONE Cobra X V2 goggle is the best drone box FPV goggles and has 4:3/16:9 switchable FPV goggle with an LCD screen, the SKYZONE cobra x for RC airplane racing drone screen has vivid color and high luminance, and the pilot can see more details in the Racing. With SteadyView receiver, the SKYZONE cobra x v2 receiver merges two signals into one, avoiding image tearing and rolling when the signal is weak, and making the image more stable and clear in challenging conditions.
The goggle support pilot wears glass while flinging. With the new OS with 10 languages to set select, the pilot has no trouble with the menu system, and with the shuttle wheel and new user interface, the pilot can set all the settings just by rolling the wheel without taking off the goggle.
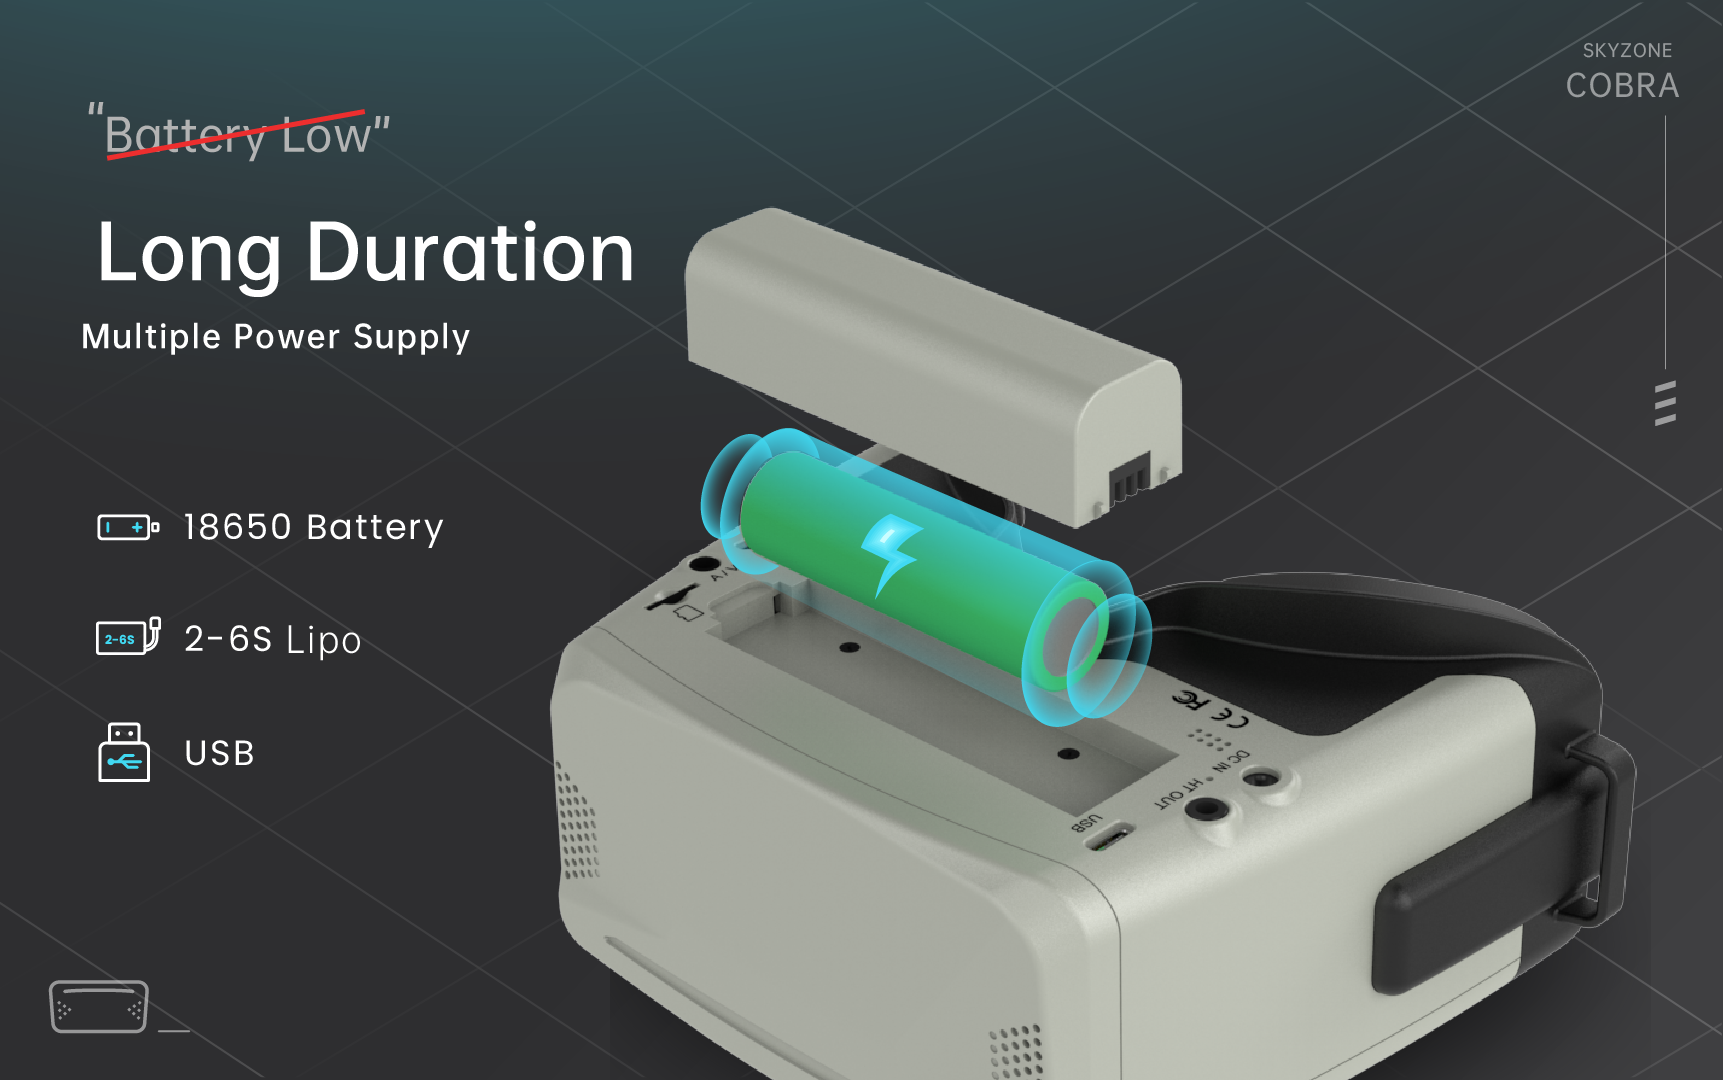
The Cobra X V2 goggles can be Powered by a 1 cell 18650 battery or 2~6s lipo battery, the USB charging and DC charging make goggles simple to use in the field. Feature an upgraded 60 FPS DVR Unit and an upgraded power management board for extended running time!
Specifications:
Model: Cobra X V2
Screen: LCD
Resolution:1280X720
FOV (Diagonal): 50°
AspectRatio:4:3/16:9
Receiver:5.8Ghz 48CH V3.3 SteadyView Receiver
Language:10 Language
Power Supply: 1 Cell 18650/DC 6.5-25.2V/USB 5V
Power Consumption:12V 0.63A 5V 1.5A
DVR: H264, 60fps,MOV 6Mbps, SD up to 128Gb
Head Tracker:3-axis Accelerometer,3-axis gyroscope
Dimentions:190*150*110mm
Weight:332g
Package Included:
1x Cobra V2 FPV Goggles
1x Receiver V3.3 Module
1x Head Strap
1x Power Cable
1x Headtracker Cable
2x 5.8GHz 2dD Antennas
1x Video/Audio Cable
1x USB-C Cable
1x User Manual


Shipping policy
SKYZONE Guarantee
Worldwide shipping. One-year warranty. If you have any technical support or need something repaired, just contact us and we will be here with you for free!
Payment Methods
We accept PayPal, Credit Card. If you are unable to pay for the above, please contact us.
Order Status
Once your order ships, you will receive a shipping notification email. This email will contain your tracking number and a link to check the status of your order. You can also check the status of your order by going to your account page.
Shipping & Tracking
Our shipping company provides an IOSS number, usually there are no additional fees, but it depends on the local customs policy. The actual situation prevails. Packages are usually processed within 24 hours.
Warehouse located
We have CN, USA and EU warehouse.
Shipping Charges
There are different shipping methods for your chioce, depending on yourself. Detailed shipping costs and chioces can be checked at the checkout page.
Free shipping on orders over $99. If your order value is under $99, you might be charged $10 for standard shipping(arrives in 7-15 days), or other shipping methods.
For Fix Wing RC FPV fixed wings product, we provide different shipping fee for Expedited shipping(arrives in 10-20 days). The specific shipping cost is subject to the checkout page.
For all orders’ package, we handle packages by DHL, UPS, EMS, our special shipping line and so on, usually takes about 7-20 days for delivery.
Shipping Time
Most orders will be shipped within usually 1~2 working days , but for special holidays, 4 business days might be needed.
The total processing time may be affected by the stock status of individual items, national holidays, etc.
For all orders’ package, we handle packages by DHL, UPS, EMS, our special shipping line and so on, usually takes about 7-20 days for delivery.
*Please note that we only process orders on business days (Monday-Friday).
*Total Delivery Time=Processing Time+ Shipping Time
Once we receive your online order we will send you a confirmation e-mail and you will receive a tracking number once the order has been shipped and is on it’s way to you.
If you have any questions about any orders in transit, please feel free to contact us. We care about you so much and we’re doing our best to catch up!
Please Note:
Orders placed on Friday Afternoons, during weekends or National Holidays will be processed the next business day.
During holiday periods, such as Thanksgiving, Black Friday and Cyber Monday, Christmas, and Easter, orders may be subject to delay.
Please allow a few additional business days for your order to be processed and dispatched.
There are estimated delivery time only, so can not guarantee an exact delivery time.
Thanks for understanding and have excellent shopping with SKYZONE!
Contact us
If you have a technical question please just submit a ticket first then there will be a soultion for you.
Technical Support
Submit A Ticket
If you have a order inventory and shipping status question please mail customer service directly and we will get back to you as soon as possible.
Customer service or wholesale inquiry Email: skyzonehobbies@gmail.com

SKYZONE Cobra x V2 Diversity 5.8ghz 48ch Steadyview Receiver FPV Goggles with DVR
- Regular price
-
$249.00
- Regular price
-
- Sale price
-
$249.00
-
-
Worldwide & Free shipping
-
-
Skyzone Cobra X is the best FPV box goggle you can buy
cobra x review by TweetFPV
-

Long Duration
Multiple Power Supply, 18650 Battery, 2-6S Lipo, USB.
-
Easy to Access
All the lO port on the bottom,easy to acess, HDMI.


FAQS
What payment methods does SKYZONE accept?
We accept Visa, MasterCard, Amex, Paypal. If we don’t have your payment method on our website, you can contact us by email and we will help you solve your payment problem.
Is it safe to use my credit card online at SKYZONE?
At SKYZONE, your personal online security is important to us. We do not store any cardholder account data. All credit card payment service are secure.
Can I return an online order to a store?
An online order can be returned to a SKYZONE Concept Store for an exchange or refund provided it is:
• Within 1 year of purchase
• You have your order number
• Items are in their original condition, with tags and hygiene stickers still attached.
Please note: Unfortunately we are unable to accept returns or exchanges on our Final Sale items due to change of mind, unless deemed faulty.
Does SKYZONE ship to my country?
SKYZONE offer worldwide shipping on all items available for sale on our website and usually ship within 24 hours.
How to create account?
How to create account?
Step 1:
Desk:

Mobile:

Step 2: Click to create an account
Desk:
Mobile:
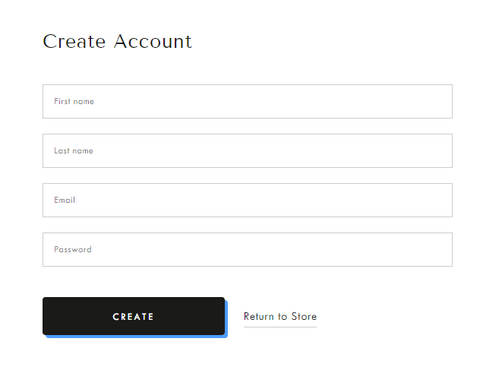
Step 3: Filling in the form information
Desk:
Mobile:
Get in touch

COBRA
User Manual
V1.3
202011
Specifications
Model
Screen
Resolution
FOV(Diagonal)
Aspect Ratio
Receiver
Language
Power Supply
Power Consumption
DVR
Head Tracker
Dimentions
Weight
Cobra X
LCD
1280X720
50°
4:3/16:9
5.8Ghz 48 CH RapidMix Receiver
10 Language
1Cell 18650/DC 6.5-25.2V/USB 5V
12V 0.63A 5V 1.5A
H264, 30fps,MOV 6Mbps, SD up to 128Gb
3-axis Accelerometer, 3-axis gyroscope
122*165*100mm
332g
Cobra S
LCD
800X480
50°
16:9
5.8Ghz 48 CH RapidMix Receiver
English/Chinese
1Cell 18650/DC 6.5-25.2V/USB 5V
12V 0.59A 5V 1.4A
MJEPG, 30FPS
3-axis Accelerometer, 3-axis gyroscope
122*165*100mm
332g
BAND/CHANNEL table
BAND/CH table
BAND/CH
CH 1
CH2
CH3
CH4
CH5
CH6
CH7
CH8
A
5865M
5845M
5825M
5805M
5785M
5765M
5745M
5725M
B
5733M
5752M
5771M
5790M
5809M
5828M
5847M
5866M
E
5705M
5685M
5665M
5645M
5885M
5905M
5925M
5945M
F
5740M
5760M
5780M
5800M
5820M
5840M
5860M
5880M
R
5658M
5695M
5732M
5769M
5806M
5843M
5880M
5917M
L
5362M
5399M
5436M
5473M
5510M
5547M
5584M
5621M
Sensitivity
Antenna port
-98dBm±1dBm
2 X SMA-K,50ohm
Package Included
1.
2.
3.
4.
5.
6.
7.
8.
9.
Goggles*1
Receiver Module*1
Head Strap *1
Power Cable*1
Headtracker cable*1
5.8GHz 2dD antennas*2
Video/Audio Cable*1
USB-C Cable*1
User Manual*1
1
Diagram
3
2
1
5
4
6
9
7
10
8
11
1.Power/Fan
3.CH/BAND/Search
5.Mode
7.3.5mm Head tracker por t
9.SD card slot
11.HDMI input
2.System Menu/Headtracker reset
4.Record/Delete
6.USB C por t
8.DC PORT(5.5*2.1mm)
10.AV IN/OUTPUT
GND
GND
VIDEO
AudioR
PPM OUT
AudioL
AV Jack Pin-out
Headtracker Jack Pin-out
2
Introduction
The SKYZONE Cobra X * is a FPV goggle with 1280*720 high resolution LCD screen , the screen
have vivid color and high Luminance , pilot can see more details in the racing . With SteadyView receiver ,
the receiver merge two signal to one, avoid image tearing and rolling when signal is weak, make image
more stable and clear in challenging condition. The goggle support pilot wear glass while fling. The new
OS with 10 languages* to set select, pilot have no trouble with the menu system, with shuttle wheel and
new user interface, pilot can set all the setting just by rolling the wheel without take off the goggle. the
goggles can power by 1 cell 18650 battery or 2~6s lipo battery, the USB charging and DC charging make
goggle simple to use in the filed.
Diversity
SteadyView
* SKYZONE Cobra S have 800*480 resolution, and UI only have 2 languages.
3
DO NOT EXPOSE THE LENS DIRECT TO SUNLIGHT, OTHERWISE
THE SCREEN WILL BURN IN.
Quick Start Guide
1.Install the receiver and antenna.
2.Plug the battery into battery bay or use power cables to connect battery to the goggle, goggle can
power by 2~6cells lipo battery, hold the power button to turn on.
Band and Chanel setting
.
1 Press the right wheel, then roll the right wheel to change channel, press the wheel again switch to band
setting mode, then roll the wheel to change the band.
2.No wheel operation for 3 seconds,goggle will quit RF setting mode .
3.Hold the right wheel to pop up search menu, press the right wheel to start auto search, after searching
all the frequency, receiver will work on the strongest signal. roll the right wheel to manually select the
channels, short press the right wheel to quit search.
Sometime the auto search channel is not accurate, user may need manually select the channel.
MODE MENU
·Short press the left wheel to pop up mode menu.
·RF normal: this mode is normal 48 CH receive mode.
·RF Racing: this mode will make receiver only working on RaceBand.
·RF Third-Party: in this mode, the goggles button cant control the external receiver, also the OSD of the
goggles cant read the band/channel of the receiver.
·AVIN: when enable the AV IN mode . The NTSC and PAL system format can be supported to be
automatically switched. The receiver module will be automatically turned off to save the power.
·HDMI IN : the receiver module and the video record module will be automatically turned off to save
the power.
·It is recognized that the screen and the corresponding resolution information will be automatically
displayed in the supported resolution format.
·Playback: in this mode, customer can review the DVR files .
PLAYBACK
·
·
·
·
·
In playback mode, roll right wheel to choose the DVR, short press right wheel to play and pause .
Left wheel to adjust the volume.
When playing the DVR, roll the right wheel to Fast Forward or Fast backward.
Press the Right button to quit DVR .
Press the Left button to delete DVR.
4
Se ttings
·Short press right button to pop up or quit setting menu.
·Roll right wheel to navigate, press the right whee l to select .
Head Tracking
·The head tracking button is on the right side of the goggles.
·The gyro required for an initialization time. When it is powered on, goggles must be kept horizontal
and stable as long as possible. When hearing the sound of a "beep", the initialization is done.
·Hold HT button to reset the PPM signal to the center, goggles will beep when press the button.
Disable the Headtracker can save the gyro initialization time to speed up goggles boot time.
Image
· I n image setting menu, customer have standard, bright, vivid, soft and 3 customized file s to adjust.
· C ustomer can adjust Brightness, C ontrast, S aturation, Hue and Sharpness to suit different environment in
3 user 1/2/3, the image setting can not change in 4 pre-set files.
DISPLAY
· In Display setting menu, customer can change the aspect ratio(4:3 or 16:9), default is 16:9*.
·In Display menu, customer can set the RSSI icon: icon + percentage, Icon, Percentage, disable, also
adjust the vertical position of the RSSI.
·The Luminance of the screen and be adjust in the menu (3 stages, default is 2).Normally do not set the
brightness too high unless the image is dim.
COBRA S only have 16:9 Mode.
DVR
·Left button is recording button and stop button.
·Build in DVR H264 encoding , SD card recommend Class10, SD card can support up to 128GB.
·SD card must be formatted into FAT32 , user can get into system menu to select the Format SD .
·The video recording function can be used in both the RF Mode and the AV IN Mode.
·By default, when recording the video (including: recording the sound), the "sound recording" function
can be turned off in the system menu, and the video signal can be recorded only.
·Automatic recording: enable this function , if the video signal has been detected, the recording function
will be activated automatically. The recording function can also manually be stopped by press the REC
button.
·Cyclic recording:Overwriting of older recordings on or off (in case of storage space is wasted).
·The video recording File will be automatically divided into the multiple Files. In the menu system, the
video length can be set as: 5 minutes, 10 minutes, 20 minutes and 30 minutes. The default video length
can be set as 30 minutes / each file.
·If the power has been suddenly disconnected during video recording process, the DVR will be damaged.
The goggles have repairing function. After entering into the playback mode, the last DVR will be
automatically checked. If it is damaged, the DVR will be automatically repaired.
5
DISPLAY
·In Display setting menu, customer can set the topbar OSD time, turn off the time off, the OSD always on.
·In Display menu, customer can set the RSSI icon: icon + percentage, Icon, Percentage, disable, also
adjust the vertical position of the RSSI.
··The Luminance of the screen and be adjust in the menu (3 stages, default is 2).Normally do not set the
brightness too high unless the image is dim.
·In Display setting menu, customer can change the aspect ratio(4:3 or 16:9), default is 16:9.
SYSTEM MENU
·In Power supply menu, user can choose battery type(2S~6S) to make sure goggles shown real capacity
of the battery.
·Voltage calibration gives user ±0.9V range to adjust the voltage, when calibrate the voltage, use
multimeter to measure the loaded voltage of the battery, then use shuttle wheel to adjust voltage on OSD
to match the real voltage.
·RSSI Calibration: use can calibrate the rssi in this menu, to calibrate the RSSI, user need remove the
antenna, and turn off the VTX, then select yes, when calibration is done, the goggle will beep.
·System Language can select in to: English, F rench, G erman, R ussian, I talian, P ortuguese, S panish,
Chinese, Japanese, Korean.
RF MODE:in this mode, user can chosse the Diversity mode or MIX mode, there are some cameras
video signal voltage didnt follow standard NTSC or PAL, which caused the picture rolling in MIX
mode,Select Diversity mode, it will solve the rolling issue.
·The built-in fan can not only be mainly used for defogging, but also can be used to dissipate the heat
within the product. The speed of fan can be set in the system menu.
·Press the POWER button to start up/stop the fan for defogging.
·User can manually set fan speed to adjust the fan noise.
The function of the wheel and buttons can be swapped from left side to the right side , makes to adapt
left handed user. when rotary switch is enabled, all the function in manual is changed from left to right.
·Factory Reset : User can reset all the function and setting in this menu.
·DVR FW upgrade:User can upgrade DVR Firmware from SD card in this menu.
·Firmware version :Goggles Firmware , DVR Firmware version and Serial Number will shown in this menu.
6
Firmware Upgrade
Goggles
1,Connect goggles to the computer.
2,Hold the left wheel when turn on the goggles, the usb cable will power the goggles, release the left
button, computer will automatically install the driver , computer will show a new removable storage .
3, copy the Firmware File to folder(Not the SD card). goggles will installing the update at the same time.
Even enabled the rotary switch function, the boot button is still left button. when the copying is done,
the firmware upgrade is done.
DVR
1,Take a SD card and format the card to FAT32.
2,Copy the DVR Firmware to the SD card , insert it in the goggles and turn it on.
3,Go to the system menu and choose DVR FM upgrade.
*COBRA S cant upgrade the firmware of DVR
Receiver Firmware
1, Take the receiver out, hold the boot button when connect the receiver to the computer.
2,Computer will automatically install the driver , computer will show a new removable storage .
3, Copy the Firmware File to the folder(Not the SD card). goggles will installing the update at the same
time. when to copying is done, the firmware upgrade is done.
Charging
·Th e goggles inte g rated with charging modu l e, u ser can cho o se US B c harg e or use barrel connector
charge.
·when goggles is powered via barrel connector ,the external power is also charging the internal
18650 battery.
·DC and Type C can both charge the internal 18650 battery.
·F or safet y, do not charge the battery unattended .
·The 18650 battery bay have protection circuit, if remove the battery without turn off the goggle, the
battery will in protection status, to quit protection, the goggle need use DC cable or USB cable to
chargethe battery to quit this mode.
This content is subject to change, download latest version from:
www.skyzonehobbies.com
7