- Manuals
- Brands
- Pfaff Manuals
- Sewing Machine
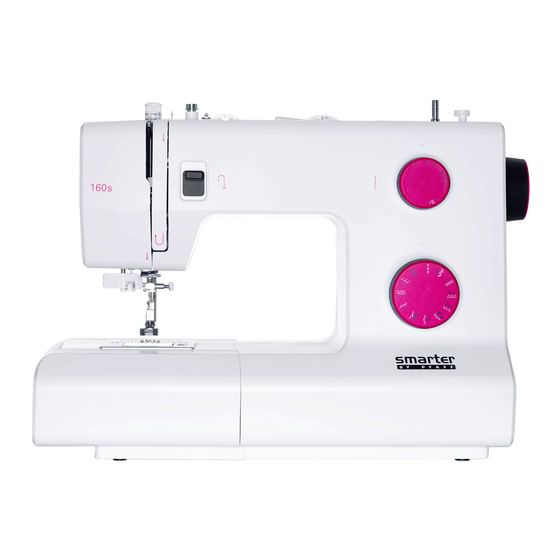
- Smarter
- Owner’s manual
-
Contents
-
Table of Contents
-
Troubleshooting
-
Bookmarks
Quick Links
Owner’s
Manual
160s
150s
140s
130s
SMARTER BY PFAFF
™
– inspired and developed by the premier PFAFF
sewing machine brand
®
Related Manuals for Pfaff Smarter
Summary of Contents for Pfaff Smarter
-
Page 1
Owner’s Manual 160s 150s 140s 130s SMARTER BY PFAFF ™ – inspired and developed by the premier PFAFF sewing machine brand ®… -
Page 2: Important Safety Instructions
This household sewing machine is designed to comply with IEC/ EN 60335-2-28 and UL1594. IMPORTANT SAFETY INSTRUCTIONS When using an electrical appliance, basic safety precautions should always be followed, including the following: Read all instructions before using this household sewing machine. Keep the instructions at a suitable place close to the machine.
-
Page 3
• Do not use bent needles. needle causing it to break. • Wear safety glasses. in the needle area, such as threading needle, changing needle, threading bobbin, or changing presser foot, etc. • Never drop or insert any object into any opening. •… -
Page 4
FOR EUROPE ONLY: This appliance can be used by children aged from 8 years and above and persons with reduced physical, sensory or mental capabilities or lack of experience and knowledge if they have been given supervision or instruction concerning use of the appliance in a safe way and understand the hazards involved. -
Page 5: Table Of Contents
TABLE OF CONTENTS INTRODUCTION ……… 6 ……….21 Machine Overview ……….6 ……….22 …………6 Adjustable Needle Position ……22 Top Parts …………7 ……….22 …………7 Accessories …………7 SEWING ……….23 Included Accessories not in Picture ..7 ….23 Presser Feet ………..8 ……23 ……9 ……….23 ….10 ……24 ……24…
-
Page 6: Introduction
INTRODUCTION Machine Overview Front Side 1. Threading slots 12. Needle bar 2. Thread cutter 3. LED light 4. Reverse lever 14. Bobbin cover 5. Free arm 15. Lower thread guide 6. Accessory tray 16. Needle screw 17. Presser foot lift 18.
-
Page 7: Top Parts
Top Parts 21. Presser foot pressure dial 22. Thread guides 24. Hole for auxiliary spool pin 25. Bobbin winder spindle 26. Take-up lever 27. Thread tension discs 28. Bobbin winder tension disc 29. Thread tension dial Rear Side 31. Main switch, connectors for power cord and foot control 32.
-
Page 8: Presser Feet
Presser Feet Standard Presser Foot 0 This foot is used mainly for straight stitching and zigzag stitching with a stitch length longer than 1.0 mm. Clearview Foot 1 When sewing decorative stitches or short zigzag stitches and other utility stitches with less than 1.0mm stitch length, use this smoothly over the stitches.
-
Page 9
Stitch Overview – 150s/160s Stitch Name Description 1-step Buttonhole For all straight stitching and topstitching Triple zigzag stitch For stitching on elastic band, darning tears and patches Blindhem stitch For invisible hem attachment Elastic blindhem For invisible hem attachment and simultaneous stitch * serging, also for stretch fabrics Decor stitch… -
Page 10
Stitch Overview – 130s/140s Stitch Name Description 4-step Buttonhole For all straight stitching and topstitching Triple zigzag stitch* For stitching on elastic band, darning tears and patches Elastic blindhem For invisible hem attachment and simultaneous stitch * serging, also for stretch fabrics Blindhem stitch For invisible hem attachment Greek stitch… -
Page 11: Preparations
2. Remove all outer packing material and the plastic bag. Note: Your SMARTER BY PFAFF™ 130s/140s/ 150s/160s sewing machine is adjusted to provide the best stitch result at normal room temperature. Ex- treme hot and cold temperatures can affect the sewn result.
-
Page 12: Free Arm
Pack away after Sewing Note: After switching off, residual power may still remain in the machine. This may cause the light to stay on for a few seconds while the power is consumed. This is normal behavior for an energy 2.
-
Page 13: Spool Pins
Spool Pins Your machine has two spool pins, a main spool pin and an auxiliary spool pin. The spool pins are designed for all types of thread. The main spool pin is used in a Narrow thread spool the horizontal position for normal threads and the vertical position for large spools or specialty threads.
-
Page 14: Threading The Machine
Threading the Machine Make sure that the presser foot is raised and the needle is in its highest position. 5. Thread the needle.
-
Page 15: Needle Threader
Needle Threader The integrated needle threader allows you The needle must be in its highest position to use the built-in needle threader. Turn the handwheel until the notch on the wheel is lowering the presser foot. 1. Use the handle (B) to pull the needle threader all the way down.
-
Page 16: Threading For Twin Needle
Threading for Twin Needle Replace the sewing needle with a twin needle. Make sure that the presser foot is raised and the needle is in its highest position. 1. Place the thread spool on the spool pin and fit the appropriately sized spool cap.
-
Page 17: Bobbin Winding
Bobbin Winding spool cap tightly against the spool. front to the back. Pull the thread clockwise around the inside to the outside. 4. Place the bobbin on the bobbin spindle. 5. Push the bobbin spindle to the right to activate the bobbin winding. Press the foot control to wind the bobbin.
-
Page 18: Presser Foot Pressure
Presser Foot Pressure The presser foot pressure has been pre-set to not need to adjust the presser foot pressure. very light or heavy fabric, adjusting the pres- sure can improve the result. For very light fabrics, loosen the pressure by turning the dial counterclockwise.
-
Page 19: Needles
Needles The sewing machine needle plays an important role recommend needles of system 130/705H. The needle package included with your machine contains needles Universal Needle (A) Universal needles have a slightly rounded point and come in a variety of sizes. For general sewing in a vari- ety of fabric types and weights.
-
Page 20: Lowering Feed Dogs
Lowering Feed Dogs You can lower the feed dogs by moving the switch at the back of the free arm to the wish to raise the feed dogs. Note: The feed dogs will not raise immediately when the lever is switched. Turn the handwheel one full turn or start sewing to re-engage the feed dogs.
-
Page 21: Stitch Selection
Stitch Selection desired stitch. The selected stitch is the one The stitches printed in white on the stitch Use non-stretch stitches when sewing woven fabrics, leather or vinyl and stretch Note: Always raise the needle above the fabric and presser foot before you turn the stitch selc- tion dial.
-
Page 22: Adjustable Needle Position
Stitch Width sired stitch width. The higher the number, the wider the stitch width. The stitch width can be varied wheel correspond to the stitch width in Note: Before you turn the stitch width dial, raise the needle to its highest position, other- wise it may bend or break.
-
Page 23: Sewing
SEWING stitch scribed, a chart shows the recommended set- chart to the right. Start to Sew – Straight Stitch A. Recommended stitch B. Stitch length in mm Raise the presser foot and position the fab- C. Stitch width in mm ric under it, next to a seam allowance guide line on the needle plate.
-
Page 24: Reinforced Straight Stitch
Reinforced Straight Stitch stitch This stitch is stronger than regular straight stitch, due to the fact that it is a triple and elastic stitch. The reinforced straight stitch can be used for heavy stretch fabrics, for Set for reinforced straight stitch crotch seams which are subject to consider- able strain and for topstitching heavy fabrics.
-
Page 25
Overlock Stitch stitch The open overlock stitch sews the seam and overcast the edge all at one time, perfect for stretch fabrics. This stitch is more elas- tic than normal seams, very durable and Set for overlock stitch Tip: When sewing, guide the fabric edge along the metal pin of the foot. -
Page 26: Blindhem
Blindhem stitch The blindhem stitch is used to make invisible hems on skirts, trousers and home decorating. 1. Finish the edge of the hem. Set for blindhem stitch 2. Fold and press the hem allowance to the wrong side. 3. Fold the hem back on itself so approxi- extends beyond the fold.
-
Page 27: Darning With The
Sewing on Patches or Appliqués stitch To cover large holes it is necessary to sew a new piece of fabric onto the damaged area. Baste the new piece of fabric onto the dam- aged area on the right side of the fabric. Set for three-step zigzag stitch the three-step zigzag stitch.
-
Page 28
Sewing on Buttons stitch 1. Remove the presser foot and lower the Set for button sewing 2. Mark the fabric where the button is to be located. Place the fabric and button under the ankle with the holes in the button lined up with the swing of the needle. -
Page 29
Standard Buttonhole stitch (model 150s/160s) The fabric should be interfaced and/or stabi- lized where buttonholes are to be sewn. Set for buttonhole 1. Mark the start position and buttonhole Push the button holder open by pushing Push the button holder forward until button will determine the length of the buttonhole. -
Page 30
Standard Buttonhole stitch (model 130s/140s) The fabric should be interfaced and/or stabi- lized where buttonholes are to be sewn. Set for buttonhole Prepare the Buttonhole Measure diameter and thickness of the but- tain correct buttonhole length. Mark the start position and buttonhole length on the fabric Note: Before starting to sew any buttonhole, al- ways push the the buttonhole foot fully back. -
Page 31: Stretch Fabrics
Use seam ripper and cut the buttonhole open from both ends towards the middle. The density of the buttonhole is adjusted Note: Density varies according to the fabric. Al- Carefully cut your buttonhole ways test sew a buttonhole on the fabric you are open with a seam ripper.
-
Page 32: Sewing Zippers
Sewing Zippers stitch the right or the left of the needle, making it 1.5-3 easy to sew both sides of the zipper. To sew the left side of the zipper, attach the Set for zipper To sew the right side of zipper, attach the Center Zipper Right presser foot Left presser foot…
-
Page 33: Maintenance
MAINTENANCE Cleaning the Machine To keep your sewing machine operating well, Wipe the exterior surface of your machine with a soft cloth to remove any dust or lint built up. Cleaning the Bobbin Area Note: Raise the needle, lower the feed dogs and turn off the machine.
-
Page 34: Troubleshooting
TROUBLESHOOTING ® your machine. For further information please contact your local authorized PFAFF dealer. General Problems The Seam has Uneven Stitches Fabric does not move? Is the thread tension correct? Make sure that the feed dogs are not lowered. Check needle thread tension and the threading.
-
Page 35: Intellectual Property
Bobbin Thread Breaks Did you insert the bobbin properly? Check the bobbin thread. Is the stitch plate hole damaged? Change the stitch plate. Is the bobbin area clean? Clean lint from bobbin area. Is the bobbin wound correctly? Wind a new bobbin. design.
-
Page 36
4710092-26A English © 2014 KSIN Luxembourg II, S.ar.l. All rights reserved. Printed in Germany on environmentally-friendly paper…
Посмотреть инструкция для Pfaff Smarter by 140s бесплатно. Руководство относится к категории швейные машины, 5 человек(а) дали ему среднюю оценку 8.1. Руководство доступно на следующих языках: английский. У вас есть вопрос о Pfaff Smarter by 140s или вам нужна помощь? Задайте свой вопрос здесь
Не можете найти ответ на свой вопрос в руководстве? Вы можете найти ответ на свой вопрос ниже, в разделе часто задаваемых вопросов о Pfaff Smarter by 140s.
Какой размер иглы лучше всего использовать?
Какой срок службы у швейной иглы?
Что может повредить иглу при шитье?
Инструкция Pfaff Smarter by 140s доступно в русский?
Не нашли свой вопрос? Задайте свой вопрос здесь
![]()
SMARTER BY PFAFF™ – inspired and developed by the premier PFAFF® sewing machine brand
This household sewing machine is designed to comply with IEC/ EN 60335-2-28 and UL1594.
IMPORTANT SAFETY INSTRUCTIONS
When using an electrical appliance, basic safety precautions should always be followed, including the following:
Read all instructions before using this household sewing machine. Keep the instructions at a suitable place close to the machine. Make sure to hand them over if the machine is given to a third party.
DANGER – TO REDUCE THE RISK OF ELECTRIC SHOCK:
$ VHZLQJ PDFKLQH VKRXOG QHYHU EH OHIW XQDWWHQGHG ZKHQ SOXJJHG
LQ $OZDV XQSOXJ WKLV VHZLQJ PDFKLQH IURP WKH HOHFWULF RXWOHW immediately after using and before cleaning, removing covers, relamping, lubricating or when making any other user servicing adjustments mentioned in the instruction manual.
WARNING – TO REDUCE THE RISK OF BURNS, FIRE, ELECTRIC SHOCK, OR INJURY TO PERSON:
7KLV VHZLQJ PDFKLQH LV QRW LQWHQGHG IRU XVH E SHUVRQV LQFOXGLQJ children) with reduced physical, sensory or mental capabilities,
or lack of experience and knowledge, unless they have been given supervision or instruction concerning use of the sewing machine by a person responsible for their safety.
&KLOGUHQ VKRXOG EH VXSHUYLVHG WR HQVXUH WKDW WKH GR QRW SOD with the sewing machine.
8VH WKLV VHZLQJ PDFKLQH RQO IRU LWV LQWHQGHG XVH DV GHVFULEHG in this manual. Use only attachments recommended by the manufacturer as contained in this manual.
1HYHU RSHUDWH WKLV VHZLQJ PDFKLQH LI LW KDV D GDPDJHG FRUG or plug, if it is not working properly, if it has been dropped or damaged, or dropped into water. Return the sewing machine to the nearest authorized dealer or service center for examination, repair, electrical or mechanical adjustment.
2
1HYHU RSHUDWH WKH VHZLQJ PDFKLQH ZLWK DQ DLU RSHQLQJV EORFNHG
Keep ventilation openings of the sewing machine and foot control free from the accumulation of lint, dust, and loose cloth.
.HHS ÀQJHUV DZD IURP DOO PRYLQJ SDUWV 6SHFLDO FDUH LV UHTXLUHG around the sewing machine needle.
$OZDV XVH WKH SURSHU QHHGOH SODWH 7KH ZURQJ SODWH FDQ FDXVH WKH needle to break.
‘R QRW XVH EHQW QHHGOHV
‘R QRW SXOO RU SXVK IDEULF ZKLOH VWLWFKLQJ ,W PD GHÁHFW WKH QHHGOH causing it to break.
HDU VDIHW JODVVHV
6ZLWFK WKH VHZLQJ PDFKLQH RII ´ µ ZKHQ PDNLQJ DQ DGMXVWPHQW in the needle area, such as threading needle, changing needle, threading bobbin, or changing presser foot, etc.
1HYHU GURS RU LQVHUW DQ REMHFW LQWR DQ RSHQLQJ
‘R QRW XVH RXWGRRUV
‘R QRW RSHUDWH ZKHUH DHURVRO VSUD SURGXFWV DUH EHLQJ XVHG RU where oxygen is being administrated.
7R GLVFRQQHFW WXUQ DOO FRQWUROV WR WKH RII ´ µ SRVLWLRQ WKHQ remove plug from outlet.
‘R QRW XQSOXJ E SXOOLQJ RQ FRUG 7R XQSOXJ JUDVS WKH SOXJ QRW the cord.
7KH QRLVH OHYHO XQGHU QRUPDO RSHUDWLQJ FRQGLWLRQV LV OHVV WKDQG% $
7KH IRRW FRQWURO LV XVHG WR RSHUDWH WKH PDFKLQH $YRLG SODFLQJ RWKHU objects on the foot control.
7KLV VHZLQJ PDFKLQH LV SURYLGHG ZLWK GRXEOH LQVXODWLRQ 8VH RQO LGHQWLFDO UHSODFHPHQW SDUWV 6HH LQVWUXFWLRQV IRU 6HUYLFLQJ RI ‘RXEOH ,QVXODWHG $SSOLDQFHV
SAVE THESE INSTRUCTIONS
3

SERVICING OF DOUBLE
INSULATED PRODUCTS
In a double-insulated product, two systems of insulation are provided instead of grounding. No ground means is provided on a double-insulated product, nor should a means for grounding
EH DGGHG WR WKH SURGXFW 6HUYLFLQJ RI D GRXEOH LQVXODWHG SURGXFW UHTXLUHV H[WUHPH FDUH DQG NQRZOHGJH RI WKH VVWHP DQG VKRXOG EH
GRQH RQO E TXDOLÀHG VHUYLFH SHUVRQQHO 5HSODFHPHQW SDUWV IRU a double-insulated product must be identical to those parts in the
SURGXFW $ GRXEOH LQVXODWHG SURGXFW LV PDUNHG ZLWK WKH ZRUGV ¶’28%/( ,168/$7,21· RU ¶’28%/( ,168/$7(‘·
4
TABLE OF CONTENTS
|
INTRODUCTION…………………………… |
6 |
|
Machine Overview …………………………………….. |
6 |
|
)URQW 6LGH……………………………………………… |
6 |
|
Top Parts………………………………………………. |
7 |
|
5HDU 6LGH………………………………………………. |
7 |
|
Accessories…………………………………………………. |
7 |
|
,QFOXGHG $FFHVVRULHV QRW LQ 3LFWXUH………. |
7 |
|
Presser Feet…………………………………………… |
8 |
|
6WLWFK 2YHUYLHZ ² V………………………….. |
9 |
|
6WLWFK 2YHUYLHZ ² V………………………… |
10 |
|
PREPARATIONS …………………………. |
11 |
|
Unpacking ………………………………………….. |
11 |
|
&RQQHFW WR WKH 3RZHU 6XSSO……………… |
11 |
|
3DFN DZD DIWHU 6HZLQJ………………………. |
11 |
|
)UHH $UP…………………………………………….. |
12 |
|
Leveling the Machine Base Plate…………. |
12 |
|
Thread Cutter……………………………………… |
12 |
|
6SRRO 3LQV …………………………………………… |
13 |
|
Threading the Machine……………………….. |
14 |
|
Needle Threader …………………………………. |
15 |
|
Threading for Twin Needle…………………. |
16 |
|
Bobbin Winding………………………………….. |
17 |
|
Inserting the Bobbin ……………………………. |
17 |
|
Presser Foot Pressure ………………………….. |
18 |
|
Thread Tension …………………………………… |
18 |
|
Needles……………………………………………….. |
19 |
|
Changing the Needle ………………………….. |
19 |
|
/RZHULQJ )HHG ‘RJV…………………………… |
20 |
|
Presser Foot Lift ………………………………….. |
20 |
|
Changing the Presser Foot ………………….. |
20 |
|
6WLWFK 6HOHFWLRQ……………………………………. |
21 |
|
6WLWFK /HQJWK……………………………………….. |
21 |
|
6WLWFK LGWK………………………………………… |
22 |
|
$GMXVWDEOH 1HHGOH 3RVLWLRQ…………………. |
22 |
|
5HYHUVH 6HZLQJ…………………………………… |
22 |
|
SEWING ………………………………………. |
23 |
|
6WDUW WR 6HZ ² 6WUDLJKW 6WLWFK……………….. |
23 |
|
&KDQJH 6HZLQJ ‘LUHFWLRQ……………………. |
23 |
|
)LQLVK 6HZLQJ……………………………………… |
23 |
|
5HLQIRUFHG 6WUDLJKW 6WLWFK……………………. |
24 |
|
7KUHH 6WHS =LJ]DJ 6WLWFK……………………… |
24 |
|
2YHUORFN 6WLWFK……………………………………. |
25 |
|
&ORVHG 2YHUORFN 6WLWFK………………………… |
25 |
|
Blindhem…………………………………………….. |
26 |
|
6HZLQJ RQ 3DWFKHV RU $SSOLTXpV…………. |
27 |
|
‘DUQLQJ ZLWK WKH |
|
|
7KUHH 6WHS =LJ]DJ 6WLWFK…………………….. |
27 |
|
Repairing Tears…………………………………… |
27 |
|
6HZLQJ RQ %XWWRQV………………………………. |
28 |
|
6WDQGDUG %XWWRQKROH PRGHO V ………. |
29 |
|
6WDQGDUG %XWWRQKROH PRGHO V ………. |
30 |
|
&RUGHG %XWWRQKROH 6WUHWFK )DEULFV …… |
31 |
|
6HZLQJ =LSSHUV…………………………………… |
32 |
|
MAINTENANCE………………………….. |
33 |
|
Cleaning the Machine …………………………. |
33 |
|
&OHDQLQJ WKH %REELQ $UHD …………………… |
33 |
|
&OHDQLQJ 8QGHU WKH %REELQ $UHD………… |
33 |
|
5HSODFLQJ WKH 6WLWFK 3ODWH……………………. |
33 |
|
TROUBLESHOOTING………………… |
34 |
5

|
7 |
|||
|
1 |
8 |
||
|
2 |
5 |
4 |
6 |
|
3 |
9 |
||
|
10 |
15 |
|
|
16 |
||
|
11 |
17 |
|
|
12 |
18 |
|
|
13 |
19 |
|
|
20 |
||
|
INTRODUCTION |
14 |
|
Machine Overview
Front Side
|
1. |
Threading slots |
%XWWRQKROH OHYHU RQO V |
|
|
2. |
Thread cutter |
12. |
Needle bar |
|
/(‘ OLJKW |
6WLWFK SODWH |
||
|
4. |
Reverse lever |
14. |
Bobbin cover |
|
5. |
Free arm |
15. |
Lower thread guide |
|
$FFHVVRU WUD |
16. |
Needle screw |
|
|
6WLWFK OHQJWK GLDO |
17. |
Presser foot lift |
|
|
8. |
Handwheel |
18. |
Needle thread guide |
|
6WLWFK VHOHFWLRQ GLDO |
19. |
Presser foot bar and presser foot holder |
|
|
10. |
Built-in needle threader |
20. |
Presser foot |
6

Top Parts
21.Presser foot pressure dial
22.Thread guides
6SRRO FDSV 6SRRO SLQ
24.Hole for auxiliary spool pin
25.Bobbin winder spindle
26.Take-up lever
27.Thread tension discs
28.Bobbin winder tension disc
29.Thread tension dial
6WLWFK ZLGWK GLDO
|
21 |
22 |
23 |
24 |
25 |
||
|
26 |
27 |
28 |
29 |
30 |
||
|
32 |
Rear Side
31.Main switch, connectors for power cord and foot control
32.Handle
6OLGH IRU ORZHULQJ WKH IHHG GRJV
Accessories
%REELQV
35. Felt pad
6FUHZGULYHU
6SRRO FDS ODUJH
6SRRO FDS VPDOO
6HDP ULSSHU EUXVK DV RQH
40. Edge guide
$X[LOLDU VSRRO SLQ
Included Accessories not in Picture
)RRW FRQWURO DQG SRZHU FRUG
1HHGOHV
+DUG FRYHU
7

Presser Feet
Standard Presser Foot 0
This foot is used mainly for straight stitching and zigzag stitching with a stitch length longer than 1.0 mm.
Clearview Foot 1
When sewing decorative stitches or short zigzag stitches and other utility stitches with less than 1.0mm stitch length, use this
IRRW 7KH JURRYH RQ WKH XQGHUVLGH RI WKH IRRW LV GHVLJQHG WR ÁRZ smoothly over the stitches.
Blindhem Foot 3
This foot is used for blindhem stitches. The toe on the foot guides the fabric. The red guide on the foot is designed to ride along the fold of the hem edge.
Note: Always use at least 5mm stitch width when using Blind Hem Foot 3. If using a stitch width other than the recommended, swing the needle by turning the hand wheel to make sure the needle doesn’t hit the metal pin in the foot.
Zipper Foot 4
This foot can be snapped on either the right or the left of the needle, making it easy to sew close to both sides of the zipper teeth. Move the needle position to the right or left to sew closer to zipper teeth.
Four-Step Buttonhole Foot 5A (for 140s)
6OLGLQJ SODWH XQGHU IRRW KDV FRQYHQLHQWO VSDFHG PDUNLQJV WR VWDUW and stop your buttonhole at precisely the correct point.
One-Step Buttonhole Foot 5B (for 160s)
This foot has a space in the back for a button used to set the size of
WKH EXWWRQKROH 7KH PDFKLQH ZLOO VHZ D EXWWRQKROH WR ÀW WKDW EXWton size.
8

Stitch Overview – 160s
|
Stitch |
Name |
Description |
|||||||||
|
5B |
1-step Buttonhole |
6WDQGDUG EXWWRQKROH |
|||||||||
|
0 |
6WUDLJKW VWLWFK |
For all straight stitching and topstitching |
|||||||||
|
0 |
=LJ]DJ VWLWFK |
)RU VHUJLQJ DQG DSSOLTXp |
|||||||||
|
0 |
Triple zigzag stitch |
For stitching on elastic band, darning tears and |
|||||||||
|
patches |
|||||||||||
|
3 |
Blindhem stitch |
For invisible hem attachment |
|||||||||
|
3 |
Elastic blindhem |
For invisible hem attachment and simultaneous |
|||||||||
|
stitch * |
serging, also for stretch fabrics |
||||||||||
|
1 |
‘HFRU VWLWFK |
For all fabrics and types of work |
|||||||||
|
1 |
Checker satin stitch |
6DWLQ GHFRUDWLYH VWLWFK |
|||||||||
|
1 |
2SHQ VFDOORS |
6DWLQ GHFRUDWLYH VWLWFK |
|||||||||
|
1 |
%ULGJLQJ 6WLWFK |
For overcasting, sewing on elastic, darning tears |
|||||||||
|
and inserting patches |
|||||||||||
|
0/1 |
Greek stitch |
$ WUDGLWLRQDO GHFRUDWLYH VWLWFK H J IRU ERUGHUV |
|||||||||
|
and towels |
|||||||||||
|
0/1 |
6KHOO HGJLQJ VWLWFK |
)RU GHFRUDWLYH KHPV RQ ÀQH PDWHULDOV H J OLQHQ |
|||||||||
|
0 |
Reinforced straight |
For stretch seams, e.g. crotch seams on sports- |
|||||||||
|
stitch * |
and workwear |
||||||||||
|
1 |
Reinforced zigzag |
For attaching elastic tape on elastic materials |
|||||||||
|
stitch * |
|||||||||||
|
1 |
Honeycomb stitch * |
For sewing on elastic threads, overlocking towel- |
|||||||||
|
ling and for decorative hem seams |
|||||||||||
|
1 |
Edge stitch narrow * |
$ GHFRUDWLYH VWLWFK |
|||||||||
|
3 |
6XSHUVWUHWFK |
$ GHFRUDWLYH VWUHWFK VWLWFK |
|||||||||
|
1 |
‘HFRUDWLYH VWLWFK |
$ GHFRUDWLYH VWLWFK |
|||||||||
|
1 |
&URVV 6WLWFKHV |
$ GHFRUDWLYH VWLWFK |
|||||||||
|
1 |
‘HFRUDWLYH VWLWFK |
$ GHFRUDWLYH VWLWFK |
|||||||||
|
0 |
Federstich |
$ GHFRUDWLYH VWLWFK |
|||||||||
|
3 |
Closed overlock |
$ FORVLQJ DQG VHUJLQJ VHDP IRU IUDLQJ PDWHULDOV |
|||||||||
|
stitch * |
|||||||||||
|
3 |
2YHUORFN VWLWFK |
$ FORVLQJ DQG VHUJLQJ VHDP IRU VWURQJHU RU QRQ |
|||||||||
|
fraying materials |
|||||||||||
* These stitches are stretch stitches
9

Stitch Overview – 140s
|
Stitch |
Name |
Description |
||||||||||||||
|
1 |
2 |
4 |
3 |
$ |
4-step Buttonhole |
6WDQGDUG EXWWRQKROH |
||||||||||
|
0 |
6WUDLJKW VWLWFK |
For all straight stitching and topstitching |
||||||||||||||
|
0 |
=LJ]DJ VWLWFK |
)RU VHUJLQJ DQG DSSOLTXp |
||||||||||||||
|
0 |
Triple zigzag stitch* |
For stitching on elastic band, darning tears and |
||||||||||||||
|
patches |
||||||||||||||||
|
3 |
Elastic blindhem |
For invisible hem attachment and simultaneous |
||||||||||||||
|
stitch * |
serging, also for stretch fabrics |
|||||||||||||||
|
3 |
Blindhem stitch |
For invisible hem attachment |
||||||||||||||
|
0/1 |
6KHOO HGJLQJ VWLWFK |
)RU GHFRUDWLYH KHPV RQ ÀQH PDWHULDOV H J OLQHQ |
||||||||||||||
|
0/1 |
Greek stitch |
$ WUDGLWLRQDO GHFRUDWLYH VWLWFK H J IRU ERUGHUV |
||||||||||||||
|
and towels |
||||||||||||||||
|
1 |
%ULGJLQJ 6WLWFK |
For overcasting, sewing on elastic, darning tears |
||||||||||||||
|
and inserting patches |
||||||||||||||||
|
1 |
Checker satin stitch |
6DWLQ GHFRUDWLYH VWLWFK |
||||||||||||||
|
1 |
2SHQ VFDOORS |
6DWLQ GHFRUDWLYH VWLWFK |
||||||||||||||
|
0 |
Reinforced straight |
For stretch seams, e.g. crotch seams on sports- |
||||||||||||||
|
stitch * |
and workwear |
|||||||||||||||
|
1 |
Reinforced zigzag |
For attaching elastic tape on elastic materials |
||||||||||||||
|
stitch * |
||||||||||||||||
|
1 |
Honeycomb stitch * |
For sewing on elastic threads, overlocking towel- |
||||||||||||||
|
ling and for decorative hem seams |
||||||||||||||||
|
3 |
6XSHUVWUHWFK |
$ GHFRUDWLYH VWUHWFK VWLWFK |
||||||||||||||
|
1 |
Edge stitch narrow |
$ GHFRUDWLYH VWLWFK |
||||||||||||||
|
3 |
2YHUORFN VWLWFK |
$ FORVLQJ DQG VHUJLQJ VHDP IRU VWURQJHU RU QRQ |
||||||||||||||
|
fraying materials |
||||||||||||||||
|
3 |
Closed overlock |
$ FORVLQJ DQG VHUJLQJ VHDP IRU IUDLQJ PDWHULDOV |
||||||||||||||
|
stitch * |
||||||||||||||||
|
0 |
Federstich |
$ GHFRUDWLYH VWLWFK |
||||||||||||||
|
1 |
&URVV 6WLWFKHV |
$ GHFRUDWLYH VWLWFK |
||||||||||||||
|
1 |
‘HFRUDWLYH VWLWFK |
$ GHFRUDWLYH VWLWFK |
||||||||||||||
* These stitches are stretch stitches
10
![]()
PREPARATIONS
Unpacking
3ODFH WKH ER[ RQ D VWHDG ÁDW VXUIDFH /LIW the machine out of the box, remove the outer packaging and lift off the machine carrying case.
2.Remove all outer packing material and the plastic bag.
Note: Your SMARTER BY PFAFF™ 140s/160s sewing machine is adjusted to provide the best stitch result at normal room temperature. Extreme hot and cold temperatures can affect the sewn result.
Connect to the Power Supply
$PRQJ WKH DFFHVVRULHV RX ZLOO ÀQG WKH SRZHU plug and the foot control.
Note: Consult a qualified electrician if in doubt as how to connect the machine to the power source. Unplug the power cord when the machine is not in use.
For this sewing machine, foot control model
)& 9 )& $ )& ‘9 PXVW EH XVHG
1.Connect the plug of the foot control to
WKH FRQQHFWLQJ VRFNHW $ RI WKH VHZLQJ machine and to the wall socket. The sewing speed is regulated by pressing the foot control.
2.Press the 2 , VZLWFK % WR ´,µ WR WXUQ RQ power and light.
Pack away after Sewing
6ZLWFK WKH PDLQ VZLWFK RII
2.Unplug the cord from the wall socket and then from the machine.
3.Unplug the foot control cord from the machine. Wind the cord around the foot control for easy storage.
4.Place all accessories in the accessory tray.
6OLGH WKH WUD RQ WR WKH PDFKLQH DURXQG WKH free arm.
5.Place the foot control in the space above the free arm.
6.Put on the hard cover.
B


 A
A
For the USA and Canada
7KLV VHZLQJ PDFKLQH KDV D SRODUL]HG SOXJ RQH blade wider than the other). To reduce the risk
RI HOHFWULF VKRFN WKLV SOXJ LV LQWHQGHG WR ÀW LQ D polarized outlet only one way. If the plug does
QRW ÀW IXOO LQ WKH RXWOHW UHYHUVH WKH SOXJ ,I LW VWLOO GRHV QRW ÀW FRQWDFW D TXDOLÀHG HOHFWULFLDQ
WR LQVWDOO WKH SURSHU RXWOHW ‘R QRW PRGLI WKH plug in any way.
11
 Loading…
- Page 1
Owner’s Manual 160s 150s 140s 130s SMARTER BY PFAFF ™ – inspired and developed by the premier PFAFF sewing machine brand ®… -
Page 2: Important Safety Instructions
This household sewing machine is designed to comply with IEC/ EN 60335-2-28 and UL1594. IMPORTANT SAFETY INSTRUCTIONS When using an electrical appliance, basic safety precautions should always be followed, including the following: Read all instructions before using this household sewing machine. Keep the instructions at a suitable place close to the machine.
- Page 3
• Do not use bent needles. needle causing it to break. • Wear safety glasses. in the needle area, such as threading needle, changing needle, threading bobbin, or changing presser foot, etc. • Never drop or insert any object into any opening. •… - Page 4
FOR EUROPE ONLY: This appliance can be used by children aged from 8 years and above and persons with reduced physical, sensory or mental capabilities or lack of experience and knowledge if they have been given supervision or instruction concerning use of the appliance in a safe way and understand the hazards involved. -
Page 5: Table Of Contents
TABLE OF CONTENTS INTRODUCTION ……… 6 ……….21 Machine Overview ……….6 ……….22 …………6 Adjustable Needle Position ……22 Top Parts …………7 ……….22 …………7 Accessories …………7 SEWING ……….23 Included Accessories not in Picture ..7 ….23 Presser Feet ………..8 ……23 ……9 ……….23 ….10 ……24 ……24…
-
Page 6: Introduction
INTRODUCTION Machine Overview Front Side 1. Threading slots 12. Needle bar 2. Thread cutter 3. LED light 4. Reverse lever 14. Bobbin cover 5. Free arm 15. Lower thread guide 6. Accessory tray 16. Needle screw 17. Presser foot lift 18.
-
Page 7: Top Parts
Top Parts 21. Presser foot pressure dial 22. Thread guides 24. Hole for auxiliary spool pin 25. Bobbin winder spindle 26. Take-up lever 27. Thread tension discs 28. Bobbin winder tension disc 29. Thread tension dial Rear Side 31. Main switch, connectors for power cord and foot control 32.
-
Page 8: Presser Feet
Presser Feet Standard Presser Foot 0 This foot is used mainly for straight stitching and zigzag stitching with a stitch length longer than 1.0 mm. Clearview Foot 1 When sewing decorative stitches or short zigzag stitches and other utility stitches with less than 1.0mm stitch length, use this smoothly over the stitches.
- Page 9
Stitch Overview – 150s/160s Stitch Name Description 1-step Buttonhole For all straight stitching and topstitching Triple zigzag stitch For stitching on elastic band, darning tears and patches Blindhem stitch For invisible hem attachment Elastic blindhem For invisible hem attachment and simultaneous stitch * serging, also for stretch fabrics Decor stitch… - Page 10
Stitch Overview – 130s/140s Stitch Name Description 4-step Buttonhole For all straight stitching and topstitching Triple zigzag stitch* For stitching on elastic band, darning tears and patches Elastic blindhem For invisible hem attachment and simultaneous stitch * serging, also for stretch fabrics Blindhem stitch For invisible hem attachment Greek stitch… -
Page 11: Preparations
2. Remove all outer packing material and the plastic bag. Note: Your SMARTER BY PFAFF™ 130s/140s/ 150s/160s sewing machine is adjusted to provide the best stitch result at normal room temperature. Ex- treme hot and cold temperatures can affect the sewn result.
-
Page 12: Free Arm
Pack away after Sewing Note: After switching off, residual power may still remain in the machine. This may cause the light to stay on for a few seconds while the power is consumed. This is normal behavior for an energy 2.
-
Page 13: Spool Pins
Spool Pins Your machine has two spool pins, a main spool pin and an auxiliary spool pin. The spool pins are designed for all types of thread. The main spool pin is used in a Narrow thread spool the horizontal position for normal threads and the vertical position for large spools or specialty threads.
-
Page 14: Threading The Machine
Threading the Machine Make sure that the presser foot is raised and the needle is in its highest position. 5. Thread the needle.
-
Page 15: Needle Threader
Needle Threader The integrated needle threader allows you The needle must be in its highest position to use the built-in needle threader. Turn the handwheel until the notch on the wheel is lowering the presser foot. 1. Use the handle (B) to pull the needle threader all the way down.
-
Page 16: Threading For Twin Needle
Threading for Twin Needle Replace the sewing needle with a twin needle. Make sure that the presser foot is raised and the needle is in its highest position. 1. Place the thread spool on the spool pin and fit the appropriately sized spool cap.
-
Page 17: Bobbin Winding
Bobbin Winding spool cap tightly against the spool. front to the back. Pull the thread clockwise around the inside to the outside. 4. Place the bobbin on the bobbin spindle. 5. Push the bobbin spindle to the right to activate the bobbin winding. Press the foot control to wind the bobbin.
-
Page 18: Presser Foot Pressure
Presser Foot Pressure The presser foot pressure has been pre-set to not need to adjust the presser foot pressure. very light or heavy fabric, adjusting the pres- sure can improve the result. For very light fabrics, loosen the pressure by turning the dial counterclockwise.
-
Page 19: Needles
Needles The sewing machine needle plays an important role recommend needles of system 130/705H. The needle package included with your machine contains needles Universal Needle (A) Universal needles have a slightly rounded point and come in a variety of sizes. For general sewing in a vari- ety of fabric types and weights.
-
Page 20: Lowering Feed Dogs
Lowering Feed Dogs You can lower the feed dogs by moving the switch at the back of the free arm to the wish to raise the feed dogs. Note: The feed dogs will not raise immediately when the lever is switched. Turn the handwheel one full turn or start sewing to re-engage the feed dogs.
-
Page 21: Stitch Selection
Stitch Selection desired stitch. The selected stitch is the one The stitches printed in white on the stitch Use non-stretch stitches when sewing woven fabrics, leather or vinyl and stretch Note: Always raise the needle above the fabric and presser foot before you turn the stitch selc- tion dial.
-
Page 22: Adjustable Needle Position
Stitch Width sired stitch width. The higher the number, the wider the stitch width. The stitch width can be varied wheel correspond to the stitch width in Note: Before you turn the stitch width dial, raise the needle to its highest position, other- wise it may bend or break.
-
Page 23: Sewing
SEWING stitch scribed, a chart shows the recommended set- chart to the right. Start to Sew – Straight Stitch A. Recommended stitch B. Stitch length in mm Raise the presser foot and position the fab- C. Stitch width in mm ric under it, next to a seam allowance guide line on the needle plate.
-
Page 24: Reinforced Straight Stitch
Reinforced Straight Stitch stitch This stitch is stronger than regular straight stitch, due to the fact that it is a triple and elastic stitch. The reinforced straight stitch can be used for heavy stretch fabrics, for Set for reinforced straight stitch crotch seams which are subject to consider- able strain and for topstitching heavy fabrics.
- Page 25
Overlock Stitch stitch The open overlock stitch sews the seam and overcast the edge all at one time, perfect for stretch fabrics. This stitch is more elas- tic than normal seams, very durable and Set for overlock stitch Tip: When sewing, guide the fabric edge along the metal pin of the foot. -
Page 26: Blindhem
Blindhem stitch The blindhem stitch is used to make invisible hems on skirts, trousers and home decorating. 1. Finish the edge of the hem. Set for blindhem stitch 2. Fold and press the hem allowance to the wrong side. 3. Fold the hem back on itself so approxi- extends beyond the fold.
-
Page 27: Darning With The
Sewing on Patches or Appliqués stitch To cover large holes it is necessary to sew a new piece of fabric onto the damaged area. Baste the new piece of fabric onto the dam- aged area on the right side of the fabric. Set for three-step zigzag stitch the three-step zigzag stitch.
- Page 28
Sewing on Buttons stitch 1. Remove the presser foot and lower the Set for button sewing 2. Mark the fabric where the button is to be located. Place the fabric and button under the ankle with the holes in the button lined up with the swing of the needle. - Page 29
Standard Buttonhole stitch (model 150s/160s) The fabric should be interfaced and/or stabi- lized where buttonholes are to be sewn. Set for buttonhole 1. Mark the start position and buttonhole Push the button holder open by pushing Push the button holder forward until button will determine the length of the buttonhole. - Page 30
Standard Buttonhole stitch (model 130s/140s) The fabric should be interfaced and/or stabi- lized where buttonholes are to be sewn. Set for buttonhole Prepare the Buttonhole Measure diameter and thickness of the but- tain correct buttonhole length. Mark the start position and buttonhole length on the fabric Note: Before starting to sew any buttonhole, al- ways push the the buttonhole foot fully back. -
Page 31: Stretch Fabrics
Use seam ripper and cut the buttonhole open from both ends towards the middle. The density of the buttonhole is adjusted Note: Density varies according to the fabric. Al- Carefully cut your buttonhole ways test sew a buttonhole on the fabric you are open with a seam ripper.
-
Page 32: Sewing Zippers
Sewing Zippers stitch the right or the left of the needle, making it 1.5-3 easy to sew both sides of the zipper. To sew the left side of the zipper, attach the Set for zipper To sew the right side of zipper, attach the Center Zipper Right presser foot Left presser foot…
-
Page 33: Maintenance
MAINTENANCE Cleaning the Machine To keep your sewing machine operating well, Wipe the exterior surface of your machine with a soft cloth to remove any dust or lint built up. Cleaning the Bobbin Area Note: Raise the needle, lower the feed dogs and turn off the machine.
-
Page 34: Troubleshooting
TROUBLESHOOTING ® your machine. For further information please contact your local authorized PFAFF dealer. General Problems The Seam has Uneven Stitches Fabric does not move? Is the thread tension correct? Make sure that the feed dogs are not lowered. Check needle thread tension and the threading.
-
Page 35: Intellectual Property
Bobbin Thread Breaks Did you insert the bobbin properly? Check the bobbin thread. Is the stitch plate hole damaged? Change the stitch plate. Is the bobbin area clean? Clean lint from bobbin area. Is the bobbin wound correctly? Wind a new bobbin. design.
- Page 36
4710092-26A English © 2014 KSIN Luxembourg II, S.ar.l. All rights reserved. Printed in Germany on environmentally-friendly paper…
Смотреть руководство для Pfaff Smarter by 140s ниже. Все руководства на ManualsCat.com могут просматриваться абсолютно бесплатно. Нажав кнопку «Выбор языка» вы можете изменить язык руководства, которое хотите просмотреть.

MANUALSCAT | RU
Вопросы и ответы
У вас есть вопрос о Pfaff Smarter by 140s, но вы не можете найти ответ в пользовательском руководстве? Возможно, пользователи ManualsCat.com смогут помочь вам и ответят на ваш вопрос. Заполните форму ниже — и ваш вопрос будет отображаться под руководством для Pfaff Smarter by 140s. Пожалуйста, убедитесь, что вы опишите свои трудности с Pfaff Smarter by 140s как можно более детально. Чем более детальным является ваш вопрос, тем более высоки шансы, что другой пользователь быстро ответит на него. Вам будет автоматически отправлено электронное письмо, чтобы проинформировать вас, когда кто-то из пользователей ответит на ваш вопрос.
Путаются нитки,ткань не движется,игла стоит на месте
Настя2019-09-09
ерхняя нить, наматывается на шпульке и или же комок сходит на строчку и идёт дальше с таким же темпом, или обрывает нить. как устранить этот дефект, 2 дня не шила, никто к машинке не подходил тем более не трогали.
Лариса2022-04-02
Задать вопрос о Pfaff Smarter by 140s
- Бренд:
- Pfaff
- Продукт:
- швейные машины
- Модель/название:
- Smarter by 140s
- Тип файла:
- Доступные языки:
- английский