Sony KV-HW212M95 Group H4 (GB, RU)_2-177-672-12 (1)
Operating Instructions
• Before operating the unit, please read this manual thoroughly and retain
it for future reference.
Инструкция по эксплуатации
• Перед работой с устройством внимательно прочтайте инструкцию
и сохраните её для дальнейшего использования.
Trinitron Color TV
KV-HW212
© 2004 Sony Corporation
2-177-672-12 (1)
M95
M91
GB
RU
01GB01COV-Rus.p65 20/9/04, 3:21 PM1
Black
Sony KV-HW212M95 Group H4 (GB, RU)_2-177-672-12 (1)
2
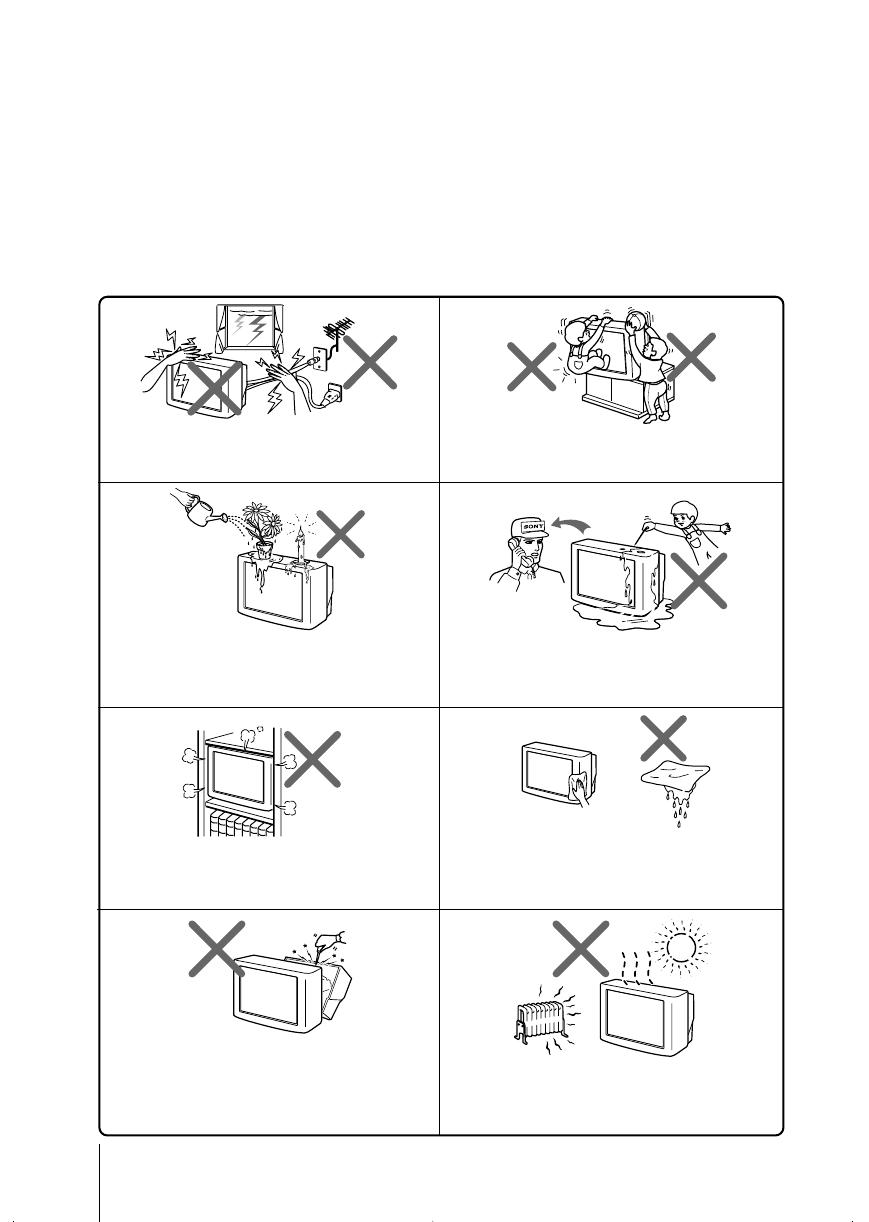
Do not place any objects on the TV. The apparatus
shall not be exposed to dripping or splashing and
that no objects filled with liquids, such as vases,
shall be placed on the apparatus.
WARNING
• Dangerously high voltages are present inside the TV.
• TV operating voltage: 110 – 240 V AC.
• Do not plug in the power cord until you have completed making all other
connections; otherwise a minimum leakage current might flow through the antenna
and other terminals to ground.
• To avoid battery leakage and damage to the remote, remove the batteries from the
remote if you are not going to use it for several days. If any liquid leaks from the
batteries and touches your skin, immediately wash it away with water.
Do not open the cabinet and the rear cover of the
TV as high voltages and other hazards are present
inside the TV. Refer servicing and disposal of the
TV to qualified personnel.
Your TV is recommended for home use only.
Do not use the TV in any vehicle or where it may be
subject to excessive dust, heat, moisture or
vibrations.
Do not operate the TV if any liquid or solid object
falls into it. Have it checked immediately by
qualified personnel only.
Do not block the ventilation openings of the TV.
Do not install the TV in a confined space, such as a
bookcase or built-in cabinet.
For children’s safety, do not leave children alone
with the TV. Do not allow children to climb onto it.
Clean the TV with a dry and soft cloth.
Do not use benzine, thinner, or any other chemicals to
clean the TV. Do not attach anything (e.g., adhesive
tape, cellophane tape, glue) on the painted cabinet of
the TV. Do not scratch the picture tube.
For your own safety, do not touch any part of the
TV, the power cord and the antenna cable during
lightning storms.
01GB02WAR-Rus.p65 20/9/04, 3:22 PM2
Black
Sony KV-HW212M95 Group H4 (GB, RU)_2-177-672-12 (1)
3
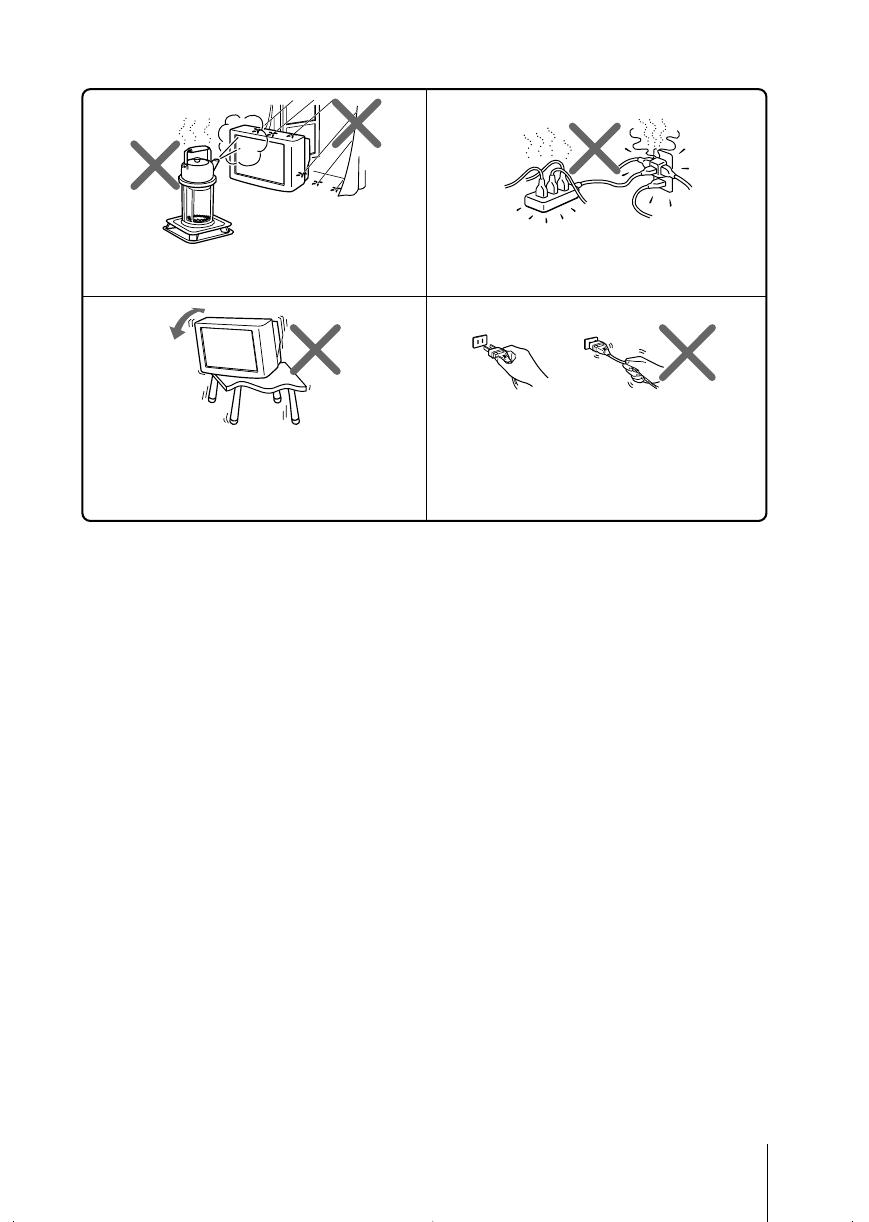
Install the TV on a stable TV stand and floor which
can support the TV set weight. Ensure that the TV
stand surface is flat and its area is larger than the
bottom area of the TV.
Do not plug in too many appliances to the same
power socket. Do not damage the power cord.
Pull the power cord out by the plug. Do not pull
the power cord itself. Even if your TV is turned off,
it is still connected to the AC power source (mains)
as long as the power cord is plugged in. Unplug
the TV before moving it or if you are not going to
use it for several days.
To prevent fire or shock hazard, do not expose the
TV to rain or moisture.
Made in Malaysia.
Sony Corporation
6-7-35 Kitashinagawa,
Shinagawa-ku, Tokyo, 141-0001 Japan.
01GB02WAR-Rus.p65 20/9/04, 3:22 PM3
Black
4
Sony KV-HW212M95 Group H4 (GB, RU)_2-177-672-12 (1)
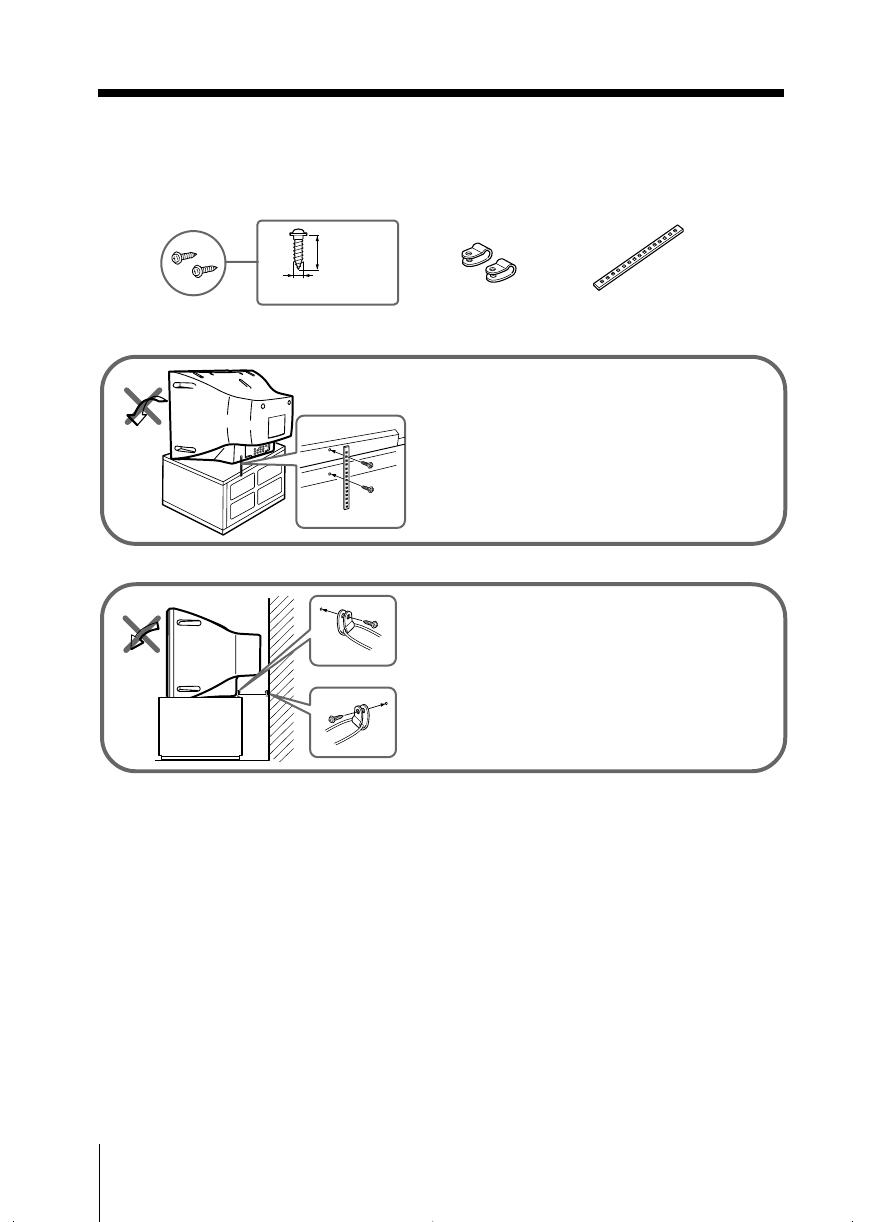
x Securing the TV
To prevent the TV from falling, use the supplied screws, clamps and band to
secure the TV.
20 mm
3.8 mm
screws clamps band
Screw the band to the TV stand and to the
provided hole at the rear of your TV.
(1) Put a cord or chain through the clamps.
(2) Screw one clamp to a wall or pillar and
the other clamp to the provided hole at
the rear of your TV.
or
Note
• Use only the supplied screws. Use of other screws may damage the TV.
01GB02WAR-Rus.p65 20/9/04, 3:22 PM4
Black

5
Sony KV-HW212M95 Group H4 (GB, RU)_2-177-672-12 (1)
Additional Information
Connecting the 3D WOOFER
(KV-HW212M95 only)………………….. 25
Connecting optional components … 25
Troubleshooting …………………………… 27
Specifications ……………………………….. 31
Table of Contents
Installation
Getting Started ………………………………. 6
Setting up your TV
(“Initial Setup”) ……………………………… 7
Overview of Controls
TV top control, front and
rear panels……………………………………… 9
Using the remote control and
basic functions ……………………………… 10
Advanced Operations
Selecting the picture and sound
modes ………………………………………….. 12
Enjoying stereo or bilingual
programs ……………………………………… 13
Viewing Teletext …………………………… 14
Menu Adjustment
Introducing the menu system ………. 15
Changing the “Picture” setting…….. 18
Changing the “Sound” setting……… 19
Changing the “Timer” setting ………. 21
Changing the “Channel Setup”
setting ………………………………………….. 22
Changing the “Setup” setting ………. 24
GB
01GB03TOC-Rus.p65 20/9/04, 3:22 PM5
Black
6 Installation
Sony KV-HW212M95 Group H4 (GB, RU)_2-177-672-12 (1)
Installation
x Getting Started
b
b
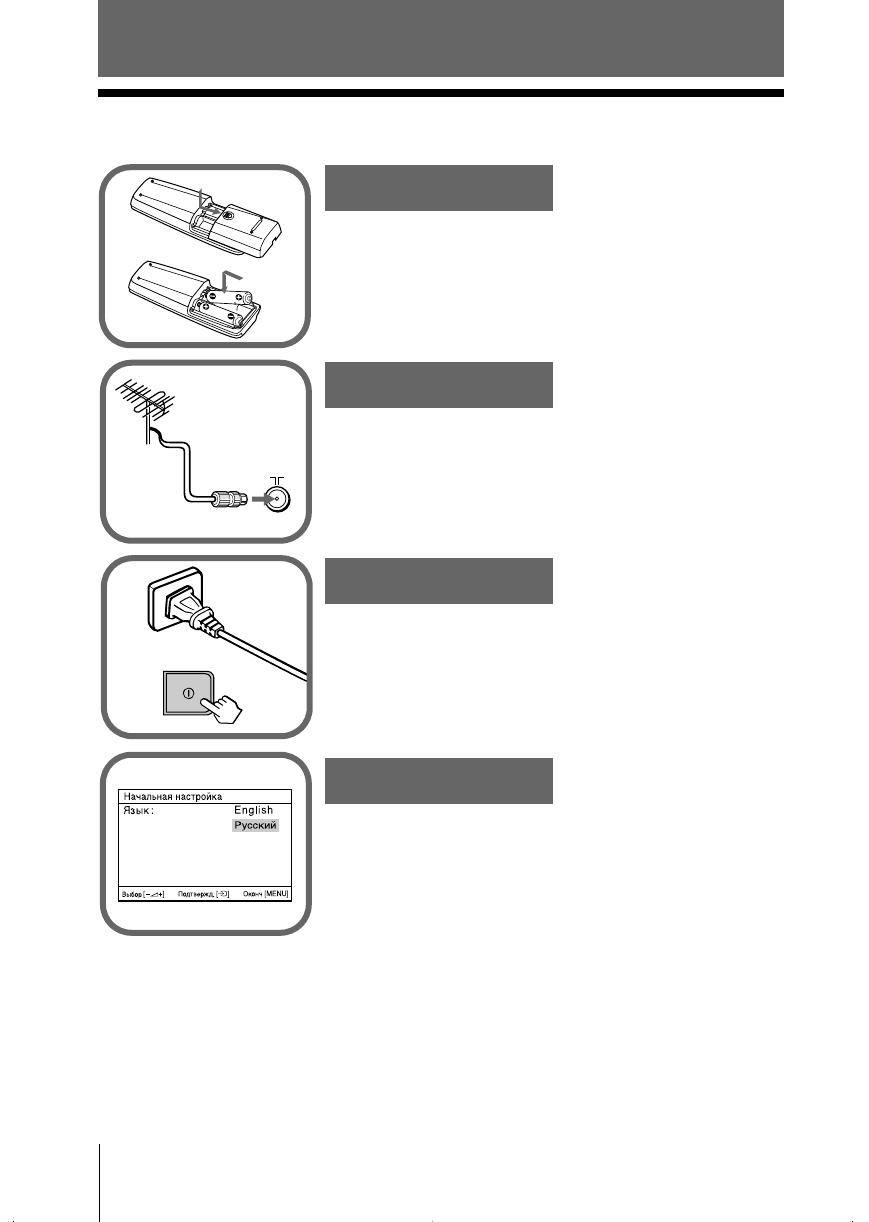
1
Step 1
Insert the batteries (supplied) into the remote.
Note
• Do not use old or different types of batteries together.
Step 2
Step 3
Step 4
Set up the TV by following the instructions of the
“Начальная настройкa” (“Initial Setup”) menu
(see page 7).
Plug in the power cord, then press ! on the TV to
turn it on.
Note
• The 1 (standby) indicator flashes green for a few seconds
when turning on the TV. This does not indicate a
malfunction.
Connect the antenna cable (not supplied) to 8
(antenna input) at the rear of the TV.
Tip
• You can also connect your TV to other optional components
(see page 25).
01GB04INS-Rus.p65 20/9/04, 3:24 PM6
Black
7
Installation
Installation
Sony KV-HW212M95 Group H4 (GB, RU)_2-177-672-12 (1)
x
Setting up your TV
(“Initial Setup”)
When you turn on your TV for the first time, the “Начальная настройкa” (“Initial
Setup”) menu will appear. You may change the menu language, preset the TV
channels automatically, change the order of TV channels that appear on the screen
and adjust the picture position using the buttons on the top control panel.
Tip
• The MENU, and V/v/B/b buttons on the remote control can also be used for the
operations below.
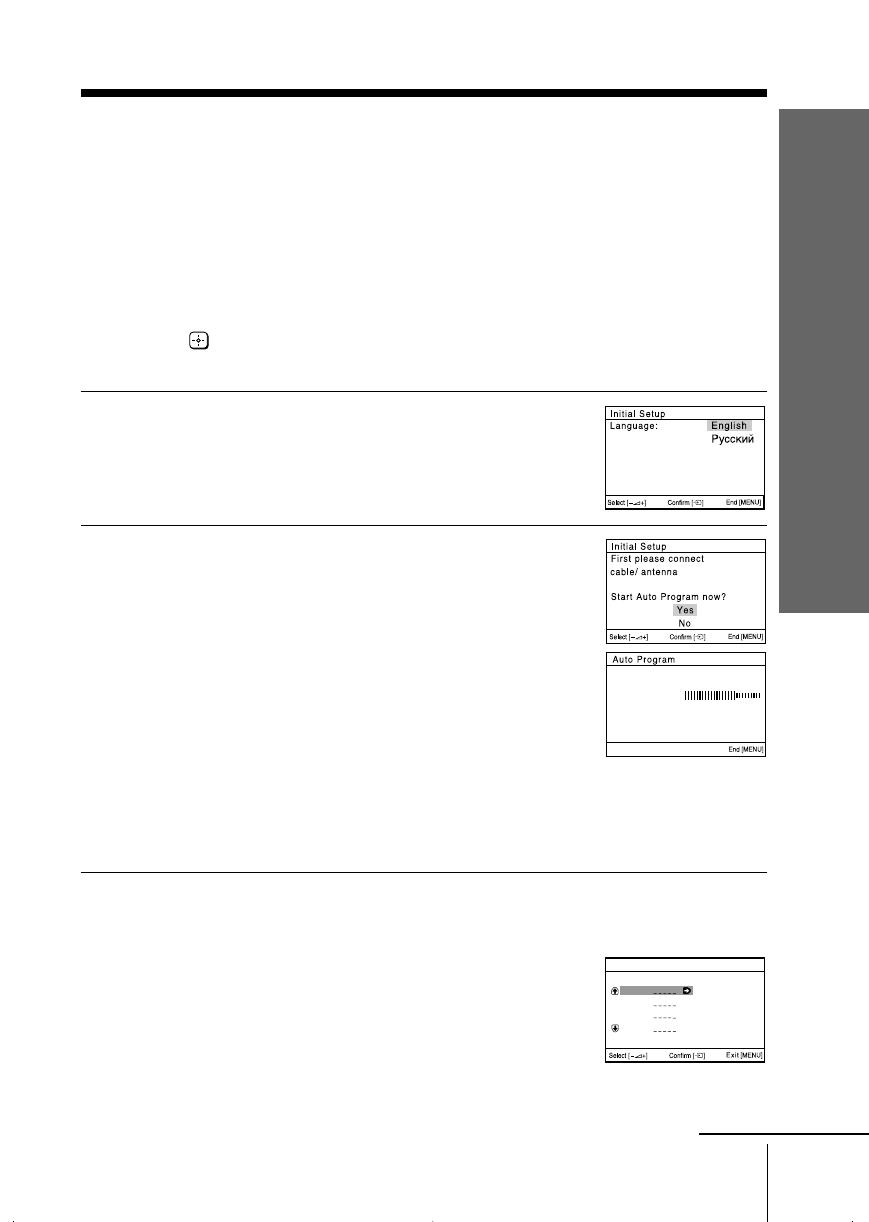
1
Press 2 +/– to select the desired menu
language, then press t.
The selected menu language appears.
2
Press 2 +/– to select “Yes”, then press t
to preset the channels automatically.
The screen will indicate automatic
presetting is in progress.
After all available channels have been tuned
and stored, the “Program Sorting” menu
appears automatically on the screen.
To skip automatic channel presetting, select
“No”, then press t.
If the message “No channel found. Please
connect cable/antenna” appears, check your
TV connections, then press t.
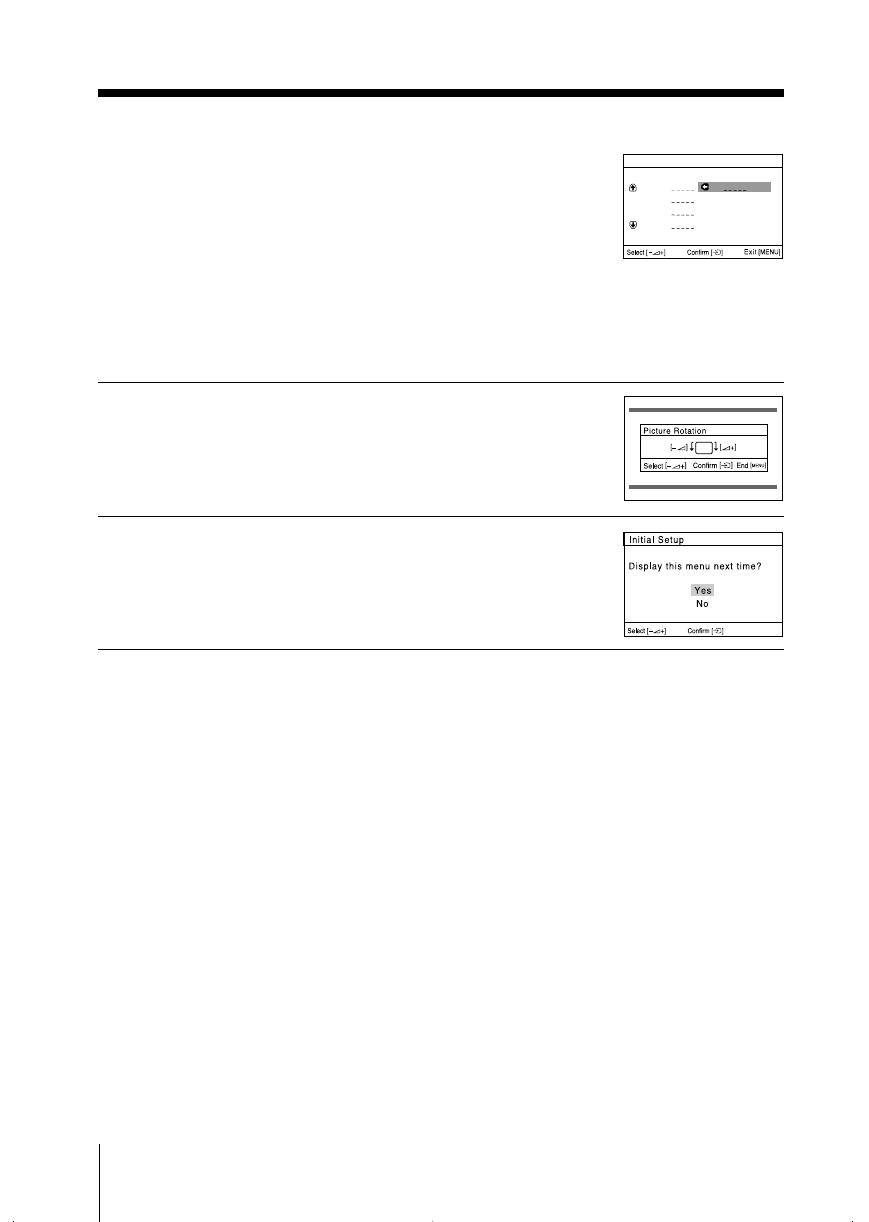
3
The “Program Sorting” menu enables you
to change the order in which the channels
appear on the screen.
a) If you wish to keep the channels in the
tuned order, press MENU.
b) If you wish to store the channels in a
different order:
1) Press 2 +/– to select the program
number with the channel you wish to
rearrange, then press t.
Program Sorting
Program:
01
02
03
04
Select channel
continue
Program:
TV System: Auto
01
VHF Low
01GB04INS-Rus.p65 20/9/04, 3:24 PM7
Black
8 Installation
Sony KV-HW212M95 Group H4 (GB, RU)_2-177-672-12 (1)
The selected channel will appear on
the screen.
2) Press 2 +/– to select the new
program number position for your
selected channel, then press t.
3) Repeat steps b) 1) and 2) if you wish
to change the order of the other
channels.
c) Press MENU to go to the next menu.
4
Press 2 +/– to adjust the bars on the
top and bottom of the menu if they are
slanted, then press t.
If no adjustment is necessary, then press t.
5
Press 2 +/– to select “No”, then press t.
This menu will not appear again the next
time you turn on the TV by pressing !.
To allow this menu to appear again, select
“Yes”, then press t.
Tips
• You can immediately go to the end of the ”Initial Setup” menu by pressing MENU.
• You can also set up your TV by using the menu system (see page 5) or by pressing the MENU
button on the top control panel for about five seconds to reset your TV to the factory setting.
01
Program Sorting
Program:
01
02
03
04
Select new position
continued
01GB04INS-Rus.p65 20/9/04, 3:24 PM8
Black

9
Overview of Controls
Overview of Controls
Sony KV-HW212M95 Group H4 (GB, RU)_2-177-672-12 (1)
Overview of Controls
x TV top control, front and rear panels
Button/Terminal Function Page
1 ! Turn off or turn on the TV. 6
2 Remote control sensor. –
3 Wake Up indicator. 21
3 1 Standby indicator. 6
4 i Headphone jack. –
5 t2 Video input terminal 2. 25
6 PROG +/– Select program number. –
7 2 +/– Adjust volume. –
8 t Select TV or video input. 25
Menu operations
7 2 +/– Select and adjust items. –
8 t Confirm selected items. –
9 MENU Display or cancel the menu. –
0 SOUND MODE Select sound mode options with a 5-Band Graphic 12
Equalizer display.
qa 8 Antenna input terminal. 25
qs T Monitor output terminal. 26
qd Component video input terminal. 26
qf t1 Video input terminal 1. 25
qg WOOFER Enjoy high quality sound. 25
(KV-HW212M95 only)
PROG
MENUSOUND MODE
098 7 6
L
R
2
3
4
2
5
(MONO)
1
qh
L
R
R
1
L
Y
C
B
C
R
(MONO) (MONO)
qf qd
qs
qa
qg
TV front panel
TV rear panel
TV top control panel
01GB04INS-Rus.p65 20/9/04, 3:24 PM9
Black
10 Overview of Controls
Sony KV-HW212M95 Group H4 (GB, RU)_2-177-672-12 (1)
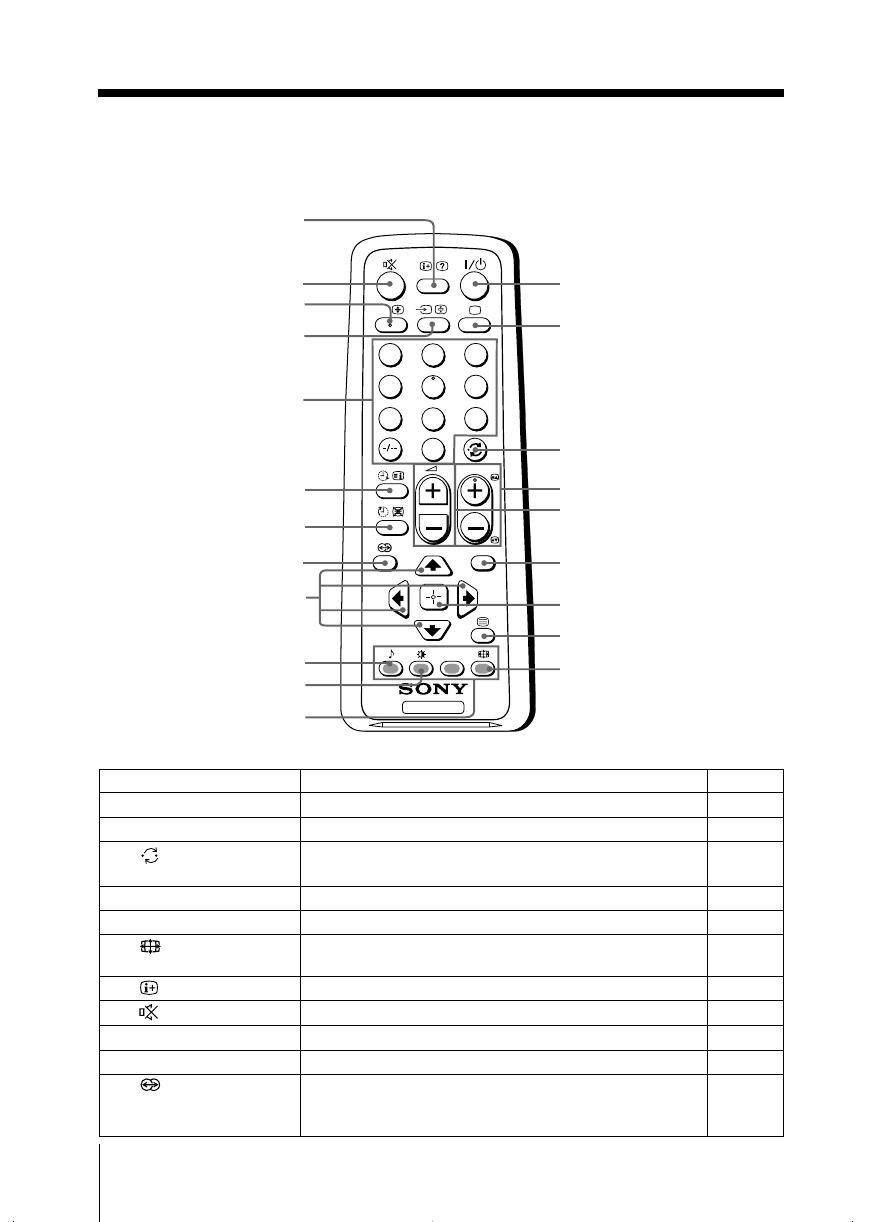
x Using the remote control and basic
functions
TV
1
2
3
4
6
7
8
9
0
5
MENU
PROG
A/B
1
2
3
6
8
7
4
5
qk
qf
qa
qg
qh
qj
0
qs
qd
ql
w;
wa
9
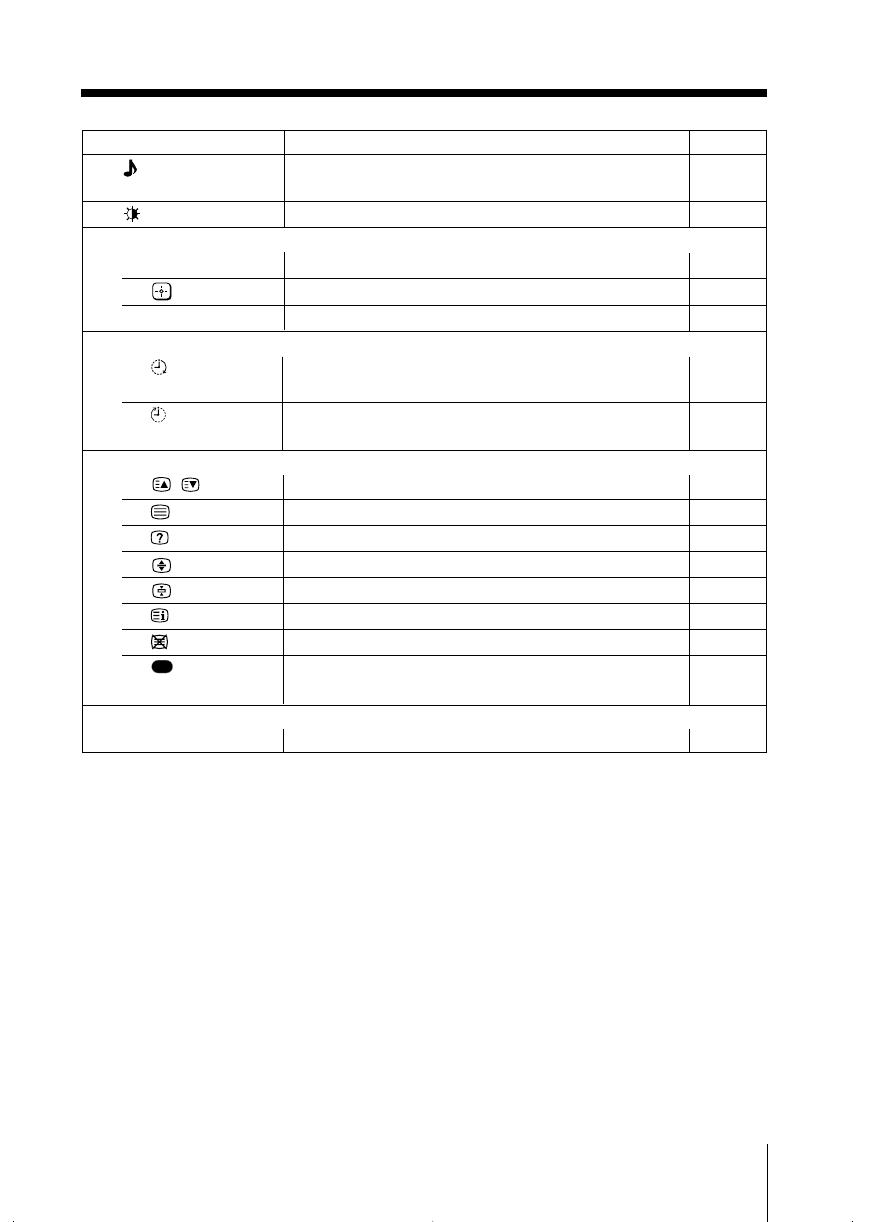
Button Description Page
1 ?/1 Turn off temporarily or turn on the TV. –
2 a Display the TV program. –
3 Jump to last program number that has been –
watched for at least five seconds.
4 PROG +/– Select program number. –
5 2 +/– Adjust volume. –
9 Change the picture size:
–
“On” (16:9 wide-mode), “Off”.
0
Display on-screen information. –
qa Mute the sound. –
qd t Select TV or video input. 25
qf 0 – 9, ÷ Input numbers. –
qj Select surround mode options:
“On” (surround), “Simulated” (stereo-like monaural –
sound), “Off”.
01GB04INS-Rus.p65 20/9/04, 3:24 PM10
Black
11
Overview of Controls
Overview of Controls
Sony KV-HW212M95 Group H4 (GB, RU)_2-177-672-12 (1)
Button Description Page
ql Select sound mode options with a 5-Band Graphic 12
Equalizer display.
w; Select picture mode options. 12
Menu operations
6 MENU Display or cancel the menu. 17
7 Confirm selected items. 17
qk V, v, B, b Select and adjust items. 17
Timer operations
qg Set TV to turn on automatically according to the –
desired period of time.
qh Set TV to turn off automatically according to the –
desired period of time.
Teletext operations (green label)
4 , Display the next or previous page. 14
8 Display Teletext broadcast. 14
0 Reveal concealed information. 14
qs Enlarge the Teletext display. 14
qd Stop Teletext display from scrolling. 14
qg Display Teletext service contents. 14
qh Show TV screen while waiting for Teletext page. 14
wa
(red, green,
Access a FASTEXT menu. 14
yellow, blue)
Stereo/bilingual operations
qs A/B Select stereo/bilingual mode. 13
Licensed by BBE Sound, Inc. under USP4638258, 4482866.
“BBE” and BBE symbol are trademarks of BBE Sound, Inc.
01GB04INS-Rus.p65 20/9/04, 3:24 PM11
Black
12 Advanced Operations
Sony KV-HW212M95 Group H4 (GB, RU)_2-177-672-12 (1)
Advanced Operations
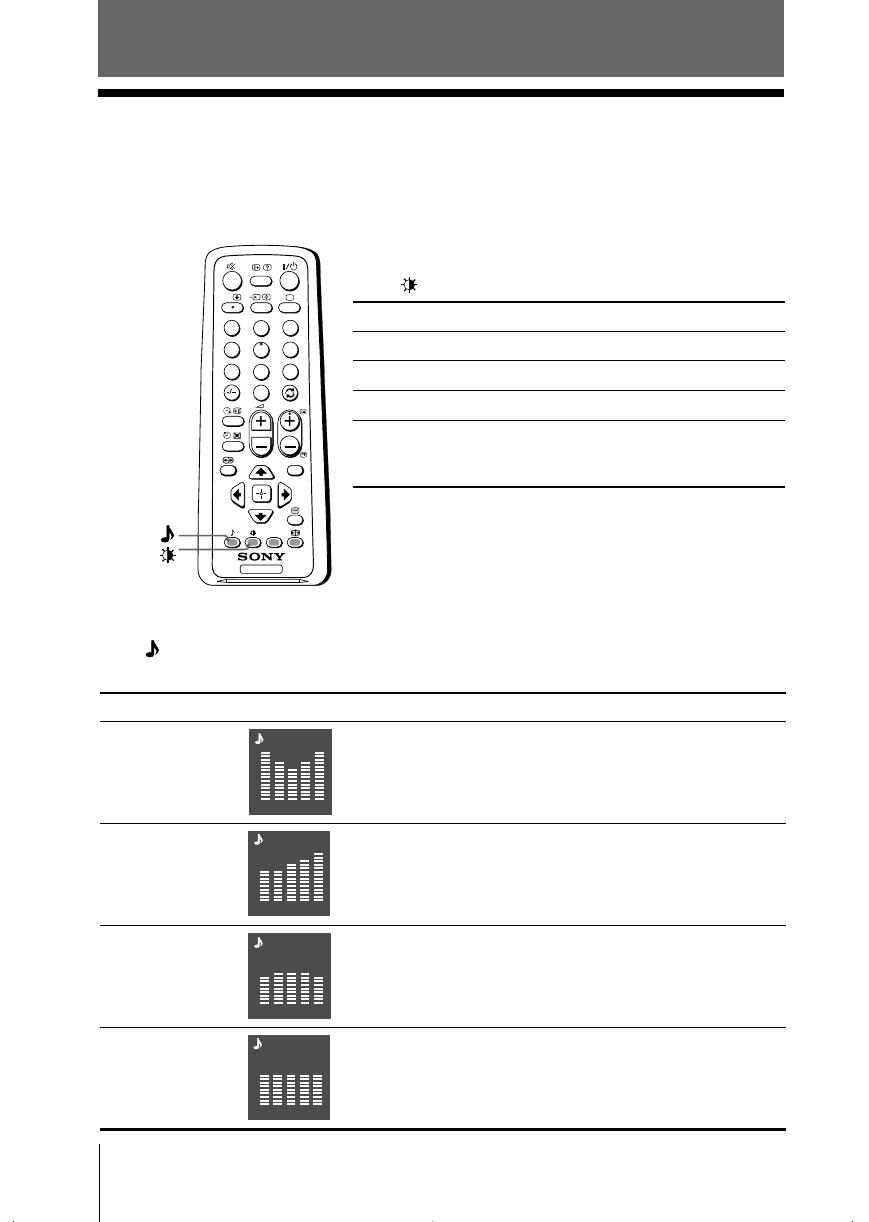
Selecting the sound mode
Press (or SOUND MODE on the top control panel) to select the desired sound
mode with a 5-Band Graphic Equalizer display.
Select To listen to
“Dynamic” dynamic and clear sound that emphasizes both the low
and high tones.
“Drama” sound that emphasizes voice and high tones.
“Soft” soft, natural and relaxing sounds.
“Personal” the last adjusted sound setting from the
“Sound Adjustment” option in the menu (see page 20).
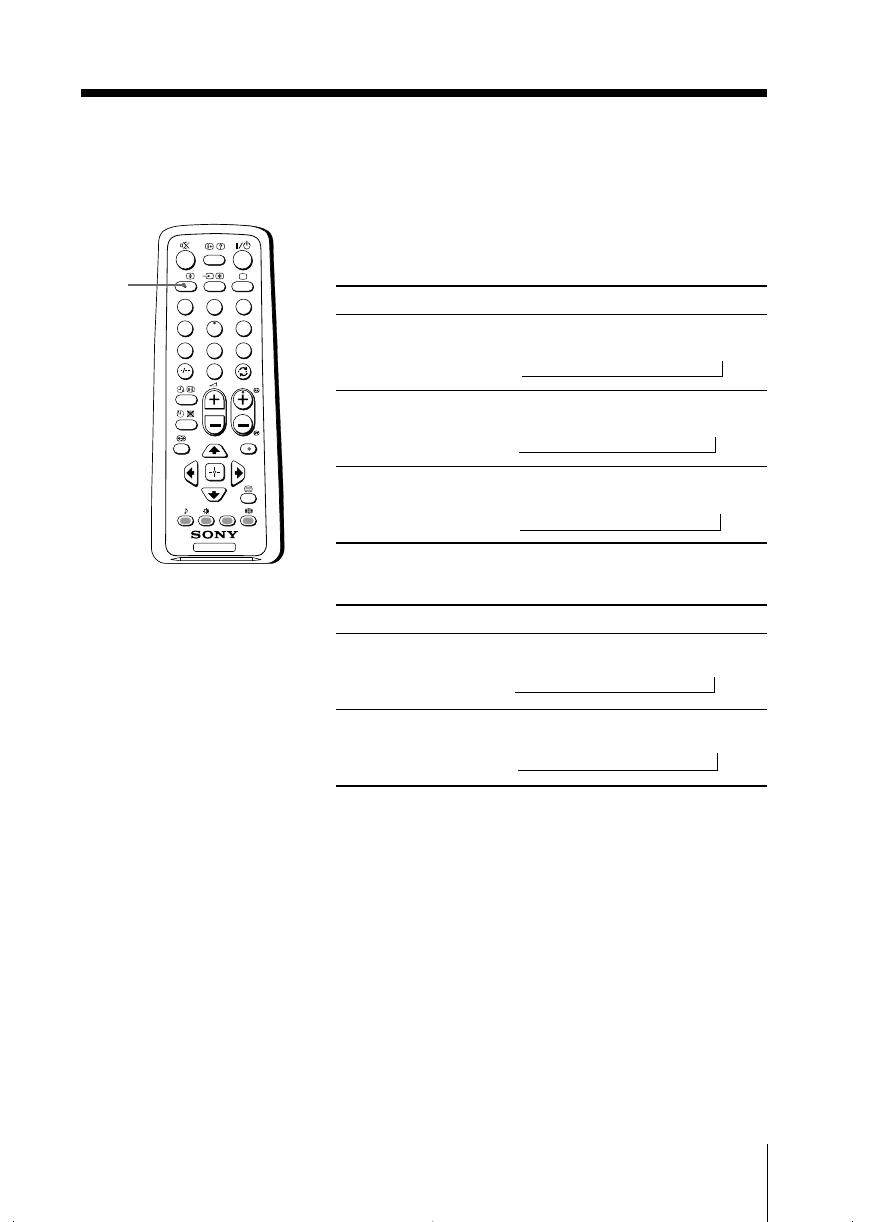
x Selecting the picture and sound
modes
You can select picture and sound modes and adjust the setting to your
preference in the “Personal” option.
Selecting the picture mode
Press to select the desired picture mode.
Select To view
“Dynamic” high contrast pictures.
“Standard” normal pictures.
“Soft” mild pictures.
“Personal” the last adjusted picture setting
from the “Picture Adjustment”
option in the menu (see page 18).
Dynamic
100 300 1k 3k 8k
100 300 1k 3k 8k
Drama
100 300 1k 3k 8k
Soft
100 300 1k 3k 8k
Personal
TV
1
2
3
4
6
7
8
9
0
5
MENU
PROG
A/B
01GB05AVD-Rus.p65 20/9/04, 3:26 PM12
Black
13
Sony KV-HW212M95 Group H4 (GB, RU)_2-177-672-12 (1)
Advanced Operations
NICAM
(Stereo sound)
Mono
(Regular sound)
t
t
NICAM Main
(Main sound)
NICAM Sub
(Sub sound)
Mono
(Regular sound)
tt
t
NICAM Main
(Main sound)
Mono
(Regular sound)
t
t
TV
1
2
3
4
6
7
8
9
0
5
MENU
PROG
A/B
A/B
x
Enjoying stereo or bilingual programs
You can enjoy stereo sound or bilingual programs of NICAM and A2 stereo
systems by using the A/B button.
Note
• If the stereo sound is noisy when receiving a stereo program, select “Mono”. The sound
becomes monaural but the noise is reduced.
Viewing a stereo or bilingual program
When receiving a NICAM program
Broadcasting On-screen display (Selected sound)
NICAM
stereo
NICAM
bilingual
NICAM
monaural
When receiving an A2 program
Broadcasting On-screen display (Selected sound)
A2
stereo
A2
bilingual
Mono
(Regular sound)
Stereo
(Stereo sound)
t
t
Main
(Main sound)
Sub
(Sub sound)
t
t
01GB05AVD-Rus.p65 20/9/04, 3:26 PM13
Black
14 Advanced Operations
Sony KV-HW212M95 Group H4 (GB, RU)_2-177-672-12 (1)
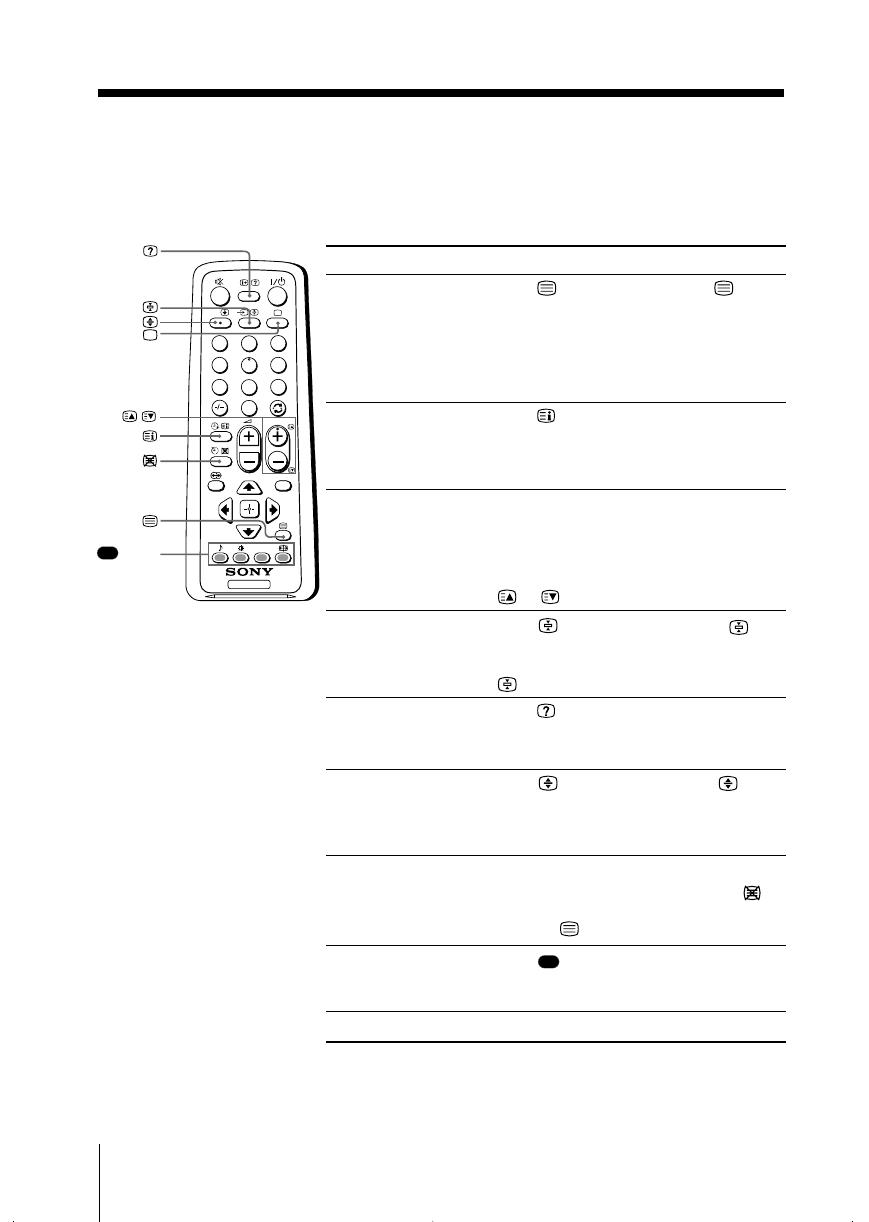
x Viewing Teletext
Some TV stations broadcast an information service called Teletext which allows
you to receive various information, such as stock market reports and news.
You can use the buttons on the remote to view Teletext.
To Do this
display a Teletext Press . Each time you press , the
page on the screen changes as follows:
TV picture Teletext t Teletext and TV t TV.
If there is no Teletext broadcast, “100” is
displayed at the top left corner of the
screen.
check the contents Press .
of a Teletext service An overview of the Teletext contents,
including page numbers, appears on the
screen.
select a Teletext page Press the number buttons to enter the
three-digit page number of the desired
Teletext page. If you make a mistake,
reenter the correct page number. To
access the next or previous page, press
or .
hold (pause) a Press to display the symbol “ ” at
Teletext display the top left corner of the screen. To
resume normal Teletext viewing, press
.
reveal concealed Press .
information (e.g., To conceal the information, press the
an answer to a quiz) button again.
enlarge the Teletext Press . Each time you press , the
display Teletext display changes as follows:
Enlarge upper half t Enlarge lower
half t Normal size.
stand by for a Teletext (1) Enter the Teletext page number that
page while watching you want to refer to, then press .
a TV program (2) When the page number is displayed,
press to show the text.
select a FASTEXT Press (red, green, yellow and blue)
menu or the colored that corresponds to the desired menu or
boxes page number.
turn off Teletext Press a.
Note
• The FASTEXT feature can be used only when the FASTEXT broadcast is available.
(red,
green,
yellow,
blue)
TV
1
2
3
4
6
7
8
9
0
5
MENU
PROG
A/B
,
01GB05AVD-Rus.p65 20/9/04, 3:27 PM14
Black
15
Sony KV-HW212M95 Group H4 (GB, RU)_2-177-672-12 (1)
Menu Adjustment
Menu Adjustment
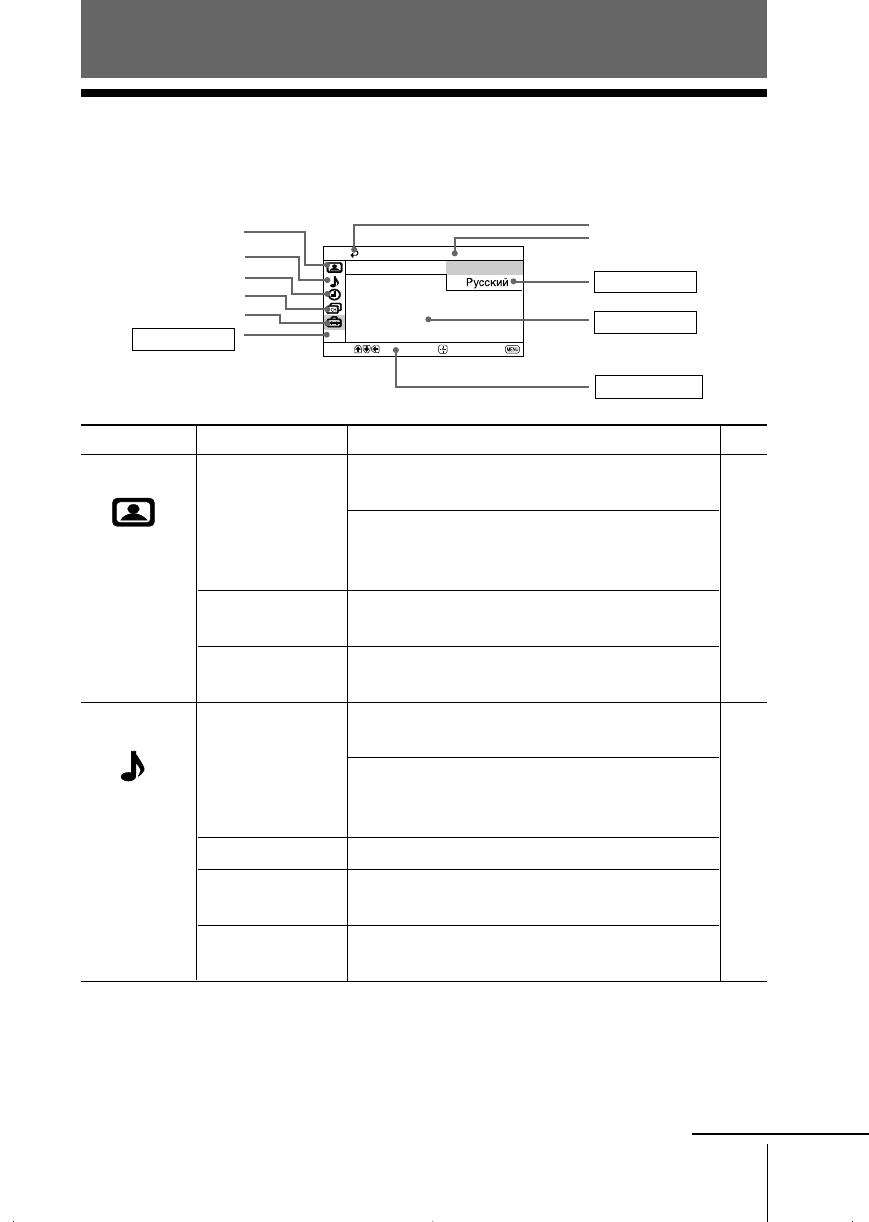
x Introducing the menu system
The MENU button lets you open a menu and change the settings of your TV.
The following is an overview of the menu system.
Return icon
Setup icon
Channel Setup icon
Timer icon
Name of the current
menu
Picture icon
Menu level 3
Menu level 2
User Guidance
Menu level 1
Level 1
“Picture”
“Sound”
Level 2
“Mode”
“Picture Adjustment”
“Color Temperature”
“Intelligent Picture”
“Mode”
“Sound Adjustment”
“Balance”
“Intelligent Volume”
“Surround”
Level 3/Function
Select the picture mode:
“Dynamic” t “Standard” t “Soft” t “Personal”
Adjust the “Personal” option:
“Picture” t “Brightness” t “Color” t
“Hue” t “Sharpness” t “Reset”
Adjust white color tint:
“Cool” t “Neutral” t “Warm”
Optimize picture quality:
“On” t “Off”
Select the sound mode:
“Dynamic” t “Drama” t “Soft” t “Personal”
Adjust sound frequency settings of “Personal”
option:
“Adjust” t “Reset”
Select to emphasize the left and right speakers.
Adjust volume automatically:
“On” t “Off”
Select the surround mode:
“On” t “Simulated” t “Off”
Page
18
19
Confirm
End
Setup
Wide Mode:
Video Label
Picture Rotation
Language: English
Color System:
Portable Audio Mode:
Select
Sound icon
continue
01GB05AVD-Rus.p65 20/9/04, 3:27 PM15
Black
16 Menu Adjustment
Sony KV-HW212M95 Group H4 (GB, RU)_2-177-672-12 (1)
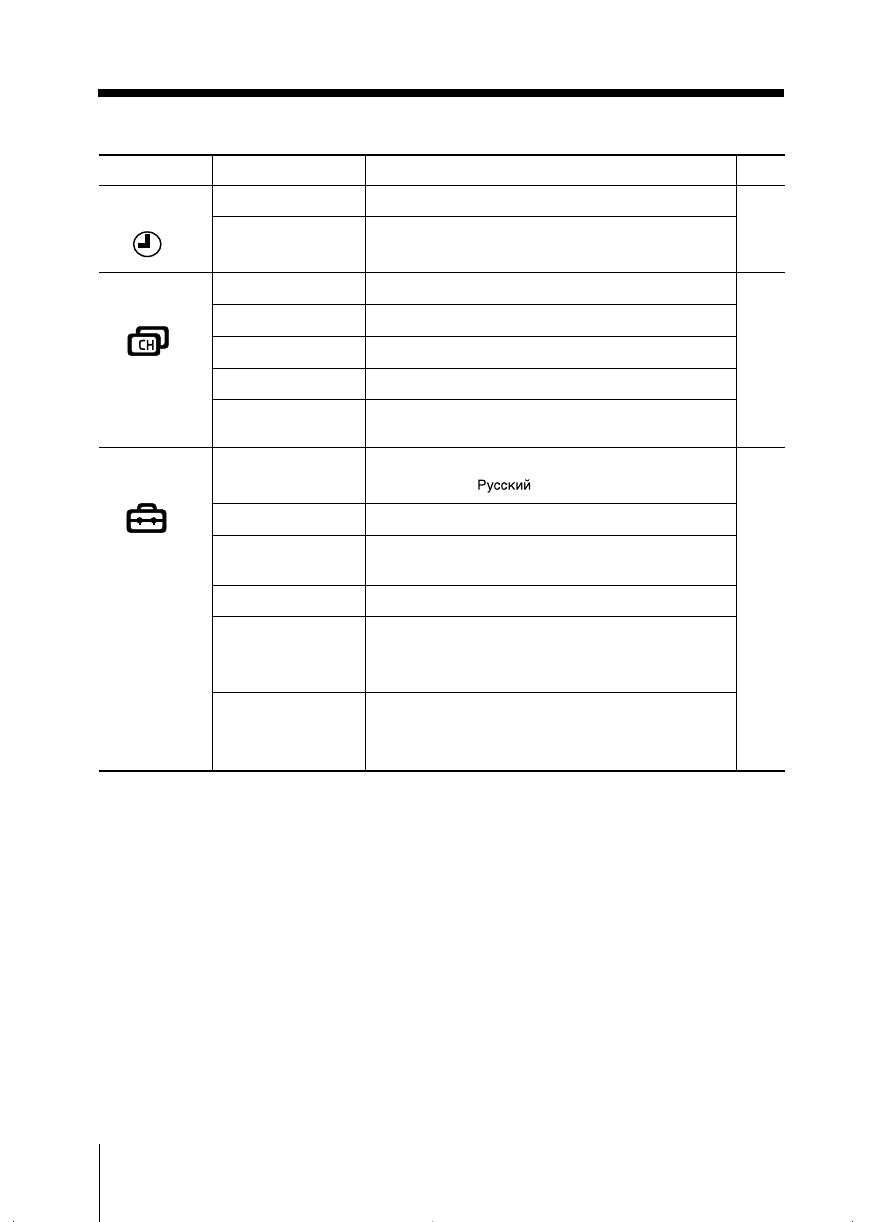
Level 1
“Timer”
“Channel Setup”
“Setup”
Level 2
“Sleep Timer”
“Wake Up Timer”
“Auto Program”
“Manual Program”
“Program Label”
“Program Block”
“Program Sorting”
“Language”
“Picture Rotation”
“Wide Mode”
“Video Label”
“Color System”
“Portable Audio
Mode”
Level 3/Function
Set TV to turn off automatically.
Set TV to turn on automatically.
Preset channels automatically.
Preset channels manually.
Label the program number.
Block unwanted programs.
Change the order in which the channels appear
on the screen.
Change the menu language:
“English” t “ ”(Russian)
Adjust the picture position.
Change the picture size:
“On” (16:9 wide-mode) t “Off”
Label the connected equipment.
Select the color system:
“Auto” t “PAL” t “SECAM” t “NTSC3.58”
t “NTSC4.43”
Select the input connected to your audio
equipment:
“Video1” t “Video2” t “Off”
Page
21
22
24
continued
01GB05AVD-Rus.p65 20/9/04, 3:27 PM16
Black
17
Sony KV-HW212M95 Group H4 (GB, RU)_2-177-672-12 (1)
Menu Adjustment
Select
End
Channel Setup
Program Block
Program Label
Manual Program
Auto Program
Confirm
Program Sorting
Select
End
Channel Setup
Program Block
Manual Program
Program Label
Program Sorting
Confirm
Auto Program
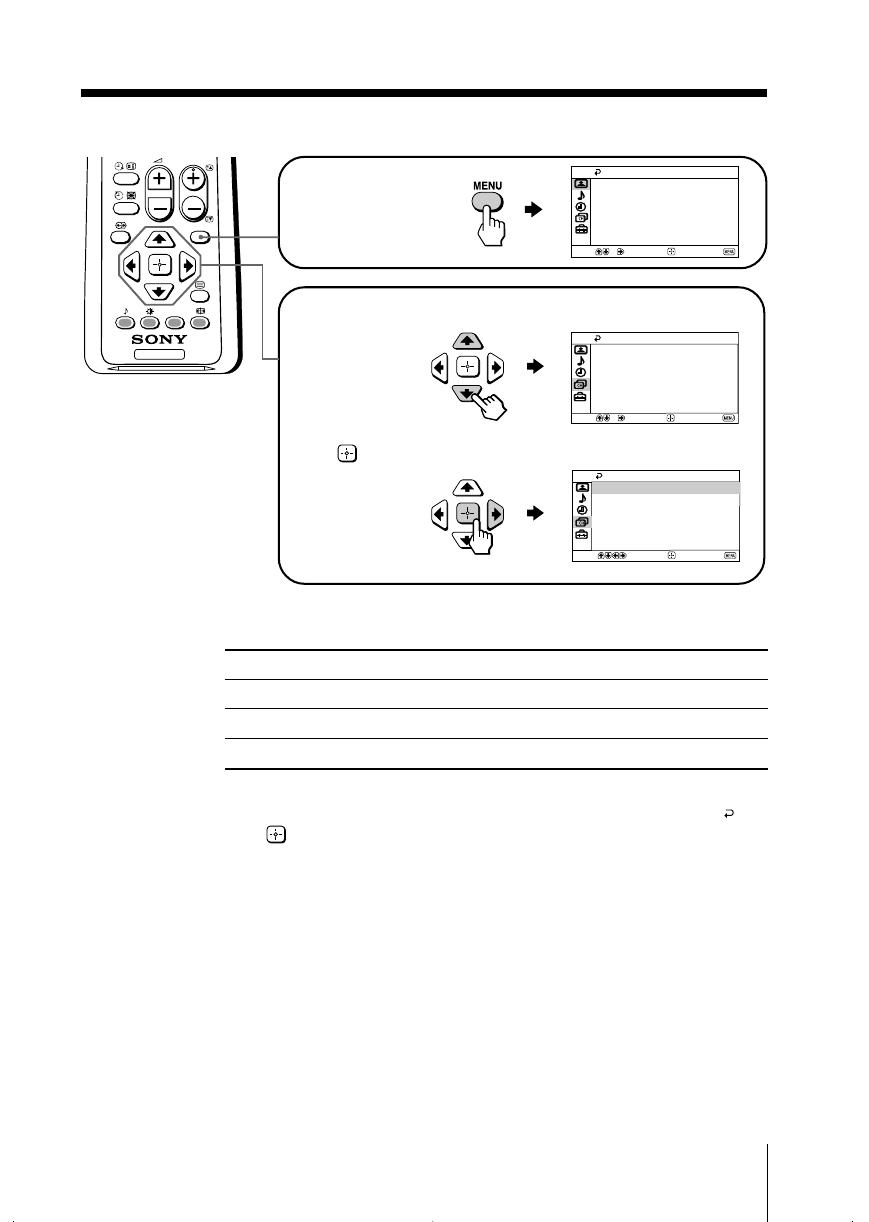
How to use the menu
Other menu operations
Tips
• If you want to exit from Menu level 2 to Menu level 1, press V or v until the return icon ( ) is
highlighted, then press .
• The MENU, t and 2 +/– buttons on the top control panel can also be used for the
operations above (see page 9).
Note
• When a feature is dimmed in the menu, it is not selectable.
To
Adjust the setting value
Move to the next/previous menu level
Cancel the menu
Press
V, v, B or b.
B or b.
MENU.
Press V or v to select
the desired item.
Press (or b) to
confirm your
selection and
go to the next
level.
Press MENU to
display the menu.
TV
MENU
PROG
Select
Confirm
End
Picture
Color Temperature: Cool
Picture Adjustment
Mode: Dynamic
Intelligent Picture: On
01GB05AVD-Rus.p65 20/9/04, 3:27 PM17
Black
18 Menu Adjustment
Sony KV-HW212M95 Group H4 (GB, RU)_2-177-672-12 (1)
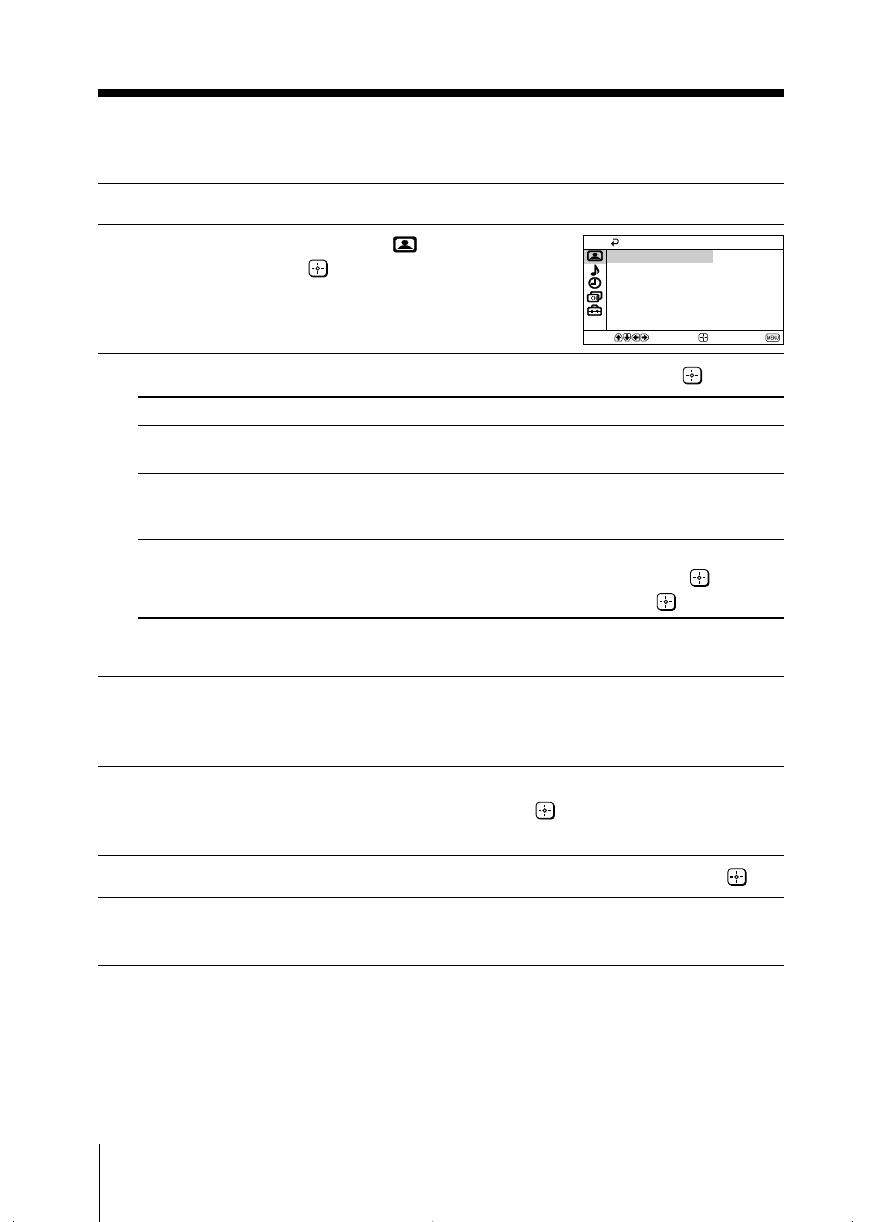
x Changing the “Picture” setting
The “Picture” menu allows you to adjust the picture settings.
1
Press MENU.
2
Make sure the “Picture” icon ( ) is
selected, then press
.
3
Press V or v to select the desired item (e.g., “Mode”), then press .
Select To
“Mode” choose either “Dynamic”, “Standard”, “Soft” or
“Personal”* (see page 12).
“Color Temperature” adjust white color tint.
Choose either “Cool” (blue tint), “Neutral” (neutral
tint) or “Warm” (red tint).
“Intelligent Picture” optimize picture quality.
Press V or v to select “On”, then press .
To cancel, select “Off”, then press .
* You can adjust the setting to your personal preference in the “Picture Adjustment” and
“Color Temperature” options only when the “Personal” mode is selected.
Adjusting the “Picture Adjustment” items under
“Personal” mode
1
Press V or v to select either “Picture” (contrast), “Brightness”, “Color”,
“Hue” (color tones) or “Sharpness”, then press
.
Selecting “Reset” will set your TV to the factory setting.
2
Press V,v,B or b to adjust the setting of your selected item, then press .
3
Repeat the above steps to adjust other items.
The adjusted settings will be received when you select “Personal”.
Notes
• “Hue” can be adjusted for the NTSC color system only.
• Reducing “Sharpness” can also reduce picture noise.
Confirm
End
Picture
Color Temperature: Cool
Picture Adjustment
Mode: Dynamic
Intelligent Picture: On
Select
01GB05AVD-Rus.p65 20/9/04, 3:27 PM18
Black
19
Menu Adjustment
Sony KV-HW212M95 Group H4 (GB, RU)_2-177-672-12 (1)
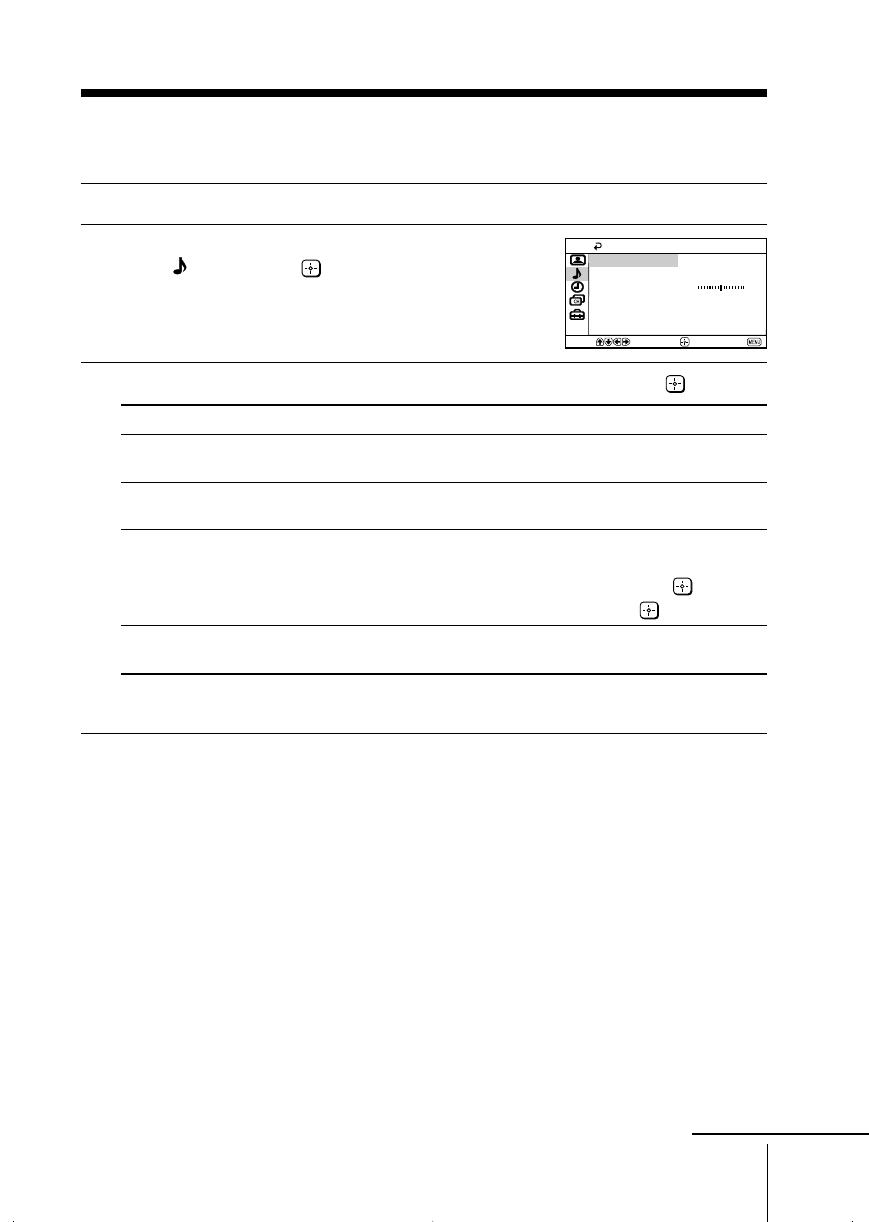
x Changing the “Sound” setting
The “Sound” menu allows you to adjust the sound settings.
1
Press MENU.
2
Press V or v to select the “Sound”
icon (
), then press .
3
Press V or v to select the desired item (e.g., “Mode”), then press .
Select To
“Mode” choose either “Dynamic”, “Drama”, “Soft” or
“Personal”* (see page 12).
“Balance” Press v or B to emphasize the left speaker.
Press V or b to emphasize the right speaker.
“Intelligent Volume” adjust the volume of all program numbers and
video inputs automatically.
Press V or v to select “On”, then press .
To cancel, select “Off”, then press .
“Surround” choose either “On”, “Simulated” or “Off”
(see page 10).
* You can adjust the setting to your personal preference in the “Sound Adjustment”
option only when the “Personal” mode is selected (see page 20).
Balance
Intelligent Volume:
Surround: Off
Off
Sound Adjustment
Dynamic
Mode:
Sound
Confirm
End
Select
continue
01GB06ADJ-Rus.p65 20/9/04, 3:27 PM19
Black
20 Menu Adjustment
Sony KV-HW212M95 Group H4 (GB, RU)_2-177-672-12(1)
Reset
100 300 1k 3k 8k
Adjust
Adjustment: Personal
Confirm
End
Select
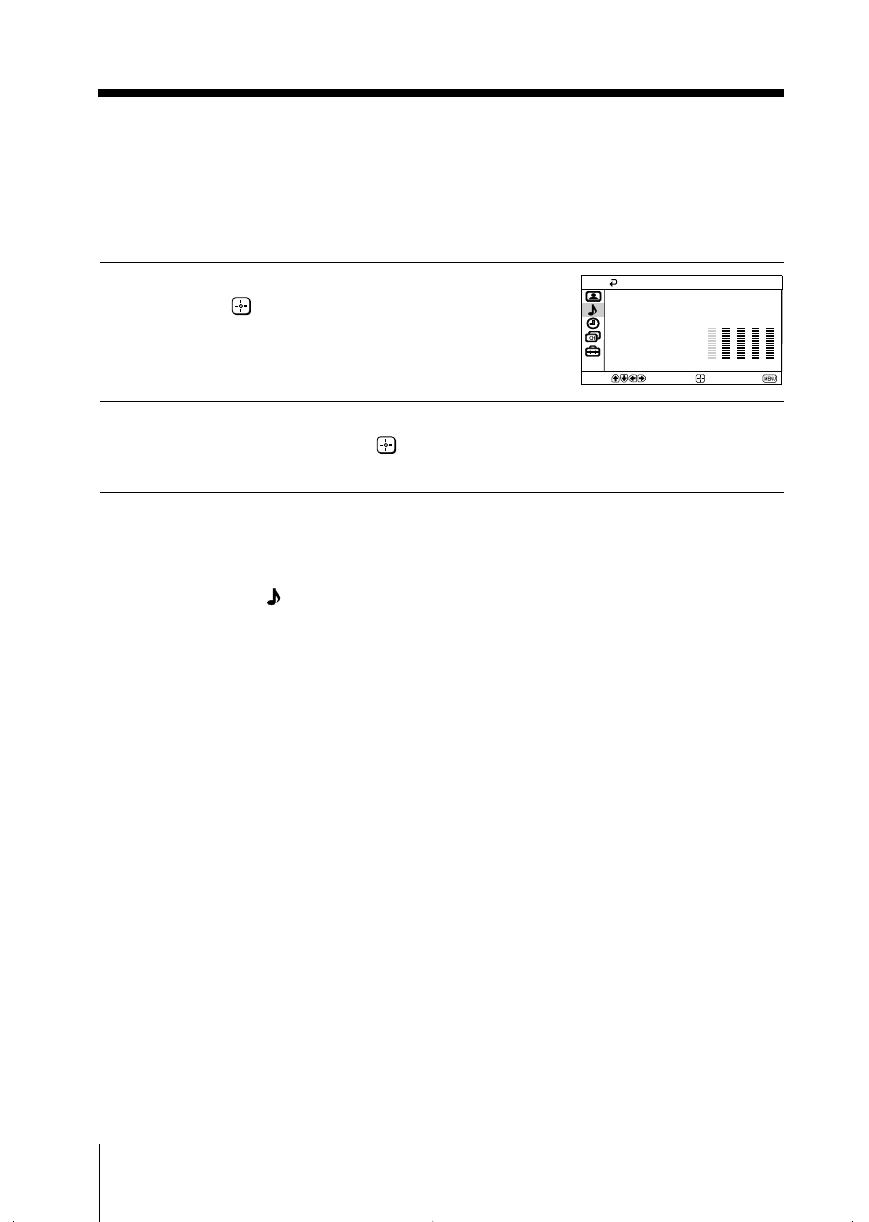
Adjusting the “Sound Adjustment” item under
“Personal” mode
The 5-Band Graphic Equalizer feature allows you to adjust sound frequency settings
of “Personal” mode in the menu.
1
Make sure that “Adjust” is selected,
then press
.
Selecting “Reset” will set your TV to
the factory setting.
2
Press B or b to select the desired sound frequency, then press V or v to
adjust the setting and press .
The adjusted settings will be received when you select “Personal”.
Notes
• Adjusting higher frequency will affect higher pitched sound and adjusting lower frequency
will affect lower pitched sound.
• You may display the settings directly using the SOUND MODE button on the top control
panel (see page 9) or button on the remote control (see page 11).
continued
01GB06ADJ-Rus.p65 20/9/04, 3:27 PM20
Black
![]()
Устройство:
Sony TRINITRON
Производитель: Sony
Размер: 0,28 MB
Добавлено: 2013-05-28
Количество страниц: 2
Как пользоваться?
Наша цель — обеспечить Вам самый быстрый доступ к руководству по эксплуатации устройства Sony TRINITRON. Пользуясь просмотром онлайн Вы можете быстро просмотреть содержание и перейти на страницу, на которой найдете решение своей проблемы с Sony TRINITRON.
Для Вашего удобства
Если просмотр руководства Sony TRINITRON непосредственно на этой странице для Вас неудобен, Вы можете воспользоваться двумя возможными решениями:
- Полноэкранный просмотр -, Чтобы удобно просматривать инструкцию (без скачивания на компьютер) Вы можете использовать режим полноэкранного просмотра. Чтобы запустить просмотр инструкции Sony TRINITRON на полном экране, используйте кнопку Полный экран.
- Скачивание на компьютер — Вы можете также скачать инструкцию Sony TRINITRON на свой компьютер и сохранить ее в своем архиве. Если ты все же не хотите занимать место на своем устройстве, Вы всегда можете скачать ее из ManualsBase.
Sony TRINITRON Руководство по эксплуатации
Печатная версия
Многие предпочитают читать документы не на экране, а в печатной версии. Опция распечатки инструкции также предусмотрена и Вы можете воспользоваться ею нажав на ссылку, находящуюся выше — Печатать инструкцию. Вам не обязательно печатать всю инструкцию Sony TRINITRON а только некоторые страницы. Берегите бумагу.
Резюме
Ниже Вы найдете заявки которые находятся на очередных страницах инструкции для Sony TRINITRON. Если Вы хотите быстро просмотреть содержимое страниц, которые находятся на очередных страницах инструкции, Вы воспользоваться ими.

![]()
![]() Инструкция по эксплуатации цветной телевизор Trinitron Sony KV-2165/2166/2167
Инструкция по эксплуатации цветной телевизор Trinitron Sony KV-2165/2166/2167
загрузить руководство пользователя цветной телевизор Trinitron Sony KV-2165, Sony KV-2166, Sony KV-2167
Если Нет звука, нажмите кнопку VOLUME +. Нажмите кнопку MUTING, проверьте подключение к сети и проверьте подключение антенны, шнура питания, видеоаппаратуры. Хорошее изображение, скачать инструкцию. Если Искажения звука, проверьте установку ТВ-системы(кроме KV-2166AS), Если нет изображения и нет звука, проверьте подключение антенны, проверьте исправность антенны и еще проверьте установку ТВ-системы (кроме KV-2166AS). А при Двойном изображение учтите, что это может быть следствием отражения телесигнала от стоящих поблизости домов, строений или холмов. Хорошее изображение. Если плывущие линии или полосы, это может быть следствием каких-либо локальных помех наличие поблизости сильного электродвигателя, компьютера мощной акустической системы и т.п. При возникновении проблем, проверьте возможные причины их появления по данной таблице. Если, несмотря на принятые меры, устранить проблему не удается, обращайтесь в сервисный центр. Снег на изображении, загрузить руководство пользователя. Нажатием кнопки А/В Вы можете выбрать язык при приеме двуканальных программ. Система передачи звука и выбранный канал отображаются на дисплее. Примечание из справочника пользователя. При очень слабом сигнале прием стереопрограмм происходит в моно-режиме. Если при приеме стереопрограмм уровень помех очень высок, выберите режим приема REGULAR/ОБЫЧНЫЙ или MONO/МОНО.
DISPLAY на экран выводятся данные о номере просматриваемой программы, установленных системе цветности и стандарте изображения. Выбор системы цветности. Нормальной считается установка переключателя в положение AUTO автоматическая. Однако, если изображение ненормальное, например, красноватый или синий оттенок, при приеме сигналов PAL, установите переключатель в положение PAL. Изображение нормализуется. Скачать инструкцию по эксплуатации телевизора Sony.
Если звук искажен или слышны помехи, если имеются искажения цвета во время приема программы через гнездо подключения антенны, нажимайте кнопку TV SYSTEM до тех пор, пока не добьетесь наилучшего качества изображения и звука. Настройка ТВ-системы для данной программной позиции заносится в память автоматически.
Настройка ТВ-системы (кроме KV-2166AS). Нажмите кнопку PIC MODE до появления на экране нужного вам стандарта. При каждом нажатии на кнопку изображение меняется следующим образом. Не используйте одновременно ВМ, подключенные в гнезда на передней панели и в гнезда аудио/видеовхода на задней панели. Всегда отключайте один из них. Прослушивание через наушники. Для прослушивания через наушники подключите их в гнездо на передней панели ТВ.
Для выбора программ вы можете использовать цифровые кнопки ПДУ, причем в данном случае для ввода двузначных номеров программ Вам необходимо сначала нажать, а затем кнопки номера программы, или кнопки PROGR. Для регулировки громкости используйте кнопки VOL. Выключение телевизора, инструкция по началу работы с устройством Сони. Для временного выключения ТВ используйте кнопку POWER на ПДУ. При этом ТВ переключается в режим ?Ожидание?, но аппарат полностью не отключается от сети, о чем говорит горящий красным индикатор режима. Для полного отключения ТВ от сети снова нажмите PRESET ON/OFF. Для обратного возврата программы повторите процесс автоматической или ручной настройки данной программы. Нажатием кнопок PROG +/- выберите программу, пропуск которой Вы хотели бы запрограммировать скачать инструкцию. Повторите операции 1-3 для настройки пропуска других программ программа, например, не настроенная или нежелательная к просмотру пропускалась при поиске программ PROG, запрограммировать Ваш ТВ на пропуск данной программной позиции. Скачать справочник пользователя. Пример: пропуск программы. Если Вас не устраивает автоматическая настройка программ, Вы можете произвести настройку программ и дать им номера по своему вкусу. Нажмите кнопку PRESET ON/OFF. Нажатием кнопок PROG выберите номер программы, которую вы хотели бы настроить. Нажатием TV SYSTEM выберите систему цветности, кроме KV-2166AS. Нажатием кнопок MANUAL PROG на передней панели ТВ настройтесь на нужную Вам станцию. 5 Нажмите кнопку PRESET ON/OFF. Вы можете настроить до 80-ти программ, начиная с первого номера. Нажмите кнопку POWER, нажмите кнопку TV SYSTEM для выбора системы цветности, принятой в Вашей стране, кроме KV-2166AS, нажмите кнопку PRESET ON/OFF. Нажмите кнопку AUTO PROGR.
Вы можете подключить антенну через гнездо на задней панели подключенного видеомагнитофона, используя для этого кабель IEC и соединительный аудио/видеокабель. Примечание из справочника по эксплуатации. При подключении моно-видеомагнитофона аудиокабель подсоединяется в гнездо L (MONO) на задней панели ТВ. При этом Вы будете слышать моно-звучание из обоих колонок. Для подключения к комбинированной МВ/ДМВ внешней антенне со стандартным коаксиальным кабелем 75 Ом: подключите штекер антенны в гнездо на задней панели телевизора.
Вы можете использовать экранное меню чтобы установить качество изображения, звук, и другие установки. Вы можете использовать кнопки на пульте ДУ и на телевизоре для управления меню. Возвращение к предшествующему меню Двигайте курсор до первой строки каждого меню (кроме основного меню), и нажмите ENTER. Скачать инструкцию по эксплуатации Sony. Если более чем 60 секунд истекает после того, как Вы нажимаете какую-либо кнопку, экранное меню исчезает автоматически. Вы можете посмотреть все характеристики, имеющиеся в распоряжении для ТВ в режиме.
Выход из экранного меню. Нажмите MENU. Если вы предпочитаете Китайский язык английскому, вы можете изменить язык меню. Вы можете использовать кнопки на пульте ДУ и телевизоре. Нажмите MENU, для перемещения курсора в положение LANGUAGE. Нажмите ENTER для выбора CHINESE. Нажмите ENTER и MENU для возврата к нормальному экрану. Скачать инструкцию по эксплуатации телевизора Sony. Нажмите MENU для перемещения курсора в четвертую строку сверху. Нажмите ENTER и нажмите MENU для возврата к нормальному экрану.
Для просмотра телевизора нажмите MAIN POWER для включения телевизора, когда ТВ в режиме STANDBAY после нажатия кнопки MAIN POWER, нажмите POWER на пульте ДУ или на ТВ. Выберите телевизионный канал, который Вы хотите смотреть. Для выбора канала непосредственно: нажмите кнопку с номером. Для выбора двузначного номера канала нажмите перед нажатием кнопок с номером. Например, для выбора канала 25 нажмите, а затем «2» и «5». Для сканирования каналов нажмите PROGR пока не найдете канал, который хотите смотреть. Нажмите VOL для регулировки громкости. Скачать инструкцию по эксплуатации Sony.
Руководство по выключению телевизора. Для временного выключения телевизора нажмите POWER. Для полного выключения телевизора нажмите MAIN POWER. Если телевизор выключается в режиме STANDBY, индикатор продолжает гореть некоторое время. Нажмите VIDEO/HOLD для просмотра телевизора нажмите TV. Быстрое переключение обратно к предыдущему каналу. Нажмите JAMP. Скачать инструкцию пользователя по эксплуатации Sony. Для отключения звука нажмите MUTING. Демонстрация информации на экране нажмите DISP/REVEAL. Программная позиция, локальная система телевещания, и установки ТВ показаны на экране.
Инструкция по работе с таймером сна. Нажмите SLEEP/INDEX. Для выхода из таймера сна нажимайте SLEEP/INDEX повторно пока надпись «SLEEP OFF» не появится на экране, или выключите телевизор. Инструкция по настройке изображения. Нажмите MENU для перемещения курсора в положение VIDEO CONTROL. Нажмите ENTER для выбора установки и нажмите ENTER. Выберите для DYNAMIC более контрастного изображения MIDDLE нормальной контрастности изображения, SOFT подходит для кино и видеоигр, PERSONAL настройки пользователя ADJUSMENT регулировки изображения. Скачать инструкцию по эксплуатации Sony. Нажмите MENU для возврата к нормальному экрану.
Вы можете настроить изображение по вашему вкусу с помощью опции ADJUSTMENT. Отрегулированные установки запоминаются в опции PERSONAL. Нажмите MENU для перемещения курсора( ) в положение VIDEO CONTROL, затем нажмите ENTER. Нажмите для перемещения курсора в положение ADJUSTMENT, затем нажмите ENTER. Нажмите для перемещения курсора в пункт меню, который хотите настроить, затем нажмите ENTER. Нажмите для регулировки, затем нажмите ENTER. Пункт меню Нажмите + для Нажмите — для PICTURE увеличение контрастности уменьшение контрастности COLOR увеличение интенсивности цвета уменьшение интенсивности цвета BRIGHT изображение ярче изображение темнее, HUE усиление зеленых тонов усиление красных тонов, SHARP изображение резче изображение мягче. Для регулировки других пунктов повторите шаги. Нажмите MENU для возврата к нормальному экрану. Примечание: Вы можете отрегулировать HUE (оттенок) только в системе NTSC. Если цвет изображения не нормальный. Скачать инструкцию по эксплуатации тв Sony.
Когда принимаете программы через терминал: нажмите TV SISTEM или COLOR SISTEM пока цвет не станет нормальным. Примечание из инструкции. Нормальное положение COLOR SISTEM в AUTO.
скачать файл
download manual users Trinitron Sony KV-2165, Sony KV-2166, Sony KV-2167 File-Size: 135 кб
benutzerhandbuch herunterladen Trinitron-Farbfernseher Sony KV-2165, Sony KV-2166, Sony KV-2167
Wenn kein Ton vorhanden ist, drücken Sie die Taste VOLUME +. Drücken Sie die MUTING-Taste, überprüfen Sie die Netzwerkverbindung und überprüfen Sie die Verbindung von Antenne, Netzkabel und Videogeräten. Gutes Bild, Anleitung herunterladen. Überprüfen Sie die Installation des TV-Systems (außer KV-2166AS), Wenn kein Bild oder kein Ton vorhanden ist, überprüfen Sie den Antennenanschluss, überprüfen Sie die Antenne, und überprüfen Sie die Installation des TV-Systems (außer KV-2166AS). Beachten Sie bei einem Doppelbild, dass dies auf die Reflexion des Fernsehsignals von Häusern, Gebäuden oder Hügeln in der Nähe zurückzuführen sein kann. Gutes Bild. Bei fließenden Linien oder Streifen kann dies auf lokale Störungen zurückzuführen sein, wenn ein starker Motor in der Nähe ist, ein Computer mit einem starken Lautsprechersystem usw. ist. Wenn Probleme auftreten, überprüfen Sie die möglichen Ursachen in dieser Tabelle. Wenn das Problem trotz der getroffenen Maßnahmen nicht behoben werden kann, wenden Sie sich an das Servicecenter. Schnee auf dem Bild, laden Sie das Benutzerhandbuch herunter. Durch Drücken der A/B-Taste können Sie die Sprache für den Empfang von Zweikanalprogrammen auswählen. Das Audiosystem und der ausgewählte Kanal werden auf dem Display angezeigt. Hinweis aus dem Benutzerhandbuch. Bei einem sehr schwachen Signal erfolgt der Empfang von Stereoprogrammen im Mono-Modus. Wenn der Störpegel beim Empfang von Stereoprogrammen sehr hoch ist, wählen Sie den Empfangsmodus REGULAR/NORMAL oder MONO/MONO.
DISPLAY Der Bildschirm zeigt Informationen über die aktuelle Programmnummer, das eingestellte Farbsystem und den Bildstandard an. Auswahl des Farbsystems. Als normal gilt die Einstellung des Schalters in die Position AUTO automatisch. Wenn das Bild jedoch abnormal ist, z. B. ein rötlicher oder blauer Farbton, stellen Sie den Schalter beim Empfang von PAL-Signalen auf PAL. Das Bild normalisiert sich. Laden Sie die Bedienungsanleitung Ihres Sony Fernsehgeräts herunter. Wenn der Ton verzerrt ist oder Störungen auftreten, wenn beim Empfang eines Programms über den Antennenanschluss Farbverzerrungen auftreten, drücken Sie die Taste TV SYSTEM so lange, bis die beste Bild- und Tonqualität erreicht ist. Die Einstellung des TV-Systems für diese Programmposition wird automatisch gespeichert. Einrichten des TV-Systems (außer KV-2166AS). Drücken Sie die Taste PIC MODE, bis der gewünschte Standard angezeigt wird. Jedes Mal, wenn Sie auf die Schaltfläche klicken, ändert sich das Bild wie folgt. Verwenden Sie keine VMs gleichzeitig, die an den Buchsen an der Vorderseite und an den Audio-/Videoeingangsbuchsen auf der Rückseite angeschlossen sind. Schalten Sie immer einen von ihnen aus. Hören über Kopfhörer. Um über Kopfhörer zu hören, schließen Sie diese an die Buchse an der Vorderseite des Fernsehgeräts an.
Um Programme auszuwählen, können Sie die Zifferntasten der Fernbedienung verwenden, in diesem Fall müssen Sie zuerst die Programmnummerntasten und dann die Programmnummerntasten oder die PROGR-Tasten drücken, um zweistellige Programmnummern einzugeben. Verwenden Sie die VOL-Tasten, um die Lautstärke einzustellen. Ausschalten des Fernsehgeräts, erste Schritte mit dem Sony-Gerät. Verwenden Sie die POWER-Taste auf der Fernbedienung, um das Fernsehgerät vorübergehend auszuschalten. Schaltet das Fernsehgerät in den Modus ?Warten?, aber das Gerät wird nicht vollständig vom Netz getrennt, was durch die rote Modusanzeige angezeigt wird. Um das Fernsehgerät vollständig vom Netz zu trennen, drücken Sie erneut PRESET ON/OFF. Wiederholen Sie die automatische oder manuelle Konfiguration des Programms, um das Programm zurückzukehren. Drücken Sie die Tasten PROG +/-, um das Programm auszuwählen, dessen Überspringen Sie programmieren möchten, um die Anleitung herunterzuladen. Wiederholen Sie die Schritte 1 bis 3, um das Überspringen anderer Programme einzustellen, z. B. wenn Sie bei der Suche nach PROG-Programmen ein Programm, das nicht konfiguriert oder unerwünscht ist, übersprungen wurde, programmieren Sie Ihr Fernsehgerät so, dass diese Programmposition übersprungen wird. Laden Sie das Benutzerhandbuch herunter. Beispiel: Überspringen eines Programms. Wenn Sie mit der automatischen Programmkonfiguration nicht zufrieden sind, können Sie die Programme anpassen und ihnen die Nummern nach Ihren Wünschen geben. Drücken Sie die PRESET ON/OFF-Taste. Drücken Sie die PROG-Tasten, um die Nummer des Programms auszuwählen, das Sie anpassen möchten. Drücken Sie TV SYSTEM, um das Farbsystem außer KV-2166AS auszuwählen. Drücken Sie die MANUAL PROG-Tasten an der Vorderseite des Fernsehgeräts, um den gewünschten Sender einzustellen. 5 Drücken Sie die PRESET ON/OFF-Taste. Sie können bis zu 80 Programme ab der ersten Nummer einrichten. Drücken Sie die POWER-Taste, drücken Sie die TV-SYSTEM-Taste, um das in Ihrem Land akzeptierte Farbsystem außer KV-2166AS auszuwählen, und drücken Sie die PRESET ON/OFF-Taste. Drücken Sie die AUTO PROGR-Taste. Sie können die Antenne mit einem IEC-Kabel und einem Audio-/Videokabel über die Buchse auf der Rückseite des angeschlossenen Videorecorders anschließen. Hinweis aus dem Benutzerhandbuch. Wenn Sie einen Mono-Videorecorder anschließen, wird das Audiokabel an die L (MONO) -Buchse auf der Rückseite des Fernsehgeräts angeschlossen. Dabei hören Sie den Mono-Sound aus beiden Lautsprechern. So verbinden Sie eine externe Antenne mit einer kombinierten MV/DMV-Antenne mit einem Standard-75-Ohm-Koaxialkabel: Schließen Sie den Antennenstecker an die Buchse auf der Rückseite des Fernsehgeräts an.
Sie können das OSD-Menü verwenden, um die Bildqualität, den Ton und andere Einstellungen einzustellen. Sie können die Tasten auf der Fernbedienung und am Fernsehgerät verwenden, um die Menüs zu steuern. Zurück zum vorherigen Menü Bewegen Sie den Cursor zur ersten Zeile jedes Menüs (mit Ausnahme des Hauptmenüs) und drücken Sie die EINGABETASTE. Bedienungsanleitung Sony herunterladen. Wenn nach dem Drücken einer Taste mehr als 60 Sekunden vergehen, verschwindet das OSD-Menü automatisch. Sie können alle verfügbaren TV-Funktionen im Modus ansehen. Beendet das OSD-Menü. Drücken Sie MENU. Wenn Sie Chinesisch dem Englischen bevorzugen, können Sie die Menüsprache ändern. Sie können die Tasten auf der Fernbedienung und dem Fernsehgerät verwenden. Drücken Sie MENU, um den Cursor in die Position LANGUAGE zu bewegen. Drücken Sie die EINGABETASTE, um CHINESE auszuwählen. Drücken Sie ENTER und MENU, um zum normalen Bildschirm zurückzukehren. Laden Sie die Bedienungsanleitung Ihres Sony Fernsehgeräts herunter. Drücken Sie MENU, um den Cursor oben in die vierte Zeile zu bewegen. Drücken Sie die EINGABETASTE und drücken Sie MENU, um zum normalen Bildschirm zurückzukehren.
Drücken Sie zum Fernsehen MAIN POWER, um das Fernsehgerät einzuschalten, wenn das Fernsehgerät im STANDBAY-Modus ist, nachdem Sie die MAIN POWER-Taste gedrückt haben, drücken Sie POWER auf der Fernbedienung oder auf dem Fernsehgerät. Wählen Sie den Fernsehsender aus, den Sie ansehen möchten. So wählen Sie einen Kanal direkt aus: Drücken Sie die Nummer-Taste. Um eine zweistellige Kanalnummer auszuwählen, drücken Sie, bevor Sie die Nummerntasten drücken. Um beispielsweise Kanal 25 auszuwählen, drücken Sie und dann «2» und «5». Um die Kanäle zu scannen, drücken Sie PROGR, bis Sie den Kanal gefunden haben, den Sie ansehen möchten. Drücken Sie VOL, um die Lautstärke einzustellen. Bedienungsanleitung Sony herunterladen. Anleitung zum Ausschalten des Fernsehgeräts. Drücken Sie POWER, um das Fernsehgerät vorübergehend auszuschalten. Drücken Sie MAIN POWER, um das Fernsehgerät vollständig auszuschalten. Wenn sich das Fernsehgerät im STANDBY-Modus ausschaltet, leuchtet die LED für eine Weile weiter. Drücken Sie VIDEO/HOLD, um das Fernsehgerät anzusehen, drücken Sie TV. Wechseln Sie schnell zum vorherigen Kanal zurück. Drücken Sie JAMP. Bedienungsanleitung Sony herunterladen. Drücken Sie MUTING, um den Ton stummzuschalten. Anzeigen von Informationen auf dem Bildschirm drücken Sie DISP/REVEAL. Die Programmposition, das lokale Fernsehsystem und die TV-Einstellungen werden auf dem Bildschirm angezeigt. Anleitung zur Arbeit mit dem Sleep-Timer. Drücken Sie SLEEP/INDEX. Um den Sleep-Timer zu verlassen, drücken Sie SLEEP/INDEX erneut, bis «SLEEP OFF» auf dem Bildschirm erscheint, oder schalten Sie den Fernseher aus. Anleitung zum Anpassen des Bildes. Drücken Sie MENU, um den Cursor in die Position VIDEO CONTROL zu bewegen. Drücken Sie die Eingabetaste, um eine Einstellung auszuwählen, und drücken Sie die EINGABETASTE. Wählen Sie für DYNAMIC kontrastreicheres Bild MIDDLE normalen Bildkontrast, SOFT eignet sich für Filme und Videospiele, PERSONAL User ADJUSMENT Anpassung des Bildes. Bedienungsanleitung Sony herunterladen. Drücken Sie MENU, um zum normalen Bildschirm zurückzukehren.
Sie können das Bild mit der Option ANPASSUNG nach Ihren Wünschen anpassen. Die angepassten Einstellungen werden in der Option PERSONAL gespeichert. Drücken Sie MENU, um den Cursor( ) in die Position VIDEO CONTROL zu bewegen, und drücken Sie dann die EINGABETASTE. Drücken Sie, um den Cursor in die Position ADJUSTMENT zu bewegen, und drücken Sie dann die EINGABETASTE. Drücken Sie, um den Cursor zu dem Menüpunkt zu bewegen, den Sie anpassen möchten, und drücken Sie dann die EINGABETASTE. Drücken Sie zum Anpassen, und drücken Sie dann die EINGABETASTE. Menüoption Drücken Sie + für Drücken Sie — für PICTURE Kontrast erhöhen Farbkontrast verringern Farbintensität erhöhen Farbintensität verringern BRIGHT Bild heller Bild dunkler, HUE Grün verstärken Rot verstärken, SHARP Bild schärfer das Bild ist weicher. Wiederholen Sie die Schritte, um die anderen Punkte anzupassen. Drücken Sie MENU, um zum normalen Bildschirm zurückzukehren. Hinweis: Sie können den Farbton nur im NTSC-System einstellen. Wenn die Farbe des Bildes nicht normal ist. Bedienungsanleitung Sony TV herunterladen.
Wenn Sie Programme über das Terminal empfangen: Drücken Sie TV SISTEM oder COLOR SISTEM, bis die Farbe normal ist. Hinweis aus der Anleitung. Die normale Position von COLOR SISTEM auf AUTO.
Datei herunterladen
-
Инструкции по эксплуатации
1

SONY FD TRINITRON KV-21FT1K инструкция по эксплуатации
(132 страницы)
- Языки:Русский
-
Тип:
PDF -
Размер:
11.81 MB -
Описание:
Кинескопный телевизор
Просмотр
На NoDevice можно скачать инструкцию по эксплуатации для SONY FD TRINITRON KV-21FT1K. Руководство пользователя необходимо для ознакомления с правилами установки и эксплуатации SONY FD TRINITRON KV-21FT1K. Инструкции по использованию помогут правильно настроить SONY FD TRINITRON KV-21FT1K, исправить ошибки и выявить неполадки.