Посмотреть инструкция для Sony Alpha SLT-A58 бесплатно. Руководство относится к категории фотокамеры, 6 человек(а) дали ему среднюю оценку 7.7. Руководство доступно на следующих языках: русский. У вас есть вопрос о Sony Alpha SLT-A58 или вам нужна помощь? Задайте свой вопрос здесь
Не можете найти ответ на свой вопрос в руководстве? Вы можете найти ответ на свой вопрос ниже, в разделе часто задаваемых вопросов о Sony Alpha SLT-A58.
Какой вес Sony Alpha SLT-A58?
Какой размер экрана Sony Alpha SLT-A58?
Какая высота Sony Alpha SLT-A58?
Какая ширина Sony Alpha SLT-A58?
Какая толщина Sony Alpha SLT-A58?
Инструкция Sony Alpha SLT-A58 доступно в русский?
Не нашли свой вопрос? Задайте свой вопрос здесь
Характеристики, спецификации
Разрешение матрицы:
20.1 Мпикс
Дисплей:
OLED 2.7″ поворотный
Режимы фокусировки:
автоматический, ручной
Тип автофокусировки:
TTL phase detection
Совместимые объективы (крепление байонета):
Minolta A-type
Размер матрицы:
15.4 x 23.2 мм
Стабилизатор изображения:
стабилизация с подвижной матрицей
Чувствительность матрицы:
ISO 100-16000
Замер экспозиции:
многосегментный, точечный, центрально-взвешенный
Режимы экспозиции:
с приоритетом диафрагмы, с приоритетом затвора
Экспокоррекция:
+/- 3 EV с шагом 1/3 ступени
Скорость затвора:
1/4000 — 30 сек
Баланс белого:
автоматический, из списка, ручная установка
Настройки баланса белого:
2500K — 9900K, вспышка, дневной свет, лампа накаливания, облачность, тень, флюоресцентное освещение
Режимы съемки:
Intelligent Auto, автоматический, брекетинг баланса белого, высококонтрастный, закат, лампа, насыщенно, панорама, пейзаж, портрет, программируемый, резкий, ручной, специальные эффекты, стандарт, сцена, черно-белый, яркий
Серийная съемка, кадров/сек.:
8
Таймер:
Есть, 10 сек., 2 сек.
Запись фото:
JPEG — 5536 x 2160
Запись видео:
AVCHD — 1920 x 1080 — 50 g
Расположение:
выдвижная, горячий башмак
Режимы вспышки:
автоматический, беспроводная, заполняющая, медленная синхронизация, подавление «эффекта красных глаз», синхронизация по задней шторке
Максимальная дальность работы:
10 м
Поддерживаемые форматы карт памяти:
Memory Stick PRO Duo, Memory Stick PRO-HG Duo, SD, SDHC, SDXC
Поддерживаемый стандарт батарей:
собственный аккумулятор
Модель аккумулятора в комплекте:
NP-FM500H
Батареи в комплекте:
1, Li-ion
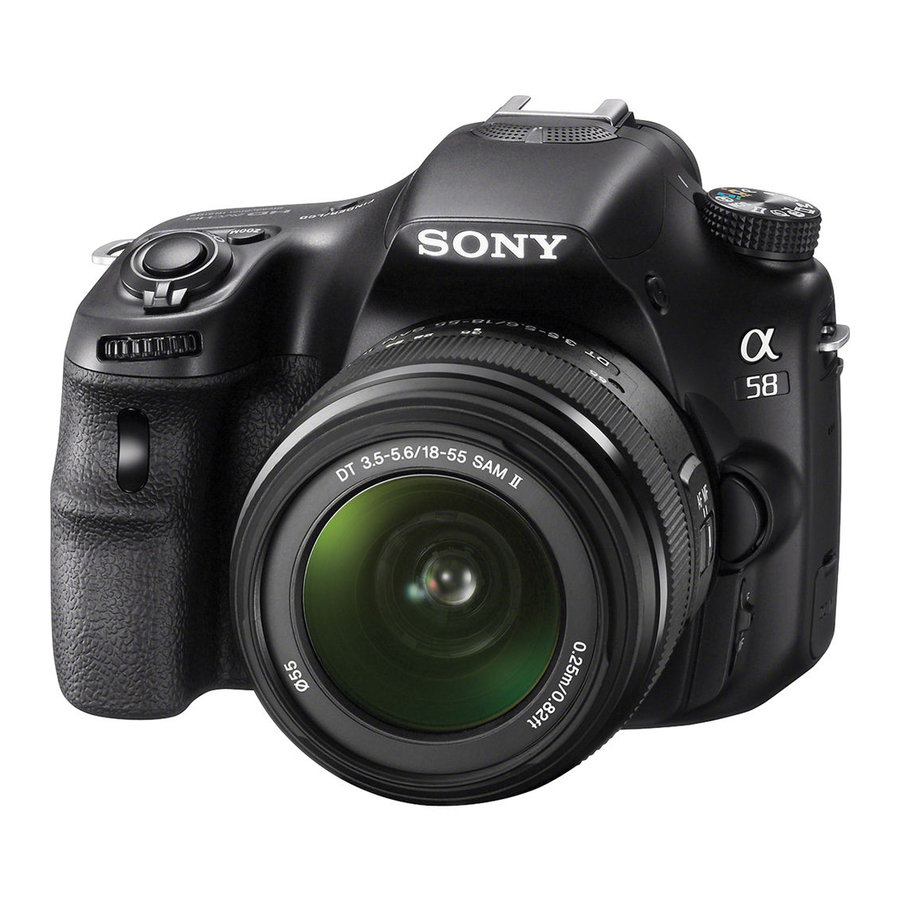
Инструкция к Фотоаппарату цифровой зеркальному Sony SLT-A58
4-459-706-12(1)
Цифровой
Подготовка камеры
фотоаппарат со
Съемка и просмотр
сменным объективом
изображений
Фотосъемка в
зависимости от объекта
Использование функций
α Руководство
съемки
Использование функций
A-переходник
воспроизведения
Список функций
Просмотр фотоснимков
на компьютере
Прочее
Дополнительные
операции
Алфавитный указатель
©2013 Sony Corporation
SLT-A58

Cодержание
Основные
операции ……………..……………….…………………….………….. 11
В данном разделе приведена основная информация по
эксплуатации фотоаппарата.
Примечания по использованию фотоаппарата …. 12
Подготовка камеры
Проверка комплектации ……..……..…..…….……..……. 15
Компоненты камеры …….……..…..……..…….……..……. 17
Передняя сторона ..……..…….……..……..…….…….... 17
Задняя сторона ..……..…….……..……..…….……..……. 19
Верхняя сторона ……..…….……..……..…….……..……. 20
Боковые стороны/Нижняя сторона …….…..……. 22
Объектив ..…….……..…..……..……..…….……..……..…. 24
Зарядка батарейного блока …..……..……..…….…….... 25
Установка аккумулятора/карты памяти (продается
отдельно) ………………………………..………………..…….. 27
Карты памяти, которые вы можете
использовать …………..…………………..…………. 29
Присоединение объектива ..……..……..…….……..…….31
Включение фотоаппарата и установка часов ……. 35
Перед съемкой ………..…….……..……..…….……..……..…. 38
Регулировка оптической резкости видоискателя
(диоптрийная коррекция) .…….……..……..…. 38
Как правильно держать фотоаппарат ……..……. 38
Съемка и просмотр изображений
Съемка неподвижных изображений ………….…….... 40
Запись фильмов ………..…..……..……..…….……..……..…. 43
Воспроизведение изображений …………..……………… 44
Удаление изображений (Удалить) …………..……..…. 45
2

Фотосъемка в зависимости от объекта
Регулировка угла установки ЖК-экрана ……….….. 46
Выбор режима съемки …………..…….……..……..…….… 47
Супер авторежим ….……..…..…….……..…….. 48
Выбор сцены ………..……..……..…….……..…….. 50
Панорамный обзор .………….……..……..…….… 51
Непрер. приор. АЭ с телеконв. …..……..….. 52
Использование функций съемки
Использование вспышки …….……..…….……..……..….. 53
Настройка яркости изображения ..……..……..…….… 55
Выбор режима протяжки ………..……..…….… 57
Переключение информационной индикации в
режиме записи (DISP) ……….…….……..……..…..….. 58
Настройка размера изображения …..…….……..…….. 59
Размер изобр. ..…….……..……..…….……..……..…….… 59
Панорама: размер ….…….……..……..…….………….… 60
Использование функций воспроизведения
Увеличение изображений ……..…….……..…..……..….. 61
Переключение на отображение списка
изображений ……….……..……..…….……..……..…….… 62
Просмотр изображений на экране телевизора …. 63
Список функций
Функции, которыми можно управлять с помощью
кнопок/переключателя………..……..…….………….… 64
Выбор функции с помощью кнопки Fn
(Функция) ……..…….……..……..…….……..……..…….… 66
Функции, которые можно выбирать с помощью
кнопки Fn (Функция) …………………………………….67
Выбор функций с помощью кнопки MENU ……… 69
Использование функции рекомендаций
камеры .…….……..…..……..……..…….……..……..…….… 78
Встроенная справка ……..……..……..…….……..…….. 78
Подсказки по съемке …..……..……..…….……..…..… 78
3

Просмотр фотоснимков на компьютере
Какие возможности предоставляет программное
обеспечение …..……..……..…….……..……..…….…….... 80
Какие возможности предоставляет
“PlayMemories Home” ……………..…….…….... 81
Какие возможности предоставляет
“Image Data Converter” …………..…….…….... 82
Установка программного обеспечения ……..…….... 83
Установка программы
“PlayMemories Home” ……………..…….…….... 83
Просмотр руководства “Справочное
руководство по PlayMemories Home” …… 84
Установка программы “Image Data
Converter” …….……..…….……..……..…….…….... 84
Просмотр руководства “Руководство по Image
Data Converter” …..…….……..……..…….…….... 85
Установка программы “Remote Camera
Control” …………..…….……..……..…….……..……. 86
Выбор способа создания видеодиска ..……..……..…. 87
Создание диска с помощью компьютера …..….. 88
Создание диска с помощью устройства,
отличного от компьютера …..…….……..……. 89
Прочее
Список экранных значков ………..……..…….……..……. 90
Функции, доступные для каждого режима
съемки ..…….……..……..…..…….……..……..…….…….... 93
Доступные режимы вспышки ……..…….……..……..…. 94
4

Дополнительные
операции
…..…….….……………….……………….………………... 95
В данном разделе приведена дополнительная информация по
эксплуатации фотоаппарата.
Подготовка
Настройка фотоаппарата .……………………………..…… 96
Снятие наглазника окуляра …..…….……..……..….. 96
Экранная индикация режима съемки …..……..…….. 97
Выбор режима экрана …………..…….……..……..….. 97
Гистограмма ….…….……..……..…..…….……..……..….. 98
Контроль объекта через объектив без
отображения эффектов ……..…….………….… 99
Список значков режима видоискателя ……..….. 99
Съемка четкого изображения без дрожания
фотоаппарата ….……..…….……..…..……..……..…….. 102
Индикатор предупреждения о дрожании
фотоаппарата …….…..……..…….……..……..… 102
Использование функции SteadyShot …..……..… 103
Использование штатива ……..……..…..……..…….. 103
Съемка
Выбор режима фотосъемки ………..……..…..……..… 104
Интеллект. Авто/ Вспышка выкл ……… 104
Супер авторежим ……..…….……..……..…..… 104
Выбор сцены ………..……..……..…….……..…… 105
Панорамный обзор .………….……..……..…….. 108
Непрер. приор. АЭ с телеконв. …..……..… 110
Программное авто ……………………………………. 111
Приор. диафрагмы ……..……..…….……..……..… 112
Приор. выдержки …………..…….……..……..…….. 115
Ручной экспозиция ……..……..…….……..……..… 117
BULB ……..……..…….……..……..…….……..……..… 119
Установка записи видео ……………..…….……..……..… 121
Простая запись видео …………………………………… 121
Цифров увелич …………..……..…….……..……..…….. 123
Изменение чувствительности отслеживания
автофокуса во время записи видео .…….. 123
5
Запись видео с регулировкой выдержки и
диафрагмы …………..…….……..……..…….…….. 124
Формат файла …….…….……..……..…….……..…….... 125
Параметры записи …………..……..…….……..…….... 126
Запись звука ……….…..…….……..……..…….……..….. 127
Регулировка фокусировки ..……..……..…….……..….. 128
Автофокус ..……..……..…….……..……..…..…….…….. 129
Блокировка фокуса ….……..……..…….……..…….... 131
Режим АФ ……..……..……..…..……..…….……..…….... 132
Область AF …..……..……..…..……..…….……..…….... 133
Подсветка АФ …….…….……..……..…….……..…….... 134
Следящий AF ..……..……..…….……..……..…….…….. 135
Фокусировка вручную ..…..……..…….……..…….... 137
Выделение контуров …..…….……..……..…….…….. 139
Фокусировоч. лупа …………..……..…….……..…….... 139
Распознавание лиц .……..…….…..……..……..…….…….. 141
Распознаван. лиц ..…….……..……..…….……..…..….. 141
Регистрация лиц ……….……..……..…….……..…..….. 142
Авто кадрирование ………….…..……..…….……..….. 144
Smile Shutter ….……..……..…….……..……..…….…….. 145
Регулировка яркости изображения ……….……..….. 147
Блокировка АЭ .……..…….……..……..…….……..….. 147
AEL с выдержкой …..…….……..……..…….……..….. 148
Режим измер. ……..…….…..……..……..…….……..….. 148
Кор.эксп.вспыш. ……….……..……..…….……..…….... 149
Управл.вспышкой …..…….……..……..…….……..….. 150
Вспышка ….…….……..……..…..…….……..……..…….…….. 152
Беспроводная вспышка ……….…..……..…….…….. 153
Установка ISO ……..……..…….……..……..…….…..…….. 155
Многокадр. шумоподавл. ….……..……..…….…….. 156
Автоматическая компенсация яркости и
контрастности (Д-диапазон) …….……..…….…….. 157
Опт.Д-диап. …………..……..…….……..……..…….…….. 157
Авто HDR …..……..…….……..……..…….……..…….... 158
Установка обработки изображений ….……..…..….. 160
Эффект рисунка ……….……..…..……..…….……..….. 160
Творческ. стиль ….…….……..……..…….…..……..….. 162
6

Регулировка цветовых тонов
(Баланс белого) ……….……..……..…….……..……..… 164
Экран точной регулировки цвета ……………….. 166
Цвет. темпер./Цветной фильтр …………………… 166
Пользоват. баланс белого …..……..…….……..…… 167
Зуммирование ………….…..……..……..…….……..……..… 169
Выбор режима протяжки ………..……..…….. 172
Покадров. Съемка ……..……..…….……..……..…….. 172
Непрерыв. Съемка ….……..……..…….…..……..…… 172
Автоспуск ……..…..…….……..……..…….……..……..… 173
Брек.: Непрер./Покадр. брекетинг ……….…….. 174
Брекетинг WB …..…….……..……..…..…….……..…… 176
Воспроизведение
Экранная индикация режима
воспроизведения …….…….……..……..…….……..…… 177
Переключение экрана во время
воспроизведения ..…………………..…………….. 177
Список значков дисплея гистограммы ………… 177
Использование функций воспроизведения ……… 179
Поворот изображения …………….……..…..……..… 179
Выб. фото./видео ……….……..…….……..……..…….. 180
Слайд-шоу ……..…….……..……..…….……..…..……..… 180
Дисп.реж.воспр. ……….……..…..……..…….……..…… 181
Прокрутка панорамных изображений ….…….. 181
Защита изображений (Защита) ……….…..……..…… 182
Удаление изображений (Удалить) ……..……..…….. 183
Удалить (Неск. снимков) ………..…..……..……..… 183
Удаление всех изображений или видеозаписей в
каждом режиме просмотра…………………..184
Воспроизведение на телевизоре ….……..……..…..… 185
Использование приложения “BRAVIA”
Sync ….……..……..…….……..……..…….……..…... 185
7

Настройка фотоаппарата
Установка формата и качества изображения ….. 187
Формат ………..……..…..…….……..……..…….……..….. 187
Качество ……….………….……..……..…….……..…….... 187
Установка других функций фотоаппарата ………. 189
ШП длит. экспоз. ….……..…….……..……..…….…….. 189
ШП высокого ISO …….……..……..…….……..…….... 190
Цвет. простран. …..…….……..……..…….……..…….... 190
Спуск б/объектива .……..…….……..……..…..…….... 191
Сетка …..…….……..……..…….……..……..…….…..…….. 191
Авто.просмотр ………….…..……..……..…….……..….. 192
Функ. кнопки AEL …………..……..…….……..…….... 192
Кнопка ISO …………..…..……..……..…….……..…….... 193
Кнопка предпросмотра ……..………….……..…….... 193
Электронная передняя шторка затвора ………. 194
Яркость видоискат. ……..…….……..…..……..…….... 194
Эконом. питания ….……..…….……..……..…….…….. 195
Настр. FINDER/LCD .……..……..…….……..…….... 195
Коррекция объектива ……….……..……..…….……..….. 196
Корр. об.: Периферич. затенение ……..…..…….. 196
Коррекция объектива: Хром. аберр. ……….….. 196
Коррекция объектива: Дисторсия ….…….…….. 196
Установка способа записи на карту памяти ……..197
Форматировать …..…….……..……..…….……..…….... 197
Номер файла …………….……..……..…….…..……..….. 197
Название папки …………….……..……..…….……..….. 198
Выбор папк. записи ……………..……..…….……..….. 198
Создать папку ………………………………………………. 198
Восстан. БД изобр. ……..…….……..…..……..…….... 199
Парам. Выгрузки ………….……..……..…….……..….. 199
Возврат к исходным установкам ……………..…….... 201
Подтверждение версии фотоаппарата …………….. 205
8

Компьютер
Использование фотоаппарата с
компьютером …….…..…….……..……..…….……..…… 206
Рекомендуемая конфигурация компьютера
(Windows) …..…….……..……..…….……..……..… 207
Рекомендуемая конфигурация компьютера
(Mac) …..……..…….…..……..……..…….……..…… 208
Подключение фотоаппарата к компьютеру ……. 209
Создание USB-соединения ……………..……..…..… 209
Установка режима USB-соединения
(Настройка USB LUN)……….…….……..…… 210
Подключение к компьютеру ……….…..……..…… 210
Импортирование изображений в компьютер
(Windows) …………..……..…….……..……..…….. 211
Импортирование изображений в компьютер
(Mac) …..……..…….…..……..……..…….……..…… 213
Удаление USB-соединения ………….……..……..… 213
Создание диска с видеозаписями ………..……..…….. 215
Создание диска с качеством высокой четкости
(HD) на компьютере (диск с записью
AVCHD) ………….……..……..…..…….……..…… 215
Создание диска с качеством стандартной
четкости (STD)…………..…….……..……..…….. 216
Типы дисков, которые можно использовать с
программой “PlayMemories Home” …….. 217
Печать
Указание DPOF ……..…….……..……..…….……..……..… 218
Печать даты …………..…….……..……..…….……..…… 219
Чистка
Чистка фотоаппарата и объектива ……………….…. 220
Чистка датчика изображения ….……..…….……..…... 221
9

Поиск и устранение неисправностей/Прочее
Устранение неисправностей ..……..…..…….……..….. 224
Предупреждающие сообщения …….…..……..…….... 235
Меры предосторожности ………………..…….…..…….. 238
Использование фотоаппарата за границей —
Источники питания ……………..……..…….……..….. 243
Формат AVCHD …..……..…….……..……..…….……..….. 244
Карты памяти …….……..……..…….……..……..…….…….. 245
Аккумулятор/Зарядное устройство ……………..….. 248
Лицензия .……..…….……..……..…….……..……..…….…….. 250
Алфавитный указатель .……………….…………………….………… 252
10
Основные операции
В данном разделе приведена основная информация
по эксплуатации фотоаппарата. В первую очередь
ознакомьтесь с данным разделом. Для более
эффективного использования фотоаппарата см.
раздел “Дополнительные операции” (стр. 95).
11
Оглавление
Аннотация для Фотоаппарата цифровой зеркального Sony SLT-A58 в формате PDF
Топ 10 инструкций
Другие инструкции
-
Contents
-
Table of Contents
-
Bookmarks
Quick Links
Interchangeable Lens
Digital Camera
Instruction Manual
A-mount
SLT-A58
4-459-708-12(1)
Preparing the camera
Shooting and viewing
images
Shooting images to suit
your subject
Using the shooting
functions
Using the playback
functions
Function list
Viewing images on a
computer
Others
Index
Related Manuals for Sony α SLT-A58
Summary of Contents for Sony α SLT-A58
-
Page 1
4-459-708-12(1) Interchangeable Lens Preparing the camera Digital Camera Shooting and viewing images Shooting images to suit your subject Instruction Manual Using the shooting functions A-mount Using the playback functions Function list Viewing images on a computer Others Index SLT-A58… -
Page 2
INSTRUCTIONS lithium ion batteries. -SAVE THESE • Be sure to charge the battery pack using a genuine Sony battery charger or a device INSTRUCTIONS that can charge the battery pack. • Keep the battery pack out of the reach of DANGER small children. -
Page 3
You can help preserve If you have any questions about this our environment by product, you may call: returning your used Sony Customer Information Center rechargeable batteries 1-800-222-SONY (7669). to the collection and The number below is for the FCC related recycling location matters only. -
Page 4: For Customers In Europe
EU Directives FCC Rules. This product has been manufactured by or These limits are designed to provide on behalf of Sony Corporation, 1-7-1 reasonable protection against harmful Konan Minato-ku Tokyo, 108-0075 Japan. interference in a residential installation. Inquiries related to product compliance…
-
Page 5
Disposal of Old Electrical & Disposal of waste batteries Electronic Equipment (Applicable in (applicable in the European Union the European Union and other and other European countries with European countries with separate separate collection systems) collection systems) This symbol on the battery This symbol on the or on the packaging product or on its packaging… -
Page 6
If the plug supplied with this equipment has a detachable fuse cover, be sure to attach the fuse cover after you change the fuse. Never use the plug without the fuse cover. If you should lose the fuse cover, please contact your nearest Sony service station. -
Page 7: Table Of Contents
Table of Contents Notes on using your camera ……….10 Preparing the camera Checking the supplied items ……….12 Identifying parts ………….. 13 Front …………….13 Back …………….14 Top …………….15 Sides/Bottom ………….. 16 Lens …………….18 Charging the battery pack ……….19 Inserting the battery pack/memory card (sold separately) ………………
-
Page 8
Using the shooting functions Using the flash …………..41 Adjusting the image brightness ……..43 Selecting the drive mode ……..45 Switching the recording information display (DISP) ..46 Setting image size …………47 Image Size …………..47 Panorama: Size …………47 Using the playback functions Enlarging images …………. -
Page 9
Others List of screen icons …………71 Functions available for each shooting mode ….74 Flash modes available …………. 75 Learning more about the camera ( Handbook) ….. 76 Checking the number of recordable images/ recording time …………77 Specifications …………..81 Index ……………. -
Page 10: Notes On Using Your Camera
Notes on using your camera Shooting procedure • Do not expose the camera to sunlight or shoot toward the sun for extended This camera has 2 modes for monitoring periods of time. The internal mechanism subjects: an LCD screen mode using the may be damaged.
-
Page 11
Notes on using your camera Notes on importing AVCHD movies to On the data specifications described a computer in this manual When importing AVCHD movies to a The data on performance and specifications computer, for Windows computers, use the are defined under the following conditions, “PlayMemories Home”… -
Page 12: Preparing The Camera
Preparing the camera Checking the supplied items First check the model name of your camera (page 11). The accessories supplied differ depending on the model. The number in parentheses indicates the quantity. Supplied with all models • Body cap (1) (Attached to the •…
-
Page 13: Identifying Parts
Identifying parts See the pages in parentheses for details on operation for the parts. Front Shutter button (30) Microphone** Power switch (27) Mode dial (36) Control dial (33, 36) (Flash pop-up) button (41) Self-timer lamp (45) Mounting index (24) Lens contacts* Lens release button (25) Mirror* Focus mode switch (51)
-
Page 14: Back
Identifying parts Back Eyepiece sensors Control button v/V/b/B/DISP (Display Viewfinder* Contents) (46)/WB (White • When you look into the Balance) (54)/ (Drive viewfinder, viewfinder mode is Mode) (45)/ (Picture Effect) activated, and when you move (54) your face away from the viewfinder, viewing mode Control button (Enter)/AF returns to LCD screen mode.
-
Page 15: Top
1)2) Multi interface shoe For details on compatible accessories for the Multi interface shoe, visit the MENU button (55) Sony web site, or consult a Sony Image sensor position dealer or local authorized Sony service facility in your area. mark…
-
Page 16: Sides/Bottom
Identifying parts Sides/Bottom Hooks for shoulder strap m (Microphone) jack • Attach both ends of the strap to • When an external microphone the camera. is connected, the internal microphone is automatically turned off. If the external microphone is a plug-in-power type, the power of the microphone is supplied by the camera.
-
Page 17
Identifying parts Battery insertion slot (21) Battery cover (21) Tripod receptacle • Use a tripod with a screw length of less than 5.5 mm (7/32 inch). You will be unable to firmly secure the camera to tripods with a screw length of 5.5 mm (7/32 inch) or longer, and attempting to do so may damage the camera. -
Page 18: Lens
(Supplied with the SLT-A58Y) • The DT 18-55mm F3.5-5.6 SAM II/DT 55-200mm F4-5.6 SAM/ DT 18-135mm F3.5-5.6 SAM are designed for Sony A-mount cameras (models equipped with an APS-C sized image sensor). You cannot use these lenses on 35mm-format cameras.
-
Page 19: Charging The Battery Pack
Charging the battery pack When using the camera for the first time, be sure to charge the NP- FM500H “InfoLITHIUM” battery pack (supplied). The “InfoLITHIUM” battery pack can be charged even when it has not been fully depleted. The battery pack can also be used when it has not been fully charged.
-
Page 20
Charging the battery pack Connect the battery charger For the U.S.A. and Canada Plug to a wall outlet (wall socket). Light on: Charging Light off: Charge completed About 175 minutes Charging time CHARGE lamp • When charging a fully depleted battery pack at a temperature of 25°C (77°F). -
Page 21: Inserting The Battery Pack/Memory Card (Sold Separately)
Inserting the battery pack/memory card (sold separately) Open the battery cover by sliding the lever. Insert the battery pack completely, using the tip of the battery to press the lock lever. Lock lever Close the cover. Slide and open the memory card cover.
-
Page 22: Insert A Memory Card
Inserting the battery pack/memory card (sold separately) Insert a memory card. • With the notched corner facing in the direction shown, insert the memory card until it clicks into place. Ensure that the notched corner faces the correct direction. Close the cover. To remove the battery pack Turn off the camera and check that the vibration of the camera has stopped and…
-
Page 23: Memory Cards That You Can Use
Inserting the battery pack/memory card (sold separately) To check the remaining battery level The supplied battery pack is a lithium-ion battery pack that can exchange information related to operating conditions with your camera. The remaining battery time in percent figures is displayed according to the operating conditions of your camera.
-
Page 24: Attaching A Lens
Attaching a lens Remove the body cap from Front lens cap the camera and the packaging lid from the rear of the lens. • Quickly change the lens somewhere away from dusty locations so as to keep dust or debris from getting inside the camera.
-
Page 25
Attaching a lens Notes • When attaching a lens, do not press the lens release button. • Do not use force when attaching a lens. • E-mount lenses are not compatible with this camera. • When using a lens equipped with a tripod socket, attach the socket on the lens side to the tripod to maintain balance. -
Page 26
Attaching a lens To attach a lens hood It is recommended that you use a lens hood to reduce flare and ensure optimum image quality. Fit the hood into the mount on the end of the lens barrel and rotate the hood clockwise until it clicks. -
Page 27: Turning On The Camera And Setting The Clock
Turning on the camera and setting the clock When you turn on the camera for the first time, the date/time setup screen appears. Set the power switch to ON to turn on the camera. The screen to set date and time appears. •…
-
Page 28
Turning on the camera and setting the clock Repeat step 4 to set other items, then press the center of the control button. Check that [Enter] is selected, then press the center of the control button. To cancel the date/time setting operation Press the MENU button. -
Page 29: Before Shooting
Before shooting Adjusting the viewfinder’s visual acuity (diopter adjustment) Adjust the diopter-adjustment dial to your eyesight until the display appears clearly in the viewfinder. Notes • The dioptric adjustment attachment (sold separately) cannot be used with this camera. Holding the camera properly Stabilize your upper body and take a position that keeps the camera from moving.
-
Page 30: Shooting And Viewing Images
Shooting and viewing images Shooting still images In [Intelligent Auto] mode, the camera analyzes the subject and allows you to shoot with the appropriate settings. Select when shooting in a location where flash use is restricted. Set the mode dial to (Intelligent Auto) or (Flash Off).
-
Page 31
Shooting still images Press the shutter button halfway down to focus. When the focus is confirmed, z or (Focus indicator) lights up. Focus indicator Press the shutter button fully down to shoot. • When [Auto Object Framing] is set to [Auto] and the camera shoots faces, close-ups, or subjects tracked by [Lock-on AF], the camera… -
Page 32: Recording Movies
Recording movies Press the MOVIE button to MOVIE button start recording. • Movie recording can be started from any exposure mode. • The shutter speed and aperture are adjusted automatically. If you want to set them to particular values, set the mode dial to (Movie) (page 36).
-
Page 33: Playing Back Images
Playing back images Press the button. button MENU button t 1 t [Still/Movie Select] t Select the desired mode • To play back still images, select [Folder View(Still)], and to play back movies, select [Folder View(MP4)] or [AVCHD View], depending on the file format.
-
Page 34: Deleting Images (Delete)
Deleting images (Delete) Once you have deleted an image, the image cannot be restored. Be sure that you do not want the image before deleting it. Display the image you want to delete and press the button. button Select [Delete] using v on the control button, then press the center of the control button.
-
Page 35: Shooting Images To Suit Your Subject
Shooting images to suit your subject Adjusting the angle of the LCD screen Adjust the LCD screen to an easily viewable angle. • The LCD screen tilts down about 55 degrees and up about 135 degrees.
-
Page 36: Selecting A Shooting Mode
Selecting a shooting mode Set the mode dial to the desired shooting mode. The following shooting modes are available: (Intelligent In [Intelligent Auto] mode, the camera analyzes the subject Auto)/ (Flash Off) and allows you to shoot with the appropriate settings. (30) Select [Flash Off] when you want to shoot without the flash.
-
Page 37: Superior Auto
Selecting a shooting mode Superior Auto Set the mode dial to (Superior Auto). Point the camera towards the subject, and adjust the focus and shoot the subject. Scene recognition Scene Recognition icon When the camera recognizes the subject and adjusts itself for shooting conditions, the following information appears on the screen: Scene Recognition icon, appropriate shooting function, and the…
-
Page 38: Scene Selection
Selecting a shooting mode Scene Selection Set the mode dial to (Scene Selection), then press the center of the control button. Select the desired mode using v/V, then press the center of the control button. • To change the scene, press the Fn button, then select another scene. Adjust the focus and shoot the subject.
-
Page 39: Sweep Panorama
Selecting a shooting mode Sweep Panorama Set the mode dial to (Sweep Panorama). Point the camera at the subject for which you want to adjust the brightness and focus, and press the shutter button halfway down. Point the camera at the edge of the composition while pressing the shutter button halfway down, and then press the shutter button…
-
Page 40: Tele-Zoom Cont. Priority Ae
Selecting a shooting mode Tele-zoom Cont. Priority AE Set the mode dial to (Tele-zoom Cont. Priority AE). Adjust the focus and shoot the subjects. • The camera continues to shoot while the shutter button is pressed fully down. • The center area on the screen is cropped and the camera records the images continuously at a maximum of about 8 images per second.
-
Page 41: Using The Shooting Functions
Using the shooting functions Using the flash In dark environments, use the flash to shoot the subject brightly and to prevent camera shake. When shooting against the sun, use the flash to lighten the image of the backlit subject. Fn button t (Flash Mode) t Select the desired setting •…
-
Page 42
Using the flash (Flash Off) Does not fire even if the flash is raised. • You cannot select this item when the mode dial is set to P, A, S, or M. If you do not want to use the flash in these modes, push the flash down. -
Page 43: Adjusting The Image Brightness
Adjusting the image brightness Normally, the exposure is automatically selected (Automatic exposure). Based on the exposure acquired by the automatic exposure, you can perform exposure compensation. You can make the entire image brighter by shifting to the + side. The entire image becomes darker when you shift to the –…
-
Page 44
Adjusting the image brightness Notes • This item cannot be set when the exposure mode is set to [Intelligent Auto], [Superior Auto], or [Scene Selection]. • When the exposure mode is set to M, the exposure can be adjusted only when [ISO] is set to [AUTO]. -
Page 45: Selecting The Drive Mode
Selecting the drive mode You can select the appropriate drive mode, such as single, continuous, or bracket shooting, to suit your purpose. on the control button t Select the desired mode (Single This mode is for normal shooting. Shooting) (Cont. Shooting) The camera records images continuously. (Self-timer) The 10-second self-timer is convenient if the photographer wants to appear in the photo, while the 2-second self-timer is…
-
Page 46: Switching The Recording Information Display (Disp)
Switching the recording information display (DISP) Each time you press DISP on the control button, the recording information display changes as follows. You can set the recording information display separately for viewfinder mode and LCD screen mode. Graphic Display Display All Info. No Disp.
-
Page 47: Setting Image Size
Setting image size Image Size MENU button t 1 t [Image Size] t Select the desired size [Aspect Ratio]: [3:2] Image size Usage guidelines L: 20M 5456 × 3632 pixels For shooting at the highest image quality M: 10M 3872 × 2576 pixels For prints up to A3+ size S: 5.0M 2736 ×…
-
Page 48: Using The Playback Functions
Using the playback functions Enlarging images A still image can be enlarged for closer examination. This is convenient for checking the focus condition of a recorded image. Display the image you want to button enlarge, then press the button. Zoom the image in or out using the button or button.
-
Page 49: Switching To The Image List Display
Switching to the image list display You can display multiple images on the screen simultaneously. Press the button. The image index screen is displayed. • You can select the number of images displayed on one page of the image index screen using [Image Index] in the button Playback menu.
-
Page 50: Viewing Images On A Tv Screen
Viewing images on a TV screen To view images that were recorded on the camera on a TV set, an HDMI cable (sold separately) and an HD TV equipped with an HDMI connector are required. Turn off both your camera and the To the HDMI connector TV, and connect the camera to the…
-
Page 51: Function List
Function list Functions that can be operated using the buttons/switch You can set up or operate various functions using the buttons/switch. For the location of the buttons/switch, see “Identifying parts” (page 13). button (41) Pops the flash up. button (43)/AV button/ Adjusts the exposure./Sets up the aperture value./Scales button (48) an image up when viewing images.
-
Page 52: Selecting A Function Using The Fn (Function) Button
Selecting a function using the Fn (Function) button This button is used for setting up or executing functions used frequently in shooting. Press the Fn button. Select the desired item using v/V/b/B on the control button, then press the center z to execute. The setup screen appears.
-
Page 53: Functions That Can Be Selected Using The Fn (Function) Button
Functions that can be selected using the Fn (Function) button The functions that can be selected using the Fn button are as follows: Scene Selection (38) Selects an appropriate mode from among the Scene Selection preset settings to suit shooting conditions. (Portrait/Sports Action/Macro/Landscape/Sunset/Night Scene/Hand-held Twilight/Night Portrait) Movie…
-
Page 54
Functions that can be selected using the Fn (Function) button White Balance Adjusts the color tone of images. (Auto WB/Daylight/Shade/Cloudy/Incandescent/Fluor.: Warm White/Fluor.: Cool White/Fluor.: Day White/Fluor.: Daylight/Flash/C.Temp./Filter/Custom) DRO/Auto HDR Adjusts the brightness and contrast automatically. (Off/D-Range Opt./Auto HDR) Creative Style Selects the desired image processing. -
Page 55: Functions Selected Using The Menu Button
Functions selected using the MENU button You can set the basic settings for the camera as a whole or execute functions such as shooting, playback, or other operations. Press the MENU button, then set up the desired item using v/V/b/B on the control button, then press the center of the control button.
-
Page 56
Functions selected using the MENU button Long Exposure NR Sets noise reduction processing for shots with a shutter speed of 1 second or longer. (On/Off) High ISO NR Sets noise reduction processing for high-sensitivity shooting. (High/Normal/Low) Flash control Sets the method for determining the intensity of flash output. (ADI flash/Pre-flash TTL) AF Illuminator Sets the AF illuminator, which provides light for a dark scene… -
Page 57
Functions selected using the MENU button Audio Recording Sets whether to record audio when shooting a movie. (On/Off) Wind Noise Reduct. Reduces wind noise during movie recording. (On/Off) Custom menu Eye-Start AF Sets whether to use auto focus when you look through the viewfinder. -
Page 58
Functions selected using the MENU button Peaking Level Enhances the outline of in-focus ranges with a specific color in manual focus mode. (High/Mid/Low/Off) Peaking Color Sets the color used for the peaking function. (Red/Yellow/White) Live View Display Sets whether to display the effect of a function on the screen, such as the effect of the exposure compensation value. -
Page 59
Functions selected using the MENU button Lens Comp.: Compensates for distortion on the screen caused by the Distortion attached lens. (Auto/Off) e-Front Curtain Sets whether or not to use the electronic front curtain shutter Shutter function. (On/Off) Face Registration Registers or changes the person to be given priority when focusing. -
Page 60
Functions selected using the MENU button Memory Card Tool menu Format Formats the memory card. File Number Sets the method used to assign file numbers to still images and MP4 movies. (Series/Reset) Folder Name Sets the folder format for still images. (Standard Form/Date Form) Select REC Folder Changes the selected folder for storing still images and MP4… -
Page 61
Functions selected using the MENU button Power Save Sets the level of the power saving feature. (Max/Standard) Power Saving Start Sets the interval after which power save mode engages. Time (30 Min/5 Min/1 Min/20 Sec/10 Sec) HDMI Resolution Sets the resolution when the camera is connected to an HDMI (Auto/1080p/1080i) CTRL FOR HDMI Operates the camera from a TV that supports “BRAVIA”… -
Page 62: Using The Guide Function Of The Camera
Using the guide function of the camera In-Camera Guide When you press the (In-Camera Guide) button on the Fn (Function) screen or menu screen, a guide for the currently selected function or setting automatically appears. (In-Camera Guide) button To select unavailable functions or settings on the Fn screen, press the center of the control button to display the appropriate setup to enable them.
-
Page 63
Using the guide function of the camera To access all shooting tips You can search through all the shooting tips from the menu. Use this item when you want to read shooting tips you have seen before. MENU button t 3 t [Shooting Tip List]t Select the desired shooting tip… -
Page 64: Viewing Images On A Computer
Viewing images Uploading images to network service on calendar Importing images from your camera Creating a movie Sharing images on disc “PlayMemories Online” Installing “PlayMemories Home” (for Windows only) You can install “PlayMemories Home” from the following URL (page 66): www.sony.net/pm…
-
Page 65: What You Can Do With «Image Data Converter
• “PlayMemories Home” is not compatible with Macs. Use the applications that are installed on your Mac. For details, visit the following URL: http://www.sony.co.jp/imsoft/Mac/ What you can do with “Image Data Converter” With “Image Data Converter,” you can do the following: •…
-
Page 66: Installing The Software
“PlayMemories Home” functions differ from those of “PMB,” use “PlayMemories Home.” Using the Internet browser on your computer, go to the following URL, then click [Install] t [Run]. www.sony.net/pm Follow the instructions on the screen to complete the installation.
-
Page 67: Installing «Image Data Converter
PlayMemories Home support page (English only): http://www.sony.co.jp/pmh-se/ Installing “Image Data Converter” Using the Internet browser on your computer, go to the following URL. For Windows: http://www.sony.co.jp/imsoft/Win/ For Mac: http://www.sony.co.jp/imsoft/Mac/ Follow the instructions on the screen to complete the installation. Viewing “Image Data Converter Guide”…
-
Page 68: Installing «Remote Camera Control
• You can record an image directly to the computer. • You can perform Interval Timer Shooting. Using the Internet browser on your computer, go to the following URL. For Windows: http://www.sony.co.jp/imsoft/Win/ For Mac: http://www.sony.co.jp/imsoft/Mac/ Follow the instructions on the screen to complete the installation.
-
Page 69: Selecting The Method For Creating A Movie Disc
Record setting available Disc type/usage Player Blu-ray disc playback devices (Sony Blu-ray disc player, PlayStation®3, etc.) To keep high-definition image quality (HD) AVCHD format playback devices (Sony Blu-ray disc player, –*…
-
Page 70: Creating A Disc Using A Computer
• To create Blu-ray discs using “PlayMemories Home,” install our proprietary add-on software. For details, access the following URL: http://support.d-imaging.sony.co.jp/BDUW/ • PlayStation®3 may not be available in some countries/regions. • Movies recorded with the [60i 24M(FX)]/[50i 24M(FX)] or [24p 24M(FX)]/[25p 24M(FX)] setting in [Record Setting] are converted by “PlayMemories Home”…
-
Page 71: List Of Screen Icons
Others List of screen icons Graphic Display (LCD screen) Display Indication Exposure mode (36) P A S M Display All Info. (LCD screen) Scene Recognition icons (37) Memory card (21)/ Upload (61) Remaining number of recordable images For playback (Basic information Aspect ratio of still display) images (55)
-
Page 72
List of screen icons Display Indication Flash charge in progress Display Indication (41) REC 0:12 Recording time of the Setting Effect OFF (58) movie (m:s) No audio recording of Focus (31) movies (57) 1/250 Shutter speed SteadyShot/Camera F4.0 Aperture shake warning EV scale (43) (Only for viewfinder) SteadyShot error… -
Page 73
List of screen icons Display Indication Face Detection (53)/ Smile Shutter (53) Auto Object Framing (53) Smile Detection Sensitivity indicator Display Indication Metering mode (53) Flash compensation (53) White balance (Auto, Preset, Custom, Color temperature, Color filter) (54) 7500K A5 G5 D-Range Optimizer/Auto HDR (54) Creative Style (54)/… -
Page 74: Functions Available For Each Shooting Mode
Functions available for each shooting mode The functions you can use depend on the selected shooting mode. In the table below, indicates the function is available, and a – indicates the function is not available. The functions you cannot use are displayed in gray on the screen. Auto Exposure Cont.
-
Page 75: Flash Modes Available
Flash modes available The flash modes you can select depend on the shooting mode and functions selected. In the table below, indicates the function is selectable, and a – indicates the function is not selectable. The flash modes you cannot select are displayed in gray on the screen. (Fill- (Slow (Rear…
-
Page 76: Learning More About The Camera ( Handbook)
( Handbook) The “ Handbook” can be downloaded from the Internet. Refer to the “ Handbook” for in-depth instructions on the many camera functions. Access the Sony support page. http://www.sony.net/SonyInfo/Support/ Select your country or region. Search for the model name of your camera within the support page.
-
Page 77: Checking The Number Of Recordable Images/Recording Time
The table shows the approximate number of images that can be recorded on a memory card formatted on this camera. The values are defined using Sony standard memory cards for testing. The values may vary depending on the shooting conditions and the type of memory card used.
-
Page 78
– Using a battery pack that is charged for an hour after the CHARGE lamp goes out. – Using Sony “Memory Stick PRO Duo” media (sold separately). • The number of still images is based on the CIPA standard under the following conditions. -
Page 79: Available Recording Time For A Movie
Checking the number of recordable images/recording time – Continuous movie recording: When the limit of the continuous movie recording (29 minutes) is reached, press the MOVIE button and continue recording. No other operations such as zoom are performed. Available recording time for a movie The table below shows the approximate total recording times using a memory card formatted on this camera.
-
Page 80: Notes On Continuous Movie Recording
Checking the number of recordable images/recording time Notes on continuous movie recording • It requires a great deal of power to perform high quality movie recording or continuous shooting using the APS-C size image sensor. Therefore, if you continue to shoot, the temperature inside the camera will rise, especially that of the image sensor.
-
Page 81: Specifications
Specifications Camera [System] Camera Type Interchangeable Lens Digital Camera Lens A-mount lens [Image sensor] Image format 23.2 mm×15.4 mm (APS-C format), CMOS image sensor Total pixel number of image sensor Approx. 20 400 000 pixels Effective pixel number of camera Approx.
-
Page 82
Specifications Diopter Adjustment –4.0 m –1 to +4.0 m –1 (diopter) [LCD screen] LCD panel 6.7 cm (2.7 type) TFT drive/Clear Photo LCD screen Total number of dots 460 800 dots [Exposure control] Metering Cell “Exmor” CMOS sensor Metering method 1 200-zone evaluative metering Metering Range –2 EV to +17 EV (at ISO 100 equivalent with F1.4… -
Page 83
5 images/RAW: 6 images [Image zooming playback] Scaling range Image size: L: Approx. ×1.0 – ×15.4/M: Approx. ×1.0 – ×11.2/S: Approx. ×1.0 – ×7.7 [Recording format] File format JPEG-compliant (DCF Ver. 2.0, Exif Ver. 2.3, MPF Baseline), RAW (Sony’s exclusive ARW2.3 format) -
Page 84
Specifications Movie (AVCHD format) AVCHD format Ver. 2.0 compatible Video: MPEG-4 AVC/H.264 Audio: Dolby Digital 2ch, equipped with Dolby Digital Stereo Creator • Manufactured under license from Dolby Laboratories. Movie (MP4 format) Video: MPEG-4 AVC/H.264 Audio: MPEG-4 AAC-LC 2ch [Recording media] “Memory Stick XC Duo”… -
Page 85
Specifications On image data compatibility • This camera conforms with the DCF (Design rule for Camera File system) universal standard established by JEITA (Japan Electronics and Information Technology Industries Association). • Playback on other equipment of images recorded using your camera and playback on your camera of images recorded or edited using other equipment are not guaranteed. -
Page 86
Specifications Lens DT 18-55mm DT 55-200mm DT 18-135mm Name (Model name) F3.5-5.6 SAM II F4-5.6 SAM F3.5-5.6 SAM (SAL18552) (SAL55200-2) (SAL18135) Equivalent 35mm- format focal length* 27–82.5 82.5–300 27–202.5 (mm) Lens groups-elements 7–8 9–13 11–14 Angle of view* 76°-29° 29°-8° 76°-12°… -
Page 87
Specifications On focal length The picture angle of this camera is narrower than that of a 35 mm-format camera. You can find the approximate equivalent of the focal length of a 35 mm- format camera and shoot with the same picture angle by increasing the focal length of your lens by half. -
Page 88
Specifications Trademarks • Mac and Mac OS are trademarks or registered trademarks of Apple Inc. • is a trademark of Sony • Intel, Intel Core, MMX, and Corporation. Pentium are trademarks or • “Memory Stick,” , “Memory registered trademarks of Intel Stick PRO,”… -
Page 89
Specifications • The application for PlayStation 3 requires PlayStation Network account and application download. Accessible in areas where the PlayStation Store is available. -
Page 90: Index
Index Index Demo Mode ……. 61 Digital Zoom……55 AEL w/ shutter ……56 Diopter-adjustment ….29 AF area ……..53 Disc creation ……69 AF Illuminator ……56 DISP……….. 46 AF Track. Duration ….56 DISP Button(Finder)….57 Aperture Priority……36 DISP Button(Monitor) ….57 Area Setting ……..28 Display ……..
-
Page 91
Index Format ……..60 Long Exposure NR….. 56 Func. of AEL button ….58 Function button ….52, 53 Mac……….67 Macro ……… 38 Graphic Display ……46 Manual Exposure ……. 36 Grid Line……..57 Memory card ……21 MENU ……..55 Menu ………. -
Page 92
Index Program Auto ……36 Specifications……81 Protect………59 Specify Printing ……59 Sports Action ……38 SteadyShot ……… 56 Quality ……..55 Still/Movie Select …… 59 Strap ……….. 16 Sunset……… 38 Rear Sync……..42 Superior Auto……37 Record Setting ……56 Sweep Panorama……39 Recording information display …46 Recording movies …….32 Recover Image DB …..60… -
Page 93
Index… -
Page 94
Index… -
Page 95
Index… -
Page 96
Additional information on this product and answers to frequently asked questions can be found at our Customer Support Website. Printed using VOC (Volatile Organic Compound)-free vegetable oil based ink. © 2013 Sony Corporation Printed in Thailand…

Данная инструкция на русском языке предназначена для фотокамеры
Sony Alpha SLT-A58, описывает принцип работы и основные моменты эксплуатации устройства.
Производитель настойчиво рекомендует перед включением фотокамеры
внимательно изучить настоящую инструкцию.
Инструкция для фотокамеры
представлена в формате PDF. Все современные браузеры уже поддерживают данный формат и сложностей с открытием файла возникнуть не должно.
Но если открыть инструкцию все же не удается, то необходимо установить на компьютер программу для чтения PDF файлов, например, Acrobat Reader. Если у вас возникли сложности с открытием инструкции на смартфоне под управлением Android, нужно установить, например, Adobe Acrobat Reader.
Комментарии (0)
Комментарии про другие Фотокамеры
Другие Фотокамеры Sony