Sony ICF-C218 Dream Machine — радиочасы с одним будильником FM/AM, которые предлагают различные типы будильников, включая радио и зуммер. Если установлено автоматическое время, текущее время будет отображаться при первом включении часов (только модель для Великобритании). Модель для Великобритании также имеет автоматическую настройку перехода на летнее/летнее время, а австралийская модель имеет кнопку перехода на летнее/летнее время для настройки перехода на летнее/летнее время. Часы также оснащены кнопкой даты для отображения месяца, дня и года, а также расширенной функцией повтора, которая позволяет вам вздремнуть до 60 минут. Для обеспечения безопасного использования в руководстве содержится несколько предупреждений и мер предосторожности, в том числе не подвергать устройство воздействию дождя или влаги, не открывать корпус и не устанавливать устройство в замкнутом пространстве. Руководство также содержит советы по устранению неполадок и инструкции по установке и замене резервной батареи. Для тех, кто использует модель для Великобритании, в руководстве объясняется, как установить часы в первый раз и как отменить или активировать автоматическую настройку летнего/летнего времени. В целом руководство Sony Dream Machine Manual содержит исчерпывающие инструкции и информацию о том, как эффективно и безопасно использовать эти радиочасы.
Машина мечты Sony ICF-C218

Особенности
- Одиночный будильник FM/AM Часы-радио.
- Различные виды сигнализации — радио и зуммер.
- Автоматическая установка времени — при первом включении часов на дисплей будет отображаться текущее время (только модель для Великобритании).
- Автоматический переход на летнее/летнее время (только модель для Великобритании).
- Кнопка перехода на летнее/летнее время для перехода на летнее/летнее время (для модели для Австралии).
- Кнопка даты для отображения месяца, дня и года.
- Резервный аккумулятор для поддержания часов во время отключения питания с установленной батареей CR2032 (для модели для Великобритании)/входит в комплект поставки (для модели для Австралии).
- Расширяемый повтор — время повтора можно увеличить с 10 до 60 минут при каждом использовании.


ПРЕДУПРЕЖДЕНИЕ
- Чтобы снизить риск возгорания или поражения электрическим током, не подвергайте устройство воздействию дождя или влаги.
- Во избежание поражения электрическим током не открывайте корпус.
- Обратитесь за обслуживанием только к квалифицированному персоналу.
- Не устанавливайте прибор в ограниченном пространстве, например в книжном шкафу или встроенном шкафу.
- Во избежание возгорания или поражения электрическим током не ставьте на устройство предметы, наполненные жидкостью, например вазы.
- Подключите устройство к легкодоступной розетке переменного тока. Если вы заметили неисправность в устройстве, немедленно отсоедините вилку сетевого шнура от розетки переменного тока.


ПРЕДУПРЕЖДЕНИЕ
Аккумулятор может взорваться при неправильном обращении. Не перезаряжайте, не разбирайте и не бросайте в огонь.
Меры предосторожности
- Работайте с устройством от источника питания, указанного в «Технических характеристиках».
- Паспортная табличка с указанием рабочего объемаtage и т. д. находится в нижней части устройства.
- Чтобы отсоединить шнур питания (сетевой шнур), вытаскивайте его за вилку, а не за шнур.
- Устройство не отключается от источника питания переменного тока (сети), пока оно подключено к розетке, даже если само устройство было выключено.
- Обеспечьте адекватную циркуляцию воздуха для предотвращения внутреннего перегрева. Не ставьте устройство на поверхность (коврик, одеяло и т. Д.) Или рядом с материалами (занавеской), которые могут блокировать вентиляционные отверстия.
- Если какой-либо твердый предмет или жидкость попали внутрь устройства, отключите устройство от сети и проверьте его с помощью квалифицированного персонала перед дальнейшей эксплуатацией.
- Для очистки корпуса используйте мягкую ткань d.ampс мягким раствором моющего средства.
- Не подключайте провод антенны к внешней антенне.
- Во избежание возгорания не закрывайте вентиляционные отверстия аппарата газетами, скатертями, занавесками и т. д. Не ставьте на аппарат зажженные свечи.
Характеристики
Отображение времени
12-часовая система
Диапазон частот
- Динамик
- прибл. Диаметр 6.6 см (2 5/8 дюйма), 8 Ом
- Выходная мощность
- 150 мВт (при 10% гармонических искажений)
- Требования к питанию
- 230 В переменного тока, 50 Гц
- Для резервного питания: 3 В постоянного тока, одна батарея CR2032
- 230 В переменного тока, 50 Гц
- Габаритные размеры:
- прибл. 155 × 64.5 × 150 мм (ш/в/г) (6 1/8 × 2 5/8 × 6 дюймов), вкл. выступающие части и элементы управления
- Масса
- прибл. 513.2 г (1 фунт 2.1 унции), вкл. CR2032
- батарея: модель для Великобритании
- прибл. 498.2 г (1 фунт 1.6 унции), вкл. CR2032
- батарея: модель для Австралии
Дизайн и технические характеристики могут быть изменены без предварительного уведомления.
Решение Проблем
- В случае возникновения какой-либо проблемы с устройством выполните следующие простые проверки, чтобы определить, требуется ли техническое обслуживание.
- Если проблема не устранена, обратитесь к ближайшему дилеру Sony.
- На часах мигает надпись «AM 12:00» из-за отключения электроэнергии.
- Батарея разряжена. Замените батарею. Удалите старую батарею и установите новую.
- Сигнал радио или зуммера не звучит в установленное время.
- Был ли активирован нужный радиосигнал или зуммер? (т.е. загорается ли индикатор ALARM?)
- Радиобудильник активирован, но в установленное время будильника не звучит.
- ГРОМКОСТЬ отрегулирована?
О резервной батарее
Чтобы сохранить хорошее время, в качестве резервного источника питания, это устройство имеет одну батарею CR2032 внутри устройства в дополнение к домашнему току (батарея поставляется с устройством для модели для Австралии). Батарея поддерживает часы в случае отключения электроэнергии.
Когда нужно заменить аккумулятор
Когда батарея становится слабой, “![]() На дисплее появится индикатор ». В случае сбоя питания, когда батарея разряжена, функции текущего времени и будильника будут инициализированы. Замените батарею литиевой батареей Sony CR2032. Использование другой батареи может привести к пожару или взрыву.
На дисплее появится индикатор ». В случае сбоя питания, когда батарея разряжена, функции текущего времени и будильника будут инициализированы. Замените батарею литиевой батареей Sony CR2032. Использование другой батареи может привести к пожару или взрыву.
Примечание для клиентов в Великобритании
Часы настроены на заводе, а их память питается от предустановленной батарейки Sony CR2032. Если на дисплее мигает «AM 12:00» при первом подключении устройства к розетке переменного тока, возможно, батарея разряжена. В этом случае обратитесь к дилеру Sony. Предустановленная батарея CR2032 считается частью продукта и на нее распространяется гарантия. Вам необходимо предъявить «Примечание для покупателей в Великобритании» (в этой инструкции) дилеру Sony, чтобы подтвердить гарантию на этот продукт.
Установка и замена резервной батареи
- Держите вилку переменного тока подключенной к розетке переменного тока, выкрутите винт, который крепит батарейный отсек в нижней части устройства с помощью отвертки, и снимите батарейный отсек. (См. рис. А-1)
- Вставьте новую батарею в батарейный отсек стороной e вверх.
- Чтобы извлечь батарею из батарейного отсека, выдвиньте ее со стороны с надписью PUSH. (См. рис. А-2)
- Вставьте батарейный отсек обратно в устройство и закрепите его винтом. (См. рис. А-3)
- При замене батареи нажмите RADIO ON, чтобы выключить индикатор «E» на дисплее.
Внимание
- При замене батареи не отсоединяйте вилку переменного тока от сетевой розетки. В противном случае текущее время и будильник будут инициализированы.
ПРИМЕЧАНИЯ ПО ЛИТИЕВОЙ БАТАРЕИ
- Храните литиевую батарею в недоступном для детей месте.
- В случае проглатывания батареи немедленно обратитесь к врачу.
- Протрите аккумулятор сухой тканью, чтобы обеспечить хороший контакт.
- При установке батареи обязательно соблюдайте полярность.
- Не держите батарею металлическим пинцетом, иначе может произойти короткое замыкание.
- Не подвергайте аккумулятор чрезмерному нагреванию, например, от прямых солнечных лучей, огня и т.п.
ВНИМАНИЕ!
Опасность взрыва при неправильной замене батареи. Заменяйте только на тот же или эквивалентный тип, рекомендованный производителем оборудования.
Предупреждение о разряде батареи
Если устройство будет оставаться отключенным от сети в течение длительного времени, извлеките аккумулятор, чтобы избежать чрезмерного разряда аккумулятора и повреждения устройства из-за протечки аккумулятора.
Установка часов в первый раз (только модель для Великобритании)
Это устройство настроено на текущую дату и время на заводе и питается от резервной батареи. Все, что вам нужно сделать в первый раз, это просто подключить его.
Подключите устройство.
«месяц и число» (около 1 секунды) t «год» (около 1 секунды) t «текущее время» появляются на дисплее по очереди.
Внимание
Во время транспортировки и первого использования может произойти ошибка часов. В этом случае обратитесь к разделу «Установка часов и даты», чтобы установить правильное время.
Когда начинается переход на летнее время (летнее время)
В следующих моделях используется автоматический переход на летнее/летнее время. Индикатор DST на дисплее появляется на дисплее в начале перехода на летнее время (летнее время) и исчезает в его конце. Автоматическая настройка летнего/летнего времени основана на
GMT (время по Гринвичу).
- Летнее время начинается в: 1:00 в последнее воскресенье марта.
- Стандартное время начинается в 2 часа ночи последнего воскресенья октября.
Чтобы отменить автоматическую настройку перехода на летнее/летнее время и установить отображение летнего времени вручную
Автоматическую настройку летнего/летнего времени можно отменить. Нажмите и удерживайте DST более 3 секунд, пока отображаются часы. Раздастся звуковой сигнал, и на дисплее появится сообщение «Aut t OFF», показывая, что автоматическая настройка летнего/летнего времени отменена. Дисплей возвращается к часам.
Заметки
- Время изменения автоматической настройки перехода на летнее/летнее время, используемое устройством (см. выше), зависит от обстоятельств и законодательства в каждой стране/регионе. В таком случае отмените автоматическую настройку летнего времени/летнего времени и при необходимости установите отображение летнего времени вручную. Клиент, проживающий в стране/регионе, где не введено летнее время (летнее время), должен отменить автоматическую настройку летнего/летнего времени перед использованием устройства.
- Чтобы снова активировать автоматическую настройку летнего/летнего времени, нажмите и удерживайте кнопку DST более 3 секунд. Раздастся звуковой сигнал, и на дисплее появится надпись «Aut t On», указывающая на то, что активирована автоматическая настройка перехода на летнее/летнее время. Дисплей возвращается к часам.
- Чтобы вручную переключить дисплей на летнее время (летнее время), см. раздел «Чтобы перевести дисплей на летнее время (летнее время)».
Установка часов и даты
Выполните процедуру, начиная с шага 1, для австралийской модели. Чтобы изменить настройку для модели для Великобритании, выполните процедуру, начиная с шага 2.
- Подключите устройство.
- На дисплее будет мигать «AM 12:00».
- Нажмите CLOCK и удерживайте более 2 секунд.
- Вы услышите звуковой сигнал, и на дисплее начнет мигать год.
- Нажимайте + или – до тех пор, пока на дисплее не появится правильный год.
- Нажмите ЧАСЫ.
- Повторите шаги 3 и 4, чтобы установить месяц, день и время.
- После установки времени раздаются два коротких звуковых сигнала, и часы начинают отсчет с 0 секунд.
- Нажатие и удержание + или – быстро изменяет год, месяц или день.
- При установке текущего времени время быстро меняется с шагом в 1 минуту до 10 минут, а затем с шагом в 10 минут.
- При установке часов вы должны выполнить каждый шаг в течение 65 секунд, иначе режим установки часов будет отменен.
Для отображения года и даты
Нажмите SNOOZE/DATE/SLEEP OFF один раз, чтобы установить дату, и в течение примерно 3 секунд снова нажмите ее, чтобы указать год. Дисплей показывает дату или год в течение примерно 3 секунд, а затем возвращается к текущему времени. Если подключить вилку переменного тока к розетке переменного тока, когда данное устройство питается от резервного источника питания, текущая дата и время отображаются в следующем порядке. (То же самое, что и при включении устройства после сбоя питания.) «месяц и число» (около 1 секунды) t «год» (около 1 секунды) t «текущее время»
Для переключения дисплея на индикацию перехода на летнее время (летнее время)
- Измените настройку настройки летнего времени (летнего времени) в соответствии со следующими процедурами, если:
- у вас есть австралийская модель.
- вы отменили автоматическую настройку летнего/летнего времени.
Нажмите летнее время.
На дисплее появится индикатор DST, и индикация времени изменится на летнее время (летнее время). Чтобы деактивировать настройку летнего времени (летнего времени), снова нажмите DST.
Управление радио
- Нажмите RADIO ON, чтобы включить радио.
- Отрегулируйте громкость с помощью VOLUME.
- Выберите ДИАПАЗОН.
- Настройтесь на станцию с помощью TUNING.
Чтобы выключить радио Нажмите RADIO OFF/ALARM RESET.
Улучшение приема
FM:
Полностью растяните проволочную FM-антенну, чтобы повысить чувствительность приема.
AM:
Поверните устройство горизонтально для оптимального приема. В устройство встроена ферритовая AM-антенна.

Установка будильника
Функцию будильника можно выбрать из двух звуков будильника, РАДИО или ЗУММЕРА.
Заметки
- Перед установкой будильника обязательно установите часы (см. «Установка часов и даты»).
- Заводская настройка времени будильника: «PM 12:00».
- Чтобы установить будильник радио, сначала настройтесь на станцию и отрегулируйте громкость (см. «Работа с радио»).
Чтобы установить время будильника
- Установите РЕЖИМ БУДИЛЬНИКА на желаемый звук будильника (РАДИО или ЗУММЕР). На несколько секунд появится время будильника, а затем на дисплее загорится индикатор ALARM. (Он не появляется, когда переключатель установлен в положение OFF.)
- Сдвиньте кнопку УСТАНОВКА ВРЕМЕНИ БУДИЛЬНИКА + или –, чтобы установить желаемое время. Каждый слайд ALARM TIME SET + или – изменяет индикацию на 1 минуту. Если вы продолжаете двигать УСТАНОВКА ВРЕМЕНИ БУДИЛЬНИКА + или –, время будильника будет двигаться вперед (или назад) на 1 минуту до 10 минут, а затем с шагом в 10 минут. Во время установки времени будильника на дисплее мигает индикатор ALARM.


Когда операция установки времени будильника завершена, через несколько секунд дисплей возвращается к часам, а индикатор ALARM перестает мигать и полностью горит.
- Когда РЕЖИМ БУДИЛЬНИКА установлен на РАДИО или ЗУММЕР, настройку времени будильника можно изменить с помощью УСТАНОВКА ВРЕМЕНИ БУДИЛЬНИКА. Один слайд ALARM TIME SET отображает время будильника в течение примерно 4 секунд. Регулируя УСТАНОВКУ ВРЕМЕНИ БУДИЛЬНИКА, когда время будильника отображается на дисплее, время будильника будет изменено.
- На дисплее мигает индикатор ALARM, пока: – На дисплее отображается время будильника. – Звучит сигнал тревоги. – Функция повтора включена.
- Настройка времени будильника не может быть изменена, если для параметра РЕЖИМ БУДИЛЬНИКА установлено значение ВЫКЛ. Если настроена УСТАНОВКА ВРЕМЕНИ БУДИЛЬНИКА, на дисплее примерно на 0.5 секунды появится надпись «OFF».
- ЧАСЫ и DST недоступны, пока звучит будильник или включена функция повтора.
- Функция будильника работает, как обычно, в начале и конце дня перехода на летнее время (летнее время). Пока установлена автоматическая настройка летнего/летнего времени (отрывок для австралийской модели), в результате, если будильник установлен на время, пропущенное при переходе на летнее время (летнее время), будильник пропускается или если будильник устанавливается на время, перекрывающееся, когда заканчивается летнее время (летнее время), будильник звучит дважды.
Задремать еще несколько минут
Нажмите SNOOZE/DATE/SLEEP OFF. Звук выключится, но автоматически включится снова примерно через 10 минут. Каждый раз, когда вы нажимаете SNOOZE/DATE/SLEEP OFF, время повтора изменяется следующим образом:![]() Максимальная продолжительность времени повтора составляет 60 минут. Дисплей показывает время повтора в течение примерно 4 секунд и возвращается к отображению текущего времени. При нажатии кнопки SNOOZE/DATE/SLEEP OFF после появления текущего времени время повтора снова начинается с 10 минут.
Максимальная продолжительность времени повтора составляет 60 минут. Дисплей показывает время повтора в течение примерно 4 секунд и возвращается к отображению текущего времени. При нажатии кнопки SNOOZE/DATE/SLEEP OFF после появления текущего времени время повтора снова начинается с 10 минут.
Чтобы остановить будильник
- Нажмите RADIO OFF/ALARM RESET, чтобы выключить будильник.
- Будильник сработает снова в то же время на следующий день.
- Если не нажать RADIO OFF/ALARM RESET, будильник будет звучать непрерывно в течение примерно 60 минут, а затем автоматически выключится.
Чтобы отключить будильник
Установите РЕЖИМ БУДИЛЬНИКА в положение ВЫКЛ. Индикатор ALARM исчезнет с дисплея. Примечание о тревоге в случае перебоя в подаче питания Если в случае перебоя в подаче питания наступает установленное время подачи будильника или перебой в подаче электроэнергии происходит во время звучания будильника, дисплей выключается, а будильник не звучит, а состояние будильника будет следующим. Если питание вернется в течение 60 минут после установленного времени будильника, сработает сигнал. Если прерывание питания произошло во время работы функции повтора, функция повтора продолжится. Если время повтора прошло, когда произошло прерывание питания, сигнал тревоги прозвучит после восстановления питания. В этом состоянии, если индикатор E не горит, доступны кнопки RADIO OFF/ALARM RESET, SNOOZE и ALARM MODE. Время SNOOZE будет установлено только на 10 минут, если кнопка SNOOZE была нажата.
Установка таймера сна
- Вы можете засыпать под радио, используя встроенный таймер сна, который автоматически выключает радио по истечении заданного времени.
- Нажмите СОН.

- Радио включается. Вы можете установить таймер сна на продолжительность 90, 60, 30 или 15 минут. Каждое нажатие изменяет дисплей следующим образом:
- Когда дисплей возвращается к «90», раздаются два коротких звуковых сигнала.
- Радио будет играть в течение установленного вами времени, а затем выключится.
- Чтобы выключить радио раньше установленного времени
- Нажмите RADIO OFF/ALARM RESET или SNOOZE/DATE/SLEEP OFF.

Использование таймера сна и будильника
- Вы можете заснуть под радио, а также проснуться от радио или зуммера в заданное время.
- Поставить будильник. (См. «Установка будильника».)
- Установите таймер сна. (См. «Настройка таймера сна».)
Утилизация старого электрического и электронного оборудования (применимо в Европейском Союзе и других европейских странах с системами раздельного сбора отходов)
Этот символ на продукте или его упаковке указывает на то, что этот продукт нельзя утилизировать как бытовые отходы. Вместо этого его следует сдать в соответствующий пункт сбора для утилизации электрического и электронного оборудования. Обеспечив правильную утилизацию этого продукта, вы поможете предотвратить потенциальные негативные последствия для окружающей среды и здоровья человека, которые в противном случае могли бы быть вызваны неправильным обращением с отходами этого продукта. Переработка материалов поможет сохранить природные ресурсы. Для получения более подробной информации об утилизации этого изделия обратитесь в местное управление по делам гражданского общества, в службу утилизации бытовых отходов или в магазин, где вы приобрели изделие. Если у вас есть какие-либо вопросы или проблемы, связанные с вашим устройством, обратитесь к ближайшему дилеру Sony.
ТЕХНИЧЕСКИЕ ХАРАКТЕРИСТИКИ
| Особенность | Описание |
|---|---|
| наименование товара | Машина мечты Sony ICF-C218 |
| Типы тревог | Одиночный будильник Радиочасы FM/AM с различными типами будильника, включая радио и зуммер |
| Автоматическая установка времени | Текущее время будет отображаться при первом подключении часов (только модель для Великобритании). |
| Автоматическая настройка летнего/летнего времени | Автоматическая регулировка для модели для Великобритании, кнопка перехода на летнее время для модели для Австралии |
| Date Display | Кнопка даты для отображения месяца, дня и года |
| Аккумулятор | Батарея CR2032 для модели для Великобритании, поставляется для модели для Австралии |
| Функция повтора | Расширяемая функция повтора позволяет вздремнуть до 60 минут |
| Предупреждения и меры предосторожности | Не подвергать воздействию дождя и влаги, не открывать корпус, не устанавливать в замкнутом пространстве, не ставить на аппарат предметы, наполненные жидкостью, подключать к легкодоступной розетке переменного тока, не закрывать вентиляционные отверстия предметами, не ставить зажженные свечи на аппарат |
| Отображение времени | 12-часовая система |
| Диапазон частот | FM / AM |
| Динамик | прибл. Диаметр 6.6 см (2 5/8 дюйма), 8 Ом |
| Выходная мощность | 150 мВт (при 10% гармонических искажений) |
| Требования к питанию | 230 В переменного тока, 50 Гц для питания, 3 В постоянного тока для резервного аккумулятора |
| Габаритные размеры: | прибл. 155 × 64.5 × 150 мм (ш/в/г) (6 1/8 × 2 5/8 × 6 дюймов), вкл. выступающие части и элементы управления |
| Масса | прибл. 513.2 г (1 фунт 2.1 унции), вкл. Батарея CR2032 для модели для Великобритании, прибл. 498.2 г (1 фунт 1.6 унции), вкл. Батарея CR2032 для австралийской модели |
FAQS
Как установить время на Sony ICF-C218 Dream Machine?
Если вы используете модель для Великобритании, текущее время будет отображаться автоматически при первом подключении часов. Если нет, вы можете установить время, нажав и удерживая кнопку CLOCK более 2 секунд. Используйте кнопки TUNING/TIME SET +/- для настройки часов и минут, затем снова нажмите CLOCK для подтверждения.
Как активировать или отменить автоматическую настройку летнего/летнего времени?
Если вы используете модель для Великобритании, часы имеют автоматическую настройку летнего/летнего времени. Чтобы отменить или активировать эту функцию, нажмите и удерживайте кнопку перехода на летнее время более 3 секунд, пока отображаются часы. Прозвучит звуковой сигнал, и на дисплее появится надпись «Aut t OFF», показывая, что автоматическая настройка летнего времени/летнего времени отменена. Чтобы активировать его снова, нажмите и удерживайте DST более 3 секунд.
Как настроить переход на летнее/летнее время на австралийской модели?
В австралийской модели есть кнопка перехода на летнее/летнее время для перехода на летнее/летнее время. Нажмите и удерживайте DST более 2 секунд, чтобы войти в режим настройки летнего времени. Используйте кнопки TUNING/TIME SET +/- для настройки часов и минут, затем снова нажмите DST для подтверждения.
Как отображать дату на Sony ICF-C218 Dream Machine?
Нажмите кнопку DATE, чтобы отобразить месяц, день и год.
Как использовать функцию повтора на Sony ICF-C218 Dream Machine?
Функция повтора позволяет вам вздремнуть до 60 минут. Когда прозвучит сигнал будильника, нажмите SNOOZE, чтобы активировать функцию повтора. Каждый раз, когда вы нажимаете SNOOZE, время повтора будет увеличиваться на 10 минут, максимум до 60 минут.
Как установить или заменить резервную батарею?
Держите вилку переменного тока подключенной к розетке переменного тока, выкрутите винт, который крепит батарейный отсек в нижней части устройства с помощью отвертки, и снимите батарейный отсек. Вставьте новую батарею в батарейный отсек стороной e вверх. Чтобы извлечь батарею из батарейного отсека, выдвиньте ее со стороны с надписью PUSH. Вставьте батарейный отсек обратно в устройство и закрепите его винтом.
Что делать, если часы мигают «AM 12:00» из-за отключения электроэнергии?
Если часы мигают «AM 12:00» из-за сбоя питания, переустановите часы, нажав и удерживая кнопку CLOCK более 2 секунд. Используйте кнопки TUNING/TIME SET +/- для настройки часов и минут, затем снова нажмите CLOCK для подтверждения.
Что делать, если радио или зуммер не сработали в заданное время?
Проверьте, активирована ли нужная радиосвязь или зуммер, посмотрев на индикатор ALARM. Если он не активирован, нажмите ALARM MODE, чтобы выбрать нужный тип будильника и установить время будильника.
Как почистить корпус Sony ICF-C218 Dream Machine?
Используйте мягкую ткань dampс мягким раствором моющего средства для очистки корпуса. Не используйте абразивные чистящие средства, растворители или химикаты.
Что делать, если в устройство попал какой-либо твердый предмет или жидкость?
Перед дальнейшей эксплуатацией отключите устройство от сети и передайте его для проверки квалифицированному персоналу.
Какой тип батареи используется в качестве резервного источника питания на Sony ICF-C218 Dream Machine?
Резервным источником питания Sony ICF-C218 Dream Machine является батарея CR2032.
Как узнать, что пора заменить резервную батарею?
Когда батарея разряжается, на дисплее появляется индикатор «E». В случае сбоя питания при низком заряде батареи будут инициализированы функции текущего времени и будильника. Замените батарею литиевой батареей Sony CR2032.
Как подтвердить гарантию на предустановленную батарею CR2032 в модели для Великобритании?
Вам необходимо предъявить «Примечание для покупателей в Великобритании» (в этой инструкции) дилеру Sony, чтобы подтвердить гарантию на предустановленную батарею CR2032.

ICF-C273 3-263-574-44(1) CED PL/CZ/HU/SK/RU/UA ICF-C273 3-263-574-44(1) CED PL/CZ/HU/SK/RU/UA
Aby wyświetlić rok i datę
SNOOZE/DATE/
SLEEP OFF
Aby zmienić wyświetlenie nawskazanie czasu letniego
D.S.T./SUMMER T
„
”
D.S.T./SUMMER T.
Aby nastawić jasnośćpodświetlenia wyświetlacza
ENTER/
BRIGHTNESS
Zmiana odstępu
kanałowego AM (MW)
Obszar Odstęp kanałowy
1
OFF/ALARM RESET
2 OFF/ALARM RESETON/BAND
2
Uwagi
•
•
Obsługa radia
— Strojenie ręczne1 ON/BAND
2 ON/BAND
ICF-C273
ICF-C273L
„
”
3 TUNING +–
4 VOLUME
• OFF/
ALARM RESET
•
v
•
TUNING +
– ON/BAND
Poprawa jakości
odbioru
FM:
AM (MW)/LW:
Programowanie
ulubionej stacji
— strojenie zaprogramowane
3-263-574-44(1)Sznur sieciowySí�ová napájecí šňůraHálózati tápkábelVOLUME
Obok regulatora głośności znajduje się
wypukły punkt wskazujący kierunek
zwiększania głośności.
Vedle voliče hlasitosti je umístěn
vystouplý bod, který znázorňuje směr
přidávání hlasitosti.
A hangerőszabályzó gomb mellett
kitapintható egy pont, amely azt mutatja,
melyik irányban emelkedik a hangerő.
Dźwignia jogPáčka jogVisszaugró gombProgramowanie stacji
1
14”2 STATION•SELECT/PRESET,
Przykład:
2
PRESET TUNING15
Ustawianie zaprogramowanejstacji
1
ON/BAND2 STATION•SELECT/PRESET3 VOLUME
Nastawianie alarmu
Uwagi
•
•
Aby ustawić godzinę budzika
1
ALARM AALARM B
2 vV
vV
3 ENTER/BRIGHTNESS
4 23
„•”
„”
„”
•„A
”
•„B
”
A Ustawianie budzika w trybieradia
1 14„”2 vV„”
„
”
3 ENTER/BRIGHTNESS
4 vV
„”
ON/BANDSTATION•SELECT/
PRESET
„”
5 ENTER/BRIGHTNESS
B Ustawianie budzika w trybiebrzęczyka
1 14„”2 vV„”
„
”
3 ENTER/BRIGHTNESS
4 vV
1:
2:„”
3:„”
5 ENTER/BRIGHTNESS
Aby użyć alarmu radiem orazbrzęczykiem
1
2 ALARM AALARM B
Aby zdrzemnąć się kilka minut
SNOOZE/DATE/SLEEP OFF
SNOOZE/DATE/
SLEEP OFF,
SNOOZE/DATE/
SLEEP OFF
Aby wyłączyć alarm
OFF/
ALARM RESET
Aby dezaktywować alarm
ALARM AALARM B
Korzystanie z
programatora
czasowego drzemki
(Programator
czasowy)
NAP
„”
„”
„
”
„
”
Aby wyłączyć sygnałprogramatora czasowegodrzemki NAP
NAPOFF/ALARM RESET
Aby wyłączyć programatorczasowy drzemki NAP
NAP
„
”
Nastawianie timera na
dobranoc
SLEEP
„”
„”
„”
•
SNOOZE/
DATE/SLEEP OFF
Jak używać jednocześnietimera na dobranoc i alarmu
1 „”2 „”
Rozwiązywanie
problemów
Zegar pokazuje nieprawidłowy czas.
•
Dźwięk alarmu radiowego lub alarmu
brzęczykiem nie rozlega się o wyznaczonym
czasie.
•
Włączony jest alarm radiowy, lecz o
wyznaczonym czasie nie dochodzi żaden
dźwięk.
•
Antena przewodowa FMFM drátová anténaFM kábelantenna
Gniazdo słuchawkowe
(ICF-C273 tylko dla modelu na
Europę)
Sluchátková zdířka (ICF-C273
pouze pro evropské modely)
Fejhallgató-csatlakozó (csak az
ICF-C273 európai modell esetén)
Na przycisku PRESET TUNING 3znajduje się wypukły punkt.Na tlačítku PRESET TUNING 3 jevystouplý bod.A PRESET TUNING 3 gombonkitapintható egy pont.
Polski
OSTRZEŻENIE
Aby ograniczyć ryzyko pożaru lub porażenia
prądem elektrycznym, nie należy narażać
tego urządzenia na działanie deszczu ani
wilgoci.
Aby uniknąć porażenia prądem, nie należy
otwierać obudowy urządzenia. Naprawy
należy zlecać wyłącznie osobom
wykwalifikowanym.
Charakterystyka
•
•
•
•
•
•
• —
•
•
Nastawianie zegara
oraz daty
1
””
2 CLOCK
3 vV
4 ENTER/BRIGHTNESS5 34
ENTER/
BRIGHTNESS
•
vV
•
”
”
• 5
ENTER/BRIGHTNESS
•
3 TUNING +–
4 VOLUME
• OFF/ALARM
RESET
•
v
•
TUNING +– ON/BAND
Zlepšení kvality příjmu
FM:
AM (MW)/LW:
Předvolení oblíbené
stanice
— ladění předvoleb
Předvolení stanice
1 142 STATION•SELECT/PRESET
Příklad:
2
PRESET TUNING 15
Naladění předvolené stanice1 ON/BAND 2 STATION•SELECT/PRESET3 VOLUME
Nastavení budíčku
Poznámky
•
•
Nastavení doby buzení1 ALARM AALARM B
2 vV
vV
3 ENTER/BRIGHTNESS
4 23
•
•A
•B
A Nastavení buzení rádiem
1 142 vV
3 ENTER/BRIGHTNESS
4 vV
ON/BAND
STATION•SELECT/PRESET
5 ENTER/BRIGHTNESS
Česky
VÝSTRAHA
Nevystavujte přístroj dešti ani vlhkosti,
předejdete tak nebezpečí vzniku požáru či
úrazu elektrickým proudem.
Neotevírejte kryt přístroje. Hrozí nebezpečí
úrazu elektrickým proudem. Opravy svěřte
výhradně kvalifikovanému servisnímu
technikovi.
Charakteristika
•
•
•
•
•
•
•
•
•
Nastavení hodin a data
1
„
„
2 CLOCK
3 vV4 ENTER/BRIGHTNESS5 34
ENTER/
BRIGHTNESS
•
vV
•
„
„
• 5
ENTER/
BRIGHTNESS
•
Zobrazení roku a data
SNOOZE/DATE/SLEEP OFF
Změna displeje na letní čas(posun o hodinu dopředu)
D.S.T./SUMMER T
„
D.S.T./SUMMER T
Nastavení jasu zadníhoosvětlení
ENTER/
BRIGHTNESS
Změna pásma AM
(MW)
Krok ladění
Krok ladění v dané oblasti
1
OFF/ALARM RESET
2 OFF/ALARMRESETON/BAND
2
Poznámky
•
•
Obsluha rádia
— Manuální ladění
1
ON/BAND
2 ON/BAND
ICF-C273
ICF-C273L
Magyar
FIGYELMEZTETÉS
A tűz és az áramütés veszélyének
csökkentése érdekében óvja a készüléket az
esőtől, nedvességtől.
Az áramütés elkerülése érdekében ne nyissa
fel a készülék házát. A készüléket csak
szakember javíthatja.
Jellemzők
•
•
•
•
•
•
•
•
•
Az óra és a dátum
beállítása
1
2 CLOCK
3 vV 4 ENTER/BRIGHTNESS5 34
ENTER/BRIGHTNESS
• Vv
•
• 5.
ENTER/BRIGHTNESS
•
Az évszám és a dátummegjelenítése
SNOOZE/DATE/SLEEP OFF
A kijelző átállítása a nyáriidőszámításra (nyári idő)
D.S.T./SUMMER T
D.S.T./SUMMER T
A háttérvilágítás fényerejénekbeállítása
ENTER/
BRIGHTNESS
Az AM (MW) sáv
hangolási
lépésközének
módosítása
Térség Hangolási lépésköz
1
OFF/ALARM RESET
2 OFF/ALARMRESETON/BAND
2
Megjegyzések
•
•
A rádió használata
— Kézi hangolás
1 ON/BAND
2 ON/BAND
ICF-C273
ICF-C273L
3 TUNING+–
*
4 VOLUME
• OFF/ALARM RESET
•
v
•
TUNING+ ON/BAND
A vétel javítása
FM (URH):
AM (MW/KH) /LW(HH):
A kedvenc
rádióállomások
beállítása
— Programozottállomáskeresés
Állomás beprogramozása1 142 STATION•SELECT/PRESET•
Példa:
2
PRESET TUNING 1-5
Programozott rádióállomáshallgatása1 ON/BAND2 STATION• SELECT/PRESET•3 VOLUME
Az ébresztés
beállítása
Megjegyzés
•
•
Az ébresztés időpontjánakbeállítása1 ALARM AALARM B
2 vV
v
V
Инструкция по эксплуатации
(обpaтнaя cтоpонa)
Інcтpyкції з eкcплyaтaції (звоpотний бік)
FM/AM PLL Synthesized
Clock Radio
ICF-C273
FM/MW/LW PLL Synthesized
Clock Radio
ICF-C273L
© 2004 Sony Corporation Printed in China
Dream Machine является товарным знаком корпорации Sony.
Dream Machine є товapним знaком Sony Corporation.
B Nastavení buzení signálembudíku
1 142 vV
3 ENTER/BRIGHTNESS
4 vV
1:
2:
3:
5 ENTER/BRIGHTNESS
Používání rádiového budíčku abzučáku1 2 ALARM AALARM B
Chcete-li si několik minutpřispat
SNOOZE/DATE/SLEEP OFF
SNOOZE/DATE/SLEEP OFF
SNOOZE/DATE/SLEEP OFF
Zastavení budíčku
OFF/
ALARM RESET
Zrušení budíčku
ALARM AALARM B
Použití časovače NAP
(odpočítávání)
NAP
Vypnutí časovače NAP
NAP
OFF/ALARM RESET
Deaktivace časovače NAP
NAP
Nastavení časovaného
vypnutí
SLEEP
•
SNOOZE/DATE/
SLEEP OFF
Současné použití budíčku ačasovaného vypnutí
1 2
Odstraňování
problémů
Hodiny neukazují správný čas.
•
Buzení rozhlasem či bzučákem se v
nastavený čas neozve.
•
Rozhlasový budíček je zapnut, ale v
nastavený čas se nic neozve.
•
3 ENTER/BRIGHTNESS
4 23
•
•A
•B
A A rádiós ébresztés beállítása
1 142 vV
3 ENTER/BRIGHTNESS
4 vV
ON/BAND
STATION•SELECT/PRESET
5 ENTER/BRIGHTNESS
B A hangjelzéses ébresztésbeállítása
1 142 vV
3 ENTER/BRIGHTNESS
4 vV
1
2
3
5 ENTER/BRIGHTNESS
A rádiós és hangjelzésesébresztés együttes használata1 2 ALARM AALARM B
Ha még néhány percigszundikálni szeretne
SNOOZE/DATE/SLEEP OFF
SNOOZE/DATE/SLEEP OFF
SNOOZE/DATE/SLEEP OFF
Az ébresztés leállítása
OFF/ALARM RESET
Az ébresztés kikapcsolása
ALARM AALARM B
A NAP
(visszaszámlálásos)
időzítő használata
NAP
A NAP visszaszámlálásosidőzítő leállítása
NAPOFF/ALARM RESET
A NAP visszaszámlálásosidőzítő kikapcsolása
NAP
Az elalvási időzítő
beállítása
SLEEP
•
SNOOZE/DATE/SLEEP OFF
Az elalvási időzítő és azébresztési funkció együtteshasználata
1 2
Hibaelhárítás
Az óra nem a pontos időt mutatja.
•
A rádiós vagy a hangjelzéses ébresztés nem
szólal meg a beállított időpontban.
•
A rádiós ébresztés be van kapcsolva, de a
beállított időpontban a készülék nem szólal
meg.
•
Óvintézkedések
•
•
•
•
•
•
•
•
Ha a készülékkel kapcsolatban kérdése,
problémája merülne fel, forduljon a
legközelebbi Sony márkakereskedőhöz.
Műszaki adatok
Időkijelzés
Frekvenciatartomány
Sáv ICF-C273 Hangolási lépésköz
Sáv ICF-C273 ICF-C273L Hangolási lépésköz
—
Hangszóró
Ω
Kimenet
v
φ
Kimenő teljesítmény
Tápfeszültség
Méretek
××
Tömeg
Środki ostrożności
•
„
”
•
•
•
•
•
•
•
W przypadku jakichkolwiek pytań lub
problemów dotyczących urządzenia należy
skontaktować się z najbliższym punktem
sprzedaży produktów firmy Sony.
Dane techniczne
Wyświetlenie czasu
Zakres częstotliwości
Pasmo ICF-C273 Interwał strojenia
Pasmo ICF-C273 ICF-C273L Interwał strojenia
—
Głośnik
Ω
Wyjście
v
Moc wyjściowa
Zasilanie
Wymiary
××
Masa
Upozornění
•
•
•
•
•
•
•
•
S veškerými problémy a dotazy týkajícími se
tohoto přístroje se obracejte na nejbližší
zastoupení společnosti Sony.
Technické údaje
Časový displej
Kmitočtová charakteristika
Pásmo ICF-C273 Krok kanálu
Pásmo ICF-C273 ICF-C273L Krok kanálu
—
Reproduktor
Ω
Výstup
v φ
Výstupní výkon
Napájecí požadavky
Rozměry
××
Hmotnost
5
ICF-C273/ICF-C273L 3-263-574-45(1) CET
PL/CZ/HU/SK/RU/UA
ICF-C273/ICF-C273L 3-263-574-45(1) CET
PL/CZ/HU/SK/RU/UA
English
WARNING
To reduce the risk of fire or electric shock, do
not expose this apparatus to rain or moisture.
To reduce the risk of fire, do not cover the
ventilation of the apparatus with newspapers,
tablecloths, curtains, etc. And do not place lighted
candles on the apparatus.
To reduce the risk of fire or electric shock, do not
expose this apparatus to dripping or splashing,
and do not place objects filled with liquids, such
as vases, on the apparatus.
Do not install the appliance in a confined space,
such as a bookcase or built-in cabinet.
Do not expose the batteries (battery pack or
batteries installed) to excessive heat such as
sunshine, fire or the like for a long time.
As the main plug is used to disconnect the unit
from the mains, connect the unit to an easily
accessible AC outlet. Should you notice an
abnormality in the unit, disconnect the main plug
from the AC outlet immediately.
CAUTION
Danger of explosion if battery is incorrectly
replaced. Replace only with the same or
equivalent type.
Features
Large, easy to-see, 1.4 inch green LED.
Dual alarm FM/AM Clock radio.
Various types of alarms — buzzer, radio and
melody.
Automatic time set — When you plug the clock
in for the first time, the current time will be
shown in the display.
Automatic Daylight Saving Time/Summer time
adjustment.
Date button to display month, day and year.
Brightness control (High/Middle/Low).
No Power No Problem™ alarm system to keep
the clock and the alarm operating during a
power interruption with a CR2032 battery
installed.
Extendable snooze — Snooze time can be
extended from 10 up to 60 minutes.
Progressive Alarm Speed (buzzer only).
About the backup
battery
To keep good time, as backup power source, this
unit has one CR2032 battery inside of the unit in
addition to the house current.
The battery keeps the clock and the alarm
operating in the event of a power interruption.
Note for customers in Canada
The clock is preset at the factory, and its memory
is powered by the preinstalled Sony CR2032
battery. If the “AM 12:00” appears on the display
when the unit is connected to AC outlet for the
first time, the battery may be weak. In this case,
consult a Sony dealer. The preinstalled CR2032
battery is considered part of the product, and is
covered by the warranty. You are required to show
“Note for customers in Canada” (in this
instruction) to a Sony dealer in order to validate
the warranty for this product.
Knowing when to replace the battery
When the battery becomes weak, the “
”
indicator appears in the display.
In the event of a power interruption when the
battery is weak, the current time and alarm will
be initialized.
Replace the battery with a Sony CR2032 lithium
battery. Use of another battery may present a risk
of fire or explosion.
Installing and replacing the backup battery1 Keep the AC plug connected to the AC outlet, remove the screw that secures the battery compartment at the rear of the unit using a screwdriver, and remove the battery compartment (See Fig. —).2 Insert a new battery in the battery compartment with the side facing up. To remove the battery from the battery compartment, push it out from the side marked PUSH (See Fig. —).3 Insert the battery compartment back into the unit and secure it with the screw (See Fig. —).4 When you are replacing the battery, press RADIO ON to turn the “
” indicator off in the display.
Notes
If you replace the battery, do not disconnect the
AC plug from the AC outlet.
Otherwise, the current time and alarm will be
initialized.
Be sure to observe the correct polarity when
installing the battery.
Setting the clock for
the first time
This unit is preset to the current date and time at
the factory, and is powered by the back up battery.
All you need to do is just plug it in and select your
time zone.
1 Plug in the unit.
First, the month and date appear, then the
year, and then the current Eastern Standard/
Daylight Time appears in the display.
2 Press TIME ZONE.
Area number “2” appears in the display.
If you live in the Eastern Time zone, you do
not need to adjust the area setting.
Area number Time zone
1 Atlantic Standard/
Daylight Time
2
(default)
Eastern Standard/
Daylight Time
3 Central Standard/
Daylight Time
4 Mountain Standard/
Daylight Time
5 Pacific Standard/Daylight
Time
6 Yukon Standard/Daylight
Time
7 Hawaiian Standard/
Daylight Time
3 Press TIME ZONE repeatedly until the desired number appears.
The display returns to the clock about 4
seconds after the operation is complete.
Note
During the shipment and your first use, a clock
error may occur. In this case, refer to “Setting the
clock and date” to set the correct time.
When daylight saving time (summer time) begins
This unit employs Automatic Daylight Saving
Time/Summer Time adjustment. The DST
indicator appears in the display at the beginning
of the daylight saving time (summer time), and
disappears at the end of it.
Daylight saving time begins at: 2:00 AM on the
second Sunday of March.
Standard time begins at: 2:00 AM on the first
Sunday of November.
To cancel the automatic DST/summer time adjustment and to set DST display manually
The automatic DST/summer time adjustment can
be cancelled.
Press and hold DST for at least 3 seconds while
the clock is displayed.
A beep sounds, and “Aut
OFF” appears in the
display to show that the automatic DST/summer
time adjustment is cancelled. The display returns
to the clock.
Notes
Daylight Saving Time depends on the law in
each country/region, and your area may not use
it. In such a case, cancel the automatic DST/
summer time adjustment before using the set
and set the time manually as necessary.
To activate the automatic DST/summer time
adjustment again, press and hold DST for at
least 3 seconds. A beep sounds, and “Aut
On” appears in the display to show that the
automatic DST/summer time adjustment is
activated. The display returns to the clock.
To change the display to the daylight saving
time (summer time) manually, see “To change
the display to the daylight saving time (summer
time) indication.”
Setting the clock and
date
To change the setting manually, follow the
procedure from step 1.
1 Press CLOCK for at least 2 seconds.
You will hear a beep and the year will start to
flash in the display.
2 Press + or – until the correct year appears in the display.3 Press CLOCK.
4 Repeat steps 2 and 3 to set the month,
day and time.
After setting the time, two short beeps sound
and the clock starts from 0 seconds.
Pressing and holding + or – changes the year,
month or day rapidly.
When setting the current time, time changes
rapidly by 1 minute-increments up to 10
minutes, and then by 10 minute-increments.
While setting the clock, you must perform each
step within 65 seconds, or the clock setting
mode will be cancelled.
To display the year and date
Press SNOOZE/DATE/SLEEP OFF once for the
date, and within about 3 seconds press it again for
the year.
The display shows the date or year for about 3
seconds and then changes back to the current
time.
If you connect the AC plug to an AC outlet while
this unit is powered from the backup power
source, the current date and time appears in the
following order (the same as when the unit is
powered on after a power interruption).
“month and date” (about 1 second)
“year”
(about 1 second)
“current time”
To change the display to the daylight saving time (summer time) indication
Change the daylight saving time (summer time)
adjustment setting according to the following
procedures if you have cancelled the automatic
DST/summer time adjustment.
Press DST.
The DST indicator appears in the display and the
time indication changes to the daylight saving
time (summer time).
To deactivate the daylight saving time (summer
time) adjustment, press DST again.
Setting the brightness
of the display
Three levels of brightness are available by pressing
BRIGHTNESS.
Playing the radio
1 Press RADIO ON to turn on the radio.2 Adjust the volume using VOLUME.3 Select BAND.4 Tune in to a station using TUNING.To turn off the radio
Press RADIO OFF/ALARM RESET.
Improving the reception
FM:
The AC power cord functions as an FM
antenna. Extend the AC power cord fully to
increase reception sensitivity.
AM:
Rotate the unit horizontally for optimum
reception. A ferrite bar AM antenna is built-in
to the unit.
Do not operate the unit over a steel desk or metal
surface, as this may lead to interference of
reception.
Setting the alarm
The dual alarm function allows you to set two
alarm programs (ALARM A and ALARM B).
The alarm time can be set for each program and
the alarm sound is selectable from buzzer, radio
or melody.
Notes
Before setting the alarm, make sure to set the
clock (see “Setting the clock and date”).
The factory set alarm time is “PM 12:00”.
To set the radio alarm, first tune in to a station
and adjust the volume (see “Playing the radio”).
To set the alarm time1 Set ALARM A (or B) to the desired alarm sound ( (buzzer), RADIO or MELODY).
The alarm time appears for a few seconds, and
then the ALARM A (or B) indicator lights up
in the display. (It does not appear when the
switch is set to OFF.)
When you set the alarm to MELODY, the
alarm sounds the melody- “Spring” from “The
Four Seasons” by Antonio Lucio Vivaldi.
2 Press ALARM TIME SET A (or B) + or –
to set the desired time.
Each press of ALARM TIME SET A (or B) + or
– changes the indication by 1 minute. If you
press and hold ALARM TIME SET A (or B) +
or –, the alarm time goes forward (or
backward) by 1 minute up to 10 minutes, and
then by 10 minutes increments. While setting
the alarm time, the ALARM A (or B) indicator
flashes in the display. The following example is
when setting the ALARM A.
When the alarm time setting is complete, the
display returns to the clock after a few seconds
and the ALARM A (or B) indicator changes
from flashing to fully lit.
While ALARM A (or B) is set to , RADIO
or MELODY, the alarm time setting can be
changed by ALARM TIME SET A (or B) + or –.
One press of ALARM TIME SET A (or B) + or –
displays the alarm time for about 4 seconds. By
pressing ALARM TIME SET A (or B) + or –
while the alarm time appears in the display, the
alarm time will be changed.
For the buzzer alarm, the beeping of the alarm
becomes more rapid after every few seconds in
three progressive stages.
The ALARM A (or B) indicator flashes in the
display while:
– The alarm time appears in the display.
– The alarm sounds.
– The snooze function is turned on.
The alarm time setting cannot be changed if
ALARM A (or B) is set to OFF. If you press
ALARM TIME SET A (or B) + or –, “OFF”
appears in the display for about 0.5 seconds.
If a second alarm sounds during a first (or the
snooze function is active), the second alarm
takes priority.
CLOCK, DST, and TIME ZONE are unavailable
while the alarm sounds or when the snooze
function is turned on.
The alarm function works as usual at the first
and last day of daylight saving time (summer
time). As a result, if the automatic DST/
summer time adjustment is set and the alarm is
set at a time skipped when the daylight saving
time begins, the alarm is skipped; if the alarm is
set at a time overlapping when daylight saving
time ends, the alarm will sound twice.
If the same alarm time is set for both ALARM
A and B, the ALARM A takes priority.
To doze for a few more minutes
Press SNOOZE/DATE/SLEEP OFF.
The alarm sound stops but will automatically
come on again after about 10 minutes. Each time
you press SNOOZE/DATE/SLEEP OFF, the
snooze time changes as follows:
The maximum snooze time is 60 minutes.
The display shows the snooze time for about
4 seconds and returns to show the current time.
When you press SNOOZE/DATE/SLEEP OFF
after the current time appears, the snooze time
starts from 10 minutes again.
To stop the Alarm
Press RADIO OFF/ALARM RESET to turn off the
alarm.
The alarm will come on again at the same time
the next day.
If RADIO OFF/ALARM RESET is not pressed, the
alarm sounds continuously for about 60 minutes,
and then it will stop automatically.
To deactivate the Alarm
Set ALARM A (or B) to OFF.
The ALARM A (or B) indicator disappears from
the display.
Note on alarm in the event of a power
interruption
In the event of a power interruption, the alarm
functions work until the battery is empty.
However, the following functions differ:
Nothing will appear on the display.
When the alarm sound is set to radio, it will
change to buzzer automatically.
If the power returns while the alarm sounds,
the alarm sounds continuously for about 60
minutes (or until turned off).
4-135-644-21(1)
©2009 Sony Corporation Printed in China
FM/AM
CLOCK RADIO
ICF-C414
Operating Instructions
Mode d’emploi (au dos)
The alarm buzzes for about one minute, stops
temporarily, and will buzz again after about five
minutes if neither SNOOZE/DATE/SLEEP OFF
or RADIO OFF/ALARM RESET are pressed
while the alarm is buzzing.
If the alarm buzzes and stops (either
automatically after 1 minute or by pressing
SNOOZE/DATE/SLEEP OFF) five times, the
alarm is automatically reset in the case of a
power interruption. The alarm will buzz for 30
minutes (or until turned off) after power is
resumed if the power is resumed within 60
minutes from the alarm time.
If you press SNOOZE/DATE/SLEEP OFF while
the alarm sounds, the snooze time is set to 10
minutes. During a power interruption, snooze
time cannot be set to more than 10 minutes.
If the “
” indicator appears in the display, the
alarm will not work in the event of a power
interruption. Replace the battery if the “
”
indicator appears.
Setting the sleep timer
You can fall asleep to the radio using the built-in
sleep timer that turns off the radio automatically
after a preset duration.
Press SLEEP.
The radio turns on. You can set the sleep timer to
90, 60, 30, or 15 minutes. Each press changes the
display as follows:
Two short beeps sound when the display returns
to “90”.
The radio will play for the duration you set, then
shut off.
To turn off the radio before the preset
time
Press RADIO OFF/ALARM RESET or SNOOZE/
DATE/SLEEP OFF.
To use both sleep timer and alarm
You can fall asleep to the radio and also be
awakened by the buzzer, radio or melody alarm at
the preset time.
1 Set the alarm. (See “Setting the alarm”.) 2 Set the sleep timer. (See “Setting the sleep timer”.)
Precautions
Play the unit on the power source specified in
“Specifications”.
To disconnect the AC power cord (mains lead),
pull it out by the plug, not the cord.
The unit is not disconnected from the AC
power source (mains) as long as it is connected
to the wall outlet, even if the unit itself has been
turned off.
The nameplate and important information
concerning safety are located on the bottom
exterior.
Do not leave the unit in a location near a heat
source such as a radiator or airduct, or in a
place subject to direct sunlight, excessive dust,
mechanical vibration, or shock.
Allow adequate air circulation to prevent
internal heat build-up. Do not place the unit on
a surface (a rug, a blanket, etc.) or near
materials (a curtain) which might block the
ventilation holes.
Should any solid object or liquid fall into the
unit, unplug the unit and have it checked by
qualified personnel before operating it any
further.
To clean the casing, use a soft cloth dampened
with a mild detergent solution.
NOTES ON LITHIUM BATTERY
Wipe the battery with a dry cloth to assure a
good contact.
Be sure to observe the correct polarity when
installing the battery.
Do not hold the battery with metallic tweezers,
otherwise a short-circuit may occur.
If you have any questions or problems concerning
your unit, please consult your nearest Sony dealer.
Troubleshooting
Should any problem occur with the unit, make
the following simple checks to determine whether
or not servicing is required.
If the problem persists, consult your nearest Sony
dealer.
The clock flashes “AM 12:00”.
A power interruption occurred and the backup
battery is low. Replace the battery. Remove the
old battery and install a new one.
The buzzer, radio or melody alarm does not
sound at the preset alarm time.
Check that the buzzer, radio or melody alarm is
activated (the ALARM A (or B) indicator lights
up).
The radio alarm is activated but does not
sound at the preset alarm time.
Check that the volume is not set to minimum.
When daylight saving time begins, the clock
does not employ the daylight saving time
automatically.
Make sure the clock is set correctly.
Press and hold DST for at least 3 seconds to
activate the automatic DST/summer time
adjustment.
Specifications
Time display
12-hour System
Frequency range
Band Frequency
FM 87.5 – 108 MHz
AM 530 – 1 710 kHz
Speaker
Approx. 6.6 cm (2
5
/8 inches) dia., 8 Ω
Power output
180 mW (at 10% harmonic distortion)
Power requirements
120 V AC, 60 Hz
For power backup: 3 V DC, one CR2032 battery
Dimensions
Approx. 178.9 × 121.8 × 88.5 mm (w/h/d)
(7
1
/8 × 4
7
/8 × 3
1
/2 inches) incl. projecting parts
and controls
Mass
Approx. 638 g (1 lb 6.5 oz) incl. CR2032 battery
Design and specifications are subject to change
without notice.
Dream Machine is a trademark of Sony Corporation.
Dream Machine est une marque de fabrique de Sony Corporation.
No Power No Problem is a trademark of Sony Corporation.
No Power No Problem est une marque de fabrique de Sony
Corporation.
Battery compartment
AC power cord
There is a tactile dot
above the VOLUME dial to
indicate which way turns
the volume up.
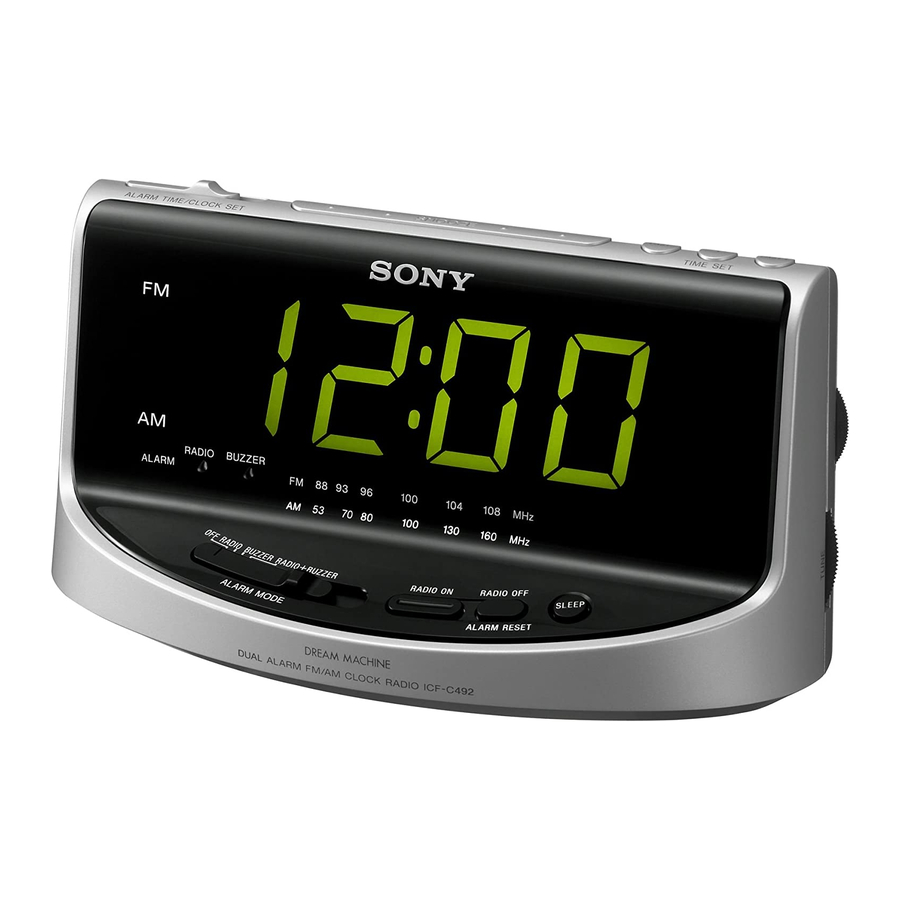
Sony DREAM MACHINE ICF-C492 — FM/AM Clock Radio Manual
Important
To reduce the risk of fire or electric shock, do not expose this apparatus to rain or moisture.
To avoid electrical shock, do not open the cabinet. Refer servicing to qualified personnel only.
Do not install the appliance in a confined space, such as a bookcase or built-in cabinet. To reduce the risk of fire or electric shock, do not place objects filled with liquids, such as vases, on the apparatus.
Connect the apparatus to an easily accessible AC outlet. Should you notice an abnormality in the apparatus, disconnect the main plug from the AC outlet immediately.
Overview

* There is a tactile dot beside VOL to show the direction to turn up the volume.
Features
- Easy to-see large 1.4 inch green LED
- Alarm Vol. Control (High/Low)
- Dual alarm (radio alarm and buzzer alarm)
- Easy to-see alarm indicator
- Variable brightness control
- Full power backup to keep the clock and the alarm (radio and buzzer) operating during a power interruption with a 6F22 battery (not supplied) installed. (For models other than the North American model, the power backup is only for the clock.)
Installing the Battery
To keep good time, your Dream Machine needs one 6F22 battery (not supplied), in addition to house current. The battery keeps the clock operating in the event of a power interruption. Before setting the time on your Dream Machine, open the lid at the bottom of the unit, install the battery with correct polarity and then close the lid.
After a power interruption, the displayed time may not be always correct (It may gain or lose about 10 minutes per hour).
Knowing When to Replace the Battery
To check the battery power, unplug the power cord from the wall outlet and plug it in again after a few minutes. If the displayed time is incorrect, replace the battery with a new one.
Changing the Brightness of the Clock display
Turn BRIGHTNESS to adjust the brightness of the clock display.
Setting the Clock
- Plug in the unit.
The display will flash «AM 12:00″or «0:00». - Set the ALARM TIME/CLOCK SET switch to CLOCK.
- Press FAST+ or – to adjust the time.
When you press FAST+, the time is raised rapidly.
When you press FAST–, the time is lowered rapidly.
When you press +, the time is raised in one-minute steps. - Set the ALARM TIME/CLOCK SET switch to HOLD.
Make sure that the ALARM TIME/CLOCK SET switch is set to HOLD. When it is set to HOLD, you cannot see the red label underneath. Otherwise, the displayed time might be changed if FAST+ or – happens to be pressed.
The clock system varies depending on the model you own.
12-hour system: «AM 12:00″=midnight
24-hour system: «0:00″=midnight
To display minute and second, press SNOOZE.
Example: When the current time is 7:15:10, the display will become:
The display returns to the current time when you release SNOOZE.
To adjust the time exactly to the second, press + briefly with the time signal.
Operating the Device
- Press RADIO ON to turn on the radio.
- Adjust volume using VOL.
- Select the BAND.
- Tune into a station using TUNE.
To turn off the radio
Press ALARM RESET•RADIO OFF.
Improving the Reception
FM: Extend the FM wire antenna fully to improve FM reception.
AM: Rotate the unit horizontally for optimum reception. A ferrite bar antenna is built into the unit.
Setting the Alarm
This radio is equipped with 3 alarm modes – RADIO, BUZZER and RADIO+BUZZER. Before setting the alarm, make sure to set the clock (see «Setting the Clock»).
To set the radio alarm, first tune in to a station and adjust the volume.
- Set the ALARM TIME/CLOCK SET switch to RADIO or BUZZER.
- Press FAST+ or – to select the desired time.
When you press FAST+, the time is raised rapidly.
When you press FAST–, the time is lowered rapidly.
When you press +, the time is raised in one-minute steps. - Set the ALARM TIME/CLOCK SET switch to HOLD.
Make sure that the ALARM TIME/CLOCK SET switch is set to HOLD after setting the clock. When it is set to HOLD, you cannot see the red label underneath. - Set the ALARM MODE switch to RADIO, BUZZER or RADIO+BUZZER.
The ALARM RADIO or ALARM BUZZER indicator lights up. When you set both alarm times, both ALARM RADIO and ALARM BUZZER indicators light up.
The alarm will come on at the preset time and will automatically turn itself off after about 59 minutes.
If the same alarm time is set for both RADIO and BUZZER, RADIO will take priority.
To check the alarm setting
Set the ALARM TIME/CLOCK SET switch to RADIO or BUZZER.
To Doze for a Few More Minutes
Press SNOOZE.
The radio or buzzer turns off but will automatically come on again after about 6 minutes. You can repeat this process as many times as you like.
To Stop the Alarm
Press ALARM RESET•RADIO OFF to turn off the alarm.
The alarm will come on again at the same time the next day.
To Deactive the Alarm
Set the ALARM MODE switch to OFF. ALARM RADIO, ALARM BUZZER or both indicators will be turned off.
To Adjust the Alarm Level
(ALARM VOL)
Select the volume of the alarm by setting ALARM VOL to HIGH or LOW.
Note
If you select the RADIO+BUZZER mode, set the BUZZER alarm time earlier than the RADIO alarm time, and then use the SNOOZE button to turn off the buzzer, the radio will not come on even if the RADIO alarm time comes during the snooze period; only the buzzer will come back on after the snooze period is over.
Setting the Sleep Timer
Enjoy falling asleep to the radio using the built-in sleep timer.
Press SLEEP.
The radio turns on. You can set the sleep timer to durations up to 59 minutes. When you keep pressing SLEEP, the time is lowered in one-minute steps.
When you press FAST+ or FAST– while holding down SLEEP, the time is changed rapidly. When you press + while holding down SLEEP, the time is raised in oneminute steps.
The radio will play for the time you set, then turn off.
To turn off the radio before the preset time
Press ALARM RESET•RADIO OFF.
Precautions
- Operate the unit on the power source specified in «Specifications».
- The nameplate indicating operating voltage, etc. is located at the bottom of the unit.
- To disconnect the power cord (mains lead), pull it out by the plug, not the cord.
- The unit is not disconnected from the AC power source (mains) as long as it is connected to the wall outlet even if the unit itself has been turned off.
- Do not leave the unit in a location near a heat source such as a radiator or airduct, or in a place subject to direct sunlight, excessive dust, mechanical vibration, or shock.
- Allow adequate air circulation to prevent internal heat build-up. Do not place the unit on a surface (a rug, a blanket, etc.) or near materials (a curtain) which might block the ventilation holes.
- Should any solid object or liquid fall into the unit, unplug the unit and have it checked by a qualified personnel before operating it any further.
- To clean the casing, use a soft cloth dampened with a mild detergent solution.
- Do not connect the antenna lead to an external antenna.
Battery Warning
When the unit will be left unplugged for a long time, remove the battery to avoid undue battery discharge and damage to the unit from battery leakage.
If you have any questions or problems concerning your unit, please consult your nearest Sony dealer.
Specifications
Time display
North and South America, Australia and UK: 12-hour system
Other countries/regions: 24-hour system
Frequency range
Italy
| Band | Frequency range |
| FM | 87.5-108 MHz |
| AM | 526.5-1 606.5 kHz |
Other countries / regions
| Band | Frequency range |
| FM | 87.5-108 MHz |
| AM | 530-1 710 kHz |
Speaker
Approx. 6.6 cm ( 2 5/8 inches) dia. 8 Ω
Power output
120 mW (at 10% harmonic distortion)
Power requirements
North and South America: 120 V AC, 60 Hz
Australia: 240 V AC, 50 Hz
Other countries: 220-230 V AC, 50 Hz
For power backup: 9 V DC, one 6F22 battery
Battery life
Approx. 9 hours (for clock and alarm backup) using Sony 006P (6F22) battery (North and South American model)
Approx. 20 hours (for clock backup) using Sony 006P (6F22) battery (Other models)
Dimensions
Approx. 198.7 × 101.5 × 109.7 mm (w/h/d)
(7 7/8 × 4 × 4 3/8 inches) not incl. projecting parts and controls
Mass
Approx. 640 g (1 lb 6.58 oz) not incl. battery
Design and specifications are subject to change without notice.
Lead-free solder is used for soldering. Halogenated flame retardants are not used in printed wiring boards.

Documents / Resources
Download manual
Here you can download full pdf version of manual, it may contain additional safety instructions, warranty information, FCC rules, etc.
Download Sony DREAM MACHINE ICF-C492 — FM/AM Clock Radio Manual
Содержание
- Как настроить часы сони дрим машин
- Sony Dream Machine, инструкция
- Содержание:
- Установка часов
- Установка будильника
- Вариант повтора
- Как установить время на Sony Dream Machine — Вокруг-Дом — 2021
- Table of Contents:
- Radio ,Dream Machine SONY ICF-C218 (Апрель 2021).
- Table of Contents:
- Руководство по эксплуатации Sony DREAM MACHINE 4-154-584-35(1)
Как настроить часы сони дрим машин
Sony Dream Machine, инструкция
ony Dream Machine — это радиочасы с CD-плеером и большим цифровым дисплеем. Dream Machine имеет несколько дополнительных опций, таких как две отдельные настройки будильника и таймер сна. Часы готовы к
Содержание:
Sony Dream Machine — это радиочасы с CD-плеером и большим цифровым дисплеем. Dream Machine имеет несколько дополнительных опций, таких как две отдельные настройки будильника и таймер сна. Часы готовы к использованию. Настройка занимает всего несколько минут.
Dream Machine предлагает несколько дополнительных опций, которых нет у традиционных будильников (изображение будильника от Хуана Дэвида Феррандо с Fotolia.com)
Установка часов
Время на Sony Dream Machine должно быть установлено, когда устройство подключено. В зависимости от типа приобретенной модели на дисплее отображается «AM 12:00» для 12-часовой системы отсчета времени или «0:00» для 24-часовой системы. Вы не можете переключаться между этими двумя системами.
Чтобы установить часы, нажмите и удерживайте кнопку «Set / Track», пока не услышите звуковой сигнал. Часовая единица на часах начнет мигать. Нажмите кнопку «Set +» или «Set -», чтобы изменить время, пока не отобразится правильное время. Когда установлено, нажмите кнопку «Set / Track» один раз, чтобы перейти к единице минут. Используйте «Set +» и «Set -», чтобы изменить единицы измерения минут. Нажмите «Set / Track», чтобы завершить установку времени. Вы услышите два звуковых сигнала, предупреждающих вас о том, что вы вышли из режима установки часов.
Установка будильника
Dream Machine позволяет настроить два разных времени будильника, в каждом из которых вы можете использовать радио, проигрыватель компакт-дисков или звонок в качестве звука будильника. Настройки аварийных сигналов называются «Тревога A» и «Тревога B». Для установки будильника A поверните ручку селектора вокруг «Alarm A» до нужного звука: «CD», «Radio» или «Bell». Удерживайте кнопку «Тревога А» до тех пор, пока на дисплее не начнет мигать индикатор «Тревога А» и не начнет мигать единица времени. Установите время, нажав «Set +» или «Set -». Нажмите «Установить будильник», чтобы перейти к единице минут, которая изменяется с помощью «Установки времени +» и «Установки времени -». Завершите настройку времени, снова нажав кнопку «Установить будильник». Если вы решили использовать проигрыватель компакт-дисков в качестве звука будильника, вам будет предложено выбрать звуковую дорожку. Используйте « Set +» и « Set -», чтобы изменить номер дорожки, и нажмите «Set Alarm».
Тревога B устанавливается с использованием того же метода настройки тревоги A, но вместо кнопки «Тревога A» используется кнопка «Тревога B».
Вариант повтора
В дополнение к традиционным настройкам будильника, Dream Machine имеет таймер сна. Таймер отключения — это таймер обратного отсчета, который подает звуковой сигнал после завершения обратного отсчета. Таймер сна не может быть установлен на определенное время, например, будильник, но его проще настроить, потому что вам нужно нажать только одну кнопку. Чтобы установить таймер, нажимайте кнопку «Сон» несколько раз, пока не найдете нужное время. Установите таймер на 10, 20, 30, 60, 90 и 120 минут. Секундомер начнет обратный отсчет, как только вы перестанете нажимать кнопку.
Как установить время на Sony Dream Machine — Вокруг-Дом — 2021
Table of Contents:
Линейка будильников и радиочасов Sony «Dream Machine» охватывает широкий спектр стилей и функций, но эти косметические различия мало влияют на их использование. Процесс установки времени на любой данной машине мечты следует последовательной методологии, поэтому, если вы использовали какую-либо модель в серии, остальные должны быть легко выучены и установлены. Между моделями могут быть небольшие различия, но в целом процесс остается простым.
Изучите кнопки установки времени в верхней части вашей машины мечты. Некоторые модели используют ползунковый переключатель для переключения между настройкой времени и режимом настройки будильника, в то время как другие требуют, чтобы вы удерживали нажатой кнопку «Установка времени».
Установите переключатель в положение «Установка времени» или нажмите и удерживайте кнопку «Установка времени», в зависимости от того, что подходит для вашей модели.
Нажмите и удерживайте кнопку «H» в течение нескольких часов, а кнопку «M» — в течение нескольких минут, пока ваши часы не отобразят правильное время. В некоторых моделях вместо кнопок «+» и «-» выполняется циклическое переключение вперед или назад до нужного времени.
Проверьте дисплей, чтобы убедиться, что вы находитесь в режиме AM или PM, в зависимости от того, что правильно.
Повторите этот процесс, чтобы установить дату, если вас об этом попросят ваши часы. По завершении отпустите кнопку «Установка времени» или верните ползунок в положение «Часы», в зависимости от того, что подходит для вашей машины мечты.
Radio ,Dream Machine SONY ICF-C218 (Апрель 2021).
Table of Contents:
Линейка будильников и радиочасов Sony «Dream Machine» охватывает широкий спектр стилей и функций, но эти косметические различия мало влияют на их использование. Процесс установки времени на любой данной машине мечты следует последовательной методологии, поэтому, если вы использовали какую-либо модель в серии, остальные должны быть легко выучены и установлены. Между моделями могут быть небольшие различия, но в целом процесс остается простым.
Изучите кнопки установки времени в верхней части вашей машины мечты. Некоторые модели используют ползунковый переключатель для переключения между настройкой времени и режимом настройки будильника, в то время как другие требуют, чтобы вы удерживали нажатой кнопку «Установка времени».
Установите переключатель в положение «Установка времени» или нажмите и удерживайте кнопку «Установка времени», в зависимости от того, что подходит для вашей модели.
Нажмите и удерживайте кнопку «H» в течение нескольких часов, а кнопку «M» — в течение нескольких минут, пока ваши часы не отобразят правильное время. В некоторых моделях вместо кнопок «+» и «-» выполняется циклическое переключение вперед или назад до нужного времени.
Проверьте дисплей, чтобы убедиться, что вы находитесь в режиме AM или PM, в зависимости от того, что правильно.
Повторите этот процесс, чтобы установить дату, если вас об этом попросят ваши часы. По завершении отпустите кнопку «Установка времени» или верните ползунок в положение «Часы», в зависимости от того, что подходит для вашей машины мечты.
Руководство по эксплуатации Sony DREAM MACHINE 4-154-584-35(1)
Краткое содержание страницы № 1
©2009 Sony Corporation
Краткое содержание страницы № 2
Disposal of Old Electrical & Electronic Equipment WARNING (Applicable in the European Union and To reduce the risk of fire or electric other European countries shock, do not expose this apparatus to with separate collection rain or moisture. systems) To reduce the risk of fire, do not cover the ventilation This symbol on the product or on its packaging of the apparatus with newspapers, tablecloths, curtains, indicates that this product shall not be treated as etc. And do not place li
Краткое содержание страницы № 3
battery over to the applicable collection point for the Notes on LCD screen recycling of waste batteries. • The displayed image on the screen is not identical in picture quality and colors with the ed image For more detailed rmation recycling of this because phosphor methods or profiles differ. Please product or battery, please your local Civic regard the displayed image as just a reference. Office, your household waste disposal service or the � Do not press against
Краткое содержание страницы № 4
this Operating Instructions � The example illustrations and images are of the ICF-CL75iP, therefore may appear different from illustrations, images and screen indicators that actually appear on your radio. � «Note» indicates cautions and limitations relevant to the correct operation of this unit. � «Tip» indicates rmation that is useful to know. � The figures in parentheses indicate the reference page for details on operation. � The language used for on-screen displays ar
Краткое содержание страницы № 5
Table of Contents Features…………………………………….. 6 Identifying the parts …………………… 8 Screen indicators …………………………………10 Getting started Checking the supplied items…….. 11 Connecting the AM aerial and AC power cord (mains lead) … 11 Setting the ………………………. 12 Using this unit Basic operations………………………. 13 Home and Option ……………………….13 Adjusting the volume ………….
Краткое содержание страницы № 6
Features This unit is multial FM/AM radio with 7.0 inch LCD screen. As well as playing your favorite music and video, you can also set a photo as wallpaper, etc. You can listen to your favorite music, watch a video or view a slideshow at bed and set your favorite alarm sound for when you wake up. Furthermore, when you insert iPod into the docking tray, you can operate iPod via this unit or iPod directly (ICF-CL75iP only). Music Radio Video Alarm Background photos Sl
Краткое содержание страницы № 7
Playback (18, 19) � iPod, iPhone, memory card, internal memory, or USB device can be used to play back music and video (iPod and iPhone s only for ICF-CL75iP). � You can listen to music with album artwork on the screen. � 1 W × 1 W front speakers can be used to listen to sounds. � You can save contents into the 1 GB internal memory. Note � You cannot display the album artwork of iPod or iPhone on this unit. � You cannot display the cover photo for WMA content. Background photos
Краткое содержание страницы № 8
Identifying the parts For details, see the pages indicated in parentheses. Front A LCD screen C Speaker B ALARM A ON/OFF button (15) D ALARM B ON/OFF button (15) Rear E AC power cord (mains lead) (11) H AM ANTENNA terminals (11) F USB connector (18) I PRO/SD/MMC (Multi card slot) (18, 25) G FM wire aerial (15) J Battery holder (28) GB 8
Краткое содержание страницы № 9
Top �> PRESET+/B (Right): You can set the K SNOOZE/BRIGHTNESS button (13, 16) tuning to minus and tune into a ion by its L Microphone (17) preset. You can select the relevant items. M OFF x ALARM RESET button Press and hold to fast forward. � Operation procedure indicates with v/V/b/B N SLEEP button (18) on the control button in this manual. O ALARM SET button (15) S OPTION button (13) P HOME button (13) T DISPLAY button (14) Q BACK/iPod button (ICF-CL75iP)/ BACK button (ICF-CL
Краткое содержание страницы № 10
Side Y SET A lever (15) wj Docking tray for iPod & iPhone (21) (ICF-CL75iP only) Z SET B lever (15) Screen indicators A Alarm A/Alarm B indicator (15) D SLEEP r indicator (18) B (12) E us bar � Displays the file name, the source, and elapsed C (12) of the music or movie playing. � is always displayed. � Memory icon indicates as follows: : Internal memory : Memory card : USB device : iPod (ICF-CL75iP only) Note � The displayed screen may differ depending o
Краткое содержание страницы № 11
Getting started 3 Connect the cords to the AM aerial terminals. Getting started Push down and hold the terminal clamp and insert the cord. Checking the supplied items Make sure that the following items are supplied: � FM/AM Radio (1) � AM loop aerial (1) � Operating Instructions (this manual) (1) � Warranty (1) (In some countries or regions, the � Cord (A) or cord (B) can be connected to warranty is not supplied.) either terminal. � Universal dock adaptor for iPhone (1) / iPhone 4 M
Краткое содержание страницы № 12
Note � The unit’s ATS (Automatic Set) Setting the automatically keeps the correct and never requires resetting. (UK model only) This unit automatically sets the and . If � You can use this unit and the AC power cord (mains this unit is initialized, you will need to set the lead) in any country or region where the power supply manually. (UK model only) is within 100 V to 240 V AC, 50 Hz/60 Hz. 1 Press the HOME button. Tip � Though the is correct
Краткое содержание страницы № 13
Using this unit Using the Option This is useful for changing the current Using this unit setting easily while using any by pressing the OPTION button. Basic operations x Option list This section describes basic operations of the Set preset/Delete preset (14) unit. Select background photo (20) Begin slide show/Stop slide show (20) Home and Option Select music (19) Select video (19) Using the Home Set current device to Alarm (A/B) (16) You can perform the
Краткое содержание страницы № 14
Changing the display Listening to the radio type The display has four variations. You can 1 Press the RADIO BAND button (ICF- select the screen, the and photo CL75iP) or the RADIO button (ICF- screen, the photo frame, or the music or radio CL70) to turn on the radio. player screen. � Displays the radio screen. 2 Press the RADIO BAND button (ICF- 1 Press the DISPLAY button repeatedly. CL75iP) or the BAND button (ICF-CL70) � Changes the display type cycles as an
Краткое содержание страницы № 15
Using this unit Deleting a preset Using the r 1 Select the desired preset number with The dual alarm allows you to use two b/B. individually set alarms. For each alarm, you can 2 Press the OPTION button and select set a favorite sound, or use an originally [Delete preset]. recorded sound with a selected photo display. � Confirmation screen appears, the selected preset is deleted. Setting an alarm Improving the reception FM: Extend the FM wire aerial fully to increase
Краткое содержание страницы № 16
xAlarm Sound Deactivating the alarm setting Select your favorite alarm sound with v/V. This Press the OFF x ALARM RESET button to unit is equipped with 7 alarm modes listed deactivate the alarm. The alarm will sound again below. at the same the next day. FM Radio Sets the preset FM ion. Note � When the alarm sounds, the original alarm screen AM Radio Sets the preset AM ion. appears except [Fun Wake-up] alarm screen. Buzzer Sets the buzzer. � For details on what to do in the eve
Краткое содержание страницы № 17
Using this unit xTo record voice Fun Wake-up A Select and press the ENTER button. � Confirmation screen appears. You can wake up by your original voice and a B Select [Yes] with b/B and press the photo as an alarm. If you want to set an alarm to ENTER button. «Fun Wake-up», refer to «Setting an alarm» on page 15. � When recording starts, record into the microphone. Good morning! Note � Maximum recording is 10 seconds. If you want to stop during recording, select x. � If you want to c
Краткое содержание страницы № 18
Using the sleep r Enjoying music, video You can easily set the sleep r by pressing and photos the SLEEP button repeatedly. Each you press the SLEEP button, the duration (in minutes) changes as follows: Importing files 120 90 60 30 20 10 1 Insert a memory card firmly into the slot with its label side facing toward OFF you or connect a USB device to the rear of this unit. Tip � [SLEEP] appears on the screen when the sleep r is set. Nature Sound for a good night’s sleep Pre
Краткое содержание страницы № 19
Using this unit Note Playing back music, video and � For details on memory cards you can use with this unit, see » the memory cards» (25). setting the background photo � Do not disconnect the AC power cord (mains lead) (wallpaper) from the wall outlet (wall socket) during the operation. The file may be damaged. 1 Press the HOME button. � Remove a memory card from the slot or disconnect the USB device from the USB connector in the 2 Select [Music] or [Video] and opposite direction fr
Краткое содержание страницы № 20
Note � Check supported file formats beforehand, refer to Using iPod & iPhone «Specifications» on page 30. � You cannot display the cover photo for WMA s (For ICF- content. � Photos are used only for the background photo CL75iP only) (wallpaper). The background photo cannot be played back. You can enjoy music, etc., from iPod by connected to this unit. To use iPod, refer to the Tip user’s guide of your iPod. � To change the background photo (wallpaper), press the OPTION button to
Источник