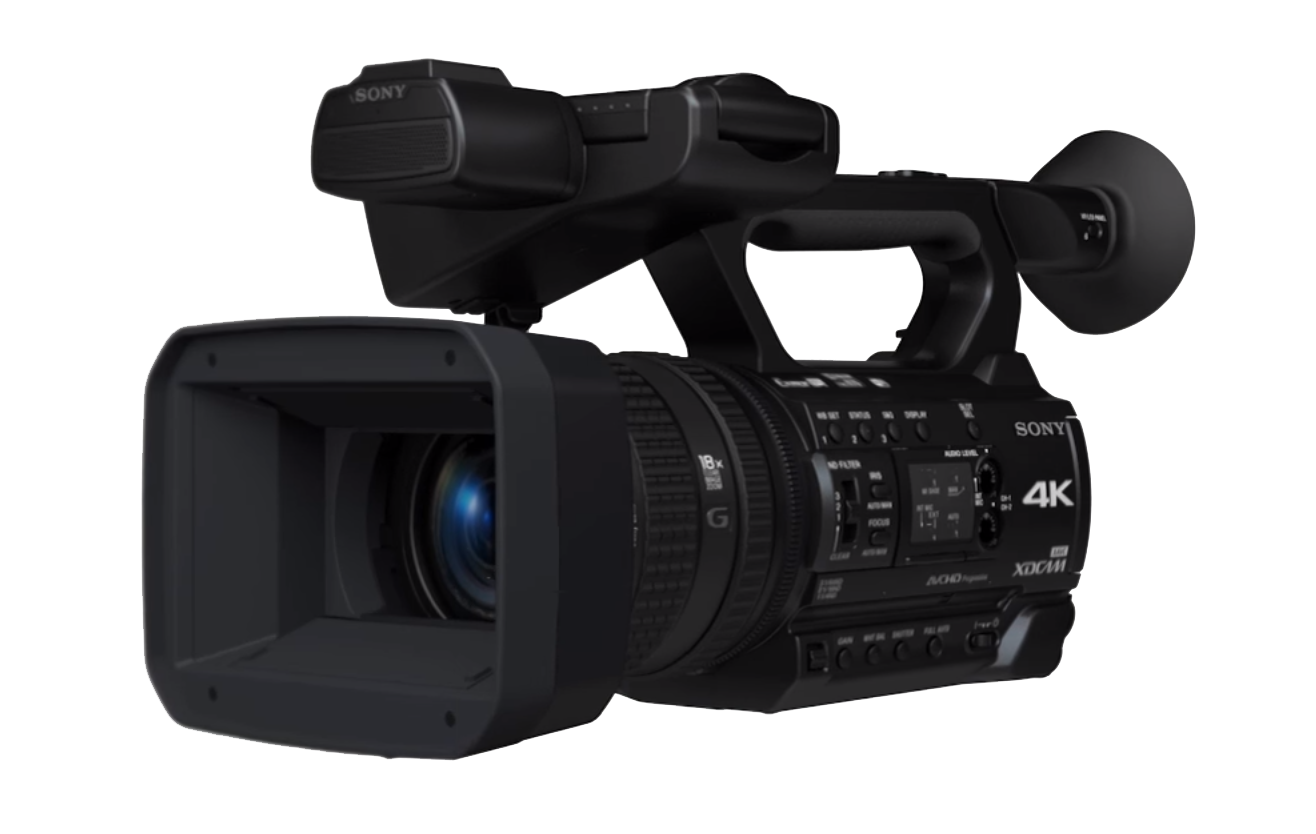
Для студии приобрели новую видеокамеру Sony pxw-z150 и поскольку в интернете отсутствует инструкция на русском языке, мы сделали машинный перевод прилагающейся к камере книжки. Все желающие могут скачать инструкцию с нашего сайта. Данная видеокамера снимает в 4K формате и FullHD (10 bit 4:2:2), что выгодно отличает ее среди конкурентов.
Продавец в магазине оказался очень любезный и дал несколько важных советов по этой видеокамере. Оказывается, известная проблема с объективом этой линейки камер (жужжание стабилизатора), может возникнуть не только из-за плохой транспортировки камеры (при ударе в объективе что-то деформируется), но и из-за включений видеокамеры с опущенным объективом «в пол».
В нашем блоге мы будем рассказывать о опыте работы с данной камерой, поэтому можете сохранить блог в закладку браузера и посещать нас иногда.
-
Contents
-
Table of Contents
-
Troubleshooting
-
Bookmarks
Quick Links
Solid-State Memory
Camcorder
Operating Guide
PXW-Z150
4-586-803-11(1)
Identifying Parts and
Controls
Getting Started
Recording
Playback
Using Network Functions
Editing
Using the Menu
Troubleshooting
Additional Information
®
Related Manuals for Sony PXW-Z150
Summary of Contents for Sony PXW-Z150
-
Page 1
4-586-803-11(1) Solid-State Memory Identifying Parts and Controls Camcorder Getting Started Recording Operating Guide Playback Using Network Functions Editing Using the Menu Troubleshooting Additional Information ® PXW-Z150… -
Page 2: Read This First
Read this first Before operating this unit, please read this manual thoroughly, and retain it for future reference. Precautions when using the the LCD screen. This is not a malfunction. These points are normal results of the camcorder manufacturing process and do not affect the •…
-
Page 3: Your Computer
recovered. Save important data on the memory a result, you may not be able to record and save card on other media such as a computer, before images properly. If this happens, save images on a formatting the memory card. PC, then format the memory card (p.
-
Page 4: Table Of Contents
Table of Contents Read this first ………………. 2 Identifying Parts and Controls Identifying Parts and Controls …………..8 Body ………………… 8 Wireless Remote Commander …………16 Screen Indicators ………………. 17 Getting Started Step 1: Checking supplied accessories ……….19 Step 2: Charging the battery pack …………20 Step 3: Attaching the accessory shoe …………
-
Page 5
Adjusting the brightness ……………..40 Adjusting the iris …………….40 Adjusting the gain …………….41 Adjusting the shutter speed …………… 41 Adjusting the light level (ND filter) …………42 Adjusting the color tone …………….43 Adjusting the white balance …………… 43 Audio setup ………………..45 Recording sound from the internal microphone …….. -
Page 6
Table of Contents (Continued) Connecting without using the NFC function (iPhone/iPad) ….81 Configuring a wireless LAN …………..82 Selecting and registering an access point ……… 82 Registering an access point using the WPS function ……83 Registering an access point using the WPS PIN method ….84 Registering an access point manually ………. -
Page 7
Troubleshooting Troubleshooting ………………115 Warning indicators and messages …………122 Additional Information Recording time ………………126 Function limitations when recording ………….129 Limitations for each file format …………129 Slow & Quick Motion and High Frame Rate recording limitations … 130 Proxy recording supported formats …………131 Streaming supported formats ……………132 Using your camcorder abroad …………..134 File/folder structure on the recording media ………135… -
Page 8: Identifying Parts And Controls
Identifying Parts and Controls Identifying Parts and Controls Body The numbers in ( ) are reference pages. A Hook for shoulder strap B Accessory shoe receptacle (p. 22) C ASSIGN4/LAST SCENE button (p. 61) D Microphone holder (p. 9) E Multi Interface Shoe (p. 46) F Power zoom lever (p.
-
Page 9
Attaching the microphone (sold separately) This section explains how to connect an external microphone (sold separately). Put the cable in the outer cable holder. 1 Place the microphone A into the microphone holder B. 2 Connect the plug of the microphone to the INPUT1 jack or INPUT2 jack C. -
Page 10
Identifying Parts and Controls (Continued) A Lens (G lens) Q AUDIO LEVEL (CH-2) dial (p. 45) B Lens cover with hood (p. 11) R AUTO/MAN (CH-2) switch (p. 45) C Internal microphone (p. 45) S CH-2 (INT MIC/EXT/MI SHOE) switch (p. 45) D Remote control sensor (p. -
Page 11
Attaching the lens cover with hood PUSH (lens hood removal) button Align the marks on the lens hood to those on the camcorder, and turn the lens hood in the direction of the arrow until it is locked. Removing the lens cover with hood Press and hold the PUSH (lens hood removal) button, and turn the lens hood in the opposite direction to the arrow. -
Page 12
Identifying Parts and Controls (Continued) A SDI OUT jack (p. 70) M Tripod receptacles (1/4 inch, 3/8 inch) Supports 1/4-20UNC and 3/8-16UNC B VIDEO OUT jack/AUDIO OUT jack screws. (p. 70) For mounting on a tripod (sold C HDMI OUT jack (p. 70) separately, screw length 5.5 mm or D Multi/Micro USB jack (p. -
Page 13
of the cable clamper using a cable tie or similar object. Cable clamper Loop clamper b Note • Do not use the cable clamper/loop clamper for any purpose other than securing cables (for example, attaching a strap for carrying the camcorder). -
Page 14
Identifying Parts and Controls (Continued) A Focus ring (p. 34) B Lens cover lever (p. 11) C Zoom ring (p. 33) D Iris ring (p. 40) E Hook for shoulder strap F Eye sensor (p. 24) G Viewfinder (p. 25) H Large eyecup (p. -
Page 15
A LCD screen (p. 24) B MENU button (p. 98) C V/v/B/b/SET buttons (p. 98) D THUMBNAIL button (p. 64) E Memory card slot A/Memory card access lamp (p. 27) F Memory card slot B/Memory card access lamp (p. 27) G i (headphones) jack (p. -
Page 16: Wireless Remote Commander
Identifying Parts and Controls (Continued) b Notes Wireless Remote Commander • Aim the Wireless Remote Commander towards the remote sensor to operate your camcorder. Remove the insulation sheet before using • Point the remote sensor away from strong light the Wireless Remote Commander. sources such as direct sunlight or overhead Insulation sheet lighting.
-
Page 17: Screen Indicators
Screen Indicators Indicator Meaning Center Upper left Upper right Warning (p. 122) Playback indicator (p. 64) Processing Relay recording (p. 31) SDI/HDMI REC CONTROL (p. 104) Bottom Upper right Upper left Indicator Meaning Indicator Meaning VF/LCD PANEL (p. 25) 100% Remaining battery Estimated remaining INTELLIGENT AUTO…
-
Page 18
Screen Indicators (Continued) Indicator Meaning White balance (p. 43) Histogram (p. 107) LOW LUX (p. 49) Audio level display (p. 109) Digital extender (p. 99) NIGHTSHOT (p. 49) ND filter (p. 42) Multi Interface Shoe video light (p. 101) Manual volume adjustment (p. -
Page 19: Getting Started
Lens cover with hood (p. 11) supplied with your camcorder. If, for any reason, there is something missing, contact your Sony dealer. The number in the parentheses indicates the number of that item supplied. • Memory cards are sold separately.
-
Page 20: Step 2: Charging The Battery Pack
• You can use a large capacity battery pack, NP- recorded movies, using the “Catalyst F970 (sold separately), with your camcorder. Browse” application software. For details, see the supplied brochure. Sony Professional products website: U.S.A. http://pro.sony.com Canada http://www.sonybiz.ca Latin America http://sonypro-latin.com Europe, Middle East, and Africa http://www.pro.sony.eu…
-
Page 21
When charging ends Connect the DC plug to the DC IN The CHG lamp turns off when the battery is jack of the camcorder. fully charged. Disconnect the AC Adaptor from the DC IN jack. z Tip • You can check the remaining battery life with the status check function (p. -
Page 22: Step 3: Attaching The Accessory Shoe
Step 3: Attaching the Step 2: Charging the battery pack (Continued) accessory shoe On the battery pack To mount the accessory shoe • Always turn the ON/STANDBY switch to Mount the accessory shoe on the accessory STANDBY (1) before changing the battery shoe mount as illustrated.
-
Page 23: Step 4: Turning On The Camcorder And Setting The Date And Time
Step 4: Turning on the camcorder and setting the date and time Turning on the camcorder Setting the date and time Set the date and time when you use your camcorder for the first time. Turn the ON/STANDBY switch to ON (❙).
-
Page 24: Step 5: Adjusting The Lcd Screen And Viewfinder
Step 5: Adjusting the Step 4: Turning on the camcorder and setting the date and time (Continued) LCD screen and viewfinder Using the LCD screen The LCD screen can be rotated in the range as illustrated below, allowing a person other than the camera operator to see the image.
-
Page 25: Adjusting The Viewfinder Focus
b Note Large eyecup The LCD screen and the viewfinder do not (supplied) operate at the same time. Adjusting the viewfinder focus Diopter adjustment dial Move it until the picture becomes clear. b Note • Do not remove the eyecup attached to the camcorder.
-
Page 26
Step 5: Adjusting the LCD screen and viewfinder (Continued) • The eye sensor will be activated if the eye sensor is blocked, even if you are not looking into the viewfinder. Using buttons Press the ASSIGN6/VF/LCD PANEL button. The [VF/LCD PANEL] menu setting changes with each press of the button. -
Page 27: Step 6: Inserting A Memory Card
Step 6: Inserting a memory card Supported memory cards File format Supported memory cards AVCHD SD, SDHC, SDXC memory cards (Class 4 or U1 or faster) Memory Stick PRO Duo (Mark2), Memory Stick PRO-HG Duo AVCHD SDHC, SDXC memory cards (Class 10 or U1 or faster) (Slow &…
-
Page 28
Step 6: Inserting a memory card (Continued) Selecting the memory card slot to be Open the cover, and insert the used for recording memory card with the notched edge Press the SLOT SEL button to change in the direction as illustrated until it which slot is selected for recording. -
Page 29: Recording
Recording Recording Recording lamp Handle record button Lens cover with hood START/STOP button Recording Your camcorder records movies on memory cards. The factory setting for recording is XAVC HD. Do the following steps to record. Open the shutter of the lens cover with hood. Continued ,…
-
Page 30
Recording (Continued) Turn the ON/STANDBY switch to ON (❙). Press the START/STOP button (or the handle record button) to start recording. [STBY] t [REC] The recording lamps light up during recording. To stop recording, press the START/STOP button (or the handle record button) again. b Notes •… -
Page 31: Continuous Recording On The Memory Cards (Relay Rec)
z Tips • For details about changing the screen display during recording, see page 68. • For details about screen display during recording, see page 17. • The recording lamps can be set to stay off ([REC LAMP], p. 113). Continuous recording on the memory cards (Relay Rec) Insert memory cards each in both slots A and B so the camcorder switches memory card A (or B) just before the remaining space on the other one runs out, and continues recording on the…
-
Page 32: Recording Movies Using Both Memory Card A And B (Simul Rec)
Recording (Continued) Recording movies using both memory card A and B (Simul Rec) You can record movies on both memory card A and memory card B simultaneously. Press MENU t select (REC/OUT SET) t [REC SET] t [SIMUL/RELAY REC] t [SIMULTANEOUS REC] with the V/v/B/b/SET button.
-
Page 33: Adjusting The Zoom
z Tip Adjusting the zoom • You can turn the handle zoom function on/off, and change the zoom operation speed ([HANDLE ZOOM], page 100). Adjusting the zoom with the zoom ring You can zoom at the desired speed by turning the zoom ring B. Fine adjustment is also possible.
-
Page 34: Adjusting The Focus
Adjusting the focus You can adjust the focus manually for different recording conditions. During recording or standby, Use this function in the following cases. press the FOCUS AUTO/MAN – To record a subject behind a window covered button B to set the focus to with raindrops.
-
Page 35: Focusing On A Detected Face (Face Detection)
Press the ASSIGN5/FOCUS MAG Select (CAMERA SET) t button. [FACE DETECTION] t [ON] with the V/v/B/b/SET button D. The center of the screen is magnified. The setting changes with each press of the When the faces are detected, frames button. appear on the LCD screen.
-
Page 36
Adjusting the focus (Continued) • Face detection is not available in the following cases. – When streaming is ON during XAVC HD/ QFHD recording – When HDMI output or proxy recording is ON during XAVC QFHD recording • For details about limitations of face detection, see “Function limitations when recording”… -
Page 37: Selecting The File Format And Recording Format
Selecting the file format and recording format • Frame rate: 30/25/24 Supported file formats • Scanning system: p (progressive) • Bit rate: 100 Mbps/60 Mbps The following five file formats are supported (default setting in bold). XAVC HD • XAVC QFHD (4K mode) (Default setting in bold) •…
-
Page 38: Setting The Output Destination When Recording In 4K Mode
Selecting the file format and recording format (Continued) Setting the output destination 1080/60i (1440) 1080/50i (1440) HQ when recording in 4K mode 720/60p HQ 720/50p HQ You can select the output for the video signal when recording in XAVC QFHD. •…
-
Page 39: Proxy Recording
Proxy recording – Face detection function This function allows you to simultaneously – Proxy recording (however, not supported record a low bitrate proxy file at the same when all the conditions below are met) time as recording the high bitrate original •…
-
Page 40: Adjusting The Brightness
Adjusting the Proxy recording (Continued) brightness You can adjust the image brightness by Select the desired image size in adjusting the iris, gain or shutter speed, or by adjusting the light volume with the ND (REC/OUT SET) t [REC filter switch B. SET] t [PROXY REC MODE] t [SIZE] t with the V/v/B/b/SET button.
-
Page 41: Adjusting The Gain
Press the GAIN button E. next to the gain value disappears, and the gain value is highlighted. Iris value Turn the iris ring A to adjust the value. The volume of the light increases the Gain value more that you open the aperture (decreasing F value).
-
Page 42: Adjusting The Light Level (Nd Filter)
Adjusting the brightness (Continued) • You can switch the shutter speed display between seconds and degrees ([SHUTTER Press the SHUTTER button F. DISPLAY], p. 109). next to the shutter speed value disappears, and the shutter speed value To adjust automatically is highlighted.
-
Page 43: Adjusting The Color Tone
Adjusting the color tone ND filter switch B suppresses this Adjusting the white balance phenomenon and gives better recording results. You can adjust and fix the white balance according to the lighting conditions of recording environment. You can store white balance values in memory A ( A) and memory B ( respectively.
-
Page 44
Adjusting the color tone (Continued) 2 Press the WHT BAL button B to highlight the white balance value. Select PRESET, A, or B using the manual lever A. 3 Select A ( A) or B ( B) using the manual lever. x Setting the A/B value 4 Press the MENU button. -
Page 45: Audio Setup
Audio setup Audio level controls The jacks, switches and dials shown below allow you to set the sound that is recorded. E: AUTO/MAN (CH-1) switch See page 9 for details about connecting a I: AUTO/MAN (CH-2) switch microphone. F: AUDIO LEVEL (CH-1) dial J: AUDIO LEVEL (CH-2) dial Recording sound from the internal microphone…
-
Page 46: Recording Sound From An External Audio Device
Audio setup (Continued) • If [INPUT CH SELECT] is set to Recording sound from an [INPUT1/INPUT1] in the [XLR SET] external audio device menu, the audio input on the INPUT1 jack is recorded to both CH1 and CH2. Use the following procedure if using a [XLR SET] >…
-
Page 47: Setting The Audio Recording Level
Connect the Multi Interface Shoe Select (AUDIO SET) t compatible microphone (sold [HEADPHONE OUT] with the V/v/ separately) to the Multi Interface B/b/SET button. Shoe. Select one of the following. Set the CH-1 (INT MIC/EXT/MI [HEADPHONE SHOE) switch D and CH-2 (INT Headphones audio output OUT] setting MIC/EXT/MI SHOE) switch H to…
-
Page 48: Useful Functions
Useful functions Selecting suitable settings Press the V/v/B/b/SET button B, automatically (auto mode select [AUTO], [INTELLIGENT AUTO], or [SCENE SELECTION], setting) and press the button again. You can make optimal recordings in various situations. b Notes • When you select [INTELLIGENT AUTO], [STEADYSHOT] is set to [ACTIVE], and the angle of view shifts 1.08 times toward the telephoto side.
-
Page 49: Shooting In Dimly Lit Locations (Low Lux)
Setting values Recording conditions Press the ASSIGN button. Shoots distant subjects • is displayed. clearly. This setting also prevents your camcorder • To cancel, press the ASSIGN button Landscape* from focusing on any again. ([LANDSCAPE]) glass or mesh in windows between the camcorder and the subject.
-
Page 50: Customizing The Picture Quality (Picture Profile)
Useful functions (Continued) Customizing the picture quality Select (CAMERA SET) t (Picture Profile) [PICTURE PROFILE] t the desired picture profile number You can customize the picture quality by using the V/v/B/b/SET button, adjusting picture profile items such as then press the button again. [GAMMA] and [DETAIL].
-
Page 51
6 Press the V/v/B/b/SET button, select [OK], then press the button again. The picture profile indicator is displayed. Continued ,… -
Page 52
Useful functions (Continued) BLACK LEVEL To set the black level. Item Description and settings Sets the black level. –15 to +15 GAMMA To select a gamma curve. Item Description and settings [STANDARD] Standard gamma curve [STILL] Gamma curve to create the tone of a still image. [CINEMATONE1] Gamma curve 1 for producing tone of film camera images [CINEMATONE2]… -
Page 53
KNEE To set knee point and slope for video signal compression to prevent over-exposure by limiting signals in high intensity areas of the subject to the dynamic range of your camcorder. When selecting [STANDARD] or [STILL] in [GAMMA], [KNEE] is set to off if [MODE] is set to [AUTO]. -
Page 54
Useful functions (Continued) SATURATION To set the color level. Item Description and settings –32 (light) to +32 (dark) COLOR PHASE To set the color phase. Item Description and settings –7 (greenish) to +7 (reddish) COLOR DEPTH To set the color depth for each color phase. This function is more effective for chromatic colors and less effective for achromatic colors. -
Page 55
Item Description and settings MEMORY1 COLOR Sets the color stored in Memory 1. [PHASE]: Sets color phase. 0 (purple) to 8 (red) to 16 (yellow) to 24 (green) to 31 (blue) [PHASE RANGE]: Sets color phase range. 0 (no color selection), 1 (narrow: to select only a single color) to 31 (wide: to select multiple colors in similar color phase) [SATURATION]: Sets saturation. -
Page 56
Useful functions (Continued) WB SHIFT To set items for the white balance shift. Items you can adjust differ depending on the filter type. Item Description and settings [FILTER TYPE] Selects a color filter type for the white balance shift. [LB-CC] : Film type (color conversion and correction) [R-B] : Video type (correction of R and B levels) [LB[COLOR TEMP]]… -
Page 57: Setting Time Data
COPY Setting the time code To copy the settings of the picture profile to another picture profile number. 1 Press the MENU button, press the V/v/ B/b/SET button and select (TC/ RESET UB SET) t [TC PRESET], then press the button again. To reset the picture profile to the default setting.
-
Page 58: Slow-Motion Recording At High Frame Rate (Hfr)
Useful functions (Continued) 3 Press the V/v/B/b/SET button, select the first two digits, then press the button again. 4 Set other digits by repeating step 3. 5 Press the V/v/B/b/SET button, select [OK], then press the button again. To reset the user bits Select [RESET] in step 2 of “Setting the user bits”…
-
Page 59
MPEG HD 422/MPEG HD 420 slow motion or quick motion images. The images recorded with the Slow & Quick When [60i] is selected Motion function will appear smoother than slow or fast-forward playback of images REC FORMAT recorded at normal speed. MEDIA 1080/24p 1080/30p… -
Page 60
Useful functions (Continued) 1080/24p 35Mbps – MPEG HD 422 (Default setting in bold) 1080/30p 50Mbps 1080/25p 50Mbps 1080/24p 50Mbps – MPEG HD 420 (Default setting in bold) 1080/30p HQ 1080/25p HQ 1080/24p HQ – AVCHD (Default setting in bold) 1080/60p PS 1080/50p PS 1080/30p FX 1080/25p FX… -
Page 61: Reviewing The Most Recently Recorded Scene (Last Scene Review)
Recording in Slow & Quick Motion Reviewing the most recently mode recorded scene (Last Scene 1 Select (CAMERA SET) t [S&Q Review) MOTION] t [EXECUTE] with the V/ v/B/b/SET button B or press the You can review the most recently recorded ASSIGN3/S&Q button C.
-
Page 62: Assigning Functions To The Assign Buttons
Assigning functions to the ASSIGN buttons Some functions can be assigned to the • CAMERA DATA DISPLAY (p. 108) ASSIGN buttons. • AUDIO LEVEL DISPLAY (p. 109) You can assign a single function to each of • DATA CODE (p. 109) the ASSIGN1 to 6 buttons.
-
Page 63
Press the MENU button A. Select (OTHERS) t [ASSIGN BUTTON] with the V/v/B/b/SET button B. Press the V/v/B/b/SET button B, select the ASSIGN button that you want to set, then press the button again. Press the V/v/B/b/SET button B, select the function that you want to assign, then press the button again. -
Page 64: Playback
Playback Playback THUMBNAIL button Playback Open the LCD panel.
-
Page 65
Press the THUMBNAIL button. The THUMBNAIL screen appears after a few seconds. Memory card Playback mode Back Thumbnails Next Current movie data (p. 66) • You can turn on or off the date and time display on the thumbnails by pressing the DISPLAY button. •… -
Page 66
Playback (Continued) 3 Select the thumbnail you want to play using the V/v/B/b buttons, and press the SET button. Selecting the thumbnail will show information about the movie in the lower part of the LCD screen. A Date and time of recording started B Resolution C Frame rate D Recording mode… -
Page 67
To return to recording mode Press the THUMBNAIL button. On playing back movies • Movies recorded using this camcorder may not be played back normally on devices other than this camcorder. Also, movies recorded on other devices may not play back properly on this camcorder. -
Page 68: Changing/Checking The Settings In Your Camcorder
Changing/checking the settings in your camcorder Displaying recording data (Data Code) You can display information, including date, time and camera data automatically stored during recording on the screen during playback. Select (DISPLAY SET) t DATA CODE and choose the data that you want to display, or press the ASSIGN button to which the DATA CODE function is assigned, during…
-
Page 69: Checking The Settings In Your Camcorder (Status Check)
F Camera shake correction (Steady Shot) • Battery Info You can check the remaining capacity of the attached battery. b Notes • Data code is not recorded in XAVC QFHD, XAVC HD, and MPEG HD modes. • When you play back the memory card on other devices, the camera data may be displayed incorrectly.
-
Page 70: Connecting To A Monitor Or A Tv
Connecting to a monitor or a TV Playback image quality depends on the type of monitor or TV, or the jacks used to make the connection. SDI cable (sold separately) To SDI input jack To video input jack Video cable (sold separately) To audio input jack Audio cable (sold separately) To HDMI input jack…
-
Page 71: Selecting Jacks For External Output
Notes • It is recommended that you use an authorized cable with HDMI logo or a Sony HDMI cable. • Images are not output from the HDMI OUT jack of your camcorder, if copyright protection signals are recorded in the movies.
-
Page 72: Output Signal Formats
Connecting to a monitor or a TV (Continued) Output signal formats The signal format of the outputs from the SDI OUT jack, HDMI OUT jack, and multi/micro USB jack is shown below. SDI OUT/HDMI OUT output format (when [60i] is selected) XAVC QFHD –: Independent of set value Menu item…
-
Page 73
Menu item Recording format SDI/HDMI 24p/30p SDI OUT output HDMI OUT output REC/OUT SET> REC/OUT SET> REC/OUT SET> signal format signal format REC SET> VIDEO OUT> VIDEO OUT> REC FORMAT SDI/HDMI 24p/30p 2160/30p 2160p/1080p/480i 24p/30p 1080/30p 2160/30p 24PsF/30PsF 1080/30psf 60P(Pull Down) 1080/60p 2160p/720p/480i –… -
Page 74
Connecting to a monitor or a TV (Continued) XAVC HD/MPEG HD 422/MPEG HD 420/AVCHD –: Independent of set value Menu item Recording format SDI/HDMI 24p/30p SDI OUT output HDMI OUT output REC/OUT SET> REC/OUT SET> REC/OUT SET> signal format signal format REC SET>… -
Page 75
Menu item Recording format SDI/HDMI 24p/30p SDI OUT output HDMI OUT output REC/OUT SET> REC/OUT SET> REC/OUT SET> signal format signal format REC SET> VIDEO OUT> VIDEO OUT> REC FORMAT SDI/HDMI 24p/30p 1080/60p 2160p/1080p/480i – 1080/60p 1080/60p 720/60p 2160p/720p/480i 720/60p 720/60p 1080/60i 2160p/1080i/480i… -
Page 76
Connecting to a monitor or a TV (Continued) SDI OUT/HDMI OUT output format (when [50i] is selected) XAVC QFHD –: Independent of set value Menu item Recording format SDI/HDMI SDI OUT output HDMI OUT output REC/OUT SET> REC/OUT SET> REC/OUT SET> signal format signal format REC SET>… -
Page 77
XAVC HD/MPEG HD 422/MPEG HD 420/AVCHD –: Independent of set value Menu item Recording format SDI/HDMI SDI OUT output HDMI OUT output REC/OUT SET> REC/OUT SET> REC/OUT SET> signal format signal format REC SET> VIDEO OUT> VIDEO OUT> REC FORMAT SDI/HDMI 1080/25p 2160p/1080p/576i… -
Page 78: Using Network Functions
Using Network Functions Using with a Smartphone The Wi-Fi function of the camcorder enables you to operate the camcorder remotely by a smartphone. You need iOS 7.0 or later. • You cannot use NFC One-touch when you use iOS. b Notes •…
-
Page 79: Connecting The Camcorder To An Android Smartphone Equipped With The Nfc Function Using One-Touch
iPhone/iPad: page 81 z Tip • You can assign [SMARTPHONE CONNECT] to an ASSIGN button. You can start [CTRL W/SMARTPHONE] by pressing that ASSIGN button when the shooting screen is displayed (p. 62). Functions that can be controlled using [CTRL W/SMARTPHONE] •…
-
Page 80: Connecting Without Using The Nfc Function (Android)
Using with a Smartphone (Continued) Connecting without using the Touch the smartphone on the NFC function (Android) camcorder. The smartphone connects to the camcorder, and “Content Browser Select [Settings] on your Mobile” is activated. smartphone, then select [Wi-Fi] [CTRL W/SMARTPHONE] starts on and the SSID (displayed on the the camcorder.
-
Page 81: Connecting Without Using The Nfc Function (Iphone/Ipad)
Connecting without using the Confirm connection to the SSID NFC function (iPhone/iPad) displayed on the camcorder. Select [Settings] on the iPhone or iPad, then select [Wi-Fi] and the SSID (displayed on the camcorder). z Tip • The next time that you want to connect to the camcorder, select the camcorder in the device list in the Connect menu, and select [Connect].
-
Page 82: Configuring A Wireless Lan
Configuring a wireless Using with a Smartphone (Continued) You can connect the camcorder to a Confirm connection to the SSID network using a wireless LAN. displayed on the camcorder. Selecting and registering an access point You can connect the camcorder and an access point using a wireless LAN.
-
Page 83: Registering An Access Point Using The Wps Function
Priority Connection Select (NETWORK SET) t Select whether to configure connection [Wi-Fi SET] t [WPS] with the V/v/ priority for access points. B/b/SET button. z Tip • After a short delay, the following • Selecting [DNS server setting] on the IP screen appears.
-
Page 84: Registering An Access Point Using The Wps Pin Method
Configuring a wireless LAN (Continued) • The camcorder and access point may not • [Registered.] appears when the access connect or the distance between them for point is registered successfully. The successful communication may be short, SSID of the registered access point is depending on the surrounding environment, also displayed.
-
Page 85: Changing The Device Name
b Note Select , and press the • If ten access points have been registered in the camcorder, another access point cannot be MENU button to close the menu registered and a message appears. Select screen. [Delete], and delete any access points that are no longer required.
-
Page 86: Configuring A Wired Lan
Configuring a wired Configuring a wireless LAN (Continued) You can connect the camcorder to a Screen items Functions network using a wired LAN. 5 Move cursor Moves the cursor in the input box to the left or right 6 Delete Deletes the character preceding the cursor Switches between…
-
Page 87: Using The Streaming Function (Streaming)
Using the streaming function (STREAMING) You can connect the camcorder to a Press the MENU button. network and stream a movie in real-time to external devices. Streaming formats Select (NETWORK SET) t [WIRED LAN SET] t [IP There are limitations on the size of the ADDRESS SET] with the V/v/B/b/ original file movie and the streaming move.
-
Page 88: Streaming Distribution
Using the streaming function (STREAMING) (Continued) Select/set the setting value. Press the THUMBNAIL button to start streaming distribution. • The screen icon changes to Press the MENU button to return to the shooting screen. Press the THUMBNAIL button again to stop streaming distribution.
-
Page 89: Using The Ftp Transfer Function
Using the FTP transfer function – FACE DETECTION When the camcorder is connected to a – COLOR BAR network, you can transfer recorded movie – DATE REC files directly to an FTP server. Proxy files can also be transferred. – SIMULTANEOUS REC/RELAY REC •…
-
Page 90: Selecting An Ftp Server
Using the FTP transfer function (Continued) USER INFO SET User name and password Select the media, where the files you want to transfer are stored, b Note and the file format on the • It is recommended that [Secure Protocol] be set thumbnail screen.
-
Page 91: Checking Ftp Transfer Results
Select whether to turn the Select (NETWORK SET) t camcorder off (YES) or not (NO) [FTP TRANSFER] t [FTP automatically when the FTP RESULT]. transfer is completed. • The transfer results are displayed. • File transfer starts. • The displayed transfer results contains the following items.
-
Page 92: Importing A Root Certificate
• If a problem occurs due to inadequate security measures or due to foreseeable circumstances, Sony Corporation is not Insert the memory card with the responsible for any resulting damage. root certificate into memory card slot A of the camcorder.
-
Page 93: Resetting Network Settings
Resetting network settings The following settings are reset when resetting network settings. • SSID/password for smartphone operation (p. 80) • Streaming settings (p. 87) • FTP transfer settings (p. 89) • FTP transfer result (p. 91) • Wired LAN settings (p. 86) •…
-
Page 94: Editing
Editing Protecting movies Dividing a movie (Protect) You can divide a movie at a designated Protect movies to avoid deleting them by point. mistake. Press the MENU button while Press the MENU button when the playing back movies. THUMBNAIL screen is displayed. Press the V/v/B/b/SET button, Press the V/v/B/b/SET button, then select…
-
Page 95: Deleting Movies
Deleting movies You can free media space by deleting movies from a memory card. Select , successively, according to the screen display. b Notes • You cannot restore images once they are deleted. • Do not remove the battery pack, the AC Adaptor, or the memory card from your camcorder during the operation.
-
Page 96: Formatting A Memory Card
Formatting a memory Deleting all data from card the memory card completely Formatting deletes data from the memory card to recover recordable free space. If a memory card is used repeatedly, b Notes garbage data accumulate which may prevent the image data from being written •…
-
Page 97: Repairing The Image Database File
Repairing the image database file b Notes This function checks the database information and the consistency of movies • It may take from several minutes to several on the memory card, and repairs any hours to empty a memory card, depending on the capacity.
-
Page 98: Using The Menu
Using the Menu Operating the menu You can change various settings or make detailed adjustments using the menu items Press the V/v/B/b/SET button, displayed on the LCD screen. select the desired menu icon, then press the button again. MENU button CAMERA SET (p.
-
Page 99: Menu Items
Menu items The function and setting value of each menu item are as follows. The default settings are marked with bold text. The display sequence of menu items may vary from the device. CAMERA SET menu CAMERA SET Menu item Sub-items/Settings Description AGC LIMIT…
-
Page 100
Menu items (Continued) CAMERA SET Menu item Sub-items/Settings Description ZOOM SET ZOOM TYPE Selects the type of zoom used when operating OPTICAL ZOOM the zoom lever. ONLY, ON[CLEAR OPTICAL ZOOM ONLY: Uses optical zoom IMAGE ZOOM], only. ON[DIGITAL ZOOM] ON[CLEAR IMAGE ZOOM]: Uses clear image zoom in addition to optical zoom. -
Page 101
CAMERA SET Menu item Sub-items/Settings Description AUTO MODE SET AUTO, INTELLIGENT Sets auto mode to optimize settings to suit the AUTO, SCENE scene to record (p. 48). SELECTION SCENE SELECTION NIGHT SCENE, Sets the scene to use when auto mode is set to SUNRISE&SUNSET, [SCENE SELECTION] (p. -
Page 102: Rec/Out Set Menu
Menu items (Continued) CAMERA SET Menu item Sub-items/Settings Description COLOR BAR ON/OFF Displays and records color bars, and outputs OFF, ON audio tone signals. • This function is automatically set to [OFF] when you switch the format, execute a function with the MENU button, or turn off the camcorder.
-
Page 103
REC/OUT SET Menu item Sub-items/Settings Description VIDEO OUT OUTPUT SELECT Selects the output destination for the video OUTPUT SELECT signal. SDI, HDMI, VIDEO Selects the output destination for the video QFHD REC OUTPUT signal when recording in XAVC QFHD (p. 38). VF/LCD PANEL, EXTERNAL OUTPUT SDI/HDMI… -
Page 104: Audio Set Menu
Menu items (Continued) REC/OUT SET Menu item Sub-items/Settings Description HDMI TC OUTPUT Sets whether to output time code to other OFF, ON professional-use devices, using HDMI. SDI/HDMI REC When the camcorder is connected to an external CONTROL recorder, sets whether the external recorder OFF, ON automatically starts/stops recording based on the camcorder’s operation.
-
Page 105
AUDIO SET Menu item Sub-items/Settings Description XLR SET INPUT CH SELECT Selects the signals for recording on CH-1 and INPUT1/INPUT1, CH-2 (p. 46). INPUT1/INPUT2 INPUT1/INPUT1: Records the input on INPUT1 signal to both CH-1 and CH-2. INPUT1/INPUT2: Records the INPUT1 signal to CH-1, and the INPUT2 signal to CH-2. -
Page 106
Menu items (Continued) AUDIO SET Menu item Sub-items/Settings Description INPUT1 TRIM Adjusts the input signal level when recording –18dB to +12dB (0dB) the signal from the INPUT1 jack or INPUT2 jack. INPUT2 TRIM • If the recording level is set to “AUTO” and –18dB to +12dB (0dB) INPUT TRIM is set to [0dB], a –48 dBu input will be recorded at the reference recording… -
Page 107: Display Set Menu
DISPLAY SET menu DISPLAY SET Menu item Sub-items/Settings Description HISTOGRAM OFF, ON, ON[ZEBRA Sets whether to display a histogram. POINT] The histogram displays the luminance distribution that shows how many pixels for each brightness level exist in the image. OFF: Does not display a histogram. ON: Displays a histogram.
-
Page 108
Menu items (Continued) DISPLAY SET Menu item Sub-items/Settings Description MARKER ON/OFF Sets whether to display markers. OFF, ON You can display multiple types of markers at the same time. • Markers are not recorded on the memory card. • During marker display, only the time code, zebra, peaking, and face detection indicators are output, even if [DISPLAY OUTPUT] is set to [ALL OUTPUT]. -
Page 109
DISPLAY SET Menu item Sub-items/Settings Description AUDIO LEVEL ON, OFF Sets whether to display the audio level meters. DISPLAY ZOOM DISPLAY BAR, NUMBER Sets whether to display the zoom position as a bar or number. FOCUS DISPLAY METER, FEET Sets the display of the focus distance in meters or feet. -
Page 110: Tc/Ub Set Menu
Menu items (Continued) TC/UB SET menu TC/UB SET Menu item Sub-items/Settings Description TC/UB DISPLAY TC, U-BIT Switches the display to time code or user bits. TC PRESET PRESET, RESET Sets the time code (p. 57). UB PRESET PRESET, RESET Sets the user bits (p. 57). TC FORMAT DF, NDF Switches the time code recording method when…
-
Page 111: Network Set Menu
TC/UB SET Menu item Sub-items/Settings Description TC MAKE PRESET, Sets how the time code continues. REGENERATE PRESET: Records a preset set time code on the memory card. REGENERATE: Reads the last recorded time code from the memory card, and starts recording with a consecutive time code.
-
Page 112
Menu items (Continued) NETWORK SET Menu item Sub-items/Settings Description Wi-Fi SET ACCESS POINT SET • Selects and configures an access point (p. 82). • Registers an access point using the WPS PIN method (p. 84). • Registers an access point manually (p. 84). Registers an access point using the WPS function (p. -
Page 113: Others Menu
OTHERS menu OTHERS Menu item Sub-items/Settings Description STATUS CHECK Checks the settings in your camcorder (p. 69). CAMERA PROFILE MEMORY CARD A, Loads, saves, and deletes camera profiles. MEMORY CARD B • A camera profile saves configuration settings, such as menu, picture profile, and button settings.
-
Page 114: Edit Menu
Menu items (Continued) OTHERS Menu item Sub-items/Settings Description 60i/50i SEL Switches the current frame rate. 60i: For recording 24p, 30p, 60i, or 60p. 50i: For recording 25p, 50i, or 50p. MEDIA FORMAT MEMORY CARD A, Formats a memory card (p. 96). MEMORY CARD B REPAIR IMAGE DB MEMORY CARD A,…
-
Page 115: Troubleshooting
(OTHERS) t INITIALIZE. 3 Select This operation will reset the date, time, and area settings. 4 Consult your Sony dealer or local authorized Sony service facility. • Power sources/LCD screen/Wireless Remote Commander (p. 115) • Memory cards (p. 117) • Recording (p. 117) •…
-
Page 116
Troubleshooting (Continued) The remaining battery indicator does not indicate the correct figure. • Ambient temperature is too high or too low, or the battery pack has not been charged enough. This is not a malfunction. • Fully charge the battery again. If the problem persists, the battery may be worn-out. Replace with a new battery (page 20, 137). -
Page 117: Memory Cards
Memory cards The camcorder does not operate with the memory card inserted. • The memory card was formatted on a computer. Format it on this camcorder (p. 96). The data file name is incorrect, or flashing. • The file is damaged. •…
-
Page 118
Troubleshooting (Continued) The actual recording time for movies is less than the estimated recording time. • Depending on the recording conditions, the time available for recording may be shorter, for example when recording a fast moving object, etc. (p. 126). The camcorder does not keep the setting changes. -
Page 119
The subjects passing by the frame very fast appear crooked. • This is called focal plane phenomenon. This is not a malfunction. Because of the way that the image device (CMOS sensor) reads out image signals, the subjects passing by the frame rapidly might appear crooked depending on the recording conditions. -
Page 120
Troubleshooting (Continued) The data file name is incorrect, or flashing. • The file is damaged. • The file format is not supported on your camcorder (p. 136). • Only the file name is displayed, if the folder structure does not conform to the universal standard. -
Page 121
Copying/Editing/Connecting to other devices Time code and other information appear on the display of the connected device. • Set [DISPLAY OUTPUT] to [LCD PANEL] (p. 109). Sound cannot be added after recording. • You cannot add sound after recording on your camcorder. Copy cannot be done correctly using the HDMI cable. -
Page 122: Warning Indicators And Messages
If the problem (Warning indicator pertaining to persists even after you have tried a couple the video light) of times, contact your Sony dealer or local authorized Sony service facility. • The battery level is too low. C:04:ss…
-
Page 123
If you connect to a computer on which — (Warning indicators software is installed, you can copy the pertaining to the write-protect of the backed up movies. memory card)* However, the loading of all moves is not guaranteed. • The write-protect switch is set to lock position on the memory card. -
Page 124
(NETWORK SET) t [Wi-Fi Select your camcorder (p. 27). SET] t [ACCESS POINT SET], and • Contact your Sony dealer. register an access point. Do not eject the memory card during Cannot find connectable access writing. Data may be damaged. -
Page 125
Failed to acquire an IP address. Change the IP address setting. Could not acquire the IP address. If connecting to a network via a wireless (NETWORK SET) t LAN, select [Wi-Fi SET] t [ACCESS POINT SET], and specify the IP address manually. If connecting to a network via a wired (NETWORK SET) t LAN, select… -
Page 126: Additional Information
Additional Information Recording time Estimated time of recording and Estimated recording time playback with each battery pack (Unit: minute) Approximate time available when you use a XAVC QFHD fully charged battery pack. 2160 Recording time 4K (QFHD) 60Mbps 100Mbps (Unit: minute) 64GB Continuous Typical…
-
Page 127
50Mbps (3M) 64GB 64GB (305) (360) (495) (665) (105) (100) • When using Sony memory cards. MPEG HD 420 • The number in ( ) is the minimum recordable time. 1080 1080 MPEG (1440) b Note HD 420 • The recording time may vary depending on the… -
Page 128
Recording time (Continued) – MPEG HD 420 HQ: 35Mbps (max) 1920×1080 HQ: 35Mbps (max) 1440×1080 HQ: 35Mbps (max) 1280×720 – AVCHD PS: max 28Mbps 1920×1080 FX: max 24Mbps 1920×1080, 1280×720 FH: approx. 17Mbps (avg) 1920×1080, 1280×720 HQ: approx. 9Mbps (avg) 1280×720… -
Page 129: Function Limitations When Recording
Function limitations when recording For details about limitation when streaming is ON, see page 88. Limitations for each file format Yes: Supported, No: Not supported Functions XAVC QFHD XAVC HD MPEG HD AVCHD RELAY REC (p. 31) SIMULTANEOUS REC (p. 32) FACE DETECTION (p.
-
Page 130: Slow & Quick Motion And High Frame Rate Recording Limitations
Function limitations when recording (Continued) Slow & Quick Motion and High Frame Rate recording limitations Yes: Supported, No: Not supported Slow-motion at high frame rate Functions Slow & Quick Motion (XAVC HD only) RELAY REC (p. 31) SIMULTANEOUS REC (p. 32) FACE DETECTION (p.
-
Page 131: Proxy Recording Supported Formats
Proxy recording supported formats b Notes • Proxy recording is not supported when the following three are selected at the same time. – Recording mode: 4K (XAVC QFHD) – Recording format bit rate: 100Mbps – Simultaneous/relay recording: ON • Proxy recording is not supported when the output during XAVC QFHD recording is set to external output. •…
-
Page 132: Streaming Supported Formats
Streaming supported formats Original file (XAVC) Streaming data Image size 1280×720 640×360 Frame rate (fps) 30(25)p 60(50)p 30(25)p Bit rate (Mbps) 3840×2160 30(25)p 1920×1080 60(50)p 60(50)i 30(25)p 1280×720 60(50)p Original file (AVCHD) Streaming data Image size 1280×720 640×360 Frame rate (fps) 30(25)p 60(50)p 30(25)p…
-
Page 133
Original file (MPEG HD 422) Streaming data Image size 1280×720 640×360 Frame rate (fps) 30(25)p 60(50)p 30(25)p Bit rate (Mbps) 1920×1080 60(50)i 30(25)p 1280×720 60(50)p Original file (MPEG HD 420) Streaming data Image size 1280×720 640×360 Frame rate (fps) 30(25)p 60(50)p 30(25)p Bit rate… -
Page 134: Using Your Camcorder Abroad
Using your camcorder abroad Power supply You can use your camcorder in any country/region using the AC Adaptor supplied with your camcorder within the AC 100V to 240V, 50Hz/60Hz range. Viewing on TV The following shows which countries and regions use 60i and 50i models. Countries and regions for [60i] use Bahama Islands, Barbados, Bermuda, Bolivia, Canada, Central America, Chile,…
-
Page 135: File/Folder Structure On The Recording Media
• Do not modify the files or folders on the camcorder from the computer. Doing so might damage image files, or prevent image files from being played back. • Sony accepts no responsibility for the results of operation using data copied from a PC to a memory card.
-
Page 136: Maintenance And Precautions
Maintenance and precautions 1920×1080/24p, 1280×720/60p About the XAVC format When [50i] is selected: 1920×1080/50i, 1920×1080/25p, Recording and playback on your 1280×720/50p camcorder Audio: LPCM 2 ch Your camcorder can record 4K (QFHD) Recording media: Memory card and HD (high definition) based on the * The camcorder is not able to play back data that XAVC format.
-
Page 137: About The «Infolithium» Battery Pack
About “Memory Stick” media – If you eject the memory card, turn the power off on your camcorder, or remove the battery pack for replacement while your camcorder is Recording/ Types of “Memory Stick” media reading or writing image files on the memory Playback card (while the access lamp is lit or flashing).
-
Page 138
Maintenance and precautions (Continued) About battery life – Put the battery pack in a pocket to warm it up, and install it in your camcorder right before • Battery capacity decreases over time and you start taking shots. through repeated use. If decreased usage time •… -
Page 139: About Handling Of Your Camcorder
(or casing, unplug your camcorder and have it vice versa) or when you use your camcorder in a checked by a Sony dealer before operating it humid place as shown below. any further.
-
Page 140
Maintenance and precautions (Continued) How to avoid moisture condensation • Store in a well-ventilated location subject to little dirt or dust. When you bring your camcorder from a cold place • To prevent mold, periodically clean the lens as into a warm place, put your camcorder in a plastic described above. -
Page 141
To prevent electromagnetic interference from portable communications and other wireless devices The use of portable telephones and other communications devices near this camera can result in malfunctions and interference with audio and video signals. It is recommended that the portable communications devices near this camera be powered off. -
Page 142: Specifications
Specifications General MPEG HD422: MPEG-2 422P@HL Power requirements 4:2:2 Long profile 8.4 V DC (using AC Adaptor) MPEG HD420: MPEG-2 MP@HL 7.2 V DC (using battery pack) 4:2:0 Long profile Power consumption MPEG HD Proxy: MPEG-4 AVC/ While recording XAVC HD, using H.264 4:2:0 Long profile viewfinder: Approx.
-
Page 143
(equivalent to f = 29.0 mm to 348.0 mm 12× (optical zoom), 24× (clear image on 35 mm lens) zoom), 192× (digital zoom) Iris White balance F2.8 to F4.5 (auto/manual selectable) Preset (Indoor: 3200K, Outdoor: 5600K Focus ± 7 steps, Color temperature set range: Auto/manual selectable 10 mm to ∞… -
Page 144
Specifications (Continued) Rechargeable battery pack (NP-F770) Viewfinder 1.0 cm (0.39-type) OLED Maximum output voltage Approx. 1.44M dots 8.4 V DC Output voltage Internal microphone 7.2 V DC Omni-directional stereo electret Maximum charging voltage condenser microphone 8.4 V DC Maximum charging current Wireless LAN 3.0 A Supported standards… -
Page 145: Index
Index CHG lamp ……20 FOCUS DISPLAY …..109 CH-1/CH-2 switches …. 45 FOCUS MAG button….34 AC Adaptor…..19, 20 CLOCK SET ……23 FOCUS MAG RATIO..108 Access point……82 COLOR BAR ….. 118 Focus Magnifier….34 Accessory shoe …..22 COLOR DEPTH ….54 Focus ring ……34 AE SHIFT……118 COLOR MODE ….
-
Page 146
Index (Continued) IRIS AUTO/MAN button..40 MENU button …… 98 Iris ring ………40 MIC+48V……45 REC BUTTON SET…..32 Microphone REC FORMAT ….37 attaching ……9 REC LAMP ……113 KNEE ……..53 internal ……45 REC/OUT SET menu..102 Multi Interface Shoe ..46 REC SET ……102 Moisture condensation .. -
Page 147
Viewfinder ……25 Specifications……142 START/STOP button …30 diopter adjustment dial …….. 25 STATUS button ….69 VOLUME….. 66, 104 STATUS CHECK….113 Status check ……69 STEADYSHOT ….100 Warning indicators ….. 122 STREAMING ….87, 111 Warning messages….123 Streaming ……87 WB OUTDOOR LEVEL ..99 supported formats ..132 WB PRESET…… -
Page 148
Trademarks Notes on the License • “XDCAM” logo is a trademark of Sony ANY USE OF THIS PRODUCT OTHER THAN Corporation. CONSUMER PERSONAL USE IN ANY MANNER THAT COMPLIES WITH THE • “XAVC” and are registered trademarks MPEG-2 STANDARD FOR ENCODING of Sony Corporation. -
Page 149
GPL/LGPL. Source code is provided on the web. Use the following URL to download it. http://www.sony.net/Products/Linux/ We would prefer you do not contact us about the contents of source code. Licenses (in English) are recorded in the internal memory of your camera. -
Page 152
© 2016 Sony Corporation Printed in China…
Посмотреть инструкция для Sony PXW-Z150 бесплатно. Руководство относится к категории видеокамеры, 4 человек(а) дали ему среднюю оценку 9.8. Руководство доступно на следующих языках: английский. У вас есть вопрос о Sony PXW-Z150 или вам нужна помощь? Задайте свой вопрос здесь
Не можете найти ответ на свой вопрос в руководстве? Вы можете найти ответ на свой вопрос ниже, в разделе часто задаваемых вопросов о Sony PXW-Z150.
Что означает аббревиатура MП?
Какой размер экрана Sony PXW-Z150?
Какая высота Sony PXW-Z150?
Какая ширина Sony PXW-Z150?
Какая толщина Sony PXW-Z150?
Какой объем памяти Sony PXW-Z150 имеет?
Инструкция Sony PXW-Z150 доступно в русский?
Не нашли свой вопрос? Задайте свой вопрос здесь
Смотреть руководство для Sony PXW-Z150 ниже. Все руководства на ManualsCat.com могут просматриваться абсолютно бесплатно. Нажав кнопку «Выбор языка» вы можете изменить язык руководства, которое хотите просмотреть.

MANUALSCAT | RU
Вопросы и ответы
У вас есть вопрос о Sony PXW-Z150, но вы не можете найти ответ в пользовательском руководстве? Возможно, пользователи ManualsCat.com смогут помочь вам и ответят на ваш вопрос. Заполните форму ниже — и ваш вопрос будет отображаться под руководством для Sony PXW-Z150. Пожалуйста, убедитесь, что вы опишите свои трудности с Sony PXW-Z150 как можно более детально. Чем более детальным является ваш вопрос, тем более высоки шансы, что другой пользователь быстро ответит на него. Вам будет автоматически отправлено электронное письмо, чтобы проинформировать вас, когда кто-то из пользователей ответит на ваш вопрос.
Задать вопрос о Sony PXW-Z150
- Бренд:
- Sony
- Продукт:
- видеокамеры
- Модель/название:
- PXW-Z150
- Тип файла:
- Доступные языки:
- английский
Сопутствующие товары Sony PXW-Z150
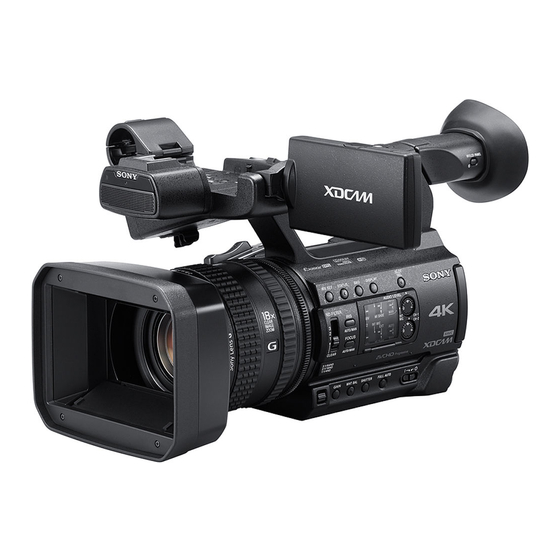
Sony PXW-Z150 — компактный ручной камкордер с поддержкой форматов вещания в 4К и Full HD.
Профессиональный ручной камкордер PXW-Z150 от Sony подходит для любой съемочной ситуации и обеспечивает высокое качество изображения в 4K и замедленную съемку в разрешении Full HD с высокой частотой 120 кадров/с, а также имеет встроенную поддержку сетевых интерфейсов для задач прямой видеотрансляции и беспроводных рабочих процессов.
Объектив «G Lens» от Sony с максимальным коэффициентом масштабирования 24x
Широкоугольный объектив с диапазоном фокусных расстояний 29–348 мм и 12-кратным оптическим масштабированием позволяет с легкостью получать детализированные изображения высокого качества при съемке масштабных пейзажей и сцен, демонстрируя высокие характеристики производительности крупного однодюймового сенсора камкордера Z150 и обеспечивая высокий уровень резкости и контрастности по всей площади изображения.
Возможности приближения во время съемки расширяются за счет передовой функции цифрового масштабирования Clear Image Zoom от Sony. При достижении максимального коэффициента оптического масштабирования в 12 раз с помощью технологии попиксельного разрешения (By Pixel Super Resolution) можно масштабировать изображение до 18 раз в формате 4K QFHD и до 24 раз в HD-формате без потери качества изображения.
.jpg)
ПЕРЕДОВОЕ КАЧЕСТВО ИЗОБРАЖЕНИЯ
Модель Z150 – первый в мире профессиональный камкордер с 1-дюймовым многослойным CMOS-сенсором. Благодаря реализации сенсора этого типа скорость считывания данных увеличена в два раза по сравнению с характеристиками стандартного 1-дюймового сенсора. Это обеспечивает замедленную съемку с высокой частотой 120 кадров/с в разрешении Full HD и видеозапись в 4К высокого качества. Полнопиксельное считывание данных позволяет раскрыть полный потенциал крупного однодюймового сенсора, устраняя необходимость суммирования зарядов смежных ячеек и пропуска строк, которые часто являются причиной появления эффектов муара.
Кроме того, крупный сенсор имеет высокую светочувствительность и разрешение, обеспечивая возможностью художественной дефокусировки фона за счет малой глубины резкости. Это создает эффективные кинематографические изображения для большей творческой свободы самовыражения.
.jpg)
ПОРАЗИТЕЛЬНОЕ КАЧЕСТВО 4К-ИЗОБРАЖЕНИЙ
Модель Z150 выводит съемку в формате 4К QFHD (3840 х 2160) на качественный уровень благодаря применению мирового кодека XAVC Long GOP со скоростью потока 100 Мбит/с, который обеспечивает высокое качество 4К-изображения при передачи видеосигналов и вещании.
Камкордер Z150 также оснащен объективом с 12-кратным оптическим масштабированием, благодаря которому обеспечивается высокое разрешение, качество и контрастность по всей площади изображения. Разработанная Sony передовая функция масштабирования Clear Image умножает коэффициент увеличения до 18х при съемке в формате 4К QFHD или до 24х при съемке в HD-формате. Это позволяет максимально реализовать возможности крупного 1-дюймового многослойного сэнсора, которым оснащена камера.
Предварительный просмотр в высоком разрешении
Камкордер Z150 позволяет точно контролировать процесс с минимальной задержкой при любом виде съемки благодаря электронному OLED-видоискателю типа 0,39 и с разрешением 1440 тыс. точек с широким углом обзора и крупным наглазником и легко регулируемой откидной ЖК-панели типа 3,5 с разрешением 1550 тыс. точек.
.jpg)
Никаких компромиссов, профессиональная функциональность
Новый уровень возможностей значительно расширяет варианты применения для различных задач съемки. Здесь реализована возможность непрерывной замедленной съемки с высокой частотой 120 кадров в секунду и замедлением в 5 раз. Высокое качество изображения поддерживается кодеком 4К XAVC Long GOP (4:2:2/10 бит, 50 Мбит/с), и MPEG-2 HD (50 Мбит/с; 35 Мбит/с).
Формат AVCHD обеспечивает дополнительную гибкость применения в различных рабочих процессах.
Камкордер позволяет реализовать любую задачу съемки.
.jpg)
Идеальный вариант ручного камкордера
Помимо компактной конструкции и небольшого веса, камкордер Z150 также оснащен мощными функциями, которые позволяют сократить количество дополнительных аксессуаров и облегчить съемку. Встроенный четырехпозиционный нейтральный светофильтр освобождает от необходимости всегда иметь при себе набор съемных светофильтров, а мультиинтерфейсный разъем позволяет сократить количество проводов при подключении микрофона, видеолампы или другого осветителя. Широкие сетевые возможности включают встроенную поддержку Wi-Fi для прямой видеотрансляции и беспроводное подключение к FTP*, что значительно повышает мобильность оператора. Кроме того, камкордером можно управлять с помощью смартфона или планшета благодаря функции дистанционного управления по Wi-Fi. Здесь продумана каждая деталь, в том числе характеристики энергоэффективности для непрерывной записи в течение 400 минут**.
* Поддержка QoS будет добавлена с выходом нового обновления встроенного ПО.
** При использовании аккумулятора NP-F970 в режиме записи XAVC 1080/50i или 60i, 50 Мбит/с с включенным ЖКД.

ВЫДАЮЩИЕСЯ ВОЗМОЖНОСТИ КОДИРОВАНИЯ ИЗОБРАЖЕНИЯ С Exmor RS
Компания Sony разработала первый в мире однодюймовый многослойный CMOS-сенсор для сферы профессионального применения, благодаря которому компактные камкордеры выходят на недостижимый ранее уровень качества изображения. Двукратное увеличение скорости считывания данных по сравнению со стандартным однодюймовым сенсором позволяет вести запись с 5-кратным замедлением и с высокой частотой кадров до 120 кадров/с в разрешении Full HD и 4K-видеозапись с полнопиксельным считыванием данных без суммирования зарядом смежных ячеек.
Крупный сенсор типа 1,0″ с разрешением 20 мегапикселей камкордера Z150 обеспечивает низкий уровень шумов и размытости изображения за счет того, что на сенсор попадает больше света. Это обеспечивает четкость и стабильность изображения даже в условиях недостаточного света при минимальной освещенности 1,7 люкс**. Большой размер сенсора также позволяет создавать эффект боке (мягкая дефокусировка объектов на заднем плане), чтобы привлечь внимание зрителя к определенным объектам.
* 14,2 миллиона эффективных пикселей. ** Режим низкой освещенности LOW LUX
.jpg)
КОМПАКТНЫЙ И ЛЕГКИЙ КОРПУС
Портативный корпус камкордера Z150 продуман с точки зрения эргономики, прост в использовании и обладает малым весом. С помощью трех независимых колец объектива можно плавно и естественно управлять фокусировкой, масштабированием и диафрагмой. Также возможно управление камкордером в полностью автоматическом или в полностью ручном режиме, что обеспечивает широкие возможности для творчества.
.jpg)
Гибкие возможности записи в форматах 4K и Full HD
Z150 обеспечивает высокое качество передачи видеосигнала в форматах 4K и Full HD, поддерживает запись с помощью передового кодека XAVC Long GOP со скоростью потока 100 Мбит/с в формате 4K QFHD и позволяет гибко встраиваться в рабочий процесс. Высокое качество изображения с низким уровнем шума и тщательной проработкой деталей достигается за счет более широкого цифрового потока кодека XAVC Long. Дополнительная гибкость работы обеспечивается в Z150 благодаря возможности переключения между рабочими процессами PAL и NTSC.
.jpg)
Непрерывная замедленная съемка со скоростью 120 кадров/с
Съемка с высокой частотой кадров позволяет превратить самые обычные действия в настоящий спектакль. Z150 позволяет записывать видео со скоростью 120 кадров в секунду в формате Full HD и с замедлением движения до 5 раз. При этом не страдает глубина цвета, а сенсор не обрезает кадры. Таким образом, вы можете быть уверены, что изображение останется цельным, а нужный угол обзора не будет потерян.
МУЛЬТИ-ИНТЕРФЕЙСНЫЙ РАЗЪЕМ (MI)
Камера Z150 оснащена гибким мультиинтерфейсным (MI) разъемом Sony, который позволяет обеспечивать питание, передачу сигнала и выполнять совместное включение/выключение совместимых аксессуаров Sony. К примеру, вы можете подключить беспроводные микрофоны Sony, такие как UWP-D11 и UWP-D12, либо видеоосветители HVL-LBPC*.
*Продаются отдельно. Управление осветителем HVL-LBPC осуществляется с камкордера Z150, питание обеспечивается отдельно.
.jpg)
ПОДДЕРЖКА РАЗНЫХ ТИПОВ ПОДКЛЮЧЕНИЙ, В ТОМ ЧИСЛЕ 3G-SDI
Камкордер Z150 обеспечивает встроенную поддержку многих возможностей подключения, включая 3G-SDI, HDMI, Multi/Micro USB, профессиональный аудиоразъем XLR, разъем для дистанционного управления, композитный (RCA). В комплект входит фирменный адаптер типа «холодный башмак» для расширения возможностей использования различных аксессуаров.
.jpg)
Гибкие возможности записи благодаря двум разъемам для медианосителей
Чтобы продлить время записи и повысить гибкость рабочих процессов, мы предусмотрели на корпусе Z150 два слота карты памяти, совместимые с форматами карт SDXC и SDHC.
Режим RELAY автоматически переключает запись на другую карту памяти после заполнения первой, а режим одновременной записи SIMUL позволяет записывать сразу на обе карты (например, для мгновенного архивирования).
Всегда оставайтесь на связи
Расширенные сетевые возможности Z150 повышают мобильность в работе: FTP-файлы можно передавать непосредственно с камкордера или организовывать прямую трансляцию любого мероприятия благодаря встроенной поддержке Wi-Fi без дополнительных аксессуаров. Фирменная технология QoS от Sony* значительно улучшает четкость при беспроводной передаче видеосигнала, обеспечивая высокое качество изображения даже в условиях ограниченной пропускной способности современных сетей. Кроме того, камкордером PXW-Z150 можно управлять дистанционно с помощью смартфона или планшета, в том числе регулировать фокусировку, масштабирование, настройки баланса белого, контролировать начало/остановку записи и т. д. с помощью приложения Content Browser Mobile** от Sony.
* Поддержка QoS будет добавлена с выходом нового обновления встроенного ПО.
** Мобильное приложение Content Browser Mobile можно загрузить из Google Play Store или App Store.
.jpg)
Вы можете купить видеокамеру Sony PXW-Z150 в интернет-магазине G-PRO.RU по выгодной, доступной цене с доставкой или самовывозом. Sony PXW-Z150: описание, фото, характеристики, гарантия, инструкция и аксессуары.