- Manuals
- Brands
- sorin Manuals
- Medical Equipment
- XTRA
- Operator’s manual
-
Contents
-
Table of Contents
-
Troubleshooting
-
Bookmarks
Quick Links
Operator’s Manual
S
V
2.00
OFTWARE
ERSION
FOR US MARKET ONLY
20077/021 US
Related Manuals for sorin XTRA
Summary of Contents for sorin XTRA
-
Page 1
Operator’s Manual 2.00 OFTWARE ERSION FOR US MARKET ONLY 20077/021 US… -
Page 2
® is a registered trademark. ® ® Microsoft and Windows are registered trademarks of the Microsoft Corporation. Manufacturer: LivaNova Deutschland GmbH Lindberghstrasse 25 D-80939 München Germany Tel: +49.(0)89.32301.0 Fax: +49.(0)89.32301.555 Distributor in U.S.A. LivaNova USA, Inc. 14401 West 65th Way Arvada, Colorado USA 80004 Tel: +1.800.221.7943 Tel: +1.303.425.5508… -
Page 3: Table Of Contents
Table of Contents Chapter 1: Introduction and Safety About the Operating Instructions …………1-1 Introducing the X System .
-
Page 4
Essential Performance …………3-14 Order Guide . -
Page 5
1 Touch …………..5-31 Manual . -
Page 6
The Protocol/Mode Tab …………..9-7 Mode Buttons . -
Page 7
Chapter 12: Quality Management Option Description …………… . 12-1 Enabling Quality Management Options . -
Page 8
Chapter 17: Warranty Limited warranty and contractual conditions for LivaNova medical equipment ……17-1 Warranty expiry …………. . . 17-1 Contents and necessary requirements of the Warranty . -
Page 9
List of Figures Chapter 1: Introduction and Safety Chapter 2: Overview Figure 2-1 Position of Separated Whole Blood Components in Centrifuge Bowl …………2-3 Chapter 3: System Description Figure 3-1 Front View ……………………..3-1 Figure 3-2 Rear View ………………………3-2 Figure 3-3 Front Handle (left), Rear Handle (center), and Rear Transport Handle (right) ………3-3 Figure 3-4 Hooks on Left Side of X …………………….3-3… -
Page 10
Figure 3-29 Vacuum Line ………………………. 3-20 Figure 3-30 Cardio Kit ……………………….3-21 Figure 3-31 Bowl Set ……………………….3-21 Figure 3-32 Cross-Section of Latham Centrifuge Bowl ……………….. 3-22 Figure 3-33 Waste Bag ……………………….3-23 Figure 3-34 Red Blood Cells (RBC) Bag ……………………. 3-24 Figure 3-35 Procedure Set ……………………… -
Page 11
Figure 5-15 Fill Phase of the Processing Screen …………………..5-9 Figure 5-16 Wash Phase of the Processing Screen ………………..5-10 Figure 5-17 Empty Phase of the Processing Screen ………………..5-11 Figure 5-18 Fill Phase Paused ……………………..5-12 Figure 5-19 Wash Phase Paused …………………….. 5-12 Figure 5-20 Wash Phase Paused with Pfat protocol ……………….. -
Page 12
Figure 5-51 Automatic Reseparation Screen ………………….5-55 Chapter 6: Special Cycles Figure 6-1 Special Cycles Screen ……………………..6-1 Figure 6-2 Return Screen ……………………….6-2 Figure 6-3 Concentrate Screen ……………………..6-3 Figure 6-4 Prime IV Screen (Paused) ……………………6-5 Figure 6-5 Purge Screen ……………………….6-6 Figure 6-6 Top: “Y”-Type Blood Administration Set with Integral Filter Bottom: Filter with “Y”-Type Blood Administration Set …………….6-9 Chapter 7: Automated Functions… -
Page 13
Figure 10-7 Ready Screen (PRP2) ……………………10-11 Figure 10-8 Sequestration Fill Phase of the Processing Screen …………….10-12 Figure 10-9 Spill Phase (PPP) of the Processing Screen ………………10-13 Figure 10-10 Empty Phase of the Processing Screen ………………… 10-15 Figure 10-11 Concentrate Screen (Preoperative Protocols) ……………… -
Page 14
Figure 15-6 Sensors Located on Machine Top ………………….. 15-6 Figure 15-7 Sensors Located on Machine Top ………………….. 15-7 Figure 15-8 Replacement of the Paper Roll ………………….15-8 Figure 15-9 Removal of the Centrifuge Well Fluid Container ………………. 15-8 Chapter 16: Technical Data Chapter 17: Warranty Appendix A: Safety Standards EN 60601-1-2 Appendix B: Approvals and Test Certificate… -
Page 15: Chapter 1: Introduction And Safety
Introduction and Safety Chapter 1: Introduction and Safety About the Operating Instructions These instructions are intended for personnel responsible for the use and/or maintenance of the X Autotransfusion System, which is an autologous blood recovery system for intra- and postoperative autotransfusion, as well as for preoperative sequestration.
-
Page 16: Chapter 2: Overview
Introduction and Safety This chapter of the manual addresses indications and contraindications for use; warnings, precautions, and adverse effects; and information about service and returning used products. Following is an overview of the remaining chapters of this manual. Chapter 2: Overview Discusses the advantages of intra- and postoperative red cell recovery, some of the clinical applications, and a brief description of how the X…
-
Page 17: Indications For Use
Introduction and Safety Indications for Use The X is indicated for use for intraoperative recovery of blood, washing of blood collected in the postoperative period and preoperative sequestration (with indirect patient connection). Typical clinical applications of autotransfusion include the following surgical specialties: •…
-
Page 18
Introduction and Safety The availability of alarms does not relieve the operator of his or her obligation to carefully monitor the entire system during operation. Unattended processing can lead to the development of problems with the operation of the system and/or with the quality of the end product. Do not touch any moving parts of the centrifuge or pump. -
Page 19
Introduction and Safety 12. The American Association of Blood Banks recommends the following guidelines for expiration of Perioperative Autologous Non-Red-Cell Blood Products: Collection Type Storage temperature Expiration Special Conditions Platelet-rich plasma intended Room temperature Shall be used before the for transfusion patient leaves the operating room or clinical procedure area… -
Page 20
Introduction and Safety Recommended action in order of Potentially harmful substance Effects priority Amniotic fluid Soluble component contains proteolytic 1. Do not aspirate into system enzymes which could activate clotting. Squamous cells could cause pulmonary emboli Fecal contamination Sepsis 1. Do not aspirate into system 2. -
Page 21
Introduction and Safety 24. Whole blood must be anticoagulated as it is collected into bags containing appropriate anticoagulant for plasma sequestration. Inadequate anticoagulation may result in clotting, interfering with the processing of the blood products. 25. Non-red cell components (e.g., platelet rich/platelet poor plasma intended for transfusion and platelet rich/platelet poor plasma) shall be used or applied before the patient leaves the operating room or clinical procedure area. -
Page 22
Introduction and Safety requested to evaluate the final hematocrit in the RBC bag. The same holds true also for volume, supernatant removal and waste line color monitoring features. 43. The X hematocrit sampling system has not been tested for all possible blood conditions. Conditions may exist which will result in hematocrit readings which differ from Coulter Counter readings. -
Page 23: Storage And Transporting Warnings
Introduction and Safety Storage and Transporting Warnings When not in use, the unit must be stored under the specified environment conditions in a dust-free place, covered with the protective cover supplied. When the unit is not in use, switch off the main switch, disconnect the plug from the socket and wind the power cord around the holders on the rear of the unit.
-
Page 24: General Precautions
Introduction and Safety 17. Connecting electrical equipment to the integral multiple socket-outlet of X effectively leads to creating an ME system, and can result in a reduced level of safety. Connecting of other devices (which is not allowed according to this user manual), must fulfill all requirements of the standard IEC 60601-1:Edition 3.1.
-
Page 25
Introduction and Safety 16. Do not completely empty the waste bag until the end of the case. If you empty the waste bag during the case, leave approximately one liter of fluid in the waste bag to prevent the possibility of vacuum being generated in the waste bag during the Empty cycle. -
Page 26
Introduction and Safety • Recent use of anti-platelet drugs • Inability to maintain stable oncotic pressure 31. When collecting PRP, LivaNova recommends the following precautions be taken to insure that the PRP product is not contaminated: • Use sterile techniques when setting up the X disposables. -
Page 27
Introduction and Safety 49. During the execution of emergency protocols, the control that causes a warning of “Minimum wash quality wash might not be reached yet” is automatically disabled. 50. The use of emergency protocols with the Rapid Transfer option produces an unwashed final collection in which the removal of contaminants is only possible through the 40-µm filter in the reservoir. -
Page 28: Operating Conditions
Introduction and Safety 67. Although it is possible to configure some of the acoustic notifications that the machine makes, any modification on the audible signals might make the operator take longer to realize the machine has made a notification. 68. It is possible to temporarily deactivate some of the controls that the machine does. The operator can make use of this possibility, under his own responsibility, therefore directly managing those controls.
-
Page 29: Unpacking And Inspection
Introduction and Safety Unpacking and Inspection Prior to delivery, all components and modules of the X have passed quality assurance testing. Before each X system is considered to be operative, it should be checked by the user according to the instructions given below. Check on delivery that the unit outer container has not been damaged.
-
Page 30: Addresses
Introduction and Safety Addresses Manufacturer: LivaNova Deutschland GmbH Lindberghstrasse 25 D-80939 München Germany Tel: +49.(0)89.32301.0 Fax: +49.(0)89.32301.555 Distributor in U.S.A. LivaNova USA, Inc. 14401 West 65th Way Arvada, Colorado USA 80004 Tel: +1.800.221.7943 Tel: +1.303.425.5508 Fax: +1.303.467.6584 Distributor in Canada LivaNova Canada, Corp.
-
Page 31: Service Information
Introduction and Safety Service Information The Company and/or its branches provide their customers with a Technical Service Department, composed of experts in installation, maintenance and repair of the LivaNova equipment. To contact a specialized technician of LivaNova Technical Service, call the central service on the following telephone number: +49 (0)89 41 61 26 462 LivaNova and/or its branches are not responsible for the safety, reliability and function of the unit:…
-
Page 32: Disposal In Accordance With Environmental Regulations
Introduction and Safety Disposal in Accordance with Environmental Regulations • Because the X System must be regarded as potentially infectious after it is finished with, it must not be disposed of in accordance with the EU Directive 2002 96 EC WEEE or its German derivative ElektroG.
-
Page 33: Chapter 2: Overview
Overview Chapter 2: Overview Advantages of Intra- and Postoperative Red Cell Recovery Although collecting and reinfusing a patient’s own blood (referred to as autologous blood) has been reported in the medical literature as far back as 1818, this procedure recently has gained renewed interest due to the growing concern over the possibility of disease transmission via transfusions of blood from a donor (referred to as homologous blood).
-
Page 34
Overview Installing the disposables, including the centrifuge bowl, is rapid, straightforward, and tool-free. The pump loop cartridge and the tubing organizer of the X Bowl Set make loading the pump, process air detector, and tubing lines easy. An ultrasonic air detector senses the presence of air or fluid in the tubing harness and discontinues processing should air be present. -
Page 35: How The Xtra System Works
Overview How the X System Works Intraoperative and postoperative processing involves three major subsequent processes: collection and anticoagulation, processing, and reinfusion. The X system collects and anticoagulates blood, processes, and provides blood for reinfusion in a safe, fast, effective, and easy-to-operate fashion. Collection and Anticoagulation Before (and during) processing, blood is aspirated from the surgical or trauma site via an aspiration line.
-
Page 36: Reinfusion
Overview Reinfusion Reinfusion of the red blood cells processed by the X is under the control and supervision of the physician in charge and can be accomplished by several different means: • Processed blood can be held in the primary RBC bag until the bag becomes full. Then the bag can be disconnected from the autologous transfusion circuit, hung, and reinfused according to normal blood administration protocol, as described in AABB standards.
-
Page 37: Options Available With Xtra
Overview The basic X has two preset protocols (plus the Emergency protocol) to use for processing (available for all four bowl sizes): • Popt, available for 55, 125, 175, 225 ml bowl • Pstd, available for 55, 125, 175, 225 ml bowl •…
-
Page 38
Overview blood recovery protocols. If the data management option is installed, this information will appear with the printed or downloaded data. Supernatant removal indicator option It enables the indication of the removal rate (%) of supernatant (and thus plasma contaminants). Waste line indicator option It enables the indication of the waste line color when the saline solution is being pumped into the bowl. -
Page 39: Chapter 3: System Description
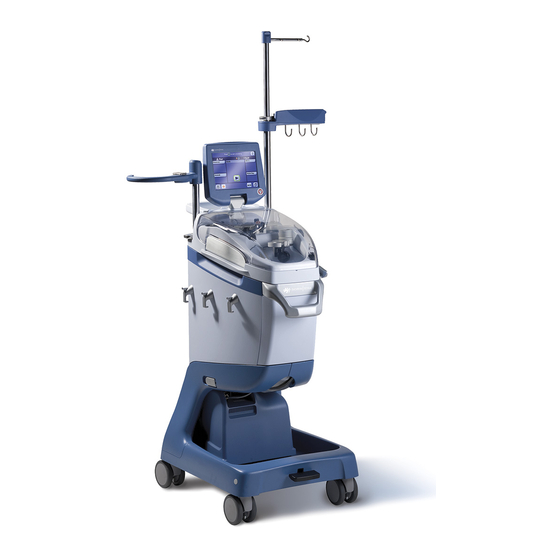
System Description Chapter 3: System Description Machine Components The following two figures illustrate the major components of the X system as viewed from the front and the back. 1 I V pol e 10 L o w er IV po l e a r m a n d h o o k s 2 T o uc h s c r ee n dis p la y pa n el 11 R ea r ha ndl e 3 R e s er vo ir ho ld er…
-
Page 40: Figure
System Description 1 R ea r h a n dle 7 R e s erv oi r h o lde r (re s t p o s i t i o n ) 2 P owe r c or d wrap 8 R e s erv oi r p ol e lo ck i ng le ve r 3 R ea r t r a n s p o r t h a ndl e 9 P r i nt e r…
-
Page 41: Handles
System Description Handles The X has three handles, designed to allow maneuverability and simplify the transport of the unit (see Figure 3-3): • Front handle for both transporting and maneuvering the system • Rear handle at top of the machine for maneuvering the system •…
-
Page 42: Cart
System Description Figure 3-5 Left: Disposable Tray on Tray Holders; Right: Waste Bag on Right-Side Hooks Cart The X cart provides high storage capacity, allows maneuvering the unit, and simplifies its transport (see Figure 3-6). The cart is a dedicated separate element, fixed to the body of the machine by means of two spring levers.
-
Page 43: Figure 3-7 Spring Lever Releases Cart
System Description • One 1 liter anticoagulant bag • One Wash Set (or one reservoir) As mentioned above, additional storage capacity is provided by the lateral hooks (see Figure 3-4 and Figure 3-5). Transportability To allow transportability and simplify cleaning, the X cart can be removed from the X body by means of two spring levers located on the lateral rear top area of the cart (see Figure 3-7).
-
Page 44: Iv Pole And Reservoir Pole
System Description Figure 3-9 Body and Cart When fixing the unit, ensure the body is aligned with the cart inserts, then close the two lateral pins by closing the lateral spring levers, keeping both hands away from the pins. WARNING When closing the lateral pins, ensure your fingers are kept away from the levers;…
-
Page 45: Reservoir Holder
System Description WARNING When releasing an IV pole or reservoir pole locking lever, the operator must always hold the pole and locking mechanism with both hands; otherwise, there is a serious risk of injury. Reservoir Holder When the reservoir pole is collapsed, the reservoir holder may be rotated to fit compactly against the rear of the machine for transport or storage.
-
Page 46
System Description 1 Co v er 3 S to p b u tt o n 2 T o uc h s cr ee n a r ea 4 H i nge Figure 3-12 Touch Screen Display Panel Touch Screen The operator interacts with the display through various screens by touching the screen where indicated by the presence of buttons and tabs. -
Page 47: Centrifuge Assembly
System Description CAUTION If the values regarding volumes, hematocrit, supernatant removal and waste color line are important for the patient, it will always be necessary to use other standard measurement instruments of the hospital. Centrifuge Assembly The centrifuge assembly is located at the front of the machine and includes the centrifuge arm, centrifuge plate, and centrifuge lid.
-
Page 48: Figure 3-14 Centrifuge Well Fluid Container
System Description CAUTION In the event of problems with the automatic removal of the lid opening lock: (a) do not attempt to force open the lid; (b) switching the machine off and on might resolve the problem; (c) if the problem persists, contact authorized technical service.
-
Page 49: Clamps
System Description Clamps The X uses three clamps to control the flow of fluids during normal processing of blood. The clamps determine which fluids are routed at each processing stage. The clamp lid allows fixing the tubing lines in place for proper clamp functioning during the case (see Figure 3-15). 1 Cla mp li d 4 E mpty cl a mp 2 Fi l l cl a mp…
-
Page 50: Processing Pump
System Description Processing Pump The processing pump (see Figure 3-16) moves fluids into and out of the centrifuge bowl while providing high flow rates with minimal hemolysis. In the autotransfusion protocols, the processing pump can be operated at rates of 25 to 1,000 ml/min. in 25 ml/min. increments. In both the PPP and PRP protocols, the pump can be operated at rates of 10 to 100 ml/min.
-
Page 51: Quality Control Indicators
System Description Quality Control Indicators Hematocrit Indicator The hematocrit indicator provides information on blood concentration in the inlet line (during the Fill phase) and in the outlet line (during the Empty phase) (see Figure 3-18). 1 H em a to c r it I n d i ca t o r 2 W a st e L in e Co lo r I n d ic a t or Figure 3-18 Location of the Hematocrit and Waste Line Color Indicators…
-
Page 52: Essential Performance
System Description Figure 3-20 Release Screw The X vacuum module can be controlled using its built-in control panel (see Figure 3-21) only when the touch screen user interface of X is not available, in the following two cases: When the X system is booting up When fatal error occurred on the X system…
-
Page 53: Disposable Description
System Description Disposable Description 1 Bl oo d co ll ec t io n r es e r v oi r 4 W a s h so l ut i on 2 R BC b a g 5 Wa s te b a g 3 An t ic oa g ul a n t s ol ut i on Figure 3-22 With Disposable Set Installed (Front View)
-
Page 54: Figure
System Description 1 P u mp lo op t ub in g 5 T ub i ng org ani ze r 2 T u bi ng fr o m pu mp to b ow l 6 B ow l o ut le t po r t ( to Wa s te b a g) 3 B o wl i n le t p o r t ( fr o m p um p ) 4 Ce n tr i fu ge b ow l Figure 3-23…
-
Page 55: Collection Set
System Description Collection Set The X Collection set allows the recovery and temporary storage of the blood shed by the surgical wound. It is composed of: • Blood Collection Reservoir (TOP or BOTTOM) • Aspiration Line • Vacuum Line • Cardio Kit (only for CARDIO Configurations) Six configurations of the X Collection Set are available: •…
-
Page 56: Figure
System Description Blood Collection Reservoir The X Blood Collection Reservoir (see Figure 3-25) is a rigid 3,800 ml reservoir with a graduated fluid level scale located in three positions at 120°. Figure 3-25 Collection Reservoir (TOP version) Several ports are located on the top of the collection reservoir (see Figure 3-26). The vacuum port (yellow port protector attached) is designed to accept 1/4 inch (6.4 mm) inside diameter tubing.
-
Page 57: Figure 3-27 Left: Reservoir With Top Outlet | Right: Reservoir With Bottom Outlet
System Description levels (greater, in absolute value, than 250 mmHg (33.3 kPa)), thus preventing the possibility of implosion. The reservoir is available in two versions, TOP outlet and BOTTOM outlet, differing only in the location of the outlet port connection to the Bowl set (see Figure 3-27): •…
-
Page 58: Figure
System Description Figure 3-28 Aspiration Line Vacuum Line The Vacuum Line (see Figure 3-29) consists of clear plastic (PVC) tubing. The proximal ends of the tube are equal and are designed to be attached respectively to the vacuum port on the blood collection reservoir and to the inlet port of the X module (or another vacuum source).
-
Page 59: Bowl Set
System Description Figure 3-30 Cardio Kit Bowl Set The X Bowl Set contains the tubing harness with pump loop cartridge, the Rapid Latham centrifuge bowl (55 ml, 125 ml, 175 ml, and 225 ml), a 10-liter waste bag, and a 1-liter primary RBC bag. Except for the waste bag, the X Bowl Set components are preconnected (see Figure 3-31).
-
Page 60: Cross-Section Of Latham Centrifuge Bowl
System Description Color Fluid Carried Clamp Name Blue Fluid collected in reservoir Fill clamp Yellow Wash solution Wash clamp Washed RBCs Empty clamp Table 3-1 Color-Coded Tubing and Clamp Association The pump loop cartridge includes the pump loop which is placed over the process pump head, and it will self-load when the pump starts to rotate.
-
Page 61
System Description Waste Bag The X Waste bag (see Figure 3-33) has a 10-liter capacity, a slide clamp on the inlet port, and a drain valve on the outlet port. The bag is hung from two pins on the right side of the X system and receives the overflow from the centrifuge bowl during the Fill and Wash phases. -
Page 62: Figure 3-34 Red Blood Cells (Rbc) Bag
System Description CAUTION Do not completely empty the waste bag until the end of the case. If you empty the waste bag during the case, leave approximately one liter of fluid in the waste bag to prevent the possibility of vacuum being generated in the waste bag during the Empty cycle.
-
Page 63: Procedure Set
System Description is strongly recommended that a Microaggregate Blood Filter (20 to 40 micron) be used on the reinfusion line. These two items are not included with the X Bowl Set. WARNING Do not reinfuse the patient’s blood from the primary RBC bag when it is connected to the X autologous transfusion circuit.
-
Page 64: Selecting The Disposable
System Description Figure 3-35 Procedure Set Selecting the Disposable The disposable products produced by LivaNova can be selected within the following categories: Procedure Sets The series of X Procedure Sets has been specifically designed to be used in situations where the risk of significant blood loss is expected perioperatively.
-
Page 65: Order Guide
System Description X/55 (WHITE) for low/slow bleedings • Orthopedic surgery, also postoperative (i.e. knees) • Spinal surgery • Pediatric surgery • Preoperative Separation X/125 (GREEN) for medium-low bleedings • Orthopedic surgery, also postoperative (i.e. knees) • Obstetric surgery • Low volume cardiac surgery: off-pump, mini-bypass, suction blood separation •…
-
Page 66
System Description Catalogue No. Product Designation Product Description 04264 Procedure Set BX/225 Procedure Set with 225 ml bowl and BOTTOM outlet reservoir 04278 Procedure Set BX/225 — Procedure Set with 225 ml bowl and BOTTOM 120µm outlet reservoir — 120 μm Table 3-3 Catalogue No. -
Page 67: Anticoagulant Solution
• Oxygenator Extension Line • Luer-Lock Adapter 04277 Collection Set BX XTRA Collection Set with BOTTOM Same as the Collection Set BOTTOM — 120 µm, plus Cardio — 120µm outlet reservoir — 120 µm filter an additional accessory kit for connection to an…
-
Page 68: Wash Solution
System Description WARNING In the event of excess heparin in collection reservoir due to inappropriate ratios, the salvaged blood may contain residual heparin. WARNING In the event of decreased patient antithrombin III levels if using heparin anti coagulation, consult the physician in order to provide alternate anticoagulation.
-
Page 69: Cables
System Description Code Description 60799 Spare kit with printer ink and paper 63056 USB memory sticks 04272 Blood Collection Reservoir Holder 04268 BRB1 Blood Reinfusion Bag X, 1 liter 04269 Waste Bag X Table 3-5 Accessories and optional products for the X system Cables LivaNova provides the following cables with the X…
-
Page 70
System Description 20077/021 US 3-32 Operator’s Manual… -
Page 71: Chapter 4: Installing The Disposables
Installing the Disposables Chapter 4: Installing the Disposables The following pages describe the step-by-step procedures for installing the disposables. Detailed instructions for use regarding the setup of disposable products are provided below. It is necessary to read carefully the following information before initiating the procedure. Before beginning the setup, it is good practice to record into the appropriate record as determined by hospital protocol the lot number from all sterile disposables used during the procedure.
-
Page 72: Setup For Intraoperative Red Cell Recovery And Reinfusion
Installing the Disposables Setup for Intraoperative Red Cell Recovery and Reinfusion Power Requirements All X disposables can be at least partially installed before the instrument is turned ON. However, power is required for the following: • Loading the pump loop into the pump rotor. The X must be turned ON so you can touch the “Load Pump”…
-
Page 73: Step-By-Step Procedures For Installing Disposables
Installing the Disposables Step-by-step Procedures for Installing Disposables Step 1: Installing the Blood Collection Reservoir The setup of the Blood Collection Reservoir can be performed by inserting it into its holder on the rear of the unit or by using the separate optional holder, to be fixed to an IV pole in the proximity of the surgical field.
-
Page 74: Step 2: Connecting The Suction Line
Installing the Disposables Figure 4-2 Positioning the Blood Collection Reservoir on the Reservoir Holder Note: A Blood Collection Reservoir can be also mounted on an IV pole. However, it requires the use of the dedicated additional holder. Tighten all the caps and luer locks on the reservoir lid. In case you are using a Blood Collection Reservoir BOTTOM, close the clamp on the bottom outlet port.
-
Page 75: Figure 4-3 Positioning The Blood Collection Reservoir On The Reservoir Holder
Installing the Disposables Pass the inner sterile wrapped assembly to the sterile field. At the sterile field, unwrap the assembly, remove the protective cover, and attach the connector to a suction cannula. Pass the other end (the split end) of the aspiration line back from the sterile field to the X operator.
-
Page 76: Step 3: Setup Of The Vacuum Line
Installing the Disposables Step 3: Setup of the Vacuum Line CAUTION Use aseptic technique when installing disposables. Attach one end of the vacuum line to the X system (or another vacuum source) and the other to the vacuum port (yellow capped) on the lid of the reservoir (see Figure 4-4). Figure 4-4 Positioning the Blood Collection Reservoir on the Reservoir Holder If you want to start aspirating from the field:…
-
Page 77: Step 4: Installing The Bowl Set
Installing the Disposables Step 4: Installing the Bowl Set Perform the following steps to install the Bowl Set: CAUTION Use aseptic technique when installing disposables. Inspect the X Bowl Set tray for damage that may have occurred during shipment. Hang the tray onto the two handles placed on the top right panel of the machine and open it. Open the centrifuge lid (see Figure 4-5).
-
Page 78: Inserting The Centrifuge Bowl
Installing the Disposables Figure 4-6 Inserting the Centrifuge Bowl 10. Close the centrifuge arm by swinging it forward (see “B” in Figure 4-6). 11. Manually rotate the bowl to ensure that it rotates without eccentricity, by viewing from directly above “shoulder” of bowl (see Figure 4-7). If the bowl does not rotate properly on its perpendicular axis, remove the bowl and repeat installation.
-
Page 79: Figure 4-8 Seating The Pump Loop Cartridge (Left); Latching The Clamp Lid (Right)
Installing the Disposables Figure 4-8 Seating the Pump Loop Cartridge (Left); Latching the Clamp Lid (Right) Note: Do not force the pump loop down the rotor since it will load automatically when the LOAD PUMP button is pressed. 13. Make sure that the tubing is correctly seated into the air sensor (see “C” in Figure 4-6). 14.
-
Page 80: Step 5: Connecting Wash Lines To The Saline Solution Containers
Installing the Disposables Step 5: Connecting Wash Lines to the Saline solution Containers CAUTION Use aseptic technique when installing disposables. CAUTION Sterile 0.9% normal saline, USP (injectable or approved for cell processing) is typically used as a wash solution. Other solutions intended for intravenous use that have been approved by the FDA and have documentation available to show the component is safe may be used.
-
Page 81: Other Setups
Installing the Disposables Connect the waste line to the waste bag (see Figure 4-12). The connection must be tight. Close the waste bag drainage port. Ensure that the clamp on the inlet tube of the Waste bag is OPEN. Figure 4-12 Connecting the Waste Bag CAUTION The Waste bag must not be squeezed while treatment is being done and must…
-
Page 82: Procedure For Removing Disposables
Installing the Disposables Procedure for Removing Disposables Once the case is finished, proceed with the removal of the disposable set: Make sure all the lines are empty. Turn OFF the vacuum source. Close the manual clamps on the lines to avoid leakage of any blood residues during removal operations.
-
Page 83: Chapter 5: Processing
Processing Chapter 5: Processing Operating the Touch Screen The X system is operated and configured through the touch screen display located on the top of the machine. The operator interacts with the display through various screens by touching the screen where indicated by the presence of buttons and tabs.
-
Page 84: Screen Structure
Processing Screen Structure Figure 5-4 shows the structure of a typical processing screen. Note: Opening a menu or help screen will obscure any currently displayed screen. Closing the menu or help screen will return to the screen. Processing screens remain active and continue to be updated even while obscured by a menu or help screen.
-
Page 85: The Displets
Whether a displet is opened or closed at wakeup can be configured from the configuration mode screen (see Chapter 8: Configuring Xtra Reservoir Displet 1 Di s p le t t it l e ba r…
-
Page 86: Rbc’s Displet
Processing Chapter 13: Vacuum Module Refer to for a description and instructions related to the X vacuum system. RBC’s Displet Figure 5-7 RBC’s Displet The RBC’s displet is always present and located in the upper-right corner of the displet area. It contains two fields: one which displays the total volume (ml) of RBCs transferred into the RBC bag during the current case, and one which displays the average hematocrit (%) of the total RBCs collected in the RBC bag during the current case.
-
Page 87: Modification Of Parameters
Processing Modification of Parameters Several screens and displets presented by the X touch screen user interface include parameters displayed in text boxes which may be modified. For example, the autostart volume field in the reservoir displet or any of the parameters in the “Protocol / Mode” tab. Figure 5-11 A Text Box Before and After Being Selected for Editing A text box containing a modifiable parameter appears recessed and with a light blue background (see…
-
Page 88: Loading The Pump Segment For A New Case
Processing 1 P ow e r s w i t ch 2 P ow e r p lu g Figure 5-12 Rear Panel of the X Note: ON = | position OFF = O position Power-Up Self-Test Once powered on, the X performs a few internal tests before it may be operated.
-
Page 89: Processing A Cycle In Automatic Or 1 Touch Mode
Processing 1 “R e t a in ” b ut t on 2 Lo a d b ut t o n Figure 5-13 Setup Screen For a detailed explanation of the Setup Screen, read “Setup Screen” on page 5-37. Touch the Load button to auto-load the pump loop tubing. The system performs the following actions during the auto-load procedure (each check is indicated on the image in the processing displet while it is being performed): •…
-
Page 90: Figure 5-14 Ready Screen
Processing WARNING Do not touch any moving parts of the centrifuge or pump. Injury may result. WARNING A trained operator should be present at all times to monitor the X system during processing. During operation, the X should never be left unattended.
-
Page 91: Fill Phase Of The Processing Screen
Processing Figure 5-15 Fill Phase of the Processing Screen For a detailed explanation of the Fill phase screen, read “Fill Screen” on page 5-39. As blood enters the bowl during the Fill phase, centrifugation concentrates the red blood cells into the bowl while supernatant components are expelled to a waste bag.
-
Page 92: Wash Phase Of The Processing Screen
Processing Figure 5-16 Wash Phase of the Processing Screen For a detailed explanation of the Wash phase screen, read “Wash Screen” on page 5-40. As the saline solution enters the bowl, it washes through the red blood cells, removing remaining supernatant and its contaminants, and is then expelled into the waste bag.
-
Page 93: Pausing And Resuming The Cycle
Processing Figure 5-17 Empty Phase of the Processing Screen For a detailed explanation of the Empty phase screen, read “Empty Screen” on page 5-41. The volume and Hct of the RBC transferred from the bowl are displayed on the processing displet and constantly updated by the system’s software.
-
Page 94: Figure 5-18 Fill Phase Paused
Processing re-separation time while the centrifuge begins spinning again, refer to “Automatic Reseparation Screen” on page 5-55). While paused, phase buttons appear in the button bar near the bottom of the screen which allow the operator to manually advance to a different phase. The operator may touch the appropriate phase button (Fill, Wash, or Empty) to manually switch to that phase.
-
Page 95: Figure 5-20 Wash Phase Paused With Pfat Protocol
Processing Figure 5-20 Wash Phase Paused with Pfat protocol Figure 5-21 Empty Phase Paused Several buttons become available while processing is paused. These are shown in the figures above (as labeled in Figure 5-18) and described below. 1. “Return” Button Touching the “Return”…
-
Page 96: Ending The Current Case
Processing This button is available only when operating with Pfat protocol. Fat Removal Button. Touching the Fat Removal button changes to the Fat Removal phase (refer to “Fat Removal Screens” on page 5-41). Table 5-1 lists which buttons are made available (in addition to the buttons already present) when processing is paused from each screen and condition from which the Pause button is available.
-
Page 97: Unloading The Pump Loop
Processing Figure 5-22 End of Case Screen For a detailed explanation of the End of Case Screen, read “End of Case Screen” on page 5-50. The End of Case Screen contains a tally table which displays various totals and data related to the Chapter 11: Data Download case.
-
Page 98: Emptying The Rbc Line Without Ending The Case
Processing Emptying the RBC Line Without Ending the Case From the End of Case Screen, it is possible to empty any blood remaining in the bowl or empty line. To do so, touch the Empty button. The system enters the Empty phase, and the Empty Phase of the Processing Screen is displayed on the touch screen (refer to “The Empty Phase”…
-
Page 99: Dealing With Expected Warnings During A Cycle
Processing If an intraoperative protocol is interrupted and if the protocol set (defined in Configuration mode) includes any Post-op protocols (factory or user defined), touching the «Retain» button will prompt the following screen: By touching “Retain Intra” the interrupted case will be resumed with the vacuum pump and protocol switched to Intraoperative mode.
-
Page 100: Figure 5-23 Reservoir Empty Warning
Processing Figure 5-23 Reservoir Empty Warning The operator can proceed in different ways, depending on the following conditions: Note: After three minutes, the pump and centrifuge will stop and the Reservoir Empty alarm with all its buttons will remain displayed. •…
-
Page 101: Wash Bag Empty
Processing Touch the Mute button (located at the far left of the button bar) to silence the alarm for 45 seconds. CAUTION The use of the Last Bowl function is recommended only to complete the case with the following conditions: the blood collection reservoir is empty, no more blood is expected to be further collected, and sufficient red cells are available in the RBC bag to complete the concentration phase.
-
Page 102: Rbc Bag Full
Processing Note: To check the current positioning of the tubing going to the bowl, you may need to press the Stop button then open the centrifuge and clamp lid. In this case, pay close attention to the correct disposable installation when closing the clamps and centrifuge lid again. Touch the Play button to continue.
-
Page 103: Waste Bag Full
Processing Waste Bag Full Figure 5-26 Waste Bag Full Warning The Waste Bag Full alarm (if enabled) is triggered at the end of the Empty phase if the volume transferred to the waste bag exceeds the pre-set safety level. It will also be triggered during the Fill/ Concentration, Wash and Fat Removal phases if the safety level is reached during those phases.
-
Page 104: Factory Protocols
Processing Factory Protocols Protocols represent specific methods of processing blood in order to obtain hematic components. A protocol defines a processing cycle which may be run one or more times in a case. The execution of one cycle of a protocol corresponds to the transfer of blood to the centrifuge bowl, the processing of the blood with removal of supernatant and related contaminants, and the collection of packed RBCs.
-
Page 105: The Autotransfusion Protocols
Processing The Autotransfusion Protocols The intraoperative (Popt, Pstd and Pfat) protocols will concentrate, wash, and collect the blood lost by the patient during a surgical intervention. The postoperative protocol (Post-op) will do the same for blood drained from a surgical cavity of a patient after a surgical intervention. Note: The Post-op protocol is similar to the Popt protocol.
-
Page 106: Popt
Processing Popt The Popt protocol is intended to process the blood recovered from the operating field or the residual volume of an extra-corporeal circuit. It has been designed to achieve an optimal compromise between hematocrit, wash quality, and processing time. Because the Popt protocol is a substantially automatic protocol where operator intervention is significantly limited, only Automatic and 1 Touch modes shall be available when it is the active protocol (refer to “The Operating Modes”…
-
Page 107: Pstd
Processing The pump will stop and processing will automatically continue to the Empty phase as soon as one of these conditions is met: ◊ the programmed wash volume has been reached, ◊ according to the rules for the Better Quality Wash function if active, or ◊…
-
Page 108: Pfat
Note: The Emergency function can be permanently enabled/disabled from the “Protocol Set” tab of the Configuration Mode Screen. The Emergency button will only be available when it is enabled. For Chapter 8: Configuring Xtra instructions on configuring the X , refer to When the Emergency button is touched, the Emergency Activation Screen (see Figure 5-28) is displayed, requiring confirmation before the function is activated.
-
Page 109: Figure 5-28 Emergency Activation Screen
Processing 1 S ta r t b ut t o n 2 C lo s e b u tt o n Figure 5-28 Emergency Activation Screen From the Emergency Activation Screen, the operator may toggle the “No Wash” and “Rapid Transfer” options before activating the Emergency function.
-
Page 110
Processing • The Emergency button appears on all Processing Screens and on the Ready Screen in its pressed status (inset and green). Touching it again will disable the Emergency function, re-enabling the previous protocol (confirmation not required). Additionally, if the Emergency function is activated with the No Wash option ON, the following takes place: •… -
Page 111: Post-Op
Processing CAUTION Inadequate washing of concentrated red blood cells can lead to an excessive level of contaminants (i.e. anticoagulants and plasma free hemoglobin) in the treated blood. Post-op The postoperative Post-op protocol is intended to concentrate, wash, and collect the blood drained from a surgical cavity of a patient in a postoperative context.
-
Page 112: Protocol Parameters (Ats)
Processing Protocol Parameters (ATS) The table below contains the parameters recommended by LivaNova for the ATS protocols, according to the bowl size used. Note: Every time a new case is started, factory procedure parameters are reinitialized to their default values, even if the unit is not shut down and restarted. Protocol Parameters Range…
-
Page 113: The Operating Modes
Chapter The 1 Touch mode will not be available if disabled in the current configuration (refer to 8: Configuring Xtra Although it is possible to disable the Autostart function when 1 Touch mode is selected, it is considered exceptional. On the contrary, it is not possible to disable the Continue function when 1 Touch mode is selected.
-
Page 114: Manual
(Fill, Wash, Spill, Empty) are always visible in the button bar of each processing screen. Manual mode will not be available if disabled in the current configuration (refer to Chapter 8: Configuring Xtra Figure 5-29 Ready Screen in Manual Mode…
-
Page 115: Figure 5-31 Wash Phase In Manual Mode
Processing Figure 5-31 Wash Phase in Manual Mode Figure 5-32 Empty Phase in Manual Mode Two options are available when processing with ATS protocols in manual mode to aid the operator and allowing for a fully manual to a semi-automatic mode of operation: •…
-
Page 116: Selecting The Active Protocol And Operating Mode
Processing CAUTION The deactivation of the RBC Detector is at the full responsibility of the doctor/ operator who must carefully supervise the fill phase (or concentration) and manually touch the Wash button to start the washing phase (or Spill or Empty to start the phase of the same name during a sequestration protocol).
-
Page 117: Set The Active Protocol
Processing Set the Active Protocol By default, when the X is powered on, the active protocol is the protocol which has been designated as the wakeup protocol. To change the wakeup protocol, refer to “Changing the Wakeup Protocol” on page 9-6. If you want to use a protocol for the next cycle that is different from the currently active protocol, do the following: Touch the Menu button from the Ready Screen to enter the Menu Screen.
-
Page 118: Touch Screen User Interface
Processing Touch Screen User Interface The following section offers a detailed description of the user interface. The figures in this section are based on typical screens encountered during normal use in Automatic or 1 Touch modes. The actual presence, visibility, and content of the displets and button bar depend on the configuration of the X system.
-
Page 119: Setup Screen
Processing Setup Screen After powering on and confirming any disabled warnings or alarms (see “Turning On the X System” on page 5-5), the operator is presented with the setup screen (see Figure 5-35). 1 “ R et a i n” b ut t on 3 H el p b ut t o n 2 L o a d d i a g r a m 4 L o a d b u t t o n…
-
Page 120: Ready Screen
Processing 5. Menu Button Touching the menu button will bring up the Menu Screen. Various X settings can be adjusted from the Menu Screen. Touching the close button in the Menu Screen will close the Menu Screen and display the previously displayed screen. Refer to the section “Menu Screen” on page 5-44.
-
Page 121: Processing Screen
Processing 5. Emergency Button Touching the Emergency button, and then confirming in the subsequent confirmation screen, initiates the Emergency function (refer to “Emergency” on page 5-26). While the Emergency function is active, this button appears in its pressed state (inset and green). Touching it again will disable the Emergency function, re-enabling the previous protocol (confirmation not required).
-
Page 122: Figure 5-38 Wash Phase Of The Processing Screen
Processing “Hct In” Field The “Hct In” field located in the processing displet displays the current hematocrit (%) of the blood entering the bowl. The “Hct In” field is not present while processing with PPP/PRP sequestration protocols. The “Hct In” field is never present if the Hct indicator has been disabled. 3.
-
Page 123: Fat Removal Screens
Processing Empty Screen 1 Em p t y S t a t us li ne Figure 5-39 Empty Phase of the Processing Screen 1. Empty Status Line The empty status line indicates the current phase with the empty icon. To the right of the icon is a text field which displays the volume of fluid which has been emptied from the bowl (ml) into the RBC bag during the current cycle.
-
Page 124: Fat Removal — Wash Processing Screen
Processing Fat Removal — Wash 1 R e a l Wa s h V ol . l in e 2 F a t R e m o v a l — W a s h s t a t u s l i n e Figure 5-40 Fat Removal –…
-
Page 125: Fat Removal — Conc Processing Screen
Processing 1. Fat Removal – Empty The Fat Removal — Empty status line indicates the current phase with the grey empty icon. To the right of the icon is a text field which displays the volume of fluid which has been emptied from the bowl (ml) into the RBC bag during the current subphase.
-
Page 126: Menu Screen
Processing Menu Screen Touching the Menu button from any screen displays the Menu Screen which consists of a list of tabs. Touching one of the tabs will display the associated menu screen. Tally Tab The Tally tab of the Menu Screen displays information about the current and past cases and allows the operator to save or print that information (see Figure 5-43).
-
Page 127
Processing “Send Output” Button Touching the “Send Output” button sends case data to the destination selected with the data destination menu. If the printer is selected, this button prints general information about the case. To add additional information to the printout, use the following two buttons: “Add Bowl Tally”… -
Page 128: Figure 5-44 Id Tab Of The Menu Screen
Processing Identifier (ID) Tab The ID tab is used to enter information (such as the patient ID) pertaining to the current case (see Figure 5-44). 1 ID F ie ld s L is t 2 L ef t and R i ght P ag e B u tt o ns Figure 5-44 ID Tab of the Menu Screen 1.
-
Page 129: Protocol/Mode Tab Of The Menu Screen
Processing 1 Pr ot o co l a r e a 2 Mo de a r e a 3 S a ve M od i f i ca t i on s b ut t o n Figure 5-45 Protocol/Mode Tab of the Menu Screen The Protocol/Mode tab is divided into two areas: the protocol area on the left which contains the protocol selection menu, parameters and automations related to the selected protocol, and the mode area on the right which usually contains the operating mode selection menu and automations related…
-
Page 130: Figure 5-46 Settings Tab Of The Menu Screen
Processing 3. Save Modifications button The Save Modifications button appears to the left of the Close button as soon as any modifications are made to the current protocol or operating mode. Touching the Modifications Button applies all modifications and closes the Menu Screen. 4.
-
Page 131: Figure 5-47 Reset Confirmation Screen
Reset Confirmation Screen “Configuration Mode” Button Touching the “Configuration Mode” button enters configuration mode (after prompting for a password). Read Chapter 8: Configuring Xtra to learn how to change the configuration settings in configuration mode. Adjust Date and Time Touching the “Adjust date and time” button causes it to be replaced by six modifiable text boxes containing the currently set year, month, day, hour, minute, and second.
-
Page 132: End Of Case Screen
Processing End of Case Screen The End of Case Screen (see Figure 5-48) appears after touching the “End Case” button from the Ready Screen. From the End of Case Screen, the operator may empty the RBC line and unload the pump loop, as well as review, export, and print the case tally data for present and past cases.
-
Page 133: Help Screen
Processing Help Screen The Help Screen is displayed by touching the Help button from any other screen. The first page will display all the modifications applied to the Warning settings and also warnings and features disabled run-time. Figure 5-49 Help Screen The second page contains the software version and serial number are displayed at the bottom of the Help Screen.
-
Page 134: Past Cases Screen
Processing Past Cases Screen The Past Cases Screen displays a list of past cases that have been run on the X system, allowing those cases to be selected for display, export, or printing (see Figure 5-50). Chapter 11: Data Download Option For more information on printing and saving case data, read 1 P a s t c a s e s l is t 2 U p a nd d o w n a r r o w b u t t o n s…
-
Page 135
Processing 1 All cases By selecting this option, it will be possible to select all the cases stored in the memory of the machine. 2 Cases performed: By selecting this option, it will be possible to select all the cases performed between two specific dates. -
Page 136
Processing “Send to RS232” Button Touching the “Send to RS232” button will output the selected case to the RS232 port. While the case is being transferred, all other buttons will be disabled and the text “Outputting Case…” will be displayed on the Past Cases Screen. “View Case”… -
Page 137: Automatic Reseparation Screen
Processing Automatic Reseparation Screen Whenever a phase is interrupted by the operator (by use of the Stop or Pause buttons) or by an alarm, it is possible to resume processing at the same point by touching the Start button from the Ready Screen.
-
Page 138
Processing Using the pump handle, manually turn the pump rotor clockwise until all the remaining fluid in the centrifuge bowl has been emptied into the Empty bag. Remove the pump loop tubing from the pump rotor. To do so, turn the pump rotor counter clockwise while pulling the pump loop tubing free. -
Page 139: Chapter 6: Special Cycles
Screen before they will be available for use. Refer to “How to Enter the Configuration Mode” on page 8-2 for instructions on entering the Configuration Mode Screen. For more on configuring the X Chapter 8: Configuring Xtra system refer to the rest of The Special Cycles Screen Touching the “Special”…
-
Page 140: Returning Fluid To The Reservoir: The Return Cycle
Special Cycles The “Special” button is only available while the machine is stopped with the Ready Screen displayed. However, by use of the “Conc” and “Return” buttons in the button bar, the Concentrate and Return cycles may be initiated at any time from the Processing Screen while processing is paused (or from a warning screen, such as during the “Reservoir empty.
-
Page 141: Adding Fluid To A Partially Filled Bowl: The Concentrate Cycle
Special Cycles Touching the Pause button will stop the pump rotor. The centrifuge will continue to spin for five minutes. While the system is paused, the operator may use the Phase buttons in the button bar to abort the Return cycle and continue processing in the selected phase.
-
Page 142: Priming The Reinfusion Line: Prime Iv
Special Cycles hematocrit of the incoming blood (%). The Concentrate pump speed (ml/min.) may be adjusted by touching the pump rotor text box. Touching the Pause button will stop the pump rotor. The centrifuge will continue to spin for five minutes. While the system is paused, the operator may use the Phase buttons in the button bar to abort the Concentrate cycle and continue processing in the selected (or a different) phase.
-
Page 143: Figure 6-4 Prime Iv Screen (Paused)
Special Cycles the saline solution from the bowl towards the RBC bag. The centrifuge does not spin during this operation. The Prime IV Screen is displayed throughout the cycle (see Figure 6-4). Figure 6-4 Prime IV Screen (Paused) The Prime IV Screen tracks the volume (ml) of saline solution which has been pumped from the bowl towards the RBC bag.
-
Page 144: Removing Air From The Rbc Bag: The Purge Cycle
Special Cycles Removing Air From the RBC Bag: The Purge Cycle It is normal for air to accumulate in the RBC bag while processing several units of blood. The Purge cycle allows the operator to use the system to remove this air. WARNING Initiate the Purge cycle only when the bowl is empty.
-
Page 145: Reinfusion
Special Cycles Reinfusion Description Reinfusion of the red blood cells processed by the X is under the control and supervision of the physician in charge and can be accomplished by several different means: • Processed blood can be held in the RBC bag until the bag becomes full. Use the Purge function (refer to “Removing Air From the RBC Bag: The Purge Cycle”…
-
Page 146: Connecting The Blood Administration Set To The X
Special Cycles Connecting the Blood Administration Set to the X RBC Bags If it is necessary to establish a continuous loop for reinfusion of blood processed by the X , follow these steps: Using aseptic technique, spike one of the unused ports of the X RBC bag (either of the two unused ports may be used) with either: ◊…
-
Page 147: Figure
Special Cycles 1 P r i m a r y R B C B a g 6 S e co n d a r y C l a m p 2 P rim a ry Cla mp 7 “ Y” T yp e Bl o od Ad mi ni s tr a t io n S et 3 Mi c r o a g g r e g a t e T r a n s f u s i o n F i l t er 8 “…
-
Page 148
Special Cycles 20077/021 US 6-10 Operator’s Manual… -
Page 149: Chapter 7: Automated Functions
Automated Functions Chapter 7: Automated Functions Description Several automated functions are available for use during processing with the X system: • Autostart function — Automatically start a cycle based on the volume of blood in the reservoir. • Continue function — Sequentially process multiple cycles without any intervention required by the operator.
-
Page 150: Figure 7-1 Autostart Activation Screen
Automated Functions This automation is available only for intraoperative and postoperative protocols (Pstd, Popt, Pfat, Post-op, and derivatives) in the Automatic and 1 Touch operating modes. It is neither available if the reservoir type is set to “none” in the Settings tab of the Menu Screen, nor when processing with the Manual operating mode.
-
Page 151: Continue Function
Automated Functions The screen is displayed for 4 seconds, during which time the operator may take the following actions: • Touch the Autostart Disable button to interrupt the automatic start and deactivate the Autostart automation. The system will return to the stopped state and display the Ready Screen. The Autostart automation may be reactivated from the Protocol/Mode tab of the Menu Screen.
-
Page 152: Last Bowl
Automated Functions When the Continue function is active, the Continue symbol ( ) appears in the status area of every screen. The Continue function may be deactivated in two ways: • By touching Continue button from the Protocol/Mode tab of the Menu Screen while the function is active (the button will then revert to its deactivated raised appearance).
-
Page 153
Automated Functions automatically,” and the Last Bowl function is terminated. CAUTION The Concentration function reprocesses already collected red blood cells subjecting them again to the mechanical action of the pump and the centrifuge. The repeated use of the Concentration function on the same red blood cells might lead to them being damaged and therefore to their loss. -
Page 154: Double Volume Wash Function
Automated Functions Double Volume Wash Function If at any time during processing a bowl cannot be completely filled (such as the reservoir becoming empty during the Fill phase), a suitable warning is issued and the Double Volume Wash function becomes available. The Double Volume Wash function is initiated by touching the “Double Wash”…
-
Page 155: Better Empty
Automated Functions • Fewer than three BQW cycles have been performed during the current Wash phase and the volume already processed exceeds 100 ml. (If 100 ml of wash solution has not yet been pumped to the bowl, then the start of the first BQW cycle will wait until it has.) The interval between two subsequent BQW cycles is always 200 ml except when air is detected between two BQW cycles.
-
Page 156
Automated Functions 20077/021 US Operator’s Manual… -
Page 157: Chapter 8: Configuring X
Configuring X Chapter 8: Configuring X Description The X system includes a number of settings and optional features that may be configured. Because modifying system settings affects the operational conditions of the machine, they may only be modified before starting a new case. However, after a case has been started, the current settings may be viewed, but not modified, from the Settings tab of the Menu Screen (by touching the View button).
-
Page 158: The Settings Tab Of The Menu Screen
Configuring X The Settings Tab of the Menu Screen A few system settings may be changed directly from the Settings tab of the Menu Screen (see Figure 8-1) without entering a password. Settings are only modifiable when the Settings tab is accessed from the Setup Screen (before starting the case).
-
Page 159: Exit From The Configuration Mode
Configuring X Screen will be displayed (see Figure 8-3). Alternatively, touch the Close button ( ) to close the password screen without entering the Configuration Mode Screen. Figure 8-2 Configuration Mode Password Screen Exit From the Configuration Mode To exit the Configuration Mode Screen, simply touch the Close button from any tab. The Configuration Mode Screen will close, any changes made will have already taken effect and will be saved, and the Settings tab of the Menu Screen will be displayed.
-
Page 160: Configuration Mode Screen Tabs
Configuring X Feature/Function Basic Advanced Protocol Set Popt enabled enabled Pstd disabled enabled Pfat enabled enabled Post-op disabled disabled disabled disabled PRP1 disabled disabled PRP2 disabled disabled Emergency key enabled enabled No Wash option disabled disabled Rapid Transfer option disabled disabled User Protocols disabled…
-
Page 161
Configuring X The quality warnings depend on the WLC indicator being enabled. Disabling the WLC indicator will also disable the “Reached” and “Not reached” quality warning settings. Wash Quality Warnings Chapter 12: Quality The following two settings relate to the wash quality warnings as described in Management Option With this feature enabled, if a minimum wash quality is reached before the Wash Reached. -
Page 162: Figure 8-4 Protocol Set Tab Of The Configuration Mode
Configuring X Setting the Enabled Protocols The Protocol Set tab of the Configuration Mode Screen (see Figure 8-4) allows for the available processing protocols to be configured. Figure 8-4 Protocol Set Tab of the Configuration Mode ATS Protocols The four settings under the “ATS Protocols” heading determine which intraoperative (Popt, Pstd and Pfat) and postoperative (Post-op) protocols are available for processing.
-
Page 163: Figure 8-5 Wakeup Tab Of The Configuration Mode
Configuring X Setting the Wakeup Configuration From the Protocol Set tab (see Figure 8-5) the various wakeup settings may be configured. The wakeup settings determine the system’s initial configuration at power on or when a new case is started after loading the pump loop. Figure 8-5 Wakeup Tab of the Configuration Mode ATS Mode of Operation…
-
Page 164: Display Tab Of The Configuration Mode
Configuring X Display Tab From the Display tab (see Figure 8-6) the various wakeup display settings and the display brightness may be configured. Figure 8-6 Display Tab of the Configuration Mode Displet Contents The settings under the “Displet contents visible at wake up” heading determine which displets are initially open (enabled) or closed (disabled) when the system is powered on.
-
Page 165
Configuring X Volume of Alarm Use this three-part toggle button at the top of the screen to set the volume for all acoustic alarms (Low, Medium, or High). Standard Tone The tone of the standard audible alarms and beeps may be configured to one of three available acoustic sequences. -
Page 166: Figure 8-8 Id Tab Of The Configuration Mode Screen
Configuring X Setting the Rapid Selection of ID From the ID tab of the Configuration Mode Screen (see Figure 8-8) it is possible to configure the rapid selection of ID for use from the ID Tab of the Menu Screen as described in “Identifier (ID) Tab” on page 5-46.
-
Page 167: Figure 8-9 Edit Field List Screen
Configuring X Once created, elements from field content lists may be renamed and deleted. Empty field lists are allowed. Touching the “Edit Field List” button will allow the operator to create a new field list for the selected item; or to add, rename, and delete items if the selected field contains an existing field list.
-
Page 168: Figure 8-10 Language Tab Of The Configuration Mode
Configuring X Setting the Language From the Language tab of the Configuration Mode Screen (see Figure 8-10) it is possible to configure the language used for the user interface throughout the X system. The language setting also affects the text of data management reports created with the data download option.
-
Page 169: Chapter 9: Programmability Option
Programmability Option Chapter 9: Programmability Option Description CAUTION The operator is responsible for setting safe parameters for the custom protocols and for the factory protocols modified during a case. The X system ships with seven factory-programmed protocols: four ATS protocols (Pstd, Popt, Pfat and Post-op) and three SEQ protocols (PPP, PRP1, PRP2).
-
Page 170: Figure 9-1 Keyboard Screen (Caps & Numbers On)
Programmability Option Text values, such as a protocol’s name, are entered using the Keyboard Screen illustrated in Figure 9-1. Keyboard Screen Figure 9-1 Keyboard Screen (Caps & Numbers ON) Backspace Button Touching the Backspace button on the Keyboard Screen deletes the last character entered from the keyboard.
-
Page 171: Creating A New Protocol
Programmability Option Creating a New Protocol Follow these steps to create a new protocol: Select a base protocol from the protocol drop-down menu. This can be either a factory protocol or an existing custom protocol. You will duplicate and then customize the base protocol in order to create the new protocol.
-
Page 172: Fill Phase Screen With Modifiable Parameter
Programmability Option 1 F il l pu mp s pe ed Figure 9-2 Fill Phase Screen With Modifiable Parameter For a detailed explanation of the Fill phase screen, read “Fill Screen” on page 5-39. The number and type of modifiable parameters depend on the selected protocol. Below is a table summarizing the parameters of each factory protocol (or any custom protocol derived from it) that may be modified at run time during the appropriate phase.
-
Page 173
Programmability Option Modifications Performed in the Protocol/Mode Tab The operator may, at any time, modify the parameters of a protocol by means of the Protocol/Mode tab of the Menu Screen (see Figure 9-3). Follow these steps to adjust the programmable parameters of a protocol from the Protocol/Mode tab of the Menu Screen: Select the protocol you wish to modify from the protocol drop-down menu. -
Page 174: Renaming A Protocol
Programmability Option Renaming a Protocol Follow these steps to rename an existing custom protocol. Note that the factory protocols cannot be renamed. Select the protocol you wish to rename from the protocol drop-down menu. Touch the Rename button to rename the newly created protocol to a more useful name. Touching the Rename button will display the Keyboard Screen (see Figure 9-1).
-
Page 175: The Protocol/Mode Tab
Programmability Option The Protocol/Mode Tab 1 P r ot o co l bu t t on s 3 Mo d e a r ea 2 P r ot o co l a r e a 4 Sa v e M o d if ic a t io n s bu t t on 5 Clo s e bu t t on Figure 9-3 Protocol/Mode Tab of the Menu Screen…
-
Page 176: Protocol Area
Programmability Option Protocol Area The protocol area contains the parameters and controls used to select and modify the active processing protocol. At the top is the protocol drop-down menu, which is used to select the active protocol. Below that appear parameters specific to the selected protocol. The parameters which are available for modification vary depending on the selected protocol.
-
Page 177: Mode Area
Programmability Option PRP1, PRP2, and Derived Protocols The PRP protocols contain a few parameters which are not available in the PPP protocol: Spill Speed The speed at which the pump moves fluid from the centrifuge bowl into the PPP and PRP bags during the Spill phase (ml/min).
-
Page 178
Programmability Option 20077/021 US 9-10 Operator’s Manual… -
Page 179: Chapter 10: Preoperative Sequestration (Ppp And Prp)
Preoperative Sequestration (PPP and PRP) Chapter 10: Preoperative Sequestration (PPP and PRP) Description The preoperative sequestration (SEQ) option of the X system allows separation of plasma and platelets from whole blood previously collected in bags. Typically, whole blood separation is performed so that the patient can receive a supply of autologous plasma containing clotting factors and platelets at the end of a procedure.
-
Page 180: Enabling The Preoperative Sequestration Protocols
Preoperative Sequestration (PPP and PRP) Enabling the Preoperative Sequestration Protocols Whole blood separation with the X system requires that at least one of the sequestration protocols be enabled. These protocols may be enabled and disabled from the Protocol Set tab of the Configuration Mode Screen.
-
Page 181: Sequestration Set
Preoperative Sequestration (PPP and PRP) fluid in the PPP and/or PRP bags includes plasma, platelets, and other formed elements, and may include some RBC’s. The plasma, platelets, and red cells may be transfused during or after the surgical procedure under the direction of the physician.
-
Page 182: Order Guide
Preoperative Sequestration (PPP and PRP) The 4-way adapter is inserted between the outlet tubing from the centrifuge bowl and the waste bag; its two sequestration lines are connected to the blood bags, for plasma (yellow clamp) and platelet collection (orange clamp). During a preoperative sequestration, the clamps are used to direct the flow of plasma and platelets into the collection bags.
-
Page 183: Setup For Preoperative Sequestration
Preoperative Sequestration (PPP and PRP) WARNING To reduce the possibility of air or particulate embolism, LivaNova STRONGLY RECOMMENDS the use of reinfusion protection devices, including microfilters, when infusing processed blood. WARNING To reduce risk of air embolism, remove all air from the plasma bags before handing the bag over for reinfusion.
-
Page 184: Installing The Blood Collection Reservoir, Connecting The Aspiration Line, Setup Of The Vacuum Line, Installing The Bowl Set
Preoperative Sequestration (PPP and PRP) Note: The Procedure Set can be used instead of sets indicated in points 2 and 3. Installing the Blood Collection Reservoir, Connecting the Aspiration Line, Setup of the Vacuum Line, Installing the Bowl Set Chapter 4: Installing the Disposables For general information about installing disposables, refer to CAUTION Use aseptic technique when installing disposables.
-
Page 185: Connecting And Hanging The Blood Transfer Bags
Preoperative Sequestration (PPP and PRP) Connecting and Hanging the Blood Transfer Bags Remove the two blood transfer bags from the package Connect the blood transfer bags to the sequestration lines as follows: ◊ In PPP procedures, connect one of the blood transfer bags to the sequestration line with the yellow clamp of the 4-way adapter.
-
Page 186: Connecting The Blood Bag Connection Line
Preoperative Sequestration (PPP and PRP) WARNING Positioning the collection bags with the inlet line facing down does not permit the correct execution of the sequestration procedure. CAUTION Use aseptic technique when installing disposables. Connecting the Blood Bag Connection Line 11. Remove the blood bag connection line from the package. If necessary, connect the adapter with spike 12.
-
Page 187: Running A Preoperative Sequestration Case
Preoperative Sequestration (PPP and PRP) Running a Preoperative Sequestration Case This section covers running a preoperative sequestration case with the X system using the dedicated SEQ protocols (PPP, PRP1, and PRP2). To learn how to run a blood recovery case using the Chapter 5: Processing intraoperative and postoperative blood recovery protocols, refer to Processing Considerations…
-
Page 188: Loading The Pump Segment For A New Case
Preoperative Sequestration (PPP and PRP) Loading the Pump Segment for a New Case The proceeding information assumes you have followed the instructions in “Turning On the X System” on page 5-5. The Setup Screen should be displayed on the touch screen display (see Figure 10-6). 1 Lo a d b u tt o n Figure 10-6 Setup Screen…
-
Page 189: Figure 10-7 Ready Screen (Prp2)
Preoperative Sequestration (PPP and PRP) 1 St a r t bu t to n Figure 10-7 Ready Screen (PRP2) For a detailed explanation of the Ready Screen, read “Ready Screen” on page 5-38. Before beginning a cycle, select the desired protocol and operating mode (as explained in “Selecting the Active Protocol and Operating Mode”…
-
Page 190: Figure 10-8 Sequestration Fill Phase Of The Processing Screen
Preoperative Sequestration (PPP and PRP) 1 P u mp sp ee d 2 Fi ll S t a t us li n e 3 Pl a y / Pa us e b ut t on Figure 10-8 Sequestration Fill Phase of the Processing Screen As blood enters the bowl during the Fill phase, centrifugation concentrates the red blood cells into the bowl while the platelet-poor plasma is spilled into the collection bag.
-
Page 191: Spill Phase (Ppp) Of The Processing Screen
Preoperative Sequestration (PPP and PRP) ◊ If operating in Manual mode with the RBC detector disabled: the buffy coat will not be detected automatically. When you have determined that enough blood has been pumped into the bowl, touch the Empty phase button in the button bar to advance to the Empty phase.
-
Page 192
Preoperative Sequestration (PPP and PRP) When the Spill PPP sub-phase begins, the centrifuge speed starts decreasing slowly until it reaches the pre-set Spill PPP speed. During this time the message “Automatic pause — Please wait for centrifuge deceleration” is displayed in the message area. At this stage, the pump remains paused for one minute to improve blood sedimentation. -
Page 193
Preoperative Sequestration (PPP and PRP) Figure 10-10 Empty Phase of the Processing Screen For a detailed explanation of the Empty phase screen, read “Empty Screen” on page 5-41. The volume of the blood transferred from the bowl is displayed on the processing displet and constantly updated by the system’s software. -
Page 194: The Concentrate Cycle (With The Ppp/Prp Protocols)
Preoperative Sequestration (PPP and PRP) The Concentrate Cycle (With the PPP/PRP Protocols) When there is insufficient blood volume in the reservoir to complete the Fill phase of a cycle, the Concentrate cycle may be used to complete filling the bowl from the RBC bag. This further concentrates the collected RBC and is referred to as “concentrating”…
-
Page 195: Dealing With Expected Warnings During A Cycle
Preoperative Sequestration (PPP and PRP) Touching the Pause button will stop the pump rotor. The centrifuge will continue to spin for five minutes. While the system is paused, the operator may use the Phase buttons in the button bar to abort the Concentrate cycle and continue processing in the selected (or a different) phase.
-
Page 196: Ppp Bag Full
Preoperative Sequestration (PPP and PRP) PPP Bag Full The PPP Bag Full warning is triggered during the Fill or Spill phases if the volume transferred to the PPP bag exceeds the pre-set safety level. Also refer to “PPP bag full. Empty or replace it.” on page 14-18.
-
Page 197: Finishing Preoperative Separation And Preparing For Blood Recovery
Preoperative Sequestration (PPP and PRP) Finishing Preoperative Separation and Preparing for Blood Recovery To finish preoperative sequestration and prepare for blood recovery, do the following: Remove any air from the PRP bags. WARNING To reduce risk of air embolism, remove all air from the plasma bags before handing the bag over for reinfusion.
-
Page 198: Tally Information
Preoperative Sequestration (PPP and PRP) Connect the suction line, described in “Step 2: Connecting the Suction Line” on page 4-4. Chapter 5: Processing 10. See for instructions on processing for intraoperative blood recovery. Tally Information A table containing total processed and collected volumes is available at any time during processing from the Tally tab of the Menu Screen (see Figure 10-12).
-
Page 199: The Preoperative Sequestration Factory Protocols
Preoperative Sequestration (PPP and PRP) The Preoperative Sequestration Factory Protocols The following sections describe only the preoperative sequestration protocols which ship with the X system: PPP, PRP1, and PRP2. For an overview of what protocols are and for specific description of the intraoperative and postoperative blood recovery protocols, refer to “Factory Protocols”…
-
Page 200: Ppp
Preoperative Sequestration (PPP and PRP) The PPP protocol is intended to collect platelet-poor plasma in the PPP bag. The remaining blood components will be emptied to the RBC bag. Unlike the other sequestration protocols, the PPP protocol is made up of only two phases: Fill and Empty. Fill Phase The Fill phase of the PPP protocol is identical to that of the PRP protocols.
-
Page 201: Prp1
Preoperative Sequestration (PPP and PRP) PRP1 The PRP1 protocol is intended to collect plasma, including platelet-rich plasma, into the PRP bag. The remaining blood components will be emptied to the RBC bag. The PRP protocol is made up of three phases: Fill, Spill, and Empty.
-
Page 202: Protocol Parameters (Ppp And Prp)
Preoperative Sequestration (PPP and PRP) Empty Phase The Empty phase of the PRP2 protocol, during which the remaining blood components in the bowl are transferred to the RBC bag, is identical to that of the PPP and PRP1 protocols detailed in “PPP” on page 10-22.
-
Page 203: Preoperative Sequestration Operating Modes
Preoperative Sequestration (PPP and PRP) Preoperative Sequestration Operating Modes The X system is equipped with two operating modes which may be used with the whole blood separation protocols: • Automatic • Manual The 1 Touch mode is not available during whole blood processing. Modes of operation influence the execution of the active protocol, affecting the transition between phases and cycles.
-
Page 204: Figure 10-15 Spill Prp Phase Of The Processing Screen
Preoperative Sequestration (PPP and PRP) Figure 10-15 Spill PRP Phase of the Processing Screen 1. “Conc” Button Touching the “Conc” button initiates the Concentrate cycle (refer to “The Concentrate Cycle (With the PPP/PRP Protocols)” on page 10-16). This button is only present while processing is paused.
-
Page 205
Preoperative Sequestration (PPP and PRP) 5. Empty button Touching the Empty button changes to the empty phase and displays the Empty Screen (refer to “Empty Screen” on page 5-41). While operating in Automatic mode, the Empty button is only visible while processing is paused; it is always visible in Manual mode. 6. -
Page 206
Preoperative Sequestration (PPP and PRP) 20077/021 US 10-28 Operator’s Manual… -
Page 207: Chapter 11: Data Download Option
Data Download Option Chapter 11: Data Download Option Description The X data download option enables the operator to download processing tallies and information for blood recovery and preoperative sequestration procedures in several ways: • Integrated printer module • Integrated USB (three) and RS232 serial ports (three) •…
-
Page 208: Usb Ports
Data Download Option Figure 11-2 Integrated Dot-Matrix Printer The printer consists of: • a front cover that allows access to the paper roll and the print head, and • a control panel comprising the PRINT and FEED buttons, and the POWER and STATUS LEDs, which have the following functions: ◊…
-
Page 209: Rs232 Ports
Data Download Option Refer to “Sending Tallies to the X USB Memory Device” on page 11-6 for instructions on saving case data via a USB port. RS232 Ports The three integrated RS232 serial ports situated on the rear panel of the X system allow the system to be connected to external computers or peripherals.
-
Page 210: Selecting Past Cases
Data Download Option From the left side of the Menu Screen, touch the ID tab. The ID tab will be displayed (see Figure 11-4). Figure 11-4 ID Tab of the Menu Screen For a detailed explanation of the ID Tab, read “Identifier (ID) Tab”…
-
Page 211: Selecting The Output Device For Data Download
Data Download Option Figure 11-5 Past Cases Screen For a detailed explanation of the Past Cases Screen, read “Past Cases Screen” on page 5-52. From the Past Cases Screen, locate and select (touch) the case(s) you wish to view or export. Scroll through the list of past cases by touching the arrow buttons to the right of the list.
-
Page 212: Sending Tallies To The Printer
Data Download Option Figure 11-6 Destination Drop-Down Menu (Expanded) Touch the desired output destination from the list. The drop-down menu will collapse, and the selected destination will be set as the currently selected destination. Alternatively, touch the arrow portion of the drop-down menu again to collapse the menu without changing the data output destination.
-
Page 213: Sending Tallies To The Stöckert Data Management System
Data Download Option WARNING Use only X USB memory sticks. Ensure that a X USB memory stick is connected to one of the USB ports on the rear panel of the X system. Select “X USB” as the output destination, following the procedure in “Selecting the Output Device for Data Download”…
-
Page 214
Data Download Option Initial Computer Setup The personal computer COM port (e.g. COM1, COM2, etc.) must be configured as follows: • 9600 Baud (per character) 800 characters per second • 8 Bit data • No Parity • 1 Stop bit •… -
Page 215: Xtra Data Output
Data Download Option Data Output Reports may be printed in containing different levels of detail about the case(s): • General Report: header, setup, totals, blank • General Report + Bowl Tally lines for notes • General Report + Alarms/Warnings + •…
-
Page 216
Data Download Option Preoperative Sequestration • Date and time of the start of the first Fill • Date and time of the end of the last Empty phase phase • Total number of cycles • Total volume of blood processed (ml) •… -
Page 217: Additional Cycle Data
Data Download Option Additional Cycle Data For each cycle of each case, the following data is recorded to the system’s internal memory and may be exported using one of the data download options by enabling the “Add Bowl Tally” and/or “Add Alarms &…
-
Page 218
Data Download Option Event Data For each event (alarm, programmable parameter change) during each cycle, the following data is recorded to the system’s internal memory and may be exported using one of the data download options: • Event type and ID •… -
Page 219: Chapter 12: Quality Management Option
Quality Management Option Chapter 12: Quality Management Option Description The X system is equipped with indicators that monitor the quality of blood processed using the intraoperative or postoperative protocols: • Hematocrit (Hct) indicator — measures the hematocrit (%) of fluid entering and of RBCs leaving the bowl.
-
Page 220: Enabling Quality Management Options
Quality Management Option CAUTION It is recommended that the operator manually monitors the color of the fluid in the waste line before proceeding with the Empty phase. Enabling Quality Management Options The hematocrit indicator (“Hct indicator”), the supernatant removal indicator and waste line color indicator (“WLC indicator”) are optional features and must be enabled in the Features tab of the Configuration Mode Screen before the functions associated with them will be available.
-
Page 221: Supernatant Removal Indicator
Quality Management Option If calibration is otherwise not successful, the system displays the message: “HCT indicator calibration failed”. To troubleshoot, refer to Chapter 14: Troubleshooting , specifically the description of “HCT indicator calibration failed” on page 14-5. In either of these cases the operator should check the disposable installation, check for the presence of saline solution, and then proceed in one of two ways: •…
-
Page 222: User Interface
Quality Management Option User Interface When the waste line color indicator is enabled, the information gathered by the indicator is presented to the operator during processing through the user interface in two ways: • The Wash phase screen will display a waste line color indicator dot which changes color from red to yellow to green with the color of the waste line (red indicating an opaque color;…
-
Page 223: Chapter 13: Vacuum Module
Vacuum Module Chapter 13: Vacuum Module Description The X is an optional vacuum module that can only be used as an accessory to the X device. It is available to provide negative vacuum pressure (-10 mmHg to -300 mmHg [-1.3 kPa to -40 kPa]). It includes a reusable fluid receptacle and a replaceable hydrophobic filter which can be removed without special tools.
-
Page 224: Operating Modes
Vacuum Module Operating Modes The operating mode may only be changed when the vacuum pump is off. There are three ways to change the vacuum operating mode: • Changing the current active protocol. This is the usual way of changing operating modes. Protocol changes requiring changes to the vacuum operating mode while the vacuum pump is ON will produce a warning and prompt the operator to confirm the stop of the vacuum before proceeding.
-
Page 225: Preliminary Setup
Vacuum Module Preliminary Setup To use the X , attach the vacuum line from the blood collection reservoir vacuum port to the inlet port on the lid of the vacuum overflow trap. Refer to “Step 3: Setup of the Vacuum Line” on page 4-6. Chapter 15: Maintenance Refer to for information about removing the vacuum overflow trap for…
-
Page 226: Figure 13-3 Cable Connections From The
Vacuum Module 1 Se r ia l co mm un ic at i on c a bl e 2 P ow e r c a bl e Figure 13-3 Cable connections from the X module to the X system The X is controlled using the X touch screen user interface.
-
Page 227
Vacuum Module When the X vacuum module is installed, the vacuum displet is present in the lower-left corner of the displet area in the Setup Screen, Ready Screen, all Processing Screens, and the End Case Screen. Refer to “The Displets” on page 5-3 for a review of the displet concept. The vacuum displet contains two controls: the Vacuum button, which toggles the vacuum pump ON and OFF;… -
Page 228: Use Of The X Vac System Through The
Vacuum Module WARNING The blood collected with the X vacuum module must be processed only with the X Autotransfusion System. Use of the X System Through the X Control Panel (Local Control) The X vacuum module can be controlled using its built-in control panel only when the touch screen user interface of X is not available, in the following two cases: When the X…
-
Page 229
Vacuum Module Performing an Intra or Post Blood Collection Procedure Ensure the module is powered on (the on/off switch located on the rear panel of the vacuum module must be switched on). Check the status of the Intra and Post mode button LEDs. To perform an Intra procedure, press the Intra button. -
Page 230: Alarms
Vacuum Module Alarms The section lists the possible alarms, and their causes and effects, that may occur during the operation of the X module. List of Fatal Alarms Error Service Code(s) Error Family Operator Response Over temperature (in the inner module) •…
-
Page 231
Vacuum Module • Timeout communication failure: Communication on the X RS-422 serial connection has timed out (for example, because of a damaged cable or loose connection). • Serial communication failure: A double communication error on the same communication window on the X serial line has occurred. -
Page 232
Vacuum Module 20077/021 US 13-10 Operator’s Manual… -
Page 233: Chapter 14: Troubleshooting
Troubleshooting Chapter 14: Troubleshooting General Precautions To prevent critical situations it is important that all alarms, warnings, and precautions for safe operation are observed. While setting up the X , the operator should always check the unit thoroughly. Chapter 1: Introduction and Safety Refer to regarding warnings and cautions related to the use and management of the X…
-
Page 234: Visual Alert
Troubleshooting Visual Alert Warnings, alarms, and fatal error messages are displayed to the operator in the message area of the touch screen user interface (see Figure 14-1). 1 Me s s a g e a r e a Figure 14-1 Example Warning Screen Warning messages are displayed on a yellow background next to the triangle warning icon, and any displet relevant to the warning is highlighted with a yellow outline.
-
Page 235: Stop Button
Troubleshooting CAUTION It is possible to temporarily deactivate some of the controls that the machine does. The operator can make use of this possibility, under his own responsibility, therefore directly managing those controls. Stop Button The Stop button is always available regardless of the alarm or warning. Pressing the Stop button during an alarm or warning will bring the system to the safe Ready Screen, dismissing the active alarm/warning.
-
Page 236
Troubleshooting Buttons Available in the Warning Message Text Button Bar During Operator Response Data Management Text or Alarm Warning/Alarm Centrifuge test failed The centrifuge could not rotate properly. Do not force the centrifuge lid. • Verify that the centrifuge is not blocked by any object, which might Warning prevent its proper… -
Page 237
Troubleshooting Buttons Available in the Warning Message Text Button Bar During Operator Response Data Management Text or Alarm Warning/Alarm Memory not functioning. Memory might have lost Part of the data has user protocol names and/or been lost. user protocol parameters. The machine will continue working anyway, but it is Warning… -
Page 238
Troubleshooting Buttons Available in the Warning Message Text Button Bar During Operator Response Data Management Text or Alarm Warning/Alarm HCT indicator The machine is unable to calibration: connect successfully complete the saline solution calibration of the Hct indicator. • The saline solution might be missing. -
Page 239
Troubleshooting Buttons Available in the Warning Message Text Button Bar During Operator Response Data Management Text or Alarm Warning/Alarm Pump loop loading The machine cannot failed properly load the pump loop. • If the pump loop is blocking the rotor, manually remove it. -
Page 240: During Processing
Troubleshooting During Processing Table 14-2 lists the warnings and alarms which may occur during processing with the X . Each warning or alarm is listed in alphabetical order by its message text. If the warning or alarm persists after performing the actions listed in the “Operator Response” column, call the authorized technical support service.
-
Page 241
Troubleshooting Buttons Available in the Data Management Warning or Message Text Button Bar During Operator Response Alarm Text Warning/Alarm Wash bag empty The sensor is detecting air in the wash line. • The wash line might be clamped or occluded. Remove the occlusion and press PLAY to resume. -
Page 242
Troubleshooting Buttons Available in the Warning or Data Management Message Text Button Bar During Operator Response Alarm Text Warning/Alarm Bowl did not empty The bowl did not empty completely completely. • Press EMPTY to resume the current phase. Reduce pump speed, if necessary. -
Page 243
Troubleshooting Buttons Available in the Warning or Data Management Message Text Button Bar During Operator Response Alarm Text Warning/Alarm Bowl not washed The wash volume has been set (when processing to zero and the bowl is not with Pfat protocol) washed. -
Page 244
Troubleshooting Buttons Available in the Warning or Data Management Message Text Button Bar During Operator Response Alarm Text Warning/Alarm Bowl should be full Air has been detected while extracting blood from the bowl but the bowl should be full. • Press FAT REM to resume the Fat Removal phase. -
Page 245
Troubleshooting Buttons Available in the Warning or Data Management Message Text Button Bar During Operator Response Alarm Text Warning/Alarm Bowl not filled / not The current phase has not been washed finished yet. (when processing with Pfat protocol) • Press FILL to resume the Fill phase. -
Page 246
Troubleshooting Buttons Available in the Warning or Data Management Message Text Button Bar During Operator Response Alarm Text Warning/Alarm Centrifuge lid lock The centrifuge lid lock is still blocked in closed closed. Do not try to force position opening. • Press X to exit and display the ready screen. -
Page 247
Troubleshooting Buttons Available in the Warning or Data Management Message Text Button Bar During Operator Response Alarm Text Warning/Alarm Disconnect the You are about to switch from a patient from the postoperative protocol to an machine intraoperative protocol. The patient must be disconnected from the machine. -
Page 248
Troubleshooting Buttons Available in the Warning or Data Management Message Text Button Bar During Operator Response Alarm Text Warning/Alarm Fluid loss in The centrifuge fluid loss sensor centrifuge: has detected fluid leakage in Biohazard risk the centrifuge housing. Open the centrifuge lid and the centrifuge arm, check that the bowl is not leaking, make sure that all clamps of bowl set and… -
Page 249
Troubleshooting Buttons Available in the Data Management Warning or Message Text Button Bar During Operator Response Alarm Text Warning/Alarm Minimum wash Based on waste line color quality might be indicator and supernatant already reached removal algorithm, the wash quality might be already acceptable. -
Page 250
Troubleshooting Buttons Available in the Warning or Data Management Message Text Button Bar During Operator Response Alarm Text Warning/Alarm Minimum wash Based on waste line color quality might be not sensor and supernatant reached yet removal algorithm, the wash (when processing quality might not be yet with Pfat protocol) acceptable. -
Page 251
Troubleshooting Buttons Available in the Warning or Data Management Message Text Button Bar During Operator Response Alarm Text Warning/Alarm RBC bag empty. The volume inside the RBC bag Bowl not filled is not sufficient to properly fill the bowl. • Make sure the line is connected and not clamped, then press PLAY to resume. -
Page 252
Troubleshooting Buttons Available in the Warning or Data Management Message Text Button Bar During Operator Response Alarm Text Warning/Alarm RBCs detected The sensor detected more than during purge 3 ml of RBCs returning into the bowl. Warning If you forgot to turn the RBC RBCs during purge bag upside down, press X to display the Purge screen, then… -
Page 253
Troubleshooting Buttons Available in the Data Management Warning or Message Text Button Bar During Operator Response Alarm Text Warning/Alarm Unload limit reached You have reached the unload limit. 1. Remove the pump loop Warning Unload limit reached manually. 2. Switch OFF the machine. Vacuum pump out of The vacuum pump is out of order… -
Page 254
Troubleshooting Buttons Available in the Warning or Data Management Message Text Button Bar During Operator Response Alarm Text Warning/Alarm Weight not reliable. The weight of the reservoir is Autostart compromised and the Autostart temporarily automation has been Warning Weight not reliable disabled. -
Page 255: Equipment Malfunctions (Fatal Errors)
Troubleshooting Equipment Malfunctions (Fatal Errors) When a malfunction is detected in the components of the machine which prevents further processing, a fatal error is issued. Every fatal error message begins with an error code of the form “EXXX” where the XXX is a one to three digit number. For example: “E18 Pump Failure!”…
-
Page 256
Troubleshooting Error Service Error Family Operator Response Code(s) • Switch the machine OFF. Electronic Failure — Memory or Microcontroller • Wait a few seconds, switch the machine on and touch the “Retain” button. • Switch the machine OFF. Electronic Failure — Serial Communication •… -
Page 257: Therapy Concerns Unrelated To The Equipment
Troubleshooting Therapy Concerns Unrelated to the Equipment If the patient situations listed in Table 14-4 occur, do not automatically assume that the problem is due to the equipment. Issue Possible Cause Possible Action Adult Respiratory Distress Syndrome 1. Trauma. 1. Medical assessment of the patient to (ARDS) determine treatment.
-
Page 258
Troubleshooting Issue Possible Cause Possible Action Increased Bleeding 1. Anatomical bleeding. 1. Maintain surgical hemostasis. 2. Excess hemodilution. 2. Medical management of patient to assess the need for replacing clotting factors. 3. Excess anticoagulant. 3. Avoid processing partially filled centrifuge bowls; use at least one liter during the Wash cycle. -
Page 259: Quality Of Salvaged Blood And Blood Product
Troubleshooting Quality of Salvaged Blood and Blood Product The quality of the salvaged blood and resultant blood products are dependent upon good operator techniques and knowledge of how the X operates. Listed below in Table 14-5 are four situations that may occur and suggested measures to overcome them. Issue Possible Cause Possible Action…
-
Page 260
Troubleshooting 20077/021 US 14-28 Operator’s Manual… -
Page 261: Glossary
Maintenance Chapter 15: Maintenance Glossary • Routine Maintenance: is defined as every maintenance action that must be performed regularly by the user of the X • Preventive Maintenance: is defined as every maintenance action performed by an authorized technician every interval defined by the equipment manufacturer Routine Maintenance Regular care and maintenance is important for the function and operation of the X because it:…
-
Page 262: Routine Visual Inspection
Maintenance Routine Visual Inspection The X equipment should be inspected periodically for any problems such as bent or broken switches, frayed or twisted power cords, and loose or missing hardware. Discontinue use of the X the device displays one or more of the above conditions until the problem is corrected and it has been verified that the device is operating correctly.
-
Page 263
Maintenance WARNING Do not use sodium hypochlorite based disinfectants, aldehydes (formic aldehide, glutaralehyde) and solvents. Rinse with water and wipe off the disinfectant product in order to prevent possible damage. Comply with the dilution required and with instructions provided by the manufacturer of the product (read carefully instructions for use and label of the product). -
Page 264: Figure 15-2 Clamps And Pump Loop Ejector
Maintenance Clamps and Pump Loop Ejector 1 P u mp ro to r 2 Pum p l oo p ej ec t or 3 Cl a mps Figure 15-2 Clamps and Pump Loop Ejector To clean clamps (see Figure 15-2), unlatch the clamp lid, lift it and follow the indications reported in section “External Surfaces”…
-
Page 265: Removal Of The Overflow Trap From The Vacuum Pump
Maintenance The trap should be removed and disassembled for cleaning. Push up on the quick-lock connector to remove the trap from the vacuum system (see Figure 15-4). Figure 15-4 Removal of the Overflow Trap from the Vacuum Pump The following drawing illustrates the disassembled parts of the overflow trap. Figure 15-5 Composition of the Overflow Trap After removing the trap from the X…
-
Page 266: List Of Operator-Replaceable Parts
Maintenance CAUTION Incorrect assembly of the vacuum overflow trap or assembly using damaged components could allow an overflow to enter the machine and damage internal vacuum system parts. Sensors Do not use abrasive cleaning solutions (refer to “External Surfaces” on page 15-2) on the following sensors (pictured in Figure 15-6): a.
-
Page 267: Figure 15-7 Sensors Located On Machine Top
Maintenance • To replace the pump rotor, lift the white lever (see “1” in Figure 15-7) and extract the rotor, making sure that it is positioned where the knurling allows its extraction. To find the correct position turn the rotor round the shaft, till it is possible to lift it. Figure 15-7 Sensors Located on Machine Top •…
-
Page 268: Centrifuge Well Fluid Container
Maintenance Figure 15-8 Replacement of the Paper Roll Changing Printer Ribbon Cartridge When it is time to change the ribbon, the print will begin to lighten. Open the printer’s front cover The ribbon cartridge is a “U” shape with the ribbon exposed across the open end of the “U” Push on the left side of the ribbon cartridge at the point marked by “PUSH”;…
-
Page 269: Preventive Maintenance
Maintenance Alternatively, perform the following to replace the container: Unscrew the container from its seat; Close it with the available cap and discard it; Fit a new container to the output connector and screw into seat. The container can be ordered as a spare part. Preventive Maintenance Regular maintenance checks by authorized service technicians The preventive maintenance of the X…
-
Page 270
Maintenance 20077/021 US 15-10 Operator’s Manual… -
Page 271: Chapter 16: Technical Data
Technical Data Chapter 16: Technical Data Technical Features of the Equipment Unit Dimensions Height = 660 mm (1055 mm*) — pole lowered Height = 1585 mm (1980 mm*) — pole completely lifted Height = 835 mm (1230 mm*) — display lifted Width = 375 mm — including the eccentric rings Width = 800 mm — with poles completely open Depth = 500 mm — 680 mm including the front and rear handles…
-
Page 272: Operating Features Of The Equipment
Technical Data Operating Features of the Equipment Centrifuge speed In ATS protocols: 5600rpm, accuracy ±40rpm In SEQ protocols: PPP: 1500÷5600rpm, steps of 100rpm, accuracy ±50rpm PRP1 and PRP2: 2400÷5600rpm, steps of 100rpm, accuracy ±50rpm Peristaltic pump In ATS protocols the flow range is: 25÷1000mL/min, steps of 25mL/min In SEQ protocols the flow range is: Fill/Spill phase: 10÷100mL/min, steps of 10mL/min Empty phase: 25÷1000mL/min, steps of 25mL/min…
-
Page 273: Chapter 17: Warranty
Warranty Chapter 17: Warranty Limited warranty and contractual conditions for LivaNova medical equipment This Limited Warranty is in addition to any statutory rights of the Purchaser pursuant to applicable law. Warranty expiry LivaNova certifies to the Buyer that all supplied products are free of manufacturing defects and that, under normal and appropriate conditions of use, such products are guaranteed for a period of 12 months starting on the date of installation and, in any event, for not more than 13 months starting on the date of dispatch, even when, in this latter case, the period of installation of the equipment is…
-
Page 274
Warranty Cases in which the Warranty shall not be effective The warranty shall not be effective in the case of products and/or materials with defects deriving from: poor handling and maintenance of the machine, incorrect use of device, tampering, modifications made by unauthorized personnel, use of materials and devices wrong or different from those indicated by the supplier and, however, in all those cases where the reasons for the defect or problem can be ascribed to the Buyer’s environment or personnel. -
Page 275
Warranty LivaNova consequently renews its invitation to scrupulously follow the user instructions and to take all the precautions necessary to ensure correct use of the device and declines all responsibility for any loss, damage, cost, accident or consequences deriving directly or indirectly from the improper use of the device. -
Page 276
Warranty Identification of Manufacturer While kindly asking you to scrupulously observe all the aforementioned provisions, please feel free to contact LivaNova or the authorized LivaNova representative, for any further details and/or technical assistance you might require. LivaNova Deutschland GmbH Lindberghstrasse 25 D-80939 München Germany Tel: +49.(0)89.32301.0 Fax: +49.(0)89.32301.555… -
Page 277: Appendix A: Safety Standards En 60601-1-2
Appendix A: Safety Standards EN 60601-1-2 Information on electromagnetic compatibility (EMC) Guidance and manufacturer’s declaration Warnings • Note: Medical electrical equipment needs precautions regarding electromagnetic compatibility and has to be installed and put into service according to the EMC information provided in the following guidance and the manufacturer’s declaration.
-
Page 278
Guidance and manufacturer’s declaration – electromagnetic immunity The X is intended for use in the professional healthcare facility environment specified below. In order to prevent adverse advents to the patient and operator due to electromagnetic disturbances, the X System must not be operated outside its intended EMC environment. -
Page 279
Test Maximum Immunity test Band Distance frequency Service Modulation power level (MHz) (MHz) (V/m) Pulse modulation 380 – 390 TETRA 400 18 Hz GMRS 460 430– 470 ± 5 kHz deviation FRS 460 1 kHz sine Pulse modulation 704 – 787 LTE Band 13, 17 217 Hz GSM 800/900… -
Page 280
IMMUNITY TEST LEVELS Phenomenon Basic EMC standard Professional healthcare facility environment ± 2 kV Electrical fast transients / bursts IEC 61000-4-4 100 kHz repetition frequency Surges IEC 61000-4-5 ± 0.5 kV, ± 1 kV Line-to-line Surges IEC 61000-4-5 ± 0.5 kV, ± 1 kV, ± 2 kV Line-to-ground 0.15 MHz –… -
Page 281: Technical Description
IMMUNITY TEST LEVELS Basic EMC standard or Phenomenon test method Professional healthcare facility environment ± 8 kV contact ELECTROSTATIC DISCHARGE IEC 61000-4-2 ± 2 kV, ± 4 kV, ± 8 kV, ± 15 kV air ± 1 kV Electrical fast transients/bursts IEC 61000-4-4 100 kHz repetition frequency Surges…
-
Page 282
20077/021 US Operator’s Manual… -
Page 283: Appendix B: Approvals And Test Certificate
Appendix B: Approvals and Test Certificate The X and X equipment have been tested and comply with the following: EMC Standards Appendix A: Safety Standards EN 60601-1-2 (See EMC Emission • IEC 60601-1-2 : 2007 and : 2014 EMC Immunity •…
-
Page 284
20077/021 US Operator’s Manual… -
Page 285: Appendix C: Quick Operating Instructions
Appendix C: Quick Operating Instructions Note: These Quick Operating Instructions represent only an overview of the operating procedures. For a complete setup and use of the machine, please refer to the X Operator’s Manual. These documents may be printed as standalone documents, preferably color and double-sided. Contents: “Setting Up the Disposables”…
-
Page 286
20077/021 US Operator’s Manual… -
Page 287: Setting Up The Disposables
Close the clamps on the Y adapter branches waiting for subsequent you are using it). connections Note: These Quick Operating Instructions represent only an overview of the operating procedures. For a complete setup and use of the machine, please refer to the Xtra Operator’s Manual. 20077/021 US Operator’s Manual…
-
Page 288
The branch ending with a male port is used to connect the reservoir to the Raise the IV pole and the display completely XTRA Bowl Set, the second one to the Oxygenator Extension Line Connect the Suction Line: Connect the Suction Line:… -
Page 289
Note: These Quick Operating Instructions represent only an overview of the operating procedures. For a complete setup and use of the machine, please refer to the Xtra Operator’s Manual. 20077/021 US Operator’s Manual… -
Page 290
Connect the fill line (blue) to the outlet port of the reservoir covered with a blue cap Note: These Quick Operating Instructions represent only an overview of the operating procedures. For a complete setup and use of the machine, please refer to the Xtra Operator’s Manual. 20077/021 US Operator’s Manual… -
Page 291
Close the waste bag drainage port. Ensure that the clamp on the inlet tube of the Waste bag is OPEN. Note: These Quick Operating Instructions represent only an overview of the operating procedures. For a complete setup and use of the machine, please refer to the Xtra Operator’s Manual. 20077/021 US Operator’s Manual… -
Page 292: Setting The Active Protocol And Mode
Note: These Quick Operating Instructions represent only an overview of the operating procedures. For a complete setup and use of the machine, please refer to the Xtra Operator’s Manual. 20077/021 US Operator’s Manual…
-
Page 293: Running An Ats Case
• If there are no other cases to process, shut down the machine. Note: These Quick Operating Instructions represent only an overview of the operating procedures. For a complete setup and use of the machine, please refer to the Xtra Operator’s Manual. 20077/021 US Operator’s Manual…
-
Page 294: Running A Prp Sequestration Case
Unload button (A) to unload the pump loop tubing, and then shutdown the machine. Note: These Quick Operating Instructions represent only an overview of the operating procedures. For a complete setup and use of the machine, please refer to the Xtra Operator’s Manual. 20077/021 US C-10 Operator’s Manual…
-
Page 295: Creating A Custom Protocol
Close button (B). Note: These Quick Operating Instructions represent only an overview of the operating procedures. For a complete setup and use of the machine, please refer to the Xtra Operator’s Manual. 20077/021 US Operator’s Manual C-11…
-
Page 296: Printing A Report For The Current Case
Note: These Quick Operating Instructions represent only an overview of the operating procedures. For a complete setup and use of the machine, please refer to the Xtra Operator’s Manual. 20077/021 US C-12 Operator’s Manual…
-
Page 297: Appendix D: Recommended Fluid Bag Configurations
Appendix D: Recommended Fluid Bag Configurations The X was tested for machine stability under various configurations of fluid bag loading. The following table lists the recommended maximum amounts and distribution of fluids to be hung on the upper and lower IV poles (see references 9 and 10 on Figure 3-1) as well as on the Waste Bag Holder (see reference 16 on Figure 3-1).
-
Page 298
20077/021 US Operator’s Manual… -
Page 299: Appendix E: Symbols And Abbreviations
Appendix E: Symbols and Abbreviations Symbols Electrical Symbols on the Unit Symbol Designation Description Alternate current (A.C.) This symbol indicates that the device requires an alternating supply current. Equipment Type B This symbol indicates that the device is classified as Type B per electrical safety standard IEC 60601-1.
-
Page 300
Symbol Designation Description Fragile: handle with care Fragile contents Keep away from heat Temperature range Keep between these -10°C (14°F) to +60°C temperatures (140°F) Serial Number Keep dry Keep out of precipitation CAUTION: Centrifuge plate operating at 5600 RPM in counterclockwise direction Raise the lever to unlock the… -
Page 301: Abbreviations
Symbol Designation Description Relative humidity range 5 — 85% Atmospheric pressure range 80 — 106 kPa Consult Operator’s Manual (Required to consult for safety) STOP Button This symbol is located on a processing key on the front panel of the X .
-
Page 302
20077/021 US Operator’s Manual… -
Page 303
This medical device bears the marking according to the European Council Directive MDD 93/42/EEC. Further information is available from Manufacturer (contact LivaNova’s local Representative or directly LivaNova’s RA & QA). -
Page 304
LivaNova Deutschland GmbH Lindberghstrasse 25 D-80939 München Germany Tel: +49.(0)89.32301.0 Fax: +49.(0)89.32301.555…
-
Contents
-
Table of Contents
-
Bookmarks
-
ENGLISH, page 1
-
РУССКИЙ, страница 73
-
FRANÇAIS, page 13
-
ESPAÑOL, página 23
-
DEUTSCH, seite 18
-
ITALIANO, pagina 8
-
DUTCH, pagina 33
-
PORTUGUÊS, página 28
-
SVENSKA, sida 38
-
POLSKI, strona 63
-
DANSK, side 43
-
SUOMI, sivu 53
-
ČEŠTINA, strana 68
-
NORSK, side 48
-
ΕΛΛΗΝΙΚΆ, σελίδα 58
-
TÜRKÇE, sayfa 78
-
汉语, 第 83 页
Quick Links
GB — ENGLISH
IT — ITALIANO
FR — FRANÇAIS
DE — DEUTSCH
ES — ESPAÑOL
PT — PORTUGUÊS
NL — NEDERLANDS
SE — SVENSKA
DK — DANSK
NO — NORGE
FI — SUOMI
EL — ΕΛΛΗΝΙΚΑ
PL — POLSKI
CZ — ČESKY
PУ — РУССКИЙ
TR – TÜRKÇE
ZH — 简体中文
XRES BLOOD COLLECTION RESERVOIR AND COLLECTION SET — INSTRUCTIONS FOR USE ……………… 3
XRES BLOOD COLLECTION RESERVOIR E COLLECTION SET — ISTRUZIONI PER L’USO ……………………… 8
XRES BLOOD COLLECTION RESERVOIR ET COLLECTION SET — INSTRUCTIONS D’UTILISATION ……… 13
XRES BLOOD COLLECTION RESERVOIR UND COLLECTION SET- GEBRAUCHSANWEISUNG ……………. 18
XRES BLOOD COLLECTION RESERVOIR Y COLLECTION SET — INSTRUCCIONES DE USO ………………… 23
XRES BLOOD COLLECTION RESERVOIR E COLLECTION SET — INSTRUÇÕES DE USO ……………………… 28
XRES BLOOD COLLECTION RESERVOIR EN COLLECTION SET — GEBRUIKSINSTRUCTIES ……………….. 33
XRES BLOOD COLLECTION RESERVOIR OCH COLLECTION SET — BRUKSANVISNING ……………………… 38
XRES BLOOD COLLECTION RESERVOIR OG COLLECTION SET — BRUGSANVISNING ………………………… 43
XRES BLOOD COLLECTION RESERVOIR OG COLLECTION SET — BRUKSANVISNING ………………………… 48
XRES T BLOOD COLLECTION RESERVOIR JA COLLECTION SET TX — KÄYTTÖOHJE ………………………… 53
XRES BLOOD COLLECTION RESERVOIR ΚΑΙ COLLECTION SET — ΟΔΗΓΙΕΣ ΧΡΗΣΗΣ …………………………. 58
XRES BLOOD COLLECTION RESERVOIR Ι COLLECTION SET — INSTRUKCJA UŻYTKOWANIA ……………. 63
XRES BLOOD COLLECTION RESERVOIR A COLLECTION SET – POKYNY K POUŽITÍ ………………………… 68
XRES BLOOD COLLECTION RESERVOIR И COLLECTION SET —
XRES BLOOD COLLECTION RESERVOIR VE COLLECTION SET — KULLANIM KILAVUZU …………………… 78
XRES BLOOD COLLECTION RESERVOIR 和 COLLECTION SET — 使用说明……………………………………. 83
ИНСТРУКЦИИ ПО ИСПОЛЬЗОВАНИЮ
011659_06 –04/2012
….. 73
Summary of Contents for sorin XTRA

GB - ENGLISH IT - ITALIANO FR - FRANÇAIS DE - DEUTSCH ES - ESPAÑOL PT - PORTUGUÊS NL - NEDERLANDS SE - SVENSKA DK - DANSK NO - NORGE FI - SUOMI EL - ΕΛΛΗΝΙΚΑ PL - POLSKI CZ - ČESKY PУ - РУССКИЙ TR – TÜRKÇE XRES BLOOD COLLECTION RESERVOIR AND COLLECTION SET - INSTRUCTIONS FOR USE .................. 3 XRES BLOOD COLLECTION RESERVOIR E COLLECTION SET - ISTRUZIONI PER L'USO ........................... 8 XRES BLOOD COLLECTION RESERVOIR ET COLLECTION SET - INSTRUCTIONS D’UTILISATION ......... 13 XRES BLOOD COLLECTION RESERVOIR UND COLLECTION SET- GEBRAUCHSANWEISUNG ................ 18 XRES BLOOD COLLECTION RESERVOIR Y COLLECTION SET - INSTRUCCIONES DE USO ..................... 23 XRES BLOOD COLLECTION RESERVOIR E COLLECTION SET - INSTRUÇÕES DE USO ........................... 28 XRES BLOOD COLLECTION RESERVOIR EN COLLECTION SET - GEBRUIKSINSTRUCTIES .................... 33 XRES BLOOD COLLECTION RESERVOIR OCH COLLECTION SET - BRUKSANVISNING ........................... 38 XRES BLOOD COLLECTION RESERVOIR OG COLLECTION SET - BRUGSANVISNING.............................. 43 XRES BLOOD COLLECTION RESERVOIR OG COLLECTION SET - BRUKSANVISNING .............................. 48 XRES T BLOOD COLLECTION RESERVOIR JA COLLECTION SET TX - KÄYTTÖOHJE .............................. 53 XRES BLOOD COLLECTION RESERVOIR ΚΑΙ COLLECTION SET - ΟΔΗΓΙΕΣ ΧΡΗΣΗΣ ............................... 58 XRES BLOOD COLLECTION RESERVOIR Ι COLLECTION SET - INSTRUKCJA UŻYTKOWANIA ................ 63 XRES BLOOD COLLECTION RESERVOIR A COLLECTION SET – POKYNY K POUŽITÍ .............................. 68 XRES BLOOD COLLECTION RESERVOIR И COLLECTION SET - ИНСТРУКЦИИ ПО ИСПОЛЬЗОВАНИЮ..... 73 XRES BLOOD COLLECTION RESERVOIR VE COLLECTION SET - KULLANIM KILAVUZU ........................ 78 XRES BLOOD COLLECTION RESERVOIR 和 COLLECTION SET - 使用说明........................................... 83 011659_06 –04/2012 CATALOGUE N. PRODUCT DESIGNATION PRODUCT DESCRIPTION 04258 04259 XRES B BLOOD COLLECTION RESERVOIR 04260 Collection Set BX BLOOD COLLECTION RESERVOIR BOTTOM PACKED TOGETHER WITH THE ACCESSORY LINES REQUIRED TO RECOVER BLOOD FROM THE OPERATING FIELD. FOR ASPIRATION AND VACUUM LINES SEE ABOVE FOR DESCRIPTION. 04266 Vacuum Line Cardio Kit THE CARDIO KIT CONTAINS: Aspiration Line Vacuum Line FOR CARDIO KIT SEE ABOVE FOR DESCRIPTION. 3 SAFETY INFORMATION SET UP HOLDER SET UP Sterile - Ethylene oxide sterilized 4 1. 2. 3. 1. 2. 3. 4. 5. 6. 7. 8. 9. 10. 11. 2. 2. 2. 3. 1. b. 2. c.1. c.2. 3. c.3. 1. 2. 5 Oxygenator Extension Line. 3. 4. 5. 6 1. 2. 3. b. 7 IT - ITALIANO IT - ITALIANO 04258 XRES T BLOOD COLLECTION RESERVOIR 04259 XRES B BLOOD COLLECTION RESERVOIR 04260 N. CATALOGO RESERVOIR DI RACCOLTA DEL SANGUE CON USCITA SUL FONDO LINEA DI ASPIRAZIONE RESERVOIR DI RACCOLTA DEL SANGUE CON USCITA IN ALTO LINEA DEL VUOTO KIT PER CARDIOLOGIA RESERVOIR DI RACCOLTA DEL SANGUE CON USCITA SUL FONDO LINEA DI ASPIRAZIONE LINEA DEL VUOTO KIT PER CARDIOLOGIA Gli impieghi previsti per XRES Blood Collection Reservoir, Collection Set Cardio e Collection Set sono rispettivamente: INFORMAZIONI SULLA SICUREZZA SPIEGAZIONE DEI SIMBOLI UTILIZZATI SULLE ETICHETTE Apirogeno Contiene FTALATI INSTALLAZIONE DEI PRODOTTI MONOUSO Alto 1. 2. 3. IT - ITALIANO 1. 2. 3. 4. 5. 6. 7. Chiudere la clamp a rullo sul tubo piccolo. 8. 9. 10. 2. 11. 3. 4. 5. 2. 2. B. 2. 3. 4. sulla a.2. a.3. NOTA: b) c) 10 7. 8. b.2. b.3. o o c.2. 1. c.3. 2. IT - ITALIANO b. 3. 4. 5. 1 2. 2. 3. 4. 5. 2. 3. 1. 12 IT - ITALIANO RÉF. CATALOGUE 04258 XRES T BLOOD COLLECTION RESERVOIR 04259 XRES B BLOOD COLLECTION RESERVOIR 04260 LIGNE DE VIDE LIGNE DE VIDE 04266 COLLECTION SET TX CARDIO LIGNE DE VIDE KIT CARDIO 04267 13 CONFIGURATION DU SUPPORT 14 Apyrogène 2. 3. Configuration de la ligne d'aspiration AAL Aspiration and Anticoagulation Line 1. 2. 3. 4. 5. 6. 7. 8. 9. 10. 11. 2. b) c) B. 2. 3. 4. 1. a.2. a.3. b.3. c.2. c.3. 3. 4. 5. b.2. 2. b.1. 2. 3. 15 o o o 2. 3. a. b. b. 2. 3. 4. 5. 2. 2. 3. 3. 2. 4. 3. 5. REPERFUSION DE SANG ÉPANCHÉ 16 17 XRES BLOOD COLLECTION RESERVOIR UND COLLECTION SET- GEBRAUCHSANWEISUNG ART.-NR. PRODUKTBEZEICHNUNG INHALT PRODUKTBESCHREIBUNG 04258 XRES T BLOOD COLLECTION RESERVOIR 04259 XRES B BLOOD COLLECTION RESERVOIR 04260 04265 04266 CARDIO-KIT 04267 Nicht pyrogen 2. 3. 19 2. 3. 4. 5. 6. 7. 8. 9. 10. 11. 2. 2. B. 2. 3. 4. b) c) 2. 3. 2. 3. 21 22 XRES BLOOD COLLECTION RESERVOIR Y COLLECTION SET - INSTRUCCIONES DE USO N.º CATÁLOGO 04258 XRES T BLOOD COLLECTION RESERVOIR RESERVORIO DE RECOGIDA DE SANGRE XTRA - SUPERIOR 04259 XRES B BLOOD COLLECTION RESERVOIR RESERVORIO DE RECOGIDA DE SANGRE INFERIOR 04260 RESERVORIO DE RECOGIDA DE SANGRE XTRA - SUPERIOR COLLECTION SET TX CARDIO RESERVORIO DE RECOGIDA DE SANGRE XTRA - SUPERIOR VÍA DE ASPIRACIÓN VÍA DE VACÍO JUEGO DE INSTRUMENTOS CARDIACOS 04267 RESERVORIO DE RECOGIDA DE SANGRE INFERIOR INFORMACIÓN DE SEGURIDAD Sin látex MONTAJE DE DESECHABLES 24 2. 3. 1. 2. b) 3. b.1. 4. b.2. 5. b.3. 6. 7. 8. 9. 10. 11. 2. c) 2. B. 2. 3. 4. a.2. a.3. NOTA: c.1. c.2. c.3. 2. 3. 4. 5. 2. 3. o o 2. 3. b. 2. 3. 4. 5. 2. 3. 4. 5. 2. 3. 2. 3. 27 PT - PORTUGUÊS PT – PORTUGUÊS DESCRIÇÃO DO PRODUTO 04258 04259 XRES B BLOOD COLLECTION RESERVOIR 04260 04266 1. ADAPTADOR EM Y 2. TUBO DE ADAPTADOR DE ¼” 3. LINHA DE EXTENSÃO DO OXIGENADOR 4. ADAPTADOR LUER-LOCK 04267 PT – PORTUGUÊS INFORMAÇÃO SOBRE SEGURANÇA MONTAGEM Contém FTALATO Montagem do XRES Blood Collection Reservoir A montagem do Blood Collection Reservoir pode ser realizada inserindo-o no suporte integrado. 1. 2. 3. PT – PORTUGUÊS 29 b) Levante o pólo intravenoso completamente. 2. 3. c) 4. 5. 6. 7. 8. 9. 10. 11. 2. Ligue o regulador de vácuo c.2. c.3. 1. 2. 3. b. b. 2. 3. 4. 5. 1. 2. 3. PT – PORTUGUÊS 31 32 PT – PORTUGUÊS NL - NEDERLANDS XRES BLOOD COLLECTION RESERVOIR EN COLLECTION SET GEBRUIKSINSTRUCTIES NL - NEDERLANDS PRODUCTNAAM INHOUD PRODUCT 04258 XRES T BLOOD COLLECTION RESERVOIR 04259 XRES B BLOOD COLLECTION RESERVOIR 04260 COLLECTION SET TX 04265 04266 COLLECTION SET TX CARDIO 04267 NL - NEDERLANDS 33 Te gebruiken vóór (vervaldatum) Productiedatum Inhoud alleen steriel als verpakking niet geopend, beschadigd of kapot is. Catalogusnummer (code) Attentie, zie gebruiksinstructies 34 Neem het bloedopvangreservoir uit de verpakking. 2. 3. NL - NEDERLANDS 2. 3. 4. 5. 6. 7. 8. 9. 10. 11. Installatie van de vacuümleiding VEL Vacuum Extension Line 1. 2. b) c) 2. B. GEBRUIKSINSTRUCTIES Bloedopvang en antistolling 1. a.2. a.3. b.1. b.2. b.3. c.2. c.3. 2. 3. 4. 5. Vul het reservoir vóór opvang van bloed met ongeveer 200 ml antistollingsoplossing. 2. 3. NL - NEDERLANDS o o o 2. 3. a. a. b. 2. 3. 4. 5. 2. 3. 2. 3. 4. 5. 2. 3. Vul de leiding in geval van snelle herinfusie volledig voordat u deze op de patiënt aansluit. Geen herinfusie onder druk toepassen (d.w.z geen bloeddrukmanchet op de secundaire herinfusiezak gebruiken). Herinfusie onder druk kan tot een luchtembolie leiden. 36 MEDISCHE HULPMIDDELEN VOOR GEBRUIK MET DE PRODUCTEN NL - NEDERLANDS NL - NEDERLANDS 37 XRES BLOOD COLLECTION RESERVOIR OCH COLLECTION SET - BRUKSANVISNING KATALOGNR PRODUKTBETECKNING INNEHÅLL PRODUKTBESKRIVNING 04258 04259 XRES B BLOOD COLLECTION RESERVOIR 04260 Aspirationsslang Vakuumslang 04266 Vakuumslang Hjärtset Aspirationsslang AVSEDD ANVÄNDNING KONTRAINDIKATIONER MONTERING 1. 2. 3. 1. 2. 3. 39 4. 5. 6. 7. 8. 9. 10. 11. Anslut en ände av vakuumslangen till XVAC vakuumsystem (eller annan vakuumkälla). 2. B. 40 c.1. c.2. c.3. 2. 3. 1. 2. b. 3. 2. 3. 4. 5. b. I rumstemperatur maximalt 4 timmar efter behandling Produktens partikod. 41 42 KATALOGNR. PRODUKTNAVN INDHOLD PRODUKTBESKRIVELSE 04258 04259 XRES B BLOOD COLLECTION RESERVOIR 04260 Aspirationsslange Vakuumslange 04265 Aspirationsslange Vakuumslange Vakuumslange DET SAMME SOM OPSAMLINGSSÆT MED TOPUDGANG PLUS ET EKSTRA TILBEHØRSSÆT TIL TILSLUTNING TIL EN OXYGENATOR ELLER ET KREDSLØB TIL ECC (CARDIO KIT) Cardio Kit DET SAMME SOM OPSAMLINGSSÆT MED BUND PLUS ET EKSTRA TILBEHØRSSÆT TIL TILSLUTNING TIL EN OXYGENATOR ELLER ET KREDSLØB TIL ECC (CARDIO KIT) TILSIGTET BRUG KONTRAINDIKATIONER 43 Produktionsdato 44 1. 2. 3. 1. 2. 3. 4. 5. 6. 7. 8. 9. 10. 11. 2. Tænd vakuumregulatoren c.2. c.3. 2. 3. 1. b. 2. 3. 2. 3. 4. 5. 46 1. 2. 3. 47 NO - NORGE XRES BLOOD COLLECTION RESERVOIR OG COLLECTION SET - BRUKSANVISNING NO – NORGE KATALOGNR. PRODUKTBENEVNELSE INNHOLD PRODUKTBESKRIVELSE 04258 04259 XRES B BLOOD COLLECTION RESERVOIR 04260 Blodoppsamlingsbeholder med utgang øverst 04266 04267 SAMME SOM BLODOPPSAMLINGSBEHOLDEREN MED UTGANG NEDERST, PLUSS ET EKSTRA TILBEHØRSSETT FOR TILKOBLING TIL EN OKSYGENATOR ELLER ECC-KRETS (CARDIOSETT). FOR CARDIO-SETTET, SE BESKRIVELSEN OVER. TILTENKT BRUK KONTRAINDIKASJONER NO – NORGE 48 KONFIGURASJON HOLDEROPPSETT 1. 2. 3. NO – NORGE 1. 2. 3. 4. 5. 6. 7. 8. 9. 10. Heng beholderen med antikoagulantløsning på en av holderne på IV-stativet. 11. Bruk aseptisk teknikk og koble til beholderen med antikoagulantløsning. 2. c.2. c.3. 50 2. 3. 1. b. 2. 3. Fortsett med behandlingen av blodet i henhold til bruksanvisningen i brukerhåndboken for celleseparatoren Konsentrering av primingvæske under ECC (kun for Collection Set Cardio) 1. NO – NORGE 2. 3. 4. Overfør primingvæsken til celleseparatoren i henhold til bruksanvisningen for produktet. Sørg for at det ikke oppstår negativt trykk i ECC-kretsen. 5. 1. 2. 3. nedre MEDISINSK UTSTYR SOM SKAL BRUKES SAMMEN MED PRODUKTENE 1. NO – NORGE 52 NO – NORGE TUOTENUMERO TUOTTEEN NIMIKE TUOTTEEN KUVAUS 04258 VERENKERÄYSSÄILIÖ - TOP 04259 XRES B BLOOD COLLECTION RESERVOIR 04260 VERENKERÄYSSÄILIÖ - TOP IMULETKU TYHJIÖLETKU TYHJIÖLETKU 04266 VERENKERÄYSSÄILIÖ - TOP KARDIOKERÄYSSARJA 04267 TYHJIÖLETKU KÄYTTÖTARKOITUS VASTA-AIHEET 53 Ei saa steriloida uudelleen. KOKOAMINEN TUEN KOKOAMINEN Varoitus: ei saa steriloida uudelleen. ea KERTAKÄYTTÖTUOTTEIDEN KOKOAMINEN 1. 2. 3. 54 3. 4. 5. 6. 7. 8. 9. 10. 11. 2. 3. 4. 5. 2. XRES Blood Reservoir 2. 3. 4. a.2. a.3. 1. 2. 3. HUOMAUTUS: b) c) b.2. b.3. o o 2. o b. 3. 1. 2. 3. 4. 5. 2. 3. 1. Sulje imuletku 2. 3. 5. 6. Avaa imuletku. TALTEENOTETUN VEREN REINFUUSIO olevaa 1. 2. 3. TUOTTEIDEN KANSSA KÄYTETTÄVÄT LÄÄKINTÄLAITTEET KÄYTETTYJEN TUOTTEIDEN PALAUTUS 56 57 XRES BLOOD COLLECTION RESERVOIR ΚΑΙ COLLECTION SET - ΟΔΗΓΙΕΣ ΧΡΗΣΗΣ 04258 04259 XRES B BLOOD COLLECTION RESERVOIR 04260 04266 ΤΟΥ 2. 3. 1. 2. 3. 4. 5. 6. 7. 8. 9. 10. 11. 2. B. c.2. c.3. 2. 3. 1. b. 2. 3. 4. 5. 2. 3. b. 61 1. 2. 3. XRES BLOOD COLLECTION RESERVOIR Ι COLLECTION SET - INSTRUKCJA UŻYTKOWANIA NR KATALOGOWY 04258 04259 XRES B BLOOD COLLECTION RESERVOIR 04260 LINIA ASPIRACYJNA POZWALA NA TRANSPORT KRWI POBRANEJ Z POLA OPERACYJNEGO DO ZBIORNIKA I TYMCZASOWĄ JEJ ANTYKOAGULACJĘ LINIA PODCIŚNIENIOWA POZWALA NA POŁĄCZENIE ZBIORNIKA ZE ŹRÓDŁEM PODCIŚNIENIA 04265 04266 TO SAMO, CO W ZESTAWIE DO ODZYSKU TYPU TOP PLUS DODATKOWY ZESTAW AKCESORIÓW SŁUŻĄCYCH DO POŁĄCZENIA Z NATLENIACZEM LUB OBWODEM KRĄŻENIA POZAUSTROJOWEGO (ZESTAW CARDIO) ZESTAW CARDIO ZAWIERA NASTĘPUJĄCE ELEMENTY: 1. ADAPTER TYPU „Y” 2. RURKA ADAPTERA ¼ CALA 3. LINIA PRZEDŁUŻAJĄCA DO NATLENIACZA 04267 Zestaw Cardio PRZEZNACZENIE PRODUKTU 63 64 5. 6. 12. 13. 14. 15. 16. 17. 18. 19. 20. 21. 22. 4. e) f) f.1. f.2. f.3. 5. 6. 4. 5. 6. b. 7. 8. 9. 10. d. 66 PRZETACZANIE ODZYSKANEJ KRWI 4. 5. 6. 67 OBSAH 04258 04259 XRES B BLOOD COLLECTION RESERVOIR 04260 04266 Podtlaková linka Cardio Kit Podtlaková linka Cardio Kit POPIS CARDIO KIT JE UVEDEN VÝŠE. ÚČEL POUŽITÍ KONTRAINDIKACE NASTAVENÍ Apyrogenní Uchovávejte v suchu. Čárový kód (číslo) (reference na kontrolovatelnost výrobku) 1. 2. 3. 1. 2. 3. 4. 5. 6. 7. 8. 9. 10. 11. Nastavení linky VEL Vacuum Extension Line 1. 2. 2. 3. 70 4. 2. 3. 1. b. 2. c.1. c.2. 3. c.3. Koncentrace plnicí tekutiny během ECC (pouze pro Collection Set Cardio) 1. 2. 3. 4. 2. 3. 1. podrobný popis události a (je-li to vhodné) stav pacienta; 72 PУ - РУССКИЙ PУ — РУССКИЙ XRES BLOOD COLLECTION RESERVOIR И COLLECTION SET - ИНСТРУКЦИИ ПО ИСПОЛЬЗОВАНИЮ № ПО КАТАЛОГУ НАЗНАЧЕНИЕ ИЗДЕЛИЯ СОДЕРЖИМОЕ ОПИСАНИЕ ИЗДЕЛИЯ 04258 Резервуар для сбора крови XRES T Резервуар для сбора крови с верхним отверстием ПРОЧНЫЙ КОНТЕЙНЕР, ОСНАЩЕННЫЙ ВСТРОЕННЫМ ФИЛЬТРОМ, ПРЕДНАЗНАЧЕННЫЙ ДЛЯ СБОРА КРОВИ, ВОССТАНОВЛЕННОЙ ИЗ ОПЕРАЦИОННОГО ПОЛЯ, С ФУНКЦИЕЙ УСТРАНЕНИЯ АГРЕГАТОВ ДИАМЕТРОМ БОЛЕЕ 40 МКМ. В МОДЕЛИ С ВЕРХНИМ ВЫПУСКНЫМ ОТВЕРСТИЕМ ВЫПУСКНОЙ ПОРТ НАХОДИТСЯ НА КРЫШКЕ УСТРОЙСТВА 04259 РЕЗЕРВУАР ДЛЯ СБОРА КРОВИ XRES B Резервуар для сбора крови с нижним отверстием ПРОЧНЫЙ КОНТЕЙНЕР, ОСНАЩЕННЫЙ ВСТРОЕННЫМ ФИЛЬТРОМ, ПРЕДНАЗНАЧЕННЫЙ ДЛЯ СБОРА КРОВИ, ВОССТАНОВЛЕННОЙ ИЗ ОПЕРАЦИОННОГО ПОЛЯ, С ФУНКЦИЕЙ УСТРАНЕНИЯ АГРЕГАТОВ ДИАМЕТРОМ БОЛЕЕ 40 МКМ. В МОДЕЛИ С НИЖНИМ ВЫПУСКНЫМ ОТВЕРСТИЕМ ВЫПУСКНОЙ ПОРТ НАХОДИТСЯ НА НИЖНЕЙ ПАНЕЛИ УСТРОЙСТВА 04260 Комплект для сбора TX Резервуар для сбора крови с верхним отверстием РЕЗЕРВУАР ДЛЯ СБОРА КРОВИ С ВЕРХНИМ ВЫПУСКНЫМ ОТВЕРСТИЕМ УКОМПЛЕКТОВАН ДОПОЛНИТЕЛЬНЫМИ МАГИСТРАЛЯМИ ДЛЯ ВОССТАНОВЛЕНИЯ КРОВИ ИЗ ОПЕРАЦИОННОГО ПОЛЯ. Магистраль всасывания Магистраль вакуумного насоса МАГИСТРАЛЬ ВСАСЫВАНИЯ ПОЗВОЛЯЕТ ПЕРЕДАВАТЬ КРОВЬ, АСПИРИРОВАННУЮ ИЗ ОПЕРАЦИОННОГО ПОЛЯ, В РЕЗЕРВУАР, ОДНОВРЕМЕННО ПРЕПЯТСТВУЯ ЕЕ СВЕРТЫВАНИЮ. МАГИСТРАЛЬ ВАКУУМНОГО НАСОСА ПОЗВОЛЯЕТ СОЕДИНИТЬ РЕЗЕРВУАР С ИСТОЧНИКОМ СОЗДАНИЯ ВАКУУМА 04265 Комплект для сбора BX Резервуар для сбора крови с нижним отверстием Магистраль всасывания Магистраль вакуумного насоса РЕЗЕРВУАР ДЛЯ СБОРА КРОВИ С НИЖНИМ ВЫПУСКНЫМ ОТВЕРСТИЕМ (BOTTOM) УКОМПЛЕКТОВАН ДОПОЛНИТЕЛЬНЫМИ МАГИСТРАЛЯМИ ДЛЯ ВОССТАНОВЛЕНИЯ КРОВИ ИЗ ОПЕРАЦИОННОГО ПОЛЯ. ОПИСАНИЕ МАГИСТРАЛЕЙ ВСАСЫВАНИЯ И ВАКУУМНОГО НАСОСА СМ. ВЫШЕ. 04266 Комплект для сбора TX, кардиологический Резервуар для сбора крови с верхним отверстием Магистраль всасывания Магистраль вакуумного насоса 04267 Комплект для сбора BX, кардиологический Кардиологический набор В КАРДИОЛОГИЧЕСКИЙ НАБОР ВХОДЯТ: 1. Y-ОБРАЗНЫЙ АДАПТЕР 2. ТРУБКИ АДАПТЕРА ДИАМЕТРОВ ¼ ДЮЙМА 3. ВЫНОСНАЯ МАГИСТРАЛЬ ОКСИГЕНАТОРА 4. АДАПТЕР С НАСАДКОЙ ЛЮЭРА Резервуар для сбора крови с нижним отверстием ВКЛЮЧАЕТ ТЕ ЖЕ КОМПОНЕНТЫ, ЧТО И КОМПЛЕКТ ДЛЯ СБОРА С НИЖНИМ ВЫПУСКНЫМ ОТВЕРСТИЕМ, ПЛЮС НАБОР ДОПОЛНИТЕЛЬНЫХ ПРИНАДЛЕЖНОСТЕЙ ДЛЯ ПОДКЛЮЧЕНИЯ К ОКСИГЕНАТОРУ ИЛИ КОНТУРУ ECC (КАРДИОЛОГИЧЕСКИЙ НАБОР) Магистраль всасывания Магистраль вакуумного насоса Кардиологический набор Все эти устройства предназначены для однократного применения, не токсичны, апирогенны, поставляются в СТЕРИЛЬНОМ состоянии и в отдельной упаковке. Стерилизовано этиленоксидом. Остаточный уровень этиленоксида в изделии не превышает пределы, установленные действующими нормативами страны использования. ПРЕДПОЛАГАЕМОЕ ИСПОЛЬЗОВАНИЕ Ниже представлены предполагаемые способы использования резервуара для сбора крови XRES, кардиологического комплекта для сбора и стандартного комплекта для сбора. Резервуар для сбора крови XRES ВКЛЮЧАЕТ ТЕ ЖЕ КОМПОНЕНТЫ, ЧТО И КОМПЛЕКТ ДЛЯ СБОРА С ВЕРХНИМ ВЫПУСКНЫМ ОТВЕРСТИЕМ, ПЛЮС НАБОР ДОПОЛНИТЕЛЬНЫХ ПРИНАДЛЕЖНОСТЕЙ ДЛЯ ПОДКЛЮЧЕНИЯ К ОКСИГЕНАТОРУ ИЛИ КОНТУРУ ECC (КАРДИОЛОГИЧЕСКИЙ НАБОР) ОПИСАНИЕ КАРДИОЛОГИЧЕСКОГО КОМПЛЕКТА СМ. ВЫШЕ. Резервуар для сбора крови XRES предназначен для интра- и постоперационного стерильного восстановления и фильтрации аутогенной крови. Комплект для сбора, кардиологический Кардиологический комплект для сбора предназначен для интра- и постоперационного стерильного восстановления и фильтрации дренажной крови в сердечно-сосудистой хирургии. Он должен использоваться совместно с магистралью всасывания и магистралью вакуумного насоса из комплекта поставки. В кардиологический комплект для сбора входит кардиологический набор, состоящий из комплекта адаптеров для подключения экстракорпорального (ECC) контура к комплекту чаши системы аутогемотрансфузии XTRA или к резервуару для сбора крови XRES. Адаптеры, входящие в кардиологический набор, PУ — РУССКИЙ 73 позволяют расширить применение методов аутогемотрансфузии до следующих процедур: концентрация жидкости для первичного заполнения при ECC; восстановление остатков жидкости для первичного заполнения из контура ECC. Комплект для сбора Стандартный комплект для сбора предназначен для интра- и постоперационного стерильного восстановления, а также фильтрации дренажной крови в других областях хирургии (не сердечно-сосудистой). Он должен использоваться совместно с магистралью магистралью всасывания и антикоагуляции (AAL) и выносной магистралью вакуумного насоса (VEL), которые входят в комплект поставки. Перечисленные выше изделия должны использоваться совместно с устройствами медицинского назначения, указанными в разделе «Устройства медицинского назначения, показанные для использования с изделием». Хранить в сухом месте ea Количество Ниже приведена общая информация о безопасности, которую необходимо учитывать оператору устройства при подготовке к его использованию. Кроме того, более подробная информация о безопасности приведена в тех разделах инструкций по использованию, текст которых относится к надлежащей работе устройства. ПРОТИВОПОКАЗАНИЯ Противопоказания к использованию данного изделия не зафиксированы. Однако возможно противопоказание к использованию крови из этого изделия для реинфузии, например при наличии определенных потенциально опасных веществ (более подробную информацию см. в руководстве для сепаратора клеток крови). Во всех случаях ответственность за использование устройства несет исключительно лечащий врач. ИНФОРМАЦИЯ О БЕЗОПАСНОСТИ Ниже приведены примеры предоставления в тексте информации о потенциально опасных ситуациях, требующих внимания пользователя, а также о правильном и безопасном применении устройства. Указывает на серьезные нежелательные реакции и потенциальную угрозу безопасности для врача и/или пациента, возникающие вследствие надлежащего или неправильного применения устройства, а также на ограничения в использовании и необходимые меры в подобных ситуациях. Указывает врачу на необходимость проявления особой осторожности для безопасного и эффективного использования устройства. ОБЪЯСНЕНИЕ ИСПОЛЬЗУЕМЫХ НА ЯРЛЫКАХ СИМВОЛОВ Только для однократного применения (не подлежит повторному использованию) Код партии (номер) (обозначение для отслеживания изделия) Срок годности (дата завершения срока годности) Дата производства Подробное описание контуров см. в руководстве пользователя для сепаратора клеток крови, произведенного компанией SORIN GROUP ITALIA Подробные инструкции по использованию устройства см. в руководстве пользователя для сепаратора клеток крови Производитель Стерилизация этиленоксидом Апирогенно УСТАНОВКА Резервуар для сбора крови XRES можно установить на встроенном держателе на системе аутогемотрансфузии XTRA или на стойке для вливания. Содержит ФТАЛАТ Не содержит латекс УСТАНОВКА ДЕРЖАТЕЛЯ ВНИМАНИЕ! Федеральное законодательство (США) разрешает продажу устройства только врачам или по их заказу Предупреждение: не подлежит повторной стерилизации. Встроенный держатель резервуара Поверните, откройте держатель резервуара и поднимите его на нужную высоту. УСТАНОВКА ОДНОРАЗОВЫХ КОМПОНЕНТОВ Стерильность содержимого гарантируется, если пакет не был открыт, поврежден или надорван Номер (код) по каталогу 74 Устройство должно использоваться согласно соответствующим инструкциям, приведенным в этом руководстве. Устройство предназначено для использования персоналом, прошедшим профессиональную подготовку. Запрещается использовать устройство в случае образования трещин на его поверхности, а также его падения или механического повреждения другого типа. Компания SORIN GROUP ITALIA не несет ответственности за проблемы, возникшие в результате использования устройства лицом без соответствующего опыта или нарушения инструкций по использованию. Ломкое! Обращаться осторожно! Избегайте условий, при которых температура крови может превысить 37 °C (98,6 °F). Хранить в сухом месте. Хранить при комнатной температуре. Необходимо обеспечить постоянную подачу и поддержание правильной дозы антикоагулянта, а также контроль его содержания. Только для однократного применения у одного пациента: во время использования устройство контактирует с кровью человека, жидкостями организма, жидкостями или газами для их последующего вливания или введения в организм, при этом специфическая конструкция устройства не позволяет выполнить его полную очистку и дезинфекцию по завершении использования. Таким образом, повторное использование у других пациентов может вызвать перекрестное инфицирование и сепсис. Кроме того, повторное использование повышает вероятность неисправности устройства (нарушения целостности, функциональности и клинической эффективности). Дополнительная обработка устройства не требуется. Не подлежит повторной стерилизации. По завершении использования утилизируйте устройство в соответствии с действующими в стране использования нормами. Устройство допускается к использованию только при условии его СТЕРИЛЬНОСТИ. Устройство содержит фталаты. Учитывая особенности контакта с телом, ограниченную продолжительность этого контакта и количество курсов лечения на одного пациента, количество фталатов, выделяемых устройством, не вызывает опасений касательно остаточного риска. Более подробная информация предоставляется компанией Sorin Group Italia по требованию. Для получения более подробной информации и/или подачи жалобы обратитесь в компанию SORIN GROUP ITALIA либо к ее официальному региональному представителю. Внимание! См. инструкцию по использованию Этой стороной вверх Ломкое! Обращаться осторожно! Хранить вдали от источника тепла PУ — РУССКИЙ Стерильность гарантируется только в том случае, если стерильная упаковка не содержит влаги, не открыта, не повреждена и не надорвана. Не используйте устройство, если есть сомнения в его стерильности. Проверьте дату завершения срока годности на прикрепленном ярлыке. Не используйте устройство, если указанный на ярлыке срок годности истек. Устройство должно быть использовано сразу после открытия стерильной упаковки. Обращаться с устройством необходимо с соблюдением правил асептики. Осмотрите устройство и тщательно проверьте его перед использованием. Транспортировка и/или хранение в условиях, которые отличаются от указанных в этом документе, могли привести к его повреждению. Не используйте растворители, такие как спирт, эфир, ацетон и т. д., чтобы избежать повреждения устройства. Выполняйте подключения с соблюдением надлежащих правил асептики. Поскольку существует вероятность контакта оператора с гематогенной инфекцией (например, ВИЧ, вирусы гепатита, бактерии, цитомегаловирус и т. д.) во время использования экстракорпоральных контуров следует постоянно соблюдать надлежащие меры предосторожности, чтобы предотвратить контакт с этими возбудителями и их передачу. Внимательно проверяйте используемый комплект на предмет утечек до и во время использования. Утечки могут быть результатом нарушения стерильности, потери крови и/или заполняющей жидкости. В случае обнаружения утечки до или во время использования замените протекающий компонент либо подтяните соединение с утечкой надлежащим образом. Установка резервуара для сбора крови XRES Резервуар для сбора крови можно установить, вставив его во встроенный держатель. 1. Извлеките резервуар из упаковки. 2. Оставьте открытым блокирующий зажим на держателе резервуара, сдвиньте край крышки резервуара к выемке в держателе и надавите на резервуар, чтобы установить его в нужное положение. Освободите блокирующий зажим. Затяните все колпачки и адаптеры Люэра на крышке резервуара. Если используется резервуар для сбора крови с нижним отверстием, закройте зажим на нижнем выпускном отверстии. 3. Перед использованием убедитесь, что резервуар для сбора крови полностью вставлен в углубление держателя. В случае неправильной установки резервуар может выпасть при случайном толчке держателя. Установка магистрали всасывания и антикоагуляции (AAL) A. расположенным на крышке резервуара для сбора крови XRES T, с обозначением ПРОМЫВКА и голубым колпачком; B. расположенным на нижней панели резервуара для сбора крови XRES B. Подсоединение выносной магистрали оксигенатора к контуру или оксигенатору для ECC 1. Перед добавлением жидкости для первичного заполнения в контур ECC подсоедините трубку адаптера диаметром ¼ дюйма из кардиологического набора к разъему диаметром ¼ дюйма контура или оксигенатора для ECC. 2. Закройте трубку адаптера диаметром ¼ дюйма с помощью зажима, не снимая защитный колпачок для сохранения стерильности. Во время первичной циркуляции устраните воздух из контура. 3. Подсоедините один конец выносной магистрали оксигенатора к свободному концу трубки адаптера диаметром ¼ дюйма. 4. Подсоедините другой конец к охватывающему разъему на отводе Yобразного адаптера или непосредственно к комплекту чаши. ИНСТРУКЦИИ ПО ИСПОЛЬЗОВАНИЮ Сбор и антикоагуляция крови 1. Включите вакуумную систему, следуя приведенным ниже инструкциям в зависимости от типа используемой системы. a) Если вакуумная система XVAC подключена к системе аутогемотрансфузии XTRA: a.1. Убедитесь, что система XVAC подключена к XTRA, а выключатель питания на задней панели вакуумной установки находится в положении ON (ВКЛ.). a.2. Включите систему аутогемотрансфузии XTRA и подождите, пока система не выполнит загрузку. a.3. Отрегулируйте уровень вакуума в разделе вакуума, расположенном на экране сепаратора клеток крови. ПРИМЕЧАНИЕ. После завершения загрузки системы уровень вакуума контролируется в разделе вакуума, расположенном на экране сепаратора клеток крови. Если в ходе экстренной ситуации требуется применение XVAC во время загрузки операционной системы XTRA, до завершения загрузки всасывание можно контролировать непосредственно с панели управления на вакуумной системе XVAC (более подробную информацию см. в главе 13 руководства оператора XTRA). Впоследствии всасывание можно контролировать только с экрана XTRA. b) Если используется только вакуумная система XVAC: b.1. Убедитесь, что выключатель питания на задней панели установки находится в положении ON (ВКЛ.). b.2. Включите систему XVAC с помощью выключателя ON/OFF (ВКЛ./ВЫКЛ.) на панели управления. b.3. Отрегулируйте уровень вакуума с помощью панели управления. c) Если используется регулятор вакуума: 1. Поднимите стойку для вливания на максимальную высоту. 2. Подготовьте пакет или флакон с раствором антикоагулянта, содержащим гепарин, ACD-A или CPDA-1. В случае использования гепарина смешайте 30 000–60 000 МЕ гепарина в литре стерильного изотонического раствора (инъекционная форма), чтобы обеспечить достаточную антикоагуляцию восстановленной крови. 3. Извлеките магистраль всасывания и антикоагуляции из упаковки и осторожно откройте внешнюю обертку. 4. Протяните внутренний стерильный комплект в упаковке к стерильному полю. 5. В стерильном поле снимите с комплекта упаковку, а также защитное покрытие и присоедините разъем ко всасывающей канюле. 6. Протяните другой конец (раздвоенный) магистрали всасывания из стерильного поля обратно к оператору системы аутогемотрансфузии XTRA. 7. Закройте роликовый зажим на трубке с небольшим внутренним диаметром. c.1. Включите регулятор вакуума. 8. Снимите защитное покрытие с трубки большого диаметра магистрали всасывания и антикоагуляции. c.2. 9. Присоедините трубку к одному из впускных отверстий на крышке резервуара. Впускные отверстия находятся под углом 45°, имеют оранжевые колпачки и маркировку ВСАСЫВАНИЕ. Перекройте все магистрали, кроме магистрали вакуумного насоса, с помощью зажима (магистраль всасывания и Yобразный адаптер, если используются) и отрегулируйте уровень вакуума. c.3. После этого откройте магистрали, поддерживая вакуум. 10. Повесьте контейнер с раствором антикоагулянта на один из держателей стойки для вливания. 11. Используя асептическую технику, проткните контейнер с раствором антикоагулянта. Установка выносной магистрали вакуумного насоса (VEL) 1. Присоедините один конец магистрали вакуумного насоса к вакуумной системе XVAC (или другому источнику вакуума). 2. Присоедините другой конец к вакуумному порту (с желтым колпачком и обозначением ВАКУУМ) на крышке резервуара для сбора крови XRES. Установка кардиологического набора (только для кардиологического набора для сбора; при использовании другой модели пропустите следующие шаги) Подключение Y-образного адаптера к резервуару для сбора крови XRES 1. Закройте зажимы на отводах Y-образного адаптера для последующих подключений. ПРИМЕЧАНИЕ. Отвод с охватываемым портом используется для соединения резервуара с комплектом чаши, а отвод с охватывающим портом — для подсоединения резервуара для сбора крови XRES к контуру или оксигенатору для ECC через выносную магистраль оксигенатора. 2. Соедините порт Y-адаптера диаметром ¼ дюйма с выпускным отверстием резервуара: Компания SORIN GROUP ITALIA рекомендует не превышать отрицательное давление –150 мм. рт. ст. (20 кПа/0,2 бар/–2,9 фунт/кв. дюйм) во время процедуры восстановления, так как это приводит к гемолизу восстановленной крови. 2. Поддерживайте вакуум на уровне не более 150 мм рт. ст. (20 кПа) в соответствии с нормативами Американской ассоциации банков крови. 3. Убедитесь, что защитное покрытие на конце магистрали всасывания в стерильном поле снято, а аспирационный наконечник беспрепятственно выходит наружу (не заблокирован). 4. Включив вакуумную систему, откройте роликовый зажим на трубке с небольшим внутренним диаметром и впустите 200 мл раствора антикоагулянта в резервуар перед началом сбора крови. Этот объем обеспечивает надлежащее увлажнение поверхностей, контактирующих с кровью. Закройте роликовый зажим, если выполнение обработки откладывается на некоторое время. 5. После того как раствор антикоагулянта будет перемещен в резервуар, отрегулируйте скорость потока раствора в пределах 60–100 капель в минуту. Более низкая скорость применяется для ACD-A или CPDA-1, более высокая — для гепарина. В случае сильного кровотечения соответственно увеличьте скорость. ПРИМЕЧАНИЕ. Поток антикоагулянта, проходящего в резервуар, регулируется вручную с помощью роликового зажима на магистрали антикоагулянта. Этот поток должен быть синхронизирован со скоростью сбора крови из хирургического поля. Если скорость сбора меняется без соответствующей регуляции потока раствора антикоагулянта, соотношение антикоагулянт/кровь может стать PУ — РУССКИЙ 75 слишком малым или большим. Недостаточное количество антикоагулянта может привести к свертыванию крови в резервуаре. При чрезмерном объеме гепарина в резервуаре для сбора крови вследствие неправильного соотношения раневая кровь может содержать остаточное количество гепарина. В случае снижения уровней антитромбина III в плазме пациента при применении гепариновой антикоагуляции обратитесь к врачу для назначения альтернативной антикоагуляции. При необходимости подачи в резервуар неотфильтрованной крови из другого источника используйте люэровское соединение с фильтрацией. Несоблюдение надлежащей антикоагуляции во время сбора крови может привести к чрезмерному свертыванию и возможной закупорке резервуара для сбора или чаши центрифуги. Перед сбором крови заполните резервуар раствором антикоагулянта в объеме приблизительно 200 мл. При восстановлении крови с использованием раствора антикоагулянта с содержанием ACD-A/CPDA-1 запрещено использовать лактатные растворы Рингера для последующей промывки. Резервуар для сбора крови XRES оснащен тремя градуированными шкалами под углом 180°, которые позволяют оператору следить за уровнем жидкости внутри резервуара из любого положения. Показания градуированных шкал должны рассматриваться исключительно как показания уровня жидкости в устройстве. Резервуар для сбора крови XRES оснащен предохранительным клапаном безопасного уровня для прерывания всасывания и остановки сбора крови из входа в магистраль вакуумного насоса. Если этот предохранительный клапан активировался, соблюдайте приведенные далее инструкции для восстановления всасывания из операционного поля. 1. Временно отключите вакуумную систему и обрабатывайте жидкость, содержащуюся в резервуаре, пока ее уровень не опустится ниже предохранительного клапана. 2. Потяните за желтую петельку на разъеме с обозначением ВАКУУМ и убедитесь, что клапан опустился в направляющей. 3. Отпустите петельку и восстановите всасывание. Устройство оснащено клапаном сброса давления, который предотвращает внутренний взрыв в случае внезапного образования глубокого вакуума. o Отрицательное давление внутри резервуара для сбора крови XRES не должно превышать –300 мм рт. ст. (40 кПа/0,4 бар/ 5,7 фунт/кв. дюйм). o Проверьте уплотнения колпачков неиспользуемых разъемов, проталкивая их до упора. o Не закупоривайте отвод предохранительного клапана на резервуаре сбора крови XRES посторонними предметами, чтобы избежать вероятности внутреннего взрыва. Использование резервуара для сбора крови XRES, подсоединенного к комплекту чаши 1. 3. Если выносная магистраль оксигенатора напрямую подключена к комплекту чаши, убедитесь, что все зажимы открыты. 4. Соблюдая инструкции по использованию устройства, переместите жидкость для первичного заполнения в сепаратор клеток крови, стараясь не создавать отрицательное давление в контуре ECC. 5. При возврате обогащенной жидкости для первичного заполнения не допускайте поступления воздуха в контур ECC. Восстановление оставшейся первичной жидкости из контура ECC (только для кардиологического набора для сбора) Во время проведения операций на сердце и сосудах рекомендуется перемещать остатки первичной жидкости из контура ECC в резервуар, чтобы минимизировать время нахождения консоли насоса в операционной. 1. Закройте зажим на магистрали всасывания. 2. Откройте оба зажима на отводах Y-образного адаптера. Убедитесь, что сегмент трубки диаметром ¼ дюйма, соединяющий Y-образный адаптер и резервуар, открыт. Снимите зажим на трубке адаптера диаметром ¼ дюйма, ранее подключенного к контуру ECC, и откройте все остальные зажимы на выносной магистрали оксигенатора. 3. Переместите остаток жидкости для первичного заполнения в резервуар из контура ECC до полного опорожнения контура, соответствующим образом регулируя уровень вакуума. 4. Переместив остаток жидкости для первичного заполнения в резервуар, закройте все зажимы между Y-образным адаптером и контуром ECC, после чего устраните соединения с контуром. После того как консоль насоса полностью отсоединена, можно начать обработку крови. 5. Снова откройте зажим на магистрали всасывания. РЕИНФУЗИЯ СОБРАННОЙ КРОВИ При готовности к началу обработки соедините впускное отверстие комплекта чаши (на голубой магистрали заполнения) с выпускным отверстием резервуара для сбора крови XRES: a. с обозначением ПРОМЫВКА и голубым колпачком, для резервуара для сбора крови XRES T; b. расположенным на нижней панели резервуара для сбора крови XRES B. 2. В случае использования Y-образного адаптера (кардиологический комплект для сбора) соедините впускное отверстие комплекта чаши (на голубой линии заполнения) с охватываемым отводом Y-адаптера и откройте соответствующий зажим. Не открывайте зажим на другой стороне Y-образного адаптера (для соединения с выносной магистралью оксигенатора). 3. Перейдите к выполнению следующих шагов по обработке крови, следуя инструкциям по использованию в руководстве оператора сепаратора клеток крови. Промойте восстановленную кровь с использованием минимального объема физиологического раствора, рекомендуемого для аутогемотрансфузии в инструкциях по использованию сепараторов клеток крови SORIN GROUP ITALIA, чтобы обеспечить гарантированное устранение избытка антикоагулянта и других нежелательных компонентов, попавших в кровь во время сбора. Для обработки рекомендуется использовать аутогенную кровь, собранную во время или после операции. Процедура промывки необходима при каждом выполнении восстановления в случае выраженного гемолиза, причиной которого является оперативное вмешательство, либо в случае острой коагулопатии, печеночной или почечной недостаточности. Ответственность за принятое решение относительно реинфузии компонентов крови, полученных в результате процедуры концентрация-промывка, несет лечащий врач. Запрещено выполнять реинфузию крови пациента из основного пакета для реинфузии, если он подсоединен к контуру промывки сепаратора клеток крови. Реинфузия из основного реинфузионного пакета, подсоединенного к контуру, может привести к воздушной эмболии пациента. Не выполняйте реинфузию под давлением (т. е. не используйте пневматическую манжету для дополнительного реинфузионного пакета). Реинфузия под давлением может вызвать воздушную эмболию. Во избежание осложнений, связанных с инфузией твердых частиц, настоятельно рекомендуется устанавливать в системе реинфузии пациента линейный фильтр для удаления микроагрегатов. Выполнение реинфузии без линейного фильтра может привести к попаданию в организм пациента потенциально опасных частиц. Чтобы снизить риск возникновения воздушной эмболии, устраните весь воздух из основного реинфузионного пакета перед его подготовкой к проведению процедуры. Ниже приведены рекомендованные Американской ассоциацией банков крови принципы относительно срока годности собранной крови1. a. Если кровь не была перелита незамедлительно, то до выполнения трансфузии собранные и обработанные в стерильных условиях единицы, а также устройство для интраоперационного сбора крови, промытое с применением 0,9%-го физиологического раствора (Фармакопея США), должны храниться с соблюдением одного из перечисленных далее условий. Концентрация жидкости для первичного заполнения во время ECC (только для кардиологического набора для сбора) 1. Перекройте подачу от Y-образного адаптера в резервуар, закрыв сегмент трубки диаметром ¼ дюйма, соединяющий Y-образный адаптер и резервуар, зажимом. Откройте зажимы на отводах Y-образного адаптера. 2. Снимите зажим на трубке адаптера диаметром ¼ дюйма, ранее подключенного к контуру ECC, и откройте все остальные зажимы на выносной магистрали оксигенатора. 76 PУ — РУССКИЙ b. При комнатной температуре в течение 4 часов после завершения обработки. При температуре от 1 °C до 6 °C в течение 24 часов, если период хранения при указанных температурных показателях начался не позже чем через 4 часа после завершения обработки. Трансфузия дренажной крови, собранной у пациента в послеоперационном или посттравматическом состоянии, должна быть выполнена в течение 6 часов после начала сбора. 1 American Association of Blood Banks. Standards for Perioperative Autologous Blood Collection and Administration. 3rd ed. Bethesda, MD: American Association of Blood Banks, 2007 г. Использование порта быстрой реинфузии резервуара для сбора крови XRES Резервуар для сбора крови XRES T На дне резервуара для сбора крови XRES T размещен порт, который при необходимости можно проколоть, чтобы обеспечить поступление дренажной крови из резервуара самотеком. Для прокалывания порта можно использовать остроконечный коннектор. Его можно использовать для опустошения резервуара в случае необходимости, а также для быстрой реинфузии необработанной собранной крови пациенту по экстренным показаниям. Для прокалывания порта быстрой реинфузии следуйте приведенным ниже инструкциям. 1. Закройте источник вакуума, потяните за желтую петельку на вакуумном порту крышки резервуара, после чего поднимите резервуар на требуемую высоту. 2. Введите остроконечный коннектор через цельную мембрану. 3. Если показана экстренная реинфузия, полностью заполните магистраль перед подключением к пациенту. Резервуар для сбора крови XRES B На дне резервуара для сбора крови XRES T размещен выпускной охватываемый порт диаметром ¼ дюйма, обеспечивающий вытекание дренажной крови из резервуара. Этот порт может использоваться для опустошения резервуара в случае необходимости, а также для быстрой реинфузии необработанной собранной крови пациенту по экстренным показаниям. Для использования нижнего выпускного отверстия в качестве порта быстрой реинфузии, следуйте приведенным ниже инструкциям. 1. Закройте источник вакуума, потяните за желтую петельку на вакуумном порту крышки резервуара, после чего поднимите резервуар на требуемую высоту. 2. Подсоедините магистраль инфузии к охватываемому коннектору порта нижнего выпускного отверстия диаметром ¼ дюйма, при необходимости используя адаптер. 3. Если показана экстренная реинфузия, полностью заполните магистраль перед подключением к пациенту. Реинфузия необработанной крови должна выполняться в ходе операций исключительно при крайней необходимости. Ответственность за назначение реинфузии необработанной крови и за ее проведение несет исключительно лечащий врач. При реинфузии необработанной крови установка фильтра для удаления микроагрегатов в магистрали реинфузии пациента является обязательным условием. УСТРОЙСТВА МЕДИЦИНСКОГО НАЗНАЧЕНИЯ, ПОКАЗАННЫЕ ДЛЯ ИСПОЛЬЗОВАНИЯ С ИЗДЕЛИЯМИ Для устранения нежелательных веществ, собранных из операционного поля, резервуар для сбора крови XRES, кардиологический комплект для сбора и стандартный комплект для сбора должны подключаться к комплектам чаши Sorin group Italia. Диаметры коннекторов подсоединяемых устройств должны соответствовать (3/8 или 1/4 дюйма). Всасывание должно выполняться с помощью хирургического аспиратора SORIN GROUP ITALIA или другого аспиратора с совместимыми техническими характеристиками. Пользователь должен следить за предупреждениями и предостережениями, а также соблюдать инструкции по использованию, которые входят в комплект поставки каждого устройства. следует упаковать и сохранять в соответствии с положениями законодательства, действующими на территории страны использования. Ответственность за надлежащую подготовку и идентификацию возвращаемого изделия несет медицинское учреждение. Возвращению не подлежат изделия, находившиеся в контакте с возбудителями гематогенных инфекций. ОГРАНИЧЕННАЯ ГАРАНТИЯ Ограниченная гарантия является дополнением к любым законным правам Покупателя согласно применяемым правовым нормам. Компания SORIN GROUP ITALIA гарантирует, что при производстве этого устройства медицинского назначения была соблюдена необходимая осторожность, обусловленная типом устройства и его предназначением. Компания SORIN GROUP ITALIA гарантирует, что это устройство медицинского назначения функционирует именно так, как указано в настоящих инструкциях по использованию, если пользователь не нарушает их и имеет необходимую квалификацию, а также если не истек срок годности, указанный на упаковке. Тем не менее, компания SORIN GROUP ITALIA не может гарантировать правильность применения устройства пользователем, точность поставленного диагноза либо назначенного лечения и/или отсутствие возможности воздействия физических или биологических особенностей отдельного пациента на эффективность работы устройства с отрицательными для пациента последствиями даже в случае соблюдения указанных инструкций. Подчеркивая необходимость точного следования инструкциям по использованию устройства и принятию всех мер предосторожности для обеспечения правильного его использования, компания SORIN GROUP ITALIA не может нести ответственность за любой ущерб, вред, дополнительные затраты, несчастные случаи или последствия каких-либо действий, прямой или непрямой причиной которых является ненадлежащее использование устройства. Компания SORIN GROUP ITALIA обязуется заменить устройство медицинского назначения, которое было неисправно на момент продажи или в момент его доставки компанией SORIN GROUP ITALIA вплоть до его получения конечным пользователем, за исключением тех случаев, когда неисправность была вызвана неправильным обращением со стороны покупателя. Указанное выше замещает все другие гарантии, явные или подразумеваемые, письменные или устные, включая гарантию товарной пригодности и соответствия назначению. Ни одно лицо, включая представителей, агентов, дилеров, посредников и дистрибьюторов компании SORIN GROUP ITALIA, и ни одна другая промышленная или коммерческая организация не имеет права представлять заявления или гарантии относительно этого устройства медицинского назначения, за исключением тех случаев, которые явным образом указаны в тексте этой ограниченной гарантии. Компания SORIN GROUP ITALIA отказывается от какихлибо других гарантий товарной пригодности и гарантий соответствия назначению, кроме явным образом указанных в этом документе. Покупатель несет ответственность за соблюдение условий данной Ограниченной гарантии и в частности обязуется, в случае возникновения споров или судебных разбирательств с компанией SORIN GROUP ITALIA, не предъявлять претензии к компании на основе заявленных или доказанных изменений либо исправлений этой Ограниченной гарантии, внесенных каким-либо из представителей, агентов, дилеров, дистрибьюторов или любым другим посредником. Существующие отношения между сторонами по договору (также в случаях, не оформленных документально), которым предоставляется данная Гарантия, каждый спор, который связан с ней или каким-либо образом имеет к ней отношение, все, что связано с ней, а также любой спор в отношении этой Гарантии, ее интерпретация и выполнение без исключений и/или сохранений каких-либо прав регулируются исключительно законодательством Италии и подлежат внутренней юрисдикции этой страны. Все перечисленные выше споры рассматриваются в суде города Модена (Италия). ВОЗВРАЩЕНИЕ ИСПОЛЬЗОВАННЫХ ИЗДЕЛИЙ Пользователь, которого не удовлетворяет качество изделия, может предоставить соответствующее уведомление дистрибьютору продукции или официальному региональному представителю компании SORIN GROUP ITALIA. Уведомление должно быть направлено безотлагательно и содержать детальный отчет о критически важных по мнению пользователя параметрах. Ниже приведен минимальный перечень данных, которые необходимо включить в уведомление. Подробное описание ситуации и состояние пациента (если имеет отношение). Данные для идентификации соответствующего изделия. Номер партии соответствующего изделия. Доступность соответствующего изделия. Все показатели, которые, по мнению пользователя, помогут определить источники неудовлетворенности. Компания SORIN GROUP ITALIA сохраняет за собой право при необходимости инициировать отзыв соответствующего изделия для экспертизы. Загрязненное устройство, подготавливаемое к возвращению, должно быть очищено. Его PУ — РУССКИЙ 77 TR – TÜRKÇE XRES BLOOD COLLECTION RESERVOIR VE COLLECTION SET - KULLANIM KILAVUZU TR – TÜRKÇE ÜRÜN ADI ÜRÜN TANIMI 04258 ENTEGRE BIR FILTREYLE DONATILMIŞ SERT DIŞ KAPLAMALI KONTEYNER; ÇAPI 40 µM'DEN KÜÇÜK AGREGATLARI UZAKLAŞTIRARAK AMELIYAT ORTAMINDAN GERI KAZANILAN KANI TOPLAMAYA YARAR. ÜST ÇIKIŞLI MODELINDE ÇIKIŞ KISMI CIHAZIN KAPAĞINDA BULUNUR 04259 XRES B BLOOD COLLECTION RESERVOIR ENTEGRE BIR FILTREYLE DONATILMIŞ SERT DIŞ KAPLAMALI KONTEYNER; ÇAPI 40 µM'DEN KÜÇÜK AGREGATLARI UZAKLAŞTIRARAK AMELIYAT ORTAMINDAN GERI KAZANILAN KANI TOPLAMAYA YARAR. ALT ÇIKIŞLI MODELINDE ÇIKIŞ KISMI CIHAZIN ALTINDA BULUNUR 04260 ÜST KAN TOPLAMA REZERVUARI; AMELIYAT ORTAMINDAN KAN GERI KAZANIMI IÇIN GEREKEN YARDIMCI HATLARLA BIRLIKTE AMBALAJLANMIŞ HALDE. ALT KAN TOPLAMA REZERVUARI; AMELIYAT ORTAMINDAN KAN GERI KAZANIMI IÇIN GEREKEN YARDIMCI HATLARLA BIRLIKTE AMBALAJLANMIŞ HALDE. 5. Y ADAPTÖRÜ 6. 1/4” HORTUM ADAPTÖRÜ 7. OKSIJENATÖR UZATMA HATTI 8. LUER KILIDI ADAPTÖRÜ 04267 KULLANIM AMACI KONTRENDİKASYONLARI ETİKETLERDE KULLANILAN SEMBOLLERİN AÇIKLAMASI KURULUMU KOLUN KURULUMU TEK KULLANIMLIK ÜRÜNLERİN KURULUMU 8. 9. 23. 24. 25. 26. TR – TÜRKÇE 79 27. 28. 29. 30. 31. 32. 33. VEL Vacuum Extension Line'nin Kurulumu 5. 6. 80 8. 9. 7. b. 8. i.1. i.2. 9. i.3. 11. 12. 13. 14. 15. f. 8. 9. ÜRÜNLERLE BERABER KULLANILACAK TIBBİ CİHAZLAR KURTARILAN KANIN YENİDEN İNFÜZYONU 7. TR – TÜRKÇE 81 82 TR – TÜRKÇE XRES BLOOD COLLECTION RESERVOIR 和 COLLECTION SET - 使用说明 目录编号 产品名称 内含物 产品说明 04258 04259 XRES B BLOOD COLLECTION RESERVOIR 04260 吸引管路 真空管路 Collection Set BX 真空管路 04266 心脏套件 04267 83 1. 2. 3. 1. 2. 3. 4. 5. 6. 7. 8. 9. 10. 11. 2. 耗材安装 84 1. b. 2. 3. 2. 3. c.1. c.2. 4. c.3. 5. 1. 2. 3. 1 85 1. 2. 3. GB IT FR DE ES PT NL Nadere informatie is te verkrijgen bij de fabrikant (neem hiervoor contact op met Sorin Group Italia’s lokale vertegenwoordiger of met Sorin Group Italia’s Regulatory Affairs & Quality Affairs afdeling). SE DK NO FI GR Ytterligare information kan erhållas från tillverkaren (kontakta Sorin Group Italias lokale representant eller Sorin Group Italias RA & QA-avdelning direkt). Yderligere information fås ved henvendelse til producenten (kontakt Sorin Group Italias lokale repræsentant eller direkte til Sorin Group Italias RA- & QA-afdeling. . PL CZ PУ Данное медицинское устройство имеет маркировку , что требуется согласно Директиве Европейского совета MDD 93/42/EEC. TR ZH Для получения более подробной информации обратитесь к Производителю (свяжитесь с региональным представителем компании Sorin Group Italia или непосредственно с отделом по контролю качества и вопросам регулирования компании Sorin Group Italia). 标识。
Аппараты для аутотрансфузии
Линейка продукции – LivaNova (Sorin Group GmbH) – модель XTRA, а также дополнительные компоненты к ней.
![]()
LivaNova (Sorin) XTRA
Инновационная высокоэффективная аутотрансфузионная система
Благодаря сходству дизайна с аппаратами искусственного кровообращения S5 и C5, которые очень популярны во всем мире, Sorin Xtra идеально сочетается с остальным ассортиментом продукции LivaNova (Sorin Group), гарантируя при этом высокую надежность и износоустойчивость.
Система аутогемотрансфузии XTRA производства компании Sorin Group, является комплексной системой восстановления аутогенной крови, которая используется для сбора крови, а также последующей концентрации и промывки эритроцитов.
Система используется для интра- и послеоперационной аутогемотрансфузии, а также предоперационной секвестрации, а также может использоваться для восстановления плазмы в ходе проведения операции.
Функция предоперационной секвестрации аутоплазмы или плазмы обогащенной тромбоцитами (PRP) позволяет выполнить сепарацию собранной у пациента крови и впоследствии повторно ввести ему плазму, содержащую тромбоциты и факторы свертывания.
Краткие характеристики
-
Цветной ЖК-экран с большой зоной просмотра (172 x 130 мм) и инновационной сенсорной технологией обеспечивает наивысшее качество отображения информации и легкость управления одним касанием. -
Передовая система управления данными. Получите полный контроль над данными. С экрана итоговых значений возможно в любое время получить информацию о процедуре. -
Sorin CONNECT. Интуитивная и инновационная система для построения графиков перфузии в реальном времени. -
ATS Data Board — это новое ПО, позволяет загружать записи истории болезни с аппарата XTRA и легко отслеживать изменения. -
Xvac. Бесшумный, мощный вакуумный насос. Xvac является модульным вакуумным насосом, конструкция которого обеспечивает чрезвычайно тихую работу, максимальную эффективность и универсальность. -
Высокая скорость обработки эритроцитов. Готовность справляться с задачами, связанными с большими объемами кровопотери: быстрая обработка в стандартном протоколе Pstd, переход в экстренный режим одним касанием. -
Полное удаление жира с помощью PFAT. Новейший протокол Pfat для эффективного удаления частиц жира из крови -
POPT. Инновационная технология двойного датчика эритроцитов в сочетании с новым заводским протоколом Popt и улучшенной конструкцией одноразовых принадлежностей -
Возможность легкой, быстрой и полностью безопасной установки одноразовых расходных материалов. -
Эргономика. Особое внимание при разработке дизайна было уделено эргономичности системы, что позволило облегчить работу оператора на всех этапах процедуры аутотрансфузии и в любых клинических ситуациях.
Особенности
Компактное, эргономичное и надежное в эксплуатации устройство для аутогемотрансфузии с привлекательным дизайном является результатом творчества специалистов, которые создали аппараты искусственного кровообращения Sorin S5 и C5.
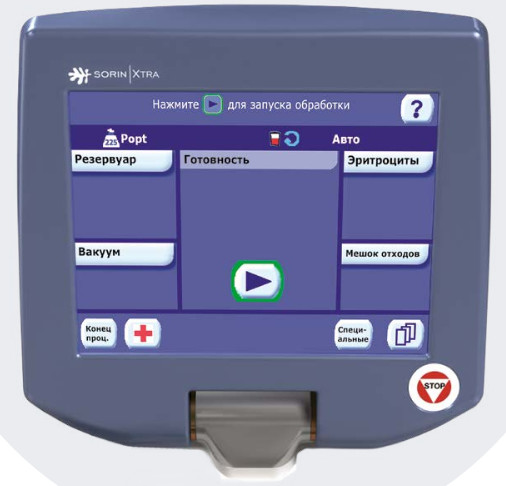
Цветной сенсорный экран
Цветной ЖК-экран TFT (диагональ 8,4 дюйма) с большой зоной просмотра (172 x 130 мм) и инновационной сенсорной технологией обеспечивает наивысшее качество отображения информации и легкость управления одним касанием.
Как и в ведущих аппаратах искусственного кровообращения S5 и C5, интерфейс пользователя Xtra передаёт всю необходимую информацию в виде модульных разделов, в которых при необходимости можно изменять параметры процедуры. Интерфейс пользователя полностью переведен на русский язык, включая комментарии и подсказки. Таким образом, гарантирован полный контроль над системой при простой навигации.
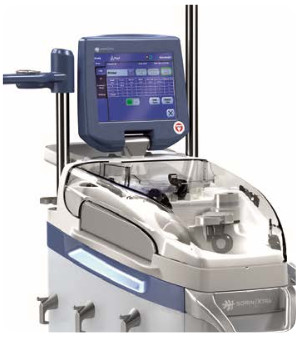
Передовая система управления данными
Получите полный контроль над данными. С экрана итоговых значений возможно в любое время получить информацию о процедуре, распечатать отчет или загрузить данные по нескольким процедурам на карту памяти USB.
– Внутренняя память для хранения данных о тысячах проведенных процедур
– USB-порты для одновременной выгрузки нескольких процедур в формате MS® Excel
– Интегрированный струйный принтер для создания высококачественных печатных копий данных процедуры
– Интерфейс RS232 для подключения внешнего ПК

Sorin CONNECT
Sorin CONNECT – это интуитивная и инновационная система для построения графиков перфузии в реальном времени, которая оснащена всеми необходимыми инструментами для проведения расчетов и анализа отклонений, призванная оказать помощь перфузиологу в процессе управления данными во время и после процесса искусственного кровообращения.
Sorin CONNECT обеспечивает функциональную интеграции с моделями АИК Sorin S5 и C5 благодаря возможности подключения к системе управления данными Sorin Group.
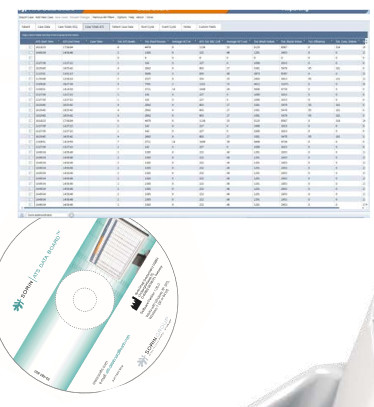
ATS Data Board
ATS Data Board – это новое программное обеспечение, которое позволяет загружать записи истории болезни с аппарата XTRA, легко отслеживать изменения в данных записях и получать соотвествующую справочную информацию, а также создавать произволные отчеты по ним.
ATS Data Board располагает множеством решений, призванных облегчить сбор информации касательно истории болезни пациента, дать оценку эффективности аутогемотрансфузии и обеспечить общий контроль за ходом процесса лечения.
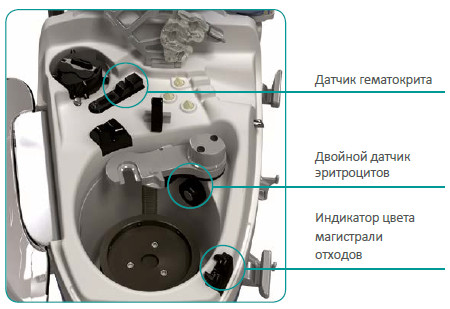

Новая технология сенсоров
Новая технология двойного датчика эритроцитов в аппарате Xtra предусматривает два оптических датчика (точечный и многоточечный), благодаря которым обеспечивается большее заполнение колокола и, как результат, более эффективная отмывка эритроцитов и высокий гематокрит конечного продукта.
Датчик гематокрита является интегрированным неинвазивным оптическим датчиком, предоставляющим информацию о концентрации эритроцитов в крови в фазе заполнения колокола из резервуара и в фазе перемещения эритроцитов в мешок для реинфузии.
Индикатор цвета магистрали отходов является оптическим датчиком, предоставляющим краткую информацию на экране о качестве промывки в виде «индикатора-светофора».
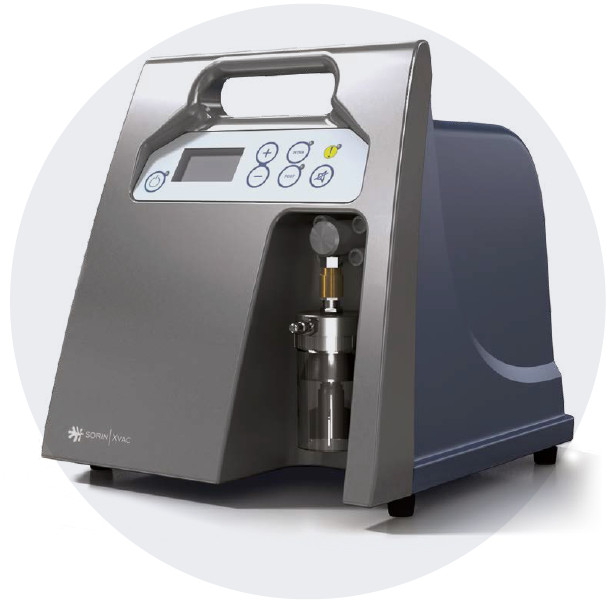
Xvac. Бесшумный, мощный вакуумный насос
Xvac является модульным вакуумным насосом, конструкция которого обеспечивает чрезвычайно тихую работу, максимальную эффективность и универсальность. Прибор может функционировать и как автономное устройство, и как компонент, полностью интегрированный в систему Xtra.
Зафиксируйте вакуумный насос Sorin Xvac в корпусе аппарата и подключите к системе, а для его активации и применения функций воспользуйтесь соответствующим разделом в интерфейсе пользователя XTRA. В случае использования вакуумного насоса в качестве автономного устройства, управление его функциями осуществляется на панели Xvac.
Xvac гарантирует исключительную универсальность благодаря возможности функционирования в двух рабочих режимах «Интраоперационный» и «Послеоперационный», что позволяет выбирать идеальное решение для восстановления эритроцитов в периоперационном периоде.
Расходные материалы
Резервуары для сбора крови Xres, колокола Xtra, комплект для сбора, наборы промывочные и аутотрансфузионные.
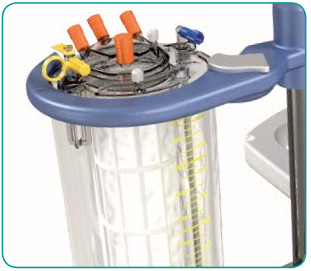
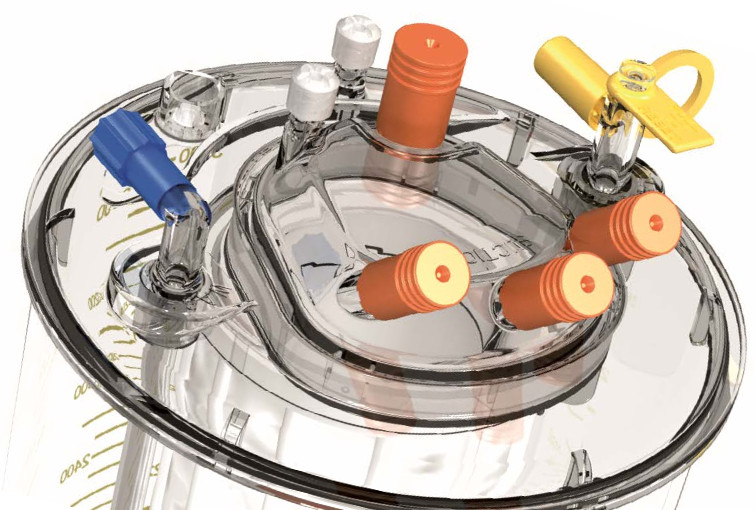
Резервуары для сбора крови Xres
Вместительность и высокое качество фильтрации. Емкость 3,8 литра. Улучшенная многослойная система фильтрации.
– Новый блокирующий механизм для надежного крепления резервуара в держателе
– Возможность вращения резервуара на 360° в держателе
– Отдельный держатель для использования с инфузионной стойкой и регулятором вакуума
– Прозрачный корпус позволяет осуществлять постоянный контроль собранной крови. Прозрачная плоская крышка позволяет следить за состоянием внутреннего фильтра
– Универсальность. Три входных порта диаметром 1/4 дюйма для сбора крови в интра- и послеоперационном периоде
– Два порта с соединением типа Луер (один с фильтром, другой без него) для перемещения крови
– Безопасность. Клапан сброса давления, предохранительный клапан для предотвращения перелива жидкости
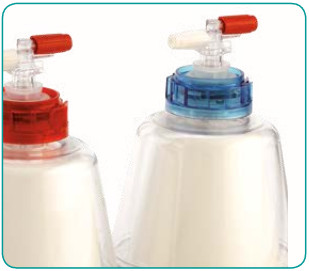
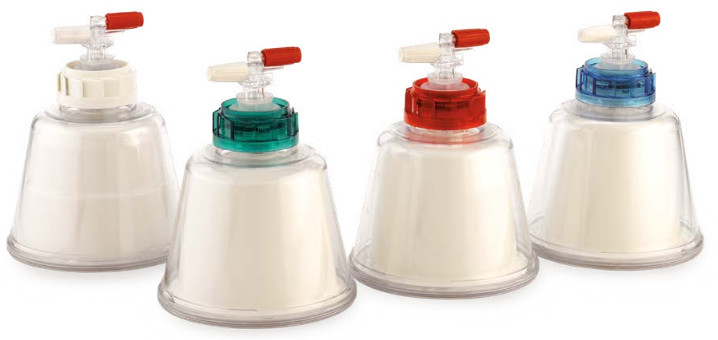
Самый широкий выбор объемов колоколов для свободы действий во всех клинических случаях.
Размеры колокола:
– Xtra 55 – наименьшего размера, для минимальных кровотечений.
– Xtra 125 – стандартный колокол для малых кровотечений.
– Xtra 175 – среднего размера для умеренных кровотечений.
– Xtra 225 – наибольшего размера для обильных кровотечений.
– Новая конструкция колокола Xtra без нижнего кольца для быстрой установки на подставку центрифуги с поворотом на 360°.
– Новый механизм, позволяющий одной рукой заблокировать колокол рычагом центрифуги и разблокировать его.
– Новая конструкция картриджа и трубок для простой установки.
– Направление трубок от крышки с установкой в держателе при закрытии зажима крышки.
– Автоматическая загрузка/разгрузка насоса в начале и в конце процедуры.

Комплект для сбора (TX, TX кардио, BX, BX кардио)
Включает резервуар Xres и соответствующие магистрали для сбора крови с операционного поля и послеоперационных дренажей.
Преимущества:
– Модульное решение, подразумевающее отдельную упаковку и стерилизацию каждого компонента, что обуславливает рентабельную стратегию доступности резервов: вы можете выполнить сбор и обработать кровь позже.
– Отдельный держатель, доступный для использования Xres на стойке для вливания и с регулятором вакуума.
– Доступность стандартной и кардиологической конфигураций (при наличии кардиологического набора).
Комплектация:
– Резервуар для сбора крови Xres T (или резервуар для сбора крови Xres B).
– Магистраль аспирации и антикоагуляции (AAL).
– Магистраль вакуумного насоса VEL.
– Кардиологический набор (только в кардиологич.конфиг.).
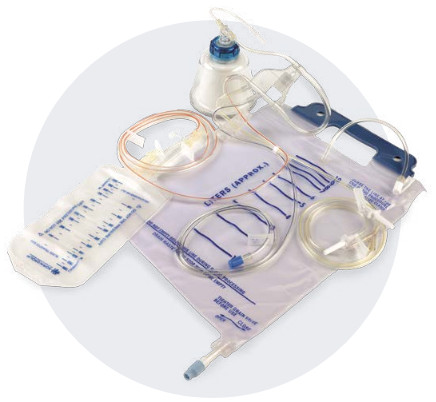
Набор промывочный (55, 125, 175, 225)
Включает колокол Xtra и соответствующие принадлежности для обработки крови с операционного поля и из послеоперационных дренажей, а также для заготовки отдельных компонентов крови в процедуре предоперационной секвестрации.
Преимущества:
– Универсальность, обусловленная доступностью четырех размеров колоколов для малого, среднего, умеренного и обильного кровотечения.
– Новая конструкция колокола, трубок и картриджа для простой, быстрой и безошибочной установки.
Комплектация:
– Колокол Xtra с предварительно подсоединенными маркированными цветом трубками и картриджем.
– Предварительно подсоединенный мешок для сбора эритроцитов BRB1 (1 л.).
– Мешок для отходов X (10 л.).
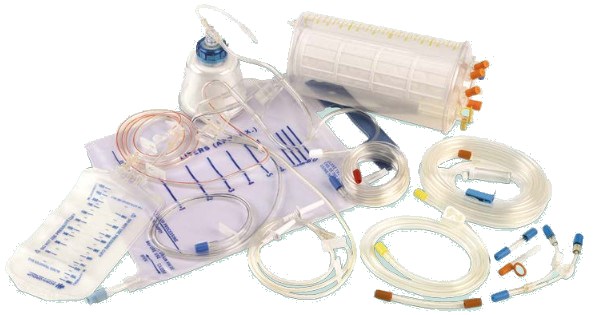
Набор аутотрансфузионный (TX кардио или BX, 55/125/175/225)
Включает резервуар Xres, колокол Xtra и все необходимые принадлежности для сбора и обработки крови с перационного поля или из послеоперационных дренажей.
Преимущества:
– Полнофункциональное решение для сбора и обработки крови.
– Пригодность для любых оперативных условий с 4-литровым резервуаром и 4-мя размерами колоколов.
– Интегрированное решение для подключения оксигенатора к резервуару Xres с кардиологическим набором (доступно только для набора для процедур TX).
Комплектация:
– Комплект для сбора (TX кардио, BX).
– Набор промывочный (55, 125, 175 или 225).
Другие компоненты
Кардиологические наборы, коннекторы, адаптеры, фильтры, магистрали и мешки.
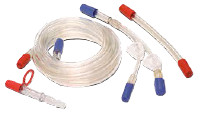
Кардиологический набор
Включает все адаптеры, компоненты и магистрали для подключения оксигенатора к системе аутогемотрансфузии для восстановления и обработки крови во время и после шунтирования.

Магистраль для соединения двух резервуаров «Y»
Позволяет подсоединить два резервуара Xres к системе Xtra в ходе процедур, для которых требуется восстановление и обработка большого объема крови.
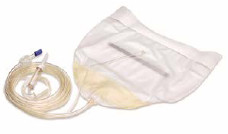
Мешок для сбора крови ортопедический
Разработан для сбора крови, потерянной в ходе ортопедических операций (например, замещения или ревизии тазобедренного сустава), и ее переноса в резервуар Xres через предварительно подсоединенную магистраль аспирации и антикоагуляции. Липкий пластырь длиной 45 см пригоден для применения на ранах любого размера.
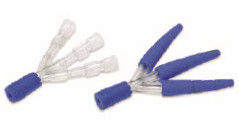
4-ходовые адаптеры
Предназначены для подсоединения дренажных трубок разного диаметра к магистрали аспирации и подачи антикоагулянта во время послеоперационного сбора крови. Доступны версии с насадками Люэра или адаптерами разного диаметра.
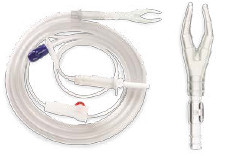
Y-коннектор для дренажа раны
Используется для подсоединения одного или двух ортопедических дренажей ран (размер: 1/8, 3/16 или 1/4 дюйма) к устройству аспирации. Ступенчатый Y-образный коннектор с наконечником 1/4 дюйма. Доступен также с предварительно подсоединенной магистралью аспирации и антикоагуляции.
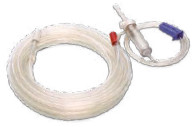
Магистраль аспирации и антикоагуляции AAL
Позволяет выполнять сбор из операционного поля в резервуар Xres и производить антикоагуляцию крови. Упаковка магистрали в два слоя (один из тканого материала, второй – из нетканого) сохраняет ее стерильность при перемещении в стерильную зону. Доступны диаметры: 1/4”, 1/4” – 3/8”, 3/8”.
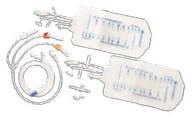
Комплект для секвестрации Set X
Предназначен для предоперационной секвестрации (PPP и PRP) из мешка для сбора крови. Показан к использованию совместно с набором промывочным.
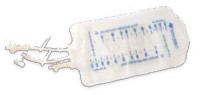
Мешок для сбора эритроцитов BRB1
Предназначен для сбора 1 литра отмытых (концентрированных) эритроцитов во время процедуры аутотрансфузии крови.
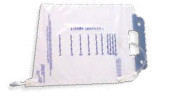
Мешок для отходов X
Используется совместно с набором промывочным X, вмещает до 10 литров отходов во время обработки.
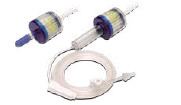
Фильтры Goccia
Предназначены для эффективного удаления микроагрегатов и защиты легочной микроциркуляции пациента.

Авторизованный дистрибьютер медицинского оборудования LivaNova. Продукция для отделений реанимации, интенсивной терапии и кардиохирургии
+7 (812) 495-65-05
197376, Санкт-Петербург
ул.Профессора Попова, д.23, литера М (Корп.3)

![]()
– это инновационная,
удобная в применении и высокоэффективная система
аутогемотрансфузии
Компактное, эргономичное и надежное в эксплуатации устройство для аутогемотрансфузии с привлекательным дизайном

Sorin Xtra идеально сочетается с остальным ассортиментом продукции Sorin Group, гарантируя при этом высокую надежность и износоустойчивость
Максимальная
безопасность
Существенно снижает потребность в гомологичной крови и предотвращает связанные с ее трансфузией риски, такие как:
- трансфузия несовместимой крови;
- синдром острого посттрансфузионного повреждения легких (СОППЛ);
- синдром системной воспалительной реакции (ССВР);
- посттрансфузионная иммуномодуляция;
- иммуносупрессия.
Снижение расходов мед. учреждения
Этот метод обеспечивает введение пациенту свежих аутогенных живых эритроцитов, что исключает расходы на трансфузию крови из банка:
- отсутствие прямых затрат, связанных со скринингом крови;
- сокращение непрямых долгосрочных затрат: по результатам нескольких исследований, реинфузия эритроцитов, восстановленных с помощью аутогемо-трансфузии, улучшает послеоперационное состояние, а также сокращает время пребывания в медицинском учреждении и расходы на дополнительное медицинское обслуживание.

Видео
![]()
Поможет Вам
познакомиться
с системой аутогемотрансфузии
Очевидные преимущества

Бесшумный, мощный вакуумный насос
Xvac является модульным вакуумным насосом, конструкция которого обеспечивает чрезвычайно тихую работу, максимальную эффективность и универсальность.
Прибор может функционировать и как автономное устройство, и как компонент, полностью интегрированный в систему Xtra.
Быстрая и легкая установка
Воспользуйтесь возможностью легкой, быстрой и полностью безопасной установки одноразовых расходных материалов.
Новая конструкция верхней панели системы Xtra и одноразовых компонентов позволяют за минимально короткое время выполнить безошибочную установку.


Передовая система управления данными
Получите полный контроль над данными.
С экрана итоговых значений возможно в любое время получить информацию о процедуре, распечатать отчет или загрузить данные по нескольким процедурам на карту памяти
Новая технология сенсоров
Новая технология двойного датчика эритроцитов в аппарате Sorin Xtra предусматривает два оптических датчика (точечный и многоточечный), благодаря которым обеспечивается большее заполнение колокола и, как результат, более эффективная отмывка эритроцитов и высокий гематокрит конечного продукта.
