Компания Sony делает много выдающихся Bluetooth-колонок. Независимо от того, есть ли у вас водонепроницаемая беспроводная колонка Sony SRS-XB41, или более крупная модель, такая как Sony XB90, вы, вероятно, захотите узнать, как подключиться к совместимому источнику звука.
К счастью, почти каждая Bluetooth-колонка Sony будет подключаться к устройствам одинаковым образом, независимо от размера или мощности конкретной модели, которая у вас есть. Следуя приведённым ниже инструкциям, вы сможете наслаждаться любимой музыкой и подкастами через динамик Sony уже сейчас.
Как подключить телефон к колонкам «Сони»: руководство по сопряжению с совместимым устройством
Прежде чем мы начнём, хотелось бы напомнить нашим читателям, насколько важно перед использованием любого гаджета ознакомиться с приложенной к нему инструкцией по эксплуатации. Там содержится много интересного о том, как правильно использовать устройство, как защитить его от повреждений и преждевременного износа. Однако, если руководство по эксплуатации — первое, что вы выбрасываете при распаковке вновь купленного продукта, подключить колонку к телефону или другому устройству (источнику звука) можно, выполнив следующие простые шаги.
1. Включите колонку
Первый и самый очевидный шаг — включить внешнее аудиоустройство. После того как вы нажмете кнопку ON, загорится светодиодный индикатор питания. Практически на каждом Bluetooth-динамике Sony в этот момент также начинает мигать индикатор Bluetooth.
Если вы впервые включаете гаджет от «Сони», вы заметите, что индикатор Bluetooth будет мигать очень быстро. Это происходит потому, что динамик никогда раньше не был сопряжен ни с одним устройством. После первого сопряжения, он автоматически будет пытаться подключаться к последнему девайсу, к которому он был ранее подключен.
2. Нажмите и удерживайте кнопку Bluetooth
Практически на каждом динамике Sony Bluetooth-кнопка будет иметь общепринятый символ (как показано ниже).

Удерживая эту кнопку в нажатом состоянии примерно секунду, вы услышите голосовое подтверждение сопряжения. При этом светодиодный индикатор, расположенный рядом с кнопкой Bluetooth, начнёт быстро мигать. Как только это произойдёт, колонка начнёт поиск совместимых устройств, после чего можно будет подключить её к телефону или ноутбуку.

Имейте в виду, процедура сопряжения будет активна в течение 5 минут. В этом есть резон, поскольку такое ограничение по времени помогает экономить заряд батареи. Если вы не успели за 5-минутный промежуток подключить динамик к совместимому устройству, процесс придётся начать заново. Когда сопряжение завершится, светодиодный индикатор рядом с кнопкой Bluetooth погаснет.
3. Подключите колонку к источнику звука
Да, мы знаем, что это может показаться довольно очевидным, но напомним: Bluetooth-колонка Sony не сможет соединиться с выбранным вами устройством, если на нём отключена или совсем отсутствует функция Bluetooth.

Теперь, когда динамик находится в режиме сопряжения и Bluetooth включен на выбранном вами устройстве, пришло время соединить их вместе. Дальнейшие действия будут определяться типом устройства, к которому планируется подключение.
Android-девайсы:
- Перейдите в настройки, найдите раскрывающееся меню «Сопряжение новых устройств» (формулировка может отличаться на разных телефонах). Здесь вы должны увидеть имя вашей колонки Sony в списке под названием «Доступные устройства».
- Осталось выбрать нужное название, кликнуть на него и выполнить сопряжение или отменить его.
Через несколько секунд Android-устройство подключится к гаджету Sony, и вы сможете начать воспроизводить звук с телефона или планшета уже через блютуз-колонку.
Устройства iOS (iPhone, iPad, MacBook и т. д.):
- В меню настроек выберите Bluetooth и убедитесь, что он включен. Откроется раскрывающееся меню, в котором будут отображаться все совместимые устройства в зоне доступа.
- Вы должны увидеть название вашей беспроводной колонки в списке под названием «Устройства».
- Выберите динамик и подождите, пока рядом с его названием не появится слово «Подключено».

Если колонка будет запрашивать пароль, используйте «0000», стандартный код для любого устройства Sony.
Устройства Windows (ноутбуки, планшеты, настольные компьютеры и т. д.):
- Как подключить колонку к телефону разобрались, теперь переходим к более крупным гаджетам. И тут всё тоже просто. Кликните на клавишу Windows. Оттуда перейдите в «Настройки», затем в «Устройства» (может быть «Устройства и принтеры»). Выберите параметр «Bluetooth и другие устройства», не забудьте убедиться, что Bluetooth включен.
- Здесь же нажмите «Добавить Bluetooth или другое устройство». Если источник звука находится в режиме сопряжения, ваш Bluetooth-динамик Sony должен быть указан как одно из доступных устройств.
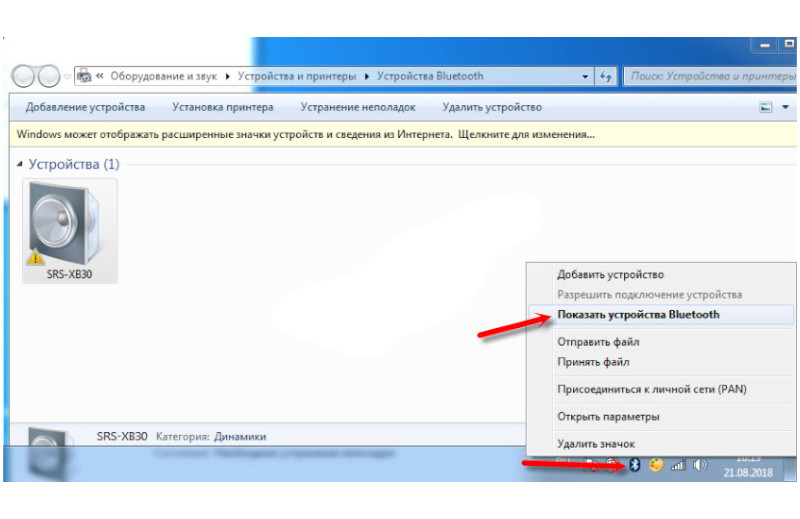
- Выберите динамик, щёлкнув его имя, после чего откроется всплывающее окно с запросом «Подключить устройство» или «Отмена».
После нажатия «Подключить устройство» ваш компьютер или планшет с Windows будет сопряжён с беспроводной колонкой Sony.
Воспроизведение музыки с приложением Music Center
Компания «Сони» предлагает своим пользователям приложение Music Center, позволяющее подключать источники звука для воспроизведения сохраненной на аудиоустройстве музыки через беспроводное соединение. Оно бесплатное, доступно к загрузке как в магазине Google Play, так и в Apple App Store.
В зависимости от функций, доступных на подключенных устройствах, через Music Center можно настроить:
- функции Wireless Multiroom, Surround и Stereo;
- добавление колонки через Bluetooth;
- сетевое подключения аудиоустройств;
- звук и эквалайзер;
- автонастройку режима ожидания.
Функционал, которым располагает само приложение Music Center:
- воспроизведение музыкальных файлов (даже в высоком разрешении), которые хранятся на мобильном устройстве;
- через Bluetooth доступны функции Wireless Party Chain;
- вывод на устройства USB DAC.
Итак, как только вам удалось подключить колонку к телефону, планшету или компьютеру, с этого момента их не придётся связывать снова. Динамик и источник звука при включении будут автоматически соединятся, если они находятся рядом друг с другом, а на вашем устройстве включен Bluetooth. Если захотите подключить Bluetooth-колонку к новому гаджету, откройте меню Bluetooth на старом устройстве и отключите соединение с продуктом Sony.
Все колонки Sony невероятно удобны в использовании, поэтому у вас не должно возникнуть никаких проблем с их подключением.
Частично, информация поверхностная
20.33%
Вообще не нашел то, что искал
53.85%
Wireless Speaker
Reference Guide
SRS-XB41
©2018 Sony Corporation
Printed in China
http://www.sony.net/
Before operating the system, please read this guide thoroughly and retain it for future reference.
WARNING
To reduce the risk of fire, do not cover the ventilation opening of the appliance with newspapers,
tablecloths, curtains, etc.
Do not expose the appliance to naked flame sources (for example, lighted candles).
To reduce the risk of fire or electric shock, do not expose the AC adaptor to dripping or splashing,
and do not place objects filled with liquids, such as vases, on the AC adaptor.
Do not install the appliance in a confined space, such as a bookcase or built-in cabinet.
Do not expose the batteries (battery pack or batteries installed) to excessive heat such as sunshine,
fire or the like for a long time.
As the main plug of the AC adaptor is used to disconnect the AC adaptor from the mains, connect it
to an easily accessible AC outlet. Should you notice an abnormality in it, disconnect it from AC outlet
immediately.
The unit is not disconnected from the AC power source (mains) as long as it is connected to the wall
outlet, even if the unit itself has been turned off.
If your skin touches the AC adaptor or this product for a long time when the power is on, it may
cause a low temperature injury.
The validity of the CE marking is restricted to only those countries where it is legally enforced,
mainly in the countries EEA (European Economic Area).
Disposal of Old Electrical & Electronic Equipment (Applicable in the
European Union and other European countries with separate collection
systems)
Do not dismantle, open or shred secondary cells or batteries. In the event of a cell leaking, do not
allow the liquid to come in contact with the skin or eyes. If contact has been made, wash the
affected area with copious amounts of water and seek medical advice. Do not use any charger
other than that specifically provided for use with the equipment. Do not use any cell or battery
which is not designed for use with the equipment. Secondary cells and batteries need to be
charged before use. Always use the correct charger and refer to the manufacturer’s instructions or
equipment manual for proper charging instructions. After extended periods of storage, it may be
necessary to charge and discharge the cells or batteries several times to obtain maximum
performance. Dispose of properly.
It should be installed and operated with at least 20 cm and more between the radiator and person’s
body (excluding extremities: hands, wrists, feet and ankles).
Precautions
On safety
The nameplate and important information concerning safety are located as follows:
Inside of the cap on the rear side of the system
On the surface of the AC adaptor
Where purchased
All countries/regions
Notes on the AC adaptor
Use only the supplied AC adaptor. To avoid damaging the system, do not use any other AC
adaptor.
On placement
Do not set the system in an inclined position.
Do not leave the system in a location near heat sources, or in a place subject to direct sunlight,
excessive dust, or mechanical shock.
Do not use or leave the system in a car.
Do not use the system in a sauna.
4-734-041-41(1)
Operating voltage
100 V – 240 V AC, 50 Hz/60 Hz
About the Party Booster function
When using the Party Booster function, notice the following. If the
system hits a person or thing, it may cause a malfunction.
Disconnect the cables and close the cap when using the system.
Do not use with the adaptor connected.
When using the function, hold firmly and do not shake the system
violently so that you do not throw or drop the system from your
hand.
Before using the function, make sure that you have secured sufficient
space around the system.
Do not hit the system with a tool.
Do not use the function while you are driving or walking.
Keep 20 cm or more away from the face and eyes while in use.
Avoid using the function for a long time. Take breaks regularly.
When using the function, if you get tired, feel uncomfortable or
experience pain somewhere in your body, stop using the function
immediately.
Others
Do not use or leave the system in an extremely cold or hot environment (temperature outside the
range of 5 °C – 35 °C). If the system is used or left in outside the above range, the system may
automatically stop to protect internal circuitry.
At high temperature, the charging may stop or the volume may reduce to protect the battery.
Even if you do not intend to use the system for a long time, charge the battery to its full capacity
once every 6 months to maintain its performance.
About the Voice Guidance
IMPORTANT: THE SOUND GUIDANCE IS AVAILABLE IN THIS PRODUCT ONLY IN ENGLISH
Depending on the status of the system, the voice guidance outputs from the speaker as followings.
When setting the system to the pairing mode; «Bluetooth pairing»
When pressing the BATT (battery) button to check the battery power during the system is turned
on; «Battery fully charged/Battery about 70%/Battery about 50%/Battery about 20%/Please
charge»
When the battery power is low; «Please charge»
When the settings are completed for the Speaker Add function; «Double mode»
When pressing and holding the ADD (Speaker Add) button during the Speaker Add function;
«Left/Right/Double mode»
On Copyrights
Android, Google Play and other related marks and logos are trademarks of Google LLC.
LDAC™ and LDAC logo are trademarks of Sony Corporation.
The BLUETOOTH® word mark and logos are registered trademarks owned by the Bluetooth SIG,
Inc. and any use of such marks by Sony Corporation is under license. Other trademarks and
tradenames are those of their respective owners.
The N Mark is a trademark or registered trademark of NFC Forum, Inc. in the United States and in
other countries.
iPhone, iPod touch, and Siri are trademarks of Apple Inc., registered in the U.S. and other
countries.
«Made for iPod» and «Made for iPhone» mean that an electronic accessory has been designed to
connect specifically to iPod or iPhone, respectively, and has been certified by the developer to
meet Apple performance standards. Apple is not responsible for the operation of this device or
its compliance with safety and regulatory standards. Please note that the use of this accessory
with iPod or iPhone may affect wireless performance.
App Store is a service mark of Apple Inc.
WALKMAN and WALKMAN logo are registered trademarks of Sony Corporation.
Other trademarks and trade names are those of their respective owners.
™ and ® marks are omitted in the documents.
Notes on waterproof and dust proof features (Read
before using the system)
Waterproof and dust proof performance of the system
The system, with the cap fastened securely, has a waterproof specification of IPX7
«Degree of protection against water immersion» of the IEC60529 «Ingress Protection Rating (IP
*3
Code)»
, and a dust proof specification of IP6X
*3
foreign objects»
.
Liquids that the waterproof performance specifications apply to
Applicable:
fresh water, tap water, pool water, sea water
Not applicable:
liquids other than the above (soapy water, water with detergent or
bath agents, shampoo, hot spring water, etc.)
1
*
IPX7 (Degree of protection against water immersion): For details, refer to the Help Guide.
*
2
IP6X (Degrees of protection against dust): For details, refer to the Help Guide.
3
*
The supplied accessories are not waterproof or dust proof.
The waterproof and dust proof performance of the system is based on our measurements under
the conditions herein described. Note that malfunctions as a result of water immersion or dust
intrusion caused by misuse by the customer are not covered by the warranty.
To avoid deterioration of waterproof and dust proof performance
Check the following and use the system correctly.
The system passes the drop test from 1.22 m on plywood of 5 cm thickness conforming to
MIL-STD 810 F Method 516.5-Shock. However, this does not guarantee no damage, no breakdown,
or waterproof and dust proof performance in all conditions. Deformation or damage from
dropping the system or subjecting it to mechanical shock may cause deterioration of the
waterproof and dust proof performance.
Do not use the system in a location where large amounts of water or hot water may splash on it.
The system does not have a design that is resistant to water pressure. Use of the system in a
location where high water pressure is applied, such as under running water or in the shower, may
cause a malfunction.
Do not pour high-temperature water or blow hot air from a hair dryer or any other appliance on
the system directly. Also, never use the system in high temperature locations such as in saunas or
near a stove.
Handle the cap with care. The cap plays a very important role in maintenance of the waterproof
and dust proof performance. When using the system, make sure that the cap is closed
completely. When closing the cap, be careful not to allow foreign objects inside. If the cap is not
closed completely the waterproof and dust proof performance may deteriorate and may cause a
malfunction of the system as a result of water or dust particles entering the system.
*1
as specified in
*2
as specified in «Degrees of protection against solid
Cap
Содержание скрывать
1
Беспроводная колонка Sony SRS-XB41
1.1
Руководство пользователя
2
Что в BOX
3
Руководство пользователя
4
Есть вопросы о вашем руководстве? Размещайте в комментариях!
4.1
Похожие сообщения
Беспроводная колонка Sony SRS-XB41

Руководство пользователя
Что в BOX

Руководство пользователя


Подробнее об этом руководстве пользователя…
Беспроводная акустическая система Sony SRS-XB41, оригинальная инструкция по эксплуатации
Есть вопросы о вашем руководстве? Размещайте в комментариях!
Похожие сообщения
-

Руководство пользователя беспроводных наушников
Руководство пользователя беспроводных наушников — Оптимизированный PDF-файл Руководство пользователя беспроводных наушников — Оригинальный PDF-файл
-
True Wireless Earbuds Руководство пользователя
True Wireless Earbuds Руководство пользователя
-
Руководство пользователя Shure UHF Wireless
Руководство пользователя Shure UHF Wireless — Оптимизированный PDF Руководство пользователя Shure UHF Wireless — Исходный PDF
-
Руководство пользователя беспроводного термометра Rubicson
Беспроводной термометр


