
RENLIG
IWM60
RU
RUSSIAN
4
РУССКИЙ
4
Содержание
Сведения по технике безопасности
Указания по безопасности
Описание изделия
Панель управления
Перед первым использованием
Ежедневное использование
Полезные советы
4
6
8
9
11
11
15
Программы
Показатели потребления
Уход и очистка
Поиск и устранение неисправностей
Технические данные
ОХРАНА ОКРУЖАЮЩЕЙ СРЕДЫ
ГАРАНТИЯ IKEA
17
23
23
26
31
32
33
Право на изменения сохраняется.
Сведения по технике безопасности
Перед установкой и эксплуатацией прибора внимательно
ознакомьтесь с приложенным руководством. Производитель
не несет ответственность за травмы и повреждения,
полученные/вызванные неправильной установкой и
эксплуатацией. Позаботьтесь о том, чтобы данное
руководство было у Вас под рукой на протяжении всего
срока службы прибора.
Безопасность детей и лиц с ограниченными
возможностями
•
•
•
Данный прибор может эксплуатироваться детьми старше 8
лет и лицами с ограниченными физическими, сенсорными
или умственными способностями и с недостаточным
опытом или знаниями только при условии нахождения под
присмотром лица, отвечающего за их безопасность, или
после получения соответствующих инструкций,
позволяющих им безопасно эксплуатировать
электроприбор и дающих им представление об опасности,
сопряженной с его эксплуатацией.
Не позволяйте детям играть с прибором.
Детям младше 3 лет запрещается находиться рядом с
прибором, если за ними не обеспечивается постоянный
надзор взрослых.
РУССКИЙ
•
•
•
•
•
5
Храните все упаковочные материалы вне досягаемости
детей.
Храните все средства для стирки вне досягаемости детей.
Не подпускайте детей и домашних животных к прибору,
когда его дверца открыта.
Если прибор оснащен устройством защиты от детей,
рекомендуем Вам включить это устройство.
Очистка и доступное пользователю техническое
обслуживание не должно производиться детьми без
присмотра.
Общие правила техники безопасности
•
•
•
•
•
•
•
•
Не изменяйте параметры данного прибора.
Соблюдайте максимально допустимую загрузку в 6 кг (см.
Главу «Таблица программ»).
Рабочее давление воды (минимальное и максимальное)
должно находиться в пределах 0,5 бар (0,05 МПа) и 8 бар
(0,8 МПа).
Вентиляционные отверстия в днище (если они
предусмотрены конструкцией) не должны перекрываться
ковровым покрытием.
При подключении прибора к водопроводу должны
использоваться новые поставляемые с ним комплекты
шлангов. Использовать старые комплекты шлангов нельзя.
В случае повреждения шнура питания во избежание
несчастного случая он должен быть заменен
изготовителем, авторизованным сервисным центром или
специалистом с равнозначной квалификацией.
Перед выполнением операций по чистке и уходу
выключите прибор и извлеките вилку сетевого шнура из
розетки.
Не используйте для очистки прибора подаваемую под
давлением воду или пар.
РУССКИЙ
•
6
Протирайте прибор мягкой влажной тряпкой. Используйте
только нейтральные моющие средства. Не используйте
абразивные средства, царапающие губки, растворители
или металлические предметы.
Указания по безопасности
• Удалите всю упаковку и вывинтите
транспортировочные болты.
• Сохраните транспортировочные
болты. Перед следующим
перемещением прибора Вам будет
необходимо заблокировать барабан.
• Прибор имеет большой вес: не
забывайте о мерах предосторожности
при его перемещении. Обязательно
используйте защитные перчатки.
• Не устанавливайте и не подключайте
прибор, если он имеет повреждения.
• Следуйте приложенным к прибору
инструкциям по его установке.
• Не устанавливайте и не
эксплуатируйте прибор в помещениях
с температурой ниже 0°C или в местах,
где он может оказаться под действием
атмосферных условий.
• Убедитесь, что пол на месте установки
прибора ровный, прочный, чистый и
не боится нагрева.
• Убедитесь, что между днищем прибора
и полом имеется достаточная
вентиляция.
• Для обеспечения необходимого
пространства между прибором и
ковровым покрытием отрегулируйте
высоту ножек прибора.
• Не устанавливайте прибор там, где его
дверцу будет невозможно полностью
открыть.
• Включайте прибор только в
установленную надлежащим образом
электророзетку с защитным контактом.
• Убедитесь, что параметры
электропитания, указанные на
табличке с техническими данными,
соответствуют параметрам
электросети. В противном случае
вызовите электрика.
• Не пользуйтесь тройниками и
удлинителями.
• Следите за тем, чтобы не повредить
вилку и сетевой кабель. В случае
необходимости замены сетевого шнура
она должна быть выполнена нашим
авторизованным сервисным центром.
• Вставляйте вилку сетевого кабеля в
розетку только во конце установки
прибора. Убедитесь, что после
установки имеется доступ к вилке.
• Не беритесь за кабель электропитания
или за его вилку мокрыми руками.
• Для отключения прибора от
электросети не тяните за кабель
электропитания. Всегда беритесь за
саму вилку.
• Только для Великобритании и
Ирландии: Прибор оснащен вилкой,
рассчитанной на ток 13 А. При замене
предохранителя в вилке
электропитания следует использовать
предохранитель 13 А ASTA (BS 1362).
• Данный прибор соответствует
директивам E.E.C.
Подключение к электросети
Подключение к водопроводу
• Прибор должен быть заземлен.
• Следите за тем, чтобы не повредить
шланги для воды.
Установка
РУССКИЙ
• Перед подключением прибора к
новым или давно не использовавшимся
трубам дайте воде стечь, пока она не
станет чистой.
• Перед первым использованием
прибора убедитесь в отсутствии
протечек.
Эксплуатация
ВНИМАНИЕ! Существует риск
травмы, поражения
электрическим током, пожара,
получения ожогов или
повреждения прибора.
• Используйте прибор только в жилых
помещениях.
• Следуйте правилам по безопасному
обращению, приведенным на упаковке
моющего средства.
• Не кладите на прибор, рядом с ним или
внутрь него легковоспламеняющиеся
материалы или изделия, пропитанные
легковоспламеняющимися веществами.
• Удостоверьтесь, что из белья
извлечены все металлические
предметы.
• Не помещайте под прибор контейнер
для сбора воды на случай возможной
7
ее протечки. Чтобы узнать, какие
дополнительные принадлежности могут
использоваться с Вашим прибором,
обратитесь в авторизованный
сервисный центр.
• Не прикасайтесь к стеклянной части
дверцы во время работы программы.
Дверца может быть горячей.
Сервис
• Для ремонта прибора обратитесь в
авторизованный сервисный центр.
• Применяйте только оригинальные
запасные части.
Утилизация
ВНИМАНИЕ! Существует
опасность травмы или удушья.
• Отключите прибор от электросети.
• Отрежьте и утилизируйте кабель
электропитания.
• Удалите защелку дверцы, чтобы
предотвратить риск ее запирания при
попадании внутрь прибора детей и
домашних животных.
РУССКИЙ
8
Описание изделия
Обзор прибора
1
2
1
2
3
4
5
6
Дозатор моющих средств
Панель управления
Ручка для открывания дверцы
Табличка с техническими данными
Сливной фильтр
Регулируемые ножки
3
4
5
6
Дозатор моющих средств
Отделение для моющего средства,
используемого при предварительной
стирке и замачивании, или для
пятновыводителя, используемого на этапе
выведения пятен (если имеется). Моющее
средство для предварительной стирки и
замачивания добавляется в начале
выполнения программы стирки.
Пятновыводитель добавляется на этапе
выведения пятен.
Отделение для порошкового или
жидкого моющего средства, используемого
при основной стирке. При использовании
жидкого моющего средства наливайте его
непосредственно перед запуском
программы.
Отделение для жидких добавок
(смягчителя для ткани, крахмала).
РУССКИЙ
9
При дозировке моющих средств и добавок руководствуйтесь указаниями
изготовителя и не превышайте отметку «МАКС» на стенке дозатора моющих
средств. Смягчитель для ткани или крахмальные добавки следует заливать в
отделение дозатора до начала выполнения программы стирки.
Система защиты от детей
Чтобы предупредить возможность запирания внутри барабана детей или домашних
животных, в приборе предусмотрено специальное устройство.
Следите за тем, чтобы дети и домашние животные не забирались в барабан.
Проверяйте барабан перед началом использования прибора.
Для включения этого устройства поверните
по часовой стрелке кнопку с внутренней
стороны дверцы (не нажимая ее) так, чтобы
паз пришел в горизонтальное положение
При необходимости используйте для этого
монету.
Чтобы отключить это устройство и закрыть
дверцу, поверните кнопку против часовой
стрелки так, чтобы паз оказался в
вертикальном положении.
Панель управления
Описание панели управления
1
2
90°
3h
6h
3
9h
1200
60°
900
700
40°
30°
500
30°
30°
60°
40°
40°
30°
40°
7
1 Селектор программ
2 Кнопка «Отсрочка пуска»
3 Индикаторы этапа программы:
6
5
4
• Этап предварительной и основной
стирки
• Этап полоскание и отжима
РУССКИЙ
10
• Окончание цикла
4 Кнопка «Пуск/Пауза»
5 Кнопка «Дополнительное
полоскание»
6 Многофункциональная кнопка
• Кнопка «Предварительная стирка»
7 Снижение скорости отжима
• Положение «Остановка с водой в
баке»
• Кнопка «Быстрая стирка»
Селектор
программ
С его помощью можно включить/выключить прибор и выбрать
программу.
Кнопка «Отсрочка
пуска»
Соответствующая дополнительная функция позволяет отложить
пуск программы на 3, 6 или 9 часов.
Индикаторы этапов При выборе программы стирки горят оба индикатора,
программы
. После нажатия на кнопку
остается гореть только
индикатор текущего этапа стирки.
Прибор приступает к выполнению программы. При этом
и
загорается по окончании
блокируется дверца. Индикатор
цикла стирки. Через несколько минут дверцу можно будет
открыть.
Если выбрана программа слива, ни один индикатор не
будет гореть.
Кнопка «Пуск/
Пауза»
Эта кнопка позволяет запустить или прекратить выбранную
программу стирки.
Снижение скорости Нажав на эту кнопку, можно изменить скорость отжима для
отжима
выбранной программы.
• Остановка с водой в баке
При выборе этой дополнительной функции вода после
последнего полоскания не сливается для предотвращения
образования складок на белье. Перед открыванием дверцы
необходимо слить воду из барабана. Для осуществления
слива воды выполните указания, приведенные в Разделе «По
окончании программы».
РУССКИЙ
Многофункционал
ьная кнопка
11
С помощью этой кнопки можно выбрать только один из
имеющихся режимов. Загорается соответствующий индикатор.
• Очень быстрая стирка
Выбор этой функции включает очень короткий цикл стирки
для слабозагрязненного и малоношеного белья.
• Предварительная стирка
При выборе этой функции перед тем, как приступать к
основной стирке, прибор производит предварительную
стирку. Продолжительность стирки при этом увеличивается.
Эта функция рекомендуется для стирки сильно загрязненного
белья.
Кнопка
«Дополнительное
полоскание»
Данный прибор специально разработан для обеспечения
экономии воды. Если необходимо прополоскать белье
дополнительным количеством воды (дополнительное
полоскание), выберите эту функцию. Будет выполнено
несколько дополнительных полосканий. Эта функция
рекомендуется для людей, страдающих аллергией на моющие
средства, а также в регионах с очень мягкой водой.
Перед первым использованием
1. Убедитесь, что подключение прибора
к электросети, водопроводу и
канализации выполнено в
соответствии с инструкциями по
установке.
2. Выньте из барабана все материалы.
3. Чтобы включить ЭКОНОМ-клапан,
налейте 2 литра воды в отсек
дозатора
основной стирки
моющих средств.
Ежедневное использование
Откройте дверцу.
Откройте дверцу, осторожно потянув ее
за ручку.
Выберите цикл стирки изделий из хлопка
при максимальной температуре удаления
любых загрязнений, которые могли
остаться после изготовления прибора.
Насыпьте половину мерки стирального
порошка в дозатор для основной стирки и
запустите прибор.
РУССКИЙ
12
Загрузите белье
Положите белье в
барабан по одной
вещи, стараясь при
этом максимально
расправить каждую
вещь.
Нажав на раму
лючка, плотно
закройте дверцу.
Загрузите моющее средство и
смягчитель ткани
Насыпьте моющее
средство в
отделение для
основной стирки
или в
соответствующее
отделение, если это
требуется для
выбранной
программы или
дополнительной
функции (более
подробно см. в
Разделе «Дозатор
моющих средств»).
Подробнее выборе
необходимого
количества моющих
средств см. в
разделе «Степени
жесткости воды».
Налейте смягчитель
для ткани и другие
добавки в
отделение,
помеченное значком
(запрещается
превышать отметку
«Макс» на стенке
дозатора).
Осторожно закройте дозатор моющих
средств
Выберите нужную программу с
помощью селектора программ.
Теперь прибор включен. Индикатор
кнопки
начнет мигать.
По окончании программы селектор
программ следует повернуть в положение
, чтобы выключить прибор.
Описание каждого цикла
стирки, сведения о
совместимости программ стирки
с программами стирки и
режимами см. в Главе
«Программы».
ВНИМАНИЕ! Если во время
работы прибора повернуть
селектор программ в
положение, соответствующее
другой программе, красный
мигнет 3
индикатор кнопки
раза, указывая на
неправильный выбор. При этом
прибор не будет выполнять
вновь выбранную программу.
Снизьте скорость отжима, нажав на
кнопку
При выборе программы автоматически
предлагается максимальная скорость
РУССКИЙ
13
отжима, предусмотренная для этой
программы.
Если Вы хотите установить другую
скорость отжима, несколько раз нажмите
на кнопку . Загорается
соответствующий индикатор.
Выбор необходимых функций с
помощью кнопок
,
и
В зависимости от программы возможно
сочетание различных режимов. Их
следует выбирать после выбора нужной
программы и до начала ее выполнения.
При нажатии этих кнопок загораются
соответствующие индикаторы. При их
повторном нажатии индикаторы гаснут.
Если выбранная функция не совместима
с программой, красный индикатор кнопки
мигнет 3 раза.
Сведения о совместимости
программ стирки с различными
режимами находятся в Главе
«Программы».
Выберите функцию «Отсрочка пуска» с
помощью кнопки
Перед тем, как запустить программу, если
вы хотите задать отсрочку пуска,
до тех пор, пока
нажимайте на кнопку
на дисплее не высветится нужное время
отсрочки. Загорается соответствующий
индикатор.
Эту функцию следует выбрать после
выбора программы, но до ее запуска.
1. Выберите программу и требуемые
режимы.
2. Выберите дополнительную функцию
«отсрочка пуска» с помощью кнопки
.
3. Нажмите на кнопку :
• прибор начнет обратный отсчет
времени;
• программа будет запущена по
истечении выбранного времени
отсрочки.
Отмена отсрочки после запуска
программы:
1. Установите прибор на ПАУЗУ, нажав
на кнопку .
2. Нажмите один раз кнопку ; при этом
индикатор, соответствующий
выбранной отсрочке, погаснет.
3. Снова нажмите на кнопку , чтобы
запустить программу.
Выбрать функцию «Отсрочка
пуска» нельзя, если задана
программа «СЛИВ».
Заданное значение отсрочки
пуска можно изменить только
после повторного выбора
программы стирки. Во время
действия отсрочки пуска дверца
будет заблокирована. Если
нужно открыть дверцу,
переведите прибор в режим
«ПАУЗА», нажав на кнопку ,
и подождите несколько минут.
После закрытия дверцы еще
раз нажмите на кнопку
.
Вы можете изменить время отсрочки
пуска или вообще отменить ее в любой
Запустите программу, нажав на кнопку
момент до нажатия кнопки
Чтобы начать выполнение выбранной
Выбор отсрочки пуска:
.
программы, нажмите на кнопку ;
соответствующий зеленый индикатор
РУССКИЙ
14
перестанет мигать. Загорятся индикаторы,
соответствующие выполняемому этапу
программы. Прибор начинает
выполнение программы; при этом дверца
блокируется.
Для прерывания выполняемой
Отмена программы
Поверните селектор программ в
положение
программы.
программы нажмите на кнопку :
замигает соответствующий индикатор.
Для возобновления работы программы с
того момента, на котором она была
прервана, снова нажмите на кнопку
Снова нажмите на кнопку , чтобы
возобновить выполнение программы.
.
для отмены выполняемой
Теперь Вы можете выбрать новую
программу.
Открывание дверцы
Если была выбрана отсрочка пуска,
прибор начнет обратный отсчет времени,
остающегося до начала запуска
программы.
После запуска программы дверца
блокируется. Если по какой-либо причине
нужно открыть дверцу, сначала
переведите прибор в режим паузы,
Если выбранная функция не совместима
с программой, красный индикатор кнопки
нажав на кнопку . Через несколько
минут дверцу можно будет открыть.
мигнет 3 раза.
Изменение дополнительной функции
или выполняемой программы
Некоторые режимы можно изменить до
того, как программа начала их
выполнять. Перед внесением в программу
любых изменений необходимо перевести
прибор в режим «ПАУЗА», нажав на
кнопку
.
Изменить текущую программу можно
только путем ее отмены. Для этого
поверните селектор программ на , а
затем - на новую программу. Запустите
новую программу, снова нажав на кнопку
Если дверца остается заблокированной,
это значит, что прибор уже начал
подогрев воды или что уровень воды в
приборе слишком высок. В любом случае
не пытайтесь открывать дверцу силой!
Если дверца не открывается, а вам
необходимо ее открыть, следует
выключить прибор, повернув селектор
программ в положение . Через
несколько минут дверцу можно будет
открыть (при этом обратите внимание на
уровень воды и температуру!).
После закрытия дверцы необходимо
снова выбрать программу стирки и
режимы и нажать на кнопку
.
. При этом вода из бака сливаться не
будет.
По окончании программы
Прерывание программы
и индикатор,
Индикатор кнопки
соответствующий только что
завершенному этапу стирки, гаснут.
Для прерывания выполняемой
программы нажмите на кнопку ; при
этом начнет мигать соответствующий
индикатор зеленого цвета.
Прибор автоматически завершит работу.
Загорается индикатор
. Через
РУССКИЙ
15
несколько минут дверцу можно будет
открыть.
селектор программ в положение
выключения прибора.
В случае выбора программы, по
окончании которой в баке остается вода,
Достаньте белье из барабана и
убедитесь, что он пуст. Если новой стирки
не планируется, закройте водопроводный
кран. Оставьте дверцу открытой для
предотвращения образования плесени и
неприятных запахов.
горит, но дверца остается
индикатор
заблокированной, указывая на
необходимость перед ее открытием слить
воду.
При этом до момента слива воды
барабан продолжает вращаться с
периодическими паузами.
1. Поверните селектор программ,
установив его в положение .
2. Выберите программу слива или
отжима.
3. При необходимости уменьшите
скорость отжима с помощью кнопки
.
4. Нажмите на кнопку .
По окончании этой программы дверцу
можно будет открыть. Поверните
для
Режим ожидания
Спустя несколько минут после окончания
программы включится режим экономии
энергии. Яркость дисплея уменьшается.
При нажатии любой кнопки прибор
выйдет из режима экономии энергии.
По окончании программы включается
система энергосбережения и загорается
соответствующий индикатор. При
нажатии любой кнопки прибор выйдет из
режима экономии энергии.
Полезные советы
Сортировка белья
Руководствуйтесь символами на этикетке
каждой вещи и инструкциями
производителя по стирке. Сортируйте
белье следующим образом: белое белье,
цветное белье, синтетика, деликатное
белье, изделия из шерсти.
Выведение пятен
Некоторые пятна могут не отстираться
только водой и моющим средством.
Поэтому перед стиркой их рекомендуется
обработать.
Кровь: промойте свежие пятна холодной
водой. Засохшие пятна следует замочить
на ночь со средством для удаления пятен,
затем потереть их в мыльном растворе.
Масляные краски: смочите
пятновыводителем на бензиновой основе,
положите вещь на мягкую подстилку и
промокните пятно; повторите обработку
несколько раз.
Засохшие жирные пятна: смочите
скипидаром, положите вещь на мягкую
подстилку и кончиками пальцев
промокните пятно, используя
хлопчатобумажную ткань.
Ржавчина: используйте раствор
щавелевой кислоты в горячей воде или
специальное средство для выведения
пятен ржавчины в холодном виде. Будьте
осторожны со старыми пятнами
ржавчины, так как структура целлюлозы
под ними повреждена и ткань может
порваться.
РУССКИЙ
Пятна плесени: обработайте
отбеливателем и тщательно сполосните
(только для белого и цветного
нелиняющего белья).
16
Информацию о жесткости воды в месте
проживания можно получить в службе
водоснабжения или от местных органов
власти.
Трава: слегка потрите мылом, а затем
обработайте отбеливателем (только для
белого и цветного нелиняющего белья).
Шариковая ручка и клей: смочите
ацетоном 1), положите вещь на мягкую
подстилку и промокните пятно.
Губная помада: смочите ацетоном, как
указано выше, затем обработайте пятно
денатуратом. Обработайте оставшиеся
следы отбеливателем.
Красное вино: замочите с моющим
средством, прополощите и обработайте
уксусной или лимонной кислотой, затем
еще раз прополощите. Обработайте
оставшиеся следы отбеливателем.
Чернила: в зависимости от состава
чернил сначала смочите пятно
ацетоном1), затем уксусной кислотой;
обработайте оставшиеся на белой ткани
следы отбеливателем и тщательно
прополощите ее.
Пятна смолы: сначала обработайте
пятновыводителем, денатуратом или
бензином, затем потрите, используя
чистящую пасту.
Градусы жесткости воды
градусы по
немецкому
стандарту
(dH°)
градусы по
французск
ому
стандарту
(°T.H.)
Мягкая
0-7
0-15
Средний
8-14
16-25
Жесткая
15-21
26-37
Очень
жесткая
> 21
> 37
Тип
Смягчитель воды следует
добавлять при стирке в воде со
средней и высокой жесткостью.
Следуйте указаниям
изготовителя. После этого
количество моющего средства
можно скорректировать
(уменьшить) в соответствии со
смягчением воды.
Градусы жесткости воды
Жесткость воды измеряется в так
называемых градусах жесткости.
1) не используйте ацетон для чистки изделий из искусственного шелка
РУССКИЙ
17
Программы
Программа
6
31)
Экономный режим для
белого и цветного
белья из хлопка,
вещей небольшой и
сильной степени
загрязнения, рубашек,
блузок, нижнего
белья.
Основна
я стирка
Полоска
ния
Макс.
конечна
я
скорость
отжима
1200
об/мин
Отделение
для моющего средства
Основна
я стирка
Полоска
ния
Макс.
конечна
я
скорость
отжима
1200
об/мин
Доступные
режимы
Макс. загрузка
Пониж. загрузка 1)
ХЛОПОК
ЭКОНОМ3)
60°-40°
Описание
цикла
ХЛОПОК
90°-60°
Белый хлопок
(изделия из хлопка с
сильной или обычной
степенью
загрязнения).
Тип
белья
Программа
Температура
Всегда выбирайте программу стирки в соответствии с символом по уходу на
этикетке каждой вещи.
2)
2)
6
СИНТЕТИКА
60°-40°-30°(Холодная стирка)
Изделия из
синтетических или
смесовых тканей:
нижнее белье,
цветное белье,
рубашки без усадки,
блузки.
6
31)
Основна
я стирка
Полоска
ния
Макс.
конечна
я
скорость
отжима
900
об/мин
3
1,51)
Отделение
для моющего средства
Основна
я стирка
Полоска
ния
Макс.
конечна
я
скорость
отжима
1200
об/мин
Доступные
режимы
Макс. загрузка
Пониж. загрузка 1)
40°-30°(Холодная стирка)
Цветной хлопок (с
обычной или слабой
степенью
загрязнения).
Описание
цикла
ХЛОПОК
18
Тип
белья
Программа
Температура
РУССКИЙ
2)
2)
ЛЕГКАЯ ГЛАЖКА
40°
ДЕЛИКАТНЫЕ
ТКАНИ
40°-30°
Изделия из
синтетических тканей:
при выборе этой
программы белье
стирается и
отжимается очень
бережно, чтобы
избежать
образования складок.
Это облегчает глажку.
Кроме того, прибор
выполняет при этом
дополнительные
полоскания.
Основна
я стирка
Полоска
ния
Макс.
конечна
я
скорость
отжима
900
об/мин
Изделия из
деликатных тканей:
например, шторы.
Основна
я стирка
Полоска
ния
Макс.
конечна
я
скорость
отжима
700
об/мин
Отделение
для моющего средства
Доступные
режимы
Макс. загрузка
Пониж. загрузка 1)
Описание
цикла
19
Тип
белья
Программа
Температура
РУССКИЙ
2)
1,5
3
1,51)
2)
(Холодная
30°стирка)
Основна
я стирка
Полоска
ния
Макс.
конечна
я
скорость
отжима
900
об/мин
3
Специальная
программа для
изделий из шерсти и
деликатных тканей с
этикеткой «чистая
новая шерсть,
пригодна для
машинной стирки, не
дает усадки».
Основна
я стирка
Полоска
ния
Макс.
конечна
я
скорость
отжима
900
об/мин
2
Отделение
для моющего средства
Специальная
программа для стирки
тканей из хлопка,
синтетики и смесовых
синтетических тканей
невысокой
загрязненности.
Выбирайте данную
программу для
снижения
энергопотребления.4).
Доступные
режимы
Макс. загрузка
Пониж. загрузка 1)
ШЕРСТЬ – РУЧНАЯ
СТИРКА
Описание
цикла
МИКС 20°С
20°
20
Тип
белья
Программа
Температура
РУССКИЙ
ПОЛОСКАНИЯ
СЛИВ
Эта программа
позволяет полоскать и
отжимать изделия из
хлопка, выстиранные
вручную. Прибор
выполняет несколько
полосканий, за
которыми следует
заключительный
длительный отжим.
Скорость отжима
можно уменьшить.
Полоска
ния
Макс.
конечна
я
скорость
отжима
1200
об/мин
Используется для
слива воды после
последнего
полоскания в
программах с
выбранным режимом
«Остановка с водой в
баке».
Слив
воды
6
6
Отделение
для моющего средства
Доступные
режимы
Макс. загрузка
Пониж. загрузка 1)
Описание
цикла
21
Тип
белья
Программа
Температура
РУССКИЙ
ОТЖИМ
Отдельный отжим,
выполняемый для
изделий, выстиранных
вручную, и по
окончании программ с
режимом «Остановка
с водой в баке».
Соответствующей
кнопкой можно
выбрать скорость
отжима в зависимости
от типа белья.
Макс.
конечна
я
скорость
отжима
1200
об/мин
Отделение
для моющего средства
Доступные
режимы
Макс. загрузка
Пониж. загрузка 1)
Описание
цикла
22
Тип
белья
Программа
Температура
РУССКИЙ
6
Поверните для выключения прибора и/или сброса программы.
ВЫКЛ
1) При выборе дополнительной функции «БЫСТРАЯ СТИРКА» рекомендуется уменьшить загрузку в соответствии
с приведенными указаниями. («Пониж. загрузка» = «пониженная загрузка»). В этом случае возможна также
стирка и при максимальной загрузке, но ее результаты будут несколько хуже.
2) При использовании жидких средств для стирки необходимо выбирать программу без функции
«ПРЕДВАРИТЕЛЬНАЯ СТИРКА».
3) Энергосберегающая программа для хлопка. Программа с температурой 60°C и загрузкой 6 кг является
эталонной программой для расчета данных, указанных на табличке энергопотребления в соответствии со
стандартом EEC 92/75. Выбор этой программы обеспечивает хорошие результаты стирки и уменьшает
потребление электроэнергии. Продолжительность программы стирки при этом увеличивается.
4) Для обеспечения хороших результатов стирки убедитесь, что средство для стирки рассчитано на стирку при
низкой температуре.
РУССКИЙ
23
Показатели потребления
Приведенные в таблице данные являются ориентировочными. Они могут
меняться в зависимости от количества и типа белья, температуры воды и
окружающей температуры.
Программы
Загрузк Потреблен Потребление Приблизительная
а (кг)
ие
воды (в
продолжительность
электроэне
литрах)
программы (в
ргии
минутах)
(кВт·ч)
Хлопок 60°С
6
1,35
59
150
«Энергосберегающая
программа для хлопка»
при 60°C 1)
6
1,02
45
159
Хлопок 40°C
6
0,85
59
140
Синтетика 40°С
3
0,55
42
90
Деликатные ткани, 40°C
3
0,55
57
65
Шерсть / Ручная стирка
30°C
2
0,25
55
60
1) «Энергосберегающая программа для хлопка» при 60°C и загрузке 6 кг является эталонной программой для
расчета данных, указанных на табличке энергопотребления в соответствии со стандартом EEC 92/75.
В отключенном состоянии (Вт)
При оставлении во включенном
состоянии (Вт)
0,10
0,98
Информация, приведенная в таблице выше, соответствует постановлению
еврокомиссии ЕС 1015/2010 введении в действие директивы 2009/125/EC.
Уход и очистка
ВНИМАНИЕ! См. Главы,
содержащие Сведения по
технике безопасности.
ВНИМАНИЕ! Прежде чем
приступать к каким-либо
операциям по чистке или уходу,
отключите прибор от
электросети.
РУССКИЙ
24
Профилактическая стирка
Используйте
маленькую щеточку
для очистки отсека и
удаления остатков
моющих средств.
Выполнение стирки с низкой
температурой может привести к
скоплению остатков внутри барабана.
Мы рекомендуем регулярно выполнять
так называемую профилактическую
стирку.
При выполнении профилактической
стирки
Промойте все
съемные части
дозатора проточной
водой, чтобы
удалить все остатки
скопившегося
порошка.
• В барабане не должно быть белья.
• Выберите программу стирки хлопка с
наиболее высокой температурой.
• Используйте обычное количество
моющего средства; им должен быть
стиральный порошок с биодобавками.
Чистка дозатора моющих средств и
отсека, в который он устанавливается
Дозатор моющих средств и добавок
следует регулярно очищать.
Чтобы извлечь
дозатор, нажмите
вниз защелку и
потяните его на себя.
Для облегчения
чистки можно также
снять верхнюю часть
отделения для
добавок.
Используйте ту же
щеточку, чтобы
прочистить отсек,
тщательно удалив
все остатки моющих
средств из его
верхней и нижней
части.
После очистки дозатора моющих средств
и отсека, в который он устанавливается,
установите дозатор на место и запустите
программу полоскания без белья, чтобы
смыть все остатки.
Чистка фильтра сливного насоса
Действуйте следующим образом:
A
B
Поставьте рядом с
фильтром тазик (А)
для сбора воды,
которая может
вытечь.
РУССКИЙ
25
Выньте шланг
аварийного слива
(B), поместите его
конец в
поставленный тазик
и снимите с него
крышку.
1
2
Когда вода
перестанет литься,
отвинтите крышку
фильтра и снимите
ее. Обязательно
держите под рукой
тряпку, чтобы
вытереть воду,
которая может
пролиться при
снятии фильтра.
Извлеките предметы
из крыльчатки
насоса,
проворачивая ее.
С помощью
карандаша
проверьте, может ли
свободно
поворачиваться
крыльчатка насоса
на задней стенке
отсека фильтра.
(Крыльчатка может
вращаться рывками;
это нормально.) Если
колесо насоса
невозможно
повернуть,
обратитесь в
авторизованный
сервисный центр.
2
Вставьте заглушку
обратно в шланг
аварийного слива и
установите его на
место. Завинтите
фильтр до упора.
1
Очистка впускного фильтра и фильтра
клапана
Если прибор наполняется водой слишком
долго или не наполняется, кнопка пуска
мигает красным цветом. Проверьте, не
засорен ли впускной фильтр и фильтр
клапана (подробнее см. Главу «Поиск и
устранение неисправностей»).
Действуйте следующим образом:
• Закройте
водопроводный
вентиль.
• Отвинтите шланг
от крана.
• Прочистите
фильтр в шланге
жесткой щеткой.
• Снова плотно
привинтите
наливной шланг к
крану.
• Отвинтите шланг от прибора.
Держите рядом тряпку, т.к. может
вытечь вода.
• Прочистите фильтр клапана жесткой
щеткой или тряпкой.
РУССКИЙ
• Привинтите
наливной шланг
обратно к
35°
45°
прибору,
повернув его
влево или вправо
в зависимости от
места установки
прибора.
Правильно
затяните
контргайку, чтобы
не допустить
утечки воды.
• Откройте водопроводный вентиль.
Опасность замерзания
Если прибор установлен в помещении,
температура в котором может опускаться
ниже 0°C, для удаления воды, оставшейся
в приборе, действуйте следующим
образом:
• извлеките вилку сетевого шнура из
розетки;
• закройте водопроводный вентиль;
• поставьте на пол тазик, поместите в
него концы наливного шланга и шланга
аварийного слива и дайте воде
полностью стечь;
• снова привинтите к крану наливной
шланг и установите на свое место
шланг аварийного слива, вновь надев
на него крышку;
• при следующем включении прибора
убедитесь, что температура
окружающей среды выше 0°C.
26
Каждый раз при сливе воды с
помощью шланга аварийного
слива необходимо налить 2
литра воды в отделение
основной стирки дозатора
моющих средств и затем
запустить программу слива. Это
приведет в действие ЭКОНОМклапан, предотвратив
ситуацию, когда остатки
моющего средства остаются
неиспользованными при
следующей стирке.
Аварийный слив
Если вода не сливается, для слива
выполните следующие действия:
• извлеките вилку сетевого шнура из
розетки;
• закройте водопроводный вентиль;
• при необходимости дождитесь, чтобы
вода остыла;
• откройте дверцу фильтра;
• поставьте на пол тазик и поместите в
него конец шланга аварийного слива.
Снимите крышку шланга. Под
воздействием гравитации вода стечет в
тазик. Когда тазик наполнится, снова
наденьте крышку на шланг. Вылейте
воду из тазика. Повторяйте эту
процедуру до окончания слива воды;
• при необходимости прочистите насос,
как описано выше;
• закройте шланг аварийного слива
крышкой и уберите его на место;
• закрутите крышку фильтра обратно и
закройте дверцу.
Поиск и устранение неисправностей
ВНИМАНИЕ! См. Главы,
содержащие Сведения по
технике безопасности.
РУССКИЙ
27
Введение
Прибор не запускается или останавливается во время работы.
В ряде неисправностей может мигать красный индикатор кнопки .
Сначала попытайтесь найти решение проблемы (см. Таблицу). Если решение не
найдено, обратитесь в авторизованный сервисный центр.
ВНИМАНИЕ! Перед выполнением проверок выключите прибор.
Возможные неисправности
Неисправность
Возможная причина
(Индикатор кнопки
Прибор не
запускается.
Способ устранения
Плотно закройте дверцу.
Дверца не закрыта.
мигает).
Вилка не вставлена в розетку
надлежащим образом.
Вставьте вилку в розетку.
В розетке отсутствует
напряжение.
Проверьте домашнюю
электропроводку.
Перегорел предохранитель на
распределительном щитке.
Замените предохранитель.
Селектор программ установлен
Поверните селектор программ и
неверно, и не нажата кнопка
Выбрана отсрочка пуска.
. снова нажмите на кнопку
.
Чтобы сразу же начать стирку
белья, отмените функцию
«Отсрочка пуска».
РУССКИЙ
Неисправность
28
Возможная причина
Способ устранения
Закрыт водопроводный вентиль.
Откройте вентиль подачи воды.
(Индикатор кнопки
мигает).
Водопроводный кран закрыт или Прочистите водопроводный
причина в накипи.
кран.
Прибор не
заливает воду:
Неправильно подключен
наливной шланг.
Проверьте подсоединение
наливного шланга.
Давление воды слишком низкое.
Обратитесь в местную службу
водоснабжения.
Наливной шланг передавлен или Проверьте подсоединение
перекручен.
наливного шланга.
(Индикатор кнопки
мигает).
В наливном шланге или впускном Прочистите фильтры наливного
клапане засорился фильтр.
шланга. (Подробнее см.
«Очистка наливного шланга и
(Индикатор кнопки
мигает).
фильтра клапана»).
Дверца не закрыта как следует.
(Индикатор кнопки
Сливной шланг передавлен или
перекручен.
(Индикатор кнопки
(Индикатор кнопки
Проверьте подключение
сливного шланга.
мигает).
Засорен сливной фильтр.
Прибор не
сливает воду.
Плотно закройте дверцу.
мигает).
мигает).
Прочистите фильтр сливного
насоса.
Выбрана программа или
дополнительная функция, по
окончании которой в баке
остается вода, или в которой
исключена фаза отжима.
Выберите программу слива или
отжима.
Неправильно подключен
сливной шланг.
Проверьте подключение
сливного шланга.
РУССКИЙ
Неисправность
Прибор
выключается в
ходе этапа
стирки.
Отжим
начинается с
опозданием или
не выполняется.
Вода на полу.
29
Возможная причина
Способ устранения
Отключена подача
электропитания.
Дождитесь возобновления
подачи электроэнергии. Прибор
продолжит работу с этапа, на
котором была прервана
работа.
Из-за неравномерного
распределения белья в
барабане сработало
электронное устройство
контроля дисбаланса. Белье
перераспределяется более
равномерно путем вращения
барабана в обратном
направлении. Это может
происходить несколько раз до
тех пор, пока дисбаланс не
исчезнет и не установится
нормальный отжим. Если по
истечении 10 минут белье в
барабане не распределилось
равномерно, отжим выполняться
не будет.
Перераспределите белье
вручную или добавьте белья и
задайте программу «Отжим».
Использовано слишком много
средства для стирки или
применено неподходящее
средство, вызывающее
избыточное пенообразование.
Уменьшите количество средства
для стирки или используйте
другое моющее средство.
Проверьте, нет ли утечек в
Проверьте подсоединение
соединениях наливного шланга. наливного шланга.
Утечка воды из шланга не всегда
заметна: проверьте, не намок ли
он.
Поврежден сливной или
наливной шланг.
Замените его на новый
(уточните в авторизованном
сервисном центре номер
запасной части по каталогу).
РУССКИЙ
Неисправность
Дверца не
открывается:
30
Возможная причина
Способ устранения
Выполнение программы не
закончено.
Дождитесь окончания стирки.
Не сработала система снятия
блокировки дверцы.
Подождите несколько минут,
прежде чем открывать дверцу.
В барабане есть вода.
Чтобы слить воду, выберите
программу слива или отжима.
Не удалены
транспортировочные болты и
элементы упаковки.
Проверьте правильность
установки прибора.
Не отрегулирована высота
Прибор издает ножек.
необычный шум.
Возможно, забит фильтр
сливного насоса.
Проверьте правильность
установки прибора в
горизонтальной плоскости.
Проверьте фильтр сливного
насоса. (Более подробные
сведения см. в Разделе «Очистка
сливного фильтра»).
Слишком мало моющего
Увеличьте количество моющего
средства, либо используется
средства или используйте
неподходящее моющее средство. другое моющее средство.
Стойкие пятна не были
Неудовлетворите обработаны перед стиркой.
льные
результаты
Задана неподходящая
стирки.
температура.
Слишком большая загрузка.
Сервис
Мы рекомендуем использовать
оригинальные запчасти. После проверки
включите прибор и нажмите на кнопку
для возобновления выполнения
программы.
Используйте имеющиеся в
продаже средства для
выведения стойких пятен.
Проверьте правильность
выбора температуры.
Уменьшите загрузку в
соответствии с таблицей
«Программы стирки».
Если неисправность устранить не удалось,
обратитесь в авторизованный сервисный
центр.
Описание модели
(MOD): .....................
PNC (код изделия): ...........................
Серийный номер (S.N.): ...............................
РУССКИЙ
31
Данные для сервисных центров находятся
на табличке с техническими данными.
Рекомендуем записать их здесь:
Made In Italy
© Inter IKEA Systems B.V. 1999
501.514.59
21552
Технические данные
Тип изделия
Габаритные размеры
Встраиваемая стиральная машина
Ширина (см)
Высота (см)
Глубина (см)
Давление в водопроводной Минимум
сети1)
Максимум
59,6
82
54,4 max
0,5 бар (0,05 МПа)
8 бар (0,8 МПа)
Хлопок, макс. загрузка (кг)
Макс. скорость отжима
(об/мин)
Класс энергопотребления
6
1200
A
Класс стирки
A
Класс отжима
B
Уровень шума при стирке
(дБ(A))
53
Уровень шума при стирке
(дБ(A))
70
Среднее годовое
потребление
электроэнергии (кВт/ч)2)
192
РУССКИЙ
32
Среднее годовое
потребление воды
(литры)2)
8699
1) Если там, где Вы проживаете, давление в водопроводной системе выше или ниже указанных значений, просим
обратиться в авторизованный сервисный центр.
2) Данное значение рассчитано для стандартной программы стирки изделий из хлопка, предназначенных для
испытательных лабораторий. Число циклов стирки в год принят равным 200.
Информация по подключению к электросети, напряжению и общей
мощности указана на табличке с техническими данными, расположенной на
внутренней стороне дверцы прибора.
ОХРАНА ОКРУЖАЮЩЕЙ СРЕДЫ
Материалы с символом
следует
сдавать на переработку. Положите
упаковку в соответствующие контейнеры
для сбора вторичного сырья. Принимая
участие в переработке старого
электробытового оборудования, Вы
помогаете защитить окружающую среду и
здоровье человека. Не выбрасывайте
вместе с бытовыми отходами бытовую
технику, помеченную символом .
Доставьте изделие на местное
предприятие по переработке вторичного
сырья или обратитесь в свое
муниципальное управление.
РУССКИЙ
33
Дата производства данного изделия указана в серийном номере
(serial numbеr), где первая цифра номера соответствует
последней цифре года производства, вторая и третья цифры –
порядковому номеру недели. Например, серийный номер
43012345 означает, что изделие произведено на тридцатой
неделе 2014 года.
Единственный импортёр, уполномоченный изготовителем на
территории Российской Федерации: OOO "ИKEA TOРГ"
фактический и юридический адреса: 141400, Московская
область, r. Xимки, микрорайон ИKEA, корп. 1, тел.
8495-737-53-00
Произведено для ИКЕА
Электролюкс Италия С.п.А. Хаусхолд Эпплайенсиз - фабрика
Порчия
корсо Лино Занусси, 30, Порчия (ПН)
Италия
Kласс энергопотребления: A
ГАРАНТИЯ IKEA
Срок действия гарантии ИКЕА
Гарантийный срок на бытовую технику
IKEA составляет пять (5) лет. Гарантия
начинает действовать в день покупки.
Исключение составляют товары серии
LAGAN/ЛАГАН, на них гарантия
составляет два (2) года. Пожалуйста,
сохраняйте чек как подтверждение
факта и даты покупки.
На какую бытовую технику не
распространяется данная гарантия?
Данная гарантия не распространяется на
бытовую технику LAGAN/ЛАГАН, а также
технику, приобретенную в магазине
ИКЕА до 1 августа 2007 года – на них
распространяется двухлетняя гарантия (2
года).
Кем выполняется техобслуживание?
Техобслуживание выполняется
сервисным центром, авторизованным
компанией IKEA.
Что покрывает данная гарантия?
Данная гарантия покрывает
неисправности изделия, обусловленные
дефектами конструкции или материалов,
проявившимися после его покупки в
магазине ИКЕА. Данная гарантия
относится только к случаям бытового
использования изделия. Все исключения
указаны в пункте «Что не покрывает
данная гарантия?». В рамках гарантии
предусматривается возмещение затрат,
связанных с устранением
неисправностей, например затраты на
ремонт, запасные части, выполнение
работ и дорожные расходы – при
условии, что доступ к технике в целях
РУССКИЙ
ремонта не затруднен и не вызывает
существенных расходов и что
неисправность вызвана дефектами
конструкции или материалов,
покрываемыми гарантией. При данных
условиях применимы нормы ЕС (№
99/44/EG) и соответствующие местные
правила и предписания. Замененные
запчасти переходят в собственность
компании ИКЕА.
Что ИКЕА делает, чтобы устранить
неисправность?
Сервисная служба, уполномоченная
компанией ИКЕА, изучит изделие и решит,
покрывается ли случай данной гарантией.
Если будет решено, что изделие попадает
под действие гарантии, то сервисная
служба ИКЕА или ее авторизованный
партнер произведет либо ремонт
неисправного изделия, либо его замену
таким же или аналогичным.
Что не покрывает данная гарантия?
• Естественный износ;
• Умышленные повреждения или
повреждения вследствие небрежного
обращения, обусловленные
невнимательностью, несоблюдением
инструкций по эксплуатации,
неправильной установкой или
подключением к электрической сети с
напряжением, не соответствующим
техническим требованиям прибора;
повреждения, вызванные химическими
или электрохимическими реакциями;
повреждения, обусловленные
ржавчиной, коррозией или
воздействием воды, в том числе, но не
ограничиваясь этим, повреждения,
вызванные повышенной жесткостью
воды, подаваемой в сети
водоснабжения; повреждения,
вызванные аномальными условиями
окружающей среды;
• Расходные материалы и запчасти, в
том числе батареи и лампочки;
34
• Повреждения нефункциональных и
декоративных деталей, не влияющих
на нормальную работу устройства, в
том числе любые царапины или
возможное различие в цвете.
• Случайные повреждения, вызванные
присутствием инородных предметов
и/или веществ, а также чисткой или
устранением засоров в фильтрах,
системах слива или дозаторах моющих
средств.
• Повреждения следующих деталей:
стеклокерамики, аксессуаров, корзин
для посуды и столовых приборов,
подающих и сливных труб,
уплотнителей, ламп и плафонов для
ламп, экранов, ручек, корпуса и частей
корпуса (эти детали попадают под
действие гарантии, только если
сервисный центр представит
заключение, что причиной
повреждений был производственный
брак).
• Случаев, если дефекты не были
обнаружены специалистом во время
визита.
• На ремонт, выполненный
неуполномоченными обслуживающими
организациями либо
неавторизованными сервиспартнерами, а так же с
использованием неоригинальных
запасных частей.
• На ремонт вследствие неправильной
установки.
• На повреждения, возникшие при
небытовом использовании товара,
например использующиеся в
профессиональных целях или иных
целях, связанных с
предпринимательской деятельностью.
• Повреждения, возникшие при
перевозке товара. Если покупатель
самостоятельно осуществляет
транспортировку товара домой или по
другому адресу, ИКЕА не несет
ответственности за повреждения,
возникшие при перевозке. Тем не
РУССКИЙ
менее, если услуга доставки была
заказана покупателем в ИКЕА, все
повреждения, возникшие при
перевозке товара, покрывается
данной гарантией.
• Условия выполнения установки
бытовой техники ИКЕА, за
исключением случаев, когда
необходимость установки вызвана
ремонтом или заменой неисправных
частей. При покупке бытовой техники в
ИКЕА услуга первоначальной
установки не включена в стоимость
товара. Если уполномоченные ИКЕА
обслуживающие организации или
авторизированные сервис-партнеры
осуществляют ремонт или замену
бытового прибора в соответствии с
условиями данной гарантии,
уполномоченные обслуживающие
организации или авторизированные
сервис-партнеры обязуются при
необходимости выполнить повторную
установку отремонтированного
бытового прибора или бытового
прибора, заменяющего неисправный.
Данные ограничения не
распространяются, если установка была
произведена квалифицированным
специалистом, с использованием
оригинальных запасных частей для
адаптации бытовой техники к
требованиям технической безопасности
другой страны ЕС.
Применимость законодательства
конкретной страны
Гарантия, предоставляемая ИКЕА,
полностью покрывает или даже
превышает все требования местного
законодательства, которые могут
отличаться в разных странах.
Зона действия
Если изделие было куплено в одной
стране ЕС и перевезено в другую страну
ЕС, гарантийное обслуживание будет
35
производиться на условиях, действующих
во второй стране. Обязательства по
гарантийному обслуживанию остаются в
силе только, если:
• сам прибор и его установка
соответствуют техническим
требованиям страны, в которой подана
заявка на гарантийное обслуживание;
• сам прибор и его установка
соответствуют инструкциям по сборке и
положениям руководства пользователя
Сервисный центр, авторизованный
ИКЕА
Вы можете обращаться к поставщикам
гарантийных услуг ИКЕА по следующим
вопросам:
1. Гарантийный ремонт;
2. Рекомендации и техническая
консультация по установке техники,
купленной в магазине ИКЕА, в
кухонную мебель ИКЕА;
Сервисный центр не сможет давать
рекомендации по следующим
вопросам:
• вопросы по установке кухонной
мебели ИКЕА
• подсоеденение к электрической
сети, если бытовая техника не
имеет вилки и кабеля;
подключение к водопроводным и
газовым коммуникациям. Эти виды
работ должны выполняться
авторизованным специалистом
3. За разъяснением функций и правил
эксплуатации техники, купленной в
магазине ИКЕА
Для получения оптимального результата
просим вас тщательно изучить
сопроводительные документы и
инструкцию по эксплуатации перед
обращением в сервисный центр.
Как связаться с нами, если вам нужна
наша помощь
РУССКИЙ
Пожалуйста, ознакомьтесь со списком
сервисных центров, авторизированных
ИКЕА, который представлен на последней
странице этой инструкции
Для ускорения обслуживания
просим вас называть артикул
изделия (12-значный сервисный
код и 8-значный код изделия),
указанный в данном буклете
при обращении в сервисные
центры.
ОБЯЗАТЕЛЬНО СОХРАНЯЙТЕ
ЧЕК!
Чек является подтверждением
покупки, его необходимо
предъявлять при обращении за
гарантийным обслуживанием.
Нужна дополнительная помощь?
По всем дополнительным вопросам, не
касающимся гарантийного обслуживания,
обращайтесь в отдел обслуживания
покупателей ближайшего магазина
ИКЕА. Пожалуйста, тщательно изучите
сопроводительные документы перед
обращением.
36
37
Country
België
Belgique
Phone number
070 246016
Call Fee
Opening time
Binnenlandse gesprekskosten
8 tot 20 Weekdagen
Tarif des appels nationaux
8 à 20. En semaine
България
00359888164080
0035924274080
Такса за повикване от страната
От 9 до 18 ч в работни дни
Česká republika
246 019721
Cena za místní hovor
Danmark
70 15 09 09
Landstakst
8 až 20 v pracovních dnech
man. - fre. 09.00 - 20.00
lør. 09.00 - 16.00
1 søndag pr. måned, normalt første
søndag i måneden
Deutschland
+49 1806 33 45
32*
* 0,20 €/Verbindung aus dem Festnetz
max. 0,60 €/Verbindung
aus dem Mobilfunknetz
8 bis 20 Werktage
Ελλάδα
211 176 8276
Υπεραστική κλήση
8 έως 20 κατά τις εργάσιμες ημέρες
España
91 1875537
Tarifa de llamadas nacionales
De 8 a 20 en días laborables
France
0170 36 02 05
Tarif des appels nationaux
9 à 21. En semaine
Trošak poziva 27 lipa po minuti
radnim danom od ponedjeljka
do petka od 08:00 do 16:00
Hrvatska
00385 1 6323 339
Ireland
0 14845915
National call rate
8 till 20 Weekdays
Ísland
5880503
Innanlandsgjald fyrir síma
9 til 18. Virka daga
Italia
02 00620818
Tariffa applicata
alle chiamate nazionali
dalle 8 alle 20 nei giorni feriali
Κυπρος
22 030 529
Υπεραστική κλήση
8 έως 20 κατά τις εργάσιμες ημέρες
Lietuva
5 230 06 99
Nacionalinių pokalbių tarifai
Pr. - Ketv.: 8:00 - 12:00, 12:45 - 17:00
Pnkt.: 8:00 - 12:00, 12:45 - 15:45
Magyarország
061 998 0549
Belföldi díjszabás
Hétköznap 8 és 10 óra között
Nederland
0900 235 45 32
en/of
0900 BEL IKEA
15 cent/min., starttarief 4.54 cent
en gebruikelijke belkosten
ma - vr 08.00 - 20.00,
zat 09.00 - 20.00
(zondag gesloten)
Norge
815 22052
Takst innland
8 til 20 ukedager
Österreich
0810 300486
max. 10 Cent/min.
Mo - Fr 8.00 - 20.00 Uhr
Polska
012 297 8787
Stawka wg taryfy krajowej
Od 8 do 20 w dni robocze
Portugal
211557985
Chamada Nacional
9 às 21. Dias de Semana
*excepto feriados
România
021 211 08 88
Tarif apel naţional
8 - 20 în zilele lucrătoare
Действующие телефонные тарифы
с 8 до 20 по рабочим дням
Время московское
Россия
8 495 6662929
Schweiz
Tarif für Anrufe im Bundesgebiet
8 bis 20 Werktage
Suisse
Tarif des appels nationaux
8 à 20. En semaine
Tariffa applicata
alle chiamate nazionali
dalle 8 alle 20 nei giorni feriali
(02) 3300 2554
Cena vnútroštátneho hovoru
8 až 20 v pracovných dňoch
Suomi
030 6005203
Lankapuhelinverkosta
0,0835 €/puhelu + 0,032 €/min
Matkapuhelinverkosta 0,192 €/min
arkipäivisin 8.00 - 20.00
Sverige
0775 700 500
lokalsamtal (lokal taxa)
mån-fre 8.30 - 20.00
lör-sön 9.30 - 18.00
031 5500 324
Svizzera
Slovensko
Türkiye
212 244 0769
Ulusal arama ücreti
Hafta içi saat 09:00’dan 18:00’a kadar
Україна
044 586 2078
Міжміськи дзвінки платні
9 - 21 В робочі дні
United Kingdom
020 3347 0044
National call rate
9 till 21. Weekdays
Slovenija
www.ikea.com
Србија
www.ikea.com
38
39
132917132-B-472014
© Inter IKEA Systems B.V. 2014
21552
AA-1383202-1
Посмотреть инструкция для Ikea RENLIG IWM60 бесплатно. Руководство относится к категории стиральные машины, 13 человек(а) дали ему среднюю оценку 8.3. Руководство доступно на следующих языках: русский, английский. У вас есть вопрос о Ikea RENLIG IWM60 или вам нужна помощь? Задайте свой вопрос здесь
Не можете найти ответ на свой вопрос в руководстве? Вы можете найти ответ на свой вопрос ниже, в разделе часто задаваемых вопросов о Ikea RENLIG IWM60.
При какой температуре следует стирать одежду?
Стоит ли использовать средство для удаления накипи при стирке в стиральной машине?
Как предотвратить появление неприятного запаха в стиральной машине?
Инструкция Ikea RENLIG IWM60 доступно в русский?
Не нашли свой вопрос? Задайте свой вопрос здесь
![]()
IWM60
ENGLISH 4 FRANÇAIS 25 DEUTSCH 54 ITALIANO 80
ENGLISH
Contents
|
Safety information |
4 |
|
Product description |
6 |
|
Control panel |
7 |
|
First use |
9 |
|
Daily use |
9 |
|
Helpful hints and tips |
12 |
|
Washing programmes |
12 |
|
Consumption values |
15 |
Subject to change without notice
 Safety information
 For your safety and correct operation of the appliance, read this manual carefully before installation and use. Always keep these instructions with the appliance even if you move or sell it. Users must fully know the oper-
ation and safety features of the appliance. The manufacturer is not responsible for damages caused by incorrect installation and use.
Children and vulnerable people safety
•Do not let persons, children included, with reduced physical sensory, reduced mental functions or lack of experience and knowledge to use the appliance. They must have supervision or instruction for the operation of the appliance by a person who is responsible for their safety.
•Keep all packaging well away from children. There is risk of suffocation.
•Keep all detergents in a safe area. Do not let children touch the detergents.
•Make sure that children or pets do not climb into the drum. Please check into the drum before using it.
This appliance incorporates a special feature to prevent children and pets becoming trapped inside the drum.
4
|
Care and cleaning |
15 |
|
What to do if… |
18 |
|
Technical data |
20 |
|
Installation |
21 |
|
Electrical connection |
22 |
|
Environment concerns |
22 |
|
IKEA GUARANTEE |
23 |
To activate this device, rotate the button clockwise (without pressing it) inside the door until the groove is horizontal. If necessary use a coin.
General safety
To disable this device and restore the possibility of closing the door, rotate the button anticlockwise until the groove is vertical.
•Do not change the specifications or modify this product. There is risk of injury and damage to the appliance.
•If the appliance is delivered in the winter months when there are minus temperatures, store it at room temperature for 24 hours before using for the first time. Please read the “dangers of freezing” chapter.
•This appliance is designed for use in normal inside temperature. Manufacturer is not responsible for freezing damages.
•Always unplug the appliance and turn off the water supply after use, cleaning and maintenance.
Installation
•A qualified and competent person must do the electrical and the plumbing installation.
•This appliance is heavy. Take care when you move it.
•Make sure that the appliance is not damaged because of transport. Do not connect a damaged appliance. If necessary, contact dedicated After Sales Service.
•Remove all packaging and transit bolts before first use. Serious damage can occur to the appliance or to neighbouring cabinets or furniture.
•Keep all transit devices so that they can be refitted if the appliance ever has to be transported again. Please refer to the relevant steps in the Assembly Instruction.
•Never place cardboard, wood or similar materials under the appliance to compensate for any unevenness in the floor.
Level accurately the appliance and tight the lock nuts to prevents vibration, noise and displacement of the appliance during operation.
•If your appliance is installed on a carpeted floor, adjust the feet in order to ensure that the air must circulate freely under the appliance.
•Check that your appliance is not standing on the inlet and drain hose and the worktop or the back of the appliance is not pressing the electrical supply cable against the wall.
•Always be sure, that there is no water leakage from hoses and their connections after the installation.
•If the appliance is installed in a location subject to frost, please read the “dangers of freezing” chapter.
Use
•The appliance is only for domestic use. Do not use the appliance for commercial and industrial use or for other uses.
•Only an authorised service engineer can repair this appliance. Use only original spare parts.
•Refer to the instructions on the label of each item (garment) before washing.
•Do not overload the appliance. See the Washing Programme Table.
•Before washing, ensure that all pockets are empty and buttons and zips are fastened.
•Any objects such as coins, safety pins, nails, screws, stones or any other hard, sharp material can cause extensive damage and must not be placed into the appliance.
•Treat stains such as paint, ink, rust, and grass before washing.
•Only use the advised quantities of fabric softener and detergent. Damage to the fabric can ensue if you overfill. Refer to the manufacturer’s recommendations of quantities.
•Wash small items such as socks, laces, washable belts etc. in a washing bag or pillow case as it is possible for such items to slip down between the tub and the inner drum.
•Do not use your appliance to wash articles with whalebones, items without hems, frayed and torn. Underwired bras must NOT be washed.
•Garments which have been in contact with volatile petroleum products should not be appliance washed. If volatile cleaning fluids are used, care should be taken to ensure that the fluid is removed from the garment before placing in the appliance.
•The water we use normally contains lime. It is a good idea to periodically use a water softening powder in the appliance. Do this without any laundry into the drum and according to the softening powder manufacturer’s instructions. This will help to prevent the formation of lime deposits making your appliance more efficiency.
•Never pull the power supply cable to remove the plug from the socket; always take hold of the plug itself.
•Never use the appliance if the power supply cable, the control panel, the working surface or the base is damaged so that the inside of the appliance is accessible.
Water inlet
•This appliance must be connected to a cold water supply.
•Do not use connection hoses from an old appliance to connect it to the water supply.

•The water pressure must be in the limits (refer to the chapter «Technical data» table). Make sure that the local water authority gives you the average mains pressure in your area.
•Make sure that there are no kinks in the water inlet hose and that the water inlet hose is not squashed or entangled.
•Before connecting up the appliance to new pipework or to pipework that has not been used for some time, run off a reasonable amount of water to flush out any debris that may have collected in the pipes.
•Turn the inlet hose on the back of the appliance to the left or the right to suit the installation.
•The inlet hose must not be lengthened. If it is too short and you do not wish to move the tap, you will have to purchase a new, longer hose specially designed for this type of use.
•Before opening the water tap, be sure to tighten the ring nut well to prevent any leaks.
Water drainage
•Make sure the end of the drain hose cannot come unhooked when the appliance is emptying. This could be done by tying it to the tap with a piece of string or attaching it to the wall.
•The drain hose must be placed at a height of not less than 44 cm and not more than 90 cm. Please refer to the Assembly Instruction booklet.
Care and cleaning
•Before maintenance, switch off the appliance and disconnect the mains plug from the mains socket.
•Clean the exterior cabinet of the appliance with soap and water only, and then dry thoroughly.
•The washing powder and additive dispenser drawer should be cleaned regularly.
•Inspected the pump regularly and particularly if:
–the appliance does not empty and/or spin
–the appliance makes an unusual noise during draining due to objects such as safety pins, coins etc. blocking the pump.
•Never remove the pump cover during a wash cycle. Always wait until the appliance has drained out the water. If you have selected an high temperature washing programme please wait until the water has cooled down.
•Ensure that the pump cover is securely retightened to prevent any leaks.
Product description
|
1 |
Detergent dispenser drawer |
|||
|
1 |
Control panel |
|||
|
2 |
||||
|
Door opening handle |
||||
|
3 |
||||
|
Rating Plate |
||||
|
2 |
||||
|
4 |
||||
|
Drain pump |
||||
|
5 |
||||
|
Adjustable feet |
||||
|
6 |
||||
|
3 |
||||
|
4 |
||||
|
5 |
6

Detergent dispenser drawer
 Compartment for detergent used for prewash and soak phase or for stain remover used during the stain action phase (if available). The prewash and soak detergent is added at the beginning of the wash programme. The stain remover is added during the stain action phase.
 Compartment for powder or liquid detergent used for main wash. If using liquid detergent pour it just before starting the programme.
 Compartment for liquid additives (fabric softener, starch).
 Follow the product manufacturer’s recommendations on quantities to use and do not ever exceed the «MAX» mark in the
detergent dispenser drawer. Any fabric softener or starching additives must be poured
Control panel
into the compartment before starting the wash programme.
Below is a picture of the control panel. It shows the programme selector dial as well as the buttons and the indicator lights. These are presented by relevant numbers on the following
pages.
|
1 |
2 |
3 |
4 |
5 |
6 |
7 |
||||||||||
|
Programme selector dial |
Start/Pause button |
|||||||||||||||
|
1 |
5 |
|||||||||||||||
|
Spin reduction button |
Delay Start button |
|||||||||||||||
|
2 |
6 |
|||||||||||||||
|
Multi-Functions button |
Programme Indicator lights |
|||||||||||||||
|
3 |
7 |
|||||||||||||||
|
Extra Rinse button |
||||||||||||||||
|
4 |
Table of Symbol
|
= Cottons |
= On/Off — Reset |
|||
|
= Economy |
= Rinse Hold |
|||
|
= Cold wash |
= Options |
|||
|
= Synthetics |
= Prewash |
|||
|
= Easy Iron |
= Quick Wash |
|||
|
= Delicates |
= Extra Rinse |
|||
|
= Wool |
= Delay Start |
|||
|
= Handwash |
= Main Wash |
|||
|
= Rinses |
= End Cycle |
|||
|
= Drain |
= Start/Pause |
|||
|
= Spin |
||||
|
Programme selector dial |
It allows you to switch the appliance On/Off and/or to select a |
|||
|
programme. |
||||
|
Spin reduction button |
By pressing this button you can change the spin speed of the |
|||
|
selected programme. |
||||
|
• Rinse Hold option: by selecting this option the water of the last |
||||
|
rinse is not emptied out to prevent the fabrics from creasing. |
||||
|
Before opening the door it will be necessary to empty out the |
||||
|
water. To empty out the water, please read the paragraph |
||||
|
«At the end of the programme». |
||||
|
Multi-Functions button: |
By pressing this button, you can select only one of the options. |
|||
|
The relevant light will light up. |
||||
|
• |
Prewash: by selecting this option the appliance performs a |
|||
|
prewash cycle before the main wash phase. The washing time |
||||
|
will be prolonged. This option is recommended for heavily |
||||
|
• |
soiled laundry. |
|||
|
Super Quick: a very short cycle for slightly soiled items that |
||||
|
have been worn for a short time. |
||||
|
Extra Rinse button |
This appliance is designed for saving energy. If it necessary to |
|||
|
rinse the laundry using an extra quantity of water (extra rinse), |
||||
|
select this option. Some additional rinses will be performed. This |
||||
|
option is recommended for people who are allergic to deter- |
||||
|
gents, and in areas where the water is very soft. |
||||
|
Start/Pause button |
This button allows you to start or to interrupt the selected wash- |
|||
|
ing programme. |
||||
|
Delay Start button |
This button allows you to delay the start of the programme by 3, |
|||
|
6 or 9 hours. |
||||
|
Programme Indicator lights |

When selecting a washing programme both lights 7.1 and 7.2 illuminate.
7.1When you have pressed the button 5 the only light corresponding to the running phase stays on.
7.2The appliance starts working and the door is locked.
The light 7.3 illuminates at the end of the washing cycle. After a
7.3few minutes the door can be opened.
Important! If the draining programme is selected any light will illuminate.
First use
1.Ensure that the electrical and water connections comply with the installation instructions.
2.Remove any material from the drum.
3.Pour 2 liters of water into the main wash
compartment  of the detergent drawer in order to activate the ECO valve.
Select a cotton cycle at the highest temperature without any laundry in the appliance, to remove any manufacturing residue from the drum and tub.
Pour 1/2 a measure of detergent into the main wash compartment and start the appliance.
Daily use
Open the door
Open the door by carefully pulling the door handle outwards.
Load the laundry
Place the laundry in the drum, one item at a time, shaking them out as much as possi-
ble.
By pushing the porthole frame, close firmly the door.
Measure out detergent and fabric softener
|
1 |
Pour the |
detergent |
|||||
|
into |
the |
main |
wash |
||||
|
compartment |
or |
||||||
|
in the |
appropriate |
||||||
|
compartment |
if the |
||||||
|
selected |
pro- |
||||||
|
gramme/option it re- |
|||||||
|
quires (see more de- |
|||||||
|
tails |
in |
«Detergent |
|||||
|
dispenser drawer»). |
|||||||
|
To |
pour |
the |
right |
||||
|
quantity of the deter- |
|||||||
|
gent, see more de- |
|||||||
|
tails |
in |
«Degrees of |
|||||
|
water hardness». |

|
2 |
Pour fabric softener |
|
|
into the compartment |
||
|
marked |
(must not |
|
|
exceed |
the «MAX» |
|
|
mark in the drawer). |
Close the drawer gently
Select the required programme by turning the programme selector dial (1)
The appliance is now switched on. The indicator light of button 5 starts to blink.
At the end of the programme the selector dial must be turned to position O , to switch the appliance off.
 For the description of each wash cycle, the compatibility among the washing programmes and the options, consult the
chapter «Washing Programmes».
Caution! If you turn the programme selector dial to another programme when
the appliance is working, the red indicator light of button 5 will blink 3 times to indicate a wrong selection. The appliance will not perform the new selected programme.
Reduce the spin speed by pressing button 2
By selecting a programme, the appliance proposes automatically the maximum spin speed provided for that programme.
Press button 2 repeatedly to change the spin speed, if you want your laundry to be spun at a different speed. The relevant light illuminates.
Select the available options by pressing buttons 2, 3 and 4
Depending on the programme, different functions can be combined. These must be selected after choosing the desired programme and before starting the programme.
When these buttons are pressed, the corresponding indicator lights illuminate. When they are pressed again, the indicator lights go out. If an incorrect option is selected, the integrated red indicator light of the button 5 flashes for 3 times.
For the compatibility among the washing programmes and the options see chapter
«Washing Programmes».
Select the Delay Start by pressing button 6
Before you start the programme, if you wish to delay the start, press the button 6 repeatedly, to select the desired delay. The relevant light illuminates.
You must select this option after you have set the programme and before you start the programme.
You can cancel or modify the delay time at any moment, before you press button 5. Selecting the delayed start:
1.Select the programme and the required options.
2.Select the delay start by pressing the button 6.
3.Press button 5:
–the appliance starts its countdown.
–The programme will start after the selected delay has expired.
Cancelling the delayed start after having started the programme:
1.Set the washing appliance to PAUSE by pressing button 5.
2.Press button 6 once, the light relevant to the selected delay goes off
3.Press button 5 again to start the programme.
The Delay Start can not be selected with DRAIN programme.
Important! The selected delay can be changed only after selecting the washing programme again.
The door will be locked throughout the delay time. If you need to open the door, you must set the appliance to PAUSE (by pressing the button 5) and then wait a few minutes. After you have closed the door, press the button 5 again.
![]()
Start the programme by pressing button 5
To start the selected programme, press the button 5, the corresponding green indicator light stops blinking. The indicator light corresponding to the running phase illuminates. The appliance starts operating and the door is locked.
To interrupt a programme which is running, press the button 5: the corresponding green indicator light starts blinking.
To restart the programme from the point at which it was interrupted, press the button 5 again. If you have chosen a delayed start, the appliance will begin the countdown.
If an incorrect option is selected, the red indicator light of the button 5 blinks 3 times.
Altering an option or a running programme
It is possible to change some options before the programme carries them out.
Before you make any change, you must PAUSE the appliance by pressing the button 5. Changing a running programme is possible only by resetting it. Turn the programme selector dial to O and then to the new programme position. Start the new programme by pressing the button 5 again. The washing water in the tub will be not emptied out.
Interrupting a programme
Press the button 5 to interrupt a programme which is running, the corresponding green indicator light starts blinking.
Press the button again to restart the programme.
Cancelling a programme
Turn the selector dial to O to cancel a programme which is running.
You can select now a new programme.
Opening the door
After the programme has started the door is locked. If, for any reason, you need to open it, set firstly the appliance to PAUSE by pressing the button 5. After a few minutes it will be possible to open the door.
If the door remains locked, this means that the appliance is already heating or that the water level is too high. In any case, do not try to force the door!
If you cannot open the door but you need to open it you have to switch the appliance off by turning the selector dial to O . After a few minutes the door can be opened (pay attention to the water level and temperature!).
After closing the door, it is necessary to select the programme and options again and to press button 5.
At the end of the programme
The appliance stops automatically. The indicator light of button 5 and the indicator light corresponding to the just finished washing phase goes off. The light 7.3 illuminates. After a few minutes the door can be opened.
If a programme or an option that ends with water left in the tub has been selected, the light 7.3 illuminates but the door remains locked to indicate that the water must be emptied out before opening the door.
Follow the below instructions to empty out the water:
1.Turn the programme selector dial to O .
2.Select the draining or spinning programme.
3.Reduce the spin speed if needed, by pressing the button 2.
4.Press button 5.
At the end of the programme, the door can be now opened. Turn the programme selector dial to O to switch the appliance off.
Remove the laundry from the drum and carefully check that the drum is empty. If you do not intend to carry out another wash, close the water tap. Leave the door open to prevent any mildew and unpleasant smells.
 Stand by : once the programme has finished the energy saving system is enabled with the pilot lights switched on. By pressing any button the appliance will come out of
the energy saving status.

Sorting out the laundry
Follow the wash code symbols on each garment label and the manufacturer’s washing instructions. Sort the laundry as follows: whites, coloureds, synthetics, delicates, woollens.
Removing stains
Stubborn stains may not be removed by just water and detergent. It is therefore advisable to treat them prior to washing.
Blood: treat fresh stains with cold water. For dried stains, soak overnight in water with a stain remover product then rub in the soap and water.
Oil based paint: moisten with benzine stain remover, lay the garment on a soft cloth and dab the stain; treat several times.
Dried grease stains: moisten with turpentine, lay the garment on a soft surface and dab the stain with the fingertips and a cotton cloth.
Rust: oxalic acid dissolved in hot water or a rust removing product used cold. Be careful with rust stains which are not recent since the cellulose structure will already have been damaged and the fabric tends to hole.
Mould stains: treat with bleach, rinse well (white cottons and fast coloureds only).
Grass: soap lightly and treat with bleach (white cottons and fast coloureds only).
Ball point pen and glue: moisten with ace-
tone1), lay the garment on a soft cloth and dab the stain.
Lipstick: moisten with acetone as above, then treat stains with methylated spirits. Treat any residual marks with bleach.
Red wine: soak in water and detergent, rinse and treat with acetic or citric acid, then rinse. Treat any residual marks with bleach.
Ink: depending on the type of ink, moisten the
fabric first with acetone1) , then with acetic acid; treat any residual marks on white fabrics with bleach and then rinse thoroughly.
Tar stains: first treat with stain remover, methylated spirits or benzine, then rub with detergent paste.
Degrees of water hardness
Water hardness is classified in so-called “degrees” of hardness. Information on hardness of the water in your area can be obtained from the relevant water supply company, or from your local authority.
|
Characteristic |
Degrees of water hardness |
||
|
German °dH |
French °T.H. |
||
|
Soft |
0-7 |
0-15 |
|
|
Medium |
8-14 |
16-25 |
|
|
Hard |
15-21 |
26-37 |
|
|
Very hard |
> 21 |
> 37 |
A water softener must be added when water has a medium-high degree of hardness. Follow the manufacturer’s instructions. The quantity of detergent can then always be adjusted (re-
duced) to degree of hardness soft.
Washing programmes
Please always refer to the care label symbol of your garment and select the washing programme based on what it says.
1) do not use acetone on artificial silk

|
ENGLISH |
13 |
||||||||||
|
Programme/ Temperature |
Typeof laundry |
Cycle Description |
Max.Load |
LoadRed. |
Available Options |
Detergent Compartment |
|||||
|
1) |
|||||||||||
|
COTTONS |
White cotton (heavy- |
Main wash |
Spin |
2) |
|||||||
|
90°-60° |
normally soiled items). |
Rinses |
final |
6 kg |
Rinse Hold |
||||||
|
Max. |
Prewash |
||||||||||
|
spin at 1200 |
3 kg1) |
Super Quick |
|||||||||
|
rpm |
Extra Rinse |
||||||||||
|
COTTONS |
White and fast col- |
Main wash |
Spin |
2) |
|||||||
|
ECO |
oured |
cotton |
econo- |
Rinses |
inal |
6 kg |
Rinse Hold |
||||
|
60° |
my, |
lightly-heavy |
Max. f |
Prewash |
|||||||
|
soiled items, shirts, un- |
spin at 1200 |
Extra Rinse |
|||||||||
|
derwear. |
rpm |
||||||||||
|
COTTONS |
Coloured cotton (nor- |
Main wash |
Spin |
2) |
|||||||
|
40°-30°-Cold |
mally-lightly |
soiled |
Rinses |
final |
6 kg |
Rinse Hold |
|||||
|
items). |
Max. |
Prewash |
|||||||||
|
spin at 1200 |
3 kg1) |
Super Quick |
|||||||||
|
rpm |
Extra Rinse |
||||||||||
|
SYNTHETICS |
Synthetic |
or |
mixed |
Main wash |
Spin |
2) |
|||||
|
60°-40°-30°- |
fabrics: |
underwear, |
Rinses |
final |
3 kg |
Rinse Hold |
|||||
|
Cold |
coloured |
garments, |
Max. |
Prewash |
|||||||
|
non-shrink shirts, blou- |
spin at |
900 |
1.5 kg1) |
Super Quick |
|||||||
|
ses. |
rpm |
Extra Rinse |
|||||||||
|
EASY IRON |
Synthetic |
fabrics: se- |
Main wash |
Spin |
|||||||
|
40° |
lecting |
this |
pro- |
Rinses |
final |
Rinse Hold |
|||||
|
gramme the laundry is |
Max. |
Prewash |
|||||||||
|
gently |
washed |
and |
spin at |
900 |
Extra Rinse |
2) |
|||||
|
spun |
to |
avoid |
any |
rpm |
1.5 kg |
||||||
|
creasing. In this |
way |
||||||||||
|
ironing is easier. Fur- |
|||||||||||
|
thermore |
the |
appli- |
|||||||||
|
ance will perform ad- |
|||||||||||
|
ditional rinses. |
|||||||||||
|
DELICATES |
Delicate |
fabrics: |
for |
Main wash |
Spin |
2) |
|||||
|
40°-30°-Cold |
example curtains. |
Rinses |
final |
3 kg |
Rinse Hold |
||||||
|
Max. |
Prewash |
||||||||||
|
spin at |
700 |
1.5 kg1) |
Super Quick |
||||||||
|
rpm |
Extra Rinse |

|
ENGLISH |
14 |
||||||||||
|
Programme/ Temperature |
Typeof laundry |
Cycle Description |
Max.Load LoadRed. |
Available Options |
Detergent Compartment |
||||||
|
1) |
|||||||||||
|
WOOL |
Special |
programme |
Main wash |
Spin |
|||||||
|
40° |
for |
wool |
garments |
Rinses |
final |
Rinse Hold |
|||||
|
bearing the «Pure new |
Max. |
2 kg |
|||||||||
|
wool, non-shrink, ap- |
spin at |
900 |
|||||||||
|
pliance washable» la- |
rpm |
||||||||||
|
bel. |
|||||||||||
|
HANDWASH |
Special |
programme |
Main wash |
Spin |
|||||||
|
30°-Cold |
for |
delicate |
fabrics |
Rinses |
final |
2 kg |
Rinse Hold |
||||
|
with «hand washing» |
Max. |
||||||||||
|
care symbol. |
spin at |
900 |
|||||||||
|
rpm |
|||||||||||
|
RINSES |
With this programme |
Rinses |
final |
Spin |
|||||||
|
it is possible to rinse |
Max. |
Rinse Hold |
|||||||||
|
and spin cotton gar- |
spin at 1200 |
Extra Rinse |
|||||||||
|
ments |
which |
have |
rpm |
||||||||
|
been |
washed |
by |
6 kg |
||||||||
|
hand. The appliance |
|||||||||||
|
performs some rinses, |
|||||||||||
|
followed |
by |
a |
final |
||||||||
|
long |
spin. The |
spin |
|||||||||
|
speed can be re- |
|||||||||||
|
duced. |
|||||||||||
|
DRAIN |
For emptying out the |
Draining of |
|||||||||
|
water of the last rinse |
water |
6 kg |
|||||||||
|
in |
programmes |
with |
|||||||||
|
the Rinse Hold option |
|||||||||||
|
selected. |
|||||||||||
|
SPIN |
Separate |
spin |
for |
Max. |
final |
Spin |
|||||
|
hand |
washed |
gar- |
spin at 1200 |
||||||||
|
ments and after pro- |
rpm |
||||||||||
|
grammes |
with |
the |
|||||||||
|
Rinse Hold option se- |
6 kg |
||||||||||
|
lected. |
You |
can |
|||||||||
|
choose the spin speed |
|||||||||||
|
by pressing the rele- |
|||||||||||
|
vant button to adapt it |
|||||||||||
|
to the fabrics to be |
|||||||||||
|
spun. |
1)If you select the SUPER QUICK option, we recommend you, to reduce the maximum load as indicated. (Red. load = reduced load). Full loading is possible however with somewhat reduced cleaning results.
2)If using liquid detergents, a programme without PREWASH must be selected.

Consumption values
|
Programme |
Energy consumption |
Water consumption |
Programme duration |
|
(KWh) |
(litres) |
(Minutes)1) |
|
|
White Cottons 90° |
2 |
61 |
140 |
|
Cottons 60° |
1.3 |
58 |
125 |
|
Cottons ECONOMY |
1.02 |
45 |
155 |
|
60° 2) |
|||
|
Cottons 40° |
0.75 |
58 |
120 |
|
Synthetics 40° |
0.5 |
47 |
80 |
|
Delicates 40° |
0.55 |
58 |
70 |
|
Wool 40° |
0.45 |
55 |
60 |
|
Handwash 30° |
0.3 |
58 |
55 |
1)Without prewash option selected.
2)«Cottons Economy» at 60°C with a load of 6 kg is the reference programme for the data entered in the energy label, in compliance with CEI 456 standards.
The consumption data shown on this chart is to be considered purely indicative, as it may vary depending on the quantity and type of laundry, on the inlet water temperature and
on the ambient temperature.
Care and cleaning
Warning! Switch the appliance off before you carry out any cleaning or
maintenance work.
Maintenance Wash
With the use of low temperature washes it is possible to get a build up of residues inside the drum.
We recommend that a maintenance wash be performed on a regular basis.
To run a maintenance wash:
•The drum should be empty of laundry.
•Select the hottest cotton wash programme.
•Use a normal measure of detergent, must be a powder with biological properties.
Cleaning the dispenser drawer and the drawer recess
|
1 |
To remove the draw- |
|
er, press the catch |
|
|
downwards and pull |
|
|
it out. |

ENGLISH
2 To aid cleaning, re- 1 move also the top
part of the additive
compartment.
A B
|
3 |
Use a stiff brush to |
2 |
|
clean and remove all |
||
|
washing powder res- |
||
|
idue. |
|
4 |
Flush out all the re- |
3 |
|||
|
moved parts |
of |
the |
|||
|
dispenser |
drawer |
||||
|
under a tap to re- |
|||||
|
move any traces of |
|||||
|
accumulated |
pow- |
||||
|
der. |
|||||
|
5 |
Use |
the previous |
4 |
||
|
brush to clean the re- |
|||||
|
cess, |
ensuring |
that |
|||
|
upper and lower part |
|||||
|
of it is well cleaned. |
|||||
|
After having cleaned |
|||||
|
the |
dispenser |
and |
|||
|
the |
drawer |
recess, |
|||
|
replace it and run a |
|||||
|
rinse |
programme |
||||
|
without any laundry |
|||||
|
in the drum to flush |
|||||
|
away any residue. |
Cleaning the pump
Proceed as follows:
16
Place a container close to the pump (A), to collect any spillage.
Pull out the emergency emptying hose (B), place it in the container and remove its cover cap.
When no more water comes out, unscrew the pump cover (A) and remove it. Always keep a rag nearby to dry up spillage of water when removing the pump.
Remove any objects from the pump impeller by rotating it.
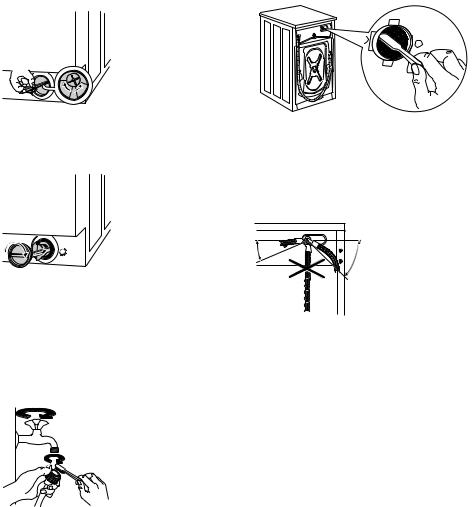
|
5 |
Use a pencil to check |
|||
|
whether |
the |
pump |
||
|
wheel right |
at the |
|||
|
back |
of the |
pump |
||
|
housing can turn. (It is |
||||
|
normal for the pump- |
||||
|
ing |
wheel |
to |
turn |
|
|
jerkily.) If the pump- |
||||
|
ing wheel cannot be |
||||
|
turned, |
please |
con- |
||
|
tact |
the |
After |
Sales |
|
|
Service. |
||||
|
6 |
Put the cap back on |
|||
|
the emergency emp- |
||||
|
tying hose and place |
||||
|
the latter back in its |
||||
|
seat. Screw the pump |
||||
|
fully in. |
Cleaning the water inlet filters
If the appliance takes long to fill with water or doesn’t fill, the starting button indicator light blinks in red. Check if the water inlet filters are blocked (see chapter «What to do if…» for more details).
Proceed as follows:
|
1 |
• |
Turn off the water |
|
• |
tap. |
|
|
Unscrew the hose |
||
|
• |
from the tap. |
|
|
Clean the filter in |
||
|
the hose with a stiff |
||
|
brush. |
||
|
• Screw firmly the in- |
||
|
let hose back onto |
||
|
the tap. |
2
•Unscrew the hose from the appliance. Keep a rag nearby because some water may flow.
•Clean the filter in the valve with a stiff brush or with the piece of cloth.
•Screw the hose back to the appliance turning it to the left or the right to suit the installation. Tight the locknut correctly to prevent water leaks.
•Turn on the water tap.
The dangers of freezing
If the appliance is exposed to temperatures below 0°C, certain precautions should be taken.
•Turn off the water tap.
•Unscrew the inlet hose.
•Place the end of the emergency emptying hose and that of the inlet hose in a bowl placed on the floor and let water drain out.
•Screw the water inlet hose back on and reposition the emergency emptying hose after having put the cap on again.
•When you intend to start the appliance up again, make sure that the room temperature is above 0°C.

Important! Every time you drain the water through the emergency emptying hose you must pour 2 litres of water into the main wash compartment of the detergent drawer and then run the drain programme. This will activate the ECO VALVE device avoiding that part of the detergent remains unused at next washing.
Emergency emptying out
If the water is not discharged, proceed as follows to empty out the appliance:
•pull out the plug from the power socket;
•close the water tap;
•if necessary, wait until the water has cooled down;
•open the pump door;
•place a bowl on the floor and place the end of the emergency emptying hose into the bowl. Remove its cap. The water should drain by gravity into the bowl. When the bowl is full, put the cap back on the hose. Empty the bowl. Repeat the procedure until water stops flowing out;
•clean the pump if necessary as previously described;
•replace the emergency emptying hose in its seat after having plugged it;
•screw the pump cover again and close the door.
What to do if…
The appliance does not start or stops during operation. It is possible that the red indicator light of button 5 blinks to indicate that the appliance is not working.
Before contacting your local Service Centre, please carry out the checks listed below.
|
Problem |
Possible cause |
Solution |
||
|
The door has not been closed (The |
Close the door firmly. |
|||
|
red indicator light of button 5 blinks). |
||||
|
The plug is not properly inserted in |
Insert the plug into the power socket. |
|||
|
the power socket. |
||||
|
There is no power at the socket. |
Please check your domestic electrical |
|||
|
The |
appliance |
installation. |
||
|
The main fuse or the fuse in a plug |
Replace the fuse. |
|||
|
does not start: |
||||
|
has blown. |
||||
|
The programme selector dial is not |
Please turn the selector dial and |
|||
|
correctly positioned and the button 5 |
press the button 5 again. |
|||
|
has not been pressed. |
||||
|
The delay start has been selected. |
If the laundry are to be washed im- |
|||
|
mediately, cancel the delay start. |
||||
|
The water tap is closed The red indi- |
Open the water tap. |
|||
|
cator light of button 5 blinks). |
||||
|
The inlet hose is squashed or kinked |
Check the inlet hose connection. |
|||
|
The |
appliance |
(The red indicator light of button 5 |
||
|
does not fill: |
blinks). |
|||
|
The filter in the inlet hose or the inlet |
Clean the water inlet filters. (See |
|||
|
valve filter are blocked (The red in- |
«Cleaning the water inlet filters» for |
|||
|
dicator light of button 5 blinks). |
more details). |
|
Problem |
Possible cause |
Solution |
|||
|
The door is not properly closed (The |
Close the door firmly. |
||||
|
red indicator light of button 5 blinks). |
|||||
|
The drain hose is squashed or kinked |
Check the drain hose connection. |
||||
|
(The red indicator light of button 5 |
|||||
|
blinks). |
|||||
|
The |
appliance |
The drain filter is clogged (The red |
Clean the drain filter. |
||
|
does not empty: |
indicator light of button 5 blinks). |
||||
|
An option or a programme that ends |
Select the draining or spinning pro- |
||||
|
with the water still in the tub or a that |
gramme. |
||||
|
eliminates all the spinning phases |
|||||
|
has been selected. |
|||||
|
The electronic unbalance detection |
Redistribute the load manually or |
||||
|
device has cut in because the laundry |
load more laundry and select the |
||||
|
is not evenly distributed in the drum. |
spin programme. |
||||
|
The |
appliance |
The laundry is redistributed by re- |
|||
|
verse rotation of the drum. This may |
|||||
|
spinning |
phase |
happen several times before the un- |
|||
|
starts |
late or |
balance disappears and normal |
|||
|
does not start: |
spinning can resume. If, after 10 mi- |
||||
|
nutes, the laundry is still not evenly |
|||||
|
distributed in the drum, the appli- |
|||||
|
ance will not spin. |
|||||
|
Too much detergent or unsuitable |
Reduce the detergent quantity or use |
||||
|
detergent (creates too much foam) |
another one. |
||||
|
has been used. |
|||||
|
Check whether there are any leaks |
Check the water inlet hose connec- |
||||
|
from one of the inlet hose fittings. It is |
tion. |
||||
|
not always easy to see this as the |
|||||
|
There |
is |
water |
water runs down the hose; check to |
||
|
see if it is damp. |
|||||
|
on the floor: |
|||||
|
The drain or inlet hose is damaged. |
Replace it with a new one (check with |
||||
|
the After Sales Service the right spare |
|||||
|
part number). |
|||||
|
The cap on the emergency emptying |
Refit the cap on the emergency emp- |
||||
|
hose has not been replaced or the |
tying hose or screw the filter fully in. |
||||
|
filter has not been properly screwed |
|||||
|
in after cleaning action. |
|||||
|
The door will not |
The programme is still running. |
Wait the end of washing cycle. |
|||
|
The door lock has not been released. |
Wait a few minutes before opening |
||||
|
open: |
the door. |
||||

|
Problem |
Possible cause |
Solution |
|
|
There is water in the drum. |
Select drain or spin programme to |
||
|
empty out the water. |
|||
|
The transit bolts and packing have |
Check the correct installation of the |
||
|
The appliance |
not been removed. |
appliance. |
|
|
The support feet have not been ad- |
Check the correct levelling of the ap- |
||
|
produces an un- |
justed |
pliance. |
|
|
usual noise |
|||
|
The drain pump could be blocked. |
Check the drain pump. (See «Clean- |
||
|
ing the pump» for more details). |
|||
|
Too little detergent or unsuitable de- |
Increase the detergent quantity or |
||
|
tergent has been used. |
use another one. |
||
|
Stubborn stains have not been trea- |
Use commercial products to treat the |
||
|
Unsatisfactory |
ted prior to washing. |
stubborn stains. |
|
|
The correct temperature was not se- |
Check if you have selected the cor- |
||
|
washing results: |
|||
|
lected. |
rect temperature. |
||
|
Excessive laundry load. |
Reduce the laundry load in accord- |
||
|
ing to the Washing Programmes ta- |
|||
|
ble. |
After the check, switch on the appliance and press the button 5 to restart the programme. If the malfunction shows again, contact your After Sales Service.
The necessary data for the service centre is on the rating plate. We recommend that you write the data here:
Model description (MOD): …………………
Product number (PNC): ………………………
Serial number (S.N.): ………………………….
Made In Italy
© Inter IKEA Systems B.V. 1999
501.514.59
21552
Technical data
|
Dimensions |
Width (cm) |
59,6 |
|
Height (cm) |
82 |
|
|
Depth (cm) |
54 |
|
|
Water supply pressure1) |
Minimum |
0,5 bar (0,05 MPa) |
|
Maximum |
8 bar (0,8 MPa) |
|
|
Cotton max. load (kg) |
6 |
![]()
|
Max. spin speed (rpm) |
1200 |
|
Energy class |
A+ |
|
Washing class |
A |
|
Spinning class |
B |
|
Washing noise (dB(A)) |
54 |
|
Spinning noise (db(A)) |
76 |
|
Average annual energy con- |
204 |
|
sumption (kWh)2) |
|
|
Average annual water con- |
9000 |
|
sumption (litres)2) |
1)If the pressure in your area is lower or higher, please contact your After Sales Service.
2)The data is based on the washing programme for test institutes assuming 220 cycles per a year.
Information on the electrical connection, voltage and overall power is given on the rating plate, on the inner edge of the appliance door.
Installation
Caution! Refer to the assembly instructions, in order to proceed with the
installation.
Warning! Make sure that mains plug is disconnected from the mains socket
during installation.
Place the appliance on the floor and install it under a counter (kitchen worktop or sink).
If a repair is necessary, the appliance must be easily accessible for the engineer. Put the appliance adjacent to a water tap and a drain. For the venting of the appliance only water fill, water drain and power supply cable openings are necessary.
|
Water inlet |
|
|
1 |
Connect the hose to a |
|
tap with 3/4″ thread. |
Turn the inlet hose to the left or the right to suit the installation. Tight the locknut correctly to prevent water leaks.
Caution! Do not place the inlet hose downwards.
 The inlet hose must not be lengthened. If it is too short and you do not wish to move the tap, you will have to purchase a new, lon-
ger hose specially designed for this type of use.

Water drainage
If you connect the water drain hose to a water trap under the A sink, remove the plastic membrane
(A). If you do not remove the membrane, detergent residue and clothes fluff can cause a blockage in the drain hose spigot.
Caution! Make sure that the water couplings are tight to prevent water leak-
age.
 The drain hose may be extended to a maximum of 4 metres. An additional drain hose and joining piece is available from
your local Service Centre.
Electrical connection
•The appliance must be earthed.
•Make sure that the electrical information on the rating plate agree with your domestic power supply.
•Always use a correctly installed shockproof socket.
•Do not use multi-way plugs, connectors and extension cables. There is a risk of fire.
•Do not replace or modify the mains cable yourself. Contact the After Sales Service.
•Make sure that the mains plug and cable is not squashed or damaged by the back of the appliance.
Environment concerns
The symbol  on the product or on its packaging indicates that this product may not be treated as household waste. Instead it should be taken to the appropriate collection point for the recycling of electrical and electronic equipment. By ensuring this product is disposed of correctly, you will help prevent potential negative consequences for the environment and human health, which could otherwise be caused by inappropriate waste handling of this product. For more detailed information about recycling of this product, please contact your local council, your
•Make sure that the mains plug is accessible after installation.
•Do not pull the mains cable to disconnect the appliance. Always pull the mains plug.
•This appliance complies with the E.E.C. Directives.
household waste disposal service or the shop where you purchased the product.
Packaging materials
The materials with the symbol 
 are recyclable. Dispose the packaging in a suitable collection containers to recycle it.
Disposal of the appliance
•To prevent the risk of physical injury or damage:
–Disconnect the mains plug from the mains socket.
–Cut off the mains cable and discard it.
–Discard the door catch. This prevents children or small animals from being closed inside of the appliance. There is a risk of suffocation.

ENGLISH
IKEA GUARANTEE
How long is the IKEA guarantee valid?
This guarantee is valid for five (5) years from the original date of purchase of Your appliance at IKEA, unless the appliance is named LAGAN in which case two (2) years of guarantee apply. The original sales receipt is required as proof of purchase. If service work is carried out under guarantee, this will not extend the guarantee period for the appliance,
Which appliances are not covered by the IKEA five (5) years guarantee?
The range of appliances named LAGAN and all appliances purchased in IKEA before 1st of August 2007
Who will execute the service?
IKEA service provider will provide the service through its own service operations or authorized service partner network.
What does this guarantee cover?
The guarantee covers faults of the appliance, which have been caused by faulty construction or material faults from the date of purchase from IKEA. This guarantee applies to domestic use only. The exceptions are specified under the headline “What is not covered under this guarantee?” Within the guarantee period, the costs to remedy the fault e.g. repairs, parts, labour and travel will be covered, provided that the appliance is accessible for repair without special expenditure. On these conditions the EU guidelines (Nr. 99/44/EG) and the respective local regulations are applicable. Replaced parts become the property of IKEA.
What will IKEA do to correct the problem?
IKEA appointed service provider will examine the product and decide, at its sole discretion, if it is covered under this guarantee. If considered covered, IKEA service provider or its authorized service partner through its own service operations, will then, at its sole discretion, either repair the defective product or replace it with the same or a comparable product.
What is not covered under this guarantee?
• Normal wear and tear.
23
•Deliberate or negligent damage, damage caused by failure to observe operating instructions, incorrect installation or by connection to the wrong voltage, damage caused by chemical or electro-chemical reaction, rust, corrosion or water damage including but not limited to damage caused by excessive lime in the water supply, damage caused by abnormal environmental conditions.
•Consumable parts including batteries and lamps.
•Non-functional and decorative parts which do not affect normal use of the appliance, including any scratches and possible color differences.
•Accidental damage caused by foreign objects or substances and cleaning or unblocking of filters, drainage systems or soap drawers.
•Damage to the following parts: ceramic glass, accessories, crockery and cutlery baskets, feed and drainage pipes, seals, lamps and lamp covers, screens, knobs, casings and parts of casings. Unless such damages can be proved to have been caused by production faults.
•Cases where no fault could be found during a technician’s visit.
•Repairs not carried out by our appointed service providers and/or an authorized service contractual partner or where nonoriginal parts have been used.
•Repairs caused by installation which is faulty or not according to specification.
•The use of the appliance in a non-domestic environment i.e. professional use.
•Transportation damages. If a customer transports the product to their home or other address, IKEA is not liable for any damage that may occur during transport. However, if IKEA delivers the product to the customer’s delivery address, then damage to the product that occurs during this delivery will be covered by this guarantee.

•Cost for carrying out the initial installation of the IKEA appliance. However, if an IKEA service provider or its authorized service partner repairs or replaces the appliance under the terms of this guarantee, the service provider or its authorized service partner will re-install the repaired appliance or in-
stall the replacement, if necessary.
This restriction do not apply to fault-free work carried out by a qualified specialist using our original parts in order to adapt the appliance to the technical safety specifications of another EU country.
How country law applies
The IKEA guarantee gives You specific legal rights, which covers or exceed local demands. However these conditions do not limit in any way consumer rights described in the local legislation
Area of validity
For appliances which are purchased in one EU country and taken to another EU country, the services will be provided in the framework of the guarantee conditions normal in the new country. An obligation to carry out services in the framework of the guarantee exists only if the appliance complies and is installed in accordance with:
•the technical specifications of the country in which the guarantee claim is made;
•the Assembly Instructions and User Manual Safety Information;
The dedicated After Sales Service for IKEA appliances:
Please do not hesitate to contact IKEA After Sales Service to:
1.make a service request under this guarantee;
2.ask for clarification on installation of the IKEA appliance in the dedicated IKEA kitchen furniture. The service won’t provide clarifications related to:
– the overall IKEA kitchen installation;
–connections to electricity (if machine comes without plug and cable), to water and to gas since they have to be executed by an authorized service engineer.
3.ask for clarification on user manual contents and specifications of the IKEA appliance.
To ensure that we provide you with the best assistance, please read carefully the Assembly Instructions and/or the User Manual section of this booklet before contacting us.
How to reach us if You need our service
Please refer to the last page of this manual for the full list of IKEA appointed contacts and relative national phone numbers.
Important! In order to provide You with a quicker service, we recommend that You use the specific phone numbers listed at the end of this manual. Always refer to the numbers listed in the booklet of the specific appliance You need an assistance for. Before calling us, assure that You have to hand the IKEA article number (8 digit code) for the appliance of which you need our assistance.
Important! SAVE THE SALES RECEIPT! It is Your proof of purchase and required for the guarantee to apply. Note that the receipt reports also the IKEA article name and number (8 digit code) for each of the appliances you have purchased.
Do You need extra help?
For any additional questions not related to After Sales of your appliances, please contact our nearest IKEA store call centre. We recommend you read the appliance documentation carefully before contacting us.

GARANTIE IKEA GARANTIE IKEA — FRANCE
FRANÇAIS
Sommaire
|
Consignes de sécurité |
25 |
|
Description de l’appareil |
28 |
|
Bandeau de commande |
29 |
|
Première utilisation |
30 |
|
Utilisation quotidienne |
31 |
|
Conseils utiles |
33 |
|
Programmes de lavage |
34 |
|
Valeurs de consommation |
37 |
|
Entretien et nettoyage |
38 |
Sous réserve de modifications
25
|
En cas d’anomalie de fonctionnement |
40 |
|
Caractéristiques techniques |
43 |
|
Installation |
44 |
|
Branchement électrique |
45 |
En matière de protection de l’environnement 45 46 48
 Consignes de sécurité
 Pour votre sécurité et pour garantir une utilisation correcte de l’appareil, lisez attentivement cette notice d’utilisation, ainsi que ses conseils et avertissements, avant d’installer et d’utiliser l’appareil pour la première fois. Conservez cette notice d’utilisation avec l’appareil. Si l’appareil devait être vendu ou cédé à une autre personne, assurez-vous que la notice d’utilisation l’accompagne. Pour éviter toute erreur ou accident, veillez à ce que toute personne qui utilise l’appareil connaisse bien son fonctionnement et ses options de sécurité. Le fabricant décline toute responsabilité en cas de dommages dus à une mauvaise instal-
lation ou utilisation.
Sécurité des enfants et des personnes vulnérables
•Cet appareil n’est pas destiné à être utilisé par des enfants ou des personnes dont les capacités physiques, sensorielles ou mentales, ou le manque d’expérience et de connaissance les empêchent d’utiliser l’appareil sans risque lorsqu’ils sont sans surveillance ou en l’absence d’instruction d’une personne responsable qui puisse leur assurer une utilisation de l’appareil sans danger.
•Ne laissez pas les emballages à la portée des enfants. Risque d’asphyxie.
•Conservez tous les produits de lavage dans un endroit sûr. Ne laissez pas les enfants toucher les produits de lavage.
•Assurez-vous que les enfants ou vos animaux domestiques ne pénètrent pas dans le tambour. Vérifiez l’intérieur du tambour avant chaque utilisation.
Cet appareil comporte un dispositif spécial qui empêche les enfants et les animaux familiers d’être emprisonnés dans le tambour.
Pour activer ce dispositif, tournez le bouton (sans appuyer dessus) dans le sens des aiguilles d’une montre jusqu’à ce que la rainure soit horizontale. Si nécessaire, utilisez une pièce de monnaie
Pour désactiver ce dispositif et permettre à nouveau la fermeture du hublot, tournez le bouton dans le sens contraire des aiguilles d’une montre jusqu’à ce que la rainure soit verticale.
Consignes générales de sécurité
•Ne modifiez pas ou n’essayez pas de modifier les caractéristiques de cet appareil. Vous risqueriez de vous blesser et d’endommager l’appareil.
•Si votre appareil est livré en hiver, lorsque la température est inférieure à 0 °C, stoc- kez-le à température ambiante pendant 24 heures avant sa première utilisation. Veuillez lire le chapitre « Précautions contre le gel ».
•Cet appareil est conçu pour une utilisation à une température intérieure normale. Le fabricant décline toute responsabilité en cas de dommages dus au gel.
•Débranchez toujours la prise de courant et fermez le robinet d’eau après chaque utilisation et avant le nettoyage et l’entretien de l’appareil.
Installation
•Les raccordements électriques et hydrauliques doivent être réalisés par des professionnels qualifiés.
•Cet appareil est lourd. Faites attention lorsque vous le déplacez.
•Vérifiez que l’appareil n’a pas été endommagé pendant le transport. Ne branchez jamais un appareil endommagé. Au besoin, contactez votre service après-vente.
•Retirez tous les emballages et dispositifs de protection avant la première utilisation. Faute de quoi l’appareil ou les meubles avoisinants pourraient être endommagés.
•Conservez ces dispositifs de sécurité ; ils devront être remontés pour tout autre transport de l’appareil. Veuillez consulter la partie correspondante des instructions de montage.
•Ne placez jamais de cales en carton, en bois ou autre sous l’appareil pour compenser l’irrégularité du sol.
Mettez l’appareil d’aplomb avec précision puis serrez les contre-écrous afin d’empêcher les vibrations, le bruit et le déplacement de l’appareil pendant son fonctionnement.
•Si l’appareil est installé sur une moquette, réglez les pieds de sorte que l’air puisse circuler librement sous l’appareil.
•Vérifiez que votre appareil ne repose pas sur le tuyau d’alimentation ou le tuyau de vidange et que le plan de travail ou l’arrière de l’appareil n’exerce aucune pression sur le câble d’alimentation.
•Assurez-vous, après avoir installé l’appareil, qu’aucun tuyau ou raccord ne fuit.
•Si l’appareil est installé dans un lieu exposé au gel, veuillez lire le chapitre « Précautions contre le gel ».
Utilisation
•Cet appareil est destiné à un usage domestique normal. N’utilisez pas cet appareil à des fins commerciales ou industrielles ou pour d’autres usages.
•Les réparations ne doivent être effectuées que par un service après vente qualifié. Une réparation non conforme peut être la cause de graves dommages. Utilisez exclusivement des pièces d’origine.
•Avant le lavage, consultez les instructions d’entretien de chaque article (vêtement).
•Ne surchargez pas l’appareil. Voir le chapitre correspondant dans cette notice d’utilisation «Programmes de lavage»
•Avant le lavage, videz les poches et fermez les boutonnières et les fermetures à glissière.
•Les objets tels que les pièces de monnaie, les épingles de sûreté, les clous, les vis, les cailloux ou tout autre objet dur, tranchant, peuvent provoquer d’importants dégâts et ne doivent pas être placés dans l’appareil.
•Les tâches de peinture, d’encre, de rouille et d’herbe doivent être traitées avant le lavage.
•N’utilisez que les quantités de lessive et d’assouplissant indiquées par le fabricant. Une quantité excessive pourrait endommager le linge. Conformez-vous aux doses préconisées par les fabricants.
•Groupez les petits articles, tels que les chaussettes, lacets, ceintures lavables etc., dans un sac de lavage ou une taie d’oreiller, afin d’éviter que ces articles ne glissent entre le tambour et la cuve.
•Ne lavez pas dans votre machine les articles avec baleines, les articles sans ourlet, effilochés ou déchirés. Les soutiens-gorge à armature NE doivent PAS être lavés en machine.
•Les articles qui ont été en contact avec des produits pétroliers volatiles ne doivent pas être lavés dans l’appareil. Si vous utilisez un liquide détachant volatile, veillez à ce que le produit se soit évaporé avant d’introduire l’article dans l’appareil.
•L’eau du robinet contient du calcaire. Il est conseillé d’utiliser régulièrement une poudre anticalcaire. Utilisez ce produit conformément aux instructions du fabricant, sans linge dans le tambour. Cela empêche la formation de dépôts de calcaire et améliore l’efficacité de votre appareil.
•Ne tirez jamais sur le câble d’alimentation pour le débrancher ; mais toujours au niveau de la prise.
•N’utilisez jamais votre appareil si le câble d’alimentation, le bandeau de commande, le plan de travail ou le socle sont endommagés de sorte que l’intérieur de l’appareil soit accessible.
Arrivée d’eau
•Cet appareil est conçu pour être raccordé à l’eau froide.
•Ne raccordez pas votre appareil à l’arrivée d’eau au moyen d’un tuyau provenant d’un ancien appareil.
•La pression de l’eau doit se situer dans les limites indiquées (reportez-vous au chapitre « Caractéristiques techniques »). Demandez à votre compagnie de distribution d’eau de vous indiquer la pression moyenne de l’eau dans votre région.
•Contrôlez que le tuyau d’arrivé d’eau n’est pas plié, ni écrasé ou emmêlé.
•Si le branchement est réalisé sur une tuyauterie neuve ou qui n’a pas servi depuis longtemps, laissez couler une certaine quantité d’eau afin d’évacuer tous les débris accumulés dans les tuyauteries.
•Le tuyau d’alimentation peut être orienté vers la gauche ou la droite pour s’adapter à l’installation.
•Le tuyau d’alimentation ne doit pas être rallongé. S’il est trop court et que vous ne souhaitez pas déplacer le robinet, vous devrez acheter un nouveau tuyau conçu pour ce type d’utilisation.
•Avant d’ouvrir le robinet d’arrivée d’eau, serrez bien la bague de serrage pour éviter toute fuite.
Vidange de l’eau
•Assurez-vous que l’extrémité du tuyau de vidange ne peut pas se décrocher pendant que l’appareil se vide. A cet effet, vous pouvez fixer le tuyau au robinet à l’aide d’une ficelle ou le fixer au mur.
•Le tuyau de vidange doit être placé à une hauteur comprise entre 44 et 90 cm. Veuillez consulter les instructions de montage.
Entretien et nettoyage
•Avant toute opération d’entretien, mettez l’appareil à l’arrêt et débranchez la prise secteur.
•Nettoyez la partie externe de l’appareil à l’eau savonneuse. Rincez et séchez soigneusement.
•Les compartiments à lessive et à produits additifs doivent faire l’objet d’un nettoyage régulier.
•Vérifiez la pompe régulièrement, en particulier si :
–l’appareil ne vidange pas ou n’essore pas.
–l’appareil fait un bruit inhabituel pendant la vidange en raison d’un blocage de la pompe par des objets tels que des épingles de sûreté, pièces de monnaie, etc.
•Ne retirez jamais le couvercle de la pompe pendant un cycle de lavage. Attendez que l’appareil ait vidangé l’eau. Si vous avez sélectionné un programme de lavage à température élevée, attendez que l’eau ait refroidi.
•Assurez-vous que le couvercle de la pompe est bien resserré afin d’éviter toute fuite.
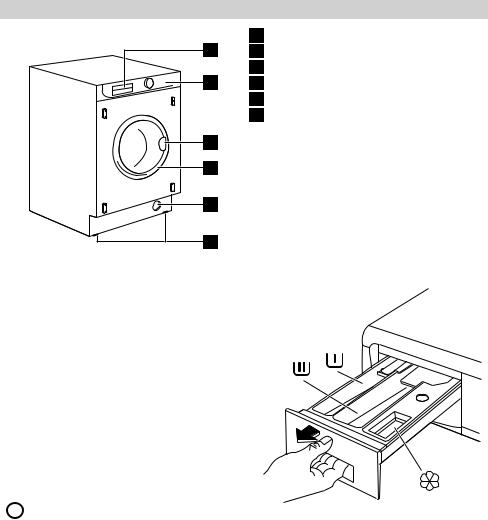
Description de l’appareil
1 Boîte à produits
12 Bandeau de commande
3 Poignée d’ouverture du hublot
2 4 Plaque signalétique
5 Pompe de vidange
6 Pieds réglables
3
4
5
6
Boîte à produits
 Compartiment destiné au produit de lavage utilisé pour le prélavage et le trempage ou pour le détachant employé au cours de la phase anti-taches (le cas échéant). La lessive de prélavage et de trempage est ajoutée au début du programme de lavage. Le détachant est ajouté pendant la phase d’action contre les taches.
 Compartiment destiné à la lessive en poudre ou liquide utilisé au cours du lavage principal. Si vous employez une lessive liquide, versez-la juste avant de démarrer le programme.
 Compartiment destiné aux additifs liquides (assouplissant, amidon).
 Respectez les doses préconisées par le fabricant du produit sans jamais dépasser le niveau « MAX » de la boîte à produits. L’assouplissant ou les additifs d’amidon doivent être versés dans le compartiment avant le départ du programme de la-
vage.

Bandeau de commande
Le bandeau de commandes est illustré ci-dessous. Il comprend : le sélecteur de programmes, les touches et les voyants. Ceux-ci sont signalés tout au long de la notice par les numéros
auxquels ils se réfèrent.
|
1 |
2 |
3 |
4 |
5 |
6 |
7 |
|||||||||||||
|
Sélecteur de programmes |
Touche Marche/Arrêt |
||||||||||||||||||
|
1 |
5 |
||||||||||||||||||
|
Touche réduction d’essorage |
Touche Départ différé |
||||||||||||||||||
|
2 |
6 |
||||||||||||||||||
|
Touche de la fonction « Tout en 1 » |
Voyants des programmes |
||||||||||||||||||
|
3 |
7 |
||||||||||||||||||
|
Touche Rinçage plus |
|||||||||||||||||||
|
4 |
|||||||||||||||||||
|
Tableau des symboles |
|||||||||||||||||||
|
= Coton |
= Marche/Arrêt — Réinitialisation |
||||||||||||||||||
|
= Éco |
= Arrêt cuve pleine |
||||||||||||||||||
|
= Lavage à l’eau froide |
= Options |
||||||||||||||||||
|
= Synthétiques |
= Prélavage |
||||||||||||||||||
|
= Repassage facile |
= Lavage rapide |
||||||||||||||||||
|
= Textiles fragiles |
= Rinçage plus |
||||||||||||||||||
|
= Laine |
= Départ différé |
||||||||||||||||||
|
= Lavage à la main |
= Lavage |
||||||||||||||||||
|
= Rinçages |
= Fin de cycle |
||||||||||||||||||
|
= Vidange |
= Marche/Arrêt |
||||||||||||||||||
|
= Essorage |
|||||||||||||||||||
|
Sélecteur de programmes |
Il vous permet de mettre l’appareil en fonctionnement et à l’arrêt, |
||||||||||||||||||
|
mais aussi de sélectionner un programme. |
|
Touche Réduction d’essora- |
En appuyant sur cette touche, vous pouvez modifier la vitesse |
|
ge |
d’essorage du programme sélectionné. |
|
• Option Arrêt cuve pleine : en choisissant cette option, l’eau du |
|
|
dernier rinçage n’est pas évacuée pour éviter que le linge ne |
|
|
se froisse. Avant d’ouvrir le hublot, vous devez vidanger l’eau. |
|
|
Pour vidanger l’eau, veuillez lire le paragraphe « Fin du pro- |
|
|
gramme ». |
|
|
Touche de la fonction « Tout |
Cette touche vous permet de sélectionner uniquement une des |
|
en 1 » : |
options. Le voyant correspondant s’allume. |
|
• Prélavage : si vous sélectionnez cette option, la machine ef- |
|
|
fectue un cycle de prélavage avant la phase de lavage prin- |
|
|
cipal. La durée de lavage sera prolongée Cette option est |
|
|
recommandée pour le linge particulièrement sale. |
|
|
• Rapide : cycle très court pour les articles peu sales, portés peu |
|
|
de temps. |
|
|
Touche Rinçage plus |
Cet appareil est conçu pour consommer peu d’eau. S’il est né- |
|
cessaire de rincer le linge avec une quantité d’eau supérieure |
|
|
(Rinçage plus), sélectionnez cette option. Le lave-linge effectue- |
|
|
ra quelques rinçages supplémentaires. Cette option est recom- |
|
|
mandée pour les personnes allergiques aux produits de lessive, |
|
|
et dans les zones où l’eau est très douce. |
|
|
Touche Marche/Arrêt |
Cette touche permet de démarrer ou d’interrompre le program- |
|
me sélectionné. |
|
|
Touche Départ différé |
Cette touche permet de retarder le démarrage du programme |
|
de 3, 6 ou 9 heures. |
|
|
Voyants des programmes |
|
|
Lorsque vous sélectionnez un programme de lavage, les deux |
|
|
voyants 7.1 et 7.2 s’allument. |
7.1Une fois que vous avez appuyé sur la touche 5, seul le voyant de la phase en cours reste allumé.
7.2L’appareil se met en marche et le hublot est verrouillé.
Le voyant 7.3 s’allume à la fin du cycle de lavage. Le hublot
7.3pourra être ouvert au bout de quelques minutes.
Important Si le programme de vidange est sélectionné un voyant au hasard s’allume.
Première utilisation
1.Assurez-vous que les raccordements électriques et hydrauliques sont conformes aux instructions d’installation.
2.Retirez tout ce qui se trouve dans le tambour.
3.Versez 2 litres d’eau dans le compartiment
de lavage principal  de la boîte à produits afin d’activer l’éco clapet. Sélectionnez un cycle coton à la température maximale, sans placer de linge dans l’appareil, afin d’éliminer du tambour et de la cuve les résidus de fabrication.
![]()
Versez 1/2 mesure de lessive dans le compartiment de lavage principal, puis mettez l’appareil en fonctionnement.
Utilisation quotidienne
Ouvrez la porte.
Ouvrez le hublot en tirant avec précaution vers l’extérieur à l’aide de la poignée.
Chargement du linge
Placez les articles un à un dans le tambour, en les dépliant le plus possible.
Poussez fermement sur le cadre du hublot afin de le fermer.
Dosez la lessive et l’assouplissant.
|
1 |
Versez |
le |
la lessive |
||
|
dans |
comparti- |
||||
|
ment de lavage prin- |
|||||
|
cipal |
ou dans le |
||||
|
compartiment requis |
|||||
|
par l’option/le pro- |
|||||
|
gramme |
sélectionné |
||||
|
(pour plus d’informa- |
|||||
|
tions, |
reportez-vous |
||||
|
à « Boîte à pro- |
|||||
|
duits »). |
|||||
|
Pour verser la quan- |
tité adéquate de lessive, reportez-vous à « Degrés de dureté de l’eau ».
|
2 |
Versez |
l’assouplis- |
|
sant dans le compar- |
||
|
timent |
(sans dé- |
|
|
passer |
le niveau |
|
|
« MAX » de la boîte |
||
|
à produits). |
Fermez doucement la boîte à produits.
Sélectionnez le programme souhaité en tournant le sélecteur sur (1).
L’appareil est mis en fonctionnement. Le voyant de la touche 5 clignote.
À la fin du programme, le sélecteur doit être tourné sur O , pour mettre l’appareil à l’arrêt.
 Pour la description de chaque cycle de lavage, la compatibilité entre les programmes de lavage et les options, consultez le
chapitre « Programmes de lavage ».
 Attention Si vous tournez le sélecteur de programmes sur un autre programme pendant le fonctionnement, le voyant rouge de la touche 5 clignote 3 fois pour signaler une
erreur de sélection. L’appareil n’effectuera pas le nouveau programme sélectionné.
Réduisez la vitesse d’essorage en appuyant sur la touche 2.
Une fois que vous avez sélectionné le programme souhaité, l’appareil propose automatiquement la vitesse d’essorage maximum autorisée pour ce programme.
Appuyez sur la touche 2 par pressions successives si vous souhaitez modifier la vitesse d’essorage. Le voyant correspondant s’allume.

Sélectionnez les options disponibles en appuyant sur les touches 2, 3 et 4.
Selon le programme, différentes fonctions peuvent être combinées. Ces dernières doivent être sélectionnées après le choix du programme et avant le démarrage du programme.
Si vous appuyez sur ces touches, les voyants correspondants s’allument. Si vous appuyez à nouveau, les voyants s’éteignent. Lorsqu’une option non compatible est sélectionnée, le voyant rouge de la touche 5 clignote 3 fois.
 Pour plus d’informations sur la compatibilité des programmes de lavage et des options, consultez le chapitre « Programmes
de lavage ».
Sélectionnez l’option Départ différé en appuyant sur la touche 6.
Avant de lancer le programme, si vous souhaitez en différer le départ, appuyez à plusieurs reprises sur la touche 6 pour sélectionner le délai souhaité. Le voyant correspondant s’allume.
Vous devez sélectionner cette option après avoir choisi le programme et avant de le lancer.
Vous pouvez modifier ou annuler le départ différé à tout moment, avant d’appuyer sur la touche 5.
Sélection du départ différé :
1.Sélectionnez le programme et les options requises.
2.Sélectionnez le départ différé en appuyant sur la touche 6.
3.Appuyez sur la touche 5 :
–l’appareil commence son décompte.
–Le programme démarre à l’expiration du départ différé sélectionné.
Annulation du départ différé après le démarrage du programme :
1.Mettez l’appareil de lavage en PAUSE en appuyant sur la touche 5.
2.Appuyez une fois sur la touche 6, le voyant correspondant au délai sélectionné s’éteint.
3.Appuyez de nouveau sur la touche 5 pour lancer le programme.
Le départ différé ne peut pas être sélectionné avec le programme de VIDANGE.
Important Le délai sélectionné ne peut être modifié qu’après avoir sélectionné de nouveau le programme de lavage.
Le hublot sera verrouillé jusqu’au moment du départ différé. Si vous devez ouvrir le hublot, réglez d’abord l’appareil sur PAUSE (en appuyant sur la touche 5), puis attendez quelques minutes. Lorsque vous avez fermé le hublot, appuyez de nouveau sur la touche 5.
Démarrage du programme au moyen de la touche 5
Pour lancer le programme sélectionné, appuyez sur la touche 5, le voyant vert correspondant cesse de clignoter. Le voyant correspondant à la phase en cours s’allume. L’appareil se met en marche et le hublot est verrouillé.
Pour interrompre un programme en cours, appuyez sur la touche 5 : le voyant vert correspondant clignote.
Pour faire repartir le programme là où il a été interrompu, appuyez de nouveau sur la touche 5. Si vous avez sélectionné un départ différé, l’appareil commence son décompte.
Lorsqu’une option non compatible est sélectionnée, le voyant rouge de la touche 5 clignote 3 fois.
Modification d’une option ou d’un programme en cours
Il est possible de modifier des options d’un programme en cours avant qu’elles ne soient exécutées.
Avant d’effectuer un changement, vous devez mettre l’appareil en PAUSE en appuyant sur la touche 5.
Si le programme est en cours, il n’est possible de le modifier qu’en le réinitialisant. Mettez le sélecteur de programme sur O , puis sur la position du nouveau programme. Lancez le nouveau programme en appuyant de nouveau sur la touche 5. L’eau reste dans la cuve.
Interruption d’un programme
Appuyez sur la touche 5 pour interrompre le programme en cours, le voyant vert correspondant clignote.

Appuyez de nouveau sur la même touche pour redémarrer le programme.
Annulation d’un programme
Mettez le sélecteur sur O pour annuler un programme en cours.
Vous pouvez à présent sélectionner un nouveau programme.
Ouverture du hublot
Une fois le programme de lavage lancé, le hublot est verrouillé. Si, pour une raison quelconque, vous devez ouvrir le hublot, réglez d’abord l’appareil sur PAUSE en appuyant sur la touche 5. Après quelques quelques minutes vous pourrez ouvrir le hublot.
Si le hublot demeure verrouillé, cela signifie que l’appareil chauffe déjà ou que le niveau d’eau est trop élevé. Quoiqu’il en soit, n’essayez pas de forcer le hublot !
Si vous ne parvenez pas à ouvrir le hublot mais que cela est absolument nécessaire, mettez l’appareil à l’arrêt en tournant le sélecteur sur O . Au bout de quelques minutes, le hublot pourra être ouvert (attention au niveau et à la température de l’eau !).
Après avoir refermé le hublot, vous devrez sélectionner de nouveau le programme et les options et appuyer sur la touche 5.
À la fin du programme
L’appareil se met à l’arrêt automatiquement. Le voyant de la touche 5 et le voyant correspondant à la phase de lavage venant de se terminer, s’éteignent. Le voyant 7.3 s’allume. Le hublot pourra être ouvert au bout de quelques minutes.
Conseils utiles
Tri du linge
Suivez les symboles pour l’entretien des textiles se trouvant sur l’étiquette dont chaque article est muni et les instructions de lavage du fabricant. Nous vous conseillons de trier le linge d’un côté, le linge résistant pouvant supporter un lavage et un repassage énergétiques, de l’autre, le linge délicat qu’il convient de traiter avec précaution.
Si vous avez sélectionné un programme ou une option qui se termine avec de l’eau restant dans la cuve, le voyant 7.3 s’allume, mais le hublot reste verrouillé pour signaler que l’eau doit être vidangée avant d’ouvrir ce dernier. Suivez les instructions ci-dessous pour vidanger l’eau :
1.Tournez le sélecteur de programme sur O .
2.Sélectionnez le programme de vidange ou d’essorage.
3.Réduisez la vitesse d’essorage, au besoin, en appuyant sur la touche 2.
4.Appuyez sur la touche 5.
À la fin du programme, le hublot peut être ouvert. Tournez le sélecteur de programme sur O pour mettre l’appareil à l’arrêt.
Sortez le linge et vérifiez que le tambour est vide. Si vous ne désirez pas faire une autre lessive, fermez le robinet d’arrivée d’eau. Laissez le hublot ouvert pour éviter la formation de moisissures et l’apparition de mauvaises odeurs.
 Mode veille : une fois le programme terminé, le système d’économie d’énergie s’active et les voyants s’allument. Appuyez sur n’importe quelle touche pour sortir l’appareil
du mode d’économie d’énergie.
Traitement des taches
Les taches résistantes ne s’éliminent pas toujours avec de l’eau et de la lessive. Il est donc conseillé de les traiter avant le lavage.
Sang : traitez les taches fraîches avec de l’eau froide. Pour les taches sèches, laissez tremper toute la nuit dans de l’eau mélangée à un détachant, puis frottez dans l’eau savonneuse.
-
Инструкции по эксплуатации
1

Ikea РЕНЛИГ инструкция по эксплуатации
(36 страниц)
- Языки:Русский
-
Тип:
PDF -
Размер:
571.35 KB -
Описание:
Встраиваемая стиральная машина
Просмотр
На NoDevice можно скачать инструкцию по эксплуатации для Ikea РЕНЛИГ. Руководство пользователя необходимо для ознакомления с правилами установки и эксплуатации Ikea РЕНЛИГ. Инструкции по использованию помогут правильно настроить Ikea РЕНЛИГ, исправить ошибки и выявить неполадки.
Need a manual for your IKEA RENLIG IWM60 Washing Machine? Below you can view and download the PDF manual for free. There are also frequently asked questions, a product rating and feedback from users to enable you to optimally use your product. If this is not the manual you want, please contact us.
Is your product defective and the manual offers no solution? Go to a Repair Café for free repair services.
Frequently Asked Questions
Our support team searches for useful product information and answers to frequently asked questions. If you find an inaccuracy in our frequently asked questions, please let us know by using our contact form.
My washing machine won’t start when I press the start-button, what can I do? Verified
In many cases the door of the washing machine hasn’t closed properly. Open and close the door and try again.
This was helpful (21423)
My washing machine won’t drain, what can I do? Verified
The main reason a washing machine won’t drain is because of blockage in either the pump or the drain hose. If your washing machine has access to these parts, try to remove any blockage. If this does not solve the problem or if you don’t have access to these parts you should contact a mechanic or the manufacturer.
This was helpful (21377)
What is the best way to disassemble my IKEA product? Verified
IKEA states that the best way to disassemble their products is to follow the instructions backwards.
This was helpful (17194)
There is a screw/plug/nail missing from my IKEA product. Where can I get a replacement? Verified
Every IKEA has a section where you can take free screws, plugs and other fixings.
This was helpful (8385)
There is no water coming into my washing machine, what can I do? Verified
Check if the water inlet is open and if there aren’t any kinks in the hose of the water inlet. If this doesn’t solve the problem you should contact the manufacturer.
This was helpful (8282)
The door of my washing machine won’t open, what can I do? Verified
There can be several causes. The most common cause is the filter being clogged. Unplug the appliance and check the filter. Remove any blockage if necessary. The location of the filter is different depening on the model. It is also possible that there is a special lever to open the door. If these options don’t help, the last option is unplug the appliance for a period of 30-60 minutes and try to open the door after that. If this doesn’t work, contact the manufacturer or a mechanic.
This was helpful (6627)
My washing machine makes a lot of noice and/or vibrates loudly, what can I do about that? Verified
It’s possible that the washing machine has not been leveled. You can do this by adjusting the feet to make it perfectly level. The problem can also be caused by inserting to much clothes in the machine. If these are not the cause of your problem you should contact the manufacturer.
This was helpful (6004)
In which compartment should the detergent go? Verified
Most washing machines have 3 compartments for detergent. These compartments are often marked with I, II and * to show where the detergent goes. Compartment I is used for a pre-wash cycle, II is for the main wash cycle and * is for fabric softener. Compartment II is used most often.
This was helpful (3913)
My washing machine smells, what can I do about it? Verified
There are washing machines with self-cleaning features. If these features are not available it’s possible to add 100ml of white vinegar or 100gr of soda crystals and have the washing machine run a 90 ℃ program.
This was helpful (3160)
Can I connect my washing machine to a warm water outlet? Verified
Although washing machines can probably handle water intake up to 65°C, this is not recommended by most manufacturers. There are wash cycles that specifically make use of cold water. In those cases warm water can harm the results of your wash cycle. Also, many washing machines are designed to be connected to a cold water outlet.
This was helpful (2729)
I want to remove a wooden dowel from my IKEA product, but I can’t get it out. What should I do? Verified
It’s best to use a pair of pliers and use light pressure to remove the dowel. Don’t squeeze too hard, or else the dowel will lose its grip.
This was helpful (1353)
What should I pay attention to when moving a washing machine? Verified
When moving a washing machine, you should secure the drum. You can use the transit bolt which come with every washing machine and will prevent the drum from moving around inside the machine. You also need to drain all the water.
This was helpful (1264)
Can I stack my dryer and washing machine? Verified
In general it is possible to directly stack a dryer and washing machine directly on top of each other. This only works with front loading models. However, it is advisable to use a fitting accessory to do so. This will prevent the machines from vibrating and falling off and also prevents damage to the bottom machine.
This was helpful (1006)
What is the difference in usage between a washer-dryer and a separate washing machine and dryer? Verified
The biggest advantage of a washer-dryer is that it takes less space. However, a separate dryer will be able to dry more than a washer-dryer. A washer-dryer also uses relatively more energy and requires more time.
This was helpful (979)
Can I connect a washing machine to an extension cord? Verified
Appliances that require large amounts of power, like a washing machine, can not be connected to all extension cords. See what the power usage of the washing machine is, which is indicated in Watt, and check if the extension cord can handle this. There are extension cords with thicker cables that are made to handle larger appliances.
This was helpful (976)