Whirlpool is a registered trademark of Whirlpool USA
5019 301 20052/A
Переклю
чатель
программ
Программа
Этикетки
по уходу
Тип стирки/Примечания
Макс.
загрузка
Моющие средства
и добавки
Дополнительные функции
Переклю
чатель
скорости
отжима
об/мин
Переклю
чатель
темпе
ратуры
°C
Пред
вари
тельная
стирка
Основная
стирка
Умяг
читель
тканей
Поло
вина
загрузки
Интен
сивное
поло
скание
За
держка
поло
скания
Без
отжима
кг
1
Хлопок с
предварительной
стиркой
Сильнозагрязненные, прочные и стойкие к температуре
хлопчатобумажные ткани и льняное полотно (постельное белье,
столовое белье, нижнее белье, рубашки и т.д.).
5,0
да
да
E
E
E
—
E
1
Макс. 90°
2
Хлопок
Постельное, столовое и нижнее белье, полотенца, рубашки и проч.
обычной степени загрязнения из хлопка и льна.
5,0
—
да
E
E
E
—
E
1
Макс. 90°
3
Цветной хлопок
Прочные и стойкие к температуре ткани из хлопка и льна средней и
сильной степени загрязнения.
5,0
—
да
E
E
E
—
E
1
Макс. 60°
4
Быстрая стирка
Постельное, столовое и нижнее белье, полотенца, рубашки и проч.
легкой степени загрязнения из хлопка и льна.
5,0
—
да
E
E
—
—
E
1
Макс. 40°
B
Специальное
полоскание для
стирки хлопка
—
Программа для обработки белья крахмалом или умягчителем.
Завершается длительным циклом отжима.
5,0
—
—
E
—
—
—
E
1
—
C
Слив + отжим
—
Слив с окончательным отжимом. Альтернативный способ
завершения стирки с тем, чтобы вынуть белье раньше.
5,0
—
—
—
—
—
—
E
1
—
5
Синтетика с
предварительной
стиркой
Сильнозагрязненные рубашки, блузки, халаты и т.п. из полиэстера
(диолен, тревира), полиамида (перлон, нейлон) или смешанных с
хлопком тканей.
2,5
да
да
E
E
—
E
E
2
Макс. 60°
6
Синтетика
Блузки, рубашки, халаты и проч. легкой и обычной степени
загрязнения из полиэстера (диолен, тревира), полиамида (перлон,
нейлон) или смешанных с хлопком тканей.
2,5
—
да
E
E
—
E
E
2
Макс. 60°
A
Полоскание
—
Программа полоскания, завершающаяся циклом отжима.
2,5
—
—
E
—
—
E
E
2
—
B
Специальное
полоскание для
стирки синтетики
—
Программа для обработки белья крахмалом или умягчителем.
Завершается длительным циклом отжима.
2,5
—
—
E
—
—
E
E
2
—
D
Слив + отжим
—
Слив с окончательным отжимом. Альтернативный способ
завершения программ стирки синтетических, деликатных и
шерстяных тканей с тем, чтобы вынуть белье раньше.
2,5
—
—
—
—
—
—
E
2
—
7
Шерсть
Только шерстяные вещи, допускающие машинную стирку и
имеющие этикетку о наличии чистой новой шерсти.
При выборе функции “Задержка полоскания” не оставляйте вещи
замоченными надолго.
1,0
—
да
E
—
—
E
E
2
Макс. 40°
D
Слив + отжим
для шерсти
—
Слив с окончательным отжимом. Альтернативный способ
завершения программ стирки синтетических, деликатных и
шерстяных тканей с тем, чтобы вынуть белье раньше.
1,0
—
—
—
—
—
—
E
2
—
A. Индикатор “On/Off” (Вкл/Выкл)
B. Кнопка “On/Off” (Вкл/Выкл)
E
: функция / да : добавьте моющее средство
1
В этой программе для улучшения обработки
вещей скорость вращения барабана (скорость
отжима) не превышает 800 об/мин.
2
В этой программе для улучшения обработки
вещей скорость вращения барабана (скорость
отжима) не превышает минимального
значения (Min об/мин).
AWG 860
RUS
A
B
3ru20052a.fm5 Page 1 Saturday, June 29, 2002 2:34 PM
Black Process Plate
CONTENTS
BEFORE USING THE WASHING MACHINE
FIRST WASH CYCLE
PRECAUTIONS AND GENERAL RECOMMENDATIONS
DESCRIPTION OF THE WASHING MACHINE
CHILD SAFETY
PREPARATION OF THE WASHING
DETERGENT AND ADDITIVES
WASHING PROGRAMME
REMOVING THE FILTER
DRAINING RESIDUAL WATER
CARE AND MAINTENANCE
TROUBLESHOOTING GUIDE
AFTER-SALES SERVICE
TRANSPORT / HANDLING
INSTALLATION
ELECTRICAL CONNECTION
Downloaded From WashingMachine-Manual.com Manuals
100
BEFORE USING THE WASHING MACHINE
1.Removing the packaging and inspection
After unpacking, make sure that the washing machine is undamaged. If in doubt, do not use the washing machine. Contact After-Sales
Service or your local retailer.
Keep the packaging materials (plastic bags, polystyrene parts, etc.) out of reach of children, as they are potentially dangerous.
2.Remove the transit bolts
The appliance is fitted with transit bolts to prevent internal damage during transport.
Before using the washing machine, you must remove the transit bolts (see Installation/
Remove the transit bolts).
3.Install the washing machine
Move the machine without carrying it by the worktop.
Install the appliance on a solid and level floor surface, preferably in a corner of the room.
Make sure that all four feet are stable and resting on the floor and then check that the appliance is perfectly level using a spirit level (see
Installation/Adjust the feet).
4.Water supply
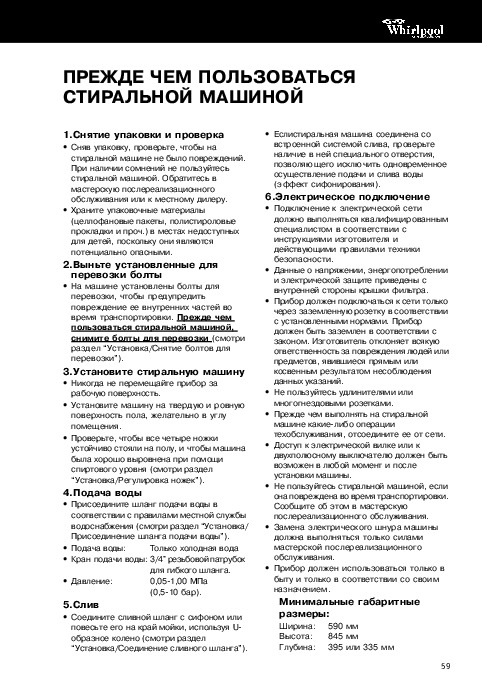
Connect the water supply inlet hose in accordance with the regulations of your local water company (see Installation/Connect the water inlet hose).
Water supply:
Tap:
Pressure:
Cold water only
3/4 threaded hose connector.
0.05-1.00 MPa
(0.5-10 bar).
5.Drain
Connect the drain hose to the siphon or hook it over the edge of a sink with the U bend
(see Installation/Connect the water drain hose).
If the washing machine is connected to a built-in drainage system, ensure the latter is equipped with a vent to avoid simultaneous loading and draining of water (siphoning effect).
6.Electrical connection
Electrical connections must be carried out by a qualified technician in compliance with the manufacturers instructions and current standard safety regulations.
Voltage information, power consumption and electrical protection data are supplied on the inside of the filter cover.
The appliance must be connected exclusively by means of a socket with an earth connection in accordance with current regulations. The appliance must be earthed by law. The manufacturer declines all liability for damage to persons or property deriving directly or indirectly from failure to observe the directions.
Do not use extension leads or multi sockets.
Before any maintenance on the washing machine disconnect it from the mains supply.
After installation, access to the mains plug or disconnection from the mains supply must be ensured at all times via a double-pole switch.
Do not operate the washing machine if it has been damaged during transport. Inform the
After-Sales Service.
Mains cable replacement is only to be carried out by After-Sales Service.
The appliance must only be used in the household for the prescribed uses.
Minimum housing dimensions:
Width:
Height:
Depth:
590 mm
845 mm
395 or 335 mm
Downloaded From WashingMachine-Manual.com Manuals
101
FIRST WASH CYCLE
This initial cycle without laundry serves to eliminate any water remaining after your appliance was tested at the factory.
1.Open the tap.
2.Close the door.
3.Pour a small amount of detergent (about 30 ml)
4.Select a short programme (see programme chart).
5.Press On/Off button .
into the detergent dispenser.
PRECAUTIONS AND GENERAL RECOMMENDATIONS
1.Packing
The packing material is recyclable as indicated by the recycling symbol . Adhere to local regulations when disposing of packaging material.
2.Energy saving tips
Achieve the best use of energy, water, detergent and time by using the recommended maximum load size.
Do not exceed manufacturers recommended dosages as shown on the detergent package.
The Eco Flap — a special system in the outlet — will prevent detergent loss from the drum to avoid detergent loss into the environment.
Use Prewash for heavily soiled laundry only!
Save detergent, time, water and energy consumption by not selecting Prewash for slight to normally soiled laundry. You save on water, energy and time as a result.
Pretreat stains with stain remover or soak dried in stains in water before washing to reduce the necessity of a hot wash program.
Save energy by using a 60° C instead of a 90° C wash programme or a 40° C instead of a 60° C wash programme.
Save energy and time by selecting a high spin speed to reduce the water content in laundry before using a drying programme (for machines with adjustable spin speed).
3.Disposing of packaging and old appliances
The washing machine is built from reusable materials. Dispose of the appliance in conformity with environmental regulations.
Before scrapping, cut off the power cable so that the washing machine cannot be connected to the mains.
Remove detergent from compartment if you intend scrapping your appliance.
Downloaded From WashingMachine-Manual.com Manuals
102
4.Child safety
Children must not be allowed to play with the washing machine.
5.General recommendations
When the appliance is not in use unplug it and turn off the tap.
Before cleaning or carrying out maintenance switch off the washing machine and disconnect it from the mains supply.
To clean the outside of the washing machine, use a neutral detergent and a damp cloth.
Do not use abrasive detergents.
Do not attempt to force the door open.
If necessary, the power cable may be replaced with an identical one obtained from our After-
Sales Service. The power cable must only be replaced by a qualified technician.
6.EC Declaration of Conformity
This washing machine has been designed, constructed and distributed in compliance with the safety requirements of EC Directives:
73/23/EEC Low Voltage Directive
89/336/EEC Electromagnetic Compatibility
Directive
93/68/EEC CE Marking Directive .
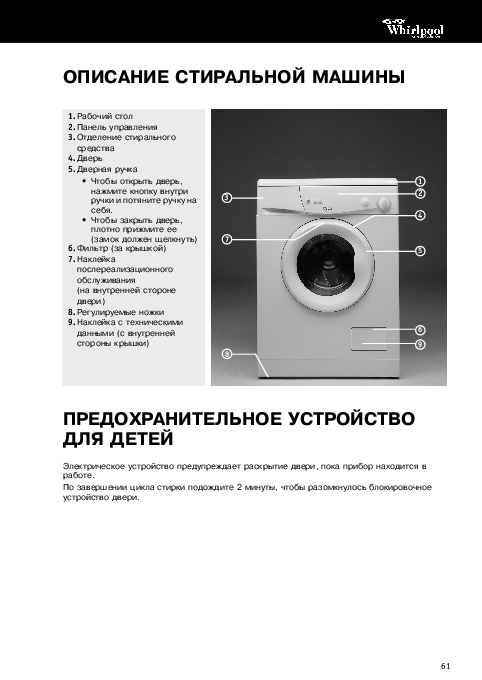
DESCRIPTION OF THE WASHING MACHINE
1.Worktop
2.Control panel
3.Detergent dispenser
4.Door
5.Door handle
To open the door press the button inside the handle and pull.
Close the door by pushing it firmly (the lock will click into place)
6.Filter (behind cover)
7.After-Sales Service sticker
(inside door)
8.Adjustable feet
9.Technical specifications sticker
(inside cover)
3
7
1
2
4
5
6
9
8
CHILD SAFETY
An electrical device prevents the door from opening while the appliance is in operation.
When the washing cycle ends, wait 2 minutes for the door to unlock.
Downloaded From WashingMachine-Manual.com Manuals
103
PREPARATION OF THE WASHING
Sort the laundry
1.Sort the laundry according to
Type of fabric / care label symbol
Cottons, mixed fibres, easy care/synthetics, wool, handwashed items.
Colour
Separate whites and coloured items. Wash new coloured articles separately.
Size
Wash items of different sizes in the same load to improve washing efficiency and distribution in the drum.
Fabric delicacy
Wash delicate articles separately: Use a special programme for Pure New Wool , curtains and other delicates. Always remove curtain glides or wash curtains with the glides inside a cotton bag.
Use the special programme for handwash fabrics.
Wash small articles (e.g. nylon stockings, belts etc.) and articles with hooks (e.g. bras) in special cotton bags for washing machines or in zipped pillow cases.
2.Empty pockets
Coins, safety pins and similar items can damage your laundry and the appliance drum and tub.
3.Fasteners
Close zips and fasten buttons or hooks; loose belts or ribbons should be tied together.
Stain removal
Blood, milk, egg and other organic substances are generally removed by the enzyme phase of the programme.
To remove red wine, coffee, tea, grass and fruit stains etc. add a stain removing agent in detergent dispenser compartment or chlorine bleach in
(depending on model).
Particularly stubborn stains can be treated with stain remover before the wash.
Dyeing and Bleaching
Commercially available products usually consist of a dye colour, fixing agent and salt. Pour the dye colour, the fixing agent and then the salt directly into the empty drum. Fill in the laundry only afterwards.
Use exclusively dyes and bleaches recommended for washing machines.
Follow the Manufacturers instructions.
Plastic and rubber components of the machine can be stained by dyes.
Loading the laundry
1.Open the door.
2.Load the articles one at a time loosely into the drum, without overfilling. Follow loads recommended in the programme chart.
Overloading will result in unsatisfactory washing results and creased laundry.
3.Close the door.
DETERGENT AND ADDITIVES
Choice of detergent and additives
The type of detergent depends on:
type of fabric (cottons, easy care/synthetics, delicate items, wool).
Note: use only specific detergents for wool.
colour;
wash temperature;
degree and type of soiling.
Notes:
Whitish residues on dark fabrics are caused by insoluble detergent components used in modern phosphate-free powder detergents.
If this occurs, shake or brush out the fabric or use liquid detergents.
Keep detergents and additives in a dry place and out of reach of children.
Use only detergents and additives specifically produced for domestic washing machines.
If you use descaling agents, dyes or bleaches, make sure they are suitable for washing machine use. Descaler could contain components that can attack parts of your washing machine.
Do not use solvents in the machine
(e.g. turpentine, benzine, etc.).
Do not machine wash fabrics that have been treated with solvents or flammable liquids.
Dosage
Follow the instructions on the detergent pack in relation to:
the degree and type of soiling;
the size of the load;
full load: follow the detergent manufacturers instructions;
half load: 3/4 of the normal amount;
minimum load (about 1 kg): 1/2 the amount used for full load;
Downloaded From WashingMachine-Manual.com Manuals
104
water hardness in your area (ask for information from your water company). soft water requires less detergent than hard water.
Notes:
Overdosing the detergent results in excessive foaming and reduces the wash efficiency. If the appliance detects excessive foam it may prevent spinning.
Using insufficient detergent results in grey laundry and increased scale deposits on the drum, tub and heating element.
You can use liquid detergent in the Prewash phase for programmes with this option. In this case put only powder detergents in the compartment for the main wash .
When using concentrated fabric softeners, add water in the detergent dispenser up to the MAX level mark.
To prevent dispensing problems when using highly concentrated powder and liquid detergents, use the special detergent ball supplied with the detergent and place it inside the drum.
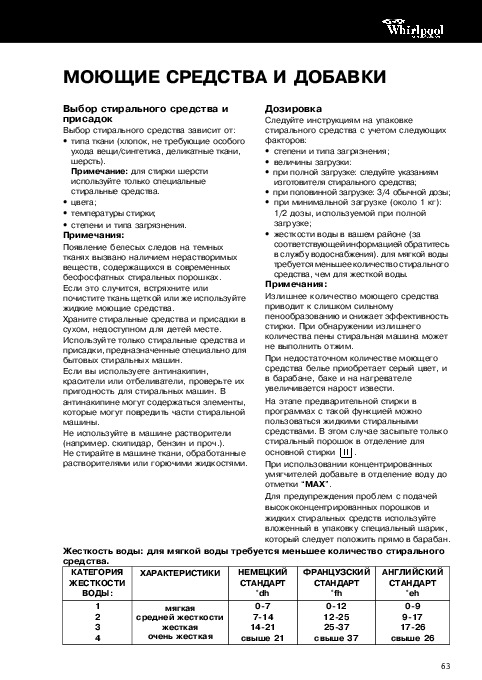
Water hardness:
soft water requires less detergent.
WATER
HARDNESS
CATEGORY:
CHARACTERISTICS GERMAN
°dh
3
4
1
2 soft average hard very hard
0-7
7-14
14-21 over 21
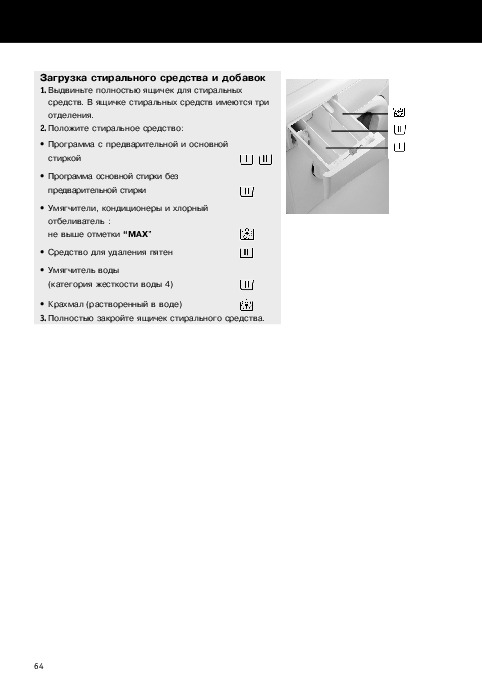
Filling the detergent and additives
1.Pull out the detergent dispenser completely, until the limit.
The dispenser has three chambers.
2.Add the detergent:
Programme with pre- and main wash
Main wash programme without prewash
Fabric softeners, conditioners and chlorine bleach: no more than to MAX mark
Stain remover
Water softener (water hardness class 4)
Starch (dissolved in water)
3.Close the detergent dispenser completely.
FRENCH
°fh
0-12
12-25
25-37 over 37
ENGLISH
°eh
0-9
9-17
17-26 over 26
Downloaded From WashingMachine-Manual.com Manuals
105
WASHING PROGRAMME
Select the programme:
1.Check that the Programme Selector is on Stop.
2.Plug in the appliance.
3.Open the tap.
4.Set the Programme Selector to the desired programme.
5.Depending on model, set the Temperature Selector knob to the desired temperature.
6.Depending on model, set the Spin Speed Selector knob to the desired spin speed.
7.Select the options desired by pressing the corresponding buttons.
By a further pressing of the button this option can be turned off again.
8.Check that the door is well closed. Press the On/Off button. The indicator lamp lights up.
Attention: During the selected washing programme the programme selector knob moves by steps clockwise. Never force it in the opposite direction.
Door lock
The door locks automatically after the programme start until the end of the programme.
If the programme selector is moved to the Stop position or if the electricity supply is interrupted, then the door is released after approximately two minutes.
In this case do not open the door: because hot water could come out of the door.
Programme end
The programme selector knob is at the stop position.
1.Press On/Off button . The indicator light turns off .
2.Cancel the special options by pressing the appropriate buttons.
3.Turn off the tap.
4.Wait for the door to unlock (about 2 minutes).
5.Open the door and unload the machine.
N.B.
Do not fully close the door but leave it ajar to allow the drum to dry out.
Changing programme
1.Press On/Off button . The indicator light turns off .
2.Select the new programme.
3.Press On/Off button . The new program will re-start.
Do not add detergent for this programme.
Programme interruption or pause
To interrupt the running programme for a certain period and continue it at a later time:
1.Press On/Off button .
2.Following the desired pause press the On/Off button again.
Downloaded From WashingMachine-Manual.com Manuals
106
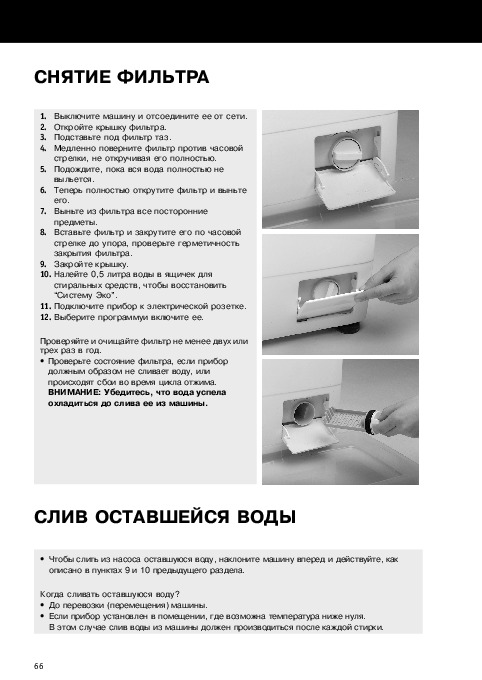
REMOVING THE FILTER
1. Stop the appliance and unplug it.
2. Open the filter cover.
3. Place a bowl beneath the filter.
4. Slowly turn the filter anticlockwise without extracting it as yet.
5. Wait until all the water has drained.
6. Now unscrew the filter completely and extract it.
7. Remove any foreign items from the foreign body trap.
8. Insert the filter and screw it in clockwise until it locks, making sure it is hermetically closed.
9. Close the cover.
10.Pour 0.5 l of water into the detergent dispenser to reactivate the Eco System.
11.Connect the appliance to the electrical outlet.
12.Select a programme and start it.
Check the filter two or three times a year and clean it if necessary.
Check the filter if the appliance is not draining correctly or if it fails to perform spin cycles.
IMPORTANT: Make sure the water has cooled before draining the appliance.
DRAINING RESIDUAL WATER
To drain the residual water from the pump, tilt the machine forwards and proceed as per points 8 and
10 of the previous chapter.
When should I drain residual water?
Before transporting (moving) the machine.
If the appliance is installed in a room subject to sub-zero temperatures.
In this case the machine should be drained after every wash.
Downloaded From WashingMachine-Manual.com Manuals
107
CARE AND MAINTENANCE
Appliance exterior and control panel
Clean using normal household cleaner (do not use abrasive products and no solvents).
Dry with a soft cloth.
Door seal
Clean with a damp cloth when necessary.
Check the condition of the door seal periodically.
Filter
Check and clean the filter two or three times a year (see Removing the Filter).
Detergent dispenser
1.Disengage the detergent dispenser by pressing the release lever in the prewash compartment and extract it .
2.Remove the siphon from the softener and bleach compartment.
3.Wash all the parts under running water.
4.Reposition the siphon and refit the detergent dispenser.
Water hose mesh strainer
Check and clean periodically.
For machines with a straight water supply hose
1.Turn off the tap.
2.Unscrew the hose from the tap.
3.Clean the internal strainer.
4.Screw the supply hose back onto the tap.
5.Unscrew the hose from the appliance.
6.Remove the filter from the washing machine with pliers and clean it.
7.Refit the filter and screw the hose connection to the appliance.
8.Turn on the tap and ensure that the connections are completely water-tight.
Downloaded From WashingMachine-Manual.com Manuals
108
TROUBLESHOOTING GUIDE
The appliance will not start, the lamp does not light up.
Check whether:
the appliance is plugged in;
the wall socket is functioning correctly
(use a table lamp or similar).
ON/OFF button pressed .
The appliance will not start, but the lamp is on.
Check whether:
the appliance door is properly closed;
a programme has been selected and the programme is started;
the water tap is turned on. If not, turn on the tap and switch the appliance off and then on again.
The appliance stops during the programme.
Check whether:
the Rinse Hold button is pressed; terminate this option by pressing the button again;
theOn/Off lamp is flashing. Press On/
Off button .
Insufficient or no water supply.
Check whether:
the tap is turned on completely;
kinks are present in water hose;
the water hose filter is clogged;
the water hose is frozen up.
Waste water not pumped out.
Check whether:
the drain hose is correctly installed
(see Installation Instructions);
the filter is clogged;
the drain hose is frozen up;
The Rinse Hold button is psressed .
Detergent and additive product residues in detergent drawer at end of wash.
Check whether:
the siphon is correctly installed and clean
(see Care and maintenance);
enough water is being supplied. The mesh filters between the inlet hose and the tap could be clogged (see Care and maintenance). Check and clean the filter two or three times a year
(see Removing the Filter).
Also see Detergent and Additives.
Machine vibrates during spin cycle.
Check whether:
Machine is perfectly horizontal with all four feet on ground (see Installation);
the transit bolts have been removed. The transit bolts must be removed before the appliance can be used (see Installation).
Final spin results are poor:
The appliance has an imbalance detection and correction system. If individual heavy articles are loaded (bathmat, bathrobe, etc.) this system may reduce the spin speed automatically to protect the appliance or even interrupt the spin cycle altogether, if the imbalance is too great even after several spin starts.
If the laundry is still too wet at the end of the cycle, add smaller articles of laundry to balance the load and repeat the spin cycle.
Excessive foam formation may also prevent spinning. Ensure correct amount of detergent is used.
Important: wait one hour and if the fault reoccurs, contact After-Sales Service, quoting the error number displayed (see After-Sales Service).
Downloaded From WashingMachine-Manual.com Manuals
109
AFTER-SALES SERVICE
Before contacting After-Sales Service:
1.Try to remedy the problem yourself
(see Troubleshooting Guide).
2.Restart the programme to check whether the problem has solved itself.
3.If the machine continues to function incorrectly, call After-Sales Service.
Specify:
The nature of the problem.
The exact model of the appliance.
The service code (number after the word
SERVICE).
The After-Sales Service sticker is on the inside of the door.
Your full address.
Your telephone number and area code.
After-Sales Service phone numbers and addresses are given on the guarantee card.
Alternatively, consult the dealer where you purchased the appliance.
TRANSPORT / HANDLING
Never move the appliance by carrying it by the worktop.
1.Unplug the appliance.
2.Turn off the tap.
3.Disconnect the inlet and drain hoses.
4.Eliminate all water from the hoses and from the appliance (see Removing the Filter, Draining residual water).
5.Fit the transit bolts (obligatory) (see Installation).
Downloaded From WashingMachine-Manual.com Manuals
110
INSTALLATION
Remove the transit bolts
1.Slacken the three or four bolts (according to model) with the spanner supplied.
2.Unscrew the bolts by hand.
3.Hold the screws together with the plastic spacers and remove them.
4.Close the holes with the plastic covers (supplied with the documents).
5.Keep the transit bolts for future use.
If the plastic spacers remain inside the machine: Open the rear panel by removing the twelve screws, remove the spacers and replace the panel.
Fit the transit bolts before transporting the appliance as follows:
1.Pry off the plastic covers with a screwdriver and remove them.
2.Insert the transit bolts, performing the steps for removal in reverse order.
Adjust the feet
If the floor is uneven, adjust the levelling feet as required
(do not insert pieces of wood, cardboard etc. under the feet):
1.Loosen the locknut using the wrench provided.
2.Adjust the height of the foot, turning it by hand.
3.Tighten the locknut anticlockwise towards the washing machine.
If the appliance is to be installed on a wooden floor, distribute the weight by placing it on a 60 x 60 (40) cm sheet of plywood at least 3 cm in thickness.
Secure the plywood sheet to the floor.
Downloaded From WashingMachine-Manual.com Manuals
111
Worktop for built-under models.
The appliance must only be installed beneath a continuous fitted kitchen worktop.
If the appliance is to be built under, it is mandatory to use the cover panel UBS. This can be obtained from specialist shops or from After-Sales Service.
1.Unplug the appliance.
2.Unscrew the worktop fixing screws from the rear of the appliance.
3.Lift the worktop slightly to free it from the housing of the top, then slide it forward to disengage it from the control panel, and remove. Install the cover panel following the relative instructions.
4.Refit the fixing screws and tighten them.
5.Plug the appliance back in.
Connect the water inlet hose
For models with straight hose:
1.Insert the dirt strainer (included in the accessories) into the threaded tap coupling and the coupling between the hose and the washing machine.
2.Carefully screw the hose connection onto the tap, preferably by hand.
3.Make sure there are no kinks in the hose.
4.Carefully screw the hose connection to the appliance inlet, preferably by hand.
5.Turn the tap on fully and check that the joints at the washing machine and the tap are watertight.
If the hose is too short, replace it with a suitable length of pressure resistant hose (1000 kPa min, EN 50084 approved type).
Check the hose regularly for brittleness and cracks and replace if necessary.
The appliance can be connected without a non-return valve.
Connect the water drain hose
1.Unhook the drain hose from the right clip.
Attention: do not unhook the left drain hose connection.
2.Connect the drain hose to the siphon or hook it over the edge of a sink by means of the U bend supplied.
3.Make sure there are no kinks in the hose.
4.Secure the hose so that it cannot fall down while the appliance is running.
Small hand basins are not suitable.
If the hose is to be inserted directly into the drain pipeline, the inside diameter of the pipe must be appropriate in relation to the diameter of the drain hose.
If you need to add an extension, use a flexible hose of the same type. Secure the unions with screw-on hose clips.
Max. drain hose length: 2.50 m
Max. drain height: 90 cm
Min.drain height: 60 cm
Downloaded From WashingMachine-Manual.com Manuals
112
ELECTRICAL CONNECTION
For Great Britain only
Warning — this appliance must be earthed
Fuse replacement
If the mains lead of this appliance is fitted with a BS
1363A 13amp fused plug, to change a fuse in this type of plug use an A.S.T.A. approved fuse to BS 1362 type and proceed as follows:
1.Remove the fuse cover (A) and fuse (B).
2.Fit replacement 13A fuse into fuse cover.
3.Refit both into plug.
Important:
The fuse cover must be refitted when changing a fuse and if the fuse cover is lost the plug must not be used until a correct replacement is fitted.
Correct replacement are identified by the colour insert or the colour embossed in words on the base of the plug.
Replacement fuse covers are available from your local electrical store.
Socket outlet / plug
If the fitted plug is not suitable for your socket outlet, please contact Whirlpool Service on 0870 600 8989 for further instruction. Please do not attempt to change plug yourself. This procedure needs to be carried out by a qualified Whirlpool technician in compliance with the manufactures instructions and current standard safety regulations.
For the Republic of Ireland only
The information given in respect of Great Britain will frequently apply, but a third type of plug and socket is also used, the
2-pin, side earth type. In this case, the wire which is coloured GREEN AND YELLOW must be connected to the
EARTH contact, and the two wires to the two pins, irrespective of colour. The supply to the socket must be fitted with a 16 amp fuse.
Downloaded From WashingMachine-Manual.com Manuals
113
-
Инструкции по эксплуатации
1

Whirlpool AWG 860 инструкция по эксплуатации
(16 страниц)
- Языки:Русский
-
Тип:
RAR -
Размер:
3.69 MB -
Описание:
Стиральная машина
Просмотр
На NoDevice можно скачать инструкцию по эксплуатации для Whirlpool AWG 860. Руководство пользователя необходимо для ознакомления с правилами установки и эксплуатации Whirlpool AWG 860. Инструкции по использованию помогут правильно настроить Whirlpool AWG 860, исправить ошибки и выявить неполадки.
Посмотреть инструкция для Whirlpool AWG 860 бесплатно. Руководство относится к категории стиральные машины, 5 человек(а) дали ему среднюю оценку 7.8. Руководство доступно на следующих языках: английский. У вас есть вопрос о Whirlpool AWG 860 или вам нужна помощь? Задайте свой вопрос здесь
Не можете найти ответ на свой вопрос в руководстве? Вы можете найти ответ на свой вопрос ниже, в разделе часто задаваемых вопросов о Whirlpool AWG 860.
При какой температуре следует стирать одежду?
Стоит ли использовать средство для удаления накипи при стирке в стиральной машине?
Как предотвратить появление неприятного запаха в стиральной машине?
Инструкция Whirlpool AWG 860 доступно в русский?
Не нашли свой вопрос? Задайте свой вопрос здесь
Перед Вами Инструкция стиральной машины Whirlpool AWG 800_AWG 853_AWG 860_AWG 870(Инструкция). Вы можете ознакомиться и скачать данное руководство по эксплуатации бесплатно.
Инструкция по применению на русском языке, предложенная производителем, позволяет
правильно использовать Вашу бытовую технику и электронику.
-
 1
1
-
2
-
3
-
4
-
5
-
6
-
7
-
8
-
9