
-
Contents
-
Table of Contents
-
Bookmarks
Quick Links
en
Suunto D4i
User’s GUide
Related Manuals for Suunto D4i
Summary of Contents for Suunto D4i
-
Page 1
Suunto D4i User’s GUide… -
Page 2: Table Of Contents
1. WELCOME TO THE WORLD OF SUUNTO DIVE COMPUTERS ….8 2. WARNINGS, CAUTIONS, AND NOTES ……….9 3. SUUNTO USER INTERFACE …………16 3.1. Navigating in the menus …………17 3.2. Button symbols and functions ……….. 18 4. GETTING STARTED …………..20 4.1.
-
Page 3
5.7. Error conditions …………..35 5.8. Wireless transmission …………36 5.8.1. Installing the wireless transmitter ………. 36 5.8.2. Pairing and code selection ……….37 5.8.3. Transmitting data …………40 5.9. DIVE mode settings ………….. 41 5.9.1. Setting the nitrox values ………… 43 5.9.2. -
Page 4
5.11.1. Recommended Safety Stops ……….55 5.11.2. Mandatory Safety Stops ……….56 5.12. Deep stops …………… 58 6. DIVING ……………… 59 6.1. Diving in the AIR mode (DIVE Air) ……….59 6.1.1. Basic dive data ………….. 60 6.1.2. Bookmark …………..61 6.1.3. -
Page 5
7.6.2. Dive history (MEM History) ……….85 7.7. Suunto DM4 with Movescount ……….86 7.8. Movescount …………… 87 8. CARE AND MAINTENANCE OF MY SUUNTO DIVING COMPUTER ..89 9. BATTERY REPLACEMENT …………94 9.1. Wireless transmitter battery replacement ……..94 9.1.1. -
Page 6
12. DISCLAIMERS …………..108 12.1. User’s responsibility …………108 12.2. CE …………….108 13. SUUNTO LIMITED WARRANTY FOR SUUNTO DIVING COMPUTERS AND SUUNTO DIVING COMPUTER ACCESSORIES ……..109 14. DISPOSAL OF THE DEVICE …………114 GLOSSARY …………….115… -
Page 7: Welcome To The World Of Suunto Dive Computers
1. WELCOME TO THE WORLD OF SUUNTO DIVE COMPUTERS Suunto D4i wristop dive computer is designed to help you get the most out of your diving. Suunto D4i simplifies your diving experience because all the information you need relating to depth, time, decompression, and additional tank pressure status is available on one easy-to-read display.
-
Page 8: Warnings, Cautions, And Notes
Before you go on to read the user’s guide itself, it is extremely important that you read the following warnings. These warnings are intended to maximize your safety while using Suunto D4i and must not be ignored. READ THIS user’s guide! Carefully read this user’s guide in its…
-
Page 9
(DCI). Therefore, Suunto strongly recommends that the device is not used for any commercial or professional diving activities. ONLY DIVERS TRAINED IN THE PROPER USE OF SCUBA… -
Page 10
SUUNTO STRONGLY RECOMMENDS THAT SPORT DIVERS WARNING LIMIT THEIR MAXIMUM DEPTH TO 40 M/130 FT OR TO THE DEPTH CALCULATED BY THE COMPUTER BASED ON THE SELECTED O % AND A MAXIMUM PO OF 1.4 BAR! Exposure to greater depths increases the risk of oxygen toxicity and decom- pression sickness. -
Page 11
Thus, any diving activity up to four days prior to initial use of the computer may cause misleading information and must be avoided. DO NOT EXPOSE THE SUUNTO OPTIONAL TANK PRESSURE WARNING TRANSMITTER TO ANY GAS MIX CONTAINING MORE THAN 40% OXYGEN! Enriched air with greater oxygen content presents a risk of fire or explosion and serious injury or death. -
Page 12
DO NOT DIVE WITH A CYLINDER OF ENRICHED AIR IF YOU WARNING HAVE NOT PERSONALLY VERIFIED ITS CONTENTS AND ENTERED THE ANALYZED VALUE INTO YOUR DIVE COM- PUTER! Failure to verify cylinder contents and enter the appropri- ate O % into your dive computer will result in incorrect dive planning information. -
Page 13
SET THE CORRECT ALTITUDE ADJUSTMENT SETTING WARNING MODE! When diving at altitudes greater than 300 m/1,000 ft, the Altitude Adjustment feature must be correctly selected in order for the computer to calculate the decompression status. The dive computer is not intended for use at altitudes greater than 3,000 m/10,000 ft. -
Page 14
It is not possible to change between AIR, NITROX and FREE NOTE modes before the instrument has counted down the no-fly time. There is one exception to this: You can change from AIR to NI- TROX mode even during the no-fly time. When planning both air and nitrox dives during the same dive series, you should set the instrument in NITROX mode and modify the gas mix accordingly. -
Page 15: Suunto User Interface
3. SUUNTO USER INTERFACE Present Depth Active Water Contact Daily Alarm Indicator Indicator Dive Alarm Indicator Diver Attention Symbol No-Fly Icon Current Time Display Mode Indicator No-Decompression Time T otal Ascent Time Safety Stop Indicator Ceiling Depth Remaining Air Time…
-
Page 16: Navigating In The Menus
3.1. Navigating in the menus Suunto D4i has four main operating modes — TIME mode (TIME), DIVE mode (DIVE), PLAN mode (PLAN), and MEMORY mode (MEM). To toggle between the main modes, press the MODE button. To select a submode in DIVE and MEM modes, press the UP/DOWN buttons.
-
Page 17: Button Symbols And Functions
3.2. Button symbols and functions The table below explains the main functions of the dive computer’s buttons. The buttons and their use is explained in more detail in the relevant sections of the user’s guide. Table 3.1. Button symbols and functions Symbol Button Press…
-
Page 18
Symbol Button Press Main functions Toggle between alternative displays DOWN Short Change submode Decrease values Change shortcuts in TIME and DIVE modes DOWN Long Enter Setting mode… -
Page 19: Getting Started
4. GETTING STARTED To get the most out of your Suunto D4i, use some time to personalize it and really make it YOUR computer. Set the correct time and date, the alarms, as well as the unit and backlight settings.
-
Page 20: Setting The Alarm
The figure below shows how to enter the TIME Settings menu. USE UP AND DOWN BUTTONS TO TOGGLE BETWEEN ALARM, TIME, DUAL TIME, DATE, UNITS, CONTRAST AND TONES. 4.1.1. Setting the alarm The dive computer has a daily alarm function. When the daily alarm activates, the screen blinks and the alarm sounds for 60 seconds.
-
Page 21: Setting The Time
4.1.2. Setting the time In the Time setting mode, you are able to set the hour, minute, and second, as well as choose between a 12 and 24 hour display. ADJUST WITH UP AND DOWN BUTTONS. ACCEPT WITH SELECT BUTTON. 4.1.3.
-
Page 22: Setting The Units
ADJUST WITH UP AND DOWN BUTTONS. ACCEPT WITH SELECT BUTTON. 4.1.5. Setting the units In the Units setting mode, you are able to choose whether the units are displayed in either the metric or imperial system (meters/feet, Celsius/Fahrenheit, and so on). ADJUST WITH UP AND DOWN BUTTONS.
-
Page 23: Setting The Contrast
ADJUST WITH UP AND DOWN BUTTONS. ACCEPT WITH SELECT BUTTON. 4.1.7. Setting the contrast In the Contrast setting mode, you are able to set the contrast of the display (the value range is between 0 and 10). ADJUST WITH UP AND DOWN BUTTONS.
-
Page 24: Stopwatch
When the tones are off, there are no audible alarms. NOTE 4.2. Stopwatch The Stopwatch function in Suunto D4i measures elapsed and split times. USE DOWN BUTTON TO START STOPWATCH AND TAKE A SPLIT TIME. THE UP BUTTON STOPS THE STOPWATCH…
-
Page 25: Ac Water Contacts
4.3. AC water contacts The water and data transfer contact is located on the side of the case. When sub- merged, the water contact poles are connected by the conductivity of the water and the “AC” symbol appears on the display. The AC text is shown until the water contact deactivates.
-
Page 26: Before Diving
It is a significant advance on the classic Haldane models, which do not predict free gas. The advantage of Suunto RGBM is additional safety through its ability to adapt to a variety of situations and dive…
-
Page 27: Emergency Ascents
In order to optimize the response to different increased risk situations, an additional category of stop, referred to as a Mandatory Safety Stop, has been introduced. The combination of stop types depends on the user settings and the specific dive situation. To get the most from the RGBM safety benefits, refer to Section 5.9.10.
-
Page 28: Nitrox
5.4. Nitrox Diving with nitrox provides you with an opportunity to increase bottom times or reduce the risk of decompression illness by reducing the nitrogen content in the gas mix. However, when the gas mix is altered, the oxygen content of the mix is generally in- creased.
-
Page 29: Audible And Visual Alarms
DCI. Therefore, FREEDIVING AFTER SCUBA DIVING IS NOT RECOMMENDED. You should avoid freediving, and not exceed 5 m/16 ft, for at least two hours after scuba diving. Suunto also recommends that you receive training in freediving WARNING techniques and physiology before conducting breath hold dives.
-
Page 30: Audible And Visual Alarm Types
Table 5.2. Instructional beep Sound pattern Interpretation Ascending Start ascending Descending Start descending The visual information on the dive computer display is shown during the alarm breaks in order to save battery. Table 5.3. Audible and visual alarm types Alarm type Alarm reason High priority alarm followed PO2 value is greater than the adjusted value.
-
Page 31
Alarm type Alarm reason High priority alarm followed Decompression ceiling depth is exceeded. You should by «Start descending» beep, immediately descend to, or below, the ceiling. repeated for the maximum of three minutes. The Er symbol blinks and an arrow points downwards. -
Page 32
Alarm type Alarm reason Low priority alarm followed by Mandatory Safety Stop is violated. You should descend «Start descending» beep, re- to complete the Safety Stop. peated for three minutes. An arrow points downwards. Low priority alarm followed by The Deep Stop depth is reached. Make the Mandatory two short beeps, sounded Deep Stop for the duration shown by the timer. -
Page 33
Alarm type Alarm reason Low priority alarm, sounded The selected depth (3–120 m / 10–394 ft) is exceeded. two times. The Maximum The fixed maximum depth (120 m / 394 ft) is exceeded. depth value blinks. You can acknowledge the alarm. Low priority alarm, sounded The selected dive time (1–999 min) is exceeded. -
Page 34: Error Conditions
WHEN THE OXYGEN LIMIT FRACTION INDICATES THAT THE WARNING MAXIMUM LIMIT IS REACHED, YOU MUST IMMEDIATELY TAKE ACTION TO REDUCE OXYGEN EXPOSURE. Failure to take action to reduce oxygen exposure after the warning is given can rapidly increase the risk of oxygen toxicity, injury, or death. 5.7.
-
Page 35: Wireless Transmission
Remove the high pressure (HP) port plug on the first stage of your regulator using an appropriate tool. Thread the high pressure transmitter of the Suunto D4i into the HP port of your regulator with your fingers. DO NOT OVERTIGHTEN! Maximum torque is 6 Nm/4.4…
-
Page 36: Pairing And Code Selection
O-ring and sealing surfaces. 5.8.2. Pairing and code selection In order to receive wireless data, the transmitter and the Suunto D4i need to be paired. During the pairing procedure, the dive computer locks on the code that the transmitter has.
-
Page 37
Ensure that the Suunto D4i is turned on, and that the wireless integration is en- abled in the Suunto D4i settings (Tank Press is set ON. For more information, refer to Section 5.9.3. Setting the tank pressure pairing). If the Suunto D4i is in the TIME mode, enter the DIVE mode by short-pressing the MODE button. -
Page 38
To re-pair the transmitter with the new code and the Suunto D4i dive computer: In the DIVE mode of the Suunto D4i, long-press the DOWN button to enter the DIVE settings. Enter the Tank Press Pairing menu (Refer to Section 5.9.3. Setting the tank pressure pairing). -
Page 39: Transmitting Data
After the pairing procedure, the Suunto D4i will receive cylinder pressure data from the transmitter. The pressure is displayed in either bars or psi, depending on the unit selected. Any time the Suunto D4i receives an appropriate signal, a flash symbol is displayed in the lower left corner.
-
Page 40: Dive Mode Settings
5.9. DIVE mode settings Suunto D4i has several user-definable functions, as well as depth and time-related alarms that you can set according to your personal preferences. The DIVE mode settings are dependent on the dive submode chosen (AIR, NITROX, FREE), so that, for example, nitrox settings are only available in the NITROX submode.
-
Page 41
Setting AIR mode NITROX mode FREE mode Depth notify alarm Dive time alarm Surf time notify alarm Sample rate Deep stop Units The figure below shows how to enter the DIVE mode settings menu. USE UP AND DOWN BUTTONS TO TOGGLE BETWEEN DIVE SETTINGS. -
Page 42: Setting The Nitrox Values
Some settings cannot be changed until five (5) minutes has NOTE elapsed after the dive. 5.9.1. Setting the nitrox values If set to the NITROX mode, the correct oxygen percentage of the gas in your cylinder must always be entered into the computer to ensure correct nitrogen and oxygen calculations.
-
Page 43: Setting The Personal/Altitude Adjustments
5.9.2. Setting the personal/altitude adjustments The current Altitude and Personal Adjustment settings are displayed in the startup screen when entering the DIVE mode. If the mode does not match the altitude or personal conditions (refer to Section 5.10.4. Diving at altitude and Section 5.10.5. Personal adjustments), it is imperative that you enter the correct selection before diving.
-
Page 44: Setting The Tank Pressure Alarm
ADJUST WITH UP AND DOWN BUTTONS. ACCEPT WITH SELECT BUTTON. 5.9.4. Setting the tank pressure alarm The tank pressure alarm can be set «ON» or «OFF» and in the range of 10–200 bar. The alarm is the secondary cylinder pressure alarm point. The alarm is activated when the tank pressure drops below the set limit.
-
Page 45: Setting The Depth Notify Alarm (Free Mode)
ADJUST WITH UP AND DOWN BUTTONS. ACCEPT WITH SELECT BUTTON. 5.9.6. Setting the depth notify alarm (FREE mode) You can set the Depth Notify Alarm setting to indicate a certain depth, for example, start of free falling or mouth filling in freediving. ADJUST WITH UP AND DOWN BUTTONS.
-
Page 46: Setting The Surface Time Notify Alarm (Free Mode)
5.9.8. Setting the surface time notify alarm (FREE mode) You can set the Surface Time Notify Alarm to indicate the length of the surface time before a new dive. Suunto D4i starts counting the time automatically when you surface (at 0.5 m/1,6 ft).
-
Page 47: Setting The Deep Stops
You can set the dive profile sample rate in free dive to 1, 2 or 5 seconds. The sample rate for nitrox and air dives is 10, 20, 30 and 60 seconds. ADJUST WITH UP AND DOWN BUTTONS. ACCEPT WITH SELECT BUTTON. 5.9.10.
-
Page 48: Activation And Pre-Checks
5.10.1. Accessing DIVE mode The Suunto D4i has three diving modes: AIR mode for diving with standard air only, NITROX mode for diving with oxygen enriched mixtures, and FREE mode for freediving.
-
Page 49: Dive Mode Activation
(MOD, 66.2 m), O2% (21%) and PO2 (1.6) value. A few seconds later the battery power indicator is shown. WARNING SUUNTO STRONGLY RECOMMENDS THAT SPORT DIVERS LIMIT THEIR MAXIMUM DEPTH TO 40 M/130 FT! Exposure to greater depths increases the risk of oxygen toxicity and decom- pression sickness.
-
Page 50: Battery Power Indication
the battery level is ok • the altitude, personal adjustment, Deep stops settings are correct • the instrument displays correct units of measurement (Metric/Imperial) • the instrument displays the correct temperature and depth (0.0 m/0 ft) • the alarm beeps •…
-
Page 51: Diving At Altitude
If the battery symbol is displayed in the Surface mode, or if the display is faded or weak, the battery may be too low to operate the dive computer, and battery replacement is recommended. For safety reasons, the backlight cannot be activated when the NOTE low battery warning is indicated by the battery symbol.
-
Page 52: Personal Adjustments
Table 5.6. Altitude Adjustment settings Alt. adjustment value Altitude range 0–300 m / 0–1000 ft 300–1500 m / 1000–5000 ft 1500–3000 m / 5000–10 000 ft Section 5.9.2. Setting the personal/altitude adjustments describes NOTE how the Altitude value is set. Traveling to a higher elevation can temporarily cause a change WARNING in the equilibrium of dissolved nitrogen in the body.
-
Page 53
cold exposure —water temperature less than 20 °C/68 °F • below average physical fitness level • fatigue • dehydration • previous history of DCI • stress • obesity • patent foramen ovale (PFO) • exercise on or after dive • This feature is used to adjust the computer to be more conservative, according to personal preference, by entering the suitable Personal Adjustment setting with the help of Table 5.7, Personal Adjustment settings. -
Page 54: Safety Stops
The reasons for performing a Safety Stop in- clude: reducing sub-clinical DCI, microbubble reduction, ascent control, and orientation before surfacing. The Suunto D4i displays two different types of Safety Stops: Recommended Safety Stop and Mandatory Safety Stop. 5.11.1. Recommended Safety Stops With every dive over 10 meters, there is a three-minute countdown for the Recommen- ded Safety Stop, to be taken in the 3–6 m/10–20 ft range.
-
Page 55: Mandatory Safety Stops
(5) seconds, the microbubble build-up is predicted to be more than is allowed for in the decompression model. The Suunto RGBM calculation model responds to this by adding a Mandatory Safety Stop to the dive. The time of this Mandatory Safety Stop depends on the severity of the ascent rate excess.
-
Page 56
WHEN CEILING AND STOP ARE DISPLAYED, MAKE A ONE MINUTE MANDATORY SAFETY STOP IN THE DEPTH ZONE BETWEEN 6 M AND 3 M. You must not ascend shallower than 3 m/10 ft with the Mandatory Safety Stop warning on. If you ascend above the Mandatory Safety Stop ceiling, a downward pointing arrow will appear and a continuous beeping starts. -
Page 57: Deep Stops
Deep stops are safety stops that occur deeper than traditional stops, with the purpose of minimizing microbubble formation and excitation. The Suunto RGBM model calculates deep stops iteratively, placing the first stop about halfway between the maximum depth and the ceiling depth. After the first Deep stop is completed, another Deep stop will be prompted halfway to the ceiling, and so on until the ceiling depth is reached.
-
Page 58: Diving
6. DIVING This section contains instructions on how to operate the dive computer and interpret its displays. The dive computer is easy to use and read. Each display shows only the data relevant to that specific diving mode. 6.1. Diving in the AIR mode (DIVE Air) This section contains information on diving with standard air.
-
Page 59: Basic Dive Data
6.1.1. Basic dive data During a No-decompression dive, the following information is displayed: your present depth in meters/feet • the available no-decompression time in minutes as NO DEC TIME • the ascent rate presented as a bar graph on the right side •…
-
Page 60: Bookmark
The bookmarks are also shown as annotations in the downloadable Suunto DM4 with Movescount software. To make a bookmark in the profile memory during a dive, press the SELECT button.
-
Page 61: Tank Pressure Data
6.1.3. Tank pressure data When using the optional wireless pressure transmitter, the pressure of your scuba cylinder in bars (or psi) is shown digitally in the lower left corner of the alternative dis- play. Whenever you start a dive, the remaining air time calculation begins. After 30–60 seconds (sometimes more, depending on your air consumption), the first estimation of remaining air time is shown in the left center window of the display.
-
Page 62: Ascent Rate Indicator
Filling your BC affects the air time calculation due to the temporary NOTE increase in air consumption. The remaining air time is not displayed when either deep stops NOTE or the decompression ceiling have been activated. You can recall the remaining air time by long-pressing the DOWN button, but the ceiling disappears.
-
Page 63: Stopwatch (Timer)
ACTIVATED BACKLIGHT, ALARM AND A BLINKING ASCENT RATE BAR NORMAL GRAPH INDICATE YOU ARE ASCENDING ASCENT FASTER THAN 10 M/MIN. YOU ARE ADVISED RATE. TO MAKE A MANDATORY SAFETY STOP WHEN YOU REACH A DEPTH OF 6 M. DO NOT EXCEED THE MAXIMUM ASCENT RATE! Rapid as- WARNING cents increase the risk of injury.
-
Page 64: Decompression Dives
6.1.6. Decompression dives When your NO DEC TIME becomes zero, your dive changes into a decompression dive. Therefore, you must perform one or more decompression stops on your way to the surface. The NO DEC TIME on your display will be replaced by an ASC TIME, and a CEILING notation will appear.
-
Page 65
the time needed at the Mandatory Safety Stop (if any) • the time needed to reach the surface after the ceiling and Safety Stops have been • completed YOUR ACTUAL ASCENT TIME MAY BE LONGER THAN DIS- WARNING PLAYED BY THE INSTRUMENT! The ascent time will increase if you: •… -
Page 66
In such cases, it is more manageable to maintain an additional distance below the ceiling, to ensure that the waves do not lift you above the ceiling. Suunto recom- mends that decompression takes place deeper than 4 m/13 ft, even if the indicated ceiling is shallower. -
Page 67
Display below the floor The blinking ASC TIME sign and an upward pointing arrow indicate that you are below the floor. You should start your ascent immediately. The ceiling depth is shown on the left side, and the minimum total ascent time on the right side of the center window. Below is an example of a decompression dive without Deep Stops, below the floor. -
Page 68
Display at the ceiling zone When you reach the ceiling zone, the display will show you two arrows pointing at each other (the “hour glass” icon). Below is an example of a decompression dive at the ceiling zone. TWO ARROWS POINT AT EACH OTHER “HOUR GLASS”… -
Page 69: Diving In The Nitrox Mode (Dive Nitrox)
You must not dive again for at least 48 hours. (Refer to Section 5.7. Error conditions). 6.2. Diving in the NITROX mode (DIVE Nitrox) The NITROX mode (DIVE Nitrox) is the second dive mode available in Suunto D4i and is used when using oxygen-enriched gas mixtures.
-
Page 70: Oxygen Displays
To set the nitrox mixes, refer to Section 5.9.1. Setting the nitrox values. Default nitrox settings In theNITROX mode, the Suunto D4i allows you to set a nitrox mix containing 21–50% oxygen. In the NITROX mode, the default setting is standard air (21% O ).
-
Page 71
NITROX DIVE MODE ACTIVATION. MAXIMUM OPERATIONAL DEPTH BASED ON SET O % (21%) AND PO2 (1.4 BAR) IS 53.6 M. If set to the NITROX mode, the Suunto D4i will additionally show on the alternative display: the oxygen percentage, labeled O •… -
Page 72: Oxygen Limit Fraction (Olf%)
UP BUTTON TOGGLES BETWEEN , OLF%, DIVE TIME AND WATER TEMPERATURE. 6.2.3. Oxygen limit fraction (OLF%) If set to the NITROX mode, in addition to tracking the diver’s exposure to nitrogen, the instrument tracks the exposure to oxygen. These calculations are treated as entirely separate functions.
-
Page 73: Day History
The free dive ends as soon as you surface (at 0,5 m/ 1,6 ft). The FREE mode does not provide decompression information. NOTE There is no ascent rate monitoring in the FREE mode. NOTE 6.3.1. Day History The Day History function shows the free dive history of your latest diving day. In the SURFACE mode you can enter the Day History by pressing the SELECT button.
-
Page 74
The Day History function shows the average depth of all dives, the deepest depth of the day as well as the time, the longest dive, and the cumulative dive time in hours and minutes, as well as the number of dives made during the day. The first dive of the next day will reset the Day History function NOTE and start a new one. -
Page 75: Free Dive Time Limit
6.3.2. Free dive time limit The FREE mode has a time limit of 10 minutes. After 10 minutes, Suunto D4i will automatically change from Free Dive to Scuba Bottom Timer. After the dive, the no- fly time will countdown from 48 hours. Also, you will not be able to dive in AIR or NI- TROX modes until the no-fly time has counted down to zero.
-
Page 76: After Diving
7. AFTER DIVING Once back at the surface, Suunto D4i continues to provide post-dive safety information and alarms. Calculations to enable repetitive dive planning also help to maximize diver safety. Table 7.1. Alarms Symbol on display Indication Diver Attention Symbol — Extend Surface Interval…
-
Page 77: Dive Numbering
Or, in the alternative displays, the following information will be shown: maximum depth of last dive in meters/feet • • dive time of last dive in minutes, shown as DIVE TIME the current time, shown as TIME • • the current temperature in °C/°F cylinder pressure in bar/psi (if enabled) •…
-
Page 78: Free Dive
7.3. Repetitive dive planning The Suunto D4i includes a dive planner that allows you to review the no-decompression limits on a subsequent dive, taking the residual nitrogen loading of previous dives into consideration.
-
Page 79: Dive Planning Mode (Plan Nodec)
Following any dive that required a decompression stop, flying should be delayed • for at least 24 hours, and if possible, for 48 hours Suunto recommends that flying is avoided until all the DAN and UHMS guidelines, • as well as the dive computer’s no-fly conditions, are satisfied 7.5.
-
Page 80
WHEN ENTERING THE PLAN MODE THE DISPLAY FIRST BRIEFLY SHOWS THE REMAINING DESATURATION TIME BEFORE GOING INTO PLAN MODE. USE UP AND DOWN BUTTONS TO SCROLL DIFFERENT NO-DECOMPRESSION LIMITS. NO-DECOMPRESSION LIMITS LONGER THAN 99 MINUTES ARE DISPLAYED AS “–” . The Planning mode takes into account the following information from previous dives: any calculated residual nitrogen •… -
Page 81: Dive Numbering Shown During Dive Planning
Higher Altitude and conservative Personal Adjustment settings will shorten the no- decompression time limits. These limits at different Altitude and Personal Adjustment setting selections are explained in Section 5.10.4. Diving at altitude and in Sec- tion 5.10.5. Personal adjustments. 7.5.1. Dive numbering shown during dive planning Dives belong to the same repetitive dive series if the instrument was still counting down the no-fly time at the beginning of the dive.
-
Page 82: Dive Logbook (Mem Logbook)
7.6.1. Dive logbook (MEM Logbook) The Suunto D4i has a very sophisticated, high capacity Logbook and Profile Memory. The data is recorded in the profile memory based on the selected sample rate. The END OF LOGS text is displayed between the oldest and most recent dive. The following information will be shown on three pages: THERE ARE THREE PAGES OF LOGBOOK DIVE INFORMATION.
-
Page 83
dive number • oxygen percentage • total dive time (in minutes in AIR and NITROX modes, and minutes and seconds • in FREE mode) Page II maximum depth • • average depth consumed pressure (if enabled) • • warnings Page III graphical dive profile •… -
Page 84: Dive History (Mem History)
HOURS AND MAXIMUM DEPTH. You can reset the maximum depth of scuba dives to 0.0 m/0 ft NOTE with the PC-Interface unit and the downloadable Suunto DM4 software. Free Dive History The Free Dive History shows the deepest and the longest dives of all free dives, and the cumulative dive time in hours and minutes, as well as the total number of dives.
-
Page 85: Suunto Dm4 With Movescount
After that, you can view and organize all the data recorded with your Suunto D4i. You can plan dives (with Suunto Dive Planner), print copies of your dive profiles, and also upload your dive logs to share with your friends at http://www.movescount.com (see Section 7.8.
-
Page 86: Movescount
• personal information (30 characters) By using the DM4, you are able to enter setup options such as: input a personal, 30-character field into the Suunto D4i • reset the Scuba History’s maximum depth to zero •…
-
Page 87
Go to www.movescount.com. Register and create your free Movescount account. Download and install the Suunto DM4 with Movescount software from the Movescount.com website if you do not already have the DM4 installed on your laptop To transfer data: Connect your dive computer to your laptop. -
Page 88: Care And Maintenance Of My Suunto Diving Computer
The service requires special tools and training. Therefore, it is advisable to contact an authorized SUUNTO dealer or distributor for service. Do not at- tempt to do any servicing that you are not sure of.
-
Page 89
SUUNTO dealer or distributor. • The specific scratch guard for D4i, D6i, and D9tx is designed to help the display from getting scratched. One scratch guard is included in the product package and they can also be purchased separately from your nearest retailer. The scratch guard is easy to attach and also to replace if needed (for more inform- ation, see the instructions on www.suunto.com). -
Page 90
A leak must be corrected without delay as moisture will seriously damage the unit, even beyond repair. SUUNTO does not take any responsibility for damage caused by moisture in the dive computer unless the instructions of this manual are carefully followed. -
Page 91
Original Suunto accessories are only distributed through Suunto’s worldwide network of authorized Suunto distributors and retailers. Original Suunto accessories are tested to be compatible with Suunto products and can be used safely. Damage caused by non-original accessories will not be covered NOTE by warranty. -
Page 92
Call center professionals can answer customer questions regarding diving products, outdoor products and compasses. HOW DO I KNOW IF MY SUUNTO PRODUCT IS COVERED BY WARRANTY? You can check the proof of purchase, which has to be two (2) years or less. You can also check the serial number of your unit. -
Page 93: Battery Replacement
9. BATTERY REPLACEMENT It is advisable to contact an authorized Suunto representative for NOTE battery replacement. It is imperative that the change is made in a proper manner to avoid any leakage of water into the battery compartment or computer.
-
Page 94: Transmitter Battery Kit
Carefully remove the battery. Do not touch the electrical contacts or the circuit board. Check for any traces of leakage, or for any other damage. If there is a leak or any other damage, take the transmitter to an authorized Suunto representative or distributor for checking and repair.
-
Page 95
Check the condition of the O-ring. A defective O-ring may indicate sealing or other problems. Dispose of the old O-ring, even if it seems to be in good condition Check that the O-ring groove and the sealing surface of the cover are clean. Clean them with a soft cloth if necessary. -
Page 96
Wireless transmitter parts. The code stands for spare part order number. -
Page 97: Technical Data
10. TECHNICAL DATA 10.1. Technical specifications Dimensions and weight: • Diameter: 50.0 mm/1.97 in • Thickness: 16.0 mm/0.61 in • Weight: 85g/3.0 oz Transmitter: • Max. diameter: 40 mm/1.57 in • Length: 80 mm/3.15 in • Weight: 118 g/4.16 oz •…
-
Page 98
It is recommended that the instrument be stored in a dry place at room temperature. Do not leave the dive computer in direct sunlight! NOTE Tissue calculation model: • Suunto RGBM algorithm (developed by Suunto and Bruce R. Wienke, BSc, MSc, PhD) -
Page 99
• 9 tissue compartments • Tissue compartment halftimes: 2.5, 5, 10, 20, 40, 80, 120, 240 and 480 minutes (on gassing). The off gassing halftimes are slowed down • Reduced gradient (variable) «M» values based on diving habit and dive violations. The «M»… -
Page 100: Rgbm
It was developed in co-operation between Suunto and Bruce R. Wienke BSc, MSc, PhD. It is based on both laboratory experiments and diving data, including data from DAN.
-
Page 101: Suunto Rgbm Adaptive Decompression
10.2.1. Suunto RGBM adaptive decompression The Suunto RGBM algorithm adapts its predictions of both the effects of microbubble build-up and adverse dive profiles in the current dive series. It also changes these calculations according to the personal adjustment you select.
-
Page 102: No-Decompression Limits For Air
10.2.2. No-decompression limits for air The no-decompression limits displayed by the dive computer for the first dive to a single depth (see Table 10.1, No-decompression time limits for various depths (m) and Table 10.2, No-decompression time limits for various depths (ft) .), are slightly more conservative than those permitted by the U.S.
-
Page 103
No-decompression time limits (mins) for various depths (m) for the first dive of a series Depth Personal Mode / Altitude Mode P0/A0 P0/A1 P0/A2 P1/A0 P1/A1 P1/A2 P2/A0 P2/A1 P2/A2 Table 10.2. No-decompression time limits for various depths (ft) No-decompression time limits (mins) for various depths (ft) for the first dive of a series Depth Personal Mode / Altitude Mode… -
Page 104: Altitude Diving
No-decompression time limits (mins) for various depths (ft) for the first dive of a series Depth Personal Mode / Altitude Mode (ft) P0/A0 P0/A1 P0/A2 P1/A0 P1/A1 P1/A2 P2/A0 P2/A1 P2/A2 10.2.3. Altitude diving The atmospheric pressure is lower at high altitudes than at sea level. After traveling to a higher altitude, you will have additional nitrogen in your body, compared to the equilibrium situation at the original altitude.
-
Page 105: Oxygen Exposure
As a result, the allowed no-decompression-stop limits are considerably reduced. 10.3. Oxygen exposure The oxygen exposure calculations are based on currently accepted exposure time limit tables and principles. In addition to this, the dive computer uses several methods to conservatively estimate the oxygen exposure. For example: The displayed oxygen exposure calculations are raised to the next higher percent- •…
-
Page 106: Intellectual Property
Suunto. 11.2. Trademark Suunto, D4i, Oxygen Limit Fraction (OLF), Suunto Reduced Gradient Bubble Model (RGBM), and Continuous Decompression and their logos are all registered or unre- gistered trademarks of Suunto. All rights are reserved.
-
Page 107: Disclaimers
12. DISCLAIMERS 12.1. User’s responsibility This instrument is intended for recreational use only. Suunto D4i must not be used for obtaining measurements that require professional or industrial precision. 12.2. CE The CE mark is used to mark conformity with the European Union EMC directive 89/336/EEC FIOH, Topeliuksenkatu 41 a A, FI-00250 Helsinki, Finland, notified body no.0430, has…
-
Page 108: Suunto Limited Warranty For Suunto Diving Computers And Suunto Diving Computer Accessories
This Limited Warranty is only valid and enforceable in the country in which you pur- chased the Product, provided that Suunto has intended the Product for sale in that country. If, however, you purchased the Product in a member state of the European…
-
Page 109
To the extent your national laws permit, the Warranty Period will not be extended or renewed or otherwise affected due to subsequent resale, Suunto authorized repair or replacement of the Product. However, part(s) repaired or replaced during the Warranty Period will be warranted for the remainder of the original Warranty Period or for three (3) months from the date of repair or replacement, whichever is longer. -
Page 110
Product repaired or replaced at no charge and returned in a reasonable amount of time. This shall be determined at the sole discretion of Suunto or a Suunto Authorized Service Center. If the Product is found not to be covered by the terms and conditions of this Limited Warranty, Suunto or a Suunto Authorized Service Centre reserve the right to charge a handling fee. -
Page 111
When the Product or a part is replaced, any replaced item becomes the property of Suunto. If a refund is given, the Product for which the refund is given must be returned to a Suunto Authorized Service Centre as it becomes the property of Suunto and/or Suunto Authorized Service Centre. -
Page 112
ERTY RESULTING FROM THE PURCHASE OR USE OF THE ITEM OR ARISING FROM BREACH OF THE WARRANTY, BREACH OF CONTRACT, NEGLIGENCE, STRICT TORT, OR ANY OTHER LEGAL OR EQUITABLE THEORY, EVEN IF SUUNTO KNEW OF THE LIKELIHOOD OF SUCH DAMAGES. SUUNTO SHALL NOT BE LIABLE FOR DELAY IN RENDERING WARRANTY SERVICE. -
Page 113: Disposal Of The Device
14. DISPOSAL OF THE DEVICE Please dispose of the device in an appropriate way, treating it as electronic waste. Do not throw it in the garbage. If you wish, you may return the device to your nearest Suunto representative.
-
Page 114: Glossary
See «Tissue group». Abbreviation for Divers Alert Network. Abbreviation for decompression illness. Suunto DM4 with Movescount, a software for managing your dives Decompression Time spent at a decompression stop, or range, before surfacing, to allow absorbed nitrogen to escape naturally from tissues…
-
Page 115
Decompression illness Any of a variety of maladies resulting either directly or indirectly from the formation of nitrogen bubbles in tissues or body fluids, as a result of inad- equately controlled decompression. Commonly called «the bends» or «DCI». Dive series A group of repetitive dives between which the dive computer indicates some nitrogen loading is present. -
Page 116
Used to measure the whole-body-toxicity. Oxygen limit fraction A term used by Suunto for the values displayed in the oxygen toxicity bar graph. The value is either the CNS% or the OTU%. Oxygen percentage or oxygen fraction in the breathing gas. Standard air has 21% oxygen. -
Page 117
Abbreviation for patent foramen ovale. It is a form of congenital heart defect that enables blood flow between the left and right atria via the in- teratrial septum. Abbreviation for oxygen partial pressure. RGBM Abbreviation for Reduced Gradient Bubble Model. Reduced Gradient Bubble Model Modern algorithm for tracking both dissolved and free gas in divers. -
Page 118
Suunto HELP DESK Global +358 2 284 1160 uSA (toll free) 1-800-543-9124 Canada (toll free) 1-800-267-7506 www.suunto.com Copyright © Suunto oy 04/2011. Suunto is a registered trademark of Suunto oy. All Rights reserved.
Посмотреть инструкция для Suunto D4i бесплатно. Руководство относится к категории спортивные часы, 3 человек(а) дали ему среднюю оценку 8.3. Руководство доступно на следующих языках: русский. У вас есть вопрос о Suunto D4i или вам нужна помощь? Задайте свой вопрос здесь
Не можете найти ответ на свой вопрос в руководстве? Вы можете найти ответ на свой вопрос ниже, в разделе часто задаваемых вопросов о Suunto D4i.
Необходимо ли выключать устройство спортивные часы на ночь?
Необходим ли интернет для GPS?
Что означает аббревиатура GPS?
Сколько часов в неделю нужно тренироваться взрослому человеку?
Какой пульс у взрослого человека в состоянии покоя?
Какой максимально допустимый пульс взрослого человека?
Инструкция Suunto D4i доступно в русский?
Не нашли свой вопрос? Задайте свой вопрос здесь
- Page 1
Suunto D4i User’s GUide… -
Page 2: Table Of Contents
1. WELCOME TO THE WORLD OF SUUNTO DIVE COMPUTERS ….8 2. WARNINGS, CAUTIONS, AND NOTES ……….9 3. SUUNTO USER INTERFACE …………16 3.1. Navigating in the menus …………17 3.2. Button symbols and functions ……….. 18 4. GETTING STARTED …………..20 4.1.
- Page 3
5.7. Error conditions …………..35 5.8. Wireless transmission …………36 5.8.1. Installing the wireless transmitter ………. 36 5.8.2. Pairing and code selection ……….37 5.8.3. Transmitting data …………40 5.9. DIVE mode settings ………….. 41 5.9.1. Setting the nitrox values ………… 43 5.9.2. - Page 4
5.11.1. Recommended Safety Stops ……….55 5.11.2. Mandatory Safety Stops ……….56 5.12. Deep stops …………… 58 6. DIVING ……………… 59 6.1. Diving in the AIR mode (DIVE Air) ……….59 6.1.1. Basic dive data ………….. 60 6.1.2. Bookmark …………..61 6.1.3. - Page 5
7.6.2. Dive history (MEM History) ……….85 7.7. Suunto DM4 with Movescount ……….86 7.8. Movescount …………… 87 8. CARE AND MAINTENANCE OF MY SUUNTO DIVING COMPUTER ..89 9. BATTERY REPLACEMENT …………94 9.1. Wireless transmitter battery replacement ……..94 9.1.1. - Page 6
12. DISCLAIMERS …………..108 12.1. User’s responsibility …………108 12.2. CE …………….108 13. SUUNTO LIMITED WARRANTY FOR SUUNTO DIVING COMPUTERS AND SUUNTO DIVING COMPUTER ACCESSORIES ……..109 14. DISPOSAL OF THE DEVICE …………114 GLOSSARY …………….115… -
Page 7: Welcome To The World Of Suunto Dive Computers
1. WELCOME TO THE WORLD OF SUUNTO DIVE COMPUTERS Suunto D4i wristop dive computer is designed to help you get the most out of your diving. Suunto D4i simplifies your diving experience because all the information you need relating to depth, time, decompression, and additional tank pressure status is available on one easy-to-read display.
-
Page 8: Warnings, Cautions, And Notes
Before you go on to read the user’s guide itself, it is extremely important that you read the following warnings. These warnings are intended to maximize your safety while using Suunto D4i and must not be ignored. READ THIS user’s guide! Carefully read this user’s guide in its…
- Page 9
(DCI). Therefore, Suunto strongly recommends that the device is not used for any commercial or professional diving activities. ONLY DIVERS TRAINED IN THE PROPER USE OF SCUBA… - Page 10
SUUNTO STRONGLY RECOMMENDS THAT SPORT DIVERS WARNING LIMIT THEIR MAXIMUM DEPTH TO 40 M/130 FT OR TO THE DEPTH CALCULATED BY THE COMPUTER BASED ON THE SELECTED O % AND A MAXIMUM PO OF 1.4 BAR! Exposure to greater depths increases the risk of oxygen toxicity and decom- pression sickness. - Page 11
Thus, any diving activity up to four days prior to initial use of the computer may cause misleading information and must be avoided. DO NOT EXPOSE THE SUUNTO OPTIONAL TANK PRESSURE WARNING TRANSMITTER TO ANY GAS MIX CONTAINING MORE THAN 40% OXYGEN! Enriched air with greater oxygen content presents a risk of fire or explosion and serious injury or death. - Page 12
DO NOT DIVE WITH A CYLINDER OF ENRICHED AIR IF YOU WARNING HAVE NOT PERSONALLY VERIFIED ITS CONTENTS AND ENTERED THE ANALYZED VALUE INTO YOUR DIVE COM- PUTER! Failure to verify cylinder contents and enter the appropri- ate O % into your dive computer will result in incorrect dive planning information. - Page 13
SET THE CORRECT ALTITUDE ADJUSTMENT SETTING WARNING MODE! When diving at altitudes greater than 300 m/1,000 ft, the Altitude Adjustment feature must be correctly selected in order for the computer to calculate the decompression status. The dive computer is not intended for use at altitudes greater than 3,000 m/10,000 ft. - Page 14
It is not possible to change between AIR, NITROX and FREE NOTE modes before the instrument has counted down the no-fly time. There is one exception to this: You can change from AIR to NI- TROX mode even during the no-fly time. When planning both air and nitrox dives during the same dive series, you should set the instrument in NITROX mode and modify the gas mix accordingly. -
Page 15: Suunto User Interface
3. SUUNTO USER INTERFACE Present Depth Active Water Contact Daily Alarm Indicator Indicator Dive Alarm Indicator Diver Attention Symbol No-Fly Icon Current Time Display Mode Indicator No-Decompression Time T otal Ascent Time Safety Stop Indicator Ceiling Depth Remaining Air Time…
-
Page 16: Navigating In The Menus
3.1. Navigating in the menus Suunto D4i has four main operating modes — TIME mode (TIME), DIVE mode (DIVE), PLAN mode (PLAN), and MEMORY mode (MEM). To toggle between the main modes, press the MODE button. To select a submode in DIVE and MEM modes, press the UP/DOWN buttons.
-
Page 17: Button Symbols And Functions
3.2. Button symbols and functions The table below explains the main functions of the dive computer’s buttons. The buttons and their use is explained in more detail in the relevant sections of the user’s guide. Table 3.1. Button symbols and functions Symbol Button Press…
- Page 18
Symbol Button Press Main functions Toggle between alternative displays DOWN Short Change submode Decrease values Change shortcuts in TIME and DIVE modes DOWN Long Enter Setting mode… -
Page 19: Getting Started
4. GETTING STARTED To get the most out of your Suunto D4i, use some time to personalize it and really make it YOUR computer. Set the correct time and date, the alarms, as well as the unit and backlight settings.
-
Page 20: Setting The Alarm
The figure below shows how to enter the TIME Settings menu. USE UP AND DOWN BUTTONS TO TOGGLE BETWEEN ALARM, TIME, DUAL TIME, DATE, UNITS, CONTRAST AND TONES. 4.1.1. Setting the alarm The dive computer has a daily alarm function. When the daily alarm activates, the screen blinks and the alarm sounds for 60 seconds.
-
Page 21: Setting The Time
4.1.2. Setting the time In the Time setting mode, you are able to set the hour, minute, and second, as well as choose between a 12 and 24 hour display. ADJUST WITH UP AND DOWN BUTTONS. ACCEPT WITH SELECT BUTTON. 4.1.3.
-
Page 22: Setting The Units
ADJUST WITH UP AND DOWN BUTTONS. ACCEPT WITH SELECT BUTTON. 4.1.5. Setting the units In the Units setting mode, you are able to choose whether the units are displayed in either the metric or imperial system (meters/feet, Celsius/Fahrenheit, and so on). ADJUST WITH UP AND DOWN BUTTONS.
-
Page 23: Setting The Contrast
ADJUST WITH UP AND DOWN BUTTONS. ACCEPT WITH SELECT BUTTON. 4.1.7. Setting the contrast In the Contrast setting mode, you are able to set the contrast of the display (the value range is between 0 and 10). ADJUST WITH UP AND DOWN BUTTONS.
-
Page 24: Stopwatch
When the tones are off, there are no audible alarms. NOTE 4.2. Stopwatch The Stopwatch function in Suunto D4i measures elapsed and split times. USE DOWN BUTTON TO START STOPWATCH AND TAKE A SPLIT TIME. THE UP BUTTON STOPS THE STOPWATCH…
-
Page 25: Ac Water Contacts
4.3. AC water contacts The water and data transfer contact is located on the side of the case. When sub- merged, the water contact poles are connected by the conductivity of the water and the “AC” symbol appears on the display. The AC text is shown until the water contact deactivates.
-
Page 26: Before Diving
It is a significant advance on the classic Haldane models, which do not predict free gas. The advantage of Suunto RGBM is additional safety through its ability to adapt to a variety of situations and dive…
-
Page 27: Emergency Ascents
In order to optimize the response to different increased risk situations, an additional category of stop, referred to as a Mandatory Safety Stop, has been introduced. The combination of stop types depends on the user settings and the specific dive situation. To get the most from the RGBM safety benefits, refer to Section 5.9.10.
-
Page 28: Nitrox
5.4. Nitrox Diving with nitrox provides you with an opportunity to increase bottom times or reduce the risk of decompression illness by reducing the nitrogen content in the gas mix. However, when the gas mix is altered, the oxygen content of the mix is generally in- creased.
-
Page 29: Audible And Visual Alarms
DCI. Therefore, FREEDIVING AFTER SCUBA DIVING IS NOT RECOMMENDED. You should avoid freediving, and not exceed 5 m/16 ft, for at least two hours after scuba diving. Suunto also recommends that you receive training in freediving WARNING techniques and physiology before conducting breath hold dives.
-
Page 30: Audible And Visual Alarm Types
Table 5.2. Instructional beep Sound pattern Interpretation Ascending Start ascending Descending Start descending The visual information on the dive computer display is shown during the alarm breaks in order to save battery. Table 5.3. Audible and visual alarm types Alarm type Alarm reason High priority alarm followed PO2 value is greater than the adjusted value.
- Page 31
Alarm type Alarm reason High priority alarm followed Decompression ceiling depth is exceeded. You should by «Start descending» beep, immediately descend to, or below, the ceiling. repeated for the maximum of three minutes. The Er symbol blinks and an arrow points downwards. - Page 32
Alarm type Alarm reason Low priority alarm followed by Mandatory Safety Stop is violated. You should descend «Start descending» beep, re- to complete the Safety Stop. peated for three minutes. An arrow points downwards. Low priority alarm followed by The Deep Stop depth is reached. Make the Mandatory two short beeps, sounded Deep Stop for the duration shown by the timer. - Page 33
Alarm type Alarm reason Low priority alarm, sounded The selected depth (3–120 m / 10–394 ft) is exceeded. two times. The Maximum The fixed maximum depth (120 m / 394 ft) is exceeded. depth value blinks. You can acknowledge the alarm. Low priority alarm, sounded The selected dive time (1–999 min) is exceeded. -
Page 34: Error Conditions
WHEN THE OXYGEN LIMIT FRACTION INDICATES THAT THE WARNING MAXIMUM LIMIT IS REACHED, YOU MUST IMMEDIATELY TAKE ACTION TO REDUCE OXYGEN EXPOSURE. Failure to take action to reduce oxygen exposure after the warning is given can rapidly increase the risk of oxygen toxicity, injury, or death. 5.7.
-
Page 35: Wireless Transmission
Remove the high pressure (HP) port plug on the first stage of your regulator using an appropriate tool. Thread the high pressure transmitter of the Suunto D4i into the HP port of your regulator with your fingers. DO NOT OVERTIGHTEN! Maximum torque is 6 Nm/4.4…
-
Page 36: Pairing And Code Selection
O-ring and sealing surfaces. 5.8.2. Pairing and code selection In order to receive wireless data, the transmitter and the Suunto D4i need to be paired. During the pairing procedure, the dive computer locks on the code that the transmitter has.
- Page 37
Ensure that the Suunto D4i is turned on, and that the wireless integration is en- abled in the Suunto D4i settings (Tank Press is set ON. For more information, refer to Section 5.9.3. Setting the tank pressure pairing). If the Suunto D4i is in the TIME mode, enter the DIVE mode by short-pressing the MODE button. - Page 38
To re-pair the transmitter with the new code and the Suunto D4i dive computer: In the DIVE mode of the Suunto D4i, long-press the DOWN button to enter the DIVE settings. Enter the Tank Press Pairing menu (Refer to Section 5.9.3. Setting the tank pressure pairing). -
Page 39: Transmitting Data
After the pairing procedure, the Suunto D4i will receive cylinder pressure data from the transmitter. The pressure is displayed in either bars or psi, depending on the unit selected. Any time the Suunto D4i receives an appropriate signal, a flash symbol is displayed in the lower left corner.
-
Page 40: Dive Mode Settings
5.9. DIVE mode settings Suunto D4i has several user-definable functions, as well as depth and time-related alarms that you can set according to your personal preferences. The DIVE mode settings are dependent on the dive submode chosen (AIR, NITROX, FREE), so that, for example, nitrox settings are only available in the NITROX submode.
- Page 41
Setting AIR mode NITROX mode FREE mode Depth notify alarm Dive time alarm Surf time notify alarm Sample rate Deep stop Units The figure below shows how to enter the DIVE mode settings menu. USE UP AND DOWN BUTTONS TO TOGGLE BETWEEN DIVE SETTINGS. -
Page 42: Setting The Nitrox Values
Some settings cannot be changed until five (5) minutes has NOTE elapsed after the dive. 5.9.1. Setting the nitrox values If set to the NITROX mode, the correct oxygen percentage of the gas in your cylinder must always be entered into the computer to ensure correct nitrogen and oxygen calculations.
-
Page 43: Setting The Personal/Altitude Adjustments
5.9.2. Setting the personal/altitude adjustments The current Altitude and Personal Adjustment settings are displayed in the startup screen when entering the DIVE mode. If the mode does not match the altitude or personal conditions (refer to Section 5.10.4. Diving at altitude and Section 5.10.5. Personal adjustments), it is imperative that you enter the correct selection before diving.
-
Page 44: Setting The Tank Pressure Alarm
ADJUST WITH UP AND DOWN BUTTONS. ACCEPT WITH SELECT BUTTON. 5.9.4. Setting the tank pressure alarm The tank pressure alarm can be set «ON» or «OFF» and in the range of 10–200 bar. The alarm is the secondary cylinder pressure alarm point. The alarm is activated when the tank pressure drops below the set limit.
-
Page 45: Setting The Depth Notify Alarm (Free Mode)
ADJUST WITH UP AND DOWN BUTTONS. ACCEPT WITH SELECT BUTTON. 5.9.6. Setting the depth notify alarm (FREE mode) You can set the Depth Notify Alarm setting to indicate a certain depth, for example, start of free falling or mouth filling in freediving. ADJUST WITH UP AND DOWN BUTTONS.
-
Page 46: Setting The Surface Time Notify Alarm (Free Mode)
5.9.8. Setting the surface time notify alarm (FREE mode) You can set the Surface Time Notify Alarm to indicate the length of the surface time before a new dive. Suunto D4i starts counting the time automatically when you surface (at 0.5 m/1,6 ft).
-
Page 47: Setting The Deep Stops
You can set the dive profile sample rate in free dive to 1, 2 or 5 seconds. The sample rate for nitrox and air dives is 10, 20, 30 and 60 seconds. ADJUST WITH UP AND DOWN BUTTONS. ACCEPT WITH SELECT BUTTON. 5.9.10.
-
Page 48: Activation And Pre-Checks
5.10.1. Accessing DIVE mode The Suunto D4i has three diving modes: AIR mode for diving with standard air only, NITROX mode for diving with oxygen enriched mixtures, and FREE mode for freediving.
-
Page 49: Dive Mode Activation
(MOD, 66.2 m), O2% (21%) and PO2 (1.6) value. A few seconds later the battery power indicator is shown. WARNING SUUNTO STRONGLY RECOMMENDS THAT SPORT DIVERS LIMIT THEIR MAXIMUM DEPTH TO 40 M/130 FT! Exposure to greater depths increases the risk of oxygen toxicity and decom- pression sickness.
-
Page 50: Battery Power Indication
the battery level is ok • the altitude, personal adjustment, Deep stops settings are correct • the instrument displays correct units of measurement (Metric/Imperial) • the instrument displays the correct temperature and depth (0.0 m/0 ft) • the alarm beeps •…
-
Page 51: Diving At Altitude
If the battery symbol is displayed in the Surface mode, or if the display is faded or weak, the battery may be too low to operate the dive computer, and battery replacement is recommended. For safety reasons, the backlight cannot be activated when the NOTE low battery warning is indicated by the battery symbol.
-
Page 52: Personal Adjustments
Table 5.6. Altitude Adjustment settings Alt. adjustment value Altitude range 0–300 m / 0–1000 ft 300–1500 m / 1000–5000 ft 1500–3000 m / 5000–10 000 ft Section 5.9.2. Setting the personal/altitude adjustments describes NOTE how the Altitude value is set. Traveling to a higher elevation can temporarily cause a change WARNING in the equilibrium of dissolved nitrogen in the body.
- Page 53
cold exposure —water temperature less than 20 °C/68 °F • below average physical fitness level • fatigue • dehydration • previous history of DCI • stress • obesity • patent foramen ovale (PFO) • exercise on or after dive • This feature is used to adjust the computer to be more conservative, according to personal preference, by entering the suitable Personal Adjustment setting with the help of Table 5.7, Personal Adjustment settings. -
Page 54: Safety Stops
The reasons for performing a Safety Stop in- clude: reducing sub-clinical DCI, microbubble reduction, ascent control, and orientation before surfacing. The Suunto D4i displays two different types of Safety Stops: Recommended Safety Stop and Mandatory Safety Stop. 5.11.1. Recommended Safety Stops With every dive over 10 meters, there is a three-minute countdown for the Recommen- ded Safety Stop, to be taken in the 3–6 m/10–20 ft range.
-
Page 55: Mandatory Safety Stops
(5) seconds, the microbubble build-up is predicted to be more than is allowed for in the decompression model. The Suunto RGBM calculation model responds to this by adding a Mandatory Safety Stop to the dive. The time of this Mandatory Safety Stop depends on the severity of the ascent rate excess.
- Page 56
WHEN CEILING AND STOP ARE DISPLAYED, MAKE A ONE MINUTE MANDATORY SAFETY STOP IN THE DEPTH ZONE BETWEEN 6 M AND 3 M. You must not ascend shallower than 3 m/10 ft with the Mandatory Safety Stop warning on. If you ascend above the Mandatory Safety Stop ceiling, a downward pointing arrow will appear and a continuous beeping starts. -
Page 57: Deep Stops
Deep stops are safety stops that occur deeper than traditional stops, with the purpose of minimizing microbubble formation and excitation. The Suunto RGBM model calculates deep stops iteratively, placing the first stop about halfway between the maximum depth and the ceiling depth. After the first Deep stop is completed, another Deep stop will be prompted halfway to the ceiling, and so on until the ceiling depth is reached.
-
Page 58: Diving
6. DIVING This section contains instructions on how to operate the dive computer and interpret its displays. The dive computer is easy to use and read. Each display shows only the data relevant to that specific diving mode. 6.1. Diving in the AIR mode (DIVE Air) This section contains information on diving with standard air.
-
Page 59: Basic Dive Data
6.1.1. Basic dive data During a No-decompression dive, the following information is displayed: your present depth in meters/feet • the available no-decompression time in minutes as NO DEC TIME • the ascent rate presented as a bar graph on the right side •…
-
Page 60: Bookmark
The bookmarks are also shown as annotations in the downloadable Suunto DM4 with Movescount software. To make a bookmark in the profile memory during a dive, press the SELECT button.
-
Page 61: Tank Pressure Data
6.1.3. Tank pressure data When using the optional wireless pressure transmitter, the pressure of your scuba cylinder in bars (or psi) is shown digitally in the lower left corner of the alternative dis- play. Whenever you start a dive, the remaining air time calculation begins. After 30–60 seconds (sometimes more, depending on your air consumption), the first estimation of remaining air time is shown in the left center window of the display.
-
Page 62: Ascent Rate Indicator
Filling your BC affects the air time calculation due to the temporary NOTE increase in air consumption. The remaining air time is not displayed when either deep stops NOTE or the decompression ceiling have been activated. You can recall the remaining air time by long-pressing the DOWN button, but the ceiling disappears.
-
Page 63: Stopwatch (Timer)
ACTIVATED BACKLIGHT, ALARM AND A BLINKING ASCENT RATE BAR NORMAL GRAPH INDICATE YOU ARE ASCENDING ASCENT FASTER THAN 10 M/MIN. YOU ARE ADVISED RATE. TO MAKE A MANDATORY SAFETY STOP WHEN YOU REACH A DEPTH OF 6 M. DO NOT EXCEED THE MAXIMUM ASCENT RATE! Rapid as- WARNING cents increase the risk of injury.
-
Page 64: Decompression Dives
6.1.6. Decompression dives When your NO DEC TIME becomes zero, your dive changes into a decompression dive. Therefore, you must perform one or more decompression stops on your way to the surface. The NO DEC TIME on your display will be replaced by an ASC TIME, and a CEILING notation will appear.
- Page 65
the time needed at the Mandatory Safety Stop (if any) • the time needed to reach the surface after the ceiling and Safety Stops have been • completed YOUR ACTUAL ASCENT TIME MAY BE LONGER THAN DIS- WARNING PLAYED BY THE INSTRUMENT! The ascent time will increase if you: •… - Page 66
In such cases, it is more manageable to maintain an additional distance below the ceiling, to ensure that the waves do not lift you above the ceiling. Suunto recom- mends that decompression takes place deeper than 4 m/13 ft, even if the indicated ceiling is shallower. - Page 67
Display below the floor The blinking ASC TIME sign and an upward pointing arrow indicate that you are below the floor. You should start your ascent immediately. The ceiling depth is shown on the left side, and the minimum total ascent time on the right side of the center window. Below is an example of a decompression dive without Deep Stops, below the floor. - Page 68
Display at the ceiling zone When you reach the ceiling zone, the display will show you two arrows pointing at each other (the “hour glass” icon). Below is an example of a decompression dive at the ceiling zone. TWO ARROWS POINT AT EACH OTHER “HOUR GLASS”… -
Page 69: Diving In The Nitrox Mode (Dive Nitrox)
You must not dive again for at least 48 hours. (Refer to Section 5.7. Error conditions). 6.2. Diving in the NITROX mode (DIVE Nitrox) The NITROX mode (DIVE Nitrox) is the second dive mode available in Suunto D4i and is used when using oxygen-enriched gas mixtures.
-
Page 70: Oxygen Displays
To set the nitrox mixes, refer to Section 5.9.1. Setting the nitrox values. Default nitrox settings In theNITROX mode, the Suunto D4i allows you to set a nitrox mix containing 21–50% oxygen. In the NITROX mode, the default setting is standard air (21% O ).
- Page 71
NITROX DIVE MODE ACTIVATION. MAXIMUM OPERATIONAL DEPTH BASED ON SET O % (21%) AND PO2 (1.4 BAR) IS 53.6 M. If set to the NITROX mode, the Suunto D4i will additionally show on the alternative display: the oxygen percentage, labeled O •… -
Page 72: Oxygen Limit Fraction (Olf%)
UP BUTTON TOGGLES BETWEEN , OLF%, DIVE TIME AND WATER TEMPERATURE. 6.2.3. Oxygen limit fraction (OLF%) If set to the NITROX mode, in addition to tracking the diver’s exposure to nitrogen, the instrument tracks the exposure to oxygen. These calculations are treated as entirely separate functions.
-
Page 73: Day History
The free dive ends as soon as you surface (at 0,5 m/ 1,6 ft). The FREE mode does not provide decompression information. NOTE There is no ascent rate monitoring in the FREE mode. NOTE 6.3.1. Day History The Day History function shows the free dive history of your latest diving day. In the SURFACE mode you can enter the Day History by pressing the SELECT button.
- Page 74
The Day History function shows the average depth of all dives, the deepest depth of the day as well as the time, the longest dive, and the cumulative dive time in hours and minutes, as well as the number of dives made during the day. The first dive of the next day will reset the Day History function NOTE and start a new one. -
Page 75: Free Dive Time Limit
6.3.2. Free dive time limit The FREE mode has a time limit of 10 minutes. After 10 minutes, Suunto D4i will automatically change from Free Dive to Scuba Bottom Timer. After the dive, the no- fly time will countdown from 48 hours. Also, you will not be able to dive in AIR or NI- TROX modes until the no-fly time has counted down to zero.
-
Page 76: After Diving
7. AFTER DIVING Once back at the surface, Suunto D4i continues to provide post-dive safety information and alarms. Calculations to enable repetitive dive planning also help to maximize diver safety. Table 7.1. Alarms Symbol on display Indication Diver Attention Symbol — Extend Surface Interval…
-
Page 77: Dive Numbering
Or, in the alternative displays, the following information will be shown: maximum depth of last dive in meters/feet • • dive time of last dive in minutes, shown as DIVE TIME the current time, shown as TIME • • the current temperature in °C/°F cylinder pressure in bar/psi (if enabled) •…
-
Page 78: Free Dive
7.3. Repetitive dive planning The Suunto D4i includes a dive planner that allows you to review the no-decompression limits on a subsequent dive, taking the residual nitrogen loading of previous dives into consideration.
-
Page 79: Dive Planning Mode (Plan Nodec)
Following any dive that required a decompression stop, flying should be delayed • for at least 24 hours, and if possible, for 48 hours Suunto recommends that flying is avoided until all the DAN and UHMS guidelines, • as well as the dive computer’s no-fly conditions, are satisfied 7.5.
- Page 80
WHEN ENTERING THE PLAN MODE THE DISPLAY FIRST BRIEFLY SHOWS THE REMAINING DESATURATION TIME BEFORE GOING INTO PLAN MODE. USE UP AND DOWN BUTTONS TO SCROLL DIFFERENT NO-DECOMPRESSION LIMITS. NO-DECOMPRESSION LIMITS LONGER THAN 99 MINUTES ARE DISPLAYED AS “–” . The Planning mode takes into account the following information from previous dives: any calculated residual nitrogen •… -
Page 81: Dive Numbering Shown During Dive Planning
Higher Altitude and conservative Personal Adjustment settings will shorten the no- decompression time limits. These limits at different Altitude and Personal Adjustment setting selections are explained in Section 5.10.4. Diving at altitude and in Sec- tion 5.10.5. Personal adjustments. 7.5.1. Dive numbering shown during dive planning Dives belong to the same repetitive dive series if the instrument was still counting down the no-fly time at the beginning of the dive.
-
Page 82: Dive Logbook (Mem Logbook)
7.6.1. Dive logbook (MEM Logbook) The Suunto D4i has a very sophisticated, high capacity Logbook and Profile Memory. The data is recorded in the profile memory based on the selected sample rate. The END OF LOGS text is displayed between the oldest and most recent dive. The following information will be shown on three pages: THERE ARE THREE PAGES OF LOGBOOK DIVE INFORMATION.
- Page 83
dive number • oxygen percentage • total dive time (in minutes in AIR and NITROX modes, and minutes and seconds • in FREE mode) Page II maximum depth • • average depth consumed pressure (if enabled) • • warnings Page III graphical dive profile •… -
Page 84: Dive History (Mem History)
HOURS AND MAXIMUM DEPTH. You can reset the maximum depth of scuba dives to 0.0 m/0 ft NOTE with the PC-Interface unit and the downloadable Suunto DM4 software. Free Dive History The Free Dive History shows the deepest and the longest dives of all free dives, and the cumulative dive time in hours and minutes, as well as the total number of dives.
-
Page 85: Suunto Dm4 With Movescount
After that, you can view and organize all the data recorded with your Suunto D4i. You can plan dives (with Suunto Dive Planner), print copies of your dive profiles, and also upload your dive logs to share with your friends at http://www.movescount.com (see Section 7.8.
-
Page 86: Movescount
• personal information (30 characters) By using the DM4, you are able to enter setup options such as: input a personal, 30-character field into the Suunto D4i • reset the Scuba History’s maximum depth to zero •…
- Page 87
Go to www.movescount.com. Register and create your free Movescount account. Download and install the Suunto DM4 with Movescount software from the Movescount.com website if you do not already have the DM4 installed on your laptop To transfer data: Connect your dive computer to your laptop. -
Page 88: Care And Maintenance Of My Suunto Diving Computer
The service requires special tools and training. Therefore, it is advisable to contact an authorized SUUNTO dealer or distributor for service. Do not at- tempt to do any servicing that you are not sure of.
- Page 89
SUUNTO dealer or distributor. • The specific scratch guard for D4i, D6i, and D9tx is designed to help the display from getting scratched. One scratch guard is included in the product package and they can also be purchased separately from your nearest retailer. The scratch guard is easy to attach and also to replace if needed (for more inform- ation, see the instructions on www.suunto.com). - Page 90
A leak must be corrected without delay as moisture will seriously damage the unit, even beyond repair. SUUNTO does not take any responsibility for damage caused by moisture in the dive computer unless the instructions of this manual are carefully followed. - Page 91
Original Suunto accessories are only distributed through Suunto’s worldwide network of authorized Suunto distributors and retailers. Original Suunto accessories are tested to be compatible with Suunto products and can be used safely. Damage caused by non-original accessories will not be covered NOTE by warranty. - Page 92
Call center professionals can answer customer questions regarding diving products, outdoor products and compasses. HOW DO I KNOW IF MY SUUNTO PRODUCT IS COVERED BY WARRANTY? You can check the proof of purchase, which has to be two (2) years or less. You can also check the serial number of your unit. -
Page 93: Battery Replacement
9. BATTERY REPLACEMENT It is advisable to contact an authorized Suunto representative for NOTE battery replacement. It is imperative that the change is made in a proper manner to avoid any leakage of water into the battery compartment or computer.
-
Page 94: Transmitter Battery Kit
Carefully remove the battery. Do not touch the electrical contacts or the circuit board. Check for any traces of leakage, or for any other damage. If there is a leak or any other damage, take the transmitter to an authorized Suunto representative or distributor for checking and repair.
- Page 95
Check the condition of the O-ring. A defective O-ring may indicate sealing or other problems. Dispose of the old O-ring, even if it seems to be in good condition Check that the O-ring groove and the sealing surface of the cover are clean. Clean them with a soft cloth if necessary. - Page 96
Wireless transmitter parts. The code stands for spare part order number. -
Page 97: Technical Data
10. TECHNICAL DATA 10.1. Technical specifications Dimensions and weight: • Diameter: 50.0 mm/1.97 in • Thickness: 16.0 mm/0.61 in • Weight: 85g/3.0 oz Transmitter: • Max. diameter: 40 mm/1.57 in • Length: 80 mm/3.15 in • Weight: 118 g/4.16 oz •…
- Page 98
It is recommended that the instrument be stored in a dry place at room temperature. Do not leave the dive computer in direct sunlight! NOTE Tissue calculation model: • Suunto RGBM algorithm (developed by Suunto and Bruce R. Wienke, BSc, MSc, PhD) - Page 99
• 9 tissue compartments • Tissue compartment halftimes: 2.5, 5, 10, 20, 40, 80, 120, 240 and 480 minutes (on gassing). The off gassing halftimes are slowed down • Reduced gradient (variable) «M» values based on diving habit and dive violations. The «M»… -
Page 100: Rgbm
It was developed in co-operation between Suunto and Bruce R. Wienke BSc, MSc, PhD. It is based on both laboratory experiments and diving data, including data from DAN.
-
Page 101: Suunto Rgbm Adaptive Decompression
10.2.1. Suunto RGBM adaptive decompression The Suunto RGBM algorithm adapts its predictions of both the effects of microbubble build-up and adverse dive profiles in the current dive series. It also changes these calculations according to the personal adjustment you select.
-
Page 102: No-Decompression Limits For Air
10.2.2. No-decompression limits for air The no-decompression limits displayed by the dive computer for the first dive to a single depth (see Table 10.1, No-decompression time limits for various depths (m) and Table 10.2, No-decompression time limits for various depths (ft) .), are slightly more conservative than those permitted by the U.S.
- Page 103
No-decompression time limits (mins) for various depths (m) for the first dive of a series Depth Personal Mode / Altitude Mode P0/A0 P0/A1 P0/A2 P1/A0 P1/A1 P1/A2 P2/A0 P2/A1 P2/A2 Table 10.2. No-decompression time limits for various depths (ft) No-decompression time limits (mins) for various depths (ft) for the first dive of a series Depth Personal Mode / Altitude Mode… -
Page 104: Altitude Diving
No-decompression time limits (mins) for various depths (ft) for the first dive of a series Depth Personal Mode / Altitude Mode (ft) P0/A0 P0/A1 P0/A2 P1/A0 P1/A1 P1/A2 P2/A0 P2/A1 P2/A2 10.2.3. Altitude diving The atmospheric pressure is lower at high altitudes than at sea level. After traveling to a higher altitude, you will have additional nitrogen in your body, compared to the equilibrium situation at the original altitude.
-
Page 105: Oxygen Exposure
As a result, the allowed no-decompression-stop limits are considerably reduced. 10.3. Oxygen exposure The oxygen exposure calculations are based on currently accepted exposure time limit tables and principles. In addition to this, the dive computer uses several methods to conservatively estimate the oxygen exposure. For example: The displayed oxygen exposure calculations are raised to the next higher percent- •…
-
Page 106: Intellectual Property
Suunto. 11.2. Trademark Suunto, D4i, Oxygen Limit Fraction (OLF), Suunto Reduced Gradient Bubble Model (RGBM), and Continuous Decompression and their logos are all registered or unre- gistered trademarks of Suunto. All rights are reserved.
-
Page 107: Disclaimers
12. DISCLAIMERS 12.1. User’s responsibility This instrument is intended for recreational use only. Suunto D4i must not be used for obtaining measurements that require professional or industrial precision. 12.2. CE The CE mark is used to mark conformity with the European Union EMC directive 89/336/EEC FIOH, Topeliuksenkatu 41 a A, FI-00250 Helsinki, Finland, notified body no.0430, has…
-
Page 108: Suunto Limited Warranty For Suunto Diving Computers And Suunto Diving Computer Accessories
This Limited Warranty is only valid and enforceable in the country in which you pur- chased the Product, provided that Suunto has intended the Product for sale in that country. If, however, you purchased the Product in a member state of the European…
- Page 109
To the extent your national laws permit, the Warranty Period will not be extended or renewed or otherwise affected due to subsequent resale, Suunto authorized repair or replacement of the Product. However, part(s) repaired or replaced during the Warranty Period will be warranted for the remainder of the original Warranty Period or for three (3) months from the date of repair or replacement, whichever is longer. - Page 110
Product repaired or replaced at no charge and returned in a reasonable amount of time. This shall be determined at the sole discretion of Suunto or a Suunto Authorized Service Center. If the Product is found not to be covered by the terms and conditions of this Limited Warranty, Suunto or a Suunto Authorized Service Centre reserve the right to charge a handling fee. - Page 111
When the Product or a part is replaced, any replaced item becomes the property of Suunto. If a refund is given, the Product for which the refund is given must be returned to a Suunto Authorized Service Centre as it becomes the property of Suunto and/or Suunto Authorized Service Centre. - Page 112
ERTY RESULTING FROM THE PURCHASE OR USE OF THE ITEM OR ARISING FROM BREACH OF THE WARRANTY, BREACH OF CONTRACT, NEGLIGENCE, STRICT TORT, OR ANY OTHER LEGAL OR EQUITABLE THEORY, EVEN IF SUUNTO KNEW OF THE LIKELIHOOD OF SUCH DAMAGES. SUUNTO SHALL NOT BE LIABLE FOR DELAY IN RENDERING WARRANTY SERVICE. -
Page 113: Disposal Of The Device
14. DISPOSAL OF THE DEVICE Please dispose of the device in an appropriate way, treating it as electronic waste. Do not throw it in the garbage. If you wish, you may return the device to your nearest Suunto representative.
-
Page 114: Glossary
See «Tissue group». Abbreviation for Divers Alert Network. Abbreviation for decompression illness. Suunto DM4 with Movescount, a software for managing your dives Decompression Time spent at a decompression stop, or range, before surfacing, to allow absorbed nitrogen to escape naturally from tissues…
- Page 115
Decompression illness Any of a variety of maladies resulting either directly or indirectly from the formation of nitrogen bubbles in tissues or body fluids, as a result of inad- equately controlled decompression. Commonly called «the bends» or «DCI». Dive series A group of repetitive dives between which the dive computer indicates some nitrogen loading is present. - Page 116
Used to measure the whole-body-toxicity. Oxygen limit fraction A term used by Suunto for the values displayed in the oxygen toxicity bar graph. The value is either the CNS% or the OTU%. Oxygen percentage or oxygen fraction in the breathing gas. Standard air has 21% oxygen. - Page 117
Abbreviation for patent foramen ovale. It is a form of congenital heart defect that enables blood flow between the left and right atria via the in- teratrial septum. Abbreviation for oxygen partial pressure. RGBM Abbreviation for Reduced Gradient Bubble Model. Reduced Gradient Bubble Model Modern algorithm for tracking both dissolved and free gas in divers. - Page 118
Suunto HELP DESK Global +358 2 284 1160 uSA (toll free) 1-800-543-9124 Canada (toll free) 1-800-267-7506 www.suunto.com Copyright © Suunto oy 04/2011. Suunto is a registered trademark of Suunto oy. All Rights reserved.

SUUNTO D4i
Руководство пользователя
ru

1. ДОБРО ПОЖАЛОВАТЬ В МИР ПОДВОДНЫХ КОМПЬЮТЕРОВ
SUUNTO …… . . . ….. . . . ….. . . . ….. . . . ….. . . . ….. . . . ….. . . . ….. . . . ….. . . . ….. . . . …. 8
2. ПРЕДУПРЕЖДЕНИЯ, ПРЕДОСТЕРЕЖЕНИЯ И ПРИМЕЧАНИЯ ….. . . . ….. 10
3. ИНТЕРФЕЙС ПОЛЬЗОВАТЕЛЯ SUUNTO .. ….. . . . ….. . . . ….. . . . ….. . . . ….. . 20
3.1. Перемещение по системе меню .. . ….. . . . ….. . . . ….. . . . ….. . . . ….. . . . … 21
3.2. Символы и функции кнопок . . . ….. . . . ….. . . . ….. . . . ….. . . . ….. . . . ….. . . . 22
4. НАЧАЛО РАБОТЫ …. . . . ….. . . . ….. . . . ….. . . . ….. . . . ….. . . . ….. . . . ….. . . . ….. 24
4.1. Параметры режима TIME (ВРЕМЯ) … . . . ….. . . . ….. . . . ….. . . . ….. . . . …. 24
4.1.1. Установка будильника ….. . . . ….. . . . ….. . . . ….. . . . ….. . . . ….. . . . ….. 25
4.1.2. Установка времени ….. . . . ….. . . . ….. . . . ….. . . . ….. . . . ….. . . . ….. . . . 26
4.1.3. Установка второго поясного времени .. . ….. . . . ….. . . . ….. . . . ….. . . 26
4.1.4. Установка даты …… . . . ….. . . . ….. . . . ….. . . . ….. . . . ….. . . . ….. . . . …. 27
4.1.5. Установка единиц измерения .. . . ….. . . . ….. . . . ….. . . . ….. . . . ….. . . . 27
4.1.6. Настройка задней подсветки … . . . ….. . . . ….. . . . ….. . . . ….. . . . ….. . 28
4.1.7. Настройка контрастности …. . . . ….. . . . ….. . . . ….. . . . ….. . . . ….. . . . . 28
4.1.8. Настройка звуковых сигналов . . . ….. . . . ….. . . . ….. . . . ….. . . . ….. . . . 29
4.2. Секундомер …. . . . ….. . . . ….. . . . ….. . . . ….. . . . ….. . . . ….. . . . ….. . . . ….. . . . 29
4.3. Контакты воды AC ….. . . . ….. . . . ….. . . . ….. . . . ….. . . . ….. . . . ….. . . . ….. . 30
5. ПЕРЕД ПОГРУЖЕНИЕМ ….. . . . ….. . . . ….. . . . ….. . . . ….. . . . ….. . . . ….. . . . ….. 32
5.1. модель декомпрессии RGBM компании Suunto .. ….. . . . ….. . . . ….. . . . . 33
5.2. В чрезвычайных ситуациях .. . . ….. . . . ….. . . . ….. . . . ….. . . . ….. . . . ….. . . . 34
5.3. Ограничения возможностей подводного компьютера ….. . . . ….. . . . ….. 34
5.4. Погружения с кислородно-азотной смесью Nitrox .. . ….. . . . ….. . . . ….. . 35
5.5. Погружения без акваланга …… . . . ….. . . . ….. . . . ….. . . . ….. . . . ….. . . . … 35
3

5.6. Звуковые и визуальные сигналы тревоги .. . . ….. . . . ….. . . . ….. . . . ….. . . 37
5.7. Состояния ошибки .. ….. . . . ….. . . . ….. . . . ….. . . . ….. . . . ….. . . . ….. . . . …. 43
5.8. Беспроводная передача . . . . ….. . . . ….. . . . ….. . . . ….. . . . ….. . . . ….. . . . …. 45
5.8.1. Установка беспроводного датчика .. . . ….. . . . ….. . . . ….. . . . ….. . . . .. 45
5.8.2. Установление связи и выбор кода … . . . ….. . . . ….. . . . ….. . . . ….. . . . 46
5.8.3. Передача данных .. . ….. . . . ….. . . . ….. . . . ….. . . . ….. . . . ….. . . . ….. . . 49
5.9. Параметры режима DIVE . . . ….. . . . ….. . . . ….. . . . ….. . . . ….. . . . ….. . . . … 51
5.9.1. Установка параметров для смеси nitrox … . . . ….. . . . ….. . . . ….. . . . . 54
5.9.2. Установка личных параметров / высоты над уровнем моря … . . . . 55
5.9.3. Параметр связи с датчиком давления в баллоне . . . . ….. . . . ….. . . . 56
5.9.4. Параметр сигнала тревоги давления в баллоне .. ….. . . . ….. . . . … 56
5.9.5. Установка сигнала тревоги по глубине . . . ….. . . . ….. . . . ….. . . . ….. . 57
5.9.6. Установка сигнала уведомления о глубине (режим FREE) . . . ….. . 58
5.9.7. Установка сигнала тревоги времени погружения . . . . ….. . . . ….. . . . 58
5.9.8. Установка сигнала уведомления времени пребывания на поверх-
ности (режим FREE) . . . . ….. . . . ….. . . . ….. . . . ….. . . . ….. . . . ….. . . . ….. . . . .. 59
5.9.9. Установка частоты отсчетов .. . . . ….. . . . ….. . . . ….. . . . ….. . . . ….. . . . 59
5.9.10. Установка параметров глубоководных остановок .. . . . ….. . . . ….. 60
5.9.11. Установка единиц измерения ….. . . . ….. . . . ….. . . . ….. . . . ….. . . . .. 60
5.10. Активация и предварительные проверки …. . . . ….. . . . ….. . . . ….. . . . … 61
5.10.1. Вход в режим DIVE (ПОГРУЖЕНИЕ) . . . . ….. . . . ….. . . . ….. . . . ….. . 61
5.10.2. Активация режима DIVE (ПОГРУЖЕНИЕ) . . . ….. . . . ….. . . . ….. . . . 62
5.10.3. Индикатор состояния элемента питания …. . . . ….. . . . ….. . . . ….. . 64
5.10.4. Высокогорные погружения .. . . . ….. . . . ….. . . . ….. . . . ….. . . . ….. . . . . 65
4

5.10.5. Личные настройки .. . . ….. . . . ….. . . . ….. . . . ….. . . . ….. . . . ….. . . . …. 66
5.11. Остановки безопасности . . . . ….. . . . ….. . . . ….. . . . ….. . . . ….. . . . ….. . . . .. 68
5.11.1. Рекомендуемые Остановки безопасности . . . ….. . . . ….. . . . ….. . . . 69
5.11.2. Обязательные Остановки безопасности …. . . . ….. . . . ….. . . . ….. . 70
5.12. Глубоководные остановки … . . . ….. . . . ….. . . . ….. . . . ….. . . . ….. . . . ….. . 71
6. ПОГРУЖЕНИЕ В ВОДУ . ….. . . . ….. . . . ….. . . . ….. . . . ….. . . . ….. . . . ….. . . . ….. 73
6.1. Погружение в режиме AIR (DIVE Air) …… . . . ….. . . . ….. . . . ….. . . . ….. . . . 73
6.1.1. Основные данные о погружении … . . . ….. . . . ….. . . . ….. . . . ….. . . . .. 74
6.1.2. Закладка . . . ….. . . . ….. . . . ….. . . . ….. . . . ….. . . . ….. . . . ….. . . . ….. . . . .. 75
6.1.3. Данные о давлении в баллоне . …. . . . . …. . . . . …. . . . . …. . . . . …. . . . . . 76
6.1.4. Индикатор скорости подъема …… . . . ….. . . . ….. . . . ….. . . . ….. . . . … 78
6.1.5. Секундомер (таймер) …… . . . ….. . . . ….. . . . ….. . . . ….. . . . ….. . . . …. 80
6.1.6. Погружения с декомпрессией …. . . . ….. . . . ….. . . . ….. . . . ….. . . . …. 80
6.2. Погружение в режиме NITROX (DIVE Nitrox) .. . . . ….. . . . ….. . . . ….. . . . .. 87
6.2.1. Перед погружением в режиме NITROX … . . . ….. . . . ….. . . . ….. . . . .. 87
6.2.2. Дисплеи кислорода ….. . . . ….. . . . ….. . . . ….. . . . ….. . . . ….. . . . ….. . . 89
6.2.3. Насыщение тканей кислородом (OLF%) . . . ….. . . . ….. . . . ….. . . . …. 91
6.3. Погружение в режиме FREE (DIVE Free) .. . . . ….. . . . ….. . . . ….. . . . ….. . 91
6.3.1. История дня .. . . . ….. . . . ….. . . . ….. . . . ….. . . . ….. . . . ….. . . . ….. . . . …. 92
6.3.2. Предел времени свободного погружения ….. . . . ….. . . . ….. . . . ….. . 93
7. ПОСЛЕ ПОГРУЖЕНИЯ . . . . ….. . . . ….. . . . ….. . . . ….. . . . ….. . . . ….. . . . ….. . . . .. 95
7.1. Продолжительность времени пребывания на поверхности … . . . ….. . . 95
7.2. Нумерация погружений … . . . . …. . . . . …. . . . . …. . . . . …. . . . . …. . . . . …. . . . . .. 97
7.2.1. СВОБОДНОЕ погружение . ….. . . . ….. . . . ….. . . . ….. . . . ….. . . . ….. . . 97
5

7.3. Планирование последовательных погружений . ….. . . . ….. . . . ….. . . . … 98
7.4. Авиаперелеты после погружения . . . . ….. . . . ….. . . . ….. . . . ….. . . . ….. . . . . 98
7.5. Режим DIVE PLANNING (PLAN NoDec) . ….. . . . ….. . . . ….. . . . ….. . . . … 100
7.5.1. Номера погружений, отображаемые при планировании погруже-
ния . . . . ….. . . . ….. . . . ….. . . . ….. . . . ….. . . . ….. . . . ….. . . . ….. . . . ….. . . . ….. . 101
7.6. Режим MEMORY .. . . . ….. . . . ….. . . . ….. . . . ….. . . . ….. . . . ….. . . . ….. . . . .. 102
7.6.1. Журнал погружения (MEM Logbook) . . . . ….. . . . ….. . . . ….. . . . ….. . 103
7.6.2. История погружений (MEM History) ….. . . . ….. . . . ….. . . . ….. . . . … 105
7.7. Suunto DM4 с Movescount .. . . ….. . . . ….. . . . ….. . . . ….. . . . ….. . . . ….. . . . 107
7.8. Movescount .. . . ….. . . . ….. . . . ….. . . . ….. . . . ….. . . . ….. . . . ….. . . . ….. . . . .. 109
8. ПРАВИЛА УХОДА И ОБСЛУЖИВАНИЯ ПОДВОДНОГО КОМПЬЮТЕРА
SUUNTO …… . . . ….. . . . ….. . . . ….. . . . ….. . . . ….. . . . ….. . . . ….. . . . ….. . . . ….. . . . . 110
9. ЗАМЕНА ЭЛЕМЕНТА ПИТАНИЯ . ….. . . . ….. . . . ….. . . . ….. . . . ….. . . . ….. . . . . 117
9.1. Замена элемента питания беспроводного передатчика . . . . ….. . . . …. 118
9.1.1. Комплект элемента питания передатчика . . . . …. . . . . …. . . . . …. . . . 118
9.1.2. Требуемый инструмент . . . ….. . . . ….. . . . ….. . . . ….. . . . ….. . . . ….. . . 118
9.1.3. Замена элемента питания передатчика …… . . . ….. . . . ….. . . . ….. 118
10. ТЕХНИЧЕСКИЕ ДАННЫЕ . ….. . . . ….. . . . ….. . . . ….. . . . ….. . . . ….. . . . ….. . . 122
10.1. Технические характеристики .. . ….. . . . ….. . . . ….. . . . ….. . . . ….. . . . …. 122
10.2. RGBM . . ….. . . . ….. . . . ….. . . . ….. . . . ….. . . . ….. . . . ….. . . . ….. . . . ….. . . . . 126
10.2.1. Адаптивная декомпрессия RGBM компании Suunto … . . . ….. . . 127
10.2.2. Пределы погружения без декомпрессионных остановок с возду-
хом …… . . . ….. . . . ….. . . . ….. . . . ….. . . . ….. . . . ….. . . . ….. . . . ….. . . . ….. . . . . 128
10.2.3. Высокогорные погружения .. . . . ….. . . . ….. . . . ….. . . . ….. . . . ….. . . 131
6

10.3. Воздействие кислорода . . ….. . . . ….. . . . ….. . . . ….. . . . ….. . . . ….. . . . .. 131
11. ИНТЕЛЛЕКТУАЛЬНАЯ СОБСТВЕННОСТЬ . . ….. . . . ….. . . . ….. . . . ….. . . . .. 133
11.1. Авторское право . …. . . . . …. . . . . …. . . . . …. . . . . …. . . . . …. . . . . …. . . . . …. . 133
11.2. Товарный знак …. . . . ….. . . . ….. . . . ….. . . . ….. . . . ….. . . . ….. . . . ….. . . . .. 133
11.3. Уведомление о патентах .. ….. . . . ….. . . . ….. . . . ….. . . . ….. . . . ….. . . . .. 133
12. ЗАЯВЛЕНИЯ ОБ ОТКАЗЕ ОТ ОТВЕТСТВЕННОСТИ …… . . . ….. . . . ….. . . 134
12.1. Ответственность пользователя . . . . ….. . . . ….. . . . ….. . . . ….. . . . ….. . . 134
12.2. CE ….. . . . ….. . . . ….. . . . ….. . . . ….. . . . ….. . . . ….. . . . ….. . . . ….. . . . ….. . . 134
13. ОГРАНИЧЕННАЯ ГАРАНТИЯ КОМПАНИИ SUUNTO НА ПОДВОДНЫЕ
КОМПЬЮТЕРЫ SUUNTO И НА ПРИНАДЛЕЖНОСТИ К ПОДВОДНЫМ КОМ-
ПЬЮТЕРАМ SUUNTO . ….. . . . ….. . . . ….. . . . ….. . . . ….. . . . ….. . . . ….. . . . ….. . . . . 135
14. УТИЛИЗАЦИЯ УСТРОЙСТВА … . . . ….. . . . ….. . . . ….. . . . ….. . . . ….. . . . ….. . 142
ГЛОССАРИЙ .. . ….. . . . ….. . . . ….. . . . ….. . . . ….. . . . ….. . . . ….. . . . ….. . . . ….. . . . . 143
7
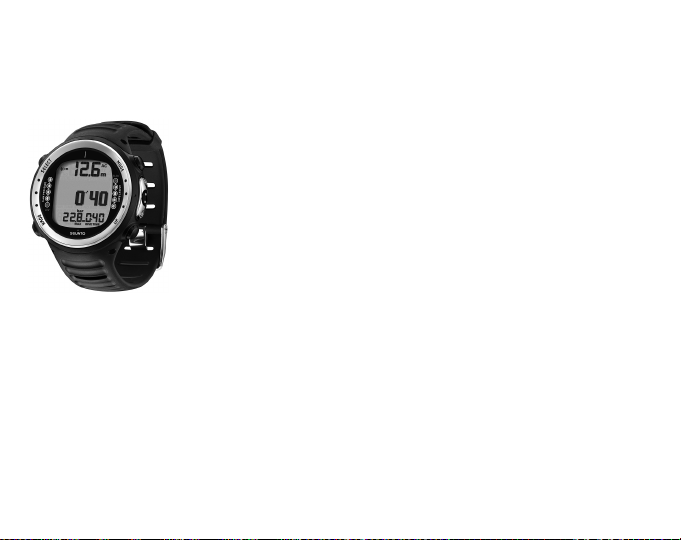
ГЛАВА 1. ДОБРО ПОЖАЛОВАТЬ В МИР ПОДВОДНЫХ КОМПЬЮТЕРОВ SUUNTO
Наручный подводный компьютер Suunto D4i специально разработан для того,
чтобы позволить вам получать максимальное удовольствиеот занятий дайвингом.
Подводный компьютер Suunto D4i упрощает процесс погружения за счет объединения на одном удобном для считывания информации экране всех необходимых
вам данных о глубине, времени, статусе декомпрессии и, дополнительно, давлении в баллоне.
8

Руководство пользователя подводного компьютера Suunto D4i содержит жизненно
важную информацию, которая позволит вам ознакомиться с вашим наручным
подводным компьютером Suunto. Для понимания порядка применения, дисплеев
и ограничений этого прибора перед началом его использования внимательно
прочитайте настоящее руководство пользователя и сохраните его для последующего использования в справочных целях. Обратите внимание на то, что в
конце руководства пользователя имеется глоссарий, который поможет вам
ознакомиться с терминологией, используемой в дайвинге.
9

ГЛАВА 2. ПРЕДУПРЕЖДЕНИЯ, ПРЕДОСТЕРЕЖЕНИЯ И ПРИМЕЧАНИЯ
По всему тексту настоящего руководства имеются значки, обозначающие указания, связанные с безопасностью. Эти значки подразделяются на три класса в
зависимости от степени важности:
Внимание
используется в связи с процедурой или ситуацией, способной привести к тяжелой травме или смерти
Предостережение
Замечание
Перед тем, как вы приступите к чтению собственно руководства пользователя,
исключительно важно прочитать приведенные ниже предупреждения. Эти предупреждения служат для обеспечения максимального уровня вашей безопасности
при использовании изделий Suunto D4i и вы не должны пренебрегать ими.
10
используетсяв связи с процедурой или ситуацией, которая
может привести к повреждению устройства
служит для обозначения важной информации

Внимание
ПРОЧИТАЙТЕ НАСТОЯЩЕЕ руководство пользователя!
Внимательно и полностью прочитайте настоящее руководство пользователя, уделяя пристальное внимание всем
перечисленным ниже предупреждениям, в том числе – входящим в Глава 5, ПЕРЕД ПОГРУЖЕНИЕМ. Убедитесь в
том, что вы полностью понимаете порядок применения,
дисплеи и ограничения подводного компьютера, так как
любое непонимание, вызванное несоблюдением требований
этого руководства пользователя или ненадлежащим использованиемэтого устройства, может привести к совершению вами ошибок, которые могут стать причиной тяжелой травмы или смерти.
Внимание
НЕ ДЛЯ ПРОФЕССИОНАЛЬНОГО ИСПОЛЬЗОВАНИЯ! Подводные компьютеры Suunto предназначены только для рекреационных целей. Особенности коммерческого или профессионального дайвинга могут сопровождаться воздействием на дайвера глубин и факторов, способных повысить
риск возникновения декомпрессионной болезни (ДКБ). По
этой причине компания Suunto настоятельно рекомендует
не применять настоящее устройство для коммерческого
или профессионального дайвинга.
11

Внимание
12
ПОДВОДНЫЙ КОМПЬЮТЕР ДОЛЖЕН ПРИМЕНЯТЬСЯ
ТОЛЬКОДАЙВЕРАМИ,ПРОШЕДШИМИ ОБУЧЕНИЕ ПОРЯДКУ ПОЛЬЗОВАНИЯ СНАРЯЖЕНИЕМ ДЛЯ ДАЙВИНГА. Никакой подводный компьютер не может заменить надлежащее
обучение методам дайвинга. Недостаточный объем или
несоответствующее обучение могут привести к совершению вами ошибок, способных вызвать тяжелую травму или
смерть.

Внимание
ВНЕ ЗАВИСИМОСТИ ОТ ПРОФИЛЯ ПОГРУЖЕНИЯ И ДАЖЕ
В СЛУЧАЕ СОБЛЮДЕНИЯ ПЛАНА ПОГРУЖЕНИЯ, ПРЕДПИСАННОГО ДЕКОМПРЕССИОННЫМИ ТАБЛИЦАМИ ИЛИ
ПОДВОДНЫМ КОМПЬЮТЕРОМ ВСЕГДА СУЩЕСТВУЕТ
ОПАСНОСТЬ ВОЗНИКНОВЕНИЯ ДЕКОМПРЕССИОННОЙ
БОЛЕЗНИ (ДКБ). НИКАКАЯ ПРОЦЕДУРА, ПОДВОДНЫЙ
КОМПЬЮТЕР ИЛИ ДЕКОМПРЕССИОННАЯ ТАБЛИЦА НЕ
МОГУТ ИСКЛЮЧИТЬ ВОЗМОЖНОСТЬ ВОЗНИКНОВЕНИЯ
ДЕКОМПРЕССИОННОЙ БОЛЕЗНИ ИЛИ КИСЛОРОДНОГО
ОТРАВЛЕНИЯ! Физиологическое состояние человека может
варьироваться день ото дня. Подводный компьютер не в
состоянии учитывать эти отклонения. Для сведения к
минимуму риска возникновения ДКБ мы настоятельно рекомендуем вам соблюдать определяемые прибором пределы
воздействий со значительным запасом. В качестве дополнительной меры предосторожности перед погружением
следует проконсультироваться с врачом относительно
вашей пригодности.
13

Внимание
КОМПАНИЯ SUUNTO НАСТОЯТЕЛЬНО РЕКОМЕНДУЕТ
ОГРАНИЧЕНИЕМАКСИМАЛЬНОЙ ГЛУБИНЫ ПОГРУЖЕНИЯ
ДЛЯ СПОРТИВНОГО ДАЙВИНГА ЗНАЧЕНИЕМ В 40 М [130
ФУТОВ] ИЛИ ГЛУБИНОЙ, РАССЧИТАННОЙКОМПЬЮТЕРОМ
ДЛЯ ВЫБРАННОГО ЗНАЧЕНИЯ O2% И МАКСИМАЛЬНОГО
ЗНАЧЕНИЯ PO21,4 БАРА! Нахождение на большей глубине
повышает риск кислородного отравления и декомпрессионной болезни.
Внимание
Внимание
14
НЕ РЕКОМЕНДУЕТСЯ ПРОВЕДЕНИЕ ПОГРУЖЕНИЙ, ТРЕБУЮЩИХ ОБЯЗАТЕЛЬНЫХ ДЕКОМПРЕССИОННЫХ ОСТАНОВОК. ВЫ ДОЛЖНЫ НАЧИНАТЬ ВСПЛЫТИЕ И ДЕКОМПРЕССИЮ СРАЗУ ПОСЛЕ ТОГО, КАК ПОДВОДНЫЙ КОМПЬЮТЕР УКАЖЕТ ВАМ НА НЕОБХОДИМОСТЬ ВЫПОЛНЕНИЯ ДЕКОМПРЕССИОННОЙ ОСТАНОВКИ! Следите за мигающим символом ASC TIME и стрелкой, направленной
вверх.
ИСПОЛЬЗУЙТЕ РЕЗЕРВНЫЕ ИЗМЕРИТЕЛЬНЫЕ ПРИБОРЫ!
Обязательно используйте резервные измерительные приборы, включая глубиномер, подводный датчик давления,
таймер или часы, и обеспечьте наличие декомпрессионных
таблиц при погружениях с подводным компьютером.

Внимание
ВЫПОЛНЯЙТЕ ПРЕДВАРИТЕЛЬНЫЙ КОНТРОЛЬ! Обязательно выполняйте включение и проверку устройства перед погружением, чтобы убедиться в полном отображении
всех сегментов жидкокристаллического дисплея (ЖКД),
наличии достаточного ресурса элементов питания, а
также в правильности показаний кислорода, высоты над
уровнем моря, личных настроек, остановок безопасности/глубоководных остановок.
Внимание
НАСТОЯТЕЛЬНО РЕКОМЕНДУЕТСЯ ИЗБЕГАТЬ АВИАПЕРЕЛЕТОВ В ТЕЧЕНИЕ ВСЕГО ВРЕМЕНИ, ПОКА КОМПЬЮТЕР
ОТСЧИТЫВАЕТВРЕМЯ ЗАПРЕТА АВИАПЕРЕЛЕТОВ. ПЕРЕД
ПОЛЕТАМИОБЯЗАТЕЛЬНО ВКЛЮЧАЙТЕ КОМПЬЮТЕР ДЛЯ
ПРОВЕРКИ ОСТАВШЕГОСЯ ВРЕМЕНИ ЗАПРЕТА АВИАПЕРЕЛЕТОВ! Авиаперелеты или нахождение на большей высоте над уровнем моря в течение времени запрета авиаперелетов может существенно увеличить риск ДКБ. Изучите
рекомендации организации Divers Alert Network (DAN) в Раздел 7.4, «Авиаперелеты после погружения». Не существует
никаких точных правил расчета интервала времени от
погружения до полета, гарантирующего полное исключение
декомпрессионной болезни.
15

Внимание
КАТЕГОРИЧЕСКИ ЗАПРЕЩАЕТСЯ ОБМЕН ИЛИ СОВМЕСТНОЕ ИСПОЛЬЗОВАНИЕ ПОДВОДНЫХ КОМПЬЮТЕРОВ ВО
ВРЕМЯ ИХ РАБОТЫ! Содержащаяся в компьютере информация будет недостоверной для любого лица, не носившего
его в течение всего погружения или нескольких последовательных погружений. Параметры погружения в компьютере
должны соответствовать параметрам пользователя.
Если компьютер был оставлен на поверхности в течение
любого из погружений, он будет отображать неточную
информацию при последующих погружениях. Подводные
компьютеры не могут учитывать погружения, совершенные без компьютера. По этой причине любые погружения
в воду в течение интервала времени протяженностью до
четырех дней перед началом использования компьютера
могут привести к неточности информации, и их следует
избегать.
Внимание
16
НЕ ПОДВЕРГАЙТЕ ДАТЧИК ДАВЛЕНИЯ В БАЛЛОНЕ, ЯВЛЯЮЩИЙСЯ ДОПОЛНИТЕЛЬНЫМОБОРУДОВАНИЕМ МОДЕЛИ
SUUNTO , ВОЗДЕЙСТВИЮ ЛЮБОЙ СМЕСИ ГАЗОВ С СОДЕРЖАНИЕМ КИСЛОРОДА СВЫШЕ 40%! Обогащенный с
более высоким содержанием кислорода создает опасность
пожара или взрыва, и может привести к тяжелым травмам
или смерти.

Внимание
НЕ ВЫПОЛНЯЙТЕ ПОГРУЖЕНИЕ С БАЛЛОНОМ С ОБОГАЩЕННЫМ , ЕСЛИ ВЫ НЕ ВЫПОЛНИЛИ ЛИЧНУЮ ПРОВЕРКУ
ЕГО СОСТАВА И НЕ ВВЕЛИ ЗНАЧЕНИЯ,ПОЛУЧЕННЫЕ ПРИ
АНАЛИЗЕ, В ВАШ ПОДВОДНЫЙ КОМПЬЮТЕР! Невыполнение требования о контроле содержимого баллона и вводе
соответствующихзначений O2% в ваш подводный компьютер приведет к получению несоответствующей информации плана погружения.
Внимание
ПОДВОДНЫЙ КОМПЬЮТЕР НЕ ДОПУСКАЕТ ВВОДА
ДРОБНЫХ ЗНАЧЕНИЙ КОНЦЕНТРАЦИИ КИСЛОРОДА. НЕ
ОКРУГЛЯЙТЕДРОБНЫЕ ЗНАЧЕНИЯ В ПРОЦЕНТАХ! Например, значение содержания кислорода 31,8% следует вводить
как 31%. Округление в сторону увеличения приведет к недооценке процентного содержания азота и окажет неблагоприятное воздействие на расчет параметров декомпрессии. При желании коррекции компьютера в сторону более
консервативных расчетов воспользуйтесь функцией личных
настроек для коррекции расчетов декомпрессии или сократите уставку парциального давления кислорода PO2для
коррекции воздействия кислорода с учетом введенных
значений O2% и PO2.
17

Внимание
УСТАНОВИТЕПРАВИЛЬНЫЙРЕЖИМ КОРРЕКЦИИ ВЫСОТЫ
НАД УРОВНЕМ МОРЯ! В случае высокогорных погружений
при значениях высоты над уровнем моря свыше 300 м/1000
футов необходимо правильно выбрать функцию коррекции
высоты над уровнем моря, чтобы позволить компьютеру
выполнить расчет статуса декомпрессии. Подводный
компьютер не предназначен для использования на высоте
над уровнем моря свыше 3000 м/10000 футов]. Невыполнение требования о выборе правильного значения коррекции
высоты над уровнем моря или выполнение погружений на
высоте, превышающей максимальный предел высоты над
уровнем моря, приведет к отображению ошибочных параметров и плана погружения.
Внимание
18
УСТАНОВИТЕПРАВИЛЬНЫЙРЕЖИМ КОРРЕКЦИИ ЛИЧНЫХ
ДАННЫХ! Если у вас имеются основания полагать о наличии
факторов, способствующих повышению риска ДКБ, рекомендуется использовать эту функцию для выполнения более консервативного расчета. Невыполнение требования
о выборе правильных личных параметров приведет к
отображению ошибочных параметров и плана погружения.

Внимание
В настоящем устройстве содержится литиевая часовая
батарея. Для снижения риска пожара или ожогов не разбирайте, не раздавливайте, не прокалывайте и не закорачивайте ее контактов, не сжигайте и не выбрасывайте в
воду. Используйте исключительно батареи указанного изготовителемтипа. Выполняйте требования по утилизации
или удалению использованных батарей.
Замечание
Переход между режимами AIR, NITROX и FREE допускается
только после завершения отсчета прибором времени запрета авиаперелетов.
Существует единственное исключение из этого правила:
Вы можете выполнить переключение из режима AIR в режим
NITROX даже в течение времени запрета авиаперелетов.
При планировании погружений как с воздухом, так и смесью
nitrox в одной и той же серии погружений вы должны установить прибор в режим NITROX и соответствующим образом изменять состав смеси газов.
19
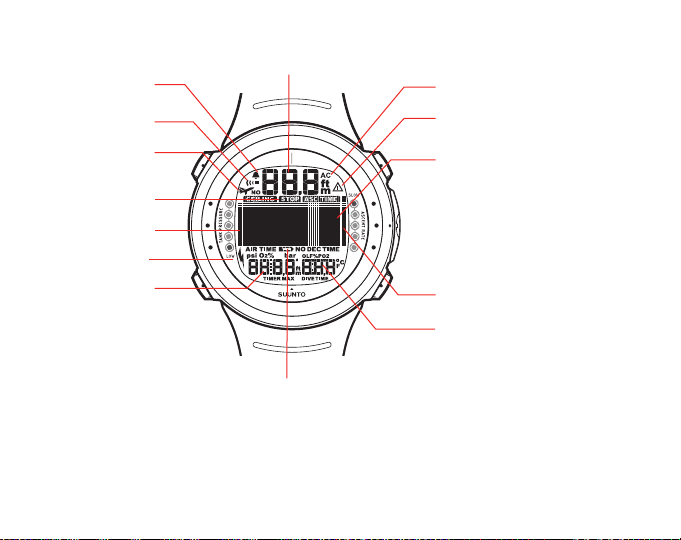
U
P
D
O
W
N
S
E
L
E
C
T
M
O
D
E
Значок запрета
авиаперелетов
No-Fly Icon
Символ «Внимание!»
для дайвера
Полосковый индикатор
скорости подъема
Индикатор сигнала
тревоги при погружении
Индикатор ежедневного
будильника
Предупреждение о низком
напряжении батареи
Фактическая глубина
Полосковый индикатор
давления в баллоне
Индикатор
беспроводной передачи
Дата
Время второго
часового пояса
Максимальная глубина
O
2
% (режим Nitrox)
Время
Давление в баллоне
Индикатор активного
состояния контакта воды
Дисплей текущего времени
Индикатор режима
Бездекомпрессионный
предел времени
Полное время подъема
Глубина потолка
Время запаса по воздуху
Индикатор остановки безопасности/
глубоководной остановки
Время до следующего погружения
Время запрета авиаперелетов
График насыщения тканей
Дисплей секунд
Секундомер
День недели
Время погружения
Номер погружения
Температура
PO
2
(режим Nitrox)
OLF% (режим Nitrox)
20
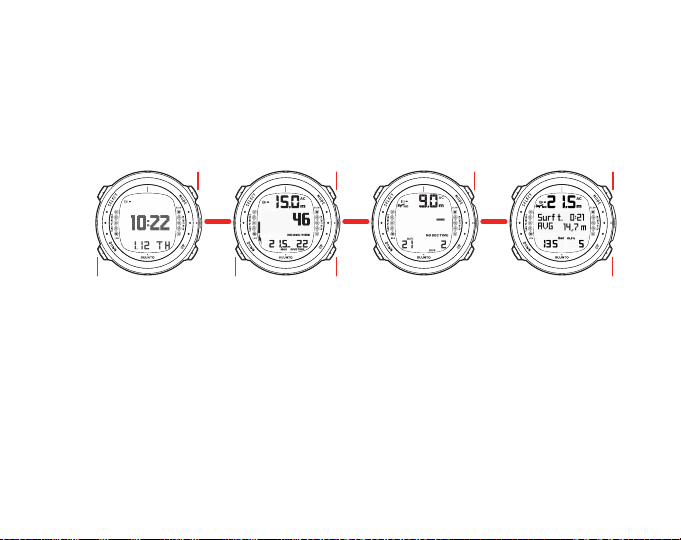
3.1. Перемещение по системе меню
SETTINGS
Alarm
Time
Dual Time
Date
Units
Backlight
Contrast
Tones
SUB-MODES
Air
Nitrox
Free
SETTINGS
Nitrox
Personal/Altitude
Tank Press Pairing
Tank Press Alarm
Depth Alarm
Depth Notify Alarm
Dive Time Alarm
Surface Time Notify Alarm
Sample Rate
Deepstop
Units
TIME DIVE PLAN MEM
SUB-MODES
Logbook
History
LIGHT LIGHT LIGHT LIGHT
Подводный компьютер Suunto D4i имеет четыре основных режима работы — режим
ВРЕМЕНИ (TIME), режим ПОГРУЖЕНИЯ (DIVE), режим ПЛАНИРОВАНИЯ (PLAN)
и режим ПАМЯТИ (MEM). Для переключения между основными режимами нажмите кнопку MODE. Для выбора подрежима в режимах DIVE и MEM воспользуйтесь кнопками UP/DOWN.
21
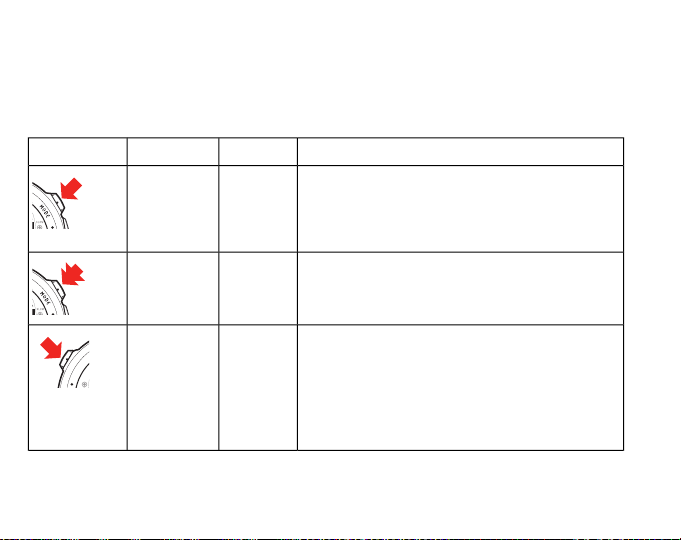
3.2. Символы и функции кнопок
В приведенной ниже таблице поясняются основные функции, выполняемые
кнопками подводного компьютера. Более подробное описание кнопок и их применения содержится в соответствующих разделах руководства пользователя.
Таблица 3.1. Символы и функции кнопок
Основные функцииНажатиеКнопкаСимвол
КороткоеMODE
Переключение между основными режимами
Выход из подрежима в основной режим
Включение задней подсветки в режиме
DIVE
ДлинноеMODE
Включение задней подсветки в других режимах
Включение секундомера в режиме DIVE
КороткоеSELECT
Выбор подрежима
Выбор и подтверждение параметров
Выбор команды пуска и остановки секундо-
мера в режиме DIVE
Отображение Истории дня в режиме FREE
(режим свободного погружения)
22
Основные функцииНажатиеКнопкаСимвол
КороткоеUP
КороткоеDOWN
ДлинноеDOWN
Переключение между альтернативными
дисплеями
Переход между подрежимами
Увеличение значений
Изменение сокращенных команд в режимах
TIME и DIVE
Переключение между альтернативными
дисплеями
Переход между подрежимами
Уменьшение значений
Изменение сокращенных команд в режимах
TIME и DIVE
Вход в режим Установки
23

ГЛАВА 4. НАЧАЛО РАБОТЫ
U
P
D
O
W
N
S
E
L
E
C
T
M
O
D
E
U
P
D
O
W
N
S
E
L
E
C
T
M
O
D
E
U
P
D
O
W
N
S
E
L
E
C
T
M
O
D
E
U
P
D
O
W
N
S
E
L
E
C
T
M
O
D
E
U
P
D
O
W
N
S
E
L
E
C
T
M
O
D
E
Для максимально эффективного использования подводного компьютера Suunto
D4i вам следует выделить определенное время для проведения его персональной
настройки, после которой он станет действительно ВАШИМ компьютером.
Установите правильные время и дату, время будильников, а также единицы измерения и параметры задней подсветки дисплея.
Подводный компьютер Suunto D4i является исключительно дружественным к
пользователю и вы быстро ознакомитесь со всеми его функциями. Вы должны
быть абсолютно уверены в том, что вы действительно знаете свой подводный
компьютер и выполнили все требуемые настройки ПЕРЕД тем, как погружаться
в воду.
4.1. Параметры режима TIME (ВРЕМЯ)
На приведенном ниже рисунке показан порядок переключения между различными
сокращенными командами режима TIME:
Замечание
24
По истечении 5 минут дисплей секунд возвращается к
отображению даты для экономии энергии батареи.
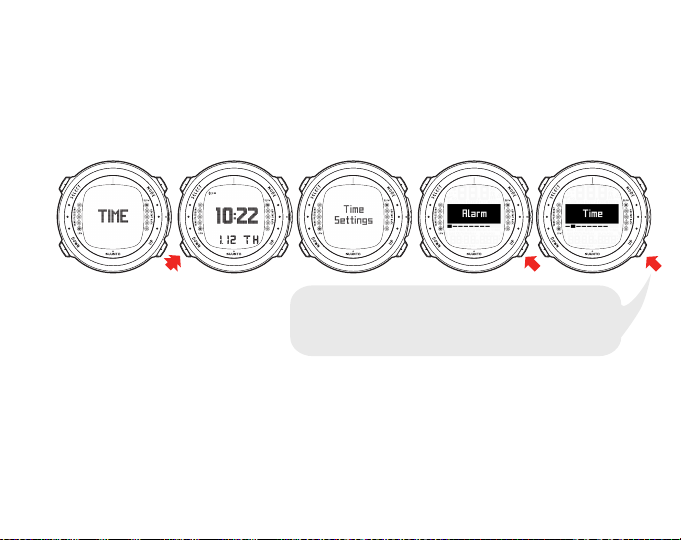
Замечание
ИСПОЛЬЗУЙТЕ КНОПКИ UP И DOWN ДЛЯ ПЕРЕКЛЮЧЕНИЯ
МЕЖДУ БУДИЛЬНИКОМ, ВРЕМЕНЕМ, ВТОРЫМ ПОЯСНЫМ
ВРЕМЕНЕМ, ДАТОЙ , ЕДИНИЦАМИ ИЗМЕРЕНИЯ, КОНТРАСТОМ
И ЗВУКОВЫМИ СИГНАЛАМИ.
Для подсветки дисплея удерживайте кнопку MODE нажатой
в течение более чем 2 секунд.
Теперь, когда вы научились выполнять переключения между сокращенными командами, можно приступить к их использованию.
На приведенном ниже рисунке показан порядок порядок входа в меню TIME
Settings (Параметры времени):
4.1.1. Установка будильника
В подводном компьютере имеется функция будильника, срабатывающего ежедневно. При наступлении запрограммированного времени в течение 60 секунд
мигает экран и звучит сигнал будильника. Для остановки сигнала будильника
нажмите любую кнопку.
25
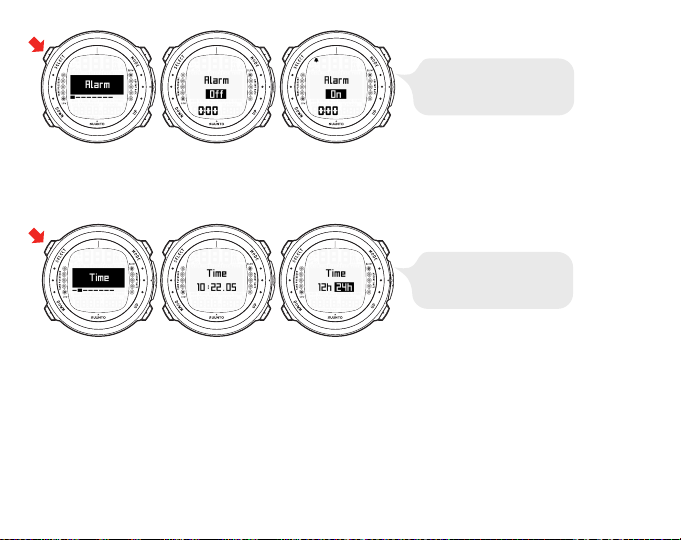
КОРРЕКЦИЯ КНОПКАМИ UP
И DOWN. ПОДТВЕРЖДЕНИЕ
ВЫБОРА КНОПКОЙ SELECT.
4.1.2. Установка времени
КОРРЕКЦИЯ КНОПКАМИ UP
И DOWN. ПОДТВЕРЖДЕНИЕ
ВЫБОРА КНОПКОЙ SELECT.
В режиме установки Time (Время) вы можете установить часы, минуты и секунды,
а также выбрать 12- или 24-часовой режим отображения.
4.1.3. Установка второго поясного времени
В режиме установки Dual Time (Второе поясное время) вы можете установить
часы и минуты второго поясного времени. Эта функция является полезной при
путешествии в другой часовой пояс.
26
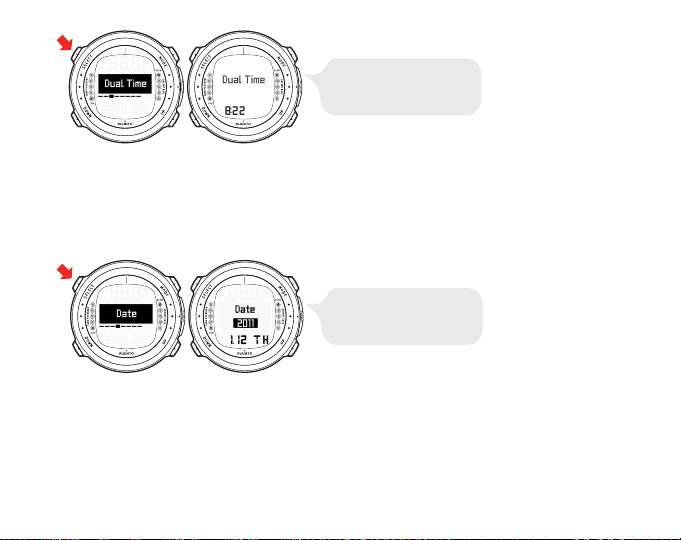
КОРРЕКЦИЯ КНОПКАМИ UP
И DOWN. ПОДТВЕРЖДЕНИЕ
ВЫБОРА КНОПКОЙ SELECT.
4.1.4. Установка даты
КОРРЕКЦИЯ КНОПКАМИ UP
И DOWN. ПОДТВЕРЖДЕНИЕ
ВЫБОРА КНОПКОЙ SELECT.
В режиме установки Date (Дата) вы можете установить год, месяц и день. День
недели автоматически вычисляется по введенной дате. При выборе метрических
единиц измерения дата отображается в формате ДД/ММ, при выборе британских
единиц – в формате ММ/ДД.
4.1.5. Установка единиц измерения
В режиме установки Units (Единицы измерения) вы можете выбрать отображение
значений в метрической или британской системе мер (метры/футы, градусы
Цельсия/Фаренгейта и т.п.).
27
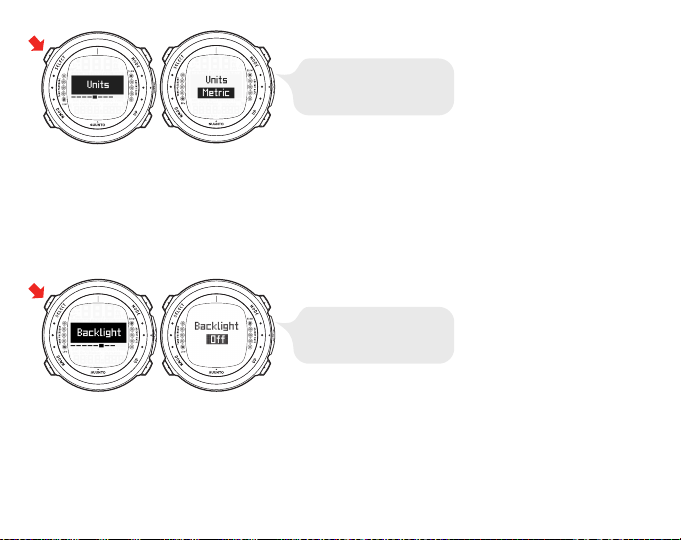
КОРРЕКЦИЯ КНОПКАМИ UP
И DOWN. ПОДТВЕРЖДЕНИЕ
ВЫБОРА КНОПКОЙ SELECT.
4.1.6. Настройка задней подсветки
КОРРЕКЦИЯ КНОПКАМИ UP
И DOWN. ПОДТВЕРЖДЕНИЕ
ВЫБОРА КНОПКОЙ SELECT.
В режиме настройки Backlight (Задняя подсветка) вы можете выбрать режимы
ON (ВКЛ.) или OFF (ВЫКЛ.) задней подсветки, а также установить продолжительность работы подсветки (5, 10, 20, 30 или 60 секунд). Если для задней подсветки
выбран режим OFF (ВЫКЛ.), то при срабатывании будильника подсветка не
включается.
4.1.7. Настройка контрастности
В режиме настройки Contrast (Контрастности) вы можете установить требуемую
контрастность дисплея (значение в диапазоне от 0 до 10).
28
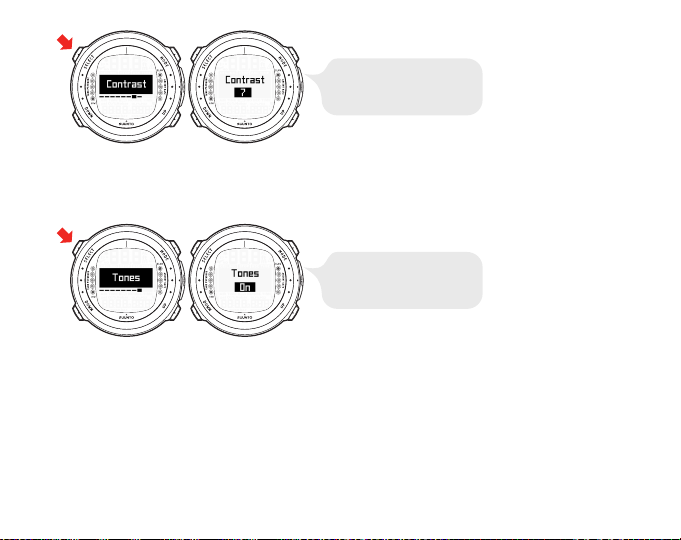
КОРРЕКЦИЯ КНОПКАМИ UP
И DOWN. ПОДТВЕРЖДЕНИЕ
ВЫБОРА КНОПКОЙ SELECT.
4.1.8. Настройка звуковых сигналов
КОРРЕКЦИЯ КНОПКАМИ UP
И DOWN. ПОДТВЕРЖДЕНИЕ
ВЫБОРА КНОПКОЙ SELECT.
В режиме настройки Tones (Звуковые сигналы) вы можете включить или выключить звуковые сигналы.
Замечание
В случае выключения звуковых сигналов срабатывание будильника не будет сопровождаться какой-либо звуковой
сигнализацией.
4.2. Секундомер
Функция Stopwatch (Секундомер) подводного компьютера Suunto D4i позволяет
измерять истекшее время и время нарастающим результатом.
29
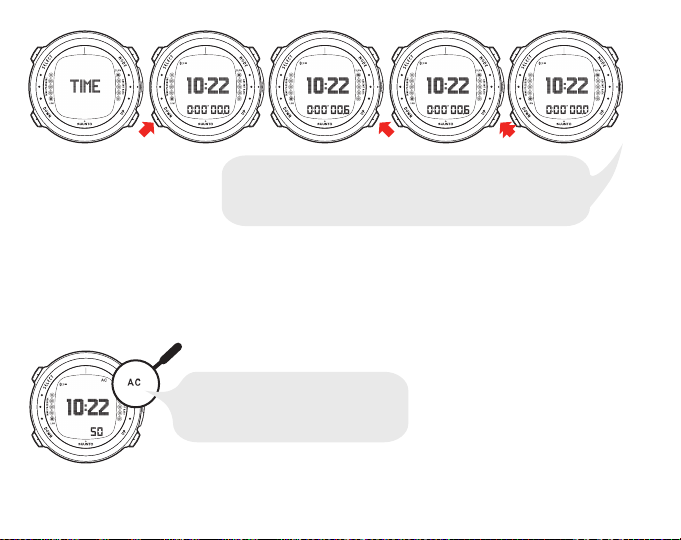
ВОСПОЛЬЗУЙТЕСЬ КНОПКОЙ DOWN ДЛЯ ЗАПУСКА СЕКУНДОМЕРА
И ИЗМЕРЕНИЯ ВРЕМЕНИ НАРАСТАЮЩИМ РЕЗУЛЬТАТОМ. КНОПКА UP
ОСТАНАВЛИВАЕТ СЕКУНДОМЕР, А ПРОДОЛЖИТЕЛЬНОЕ НАЖАТИЕ
СБРАСЫВАЕТ ЕГО ПОКАЗАНИЯ.
4.3. Контакты воды AC
СИМВОЛ AC ОТОБРАЖ АЕТС Я В ПРАВОМ
ВЕРХНЕМ УГЛУ ДИСПЛЕЯ ПРИ КОНТАКТЕ
ПОДВОДНОГО КОМПЬЮТЕРА С ВОДОЙ. ЭТО
ТАКЖЕ АКТИВИРУЕТ РЕЖИМ DIVE.
Контакты воды и для передачи данных расположены на задней части корпуса.
При погружении подводного компьютера в воду контактные выводы соединяются
за счет проводимости воды и на дисплее отображается символ «AC». Текст AC
отображается до тех пор, пока контакты воды не будут разомкнуты.
30
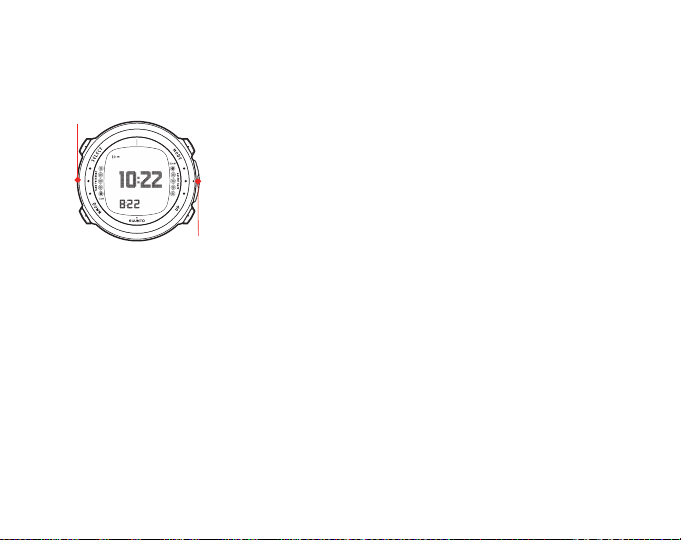
Загрязнение или инородные частицы на контактах воды могут нарушить их авто-
ДАТЧИК
ГЛУБИНЫ
ВОДЫ/ДАТЧИК
ДАННЫХ
матическое срабатывание. По этой причине важно поддерживать контакты воды
в чистоте. Для чистки контактов воспользуйтесь пресной водой и мягкой щеткой,
например – зубной.
31

ГЛАВА 5. ПЕРЕД ПОГРУЖЕНИЕМ
Не пытайтесь пользоваться подводным компьютером, не прочитав полностью
настоящее руководство пользователя, включая все предупреждения. Вы должны
быть уверены в том, что полностью понимаете порядок обращения, дисплеи и
ограничения настоящего прибора. Если у вас имеются какие-либо вопросы относительно руководства или подводного компьютера, свяжитесь со своим дилером
компании SUUNTO, прежде чем выполнять погружения с подводным компьютером.
Вы должны всегда помнить о том, что ВЫ НЕСЕТЕ ПЕРСОНАЛЬНУЮ ОТВЕТСТВЕННОСТЬ ЗА СОБСТВЕННУЮ БЕЗОПАСНОСТЬ!
В случае надлежащего использования подводный компьютер Suunto D4i является
непревзойденным средством для оказания помощи прошедшим надлежащее
обучение и сертифицированным дайверам при планировании и выполнении ими
спортивных погружений. Однако это НЕ МОЖЕТ ЗАМЕНИТЬ СЕРТИФИЦИРОВАННОЕ ОБУЧЕНИЕ ПОГРУЖЕНИЯМ С АВТОНОМНЫМ ДЫХАТЕЛЬНЫМ АППАРАТОМ, включая обучение принципам декомпрессии.
Внимание
32
Погружение с использованием смесей газов подвергает вас
рискам, отличным от рисков, связанных с погружением с
обычным воздухом. Эти риски не являются очевидными и
требуют специального обучения для их понимания и
предотвращения. Эти риски включают опасность тяжелой
травмы или смерти.

Не пытайтесь выполнять погружения с любой смесью газов помимо обычного
воздуха, не пройдя предварительно сертифицированное обучение по этому
предмету.
5.1. модель декомпрессии RGBM компании Suunto
Разработаннаякомпанией Suunto Модель ограничения градиента газообразования (Reduced Gradient Bubble Model, RGBM), применяемая в подводных компьютерах Suunto D4i, предсказываетсодержание как растворенного, так и свободного
газа в крови и тканях дайверов. Этот алгоритм стал значительным шагом по
сравнению с классическими моделями Холдана, в которых не выполнялось
предсказание свободного газа. Преимуществом алгоритма Suunto RGBM является повышенная безопасность, обеспечиваемая его способностью приспосабливаться к самым разным ситуациям и профилям погружений.
Для оптимизации действий, предпринимаемых в различных ситуациях, связанных
с повышенным риском, была введена дополнительная категория остановки, называемая Обязательной остановкой безопасности. Комбинация типов остановок
зависит от настроек пользователя и от конкретной ситуации при погружении.
Для максимально эффективного использования преимуществ обеспечения
безопасности моделью RGBM см. Раздел 5.9.10, «Установка параметров глу-
боководных остановок» и Раздел 5.12, «Глубоководные остановки».
33

5.2. В чрезвычайных ситуациях
В маловероятном случае возникновения неисправности вашего подводного
компьютера во время погружения соблюдайтепорядок действий в чрезвычайных
ситуациях, сообщенный вам сертифицированной организацией по обучению
дайвингу или следующий порядок действий:
Спокойно оцените ситуацию и затем незамедлительно вернитесь на глубину
1.
менее 18 м/60 футов.
После достижения глубины 18 м/60 футов замедлите всплытие до 10 м / 33
2.
футов в минуту и достигните значения глубины в пределах от 3 до 10 метров
/ от 10 до 20 футов.
Находитесь на этой глубине так долго, как это возможно с учетом вашей
3.
оценки имеющегося воздуха. После достижения поверхности не выполняйте
погружения по крайней мере в течение 24 часов.
5.3. Ограничения возможностей подводного компьютера
Несмотря на то, что работа подводного компьютера основывается на современных достижениях исследований и технологии декомпрессии, вы должны понимать,
что компьютер не способен контролировать фактические физиологические
функции организма индивидуального дайвера. Все известные авторам современные декомпрессионные таблицы, включая Таблицы ВМФ США, основаны на теоретических математических моделях, которые должны использоваться в качестве ориентира для снижения вероятности возникновения декомпрессионной
болезни.
34

5.4. Погружения с кислородно-азотной смесью Nitrox
Погружения с кислородно-азотной смесью (nitrox) дает вам возможность увеличить время нахождения на глубине или снизить риск возникновения декомпрессионной болезни за счет снижения содержания азота в смеси газов.
Тем не менее, при смене смеси газов содержание кислорода в смеси, как правило,
увеличивается. Это увеличение подвергает дайвера опасности кислородного
отравления, которое обычно не учитывается при рекреационном дайвинге. Для
снижения уровня этого риска подводный компьютер отслеживает продолжительность и интенсивность воздействия кислорода и предоставляет дайверу информацию, позволяющую скорректировать план погружения таким образом, чтобы
сохранить воздействие кислорода в разумных безопасных пределах.
Помимо физиологического воздействия обогащенного воздуха на организм человека, имеются и эксплуатационные соображения, которые должны учитываться
при использовании дыхательных смесей измененного состава. Повышенные
концентрации кислорода связаны с опасностью пожара или взрыва. Проконсультируйтесь с компанией-изготовителем вашего оборудования, чтобы убедиться
в его совместимости со смесью nitrox.
5.5. Погружения без акваланга
Погружения без акваланга (фридайвинг) и, особенно – погружения без акваланга
в сочетании с погружениями с аквалангом, могут подвергать вас рискам, которые
до настоящего времени не были предметом исследований и не являются широко
известными.
35

Любое лицо, занимающееся любыми видами погружений с задержкой дыхания,
подвергается опасности возникновения латентной гипоксии (SWB), которая выражается во внезапной потере сознания из-за кислородного голодания.
Любая задержка дыхания в той или иной степени приводит к накоплению азота
в крови и других тканях с быстрым насыщением. Учитывая незначительное
время, проводимое на глубине, это накопление как правило бывает незначительным. Следовательно, если погружение без акваланга не было связано со значительными усилиями, погружение с аквалангом после погружения с задержкой
дыхания связано с незначительными рисками. Тем не менее, возможные опасности при погружении в обратном порядке изучены в меньшей степени и это
может сопровождаться значительным увеличением риска возникновения ДКБ.
Следовательно, ФРИДАЙВИНГ ПОСЛЕ ПОГРУЖЕНИЯ С АКВАЛАНГОМ НЕ
РЕКОМЕНДУЕТСЯ. После погружений с аквалангом вы должны в течение как
минимум двух часов избегать занятий фридайвингом или не погружаться на
глубину свыше 5 м/16 футов.
Внимание
36
Компания Suunto также рекомендует прохождение обучения
методам ныряния без акваланга и в области физиологии
перед нырянием с задержкой дыхания. Никакой подводный
компьютер не может заменить надлежащее обучение методам дайвинга. Недостаточный объем или несоответствующее обучение могут стать причиной совершения
дайвером ошибок, способных привести к тяжелой травме
или смерти.
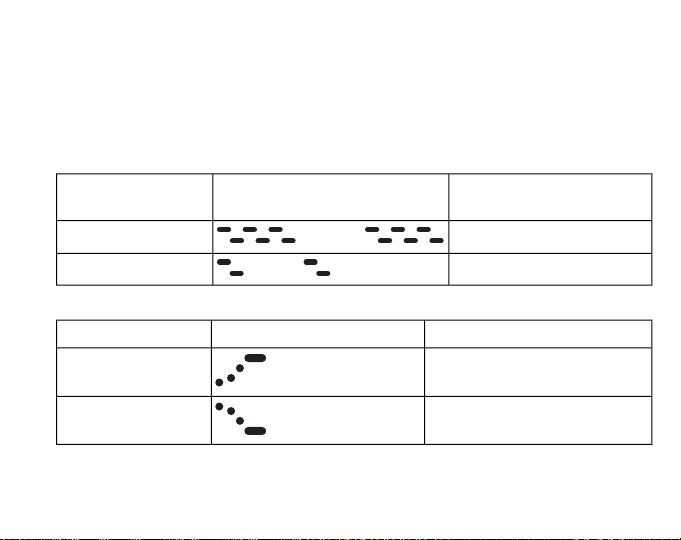
5.6. Звуковые и визуальные сигналы тревоги
В подводном компьютере имеются звуковые и визуальные сигналы тревоги для
предупреждения вас о приближении к важным предельным значениям или о
необходимости квитирования заранее установленных сигналов тревоги. В приведенной ниже таблице описываются различные виды сигналов тревоги и их
значение.
Таблица 5.1. Сигналы тревоги подводного компьютера
ги
Низкий приоритет
Таблица 5.2.
Восходящий
Для экономии энергии батареи визуальная информация отображается на
дисплее компьютера во время перерывов при срабатывании сигналов тревоги.
Начало всплытия
Начало погруженияНисходящий
ДлительностьТип звукового сигналаТип сигнала трево-
2,4 с сигнал + 2,4 с паузаВысокий приоритет
0,8 с сигнал + 3,2 с пауза
ЗначениеТип звукового сигналаСигнал-указание
37
Таблица 5.3. Типы звуковых и визуальных сигналов тревоги
Причина сигнала тревогиТип сигнала тревоги
Сигнал тревоги высокого
приоритета, за которым
следует звуковой сигнал
«Начать всплытие», повторяемый максимум в течение
трех минут. Значение PO2
мигает.
Сигнал тревоги высокого
приоритета, за которым
следует звуковой сигнал
«Начать погружение», повторяемый максимум в течение
трех минут. Мигает символ
Er и отображается стрелка,
направленная вниз.
Сигнал тревоги высокого
приоритета, повторяется
три раза. Символ SLOW
мигает.
38
Значение PO2 превышает скорректированное
значение. Текущее значение глубины является
слишком большим для используемого газа. Вы
должны немедленно выполнить подъем или перейти на газ с меньшим процентным содержанием
кислорода.
Превышено значение глубины потолка декомпрессии. Вы должны немедленно выполнить спуск до
глубины потолка или ниже.
Превышена максимально допустимая скорость
всплытия, составляющая 10 м/мин./33 фут./мин.
Уменьшите скорость всплытия.
Сигнал тревоги низкого
приоритета, за которым
следует звуковой сигнал
«Начать всплытие», повторяемый два раза. Мигает
символ ASC TIME и отображается стрелка, направленная вверх.
Сигнал тревоги низкого
приоритета, за которым
следует звуковой сигнал
«Начать погружение», в течение всего времени нарушения глубоководной остановки. Мигает символ
DEEPSTOP и отображается
стрелка, направленная
вниз.
Причина сигнала тревогиТип сигнала тревоги
Погружение без декомпрессионных остановок переходит в погружение с декомпрессионной остановкой. Глубина превышает значение пола декомпрессии. Вы должны выполнить всплытие до глубины
пола или выше.
Не выполнено требование об обязательной глубоководной остановке. Вы должны выполнить погружение для выполнения глубоководной остановки.
39
Сигнал тревоги низкого
приоритета, за которым
следует звуковой сигнал
«Начать погружение», повторяемый в течение трех минут. Стрелка, направленная
вниз.
Сигнал тревоги низкого
приоритета, за которым
следует два коротких звуковых сигнала, подаваемые
один раз. Отображаются
символы DEEPSTOP и таймера.
40
Причина сигнала тревогиТип сигнала тревоги
Не выполнено требование об обязательной остановке безопасности. Вы должны выполнить погружение для выполнения остановки безопасности.
Достигнута глубина глубоководной остановки. Выполните обязательную глубоководную остановку
на время, отображаемое таймером.
Звуковой сигнал тревоги
низкого приоритета, повторяется два раза. Значение
Tank pressure (Давление
в баллоне) мигает.
Звуковой сигнал тревоги
низкого приоритета, повторяется два раза. Значение
OLF% мигает, если значение PO2 превышает 0,5
бар.
Звуковой сигнал тревоги
низкого приоритета, повторяется два раза. Значение
Maximum depth (Максимальная глубина) мигает.
Причина сигнала тревогиТип сигнала тревоги
Давление в баллоне достигло выбранного уровня
сигнала тревоги по давлению, 10–200 бар /
200–2900 фунт./кв. дюйм. Давление в баллоне достигло фиксированного уровня сигнала тревоги по
давлению, 50 бар/700 фунт./кв. дюйм. Этот сигнал
тревоги срабатывает только в том случае, если
была правильно установлена связь с беспроводным датчиком давления в баллоне и если передача
данных о давлении в баллоне не прерывалась в
течение погружения вне зависимости от причины
этого. Вы можете выполнить квитирование сигнала
тревоги.
Значение OLF достигло фиксированного значения
80% или 100%. Только в режиме DIVE Nitrox. Вы
можете выполнить квитирование сигнала тревоги.
Превышена выбранная глубина (3–120 м /10–394
фута). Превышена фиксированная максимальная
глубина (120 м / 394 фута). Вы можете выполнить
квитирование сигнала тревоги.
41
Звуковой сигнал тревоги
низкого приоритета, повторяется два раза. Значение
Dive time (Время погружения) мигает.
Звуковой сигнал тревоги
низкого приоритета, подается один раз. Значение
Maximum depth (Максимальная глубина) мигает.
Звуковой сигнал тревоги
низкого приоритета, подается один раз. Значение
Surface time (Время на поверхности) мигает.
Причина сигнала тревогиТип сигнала тревоги
Превышено выбранное время погружения (1–999
мин.). Вы можете выполнить квитирование сигнала
тревоги.
Индицирует достижение определенной глубины.
Только в режиме DIVE Free. Вы можете выполнить
квитирование сигнала тревоги.
Отображает требуемую продолжительность пребывания на поверхности перед следующим погружением. Только в режиме DIVE Free. Вы можете выполнить квитирование сигнала тревоги.
Замечание
42
Если для задней подсветки выбран режим OFF (ВЫКЛ.), то
при срабатывании сигнала тревоги подсветка не включается.

Замечание
Если для звуковых сигналов выбран режим OFF (ВЫКЛ.), то
при срабатывании сигналов тревоги звуковые сигналы
отсутствуют.
Внимание
5.7. Состояния ошибки
У подводного компьютера имеются предупреждающие индикаторы, призывающие
вас отреагировать на возникновение некоторых ситуаций, значительно повышающих риск возникновения декомпрессионной болезни. При отсутствии вашей
реакции на эти предупреждения подводный компьютер переходит в режим Error
(Ошибка), и это свидетельствует о значительном увеличении опасности возникновения декомпрессионной болезни. Если вы понимаете принципы работы
подводногокомпьютера и осмысленно эксплуатируете его, то его переход в режим
Error представляется весьма маловероятным событием.
ЕСЛИ ДИСПЛЕЙ НАСЫЩЕНИЯ ТКАНЕЙ КИСЛОРОДОМ
УКАЗЫВАЕТНА ДОСТИЖЕНИЕ МАКСИМАЛЬНОГО ПРЕДЕЛА, ВЫ ДОЛЖНЫ ПРИНЯТЬ НЕМЕДЛЕННЫЕ МЕРЫ ДЛЯ
СОКРАЩЕНИЯ ВОЗДЕЙСТВИЯКИСЛОРОДА. Невыполнение
требования о принятии мер по сокращению воздействия
кислорода после предупреждения может быстро привести
к увеличению риска кислородного отравления, травмы или
смерти.
43

В этом времени учен спуск со скоростью 10 м/мин. Значения времени обеспечивают безопасный подъем до самой поверхности с использованием имеющихся
на глубине запасов газа и без превышения допустимых значений давления в
тканях.
Пропуск декомпрессии
Компьютер переключается в режим Error в случае пропуска декомпрессии, например, если вы будете находиться выше уровня потолка в течение более чем
трех минут. В течение этого периода длительностью в три минут отображается
сообщение Er и раздаются звуковые сигналы. После этого подводный компьютер
переходит в постоянный режим Error. Прибор продолжит нормальную работу,
если вы опуститесь ниже потолка в течение этого трехминутного периода.
Если подводный компьютер находится в постоянном режиме Error (Ошибка), то
в центре его окна отображается только символ Er. Подводный компьютер не
отображает значения времени подъема или остановок. Тем не менее, все
остальные дисплеи будут работать как и прежде, чтобы предоставить вам информацию о подъеме. Вы должны немедленно выполнить подъем до значения
глубины в пределах от 3 до 6 метров / от 10 до 20 футов и оставаться на этой
глубине до тех пор, пока ограничения по запасу воздуха не заставят вас подняться
на поверхность.
После достижения поверхности выполнение погружений запрещается по крайней
мере в течение 48 часов. Если подводный компьютер находится в постоянном
режиме Error (Ошибка), то в центре его окна отображается символ Er и режим
планирования не работает.
44

5.8. Беспроводная передача
Для работы с датчиком необходимо задействовать функцию работы с беспроводным датчиком в настройках вашего подводного компьютера Suunto D4i. Порядок включения и выключения работы с беспроводным датчиком см. в Раз-
дел 5.9.3, «Параметр связи с датчиком давления в баллоне».
5.8.1. Установка беспроводного датчика
Мы настоятельно рекомендуем вам, чтобы при покупке подводного компьютера
Suunto D4i обслуживающий вас представитель компании Suunto выполнил
установку датчика на первой ступени вашего регулятора.
Тем не менее, если вы хотите выполнить установку самостоятельно, выполните
следующие операции:
Удалите заглушку порта высокого давления (HP) первой ступени вашего
1.
регулятора при помощи соответствующего инструмента.
Ввинтите датчик высокого давления вашего подводного компьютера Suunto
2.
D4i в порт высокого давления вашего регулятора усилием пальцев. НЕ ПЕРЕТЯГИВАЙТЕ! Максимально допустимый момент затяжки составляет 6 Нм/4,4 фунт-фут или 53 фунт-дюйм. Герметичность обеспечивается за счет
статического уплотнительного кольца, не перетягивайте соединение!
Подсоедините регулятор к баллону акваланга и медленно откройте клапан.
3.
Погрузите первую ступень регулятора в воду для контроля утечек. В случае
обнаружения утечек проверьте состояние уплотнительного кольца круглого
сечения и уплотнительных поверхностей.
45

5.8.2. Установление связи и выбор кода
Для приема данных по беспроводному каналу связи необходимо установить
связь между датчиком и вашим подводным компьютером Suunto D4i. Во время
процедуры установления связи подводный компьютер фиксирует код датчика.
Датчик включается при давлении свыше 15 бар/300 фунт./кв. дюйм, после чего
он начинает передавать данные давления совместно с кодовым числом. Во
время процедуры установки связи подводный компьютер Suunto записывает
кодовое число в память и начинает отображение значений давления, поступающих с этим кодом. Эта процедура кодирования предотвращает случайный прием
данных от других дайверов, использующих беспроводной датчик компании Suunto.
При отсутствии в памяти кода подводный компьютер Suunto D4i отображает сообщение «cd:—» и, работая с пониженной чувствительностью, принимает данные
только на очень малом расстоянии. При размещении подводного компьютера
Suunto в непосредственной близости от датчика он выполнит сохранение в памяти принятого кода, начнет прием при полном значении чувствительности и
будет осуществлять отображение данных, полученных только для этого кода.
Замечание
Для установления связи между датчиком и подводным компьютером Suunto D4i:
46
Процедура установления связи должна быть выполнена
только один раз, перед первым использованием. Вам не
потребуется повторять процедуру установления связи,
за исключением случаев замены датчика на новый или при
использовании другим дайвером из вашей группы этого же
кода.
 Loading…