-
Consumer services
>
-
User manual, instruction for use
>
-
Electrical Cooking
>
-
Oilless Fryer
>

User manual and frequently asked questions ACTIFRY GENIUS FZ760
The healthy and easiest way to enjoy your favorite fried recipes
Everyday cooking is Genius with ActiFry! Delivering ultimate intelligence and versatility, ActiFry Genius features 9 automatic menu settings for a variety of fried foods, and uses little to no oil for healthy, delicious meals. With exclusive Dual Motion Technology, this air fryer guarantees hassle-free cooking, with no shaking or monitoring required.
Reference : FZ760030
Frequent questions
The app is no longer compatible on Android versions 4.4.4 or lower, because of reinforced data security.
As far as possible, we recommend that you update your device to a higher Android version or use another compatible device.
Updates will not only allow you to enjoy a richer experience with new features and compatibility with the latest technology, but will also protect you against possible security vulnerabilities that have been fixed in the latest versions.
With a dosing spoon of oil of your choice, you’ll get light and crispy fries. Depending on your taste, you can add 1 extra spoon of oil for even more delicacy!
Wash the cut chips twice in a bowl of water before cooking to remove any excess starch. It is then essential to dry them thoroughly before cooking in a clean, absorbent tea towel and finally patted dry with kitchen paper. If you are cooking frozen chips you do not need to add any oil as these already contain oil and could make the chips soggy. If using the 2 in1 feature (bowl + tray) after the food is cooked on the tray, cook the chips for a further 2-5 minutes after you’ve removed the tray to make them crispier.
None as the chips already contain oil.
If you are cooking frozen chips you do not need to add any oil as they already contain oil.
For the 1kg, 1.2kg and Actifry Mini models you have to use the paddle during cooking to prevent food from falling into the motor unit.
The bowl is too full. Observe the quantities indicated in the cooking table of the instruction manual.
For Actifry: 1 Kg of fresh chips / 750 gr of frozen chips.
For Actifry Familly: 1.5 kg of fresh chips / 1.2 kg of frozen chips.
There are many possible reasons:
• You may not have used the right variety of potatoes.
• The potatoes were insufficiently washed and dried prior to cooking and still contain too much starch.
• The chips are too thick. Cut the chips thinner.
• You have not used enough oil. Increase the amount of oil.
• The filter may be obstructed. Clean the filter. (ActiFry models only)
There could be several reasons:
• You didn’t use the paddle. Use it for all cooking.
• Fries or food are not cut evenly. The fries or food must be cut to the same size for perfect cooking.
• The paddle does not rotate: check that the paddle is properly positioned.
The size of the chip affects how crunchy or soft it is.
The thinner the chips, the more crunchy they will be and conversely, thicker chips will be softer inside.
Depending on your taste preferences, you may vary the cooking time and the cut of your chips: thin: 8 x 8 mm/Standard: 10 x 10 mm/Thick: 13 x 13 mm.
For best results, wash the whole potatoes and then sliced potatoes in plenty of water until it runs clear.
This allows you to remove as much starch as possible to prevent the chips from sticking together.
Dry them thoroughly using a dry, absorbent kitchen towel.
The chips should be completely dry before cooking.
There is no danger in opening the lid while cooking, but it is not recommended, even when the ingredients collect on the sides of the pan.
This will lower the temperature inside the device and, for «Smart» recipes, may disrupt the cooking settings tested to guarantee perfect results.
Do not exceed the maximum quantities and operating times indicated in the recipe table, otherwise you will not get the expected result and may damage your device.
You can vary your pleasures and use different oils!
Standard oils: olive, rapeseed*, grape seed, corn, peanut, sunflower, soybean*
Flavoured oils: aromatic herbs, chilli, garlic, lemon…
Special oils: hazelnut*, sesame*, safflower*, almond*, avocado*, argan*…
We advise against using walnut oil, which results in a rancid taste after cooking.
(* cooking oil according to manufacturer).
• Leave it to cool down completely before cleaning.
• Open the lid and lift the latch to remove.
• Remove the paddle, cooking pan and removable filter.
• All removable pieces are dishwasher safe or may be cleaned with a soft sponge and washing up liquid.
• To prolong the life of your bowl or cooking tray, we recommend handwashing; for dishwasher use, it is preferable to use gentle detergents, such as liquid or gel.
• Dry all the pieces carefully before putting everything back in place.
We do not recommend the use of detergent products other than washing-up liquid.
Yes – this is perfectly normal.
If food is too thick it can burn on the top. Reduce the thickness of the food. Some food is unsuitable for cooking on the tray such as breaded fish or food coated with breadcrumbs as they dry out and burn during hot air cooking.
Check that the paddle is correctly positioned. We remind you that this appliance is not suitable for the preparation of liquid recipes (soups…).
If the problem persists, take the appliance to an Authorised Service Centre.
If you think there is a malfunction in the engine operation of the device, take it to an Authorized Service Center for checking.
You probably used new potatoes. With new potatoes, reduce the quantity to 750 g and adjust the cooking time.
It is an anomaly in the operation of the device.
Unplug, wait 10 seconds, plug back in. Press the ON/OFF button.
If the LCD screen always shows the same message, take the device to an Authorized Service Center to have it checked.
There could be several explanations:
• The device is not properly plugged in.
• You have not yet pushed the power button or you have pushed it incorrectly. Try again by pushing it firmly.
• You have pushed the power button, but the device still does not work. Check that the lid is securely closed.
• The engines are running but the device does not heat up. Take the device to an Authorised Service Centre to have it checked.
• The paddle does not rotate. Check that the blade is correctly in place, if not, take the unit to an Authorised Service Centre to have it checked.
You have probably salted your food during the cooking process. Don’t salt your food before the end of cooking to avoid scratching.
For models using the tray, and to preserve its qualities for longer, do not use any metal utensils.
Maybe it’s not locked. Reclip it correctly: put the locking lever in the upper position, place the paddle in the centre of the tray and then push the lever down.
There could be several reasons:
• During the first use, there may be an odour emission that is not harmful. This phenomenon, which has no effect on the use of the device, will disappear quickly.
• Remove all stickers and packaging materials. Never put the device under water.
• For a good start of the device, we advise you to cook for at least 20 minutes with half a litre of water. From the second cooking time, your ActiFry will give you complete satisfaction.
• Never leave the dosing spoon in the device during operation.
• Never cook without a paddle. Depending on the model, do not forget to remove the protective sleeves located under the lid.
After following the instructions in the user manual for starting the appliance, make sure that your electrical socket is working by plugging another appliance. If it still does not work, do not try to dismantle or repair the appliance yourself, instead, take it to an approved repair centre
Do not use your appliance. To avoid any danger, have it replaced by an approved repair centre.
To change the type of degrees, it is necessary to press the following button for 5 seconds:
The cooking temperature is approximately 180°C (160°C at the heart of the food) at the end of the cooking.
Due to the rotation of the paddle we would not suggest cooking fish in the Actifry as it can easily break up during cooking. In order to avoid this, we recommend that you use the top tray for cooking fish (2in1 model only).
It is normal to see a small gap between the cover and the body. The lid and body should not be air tight.
Always clip the lid into place firmly but gently. When closing the lid, do not bang the lid shut but use the finger tab on the front of the lid to gently press the lid into place. If putting the lid in the dishwasher, always place it near the top of the dishwasher (the cooler area) and use a cooler setting — refer to your dishwasher manual.
Yes, this is a genuinely multi-purpose appliance, which can be used to cook a wide range of foods.
Your appliance can be used for numerous recipes, from starters to desserts.
You can also make crispy chips, tender chicken or even fruit cake…
The previous Actifry designs and Actifry Family do not allow the 2 in 1 ActiFry plate to be added.
Store the potatoes in a good cellar or a cool cupboard (between 6 and 8°C), away from light.
Your appliance contains valuable materials which can be recovered or recycled. Leave it at a local civic waste collection point.
Please go to the “Accessories” section of the website to easily find whatever you need for your product.
Find more detailed information in the Guarantee section of this website.
If you believe that one part is missing, please call Consumer Services Center and we will help you find a suitable solution.
-

Warranty
View the product warranty conditions
-
Contact
Our advisors are at your service.
![]()

Актифри Гений
www.tefal-home.com.tw
www.tefal.co.th


Важные рекомендации Инструкции по технике безопасности
- Прибор можно использовать на высоте до 2000 м над уровнем моря.
- Этот прибор предназначен только для внутреннего бытового использования; любое профессиональное использование, не соответствующее инструкциям, освобождает производителя от любой ответственности, а гарантия считается недействительной.
- Внимательно прочитайте эти инструкции и храните их в безопасном месте.
- Этот прибор предназначен только для домашнего использования.
- Этот прибор не предназначен для работы с внешним таймером или отдельной системой дистанционного управления. Подключенными устройствами можно управлять через смартфон или планшет в соответствии с инструкциями производителя.
- Не используйте прибор, если он или шнур питания повреждены, если он упал и имеет видимые повреждения или работает ненормально. В этом случае устройство необходимо отправить в утвержденный сервисный центр.
- Если шнур питания поврежден, он должен быть заменен изготовителем, авторизованной службой послепродажного обслуживания или лицом с аналогичной квалификацией во избежание любой опасности. Никогда не разбирайте прибор самостоятельно.
- Этот прибор не предназначен для использования людьми (включая детей) с физическими, сенсорными или умственными нарушениями, а также людьми без знаний или опыта, если они не находятся под наблюдением или не получили предварительных инструкций относительно использования прибора кем-то, кто несет ответственность за их безопасность. . Следите за детьми, чтобы они не играли с прибором.
- Этот прибор может использоваться детьми в возрасте от 8 лет и старше, а также лицами с ограниченными физическими, сенсорными или умственными способностями или с недостатком опыта и знаний, если они находятся под присмотром или проинструктированы относительно безопасного использования прибора и понимают опасности. вовлеченный. Дети не должны играть с прибором. Дети в возрасте до 8 лет не должны пользоваться этим прибором без постоянного присмотра ответственного взрослого. Очистка и техническое обслуживание пользователем не должны производиться детьми, если они не старше 8 лет и находятся под присмотром. Храните прибор и его шнур в недоступном для детей младше 8 лет месте. Некоторые части прибора могут нагреваться во время работы, что может привести к ожогам. Не прикасайтесь к горячим поверхностям прибора (крышке, видимым металлическим частям и т. д.).
- Все эти съемные детали можно мыть в посудомоечной машине или с помощью неабразивной губки и жидкости для мытья посуды.
 Очистите корпус прибора с помощью объявленияamp губка и жидкость для мытья посуды.
- Тщательно высушите детали перед повторной сборкой.
- Дети не должны чистить или выполнять операции по техническому обслуживанию прибора, если они не находятся под присмотром ответственного взрослого.
- Не используйте инструкцию рядом с легковоспламеняющимися материалами (жалюзи, занавески и т. д.), а также вблизи внешних источников тепла (газовая плита, конфорка и т. д.).
- Этот прибор предназначен только для домашнего использования. Он не предназначен для использования в следующих приложениях, и гарантия не распространяется на:
— кухни для персонала в магазинах, офисах и других рабочих помещениях;
— фермы гостиницы,
– клиенты в отелях, мотелях и других жилых помещениях,
— помещения типа «ночлег и завтрак». - Не погружайте изделие в воду.
- Никогда не используйте прибор без лопатки для смешивания (если это не указано в рецепте ActiFry) или без соответствующей принадлежности.
- В целях вашей безопасности этот прибор соответствует применимым стандартам и нормам (Директивы поtage, Электромагнитная совместимость, Материалы, контактирующие с пищевыми продуктами, Окружающая среда и т. д.).
- Убедитесь, что объемtage вашей сети соответствует объемуtagе указано на паспортной табличке на приборе (переменный ток).
- Учитывая, что существует так много различных стандартов, если прибор будет использоваться в стране, отличной от той, в которой он был куплен, проверьте его в авторизованном сервисном центре.
- Для моделей со съемным шнуром питания используйте только оригинальный шнур питания.
- Не используйте удлинитель. Если вы все же решите это сделать, под свою ответственность используйте удлинитель, который находится в хорошем состоянии и соответствует мощности устройства.
- Используйте прибор на плоской, устойчивой, жаростойкой рабочей поверхности вдали от брызг воды.
- Не позволяйте шнуру питания свисать.
- Не вынимайте вилку из розетки за шнур питания.
- Всегда отключайте прибор от сети: после использования, чтобы переместить или почистить.
- В случае пожара отключите прибор от электросети и потушите пламя с помощью рекламы.amp кухонное полотенце.
- Никогда не используйте прибор под кухонными шкафами.
- Никогда не перемещайте прибор, если в нем еще есть горячая еда.
- Никогда не включайте пустой прибор.
- Никогда не оставляйте прибор без присмотра, пока он подключен к сети и включен. При использовании продукта в первый раз он может выделять нетоксичный запах. Это не повлияет на использование и быстро исчезнет. Не перегружайте лоток; придерживайтесь рекомендованных количеств.
- Ваш прибор оснащен автоматическим переворачивателем стружки (в зависимости от модели). Этот переворачиватель чипсов следует использовать для приготовления чипсов. Мы также рекомендуем использовать его для рецептов, требующих большого количества продуктов. Устройство для переворачивания стружки необходимо снять для жидких рецептов.
- Во избежание повреждения прибора обязательно следуйте рецептам, приведенным в инструкции и книге рецептов; убедитесь, что вы используете правильное количество ингредиентов.
ЗАЩИЩАТЬ ОКРУЖАЮЩУЮ СРЕДУ
- Ваш прибор рассчитан на многолетнюю работу. Однако, когда вы решите заменить его, не забудьте подумать о том, как вы можете внести свой вклад в защиту окружающей среды.
- Прежде чем выбросить прибор, выньте аккумулятор из таймера и утилизируйте его в местном центре сбора бытовых отходов (в зависимости от модели).
- Одобренные сервисные центры примут обратно любые старые бытовые приборы, которые у вас могут быть, чтобы их можно было утилизировать в соответствии с экологическими нормами.
ЗАЩИТА ОКРУЖАЮЩЕЙ СРЕДЫ ПРЕЖДЕ ВСЕГО!
![]()
Ваш прибор содержит ценные материалы, которые можно восстановить или переработать.
![]() Оставьте его в местном пункте сбора бытовых отходов.
Оставьте его в местном пункте сбора бытовых отходов.
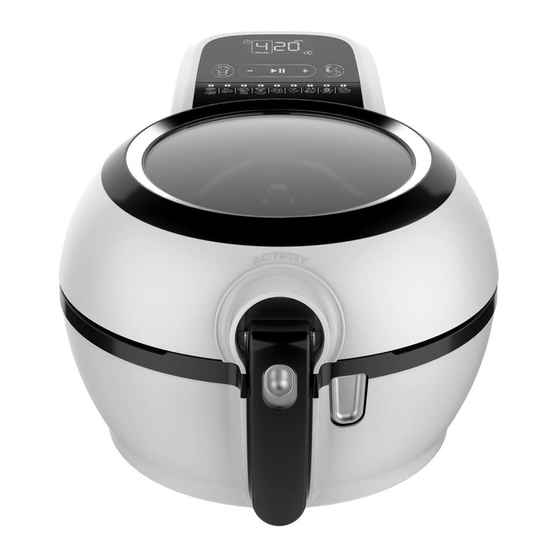
ОПИСАНИЕ
| 1 Base 2 Кнопка открытия крышки 3 крышка 4 Viewокно 5 Цифровая панель управления 6 Мерная ложка 7 Кнопка освобождения весла 8 Съемная мешалка 9 Съемное поворотное кольцо 10 Кнопка разблокировки ручки сковороды 11 Кулинарная сковорода |
12 Съемный противень 13 съемный фильтр 14 Время приготовления 15 Температура 16 Отложенный старт 17 Согреться 18 Функциональный режим для выбора предварительно запрограммированный режим приготовления 19 Ручной режим 20 Запустить/приостановить приготовление 21 режимов приготовления |
ИНСТРУКЦИЯ ПО ПРИМЕНЕНИЮ
Перед первым использованием
- Удалите все наклейки и любую упаковку.
- Откройте крышку, нажав кнопку открывания крышки – рис.1 и нажав на защелки, чтобы снять крышку – рис.2.
- Удалите мерную ложку.
- Поднимите рукоятку в горизонтальное положение, пока не услышите ЩЕЛЧОК, когда она зафиксируется – рис.3.
- Снимите лопасть, нажав кнопку фиксатора – рис.4.
- Выньте кастрюлю для приготовления пищи.
- Чтобы снять поворотное кольцо, потяните зажимы наружу, затем поднимите его.
- Снимите съемный фильтр – рис.6.
- Все съемные части можно мыть в посудомоечной машине (рис. 7) или можно чистить с помощью неабразивной губки и небольшого количества моющего средства.
- Очистите корпус прибора с помощью объявленияamp губка и моющее средство – рис.8.
- Тщательно высушите, прежде чем ставить все на место.
- Перемещайте лопасть, пока не услышите «ЩЕЛЧОК» – рис.9.
- Чтобы заменить переворачивающее кольцо, поместите его на край чаши, отцентрируйте на чаше и нажимайте до тех пор, пока не услышите «ЩЕЛЧОК».
- При первом использовании прибор может издавать безвредный запах. Это не влияет на использование прибора и вскоре исчезнет.
ПРИМЕЧАНИЕ: - Никогда не погружайте основание в воду или любую другую жидкость.
- При первом использовании, чтобы получить наилучшие результаты от вашего нового продукта, мы советуем вам приготовить рецепт, который готовится в течение 30 минут или более.
Подготовка еды
Во избежание повреждения прибора соблюдайте количества ингредиентов и жидкостей, указанные в руководстве и книге рецептов.
Для всех рецептов никогда не превышайте максимальный уровень, указанный на съемной лопатке – рис.10.
Не оставляйте мерную ложку внутри кастрюли во время приготовления пищи.
- Откройте крышку – рис.1.
- Уберите ложку из кастрюли.
- Поместите продукты в кастрюлю, равномерно распределив их, соблюдая максимальное количество (см. таблицы приготовления на стр. 13–15) – рис.10.
- Добавьте масло в пищу ложкой (1 ложка Actifry Genius = 14 мл) – рис. 11, равномерно распределив его (см. таблицы приготовления на стр. 13–15).
- Разблокируйте рукоятку и задвиньте ее обратно в гнездо – рис.12.
- Закройте крышку – рис.13.
ГОТОВКА
- Никогда не включайте пустой прибор.
- Никогда не перегружайте сковороду. Соблюдайте рекомендуемые количества.
- Этот прибор не подходит для рецептов с высоким содержанием жидкости (например, супы, соусы для готовки…).
- Никогда не включайте прибор, если емкость для приготовления пищи пуста.
Начать готовить
- Откройте крышку – рис.1.
- Поместите продукты в кастрюлю и не превышайте максимальное количество (см. Таблицу времени приготовления) и отметку уровня Maxi на лопатке для жидких рецептов – рис.10.
- Подготовьте ингредиенты, как указано в книге рецептов. Поместите ингредиенты в кастрюлю в соответствии с инструкциями в вашем рецепте.
- Отпустите рукоятку и полностью опустите ее в гнездо – рис.12.
- Закройте крышку – рис.13.
- Включите прибор в электрическую розетку. Прибор издаст 2 звуковых сигнала, и на экране отобразится 00 – рис.14.
2 способа установки времени приготовления:
Автоматический режим приготовления:
9 режимов приготовления автоматически регулируют температуру приготовления и вращение лопасти в зависимости от типа выбранного продукта.
- Выберите функциональный режим
 — Инжир. 15.
 - Для выбора режима приготовления нажимайте кнопку + до тех пор, пока не отобразится нужный режим от 1 до 9 – рис. 16.
- Нажмите кнопку запуска
 — Инжир. 17.
 - Отрегулируйте время приготовления, нажимая кнопку +/-.
Примечание: Отрегулируйте время приготовления после включения прибора. - При использовании автоматического режима приготовления следуйте инструкциям в книге рецептов о том, где размещать продукты в кастрюле.
Примечание. Лопатка не вращается в начале приготовления для режимов 2, 3, 4, 5, 7, 8 и 9. - Чтобы остановить или отменить режим приготовления, постоянно удерживайте кнопку кнопку в течение 2 секунд, и на экране отобразится 00 (рис. 14).

 |
1. Чипсы и картофель фри, например картофельные чипсы, овощные чипсы, картофельные дольки, … |  |
6. Курица, например, голени и крылышки, … |
 |
2. Закуски в панировке, например куриные наггетсы, королевские креветки в панировке, … |  |
7. Wok* например, жареный рис с креветками, тушеная говядина, овощи, обжаренные во фритюре, … |
 |
3. Закуски в кляре, например, луковые кольца в кляре, кальмары в кляре. кольца, … |
 |
8. Мировая еда* например, тажин из баранины, кебаб, … |
 |
4. Булочки, например, закуски из теста, такие как самоса, блинчики с начинкой, … |  |
9. Десерты, например компот из яблок и груш, карамелизированные орехи, … |
 |
5. Фрикадельки и овощные шарики |
*программы «1 еда за 1 раз»
Ручной режим:
- Установите время приготовления в минутах с помощью кнопки +/- (см. таблицу приготовления на стр. 13–15).
- Затем установите температуру приготовления, нажав кнопку температуры/таймера – рис. 18, и установите требуемую температуру с помощью кнопки +/- (см. таблицу приготовления стр. 13 до стр. 15).
- Нажмите старт.
ПРИМЕЧАНИЕ:
- Отобразится выбранное время, и начнется поминутный обратный отсчет. Время выбирается и отображается в минутах. Только время, оставшееся до 1 минуты, будет отображаться в секундах.
- Прибор можно поставить на паузу. Просто нажмите клавишу 11. При нажатии кнопки ▶ приготовление возобновится.
- Время можно изменить в любой момент во время приготовления с помощью кнопок +/- – рис.17.
- В случае ошибки или для удаления выбранного времени удерживайте кнопку в течение 2 секунд и повторно выберите время.
Отложенный старт
Отложенный старт можно настроить с помощью одного из 9 автоматических режимов приготовления или ручного режима:
– Подключите прибор.
– Нажмите кнопку «Температура/Таймер» на 3 секунды. Пиктограмма![]() появится, и таймер будет мигать 0:00.
появится, и таймер будет мигать 0:00.
– Установите время отложенного запуска с помощью кнопок +/- (интервалы: 10 минут) (максимум до 9 часов).
– Нажмите «Старт», и таймер отложенного старта начнет обратный отсчет. Приготовление начнется, как только таймер отложенного старта достигнет 0:00.
Сохраняйте теплую функцию
- По окончании приготовления, если в течение 3 минут не будет предпринято никаких действий, автоматически включается режим поддержания тепла (кроме режима 1 – Чипсы).
- После 30 минут поддержания тепла прибор останавливается.
- Чтобы отключить функцию «Подогрев», нажмите одновременно кнопки + и – и удерживайте их в течение 3 секунд.
- Чтобы повторно активировать функцию «Подогрев», нажмите одновременно кнопки + и – на длительное время (3 секунды).
Убрать еду
При открытии крышки прибор перестает работать. Чтобы возобновить приготовление, закройте крышку и нажмите кнопку![]() кнопку.
кнопку.
Если крышка остается открытой более 2 минут, прибор перезагружается.
- После завершения приготовления пищи таймер издает звуковой сигнал.
- Откройте крышку – рис.1.
- Поднимите ручку, пока не услышите щелчок, который фиксирует ее, и выньте кастрюлю – рис. 19 и 20.
- Подавать сразу.
- Во избежание ожогов не прикасайтесь к крышке или к каким-либо другим сторонам, кроме прохладных зон: ручки кастрюли и кнопки открывания крышки.
ГЕНИАЛЬНЫЕ СОВЕТЫ ПО ПРИГОТОВЛЕНИЮ ACTIFRY
- Не добавляйте соль в чипсы, пока они находятся в кастрюле. Добавляйте соль только после того, как чипсы
удаляются из кастрюли. - Добавляя сушеные травы и специи в ActiFry, смешивайте их с небольшим количеством масла или жидкости. Если вы попытаетесь насыпать их прямо в кастрюлю, они просто разлетятся системой горячего воздуха.
- Сильно окрашенные специи могут слегка окрасить лопатку и части прибора. Это нормально.
- Готовьте все продукты на кусочки одинакового размера, чтобы все они готовились одновременно.
- Готовьте овощи, особенно корнеплоды, небольшими кусочками или обжаривайте, чтобы они хорошо прожарились.
- При использовании лука в рецептах ActFry его лучше нарезать тонкими ломтиками, а не измельчать, так как он лучше готовится. Разделите луковые кольца перед тем, как добавить их в кастрюлю, и быстро перемешайте, чтобы они равномерно распределились. Только для автоматического режима приготовления:
- Для выбранных режимов приготовления ингредиенты следует размещать в кастрюле, как указано в книге рецептов ActiFry Genius. Это обеспечивает правильный уровень приготовления каждого ингредиента. Те, которые требуют более длительного времени приготовления, помещаются в верхнюю половину кастрюли. Те, которые требуют более короткого времени приготовления, кладут рядом с ручкой.
ВРЕМЯ ПРИГОТОВЛЕНИЯ
Время приготовления дано в качестве приблизительного ориентира и может варьироваться в зависимости от сезонности продукта, его размера, используемого количества и индивидуальных вкусов, а также объема.tagе. Указанное количество масла может быть увеличено в зависимости от вашего вкуса и потребностей. Если вы хотите более хрустящие чипсы, вы можете добавить несколько дополнительных минут ко времени приготовления.
Картофель
| Тип | Количество | Актифри
ложки масла |
Готовка
Режим |
Гений 1.2 кг
приготовление время* (мин) |
Гений 1.7 кг
приготовление время* (мин) |
|
| Свежие чипсы
10 мм х 10 мм |
Свежий (чипсы) | 750 г | 1/2 | 1 | 26-28 | 25-27 |
| 1000 г | 3/4 | 1 | 30-34 | 28-30 | ||
| 1500 г | 1 | 1 | – | 36-38 | ||
| 1700 г | 1 | 1 | – | 42-44 | ||
| Замороженные чипсы
13 мм х 13 мм |
Замороженные (чипсы)** | 750 г | Ничто | 1 | 26-28 | 23-25 |
| 1200 г | Ничто | 1 | – | 36-38 |
* Свежесобранному картофелю может потребоваться больше времени для приготовления, чтобы он получился более хрустящим и золотисто-коричневым.
** Для достижения наилучших результатов мы рекомендуем использовать замороженные чипсы без покрытия из пшеничной муки, поскольку они, как правило, дают менее хрустящие результаты, а тесто может упасть во время приготовления (подробности см. в списке ингредиентов на упаковке).
Мясо-птица
Чтобы придать мясу немного аромата, не стесняйтесь смешивать специи с маслом (паприка, карри, смесь трав, тимьян, лавровый лист и т. д.).
| Куриные наггетсы | Тип | Количество | Активировать ложки масла | Режим приготовления | Время приготовления Genius 1.2 кг (мин) | Гений 1.7 кг время приготовления (мин) |
| Свежий или замороженный | 750 г | Ничто | 2 | 13 – 15 | 10 – 12 | |
| Свежий | 1200 г | Ничто | 2 | – | 13 – 15 | |
| Frozen | 1200 г | Ничто | 2 | – | 15 – 17 | |
| Куриные ножки | Свежий | 4 — 6 | Ничто | 6 | 20 – 25 | 20- 22 |
| Куриная грудка (без костей) |
Свежий | 6 | Ничто | 6 | 20 – 25 | 18 – 20 |
| Свежий | 9 | Ничто | 6 | – | 22 – 24 | |
| Фрикадельки | Frozen | 750 г | 1 | 5 | 16 – 18 | 14 – 15 |
| Frozen | 1200 г | 1 1/2 | 5 | – | 18 – 20 |
Блюда из риса и овощей
|
Тип |
Количество |
Актифри ложки масла | Готовка Режим | Время приготовления Genius 1.2 кг (мин) | Время приготовления Genius 1.7 кг (мин) | |
|
Рататуй* |
Frozen | 750 г | Ничто | 7 | 16-18 | 14 – 16 |
| Frozen | 1000 г | Ничто | 7 | – | 23-25 | |
| Фермерское жаркое* | Frozen | 1000 г | Ничто | 6 | – | 22-24 |
|
Паэлья* |
Frozen | 650 г | Ничто | 220 ° C | 16-19 | 12 – 14 |
| Frozen | 1000 г | Ничто | 220 ° C | – | 15-17 |
* Замороженные препараты доступны не во всех странах.
Рыба – моллюски
| Тип | Количество | Активировать ложки масла | Режим приготовления | Время приготовления Genius 1.2 кг
(мин) |
Время приготовления Genius 1.7 кг
(мин) |
|
| Кальмары в кляре | Frozen | 300 г | Ничто | Режим | 11-13 | 10-12 |
| 500 г | 3 | – | 11-13 | |||
| Королевские креветки (сырой) |
Свежий | 300 г | Ничто | 3 | 11-13 | 8-10 |
| 450 г | 3 | – | 8-10 |
Овощи
|
Тип |
Количество |
Активные ложки масла | Готовка Режим | гениальность 1.2кг приготовление время (мин) | гениальность 1.7кг приготовление время (мин) | |
|
кабачки |
Полосы |
750 г | 1 + 150 мл. вода | 7 | 25-30 | 20 – 25 |
| 1200 г | 1 + 150 мл. вода | 7 | – | 25-30 | ||
|
Перец |
Полосы |
650 г | 1 + 150 мл. вода | 7 | 18-22 | 15 – 18 |
| 1200 г | 1 + 150 мл. вода | 7 | – | 20-25 | ||
|
грибы |
помещение |
650 г | 1 | 7 | 10-15 | 10 – 15 |
| 1000 г | 1 | 7 | – | 16-18 | ||
|
Помидоры |
помещение |
650 г | 1 + 150 мл. вода | 7 | 13-16 | 12 – 14 |
| 1000 г | 1 + 150 мл. вода | 7 | – | 15-17 | ||
|
Лук |
Ломтики |
500 г | 1 | 220 ° C | 12-16 | 12 – 14 |
| 750 г | 1 | 220 ° C | – | 18-20 |
Фрукты
| Тип | Количество | Активировать ложки масла и сахара | Готовка Режим | Гений 1.2 кг приготовление время (мин) | гениальность 1.7кг приготовление время (мин) | |
| Бананы | Ломтики | 5 | 1 + 1 сахара | 9 | 5-6 | 5-6 |
| 7 | 1 + 1 сахара | 9 | – | 5-6 | ||
| Клубника | помещение | 1000 г | 2 сахара | 9 | 10-12 | 8-10 |
| 1500 г | 2 сахара | 9 | – | 10-12 | ||
| Яблоки | Половинки | 3 | 1 + 1 сахара | 9 | 10-12 | 8-10 |
| 5 | 1 + 2 сахара | 9 | – | 10-12 | ||
| Ананасы | Свежий (очищенный и нарезанный на кусочки) | 1 | 2 сахара | 9 | 10-15 | 10-12 |
| 2 | 2 сахара | 9 | – | 15-17 |
ЛЕГКО ОЧИСТИТЬ
Очистка прибора
Никогда не погружайте прибор в воду или любую другую жидкость. Не используйте агрессивные или абразивные чистящие средства. Съемный фильтр необходимо регулярно очищать. Чтобы ваша съемная посуда прослужила дольше, никогда не используйте металлическую посуду.
Мы не рекомендуем использовать какие-либо моющие средства, кроме жидкости для мытья посуды, для очистки какой-либо части прибора.
- Перед очисткой дайте прибору полностью остыть.
- Откройте крышку, нажав на кнопку – рис.1, и нажмите на защелки, чтобы снять крышку – рис.2.
- Поднимите съемную ручку кастрюли, пока не услышите «ЩЕЛЧОК», чтобы снять кастрюлю – рис.3.
- Выньте кастрюлю для приготовления пищи.
- Снимите лопасть, нажав кнопку фиксатора – рис.4.
- Снимите съемный фильтр – рис.6.
- Чтобы снять поворотное кольцо, потяните зажимы наружу, затем поднимите его.
- Все съемные части можно мыть в посудомоечной машине (рис. 7) или можно чистить с помощью неабразивной губки и небольшого количества моющего средства.
- Очистите корпус прибора с помощью объявленияamp губка и немного моющего средства – рис.8.
Тщательно высушите, прежде чем ставить все на место. - Мы гарантируем, что съемная посуда СООТВЕТСТВУЕТ НОРМАМ в отношении материалов, контактирующих с пищевыми продуктами.
- Если пища прилипает или пригорает к сковороде или лопасти, дайте им отмокнуть в теплой воде перед очисткой.
НЕСКОЛЬКО СОВЕТОВ В СЛУЧАЕ ПРОБЛЕМ…
| Проблемы | Причины | Решения |
| Прибор не работает. | Прибор неправильно подключен к сети. | Убедитесь, что прибор правильно подключен к сетевой розетке. |
| Вы еще не нажали кнопку |
нажмите кнопку |
|
| Вы нажали кнопку |
Закройте крышку. | |
| Прибор не нагревается. | Позвоните в службу поддержки клиентов. | |
| Весло не поворачивается. | Лопатка не вращается в начале приготовления в режимах приготовления 2, 3, 4, 5, 7, 8 и 9.
Перезапустите, используя ручной режим, чтобы проверить обороты весла. Если он не поворачивается, убедитесь, что он вставлен в правильном положении. В противном случае позвоните в службу поддержки клиентов. |
|
| Весло не стоит на месте | Весло не заблокировано. | Перемещайте лопасть, пока не услышите «ЩЕЛЧОК» – рис.12. |
|
Еда приготовлена неравномерно. |
Вы не использовали весло. | Поставьте его на место. |
| Продукты/чипсы нарезаны неравномерно. | Нарежьте продукты/чипсы одинакового размера. |
| Проблемы | Причины | Решения |
| Чипсы недостаточно хрустящие. | Вы используете не тот сорт картофеля, который рекомендуется для чипсов. | Выберите сорт картофеля, который рекомендуется для чипсов, например, картофель Maris Piper или King Edward. |
|
Картофель недостаточно вымыт и/или не полностью высушен. |
Картофель нужно долго мыть, чтобы удалить крахмал, слить воду и тщательно обсушить перед приготовлением. Они должны быть полностью сухими. | |
| Чипсы слишком толстые. | Нарежьте их более тонко. Максимальные размеры чипа составляют 13 мм x 13 мм. | |
| Масла не хватает. | Увеличьте количество масла (см. таблицу приготовления на стр. 13–15). | |
| Фильтр забит. | Очистите фильтр. | |
| Чипсы ломаются во время приготовления. | Количество слишком велико. | Уменьшите количество картофеля и отрегулируйте время приготовления. |
| Еда остается на краю кастрюли. | На сковороде слишком много еды. | Соблюдайте максимальное количество, указанное в таблице приготовления. Установите поворотное кольцо на место. Уменьшите количество еды. |
| Превышен максимальный уровень. | Уменьшите количество. | |
| Жидкости для приготовления пищи попали на основание прибора. | Неисправная сковорода или лопасть. | Убедитесь, что лопатка установлена правильно, в противном случае позвоните в службу поддержки клиентов. |
| Максимальный уровень превышен. | Соблюдайте максимальный уровень. Не используйте ActiFry для приготовления блюд с высоким содержанием жидкости. |
|
| ЖК-экран не работает. | Прибор не подключен к сети. | Подключите прибор. |
| Крышка открыта. | Закройте крышку. | |
| На ЖК-дисплее отображается «Er» (ошибка). | Прибор работает неправильно. | Отключите прибор от сети, подождите 10 секунд, снова включите прибор и нажмите кнопку.
Если на ЖК-дисплее по-прежнему отображается Er, см. таблицу кодов ошибок на стр. 18. |
| Прибор ненормально шумит. | Вы подозреваете, что есть проблема в том, как работает двигатель прибора. | Отнесите прибор в авторизованный сервисный центр. |
Если у вас есть какие-либо проблемы с продуктом или вопросы, сначала позвоните в нашу группу по работе с клиентами, чтобы получить квалифицированную помощь и совет:
или свяжитесь с нами через наш webсайт: www.tefal.com
ТАБЛИЦА КОДОВ ОШИБОК: E.
| Е. 1 или 2 | Вентилятор не работает. | Убедитесь, что все съемные детали установлены и правильно расположены (выходная решетка вентиляции чаши и съемный фильтр, поддон, крышка). Убедитесь, что в съемных частях нет посторонних предметов. Убедившись в отсутствии посторонних предметов в вентиляционных отверстиях, если неисправность сохраняется, отнесите прибор в авторизованный сервисный центр. |
| E. 3 | Эта ошибка может появиться, если прибор долгое время хранился при слишком низкой температуре. | Оставьте прибор при температуре окружающей среды выше 15°C на один час перед повторным включением. Если неисправность сохраняется, отнесите прибор в авторизованный сервисный центр. |
|
E. 4 |
В вашем приборе неисправен датчик температуры. | Отнесите прибор в авторизованный сервисный центр. |
| E. 5 | Объемtage вашей домашней сети слишком низкий. Производительность приготовления может быть изменена. | Обратитесь к поставщику электроэнергии. |
| E. 6 | Объемtagэлектронная почта вашей домашней сети слишком высока; из соображений безопасности ваш прибор должен быть защищен от риска перегрева. | Обратитесь к поставщику электроэнергии. |
МЕЖДУНАРОДНАЯ ОГРАНИЧЕННАЯ ГАРАНТИЯ TEFAL/T-FAL*: www.tefal.com
Этот продукт подлежит ремонту компанией TEFAL / T-FAL * в течение и после гарантийного периода.
Принадлежности, расходные материалы и детали, заменяемые конечным пользователем, можно приобрести, если они доступны на месте, как описано на интернет-сайте TEFAL / T-FAL. www.tefal.com
Гарантия **
TEFAL/T-FAL гарантирует отсутствие в данном изделии любых производственных дефектов материалов или изготовления в течение гарантийного периода в этих странах***, как указано в прилагаемом списке стран, начиная с первоначальной даты покупки или даты поставки. Международная гарантия производителя покрывает все расходы, связанные с восстановлением проверенного эффективного продукта, чтобы он соответствовал своим первоначальным спецификациям, путем ремонта или замены любой дефектной детали и необходимых работ. По выбору TEFAL/T-FAL вместо ремонта дефектного изделия может быть предоставлена замена изделия. Единственное обязательство TEFAL/T-FAL и ваше исключительное решение по данной гарантии ограничиваются таким ремонтом или заменой. Условия и исключения
TEFAL / T-FAL не обязан ремонтировать или заменять какой-либо продукт, который не сопровождается действующим доказательством покупки. Продукт может быть доставлен непосредственно лично или должен быть надлежащим образом упакован и возвращен путем зарегистрированной доставки (или эквивалентным методом поз.tagд) в авторизованный сервисный центр TEFAL / T-FAL. Полная информация об адресах авторизованных сервисных центров в каждой стране указана на TEFAL / T-FAL. webвеб-сайте (www.tefal.com) или позвонив в соответствующий центр обслуживания потребителей, указанный в прилагаемом списке стран. Чтобы предложить наилучшее послепродажное обслуживание и постоянно повышать удовлетворенность клиентов, TEFAL/T-FAL может отправить опрос об удовлетворенности всем клиентам, которые отремонтировали или заменили свой продукт в
Авторизованный сервисный центр TEFAL/T-FAL.
Эта гарантия распространяется только на продукты, приобретенные и используемые для бытовых целей, и не распространяется на любой ущерб, возникший в результате неправильного использования, небрежности, несоблюдения инструкций TEFAL/T-FAL, модификации или несанкционированного ремонта продукта, дефектной упаковки. владельцем или неправильным обращением со стороны любого перевозчика. Она также не распространяется на нормальный износ, техническое обслуживание или замену расходных материалов, а также на следующее:
– использование неподходящего типа воды или расходных материалов
– попадание внутрь изделия воды, пыли или насекомых (за исключением приборов с функциями, специально предназначенными для защиты от насекомых).
— удаление накипи (любое удаление накипи должно выполняться в соответствии с инструкциями по применению)
— повреждение стеклянной или фарфоровой посуды в изделии
— повреждения или плохие результаты именно из-за неправильной громкостиtage или частота как stamped на идентификаторе продукта или спецификации
— механические повреждения, перегрузки
– повреждения в результате удара молнии или скачков напряжения
– несчастные случаи, включая пожар, наводнение и т. д.
— профессиональное или коммерческое использование
Законные права потребителей
Эта международная гарантия TEFAL / T-FAL не влияет на установленные законом права, которые может иметь потребитель, или те права, которые не могут быть исключены или ограничены, а также права в отношении розничного продавца, у которого потребитель приобрел продукт. Эта гарантия дает потребителю определенные юридические права, и потребитель может также иметь другие юридические права, которые варьируются от штата к штату или от страны к стране. Потребитель может отстаивать любые такие права по своему усмотрению.
***Если продукт был приобретен в указанной стране, а затем использовался в другой указанной стране, срок действия международной гарантии TEFAL/T-FAL равен сроку действия в стране использования, даже если продукт был приобретен в указанной стране с разный гарантийный срок. Процесс ремонта может занять больше времени, если продукт не продается на месте компанией TEFAL/T-FAL. Если продукт не подлежит ремонту в новой стране, международная гарантия TEFAL/T-FAL ограничивается заменой на аналогичный или альтернативный продукт по аналогичной цене, где это возможно. *Бытовая техника TEFAL представлена под торговой маркой T-FAL на некоторых территориях, таких как Америка и Япония. TEFAL/T-FAL являются зарегистрированными товарными знаками Groupe SEB. Пожалуйста, сохраните этот документ для справки, если вы захотите предъявить претензию по гарантии.
**Только для Австралии: Наши товары поставляются с гарантиями, которые не могут быть исключены в соответствии с Законом Австралии о защите прав потребителей. Вы имеете право на замену или возмещение в случае серьезной неисправности и компенсацию за любые другие разумно предсказуемые убытки или ущерб. Вы также имеете право на ремонт или замену товара, если товар не соответствует приемлемому качеству и неисправность не является серьезной неисправностью.
**Только для Индии: Гарантия на ваш продукт Tefal составляет 2 года. Гарантия распространяется исключительно на ремонт дефектного продукта, но, по выбору TEFAL, вместо ремонта дефектного продукта может быть предоставлена замена продукта. Для ремонта продукта покупатель в обязательном порядке должен зарегистрировать запрос на обслуживание в специальном приложении для смартфонов TEFAL SERVICE APP или позвонив в Центр поддержки потребителей TEFAL по телефону 1860-2001232, Часы работы Пн-Сб с 09:06 до XNUMX:XNUMX. На товары, возвращенные почтой, гарантия не распространяется. В качестве доказательства покупки потребитель должен предоставить оба этихamped гарантийный талон и денежный авизо.
п. 5 – 20
Документы / Ресурсы
Рекомендации
-
Contents
-
Table of Contents
-
Bookmarks
Quick Links
EN
Actifry Genius
www.tefal.co.uk
Related Manuals for TEFAL ACTIFRY GENIUS FZ760
Summary of Contents for TEFAL ACTIFRY GENIUS FZ760
-
Page 1
Actifry Genius www.tefal.co.uk… -
Page 2
ActiFry Genius 1.2 kg ActiFry Genius 1.7 kg… -
Page 5: Important Recommendations
Important recommendations Safety instructions • The appliance can be used up to an altitude of 2000 m. • This appliance has been designed for internal domestic use only; any professional use which does not conform to the instructions will release the manufacturer from all responsibility and the warranty will be deemed null and void.
-
Page 6
instructions concerning the use of the appliance by someone responsible for their safety. Children must be supervised to ensure that they do not play with the appliance. • This appliance can be used by children aged from 8 years and above and persons with reduced physical, sensory or mental capabilities or lack of experience and knowledge if they have been given supervision or instruction concerning use… -
Page 7
• Children should not clean or perform maintenance procedures on the appliance unless they are supervised by a responsible adult. • Do not use the instruction close to inflammable materials (blinds, curtains, etc), nor close to an external heat source (gas hob, hotplate, etc). •… -
Page 8
• Never move the appliance when it still contains hot food. • Never operate your appliance when empty. • Never leave the appliance unattended whilst it is plugged in and switched on. When using the product for the first time, it may release a non-toxic odour. This will not affect use and will disappear rapidly. -
Page 9: Before Using For The First Time
DESCRIPTION 12 Removable cooking pan Base Lid opening button 13 Removable filter 14 Cooking time Viewing window 15 Temperature Digital control panel 16 Delayed start Measuring spoon 17 Keep warm Paddle release button 18 Function mode to select a Removable mixing paddle pre-programmed cooking mode Removable turn-over ring 19 Manual mode…
-
Page 10
Preparing the food To avoid damaging your appliance, please follow the quantities of ingredients and liquids given in the manual and the recipe book. For all recipes, never exceed the maximum level indicated on the removable paddle fig.10. Do not leave the measuring spoon inside the pan while cooking food. •… -
Page 11
1. Chips and fries e.g potato 6. Chicken e.g drumsticks and chips, vegetable chips, potato wings, … wedges, … 2. Breaded snacks e.g chicken 7. Wok* e.g. fried rice with nuggets, breaded king prawns, sauted beef, stir fry prawns, … vegetables, … -
Page 12
Keep warm function • When cooking is finished, if no action is done after 3 minutes, the keep warm mode automatically starts (except for mode 1 – Chips). • After 30 minutes keeping warm, the appliance stops. • To deactivate « Keep warm » function, press simultaneously + and – buttons for a long time (3 seconds). -
Page 13
TIPS FOR COOKING CHIPS ACTIFRY GENIUS TIPS FOR COOKING CHIPS(for UK only) For the best results with your ActiFry, We advise following our recommendations on The type of potatoes and oil to use. Which variety of potato should I use? As a general use, we suggest that you use potatoes that have been recommended for chipping. -
Page 14
COOKING TIMES The cooking times are given as a rough guide and may vary depending on the seasonality of the food, its size, the quantities used and individual tastes, as well as the voltage. The amount of oil indicated may be increased depending on your taste and needs. If you want crisper chips, you can add a few extra minutes to the cooking time. -
Page 15
Rice and Vegetable Dishes Actifry Genius 1.2kg Genius 1.7kg Cooking Type Quantity spoons cooking time cooking time mode of oil (mins) (mins) Frozen 750 g None 16-18 14 — 16 Ratatouille* Frozen 1000 g None – 23-25 Farmer’s stir fry* Frozen 1000 g None… -
Page 16: Cleaning The Appliance
Fruit Genius 1.2kg Genius 1.7kg Actifry spoons of Cooking Type Quantity cooking cooking oil and sugar mode time (mins) time (mins) 1 + 1 of sugar Bananas Slices 1 + 1 of sugar – 1000 g 2 of sugar 10-12 8-10 Strawberries Quarters…
-
Page 17
A FEW TIPS IN CASE OF PROBLEMS… Problems Causes Solutions Make sure the appliance is The appliance is not plugged in properly plugged in to a main properly. power socket. You have not yet pressed Press button button You have pressed button Close the lid. -
Page 18
Problems Causes Solutions Choose a potato variety that You are not using a potato is recommended for chips such variety that is recommended as Maris Piper or King Edward for chips. potatoes. Wash potatoes for a long The potatoes are insuffciently time to remove the starch, washed and/or not completely drain and dry very thoroughly… -
Page 19
Helpline: 0345 602 1454 — UK (01) 677 4003 — ROI or contact us via our web site: www.tefal.co.uk TABLE OF ERROR CODES: E. Check that all removable parts are fitted and correctly positioned (bowl ventilation output grid and removable filter, pan, lid). -
Page 20
Conditions & Exclusions TEFAL/T-FAL shall not be obliged to repair or replace any product which is not accompanied by a valid proof of purchase. The product can be taken directly in person or must be adequately packaged and returned, by recorded delivery (or equivalent method of postage), to a TEFAL/T-FAL authorised service centre. -
Page 21
The repair process may require a longer time if the product is not locally sold by TEFAL/T-FAL. If the product is not repairable in the new country, the international TEFAL/T-FAL guarantee is limited to a replacement by a similar or alternative product at similar cost, where possible. -
Page 22
5 – 21 1520006231…

EN
Actifry Genius
www.tefal.co.uk
ActiFry Genius 1.2 kg
3
5
7
7
7
7
7
7
6
7
7
7
7
7
7
7
4
7
7
8
7
7
13
1
2
14
16
15
17
10
9
11
12
20
ActiFry Genius 1.7 kg
19
18
7
3
5
21
7
7
77
7
7
7
7
6
4
7
7
7
7
7
7
7
7
8
7
7
13
1
2
9
10
11
12
1
7
2
1
2
1
1
2
3
4
5
6
7
8
9
10
11
12
2
1
7
13
7
7
14
7
15
7
16
17
19
20
18
Important recommendations
Safety instructions
• The appliance can be used up to an altitude of 2000 m.
• This appliance has been designed for internal
domestic use only; any professional use which does
not conform to the instructions will release the
manufacturer from all responsibility and the warranty
will be deemed null and void.
• Read these instructions carefully and keep them in a
safe place.
• This appliance is intended for domestic use only.
• This appliance is not intended to function using an
external time-switch or a separate remote control
system. Connected devices may be controlled
via smartphone or tablet, according to the
manaufacturer’s instructions.
• Do not use the appliance if it or the power cord is
damaged or if it has fallen and has visible damage or
appears to be working abnormally. If this occurs, the
appliance must be sent to an Approved Service Centre.
• If the power cord is damaged, it must be replaced by
the manufacturer, an approved After-Sales Service or a
similarly qualified person, in order to avoid any danger.
Never take the appliance apart yourself.
• This appliance is not designed to be used by people
(including children) with a physical, sensory or
mental impairment, or people without knowledge or
experience, unless they are supervised or given prior
EN
5
instructions concerning the use of the appliance by
someone responsible for their safety. Children must
be supervised to ensure that they do not play with
the appliance.
• This appliance can be used by children aged from
8 years and above and persons with reduced
physical, sensory or mental capabilities or lack
of experience and knowledge if they have been
given supervision or instruction concerning use
of the appliance in a safe way and understand
the hazards involved. Children shall not play with
the appliance. Children under the age of 8 years
should not use this appliance unless continuous
supervision by a responsible adult is given. Cleaning
and user maintenance shall not be made by children
unless they are older than 8 years and supervised.
Keep the appliance and its cord out of reach of
children less than 8 years.
•
Certain parts of the appliance can become hot
when the appliance is operating, which could
cause burns. Do not touch the hot surfaces of the
appliance (the lid, visible metal parts, etc).
• All these removable parts may be cleaned in the
dishwasher or with a non-abrasive sponge and
dishwashing liquid.
• Clean the body of the appliance with a damp sponge
and dishwashing liquid.
• Dry the parts carefully before reassembling.
6
• Children should not clean or perform maintenance EN
procedures on the appliance unless they are
supervised by a responsible adult.
• Do not use the instruction close to inflammable
materials (blinds, curtains, etc), nor close to an
external heat source (gas hob, hotplate, etc).
• This appliance is intented for domestic use only. It is
not intended to be used in the following applications,
and the guarantee will not apply for:
––staff kitchen areas in shops, offices and other
working environments;
––farm houses inns,
––clients in hotels, motels and other residential
type environments,
––bed and breakfast type environments.
• Do not immerse the product in water.
• Never operate the appliance without the mixing
paddle – unless specified in the ActiFry recipe – or the
appropriate accessory.
• For your safety, this appliance conforms with applicable standards and regulations (Directives on
Low Voltage, Electromagnetic Compatibility, Materials in contact with food, Environment, etc.).
• Check that the voltage of your mains network corresponds to the voltage given on the rating
plate on the appliance (alternative current).
• Given that there are so many different standards, if the appliance is to be used in a country
other than that in which it was bought, have it checked by Approved Service Centre.
• For models with detachable power cords, only use the original power cord.
• Do not use an extension lead. If you nevertheless decide to do so, under your own responsibility,
use an extension lead that is in good condition and compliant with the power of the appliance.
• Use the appliance on a flat, stable, heat-resistant work surface away from water splashes.
• Do not let the power cord dangle.
• Do not unplug the appliance by pulling on the power cord.
• Always unplug your appliance: after use, to move it, or to clean it.
• In the event of fire, unplug the appliance and smother the flames using a damp tea towel.
• Never operate the appliance underneath kitchen cupboards.
7
• Never move the appliance when it still contains hot food.
• Never operate your appliance when empty.
• Never leave the appliance unattended whilst it is plugged in and switched on.
When using the product for the first time, it may release a non-toxic odour. This will not affect
use and will disappear rapidly.
Do not overload the tray; stick to the recommended quantities.
• Your appliance is equipped with an automatic chip turner (depending on model). This chip
turner should be used to cook chips. We also recommend using it for recipes that require a
large quantity of food. The chip turner must be removed for liquid recipes.
• To avoid damaging your appliance, please ensure that you follow recipes in the
instructions and recipe book; make sure that you use the right amount of ingredients.
PROTECT THE ENVIRONMENT
• Your appliance has been designed to run for many years. However, when you decide
to replace it, remember to think about how you can contribute to protecting the
environment.
• Before discarding your appliance you should remove the battery from the timer and
dispose of it at a local civic waste collection centre (according to model).
• The Approved Service Centres will take back any old appliances you may have so that
they can be disposed of in accordance with environmental regulations.
ENVIRONMENT PROTECTION FIRST!
Your appliance contains valuable materials which can be recovered or recycled.
Leave it at a local civic waste collection point.
8
DESCRIPTION
1
2
3
4
5
6
7
8
9
10
11
Base
Lid opening button
Lid
Viewing window
Digital control panel
Measuring spoon
Paddle release button
Removable mixing paddle
Removable turn-over ring
Cooking pan handle release button
Cooking pan handle
EN
12
13
14
15
16
17
18
Removable cooking pan
Removable filter
Cooking time
Temperature
Delayed start
Keep warm
Function mode to select a
pre-programmed cooking mode
19 Manual mode
20 Launch/pause the cooking
21 Cooking modes
INSTRUCTIONS FOR USE
Before using for the first time
• Remove all the stickers and any packaging.
• Open the lid by pressing on the lid opening button - fig.1 and press the catches to remove
the lid - fig.2.
• Remove the measuring spoon.
• Lift the pan handle to a horizontal position until you hear a “CLICK” as it locks - fig.3.
• Remove the paddle by pushing the release button - fig.4.
• Take out the cooking pan.
• To remove the turn-over ring, pull the clips outwards, then lift it off.
• Remove the detachable filter - fig.6.
• All the removable parts are dishwasher safe - fig.7 or can be cleaned using a non abrasive
sponge and some washing up liquid.
• Clean the body of the appliance with a damp sponge and washing up liquid - fig.8.
• Dry carefully before putting everything back in place.
• Reposition the paddle until you hear the «CLICK» - fig.9.
• To replace the turn-over ring, place it at the edge of the pan, centre it on the pan and press
down until you hear a “CLICK”.
• When using for the first time, the appliance may give off a harmless odour. This has no
impact on the use of the appliance and will soon disappear.
NOTE:
• Never immerse the base in water or any other liquid.
• On first use, to obtain the best results from your new product, we advise you to prepare
a recipe that cooks for 30 minutes or more.
9
Preparing the food
To avoid damaging your appliance, please follow the quantities of ingredients and liquids
given in the manual and the recipe book.
For all recipes, never exceed the maximum level indicated on the removable paddle - fig.10.
Do not leave the measuring spoon inside the pan while cooking food.
• Open the lid - fig.1.
• Remove the spoon inside the pan.
• Place the food in the cooking pan, distributing it evenly, making sure that you respect the
maximum quantity (see cooking tables p. 14 to p. 16) - fig.10.
• Add the oil to the food with the spoon (1 Actifry Genius spoonful = 14 ml) - fig.11, spreading
it evenly (see cooking tables p. 14 to p. 16).
• Unlock the handle and push it right back into its housing - fig.12.
• Close the lid - fig.13.
COOKING
• Never operate your appliance when empty.
• Never overload the cooking pan. Comply with the recommended quantities.
• This appliance is not suitable for recipes with a high-liquid content (eg. soups, cook-in sauces...).
• Never turn on the appliance if the cooking pan is empty.
Start cooking
• Open the lid - fig.1.
• Place the food in the cooking pan and do not exceed the maximum quantity (see Table of
cooking times) and the Maxi level mark on the paddle for liquid recipes - fig.10.
• Prepare your ingredients as indicated in the recipe book. Place your ingredients into the
cooking pan as per the instructions in your recipe.
• Release the handle and lower it fully into its housing - fig.12.
• Close the lid - fig.13.
• Plug the appliance into an electrical socket outlet. The appliance will emit 2 beeps and the
screen will display 00 - fig.14.
2 ways of setting the cooking time:
Automatic cooking mode:
The 9 cooking modes automatically adjust the cooking temperature and whether the paddle
rotates according to the type of food selected.
• Select Function mode
- fig. 15.
• To select the cooking mode press the + button until the required mode 1 to 9 is displayed - fig. 16.
• Press start key
- fig. 17.
• Adjust cooking time by pressing +/- button.
Note: Adjust the cooking time after starting the appliance.
• When using the automatic cooking mode follow the instructions in the recipe book on where
to position food in the pan.
Note: The paddle does not turn at the beginning of cooking for modes 2, 3, 4, 5, 7, 8 and 9.
• To stop or cancel the cooking mode , continually hold down the
key for 2 seconds and the
screen will display 00 (fig. 14)
10
1. Chips and fries e.g potato
chips, vegetable chips, potato
wedges, ...
6. Chicken e.g drumsticks and
wings, ...
2. Breaded snacks e.g chicken
nuggets,
breaded
king
prawns, ...
7. Wok* e.g. fried rice with
prawns, sauted beef, stir fry
vegetables, ...
3. Battered snacks e.g. battered
onion rings, battered calamari
rings, ...
8. World food* e.g
tajine, kebab, ...
4. Rolls e.g. pastry snacks like
samosa, spring rolls, ...
9. Desserts e.g apples and pear
compote, caramelised nuts, ...
EN
lamb
5. Meatballs and vegetable balls
*’1 meal in 1 go’ programs
Manual mode:
• Set the cooking in minutes by using the +/- button (see cooking table p. 14 to p. 16).
• Then set the cooking temperature by pressing the temperature/timer button - fig.18, and
set the temperature required using the +/- button (see cooking table p. 14 to p. 16).
• Press start.
NOTE:
• The selected time will be displayed and a minute by minute countdown will begin. Time is selected
and displayed in minutes. Only time remaining under 1 minute will be displayed in seconds.
• The appliance can be paused. Simply press the key. Pressing the key will restart cooking.
• The time can be changed at any time during cooking by using the +/- buttons - fig.17.
• In the event of an error or to delete the selected time, hold down the
key for 2 seconds
and re-select the time.
Delayed start
Delayed start can be set using one of the 9 automatic cooking modes or the manual mode:
–– Plug in the appliance.
–– Press the Temperature/Timer button for 3 seconds. The pictogram
will appear, and the
timer will flash 0:00.
–– Set the delayed start time using the +/- buttons (Intervals: 10 minutes) (up to a maximum
of 9 hours).
–– Press start, and the delayed start timer will begin to count down. Cooking will commence
once the delayed start timer reaches 0:00.
11
Keep warm function
• When cooking is finished, if no action is done after 3 minutes, the
keep warm mode
automatically starts (except for mode 1 – Chips).
• After 30 minutes keeping warm, the appliance stops.
• To deactivate « Keep warm » function, press simultaneously + and – buttons for a long time
(3 seconds).
• To re-activate « Keep warm » function, press simultaneously + and – buttons for a long time
(3 seconds).
Remove the food
When you open the lid, the appliance stops working. To restart cooking, close the lid and
press the
button.
When the lid is left open for over 2 minutes, the appliance will reset.
• Once cooking is completed, the timer beeps.
• Open the lid - fig.1.
• Lift the handle until you hear a “click” that it locks and take out the cooking pan - fig.19 & 20.
• Serve at once.
• To avoid any risk of burns, do not touch the lid or any part other than the cool touch areas:
pan handle and lid opening button.
ACTIFRY GENIUS COOKING TIPS
• Do not add salt to chips while the chips are in the cooking pan. Only add salt once the chips
are removed from the cooking pan.
• When adding dried herbs and spices to ActiFry, mix them with some oil or liquid. If you try
sprinkling them directly into the pan they will just get blown around by the hot air system.
• Strong coloured spices may slightly stain the paddle and parts of the appliance. This is normal.
• Prepare all food in evenly sized pieces to ensure that they all cook at the same time.
• Prepare vegetables, especially root vegetables, in small pieces or stir fry size to ensure they
cook through.
• If using onions in ActFry recipes they are best thinly sliced rather than chopped as they cook
better. Separate the onion rings before adding them to the cooking pan and give them a
quick stir so that they are evenly distributed.
For the automatic cooking mode only:
• For selected cooking modes, ingredients should be placed in the cooking pan as stated in the
ActiFry Genius recipe book. This ensures the right level of cooking for each ingredient. Those
which require a longer cooking time are put in the top half of the pan. Those requiring a
shorter cooking time are put next to the handle.
12
TIPS FOR COOKING CHIPS
EN
ACTIFRY GENIUS TIPS FOR COOKING CHIPS(for UK only)
For the best results with your ActiFry,
We advise following our recommendations on
The type of potatoes and oil to use.
Which variety of potato should I use?
As a general use, we suggest that you use potatoes that have been recommended for chipping.
In many supermarkets the information on the packaging tells you which varieties are suitable
for making chips. We recommend varieties such as King Edward and Maris Piper for good results.
When potatoes have been freshly harvested, they have a higher water content, we recommend
cooking the chips for a few more minutes.
Where should I store potatoes?
The best place to store potatoes is in a dark cellar or cool cupboard (between 6 and 8°C), away
from the light.
How should I prepare potatoes for ActiFry?
To obtain the best results, you must ensure that the chips do not stick together. With this
in mind, wash the whole potatoes and then cut them into chips using a sharp knife or chip
cutter. The chips should be of equal size so that they cook at the same time. Wash the chipped
potatoes in plenty of cold water until it runs clear in order to remove as much of the starch as
possible. Dry the chips thoroughly using a clean highly absorbent tea towel. The chips must be
perfectly dry before putting them in the ActiFry otherwise they will not turn crispy. To check
that they are dry enough pay them with paper kitchen towel just before cooking. If there is
any wetness on the paper dry them again. Remember the cooking time of the chips will vary
according to the weight of chips and the batch of potatoes used.
How should I cut the potatoes?
The size of a chip influences how crunchy or soft it is. The thinner your chips, the more crunchy
they will be and conversely, thicker chips will be softer inside. You can cut your chips to the
following thickness and length according to your tastes:
Thickness: American style: 8 x 8mm/ Thin: 10x 10mm/ Standard: 13x 13 mm
Length: Up to approx 9 cm.
In ActiFry the maximum recommended chip thickness is 13mm x 13mm and
a length of up to 9cm.
What type of oil can I use?
You can use a wide variety of oils in ActiFry:
• Standard oils : olive oil, grape seed oil, corn oil, groundnut (peanut) oil, sunflower oil, soya oil*
• Flavoured oils : oils infused with aromatic herbs, garlic, chilli, lemon…
• Speciality oils : hazelnut*, sesame*…
(*cook according to the manufacturers instructions)
13
COOKING TIMES
The cooking times are given as a rough guide and may vary depending on the seasonality of
the food, its size, the quantities used and individual tastes, as well as the voltage. The amount
of oil indicated may be increased depending on your taste and needs. If you want crisper chips,
you can add a few extra minutes to the cooking time.
Potatoes
Type
Fresh chips
10 mm x 10 mm
Frozen chips
13 mm x 13 mm
Fresh (chips)
Frozen
(chips)**
Quantity
Actifry
spoons
of oil
Cooking
mode
Genius 1.2kg
cooking
time* (mins)
Genius 1.7kg
cooking
time* (mins)
750 g
1/2
1
26-28
25-27
1000 g
3/4
1
30-34
28-30
1500 g
1
1
X
36-38
1700 g
1
1
X
42-44
750 g
None
1
26-28
23-25
1200 g
None
1
–
36-38
* Freshly harvested potatoes may require a longer cooking time to obtain a crisper more golden
brown result.
** For best results we recommend using frozen chips without any wheat flour batter coating
as they tend to give less crisp results and the batter may fall off during cooking (check the
ingredient list on the packet for details).
Meat- poultry
To add a little flavour to your meat, don’t hesitate to mix spices in with the oil (paprika, curry,
mixed herbs, thyme, bay leaf, etc).
Chicken nuggets
Chicken
drumsticks
Chicken breast
(boneless)
Meatballs
14
Type
Quantity
Actifry
spoons
of oil
Cooking
mode
Genius 1.2kg
cooking time
(mins)
Genius 1.7kg
cooking time
(mins)
Fresh or
Frozen
750 g
None
2
13 - 15
10 - 12
Fresh
1200 g
None
2
–
13 - 15
Frozen
1200 g
None
2
–
15 - 17
Fresh
4 to 6
None
6
20 - 25
20- 22
Fresh
6
None
6
20 - 25
18 - 20
Fresh
9
None
6
–
22 - 24
Frozen
750 g
1
5
16 - 18
14 - 15
Frozen
1200 g
1 1/2
5
–
18 - 20
Rice and Vegetable Dishes
Cooking
mode
Genius 1.2kg
cooking time
(mins)
Genius 1.7kg
cooking time
(mins)
Quantity
Frozen
750 g
Frozen
1000 g
None
7
16-18
14 - 16
None
7
–
Frozen
23-25
1000 g
None
6
–
22-24
Frozen
650 g
None
220°C
16-19
12 - 14
Frozen
1000 g
None
220°C
–
15-17
Cooking
mode
Genius 1.2kg
cooking time
(mins)
Genius 1.7kg
cooking time
(mins)
3
11-13
10-12
3
–
11-13
3
11-13
8-10
3
–
8-10
Type
Ratatouille*
Farmer’s stir fry*
Paëlla*
EN
Actifry
spoons
of oil
* Frozen preparations not available in all countries.
Fish – shellfish
Type
Battered
calamari
Frozen
Quantity
300 g
500 g
Actifry
spoons
of oil
None
300 g
King prawns
(raw)
Fresh
None
450 g
Vegetables
Type
Courgettes
Peppers
Mushrooms
Tomatoes
Onions
Strips
Strips
Quarters
Quarters
Slices
Quantity
Actifry spoons
of oil
Cooking
mode
Genius 1.2kg
cooking
time (mins)
Genius 1.7kg
cooking
time (mins)
20 - 25
750 g
1 + 150 ml. water
7
25-30
1200 g
1 + 150 ml. water
7
–
25-30
650 g
1 + 150 ml. water
7
18-22
15 - 18
1200 g
1 + 150 ml. water
7
–
20-25
650 g
1
7
10-15
10 - 15
1000 g
1
7
–
16-18
650 g
1 + 150 ml. water
7
13-16
12 - 14
1000 g
1 + 150 ml. water
7
–
15-17
500 g
1
220°C
12-16
12 - 14
750 g
1
220°C
–
18-20
15
Fruit
Type
Bananas
Slices
Strawberries
Quarters
Apples
Pineapples
Quantity
Actifry spoons of
oil and sugar
Cooking
mode
Genius 1.2kg
cooking
time (mins)
Genius 1.7kg
cooking
time (mins)
5
1 + 1 of sugar
9
5-6
5-6
7
1 + 1 of sugar
9
–
5-6
1000 g
2 of sugar
9
10-12
8-10
1500 g
2 of sugar
9
–
10-12
3
1 + 1 of sugar
9
10-12
8-10
5
1 + 2 of sugar
9
–
10-12
1
2 of sugar
9
10-15
10-12
2
2 of sugar
9
–
15-17
Halves
Fresh
(peeled &
cut into
pieces)
EASY TO CLEAN
Cleaning the appliance
Never immerse the appliance in water or any other liquid. Do not use any corrosive or
abrasive cleaning products. The removable filter must be cleaned regularly. To ensure your
removable cooking pan lasts longer, never use any metal ustensils.
We do not recommend the use of any detergent other than washing up liquid to clean any
part of the appliance.
• Leave the appliance to cool completely before cleaning.
• Open the lid by pressing the button - fig.1 and press the latches to remove the lid - fig.2.
• Lift the removeable pan handle until you hear a «CLICK», in order to remove the pan - fig.3.
• Take out the cooking pan.
• Remove the paddle by pushing the release button - fig.4.
• Remove the detachable filter - fig.6.
• To remove the turn-over ring, pull the clips outwards, then lift it off.
• All the removable parts are dishwasher safe - fig.7 or can be cleaned using a non abrasive
sponge and some washing up liquid.
• Clean the body of the appliance with a damp sponge and a little washing up liquid - fig.8.
Dry carefully before putting everything back in place.
• We guarantee that the detachable cooking pan COMPLIES WITH REGULATIONS with
regards to materials in contact with food.
• If food gets stuck or burnt onto the pan or paddle, leave them to soak in warm water before
cleaning.
16
A FEW TIPS IN CASE OF PROBLEMS…
Problems
Causes
The food has not
been cooked
uniformly.
Solutions
The appliance is not plugged in
properly.
Make sure the appliance is
properly plugged in to a main
power socket.
You have not yet pressed
button
.
Press button
You have pressed button
but
the appliance does not operate.
Close the lid.
The appliance is not heating.
Call the customer Helpline
0345 602 1454
(01) 677 4003 - ROI
The paddle does not turn.
The paddle does not turn at the
beginning of cooking in cooking
modes 2, 3, 4, 5, 7, 8 and 9.
Restart using the manual mode
to check the paddle turns. If it
does not turn, check that it is
inserted in the correct position.
Otherwise, call the customer
Helpline below:
0345 602 1454
(01) 677 4003 - ROI
The paddle is not locked.
Reposition the paddle until you
hear it «CLICK» - fig.12.
You have not used the paddle.
Put it in position.
The food / chips have not been
cut uniformly.
Cut the food / chips all to the
same size.
The appliance does
not work.
The paddle does
not stay in place
EN
.
17
Problems
The chips are not
crunchy enough.
The chips break during
cooking.
The food stays on the
edge of the pan.
Cooking liquids have
leaked into the base of
the appliance.
The LCD screen does
not work.
The LCD displays shows
«Er» (error).
The appliance is
abnormally noisy.
18
Causes
Solutions
You are not using a potato
variety that is recommended
for chips.
Choose a potato variety that
is recommended for chips such
as Maris Piper or King Edward
potatoes.
The potatoes are insuffciently
washed and/or not completely
dried.
Wash potatoes for a long
time to remove the starch,
drain and dry very thoroughly
before cooking. They must be
completely dry.
The chips are too thick.
Cut them more thinly. The
maximum chip dimensions are
13 mm x 13 mm.
There is not enough oil.
Increase the amount of oil
(see cooking table p. 14 to
p. 16).
The filter is clogged.
Clean the filter.
The quantity is too large.
Reduce the amount of potatoes
and adjust the cooking time.
The pan has too much food.
Comply with the maximum
quantities shown on the cooking
table.
Put the turn-over ring in place.
Reduce the amount of food.
Max level exceeded.
Reduce the quantities.
Faulty pan or paddle.
Check that the paddle is
correctly positioned, otherwise
call the customer Helpline
below.
The max level has been
exceeded.
Observe the max level.
Do not use ActiFry for making
recipes with a high liquid
content.
The appliance is not plugged in.
Plug the appliance in.
The lid is open.
Close the lid.
The appliance is not
functioning correctly.
Unplug the appliance, wait for
10 seconds, plug the appliance
in again and press
button.
If the LCD screen still shows Er, see
the table of error codes p. 19.
You suspect there is a problem
in the way the appliance motor
is working.
Call the customer Helpline
below.
If you have any product problems or queries call our Customer Relations Team first for
expert help and advice:
EN
Helpline:
0345 602 1454 - UK
(01) 677 4003 - ROI
or contact us via our web site: www.tefal.co.uk
TABLE OF ERROR CODES: E.
The fan is not working.
Check that all removable parts
are fitted and correctly positioned
(bowl ventilation output grid and
removable filter, pan, lid).
Check that there are no foreign
items in the removable parts.
After checking that there are no
foreign items in the ventilation
outlets, if the fault persists, call the
customer Helpline. p. 19
E. 3
This error may appear if the
appliance has been stored
for a long time at too low a
temperature.
Leave the appliance at an ambient
temperature of more than 15°C for
one hour before starting it up again.
If the fault persists, call the
customer Helpline. p. 19
E. 4
Your appliance has a fault in
the temperature sensor.
Call the customer Helpline below.
p. 19
E. 5
The voltage of your
domestic network is too low.
Cooking performance may
be altered.
Contact your electricity supplier.
E. 6
The voltage of your
domestic network is too
high; for safety reasons
your appliance should be
protected against the risks
of overheating.
Contact your electricity supplier.
E. 1 or 2
19
TEFAL/T-FAL* INTERNATIONAL LIMITED GUARANTEE
: www.tefal.com
This product is repairable by TEFAL/T-FAL*, during and after the guarantee period.
Accessories, consumables and end-user replaceable parts can be purchased, if locally available, as described
on the TEFAL/T-FAL internet site www.tefal.com
The Guarantee**
TEFAL/T-FAL guarantees this product against any manufacturing defect in materials or
workmanship during the guarantee period within those countries*** as stated in the attached
country list, starting from the initial date of purchase or delivery date. The international
manufacturer’s guarantee covers all costs related to restoring the proven defective product
so that it conforms to its original specifications, through the repair or replacement of any
defective part and the necessary labour. At TEFAL/T-FAL’s choice, a replacement product may
be provided instead of repairing a defective product. TEFAL/T-FAL’s sole obligation and your
exclusive resolution under this guarantee are limited to such repair or replacement.
Conditions & Exclusions
TEFAL/T-FAL shall not be obliged to repair or replace any product which is not accompanied by
a valid proof of purchase. The product can be taken directly in person or must be adequately
packaged and returned, by recorded delivery (or equivalent method of postage), to a
TEFAL/T‑FAL authorised service centre. Full address details for each country’s authorised
service centres are listed on TEFAL/T-FAL website (www.tefal.com) or by calling the appropriate
consumer Service centre set out in the attached country list. In order to offer the best possible
after-sales service and constantly improve customer satisfaction, TEFAL/T-FAL may send a
satisfaction survey to all customers who have had their product repaired or exchanged in a
TEFAL/T-FAL authorised service centre.
This guarantee applies only for products purchased and used for domestic purposes and
will not cover any damage which occurs as a result of misuse, negligence, failure to follow
TEFAL/T‑FAL instructions, or a modification or unauthorised repair of the product, faulty
packaging by the owner or mishandling by any carrier. It also does not cover normal wear and
tear, maintenance or replacement of consumable parts, or the following:
–– using the wrong type of water or
–– damages or poor results specifically
consumable
due to wrong voltage or frequency
–– ingress of water, dust or insects into
as stamped on the product ID or
the product (excluding appliances with
specification
features specifically designed for insects)
–– mechanical damages, overloading
–– scaling (any de-scaling must be carried
–– damage as a result of lightning or power
out according to the instructions for use)
surges
–– damage to any glass or porcelain ware in
–– accidents including fire, flood, etc
the product
–– professional or commercial use
20
Consumer Statutory Rights
This international TEFAL/T-FAL guarantee does not affect the Statutory Rights a consumer
may have or those rights that cannot be excluded or limited, nor rights against the retailer
from which the consumer purchased the product. This guarantee gives a consumer specific
legal rights, and the consumer may also have other legal rights which vary from State to
State or Country to Country. The consumer may assert any such rights at his sole discretion.
***Where a product purchased in a listed country and then used in another listed country, the
international TEFAL/T-FAL guarantee duration is the one in the country of usage, even if the
product was purchased in a listed country with different guarantee duration. The repair process
may require a longer time if the product is not locally sold by TEFAL/T-FAL. If the product is
not repairable in the new country, the international TEFAL/T-FAL guarantee is limited to a
replacement by a similar or alternative product at similar cost, where possible.
*TEFAL household appliances appear under the T-FAL brand in some territories like America and
Japan. TEFAL/T-FAL are registered trademarks of Groupe SEB.
Please keep this document for your reference should you wish to make a claim under the
guarantee.
**For Australia only:
Our goods come with guarantees that cannot be excluded under the Australian Consumer
Law. You are entitled to a replacement or refund for a major failure and compensation for
any other reasonably foreseeable loss or damage. You are also entitled to have the goods
repaired or replaced if the goods fail to be of acceptable quality and the failure does not
amount to a major failure.
**For India only: Your Tefal product is guaranteed for 2 years. The guarantee covers
exclusively the repair of a defective product, but at TEFAL’s choice, a replacement product
may be provided instead of repairing a defective product. It is mandatory that the consumer,
to have his product repaired, has to log a service request on the dedicated Smartphone
application TEFAL SERVICE APP or by calling TEFAL Consumer Care Center at 1860-2001232, Opening hours Mon-Sat 09 AM to 06 PM. Products returned by Post will not be
covered by the guarantee. As a proof of purchase consumer needs to provide both this
stamped guarantee card and cash memo.
EN
EN
p.
5 – 21
1520006231
Посмотреть инструкция для Tefal ActiFry Genius FZ7600 бесплатно. Руководство относится к категории фритюрницы, 1 человек(а) дали ему среднюю оценку 5.9. Руководство доступно на следующих языках: английский. У вас есть вопрос о Tefal ActiFry Genius FZ7600 или вам нужна помощь? Задайте свой вопрос здесь
Главная
| Tefal | |
| ActiFry Genius FZ7600 | |
| фритюрница | |
| английский | |
| Руководство пользователя (PDF) |
Не можете найти ответ на свой вопрос в руководстве? Вы можете найти ответ на свой вопрос ниже, в разделе часто задаваемых вопросов о Tefal ActiFry Genius FZ7600.
Как часто следует менять масло или жир во фритюрнице?
Можно ли чистить фритюрницу жесткой губкой?
На чём полезнее жарить, на растительном масле или животном жире?
Инструкция Tefal ActiFry Genius FZ7600 доступно в русский?
Не нашли свой вопрос? Задайте свой вопрос здесь